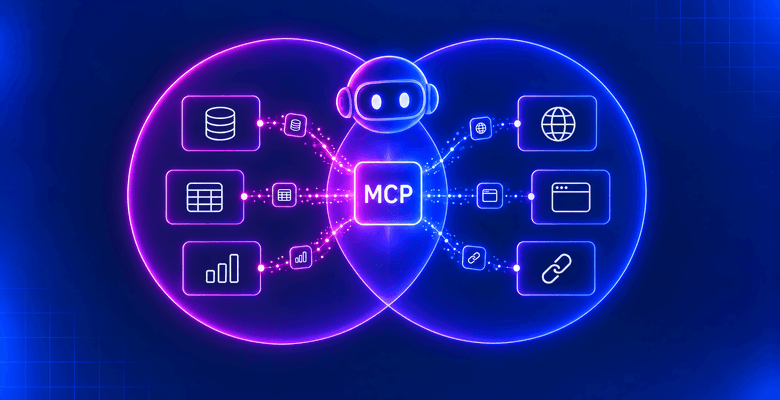
An AI agent that sees only your internal data can tell you what happened in your business. An agent that sees only the web can tell you what’s happening in your market. Most real questions need both.
In this tutorial, you will learn:
- What CData Connect AI is and how its AI Gateway exposes many data sources through one endpoint.
- Why pairing internal business data with live web data from Bright Data helps agents answer real business questions.
- How to add the Bright Data MCP server to a Connect AI Tool Server, next to a CRM source, and run a question that needs both.
Let’s dive in!
What Is CData Connect AI?
CData Connect AI is a managed platform that gives AI agents live, governed access to business systems through the Model Context Protocol (MCP). It ships with a catalog of hundreds of connectors, including Salesforce, Snowflake, NetSuite, and SAP, so your team does not have to build a connector for each one.
Its main features include:
- Live connectivity: Agents access current data and take action in the source system in real time, instead of working from a copy that went stale last week.
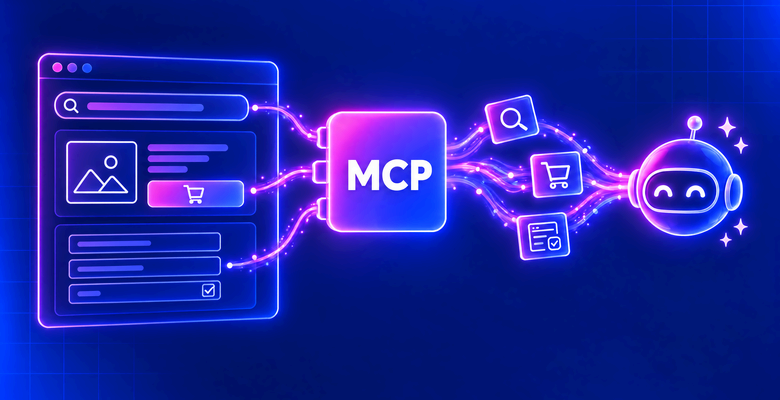
- AI Gateway: Groups upstream MCP servers into a “Tool Server,” a single URL your agent connects to. A Tool Server can hold CData source MCPs and third-party MCP servers side by side.
- Permissions: Access follows the permissions you have already set, so an agent sees only what the person asking is allowed to see. New connections grant
SELECTonly by default; taking action requires the appropriate additional permissions. - Logs: A Query Log and an MCP Log record every query and tool call, with the user and upstream server behind each one.
Bright Data appears in Connect AI in two places. The read-only Bright Data API Profile in the source catalog, live since Sept. 24, exposes account data (zones, usage, dataset snapshots) as SQL tables, which is useful for tracking web data spend. Live search and scraping come from the Bright Data MCP server, added to a Tool Server as a third-party source. This tutorial uses the second path.
Why Connect Internal Data to Live Web Data?
The inside-out view comes from the systems you run your business on. The outside-in view comes from the public web, where competitors change prices, customers post reviews, and markets move on their own schedule.
Each view has a blind spot. Internal data shows what you sold and to whom, but it can’t show why a deal stalled. Web data shows what competitors charge and what customers say, and it has no idea which of those customers are yours.
Consider three questions an agent can answer only with both views:
- Which open opportunities in Salesforce mention a competitor that just changed its pricing?
- Which customers in the Snowflake warehouse are posting complaints about us in public reviews?
- How do our list prices in the ERP compare with what shows up in search results this week?
Each question joins a private record to a public signal. Teams usually build that join by hand: a pipeline into the CRM, a separate scraper for competitor sites, a third integration for the warehouse. With both sources behind one Connect AI endpoint, the join happens inside the agent’s workflow.
The Bright Data MCP server supplies the outside-in view. It lets an agent search, scrape, and read live web pages. Search runs on the SERP API, page reads run on Bright Data’s unblocking layer, and proxy rotation and anti-bot handling are managed for the agent. Output arrives as Markdown, so a model can read it without cleanup.
For heavier jobs, the same account opens the rest of the product line: Web Unlocker for any hard-to-reach page, the Web Scraper API for structured records from sites like G2, and ready-made datasets such as Trustpilot reviews.
How to Connect CData Connect AI to Bright Data MCP
Follow the steps below to build a Connect AI Tool Server that exposes a CRM pipeline and the Bright Data MCP server through one URL. Then, you will point an agent at it and ask a question that needs both.
Prerequisites
To follow along with this guide, you need:
- A CData Connect AI account (a free trial works).
- A Bright Data account. New accounts include 5,000 free MCP requests a month.
- An MCP-compatible AI client, such as Claude Code, Codex, Cursor, ChatGPT, or Copilot Studio.
Do not worry about setting up the Bright Data side just yet. Connect AI walks you through the sign-in when you need it, and you never have to paste an API key into the gateway.
Step #1: Connect an Internal Source
Log in to Connect AI, open “Sources,” and click “Add Connection.” Pick your system and enter its connection details. Then, click “Save & Test.”
In this tutorial, we use a CRM pipeline export (a CSV over HTTPS) so you can reproduce the setup without a Salesforce org. The steps are the same for Salesforce, Snowflake, or any other connector.
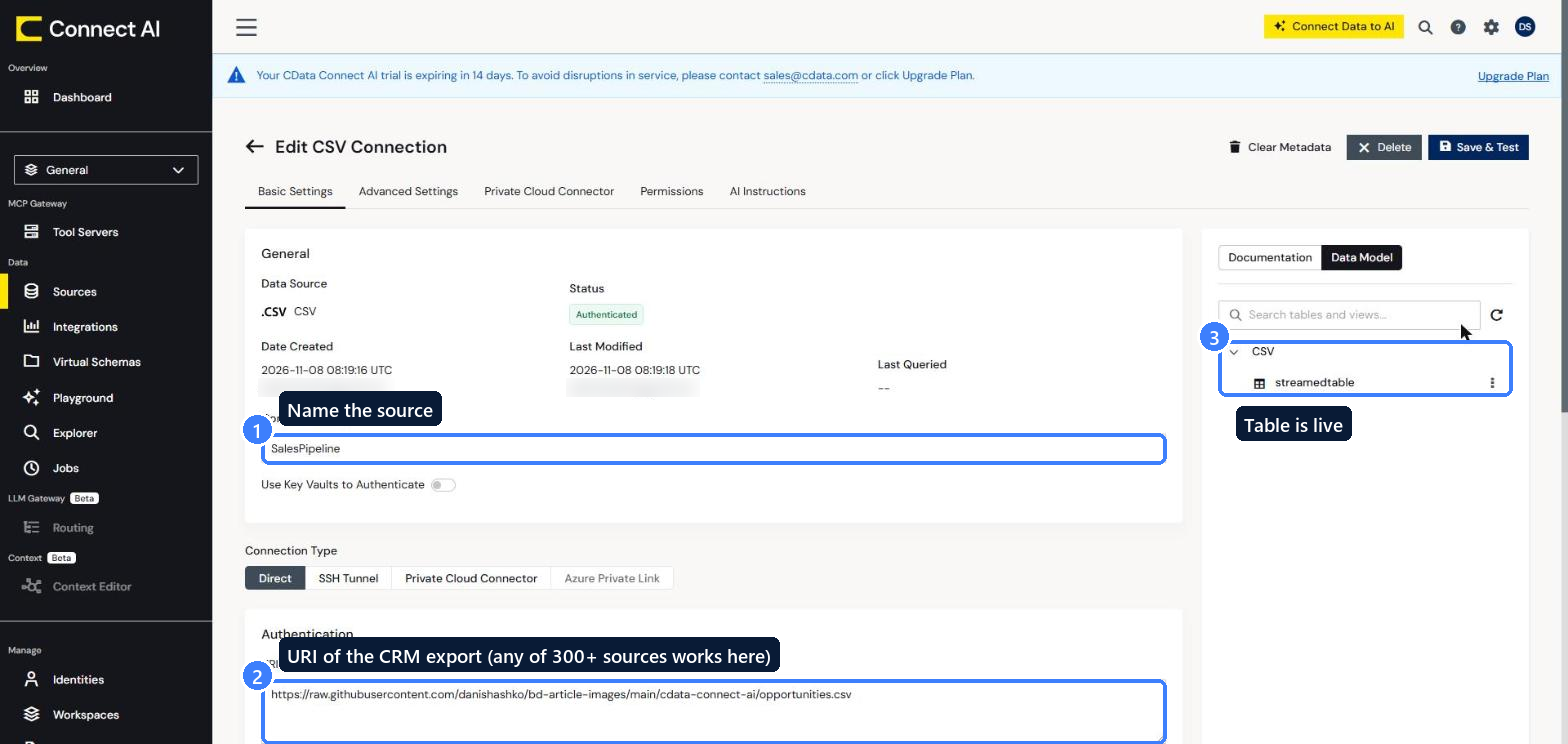
The demo pipeline has ten opportunities. Eight name a competitor in the competitor_mentioned field, and every deal is quoted at $12 per seat per month.
Step #2: Add Bright Data MCP as a Third-Party Source
Open “AI Gateway > Tool Servers” and click “Add Tool Server.” Give it a name and click “Next.” On the “Select MCP Servers” step, choose “Add MCP Server > Add Third Party Source,” then fill out the form as follows:
- Name:
brightdata - Authentication: “Per-User OAuth”
- Upstream MCP URL:
https://mcp.brightdata.com/mcp
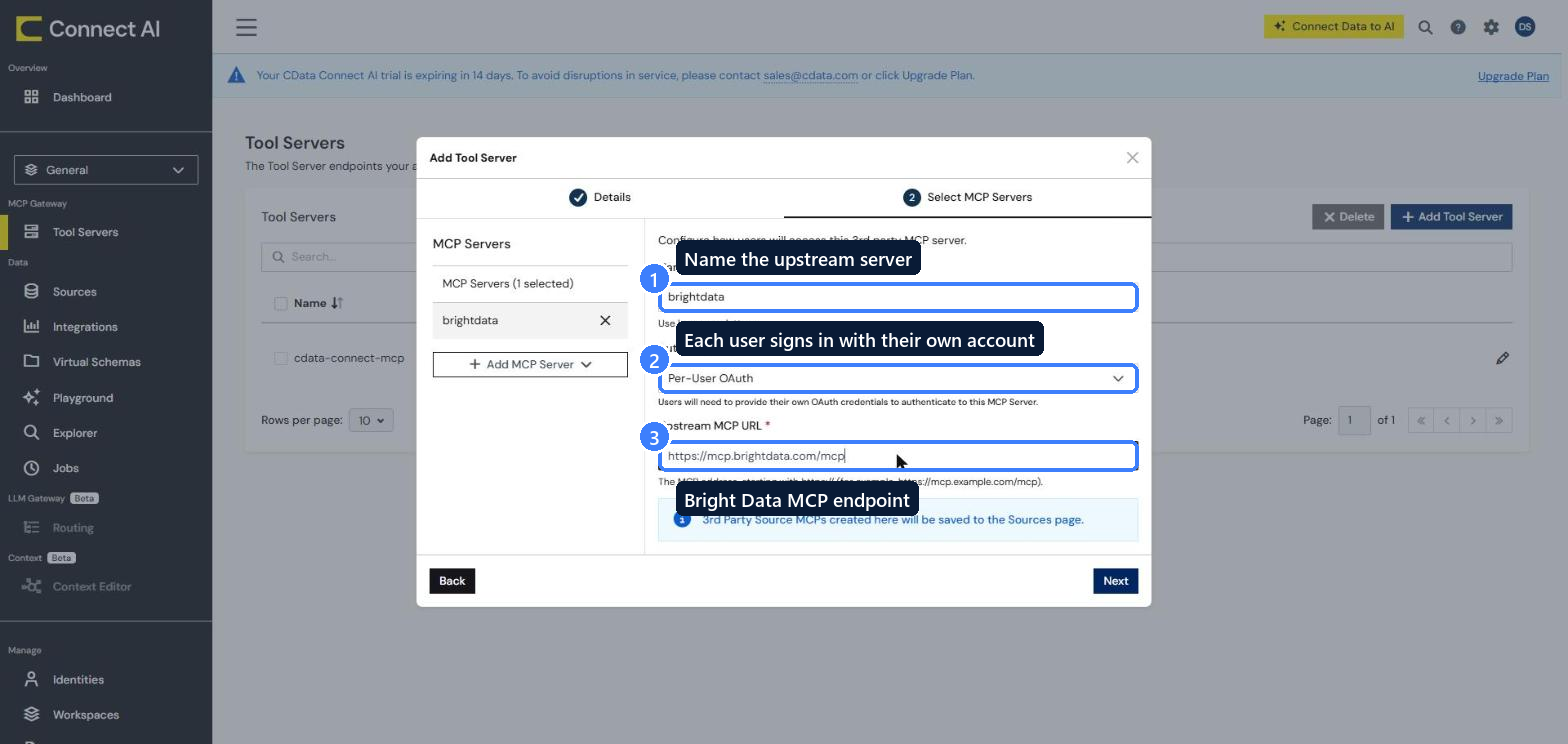
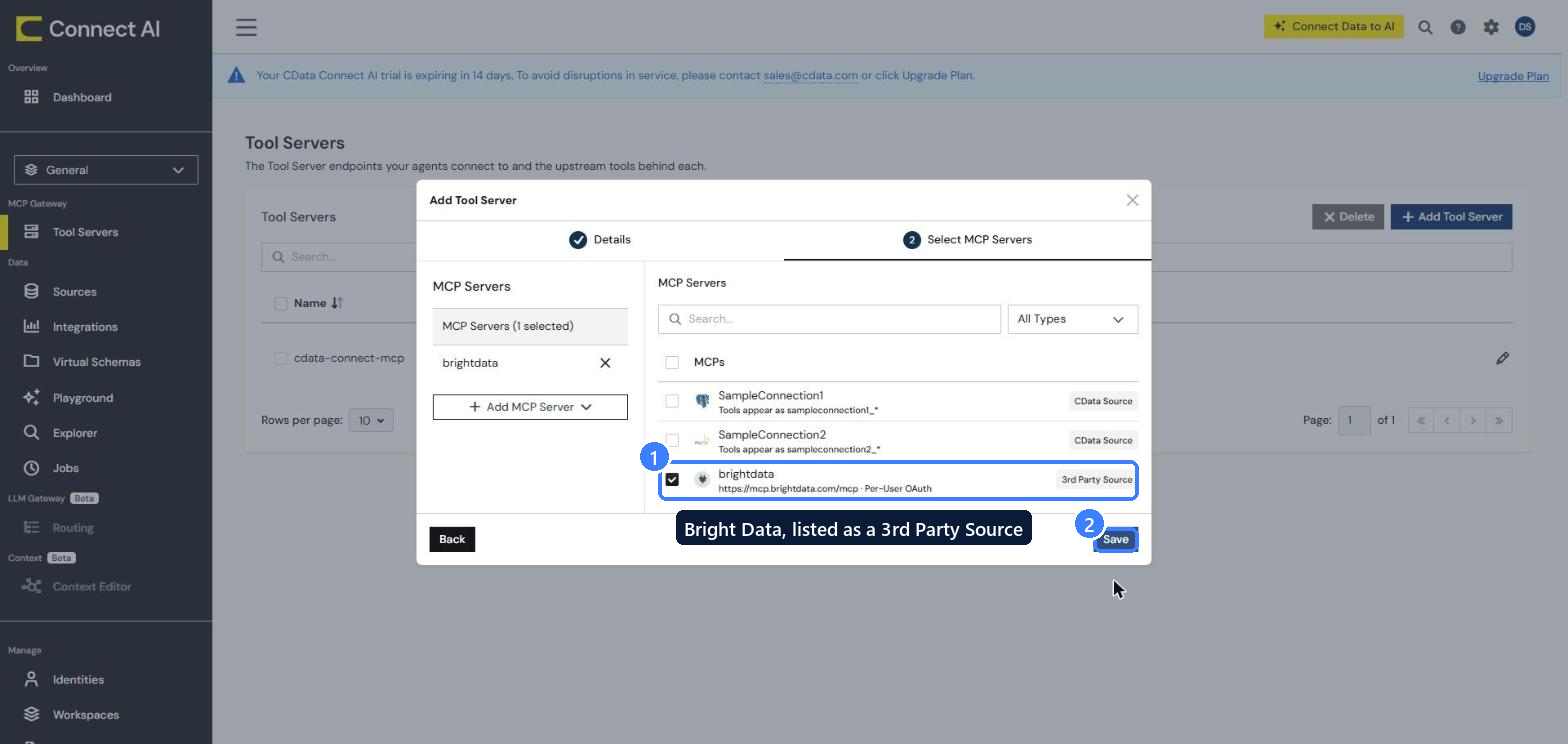
Click “Next.” Bright Data now shows in the list as a “3rd Party Source,” next to your CData sources. Click “Save”:
Step #3: Add the Internal Source to the Tool Server
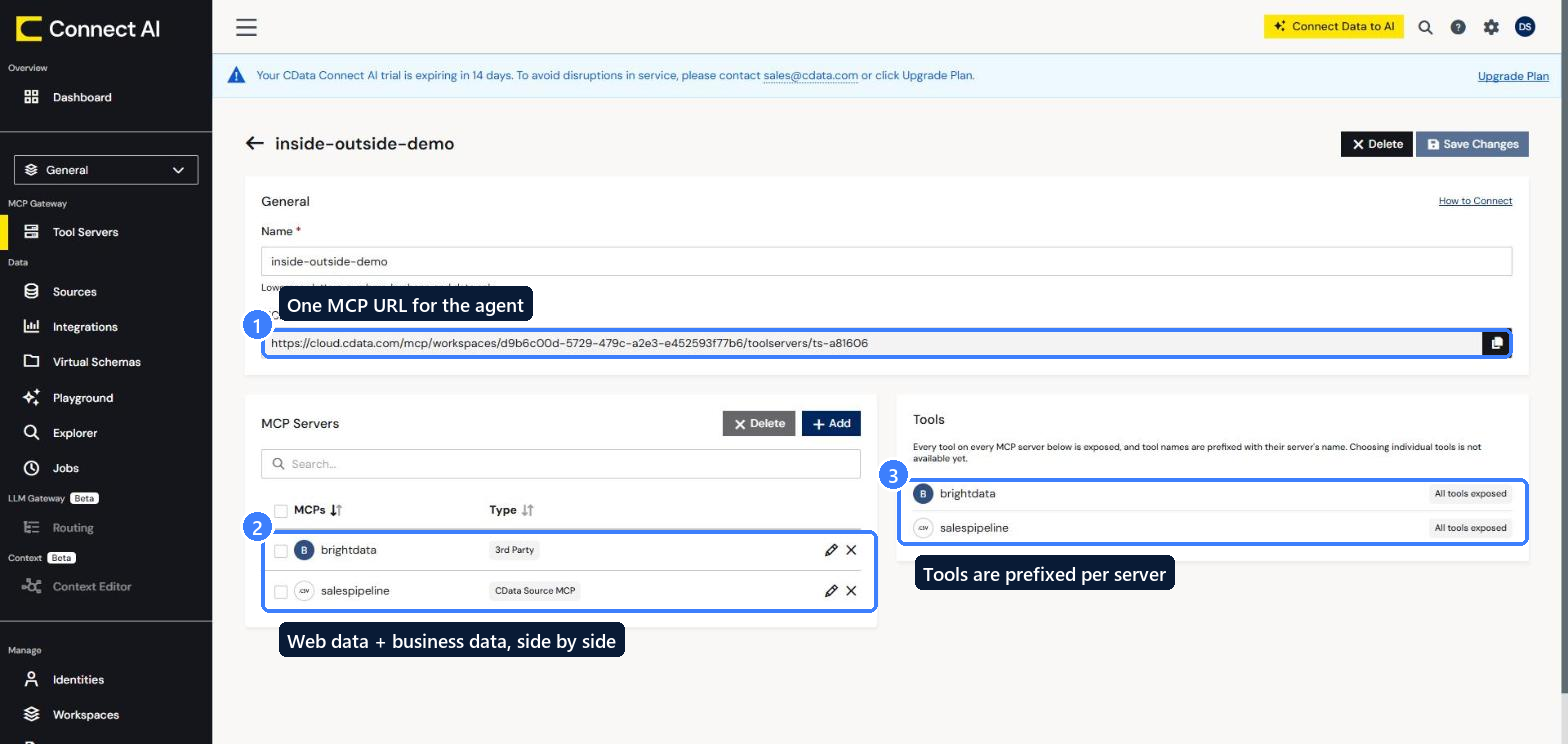
Open the new Tool Server and click “Add > Add CData Source MCPs.” Select the source from Step #1 and save. The Tool Server now exposes both, with tool names prefixed by server, so the agent always knows which side of the picture a tool reads from:
If both sources already exist, the whole Tool Server setup takes one pass:
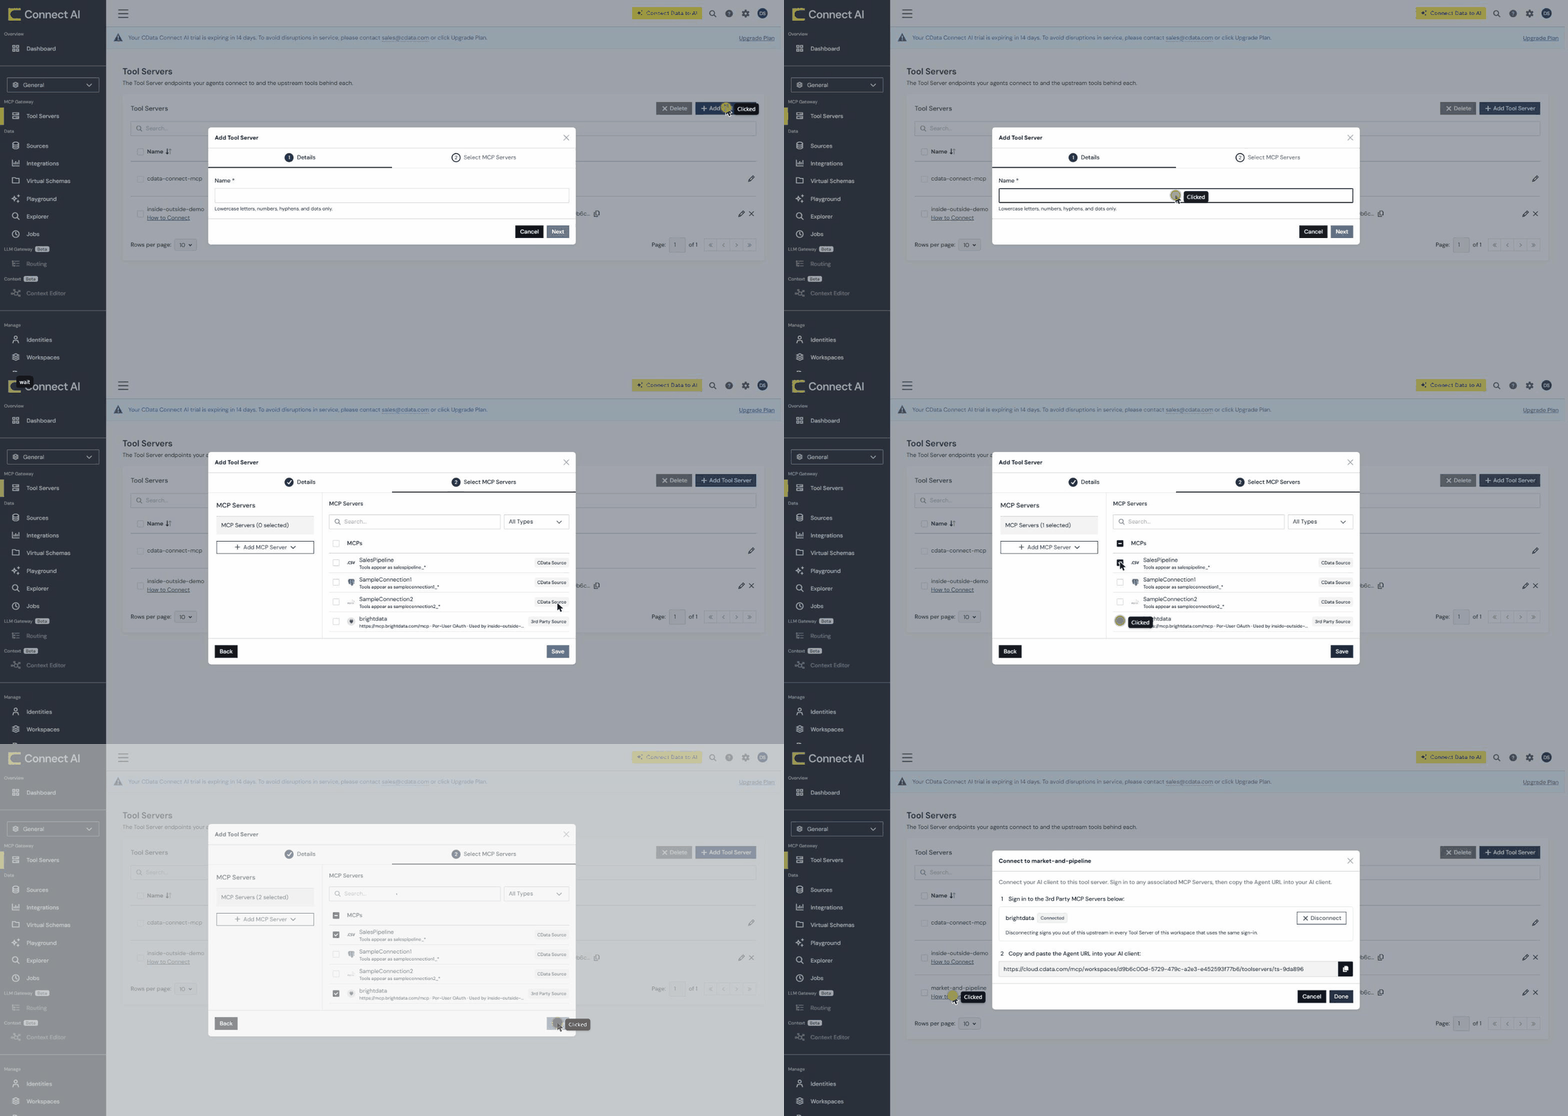
Step #4: Sign In to Bright Data
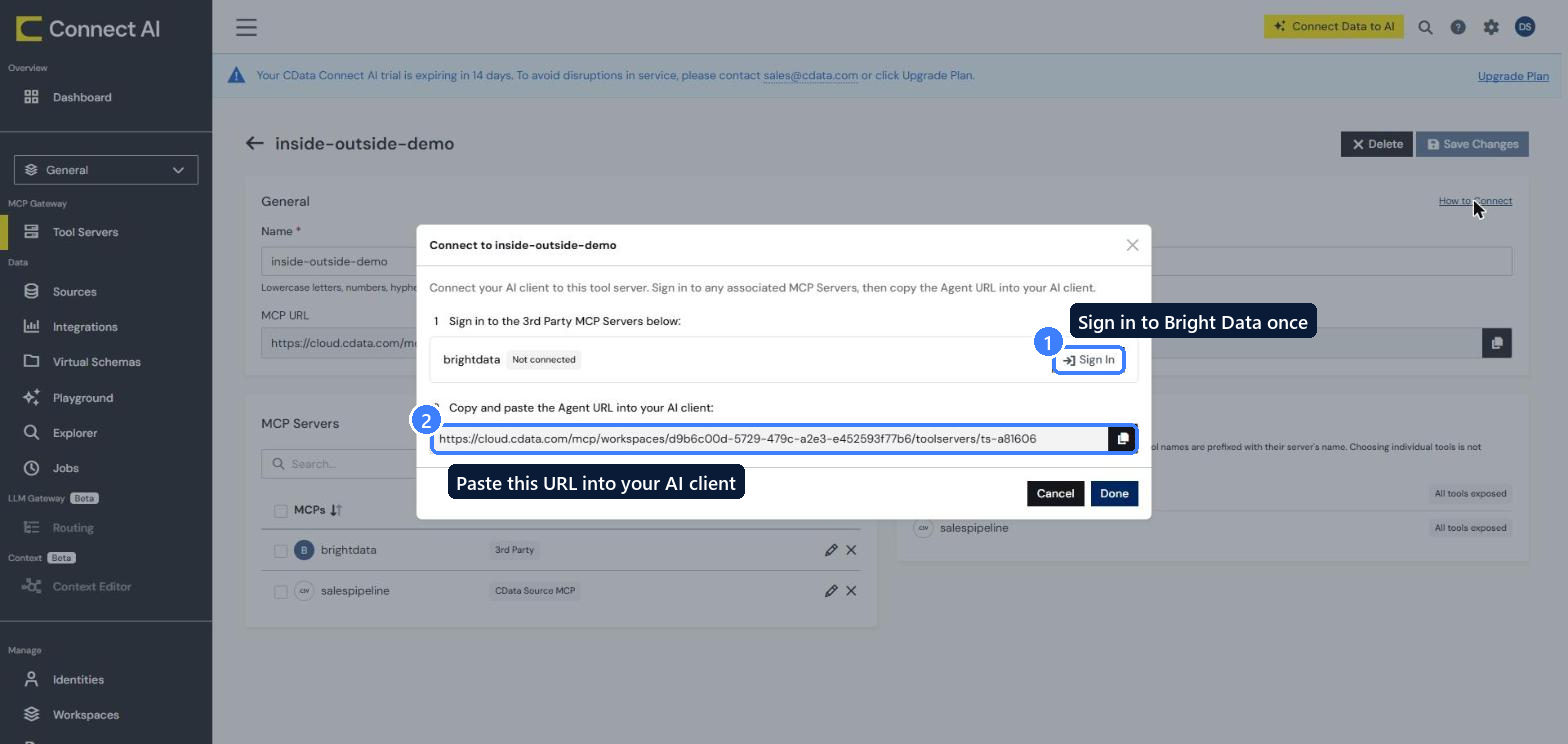
Click “How to Connect” on the Tool Server page, then press “Sign In” next to brightdata:
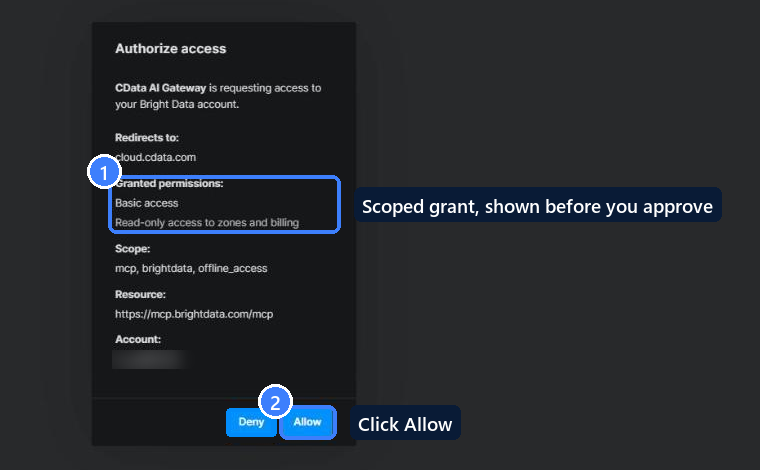
Bright Data’s consent screen opens in a new tab. It names the app asking (CData AI Gateway), the redirect, and the scope before anyone clicks “Allow”:
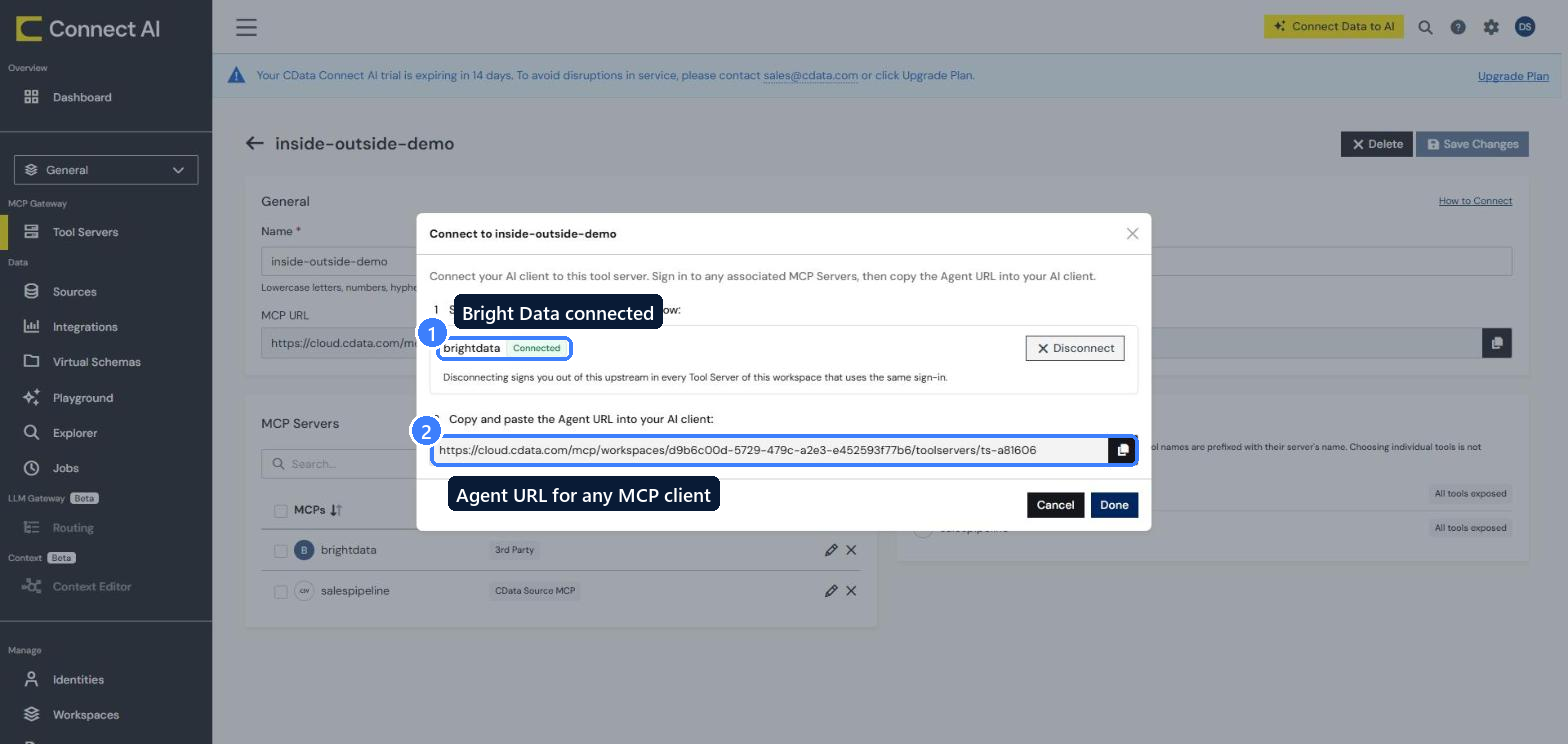
Back in Connect AI, Bright Data shows as “Connected,” and the Agent URL is ready to copy:
Step #5: Connect Your AI Agent
Paste the Agent URL into any MCP client. You can also use it from your own agent built on the Claude Agent SDK or LangGraph.
In Claude Code, that is one command:
claude mcp add --transport http connect-ai https://cloud.cdata.com/mcp/workspaces/<workspace-id>/toolservers/<tool-server-id>Next, launch claude, run /mcp, and authenticate connect-ai with your Connect AI account. The server should then show as connected.
In Codex, the command is just as short:
codex mcp add connect-ai --url https://cloud.cdata.com/mcp/workspaces/<workspace-id>/toolservers/<tool-server-id>Codex detects that the server supports OAuth and opens the Connect AI sign-in in your browser. If you need to sign in again later, run codex mcp login connect-ai.
Step #6: Ask a Question That Needs Both Views
Launch a prompt like this:
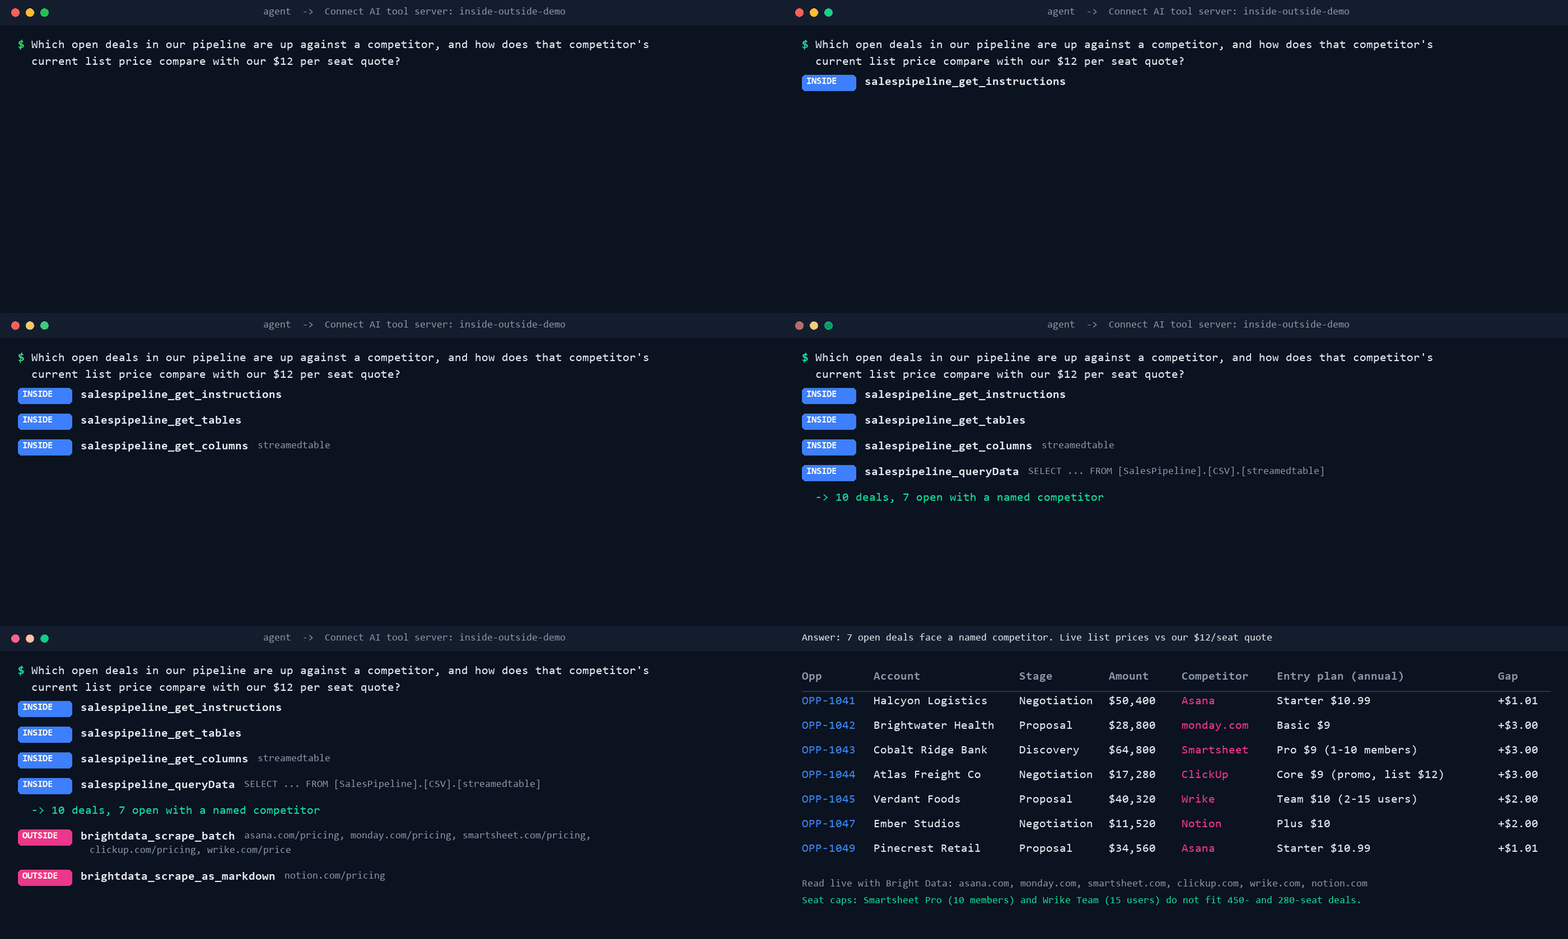
Which open deals in our pipeline are up against a competitor, and how does that competitor’s current list price compare with our $12 per seat quote?
The agent first reads the pipeline through the salespipeline_* tools and finds seven open deals that name a competitor. Then, it sends the six competitor pricing pages to brightdata_scrape_batch and brightdata_scrape_as_markdown. One MCP URL, one sign-in, seven tool calls, about two minutes end to end:
The answer joins both sides in one table:
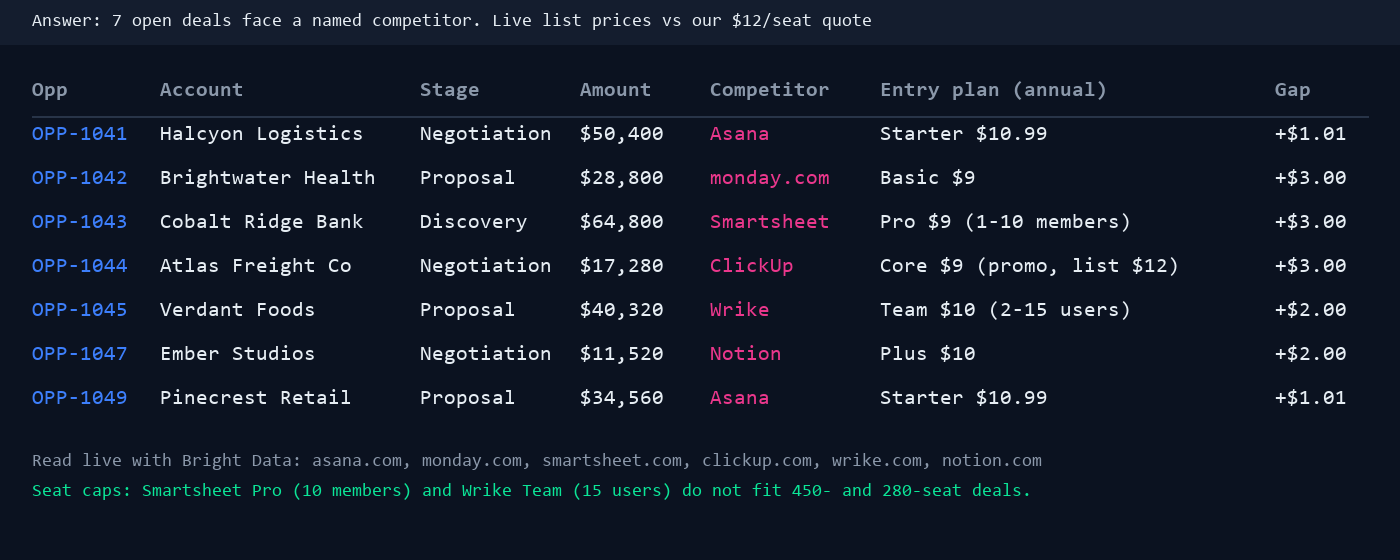
Two findings came only from reading the live pages. Smartsheet’s $9 Pro plan caps at 10 members, so the 450-seat deal really compares with Business at $19. Wrike’s $10 Team plan caps at 15 users and its $25 Business plan at 200, so the 280-seat deal lands on a custom Enterprise quote. ClickUp’s $9 is a promotion off a $12 list price, which puts that deal at parity. Without the web view, a rep would have defended price on all seven deals. With it, they know which entry prices the buyer can’t actually get.
The Tool Server is not tied to one client. We asked Codex the same question through connect-ai, and it queried the pipeline, read the same six pricing pages through Bright Data, and returned its own comparison table:
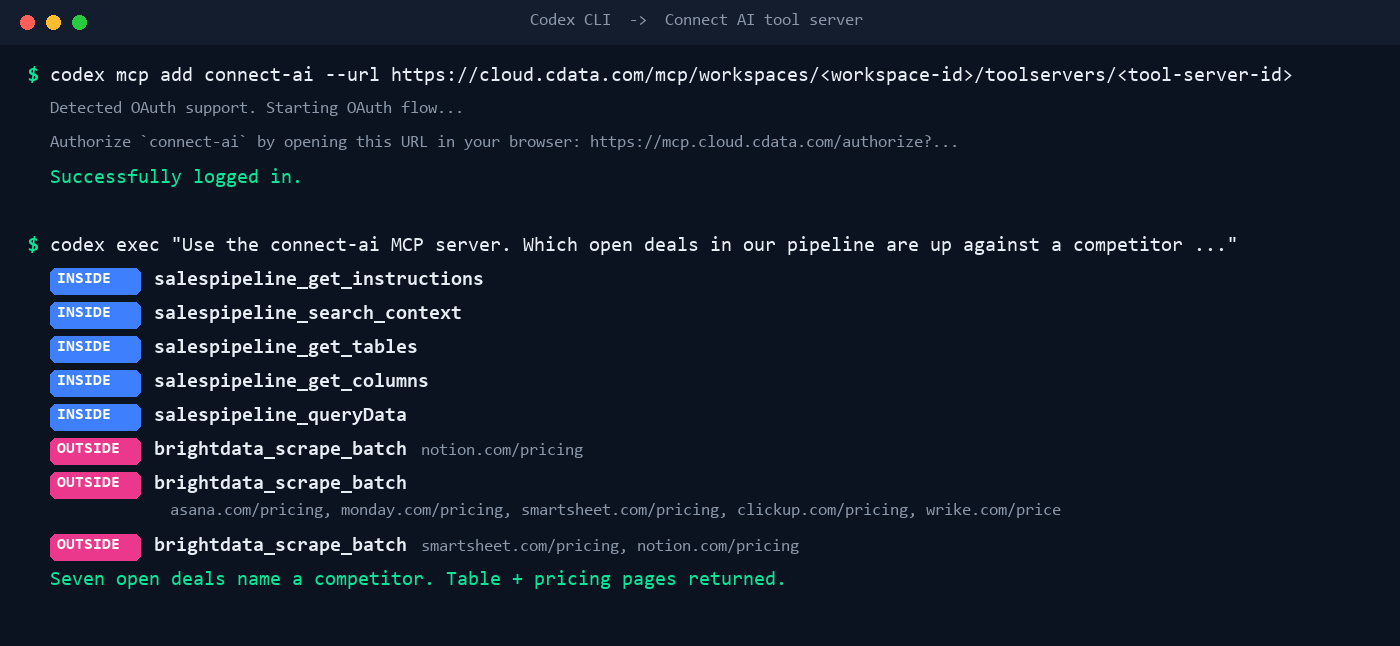
Competitor pricing pages change often, so rerun the question before acting on any number above. The demo pipeline is a public CSV of fictional accounts, so you can rebuild this exact setup and get today’s prices.
Step #7: Review the Calls in the MCP Log
Open “Logs > MCP Log.” Every tool call appears with the user, the Tool Server, the upstream server, and a trace ID. The Bright Data scrapes and the pipeline queries from Step #6 sit in the same log, a few seconds apart:
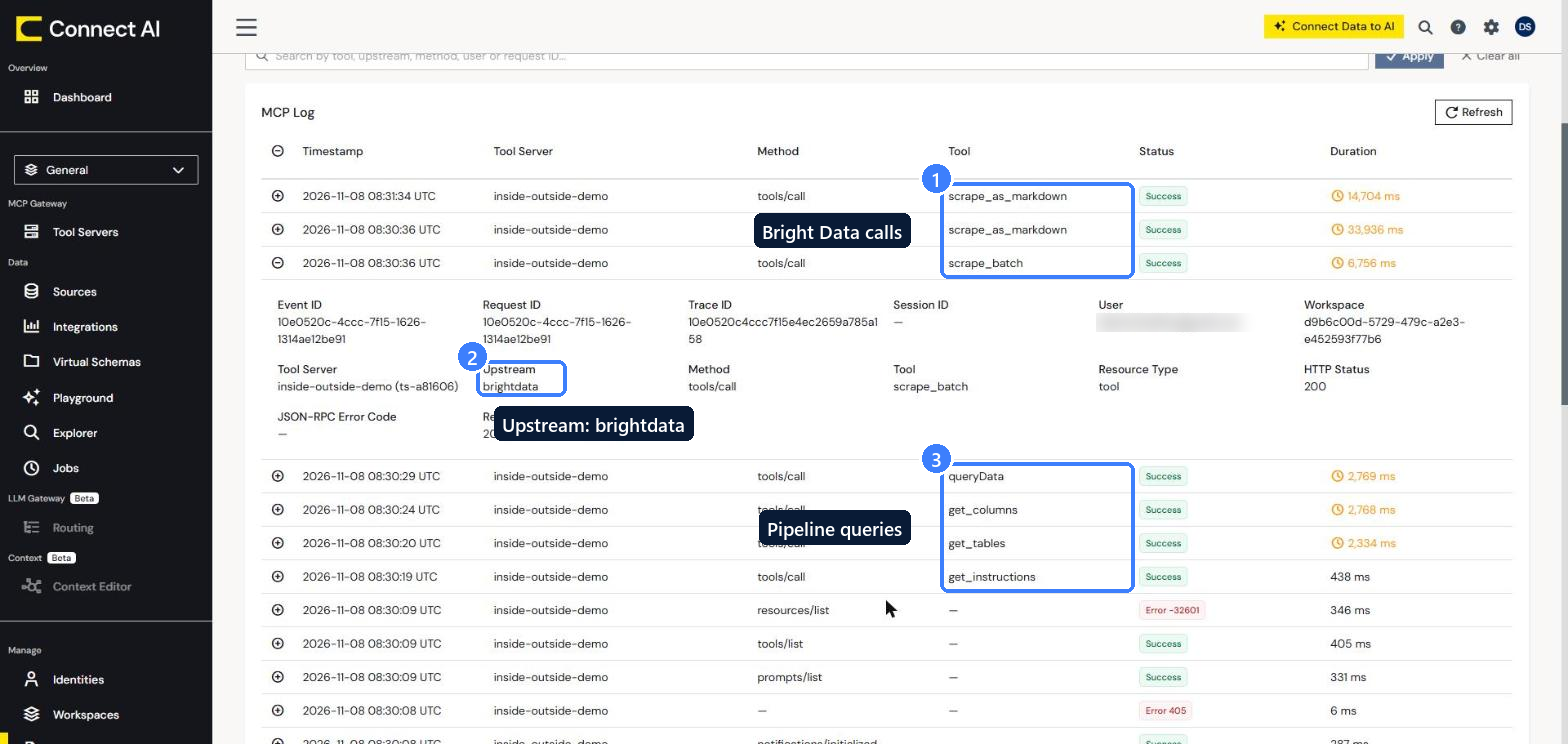
That gives you one set of controls for both views:
- Per-user identity: Each person signs in to Bright Data with their own account, and Connect AI permissions decide which internal sources they can query.
- Read-only business data: Connections grant
SELECTonly by default, so the agent in this setup can query the pipeline but can’t change a CRM record. Agents can take action in source systems when the appropriate additional permissions are granted. - Scoped consent: The Bright Data grant shows its scope up front and can be disconnected from the Tool Server at any time.
On the web side, Bright Data’s Trust Center lists its certifications, including SOC 2, ISO 27701, and GDPR, which matters when security teams review what an agent is allowed to touch. For company-wide rollouts, the enterprise MCP guide covers authentication, authorization, and compliance for MCP at scale.
Et voilà! Your agent now knows your business and your market, through one governed endpoint.
Conclusion
In this article, you learned how to connect CData Connect AI to the Bright Data MCP server through a single Tool Server. The result is an AI agent that can query internal business data and live web data in one workflow, under one sign-in, with every call in one log.
The same pattern fits more than pricing. You can compare your customer list with public reviews collected across sites, building on this multi-source review intelligence agent or the customer review scraping guide. You can research prospects on the live web and push them into the CRM, the way the AI SDR agent with Bright Data MCP does. You can also extend an AI agent that saves data to a database with Connect AI as its data layer.
Start a CData Connect AI free trial and explore the CData Connect AI docs. Sign up for a free Bright Data account, add the Bright Data MCP server to a Connect AI Tool Server, and ask the question your team keeps answering by hand!



Web Data & AI Expert
 6 years experience
Daniel Shashko is a Senior SEO/GEO at Bright Data, specializing in B2B marketing, international SEO, and building AI-powered agents, apps, and web tools.