
In this article, you will learn:
- What Azure Synapse Analytics is and what it offers.
- Why integrating with Bright Data’s SERP API in Azure Synapse Analytics is a winning strategy.
- How to build an Azure Synapse pipeline that collects, transforms, and analyzes web search data using Bright Data’s SERP API.
Let’s dive in!
What Is Azure Synapse Analytics?
Azure Synapse Analytics is a cloud-based analytics platform that brings together data integration, enterprise data warehousing, and big data processing in a single workspace. It provides pipeline orchestration, Apache Spark pools, and both dedicated and serverless SQL pools, enabling you to ingest, transform, and query data at scale from a single unified environment.
Its main goal is to help you go from raw data to business insight. This is achieved by combining a pipeline engine (built on Azure Data Factory) for data ingestion, Apache Spark notebooks for code-based transformations, and SQL pools for querying and serving analytics-ready datasets to dashboards, ML models, and downstream applications.
Azure Synapse Analytics vs Azure AI Foundry: What’s the Difference?
If you have already read our guide on integrating SERP API with Azure AI Foundry, you might be wondering how Synapse Analytics differs. The two serve fundamentally different purposes:
- Azure AI Foundry is a unified AI development platform focused on building, deploying, and managing AI applications, agents, and prompt flows. It provides access to a catalog of LLMs (from Azure OpenAI, Meta, Mistral, etc.) and is designed for AI-first development involving prompt engineering, model fine-tuning, and RAG workflows.
- Azure Synapse Analytics is a data analytics and warehousing platform focused on ingesting large volumes of data, running complex transformations, and serving structured analytics at scale. It excels at ETL/ELT pipelines, big data processing with Spark, and SQL-based business intelligence.
In short, Azure AI Foundry is where you build AI-powered applications and prompt flows, while Azure Synapse Analytics is where you build data pipelines that collect, transform, and warehouse data for analytics and reporting.
They actually complement each other perfectly. You can use Synapse to build the data foundation, collecting and warehousing web data at scale, and then feed that curated data into AI Foundry for LLM-powered analysis. In this tutorial, you will see how Synapse Analytics can integrate with Bright Data’s SERP API to build a complete web data pipeline that collects search results, transforms them with Spark, and serves analytics via SQL.
Why Integrate Bright Data’s SERP API Into Azure Synapse Analytics
Azure Synapse Analytics provides a powerful REST connector in its pipeline engine that lets you call any REST API and land the results directly in Azure Data Lake Storage. This opens the door to ingesting external data sources into your analytics workflows. However, to inject real-time web search data into your data warehouse, you need a reliable, scalable, and structured data source.
This is where Bright Data’s SERP API comes in. SERP API lets you programmatically search queries on search engines, including Google, Bing, DuckDuckGo, Yandex, and more, and retrieve the full SERP content. It returns data in multiple formats, including parsed JSON, raw HTML, and AI-ready Markdown, giving you a reliable source of fresh, verifiable data.
This approach is especially useful for:
- SEO keyword tracking pipelines to monitor your search rankings across thousands of keywords daily and identify trends over time.
- Competitive intelligence warehouses to collect competitor visibility data and join it with internal metrics for strategic analysis.
- Market research datasets to aggregate search result trends across industries, regions, and time periods for large-scale reporting.
- Content performance analytics to track how your content ranks for target keywords and measure the impact of SEO efforts.
By combining Azure Synapse’s pipeline orchestration and data warehousing capabilities with Bright Data’s SERP API, you can create data pipelines that continuously collect, transform, and analyze web search data at scale, without maintaining any scraping infrastructure.
How to Build a SERP Data Pipeline in Azure Synapse With Bright Data
In this guided section, you will see how to integrate Bright Data’s SERP API into an Azure Synapse pipeline as part of a daily keyword ranking tracker. This pipeline consists of five main steps:
- Workspace setup: You create an Azure Synapse workspace with a linked Data Lake Storage account.
- Data source configuration: You create a REST linked service pointing to Bright Data’s SERP API, with secure credential storage.
- Ingestion pipeline: A Synapse pipeline calls the SERP API for a set of tracked keywords and lands the raw JSON results in your data lake.
- Spark transformation: An Apache Spark notebook flattens and normalizes the raw SERP data into analytics-ready Delta tables.
- SQL analytics: Serverless SQL queries analyze ranking trends, and views are created for Power BI dashboards.
Note: This is just an example, and you can take advantage of the SERP API in many other scenarios and use cases. For example, you could also build pipelines for competitive price monitoring or feed SERP data into machine learning models.
Follow the instructions below to build a web data pipeline powered by Bright Data’s SERP API within Azure Synapse Analytics!
Prerequisites
To follow along with this tutorial section, make sure you have:
- A Microsoft account.
- An Azure subscription (even the free trial is sufficient).
- A Bright Data account with an active SERP API zone and API key (with Admin permissions).
Follow the official Bright Data documentation to set up your SERP API zone and get your API key. Store both your API key and zone name in a safe place, as you will need them shortly.
Step 1: Create an Azure Synapse Workspace
Azure Synapse pipelines are only available within a Synapse workspace, so the first step is to create one.
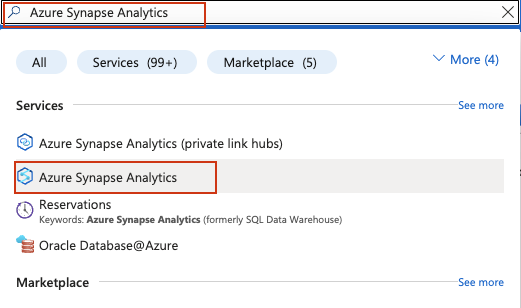
Log in to your Azure account and search for Azure Synapse Analytics in the search bar at the top of the Azure Portal:
On the Synapse Analytics management page, click Create. Fill out the creation form:
- Select your Azure subscription.
- Select an existing resource group or create a new one.
- Give your workspace a name, such as
bright-data-serp-pipeline. - Choose a region close to you.
- For Data Lake Storage Gen2, select Create new and provide a storage account name (must be all lowercase, 3–24 characters, globally unique, e.g.,
serppipelinelake). Create a new file system namedraw.
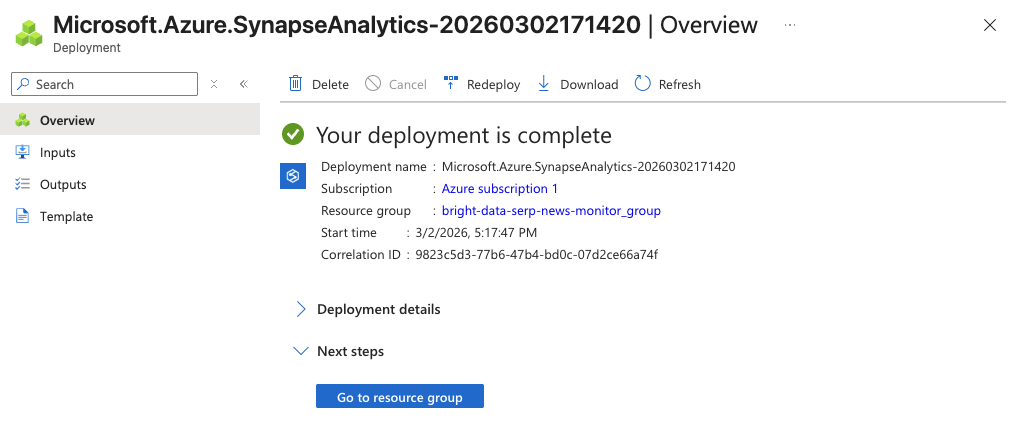
Click Review + Create, then Create to start the deployment.
The initialization process may take a few minutes. Once it is complete, you should see a confirmation page. Click Go to resource, then click Open Synapse Studio to launch the web-based development environment.
You now have a Synapse workspace where you can build pipelines, write Spark notebooks, and run SQL queries.
Step 2: Create an Apache Spark Pool
To run the transformation notebooks later in this tutorial, you need an Apache Spark pool in your workspace.
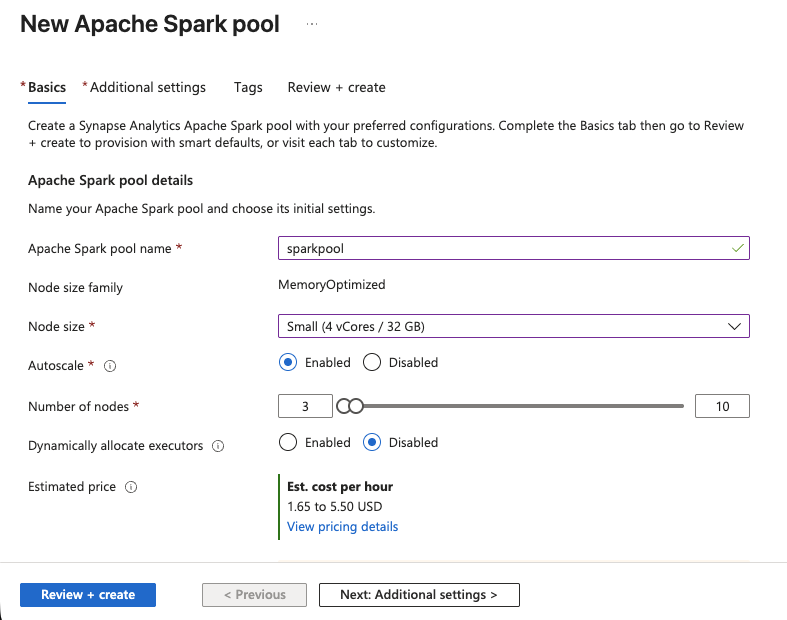
- In Synapse Studio, go to Manage > Apache Spark pools > New.
- Give the pool a name, such as
sparkpool. - Set the Node size to Small (4 vCores / 32 GB), this is sufficient for SERP data transformations.
- Enable Autoscale and set the range to 3–5 nodes.
- Click Review + Create, then Create.
The Spark pool will be ready in a few moments. You now have compute power for running PySpark notebooks.
Step 3: Build the Ingestion Pipeline
Now you will create a Synapse pipeline that calls Bright Data’s SERP API for a set of tracked keywords and lands the results in your data lake.
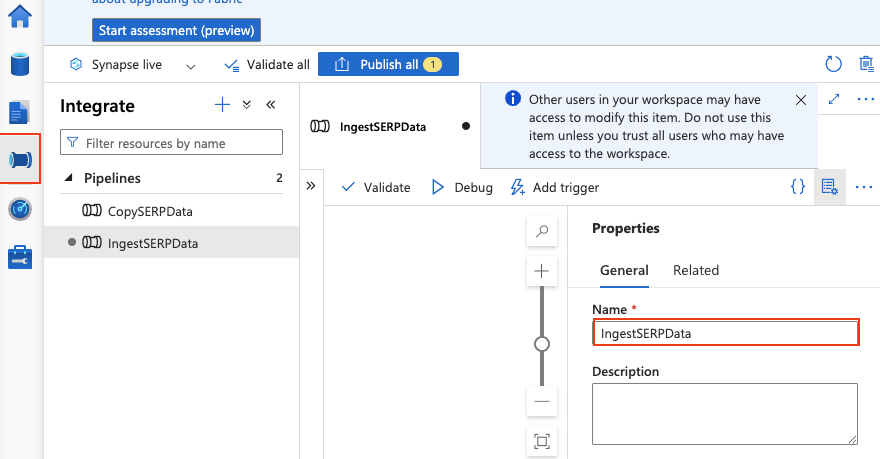
Create a new pipeline
- Go to Integrate > + > Pipeline.
- Name it
IngestSERPData.
Add pipeline parameters
Click on the pipeline canvas background to open the pipeline properties. Go to the Parameters tab and add:
| Name | Type | Default value |
|---|---|---|
keywords |
Array | ["web scraping tools", "proxy service", "data extraction API"] |
These are the keywords you want to track rankings for. You can modify this list at any time.
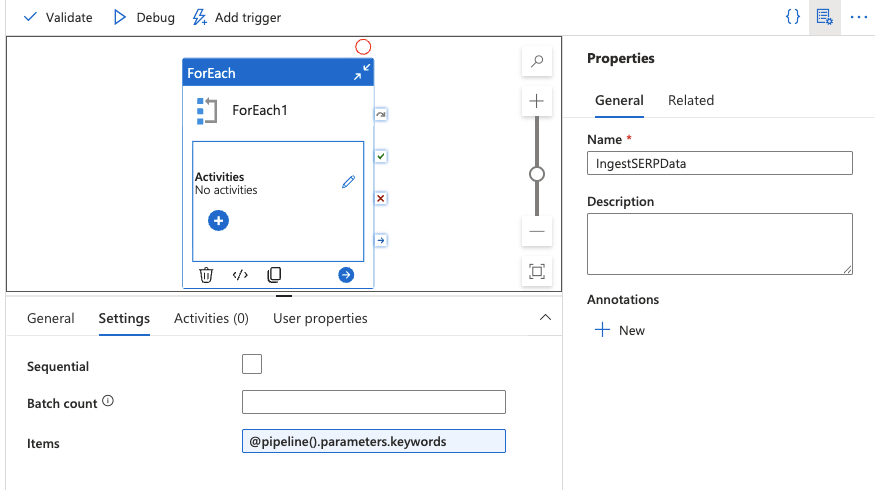
Add a ForEach activity
- Drag a ForEach activity onto the canvas from the Activities panel.
- In the Settings tab, set the Items field to:
@pipeline().parameters.keywords
This will iterate over each keyword in your array.
Add a Web activity inside the ForEach
A Web activity calls a REST API directly, no datasets or linked services needed for the request itself.
- Double-click the ForEach activity to open its inner canvas. You should see the designer header change to indicate you are inside the ForEach scope (breadcrumb-like
IngestSERPData > ForEach1). - From the Activities panel on the left, expand General and drag a Web activity onto the inner canvas.
- Give it a name, such as
CallSERPAPI.

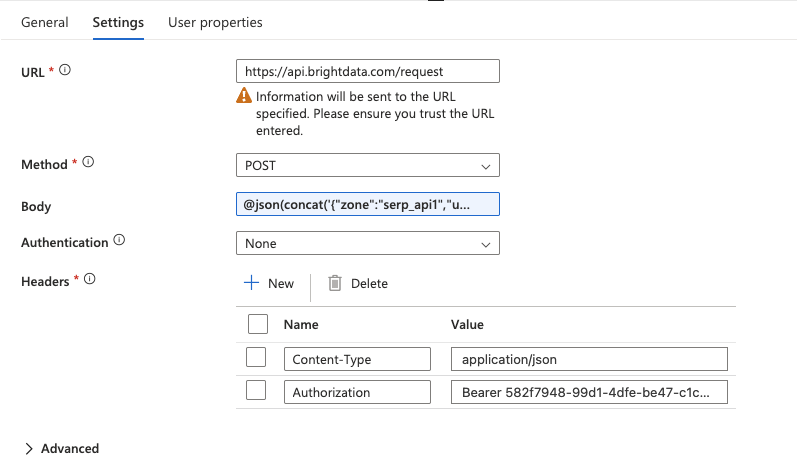
Configure the Web activity
Click on the Web activity to select it, then go to the Settings tab and configure:
- URL: Type the full API endpoint directly in the field:
https://api.brightdata.com/request- Method: Select
POSTfrom the dropdown. - Headers: Click + Add header twice to add: Name Value
Content-Typeapplication/jsonAuthorizationBearer YOUR_BRIGHT_DATA_API_KEY - Body: This is where you pass the SERP API request with the current keyword from the ForEach loop. Type the following expression directly in the Body field (do not use the “Add dynamic content” popup):
@concat('{"zone":"YOUR_SERP_API_ZONE","url":"https://www.google.com/search?q=',replace(item(),' ','+'),'&hl=en&gl=us","format":"raw","data_format":"json"}')Replace YOUR_SERP_API_ZONE with your actual zone name from the Bright Data dashboard.
Important: The
@must be the very first character in the field, no leading spaces. This tells Synapse to evaluate the text as an expression. If entered correctly, the field will highlight the expression. If it appears as plain text, delete and retype, ensuring@is at position zero.What this does: The
item()function returns the current keyword from the ForEach loop (e.g.,"web scraping tools"). Thereplace()function replaces spaces with+characters to form a valid URL query parameter. Theconcat()function builds the full JSON request body as a single string.
- Authentication: Set to
None(authentication is already handled via the Authorization header).
Add a schedule trigger
- Back on the main pipeline canvas, click Add trigger > New/Edit.
- Select New and set a daily recurrence (e.g., 6:00 AM UTC).
- Click OK, then Publish all to save and deploy the pipeline.
To test it immediately, click Trigger now > OK. Navigate to Monitor > Pipeline runs to watch the execution. You should see the pipeline succeed and find JSON files in your data lake under the raw/serp/ path.
Return to the main pipeline canvas
Click the pipeline name (IngestSERPData) in the breadcrumb at the top of the designer to return to the main canvas. You should see the ForEach activity with an indicator showing it contains child activities.
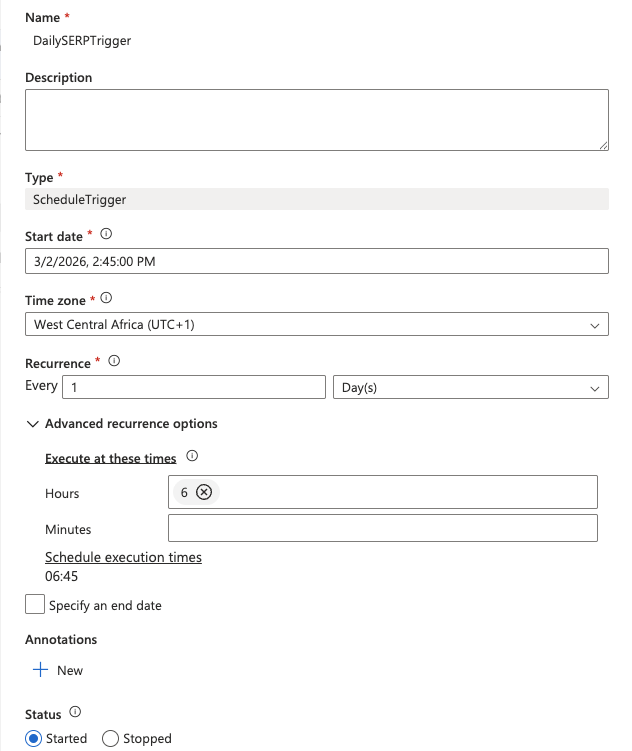
Add a schedule trigger
- Click Add trigger > New/Edit at the top of the pipeline designer.
- In the dropdown, select New.
- Give the trigger a name (e.g.,
DailySERPTrigger), set the Type to Schedule, and configure:
- Start date: Today’s date
- Recurrence: Every
1Day - At these hours:
6(for 6:00 AM UTC)
- Click OK, then confirm the trigger parameters.
- Click Publish all at the top of Synapse Studio to save and deploy everything.
Test the pipeline
To run the pipeline immediately without waiting for the scheduled trigger:
- Click Trigger now > OK at the top of the pipeline designer.
- Navigate to Monitor > Pipeline runs in the left menu.
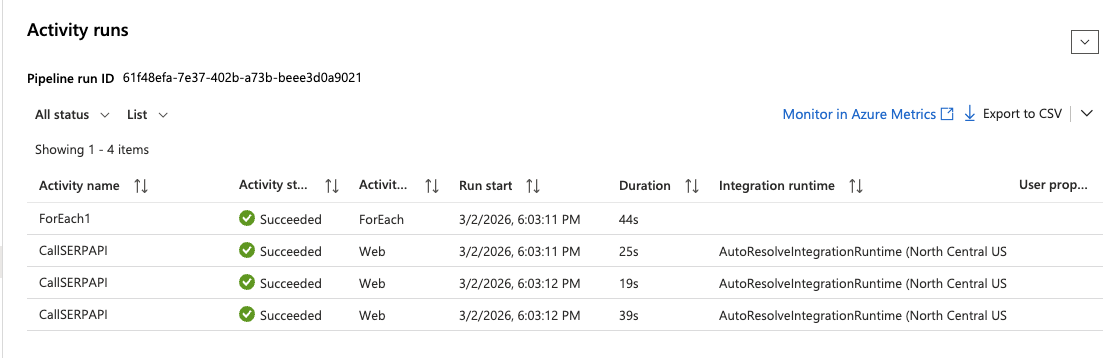
- Wait for the run to complete, you should see a green Succeeded status.
- Click on the run and expand the ForEach activity to inspect each Web activity execution. Click on any
CallSERPAPIiteration to see the full API response in the Output section.
Step 4: Collect and Transform Data With Apache Spark
The Web activity in Step 3 validated that the SERP API integration works and demonstrated pipeline orchestration with scheduling. For the data collection and transformation step, you will use an Apache Spark notebook that calls the SERP API directly using Python, saves the raw responses to your data lake, and transforms them into analytics-ready Delta tables.
This approach is standard in data engineering; pipelines handle orchestration and scheduling, while notebooks handle the actual data processing logic.
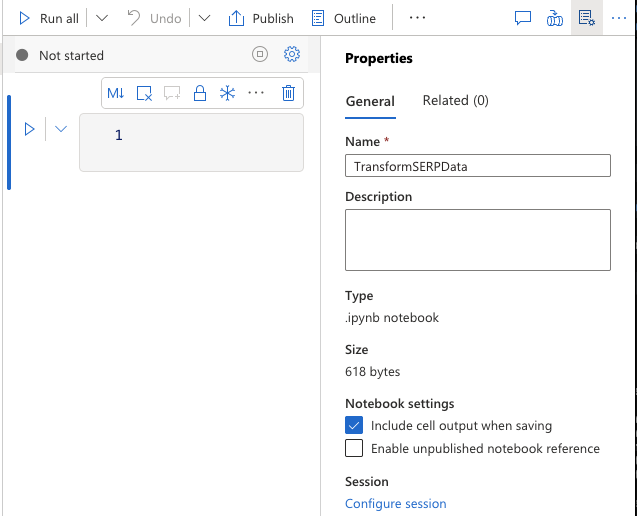
Create a Spark notebook
- Navigate to Develop > + > Notebook.
- Name it
TransformSERPData. - Attach it to your
sparkpoolApache Spark pool. - Make sure PySpark (Python) is selected as the language.
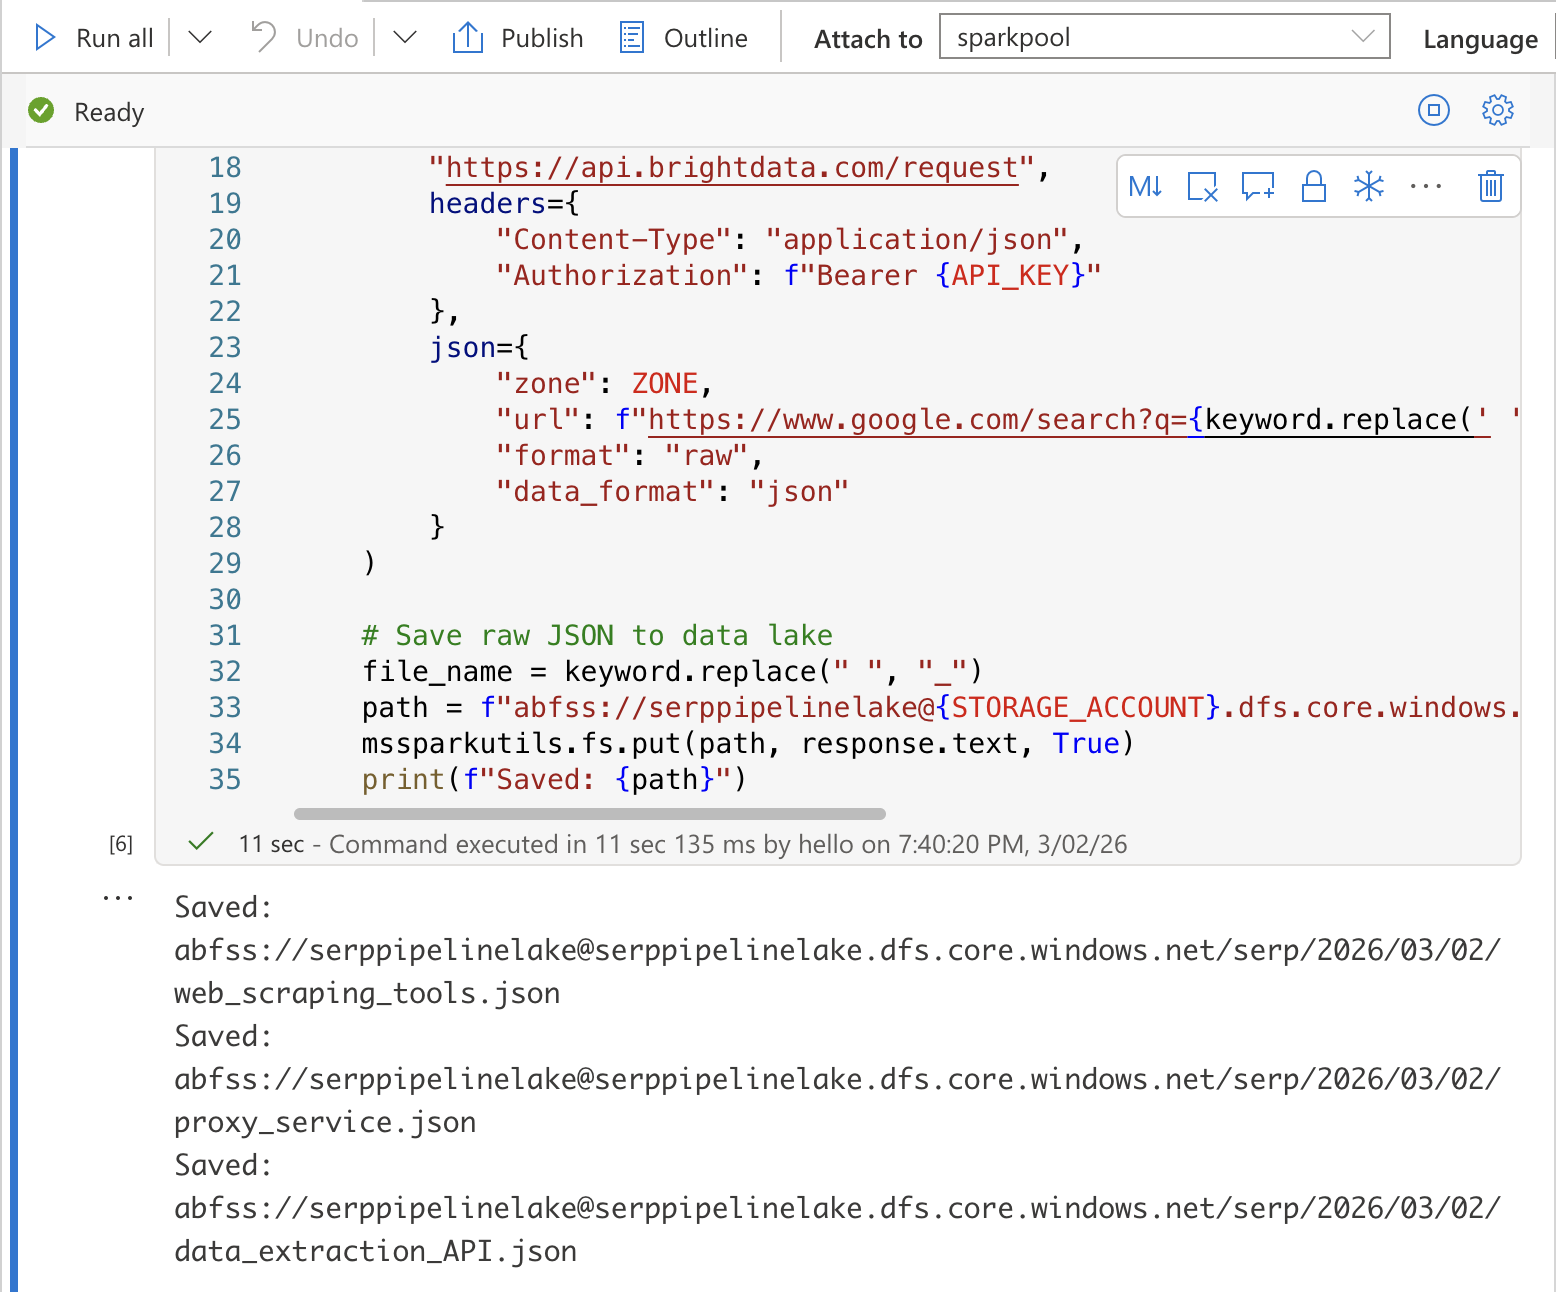
Cell 1: Collect SERP data and save to data lake
In the first cell, add the following code. This calls the Bright Data SERP API for each keyword and saves the raw JSON responses to your data lake:
import requests
import json
from datetime import datetime
from notebookutils import mssparkutils

# Configuration
API_KEY = "YOUR_BRIGHT_DATA_API_KEY"
ZONE = "YOUR_SERP_API_ZONE"
STORAGE_ACCOUNT = "YOUR_STORAGE_ACCOUNT"
import requests
import json
from datetime import datetime
from notebookutils import mssparkutils

# Collect SERP data for each keyword
today = datetime.utcnow().strftime("%Y/%m/%d")

for keyword in KEYWORDS:
    # Call the Bright Data SERP API
    response = requests.post(
        "https://api.brightdata.com/request",
        headers={
            "Content-Type": "application/json",
            "Authorization": f"Bearer {API_KEY}"
        },
        json={
            "zone": ZONE,
            "url": f"abfss://[email protected]/serp/{today}/{file_name}.json"
        }
    )

    # Save raw JSON to data lake
    file_name = keyword.replace(" ", "_")
    path = f"abfss://raw@{STORAGE_ACCOUNT}.dfs.core.windows.net/serp/{today}/{file_name}.json"
    mssparkutils.fs.put(path, response.text, True)
    print(f"Saved: {path}")
Replace YOUR_BRIGHT_DATA_API_KEY, YOUR_SERP_API_ZONE, and YOUR_STORAGE_ACCOUNT with your actual values.
Security Tip: In production, store your API key in Azure Key Vault and retrieve it using
mssparkutils.credentials.getSecret("your-keyvault-name", "BRIGHT_DATA_API_KEY")instead of hardcoding it.
Run the cell by pressing Shift + Enter. You should see output confirming each file was saved to the data lake.
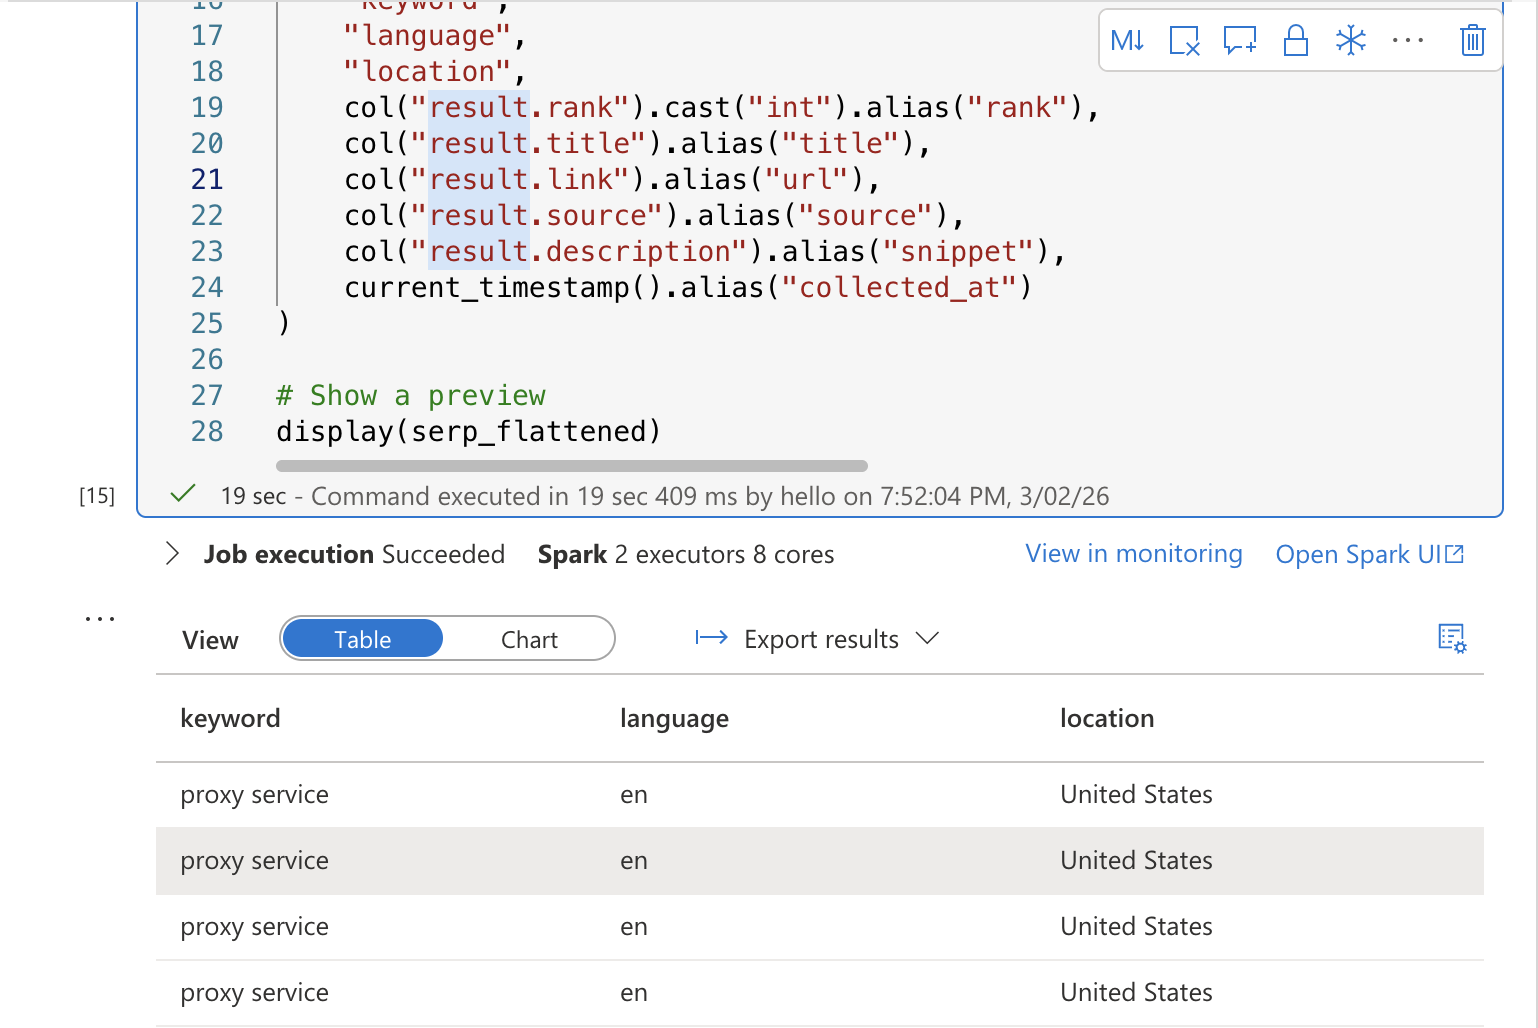
Cell 2: Transform and flatten the SERP data
In a new cell, add the transformation code that reads the raw JSON and flattens it into a structured table:
from pyspark.sql.functions import explode, col, current_timestamp
from pyspark.sql.types import StructType, StructField, StringType, IntegerType, ArrayType

# Read raw SERP data from the data lake
serp_raw = spark.read.option("multiline", "true").json(
    f"abfss://serppipelinelake@{STORAGE_ACCOUNT}.dfs.core.windows.net/serp/{today}/*.json"
)

# Flatten: extract the keyword from general.query and explode organic results
serp_flattened = serp_raw.select(
    col("general.query").alias("keyword"),
    col("general.language").alias("language"),
    col("general.location").alias("location"),
    explode(col("organic")).alias("result")
).select(
    "keyword",
    "language",
    "location",
    col("result.rank").cast("int").alias("rank"),
    col("result.title").alias("title"),
    col("result.link").alias("url"),
    col("result.source").alias("source"),
    col("result.description").alias("snippet"),
    current_timestamp().alias("collected_at")
)

# Show a preview
display(serp_flattened)
Run the cell. You should see a preview table showing the flattened SERP results with columns for keyword, rank, title, URL, snippet, and collection timestamp.
Cell 3: Save to a Delta table
In a third cell, write the transformed data to a Delta table for SQL analytics:
# Write transformed data as a Delta table to your data lake
serp_flattened.write.format("delta").mode("append").save(
  f"abfss://[email protected]/curated/serp_rankings"
)
print("Data written to curated/serp_rankings") 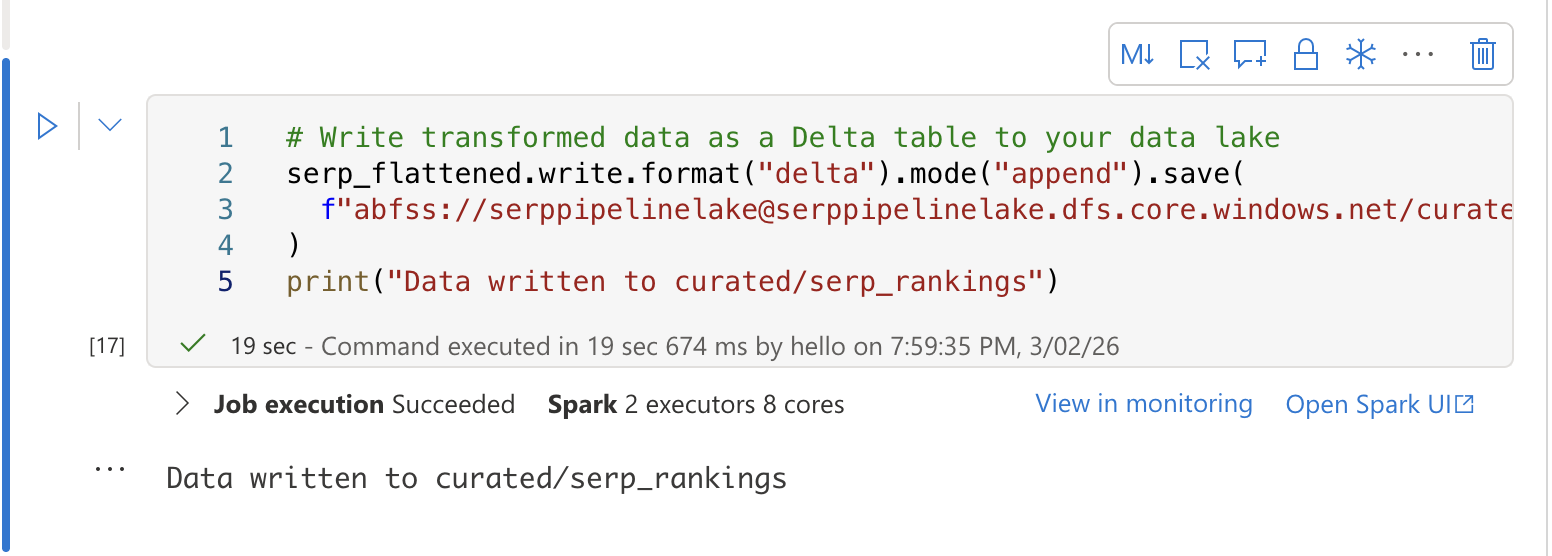
Add the notebook to your pipeline
- Return to your
IngestSERPDatapipeline in the Integrate hub. - Drag a Notebook activity onto the canvas, outside and after the ForEach activity.
- In the Settings tab, select your
TransformSERPDatanotebook and attach it tosparkpool. - Connect the ForEach activity to the Notebook activity with a Success dependency (drag the green arrow).
- Click Publish all to save.
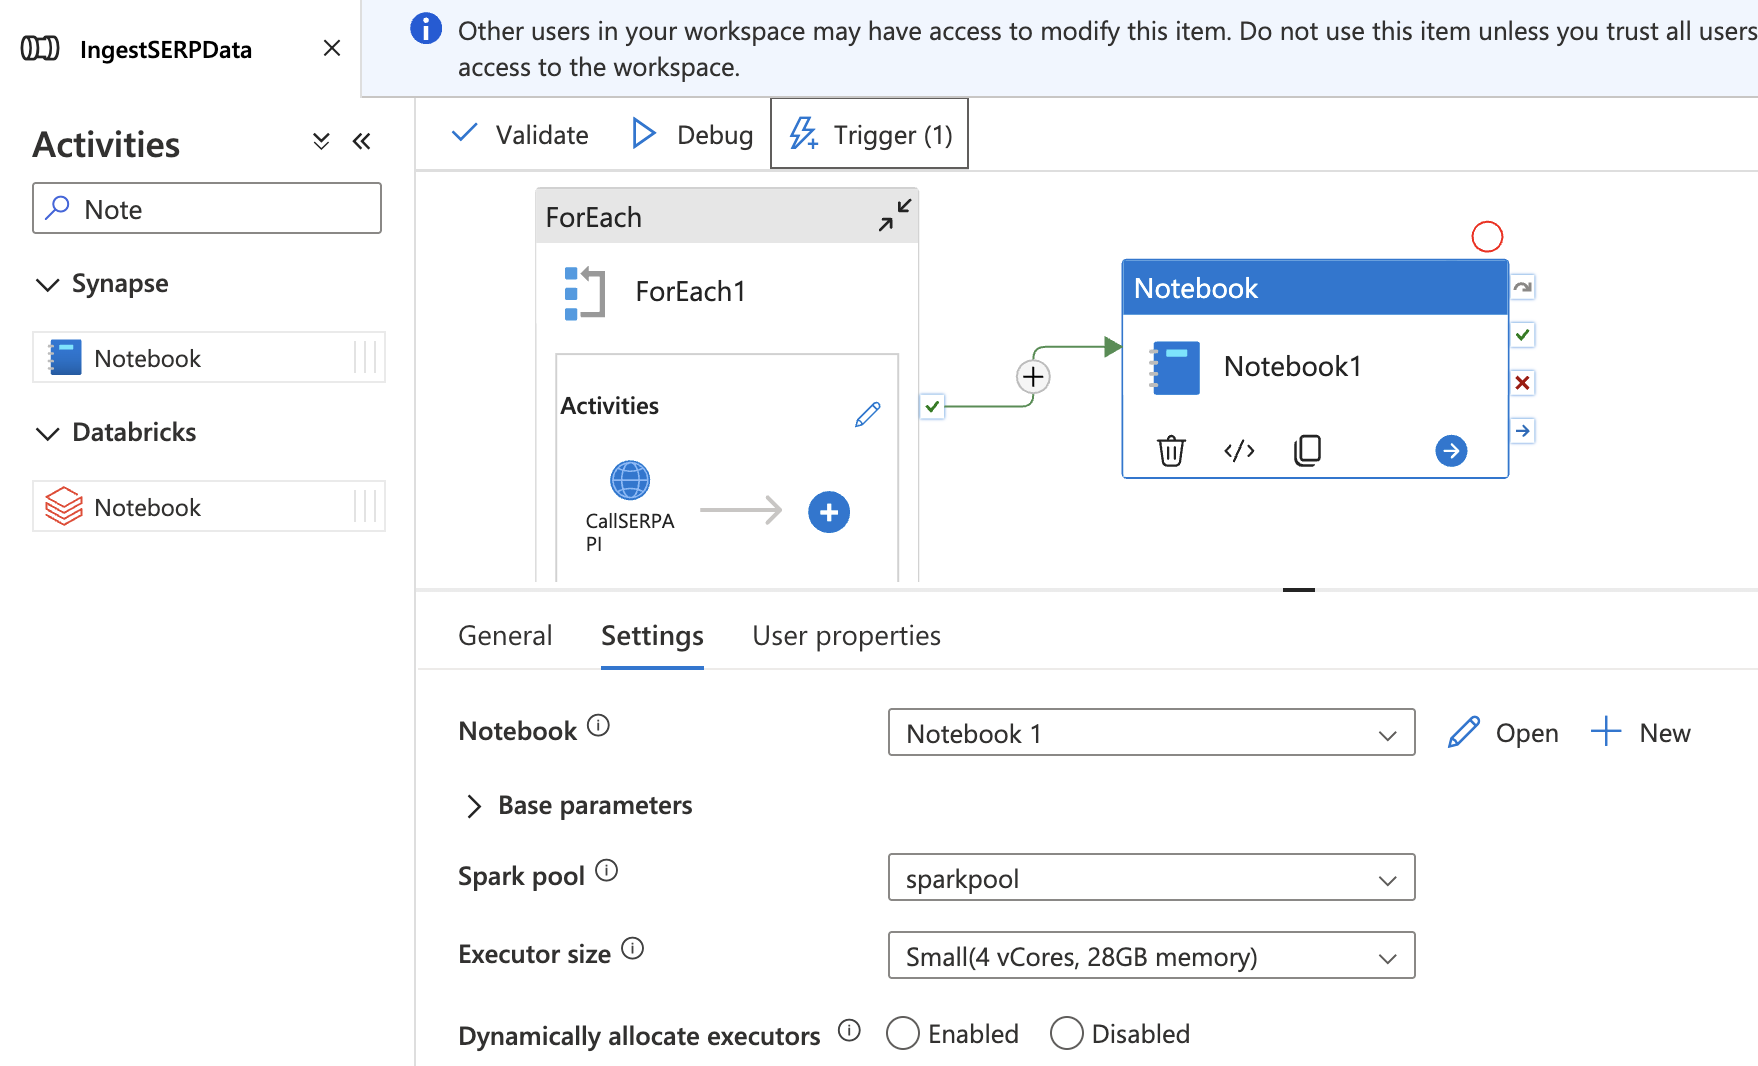
Now the full pipeline runs end-to-end: collect SERP data → land in data lake → transform into a Delta table.
Step 5: Analyze Rankings With SQL
Once your data is in a Delta table, you can query it directly using Synapse’s serverless SQL pool — no additional provisioning required. The serverless SQL pool reads Delta files directly from your data lake using the OPENROWSET function.
Create a database
Navigate to Develop > + > SQL script. Make sure Built-in (serverless) is selected as the SQL pool at the top of the script editor. Run the following to create a dedicated database for your SERP analytics:
CREATE DATABASE serp_analytics;After the database is created, switch to it by selecting serp_analytics from the database dropdown at the top of the script editor.
Track ranking changes over time
Create a new SQL script (or clear the previous one) and run the following query. This reads the Delta table directly from your data lake using OPENROWSET:
-- See how rankings shift day over day for each keyword and URL
SELECT
    keyword,
    url,
    rank,
    collected_at,
    rank - LAG(rank) OVER (PARTITION BY keyword, url ORDER BY collected_at) AS rank_change
FROM OPENROWSET(
    BULK 'abfss://[email protected]/curated/serp_rankings/',
    FORMAT = 'DELTA'
) AS serp_rankings
WHERE keyword = 'web scraping tools'
ORDER BY collected_at DESC, rank ASC;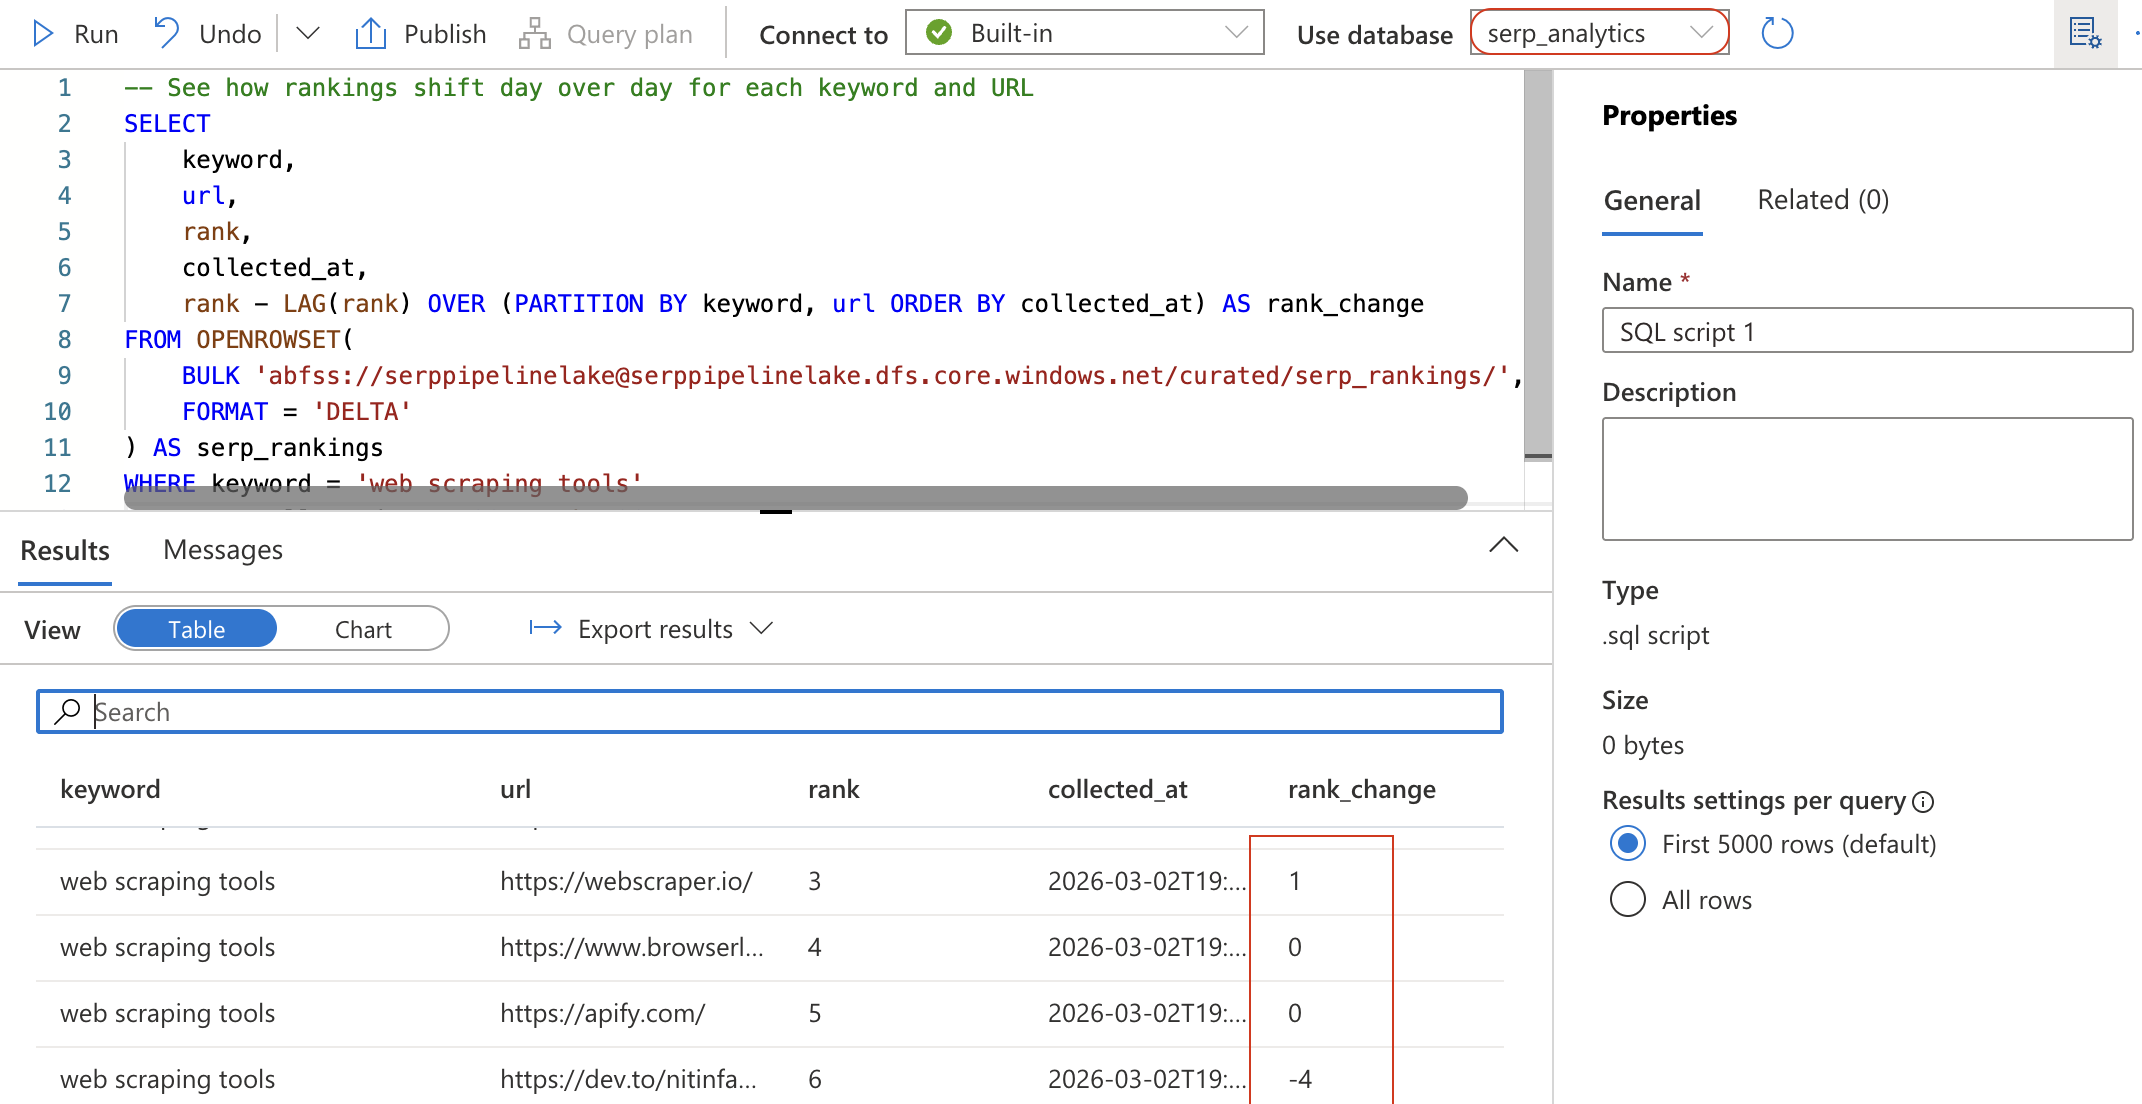
This query uses the LAG window function to calculate how each URL’s position has changed since the previous collection. A negative rank_change means the URL moved up in the rankings.
Create a summary view for Power BI
To make the data easily consumable by Power BI, create a view that summarizes daily rankings per keyword:
CREATE VIEW daily_serp_summary AS
SELECT
    keyword,
    CAST(collected_at AS DATE) AS report_date,
    COUNT(*) AS total_results,
    AVG(CAST(rank AS FLOAT)) AS avg_rank,
    MIN(rank) AS best_rank
FROM OPENROWSET(
    BULK 'abfss://[email protected]/curated/serp_rankings/',
    FORMAT = 'DELTA'
) AS serp_rankings
GROUP BY keyword, CAST(collected_at AS DATE);
Click Run. This creates a view — a saved query that can be referenced by name. Verify it works by running:
SELECT * FROM daily_serp_summary;You should see one row per keyword per day, with the total number of results, average rank, and best rank.

Step 6: Inspect the Results
After the full pipeline runs, you can inspect every stage from Synapse Studio.
Navigate to Monitor > Pipeline runs and click on the most recent run to inspect it. You will see a visual representation of each step, showing:
- The ForEach activity with each keyword iteration and the Web activity results.
- The Notebook activity with the Spark job execution details.
Expand the ForEach activity to verify that SERP data was successfully retrieved for each keyword. Click into any CallSERPAPI Web activity run to see the request/response details in the Input and Output sections.
Navigate to Data > Linked > your storage account to browse the raw JSON files in the raw/serp/ folder. You should see date-partitioned folders with one JSON file per keyword.
Finally, open the Develop hub, go to your TransformSERPData notebook, and check the Delta table by running:
SELECT * FROM curated.serp_rankings ORDER BY collected_at DESC LIMIT 20;You should see structured rows with keyword, rank, title, URL, snippet, and collection timestamp, clean, analytics-ready data built from raw SERP results. Bright Data’s SERP API handled the hard part: reliably fetching Google search results at scale, bypassing anti-bot measures and rate limiters, and returning structured data ready for your pipeline.
Taking It Further
This example demonstrates a keyword ranking tracker, but you can extend your Synapse pipeline in many directions:
- Replace the SERP API call with Bright Data’s Web Scraper API to collect product pricing, reviews, or job listings, and build competitive price intelligence dashboards.
- Add a second Spark notebook to run sentiment analysis on SERP snippets, scoring each result for positive or negative framing.
- Connect the curated Delta tables to Azure Machine Learning for predictive analytics, such as forecasting ranking changes or identifying emerging search trends.
- Build a hybrid cloud architecture where SERP data lands in Azure Data Lake while sensitive internal data stays on-premises, with Synapse querying both via federated queries.
- Forward the transformed data to an Azure AI Foundry prompt flow for LLM-powered analysis, combining Synapse’s data engineering with AI Foundry’s AI capabilities.
- Integrate with tools like LangChain or CrewAI to build agentic workflows that consume your curated SERP data.
The possibilities are virtually endless!
Conclusion
In this blog post, you learned how to use Bright Data’s SERP API to fetch fresh search results from Google and integrate them into a complete data pipeline in Azure Synapse Analytics.
The pipeline demonstrated here is ideal for anyone who wants to build an automated keyword ranking tracker that continuously collects SERP data, transforms it into analytics-ready tables, and delivers insights via SQL queries and Power BI dashboards. Unlike the Azure AI Foundry approach, which is ideal for AI-first prompt engineering and RAG workflows, Azure Synapse Analytics excels at large-scale data ingestion, transformation, and warehousing for business intelligence and analytics.
To create more advanced data pipelines, explore Bright Data’s full suite of web scraping tools for retrieving, validating, and transforming live web data. For a deeper dive on data pipeline architecture patterns, the Bright Data blog covers the fundamentals.
Sign up for a free Bright Data account today and start experimenting with our AI-ready web data solutions!

Technical Writer
Arindam Majumder is a developer advocate, YouTuber, and technical writer who simplifies LLMs, agent workflows, and AI content for 5,000+ followers.


