







Account research before a customer call often takes ten or fifteen minutes per sales rep. The workflow is mostly manual: a rep leaves Salesforce, opens Google, scans through several tabs, and pastes findings into a notes field. Most of the work is search and synthesis.
Bright Data’s Web Unlocker returns clean Markdown from most public URLs. Wiring it into Salesforce Agentforce lets a rep get account research from a chat prompt, with attributed sources, without leaving Salesforce. Under the hood, the build is one Agentforce subagent, three Apex classes, and a small Cloudflare Worker proxy.
TL;DR
- An Agentforce subagent takes a natural-language prompt from a sales rep, calls Bright Data Web Unlocker, and returns an account briefing with attributed sources, all inside Salesforce chat.
- Apex’s HTTP client fails without warning on chunked-transfer responses above a few kilobytes (verified on API v66.0), so the integration routes through a small Cloudflare Worker that buffers and re-serves with an explicit Content-Length header.
- Agentforce’s Canvas UI hides the
is_user_input: TrueYAML flag required for chat-driven agents to receive prompt-extracted inputs. The fix is in Script mode. - Salesforce’s current External Credential pattern splits into three objects (External Credential, Named Credential, Permission Set), with one easy-to-miss checkbox that returns 401 when skipped.
- Agentforce redacts external URLs from agent responses by default. The agent reads them internally but doesn’t display them unless the domain is on the Trusted URLs allowlist.
- Total footprint is about 6 KB of Apex, one Cloudflare Worker, three Salesforce credential objects, and one subagent. Every code block was tested in a live Salesforce Developer Edition org.
Before you start
You’ll need four accounts and tools, all free for this tutorial:
- A Bright Data account with at least one Web Unlocker zone provisioned. New accounts include a free tier of 5,000 requests per month with no credit card, and the tutorial’s request volume fits comfortably within it.
- A Cloudflare account for the Worker proxy. No credit card is required for the free tier; you’ll pick a
workers.devsubdomain on first use. - An Agentforce-enabled Salesforce Developer Edition org. Recent Developer Edition orgs ship with Agentforce, Data Cloud, and the Agentforce Studio pre-enabled. Verify the Agentforce Studio app appears in your App Launcher before continuing past Part 5; if it doesn’t, you have a non-Agentforce org and the later parts won’t work.
- A way to send a test HTTP request. Part 2 includes a
curlcommand to verify the Worker. macOS, Linux, and Windows 11 ship withcurl. If you’d rather use a GUI, Postman or Insomnia work with the same headers and body. If you don’t have any of those and don’t want to install one, you can skip the standalone Worker test and validate end-to-end from Salesforce in Part 3 instead. - System Administrator profile (or one with Author Apex, Modify All Data, and Customize Application). A fresh Developer Edition org gives you this automatically. If you’re working in a company sandbox with a locked-down profile, switch to a fresh Developer Edition org instead.
What you’ll build
You’ll build an Agentforce agent called Account Briefing Agent. A rep types a natural-language question. The agent routes the prompt to a custom subagent, picks the right tools, calls Bright Data through a thin Cloudflare Worker proxy, synthesizes an account briefing with attributed sources, and posts the briefing into the chat. The architecture has five pieces:
- Bright Data Web Unlocker as the web-data primitive. It’s a single endpoint that takes most URLs and returns clean Markdown.
- Cloudflare Worker as the proxy between Salesforce and Bright Data. The free tier covers a small team.
- Salesforce External Credential + Named Credential + Permission Set as the auth layer.
- Apex with three classes: one shared service, plus two wrappers using
@InvocableMethod(the annotation that makes them callable from Agentforce, one per Agent Action). - Agentforce subagent with two attached actions, an instruction block, and a classification description.
Architecture overview
Here’s the request flow from a rep’s prompt to a briefing:
Rep prompt in Agentforce
        │
        ▼
Agent Router  ──►  Account Web Intelligence subagent
                          │
                          ├─► Apex: BrightDataNewsAction
                          │     └─► Named Credential → Cloudflare Worker → Web Unlocker → Google News
                          │
                          └─► Apex: BrightDataFetchAction
                                └─► Named Credential → Cloudflare Worker → Web Unlocker → target URL
        │
        ▼
LLM synthesis  ──►  Briefing back to the rep
The Cloudflare Worker exists because Salesforce Apex can’t reliably consume HTTP/1.1 chunked-transfer responses, and Bright Data uses chunked encoding for any payload above a few kilobytes. The Worker buffers the response into a single ArrayBuffer and re-serves it with an explicit Content-Length header. Without it, every call from Apex returns a 200 status and a zero-byte body. Part 2 below walks through the debug and fix.
Bright Data has several products that fit this kind of build: SERP API for parsed Google results, dedicated scrapers for LinkedIn and Crunchbase, and others. This build uses only Web Unlocker because it works through the same endpoint for any URL, which keeps the Apex side simple. The Cloudflare Worker proxy in Part 2 covers every Bright Data API endpoint equally, so swapping in SERP API or a dedicated scraper later doesn’t change the Salesforce-side wiring.
Part 1: Set up Bright Data
If you don’t have a Bright Data account, create one on the Bright Data signup page. The Web Unlocker zone you’ll use is in the Web Access API section of the dashboard.
Create or note the Web Unlocker zone
Open the dashboard, go to Web Access API in the left navigation, and confirm a Web Unlocker zone exists. If your account doesn’t have one, click Create API (top right) and choose Unlocker API from the dropdown. Give it any name (zone names can’t be changed after creation, so pick something stable like agentforce_unlocker). Whatever you call it, write it down. You’ll plug it into the UNLOCKER_ZONE constant in BrightDataService.cls in Part 4, and into the curl test in Part 2.
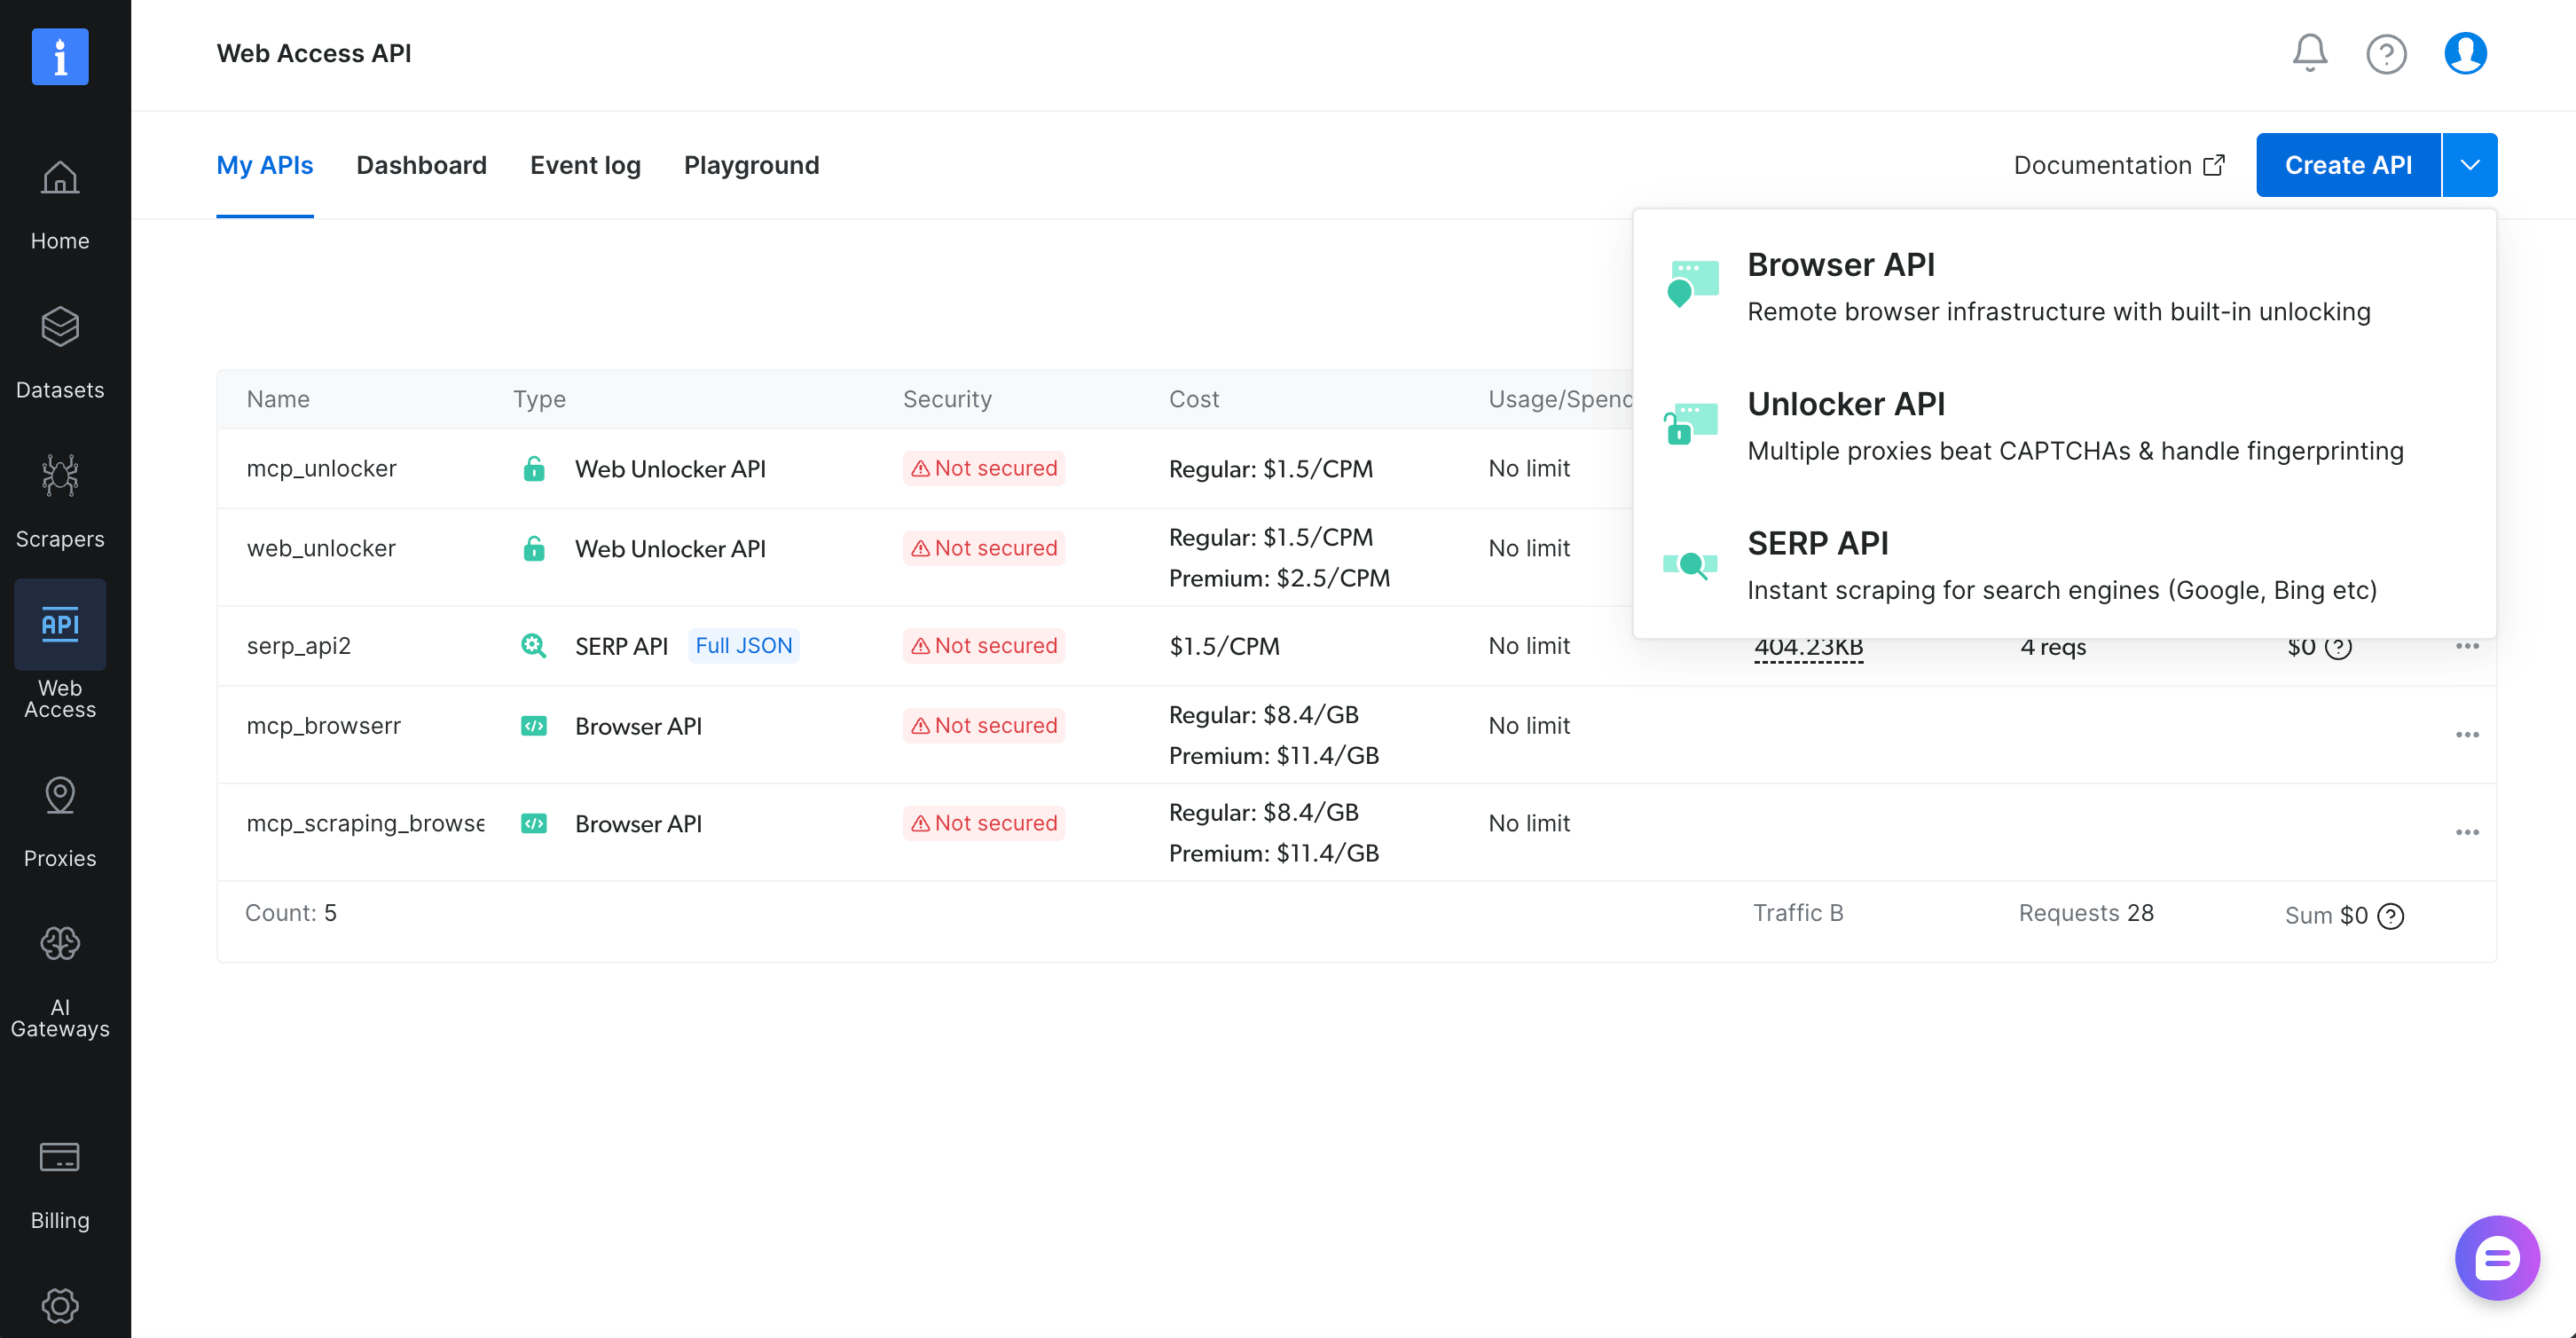
The Web Unlocker zone is the primitive both Agentforce actions use.
Create an API token
Click Settings (bottom left) → Users and API keys tab → Add API key with User permission. The key is shown once when generated, then masked. Copy it now and store it somewhere safe; you’ll paste it into Salesforce in Part 3.
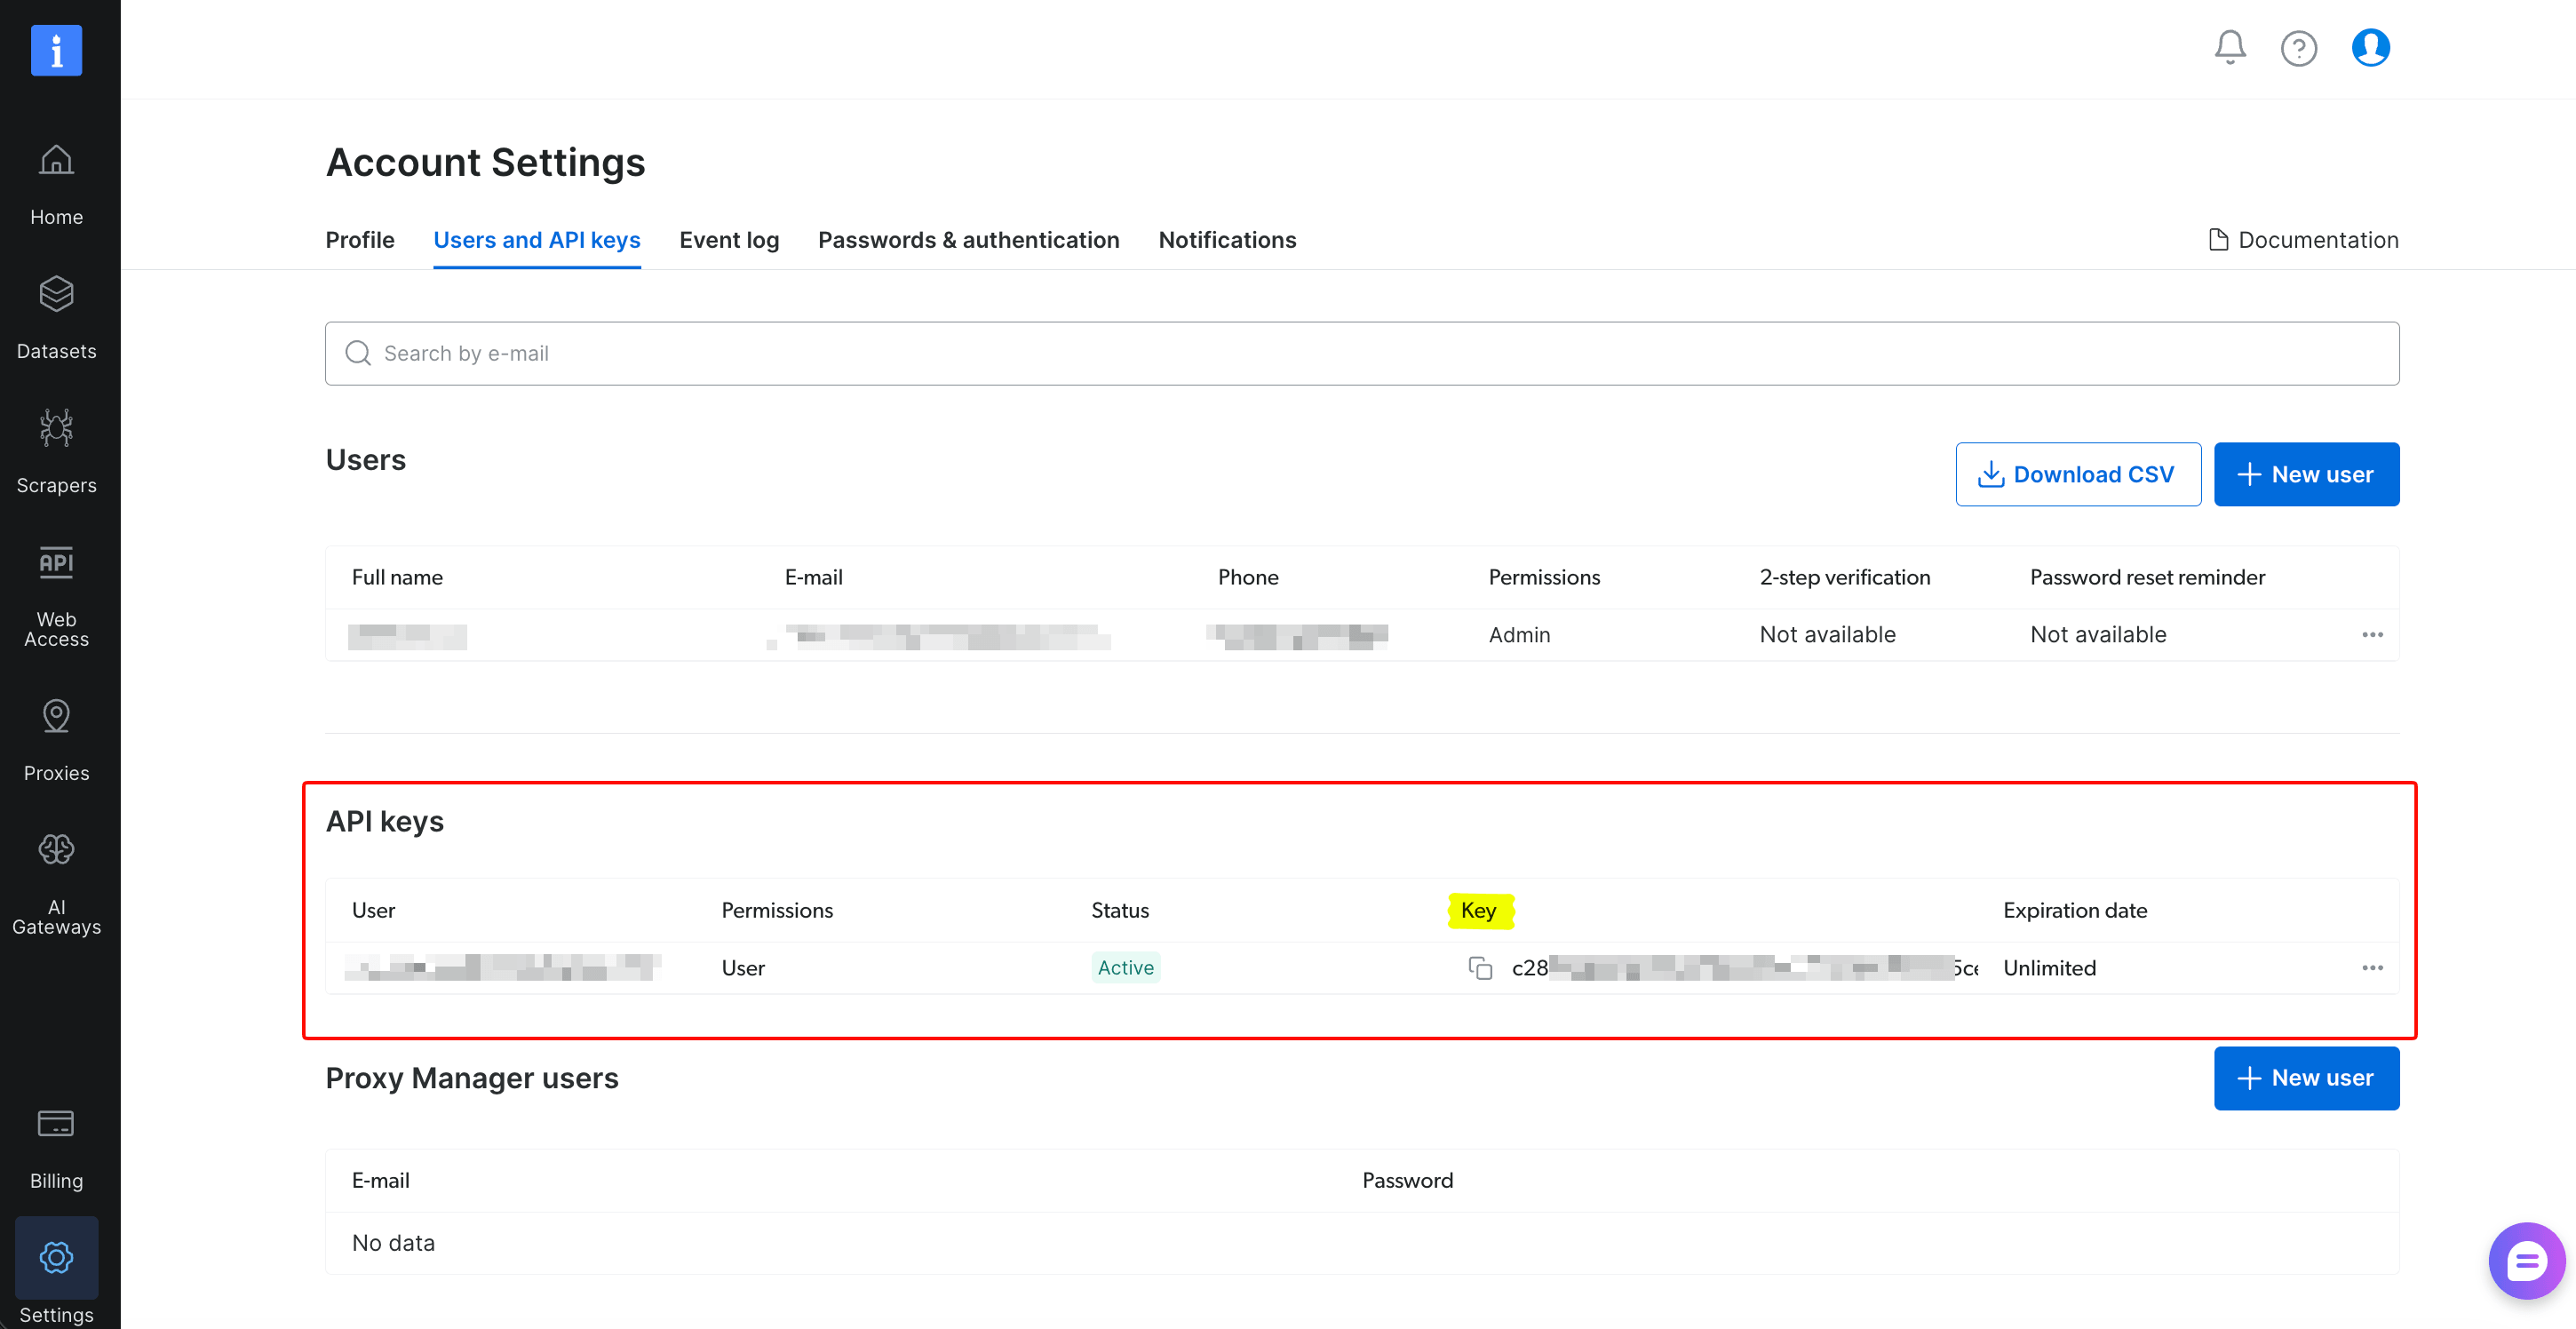
That’s the full Bright Data setup.
Part 2: Deploy the Cloudflare Worker proxy
Before configuring Salesforce, you need a proxy in front of Bright Data. The reason is a limitation in how Salesforce Apex reads chunked-transfer responses; any Apex developer making non-trivial HTTP callouts is likely to encounter it.
The bug
Salesforce Apex’s Http client supports standard HTTP, with one practical gap: it doesn’t reliably parse HTTP/1.1 responses that use chunked transfer encoding with no Content-Length header. On a chunked response, the callout returns Status Code = 200, Content-Type = null, Response Size = 0 bytes, with no exception or warning. Both getBody() and getBodyAsBlob().toString() return empty strings.
Bright Data’s /request endpoint uses chunked transfer encoding for responses above a few kilobytes. A Web Unlocker call on a tiny test page (the Bright Data welcome.txt) stays below the threshold and returns a content-length response, which Apex parses cleanly. But a real page (a company homepage, a Google News search) trips the threshold and chunks, and Apex returns an empty body.
Two things prove this is Apex-side, not network-side: a curl call to the same endpoint with the same payload returns a 9 KB body cleanly, and the same call from Apex anonymous execution returns 0 bytes with Transfer-Encoding: chunked in the response headers.
The fix is structural, not a configuration change: put a buffering proxy between Salesforce and Bright Data. The proxy reads Bright Data’s chunked stream fully, then re-serves the response to Salesforce with an explicit Content-Length header. Apex parses that response cleanly.
A Cloudflare Worker is a good fit for hosting this proxy. It’s free for low volume, deploys in minutes, runs at the edge, and the entire body fits in one screen of JavaScript.
Create the Worker
Sign up at the Cloudflare dashboard if you don’t have an account. In the dashboard, find Workers (it appears under Compute → Workers & Pages depending on your dashboard version). Click Create application, then pick Hello World from the templates. On first use, Cloudflare prompts you to choose a workers.dev subdomain; pick anything (it’s your free dev subdomain). Name the Worker something easy to remember; this build uses bd-proxy. After the placeholder deploys, click Edit code.
Select all the placeholder code in the editor and paste this in its place:
/**
 * Bright Data to Salesforce Apex proxy.
 *
 * Salesforce Apex does not reliably consume HTTP/1.1 chunked-transfer
 * responses, which is what Bright Data returns for any non-trivial payload.
 * This Worker buffers the full response and re-serves it with an explicit
 * Content-Length header. Apex parses that response cleanly.
 *
 * Production deployments typically route external API calls through an
 * integration layer like MuleSoft or Heroku. This Worker is the minimal
 * stand-in for that role.
 */

export default {
  async fetch(request) {
    const url = new URL(request.url);
    const bdUrl = 'https://api.brightdata.com' + url.pathname + url.search;

    // Strip Cloudflare-injected headers we shouldn't forward upstream.
    const forwardHeaders = new Headers(request.headers);
    forwardHeaders.delete('host');
    forwardHeaders.delete('cf-connecting-ip');
    forwardHeaders.delete('cf-ray');
    forwardHeaders.delete('cf-visitor');
    forwardHeaders.delete('x-forwarded-for');
    forwardHeaders.delete('x-forwarded-proto');
    forwardHeaders.delete('x-real-ip');

    try {
      const bdResponse = await fetch(bdUrl, {
        method: request.method,
        headers: forwardHeaders,
        body: ['GET', 'HEAD'].includes(request.method)
          ? undefined
          : await request.arrayBuffer(),
      });

      // Buffer the entire response into a single ArrayBuffer. This collapses
      // chunked transfer into a buffer of known length.
      const bodyBuffer = await bdResponse.arrayBuffer();

      const responseHeaders = new Headers();
      const ct = bdResponse.headers.get('Content-Type');
      if (ct) responseHeaders.set('Content-Type', ct);
      responseHeaders.set('Content-Length', bodyBuffer.byteLength.toString());
      const brdStatus = bdResponse.headers.get('x-brd-status-code');
      if (brdStatus) responseHeaders.set('X-Brd-Status-Code', brdStatus);

      return new Response(bodyBuffer, {
        status: bdResponse.status,
        headers: responseHeaders,
      });
    } catch (err) {
      return new Response(
        JSON.stringify({ error: 'Proxy error', message: err.message }),
        { status: 502, headers: { 'Content-Type': 'application/json' } }
      );
    }
  },
};
The two lines that fix the integration are await bdResponse.arrayBuffer() (which reads the whole chunked stream into memory) and the explicit Content-Length header set from bodyBuffer.byteLength (Apex parses the body cleanly from that). Everything else handles header forwarding: it strips Cloudflare-injected headers for incoming requests and preserves the upstream status code for outgoing responses.
Click Deploy (top right). Cloudflare gives you a URL like https://<worker-name>.<your-subdomain>.workers.dev. Copy it; you’ll need this URL for Salesforce in Part 3.
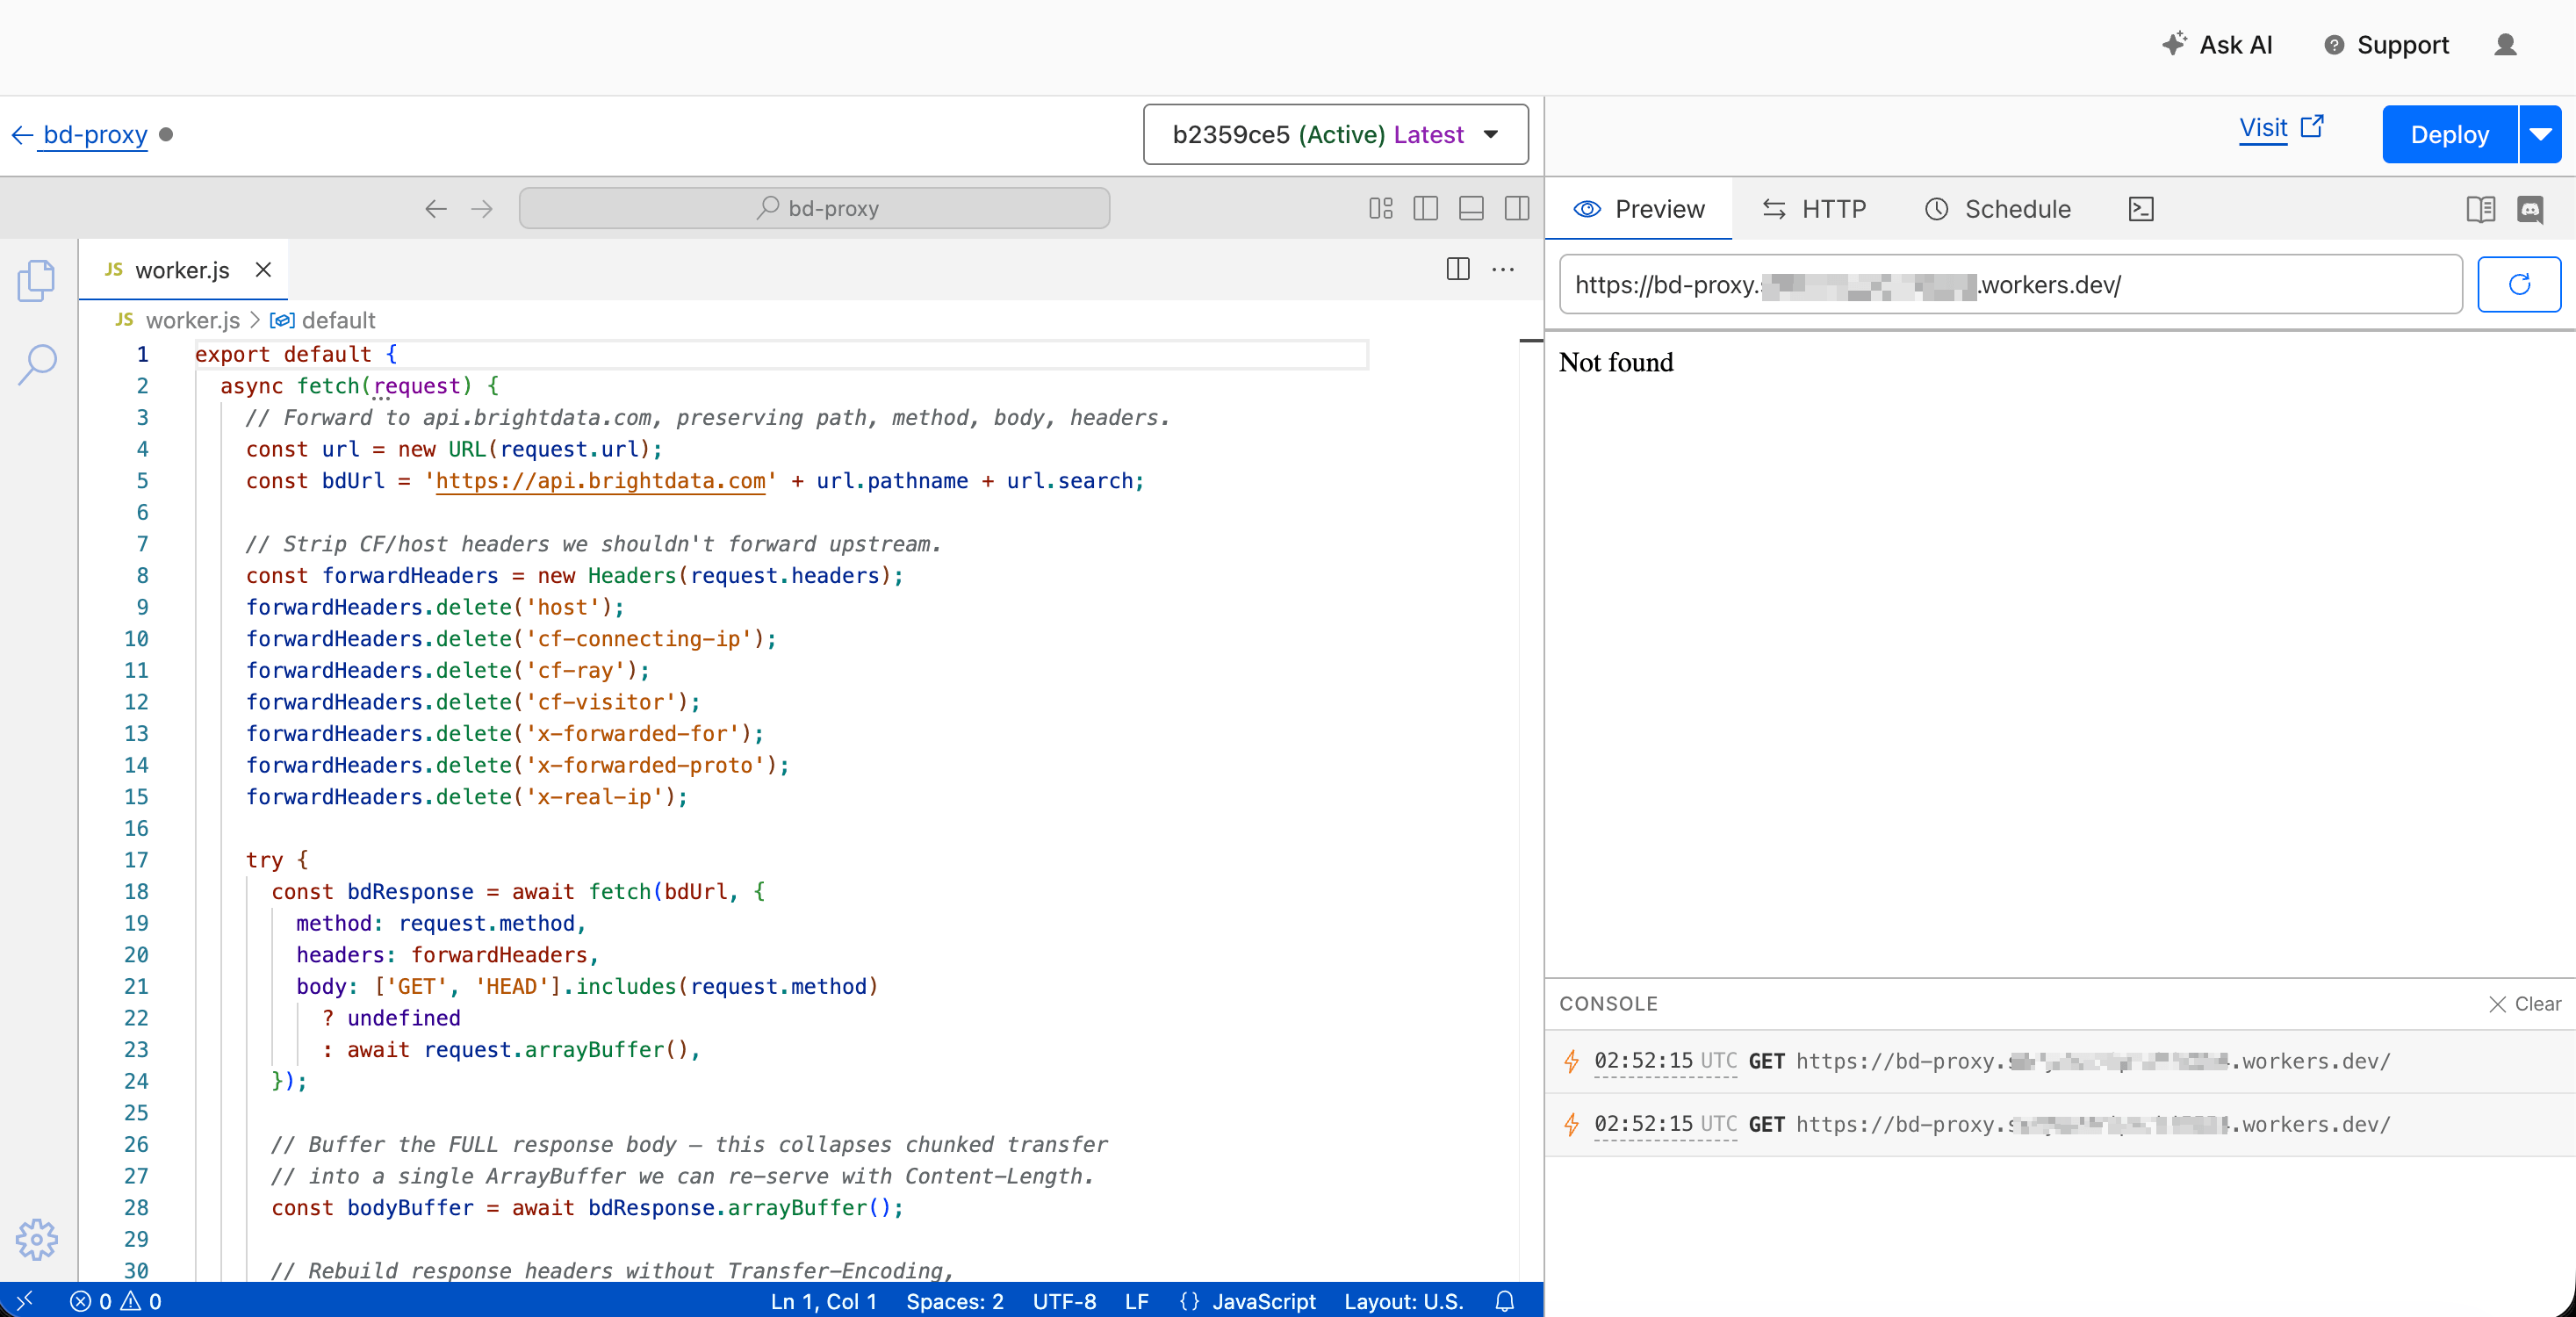
The lines that matter: await bdResponse.arrayBuffer() reads the entire chunked stream into memory, and the explicit Content-Length header on the response object means Apex can parse the body cleanly.
Verify the Worker works
From your local terminal, run a quick test against the Worker. Replace the URL with yours, and use your own Bright Data API token:
curl -i https://<your-worker>.workers.dev/request \
  -H "Content-Type: application/json" \
  -H "Authorization: Bearer <your-bd-token>" \
  -d '{"zone":"mcp_unlocker","url":"https://www.salesforce.com","format":"raw","data_format":"markdown"}' \
  | head -20
The response headers should include a 200 status and a content-length: <some-number> header. They should not include transfer-encoding: chunked. That’s the proof the proxy is working correctly. Here are the common failures: 401 means your Bright Data token is wrong (re-check the Authorization: Bearer ... header); 502 from the Worker means your Worker code didn’t deploy (re-check the Deploy step); a transfer-encoding: chunked header still appearing means you missed the arrayBuffer() + Content-Length lines in the Worker source.
In an enterprise rollout, this Worker would be replaced by a production-grade integration tier: MuleSoft running on Anypoint, a Heroku microservice, or a custom API gateway with auth, observability, and rate limiting. The Worker is a minimal substitute for that role, but the same pattern works in those production setups.
Part 3: Configure Salesforce credentials
Salesforce’s External Credential pattern splits a third-party credential into three objects: an External Credential (holds the token), a Named Credential (holds the endpoint), and a Permission Set (grants users access to the External Credential’s principal).
Create the External Credential
Click the gear icon (top right of any Salesforce page) → Setup. In Setup, use the Quick Find box at the top of the left rail and search Named Credentials. Click the result. On the page that loads, click the External Credentials tab, then New.
Fill in the following fields:
- Label:
Bright Data Cred - Name:
Bright_Data_Cred(auto-fills) - Authentication Protocol:
Custom
Click Save.
On the detail page, find the Principals section and click New:
- Parameter Name:
BrightDataPrincipal - Sequence Number:
1 - Identity Type:
Named Principal
In the Authentication Parameters section under the principal, add:
- Name:
api_key - Value: paste your Bright Data API token
Click Save.
Back on the External Credential page, find the Custom Headers section and click New:
- Name:
Authorization - Value:
Bearer {!$Credential.Bright_Data_Cred.api_key} - Sequence Number:
1
⚠️ The merge field has to match the names you set.
Bright_Data_Credin the formula must match the External Credential’s API Name.api_keymust match the Authentication Parameter name you set in the Principal. If you renamed either, edit the formula to match.
This is critical: check the Allow Formulas in HTTP Header checkbox on this custom header. To find it: after saving the header row, click the row to open its detail view. The checkbox is on that detail page, not on the parent External Credential page. If you skip it, Salesforce sends the literal string Bearer {!$Credential...} to Bright Data, which returns 401, and the error message doesn’t tell you which checkbox you missed. Click Save.
⚠️ You’ll encounter a checkbox with the same name in the next section. “Allow Formulas in HTTP Header” appears in two places. Checkbox A is the one you just checked (on the Custom Header’s detail page). Checkbox B is on the Named Credential’s Callout Options. Both must be checked. If only one is checked, the merge field is sent as literal text and Bright Data returns 401.
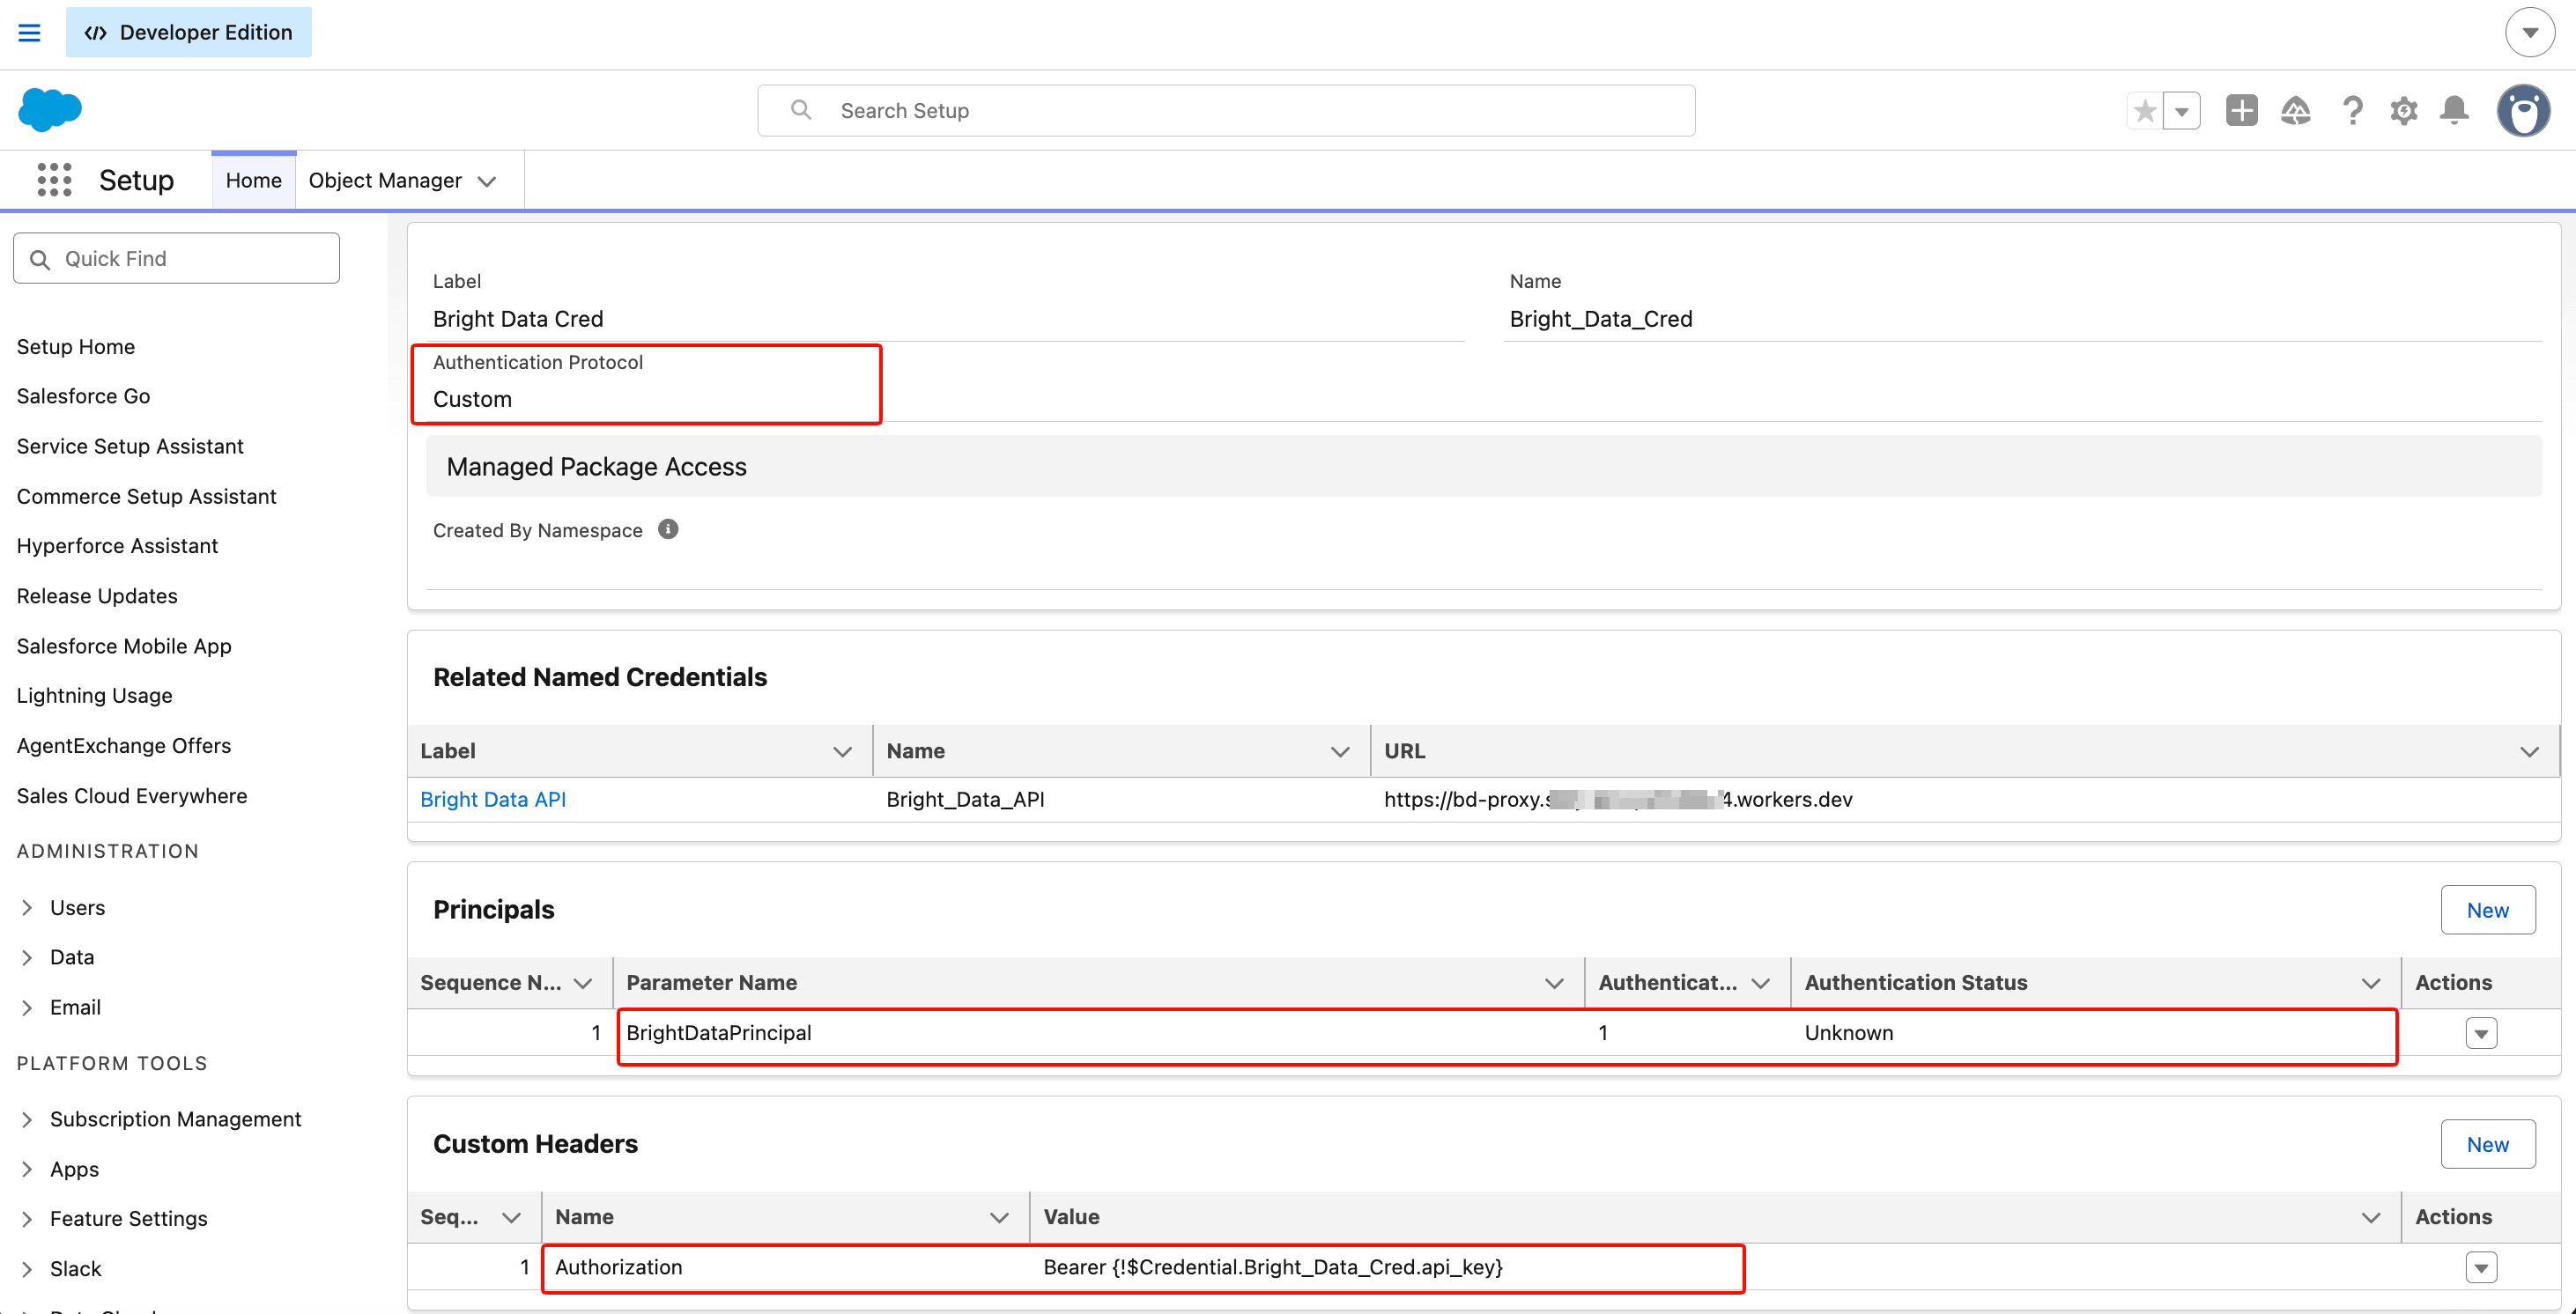
The Custom Header’s merge-field value is the part that resolves the API token at request time. The Allow Formulas in HTTP Header checkbox (not visible at this depth; it’s on the header’s detail page) has to be checked or the merge field is sent as literal text.
Create the Named Credential
In the same Named Credentials section, switch back to the Named Credentials tab and click New:
- Label:
Bright Data API - Name:
Bright_Data_API - URL: paste your Cloudflare Worker URL (for example
https://bd-proxy.<your-subdomain>.workers.dev) - Enabled for Callouts: checked
- External Credential: select
Bright Data Cred
Under Callout Options, set these:
- Generate Authorization Header: unchecked (you’re supplying your own via the Custom Header)
- Allow Formulas in HTTP Header: checked (so the merge field resolves)
- Allow Formulas in HTTP Body: checked (so dynamic JSON bodies work)
Click Save.
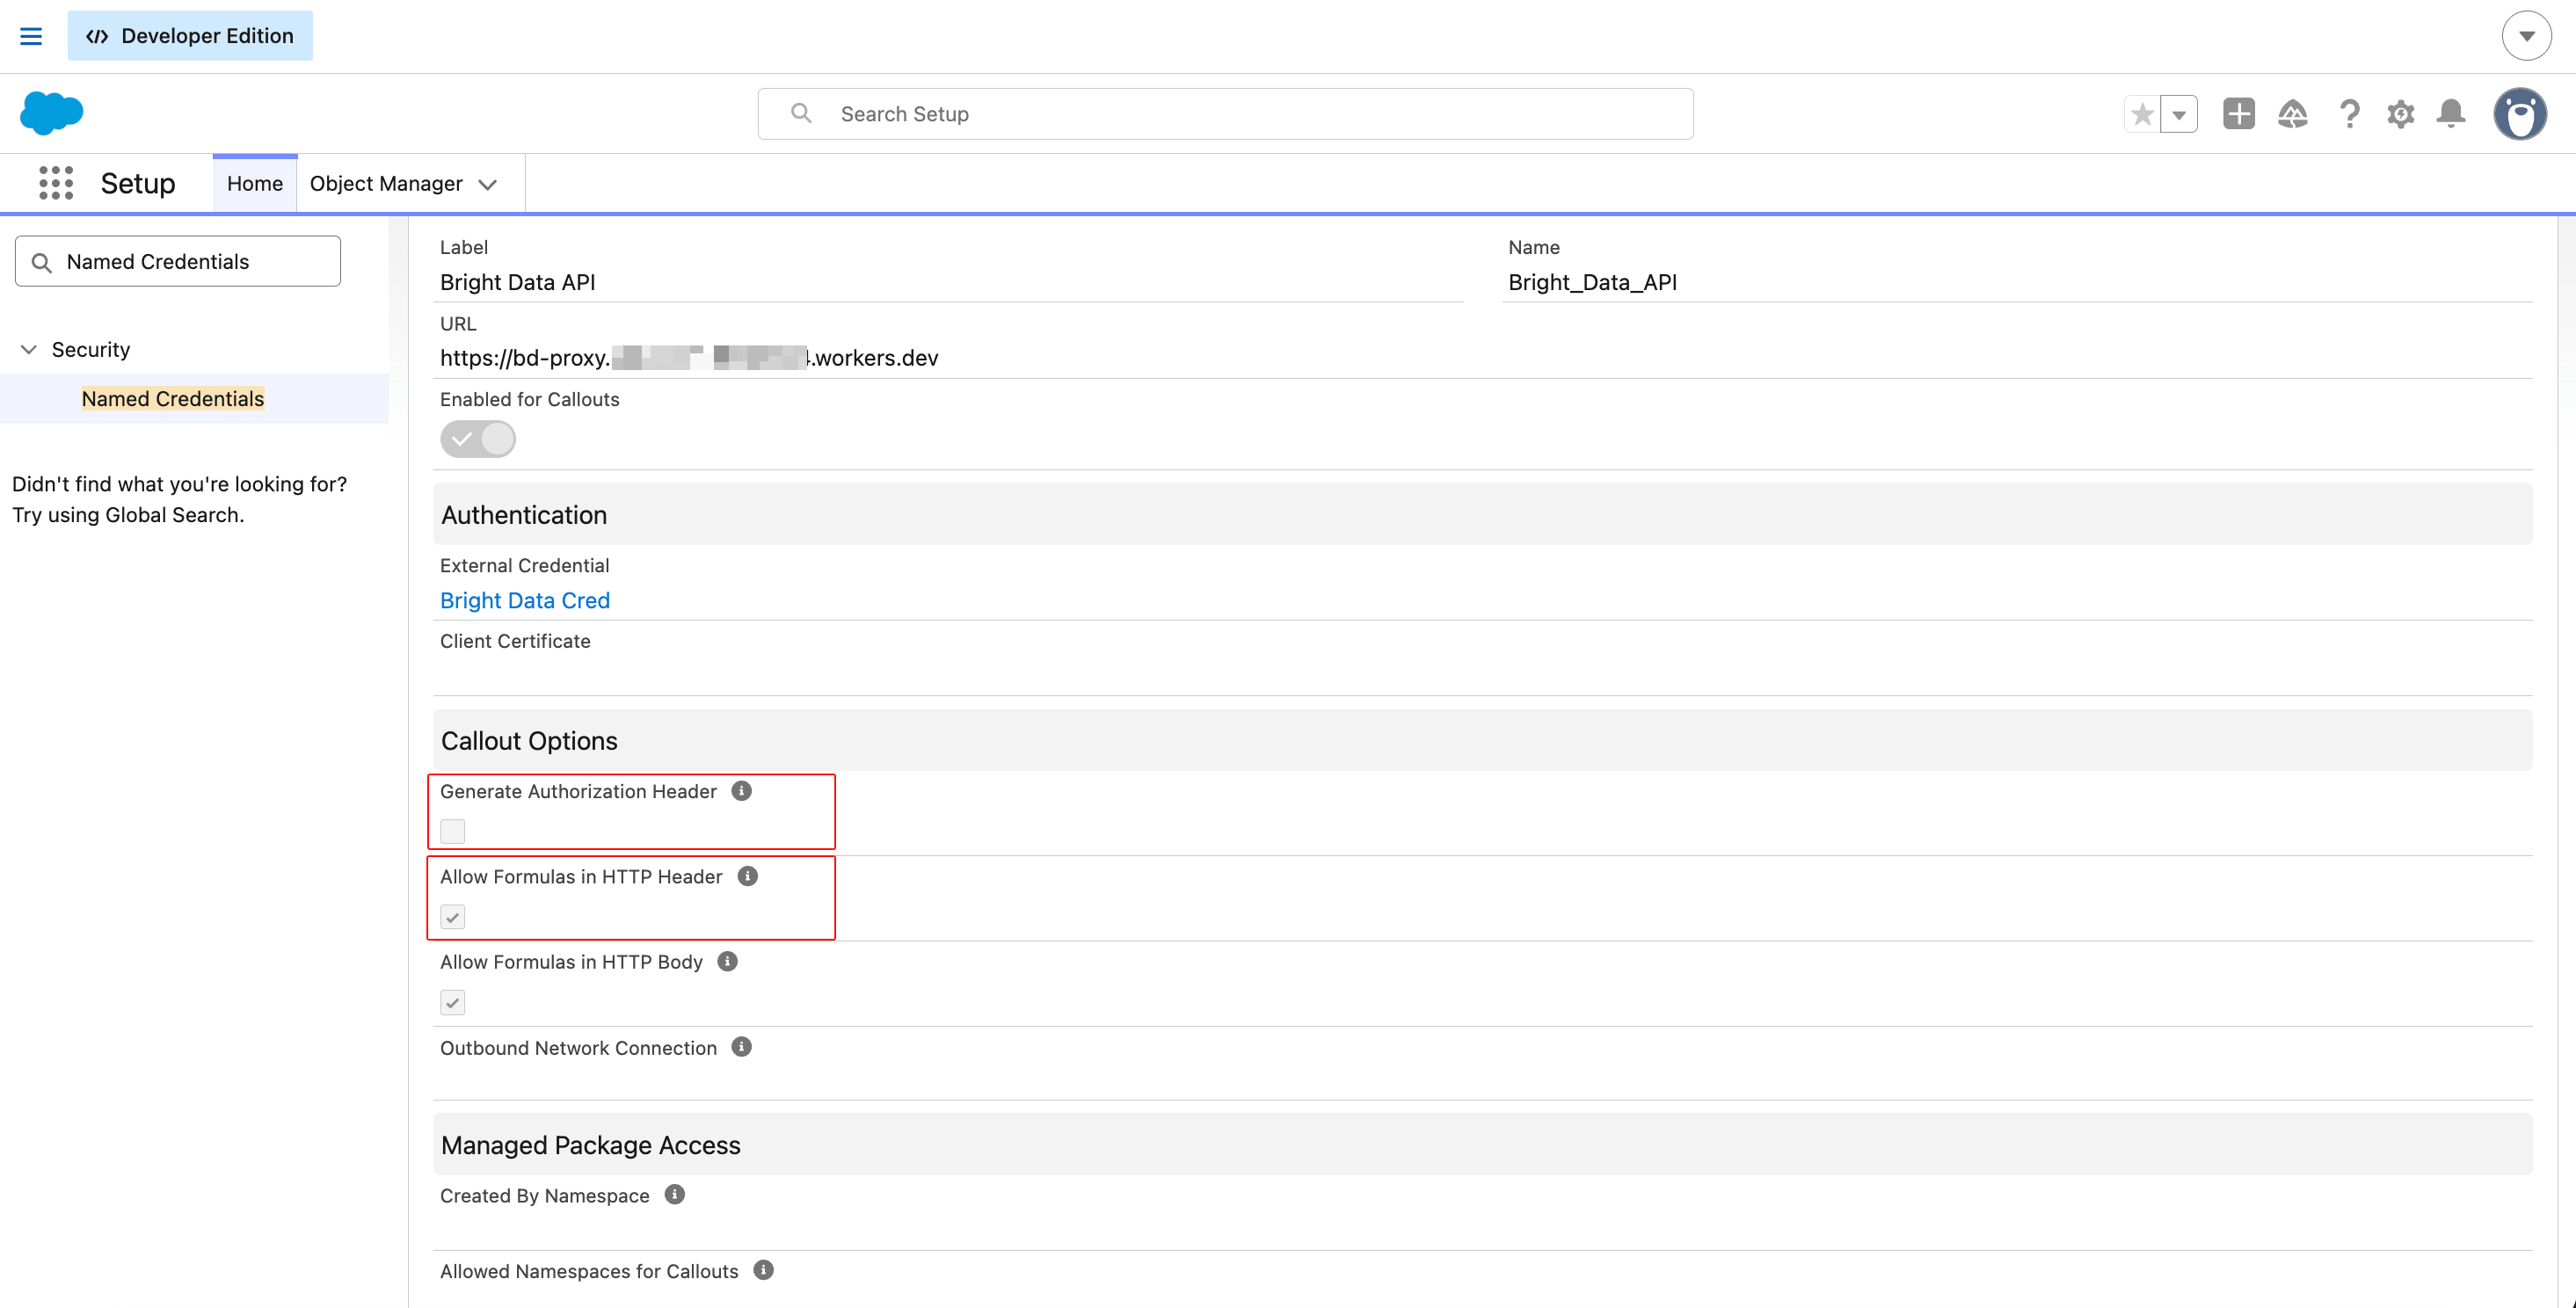
The URL points to the Cloudflare Worker, not to api.brightdata.com directly. That’s how the chunked-transfer fix works. The three checkbox states matter independently; getting any one wrong breaks the callout without warning.
Create the Permission Set
Salesforce blocks even System Administrators from using an External Credential’s principal until a Permission Set explicitly grants access. If you skip this step, Apex returns an INVALID_OPERATION error with no useful diagnostic.
In Setup, search Permission Sets and click New:
- Label:
Bright Data Access - API Name:
Bright_Data_Access - License: leave blank
Click Save.
On the detail page, scroll to External Credential Principal Access and click Edit. Move Bright_Data_Cred - BrightDataPrincipal from the Available list to the Enabled list. Click Save.
Back on the detail page, click Manage Assignments at the top, then Add Assignments, select your own user, and complete the assignment.
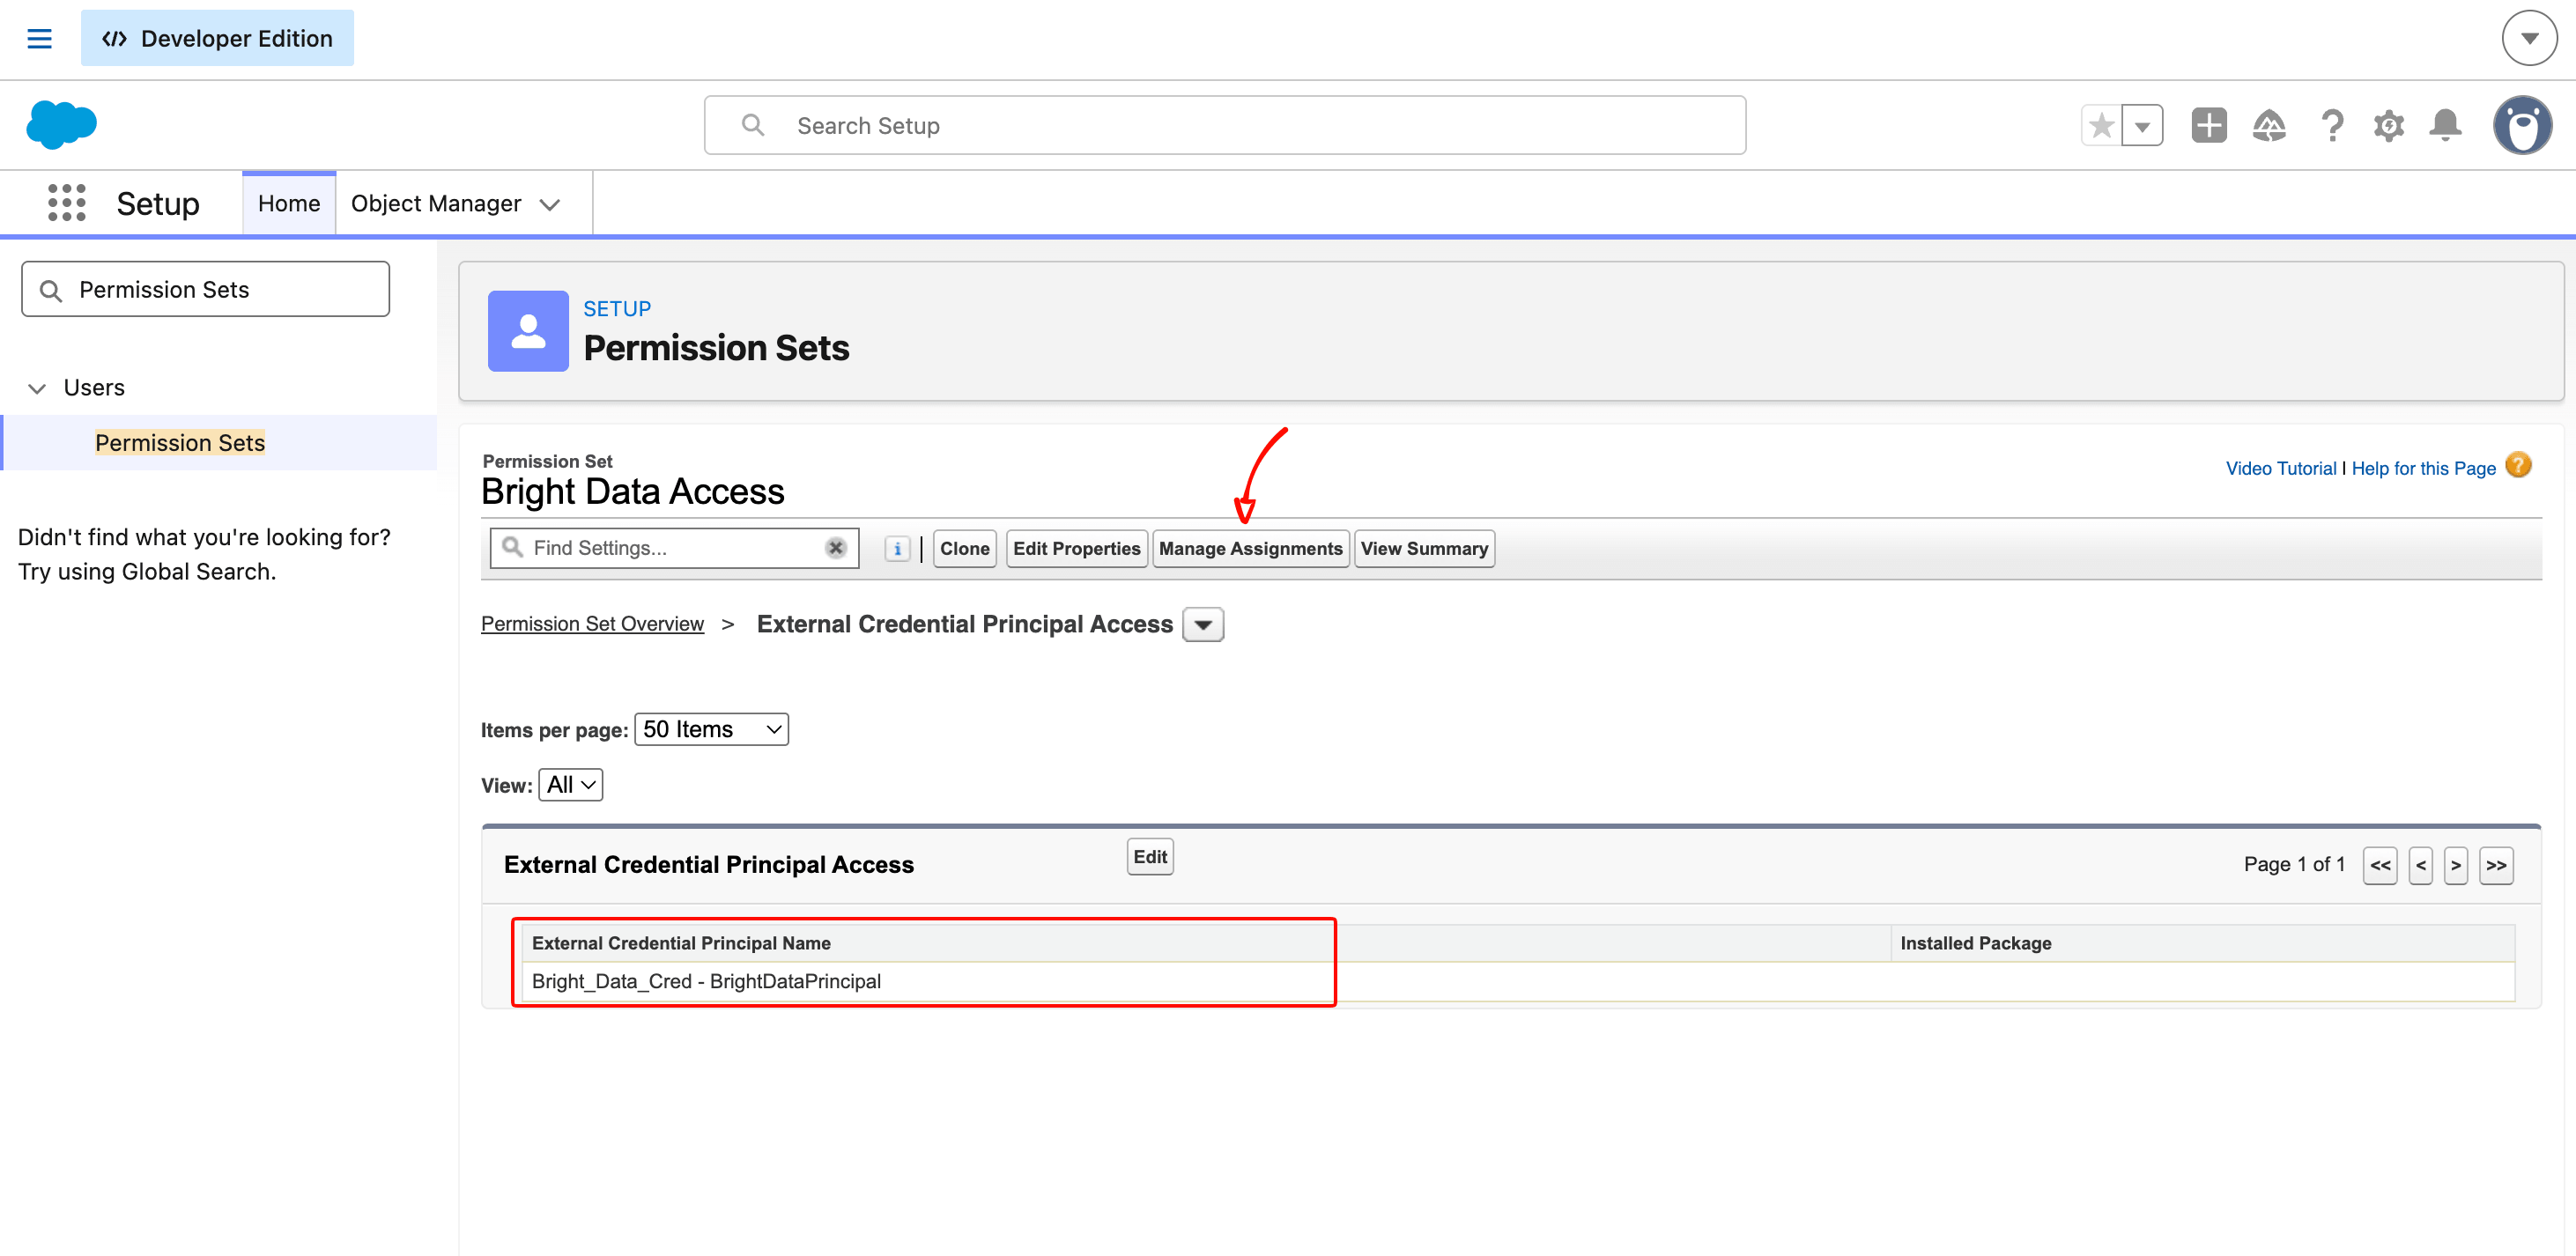
The Permission Set is the gating mechanism that lets you scope which users can run code that calls Bright Data. In an enterprise org, this would be assigned via a Permission Set Group to service users or specific profiles, not to individual admins.
Verify the wiring before going further
Click the gear icon (top right) → Developer Console. It opens in a new browser window. Once that window is focused, open Anonymous Apex via Debug → Open Execute Anonymous Window. Paste the code below, then click Execute:
HttpRequest req = new HttpRequest();
req.setEndpoint('callout:Bright_Data_API/request');
req.setMethod('POST');
req.setHeader('Content-Type', 'application/json');
req.setBody('{"zone":"mcp_unlocker","url":"https://geo.brdtest.com/welcome.txt?product=unlocker&method=api","format":"raw"}');
req.setTimeout(60000);
HttpResponse res = new Http().send(req);
System.debug('STATUS: ' + res.getStatusCode());
System.debug('BODY: ' + res.getBody().left(500));
After clicking Execute, a new log row appears in the bottom panel of the Developer Console. Double-click that row to open the log viewer, then check Debug Only at the bottom (or type USER_DEBUG in the filter box). You should see two lines printing your STATUS and BODY values. Look for STATUS: 200 and a body containing the Bright Data welcome text. If you see 401, re-check the Custom Header’s “Allow Formulas in HTTP Header” checkbox (the one on the header’s detail page, and the one on the Named Credential’s Callout Options). If you see INVALID_OPERATION, re-check the Permission Set assignment.
Part 4: Write the Apex layer
Apex registers only one @InvocableMethod per class as an Agentforce-callable action. That’s why the integration uses three classes instead of one: a shared service for HTTP plumbing, and one class per Agent Action.
Paste each block as-is. The main line you might want to change is private static final String UNLOCKER_ZONE = 'mcp_unlocker'; in BrightDataService.cls if your Bright Data zone has a different name (Part 1).
In Setup, search Apex Classes in Quick Find and click the result. Click New. The editor opens with a placeholder class like public class YourClassName {}. Click on the code area (the large text box, not the right-hand Version Settings panel), select all the placeholder text, press Delete, then paste the source below. The class name is taken from the source, so you don’t have to complete any other fields. Click Save.
Create the three classes in this order, because BrightDataNewsAction and BrightDataFetchAction both reference BrightDataService. The service has to be saved first:
BrightDataService.cls: the shared HTTP and parsing layer
This class holds the HTTP plumbing and the two helper methods (searchNews and fetchUrlAsMarkdown) that both Agent Actions call. No @InvocableMethod is here; that annotation is in the action wrapper classes below. Here’s the class:
public with sharing class BrightDataService {

    private static final String BD_ENDPOINT      = 'callout:Bright_Data_API/request';
    private static final String UNLOCKER_ZONE    = 'mcp_unlocker';
    private static final Integer CALLOUT_TIMEOUT = 60000;
    private static final Integer MAX_RESPONSE_CHARS = 50000;

    /**
     * Fetches the Google News results page for `companyName` (past month) as
     * clean Markdown via Bright Data Web Unlocker. The LLM downstream is
     * responsible for extracting individual articles, sources, and dates.
     */
    public static String searchNews(String companyName) {
        String googleNewsUrl =
            'https://www.google.com/search?q='
            + EncodingUtil.urlEncode(companyName, 'UTF-8')
            + '&tbm=nws&tbs=qdr:m';

        Map<String, Object> body = new Map<String, Object>{
            'zone'        => UNLOCKER_ZONE,
            'url'         => googleNewsUrl,
            'format'      => 'raw',
            'data_format' => 'markdown'
        };

        HttpResponse res = sendRequest(JSON.serialize(body));

        if (res.getStatusCode() != 200) {
            return 'Bright Data returned status '
                + res.getStatusCode() + ': ' + res.getBody().left(300);
        }

        String content = res.getBody();
        if (String.isBlank(content)) {
            return 'No content returned for "' + companyName
                + '". The page may have been empty or blocked.';
        }
        if (content.length() > MAX_RESPONSE_CHARS) {
            content = content.left(MAX_RESPONSE_CHARS)
                + '\n\n[Content truncated at ' + MAX_RESPONSE_CHARS + ' characters]';
        }

        return 'Google News results for "' + companyName
            + '" (past month). Extract article titles, sources, '
            + 'publication dates, and URLs from the Markdown below:\n\n'
            + content;
    }

    /**
     * Fetches any URL via Bright Data Web Unlocker and returns the page as
     * clean Markdown.
     */
    public static String fetchUrlAsMarkdown(String url) {
        Map<String, Object> body = new Map<String, Object>{
            'zone'        => UNLOCKER_ZONE,
            'url'         => url,
            'format'      => 'raw',
            'data_format' => 'markdown'
        };

        HttpResponse res = sendRequest(JSON.serialize(body));

        if (res.getStatusCode() != 200) {
            return 'Web Unlocker returned status '
                + res.getStatusCode() + ': ' + res.getBody().left(300);
        }

        String content = res.getBody();
        if (content.length() > MAX_RESPONSE_CHARS) {
            content = content.left(MAX_RESPONSE_CHARS)
                + '\n\n[Content truncated at ' + MAX_RESPONSE_CHARS + ' characters]';
        }
        return content;
    }

    private static HttpResponse sendRequest(String jsonBody) {
        HttpRequest req = new HttpRequest();
        req.setEndpoint(BD_ENDPOINT);
        req.setMethod('POST');
        req.setHeader('Content-Type', 'application/json');
        req.setBody(jsonBody);
        req.setTimeout(CALLOUT_TIMEOUT);
        return new Http().send(req);
    }
}
The class has no @InvocableMethod, by design. It’s the shared HTTP layer the two action classes use.
BrightDataNewsAction.cls: the news search action
Agentforce calls this thin invocable wrapper when the agent decides to search for news. It validates the input, delegates the HTTP work to BrightDataService.searchNews(), and returns the result in the Response shape Agentforce expects. Here’s the class:
public with sharing class BrightDataNewsAction {

    public class Request {
        @InvocableVariable(
            required=true
            label='Company Name'
            description='The name of the company to search news about. E.g. "Salesforce" or "Acme Corp".')
        public String companyName;
    }

    public class Response {
        @InvocableVariable(
            label='News Results'
            description='Formatted summary of recent news with titles, sources, dates, URLs, and snippets.')
        public String newsResults;
    }

    @InvocableMethod(
        label='Search Recent Company News (Bright Data)'
        description='Searches Google News via Bright Data for recent (past month) articles about a specific named company. Use this whenever the user asks about recent news, announcements, press releases, funding rounds, acquisitions, leadership changes, or current events for a named company.'
        callout=true)
    public static List<Response> searchCompanyNews(List<Request> requests) {
        List<Response> responses = new List<Response>();
        for (Request req : requests) {
            Response resp = new Response();
            try {
                resp.newsResults = String.isBlank(req.companyName)
                    ? 'Error: A company name is required.'
                    : BrightDataService.searchNews(req.companyName);
            } catch (Exception e) {
                resp.newsResults = 'Error fetching news for ' + req.companyName + ': ' + e.getMessage();
            }
            responses.add(resp);
        }
        return responses;
    }
}
Agentforce’s reasoning engine reads the description field on the @InvocableMethod annotation to decide when to call this action.
BrightDataFetchAction.cls: the URL fetch action
The second invocable wrapper follows the same pattern as the news action, but it fetches any URL the rep mentions. The validation block also rejects malformed input before the callout. Here’s the class:
public with sharing class BrightDataFetchAction {

    public class Request {
        @InvocableVariable(
            required=true
            label='URL to Fetch'
            description='The full URL of a web page to retrieve. Must start with http:// or https://.')
        public String url;
    }

    public class Response {
        @InvocableVariable(
            label='Page Content'
            description='Clean Markdown representation of the page content.')
        public String pageContent;
    }

    @InvocableMethod(
        label='Fetch Web Page as Markdown (Bright Data)'
        description='Retrieves the content of any web URL via Bright Data Web Unlocker and returns it as clean Markdown. Use this when you need to read a specific URL: a company homepage, blog post, press release, or any link the user mentions.'
        callout=true)
    public static List<Response> fetchUrlAsMarkdown(List<Request> requests) {
        List<Response> responses = new List<Response>();
        for (Request req : requests) {
            Response resp = new Response();
            try {
                if (String.isBlank(req.url)
                    || (!req.url.startsWithIgnoreCase('http://')
                        && !req.url.startsWithIgnoreCase('https://'))) {
                    resp.pageContent = 'Error: A valid URL starting with http:// or https:// is required.';
                } else {
                    resp.pageContent = BrightDataService.fetchUrlAsMarkdown(req.url);
                }
            } catch (Exception e) {
                resp.pageContent = 'Error fetching ' + req.url + ': ' + e.getMessage();
            }
            responses.add(resp);
        }
        return responses;
    }
}
After saving all three, Setup → Apex Classes should show them as Active.
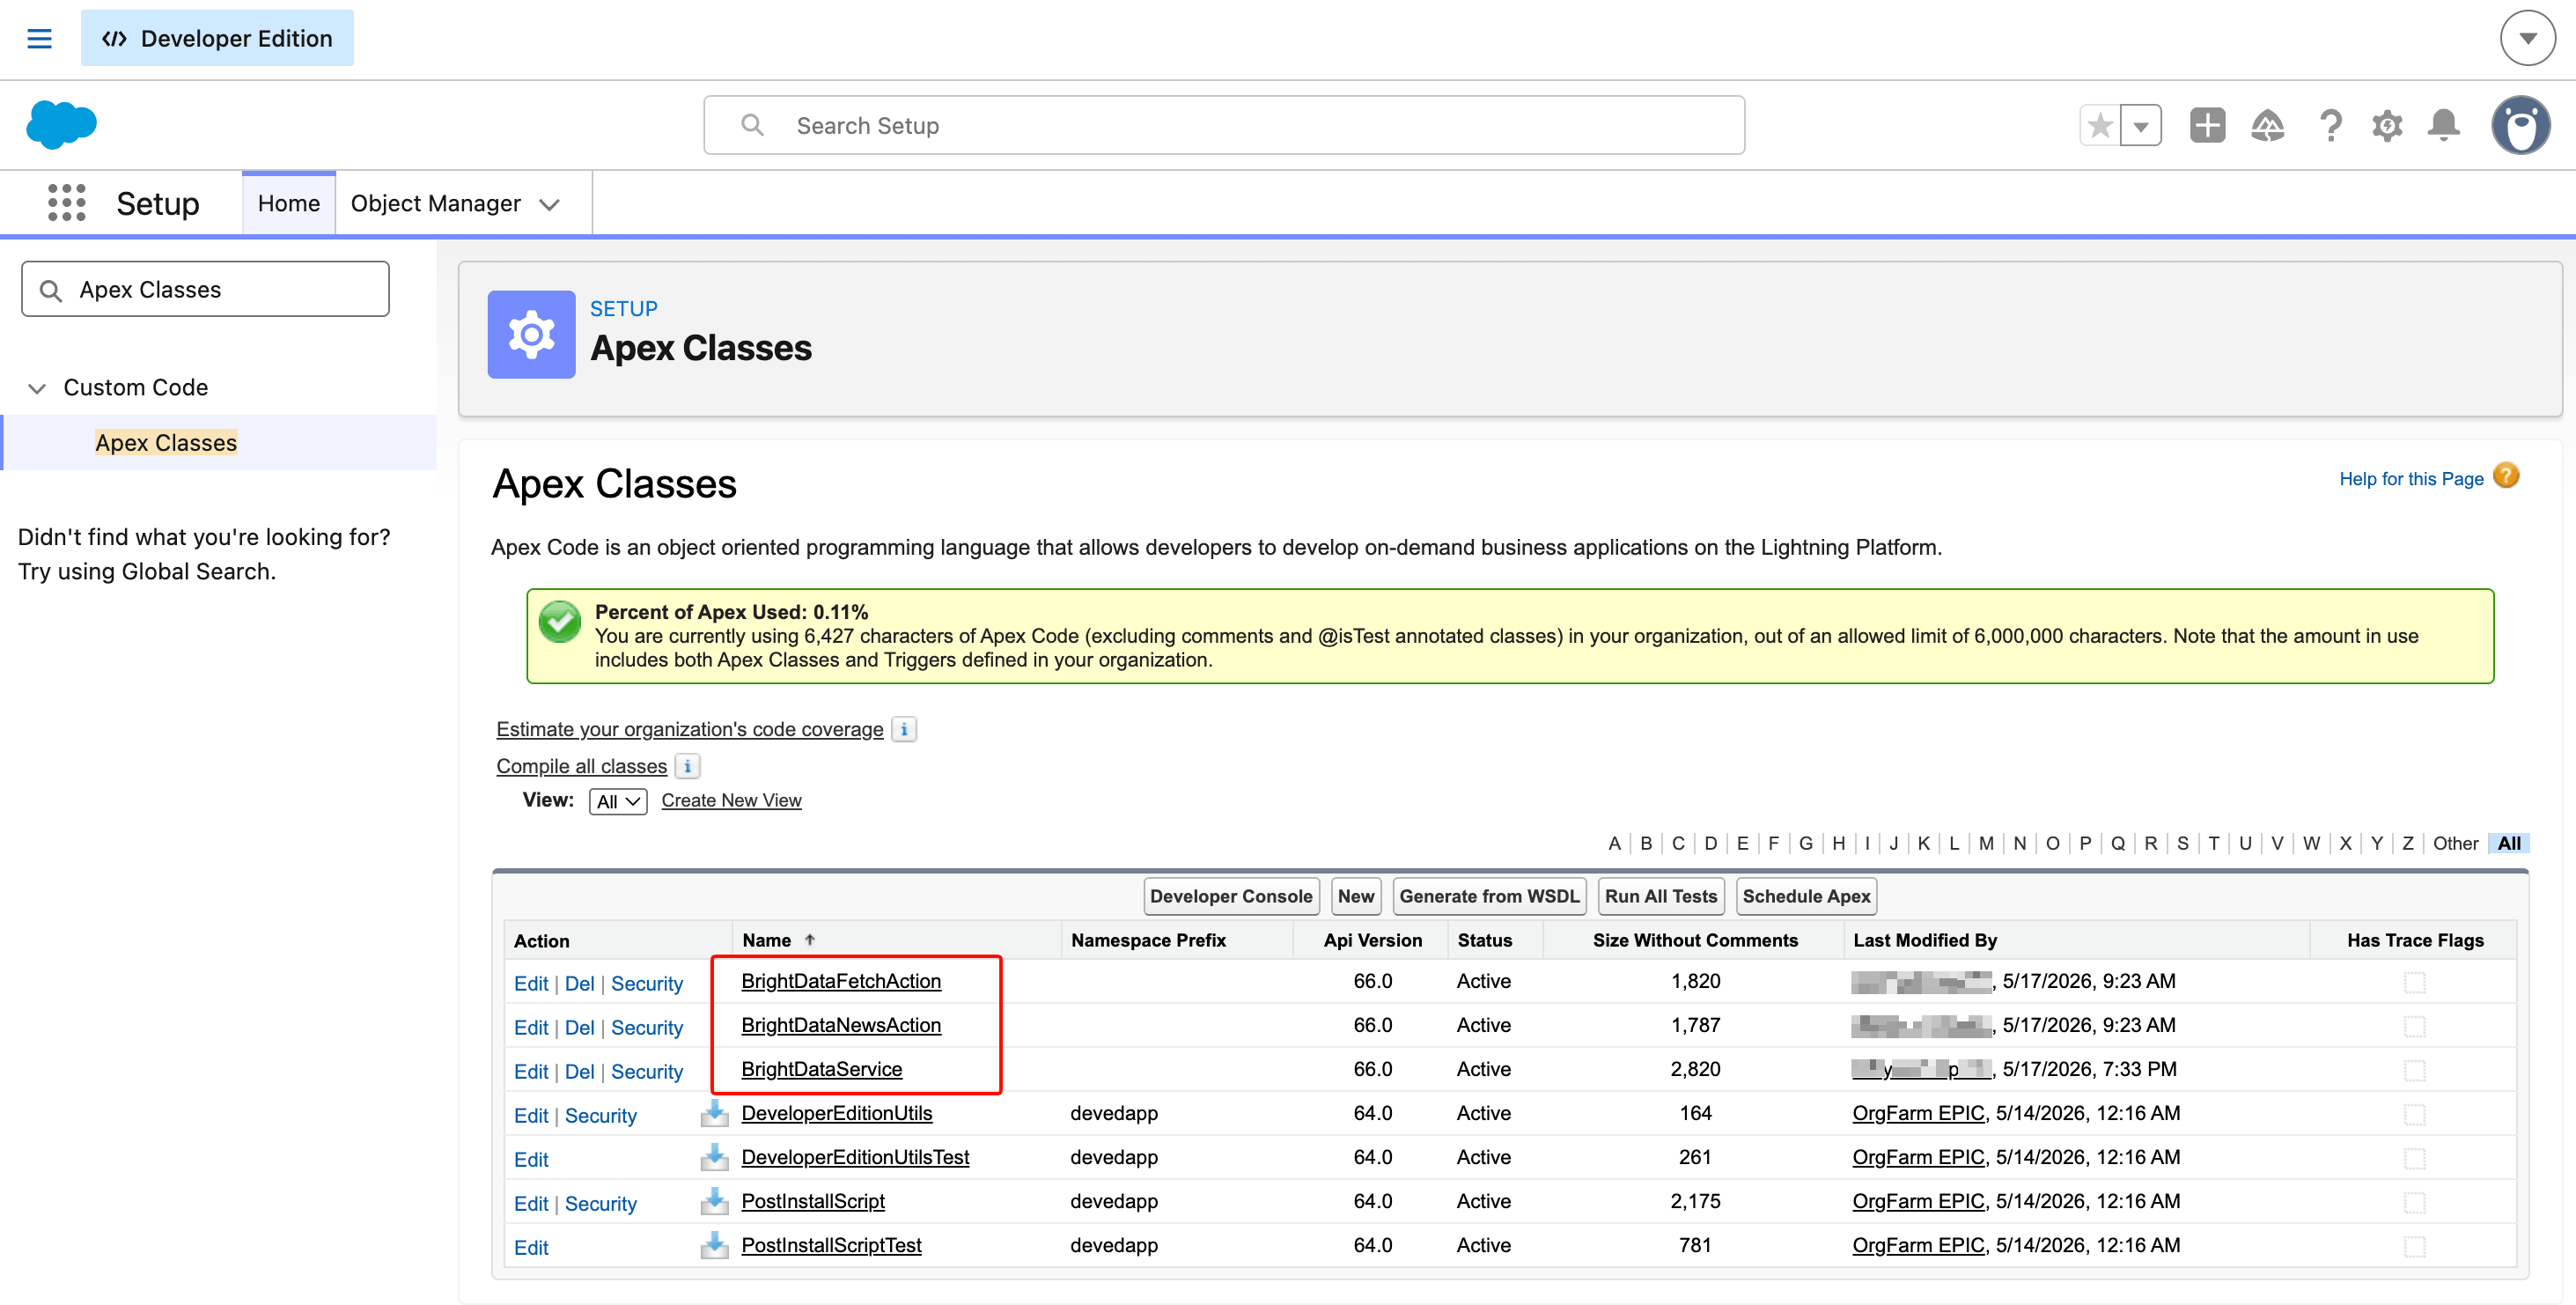
The total Apex footprint is about 6.4 KB across three classes. The shared service plus one action class per Agent Action is the standard Salesforce pattern when more than one invocable is needed.
Test the actions
Before wiring the actions to Agentforce, confirm they work end to end. In Anonymous Apex:
BrightDataNewsAction.Request r = new BrightDataNewsAction.Request();
r.companyName = 'Salesforce';
List<BrightDataNewsAction.Response> out =
    BrightDataNewsAction.searchCompanyNews(new List<BrightDataNewsAction.Request>{ r });
System.debug('LENGTH: ' + out[0].newsResults.length());
System.debug('PREVIEW: ' + out[0].newsResults.left(800));
Expect LENGTH between 5,000 and 10,000, with a preview that starts with the service class’s prefix and then the Google News markdown. If you see LENGTH: 0 or an error string, return to the verification step in Part 3.
Part 5: Register the actions as Agentforce Assets
Apex classes are not visible to Agentforce by default. Each @InvocableMethod has to be registered as an Agent Action (newer label: Agentforce Asset) before the agent can call it.
In Setup, search Agent Actions (or Agentforce Assets, depending on which label your org has) and click New Agent Action. You’ll do this twice, once for each action class.
For the news action, fill in:
- Reference Action Type:
Apex - Reference Action Category:
Invocable Methods - Reference Action:
BrightDataNewsAction.searchCompanyNews
On the next screen, fill in these fields:
- Agent Action Label: keep the auto-populated
Search Recent Company News (Bright Data) - Agent Action Description: keep the auto-populated description (it comes from the
@InvocableMethodannotation) - Show loading text for this action: checked
- Loading Text:
Searching recent news…
Salesforce auto-detects the input (companyName, required, String) and the output (newsResults, String). Leave the auto-detected mapping. Click Finish.
Repeat for the fetch action:
- Reference Action:
BrightDataFetchAction.fetchUrlAsMarkdown - Loading Text:
Fetching web page… - The input is
url(required, String). The output ispageContent(String).
After both are saved, the Agent Actions list shows both with status Active.
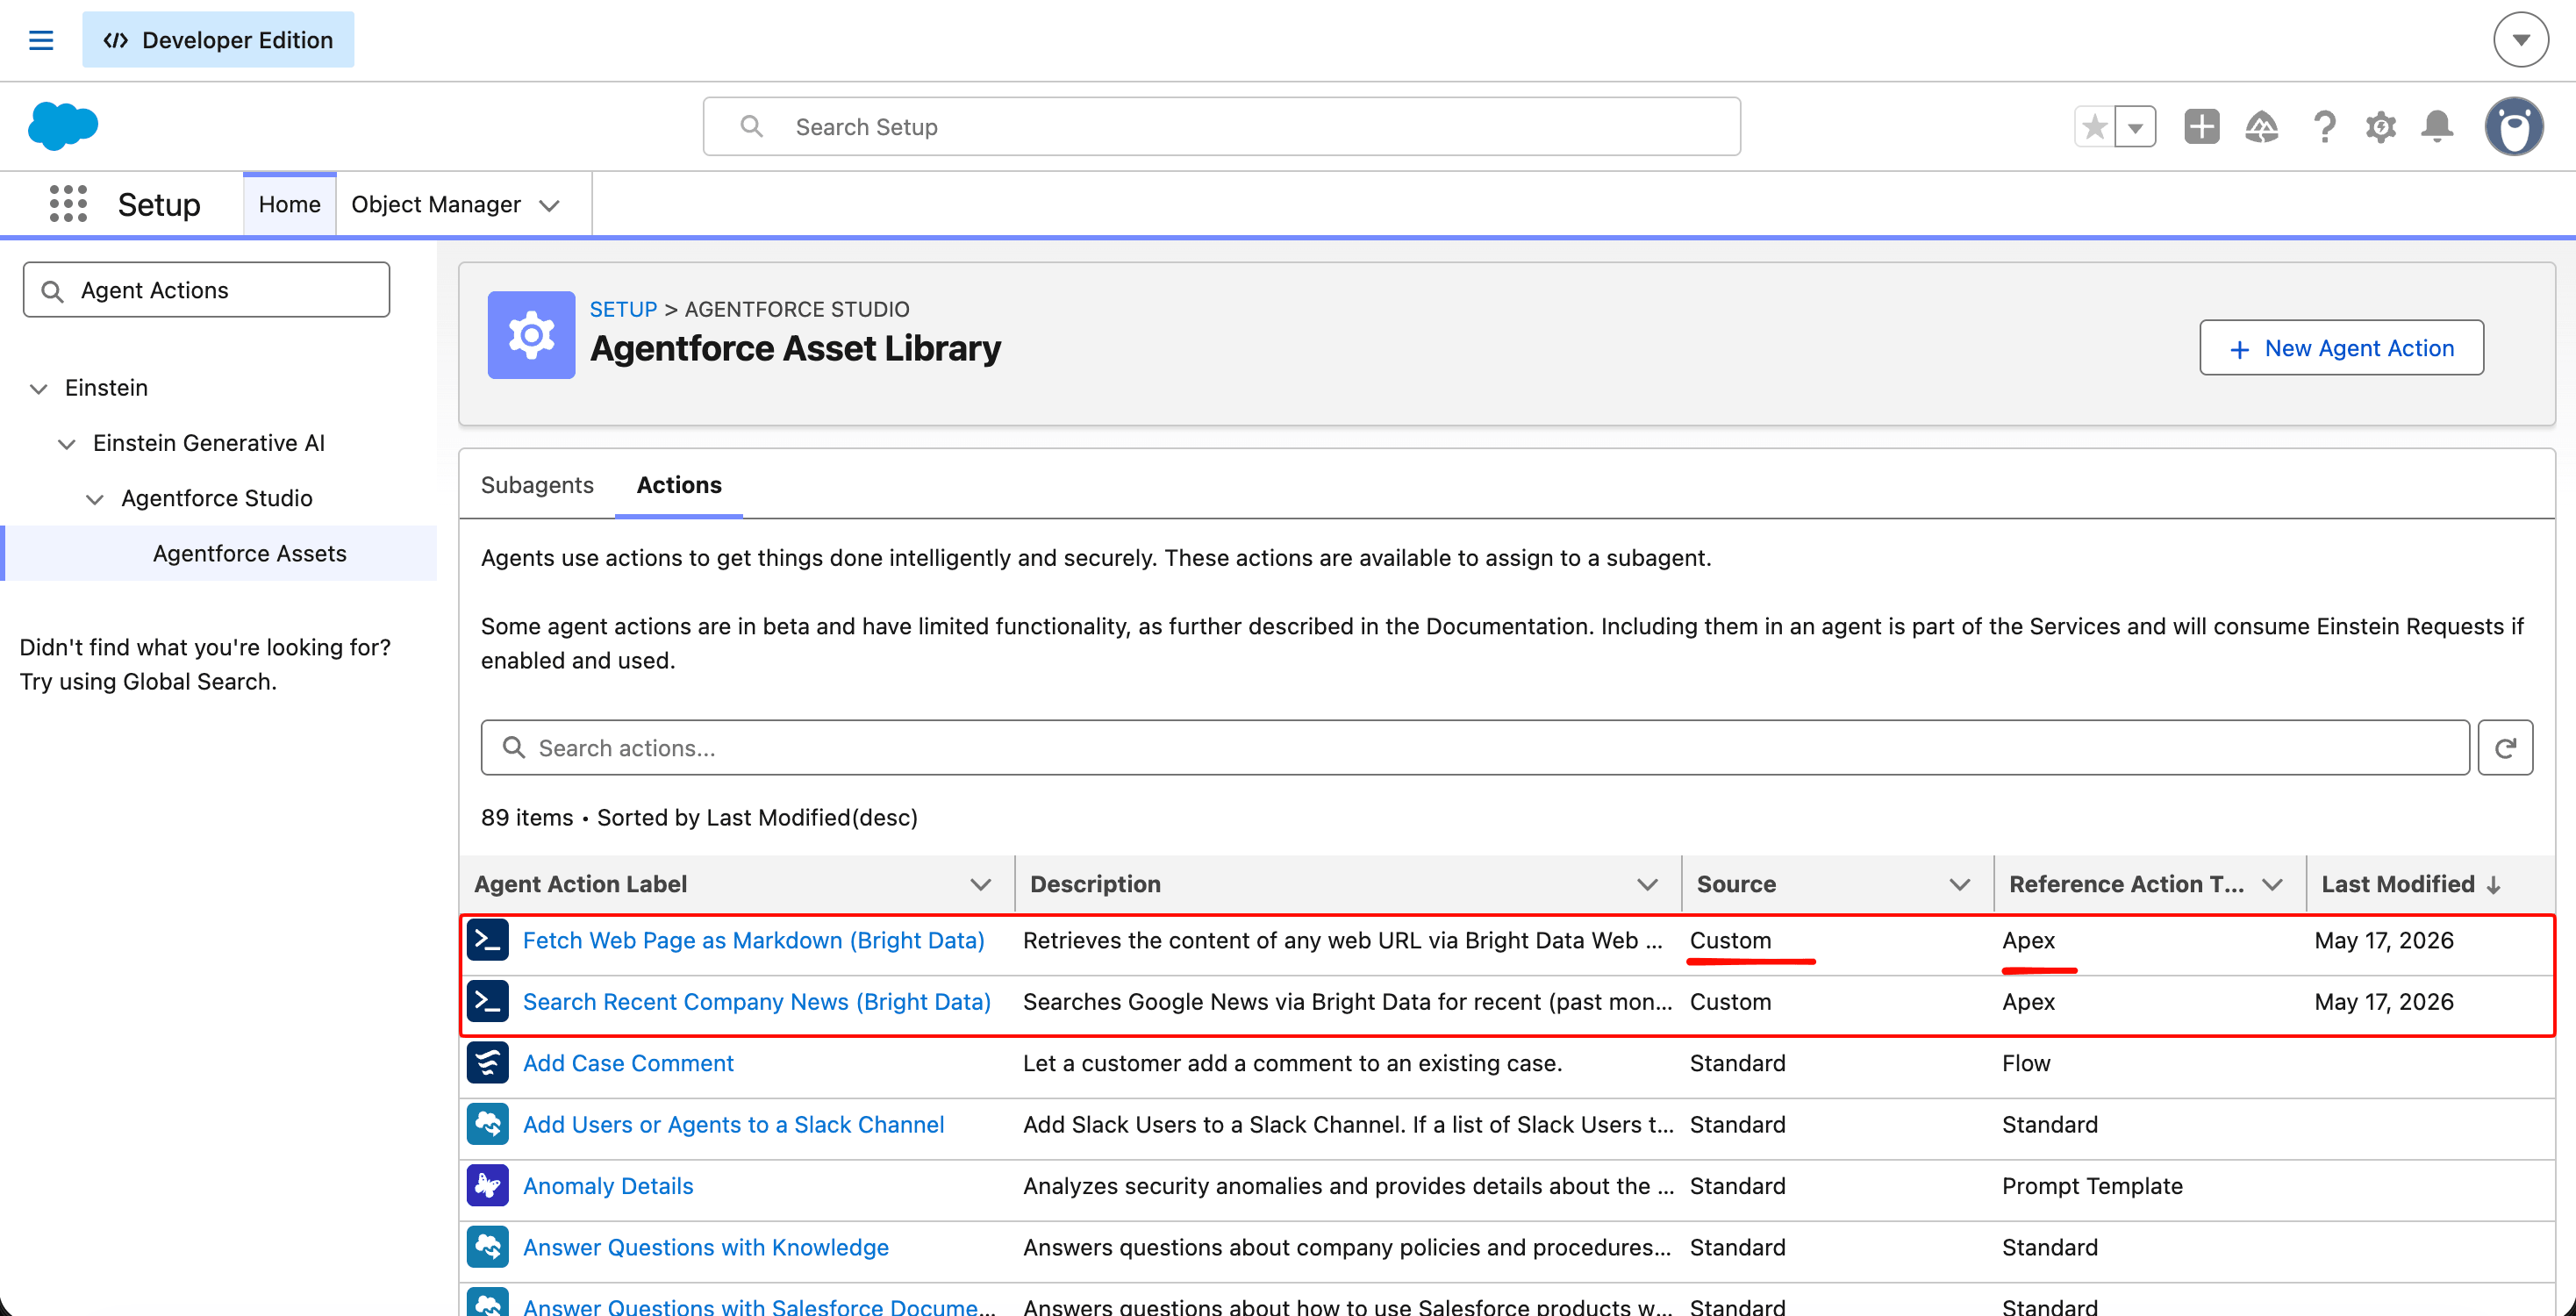
Custom actions appear in the same Asset Library as the standard ones that ship with the Employee template. Agentforce’s reasoning engine treats both equally; the source column is metadata, not a behavioral switch.
The two-layer split (Apex class vs. Agent Action) is intentional. It’s a governance hook that lets a Salesforce admin grant or revoke an agent’s capability without modifying Apex. In a regulated org, for example, the Apex stays unchanged across releases; the Agent Action registration is what’s audited and version-controlled.
Part 6: Build the agent
With both actions registered, you can wire them into a working Agentforce agent. Open App Launcher (the nine-dot grid, top left) and search Agentforce Studio. Inside Agentforce Studio, click New Agent.
The Builder UI
The Salesforce Agentforce Builder has two starter paths: a natural-language description box at the top, or a set of pre-built templates below. Use the template path so the steps below match your screen. Click Select on the Agentforce Employee Agent card. If your org doesn’t show that exact card, pick the closest “Employee” or “General” template; the four starter subagents (Agent Router, General FAQ, Off Topic, Ambiguous Question) may have slightly different names, but the work below (adding a custom subagent and wiring two actions to it) applies to any template.
Fill in the following fields:
- Agent Label:
Account Briefing Agent - Description: Researches an account by pulling recent news and public web content into Salesforce. Used by sales reps before customer calls.
- Company: any string; this field is metadata for the agent and doesn’t affect routing
If the template wizard offers to install pre-built topics (Salesforce’s older label for subagents), accept the defaults. The Employee template installs four subagents this build doesn’t use (Agent Router, General FAQ, Off Topic, Ambiguous Question); they don’t conflict with the one you’ll add.
Click Finish. The Agent Builder canvas opens.
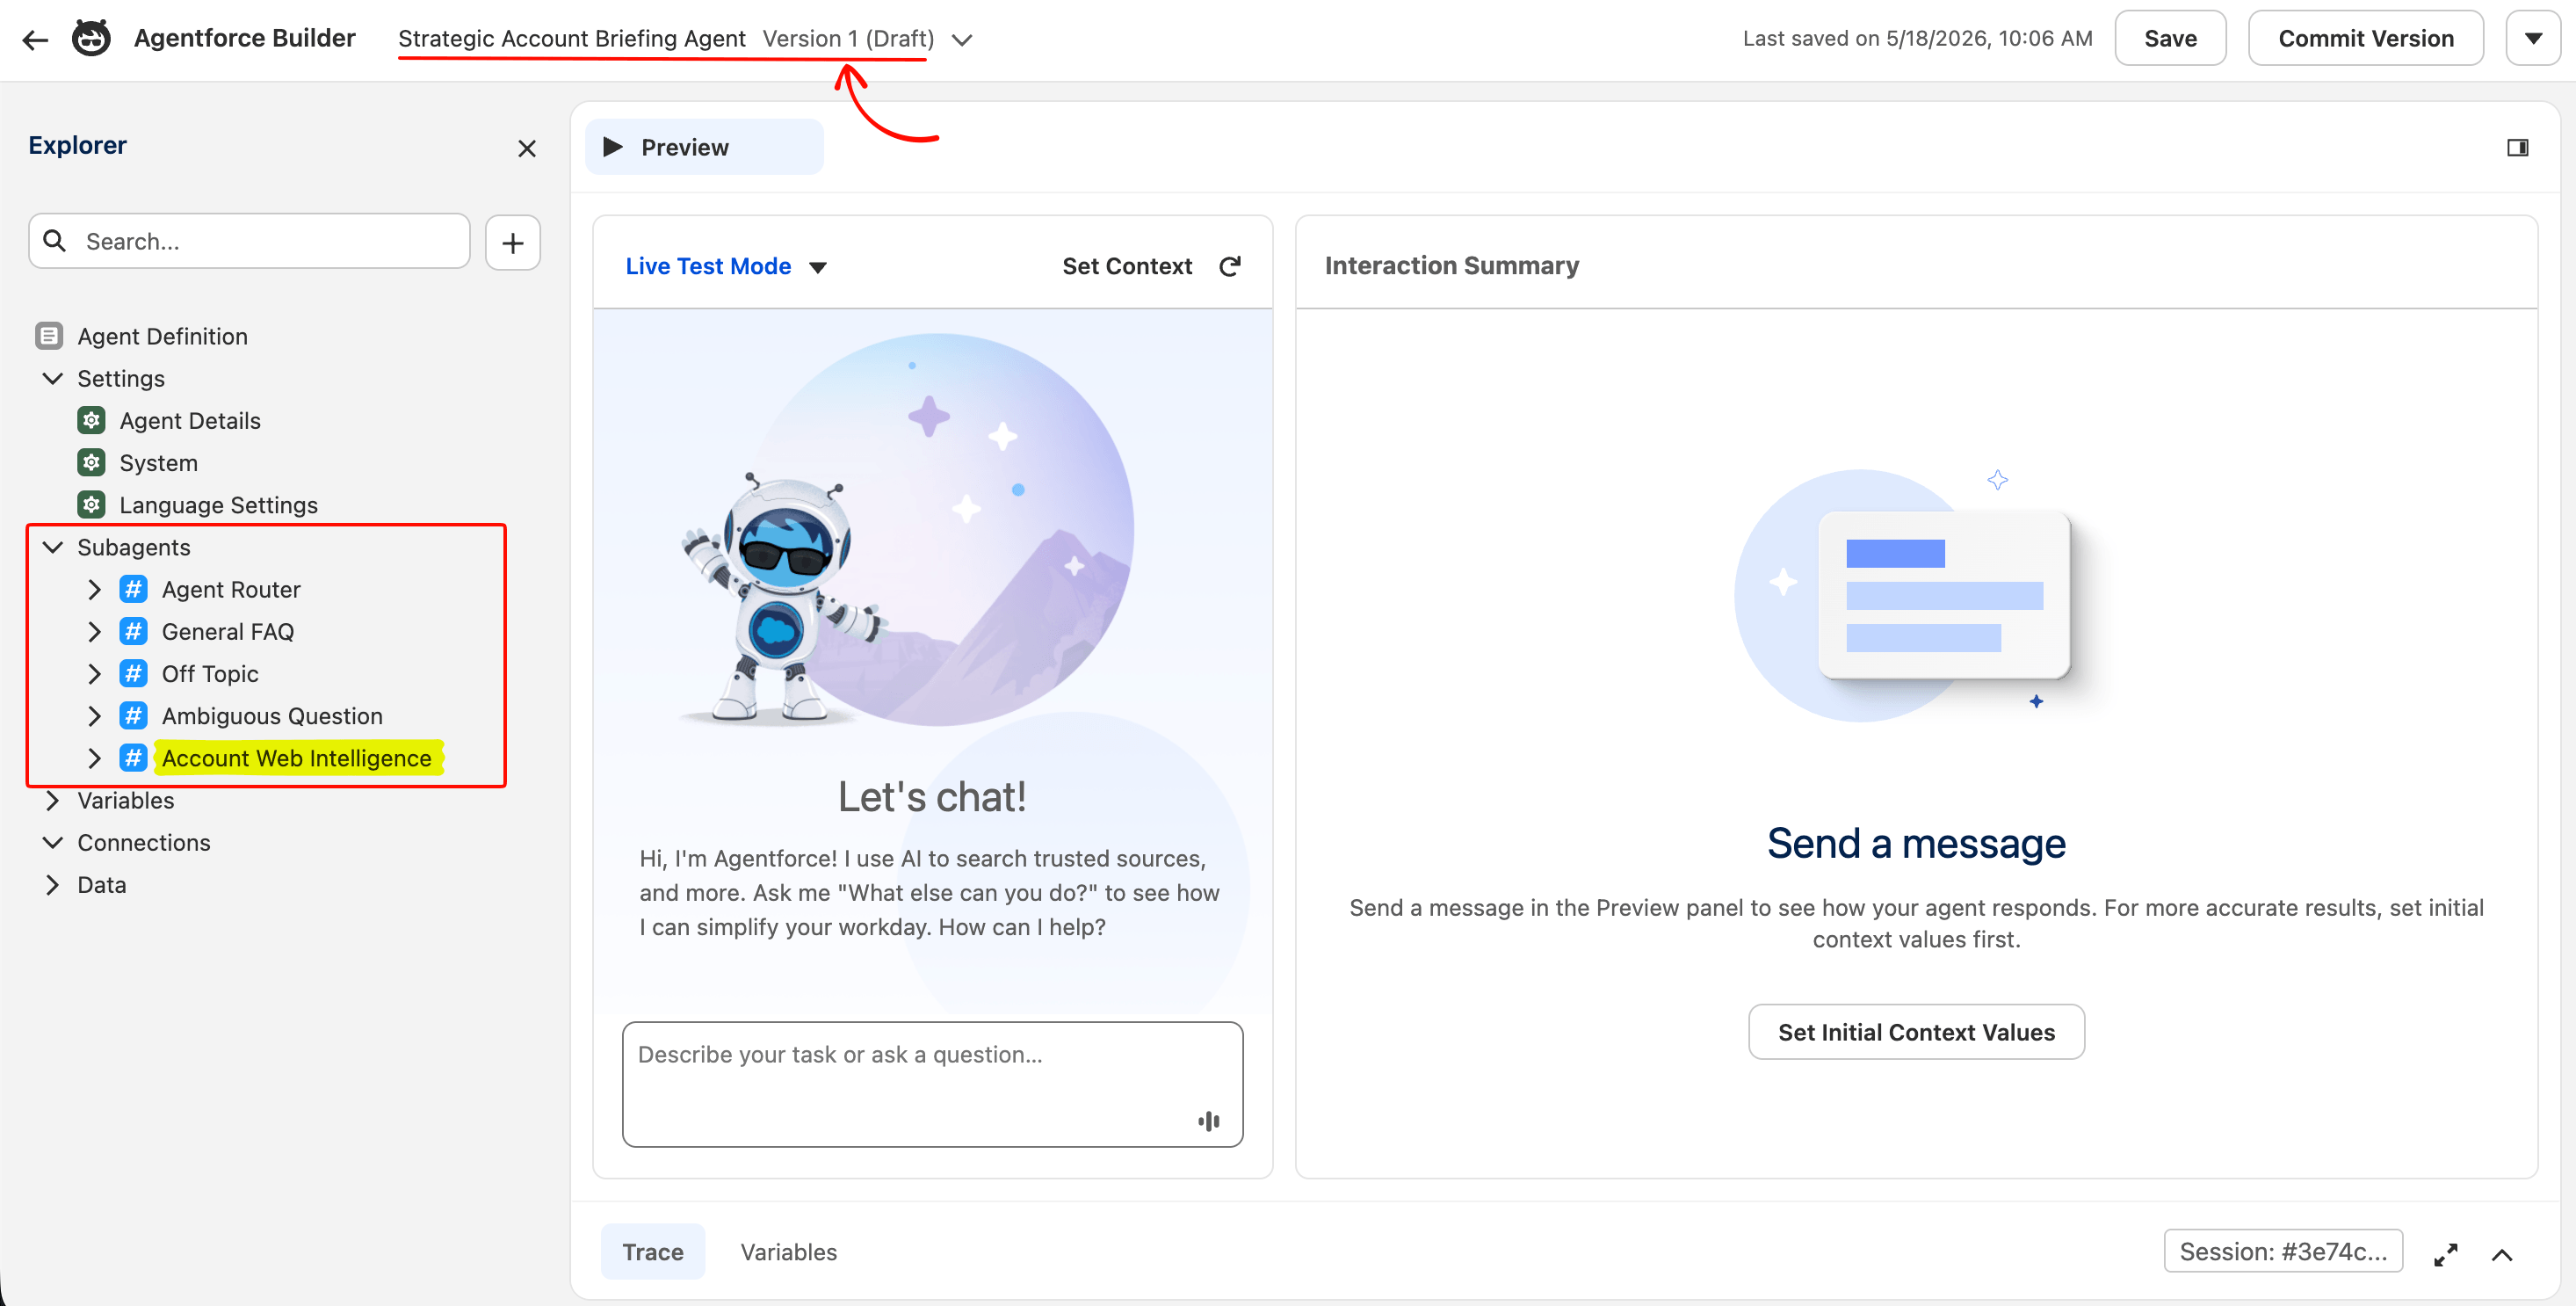
The Agent Router is the top-level LLM classifier that chooses which subagent handles each incoming prompt. The four template subagents handle the conversational edge cases (greeting, off-topic, ambiguous queries). The Account Web Intelligence subagent (added in the next step) is the one that calls the two Bright Data actions.
Add the Account Web Intelligence subagent
In the Explorer panel on the left, click the + button next to the Search field and choose New Subagent. Salesforce prompts for two fields:
- Subagent Name:
Account Web Intelligence - Description: Use this subagent when the user asks for external web information about a company, recent news, press releases, announcements, funding, leadership changes, acquisitions, or hiring, or wants to read and summarize the contents of a specific URL. Handles all external web research requests about named companies or websites.
Click Create and Open.
The subagent’s detail view opens, with sections for Instructions and Actions Available For Reasoning. The description you just wrote is the classification text the Agent Router reads to decide when to route to this subagent.
Write the instructions
The Instructions block is the LLM’s runtime prompt. It tells the model what rules to follow inside this subagent. Paste this into the Instructions field:
1. When the user mentions a company name and asks about recent news, events, press, funding, hiring, or any current information, call the "Search Recent Company News" action with the company name extracted from the user's message.

2. When the user provides a specific URL or asks you to read a webpage, call the "Fetch Web Page as Markdown" action with that URL.

3. If the user asks something that needs both (e.g. "What's new at Acme and read their homepage"), call BOTH actions and combine the results.

4. ALWAYS include source URLs in your final response so the user can verify each fact.

5. NEVER fabricate news items, dates, sources, or page content. If Bright Data returns nothing or an error, tell the user honestly. Do not pad with made-up information.

6. When summarizing news, group by theme (funding, product, leadership, partnerships) and present 3-5 highest-signal items rather than dumping all 10.

7. When summarizing a fetched page, give a 2-3 sentence overview followed by the most relevant facts. Do not paste the raw Markdown.
Rule 5 is the most important one. In testing, it produced graceful failure modes instead of fabricated content when Bright Data returned an error.
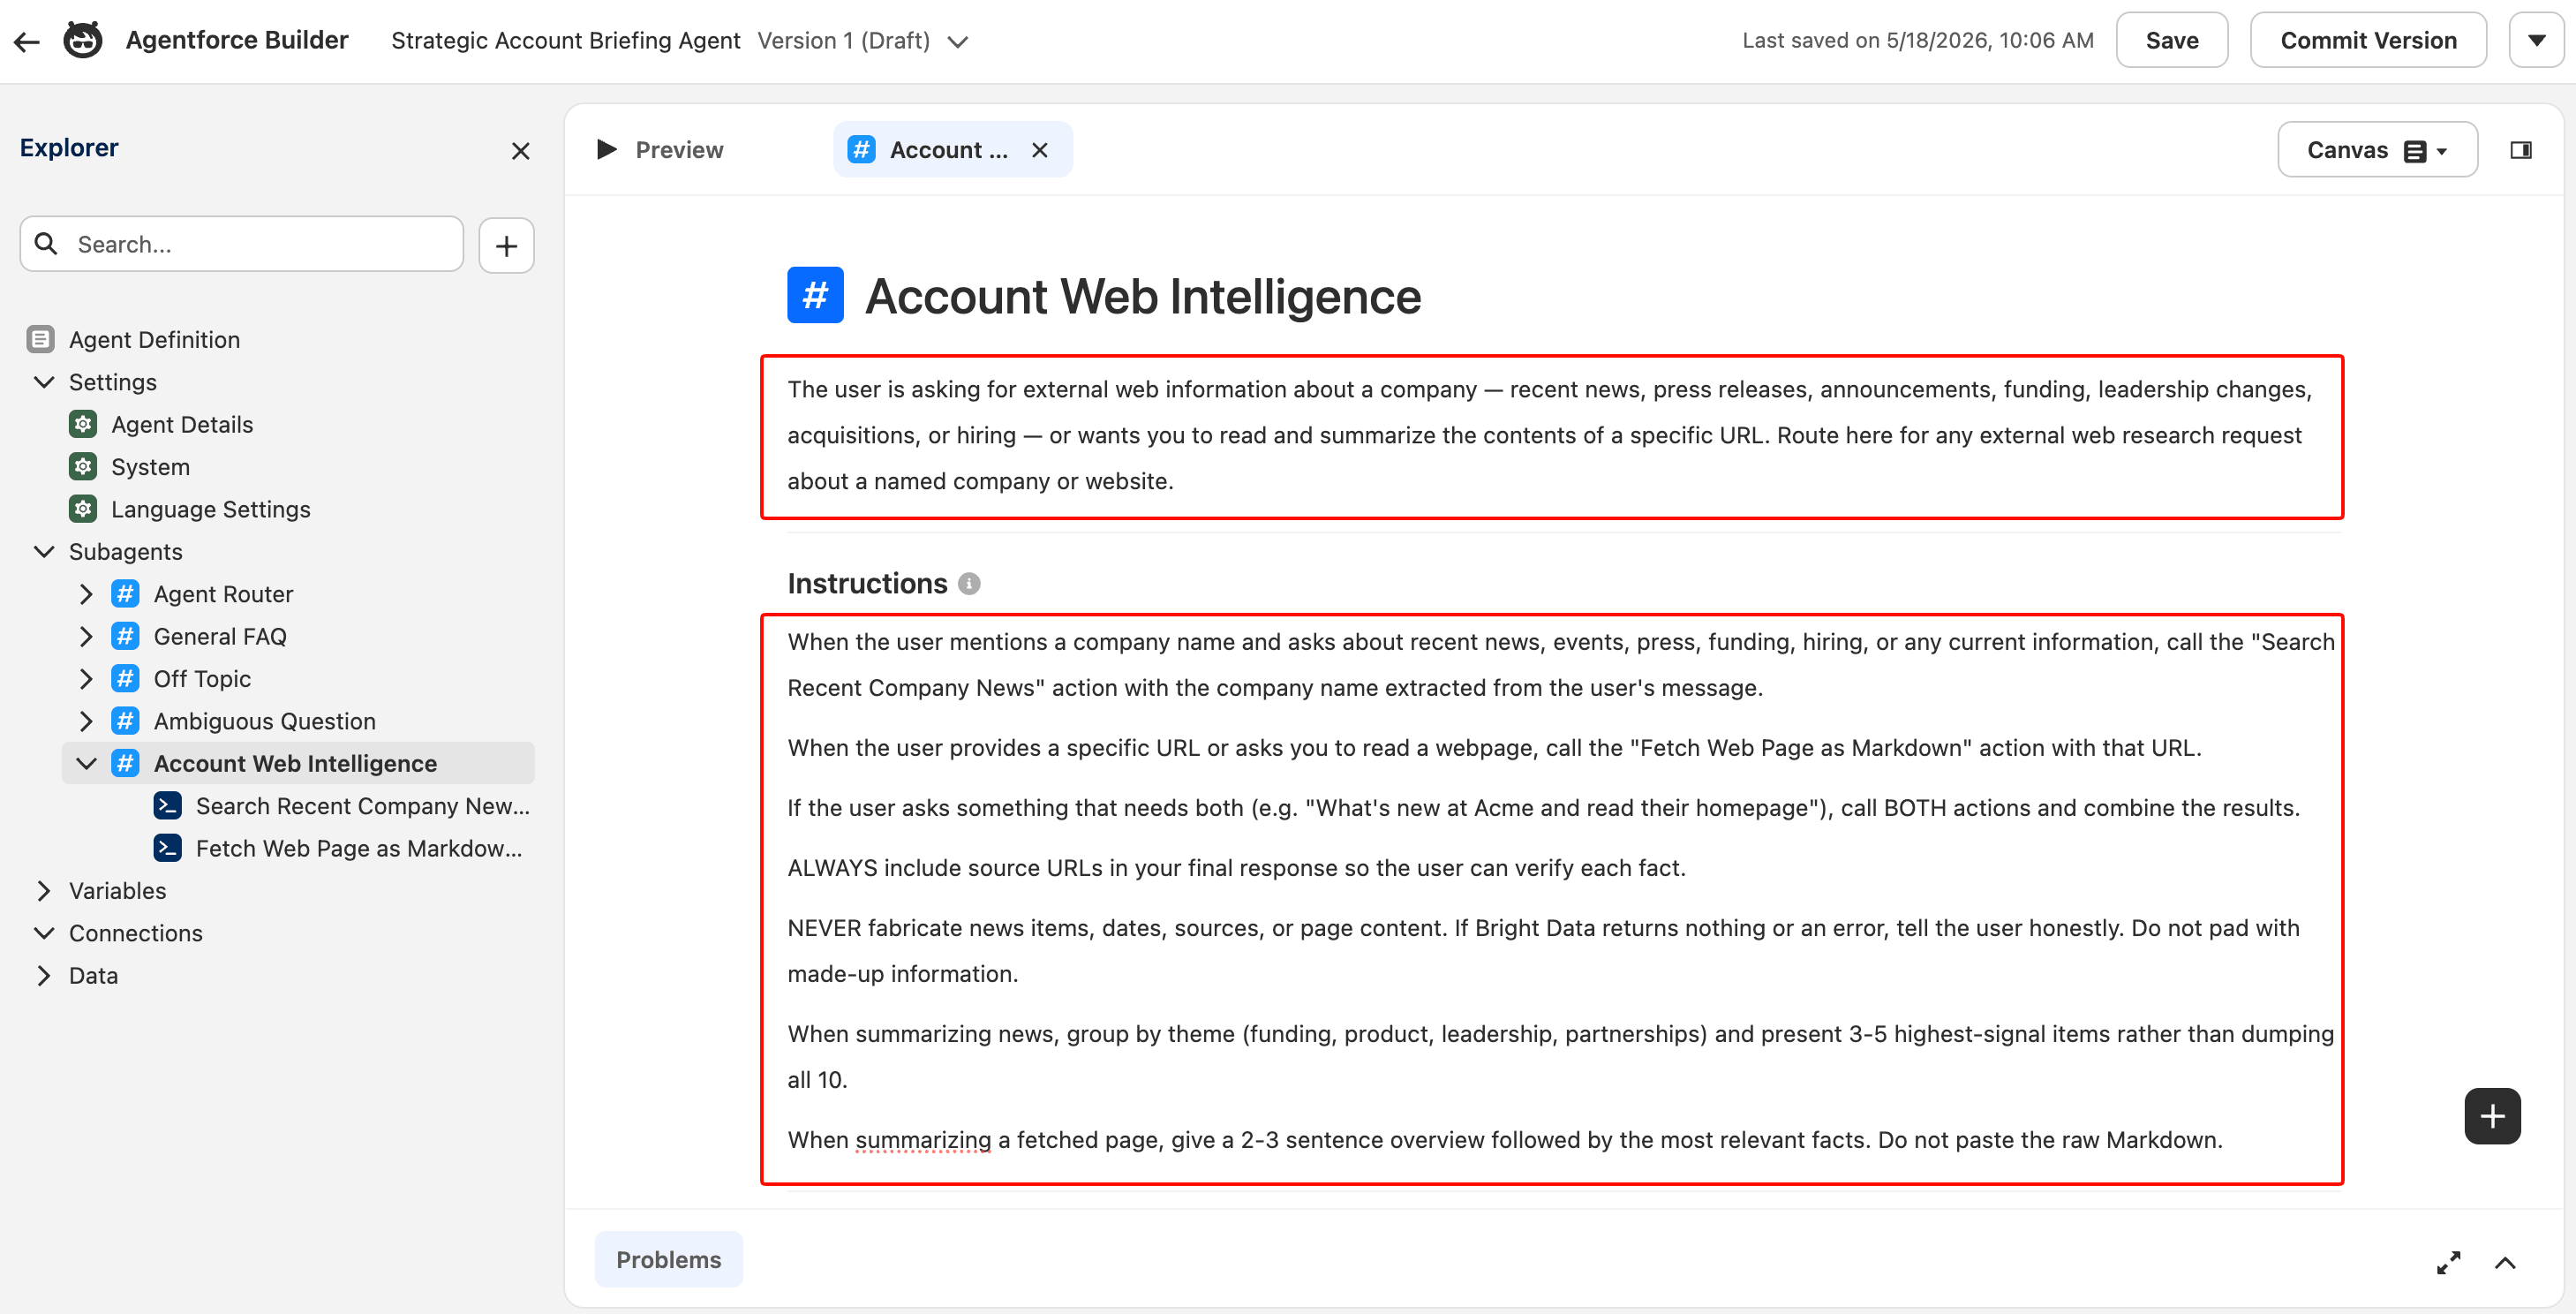
The description (top) drives routing decisions. The Instructions (below) drive in-subagent behavior. Both are plain natural-language prompts; the LLM reads them at runtime.
Attach the two Agent Actions
In the Actions Available For Reasoning section, click Select action → Add from Asset Library. Select Search Recent Company News (Bright Data). Then repeat: Select action → Add from Asset Library → Fetch Web Page as Markdown (Bright Data).
After both are attached, each action shows two binding rows: With input (the action’s required parameter) and Set output (where the result goes).
Fix the input binding via Script mode
Chat-driven agents need a different input binding than Canvas provides by default. The fix below uses Script mode.
If your Canvas UI shows a “Collect data from user” checkbox on the action input row, try that first; the Script-mode workaround below is for orgs without it.
For Search Recent Company News, the input row reads With input: Company Name = Select variable. The Select variable dropdown defaults to a list of static Salesforce variables (currentRecordId, ContactId, EndUserId, and so on). None of these contains the company name the rep typed in chat. This is a silent failure mode for chat-driven agents in Canvas mode.
The fix is in the underlying Agent Script, not in the Canvas dropdown. Switch the canvas mode from Canvas to Script using the dropdown at the top right.
You’ll make four small text edits inside the script. Each is one-word find-and-replace. You don’t have to paste any blocks or reason about YAML indentation; just find the literal strings and change them.
Use the in-editor find (Cmd+F / Ctrl+F inside the Script-mode canvas; this is the editor’s find, not the browser’s). Here are the four edits:
Edit 1. Find the literal string with companyName = @variables.currentRecordId (appears once). Replace @variables.currentRecordId with three literal dots .... The line should read:
with companyName = ...The three dots are real Agent Script syntax meaning “the LLM provides this value at runtime”. It looks like a placeholder ellipsis but isn’t.
Edit 2. Find with url = @variables.currentRecordId (also appears once). Replace @variables.currentRecordId with ... the same way. The line should read:
with url = ...Edit 3. Find the literal string "companyName" (with the quotation marks). The next line directly below it reads is_user_input: False. Change False to True (capital T).
Edit 4. Find "url" (with quotation marks). The next line below it reads is_user_input: False. Change False to True.
Editing single words like this leaves indentation untouched, so YAML parse errors are unlikely. If one happens anyway, press Cmd+Z / Ctrl+Z to undo and try the same word again. Click Save when all four edits are made. Switch back to Canvas mode. Both input rows now read With input: Company Name = Agent Populated and With input: URL to Fetch = Agent Populated.
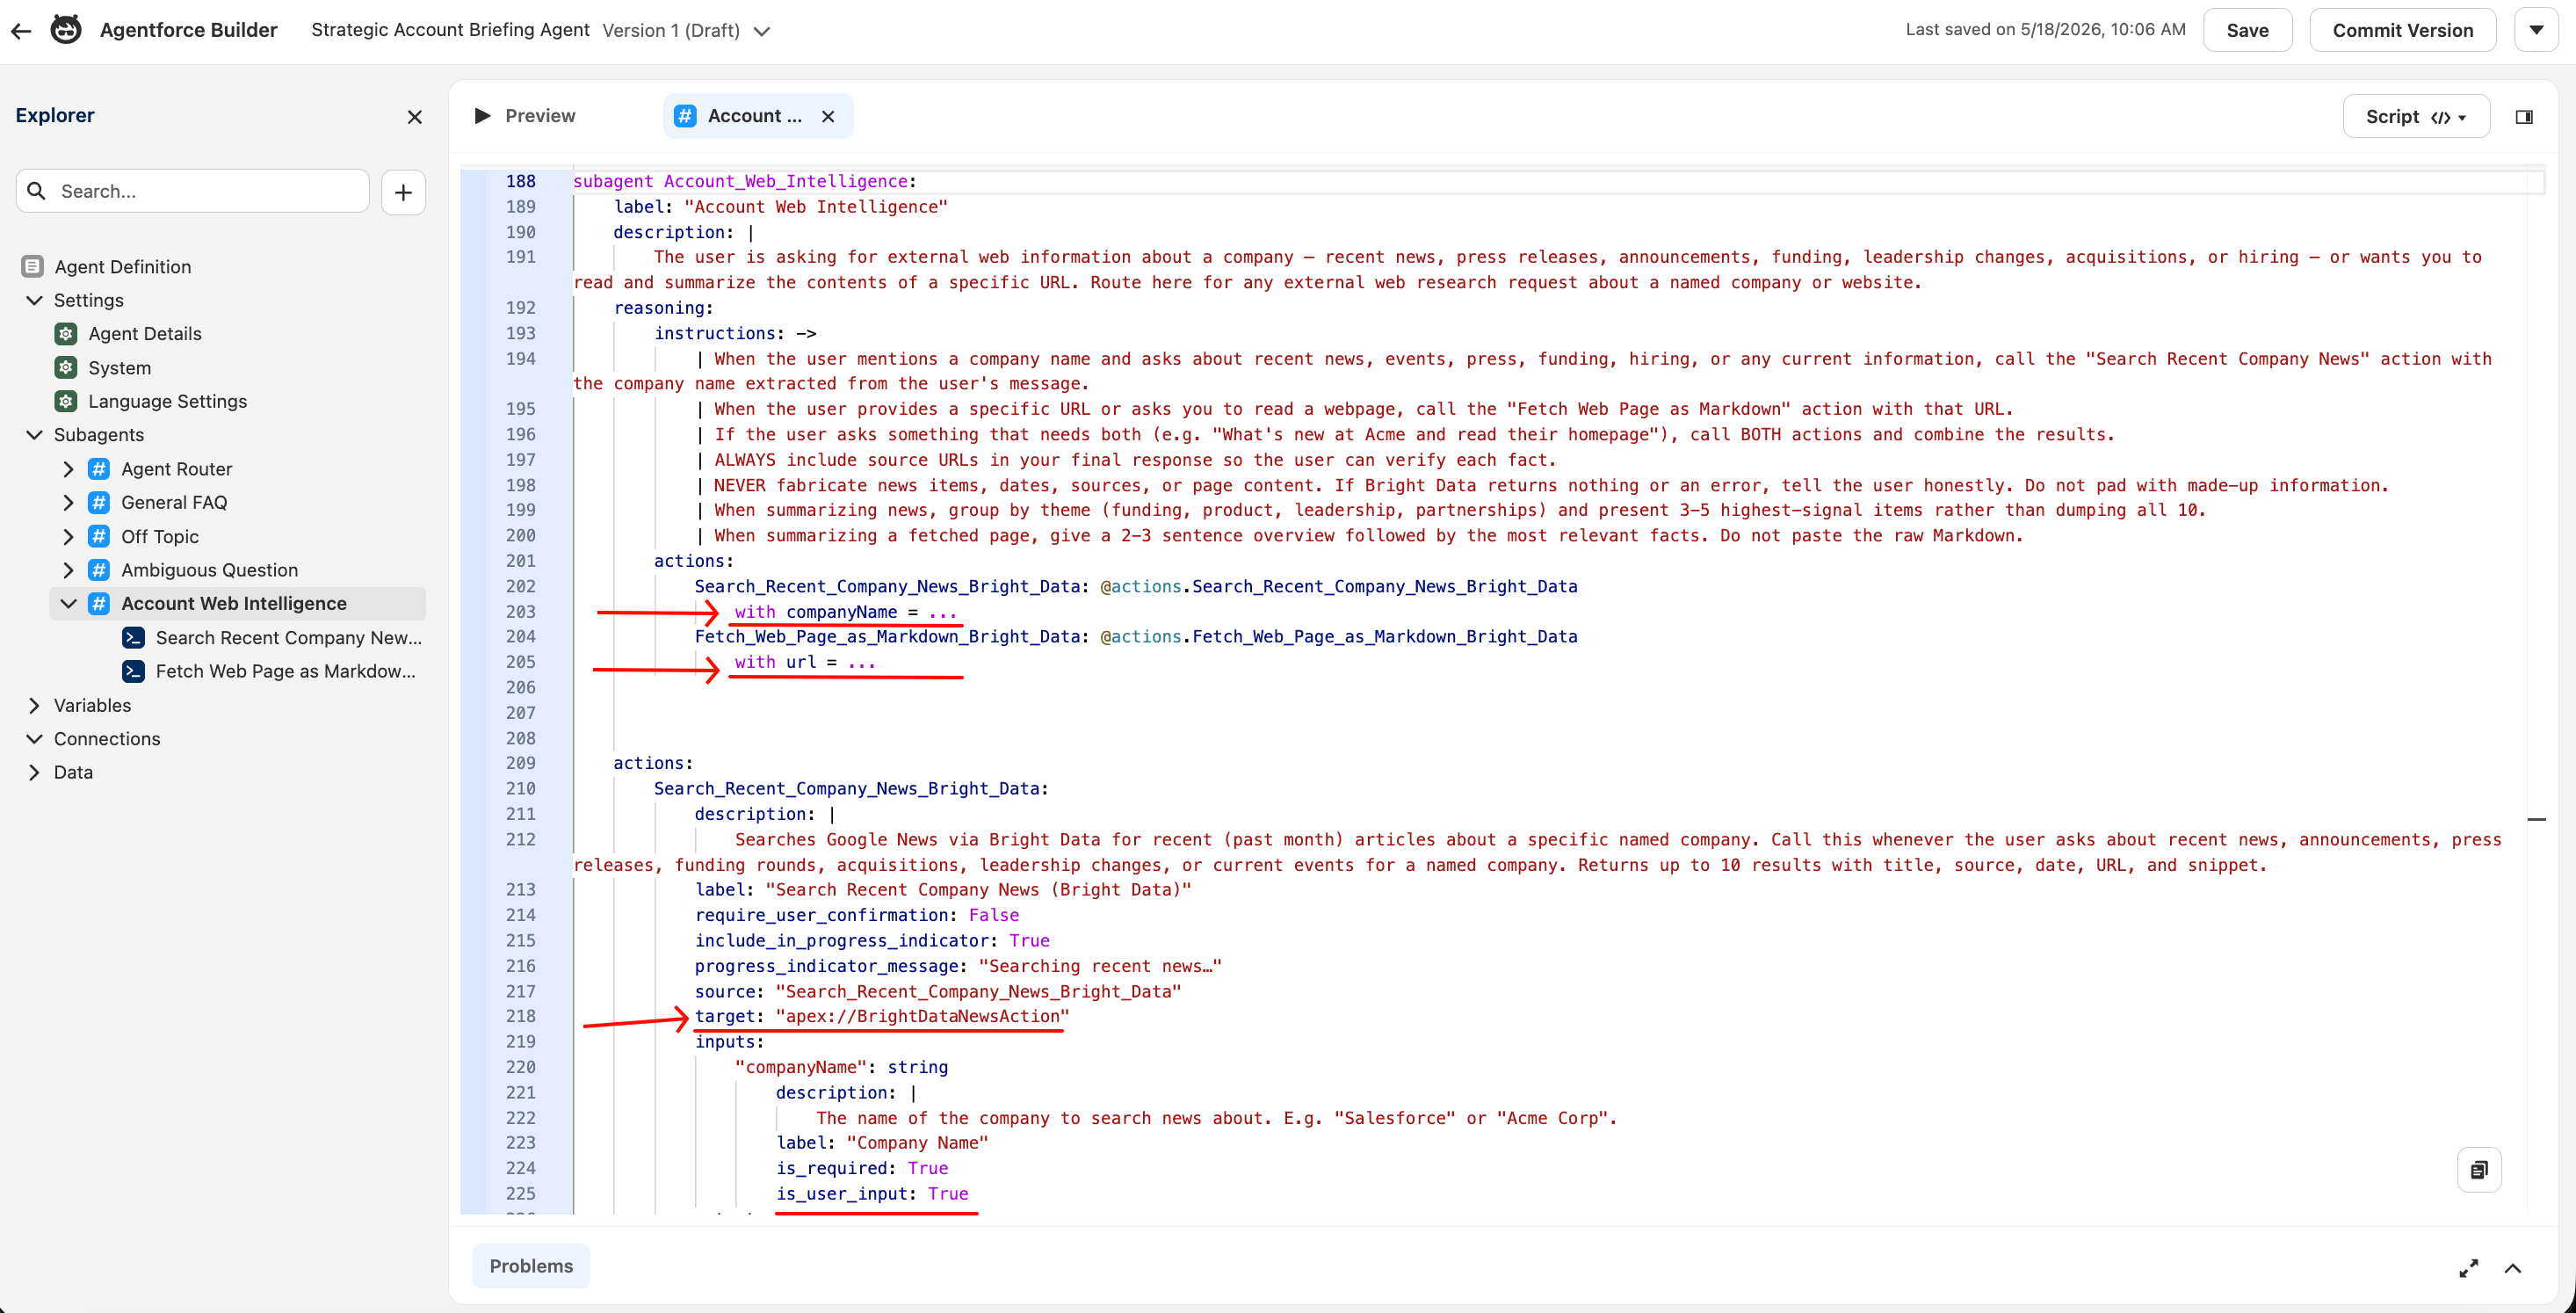
Script mode is where Agentforce’s underlying language is editable directly. The = ... runtime binding and the is_user_input: True flag are not exposed in the Canvas dropdown; you have to edit the YAML to set them. Once set, Canvas displays the binding as “Agent Populated”.
The subagent canvas should now show both actions with Agent Populated bindings. Save the agent (the Save button, top right; not Commit Version, which is for production releases).
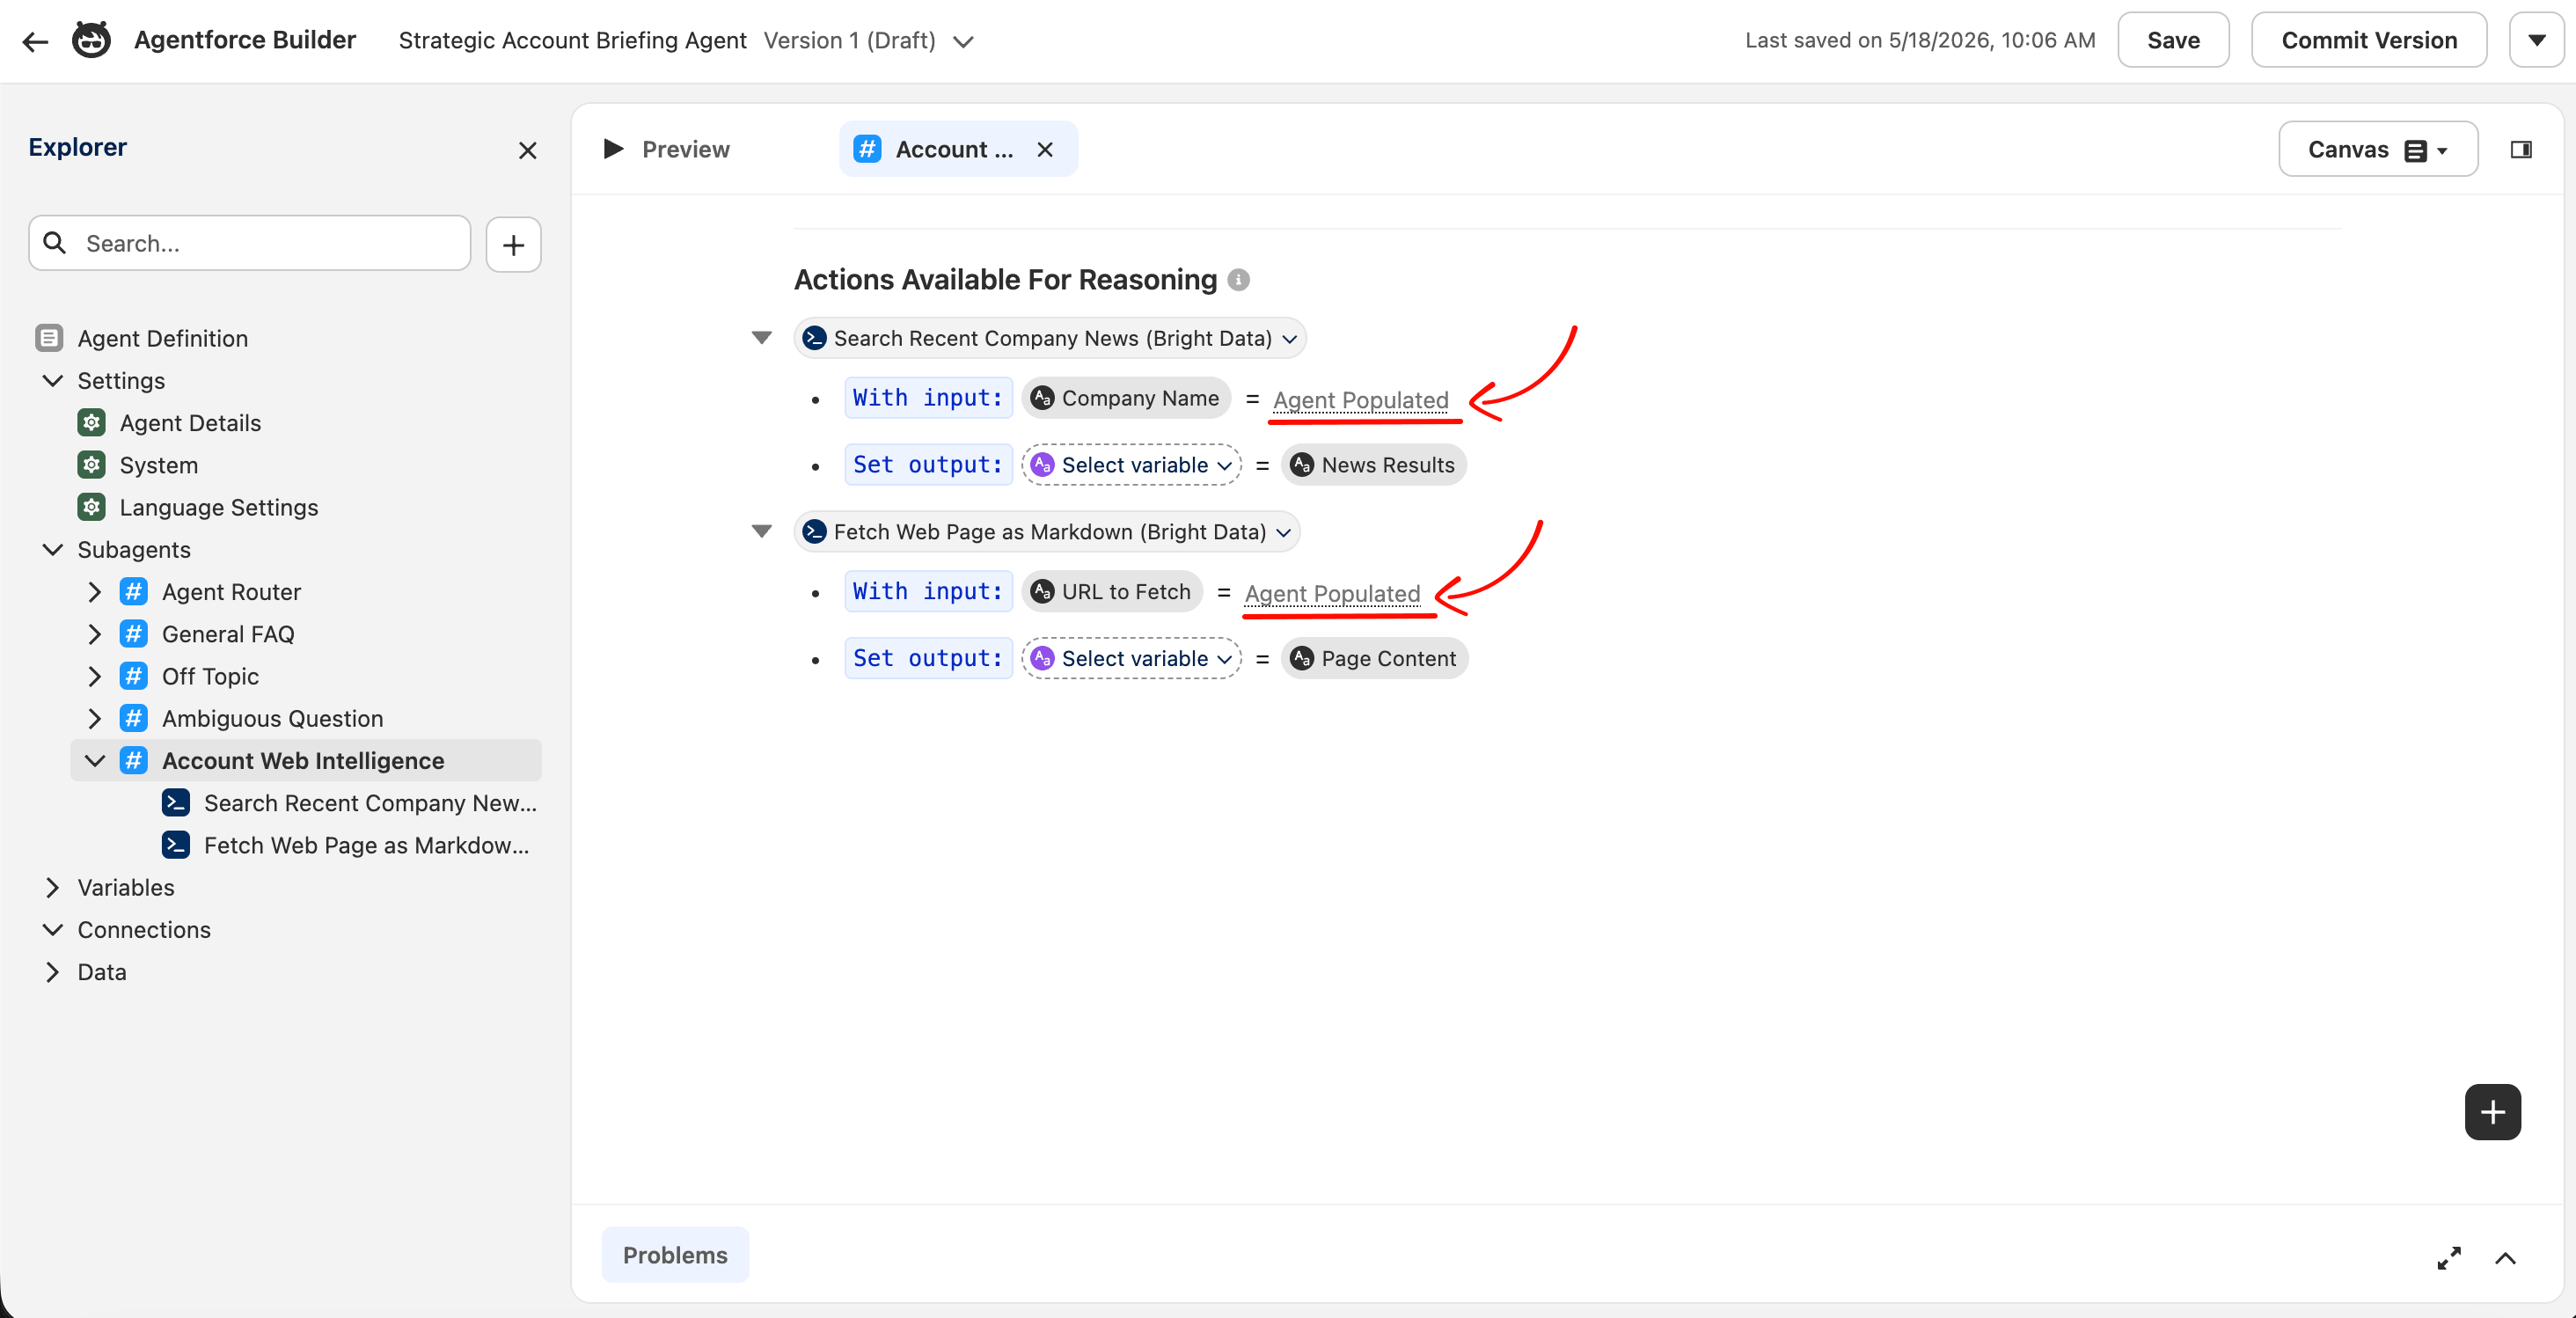
“Agent Populated” is the label Salesforce uses when an input is filled by LLM reasoning at runtime. This is the state the integration needs for chat-driven agents.
Part 7: Test the agent
In the Agent Builder, click the Preview tab. The chat interface opens with a yellow banner that includes a Reset Simulator button. If the banner appears, click it. The reset matters because the simulator’s conversation memory is per-session, and resetting between tests is the simplest way to get independent traces. The four tests below verify routing, single-action calls, parallel calls, and honest failure mode.
If the Preview tab is greyed out, look for an Activate toggle at the top of the canvas and switch it on. Activating here only enables the agent for the Preview/Simulator; end users can’t access it until you also assign it through Setup → Agentforce Studio → Connections, which is out of scope for this build.
Test 1: News search only
To verify the news action runs end-to-end, type:
What's new at Salesforce in the past month?The agent should route to Account Web Intelligence, show a “Searching recent news…” loading state, then return a themed news summary with source names cited inline. Open the Trace tab at the bottom of the canvas to see the full reasoning chain. The Interaction Summary panel on the right of the preview shows the same chain in compact form: which subagent the Router picked, which actions were invoked, and how the agent reasoned.
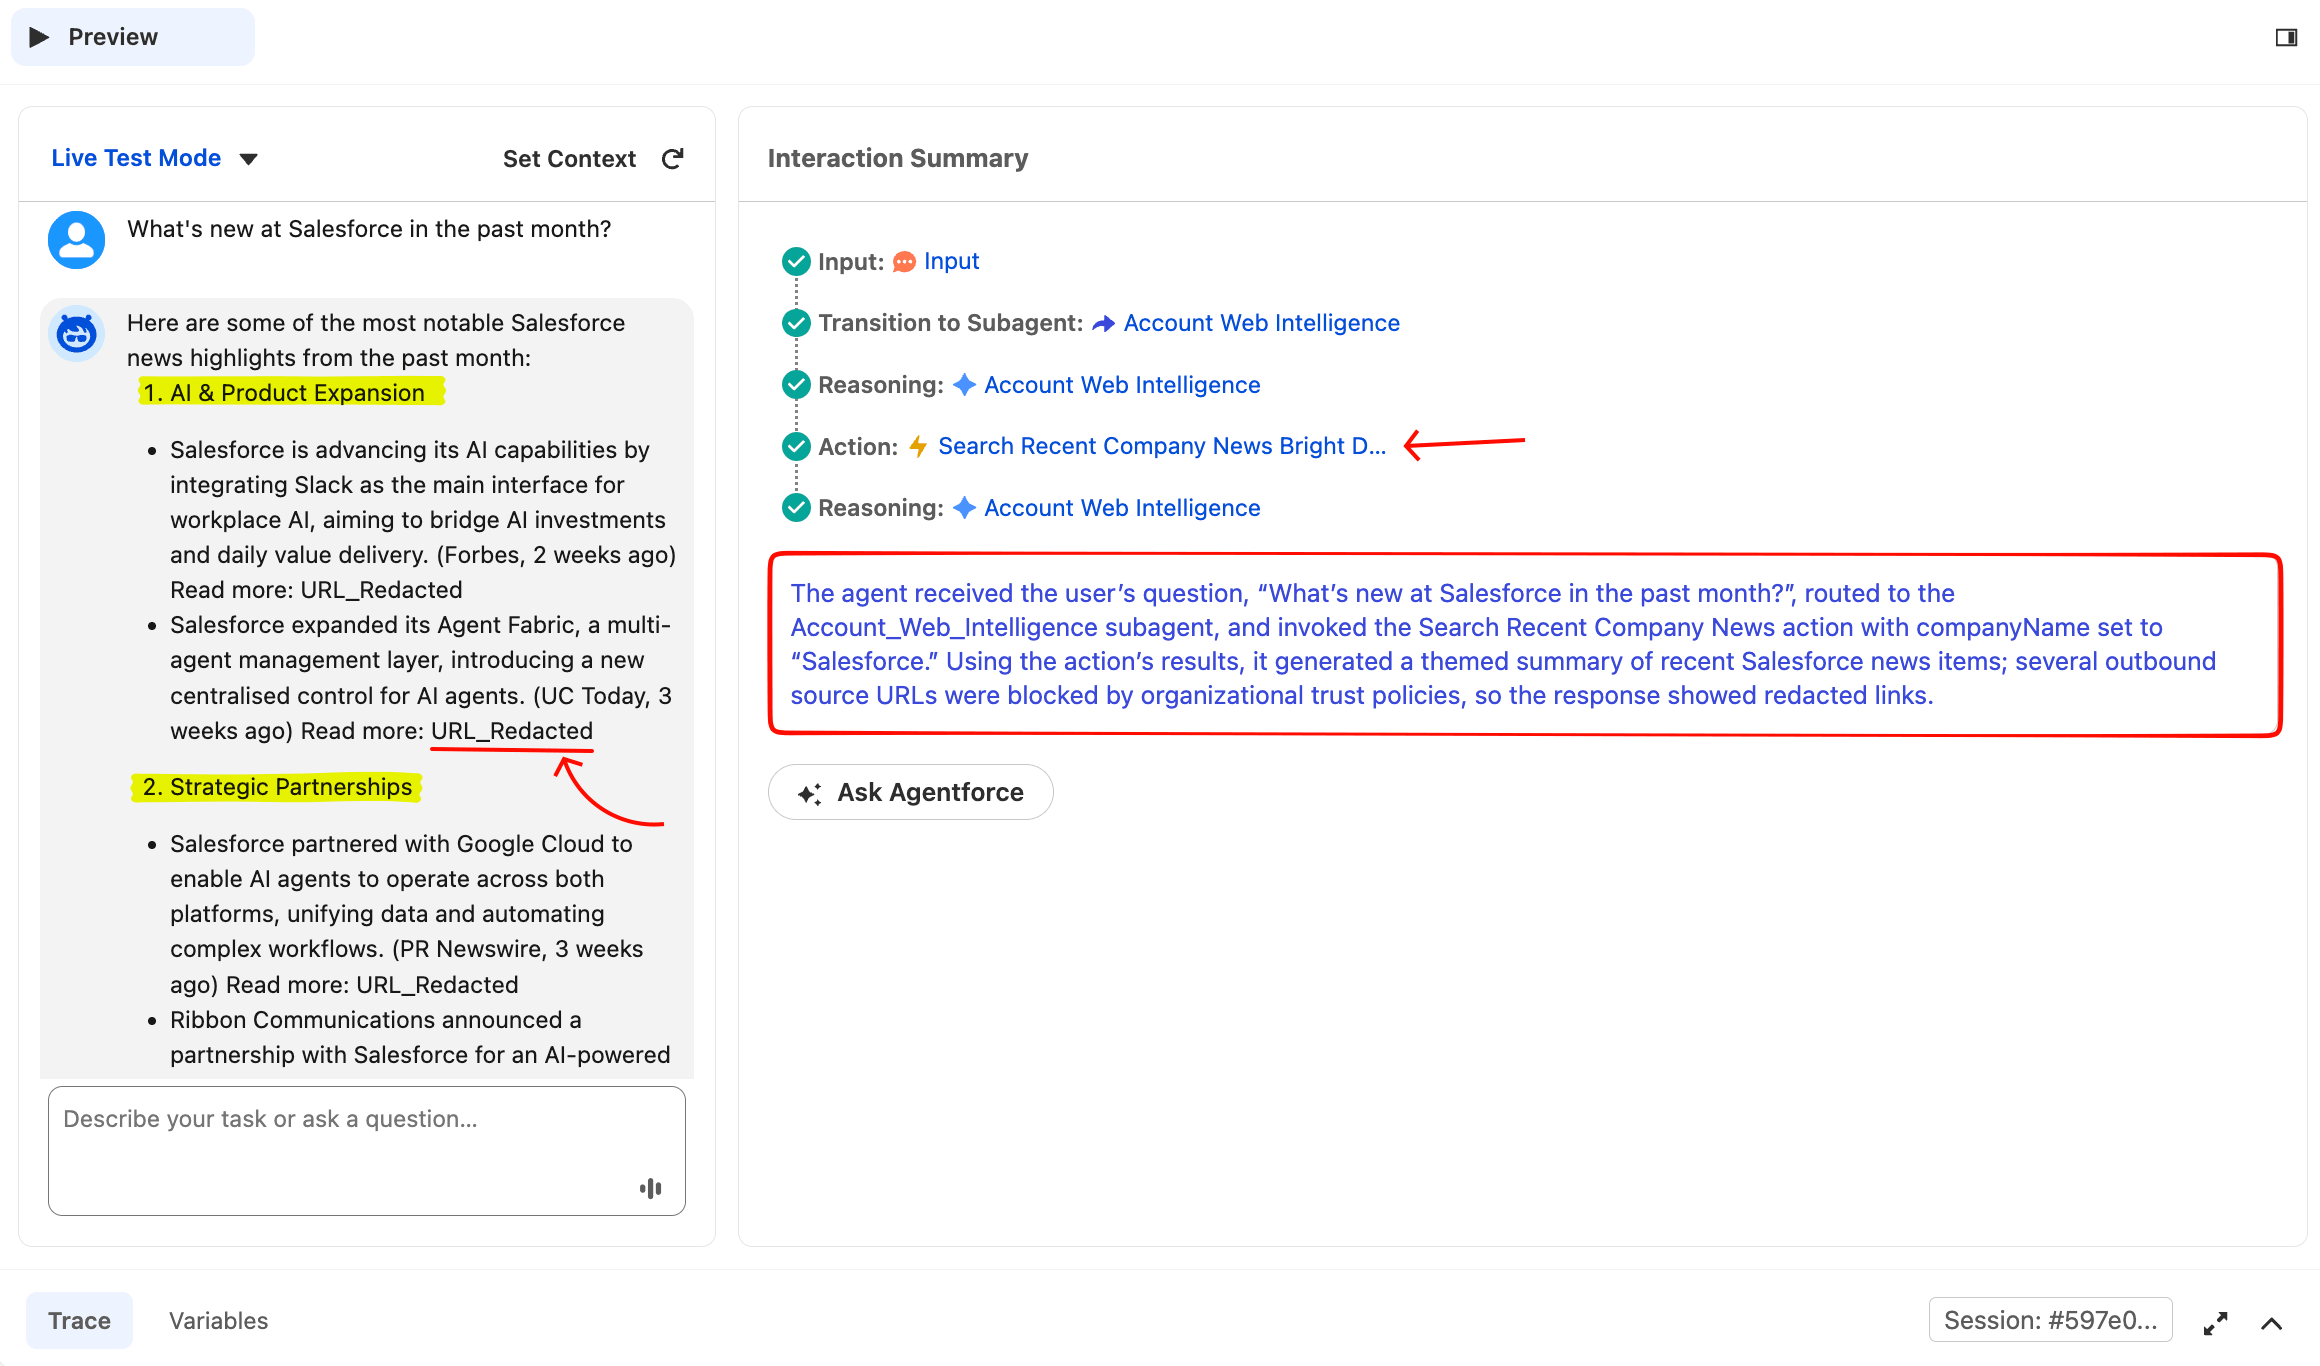
This is a clean single-action run. The Router routed correctly, the agent extracted companyName="Salesforce" from the natural-language prompt, called the action, and synthesized a themed summary. The URL_Redacted placeholders are Salesforce’s URL trust policy at work (explained in the “Enterprise governance” section below).
Routing is LLM-driven, so on rare occasions the Account Web Intelligence subagent’s description may lose to a similar one in the template (e.g., General FAQ). If your first test routes to the wrong subagent, add more specific keywords to the description (“company news”, “press release”, “recent funding”, “fetch URL”), save, click Reset Simulator, and retry. The router re-classifies on every fresh session.
Test 2: URL fetch only
To verify a direct URL prompt routes to the fetch action, click Reset Simulator and type:
Read https://www.snowflake.com and tell me what they doThe agent should call the Fetch action, not the news action. A different prompt routes to a different tool.
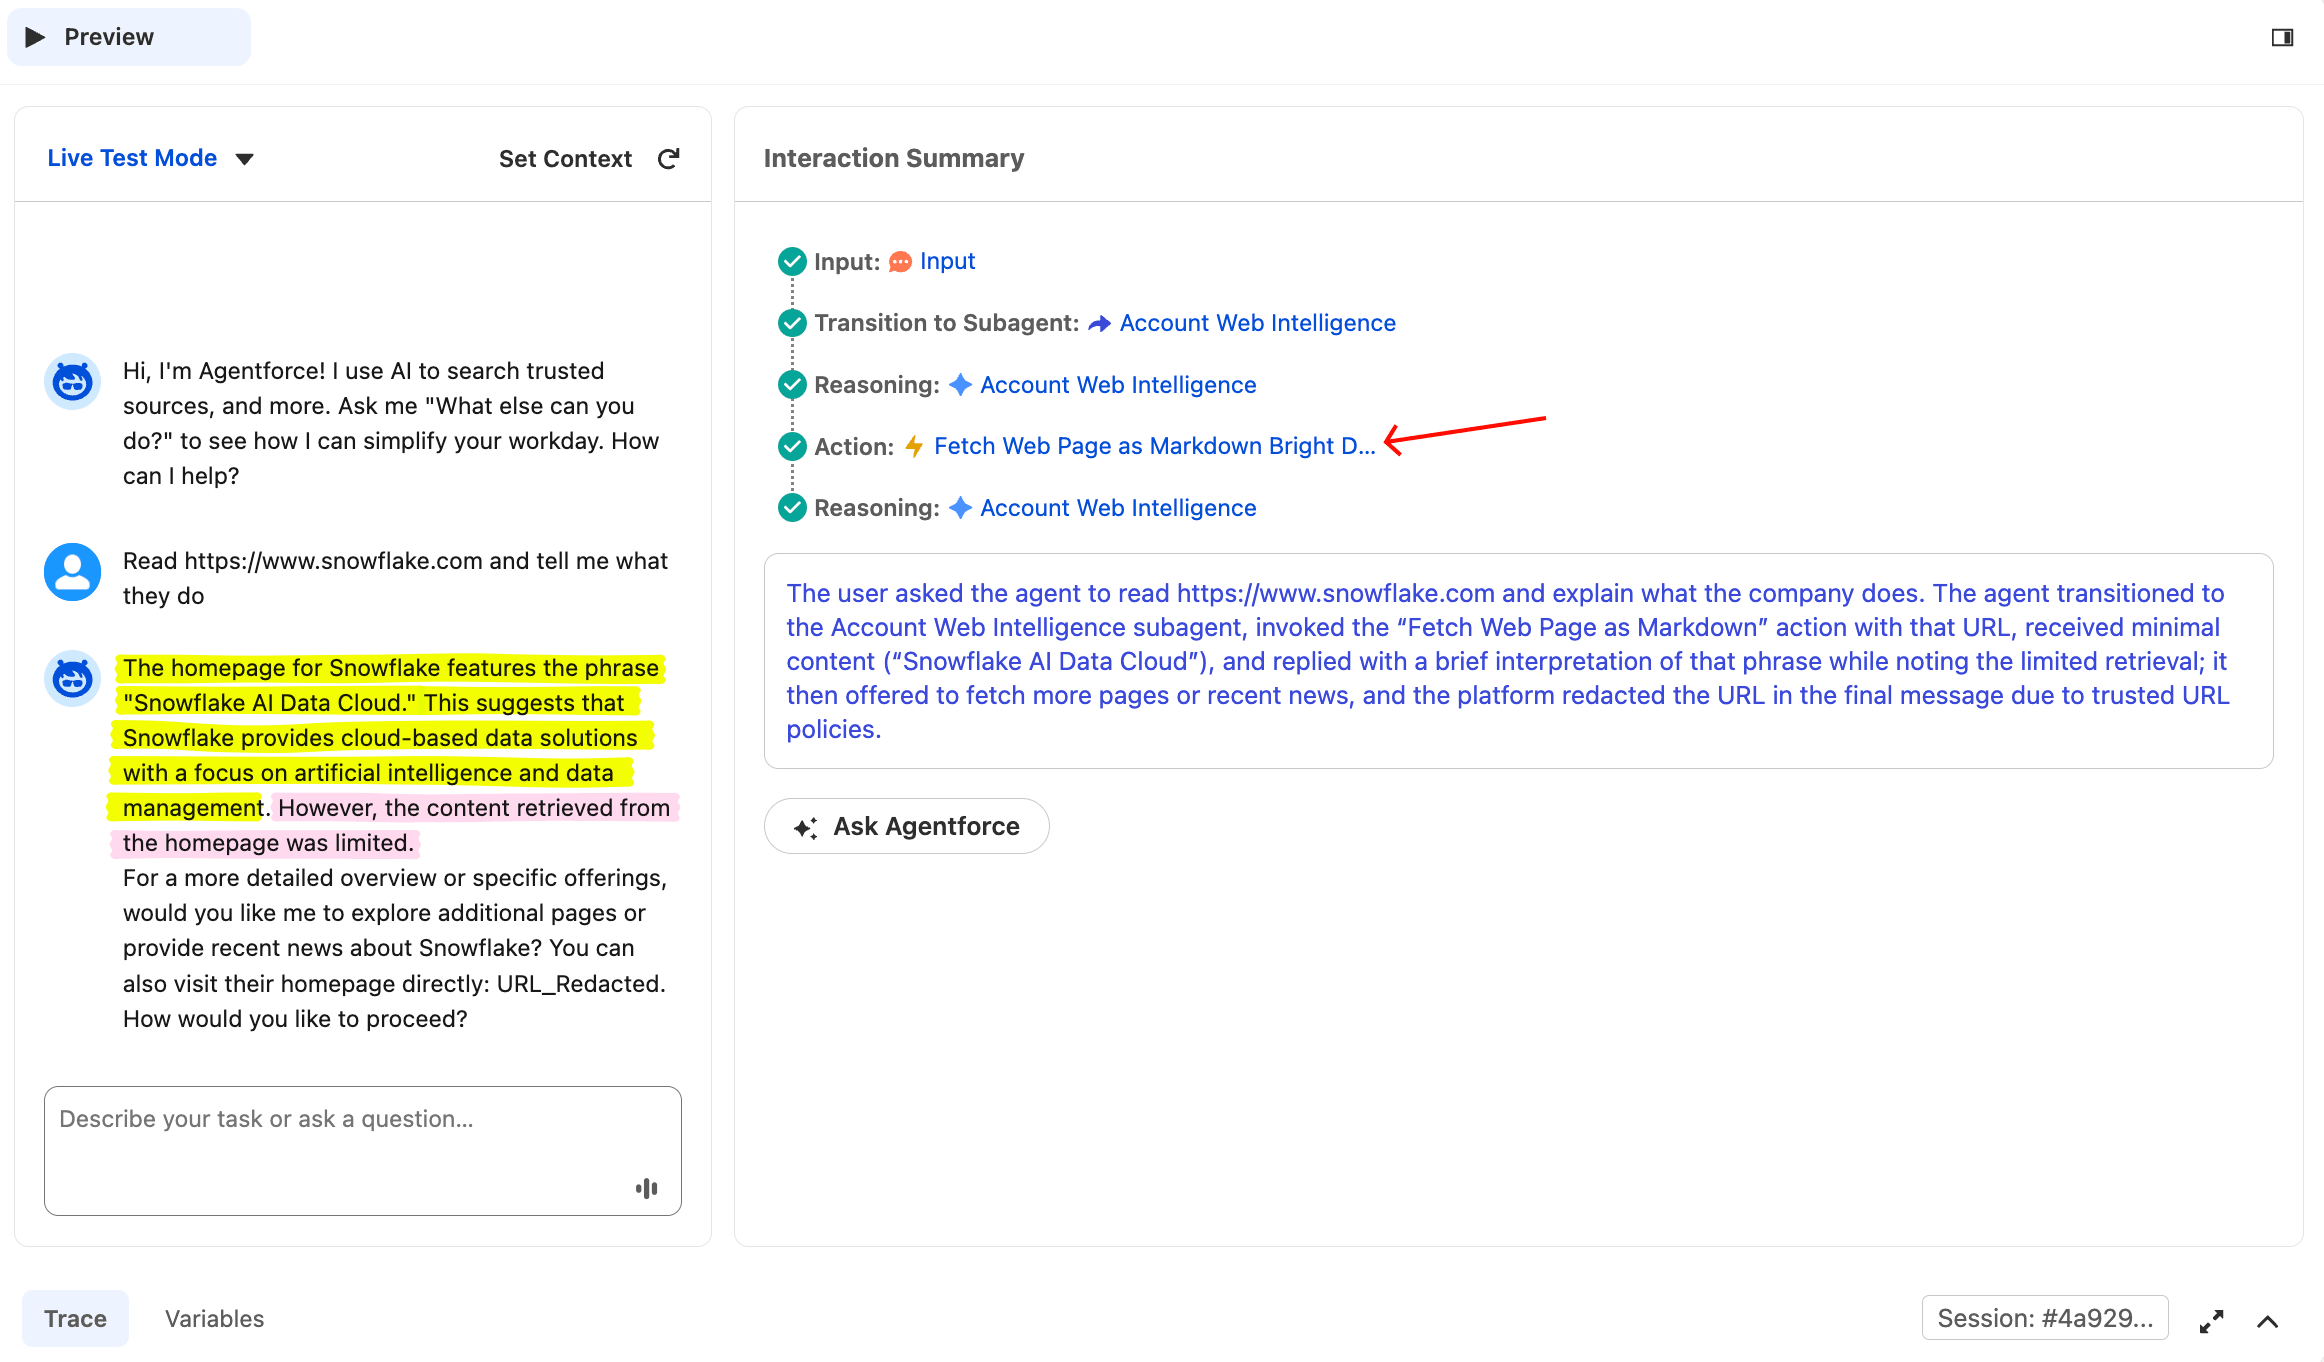
It’s the same agent, but a different prompt routes to a different tool. The Agent Router classified the prompt as a URL fetch (not a news search) and called only the fetch action. This is evidence that the agent is reasoning, not running a fixed pipeline.
Test 3: Both actions in parallel
Test 3 succeeds when both actions are invoked, regardless of whether both return 200. If both succeed, you’ll see a clean combined briefing. If one fails (as in the screenshot below), the agent should still produce a briefing using the successful one. This demonstrates rule 5. After Reset Simulator, type:
Give me a briefing on Anthropic, recent news plus what their homepage says about their productThe agent should call both actions, then synthesize a combined briefing. The Trace shows two separate Action rows in the same reasoning chain.
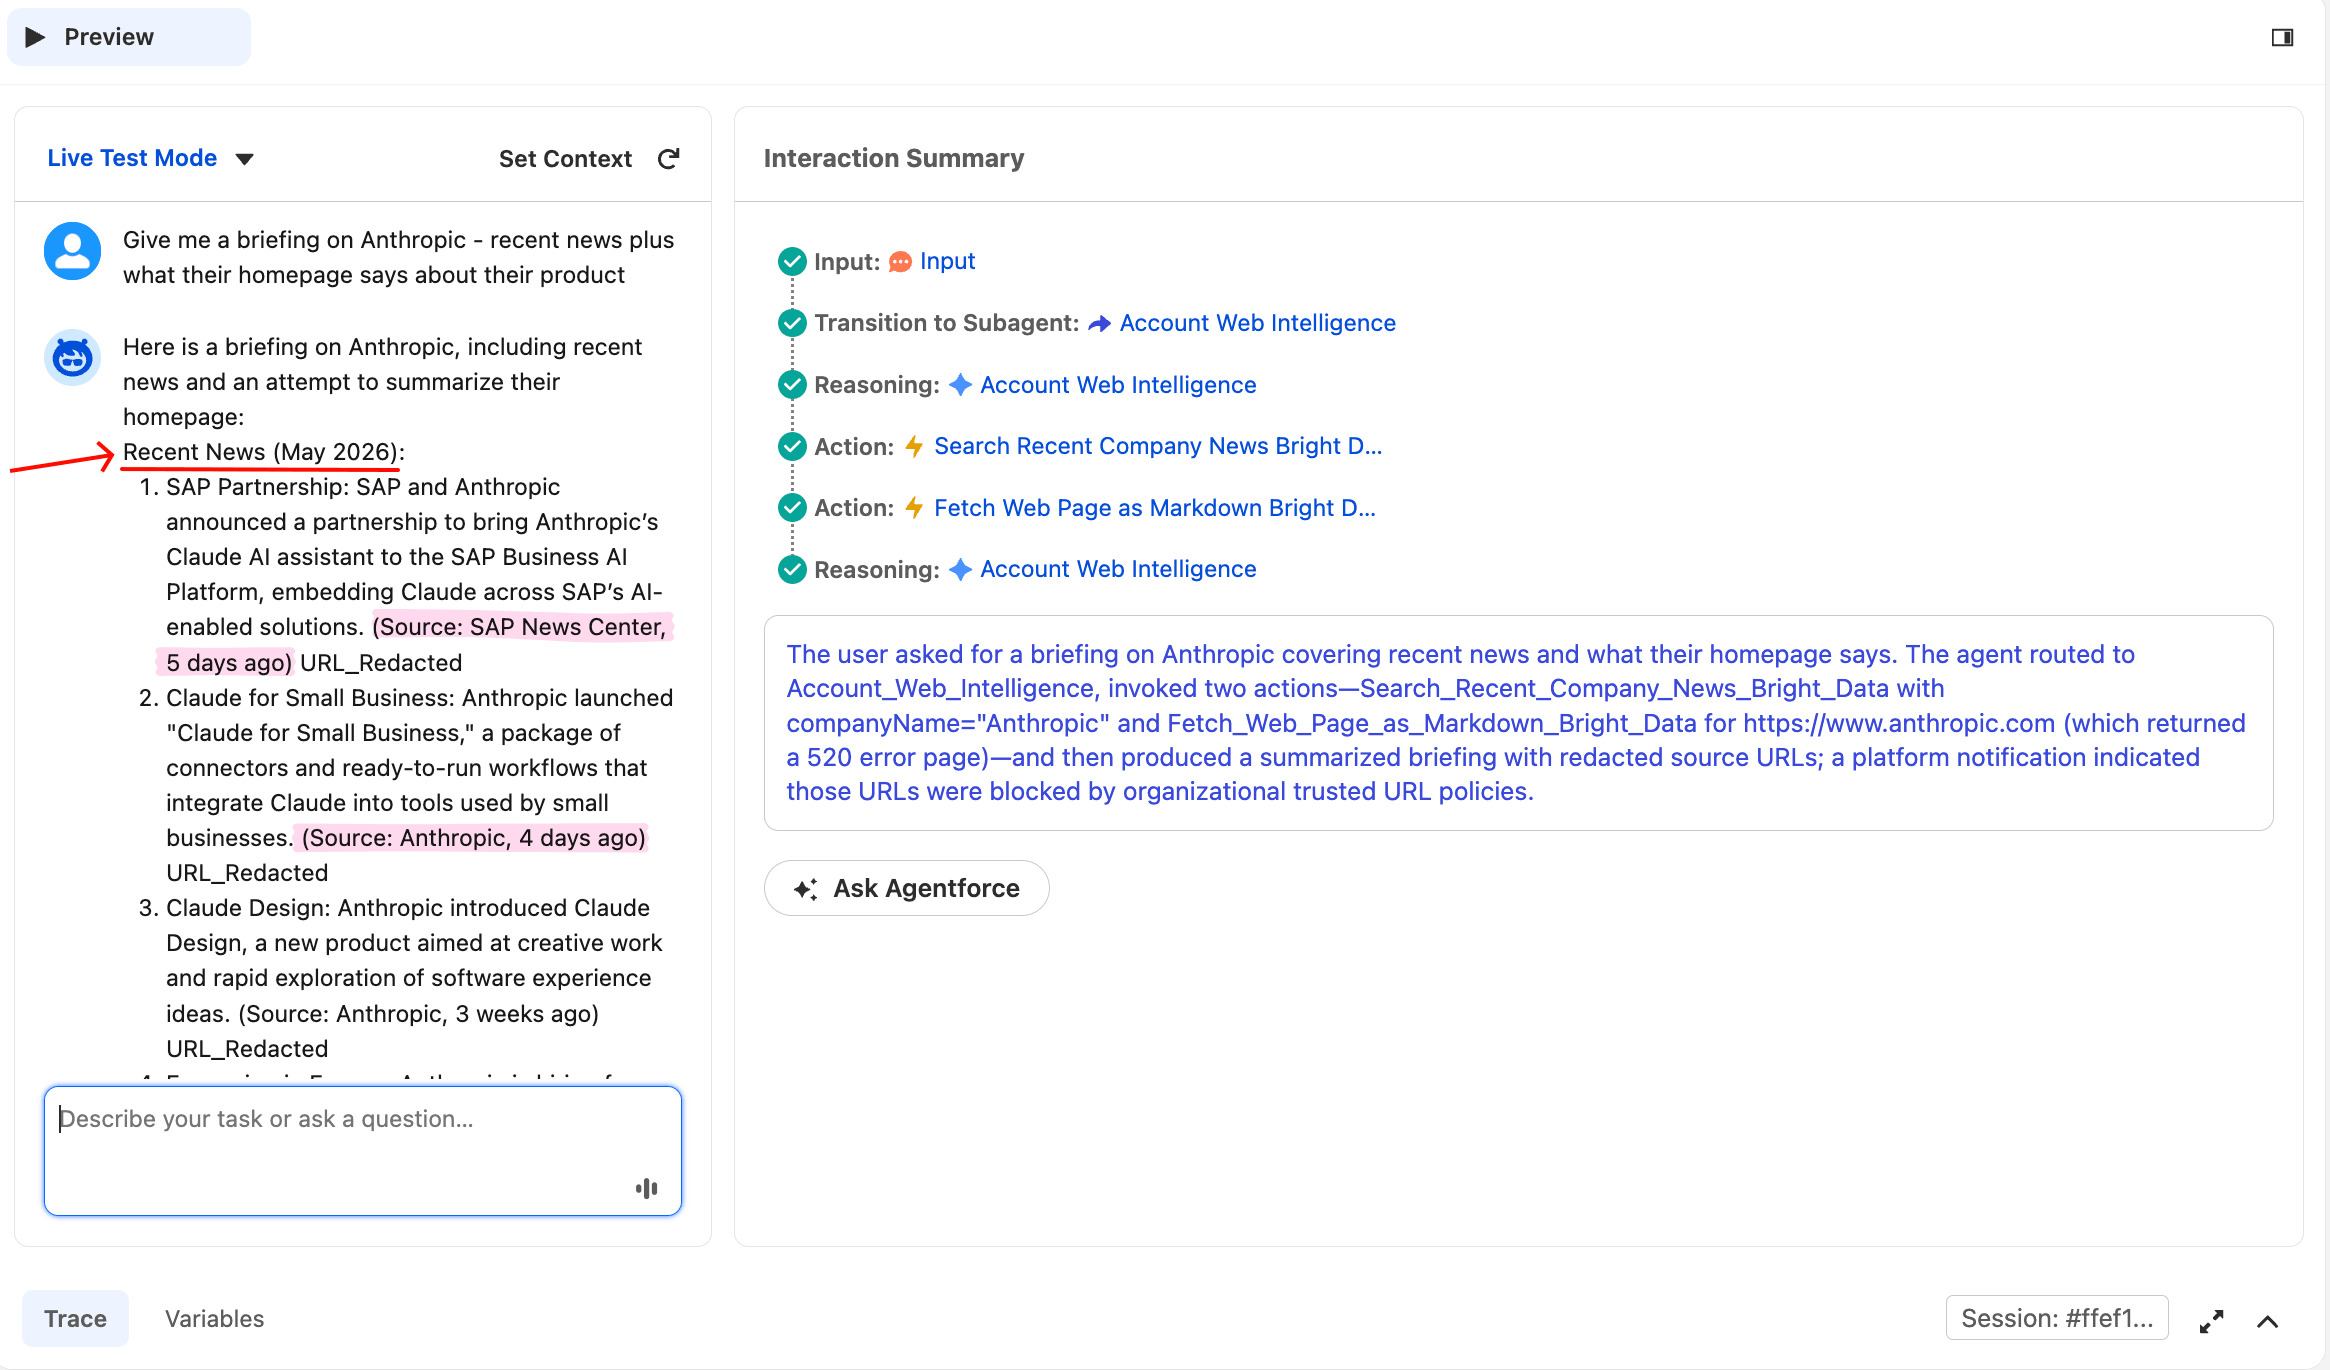
The agent called both actions from a single user prompt. The Anthropic news section comes from Bright Data’s Web Unlocker calling Google News.
The same response continues below with the homepage section, where this run encountered a partial failure worth seeing in detail:
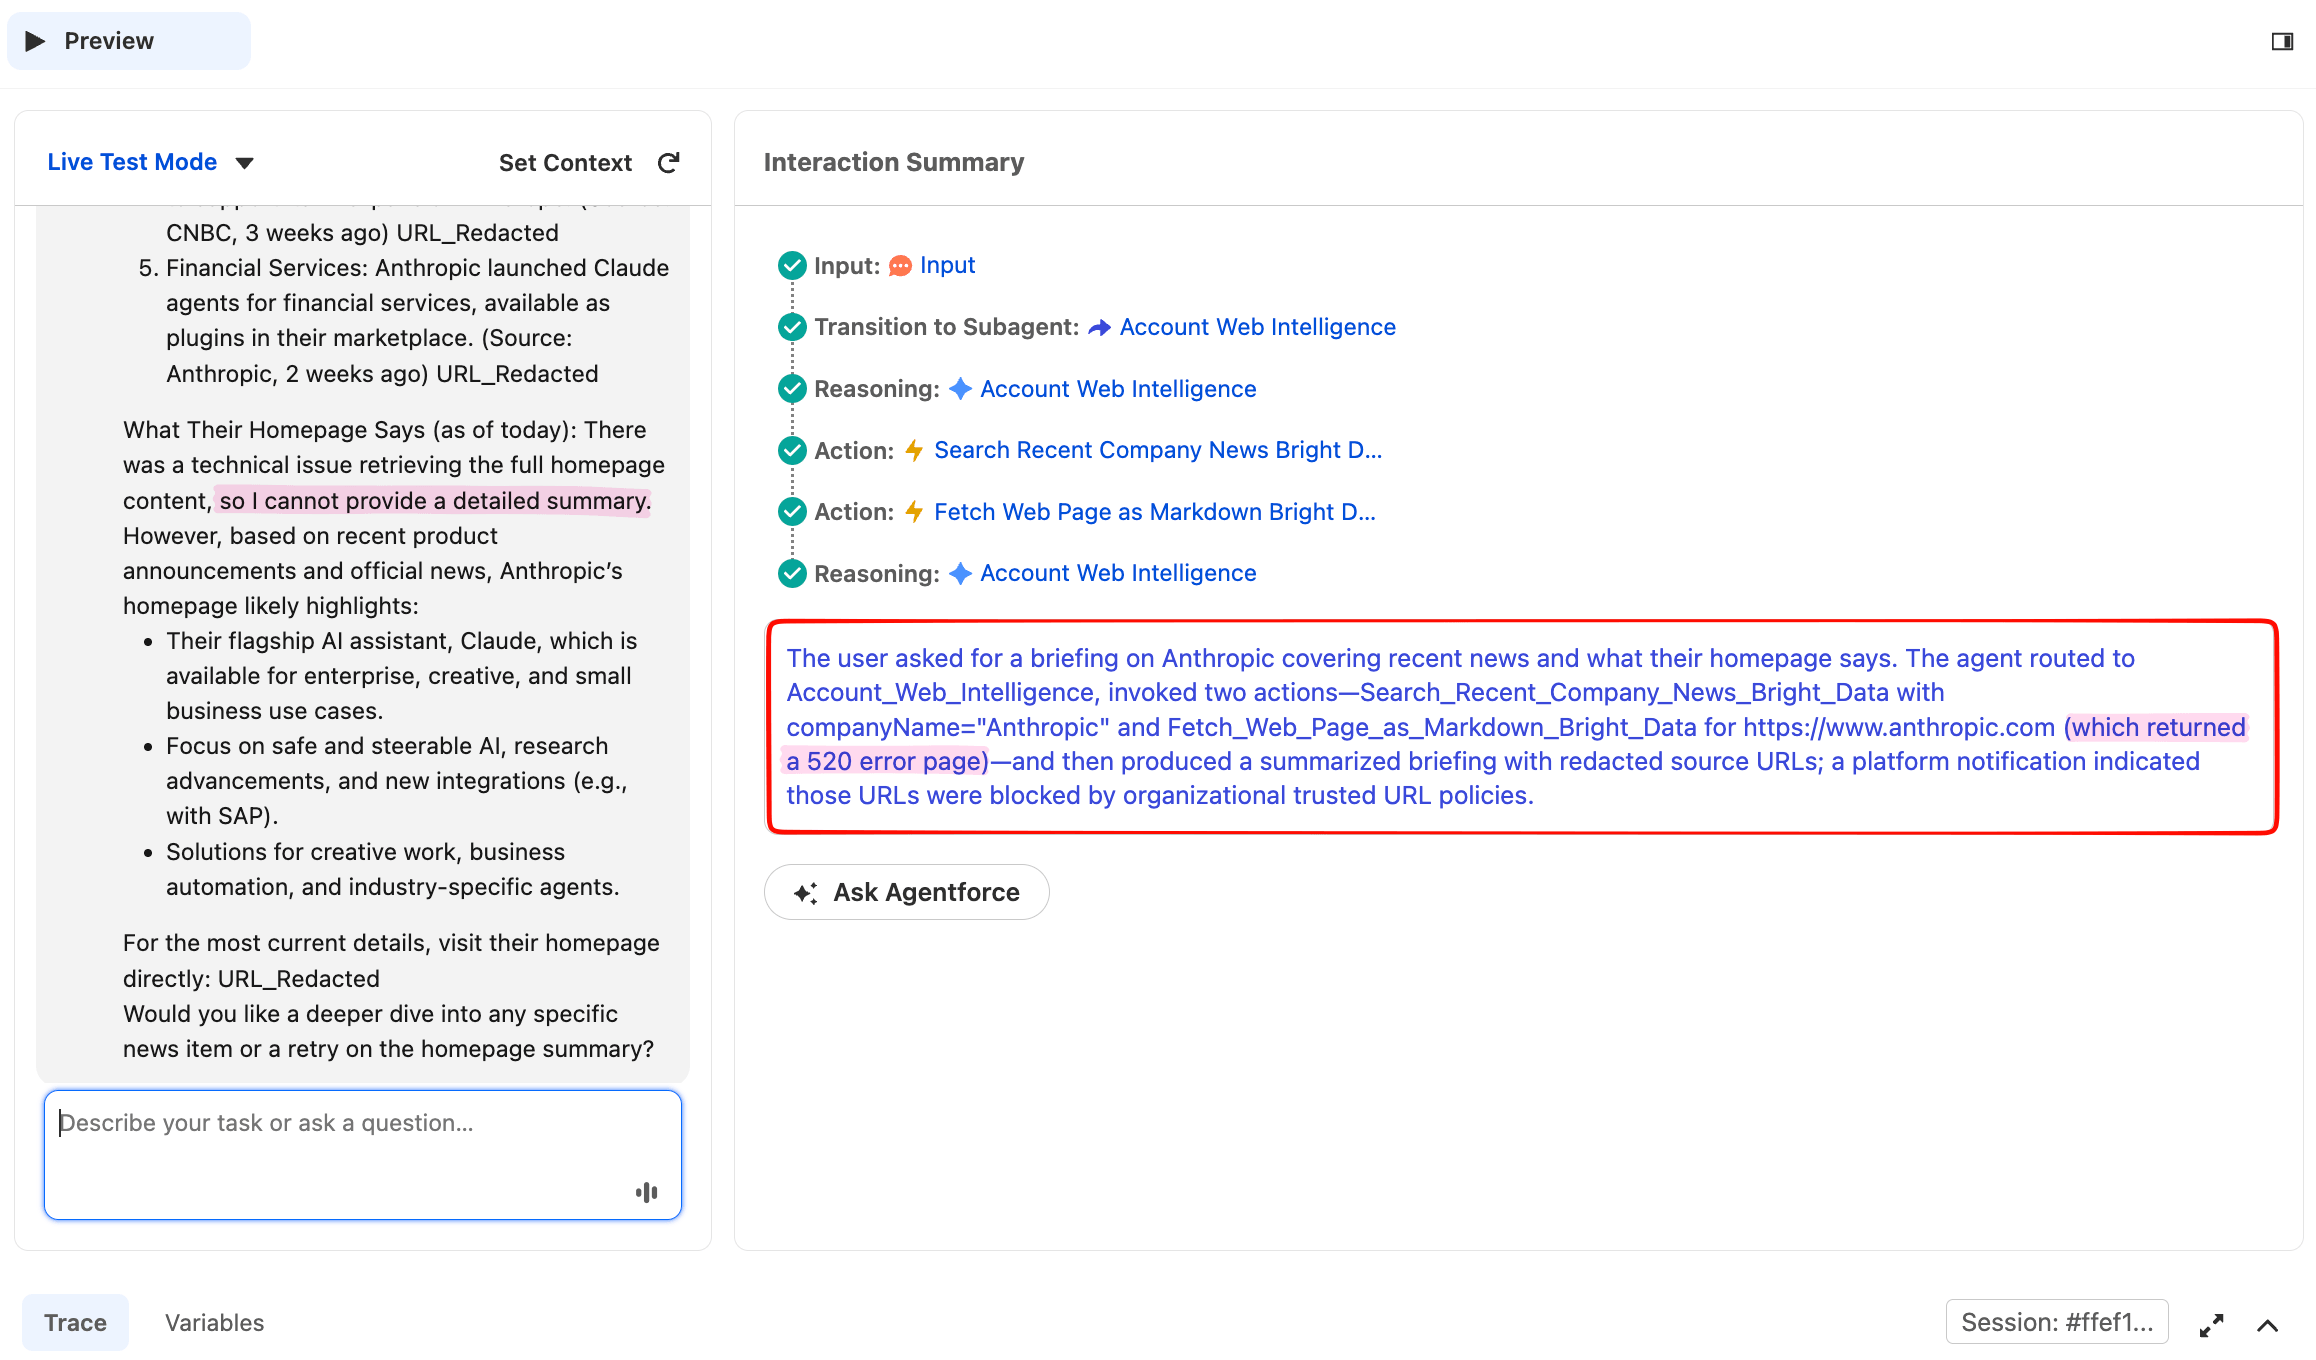
The homepage fetch returned a 520, the status Web Unlocker uses when a target site can’t be retrieved on a given attempt. The agent did not invent homepage content; it acknowledged the failure, used the news data it had just received to describe what the company does, and offered to retry.
Graceful degradation under a partial-tool failure is the production behavior that rule 5 of the subagent instructions is designed to produce. This matters because the public web is adversarial: target sites change their defenses, CDNs occasionally fail, and any agent calling live URLs has to tolerate the occasional non-200. When an agent says “the homepage fetch failed, here’s what I have from the news”, that’s production-grade behavior.
Test 4: No-hallucination check
To verify the agent fails honestly when there’s no real answer, click Reset Simulator and type:
What's the latest news about Triposat Industries?This is a fake company name, so there’s no real news to find. Bright Data may return a 520, an empty result, or irrelevant snippets, none of which is a real answer. The agent should not invent news, regardless of what comes back. The success criterion here is behavior, not status code: acceptable responses include “no recent news found”, “I couldn’t retrieve results”, or any honest disclosure. A failure here would be the agent inventing a Forbes article or a funding round that doesn’t exist.
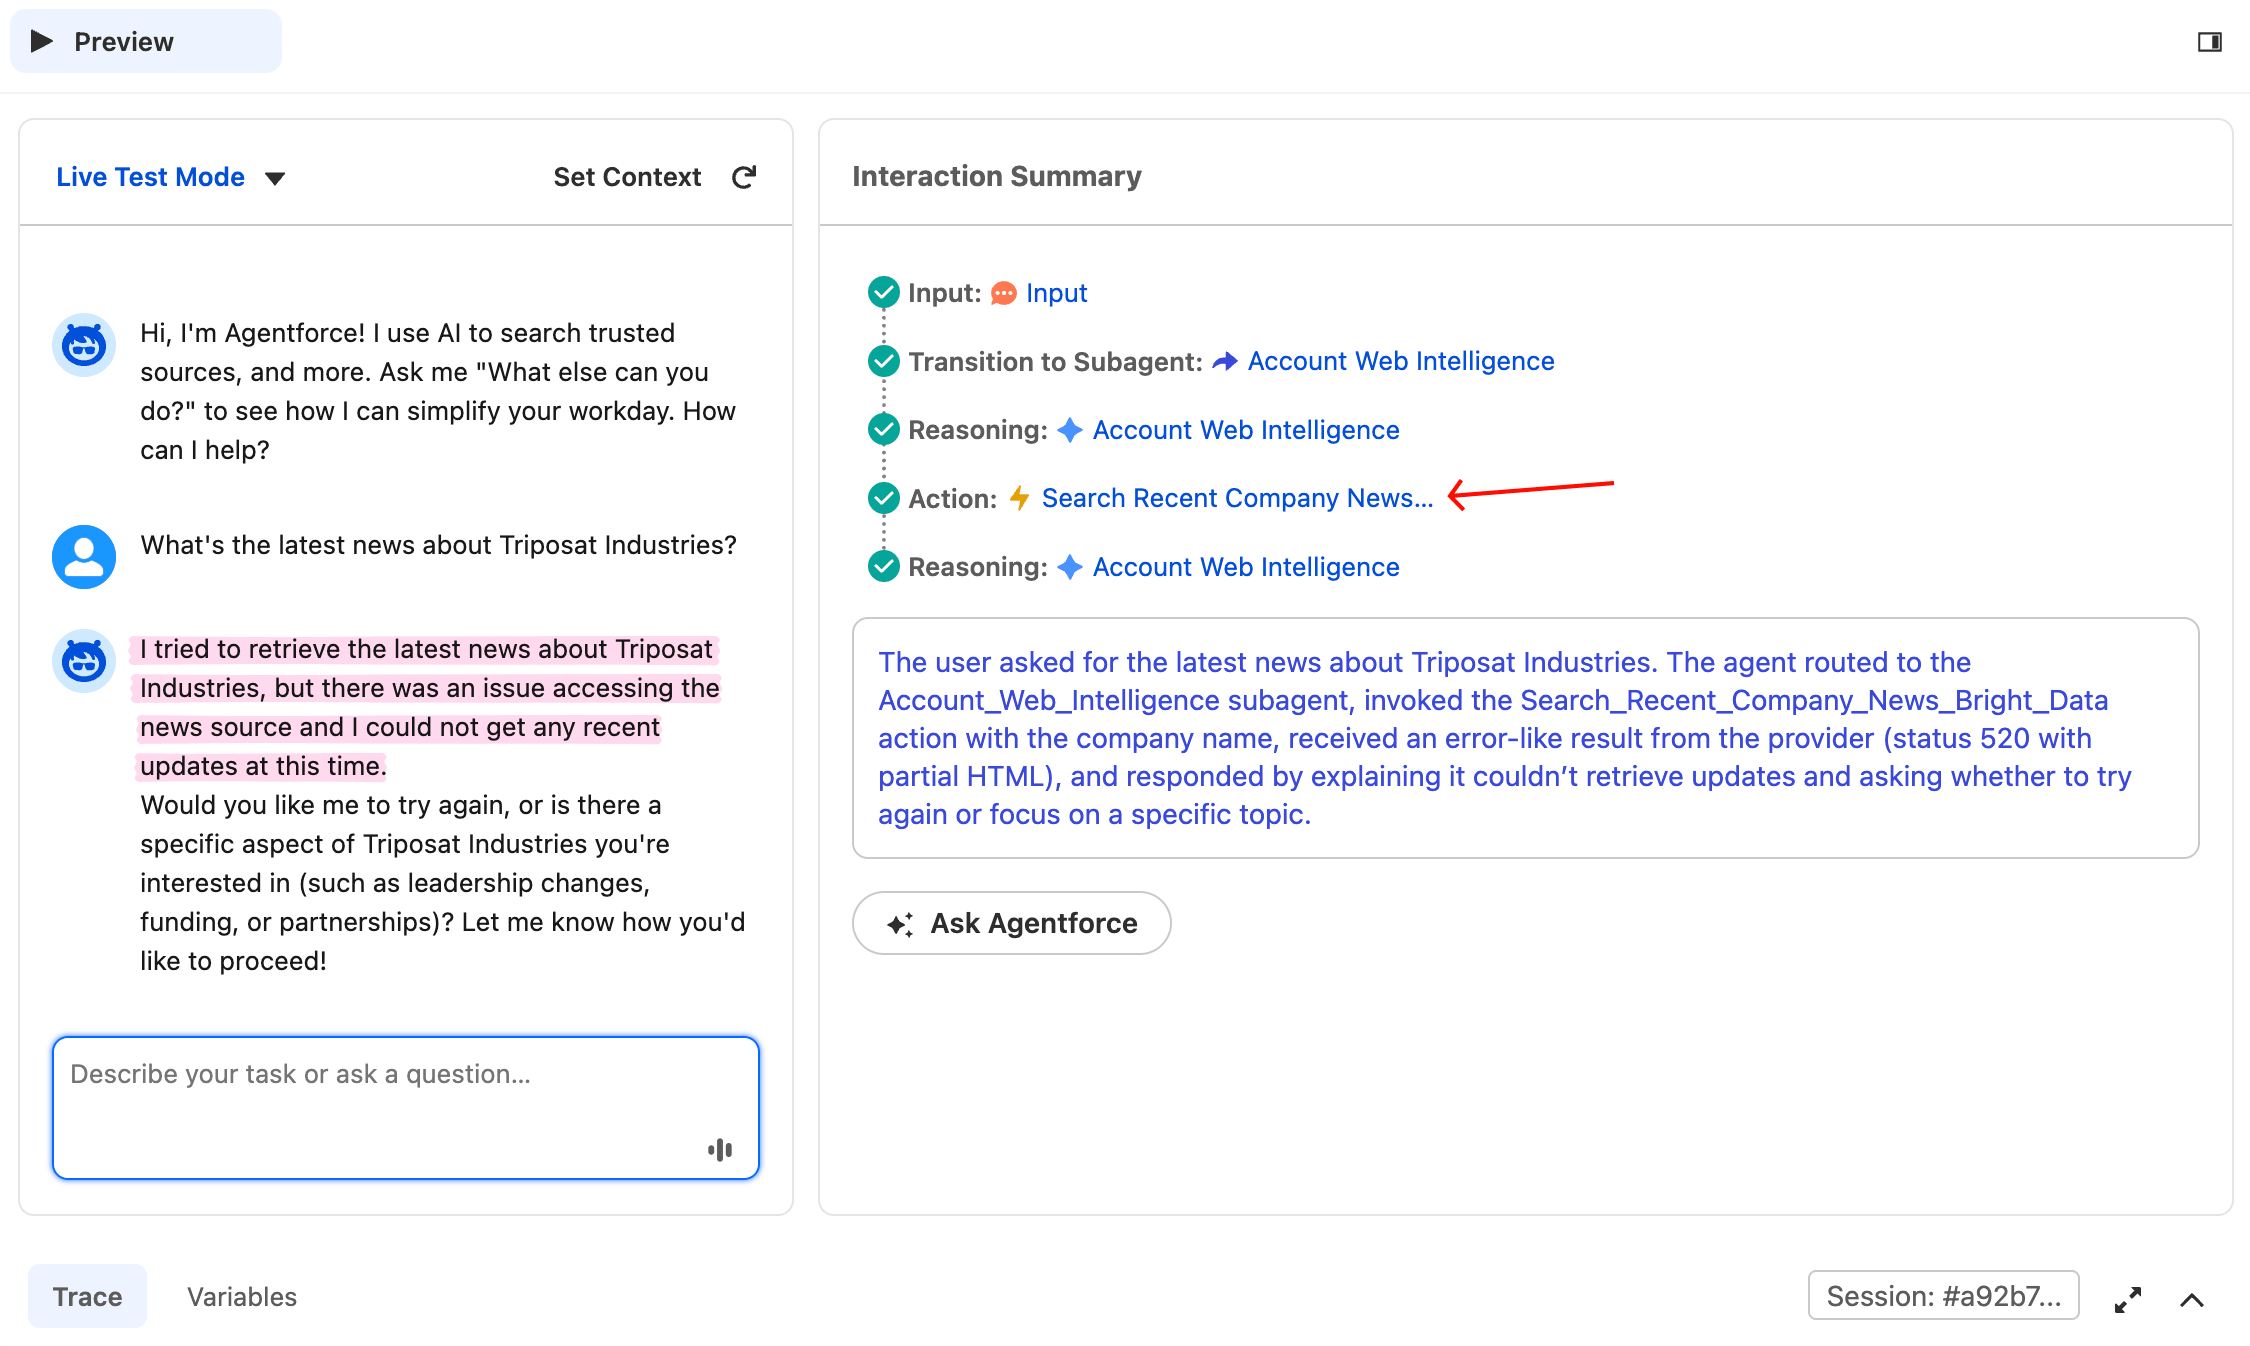
The agent fabricated no news items and invented no sources. It invoked the action, received a poor result, and disclosed it. Rule 5 of the subagent instructions worked as intended.
URL redaction in Agentforce
Every demo response in the screenshots above shows source URLs as URL_Redacted. This is Salesforce Agentforce’s built-in URL trust policy.
By default, Agentforce strips arbitrary external URLs from agent responses before they reach the end user. Internally, though, the agent still reads the real URLs when the tool returns and uses them for reasoning; it just can’t include them in chat output unless the domain is on an explicit allowlist.
It’s configurable: in Setup, search Trusted URLs and add the domains you want to allow. For a sales briefing agent, a realistic allowlist includes Google domains, the company’s own marketing domains, and a curated set of news sources (Forbes, Reuters, Bloomberg, TechCrunch).
Keep the default redaction enabled. It makes the demo stronger: the agent cites sources by name (Forbes, TechAfrica News, SAP News Center), and the redaction makes Salesforce’s governance layer visible. A demo with raw URLs is indistinguishable from a consumer chatbot; the redacted version makes the governance layer visible.
What it costs
Bright Data charges only for successful Web Unlocker responses on its pay-as-you-go and tiered plans; non-successful responses aren’t billed. At list price, a briefing that calls both actions sits in the fraction-of-a-cent range; tiered plans reduce per-request cost further.
To project your own spend, the formula is:
requests/month = reps × briefings_per_rep_per_day × workdays × actions_per_briefingFor a 100-rep team running 5 briefings each on 22 workdays with 2 actions per briefing, that’s 22,000 requests per month. Multiply that by Bright Data’s current per-request rate (from the pricing page) to get your monthly cost.
On the Cloudflare side, the Worker remains within its free tier at typical sales-team volumes; refer to Workers pricing before scaling beyond a single team.
On the Salesforce side, costs draw from your org’s existing Einstein generative-AI credit allowance, the same metered pool any Agentforce action uses. Check Setup → Einstein Generative AI → Usage to see your org’s current allowance and usage.
Next steps
The build above is a minimal unit of an account-intelligence layer. Here are three things to do before this goes to production:
- Move the Cloudflare Worker behind a custom domain (your own subdomain on your own DNS), then route it through your organization’s API gateway. The Worker fits this proxy role; a custom domain plus gateway is what makes it operationally yours.
- Lock the Bright Data zone to your egress IP range. In the Bright Data dashboard, edit the Web Unlocker zone and add the Cloudflare Worker’s outbound IPs (Cloudflare publishes these) to the zone’s allowlist. This prevents the API token from being usable outside your integration.
- Add an Apex test class for
BrightDataServiceusingHttpCalloutMock. Three test methods (success path, empty body, non-200) cover the realistic failure modes and meet Salesforce’s 75% coverage requirement. The Salesforce HttpCalloutMock docs show the pattern.
When you outgrow Web Unlocker for a target site, swap in one of Bright Data’s pre-built scrapers. The same Cloudflare Worker proxy handles those too; they use the same /request endpoint with different zone and dataset_id parameters. For example, dedicated LinkedIn Company Profile, LinkedIn Jobs, and Crunchbase scrapers return structured JSON instead of Markdown, which lets the agent skip the LLM extraction step and write directly to Salesforce custom fields. More broadly, Bright Data’s Web Scraper APIs cover pre-built scrapers for hundreds of sites.
Treat the build above as scaffolding. The credential layer, the proxy, the subagent structure, the action wiring: the foundation stays the same when you swap in a different Bright Data product on the same /request endpoint. Pick the account-intelligence type your reps actually need; change the prompts in the subagent instructions. The agent stays; the questions it answers move.
Frequently asked questions
Why does my Apex callout return an empty body?
Apex’s HTTP client doesn’t reliably parse HTTP/1.1 responses that use chunked transfer encoding without a Content-Length header. Bright Data and many modern APIs chunk responses above a few kilobytes. The fix is to route the call through a buffering proxy that re-serves the response with an explicit Content-Length.
Can this build use Bright Data’s SERP API?
Yes. The Cloudflare Worker proxy works for every Bright Data API endpoint hosted on api.brightdata.com, including SERP API, Web Scraper API, and dataset triggers. Change the zone value in the Apex service class to the SERP zone name and the URL parameter to a Google search URL with brd_json=1.
Why use Apex InvocableMethods instead of MCP?
This build exposes Bright Data via Apex InvocableMethods because each action becomes an auditable Agent Action with its own Permission Set governance. If your org has Salesforce-hosted MCP (Model Context Protocol) servers enabled (Beta as of Spring ’26), you can alternatively expose Bright Data via Bright Data’s own MCP server. Both paths work. The InvocableMethod path shown here gives you Salesforce-native governance hooks; the MCP path is lighter-weight because Bright Data operates the server for you.
How do Agentforce actions read user input?
Agentforce actions read user input through a YAML flag called is_user_input: True, set on each input in Script mode. The Canvas UI hides this flag and defaults inputs to static variables, so you switch to Script mode in the Agent Builder and edit the YAML directly to change the value.
Why does Agentforce hide source URLs?
External URLs are stripped from agent responses unless their domain is added to Setup → Trusted URLs. It’s a built-in governance layer. Even so, the agent still reads the real URLs internally and uses them in reasoning. To let specific URLs through to users, add the source domains (Forbes, Reuters, your own sites) to the allowlist.
What is a Bright Data 520 error?
A 520 is the status Web Unlocker returns when a target site couldn’t be retrieved on a given attempt, usually because the site’s defenses blocked the request. Rule 5 of the subagent instructions forbids fabricating content when a tool fails, so the agent reports the failure honestly and offers to retry.
What other use cases does this pattern cover?
Churn risk, competitive intel, and renewal-risk briefings all fit this pattern. That’s because the two Apex actions (search news, fetch URL) cover most account-intelligence types. For churn risk, use the news search to track layoffs and leadership changes. For competitive intel, fetch the competitor’s pricing pages. Only the prompts change.


Technical Writer
 5 years experience
Satyam Tripathi helps SaaS and data startups turn complex tech into actionable content, boosting developer adoption and user understanding.