
In this guide, you will see:
- What AG2 is and how it supports both single-agent and multi-agent system development, as well as the benefits of extending it with Bright Data.
- The prerequisites to get started with this integration.
- How to power an AG2 multi-agent architecture with Bright Data via custom tools.
- How to connect AG2 to Bright Data’s Web MCP.
Let’s dive in!
An Introduction to AG2 (Formerly AutoGen)
AG2 is an open-source AgentOS framework for building AI agents and multi-agent systems capable of autonomously collaborating to solve complex tasks. It lets you craft single-agent workflows, orchestrate multiple specialized agents, and integrate external tools into modular, production-ready pipelines.
AG2, formerly AutoGen, is an evolution of the Microfost AutoGen library. It preserves the original architecture and backward compatibility while enabling multi-agent workflows, tool integration, and human-in-the-loop AI. Written in Python, it has 4k+ GitHub stars.
(If you are looking for guidance on integrating Bright Data with AutoGen, refer to the dedicated blog post.)
AG2 provides the flexibility and advanced orchestration patterns needed to take agentic AI projects from experimentation to production.
Some of its core features include multi-agent conversation patterns, human-in-the-loop support, tool integration, and structured workflow management. Its end goal is to help you build sophisticated AI systems with minimal overhead.
Despite those wonderful capabilities, AG2 agents still face core LLM limitations: static knowledge from training data and no native access to live web information!
Integrating AG2 with a web data provider like Bright Data addresses all those issues. Connecting AG2 agents to Bright Data’s APIs for web scraping, search, and browser automation enables real-time, structured web data, boosting their intelligence, autonomy, and practical utility.
Prerequisites
To follow along with this guide, you need:
- Python 3.10 or higher installed on your local machine.
- A Bright Data account with the Web Unlocker API, SERP API, and an API key configured. (This tutorial will guide you through all required setups.)
- An OpenAI API key (or an API key from any other LLM supported by AG2).
It is also helpful to have some familiarity with Bright Data’s products and services, as well as a basic understanding of how the AG2 tool system works.
How to Integrate Bright Data into an AG2 Multi-Agent Workflow
In this step-by-step section, you will build a multi-agent AG2 workflow based on Bright Data services. In particular, a dedicated agent for web data retrieval will access Bright Data’s Web Unlocker and SERP API via custom AG2 tool functions.
This multi-agent system will identify top influencers on platforms like Twitch in the food industry to support promoting a new type of hamburger. This example demonstrates how AG2 can automate data collection, produce structured business reports, and enable informed decision-making—all without manual effort.
See how to implement it!
Step #1: Create an AG2 Project
Open a terminal and create a new folder for your AG2 project. For example, name it ag2-bright-data-agent:
mkdir ag2-bright-data-agentag2-bright-data-agent/ will contain the Python code for implementing and orchestrating AG2 agents that integrate with Bright Data functions.
Next, move into the project directory and create a virtual environment inside it:
cd ag2-bright-data-agent
python -m venv .venv
Add a new file called agent.py to the project root. Your project structure should now look like this:
ag2-bright-data-agent/
├── .venv/
└── agent.py # <----
The agent.py file will contain the AG2 agent definition and orchestration logic.
Open the project folder in your preferred Python IDE, such as Visual Studio Code with the Python extension or PyCharm Community Edition.
Now, activate the virtual environment you just created. In Linux or macOS, run:
source .venv/bin/activateEquivalently, on Windows, execute:
.venv/Scripts/activateWith the virtual environment activated, install the required PyPI dependencies:
pip install ag2[openai] requests python-dotenvThis application relies on the following libraries:
ag2[openai]: For building and orchestrating multi-agent AI workflows powered by OpenAI models.requests: For making HTTP requests to Bright Data services through custom tools.python-dotenv: For loading required secrets from environment variables defined in a.envfile
Well done! You now have a ready-to-use Python environment for multi-agent AI development with AG2.
Step #2: Configure the LLM Integration
The AG2 agents you are going to build in the next steps require a brain, which is provided by an LLM. Each agent can use its own LLM configuration, but for simplicity, we will connect all agents to the same OpenAI model.
AG2 includes a built-in mechanism for loading LLM settings from a dedicated configuration file. To do so, add the following code to agent.py:
from autogen import LLMConfig

# Load LLM configuration from the OpenAI config list file
llm_config = LLMConfig.from_json(path="OAI_CONFIG_LIST")
This code loads the LLM configuration from a file named OAI_CONFIG_LIST.json. Create this file in your project’s root directory:
ag2-bright-data-agent/
├── .venv/
├── OAI_CONFIG_LIST.json # <----
└── agent.py
Now, populate OAI_CONFIG_LIST.json with the following content:
[
  {
    "model": "gpt-5-mini",
    "api_key": "<YOUR_OPENAI_API_KEY>"
  }
]
Replace the <YOUR_OPENAI_API_KEY> placeholder with your actual OpenAI API key. This configuration powers your AG2 agents using the GPT-5 Mini model, but you can swap in any other supported OpenAI model if needed.
The llm_config variable will be passed to your agents and the group chat orchestrator. That enables them to reason, communicate, and execute tasks using the configured LLM. Awesome!
Step #3: Manage Environment Variable Reading
Your AG2 agents can now connect to OpenAI, but they also need access to another third-party service: Bright Data. Just like OpenAI, Bright Data authenticates requests using an external API key.
To avoid security risks, you should never hard-code API keys directly in your code. Instead, the best practice is to load them from environment variables. This is exactly why you installed python-dotenv earlier.
First, import python-dotenv in agent.py. Employ it to load environment variables from a .env file using the load_dotenv() function:
from dotenv import load_dotenv
import os

# Load environment variables from the .env file
load_dotenv()
Next, add a .env file to your project’s root directory, which should contain:
ag2-bright-data-agent/
├── .venv/
├── OAI_CONFIG_LIST.json
├── .env # <----
└── agent.py
After adding your secret values to the .env file, you will be able to access them in the code using os.getenv():
ENV_VALUE = os.getenv("ENV_NAME")Cool! Your script can securely load third-party integration secrets from environment variables.
Step #4: Set Up Bright Data Services
As anticipated in the introduction, the web data agent will connect to Bright Data’s SERP API and Web Unlocker API to handle web searches and content retrieval from web pages. Together, these services give the agent the ability to fetch live web data in an agentic RAG-style data retrieval layer.
To interact with those two services, you will have to define two custom AG2 tools later on. Before doing that, you must set everything up in your Bright Data account.
Start by creating a Bright Data account, if you do not already have one. Otherwise, log in and reach your dashboard. From there, navigate to the “Proxies & Scraping” page and review the “My Zones” table listing the configured services in your profile: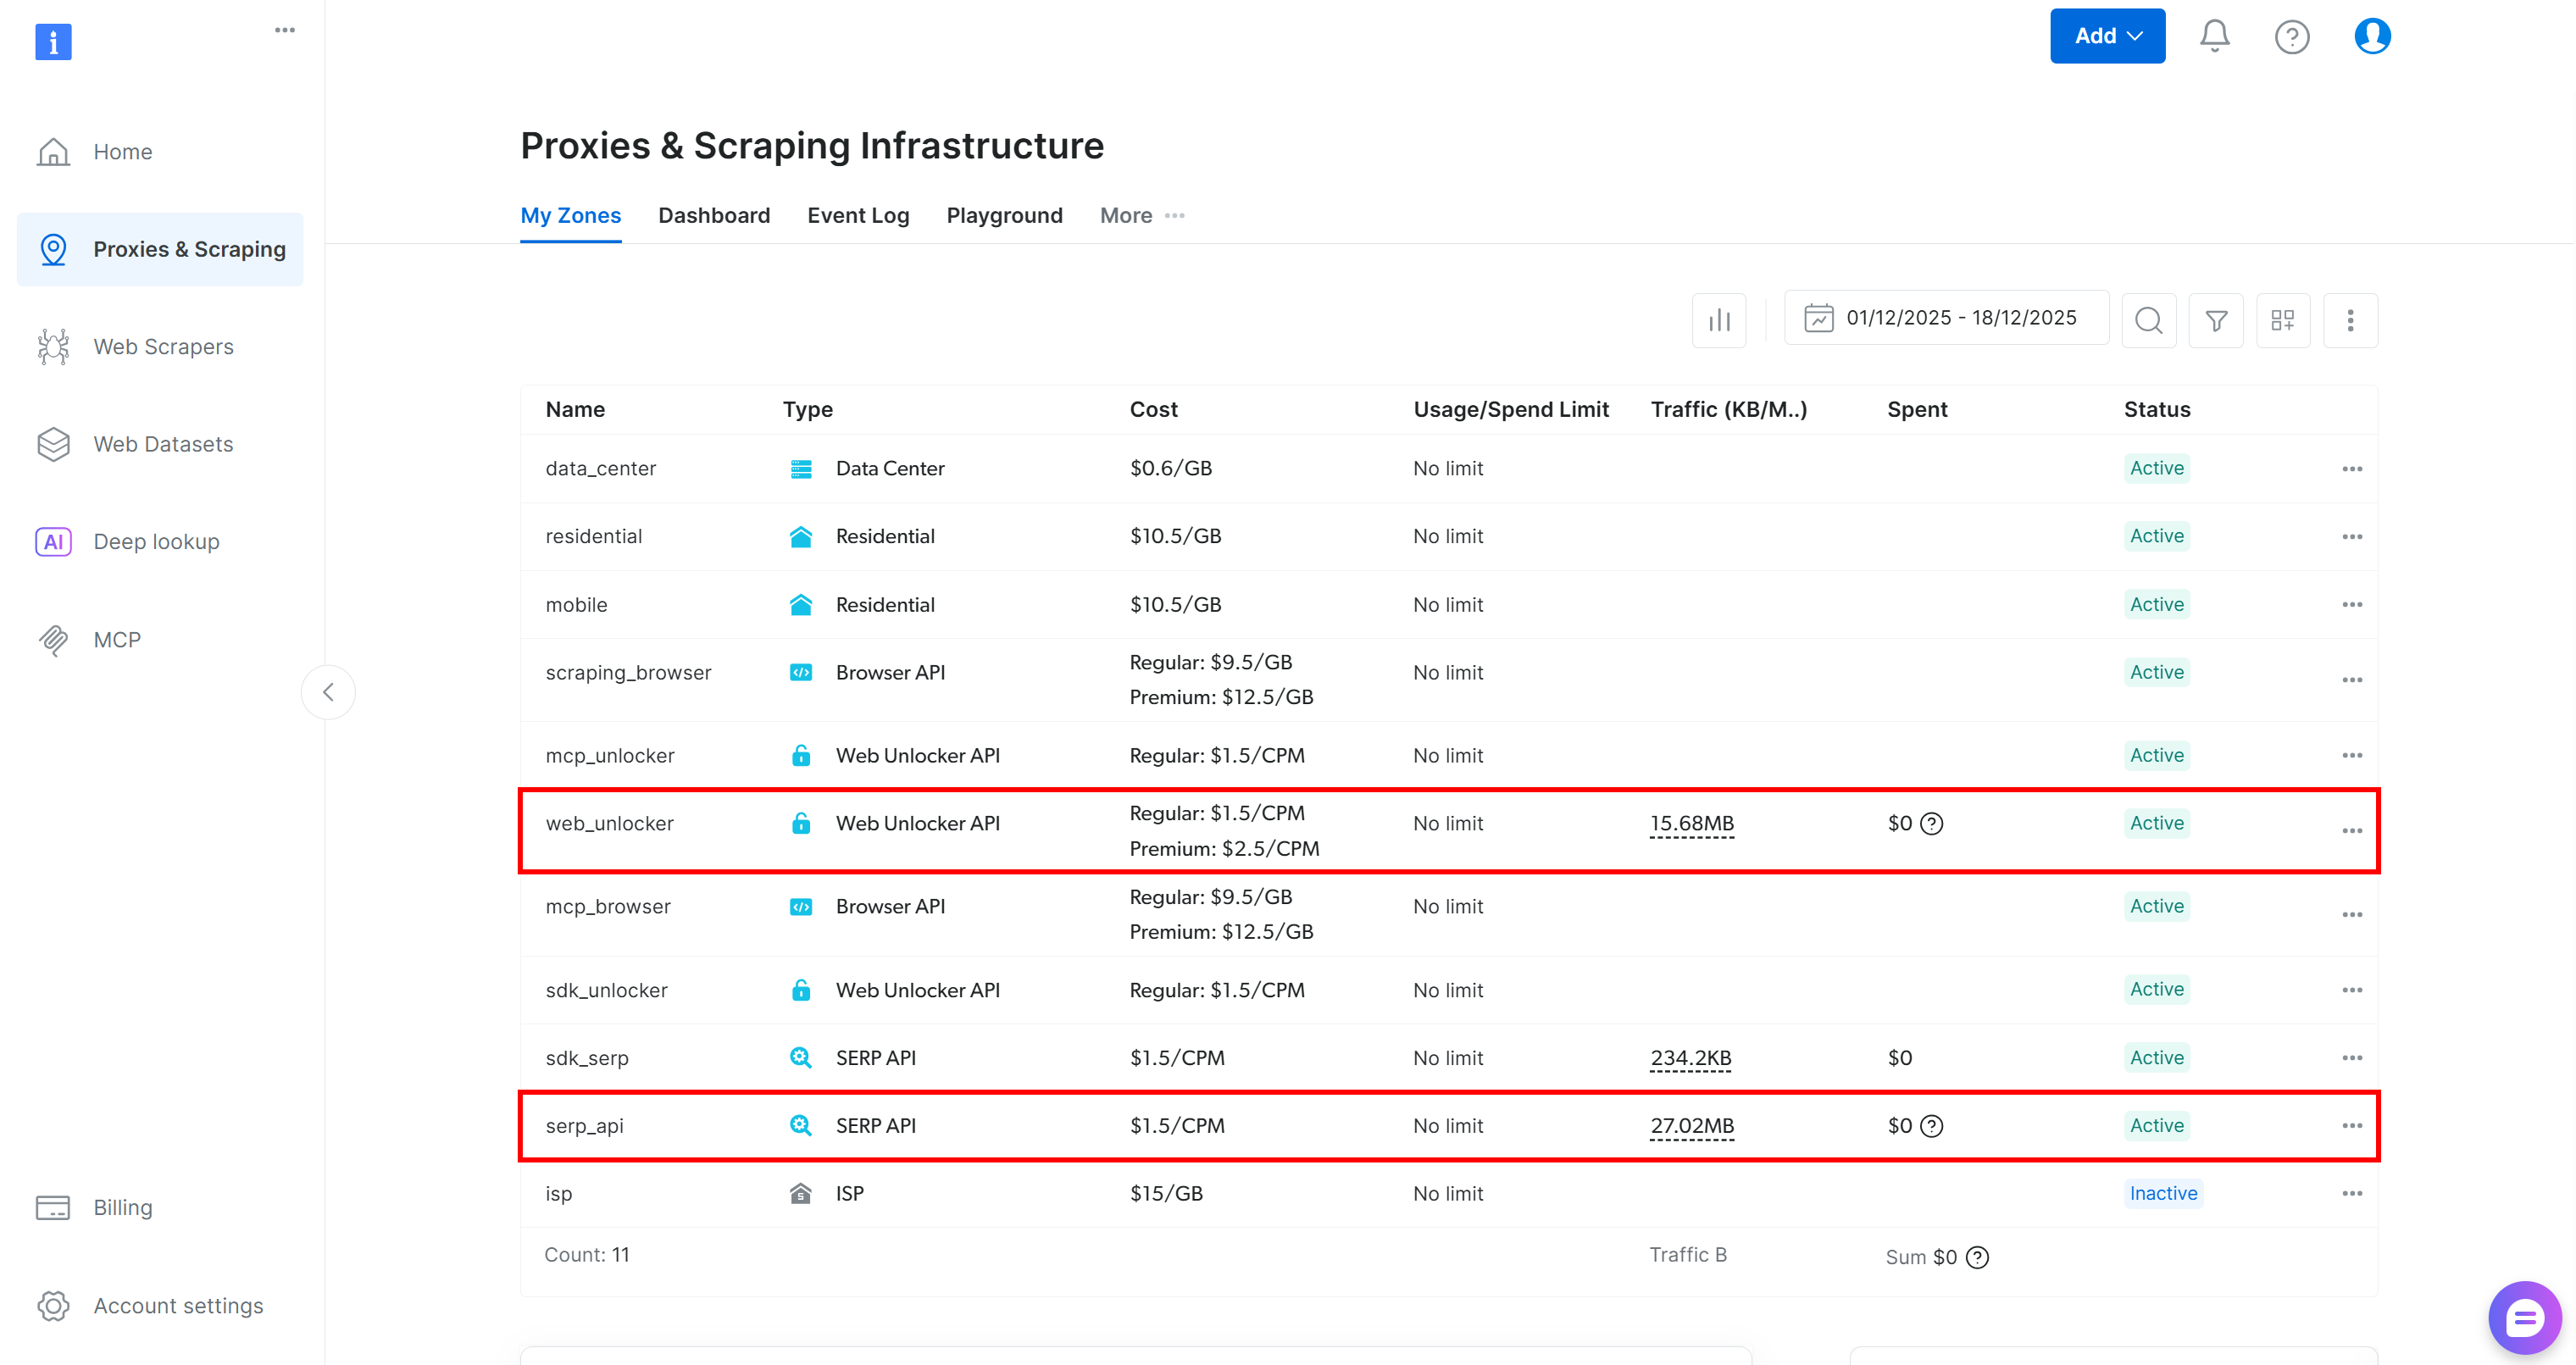
If, as above, the table already includes a Web Unlocker API zone (in this case, called web_unlocker) and a SERP API zone (in this case, called serp_api), then you are all set. These two zones will be used by your custom AG2 tools to call the required Bright Data services.
If one or both zones are missing, scroll down to the “Unblocker API” and “SERP API” cards and click “Create zone” for each one. Follow the setup wizard to create both zones: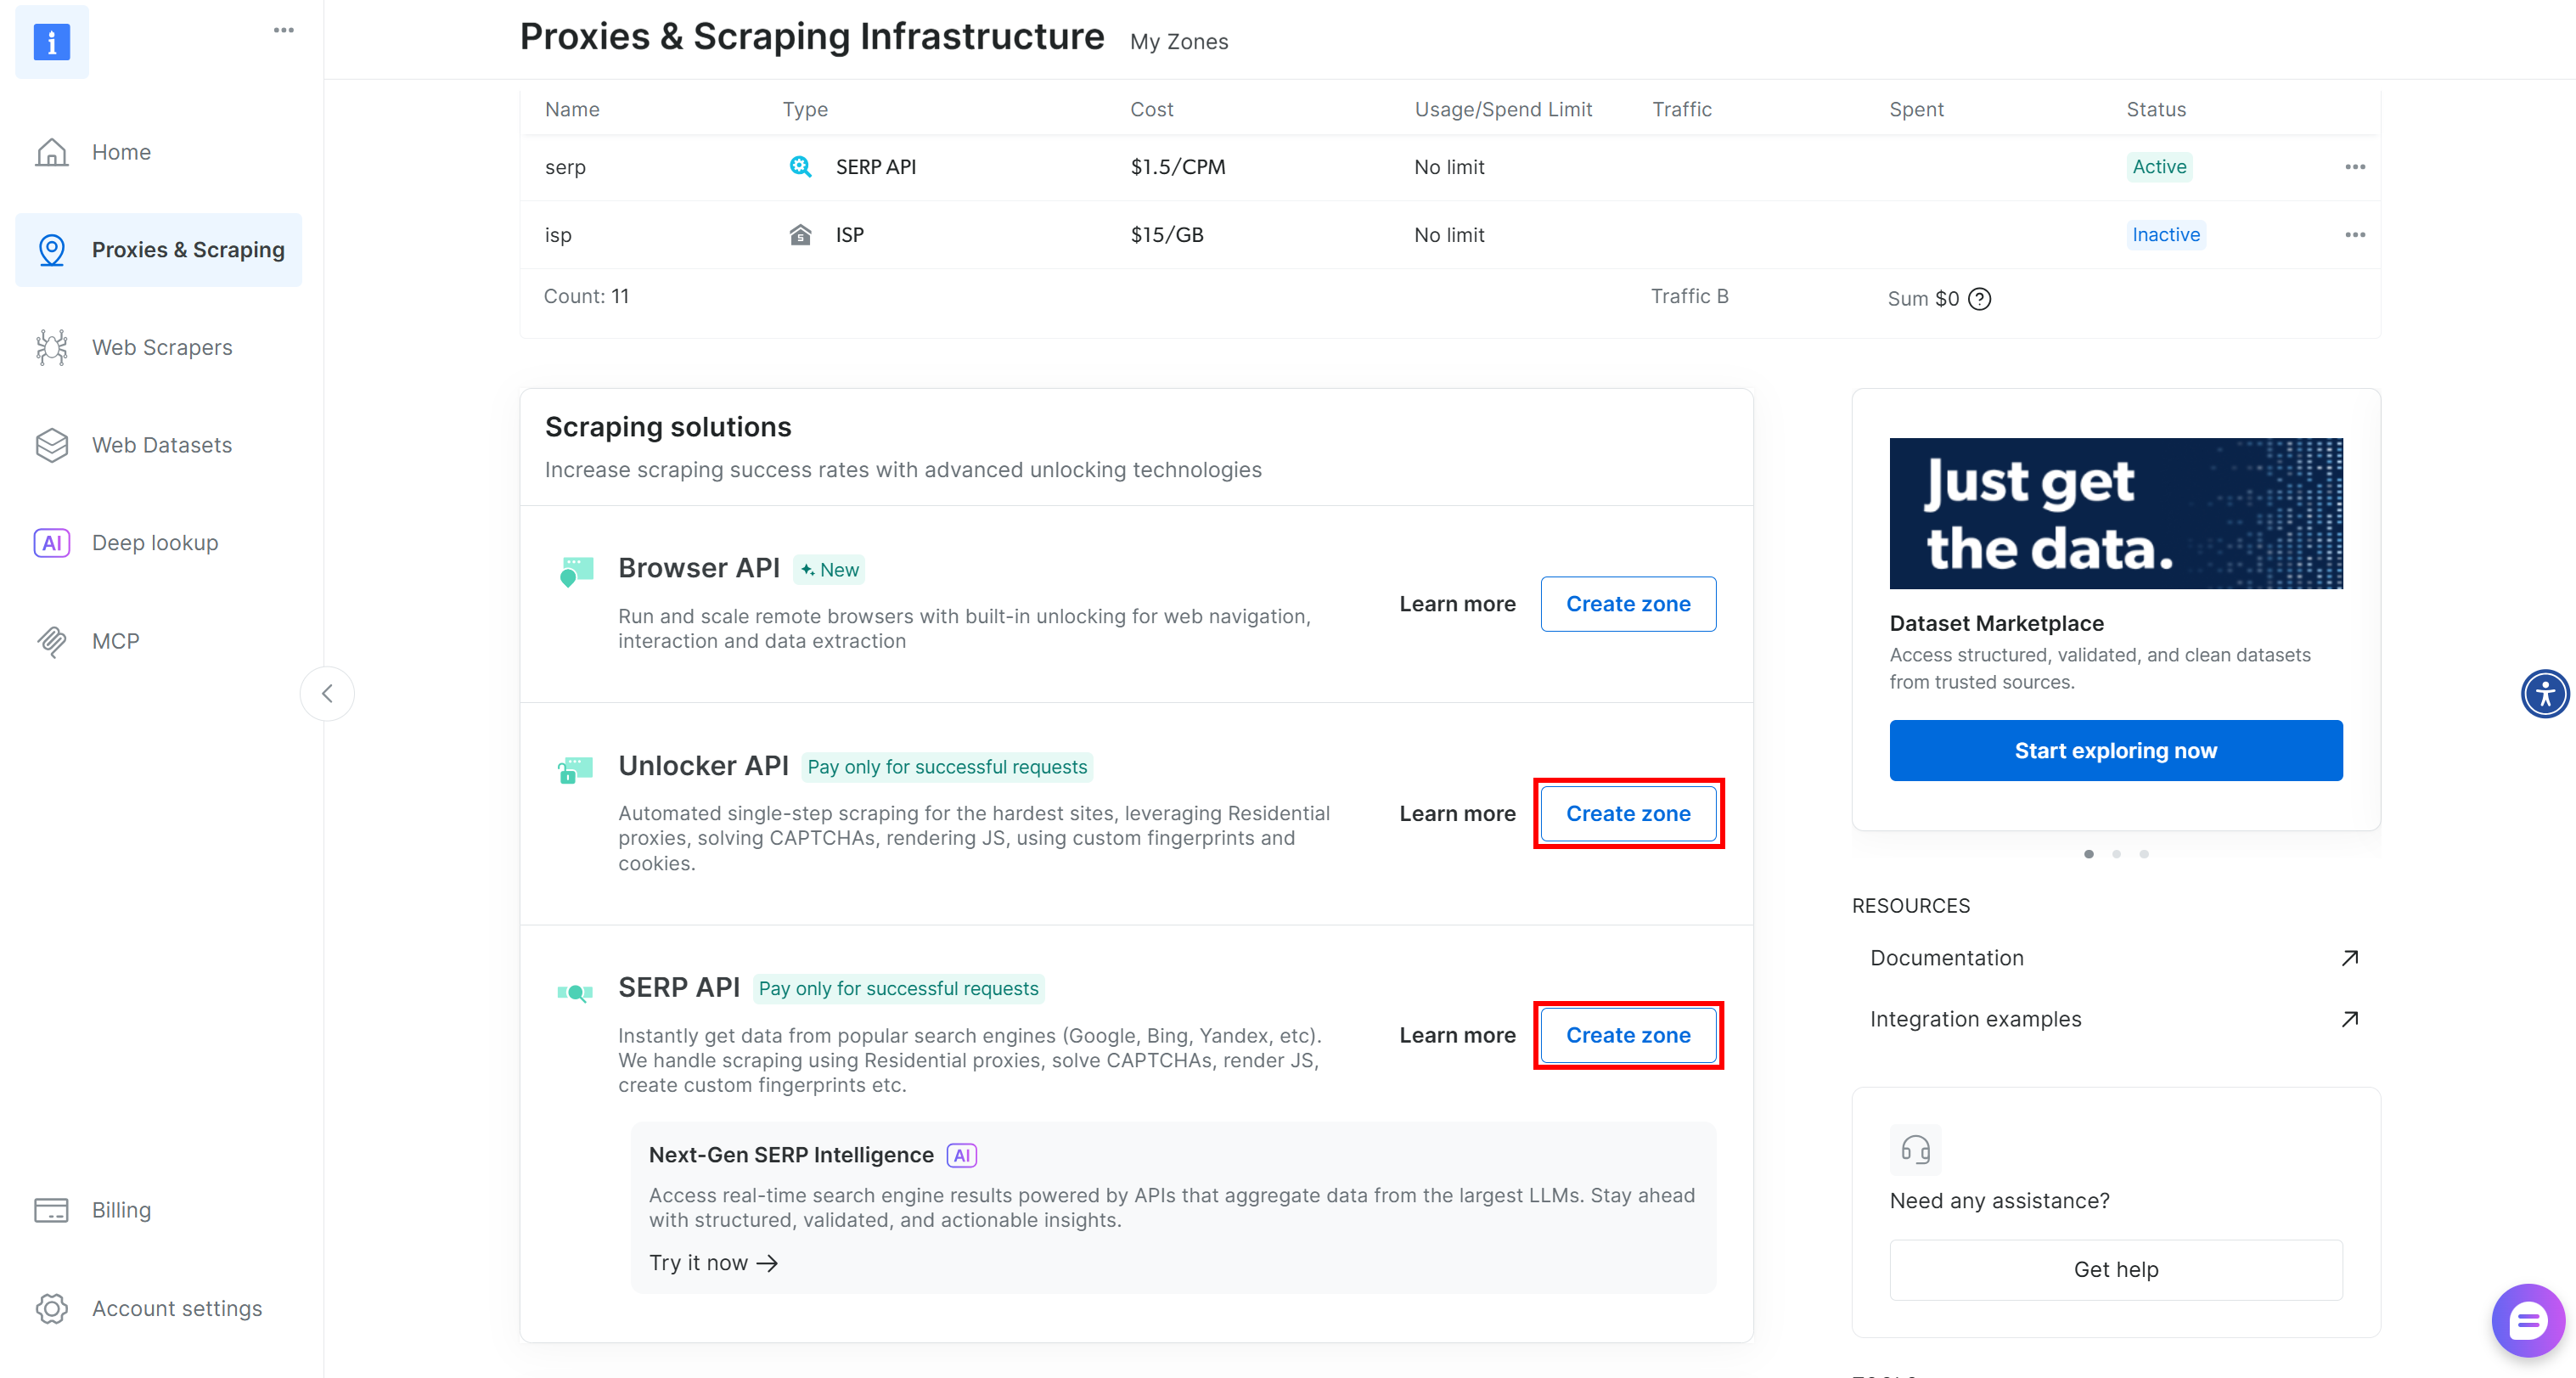
For detailed, step-by-step instructions, refer to the official documentation:
Important: From now on, we will assume your zones are called serp_api and web_unlocker, respectively.
Once your zones are ready, generate your Bright Data API key. Store it as an environment variable in .env:
BRIGHT_DATA_API_KEY="<YOUR_BRIGHT_DATA_API_KEY>"Then, load it in agent.py as shown below:
BRIGHT_DATA_API_KEY = os.getenv("BRIGHT_DATA_API_KEY")Perfect! You have all the building blocks to connect your AG2 agents to Bright Data’s SERP API and Web Unlocker services through custom tools.
Step #5: Define Bright Data Tools for Your AG2 Agents
In AG2, tools provide specialized capabilities that agents can invoke to perform actions and make decisions. Under the hood, tools are simply custom Python functions that AG2 exposes to agents in a structured way.
In this step, you will implement two tool functions in agent.py:
serp_api_tool(): Connects to the Bright Data SERP API to perform Google searches.web_unlocker_api_tool(): Connects to the Bright Data Web Unlocker API to retrieve web page content, bypassing all anti-bot systems.
Both tools use the Requests Python HTTP client to make authenticated POST requests to Bright Data based on the docs:
- Send Your First Request with Bright Data’s SERP API
- Send Your First Request with Bright Data’s Web Unlocker API
To define the two tool functions, add the following code to agent.py:
from typing import Annotated
import requests
import urllib.parse

def serp_api_tool(
    query: Annotated[str, "The Google search query"],
) -> str:
    payload = {
        "zone": "serp_api",  # Replace it with the name of your Bright Data SERP API zone
        "url": f"https://www.google.com/search?q={urllib.parse.quote_plus(query)}&brd_json=1",
        "format": "raw",
    }

    headers = {
        "Authorization": f"Bearer {BRIGHT_DATA_API_KEY}",
        "Content-Type": "application/json",
    }

    response = requests.post(
        "https://api.brightdata.com/request",
        json=payload,
        headers=headers,
    )
    response.raise_for_status()

    return response.text


def web_unlocker_api_tool(
    url_to_fetch: Annotated[str, "Target page URL to fetch"],
    data_format: Annotated[
        str | None,
        "Output page format (e.g., 'markdown', or omit for raw HTML)"
    ] = "markdown",
) -> str:
    payload = {
        "zone": "web_unlocker",  # Replace it with the name of your Bright Data Web Unlocker zone
        "url": url_to_fetch,
        "format": "raw",
        "data_format": data_format,
    }

    headers = {
        "Authorization": f"Bearer {BRIGHT_DATA_API_KEY}",
        "Content-Type": "application/json",
    }

    response = requests.post(
        "https://api.brightdata.com/request",
        json=payload,
        headers=headers
    )
    response.raise_for_status()

    return response.text
The two tools authenticate requests using your Bright Data API key and send POST requests to the Bright Data API endpoint:
serp_api_tool()queries Google and retrieves search results in structured JSON format by enabling thebrd_json=1parameter.web_unlocker_api_tool()fetches any web page and returns its content in Markdown (or raw HTML if desired).
Important: Both JSON and Markdown are excellent formats for LLM ingestion in AI agents.
Note that both functions use Python typing along with Annotated to describe their arguments. The types are required to transform these functions into proper AG2 tools, while the annotation descriptions help the LLM understand how to populate each argument when invoking the tools from within an agent.
Great! Your AG2 application now includes two Bright Data tools, ready to be configured and utilized by your AI agents.
Step #6: Implement the AG2 Agents
Now that your tools are in place, it is time to build the AI agent structure described in the introduction. This setup consists of three complementary agents:
user_proxy: Acts as the execution layer, safely running tool calls and orchestrating the workflow without human input. It is an instance of theUserProxyAgent, a special AG2 agent that functions as a proxy for the user, executing code and providing feedback to other agents as needed.web_data_agent: Responsible for web data discovery and retrieval. This agent searches the web using the Bright Data SERP API and retrieves page content via the Web Unlocker API. As aConversableAgent, it can communicate with other agents and humans, process information, follow instructions defined in its system message, and more.reporting_agent: Analyzes the collected data and transforms it into a structured, business-ready Markdown report for decision-makers.
Together, these agents form a fully autonomous multi-agent pipeline designed for Twitch streamer identification and promotion of a targeted product.
In agent.py, specify all three agents with the following code:
from autogen import (
    UserProxyAgent,
    ConversableAgent,
)

# Executes tool calls and orchestrates the workflow without human intervention
user_proxy = UserProxyAgent(
    name="user_proxy",
    code_execution_config=False,
    human_input_mode="NEVER",
    llm_config=llm_config,
)

# Responsible for searching and retrieving web data
web_data_agent = ConversableAgent(
    name="web_data_agent",
    code_execution_config=False,
    llm_config=llm_config,
    system_message=(
        """
        You are a web data retrieval agent.
        You search the web using the Bright Data SERP API tool
        and retrieve page content using the Web Unlocker API tool.
        """
    ),
)

# Analyzes collected data and produces a structured report
reporting_agent = ConversableAgent(
    name="reporting_agent",
    code_execution_config=False,
    system_message=(
        """
        You are a marketing analyst.
        You produce structured, business-ready Markdown reports
        intended for decision-makers.
        """
    ),
    llm_config=llm_config,
    # Automatically terminate the conversation once the word "report" appears
    is_termination_msg=lambda msg: "report" in (msg.get("content", "") or "").lower()
)
In the above code, note that:
- AG2 agents can execute code contained in messages (e.g., code blocks) and pass results to the next agent. In this setup, code execution is disabled via
code_execution_config=Falsefor security. - All agents are powered by the
llm_configloaded in Step #2. - The
reporting_agentincludes anis_termination_msgfunction to automatically end the workflow once the message contains the word “report,” signaling that the final output has been produced.
Next, you will register Bright Data tools with the web_data_agent to enable web retrieval!
Step #7: Register the AG2 Bright Data Tools
Register the Bright Data functions as tools and assign them to the web_data_agent through the register_function(). The user_proxy agent will act as the executor for these tools, as required by AG2’s architecture:
from autogen import register_function

# Register SERP search tool for the web data agent
register_function(
    serp_api_tool,
    caller=web_data_agent,
    executor=user_proxy,
    description="Use Bright Data's SERP API to perform a Google search and return raw results."
)

# Register Web Unlocker tool for fetching protected pages
register_function(
    web_unlocker_api_tool,
    caller=web_data_agent,
    executor=user_proxy,
    description="Fetch a web page using Bright Data's Web Unlocker API, bypassing common anti-bot protections.",
)
Note that each function includes a concise description to help the LLM understand its purpose and know when to call it.
With these tools registered, the web_data_agent can now plan web searches and web page access, while the user_proxy handles execution.
Your AG2 multi-agent pipeline is now fully capable of autonomous data discovery and scraping using Bright Data’s APIs. Mission complete!
Step #8: Introduce the AG2 Multi-Agent Orchestration Logic
AG2 supports several ways to orchestrate and manage multiple agents. In this example, you will see the GroupChat pattern.
The core of an AG2 group chat is that all agents contribute to a single conversation thread, sharing the same context. This approach is ideal for tasks that require collaboration among multiple agents, like in our pipeline.
Then, a GroupChatManager handles agent coordination within the group chat. It supports different strategies for selecting the next agent to act. Here, you will configure the default auto strategy, which leverages the manager’s LLM to decide which agent should speak next.
Combine everything for multi-agent orchestration as below:
from autogen import (
    GroupChat,
    GroupChatManager,
)

# Define the multi-agent group chat
groupchat = GroupChat(
    agents=[user_proxy, web_data_agent, reporting_agent],
    speaker_selection_method="auto",
    messages=[],
    max_round=20
)

# Manager responsible for coordinating agent interactions
manager = GroupChatManager(
    name="group_manager",
    groupchat=groupchat,
    llm_config=llm_config
)Note: The workflow will terminate when either the reporting_agent produces a message that triggers its is_termination_msg logic or after 20 rounds of back-and-forth interactions among the agents (due to the max_round argument), whichever comes first.
Here we go! The agent definitions and orchestration logic are complete. The final step is to start the workflow and export the results.
Step #9: Launch the Agentic Workflow and Export the Result
Describe the Twitch streamer influencer search task in detail and pass it as a message to the user_proxy agent for execution:
prompt_message = """
Scenario:
---------
A food & beverage brand wants to promote a new type of hamburger.

Goal:
- Search for the Food & Drink category page on TwitchMetrics
- Fetch the content of the TwitchMetrics category page retrieved from the SERP and select the top 5 streamers
- Visit each streamer’s TwitchMetrics profile page and retrieve relevant information
- Produce a structured Markdown report including:
  - Channel name
  - Estimated reach
  - Content focus
  - Audience fit
  - Feasibility of brand outreach
"""

# Start the multi-agent workflow
user_proxy.initiate_chat(recipient=manager, message=prompt_message)
Once the workflow finishes, persist the output (i.e., the Markdown report) to disk with:
with open("report.md", "w", encoding="utf-8") as f:
    f.write(user_proxy.last_message()["content"])
Amazing! Your AG2 + Bright Data multi-agent workflow is now fully operational and ready to collect, analyze, and report Twitch influencer data.
Step #10: Put It All Together
The final code in your agent.py file will be:
from autogen import (
    LLMConfig,
    UserProxyAgent,
    ConversableAgent,
    register_function,
    GroupChat,
    GroupChatManager,
)
from dotenv import load_dotenv
import os
from typing import Annotated
import requests
import urllib.parse

# Load LLM configuration from the OpenAI config list file
llm_config = LLMConfig.from_json(path="OAI_CONFIG_LIST")

# Load environment variables from the .env file
load_dotenv()

# Retrieve the Bright Data API key from environment variables
BRIGHT_DATA_API_KEY = os.getenv("BRIGHT_DATA_API_KEY")

# Define the functions to implement the Bright Data tools
def serp_api_tool(
    query: Annotated[str, "The Google search query"],
) -> str:
    payload = {
        "zone": "serp_api",  # Replace it with the name of your Bright Data SERP API zone
        "url": f"https://www.google.com/search?q={urllib.parse.quote_plus(query)}&brd_json=1",
        "format": "raw",
    }

    headers = {
        "Authorization": f"Bearer {BRIGHT_DATA_API_KEY}",
        "Content-Type": "application/json",
    }

    response = requests.post(
        "https://api.brightdata.com/request",
        json=payload,
        headers=headers,
    )
    response.raise_for_status()

    return response.text


def web_unlocker_api_tool(
    url_to_fetch: Annotated[str, "Target page URL to fetch"],
    data_format: Annotated[
        str | None,
        "Output page format (e.g., 'markdown', or omit for raw HTML)"
    ] = "markdown",
) -> str:
    payload = {
        "zone": "web_unlocker",  # Replace it with the name of your Bright Data Web Unlocker zone
        "url": url_to_fetch,
        "format": "raw",
        "data_format": data_format,
    }

    headers = {
        "Authorization": f"Bearer {BRIGHT_DATA_API_KEY}",
        "Content-Type": "application/json",
    }

    response = requests.post(
        "https://api.brightdata.com/request",
        json=payload,
        headers=headers
    )
    response.raise_for_status()

    return response.text

# Executes tool calls and orchestrates the workflow without human intervention
user_proxy = UserProxyAgent(
    name="user_proxy",
    code_execution_config=False,
    human_input_mode="NEVER",
    llm_config=llm_config,
)

# Responsible for searching and retrieving web data
web_data_agent = ConversableAgent(
    name="web_data_agent",
    code_execution_config=False,
    llm_config=llm_config,
    system_message=(
        """
        You are a web data retrieval agent.
        You search the web using the Bright Data SERP API tool
        and retrieve page content using the Web Unlocker API tool.
        """
    ),
)

# Analyzes collected data and produces a structured report
reporting_agent = ConversableAgent(
    name="reporting_agent",
    code_execution_config=False,
    system_message=(
        """
        You are a marketing analyst.
        You produce structured, business-ready Markdown reports
        intended for decision-makers.
        """
    ),
    llm_config=llm_config,
    # Automatically terminate the conversation once the word "report" appears
    is_termination_msg=lambda msg: "report" in (msg.get("content", "") or "").lower()
)

# Register SERP search tool for the web data agent
register_function(
    serp_api_tool,
    caller=web_data_agent,
    executor=user_proxy,
    description="Use Bright Data's SERP API to perform a Google search and return raw results."
)

# Register Web Unlocker tool for fetching protected pages
register_function(
    web_unlocker_api_tool,
    caller=web_data_agent,
    executor=user_proxy,
    description="Fetch a web page using Bright Data's Web Unlocker API, bypassing common anti-bot protections.",
)

# Define the multi-agent group chat
groupchat = GroupChat(
    agents=[user_proxy, web_data_agent, reporting_agent],
    speaker_selection_method="auto",
    messages=[],
    max_round=20
)

# Manager responsible for coordinating agent interactions
manager = GroupChatManager(
    name="group_manager",
    groupchat=groupchat,
    llm_config=llm_config
)

prompt_message = """
Scenario:
---------
A food & beverage brand wants to promote a new type of hamburger.

Goal:
- Search for the Food & Drink category page on TwitchMetrics
- Fetch the content of the TwitchMetrics category page retrieved from the SERP and select the top 5 streamers
- Visit each streamer’s TwitchMetrics profile page and retrieve relevant information
- Produce a structured Markdown report including:
  - Channel name
  - Estimated reach
  - Content focus
  - Audience fit
  - Feasibility of brand outreach
"""

# Start the multi-agent workflow
user_proxy.initiate_chat(recipient=manager, message=prompt_message)

# Persist the final report to a Markdown file
with open("report.md", "w", encoding="utf-8") as f:
    f.write(user_proxy.last_message()["content"])
Thanks to the powerful AG2 API, in just around 170 lines of code, you have built a complex, enterprise-ready, Bright Data-powered multi-agent workflow!
Step #11: Test the Multi-Agent System
In your terminal, verify that your AG2 agentic application works with:
python agent.pyThe expected output will look like this:
In detail, note how the multi-agent workflow proceeds step by step:
- The
web_data_agentdetermines it needs to call theserp_api_toolto locate the required TwitchMetrics “Food & Drink” category page. - Through the
user_proxyagent, the tool executes multiple search queries. - Once the correct TwitchMetrics category page is identified, it calls the
web_unlocker_api_toolto scrape the content in Markdown format. - From the Markdown output, it extracts the URLs of the top 5 influencer TwitchMetrics profiles in the “Food & Drink” category.
- The
web_unlocker_api_toolis called again to retrieve each profile’s page content in Markdown. - All collected data is passed to the
reporting_agent, which analyzes it and produces the final report.
This final report is saved to disk as report.md, as specified in the code: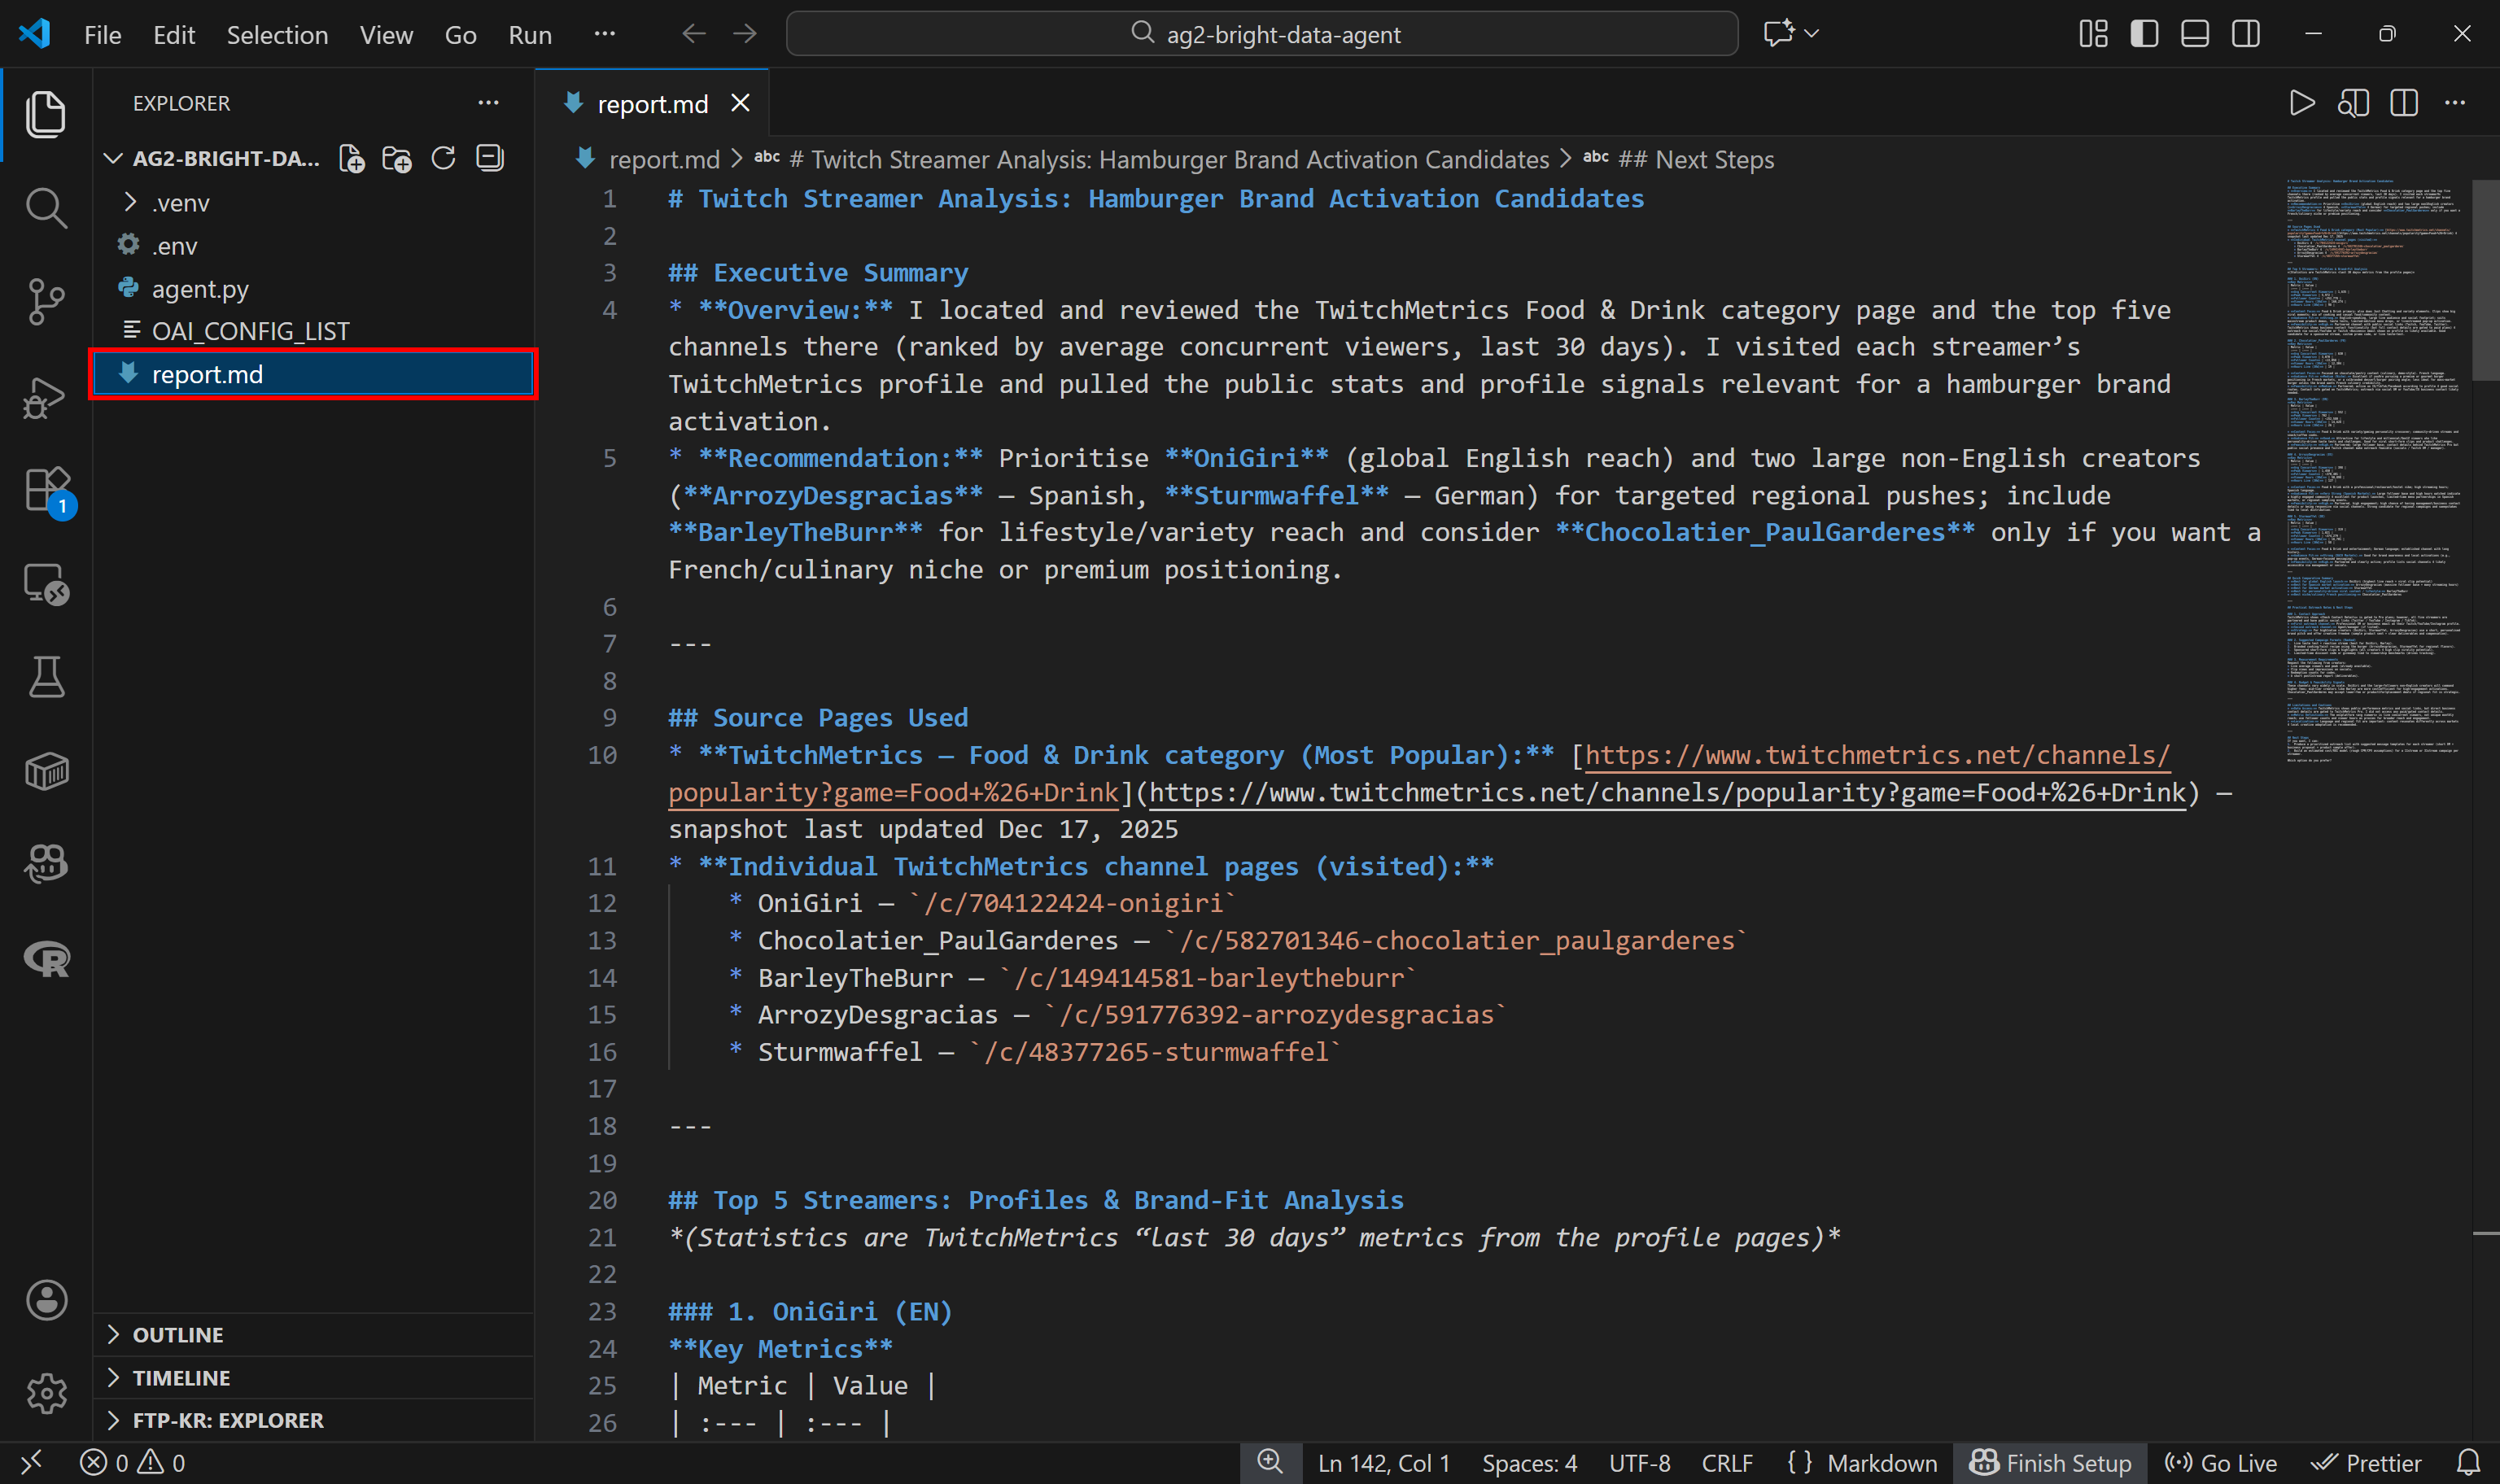
View it in VS Code using the Markdown preview to see how detailed and information-rich the report is:
If you are wondering where the source data comes from, check the Food & Drink Twitch stream category page on TwitchMetrics: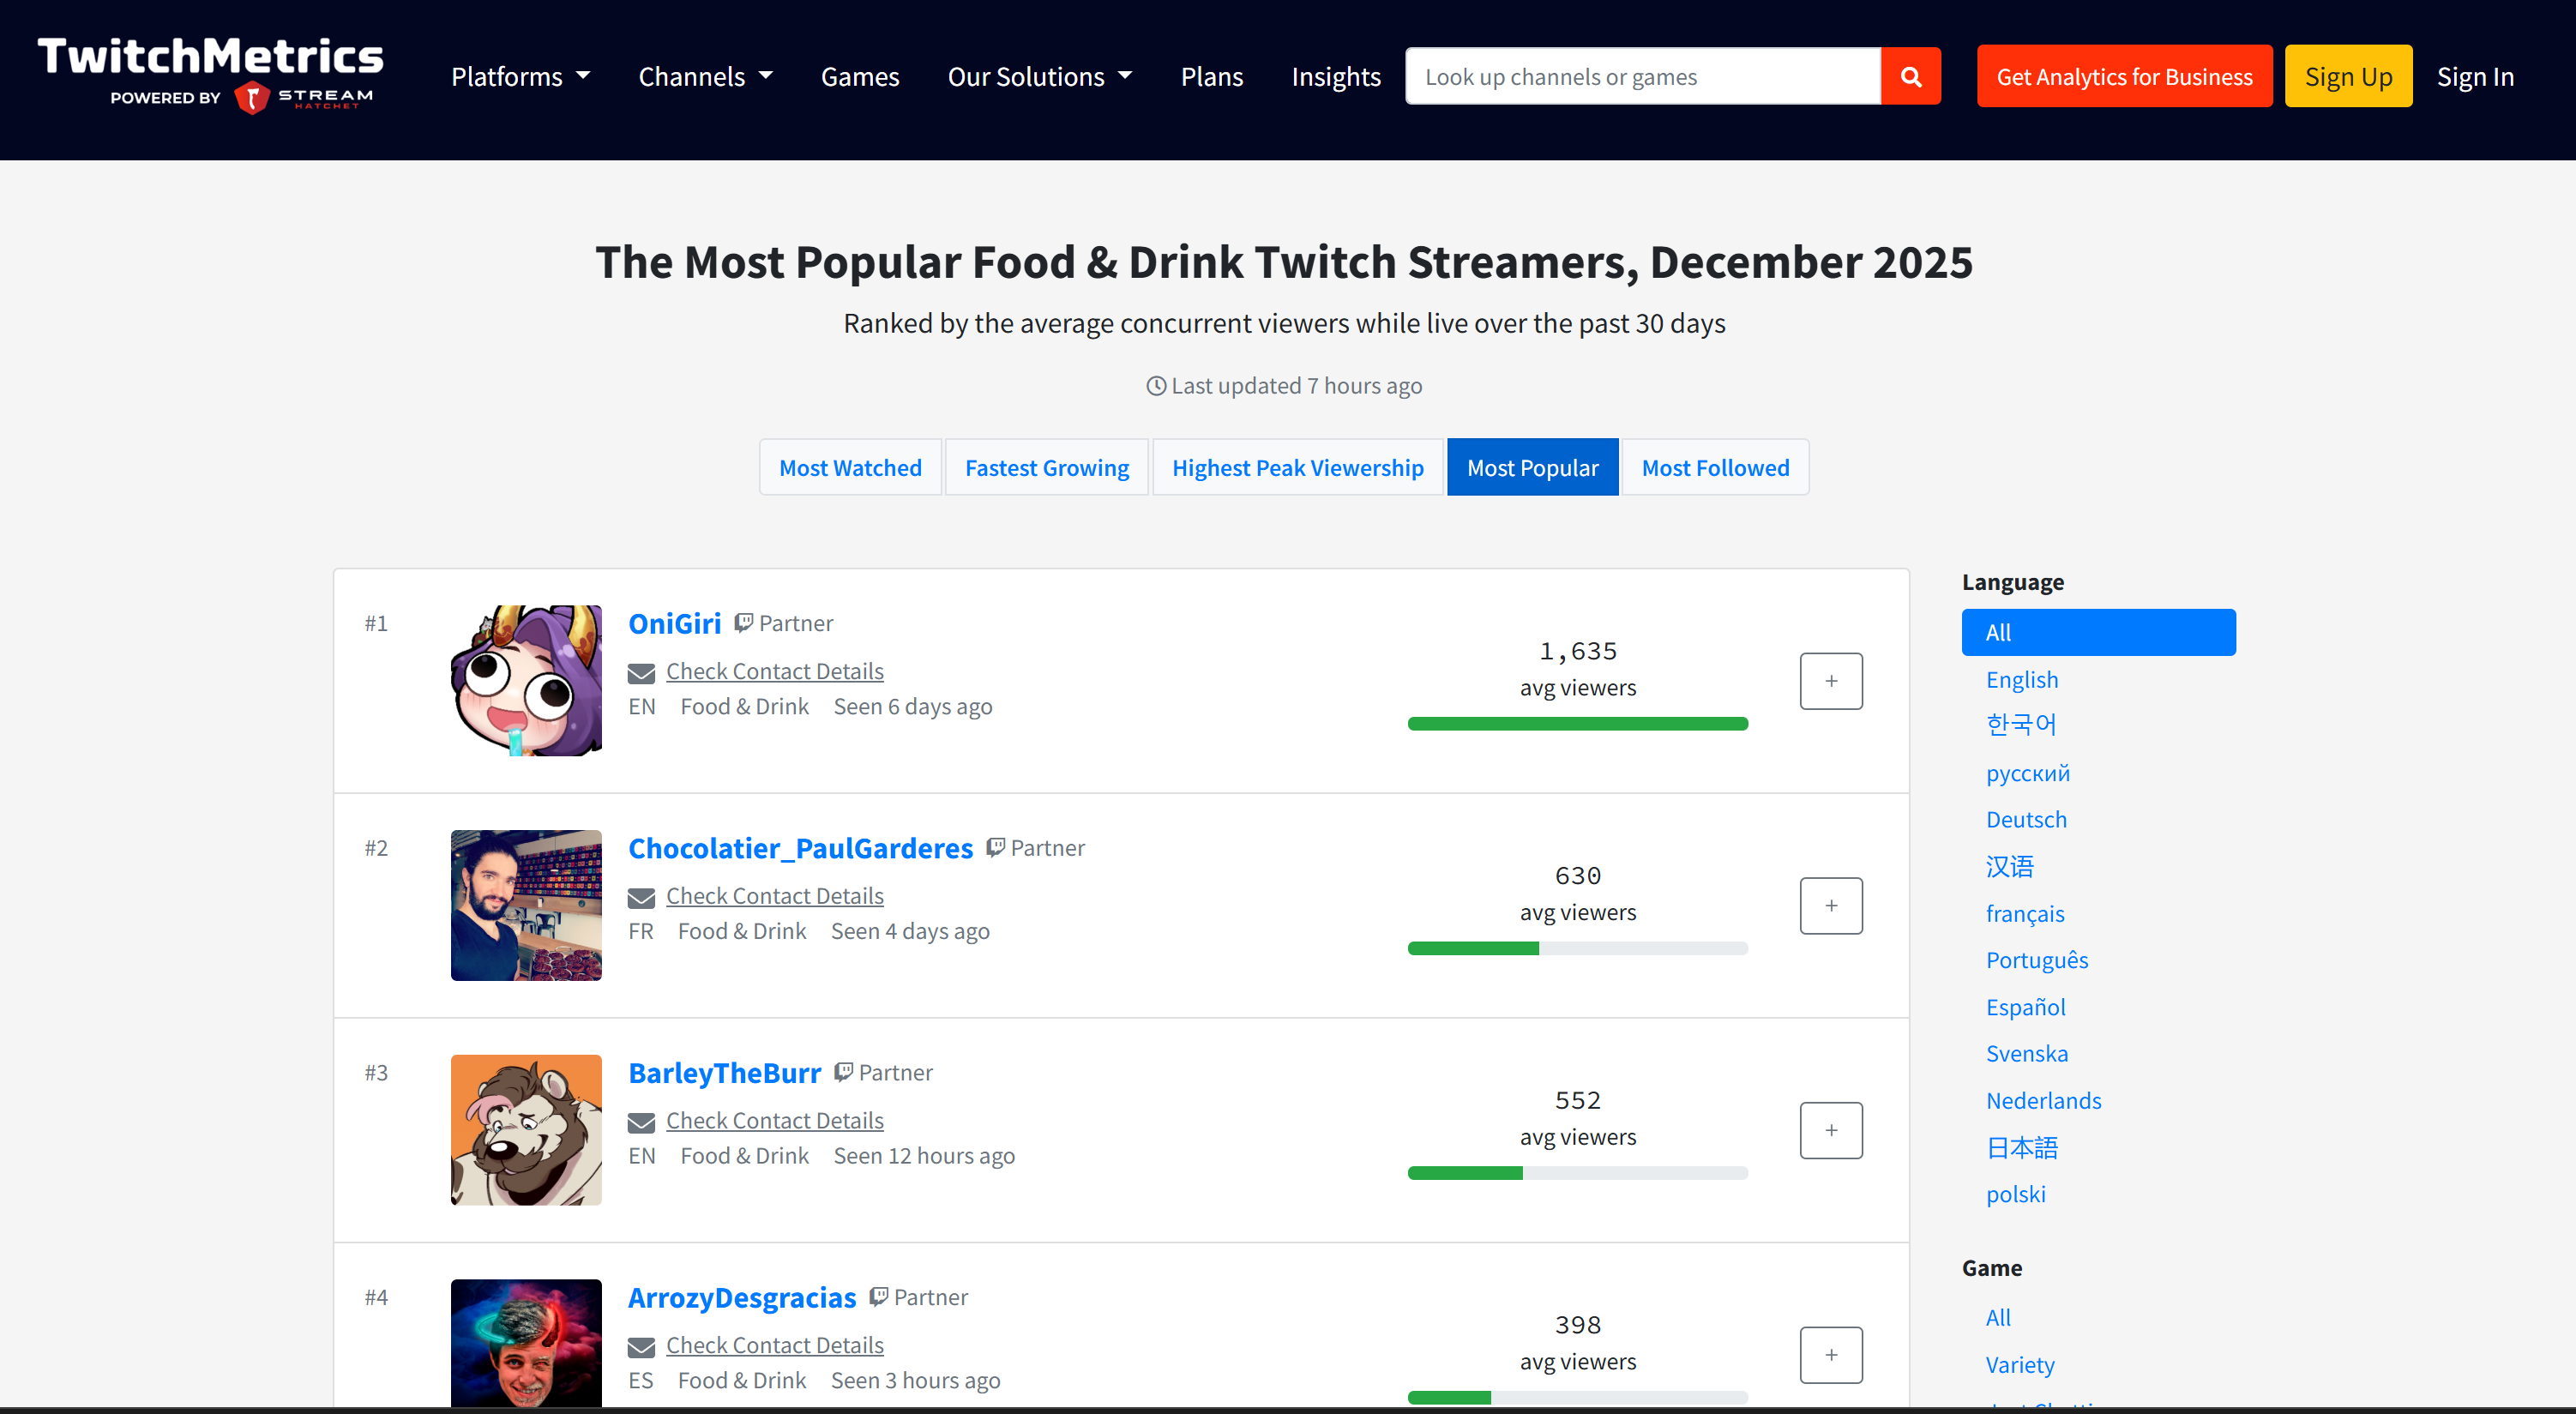
Note that the Twitch streamer information in the report matches the dedicated TwitchMetrics profile pages for each of the top 5 profiles: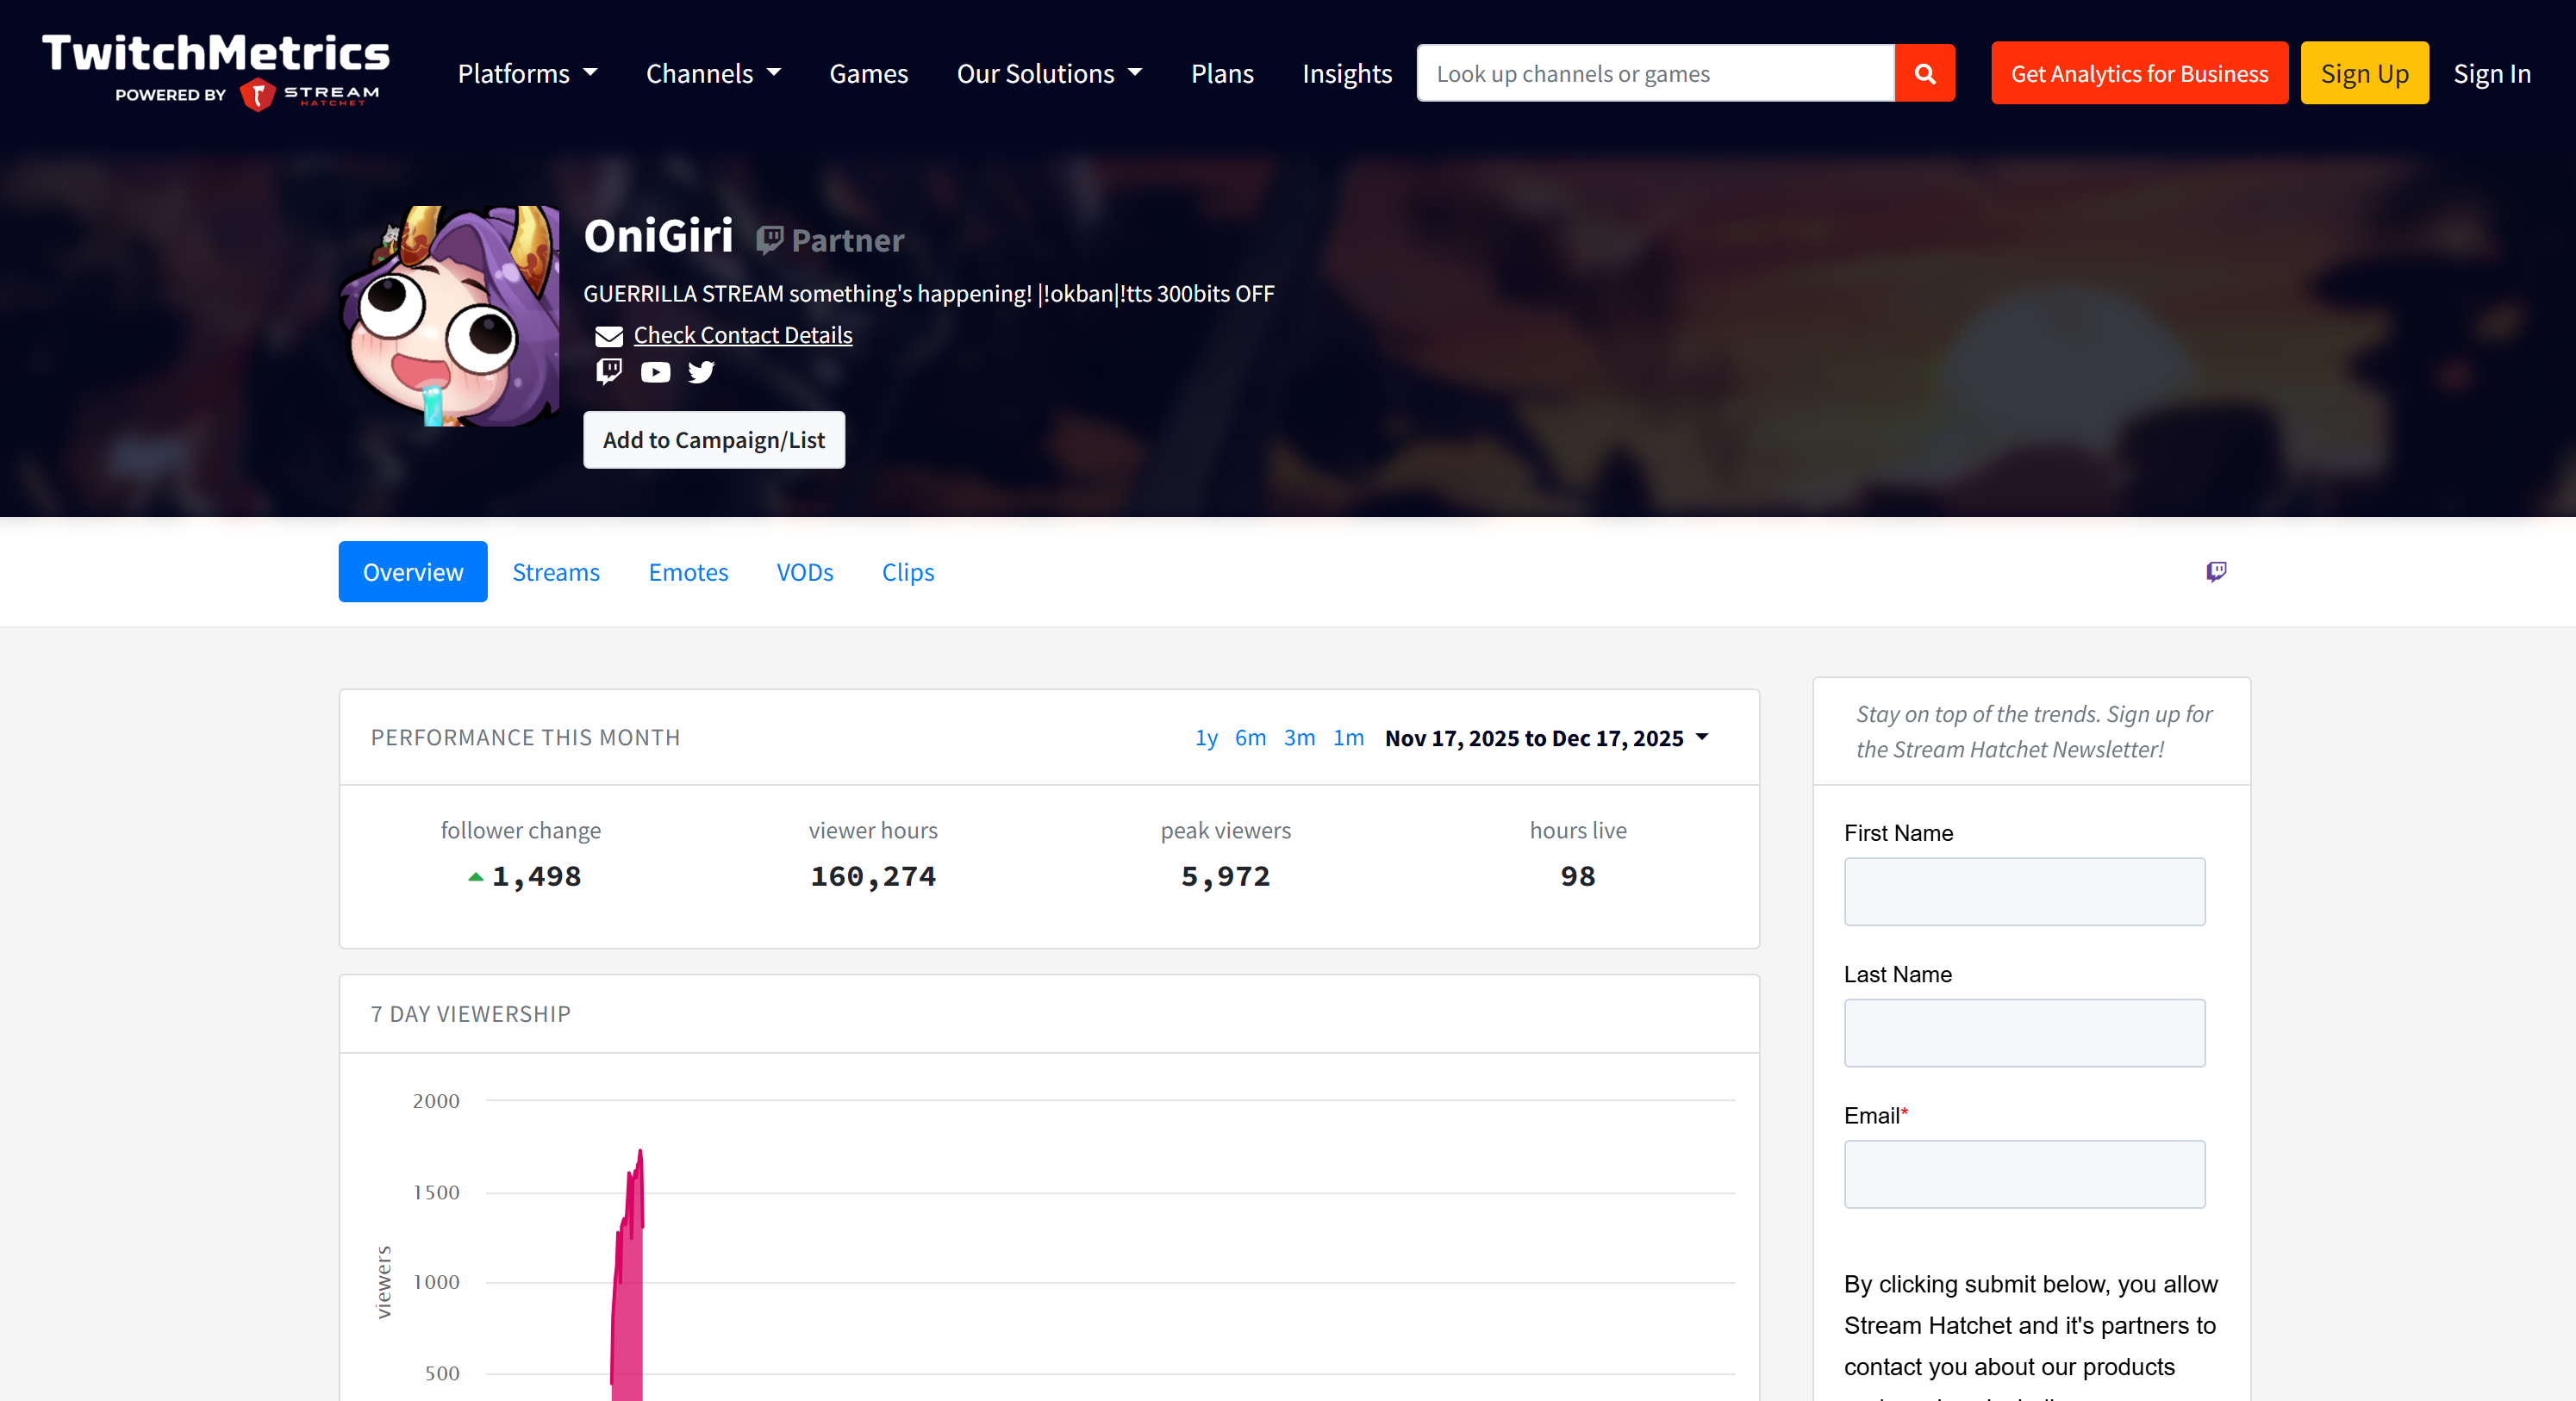
All that information was retrieved automatically by the multi-agent system, demonstrating the power of AG2 and its integration with Bright Data.
Now, feel free to experiment with different input prompts. Thanks to Bright Data, your AG2 multi-agent workflow can handle a variety of real-world tasks.
Et voilà! You have just witnessed the capabilities of an AG2 workflow enhanced with Bright Data
Connecting AG2 to Bright Data Web MCP: A Step-by-Step Guide
Another way to integrate Bright Data into AG2 is through the Bright Data Web MCP server.
Web MCP gives you access to 60+ tools built on top of Bright Data’s web automation and data-collection platform. Even on the free tier, it exposes two powerful tools:
| Tool | Description |
|---|---|
search_engine |
Fetch Google, Bing, or Yandex results in JSON or Markdown format. |
scrape_as_markdown |
Scrape any webpage into clean Markdown while bypassing anti-bot measures. |
Web MCP’s Pro mode takes the functionality further. This premium option unlocks structured data extraction for major platforms like Amazon, LinkedIn, Instagram, Reddit, YouTube, TikTok, Google Maps, and more. It also adds tools for advanced browser automation.
Note: For project setup, refer to Step #1 from the previous chapter.
Next, let’s see how to use Bright Data’s Web MCP within AG2!
Prerequisites
To follow this section of the tutorial, you need Node.js installed locally, as it is required to run Web MCP on your machine.
You must also install the MCP package for AG2 with:
pip install ag2[mcp]This enables AG2 to act as an MCP client.
Step #1: Get Started With Bright Data’s Web MCP
Before connecting AG2 to Bright Data’s Web MCP, ensure that your local machine can run the MCP server. This is important because you will be shown how to connect to the Web MCP server locally.
Note: Web MCP is also available as a remote server via Streamable HTTP, which is more suitable for enterprise-grade use cases thanks to its unlimited scalability.
First, make sure you have a Bright Data account. If you already do, simply log in. For a quick setup, follow the instructions in the “MCP” section of your dashboard:
For extra guidance, refer to the steps below.
Start by generating your Bright Data API key. Store it in a safe place, as tou will use it shortly to authenticate your local Web MCP instance.
Next, install Web MCP globally on your machine using the @brightdata/mcp package:
npm install -g @brightdata/mcpStart the MCP server by executing:
API_TOKEN="<YOUR_BRIGHT_DATA_API>" npx -y @brightdata/mcpOr, equivalently, in PowerShell:
$Env:API_TOKEN="<YOUR_BRIGHT_DATA_API>"; npx -y @brightdata/mcpReplace <YOUR_BRIGHT_DATA_API> with your Bright Data API token. These commands set the required API_TOKEN environment variable and launch the Web MCP server locally.
If successful, you should see output similar to this:
By default, Web MCP creates two zones in your Bright Data account on first launch:
mcp_unlocker: A zone for Web Unlocker.mcp_browser: A zone for Browser API.
These zones power the 60+ tools available in Web MCP.
You can verify that the zones were created by visiting “Proxies & Scraping Infrastructure” in your Bright Data dashboard: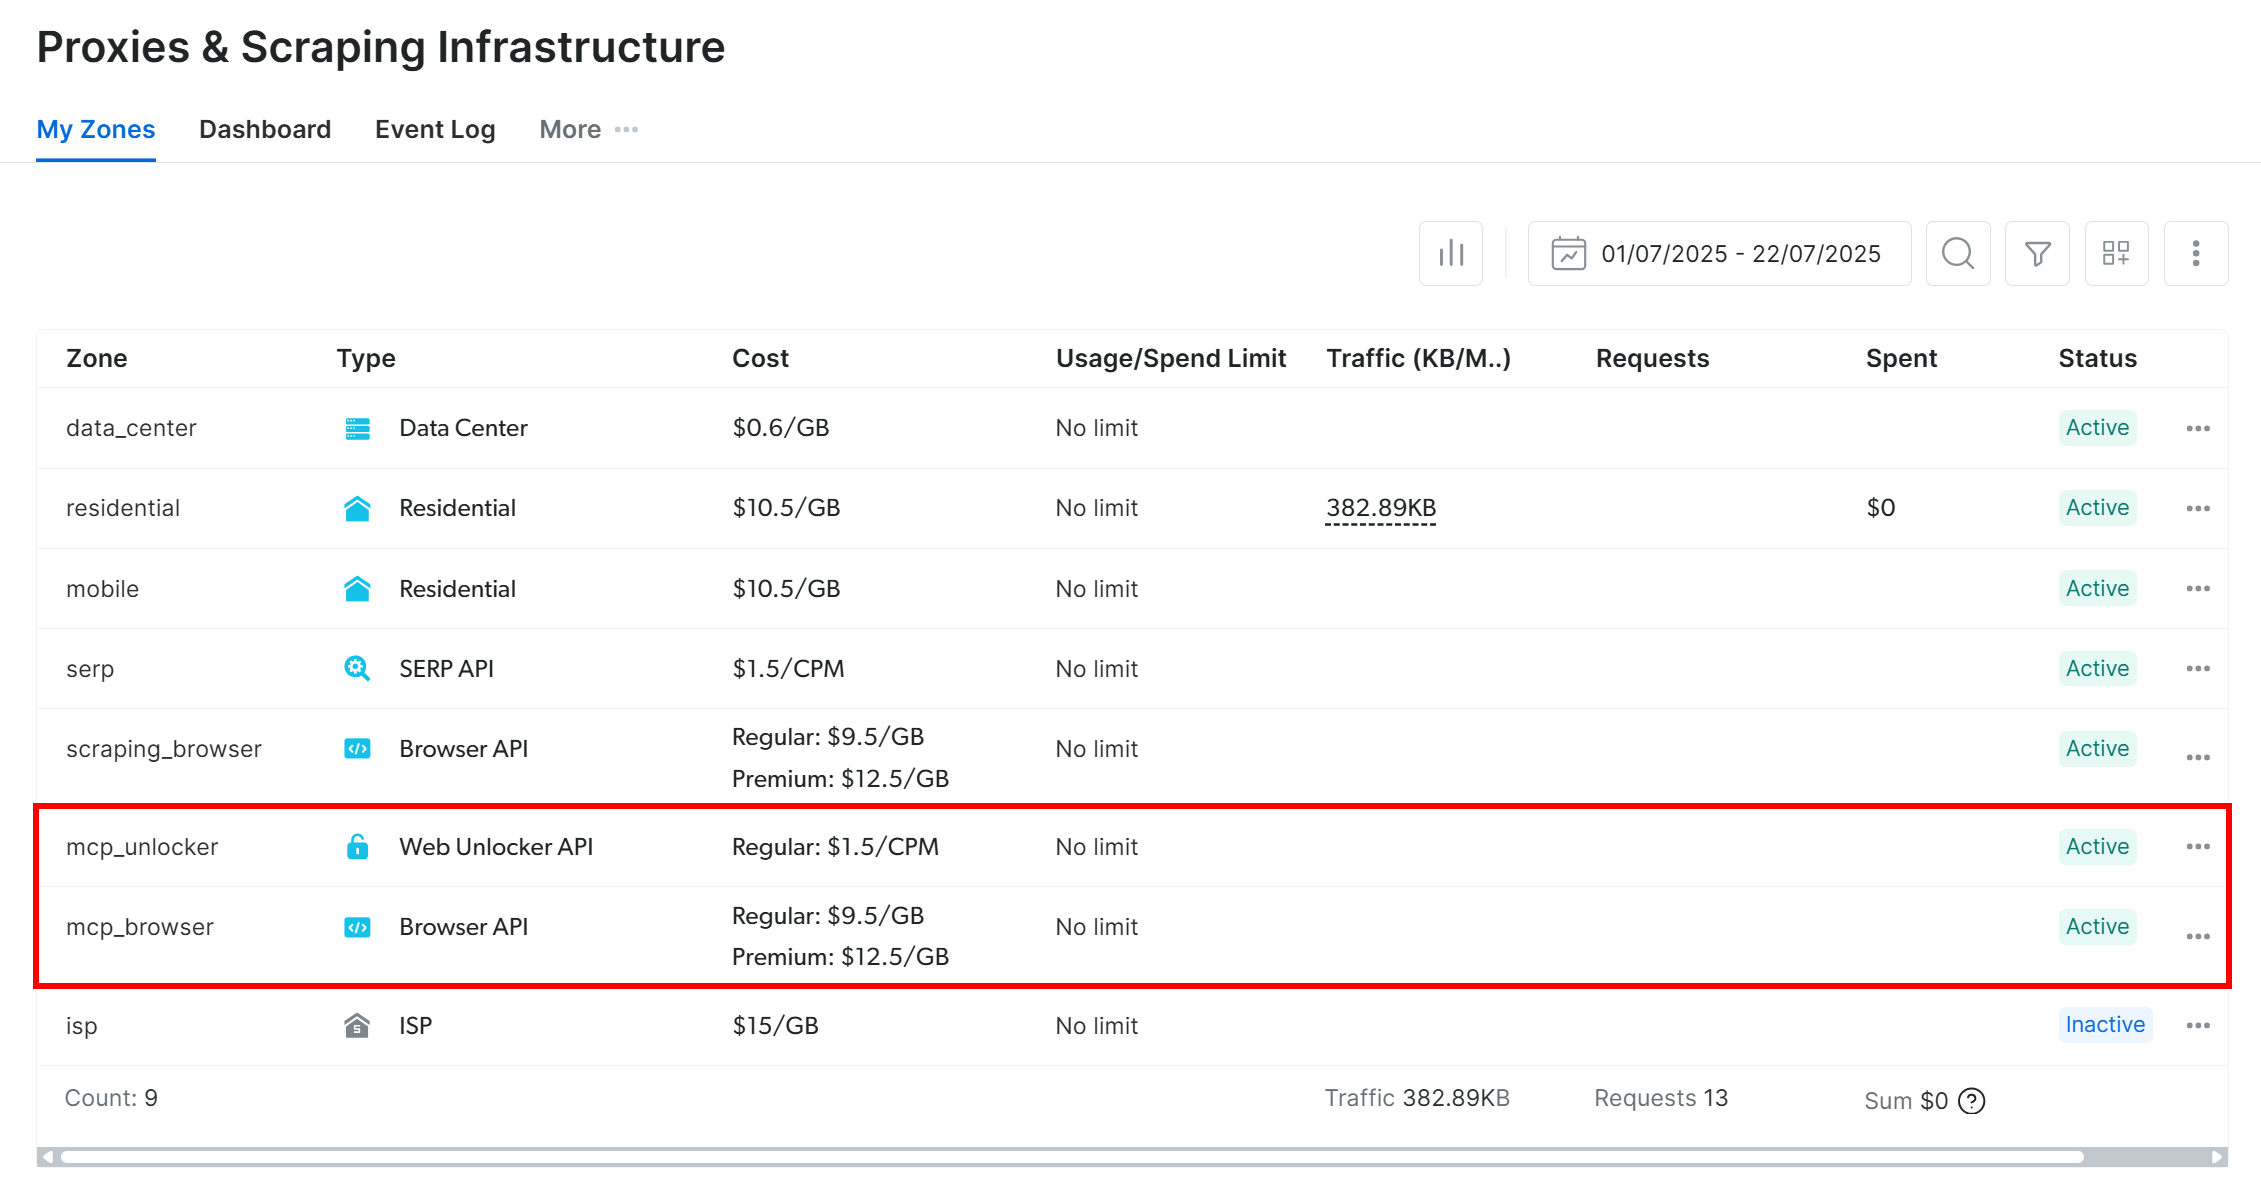
On the Web MCP free tier, only the search_engine and scrape_as_markdown tools (and their batch versions) are available.
To unlock all tools, enable Pro mode by setting the PRO_MODE="true" environment variable:
API_TOKEN="<YOUR_BRIGHT_DATA_API>" PRO_MODE="true" npx -y @brightdata/mcpOr, on Windows:
$Env:API_TOKEN="<YOUR_BRIGHT_DATA_API>"; $Env:PRO_MODE="true"; npx -y @brightdata/mcpPro mode unlocks all 60+ tools, but it is not included in the free tier and may incur additional charges.
Done! You have now verified that the Web MCP server runs locally. Stop the MCP process for now, as the next step is to configure AG2 to start the server locally and connect to it.
Step #2: Web MCP Integration in AG2
Use the AG2 MCP client to connect to a local Web MCP instance via STDIO and retrieve the available tools:
from mcp import ClientSession, StdioServerParameters
from mcp.client.stdio import stdio_client
from autogen.mcp import create_toolkit

# Instructions to connect to a local Web MCP instance
server_params = StdioServerParameters(
    command="npx",
    args=["-y", "@brightdata/mcp"],
    env={
        "API_TOKEN": BRIGHT_DATA_API_KEY,
        "PRO_MODE": "true" # Optional
    },
)

async with stdio_client(server_params) as (read, write), ClientSession(read, write) as session:
    # Create an MCP connection session and retrieve the tools
    await session.initialize()
    web_mcp_toolkit = await create_toolkit(session, use_mcp_resources=False)
The StdioServerParameters object mirrors the npx command you ran earlier, including environment variables for credentials and settings:
API_TOKEN: Required. Set to your Bright Data API key.PRO_MODE: Optional. Remove if you want to stay on the free tier (search_engineandscrape_as_markdownand their batch versions only).
The session is used to connect to Web MCP and create an AG2 MCP toolkit using create_toolkit.
Note: As stressed in a dedicated GitHub issue, the option use_mcp_resources=False is required to avoid the mcp.shared.exceptions.McpError: Method not found error.
Once created, the web_mcp_toolkit object contains all Web MCP tools. Check that with:
for tool in web_mcp_toolkit.tools:
    print(tool.name)
    print(tool.description)
    print("---\n")
The output will be: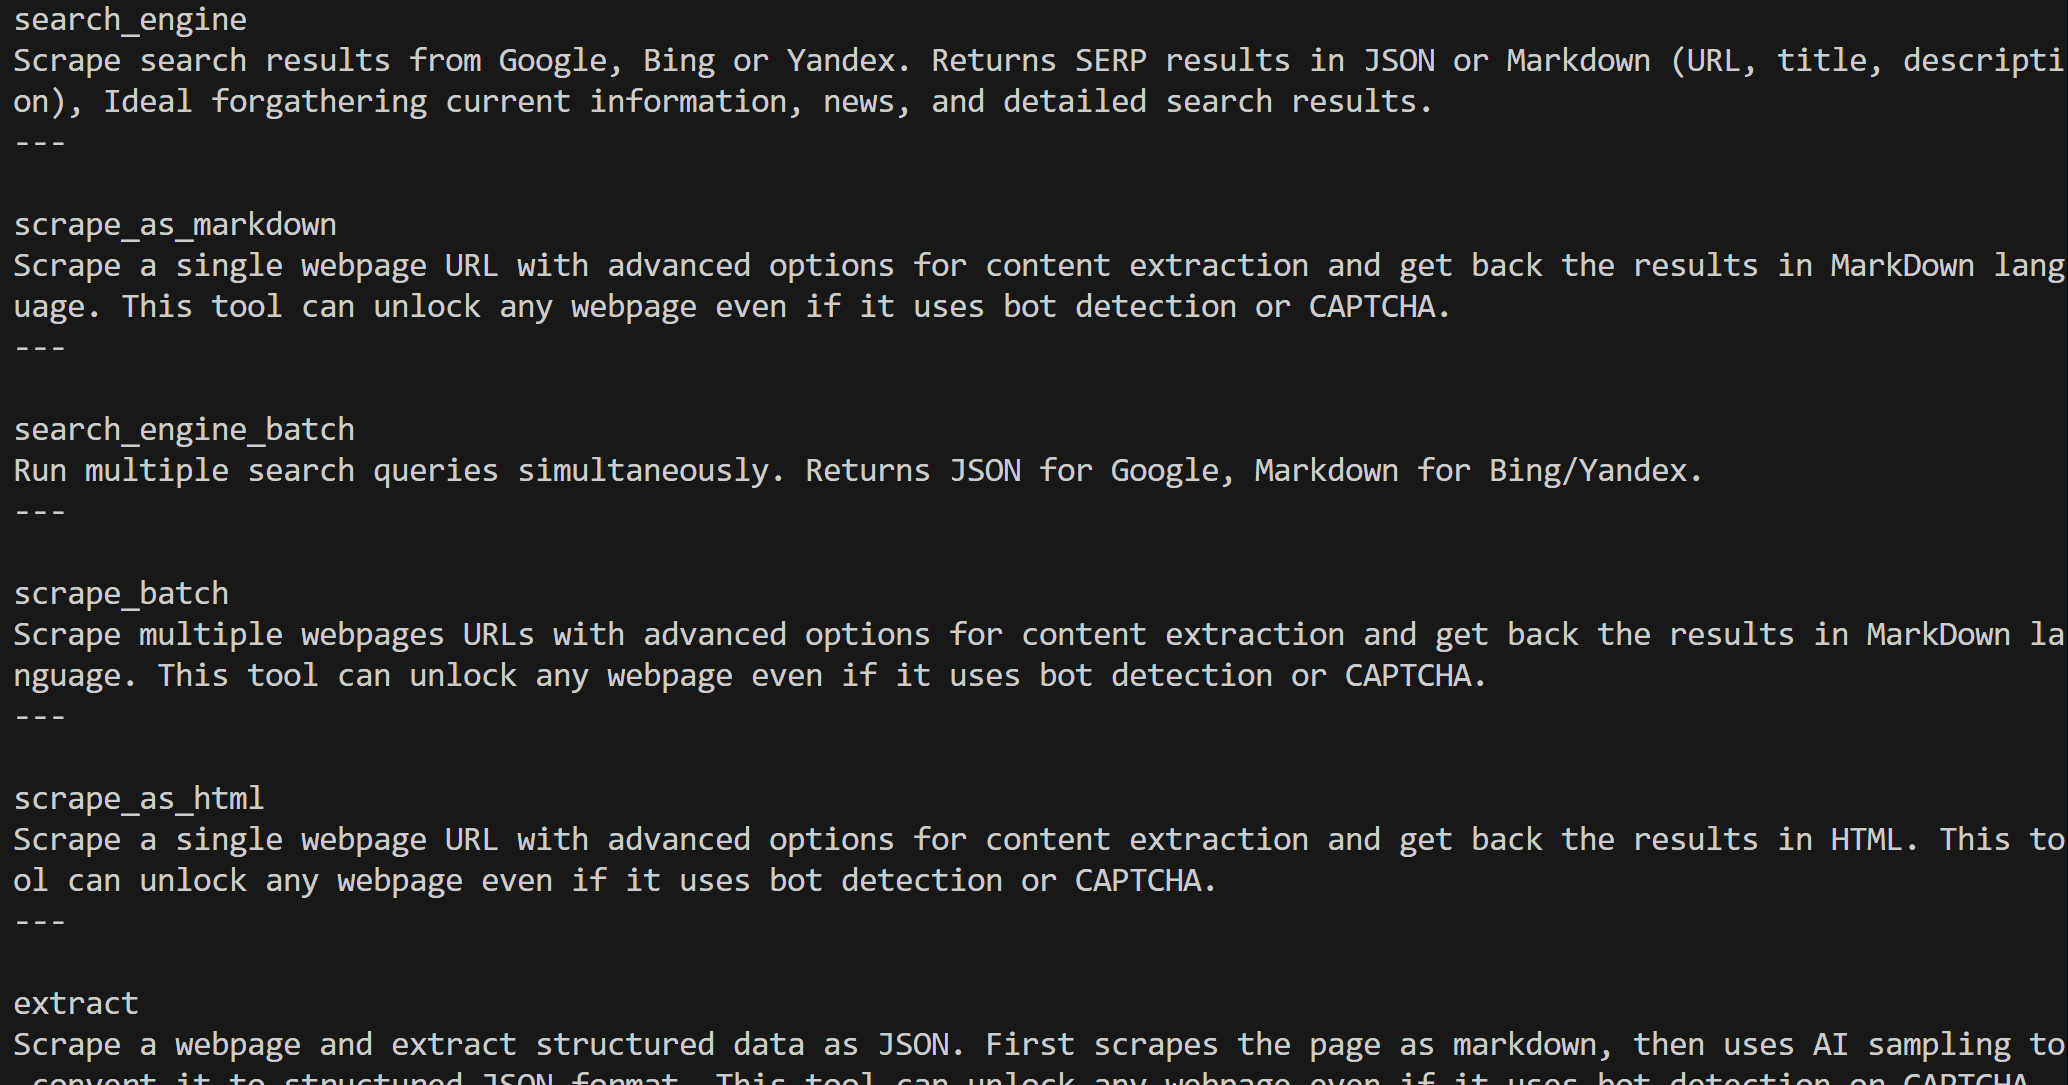
Depending on the configured tier, you will either have all 60+ Web MCP tools (Pro mode) or only the free tier tools.
Excellent! Your Web MCP connection is now fully functional in AG2.
Step #3: Connect the Web MCP Tools to an Agent
The simplest way to test Web MCP integration in AG2 is through an AssistantAgent, a subclass of ConversableAgent designed to quickly solve tasks using the LLM. First, define the agent and register the Web MCP toolkit with it:
from autogen import AssistantAgent

# Define an agent capable of searching and retrieving web data
assistant_agent = AssistantAgent(
    name="assistant",
    code_execution_config=False,
    llm_config=llm_config,
    system_message="""
    You have access to all tools exposed by the Web MCP, including:
    - Web search
    - Web scraping and page fetching
    - Web data feeds
    - Browser-based user simulation

    Use these tools when required.
    """
)
# Register the Web MCP tools with the agent
web_mcp_toolkit.register_for_llm(assistant_agent)
Once registered, you can launch the agent using the a_run() function and directly specify the tools to use. For example, here is how to test the agent on an Amazon web scraping task:
prompt = """
Retrieve data from the following Amazon product and produce a quick summary with the main info:
https://www.amazon.com/Muddy-Mats-Premium-Absorbent-Chenille/dp/B08N6VLJKV/
"""

# Run the Web MCP-extended agent asynchronously
result = await assistant_agent.a_run(
        message=prompt,
        tools=web_mcp_toolkit.tools,
        user_input=False,
)
await result.process()Important: Keep in mind, this is just a demo to showcase the integration. Thanks to all the Web MCP tools, the agent can handle much more complex, multi-step tasks across different web platforms and data sources.
Step #4: Final Code + Execution
Below is the final code for your AG2 + Bright Data Web MCP integration:
import asyncio
from autogen import (
    LLMConfig,
    AssistantAgent,
)
from dotenv import load_dotenv
import os
from mcp import ClientSession, StdioServerParameters
from mcp.client.stdio import stdio_client
from autogen.mcp import create_toolkit

# Load environment variables from the .env file
load_dotenv()

# Retrieve the Bright Data API key from environment variables
BRIGHT_DATA_API_KEY = os.getenv("BRIGHT_DATA_API_KEY")

# Define the MCP toolkit containing all the Web MCP tools
async def launch_mcp_agent():
    # Load LLM configuration from the OpenAI config list file
    llm_config = LLMConfig.from_json(path="OAI_CONFIG_LIST")

    # Instructions to connect to a local Web MCP instance
    server_params = StdioServerParameters(
        command="npx",
        args=["-y", "@brightdata/mcp"],
        env={
            "API_TOKEN": BRIGHT_DATA_API_KEY,
            "PRO_MODE": "true" # Optional
        },
    )

    async with stdio_client(server_params) as (read, write), ClientSession(read, write) as session:
        # Create an MCP connection session and retrieve the tools
        await session.initialize()
        web_mcp_toolkit = await create_toolkit(session, use_mcp_resources=False)

        # Define an agent capable of searching and retrieving web data
        assistant_agent = AssistantAgent(
            name="assistant",
            code_execution_config=False,
            llm_config=llm_config,
            system_message="""
            You have access to all tools exposed by the Web MCP, including:
            - Web search
            - Web scraping and page fetching
            - Web data feeds
            - Browser-based user simulation

            Use these tools when required.
            """
        )
        # Register the Web MCP tools with the agent
        web_mcp_toolkit.register_for_llm(assistant_agent)

        # The prompt to pass to the agent
        prompt = """
        Retrieve data from the following Amazon product and produce a quick summary with the main info:
        https://www.amazon.com/Muddy-Mats-Premium-Absorbent-Chenille/dp/B08N6VLJKV/
        """

        # Run the Web MCP-extended agent asynchronously
        result = await assistant_agent.a_run(
                message=prompt,
                tools=web_mcp_toolkit.tools,
                user_input=False,
        )
        await result.process()

asyncio.run(launch_mcp_agent())
Execute it, and the result will be: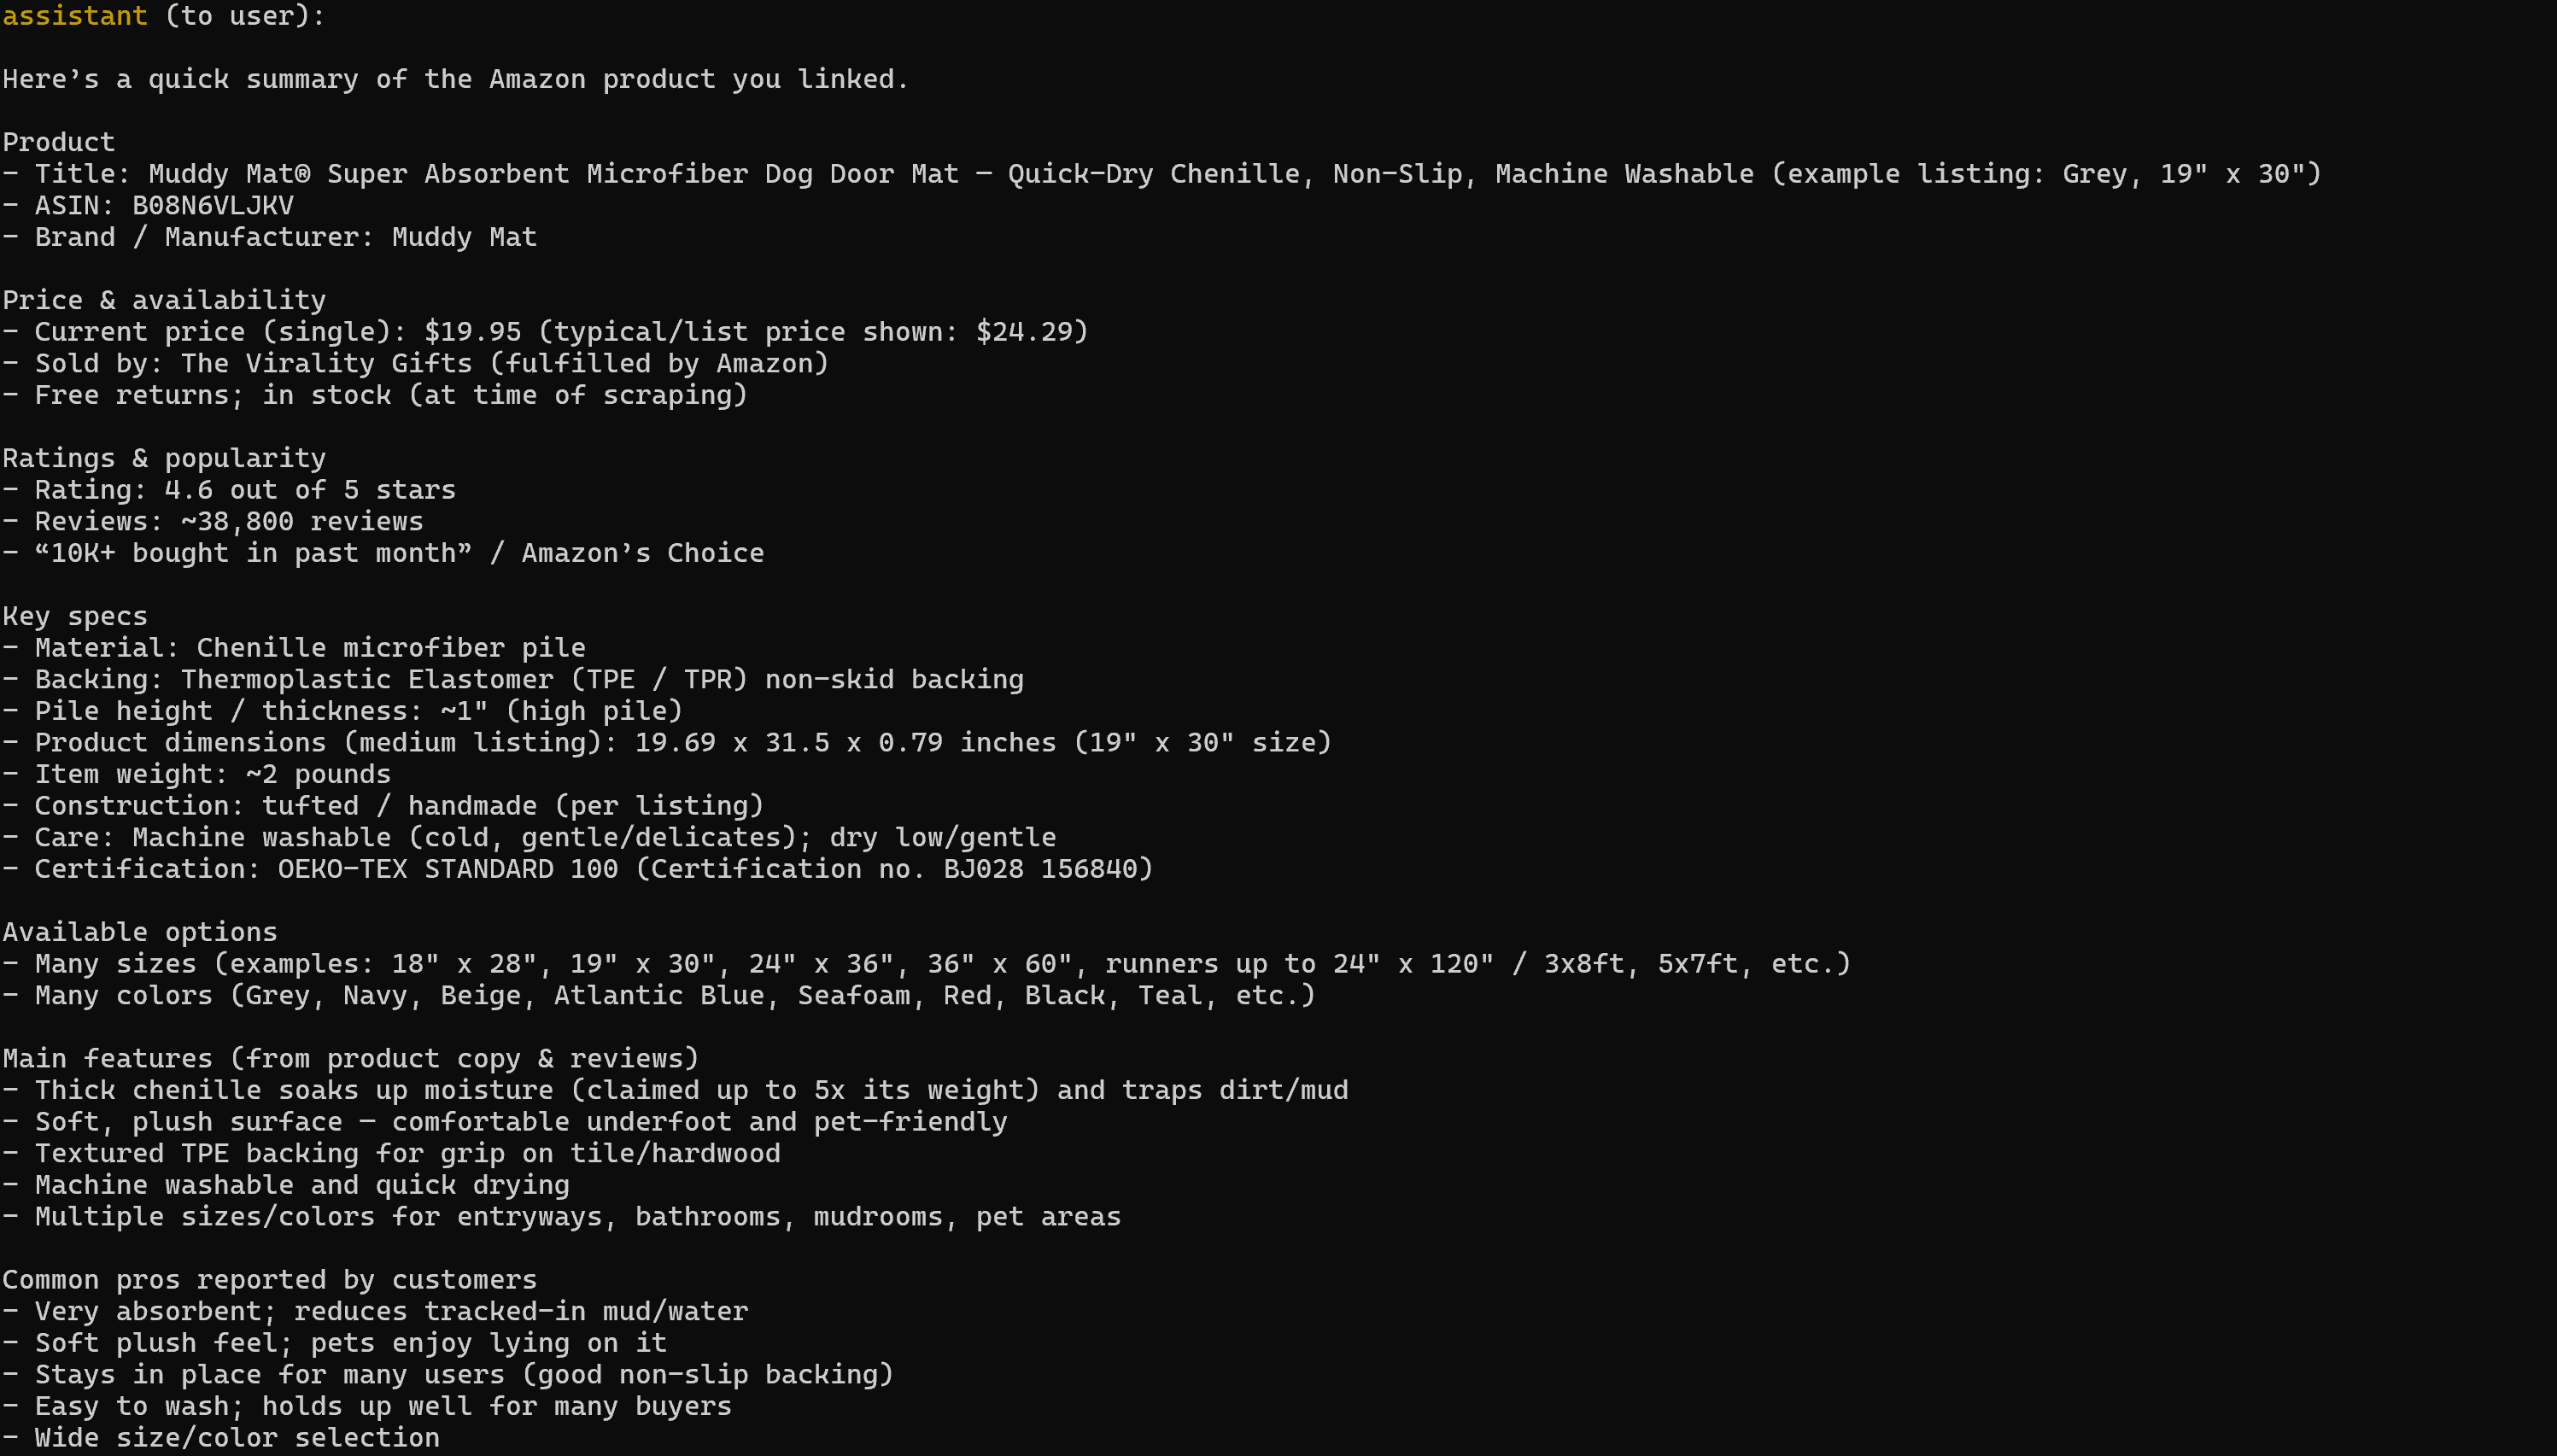
Note that the generated report includes all the relevant data from the target Amazon product page: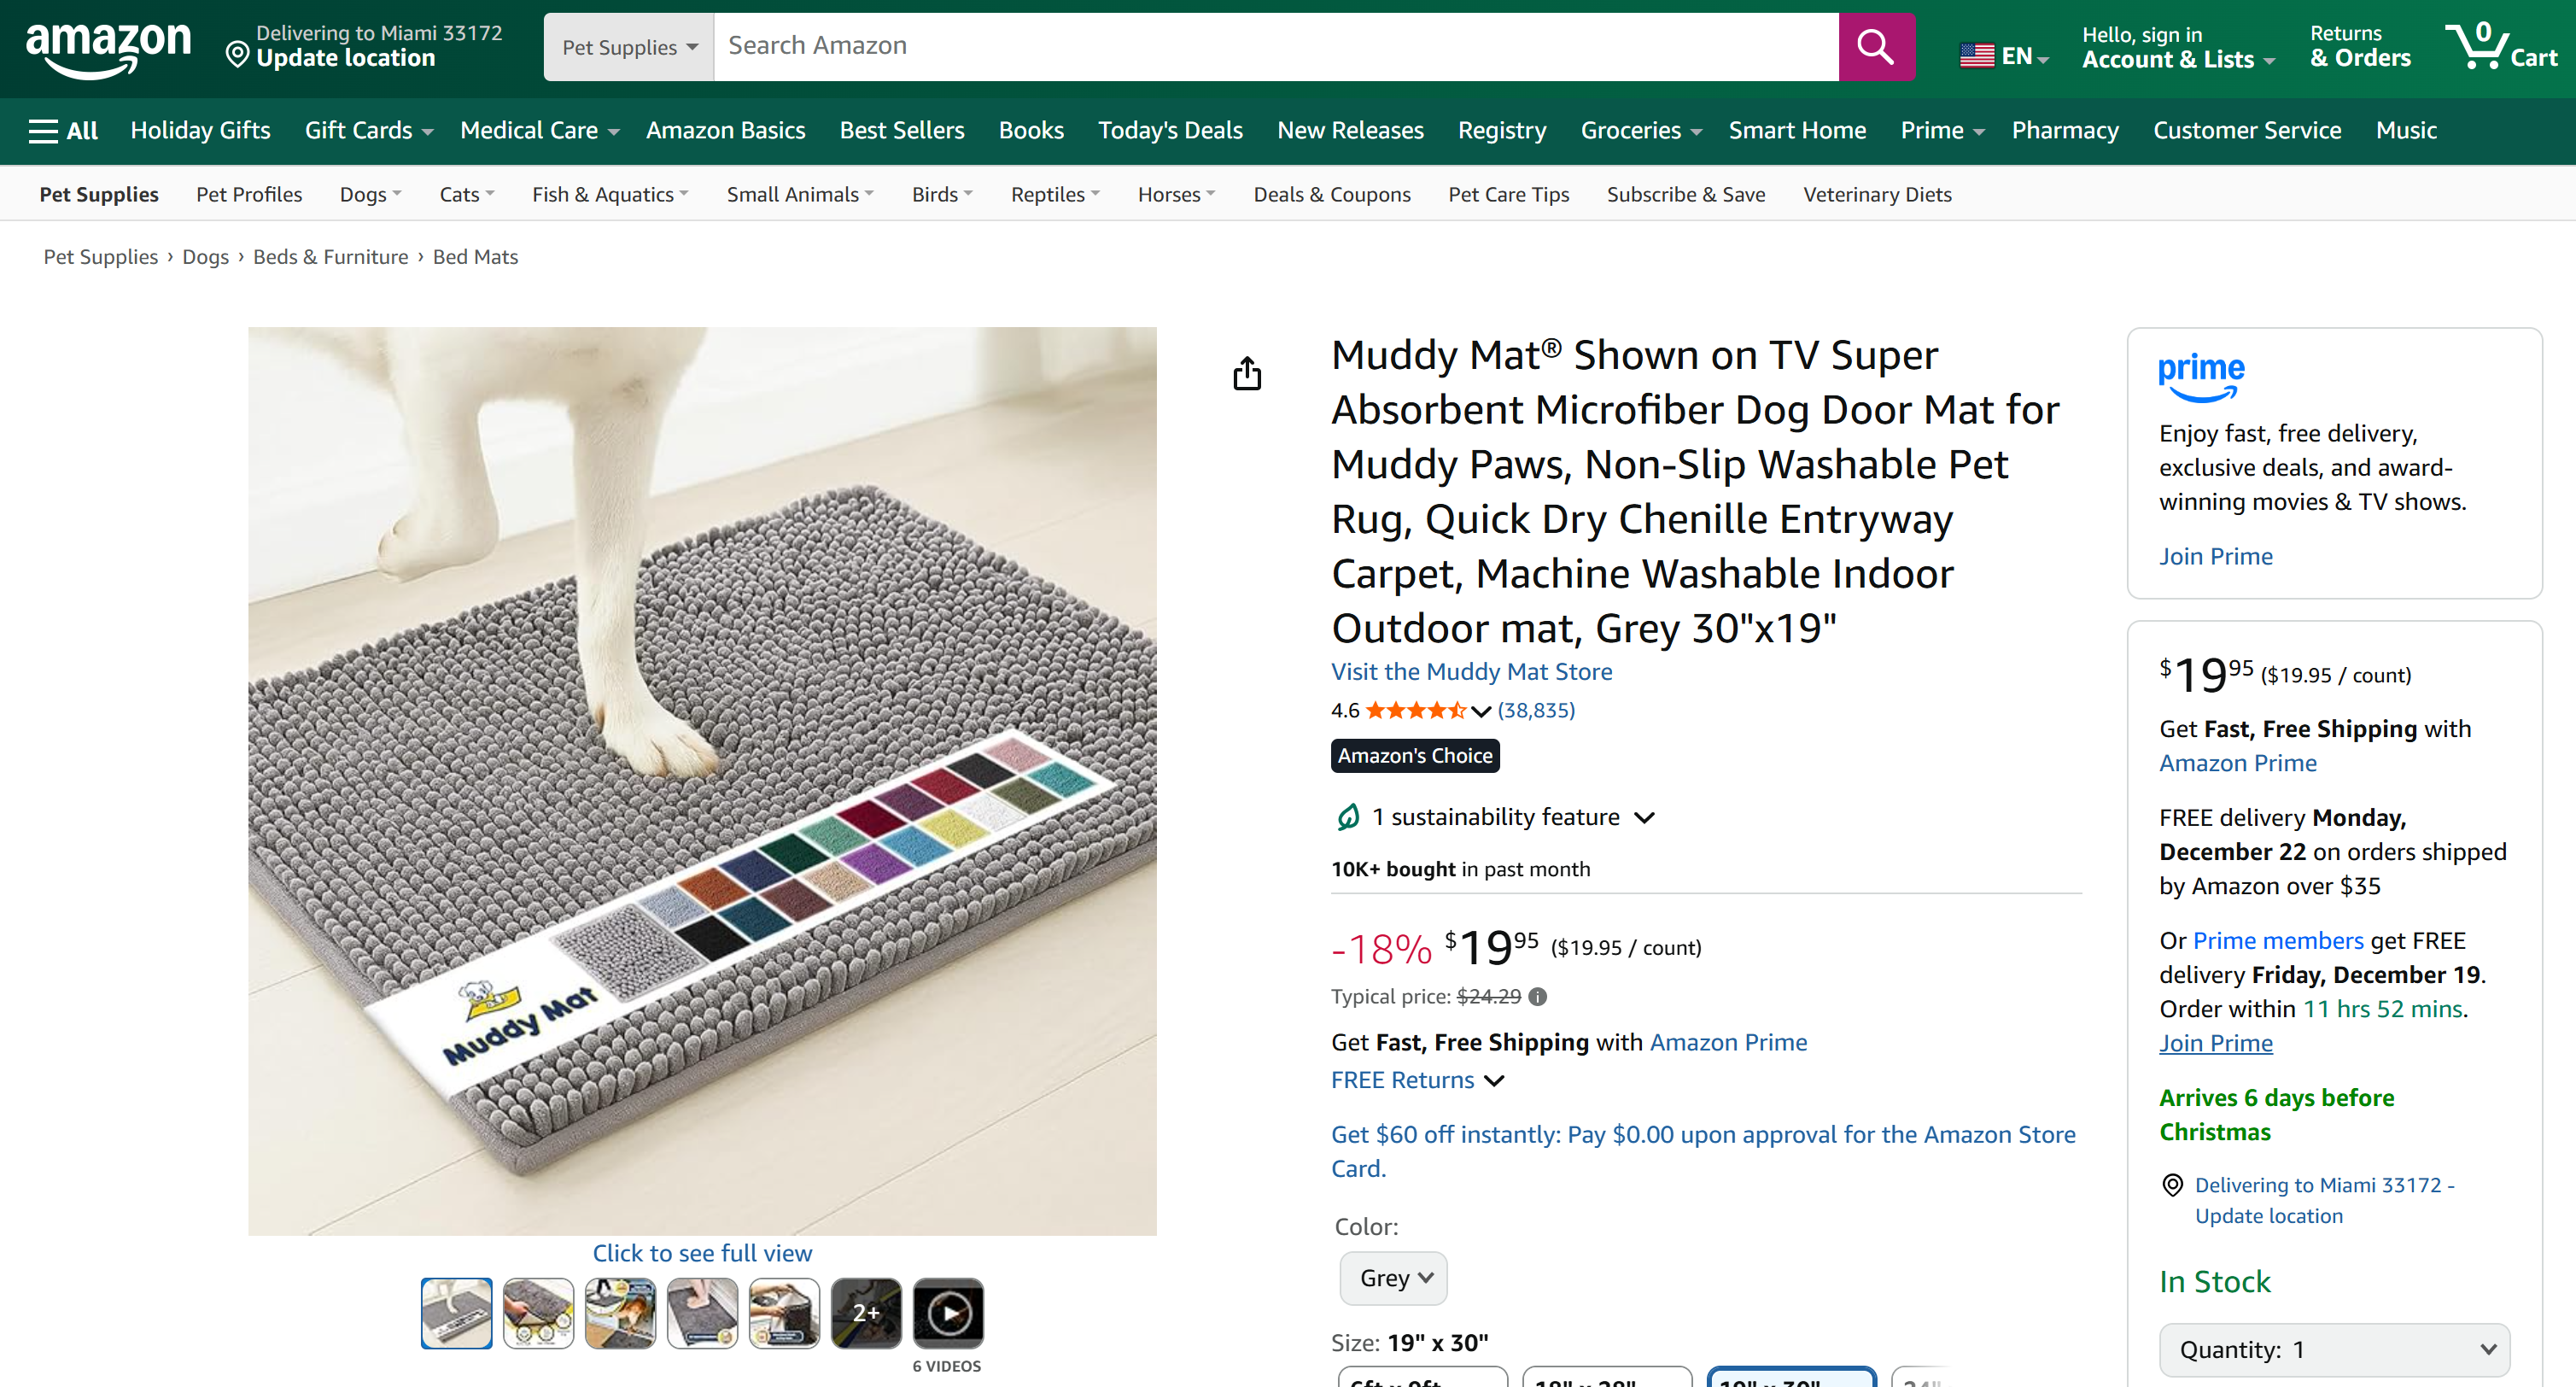
If you have ever tried scraping Amazon product data in Python, you know it is no joke. Amazon employs the notoriously difficult Amazon CAPTCHA, as well as other anti-bot measures. Plus, product pages are constantly changing and have varying structures.
Bright Data’s Web MCP handles all of that for you. On the free tier, it calls the scrape_as_markdown tool behind the scenes to retrieve the page structure in clean Markdown via Web Unlocker. In Pro mode, it leverages the web_data_amazon_product product, which calls Bright Data’s Amazon Scraper to gather fully structured product data.
This is it! You now know how to extend AG2 with Bright Data Web MCP.
Conclusion
In this tutorial, you learned how to integrate Bright Data with AG2, either through custom functions or via Web MCP.
This integration enables AG2 agents to perform web searches, extract structured data, access live web feeds, and automate web interactions. All that is powered by Bright Data’s suite of services for AI
Create a Bright Data account for free and start exploring our AI-ready web data tools today!

Technical Writer
Antonello Zanini is a technical writer, editor, and software engineer with 5M+ views. Expert in technical content strategy, web development, and project management.


