
In this article, you will find out:
- What AutoGen is and what makes it unique.
- Why you should extend your agents with web data retrieval and interaction capabilities via MCP.
- How to build an AutoGen AgentChat agent that integrates with Bright Data’s Web MCP.
- How to test the same agent in the visual web application AutoGen Studio.
Let’s dive in!
What Is AutoGen?
AutoGen is an open-source framework for building multi-agent AI systems, developed by Microsoft. It allows multiple AI agents to collaborate and communicate with each other to complete complex tasks, either autonomously or with human guidance.
The library has gained significant popularity, boasting over 50k stars on GitHub, and is available for both Python and C# (.NET).
Main Features
The core capabilities offered by AutoGen include:
- Customizable and conversational agents: Integrates AI agents with LLMs, human input, and various tools. You can define custom behaviors and conversation patterns using a high-level API or even in JSON.
- Human-in-the-loop workflows: Supports incorporating human feedback at multiple points in the workflow. For example, the
UserProxyAgentcan act as a proxy for a human, enabling oversight and intervention. - Tool integration: Agents can be equipped with a wide range of tools, such as functions for web searches, code execution, or file handling. This also includes support for MCP integration.
- Built-in agent types: AutoGen provides several pre-built agent types, including:
UserProxyAgent: Represents a human user and can execute code.AssistantAgent: A general-purpose LLM-based assistant capable of performing tasks and using tools.CodeExecutorAgent: Specializes in running and testing code.
- Observability and debugging: Features built-in tools for tracing and debugging agent interactions and workflows, with support for standards like OpenTelemetry.
- AutoGen Studio: A graphical, low-code, web interface for rapidly prototyping, testing, and deploying multi-agent systems.
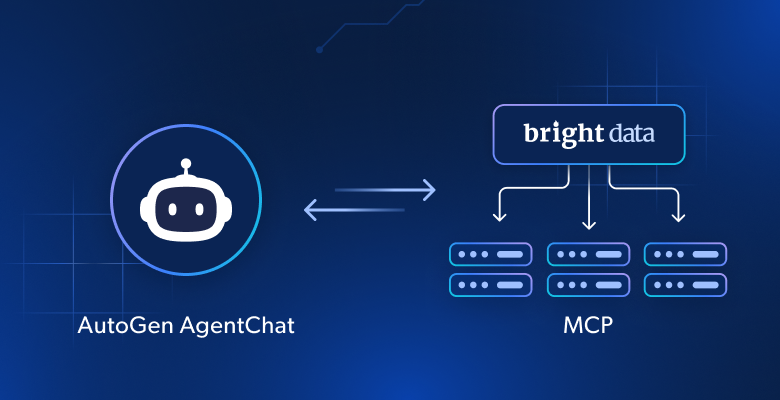
Why Extend AutoGen Agents with Bright Data’s Web MCP
AutoGen supports multiple AI model providers. Yet, no matter which LLM you choose—whether OpenAI, Anthropic, Ollama, or another provider—all models share the same fundamental limitation: their knowledge is static.
LLMs are trained on data that represents a snapshot in time, meaning their knowledge can quickly become outdated. More importantly, they cannot natively interact with live websites or access data sources on their own.
Thankfully, AutoGen supports MCP. That means you can combine your agents with Bright Data’s Web MCP. This extends LLMs, giving them tools to retrieve fresh, high-quality data directly from the web, along with other capabilities.
More in detail, the Web MCP is an open-source server that provides more than 60 AI-ready tools. These are all powered by Bright Data’s infrastructure for web interaction and data collection.
Even on a free tier, you will have access to these two game-changing tools:
| Tool | Description |
|---|---|
search_engine |
Retrieve search results from Google, Bing, or Yandex in JSON or Markdown. |
scrape_as_markdown |
Scrape any webpage into clean Markdown format, bypassing bot detection and CAPTCHA. |
Beyond that, Web MCP unlocks dozens of specialized tools for structured data collection across popular platforms like Amazon, LinkedIn, TikTok, Google Play, App Store, Yahoo Finance, and more. Discover more on the official GitHub page.
In short, configuring Web MCP in AutoGen helps you build complex AI agents capable of interacting with live websites and accessing up-to-date web data to generate insights grounded in the real world.
How to Build an AI Agent with Tools from Web MCP in AutoGen AgentChat Using Python
In this guided section, you will learn how to build an agent using AutoGen AgentChat, the high-level API for creating multi-agent applications. Specifically, the agent will be able to use all the tools exposed by the Web MCP server, extending the capabilities of the underlying LLM.
Note: The following agent will be written in Python, but you can easily adapt it to .NET.
Follow the steps below to create an Agent in Python with AutoGen and MCP integration!
Prerequisites
To follow along with this tutorial, make sure you have:
- Python 3.10+ installed on your machine.
- Node.js installed (we recommend the latest LTS version).
- An OpenAI API key (or an API key from any of the other supported LLMs).
You will also need a Bright Data account with an API key, but do not worry because you will be guided through that shortly. Having a basic understanding of how MCP works and the tools exposed by the Web MCP will also be helpful.
Step #1: AutoGen Project Setup
Open a terminal and create a new directory for your AutoGen AI project:
mkdir autogen-mcp-agentThe autogen-mcp-agent/ folder will contain the Python code for your MCP-integrated agent.
Next, navigate into the project directory and initialize a virtual environment inside it:
cd autogen-mcp-agent
python -m venv .venv
Activate the virtual environment. In Linux or macOS, run:
source .venv/bin/activateEquivalently, on Windows, execute:
.venv/Scripts/activateAdd a new file called agent.py to your project, which should now contain:
autogen-mcp-agent/
├── .venv/
└── agent.py
agent.py will serve as your main Python file and contain the AI agent logic.
Load the project folder in your favorite Python IDE, such as Visual Studio Code with the Python extension or PyCharm Community Edition.
With the virtual environment activated, install the required dependencies:
pip install autogen-agentchat "autogen-ext[openai]" "autogen-ext[mcp]" python-dotenvThe libraries you just installed are:
autogen-agentchat: For developing single-agent or multi-agent applications through an easy-to-use API built on top of autogen-core."autogen-ext[openai]": Extension for AutoGen to build agents powered by OpenAI models."autogen-ext[mcp]": Extension for connecting AutoGen agents to MCP servers.python-dotenv: To load environment variables from a local.envfile.
Note: If you do not plan to use OpenAI models, install the appropriate package for your preferred LLM provider, as explained in the docs.
Done! Your Python environment is now ready for AI agent development with AutoGen.
Step #2: Configure Environment Variable Reading
Your agent will rely on connections to third-party services like OpenAI and Bright Data. To authenticate these connections, you need to provide your API keys. Instead of hard-coding them in your agent.py file, which is a bad practice and can raise security issues, configure your script to read secrets from environment variables.
This is why the python-dotenv package was installed in the first place. In your agent.py file, import the library and call load_dotenv() to load your environment variables:
from dotenv import load_dotenv

load_dotenv()
Your assistant can now read variables from a local .env file.
Thus, add a .env file to the root of your project directory:
autogen-mcp-agent/
├── .venv/
├── .env         # <------
└── agent.py
You can now access environment variables in your code with:
import os

os.getenv("ENV_NAME")
Wonderful! Your script loads third-party integration secrets using environment variables.
Step #3: Get Started with Bright Data’s Web MCP
Before connecting your agent to Bright Data’s Web MCP, you must first ensure that your machine can run the server. This is required because you will instruct AutoGen to launch the Web MCP locally, and the agent will then connect to it.
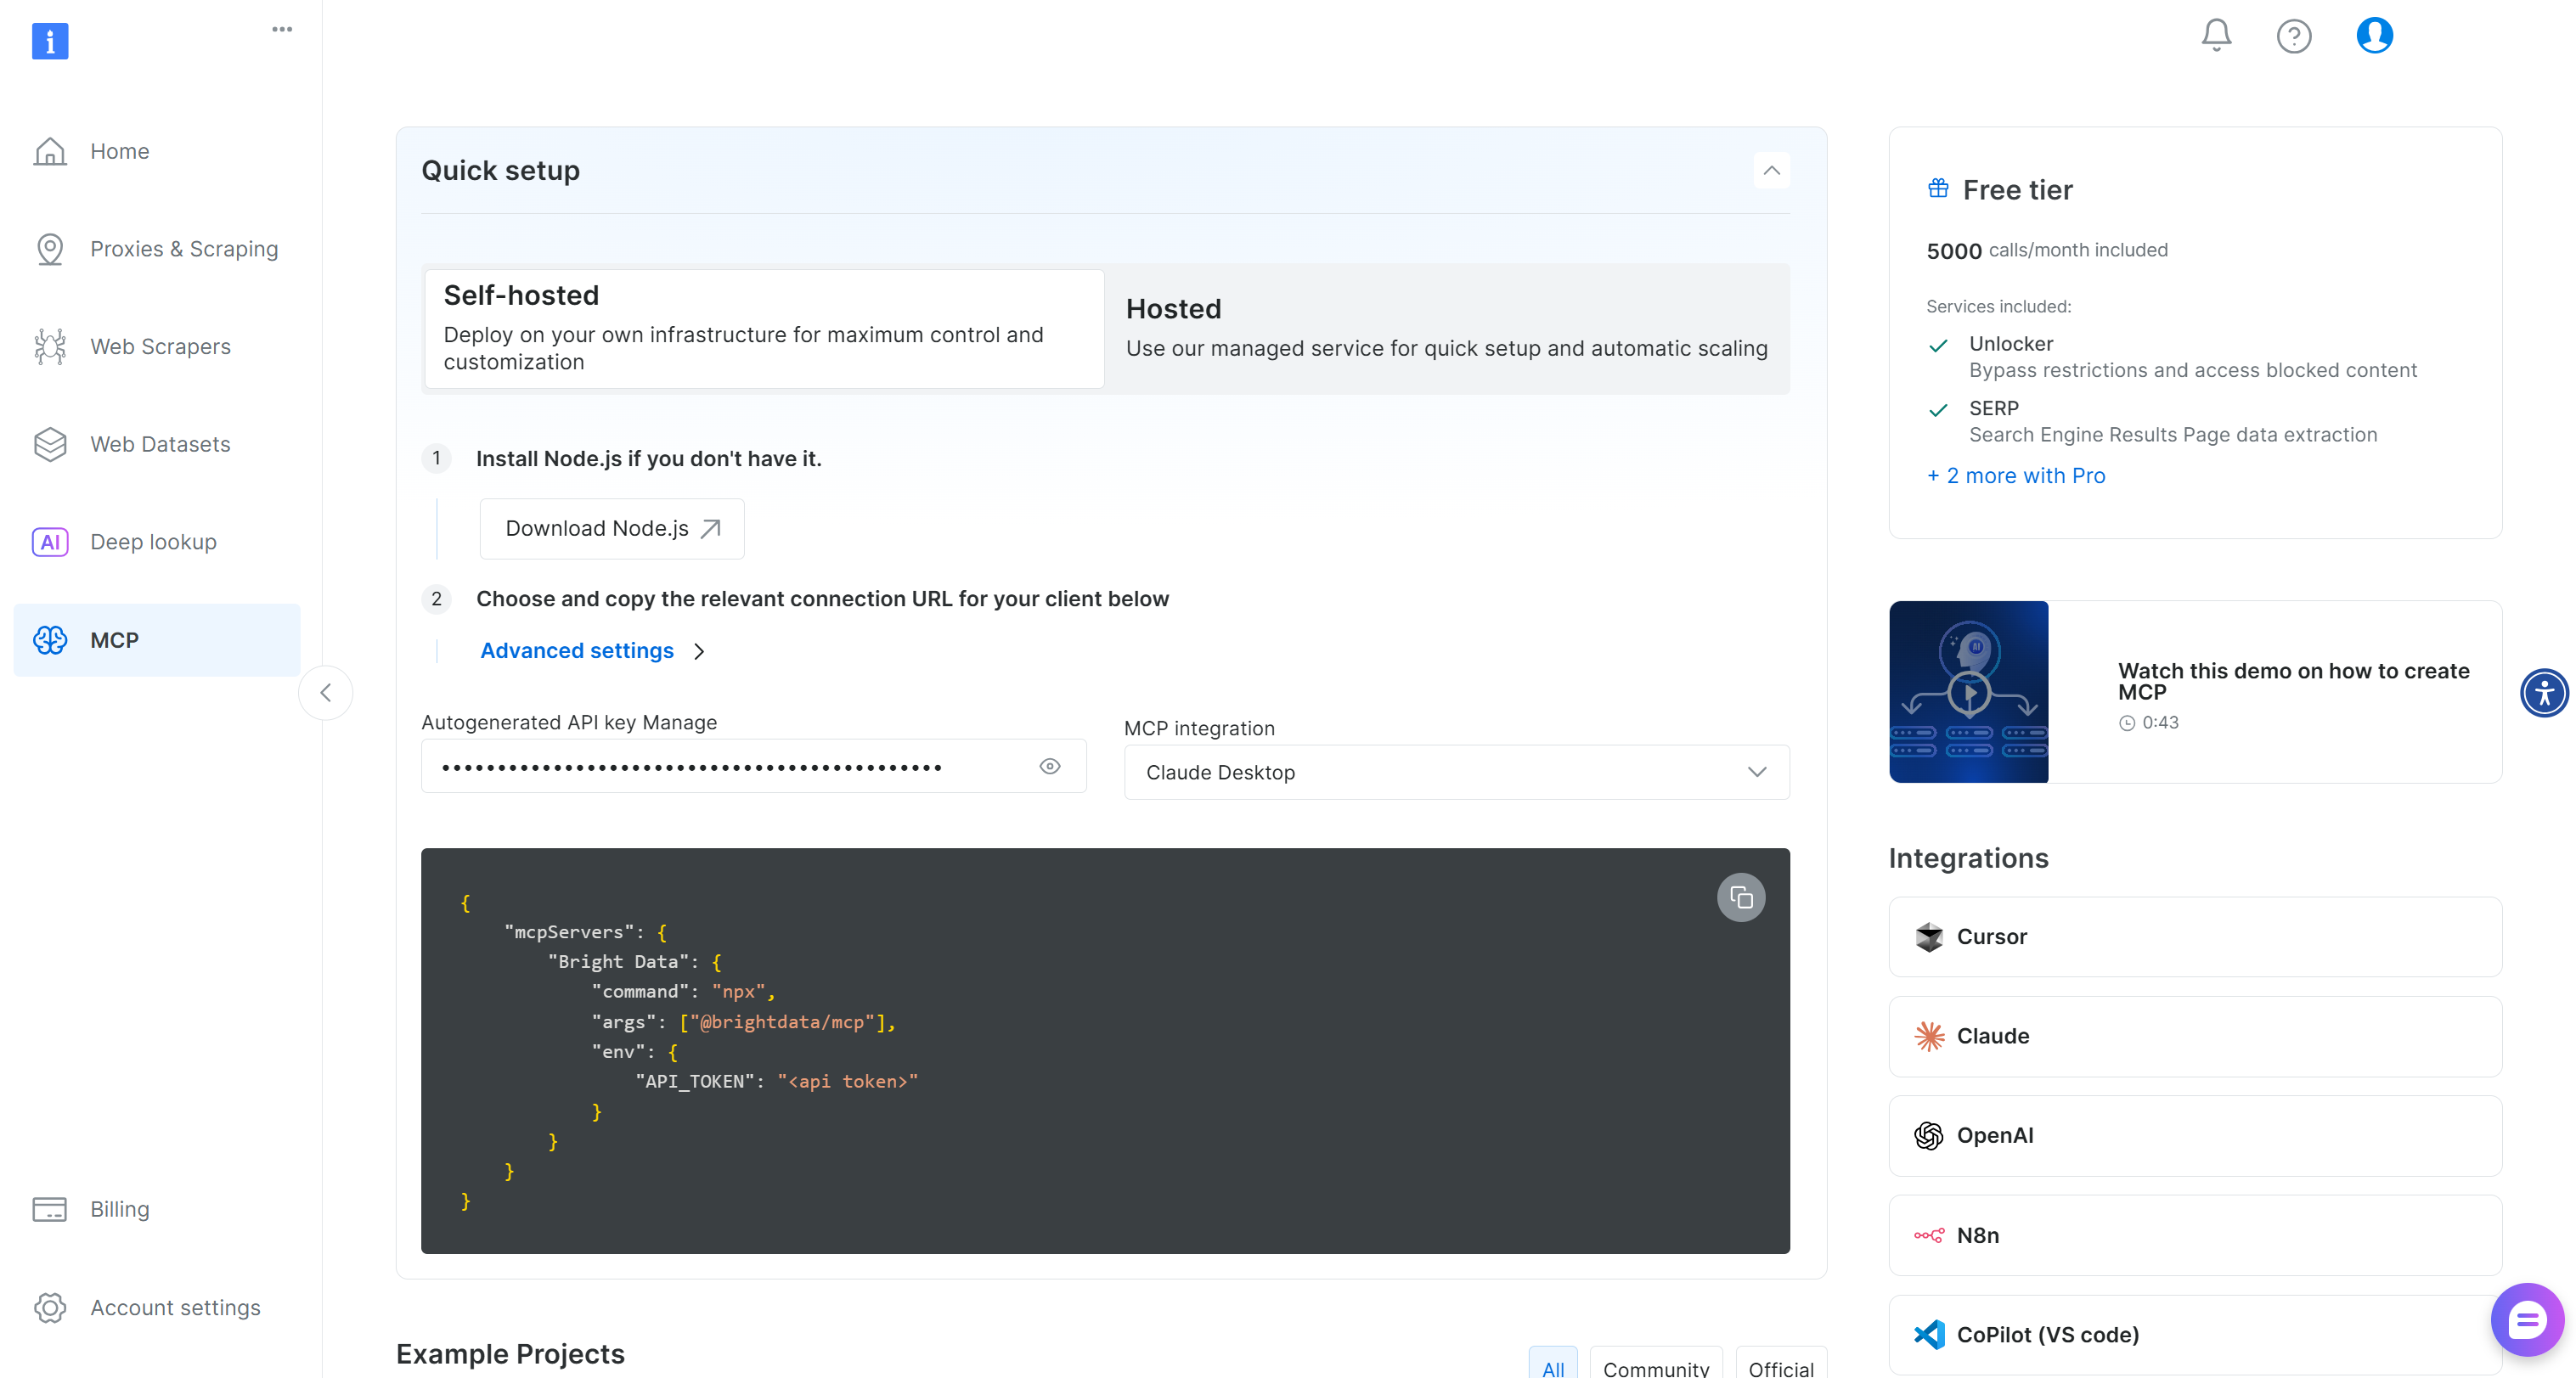
If you do not already have a Bright Data account, create one. If you do, simply log in. For a quick setup, take a look at the “MCP” section in your account:
For more guidance, follow the instructions below.
Begin by generating a Bright Data API key. Then, store it in a safe place, as you will need it shortly. Here, we assume the API key has Admin permissions, as that simplifies the Web MCP integration process.
Proceed by installing the Web MCP globally on your system through the @brightdata/mcp npm package:
npm install -g @brightdata/mcpNext, verify that the local MCP server works by launching it:
$Env:API_TOKEN="<YOUR_BRIGHT_DATA_API>"; npx -y @brightdata/mcpOr, equivalently, on Linux/macOS:
API_TOKEN="<YOUR_BRIGHT_DATA_API>" npx -y @brightdata/mcpReplace the <YOUR_BRIGHT_DATA_API> placeholder with your actual Bright Data API token. Both commands set the required API_TOKEN environment variable and launch the Web MCP locally.
If successful, you should see an output like this:

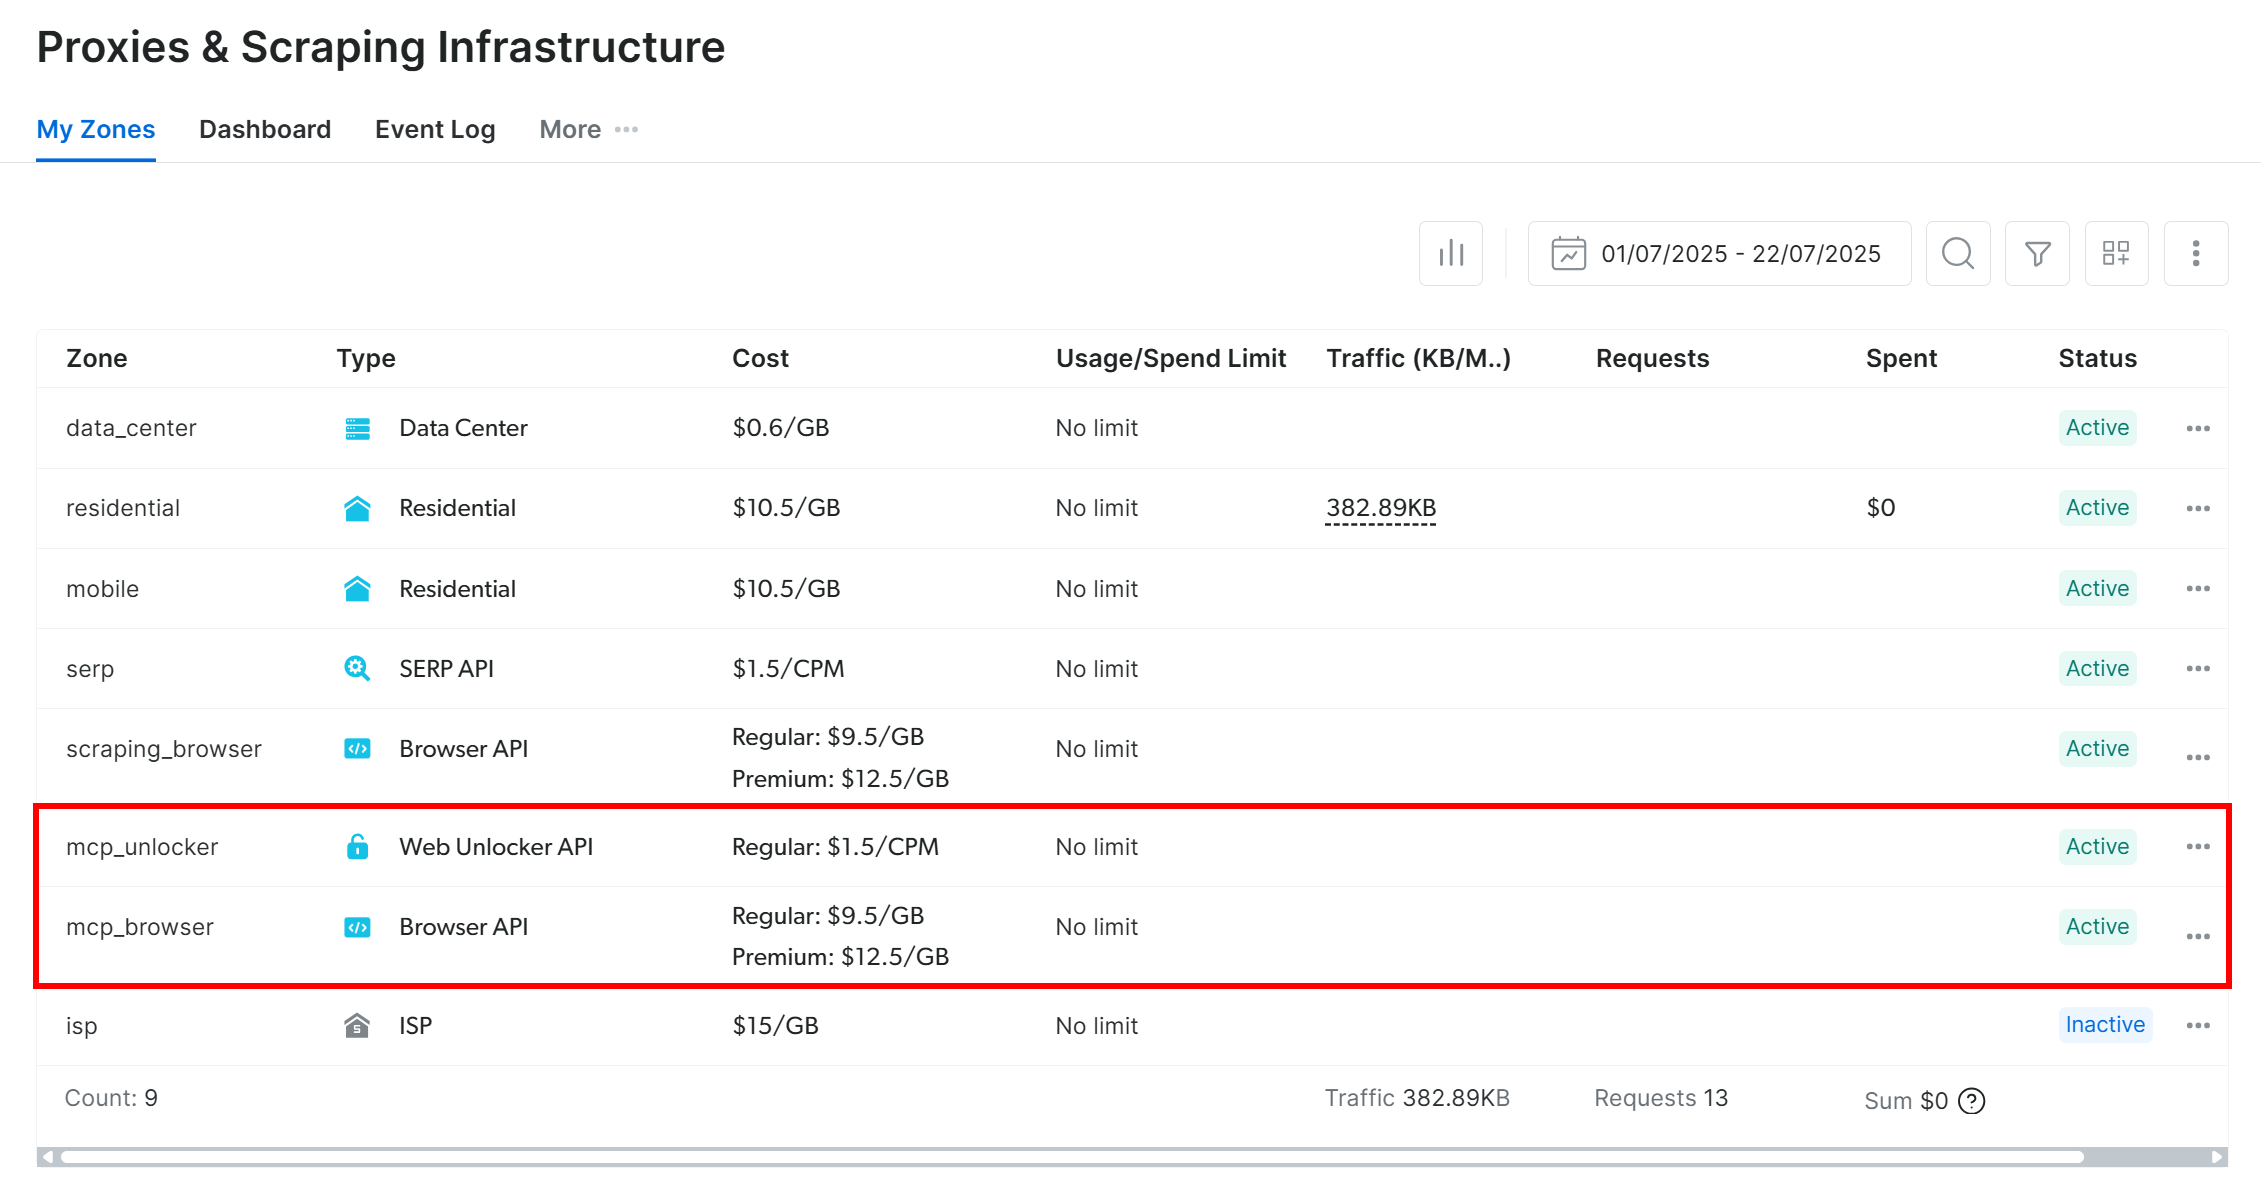
On the first launch, the Web MCP automatically creates two default zones in your Bright Data account:
mcp_unlocker: A zone for Web Unlocker.mcp_browser: A zone for Browser API.
Web MCP relies on those two Bright Data products to power its 60+ tools.
To confirm the zones were created, log in to your Bright Data dashboard and reach the “Proxies & Scraping Infrastructure” page. You should spot the two zones in the table:
Note: If your API token does not have Admin permissions, these zones will not be created. In this case, you must define them manually in the dashboard and configure their names in the command via environment variables (read the GitHub page for details).
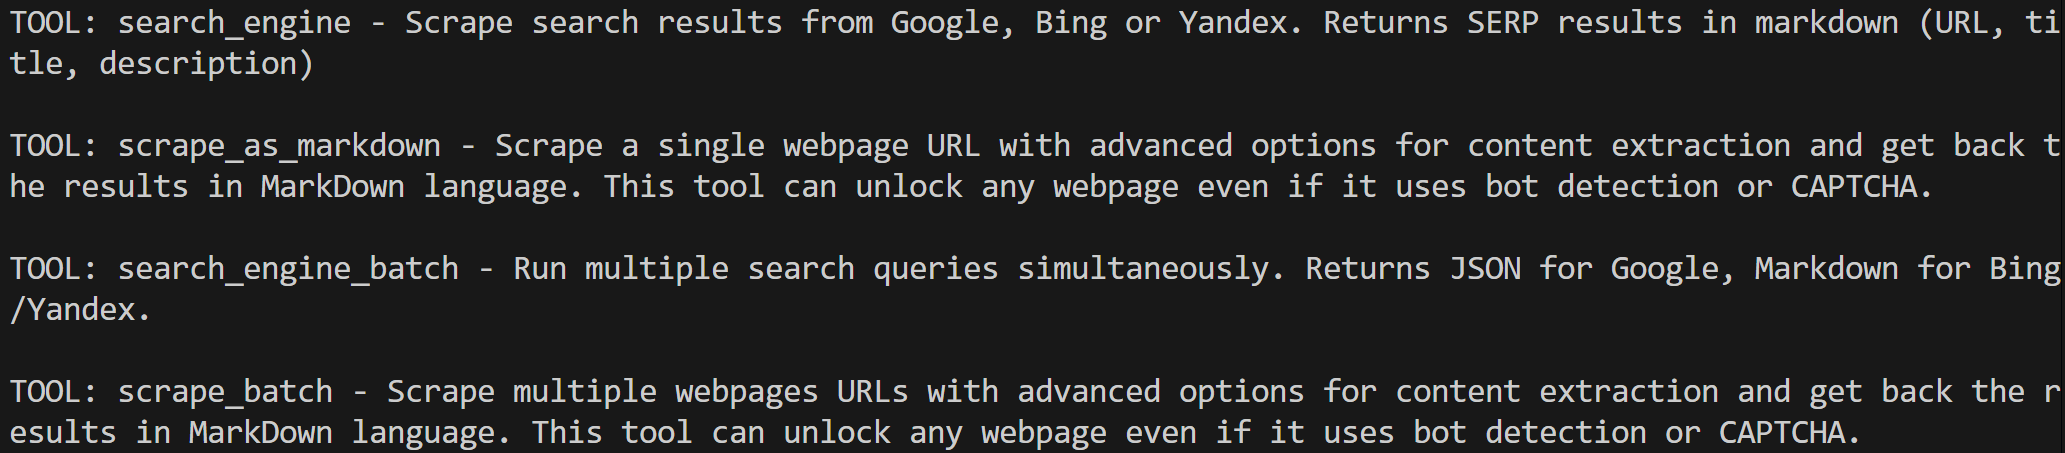
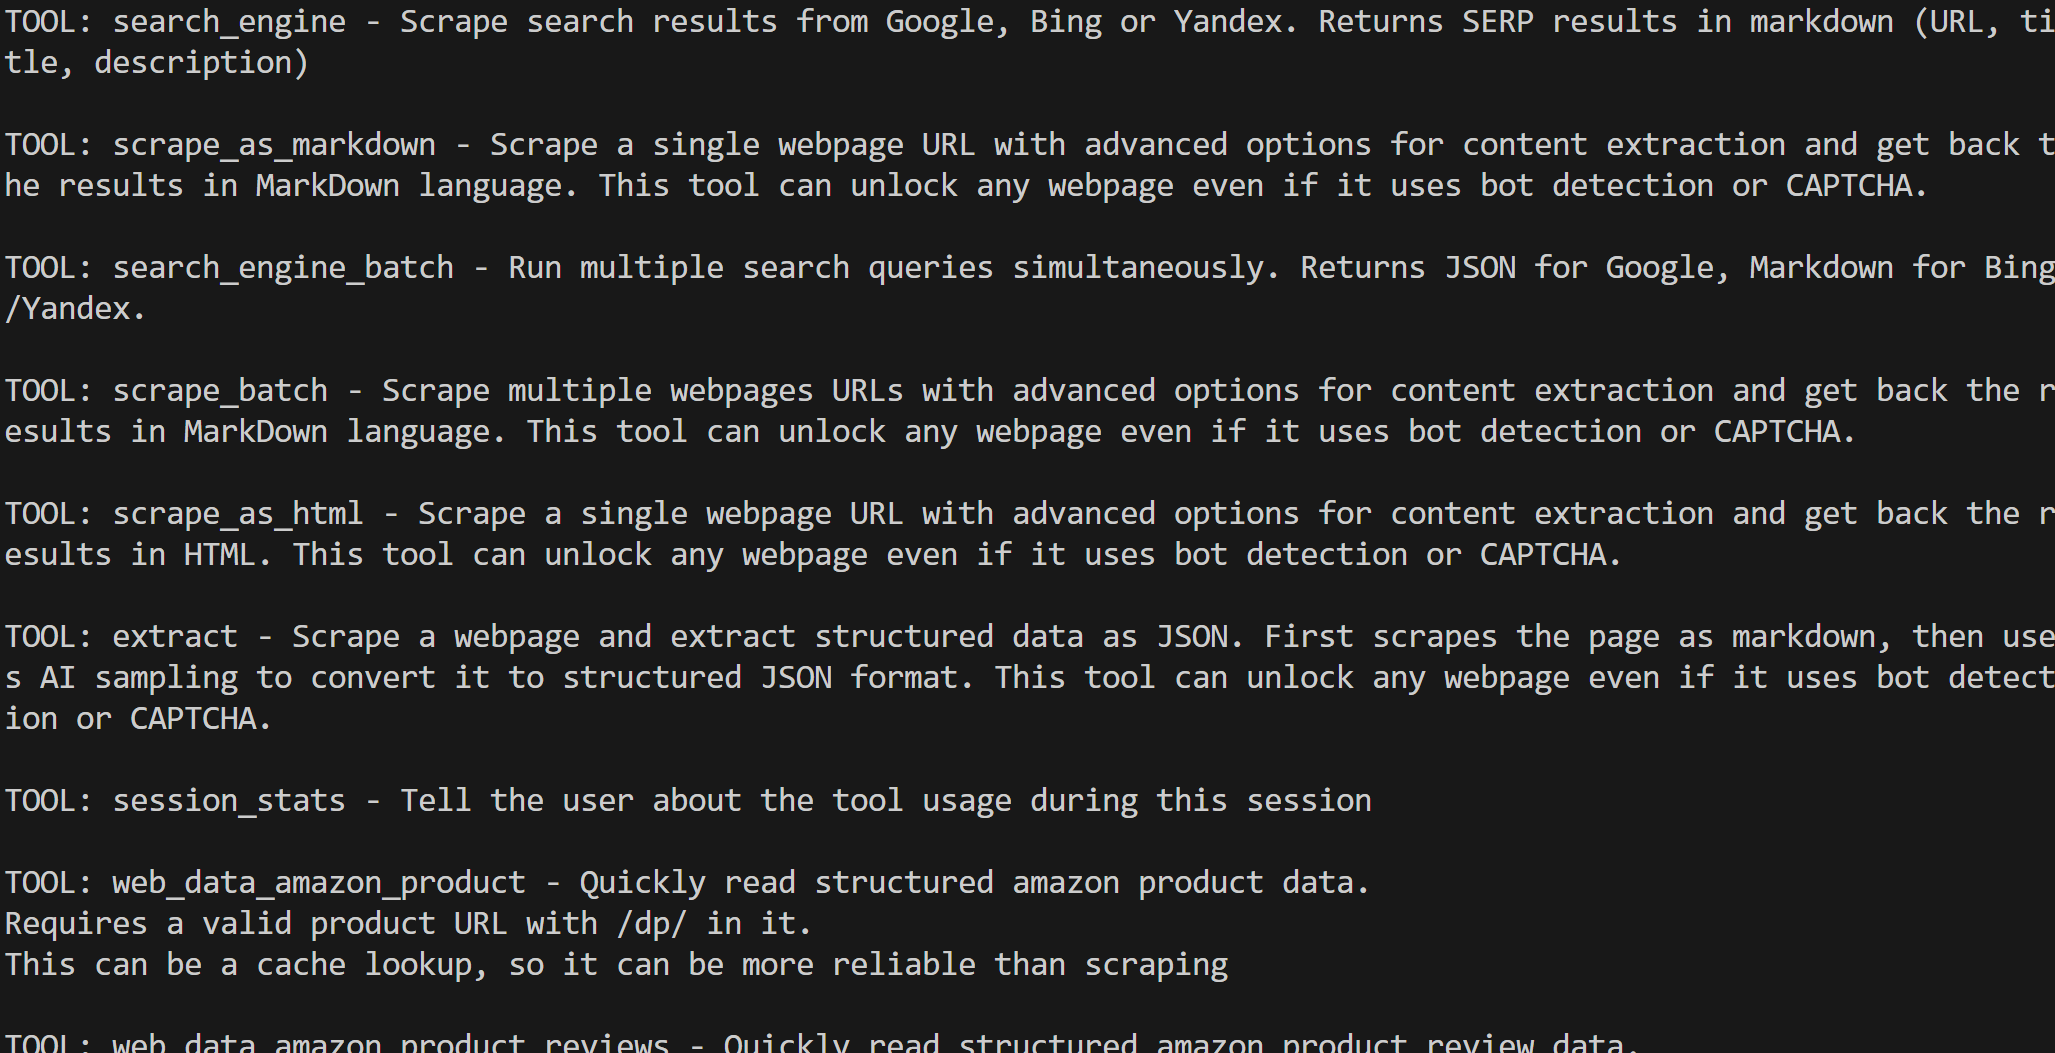
Remember that, by default, the MCP server only exposes the search_engine and scrape_as_markdown tools (and their batch versions). These tools are included in the Web MCP free tier, so you can use them for free.
To unlock advanced tools, such as browser automation and structured data feeds, you need to enable Pro mode. To do so, set the PRO_MODE="true" environment variable before launching the Web MCP:
$Env:API_TOKEN="<YOUR_BRIGHT_DATA_API>"; $Env:PRO_MODE="true"; npx -y @brightdata/mcpOr, on Linux/macOS:
API_TOKEN="<YOUR_BRIGHT_DATA_API>" PRO_MODE="true" npx -y @brightdata/mcpPro mode unlocks all 60+ tools, but it is not included in the free tier and will incur additional charges.
Perfect! You just verified that the Web MCP server runs on your machine. Stop the MCP process, as you will configure your AutoGen AgentChat agent to launch and connect to it in the next step.
Step #4: Configure the Web MCP Connection
Now that your machine can run the Web MCP, you need to instruct your script to connect to the server.
Start by adding the Bright Data API key you retrieved earlier to your .env file:
BRIGHT_DATA_API_KEY="<YOUR_BRIGHT_DATA_API_KEY>"Replace <YOUR_BRIGHT_DATA_API_KEY> with your actual API key.
In agent.py, load the Bright Data API key value with:
BRIGHT_DATA_API_KEY = os.getenv("BRIGHT_DATA_API_KEY")Next, define an async function and configure the MCP connection to a local Web MCP process:
from autogen_ext.tools.mcp import (
    StdioServerParams,
    mcp_server_tools
)

async def main():
    # Configs to connect to the Bright Data Web MCP
    bright_data_mcp_server = StdioServerParams(
        command="npx",
        args=[
            "-y",
            "@brightdata/mcp"
        ],
        env={
            "API_TOKEN": BRIGHT_DATA_API_KEY,
            "PRO_MODE": "true" # Optional
        }
    )

    # Load the tools exposed by the Bright Data Web MCP server
    bright_data_tools = await mcp_server_tools(bright_data_mcp_server)

    # Agent definition...
This configuration mirrors the npx command from the previous step, using the environment variable for the API token. Note that PRO_MODE is optional, while API_TOKEN is required.
Essentially, your agent.py script will now launch a Web MCP process and connect to it via STDIO. The result is an array of tools that you can pass to your AutoGen agents.
Verify the connection by listing the available tools:
for bright_data_tool in bright_data_tools:

print(f"TOOL: {bright_data_tool.name} - {bright_data_tool.description}\n")
If you run your script with Pro mode disabled, you should see output similar to this:
Otherwise, with Pro mode enabled, you will see all 60+ tools:
Here we go! The output confirms that your Web MCP integration is working perfectly.
Step #5: Define Your AutoGen Agent
AutoGen AgentChat comes with a set of preset agents, each designed with different response styles. In this case, the general-purpose AssistantAgent is the best fit.
Before defining the agent, you need to configure an LLM integration—since an agent cannot function without an underlying AI model.
Begin by adding your OpenAI API key to the .env file:
OPENAI_API_KEY="<YOUR_OPENAI_API_KEY>"Then, set up the OpenAI integration in your code with:
from autogen_ext.models.openai import OpenAIChatCompletionClient

model_client = OpenAIChatCompletionClient(
    model="gpt-4o-mini",
)
The OpenAIChatCompletionClient automatically reads the OPENAI_API_KEY environment variable, so there is no need to load it in your code. That env will be used to authenticate the underlying API calls to OpenAI.
Notice that the example above connects your agent to OpenAI’s GPT-4o model. If you plan to use another model or LLM provider, check their documentation and adjust accordingly.
Note: As of this writing, GPT-5 models are not yet supported in autogen-ext[openai].
Now, combine the model with the MCP tools you loaded earlier to create an assistant agent:
from autogen_agentchat.agents import AssistantAgent

agent = AssistantAgent(
    name="web_agent",
    model_client=model_client,
    tools=bright_data_tools,
)
Terrific! You just built your first AutoGen AgentChat agent, powered by OpenAI and integrated with Bright Data’s MCP tools.
Step #6: Create Your AutoGen Team
You can pass a task directly to your agent and run it. However, this will not give you the best experience, as the agent will stop after a single tool execution. While you could tweak this behavior with the max_tool_iterations argument, it is usually better to define a team.
In AutoGen, a team is a group of agents working together toward a goal. In your case, the team will only have one agent (which is a valid setup). Still, defining a team now makes it easier to expand later if you want to add more agents and build a multi-agent workflow.
A common setup is the RoundRobinGroupChat team, where agents take turns in a round-robin style. You will also need a termination condition to decide when the loop should stop. Here, we will use TextMentionTermination, configured to end the process when the word “TERMINATE” appears in the agent’s response:
from autogen_agentchat.conditions import TextMentionTermination
from autogen_agentchat.teams import RoundRobinGroupChat

# Define a termination condition for the loop
text_termination = TextMentionTermination("TERMINATE")

# Create a team with the only agent
team = RoundRobinGroupChat([agent], termination_condition=text_termination)
Note that this is a standard setup shown in most AutoGen examples.
Even with only one agent, the team will keep calling it repeatedly until the task is complete. This is especially useful for complex tasks that may require multiple tool calls—and thus multiple interaction rounds—before finishing.
Nice! It only remains to run the team and capture the result.
Step #7: Perform the Task
To execute your AutoGen AgentChat application, pass a task to the team your agent belongs to. To test the extended web data retrieval capabilities, try running a prompt like this:
task = """
Retrieve information from the following app on the App Store:
"https://apps.apple.com/us/app/brave-browser-search-engine/id1052879175"

Based on user reviews, pricing, and all available information, tell me whether you think this app is worth installing and can be trusted.
"""
Naturally, OpenAI models alone cannot perform this task since they cannot fetch all data from the App Store. This is where your integration with Bright Data’s tools comes into play. With this setup, your agent can scrape the app page, analyze reviews and pricing details, and then let the LLM process the information into a clear, human-readable report.
This is a practical example of how you might build an agent that evaluates apps before installation, highlighting potential issues or user concerns. After all, installing apps without due diligence can be risky from a security perspective.
Now, run the task and stream the response directly in your terminal with:
from autogen_agentchat.ui import Console

await Console(team.run_stream(task=task))
Cool! At this point, the team will start, and the task will be handed off to your configured agent. The agent may run multiple iterations to achieve the goal. The expected outcome is that the agent uses Bright Data’s tools from Web MCP to scrape data from the App Store, then the LLM synthesizes that data into an evaluation of whether the chosen app is worth installing.
As a last step, do not forget to close the connection to your chosen model at the end of your script:
await model_client.close()Step #8: Put It All Together
Your agent.py file should contain:
# pip install autogen-agentchat "autogen-ext[openai]" "autogen-ext[mcp]" python-dotenv
import asyncio
from dotenv import load_dotenv
import os
from autogen_ext.tools.mcp import (
    StdioServerParams,
    mcp_server_tools
)
from autogen_ext.models.openai import OpenAIChatCompletionClient
from autogen_agentchat.agents import AssistantAgent
from autogen_agentchat.conditions import TextMentionTermination
from autogen_agentchat.teams import RoundRobinGroupChat
from autogen_agentchat.ui import Console

# Load the environment variables from the .env file
load_dotenv()

# Load your Bright Data API key from the envs
BRIGHT_DATA_API_KEY = os.getenv("BRIGHT_DATA_API_KEY")

async def main():
    # Configs to connect to the Bright Data Web MCP
    bright_data_mcp_server = StdioServerParams(
        command="npx",
        args=[
            "-y",
            "@brightdata/mcp"
        ],
        env={
            "API_TOKEN": BRIGHT_DATA_API_KEY,
            "PRO_MODE": "true" # Optional
        }
    )

    # Load the tools exposed by the Bright Data Web MCP server
    bright_data_tools = await mcp_server_tools(bright_data_mcp_server)

    # LLM integration
    model_client = OpenAIChatCompletionClient(
        model="gpt-4o-mini",
    )

    # Define your AI assistant agent powered by the Web MCP tools
    agent = AssistantAgent(
        name="web_agent",
        model_client=model_client,
        tools=bright_data_tools,
    )

    # Define a termination condition for the loop
    text_termination = TextMentionTermination("TERMINATE")

    # Create a team with the only agent
    team = RoundRobinGroupChat([agent], termination_condition=text_termination)

    # The task to be executed by the team
    task = """
    Retrieve information from the following app on the App Store:
    "https://apps.apple.com/us/app/brave-browser-search-engine/id1052879175"

    Based on user reviews, pricing, and all available information, tell me whether you think this app is worth installing and can be trusted.
    """

    # Stream the team's response to the terminal
    await Console(team.run_stream(task=task))

    # Close the AI connection
    await model_client.close()

if __name__ == "__main__":
    asyncio.run(main())
Wow! In around 70 lines of code, you just build a single-agent team to analyze apps for installation on the App Store.
Execute the agent with:
python agent.pyThis is what you should see in the terminal:
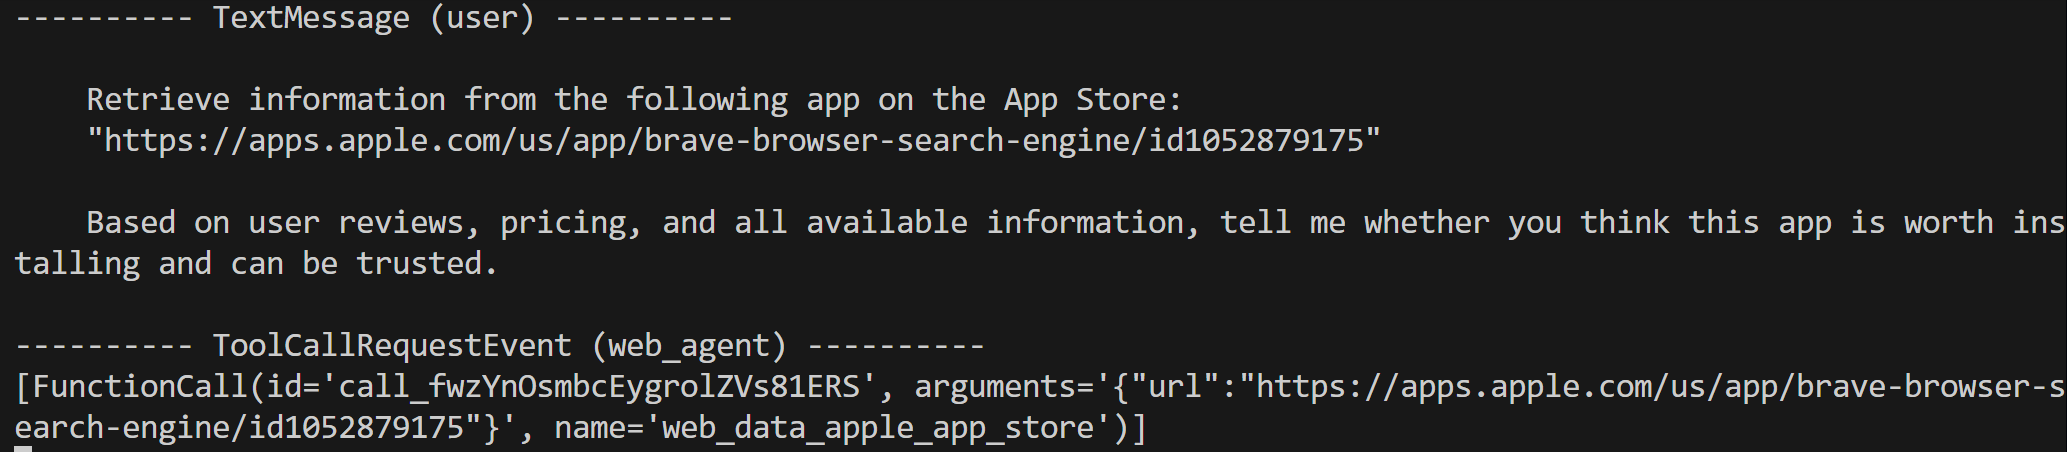
As you can tell, the agent correctly identified that web_data_apple_app_store from Web MCP was the right tool for this task. This is a Pro tool to “quickly retrieve structured Apple App Store data.” So, it definitely was a good choice. If you did not enable Pro mode, the agent would instead utilize the scrape_as_markdown tool.
The tool execution may take a little time. The result is structured data (in JSON format) extracted from the App Store page, as expected:

That structured output is then analyzed and processed by the LLM, which generates a Markdown report:
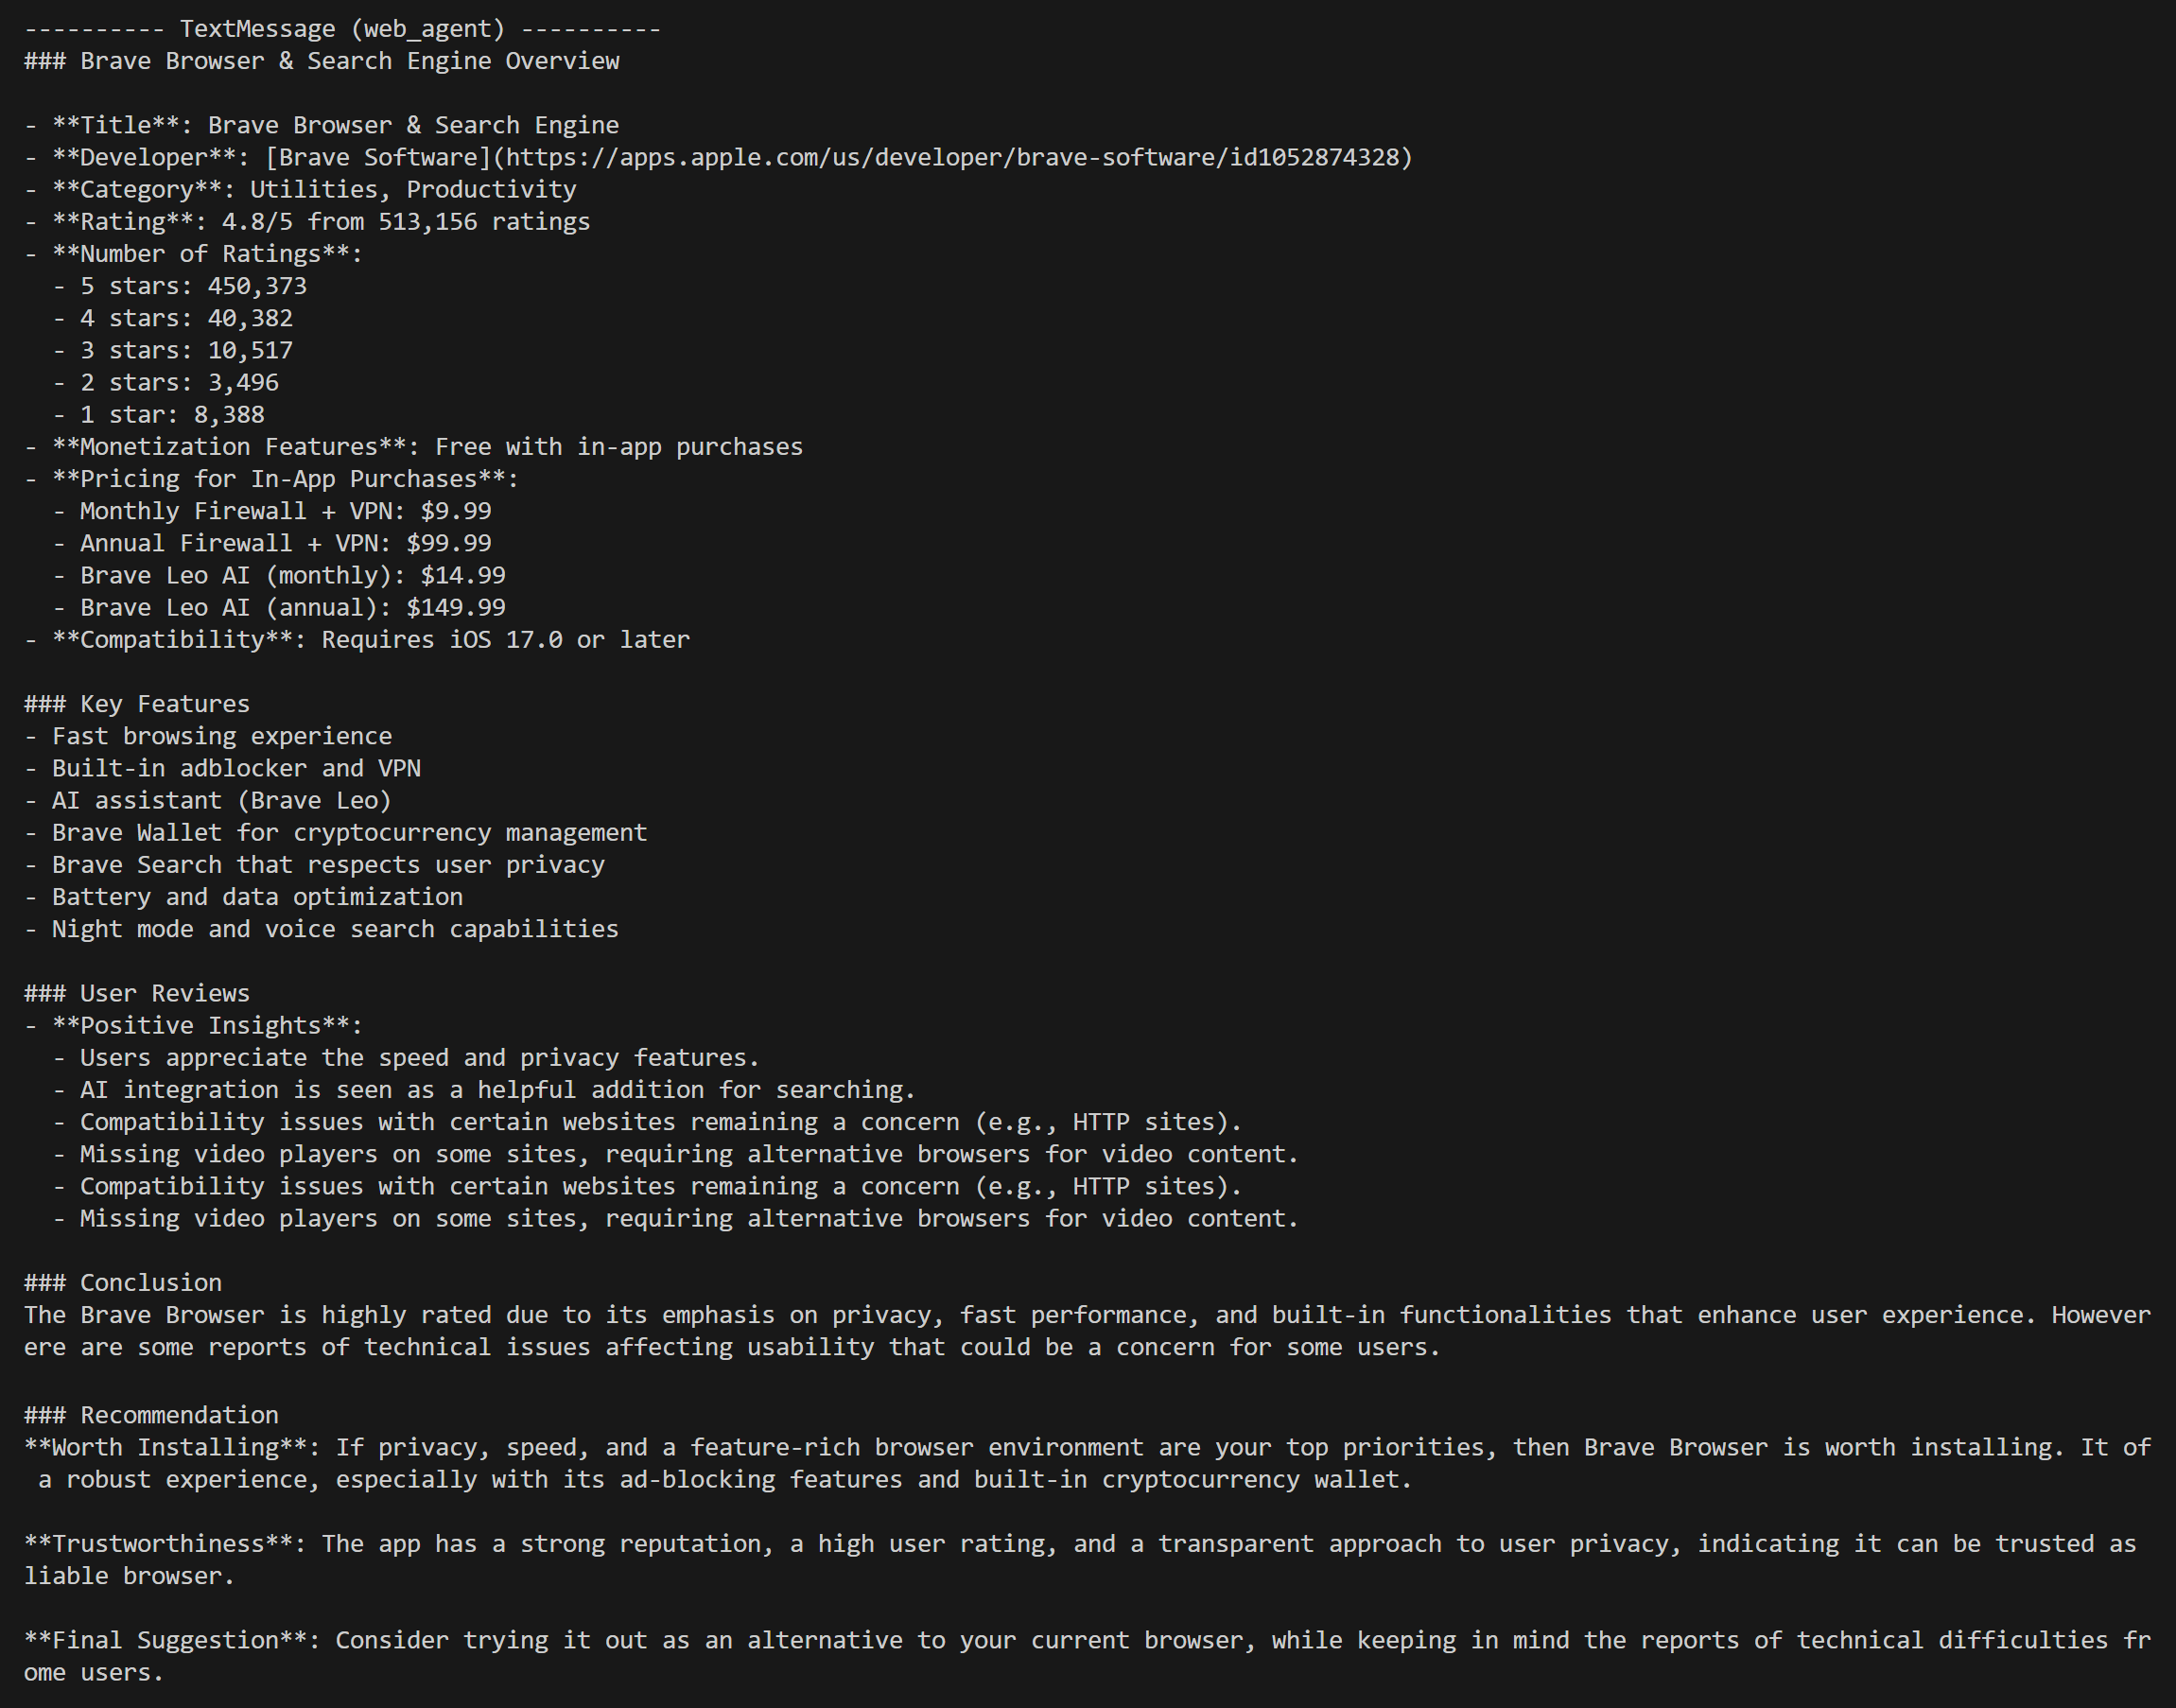
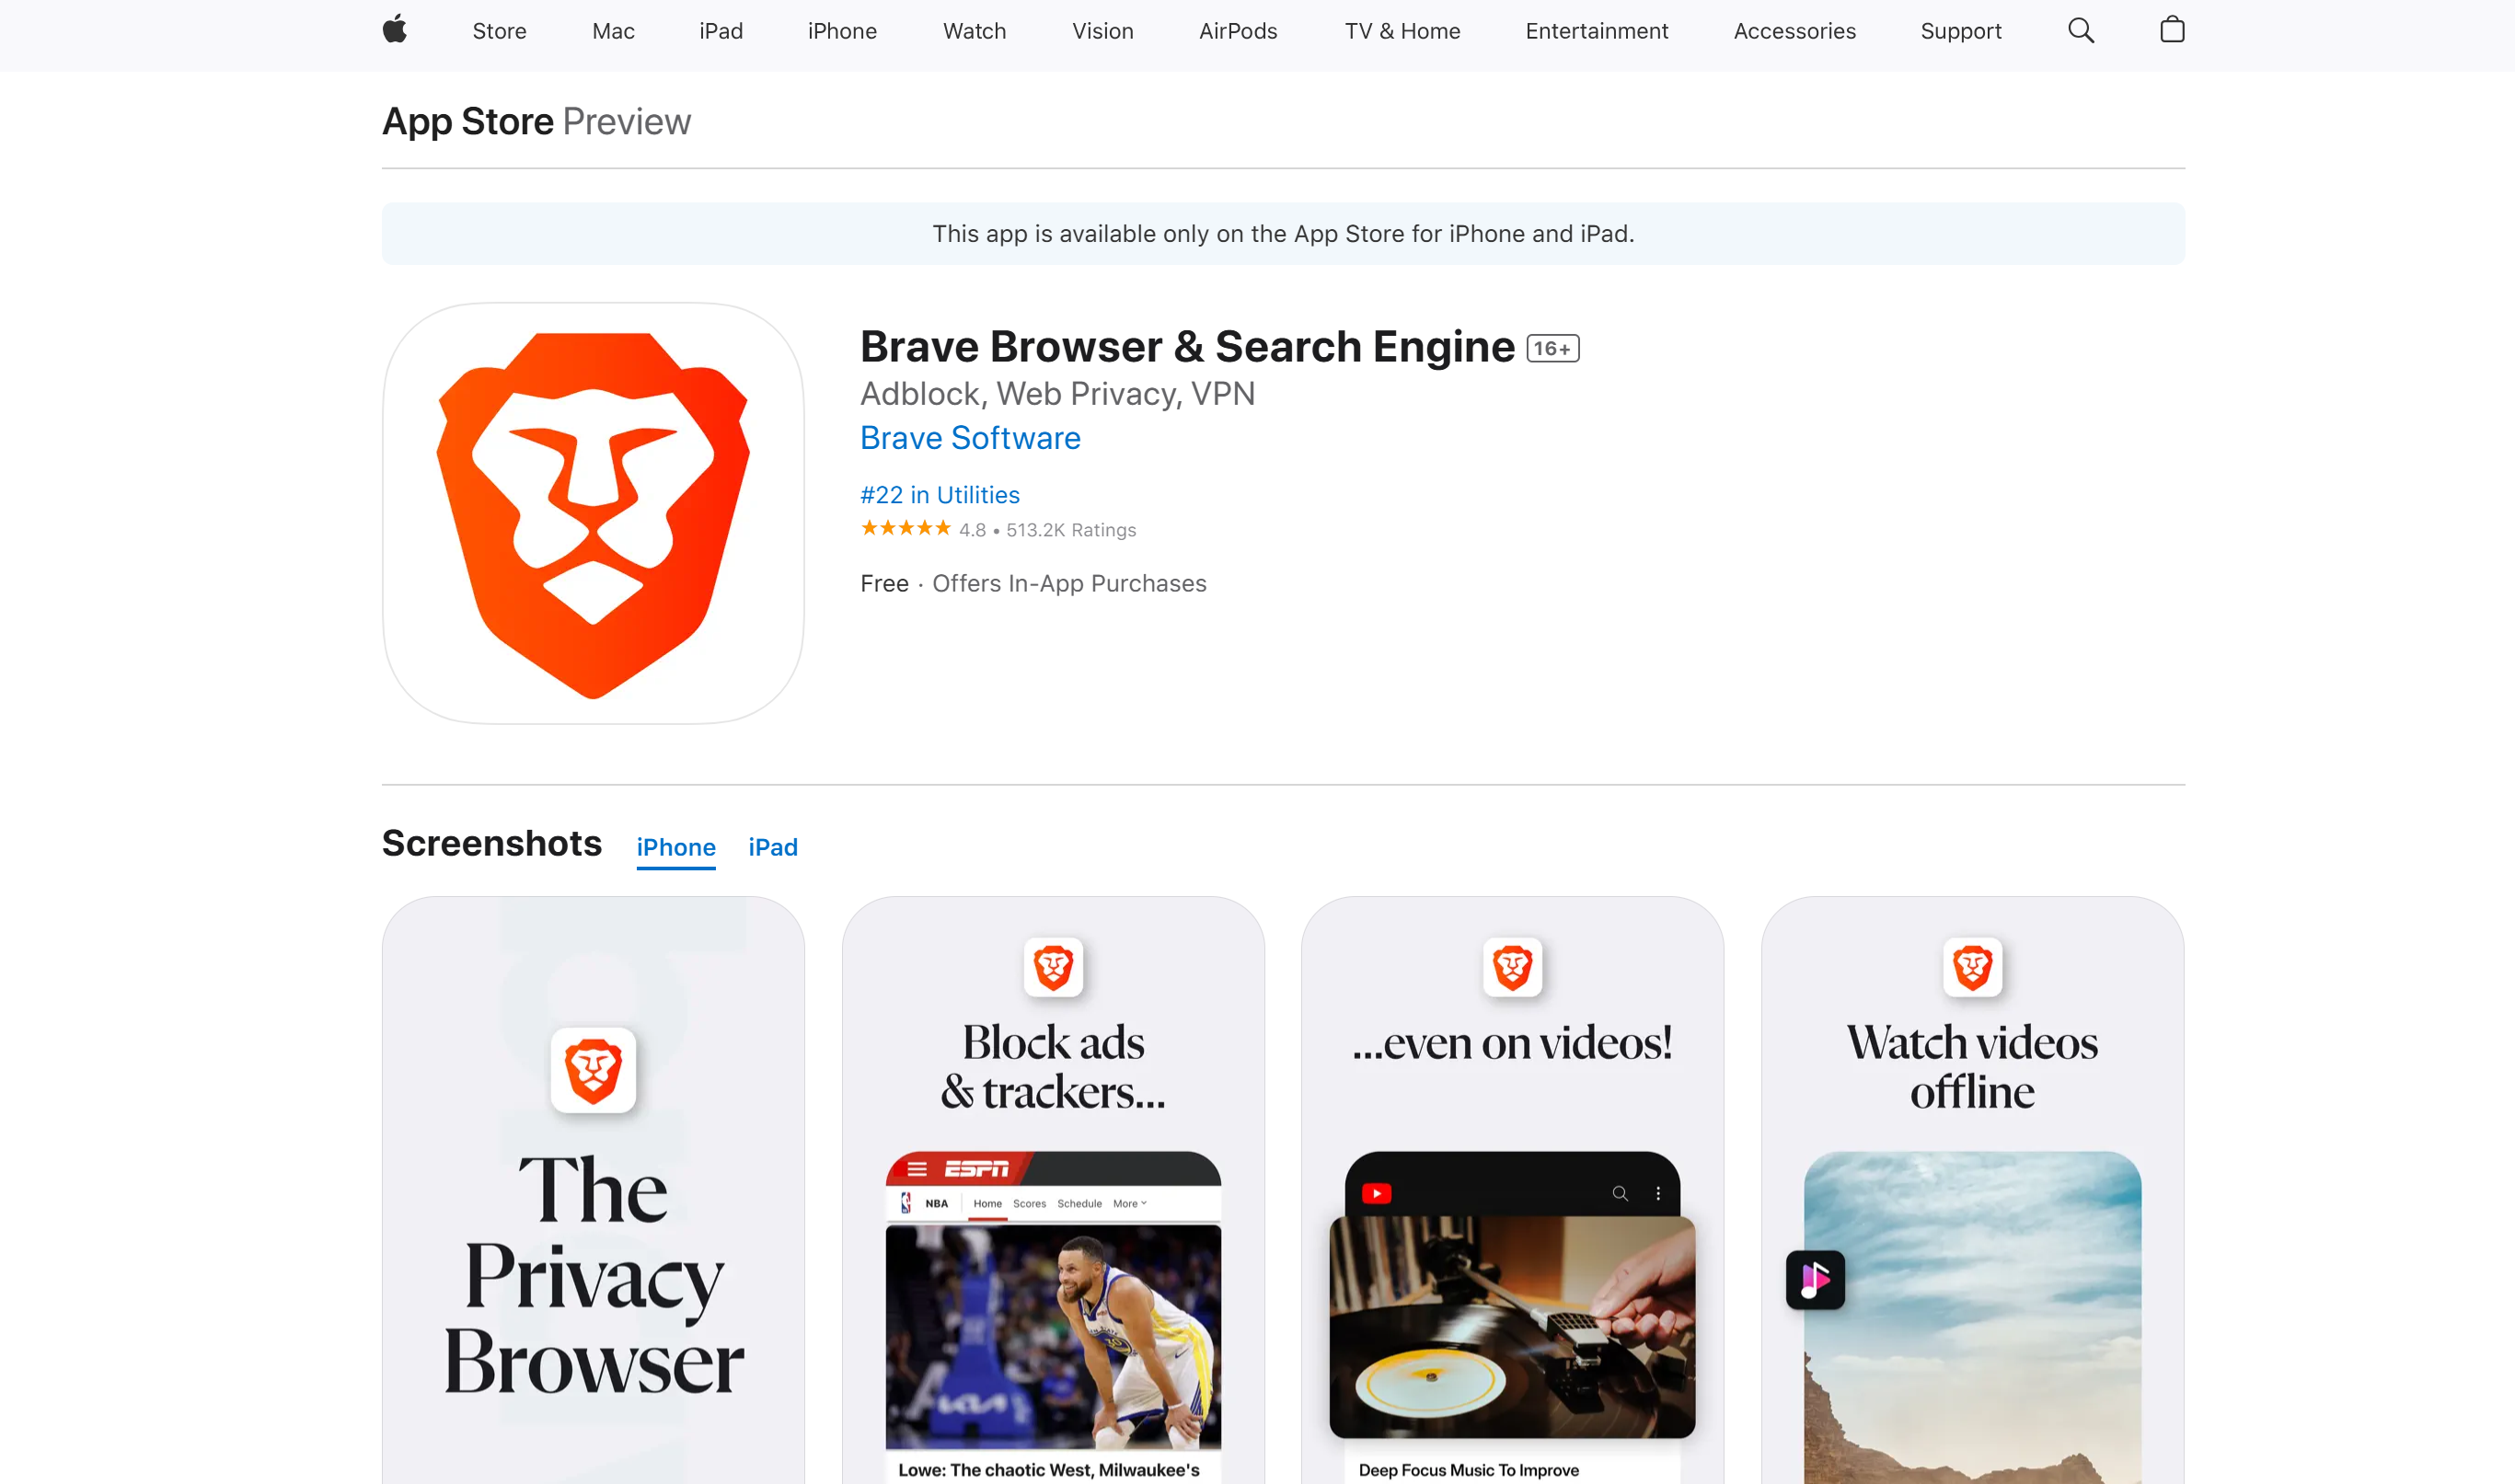
Notice the detailed information provided at the beginning of the generated report. That matches exactly what is displayed on the target App Store page:
Mission accomplished! Your agent can now retrieve data from the web and process it to perform meaningful tasks.
Keep in mind that this was just a simple example. With the broad range of Bright Data Web MCP tools available in AutoGen AgentChat, you can design much more advanced agents tailored to a wide variety of real-world use cases.
Et voilà! You just saw the power of integrating Bright Data’s Web MCP into an AutoGen AgentChat AI agent in Python.
Visually Test the Web MCP-Enhanced Agent in Agent Studio
AutoGen also provides Studio, a low-code, browser-based tool that lets you create and experiment with agents visually. You can use it to test the agent with MCP integration in a simplified way. See how!
Prerequisites
The only prerequisite to follow this optional section of the tutorial is to have AutoGen Studio installed. From your activated virtual environment in the project directory, install it with:
pip install -U autogenstudioAutoGen Studio will automatically read the OPENAI_API_KEY from your .env file, so you do not need to configure it manually inside the tool.
Step #1: Get the Team JSON Config File
In AutoGen, any component in a team setup can be represented as a JSON file. Since AutoGen Studio is built on top of AgentChat, you can export AgentChat components to JSON and then load them into AutoGen Studio. That is exactly what we will do here!
Start by exporting the team definition you created earlier into a local JSON file:
config = team.dump_component()
with open("bd_mcp_team.json", "w", encoding="utf-8") as f:
    f.write(config.model_dump_json())
This will produce a bd_mcp_team.json file inside your project folder, open it.
The file contains a JSON representation of your agent, including all the necessary details to connect with Bright Data’s Web MCP tools.
Step #2: Load the JSON File in AutoGen Studio
Launch AutoGen Studio locally with:
autogenstudio ui --port 8080The application will be available in your browser at http://127.0.0.1:8080. Open it, and you should get the following web app:
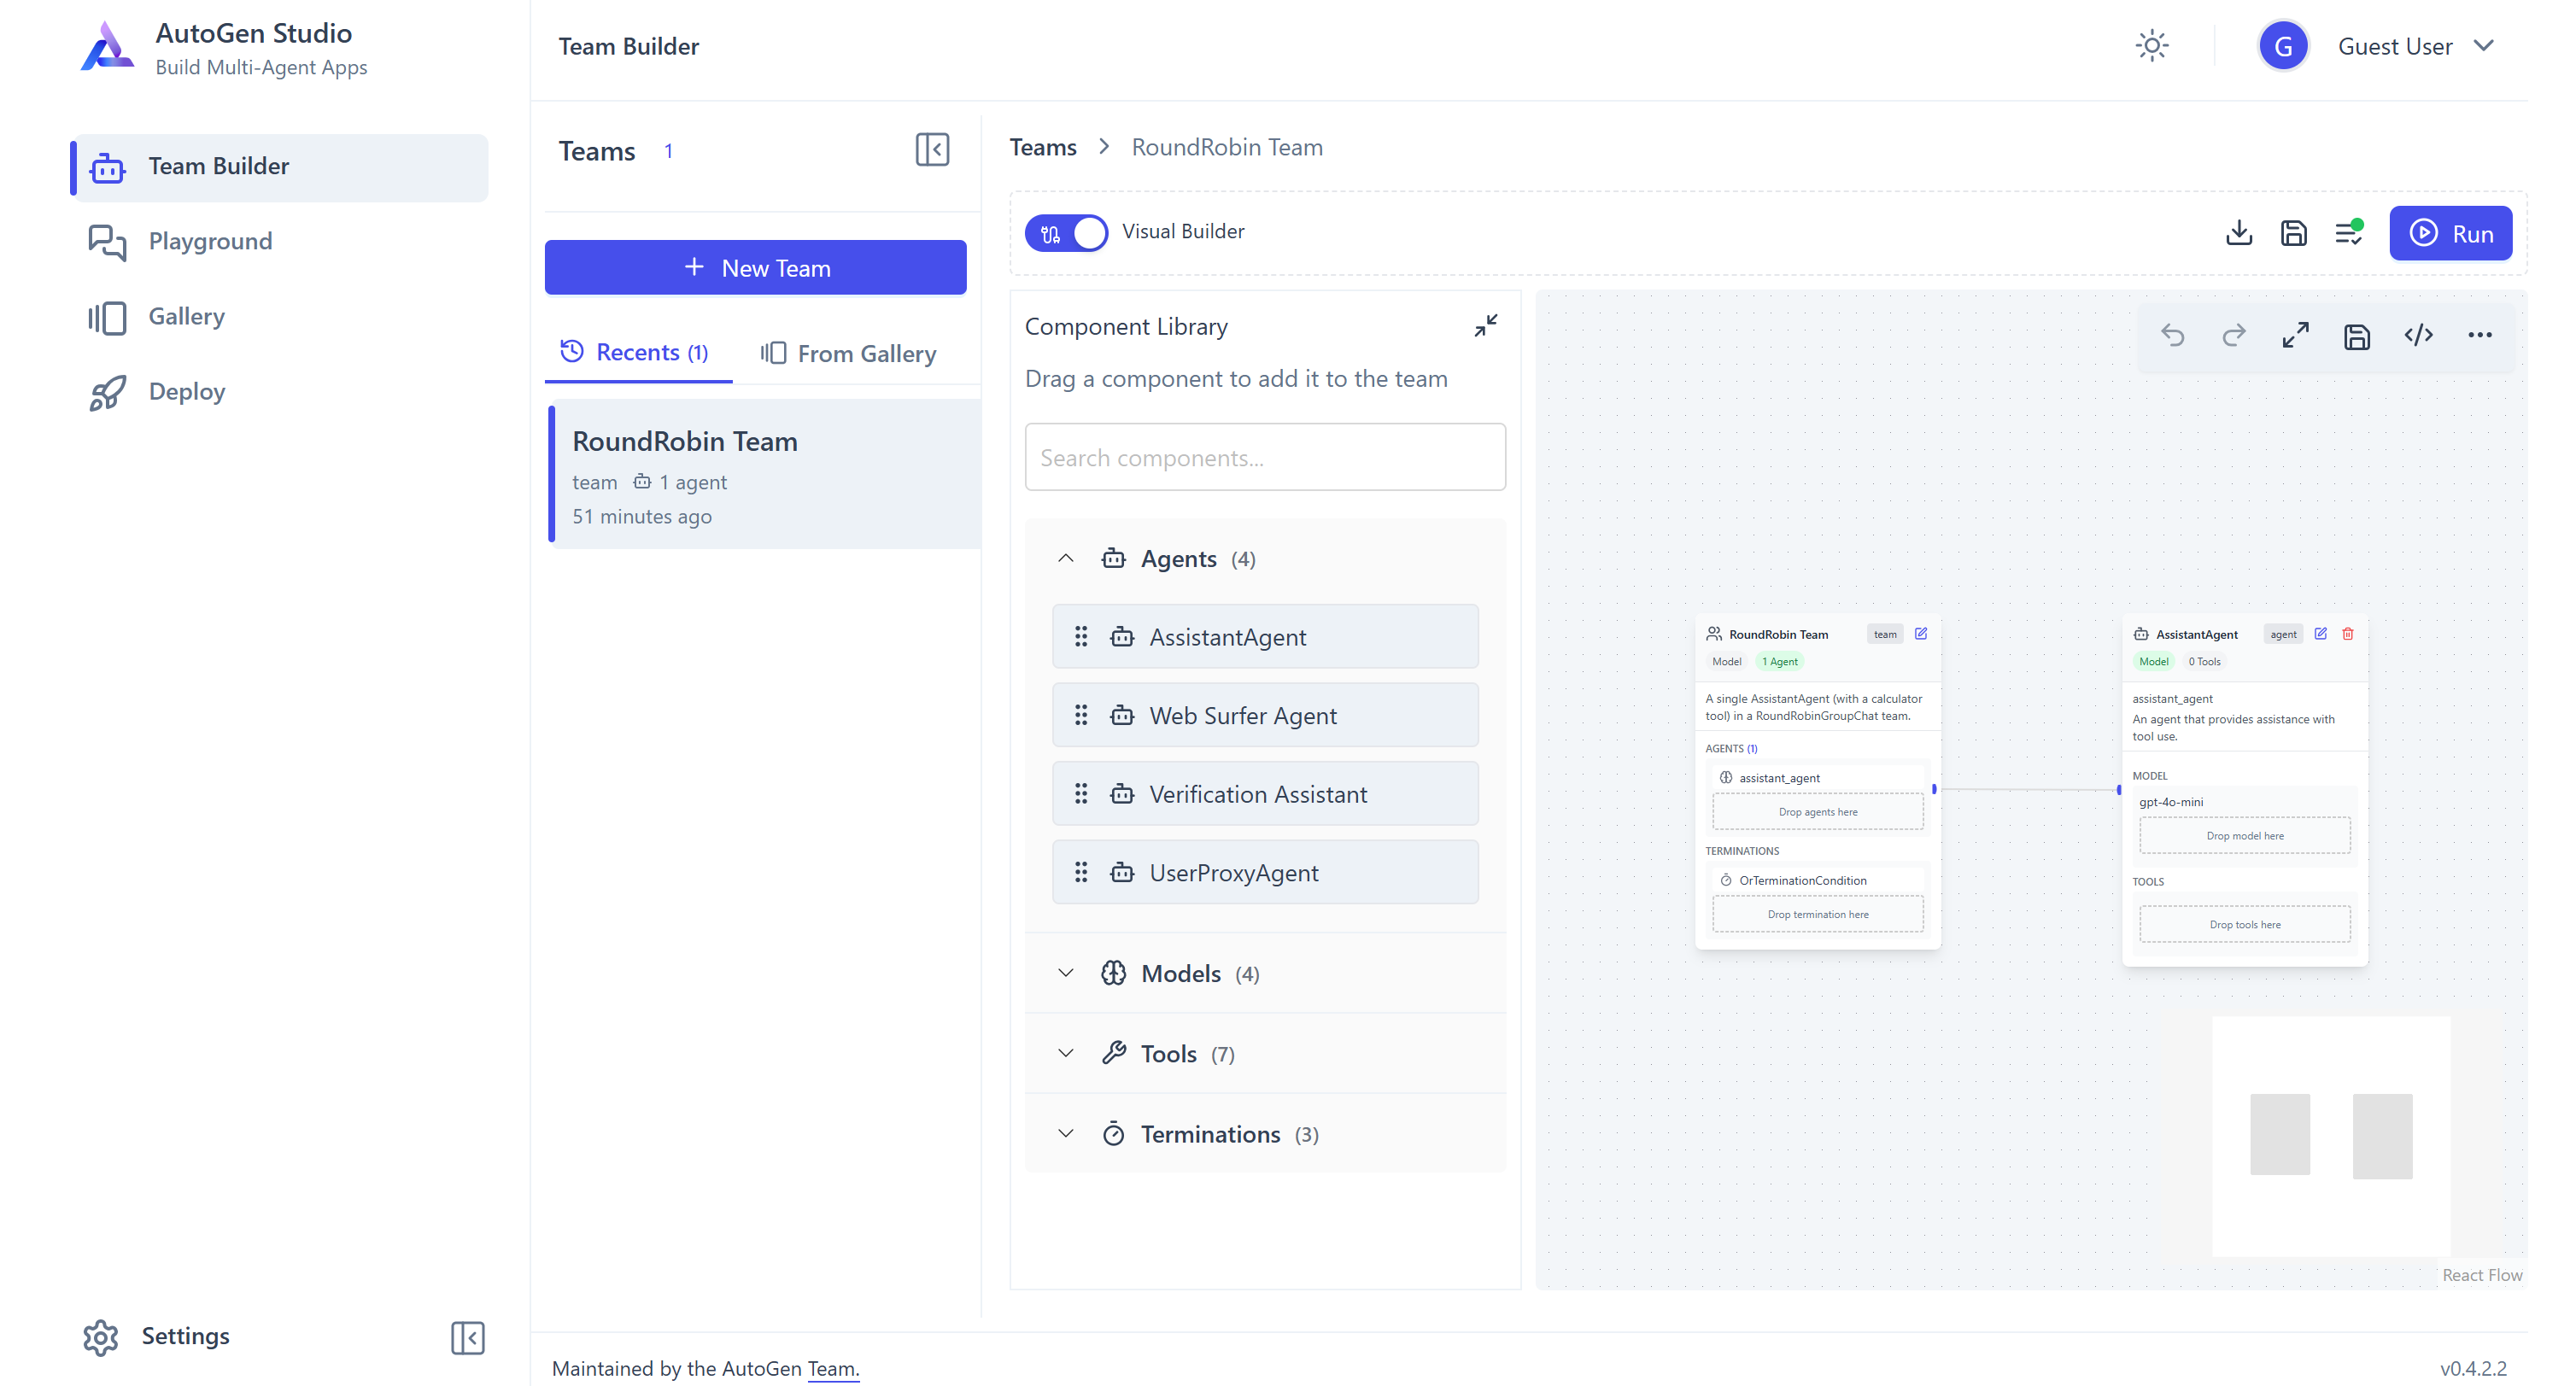
By default, the solution comes with a team called “RoundRobin Team.” To configure it as your MCP-extended agent, toggle the “Visual Builder” switch and reach the “View JSON” mode:
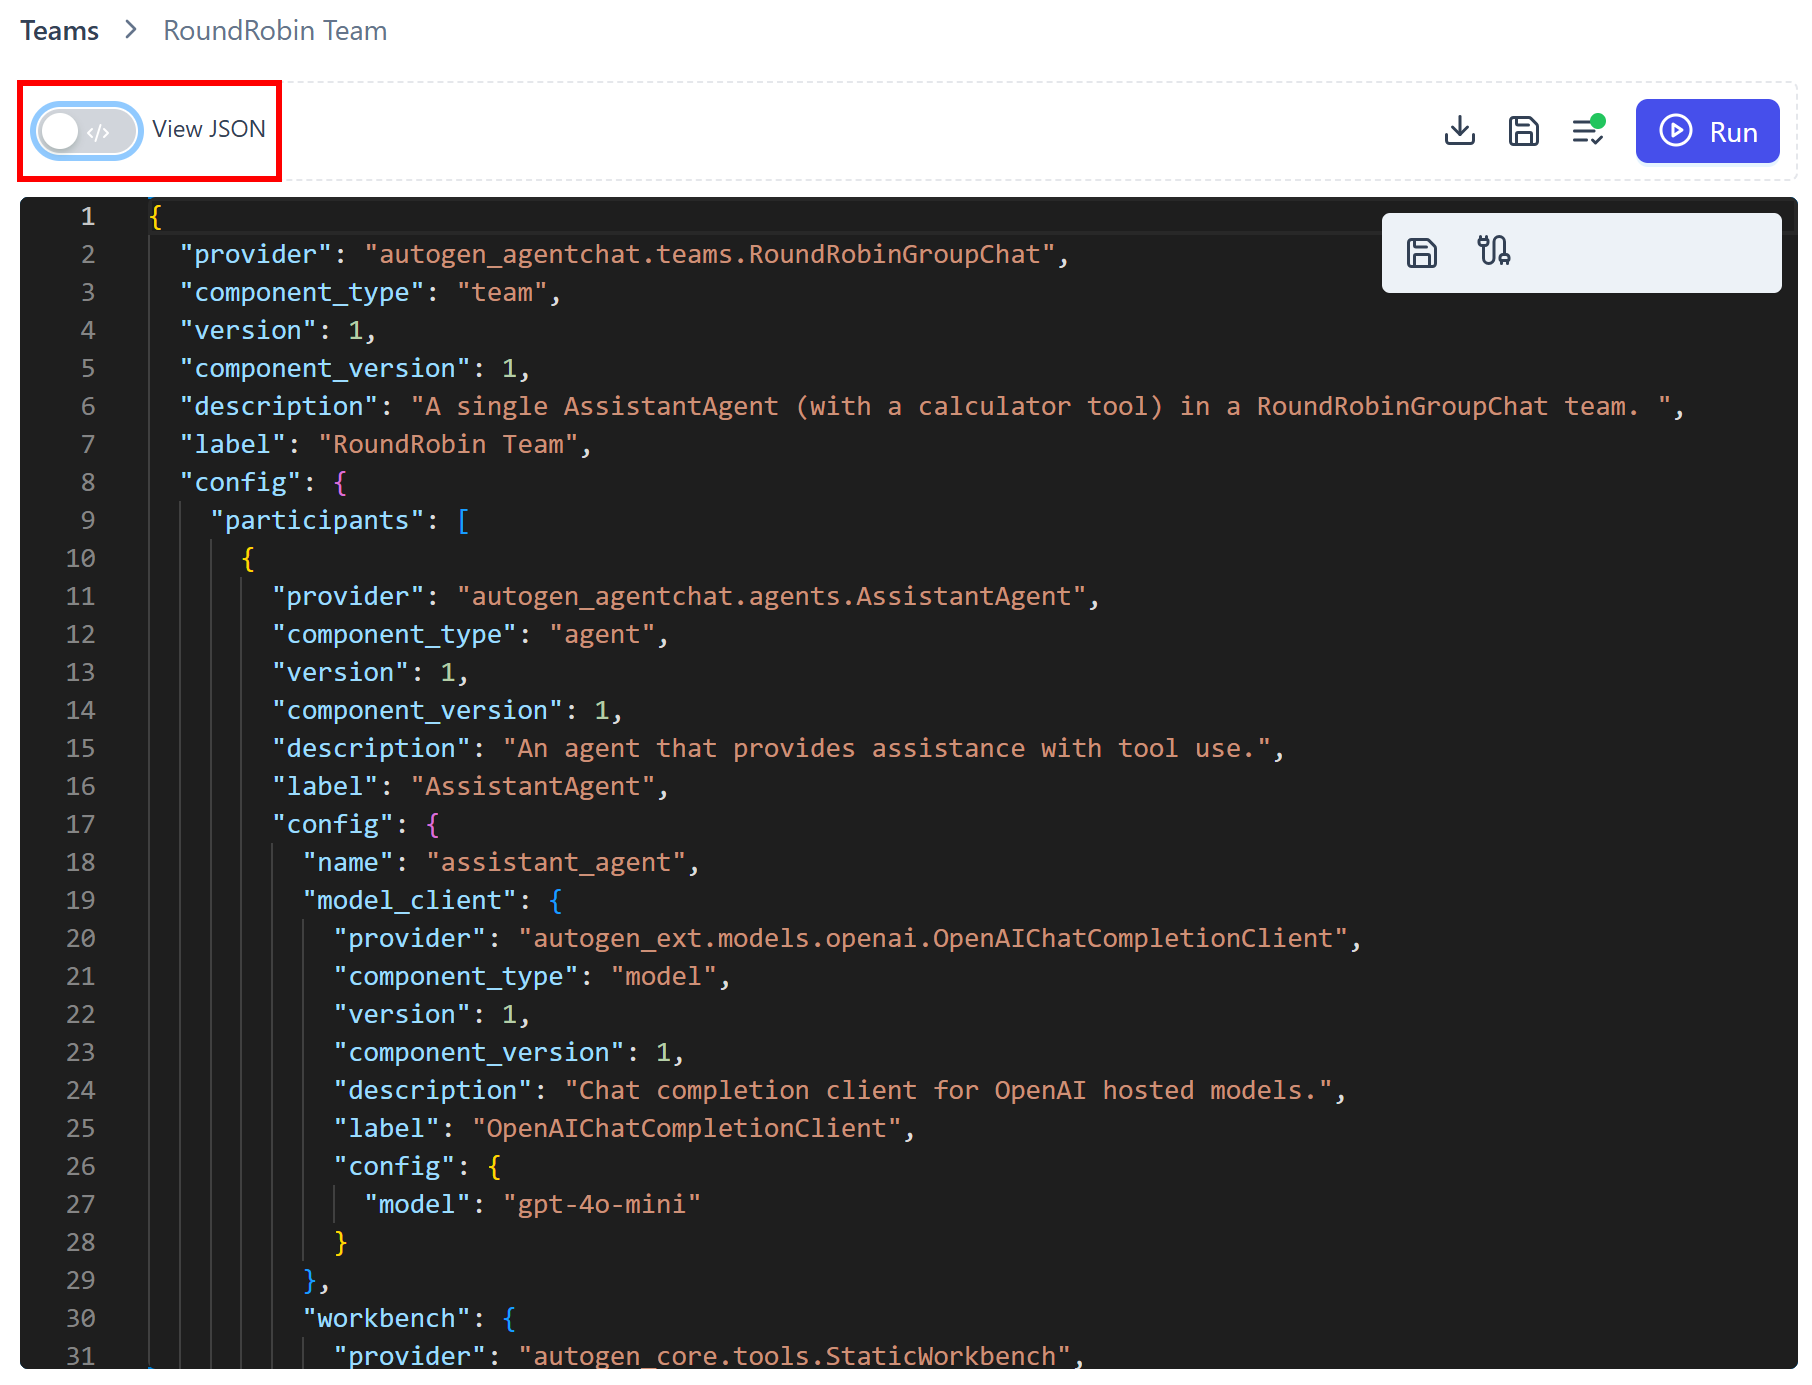
In the JSON editor, paste the content from your bd_mcp_team.json file and press the “Save Changes” button:
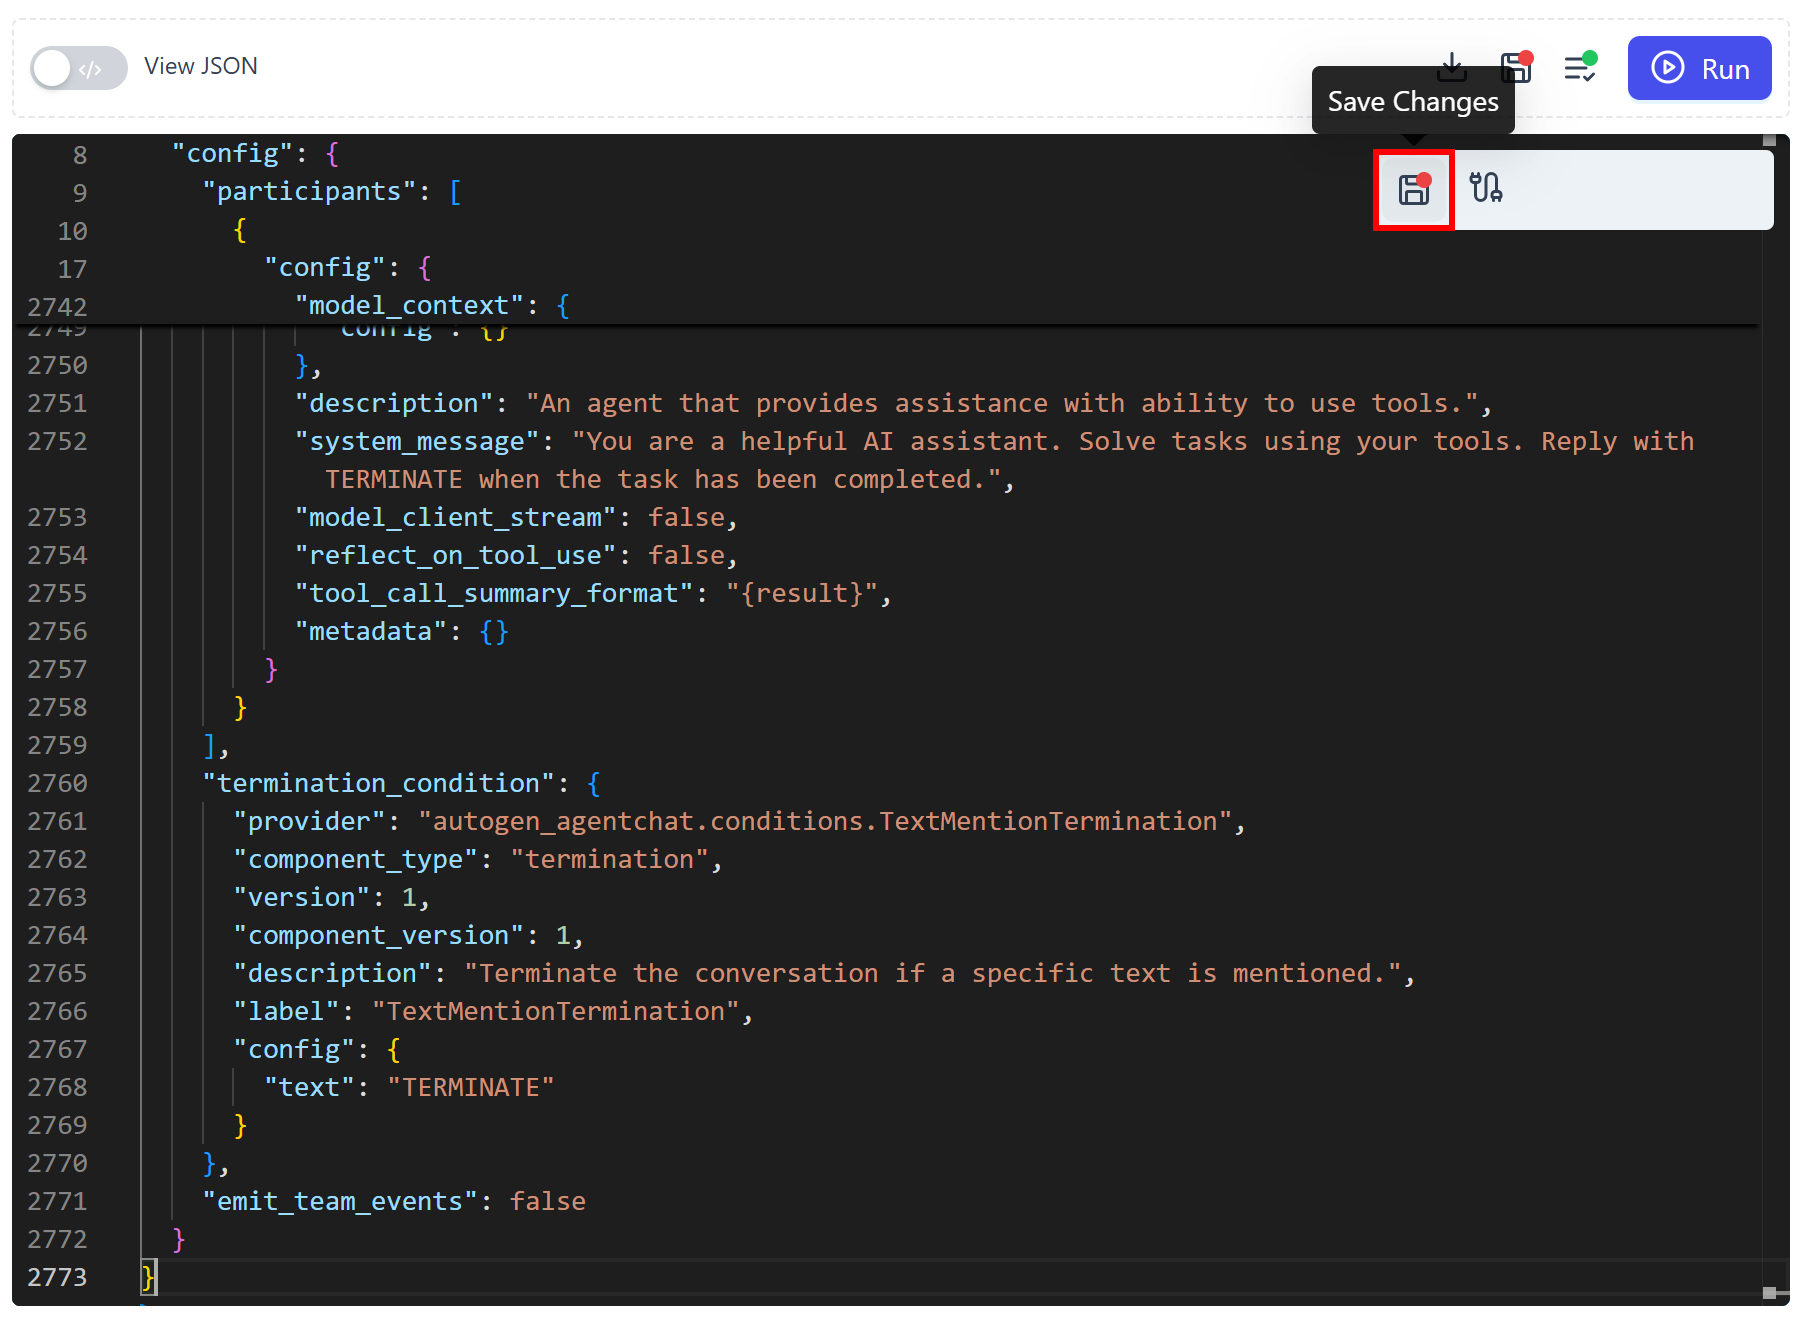
Your updated “RoundRobin Team” should now look like this:
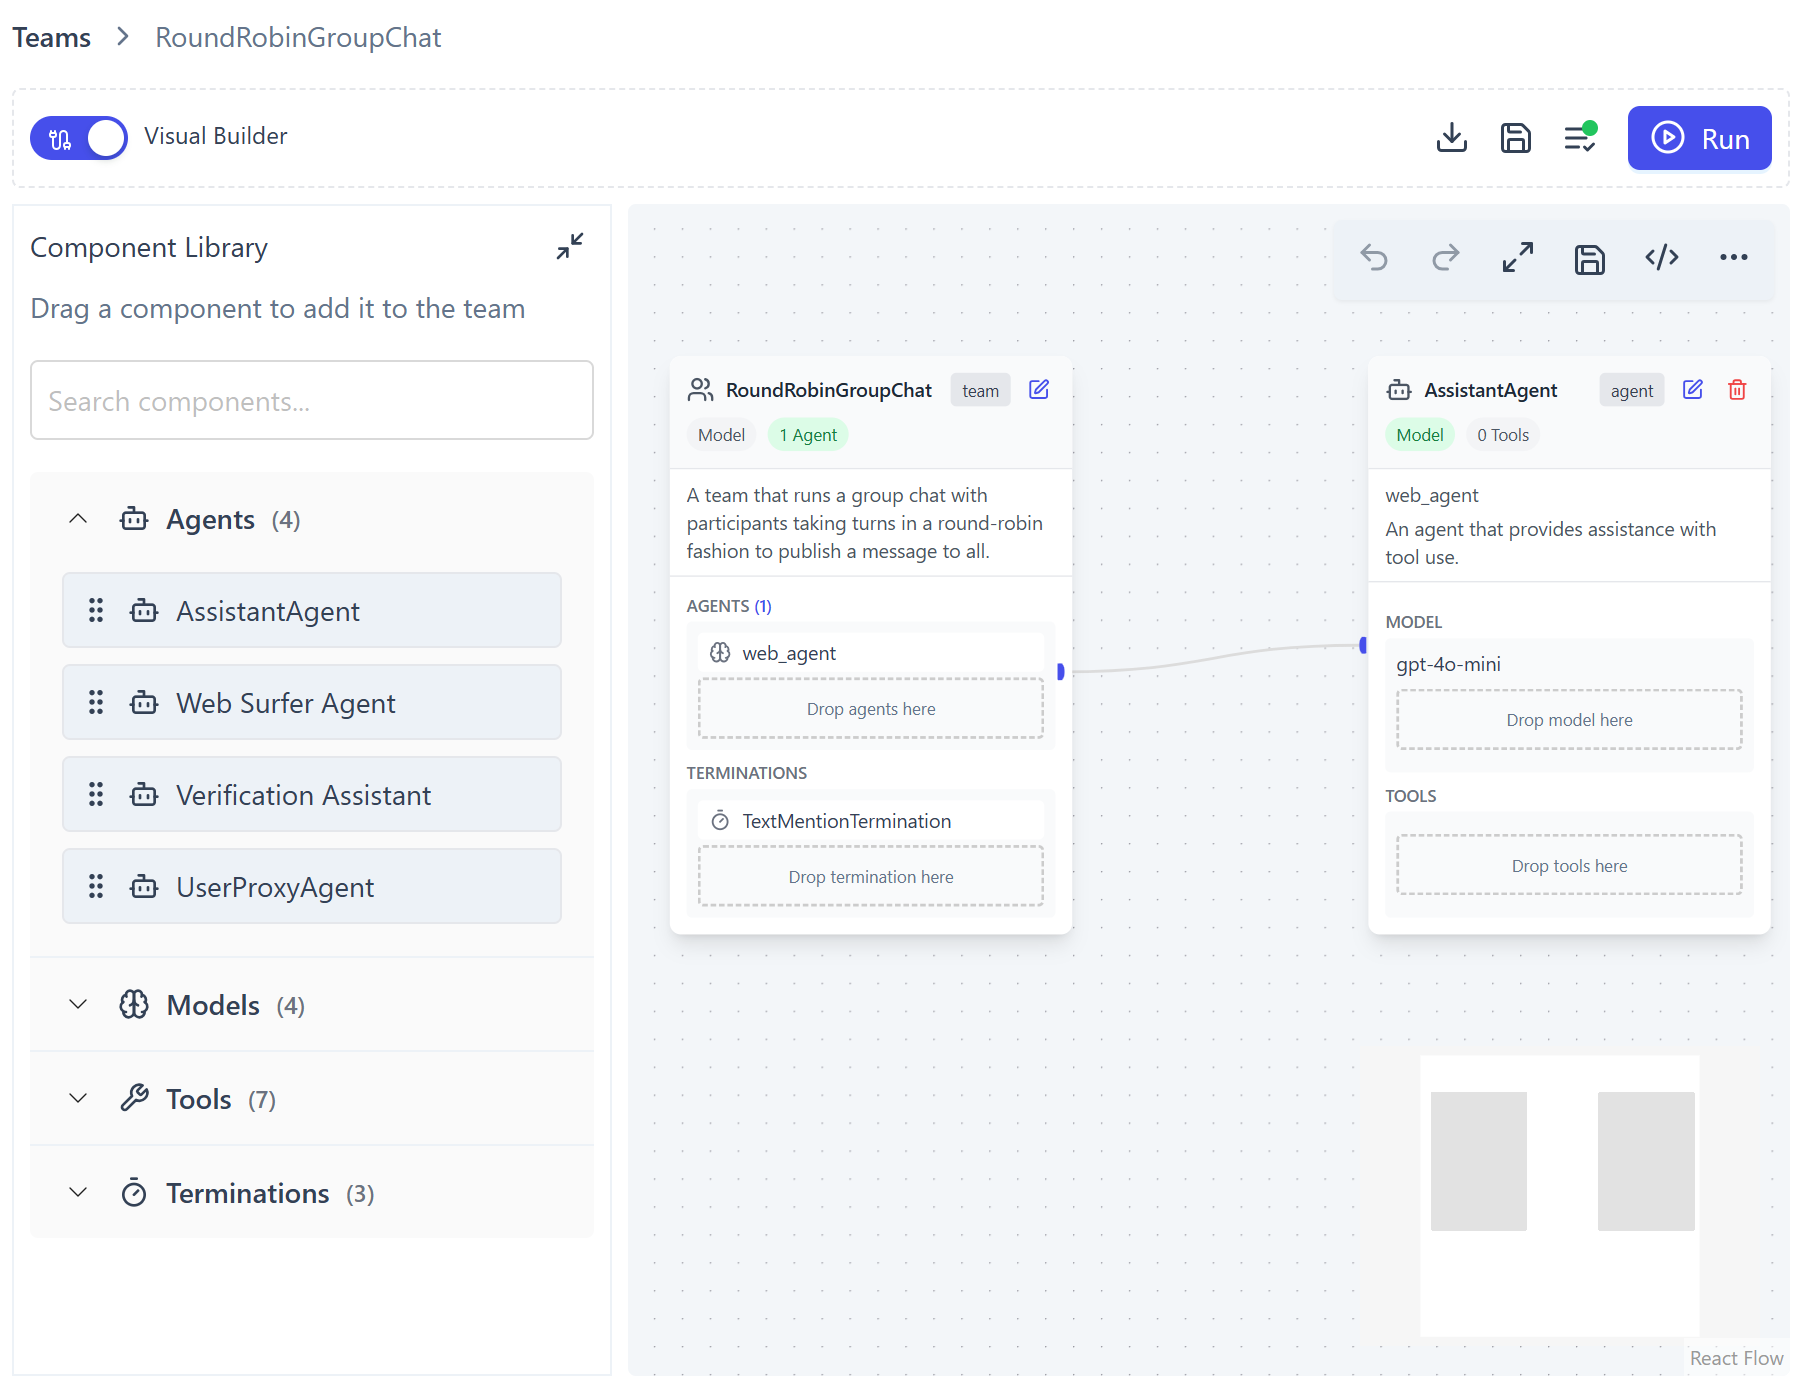
Notice that the agent name is now web_agent, just as you defined it in the code. You will now be able to test your agent integrated with Web MCP directly in AutoGen Studio.
Step #3: Visually Test the Agent
Press the “Run” button in the top-right corner. The chat section for testing your team will appear:
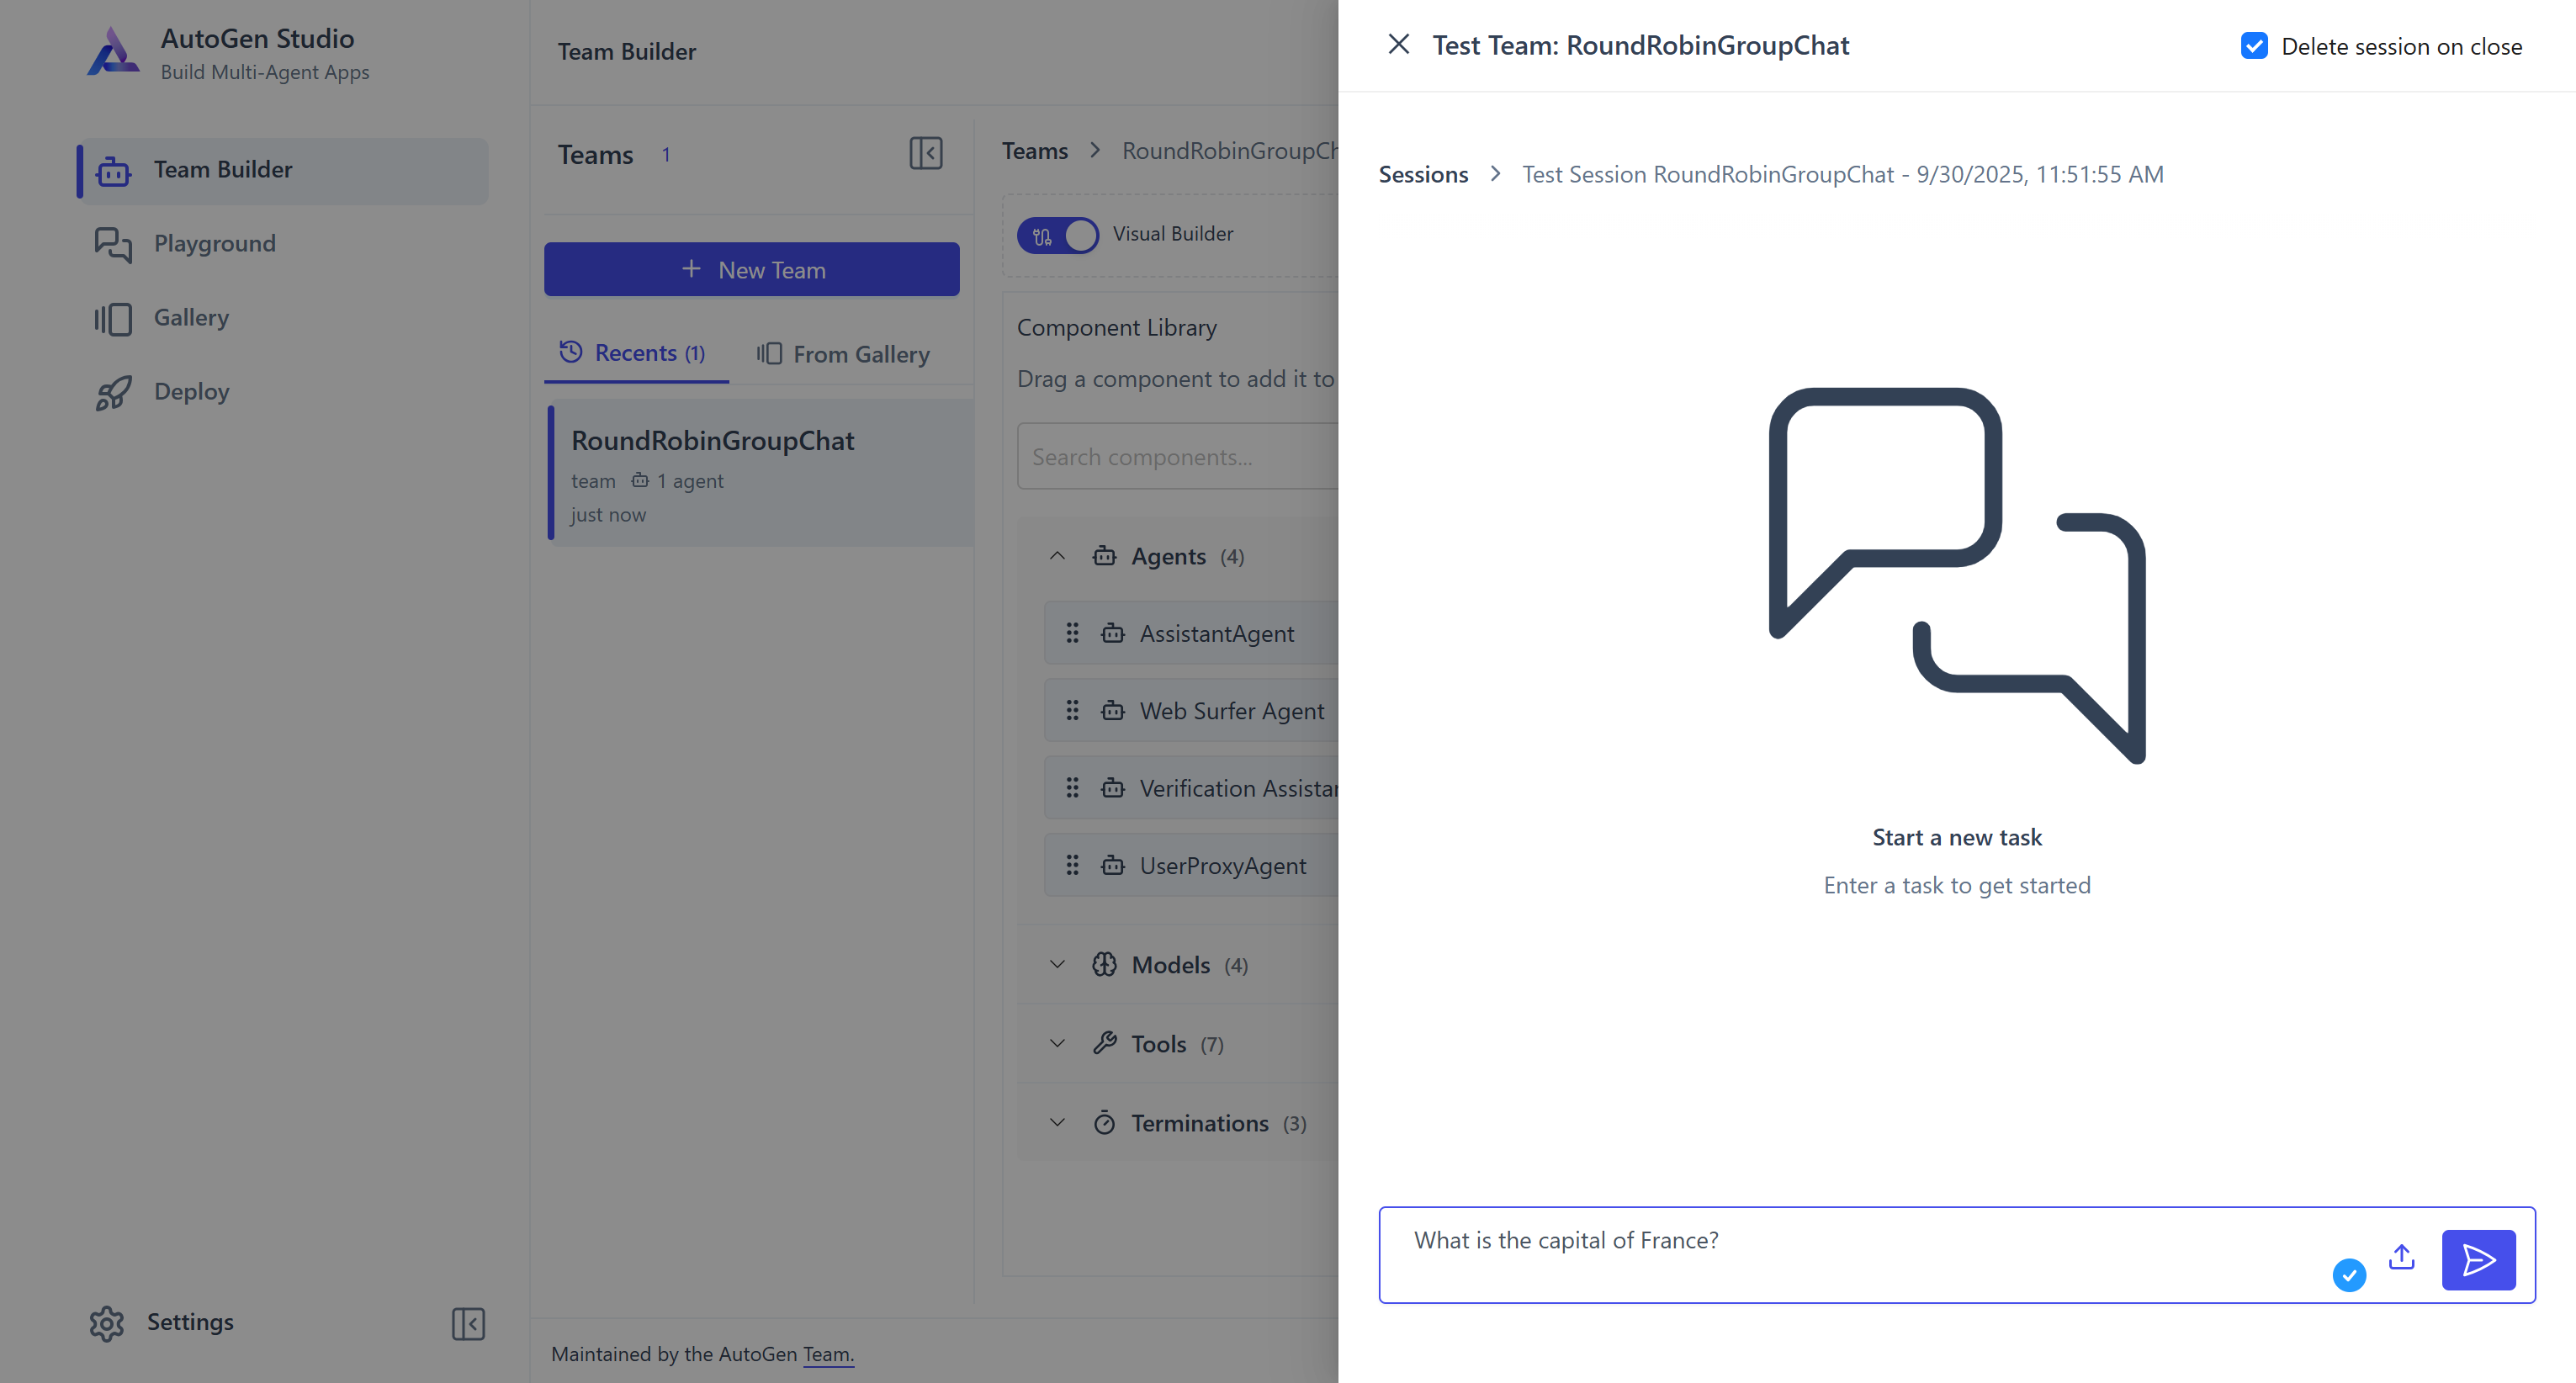
Paste the same task prompt as before and launch it:
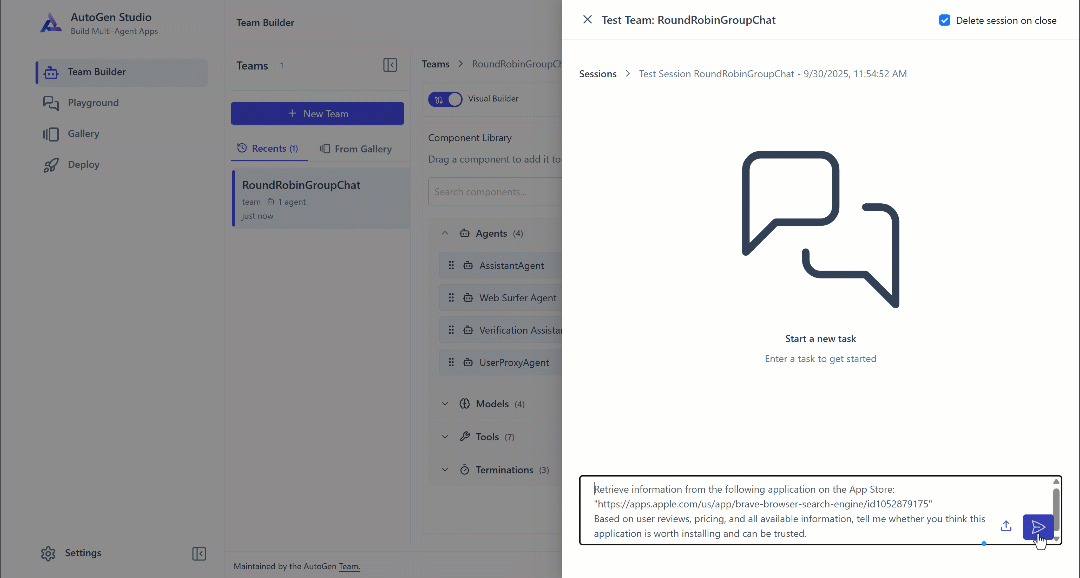
As before, the agent selects and executes the web_data_apple_app_store tool. The final output will be:
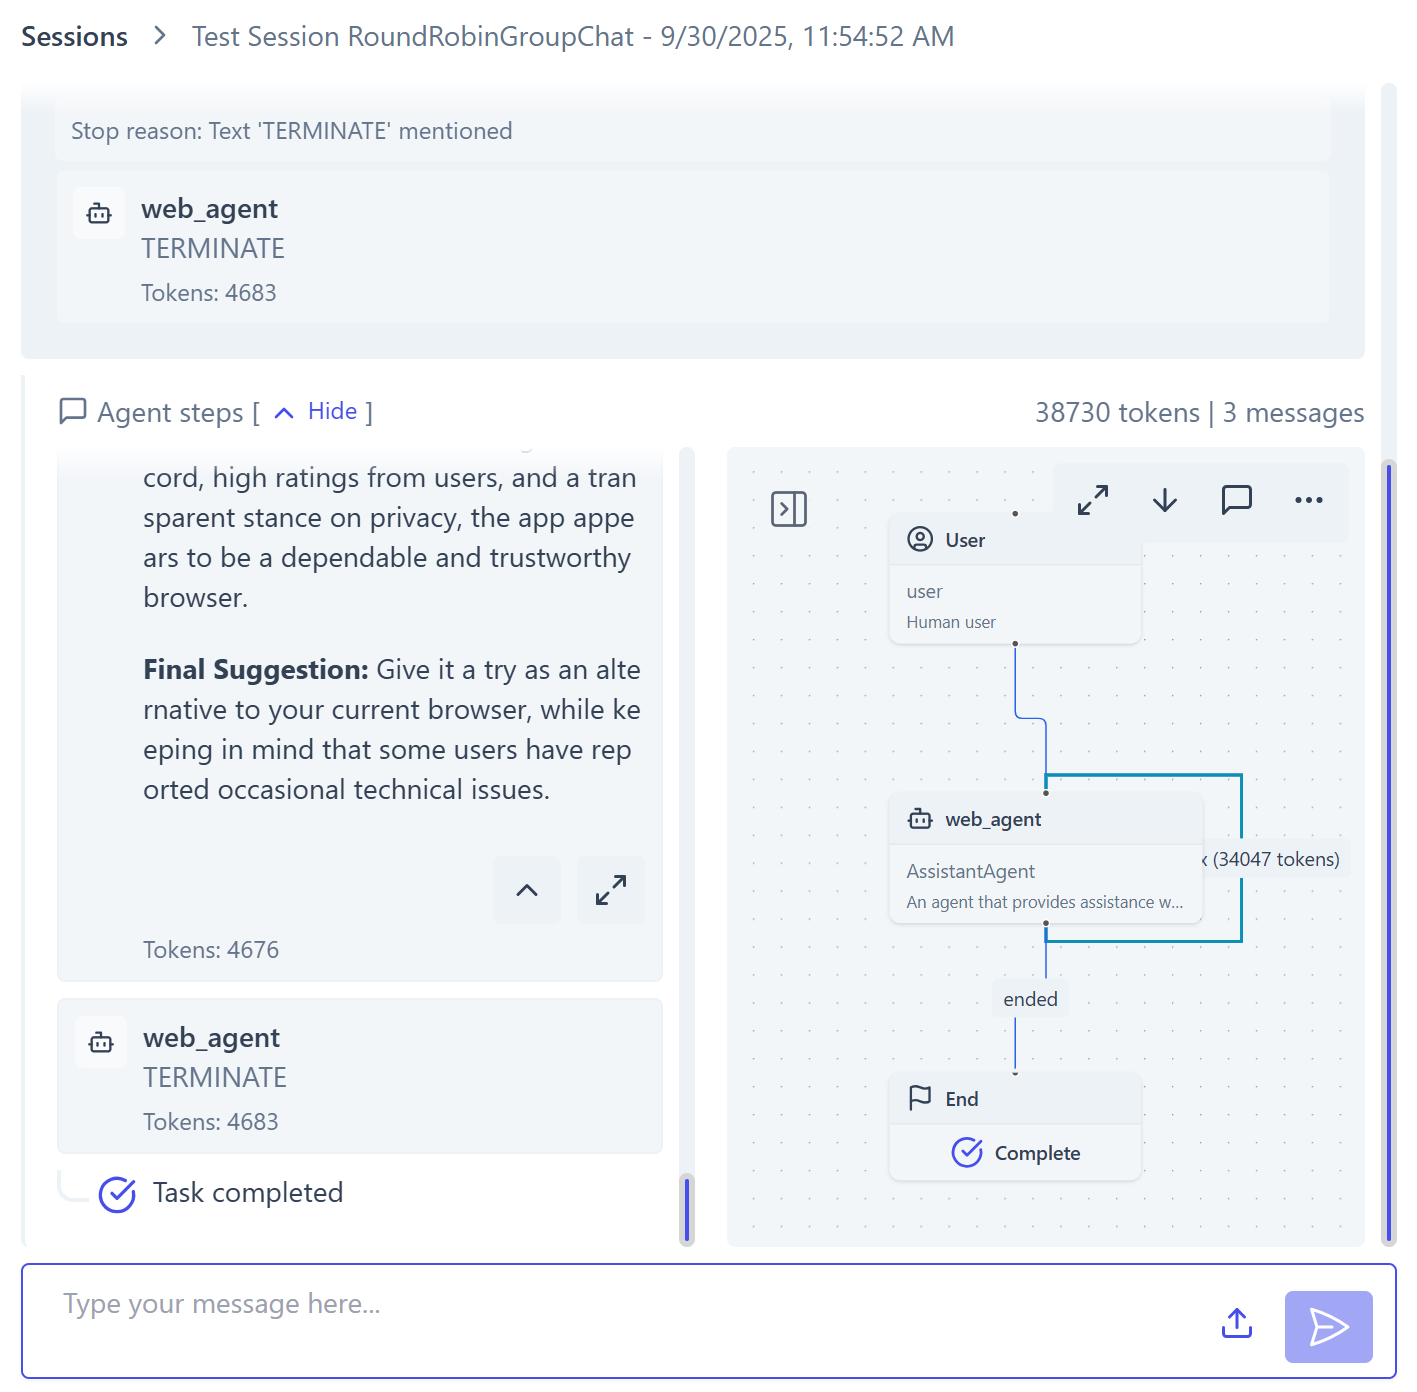
On the left, the penultimate message contains the agent’s generated response. This time, you can also see that the agent terminates using a “TERMINATE” message, which is sent automatically. On the right, there is a visual representation of the execution, helping you understand what happens step by step.
Even though the agent has terminated, its context is still shared with the team. This means you can continue the conversation seamlessly by passing another task—just like in ChatGPT or any other chat-like AI interface.
This demonstrates one of the real benefits of testing your agents in AutoGen Studio. You can visually track agent actions, inspect outputs, and maintain context across multiple interactions. Amazing!
Conclusion
In this blog post, you saw how to build an AI agent using AutoGen AgentChat and supercharge it with tools from Bright Data’s Web MCP (which also offers a free tier!) You also tested your agent visually and ran it in a chat-like experience through AutoGen Studio.
This integration extends your agent with web search, structured data extraction, access to web data feeds, web interaction capabilities, and more. To build more advanced AI agents, explore the broader suite of products and services within Bright Data’s AI infrastructure.
Sign up for a free Bright Data account today and start experimenting with AI-ready web data tools!

Technical Writer
Antonello Zanini is a technical writer, editor, and software engineer with 5M+ views. Expert in technical content strategy, web development, and project management.


