In this guide, you will see:
- Everything you need to know to take your first steps with DuckDuckGo scraping.
- The most popular and effective approaches to web scraping DuckDuckGo.
- How to build a custom DuckDuckGo scraper.
- How to use the DDGS library for scraping DuckDuckGo.
- How to retrieve search engine results data via the Bright Data SERP API.
- How to provide DuckDuckGo search data to an AI agent via MCP.
Let’s dive in!
Getting Started with DuckDuckGo Scraping
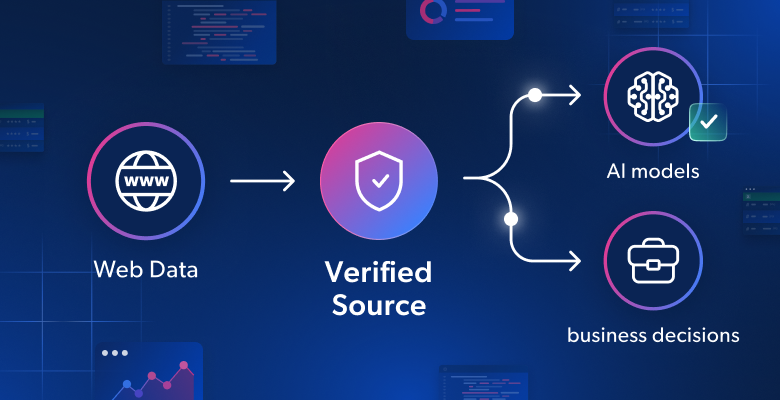
DuckDuckGo is a search engine that provides built-in protection against online trackers. Users appreciate it for its privacy-focused policy, as it does not track searches or browsing history. That way, it stands out from mainstream search platforms and has seen a steady increase in usage over the years.
The DuckDuckGo search engine is available in two variants:
- Dynamic version: The default version, which requires JavaScript and includes features like “Search Assist,” an alternative to Google AI overviews.
- Static version: A simplified version that works even without JavaScript rendering.
Depending on the version you choose, you will need different scraping approaches, as outlined in this summary table:
| Feature | Dynamic SERP Version | Static SERP Version |
|---|---|---|
| JavaScript required | Yes | No |
| URL format | https://duckduckgo.com/?q=<SEARCH_QUERY> |
https://html.duckduckgo.com/html/?q=<SEARCH_QUERY> |
| Dynamic content | Yes, like AI summaries and interactive elements | No |
| Pagination | Complex, based on a “More Results” button | Simple, via a traditional “Next” button with page reload |
| Scraping approach | Browser automation tools | HTTP client + HTML parser |
Time to explore the scraping implications for the two DuckDuckGo SERP (Search Engine Results Page) versions!
DuckDuckGo: Dynamic SERP Version
By default, DuckDuckGo loads a dynamic web page that requires JavaScript rendering, with a URL like:
https://duckduckgo.com/?q=<SEARCH_QUERY>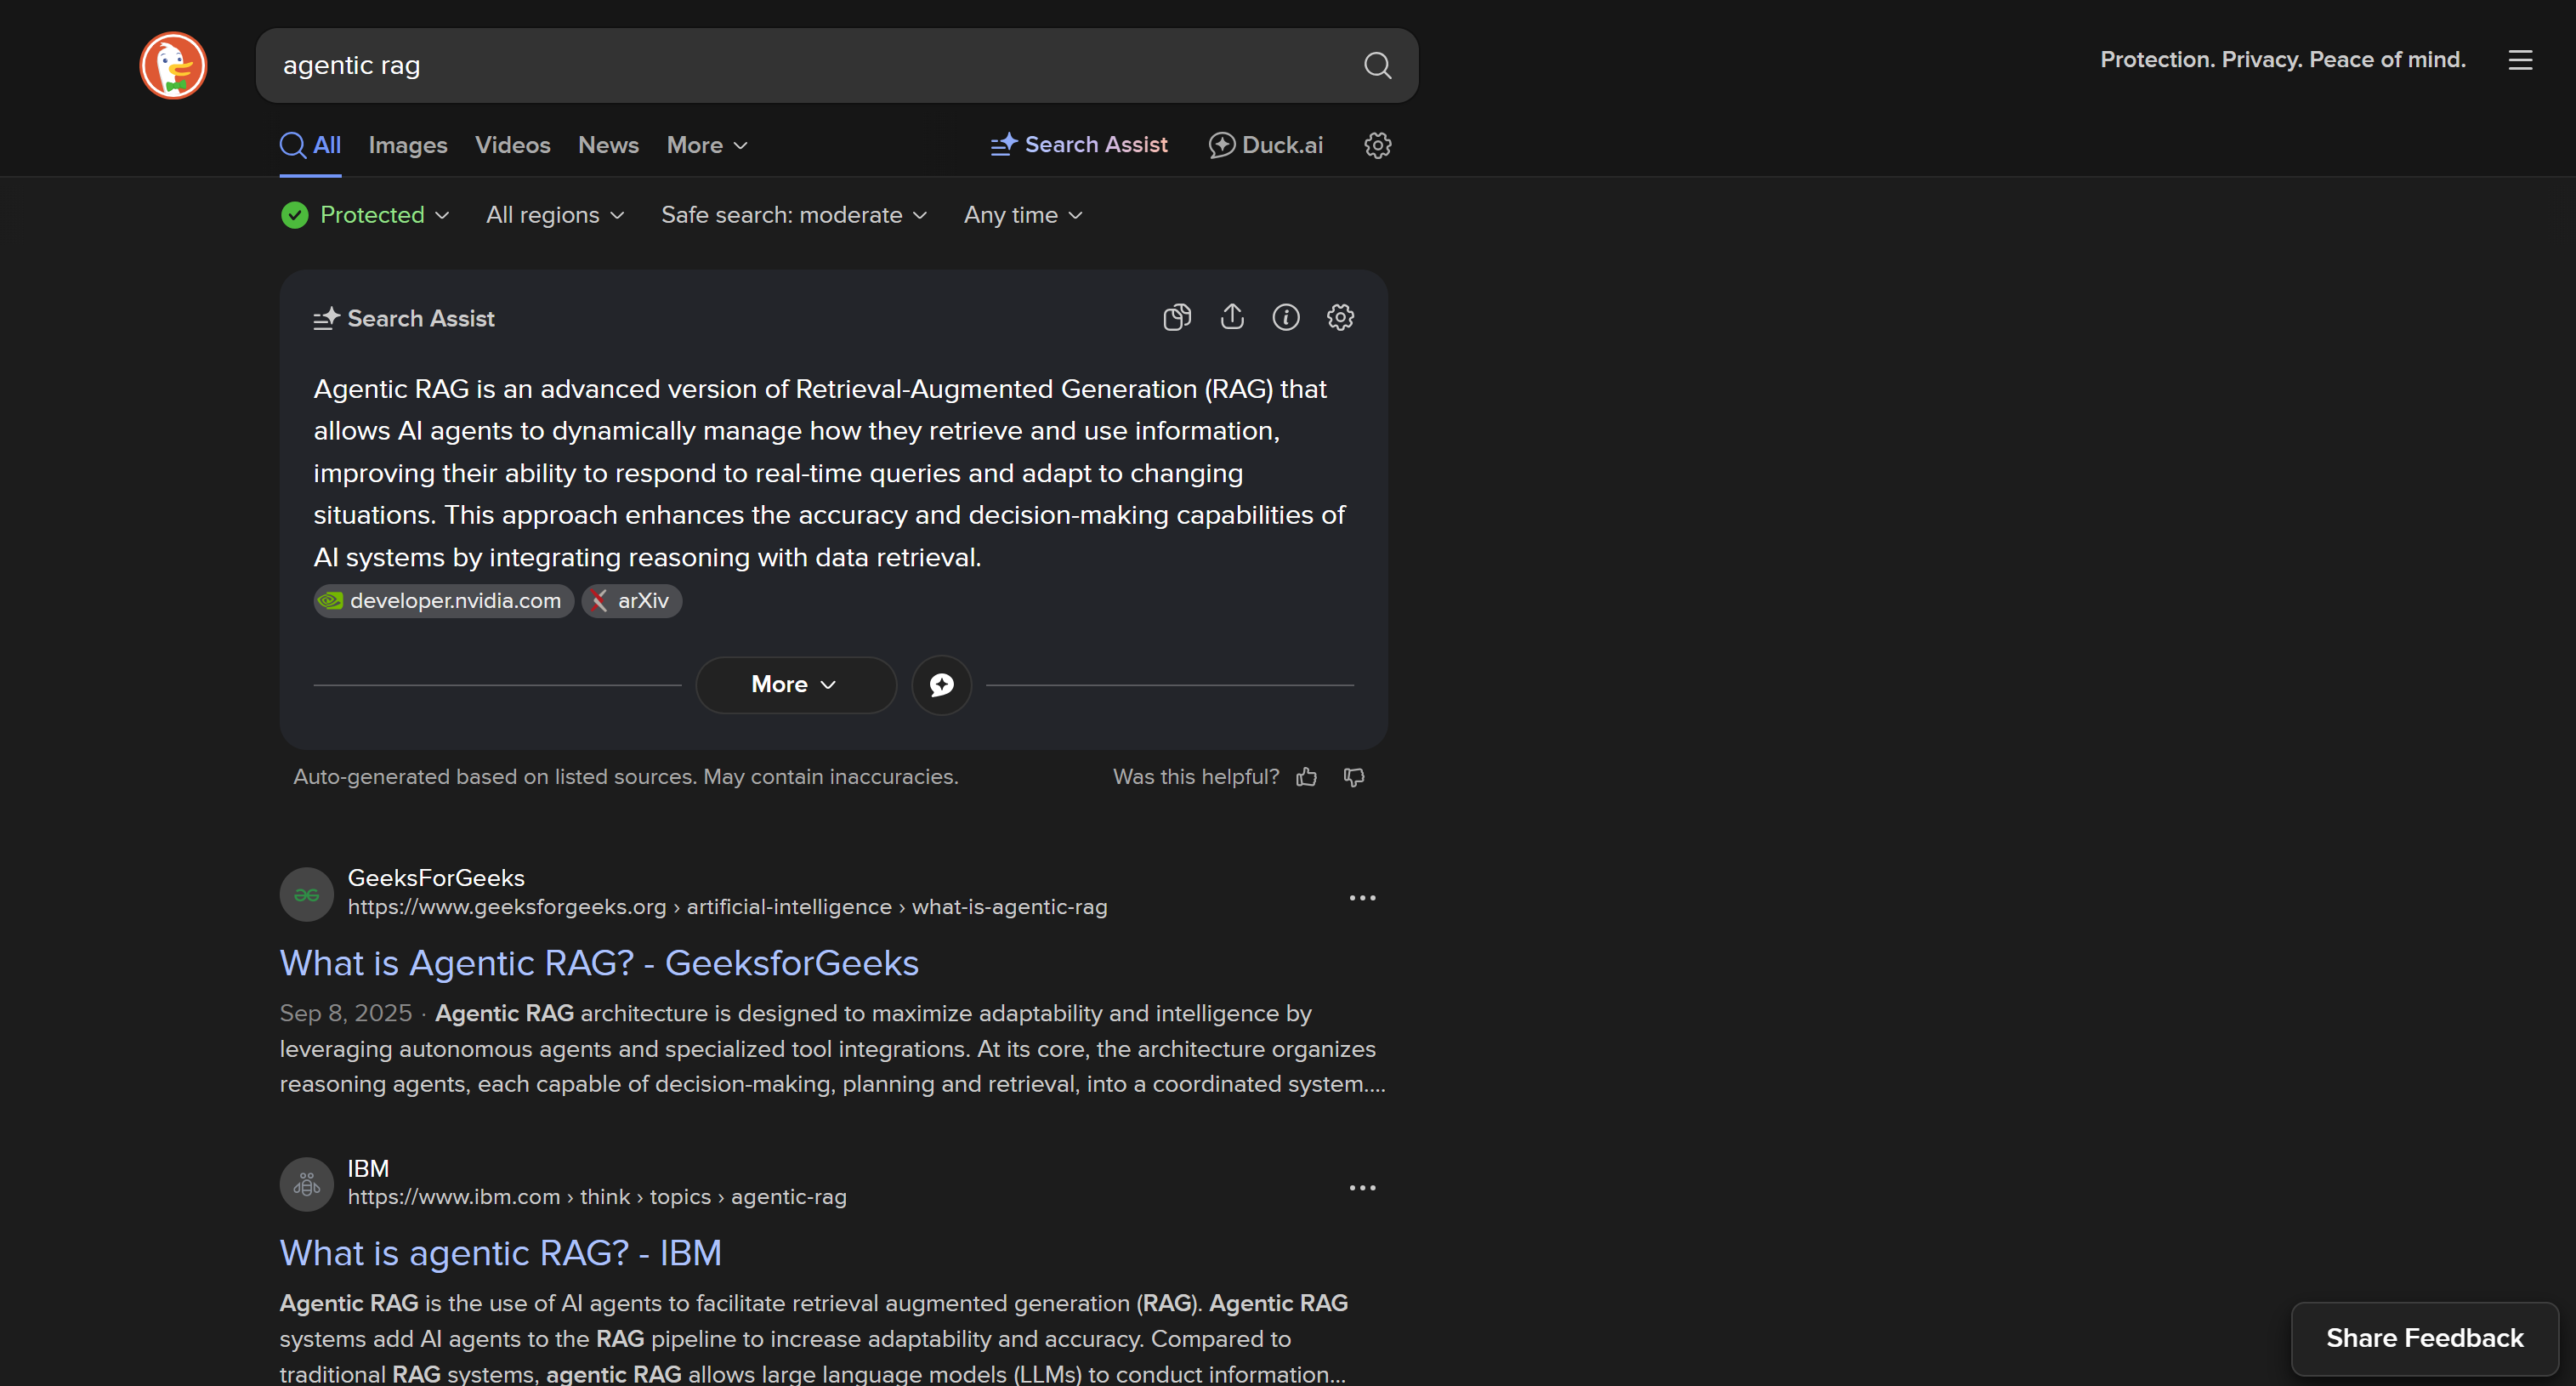
This version includes complex in-page user interactions, such as the “More Results” button to dynamically load other results:
The dynamic DuckDuckGo SERP comes with more features and richer information but requires browser automation tools for scraping. The reason is that only a browser can render pages that depend on JavaScript.
The problem is that controlling a browser introduces additional complexity and resource usage. That is why most scrapers rely on the static version of the site!
DuckDuckGo: Static SERP Version
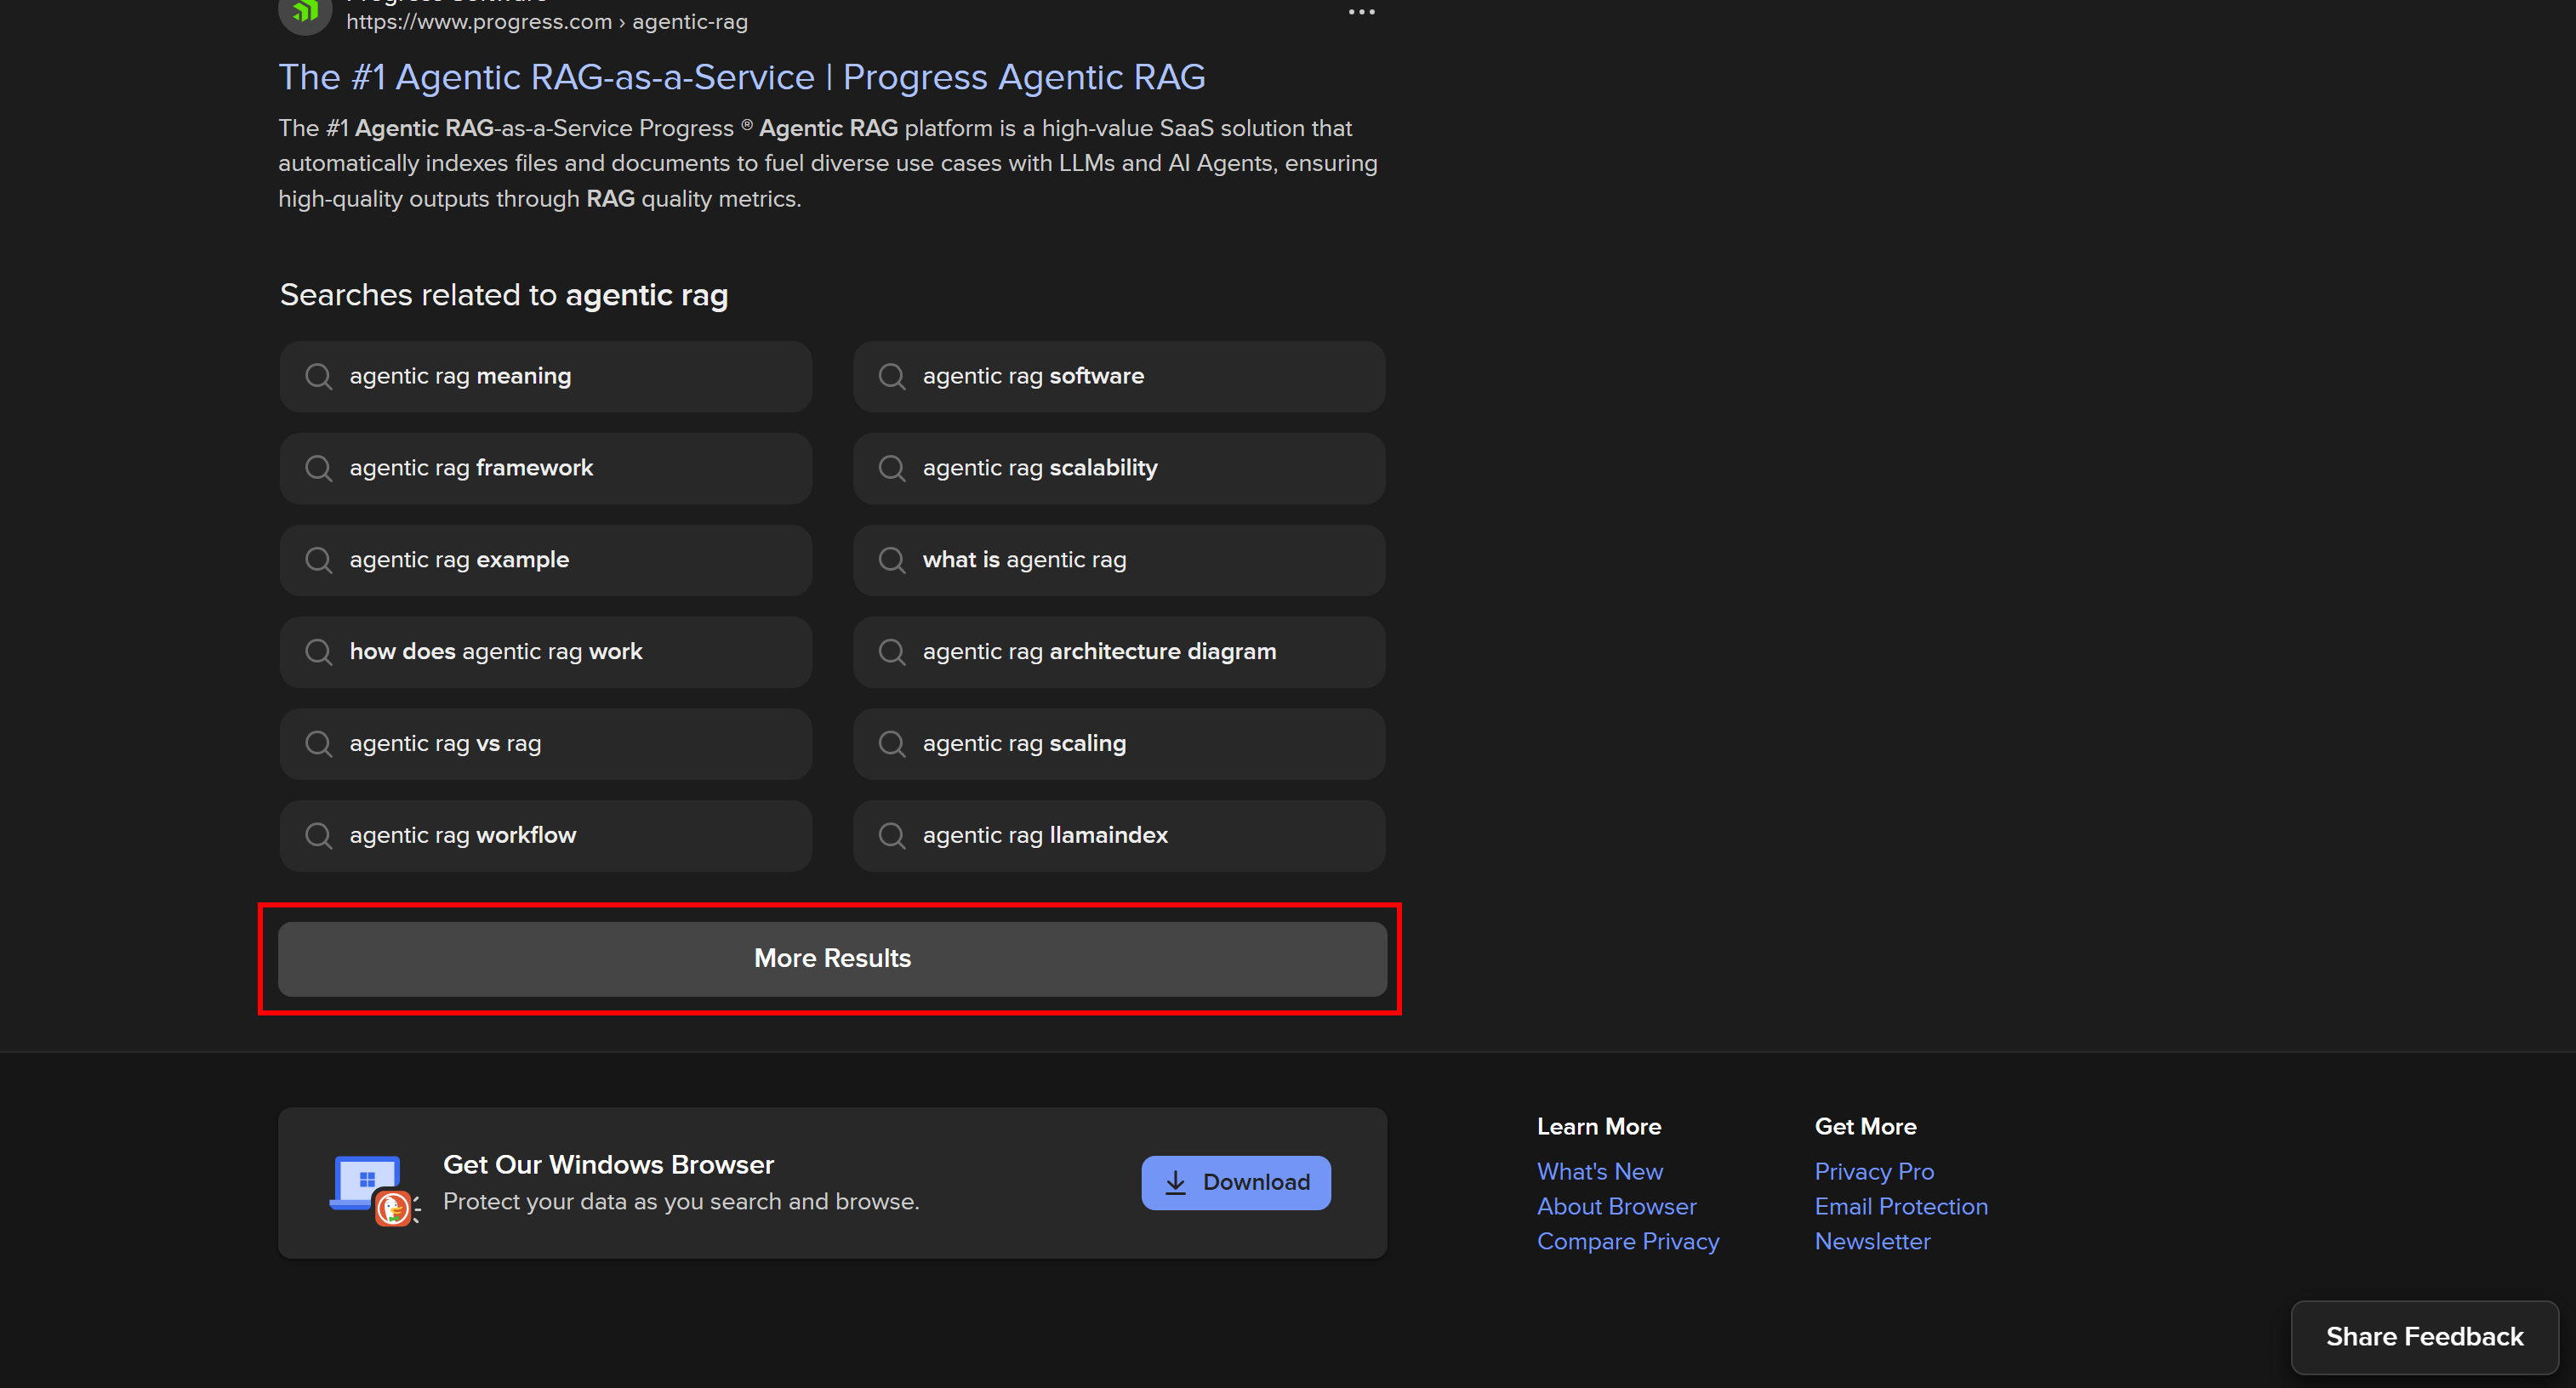
For devices that do not support JavaScript, DuckDuckGo also supports a static version of its SERPs. These pages follow a URL format like below:
https://html.duckduckgo.com/html/?q=<SEARCH_QUERY>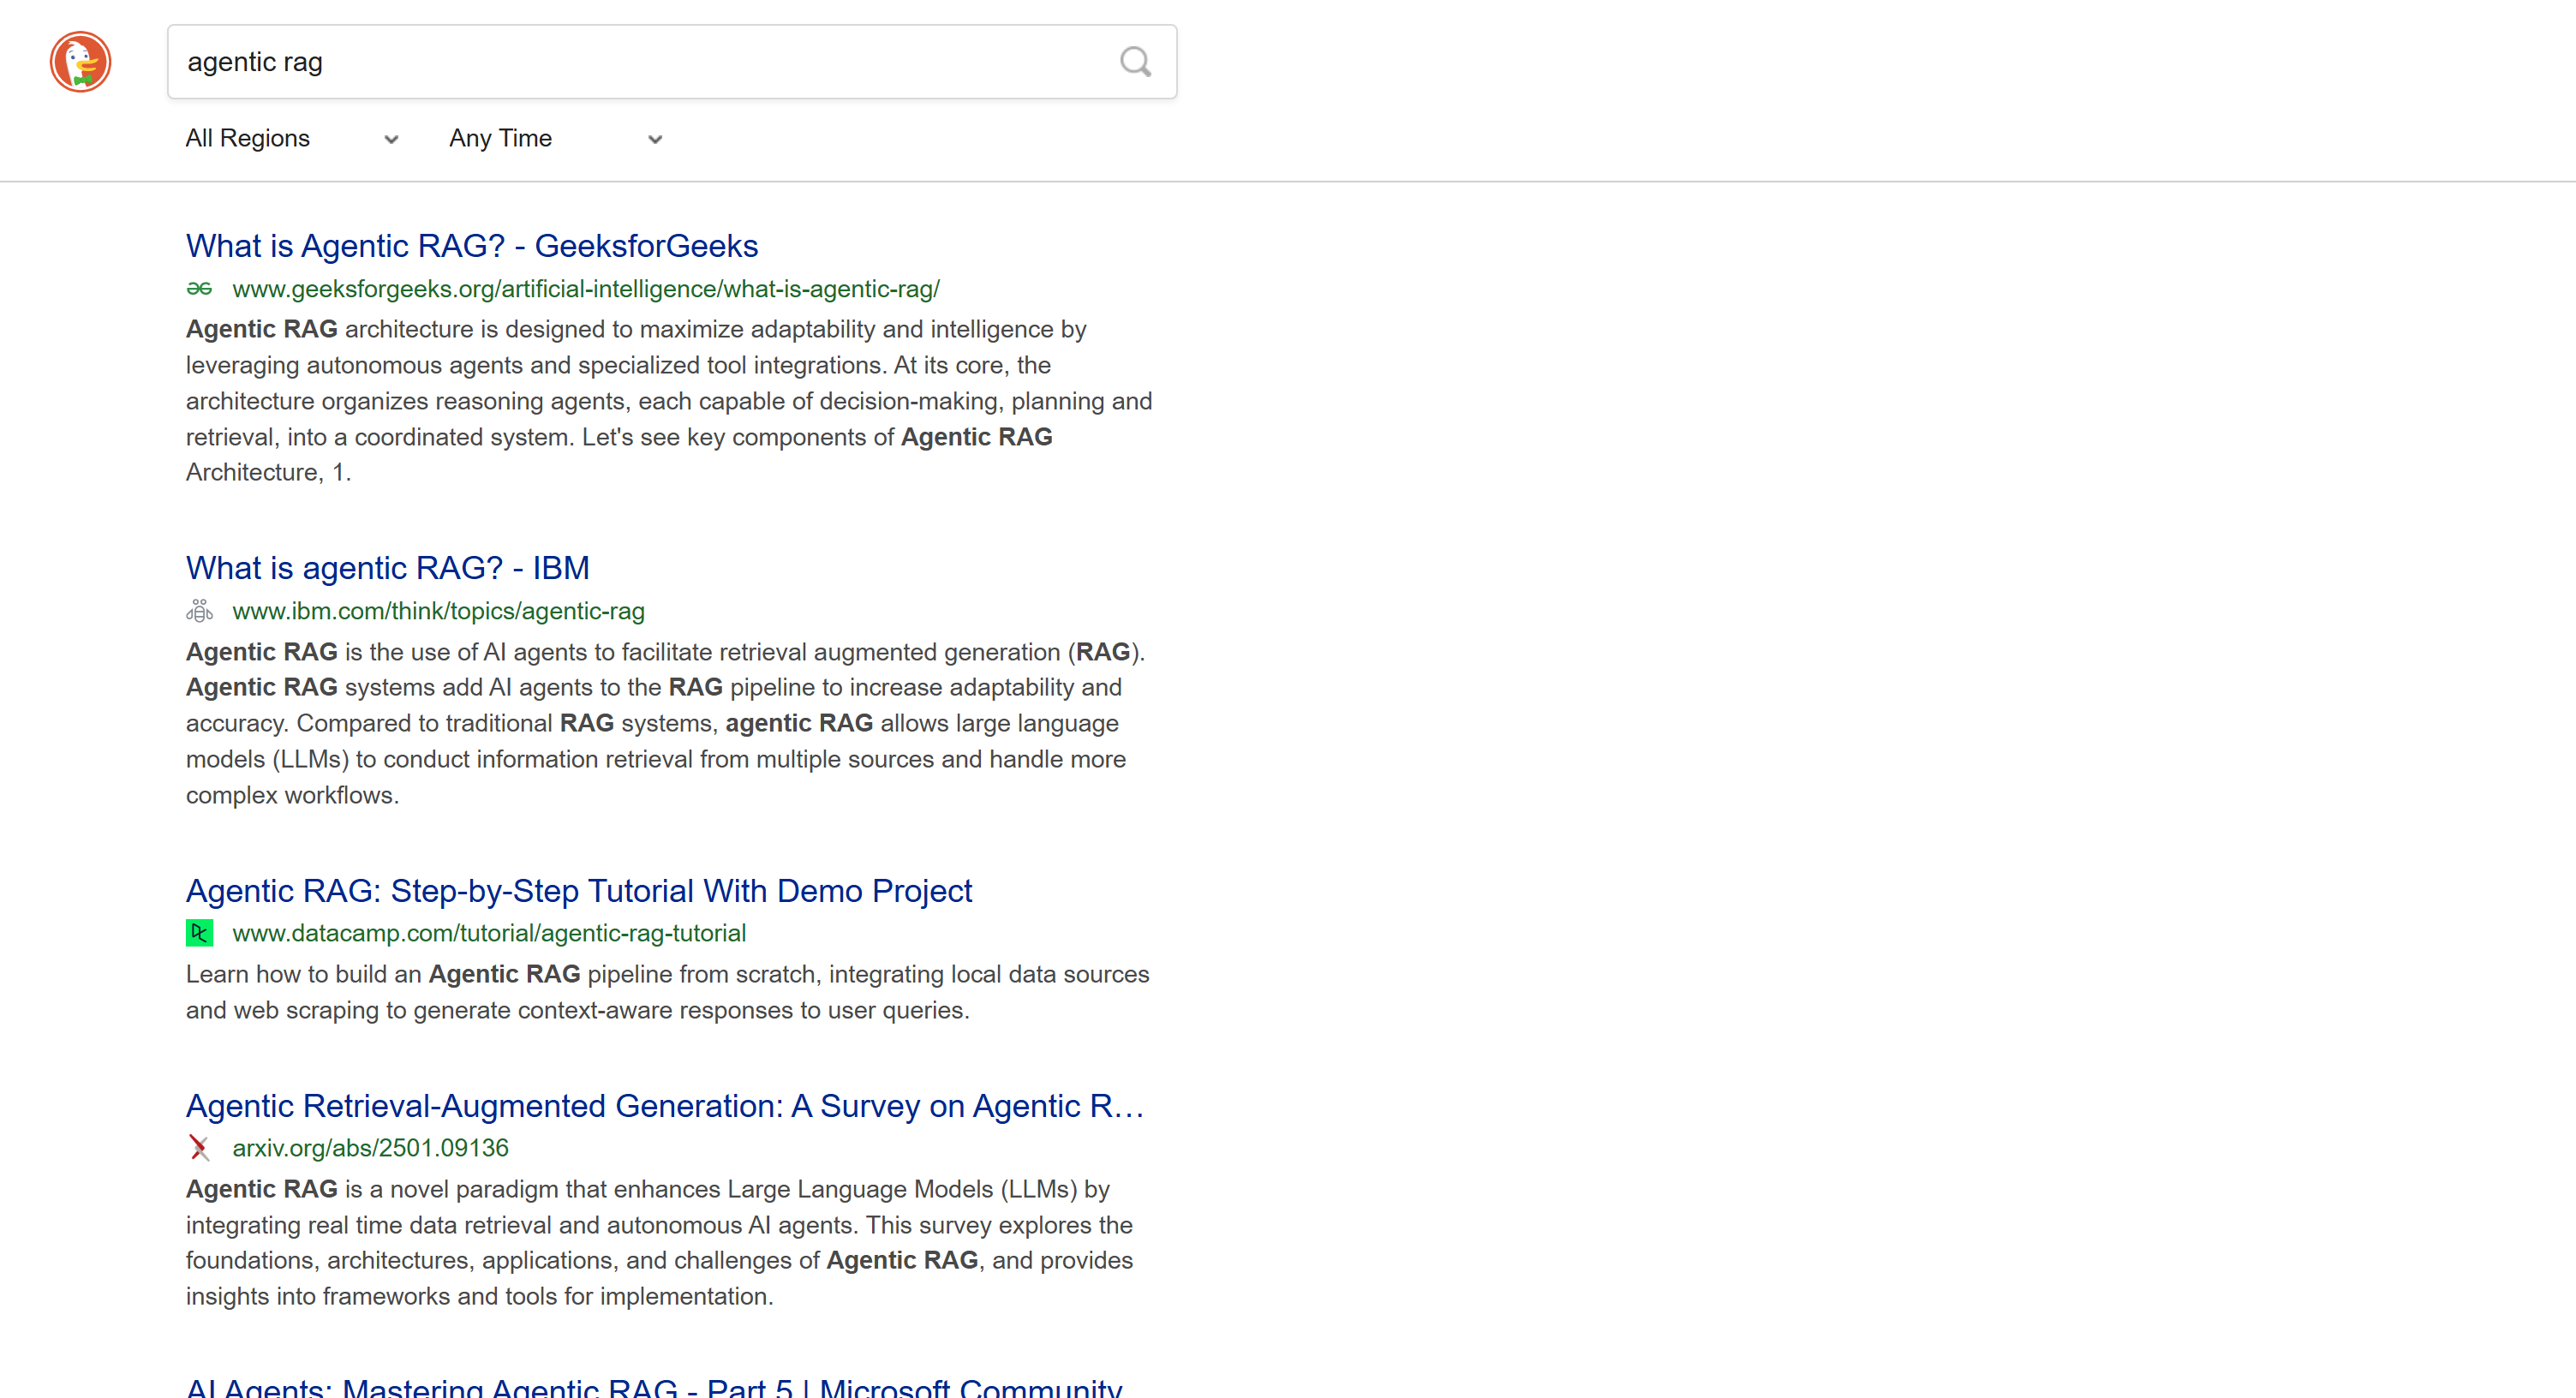
This version does not include dynamic content like the AI-generated summary. Also, pagination follows a more traditional approach with a “Next” button that takes you to the next page:
Since this SERP is static, you can scrape it using a traditional HTTP client + HTML parser approach. This method is faster, easier to implement, and consumes fewer resources.
Possible Approaches to Scraping DuckDuckGo
Take a look at the four possible DuckDuckGo web scraping approaches we will present in this article:
| Approach | Integration Complexity | Requires | Pricing | Risk of Blocks | Scalability |
|---|---|---|---|---|---|
| Build a custom scraper | Medium/High | Python programming skills | Free (may require premium proxies to avoid blocks) | Possible | Limited |
| Rely on a DuckDuckGo scraping library | Low | Python skills / CLI usage | Free (may require premium proxies to avoid blocks) | Possible | Limited |
| Use Bright Data’s SERP API | Low | Any HTTP client | Paid | None | Unlimited |
| Integrate the Web MCP server | Low | AI agent frameworks/solutions supporting MCP | Free tier available, then paid | None | Unlimited |
You will learn more about each of them as you go through this tutorial.
Regardless of which approach you follow, the target search query in this blog post will be “agentic rag”. In other words, you will see how to retrieve DuckDuckGo search results for that query.
We will assume you already have Python installed locally and are familiar with it.
Approach #1: Build a Custom Scraper
Utilize a browser automation tool or an HTTP client combined with an HTML parser to build a DuckDuckGo web scraping bot from scratch.
👍 Pros:
- Full control over scraping logic.
- Can be customized to extract exactly what you need.
👎 Cons:
- Requires setup and coding.
- May run into IP blocks if scraping at scale.
Approach #2: Rely on a DuckDuckGo Scraping Library
Use an existing scraping library for DuckDuckGo, like DDGS (Duck Distributed Global Search), which provides all the functionality you require without writing a single line of code.
👍 Pros:
- Minimal setup required.
- Handles search engine scraping tasks automatically, via Python code or simple CLI commands.
👎 Cons:
- Less flexibility compared to a custom scraper, with limited control over advanced use cases.
- Still runs into IP blocks.
Approach #3: Use Bright Data’s SERP API
Leverage the premium Bright Data SERP API endpoint, which you can call from any HTTP client. This supports several search engines, including DuckDuckGo. It handles all the complexities for you while providing scalable, high-volume scraping.
👍 Pros:
- Unlimited scalability.
- Avoids IP bans and anti-bot measures.
- Integrates with HTTP clients in any programming language, or even with visual tools like Postman.
👎 Cons:
- Paid service.
Approach #4: Integrate the Web MCP Server
Provide your AI agent with DuckDuckGo scraping capabilities by accessing the Bright Data SERP API for free via the Bright Data Web MCP.
👍 Pros:
- Easy AI integration.
- Free tier available.
- Easy to use within AI agents and workflows.
👎 Cons:
- You cannot fully control LLMs.
Approach #1: Build a Custom DuckDuckGo Scraper with Python
Follow the steps below to learn how to build a custom DuckDuckGo scraping script in Python.
Note: For simplified and fast data parsing, we will use the static version of DuckDuckGo. If you are interested in gathering AI-generated ”Search Assists,” read our guide on scraping AI-overview results from Google. You can easily adapt that to DuckDuckGo.
Step #1: Set Up Your Project
Start by opening your terminal and creating a new folder for your DuckDuckGo scraper project:
mkdir duckduckgo-scraperThe duckduckgo-scraper/ folder will contain your scraping project.
Next, navigate into the project directory and create a Python virtual environment inside it:
cd duckduckgo-scraper
python -m venv .venv
Now, open the project folder in your preferred Python IDE. We recommend Visual Studio Code with the Python extension or PyCharm Community Edition.
Create a new file named scraper.py in the root of your project directory. Your project structure should look like this:
duckduckgo-scraper/
├── .venv/
└── agent.py
In the terminal, activate the virtual environment. On Linux or macOS, run:
source venv/bin/activateEquivalently, on Windows, execute:
venv/Scripts/activateWith the virtual environment activated, install the project dependencies with:
pip install requests beautifulsoup4The two required libraries are:
requests: A popular Python HTTP client. It will be used to fetch the static version of the DuckDuckGo SERP.beautifulsoup4: A Python library for parsing HTML, allowing you to extract data from the DuckDuckGo results page.
Great! Your Python development environment is now ready to build a DuckDuckGo scraping script.
Step #2: Connect to the Target Page
Start by importing requests in scraper.py:
import requestsNext, perform a browser-like GET request to the static version of DuckDuckGo using the requests.get() method:
# Base URL of the DuckDuckGo static version
base_url = "https://html.duckduckgo.com/html/"

# Example search query
search_query = "agentic rag"

# To simulate a browser request and avoid 403 errors
headers = {
  "User-Agent": "Mozilla/5.0 (Windows NT 10.0; Win64; x64) AppleWebKit/537.36 (KHTML, like Gecko) Chrome/140.0.0.0 Safari/537.36"
}

# Connect to the target SERP page
params = {
    "q": search_query
}
response = requests.get(base_url, params=params, headers=headers)
If you are not familiar with this syntax, refer to our guide on Python HTTP requests.
The snippet above will send a GET HTTP request to https://html.duckduckgo.com/html/?q=agentic+rag (the target SERP of this tutorial) with the following User-Agent header:
Mozilla/5.0 (Windows NT 10.0; Win64; x64) AppleWebKit/537.36 (KHTML, like Gecko) Chrome/140.0.0.0 Safari/537.36Setting a real-world User-Agent like the one above is required to avoid receiving 403 Forbidden errors from DuckDuckGo. Learn more about the importance of the User-Agent header in web scraping.
The server will respond to the GET request with the HTML of the DuckDuckGo static page. Access it with:
html = response.textVerify the page contents by printing it:
print(html)You should see HTML similar to this:
<!DOCTYPE html PUBLIC "-//W3C//DTD XHTML 1.0 Transitional//EN"
"http://www.w3.org/TR/xhtml1/DTD/xhtml1-transitional.dtd">
<html xmlns="http://www.w3.org/1999/xhtml">
<head>
<meta http-equiv="content-type" content="text/html; charset=UTF-8" />
<meta name="viewport" content="width=device-width, initial-scale=1.0, maximum-scale=3.0, user-scalable=1" />
<meta name="referrer" content="origin" />
<meta name="HandheldFriendly" content="true" />
<meta name="robots" content="noindex, nofollow" />
<title>agentic rag at DuckDuckGo</title>
<!-- Omitted for brevity... -->
</head>
<!-- Omitted for brevity... -->
<body>
<div>
<div class="serp__results">
<div id="links" class="results">
<div class="result results_links results_links_deep web-result">
<div class="links_main links_deep result__body">
<h2 class="result__title">
<a rel="nofollow" class="result__a"
href="//duckduckgo.com/l/?uddg=https%3A%2F%2Fwww.geeksforgeeks.org%2Fartificial%2Dintelligence%2Fwhat%2Dis%2Dagentic%2Drag%2F&rut=db125a181b0852a6be3a488cb8060da7f7359f97d50cdc2b70fd9cd4dd3d1df9">
What is Agentic RAG? - GeeksforGeeks
</a>
</h2>
<!-- Omitted for brevity... -->
</div>
</div>
<!-- Other results ... -->
</div>
</div>
</div>
</body>
</html>Wonderful! This HTML contains all the SERP links you are interested in scraping.
Step #3: Parse the HTML
Import Beautiful Soup in scraper.py:
from bs4 import BeautifulSoupThen, use it to parse the HTML string retrieved earlier into a navigable tree structure:
soup = BeautifulSoup(html, "html.parser")This parses the HTML using Python’s built-in "html.parser". You can also configure other parsers, such as lxml or html5lib, as explained in our BeautifulSoup web scraping guide.
Well done! You can now use the BeautifulSoup API to select HTML elements on the page and extract the data you need.
Step #4: Prepare to Scrape All SERP Results
Before delving into the scraping logic, you should familiarize yourself with the structure of DuckDuckGo SERPs. Open this web page in incognito mode (to ensure a clean session) in your browser:
https://html.duckduckgo.com/html/?q=agentic+ragNext, right-click on a SERP result element and select the “Inspect” option to open the browser DevTools:
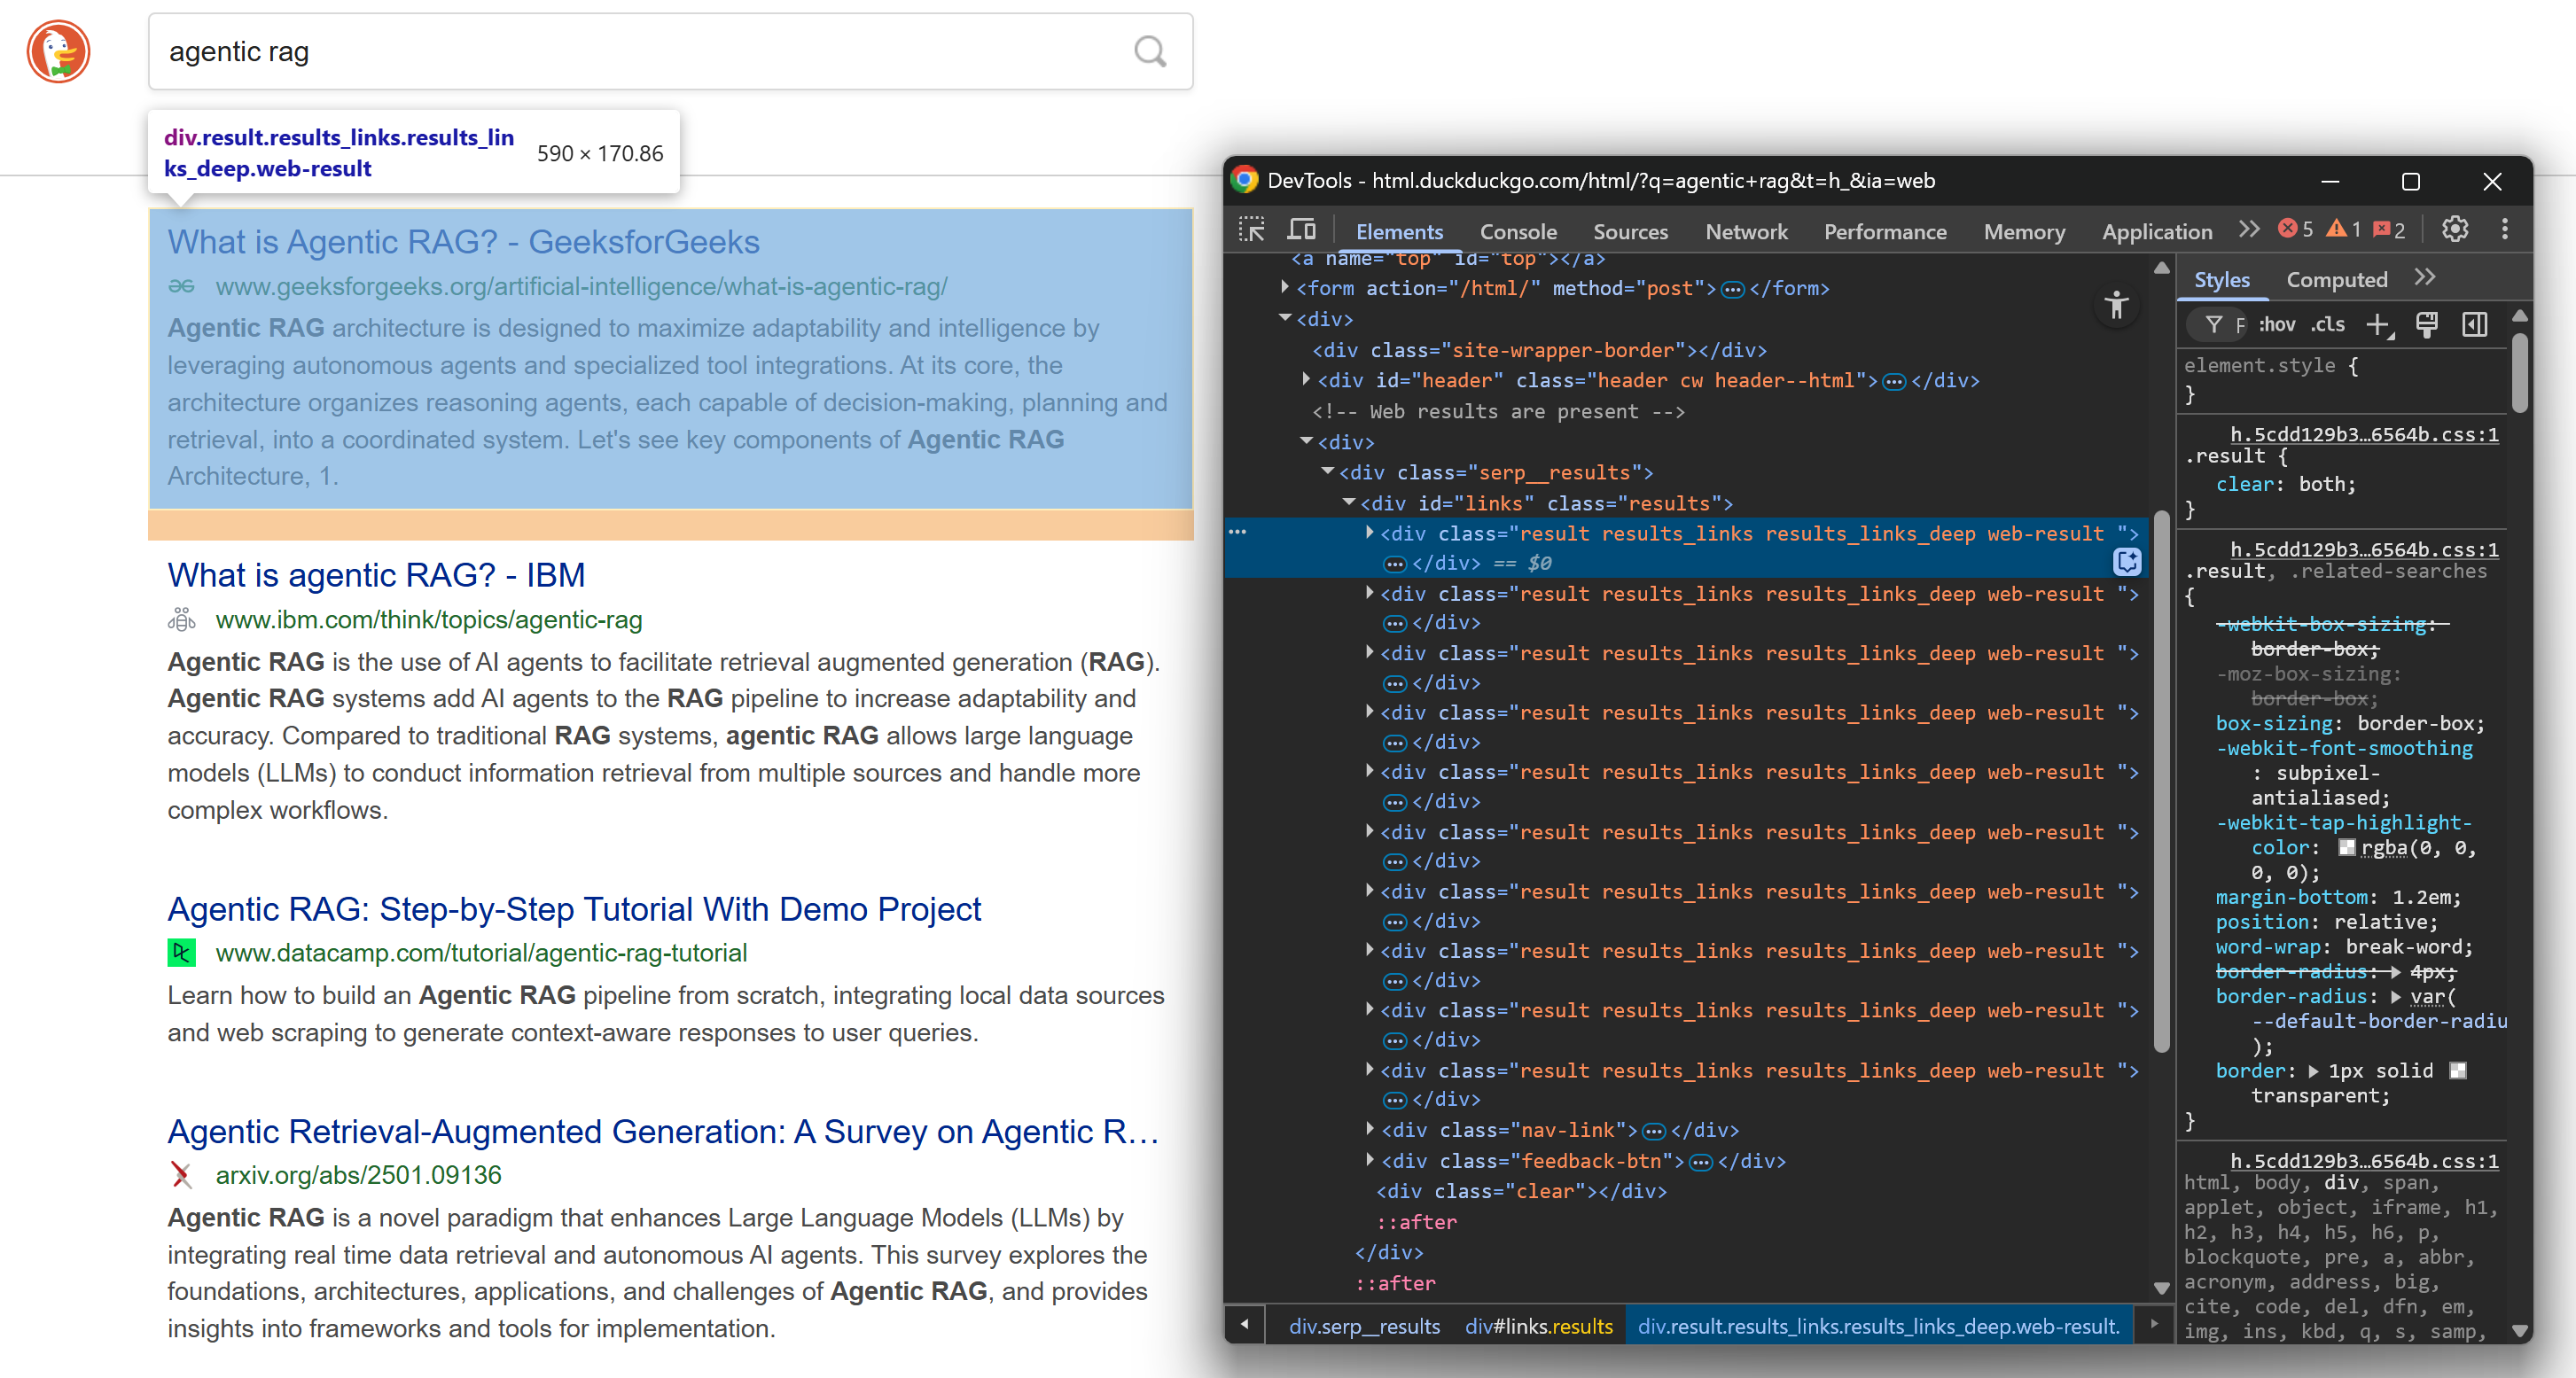
Take a look at the HTML structure. Notice that each SERP element has the result class and is contained in a <div> identified by the links ID. This means you can select all search result elements using this CSS selector:
#links .resultApply that selector to the parsed page with Beautiful Soup’s select() method:
result_elements = soup.select("#links .result") Since the page contains multiple SERP elements, you will need a list to store the scraped data. Initialize one like this:
serp_results = []Finally, iterate over each selected HTML element. Prepare to apply your scraping logic to extract DuckDuckGo search results and populate the serp_results list:
for result_element in result_elements:
    # Data parsing logic...
Great! You are now getting close to achieving your DuckDuckGo scraping goal.
Step #5: Scrape Results Data
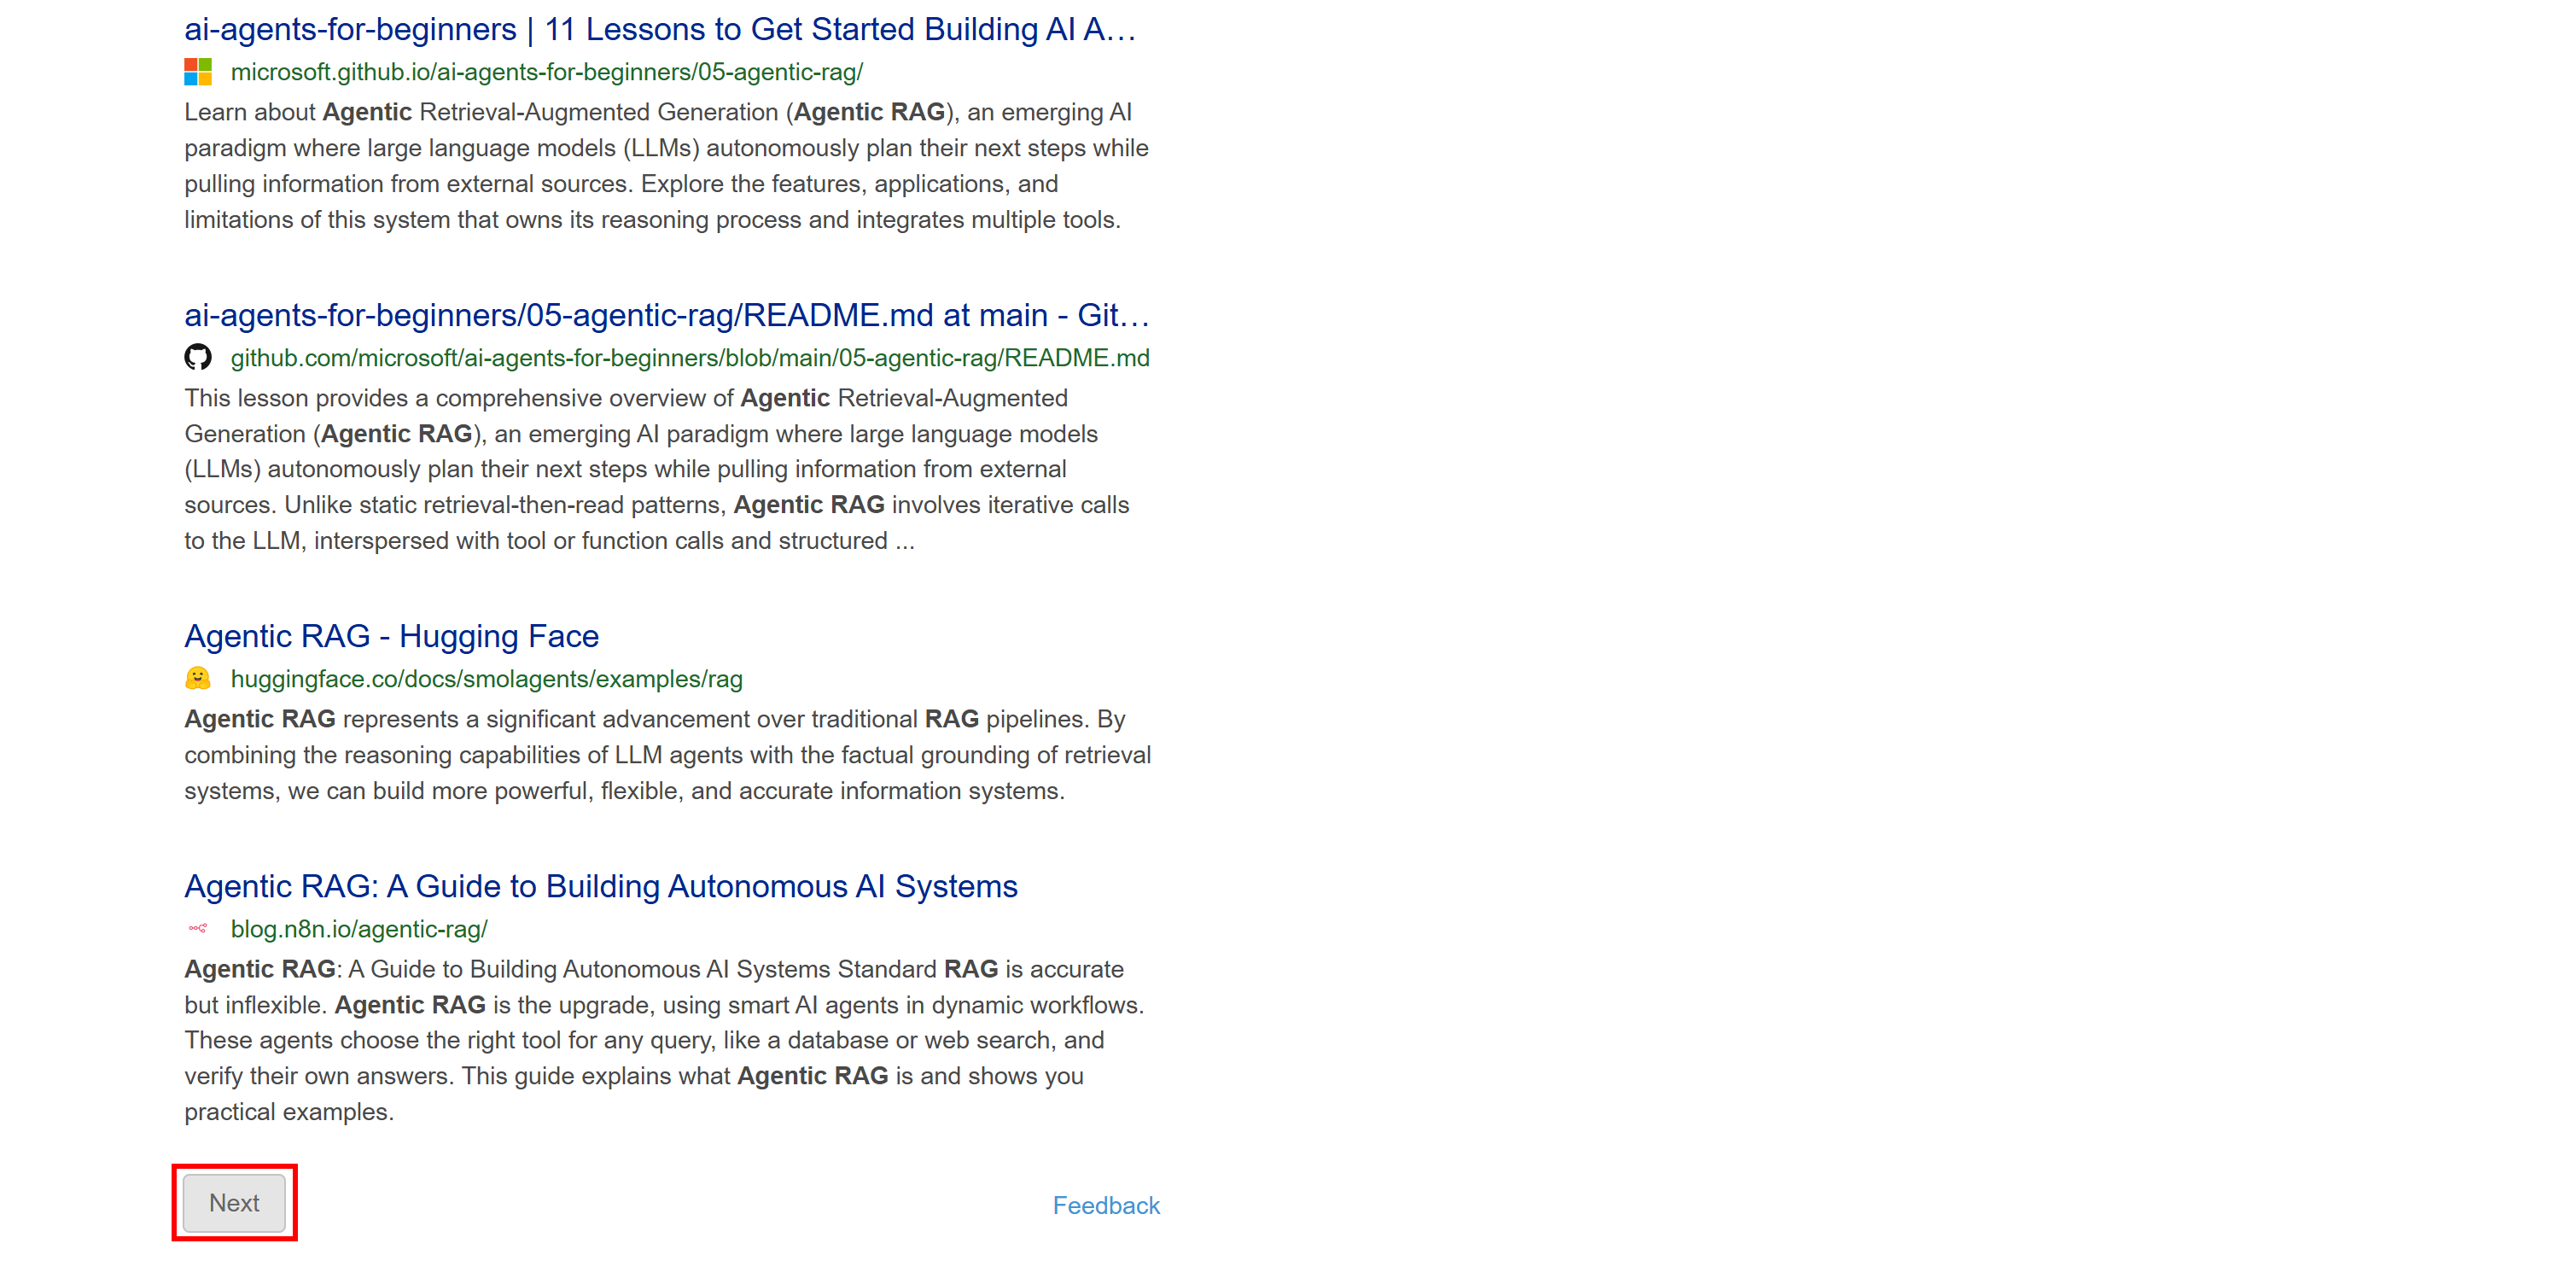
Again, inspect the HTML structure of a SERP element on the results page:
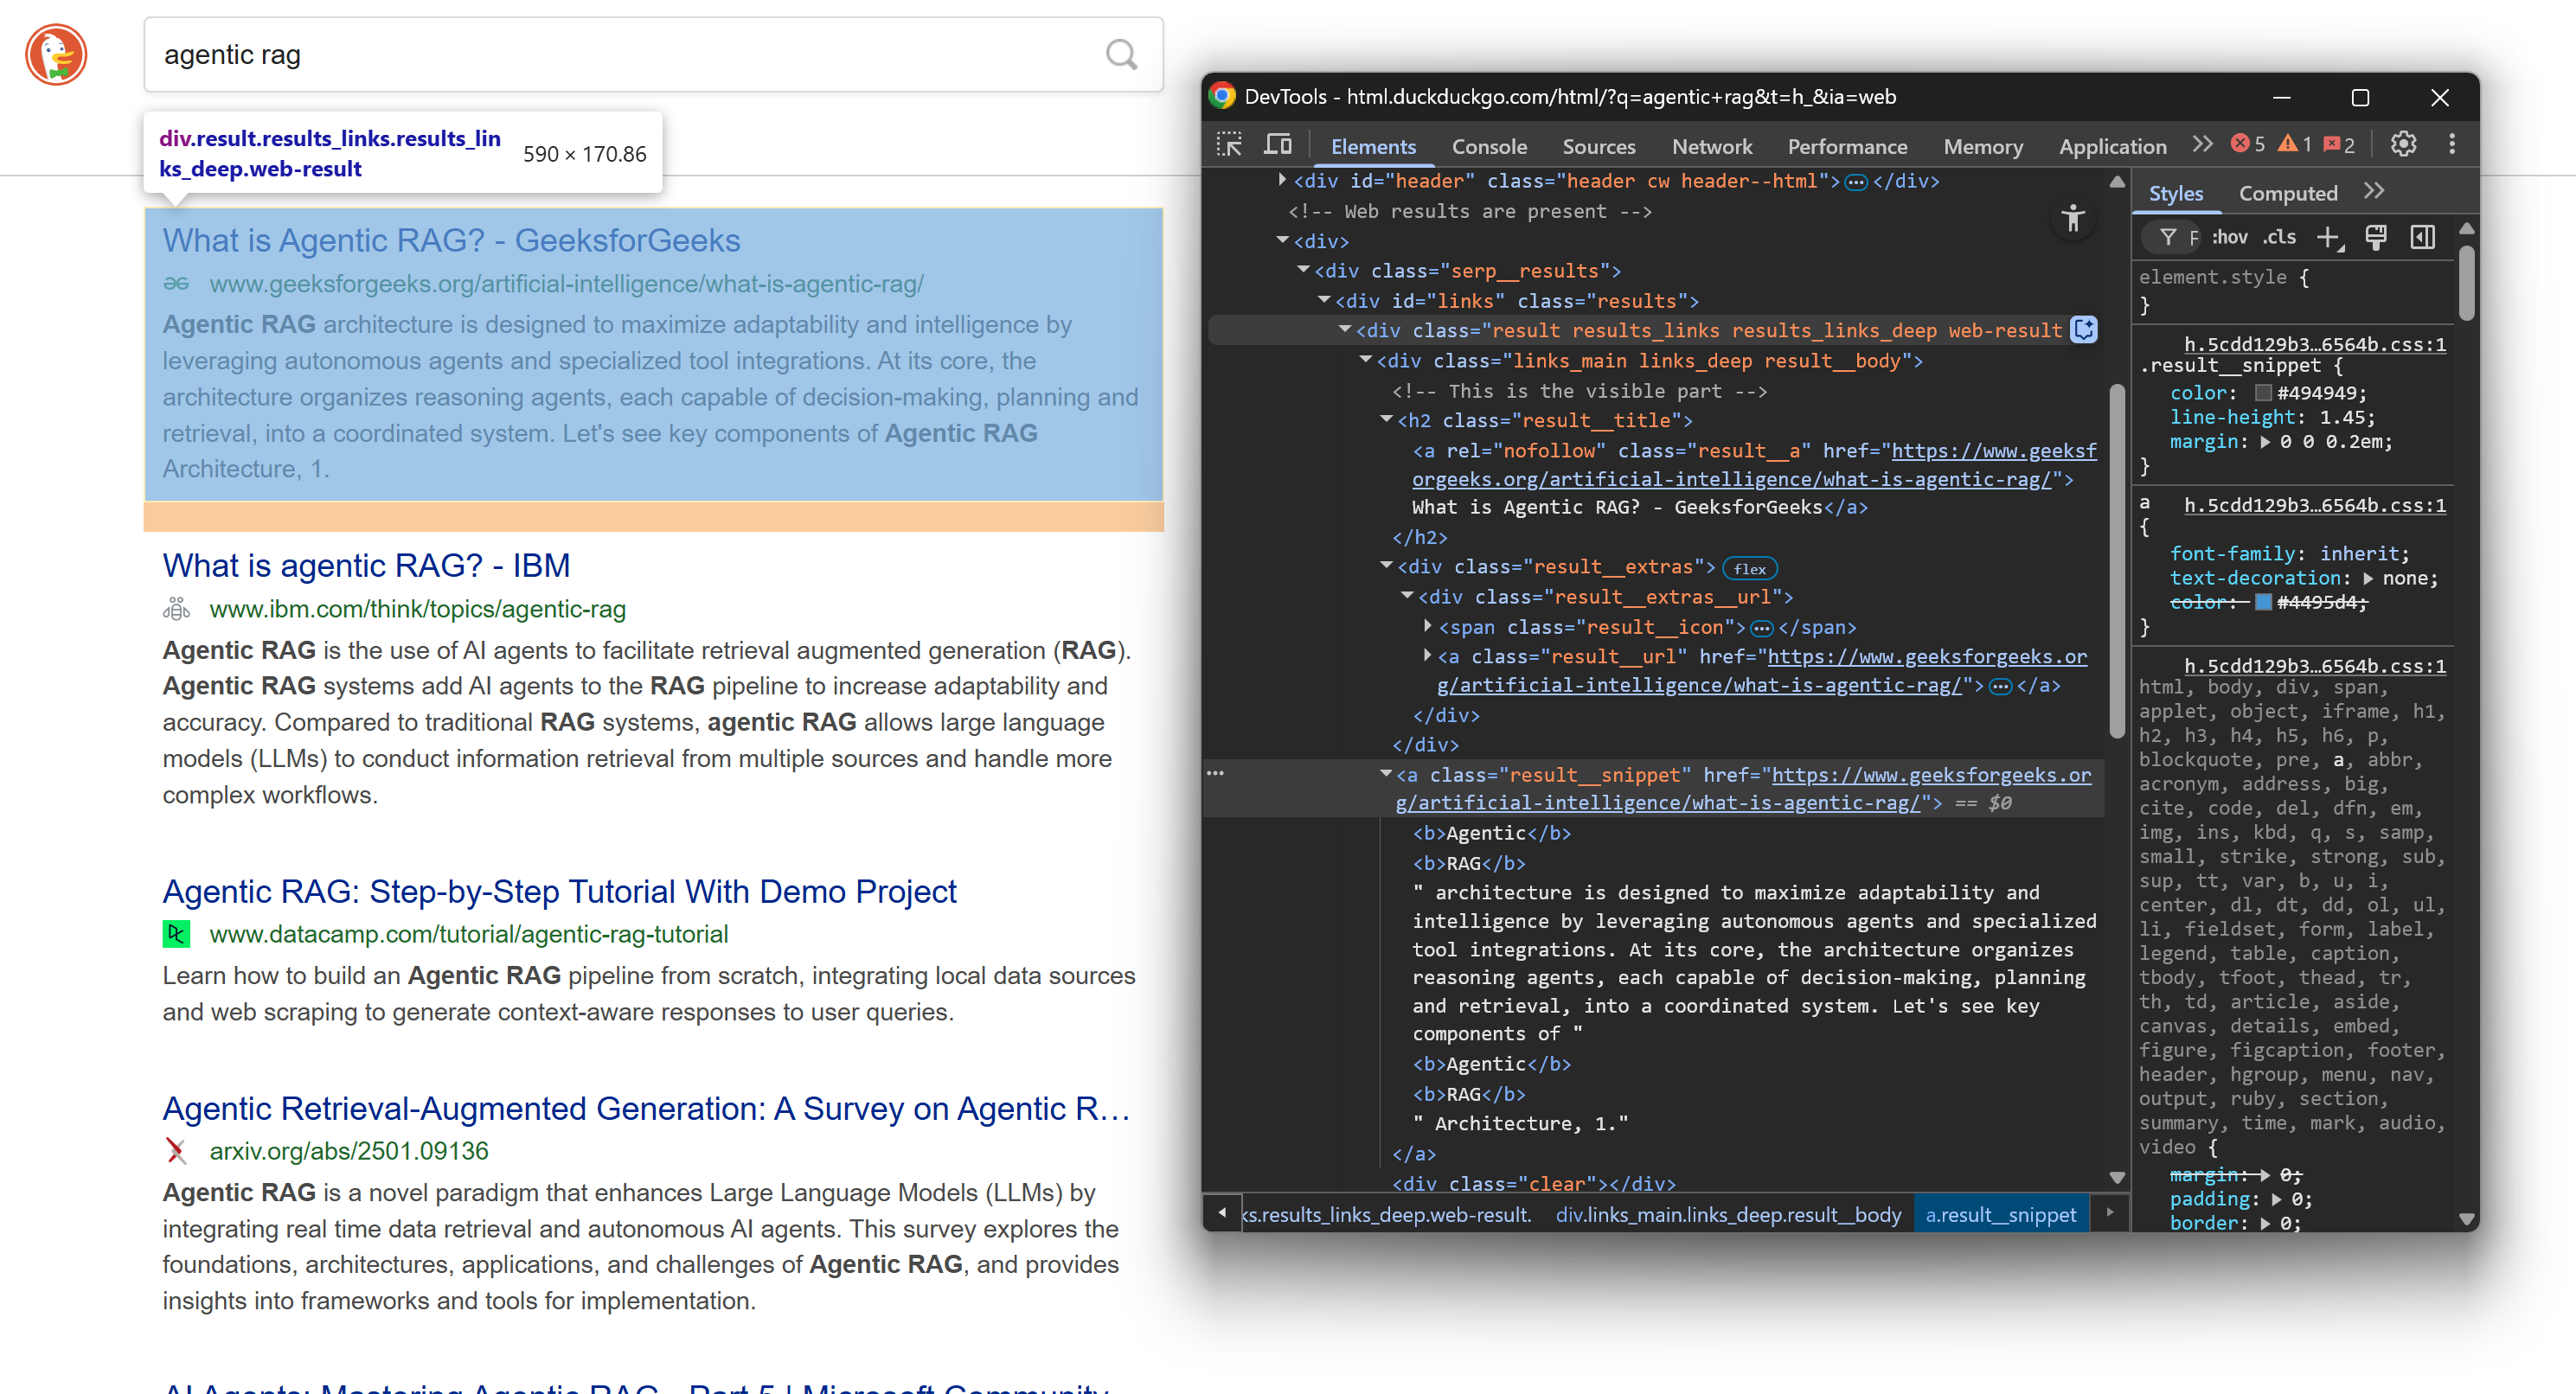
This time, focus on its nested HTML nodes. As you can see, from those elements, you can scrape:
- Result title from the
.result__atext - Result URL from the
.result__ahrefattribute - Display URL from the
.result__urltext - Result snippet/description from the
.result__snippettext
Apply BeautifulSoup’s select_one() method to pick the specific node, then use either .get_text() to extract the text or [<attribute_name>] to access an HTML attribute.
Implement the scraping logic with:
title_element = result_element.select_one(".result__a")
url = "https:" + title_element["href"]
title = title_element.get_text(strip=True)

url_element = result_element.select_one(".result__url")
display_url = url_element.get_text(strip=True)

snippet_element = result_element.select_one(".result__snippet")
snippet = snippet_element.get_text(strip=True)Note: strip=True is useful because it removes leading and trailing whitespace from the extracted text.
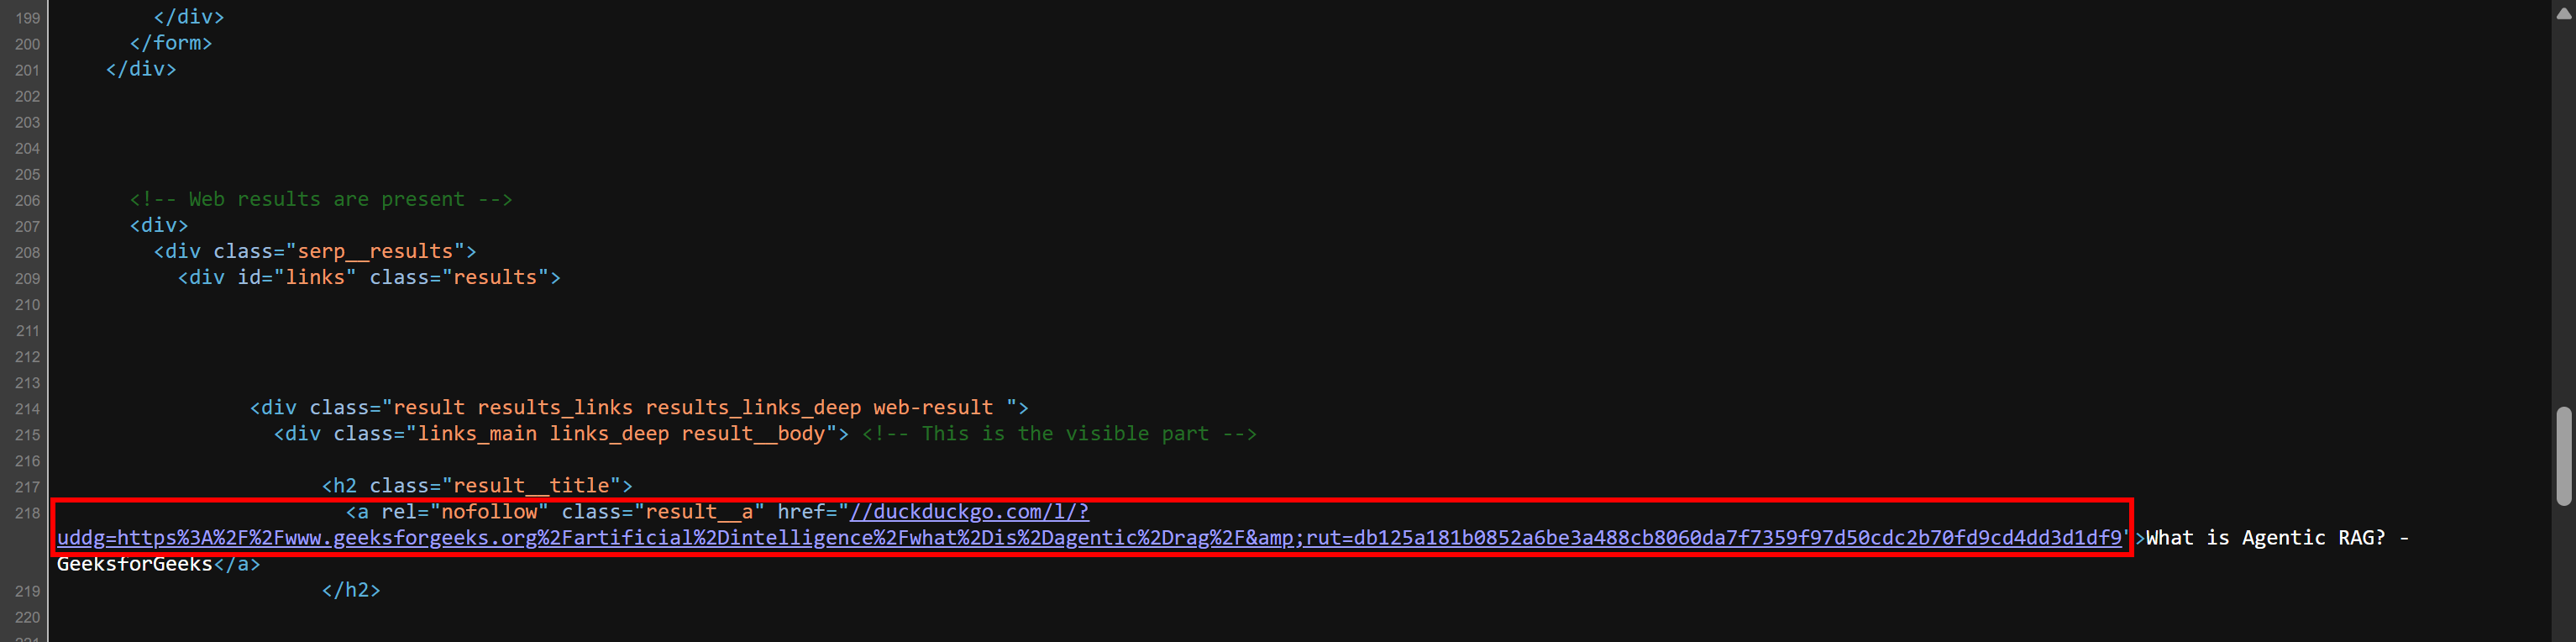
If you are wondering why you need to concatenate "https:" to title_element["href"], that is because the HTML returned by the server is slightly different from the one rendered in your browser. The raw HTML, which your scraper actually parses, contains URLs in a format like this:
//duckduckgo.com/l/?uddg=https%3A%2F%2Fwww.geeksforgeeks.org%2Fartificial%2Dintelligence%2Fwhat%2Dis%2Dagentic%2Drag%2F&rut=db125a181b0852a6be3a488cb8060da7f7359f97d50cdc2b70fd9cd4dd3d1df9As you can see, the URL starts with // instead of including the scheme (https://). By prepending "https:", you ensure the URL becomes more usable (outside of browsers, which support that format, too).
Verify this behavior yourself. Right-click the page and choose the “View page source” option. This will show you the raw HTML document returned by the server (without any browser rendering applied). You will see SERP links in that format:
Now, with the scraped data fields, create a dictionary for each search result and append it to the serp_results list:
serp_result = {
  "url": url,
  "title": title,
  "display_url": display_url,
  "snippet": snippet
}
serp_results.append(serp_result)
Perfect! Your DuckDuckGo web scraping logic is complete. It only remains to export the scraped data.
Step #6: Export the Scraped Data to CSV
At this point, you have DuckDuckGo search results stored in a Python list. To make that data usable by other teams or tools, export it to a CSV file using Python’s built-in csv library:
with open("duckduckgo_results.csv", "w", newline="", encoding="utf-8") as f:
    headers = serp_results[0].keys()
    writer = csv.DictWriter(f, fieldnames=headers)

    # Write the header
    writer.writeheader()

    # Write all data rows
    writer.writerows(serp_results)
Do not forget to import csv:
import csvThis way, your DuckDuckGo scraper will produce an output file named duckduckgo_results.csv containing all the scraped results in CSV format. Mission complete!
Step #7: Put It All Together
The final code contained in scraper.py is:
import requests
from bs4 import BeautifulSoup
import csv

# Base URL of the DuckDuckGo static version
base_url = "https://html.duckduckgo.com/html/"

# Example search query
search_query = "agentic rag"

# To simulate a browser request and avoid 403 errors
headers = {
  "User-Agent": "Mozilla/5.0 (Windows NT 10.0; Win64; x64) AppleWebKit/537.36 (KHTML, like Gecko) Chrome/140.0.0.0 Safari/537.36"
}

# Connect to the target SERP page
params = {
    "q": search_query
}
response = requests.get(base_url, params=params, headers=headers)
# Retrieve the HTML content from the response
html = response.text

# Parse the HTML
soup = BeautifulSoup(html, "html.parser")

# Find all result containers
result_elements = soup.select("#links .result")

# Where to store the scraped data
serp_results = []

# Iterate over each SERP result and scrape data from it
for result_element in result_elements:
    # Data parsing logic
    title_element = result_element.select_one(".result__a")
    url = "https:" + title_element["href"]
    title = title_element.get_text(strip=True)

    url_element = result_element.select_one(".result__url")
    display_url = url_element.get_text(strip=True)

    snippet_element = result_element.select_one(".result__snippet")
    snippet = snippet_element.get_text(strip=True)

    # Populate a new SERP result object and append it to the list
    serp_result = {
      "url": url,
      "title": title,
      "display_url": display_url,
      "snippet": snippet
    }
    serp_results.append(serp_result)

# Export the scraped data to CSV
with open("duckduckgo_results.csv", "w", newline="", encoding="utf-8") as f:
    headers = serp_results[0].keys()
    writer = csv.DictWriter(f, fieldnames=headers)

    # Write the header
    writer.writeheader()

    # Write all data rows
    writer.writerows(serp_results)
Wow! In less than 65 lines of code, you just built a DuckDuckGo data scraping script.
Launch it with this command:
python scraper.pyThe output will be a duckduckgo_results.csv file, which will appear in your project folder. Open it, and you should see scraped data like this:

Et voilà! You transformed unstructured search results from a DuckDuckGo web page into a structured CSV file.
[Extra] Integrate Rotating Proxies to Avoid Blocks
The scraper above works well for small runs, but it will not scale much. That is because DuckDuckGo will start blocking your requests if it sees too much traffic coming from the same IP. When that happens, its servers start returning 403 Forbidden error pages containing a message like this:
If this persists, please <a href="mailto:[email protected]?subject=Error getting results">email us</a>.<br />
Our support email address includes an anonymized error code that helps us understand the context of your search.
That means the server has identified your request as automated and blocked it, generally due to a rate limiting issue. To avoid blocks, you need to rotate your IP address.
The solution is to send requests through a rotating proxy. If you want to learn more about this mechanism, take a look at our guide on how to rotate an IP address.
Bright Data offers rotating proxies backed by a network of over 150 million IPs. See how to integrate them in your DuckDuckGo scraper to avoid blocks!
Follow the official proxy setup guide, and you will end up with a proxy connection string that looks like this:
<BRIGHT_DATA_PROXY_USERNAME>:<BRIGHT_DATA_PROXY_PASSWORD>@brd.superproxy.io:33335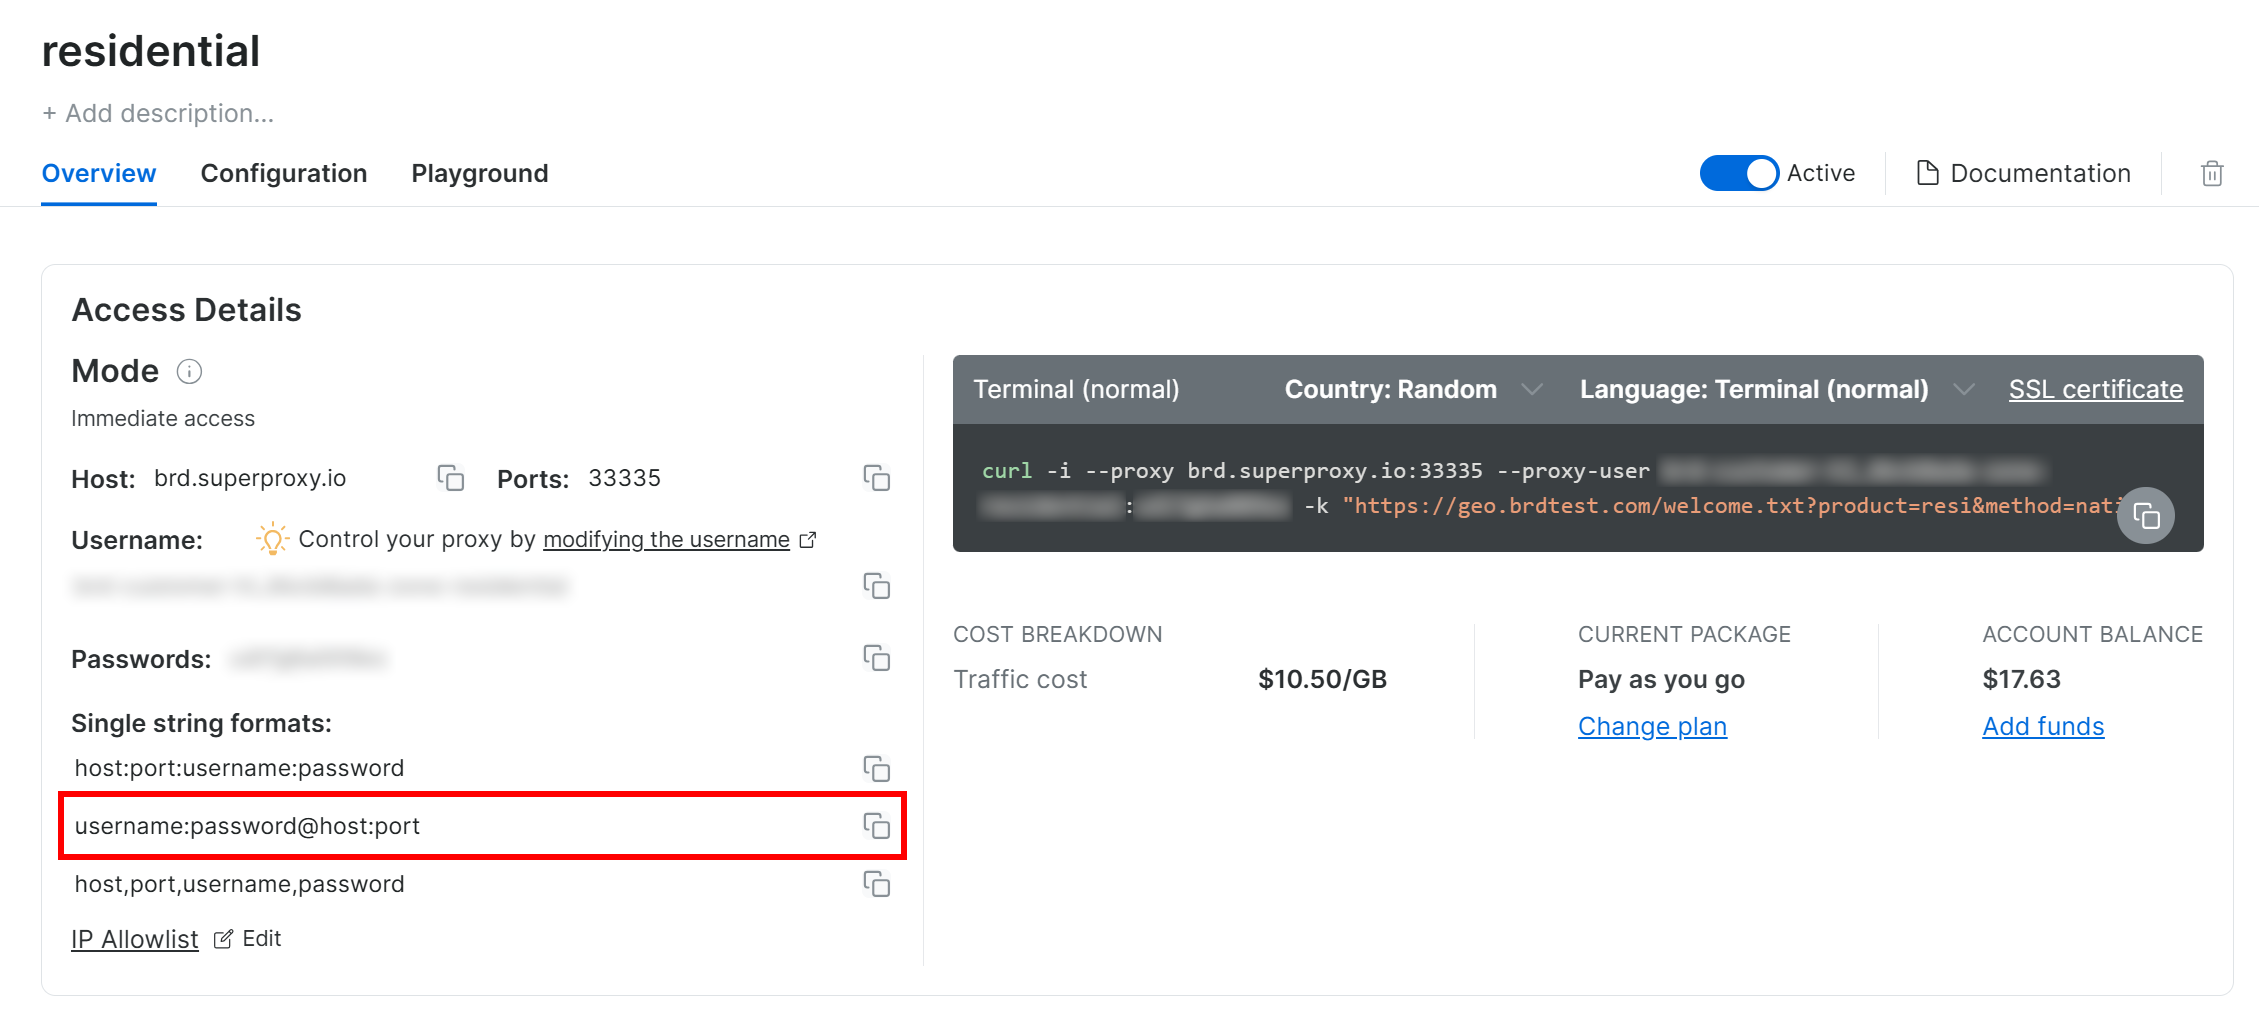
Set the proxy in Requests, as below:
proxy_url = "http://<BRIGHT_DATA_PROXY_USERNAME>:<BRIGHT_DATA_PROXY_PASSWORD>@brd.superproxy.io:33335"
proxies = {
    "http": proxy_url,
    "https": proxy_url,
}

# params and headers definition...

response = requests.get(
    base_url,
    params=params,
    headers=headers,
    proxies=proxies,   # route the request through the rotating proxy
    verify=False,
)Note: verify=False disables SSL certificate verification. This will avoid errors related to proxy certificate validation, but it is insecure. For a more production-ready implementation, refer to our documentation page on SSL certificate validation.
Now your GET requests to DuckDuckGo will be routed through Bright Data’s 150-million IP residential proxy network, ensuring a fresh IP each time and helping you avoid IP-related blocks.
Approach #2: Relying on a DuckDuckGo Scraping Library like DDGS
In this section, you will learn how to use the DDGS library. This open-source project, with over 1.8k stars on GitHub, was previously known as duckduckgo-search because it used to focus specifically on DuckDuckGo. Recently, it was rebranded to DDGS (Dux Distributed Global Search) as it now supports other search engines as well.
Here, we will look at how to use it from the command line to scrape DuckDuckGo search results!
Step #1: Install DDGS
Install DDGS globally or inside a virtual environment via the ddgs PyPI package:
pip install -U ddgsOnce installed, you can access it via the ddgs command-line tool. Verify the installation by running:
ddgs --helpThe output should look like this:
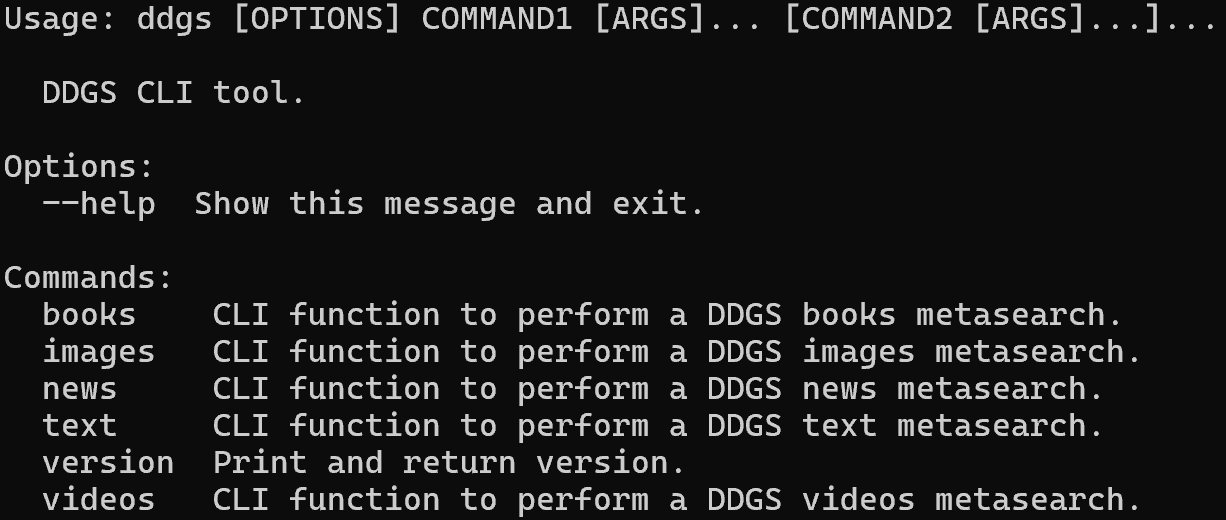
As you can tell, the library supports several commands for scraping different types of data (e.g., text, images, news, etc.). In this case, you will use the text command, which targets search results from SERPs.
Note: You can also call those commands via the DDGS API in Python code, as explained in the documentation.
Step #2: Use DDGS via CLI for DuckDuckGo Web Scraping
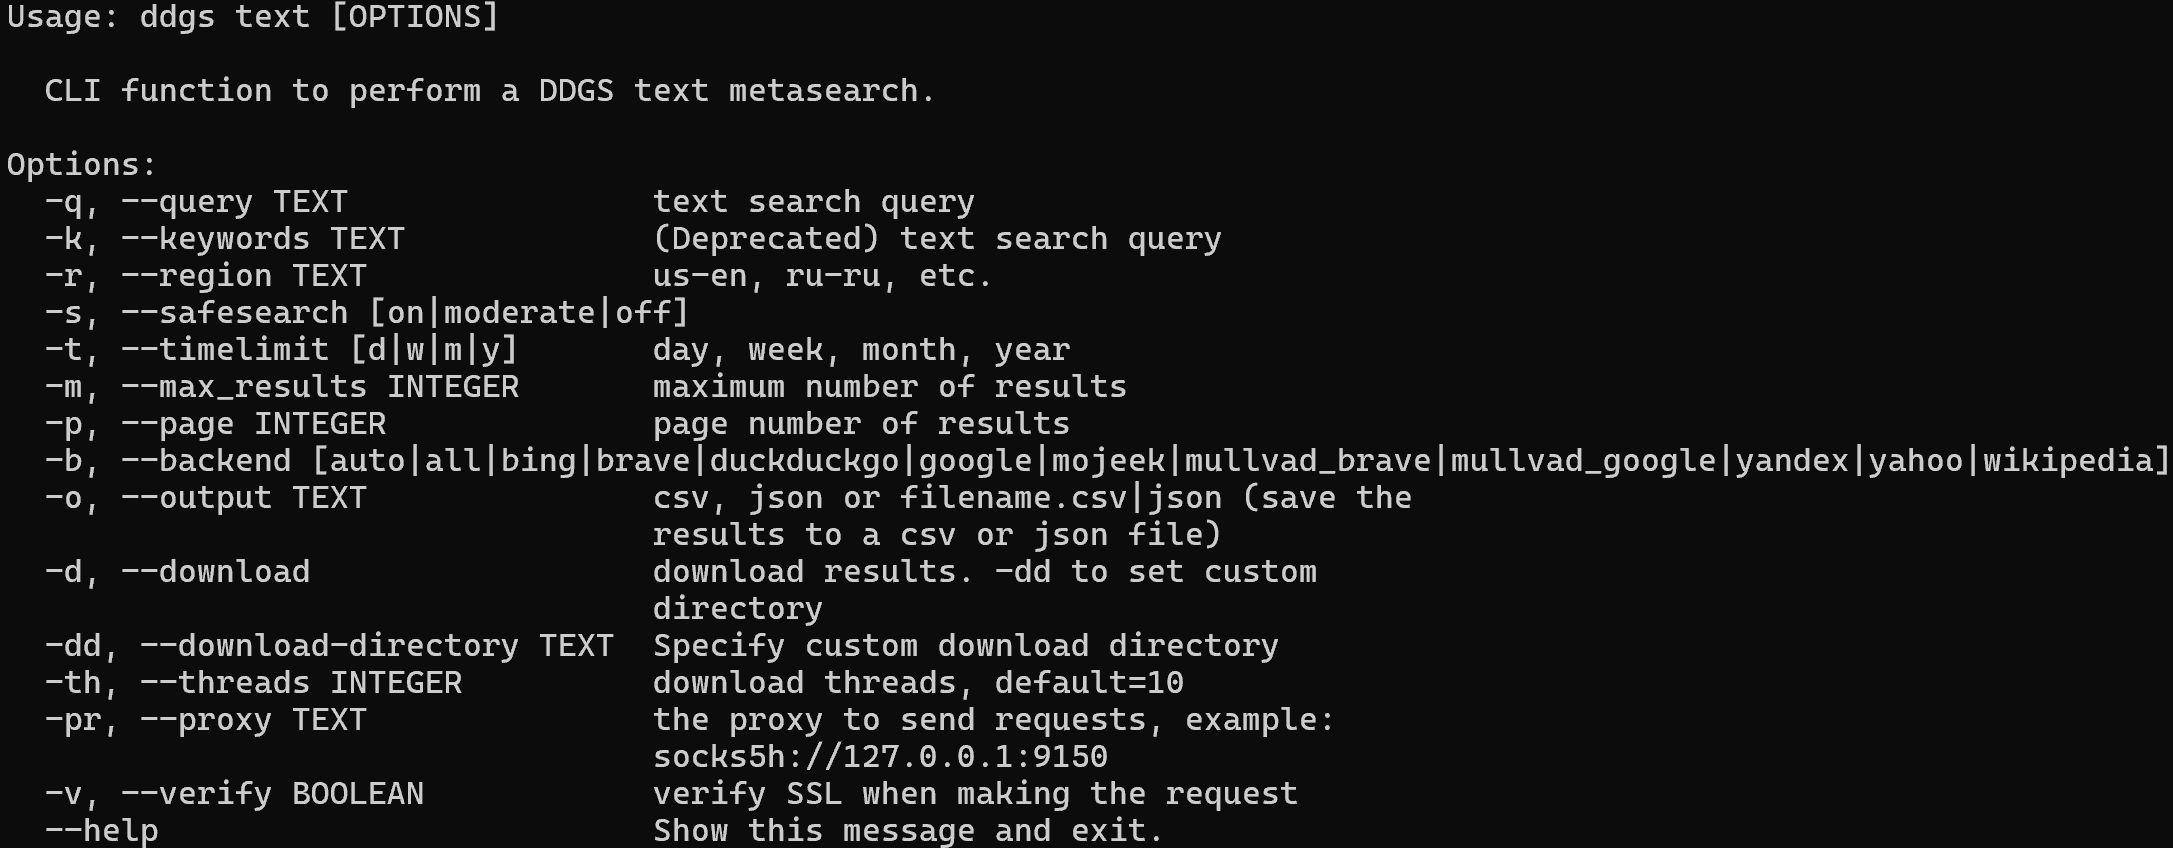
First, get familiar with the text command by running:
ddgs text --helpThis will display all supported flags and options:
To scrape DuckDuckGo search results for "agentic rag" and export them to a CSV file, run:
ddgs text -q "agentic rag" -b duckduckgo -o duckduckgo_results.csvThe output will be a duckduckgo_results.csv file. Open it, and you should see something like:

Amazing! You obtained the same search results as with the custom Python DuckDuckGo scraper, but with a single CLI command.
[Extra] Integrate a Rotating Proxy
As you just witnessed, DDGS is an extremely powerful SERP search and web scraping tool. Still, it is not magic. On large-scale scraping projects, it will run into the same IP bans and blocks mentioned earlier.
To avoid such issues, just like before, you need a rotating proxy. No wonder, DDGS comes with native support for proxy integration via the -pr (or --proxy) flag.
Retrieve your Bright Data rotating proxy URL and set it in your ddgs CLI command like this:
ddgs text -q "agentic rag" -b duckduckgo -o duckduckgo_results.csv -pr <BRIGHT_DATA_PROXY_USERNAME>:<BRIGHT_DATA_PROXY_PASSWORD>@brd.superproxy.io:33335Done! The underlying web requests made by the library will now be routed through the Bright Data rotating proxy network. This lets you scrape safely without worrying about IP-related blocks.
Approach #3: Using Bright Data’s SERP API
In this chapter, you will learn how to use the all-in-one SERP API from Bright Data to programmatically retrieve search results from DuckDuckGo’s dynamic version. Follow the instructions below to get started!
Note: For a simplified and quicker setup, we assume you already have a Python project in place with the requests library installed.
Step #1: Set Up Your Bright Data SERP API Zone
First, create a Bright Data account or log in if you already have one. Below, you will be guided through the process of setting up the SERP API product for DuckDuckGo scraping.
For a faster setup, you can also refer to the official SERP API “Quick Start” guide. Otherwise, continue with the following steps.
Once logged in, navigate to your Bright Data account and click the “Proxies & Scraping” option to reach this page:
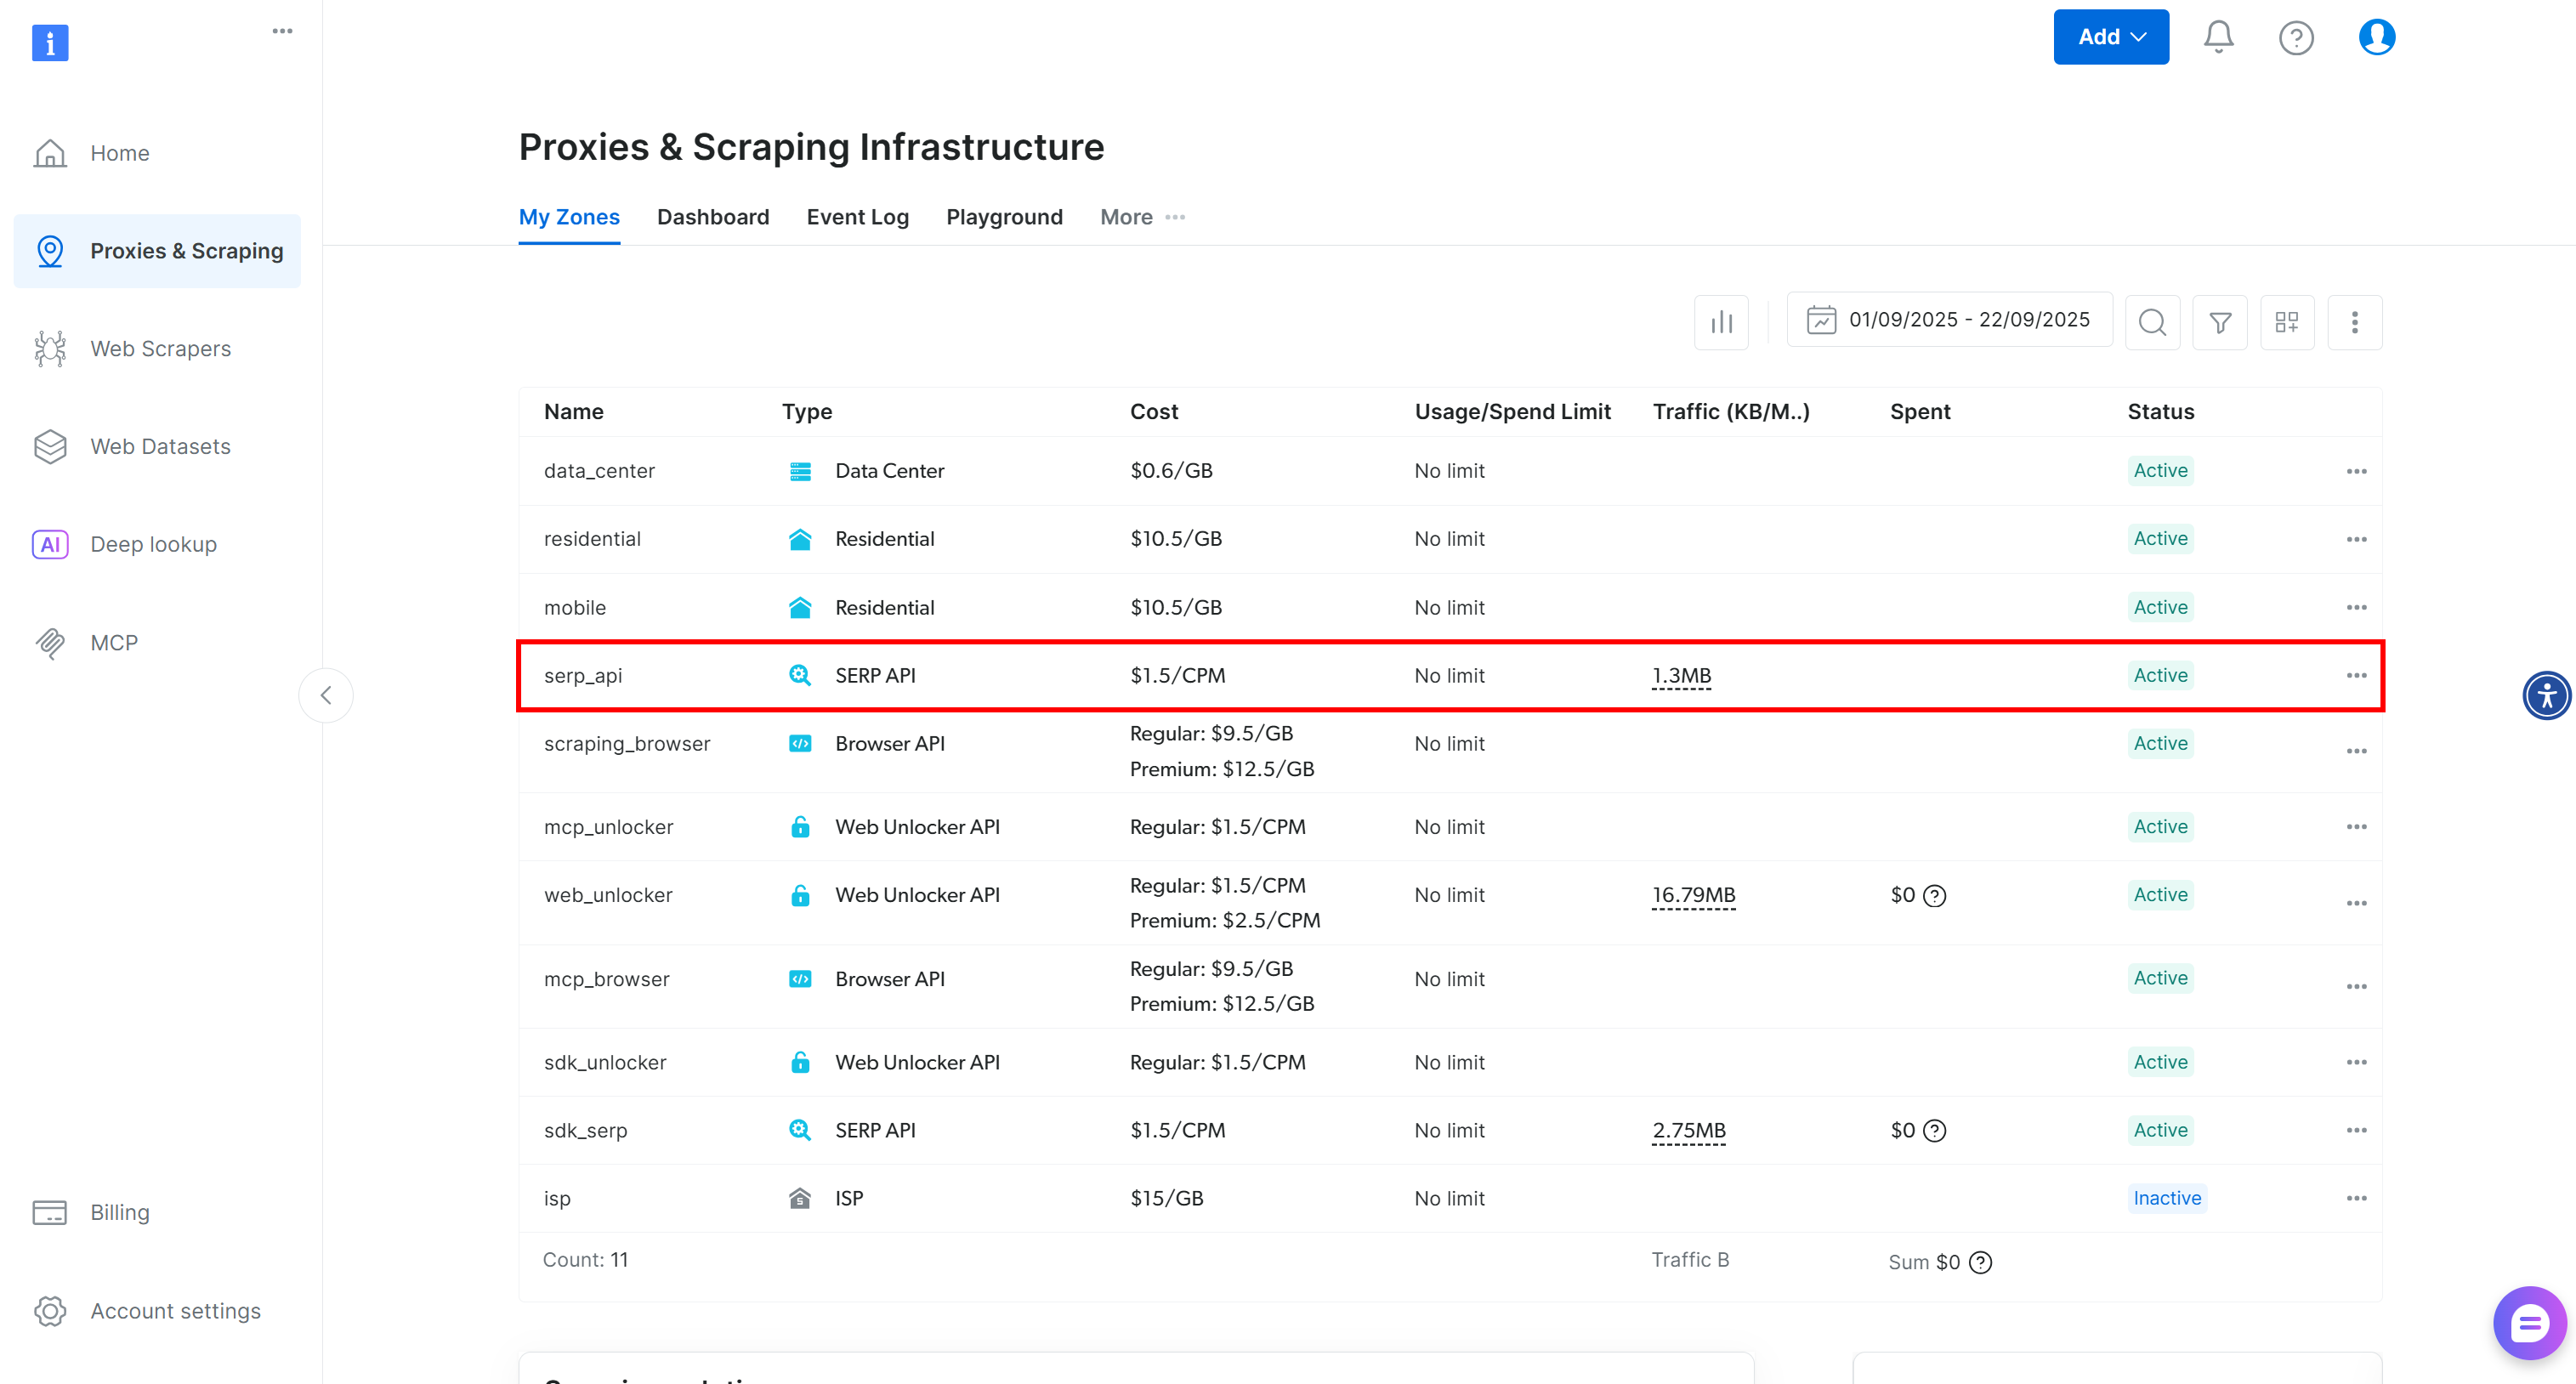
Check the “My Zones” table, which lists your configured Bright Data products. If an active SERP API zone already exists, you are ready to go. Simply copy the zone name (serp_api, in this case), as you will need it later.
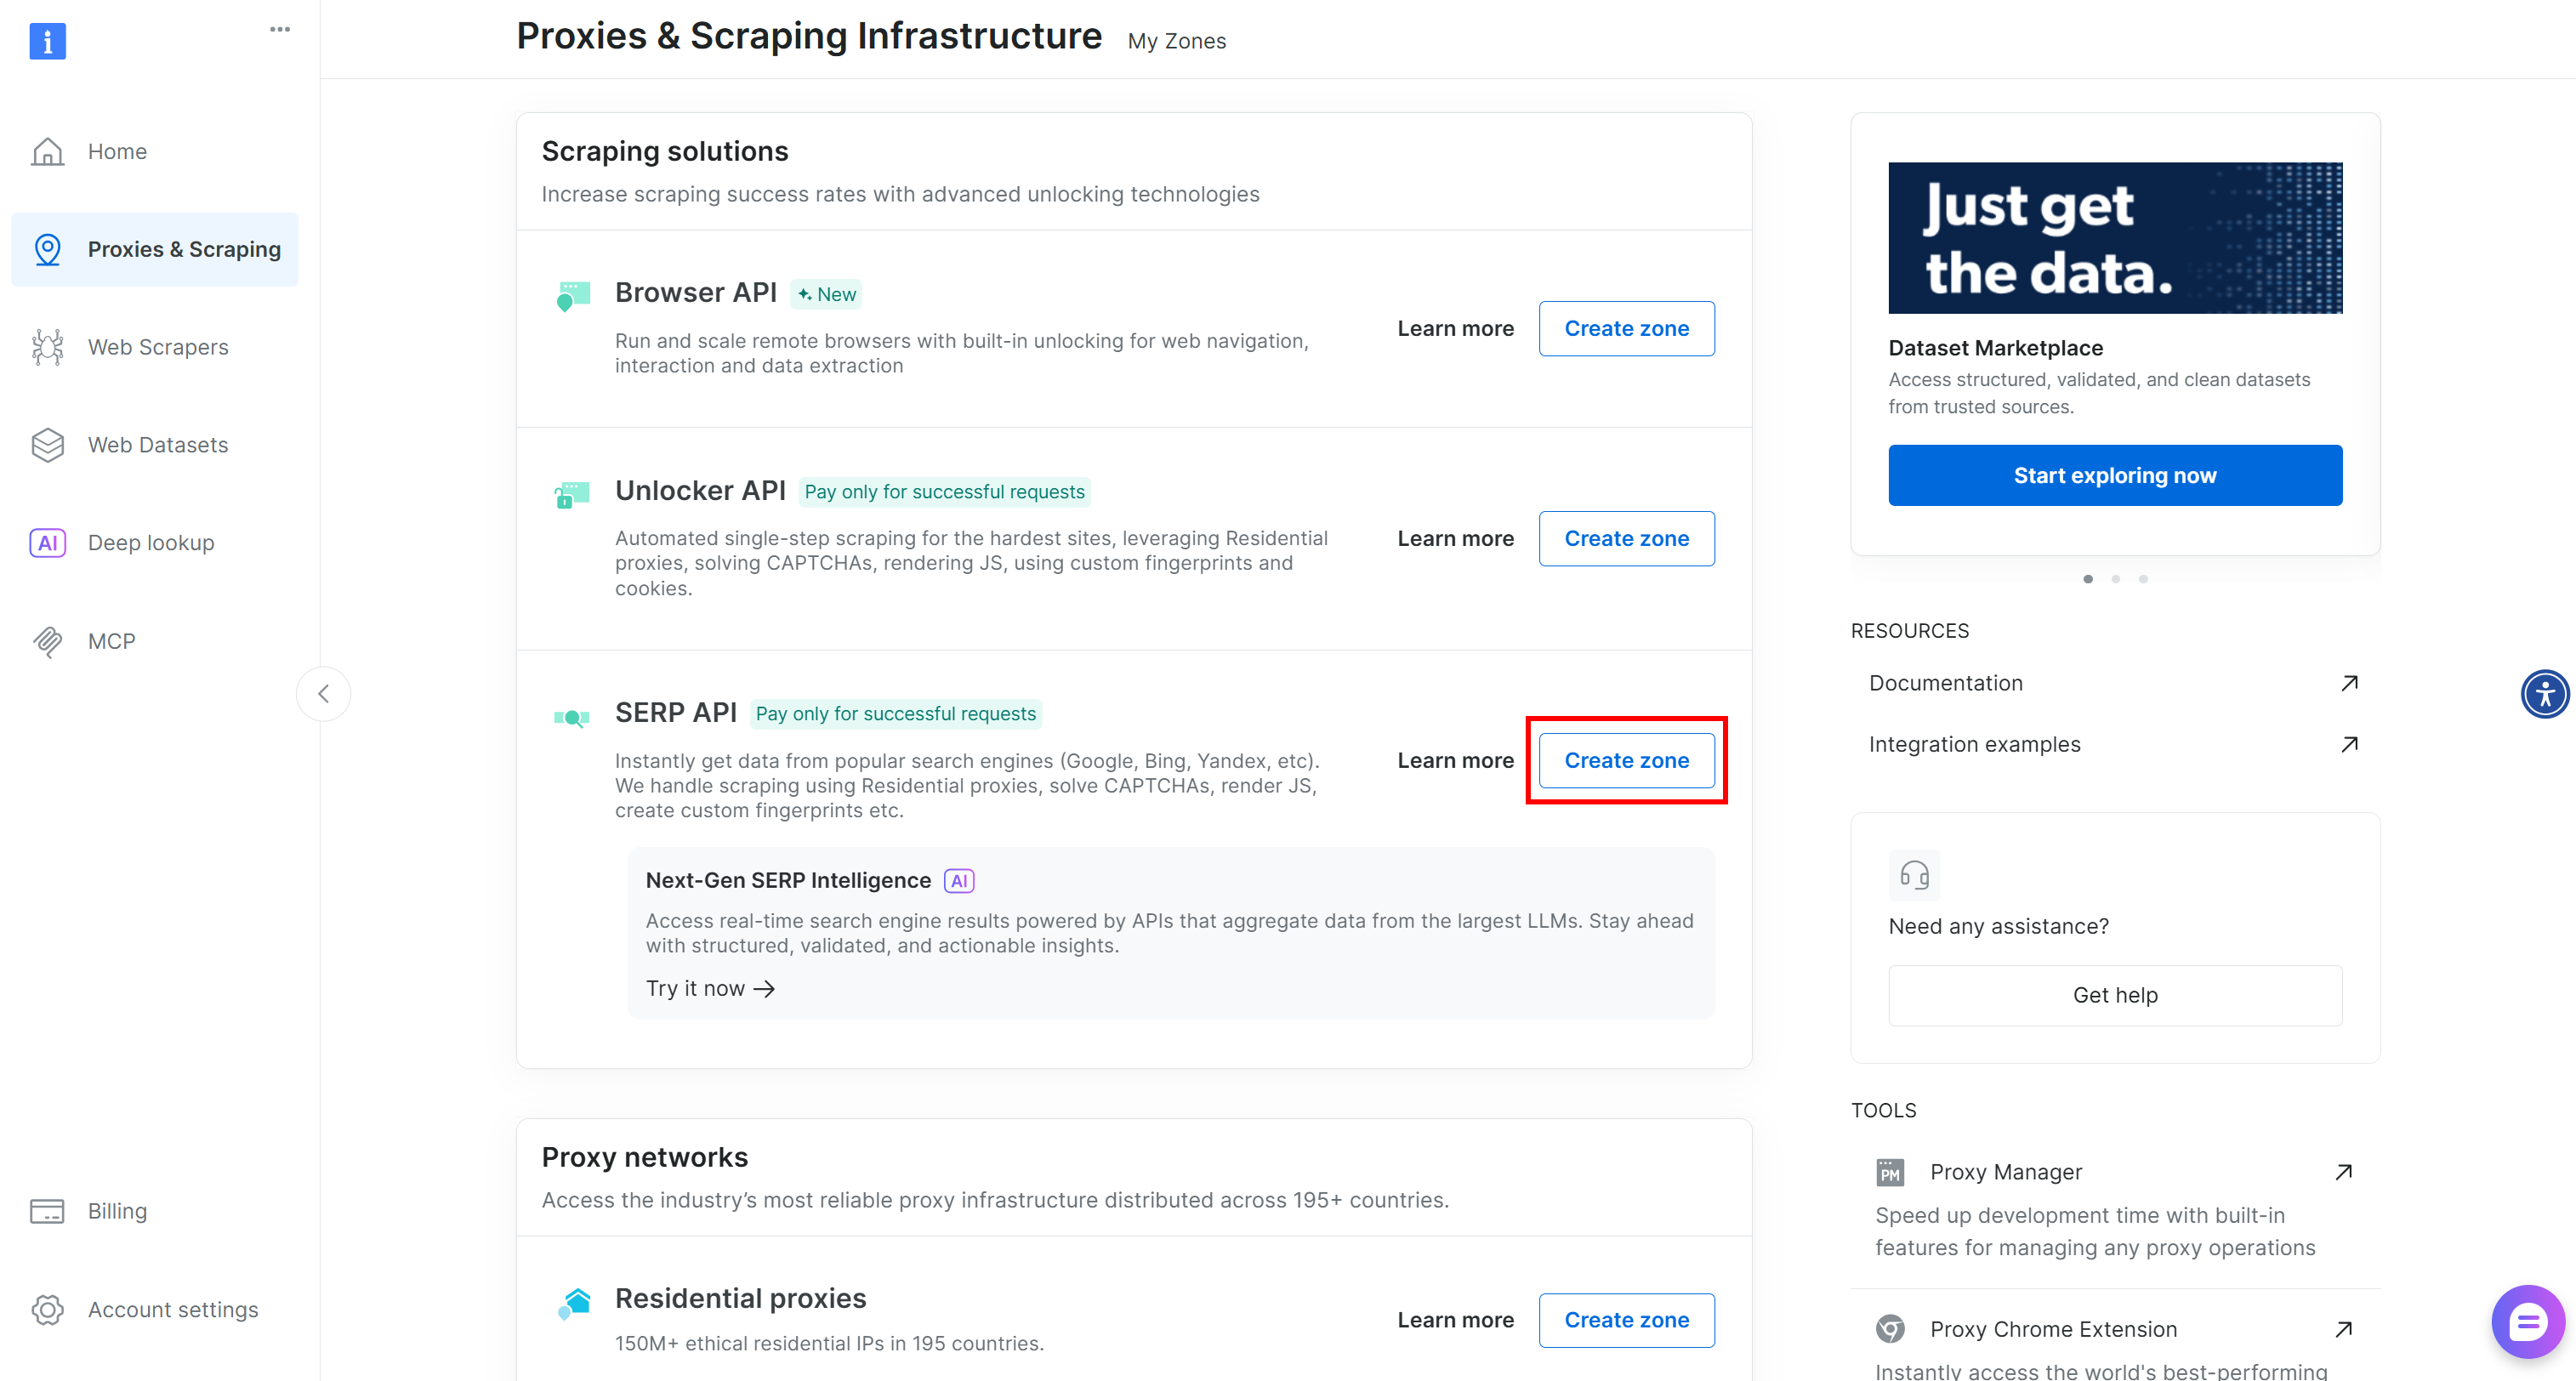
If no zone exists, scroll down to the “Scraping Solutions” section and click the “Create Zone” button on the “SERP API” card:
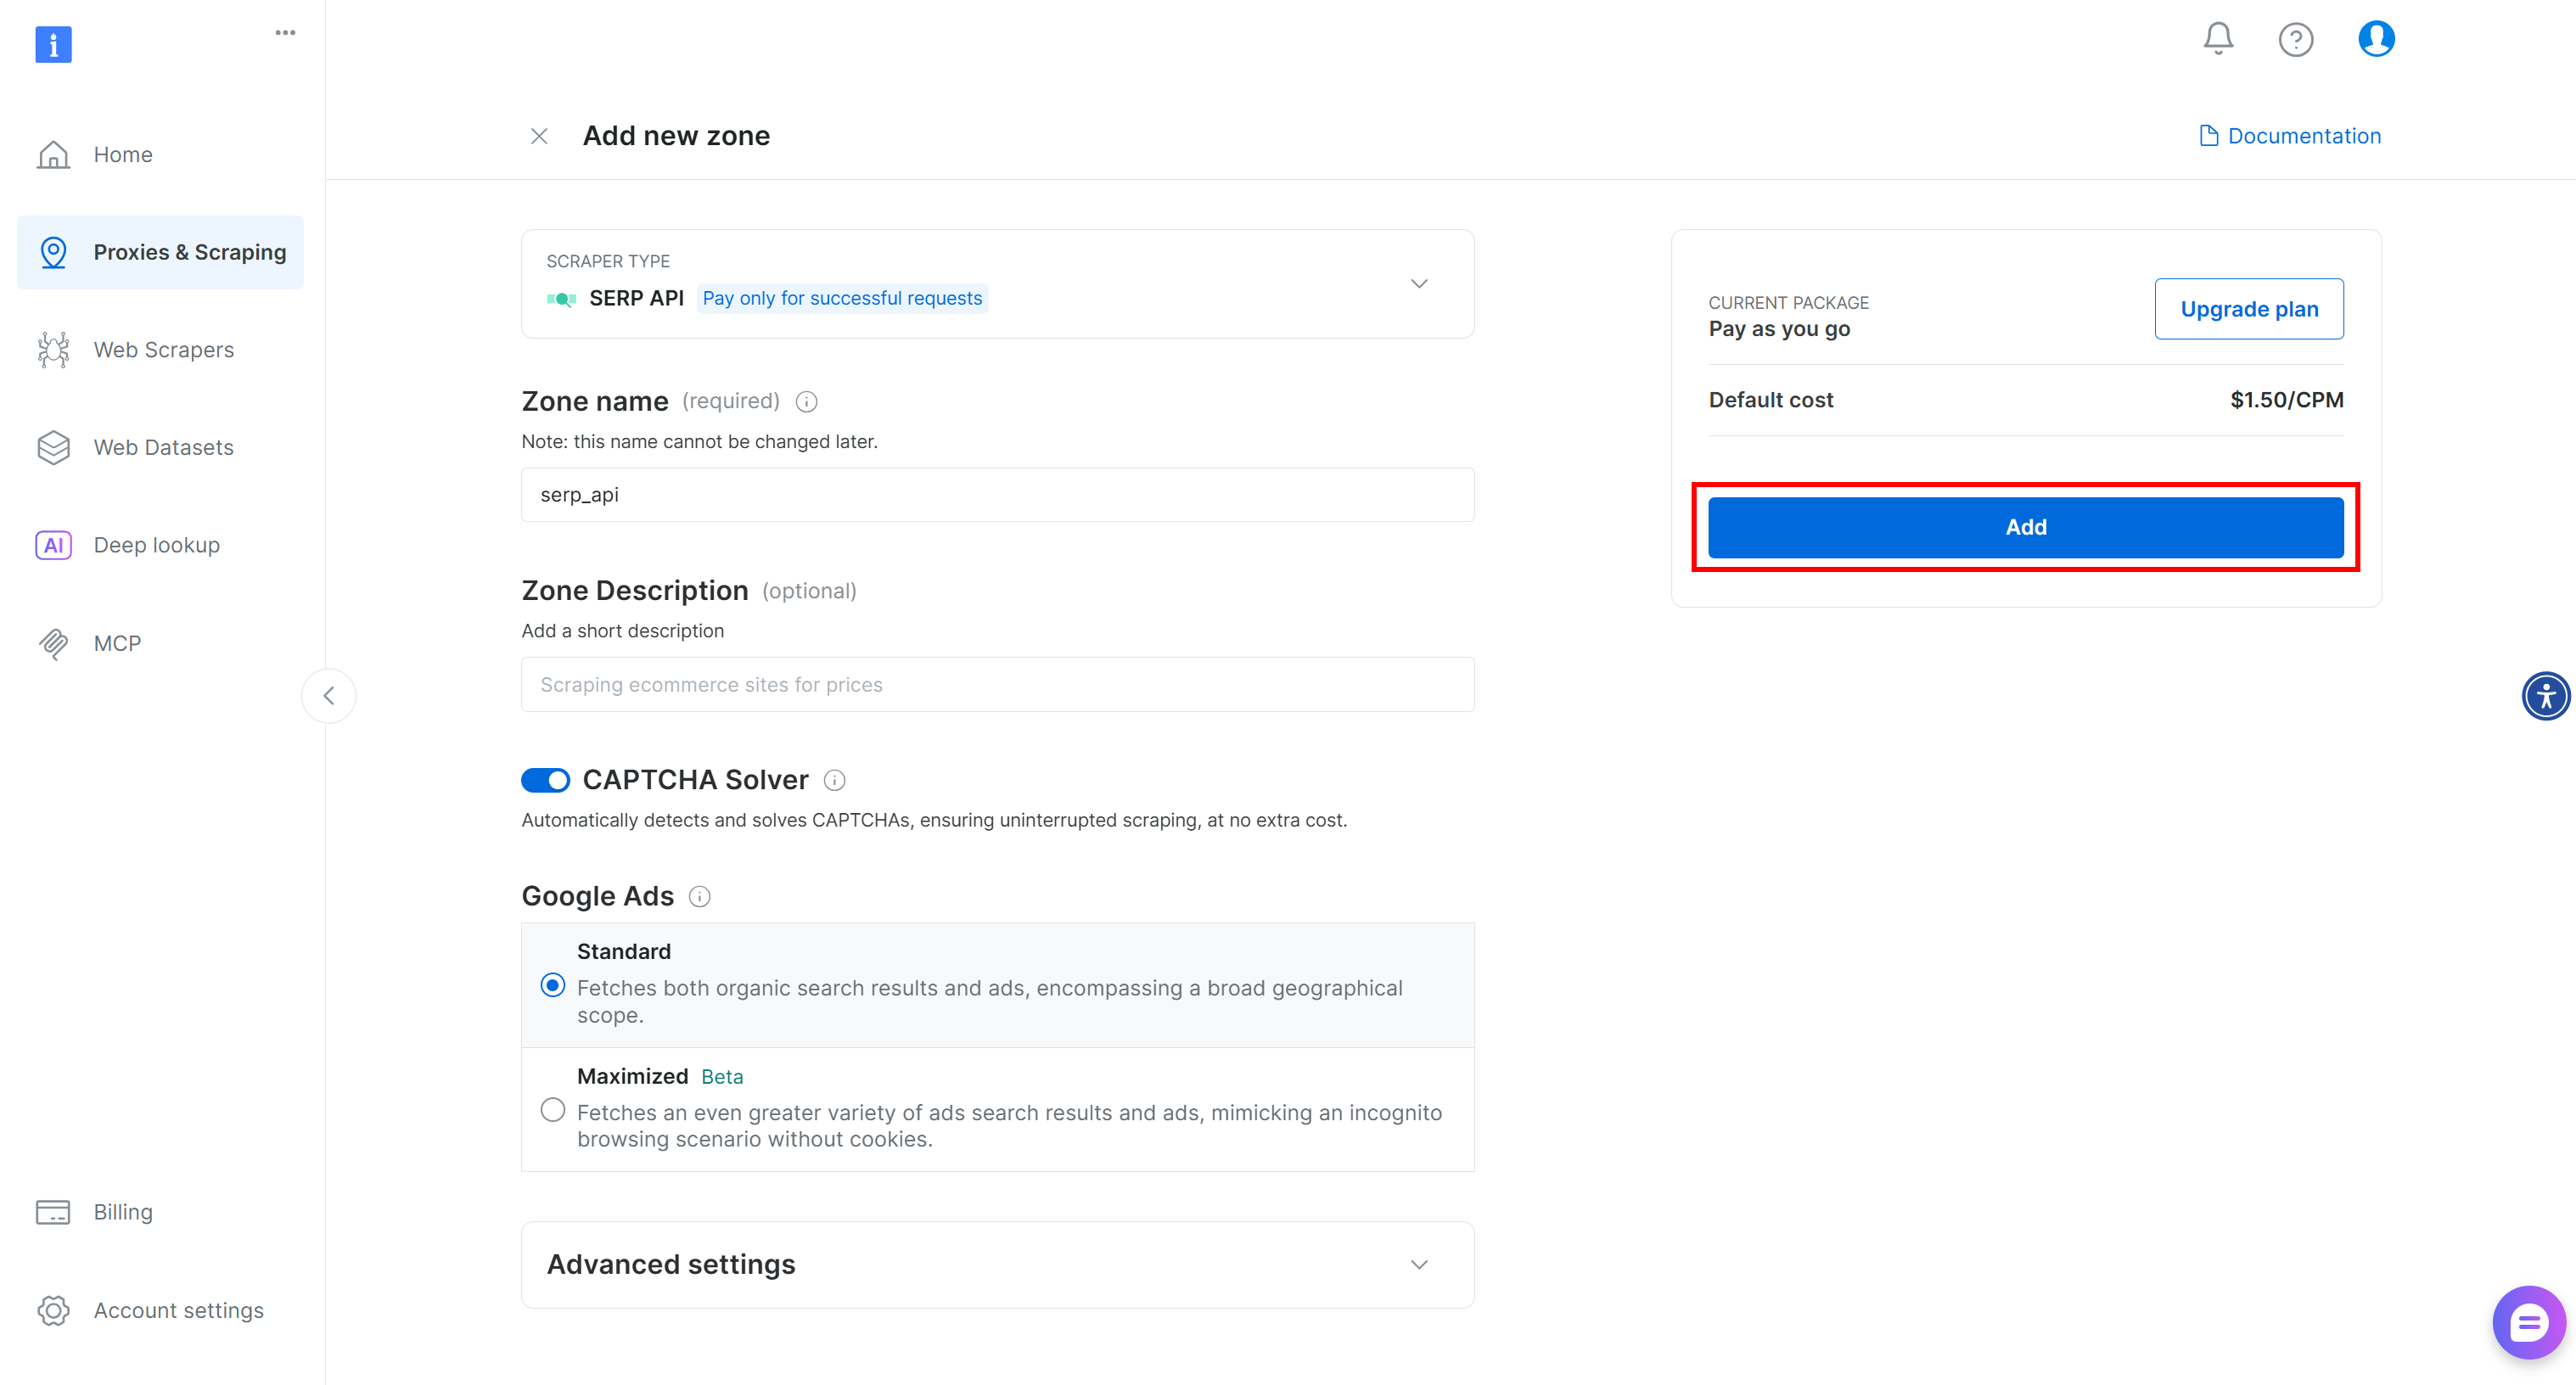
Give your zone a name (e.g., serp-api) and press “Add”:
Next, go to the zone’s product page and make sure it is enabled by toggling the switch to “Active”:
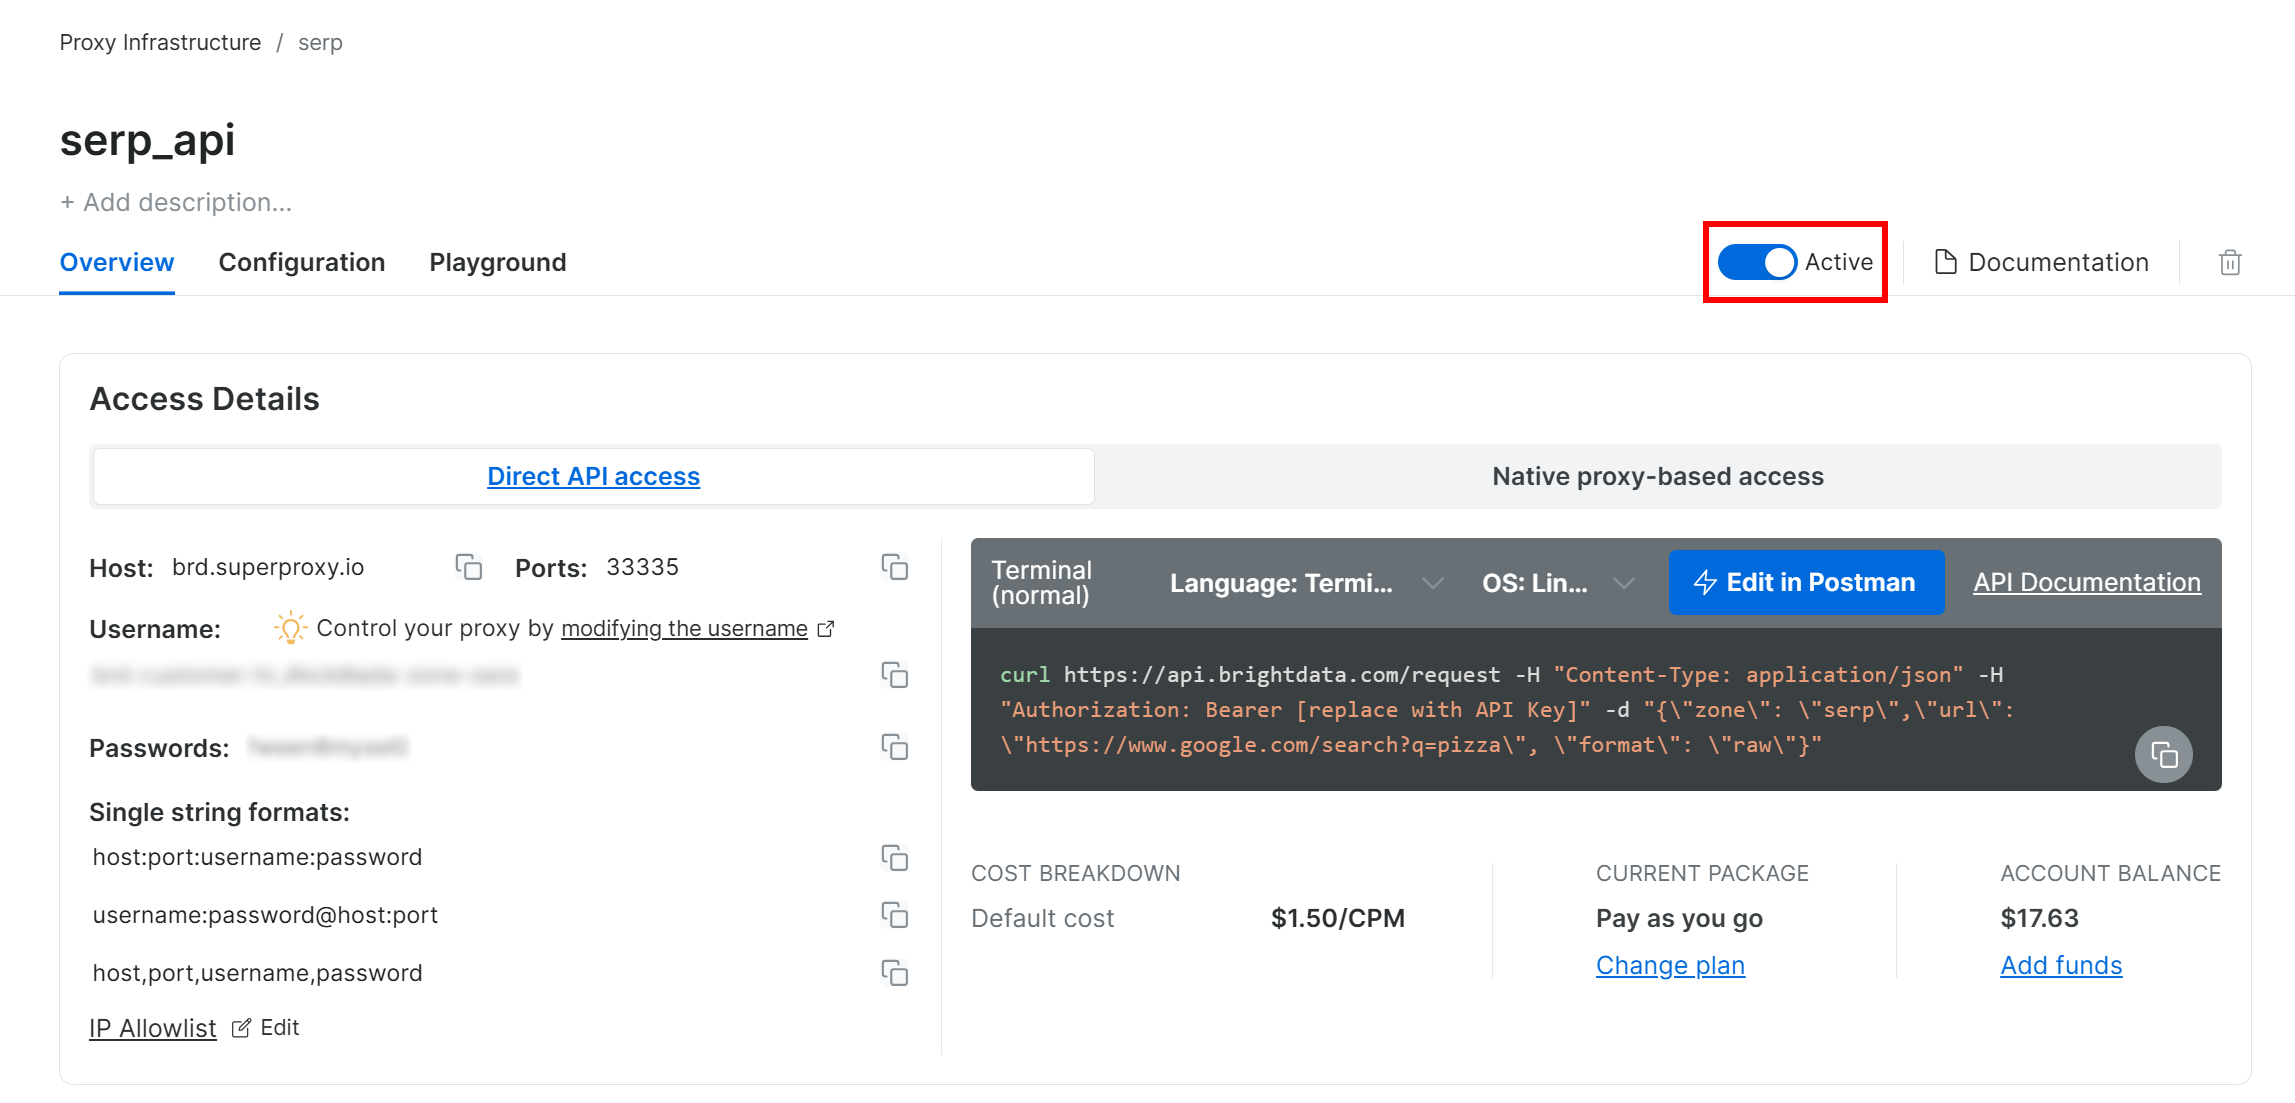
Terrific! You have now successfully configured Bright Data’s SERP API.
Step #2: Retrieve Your Bright Data API Key
The recommended way to authenticate SERP API requests is by using your Bright Data API key. If you have not generated one yet, follow the official guide to get yours.
When making a POST request to the SERP API, include the API key in the Authorization header like this for authentication:
"Authorization: Bearer <BRIGHT_DATA_API_KEY>"Great! You now have all the building blocks needed to call Bright Data’s SERP API in a Python script (or through any other HTTP client).
Step #3: Call the SERP API
Put it all together and call the Bright Data SERP API on the “agentic rag” DuckDuckGo search page with this Python snippet:
# pip install requests
import requests

# Bright Data credentials (TODO: replace with your values)
bright_data_api_key = "<YOUR_BRIGHT_DATA_API_KEY>"
bright_data_serp_api_zone_name = "<YOUR_SERP_API_ZONE_NAME>"

# Your DuckDuckGo target search page
duckduckgo_page_url = "https://duckduckgo.com/?q=agentic+rag"

# Perform a request to Bright Data's SERP API
response = requests.post(
    "https://api.brightdata.com/request",
    headers={
        "Authorization": f"Bearer {bright_data_api_key}",
        "Content-Type": "application/json"
    },
    json={
        "zone": bright_data_serp_api_zone_name,
        "url": duckduckgo_page_url,
        "format": "raw"
    }
)

# Access the rendered HTML from the dynamic version of DuckDuckGo
html = response.text
# Parsing logic...
For a more complete example, check out the “Bright Data SERP API Python Project” on GitHub.
Notice that, this time, the target URL can be the dynamic DuckDuckGo version (e.g., https://duckduckgo.com/?q=agentic+rag). The SERP API handles the JavaScript rendering, integrates with the Bright Data proxy network for IP rotation, and manages other anti-scraping measures such as browser fingerprinting and CAPTCHAs. So, there will be no issues when scraping dynamic SERPs.
The html variable will contain the fully rendered HTML of the DuckDuckGo page. Verify that by printing the HTML with:
print(html)You will get something like this:
<!DOCTYPE html>
<html lang="en-US">
  <head>
      <meta http-equiv="content-type" content="text/html; charset=utf-8">
      <meta name="viewport" content="width=device-width, initial-scale=1.0">
      <title>Agentic RAG at DuckDuckGo</title>
      <!-- Omitted for brevity ... -->
  </head>
  <body>
      <div class="site-wrapper" style="min-height: 825px;">
          <div id="content">
              <div id="duckassist-answer" class="answer-container">
                  <div class="answer-content-block">
                      <p class="answer-text">
                          <span class="highlight">Agentic RAG</span> is an advanced version of Retrieval-Augmented Generation (RAG) that allows AI agents to dynamically manage how they retrieve and use information, improving their ability to respond to real-time queries and adapt to changing situations. This approach enhances the accuracy and decision-making capabilities of AI systems by integrating reasoning with data retrieval.
                      </p>
                      <!-- Omitted for brevity ... -->
                  </div>
                  <!-- Omitted for brevity ... -->
              </div>

              <ul class="results-list">
                  <li class="result-item">
                      <article class="result-card">
                          <div <!-- Omitted for brevity ... -->

                          <div class="result-body">
                              <h2 class="result-title">
                                  <a href="https://www.geeksforgeeks.org/artificial-intelligence/what-is-agentic-rag/" rel="noopener" target="_blank" class="result-link">
                                      <span class="title-text">What is Agentic RAG? - GeeksforGeeks</span>
                                  </a>
                              </h2>
                              <div class="result-snippet-container">
                                  <div class="result-snippet">
                                      <div>
                                          <span class="snippet-text">
                                              <span class="snippet-date">Sep 8, 2026</span>
                                              <span>
                                                  <b>Agentic RAG</b> architecture is designed to maximize adaptability and intelligence by leveraging autonomous agents and specialized tool integrations. At its core, the architecture organizes reasoning agents, each capable of decision-making, planning, and retrieval, into a coordinated system. Let's see key components of <b>Agentic RAG</b> Architecture, 1.
                                              </span>
                                          </span>
                                      </div>
                                  </div>
                              </div>
                          </div>
                      </article>
                  </li>
                  <!-- Other search results ... -->
              </ul>
              <!-- Omitted for brevity ... -->
          </div>
          <!-- Omitted for brevity ... -->
      </div>
  </body>
</html>Note: The output HTML may also include the “Search Assist” AI-generated summary since you are dealing with the dynamic version of the page.
Now, parse this HTML as shown in the first approach to access the DuckDuckGo data you need!
Approach #4: Integrating a DuckDuckGo Scraping Tool into an AI Agent via MCP
Remember that the SERP API product is also exposed via the search_engine tool available in the Bright Data Web MCP.
That open-source MCP server provides AI access to Bright Data’s web data retrieval solutions, including DuckDuckGo scraping capabilities. In detail, the search_engine tool is available in the Web MCP free tier so that you can integrate it into your AI agents or workflows without any cost.
To integrate the Web MCP into your AI solution, you generally need Node.js installed locally and a configuration file like this:
{
  "mcpServers": {
    "Bright Data Web MCP": {
      "command": "npx",
      "args": ["-y", "@brightdata/mcp"],
      "env": {
        "API_TOKEN": "<YOUR_BRIGHT_DATA_API_KEY>"
      }
    }
  }
}
For example, this setup works with Claude Code. Discover other integrations in the docs.
Thanks to this integration, you will be able to retrieve SERP data in natural language and use it in your AI-powered workflows or agents.
Conclusion
In this tutorial, you saw the four recommended methods for scraping DuckDuckGo:
- Via a custom scraper
- Using DDGS
- With the DuckDuckGo Search API
- Thanks to Web MCP
As demonstrated, the only reliable way to scrape DuckDuckGo at scale while avoiding blocks is by using a structured scraping solution backed by robust anti-bot bypass technology and a large proxy network, like Bright Data.
Create a free Bright Data account and start exploring our scraping solutions!

Technical Writer
Antonello Zanini is a technical writer, editor, and software engineer with 5M+ views. Expert in technical content strategy, web development, and project management.