

In this tutorial, you will learn:
- What AWS Glue is and what it offers.
- Why Bright Data supports ETL pipelines thanks to its web data retrieval services.
- How to integrate Bright Data into an ETL job in AWS Glue.
Let’s dive in!
What Is AWS Glue?
AWS Glue is a serverless data integration service built to simplify the process of discovering, preparing, and combining data from multiple sources at any scale.
It allows you to build ETL (Extract, Transform, Load) workflows for analytics, machine learning, and application development without managing infrastructure. AWS Glue accelerates data pipeline development and makes data readily accessible for analysis. That is achieved by centralizing your data catalog and providing visual and code-based job authoring tools.
The three most relevant features it offers are:
- Discover and organize data: Automatically infer schemas, catalog metadata, and connect to data sources across AWS, on-premises, and other clouds.
- Transform and clean data: Visual job editor, interactive notebooks, streaming ETL support, and built-in ML-based deduplication.
- Build and monitor pipelines: Schedule, automate, and scale jobs, with the ability to monitor pipelines with detailed insights and triggers.
Find out more in the official docs.
Why Integrate Bright Data into Your AWS Glue ETL Workflow
Integrating Bright Data into an AWS ETL workflow can dramatically expand the scope and quality of your data pipelines.
While ETL traditionally focuses on extracting structured data from known sources, Bright Data enables access to real-time, structured web data. That unlocks insights that would otherwise require manual collection or complex scraping infrastructure.
Beyond rich web data Extraction (E), Bright Data can improve your Transform (T) phase as well. During transformation, you can enrich datasets by appending live market, product, or social information to your records. For instance, you could add stock performance metrics, competitor pricing, or company metadata to your internal datasets.
Those insights help teams make more informed decisions. Data verification is another key benefit, as scraped data can be cross-referenced with authoritative sources. That helps you enforce accuracy before loading into your target data store.
How to Use Bright Data to Retrieve Web Data for an AWS Glue ETL Job
This guided section will showcase a possible Bright Data integration in an AWS Glue ETL job. Specifically, you will see how to build this sample ETL pipeline:
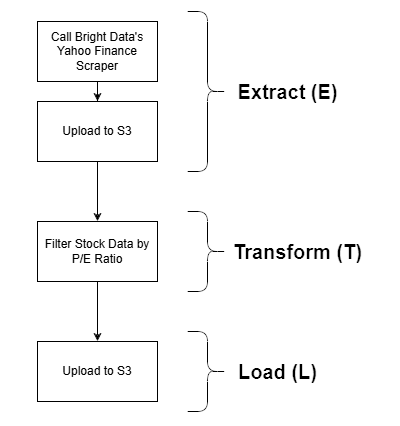
Bright Data comes into play in the Extract (E) phase, thanks to its powerful web data retrieval options. The Yahoo Finance Scraper is employed to retrieve stock data, which is then filtered by P/E ratio and finally stored in an S3 bucket. This is a simple example, yet still a realistic demonstration of a full ETL workflow.
Note: Other Bright Data integration approaches in AWS Glue can be explored and considered after this tutorial.
Follow the instructions below to get started!
Prerequisites
Before following this tutorial, make sure you have the following set up:
- An AWS account (even a free trial account will work).
- A Bright Data account with an API key configured. Follow the official instructions to generate your API key.
- An S3 bucket defined in your AWS account.
- Basic Python knowledge to write a script that integrates with Bright Data scraping APIs and uploads the scraped data to your S3 bucket.
- Basic SQL skills to write a simple query in the Transform (T) phase of the ETL pipeline.
For this tutorial, we will assume your S3 bucket is named bright-data-etl-bucket: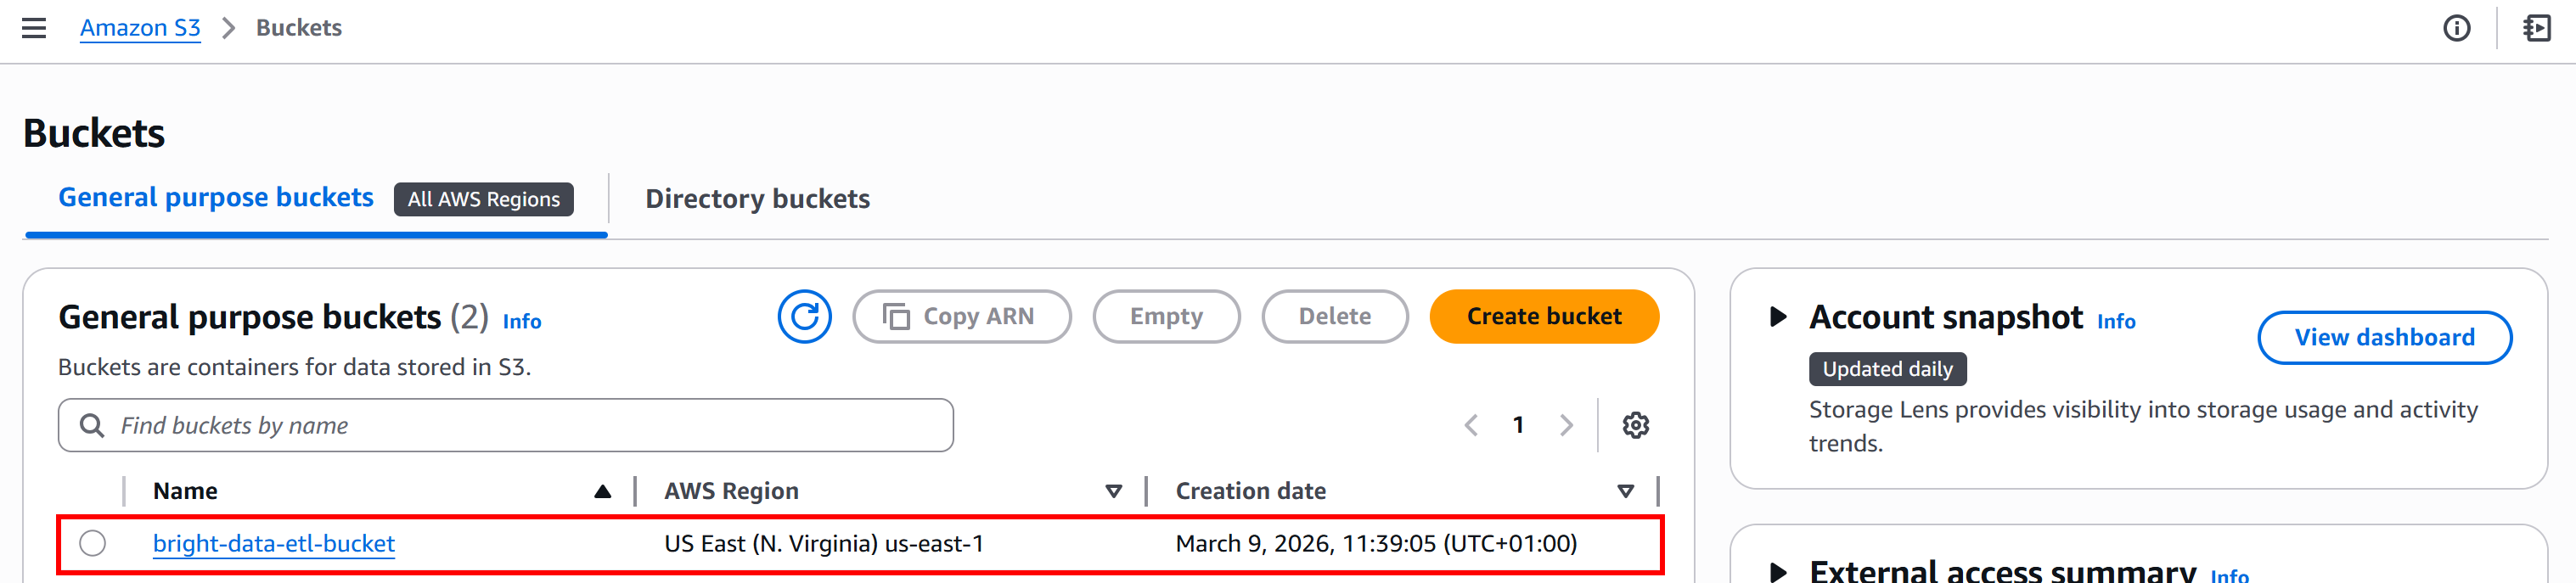
It is also useful to have some familiarity with how Bright Data Web Scraping APIs work.
Step #1: Get Started with Bright Data Scraping APIs
While developing an ETL pipeline, you should obviously start with the Extract (E) phase. The first step is to retrieve data using the Bright Data Yahoo Finance Scraper, so it is important to get familiar with it.
Start by creating a Bright Data account, if you do not have one already. Otherwise, log in to your existing account. In the control panel, navigate to the “Web Scrapers” section: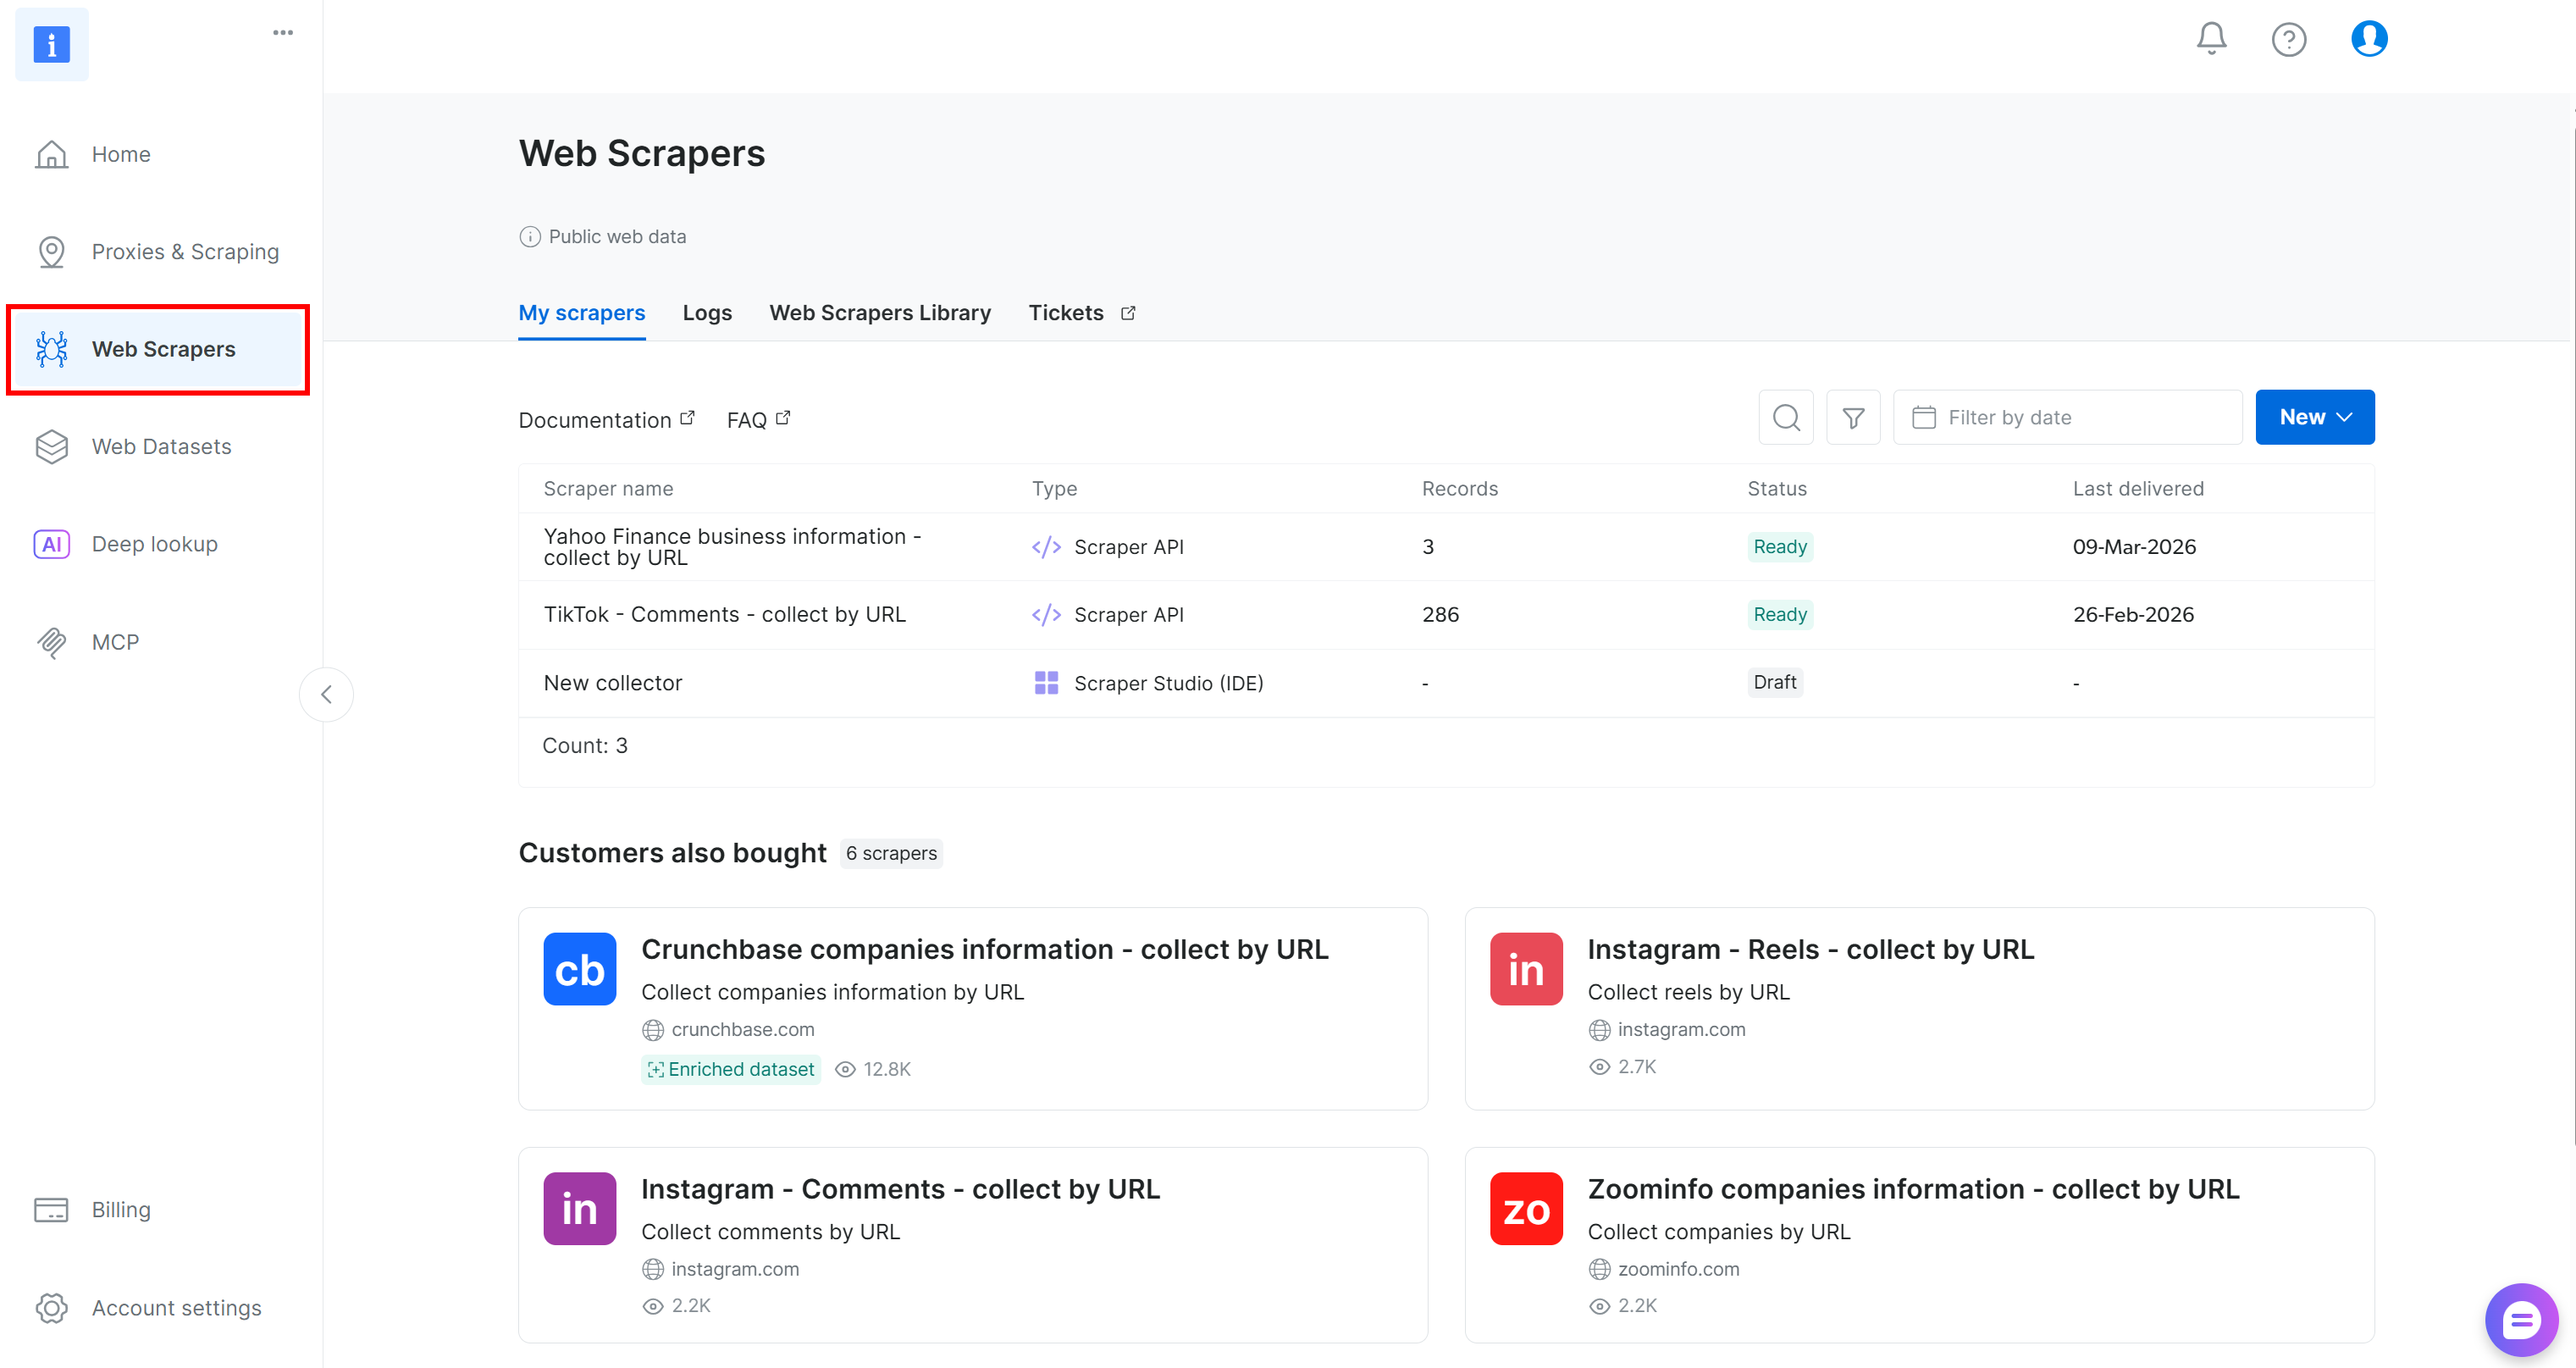
Next, go to the “Web Scrapers Library” tab. Search for “finance” and select the “Yahoo Finance Scraper” option. Access the available scraper: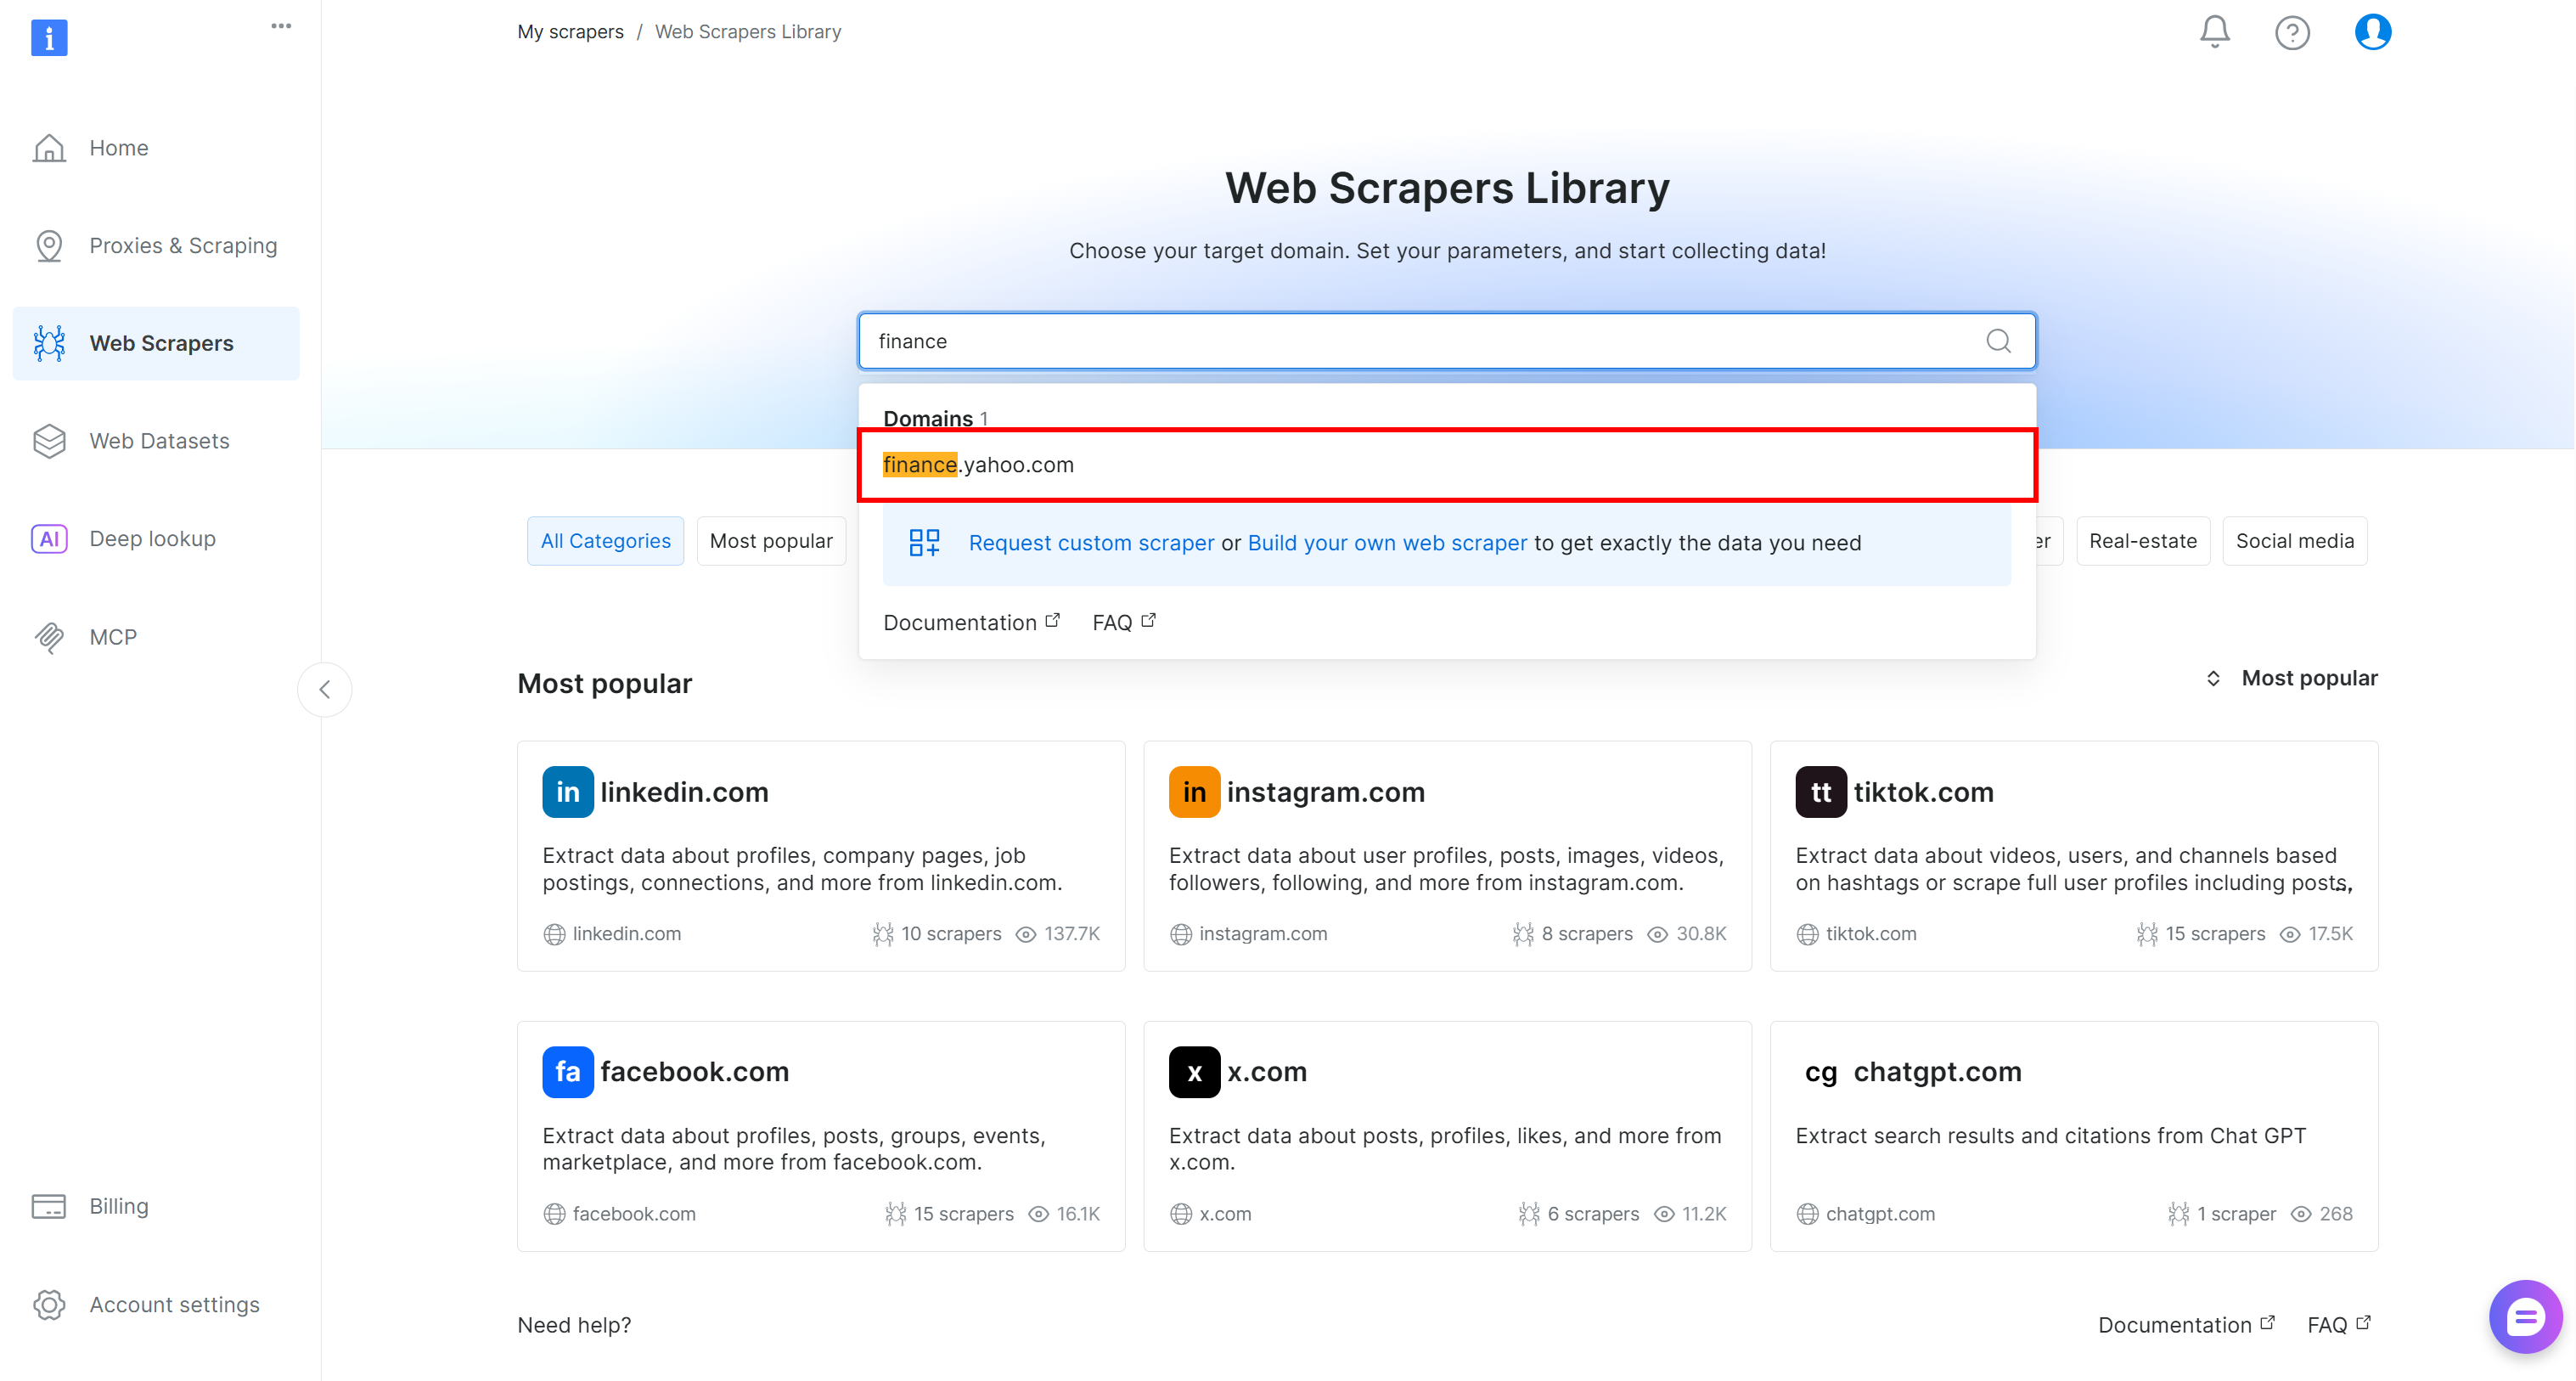
On the Yahoo Finance Scraper page, you can explore the input requirements and output schema of this scraper: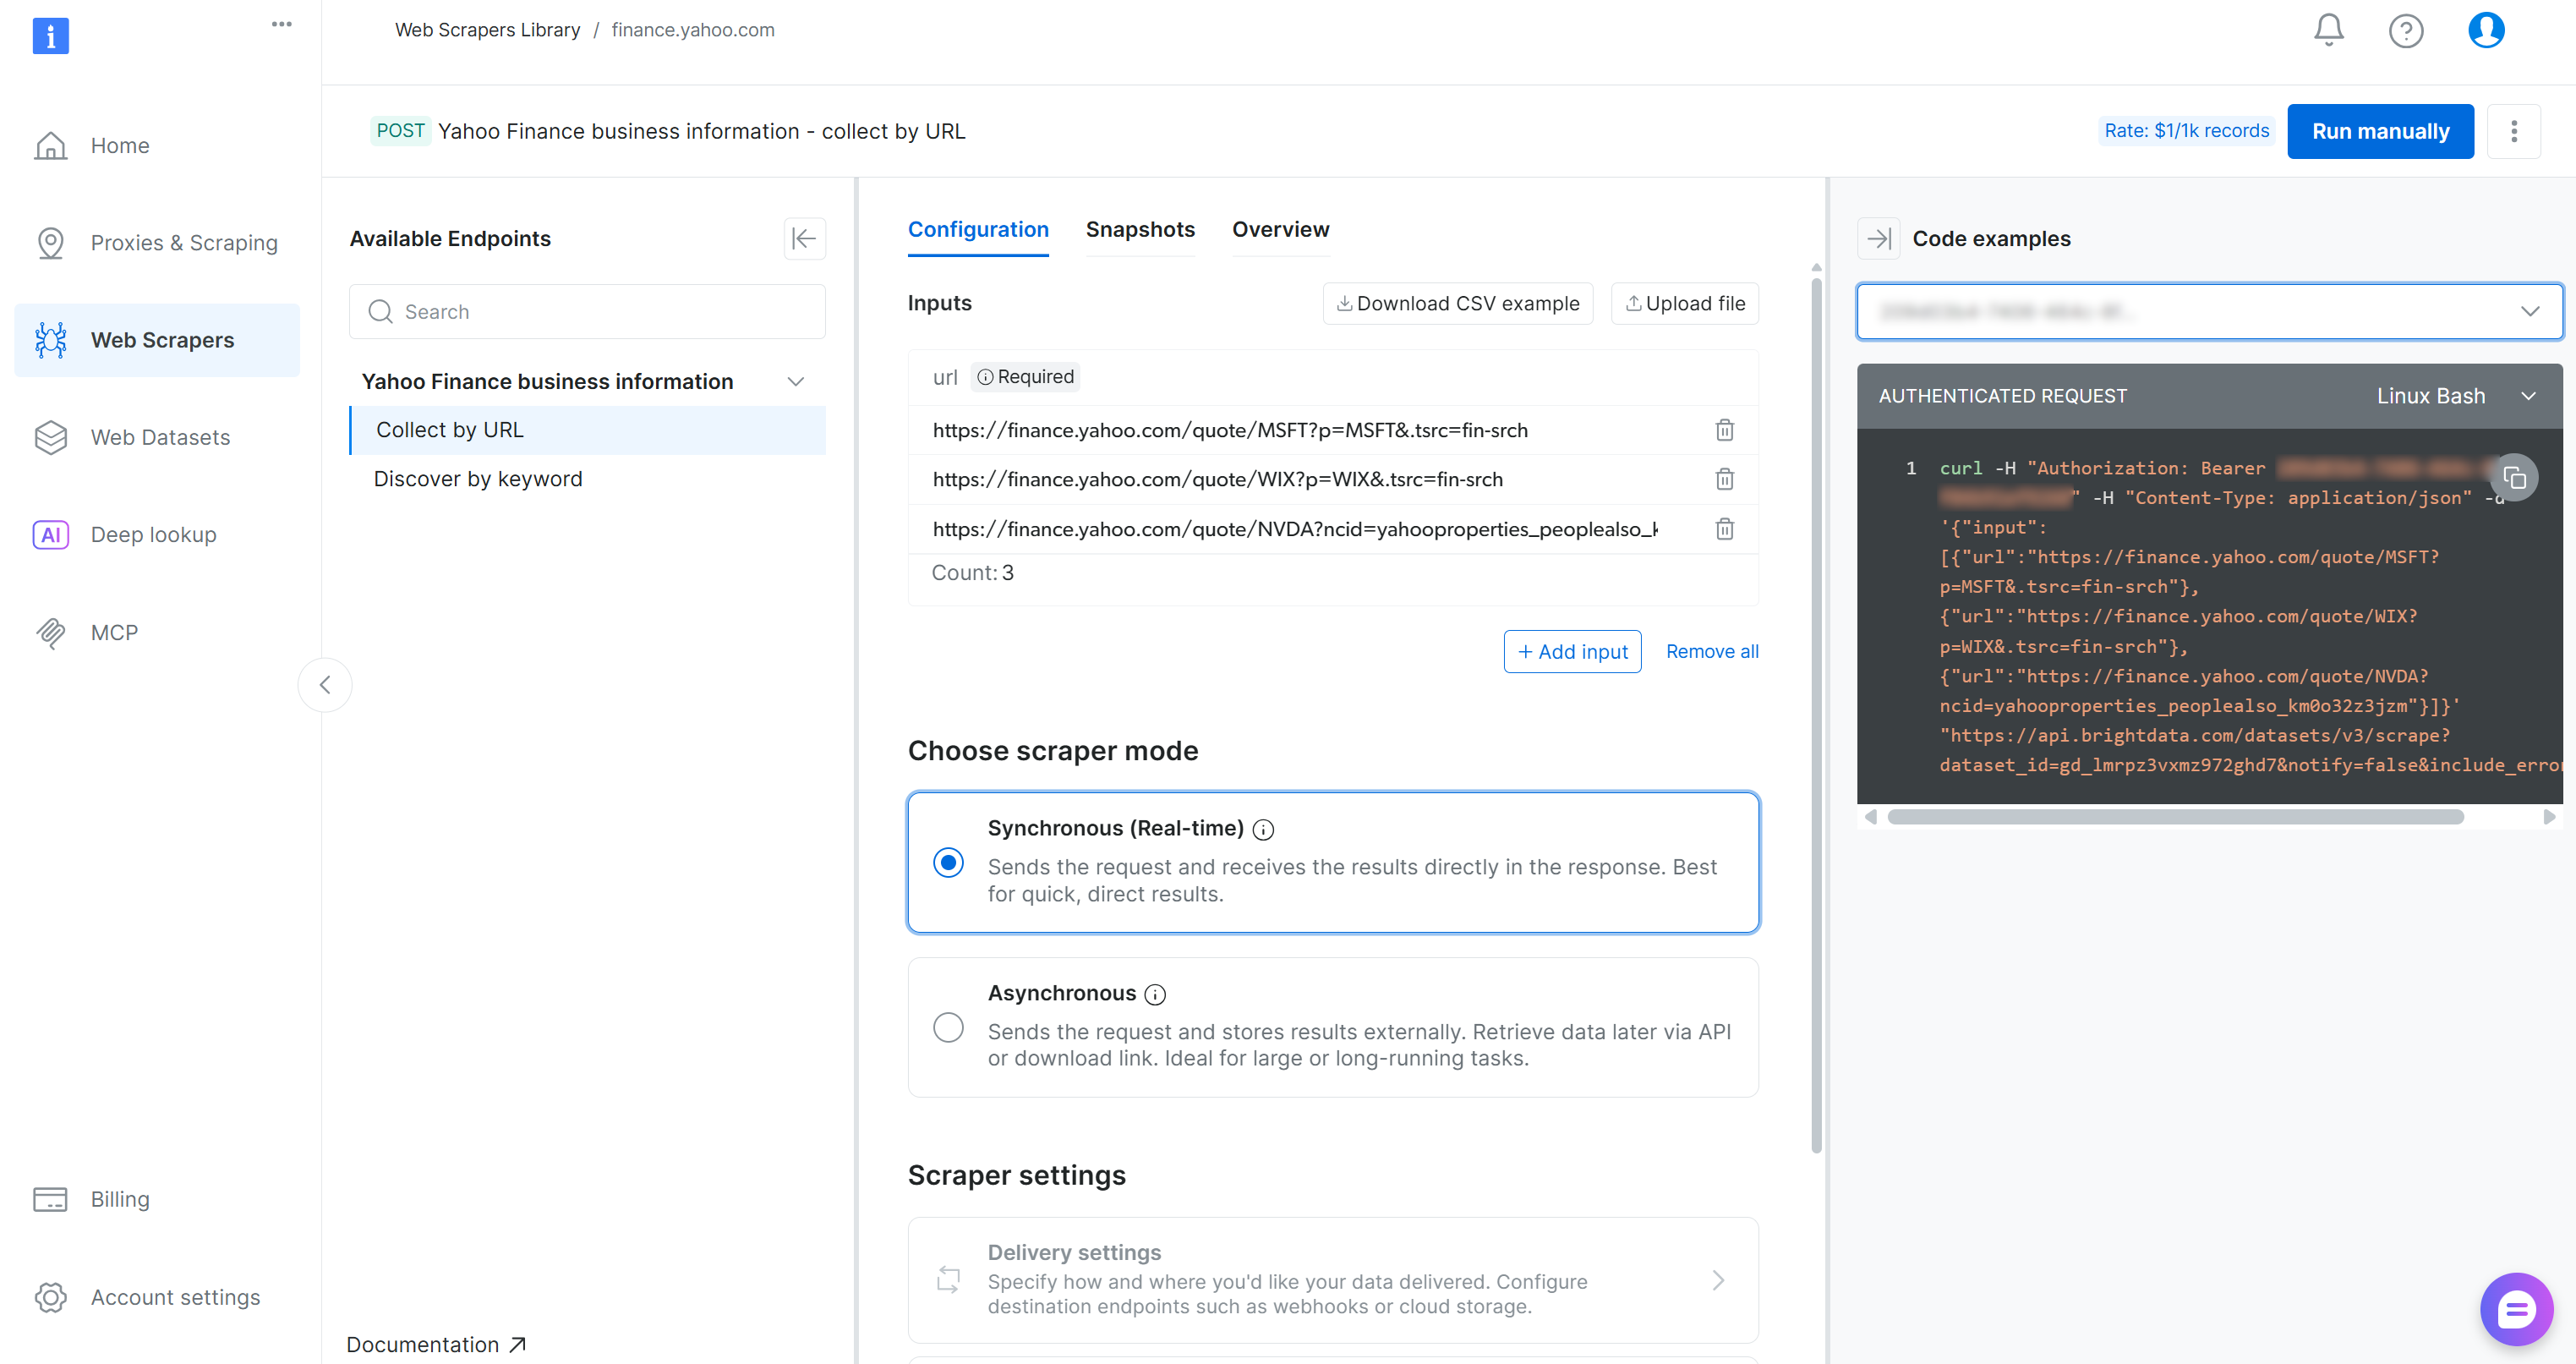
The control panel also provides code snippets in multiple programming languages for quick setup. The key point is that the scraper accepts one or more Yahoo Finance stock pages as input and returns structured, real-time stock data. Perfect!
Step #2: Configure the S3 Delivery
Bright Data Web Scraping APIs support automatic delivery of scraped data to Amazon S3. So, it makes sense to take advantage of this useful feature to speed up the data collection step. To configure Amazon S3 delivery, you first need to enable asynchronous mode.
In the “Configuration” tab, select the “Asynchronous” option. Then, click the “Delivery settings” button:
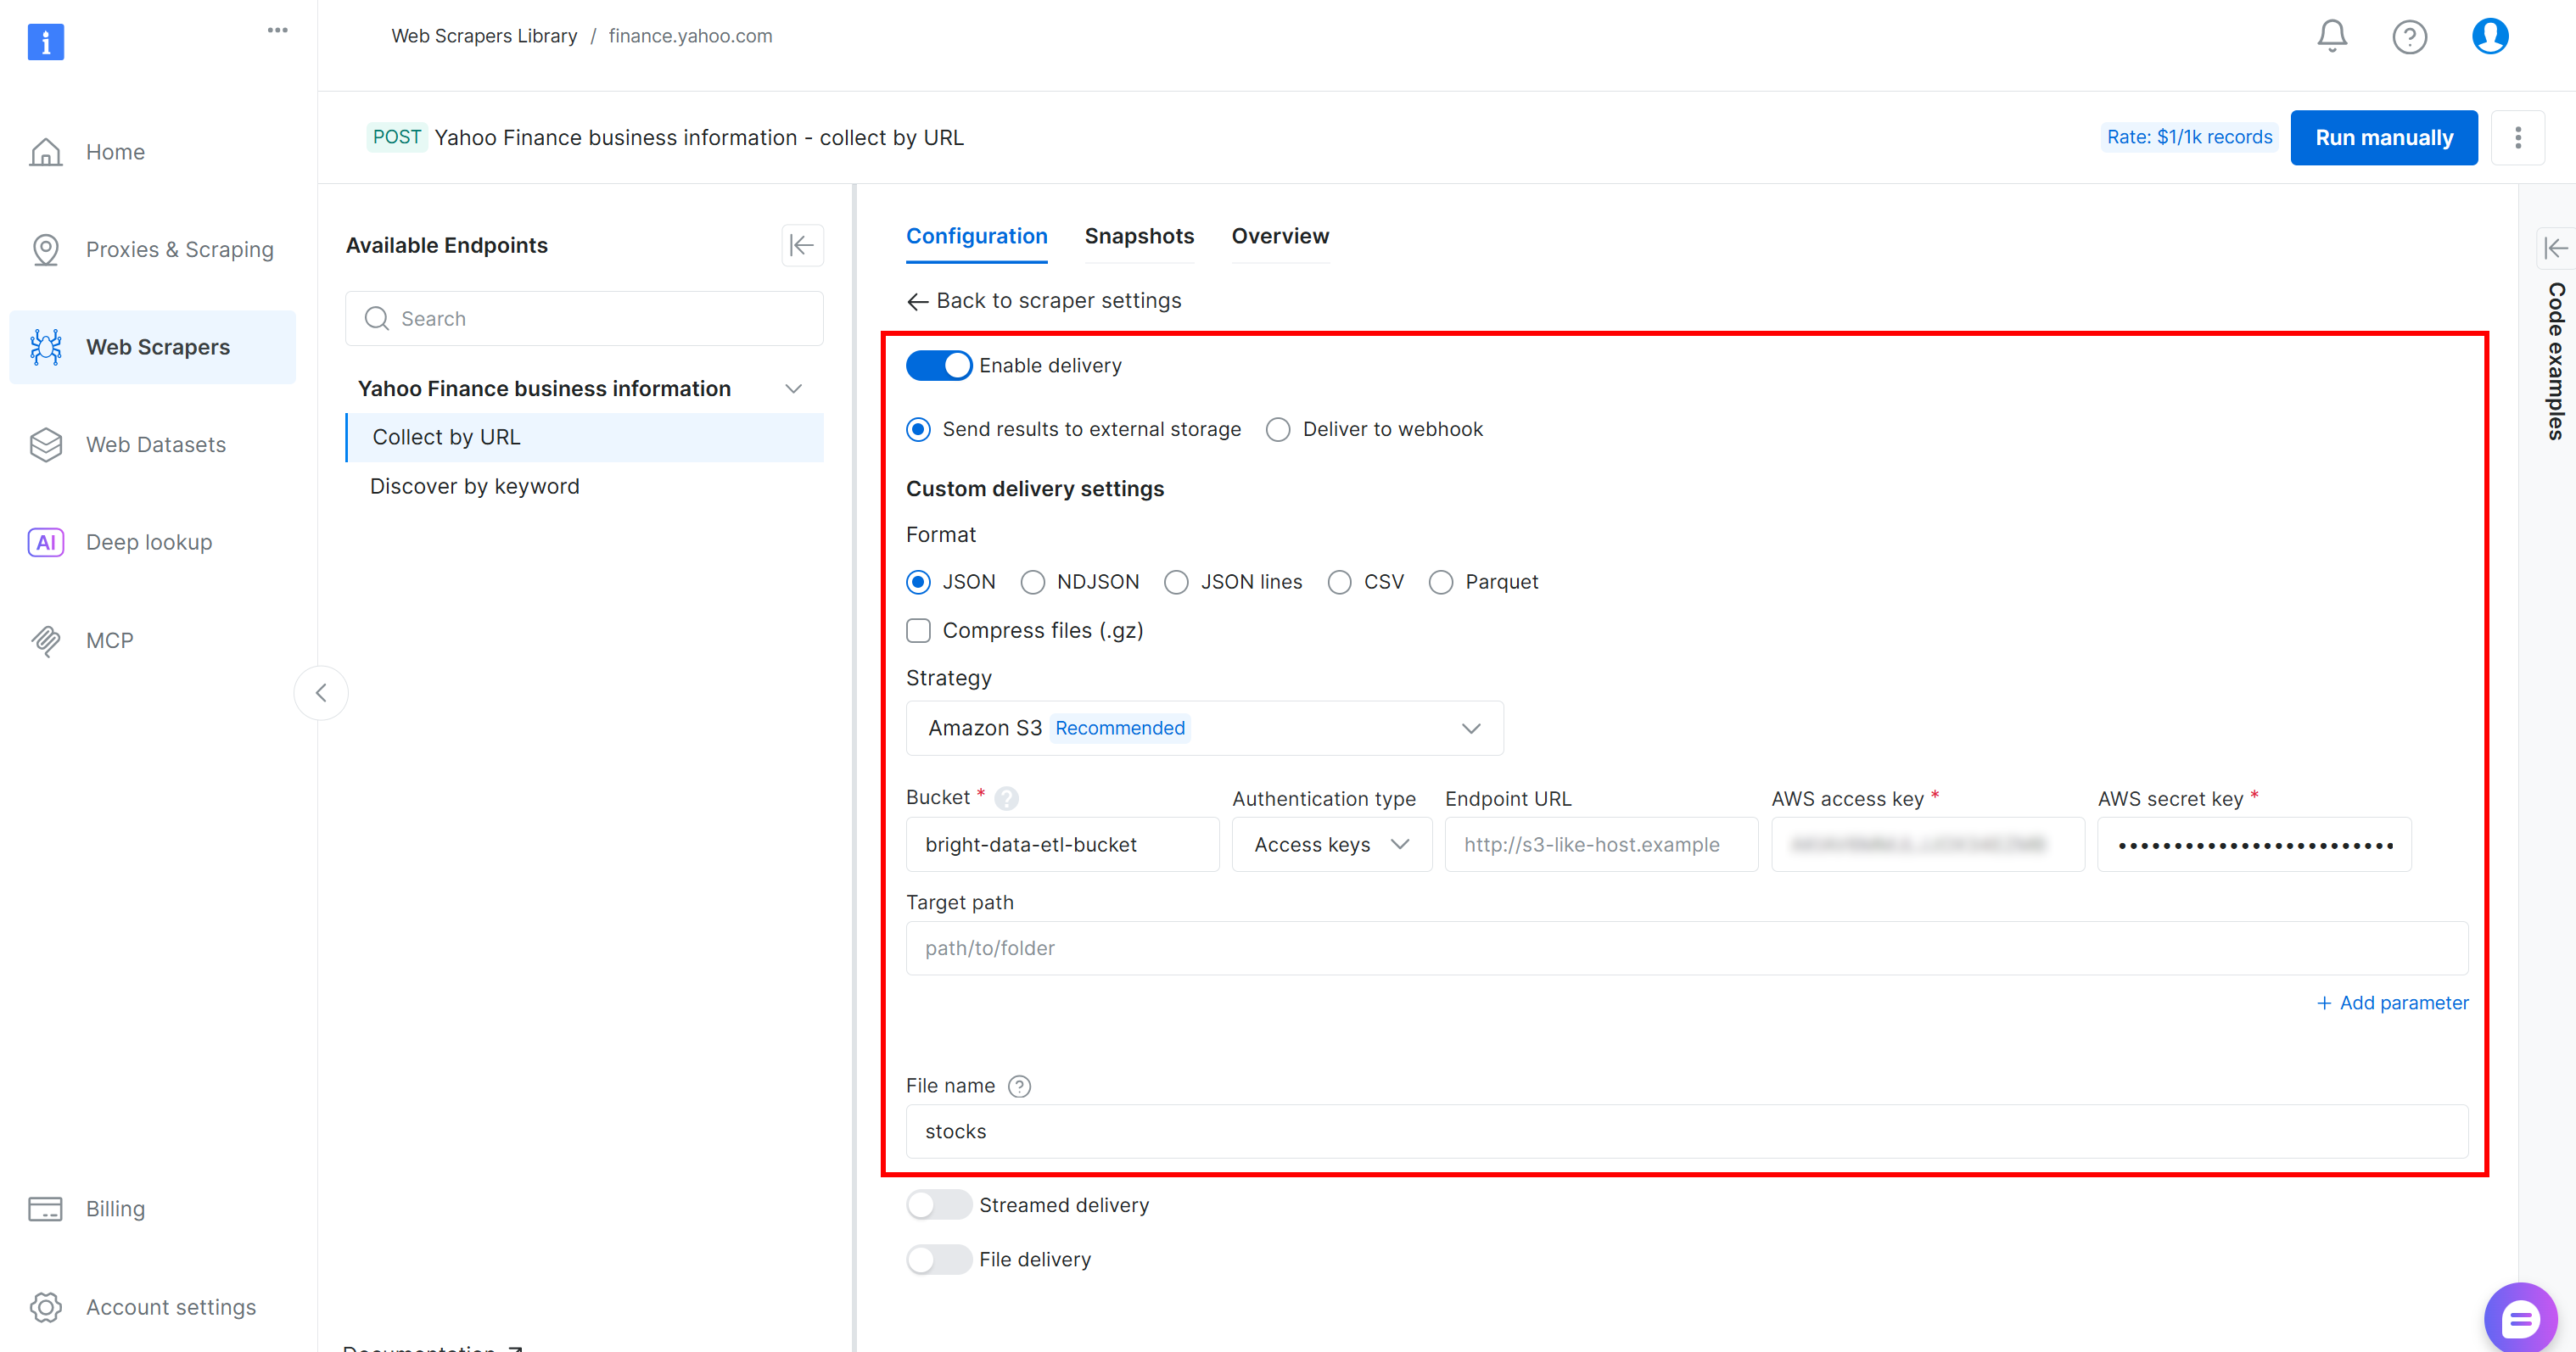
Configure the data delivery to your Amazon S3 bucket by filling out the form as follows:
- Enable the “Enable delivery” toggle.
- Set the format to
JSON. - Select “Amazon S3” as the storage destination.
- Enter your S3 bucket name (in this example,
bright-data-etl-bucket). (The Endpoint URL field can be left empty.) - Leave the “Target path” empty to upload the file to the root folder of the bucket.
- Set the “Authentication type” option to the “Access keys” value.
- Paste your AWS Access Key ID and AWS Secret Access Key.
- Set the filename to
stocks.
With this configuration, the Web Scraping API will run in asynchronous mode. This means Bright Data will create a scraping task that runs on its infrastructure. Once the task is complete, the scraped data will be automatically uploaded to your Amazon S3 bucket, where it can be accessed by your AWS Glue ETL job. Amazing!
Step #3: Run the Web Data Extraction Logic
To verify that the web data extraction logic works, add a few Yahoo Finance stock URLs (e.g., NVDA, AAPL, GOOGL, MSFT, AMZN, TSLA, META, AVGO, BRK.B, LLY) and press the “Run manually” button: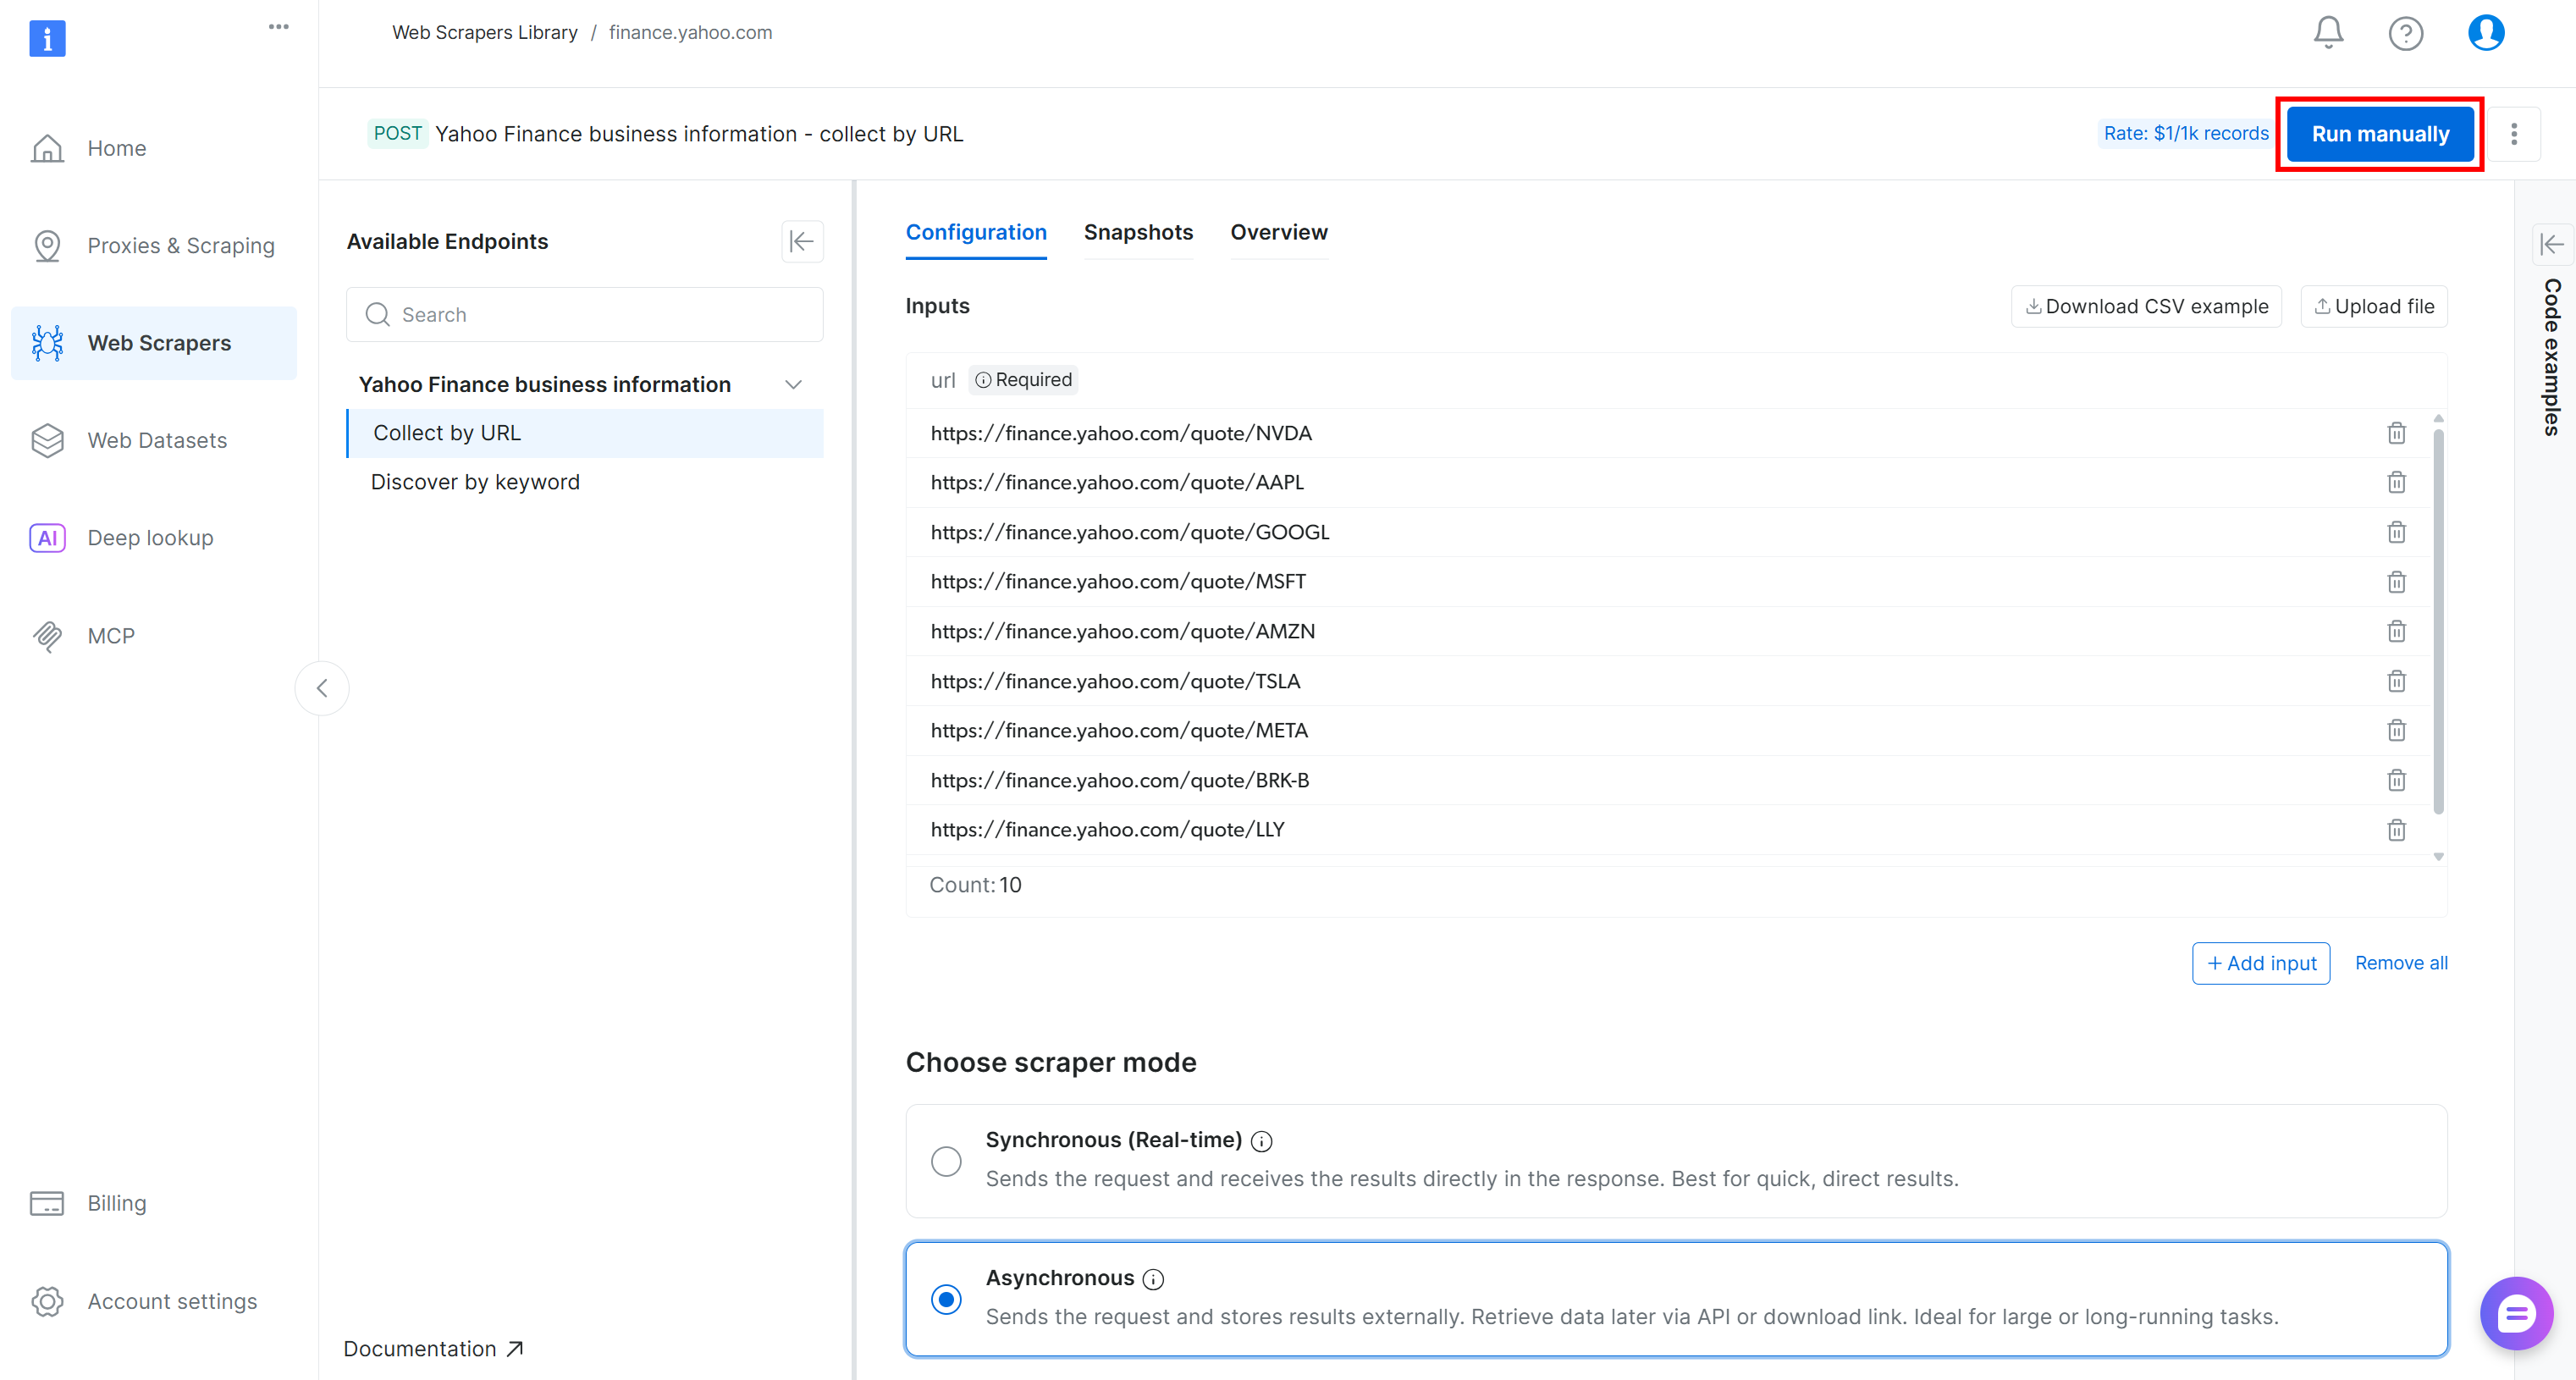
The scraping API request will be sent, and the scraping task will start on the cloud. You can monitor the status of the task in real time from the Bright Data control panel: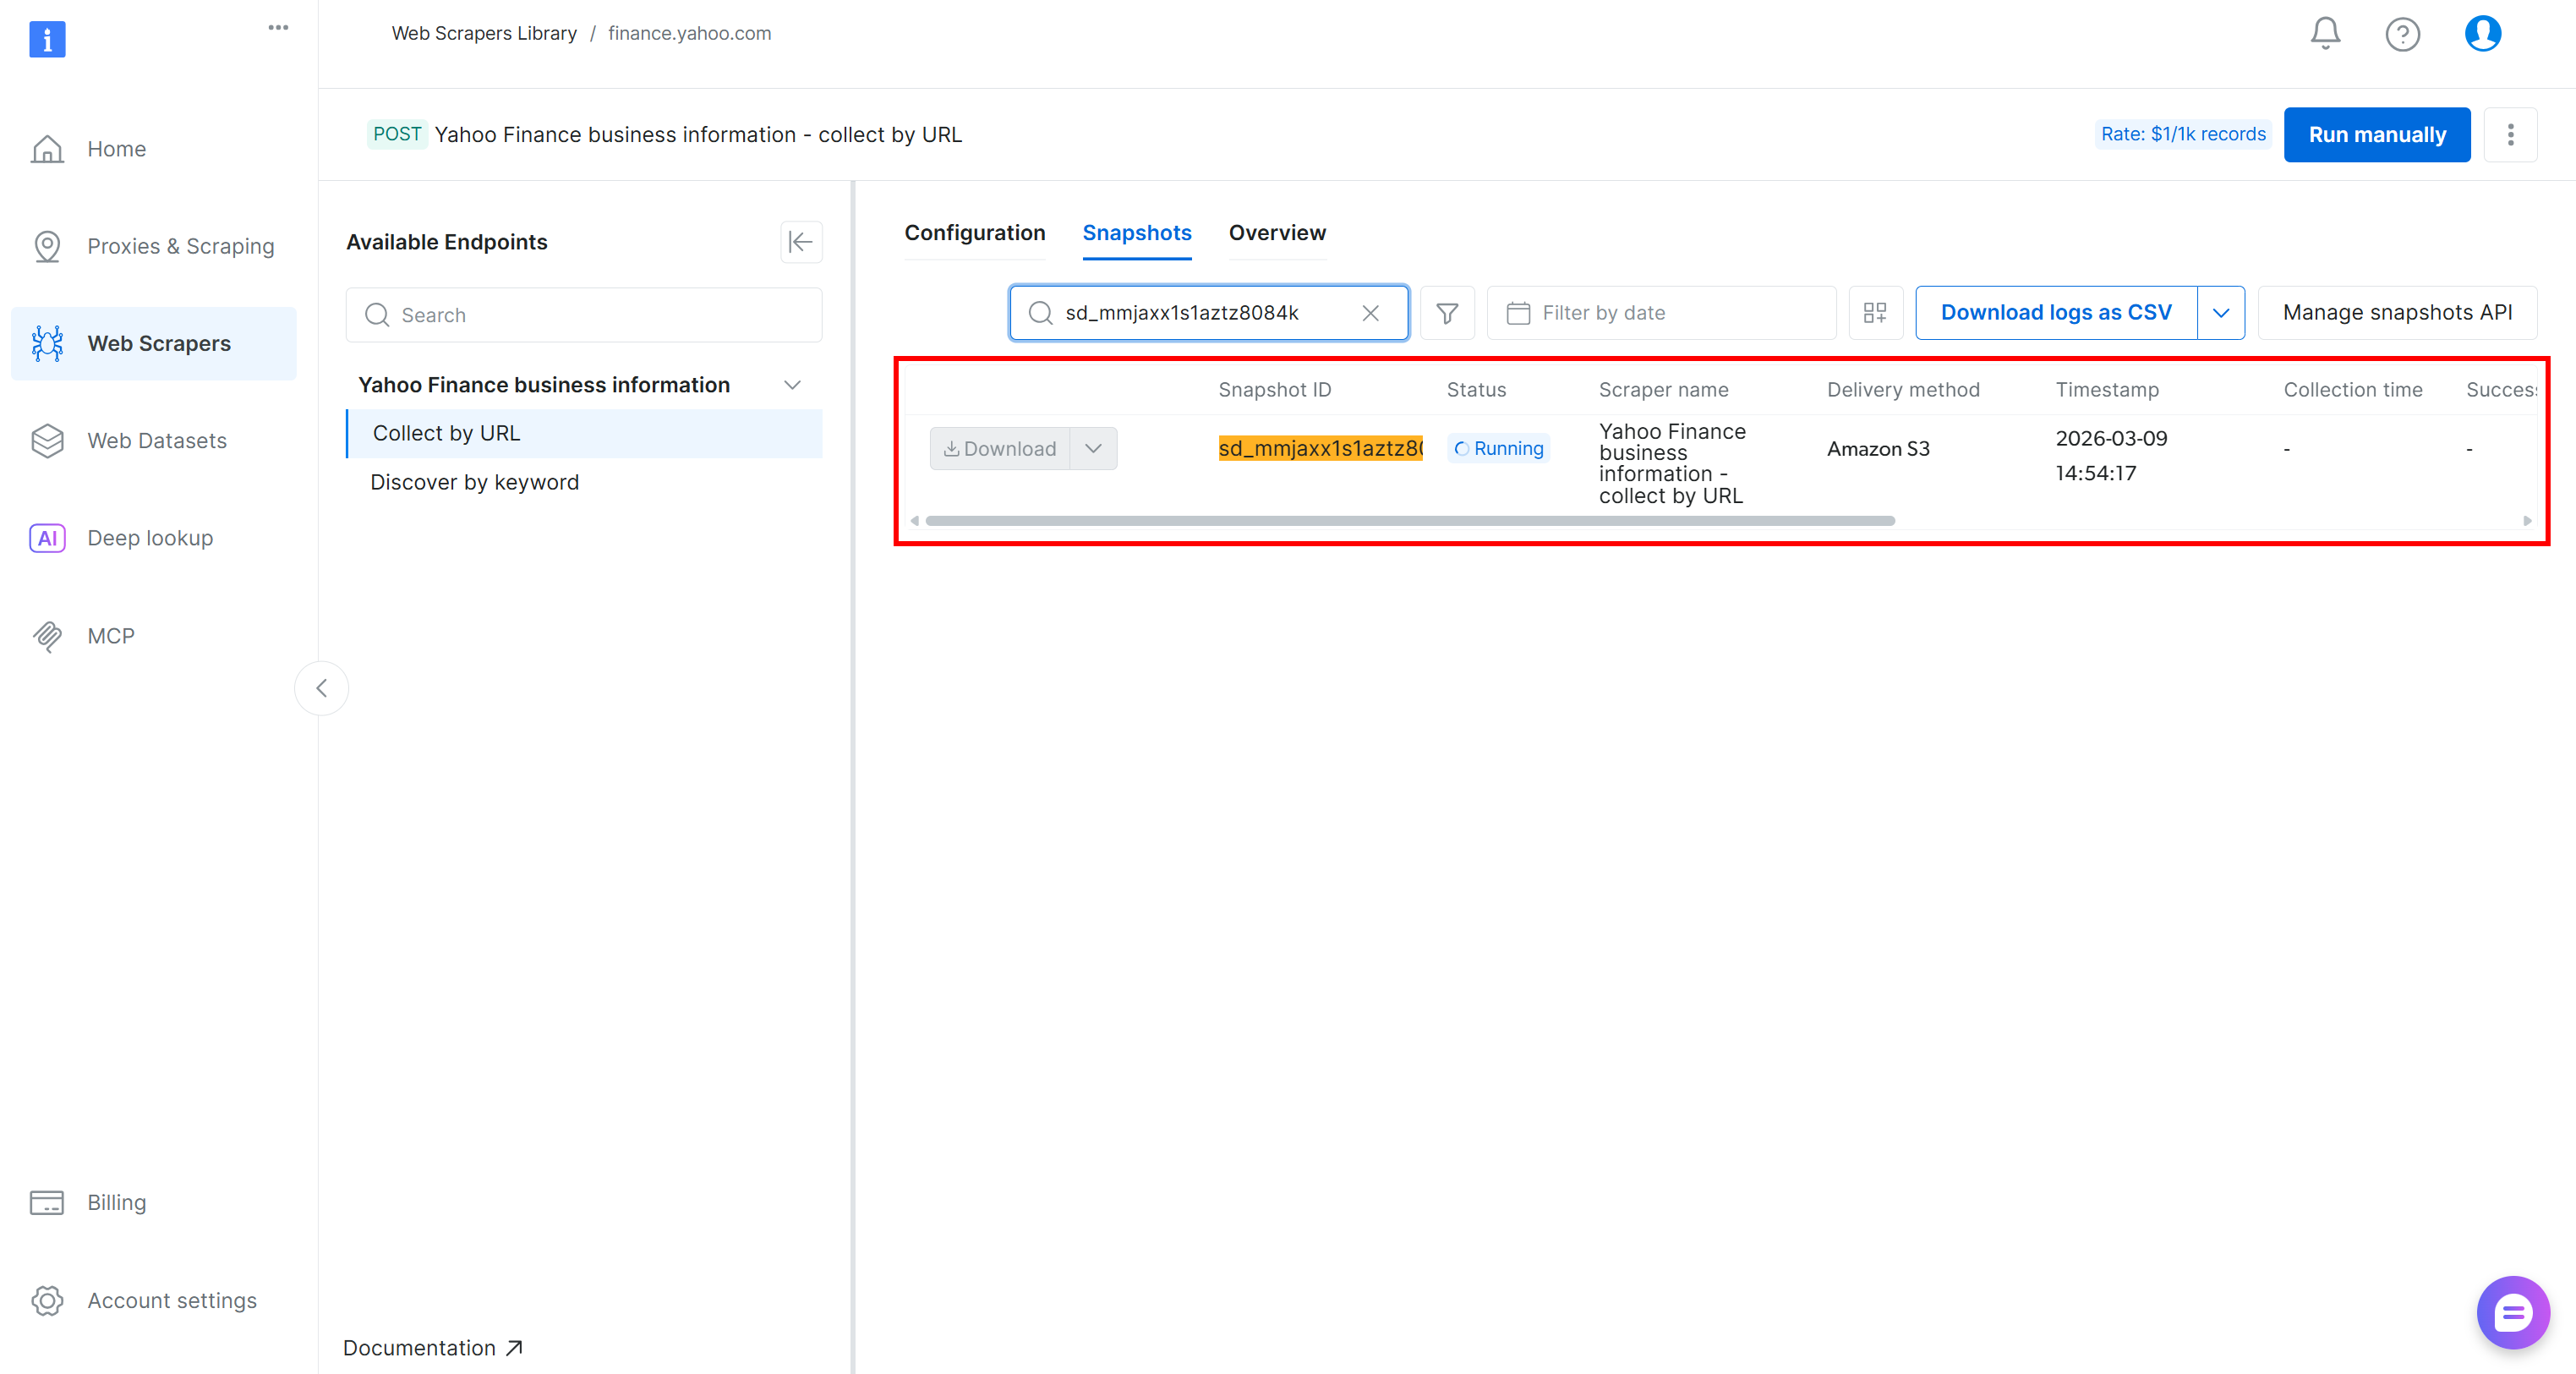
Alternatively, you can achieve the same result programmatically by running one of the code snippets available in the Bright Data console (shown in the right column), using your preferred programming language: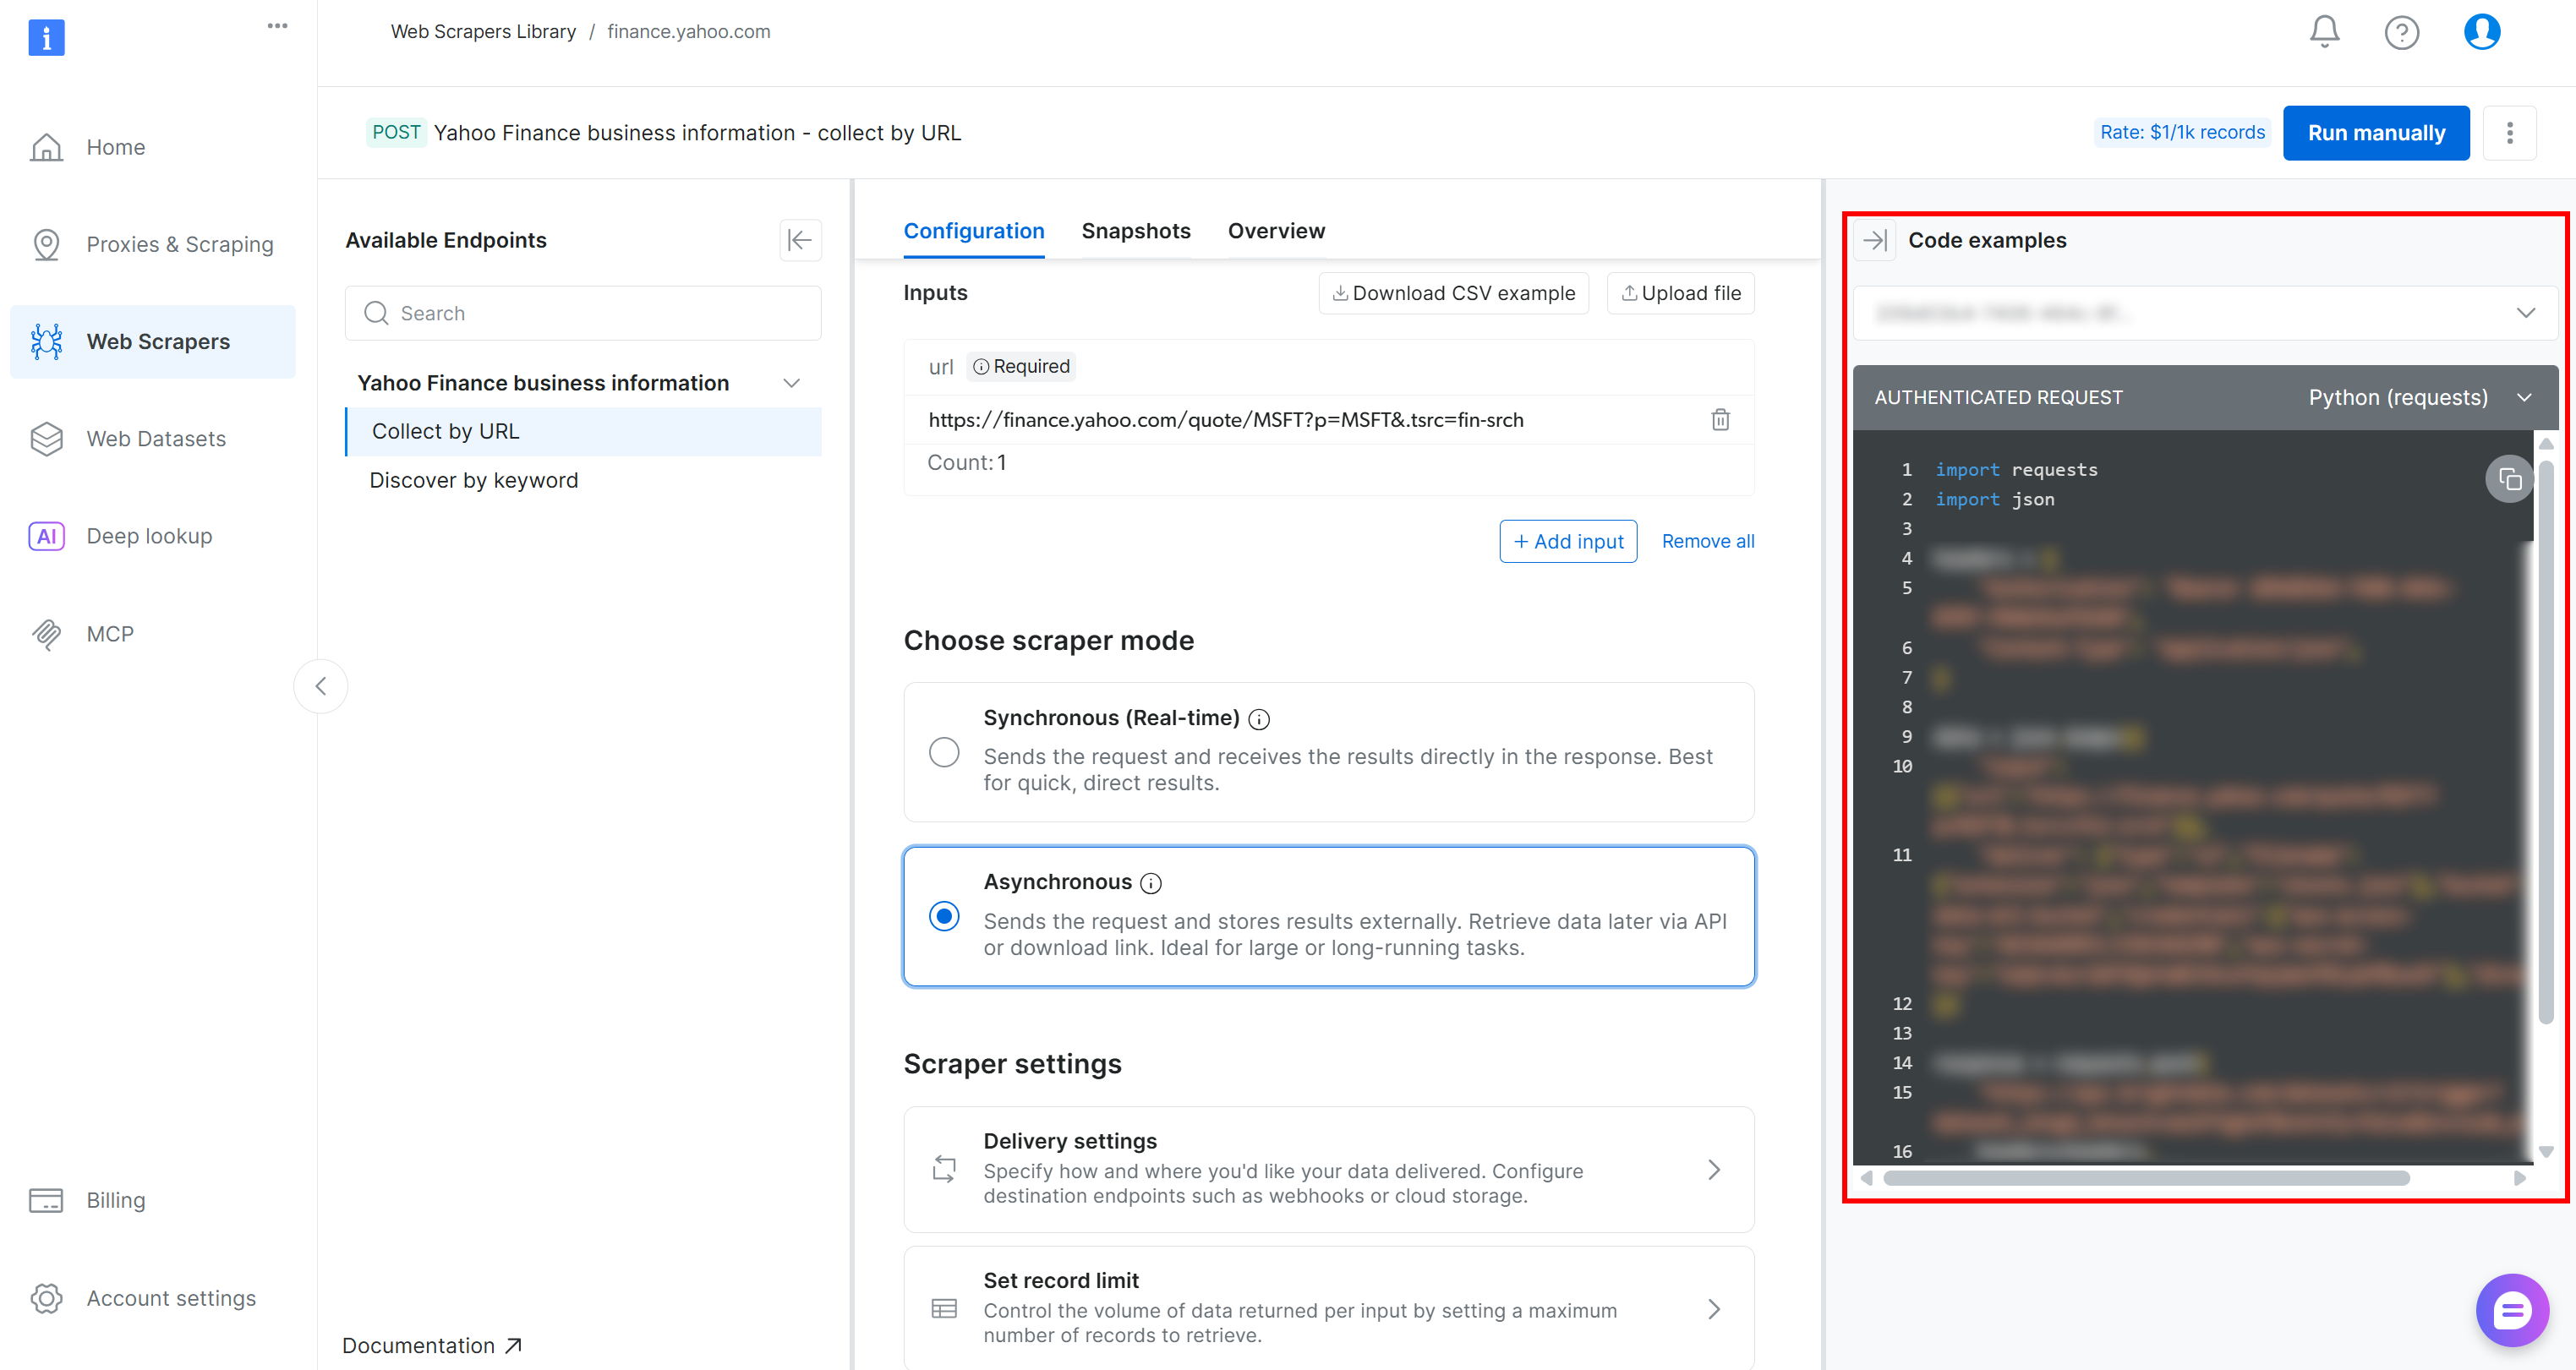
When the task status changes to “Ready,” check your AWS S3 bucket. You should notice a new file named stocks.json:
If you open the stocks.json file in your browser, you will see something like this: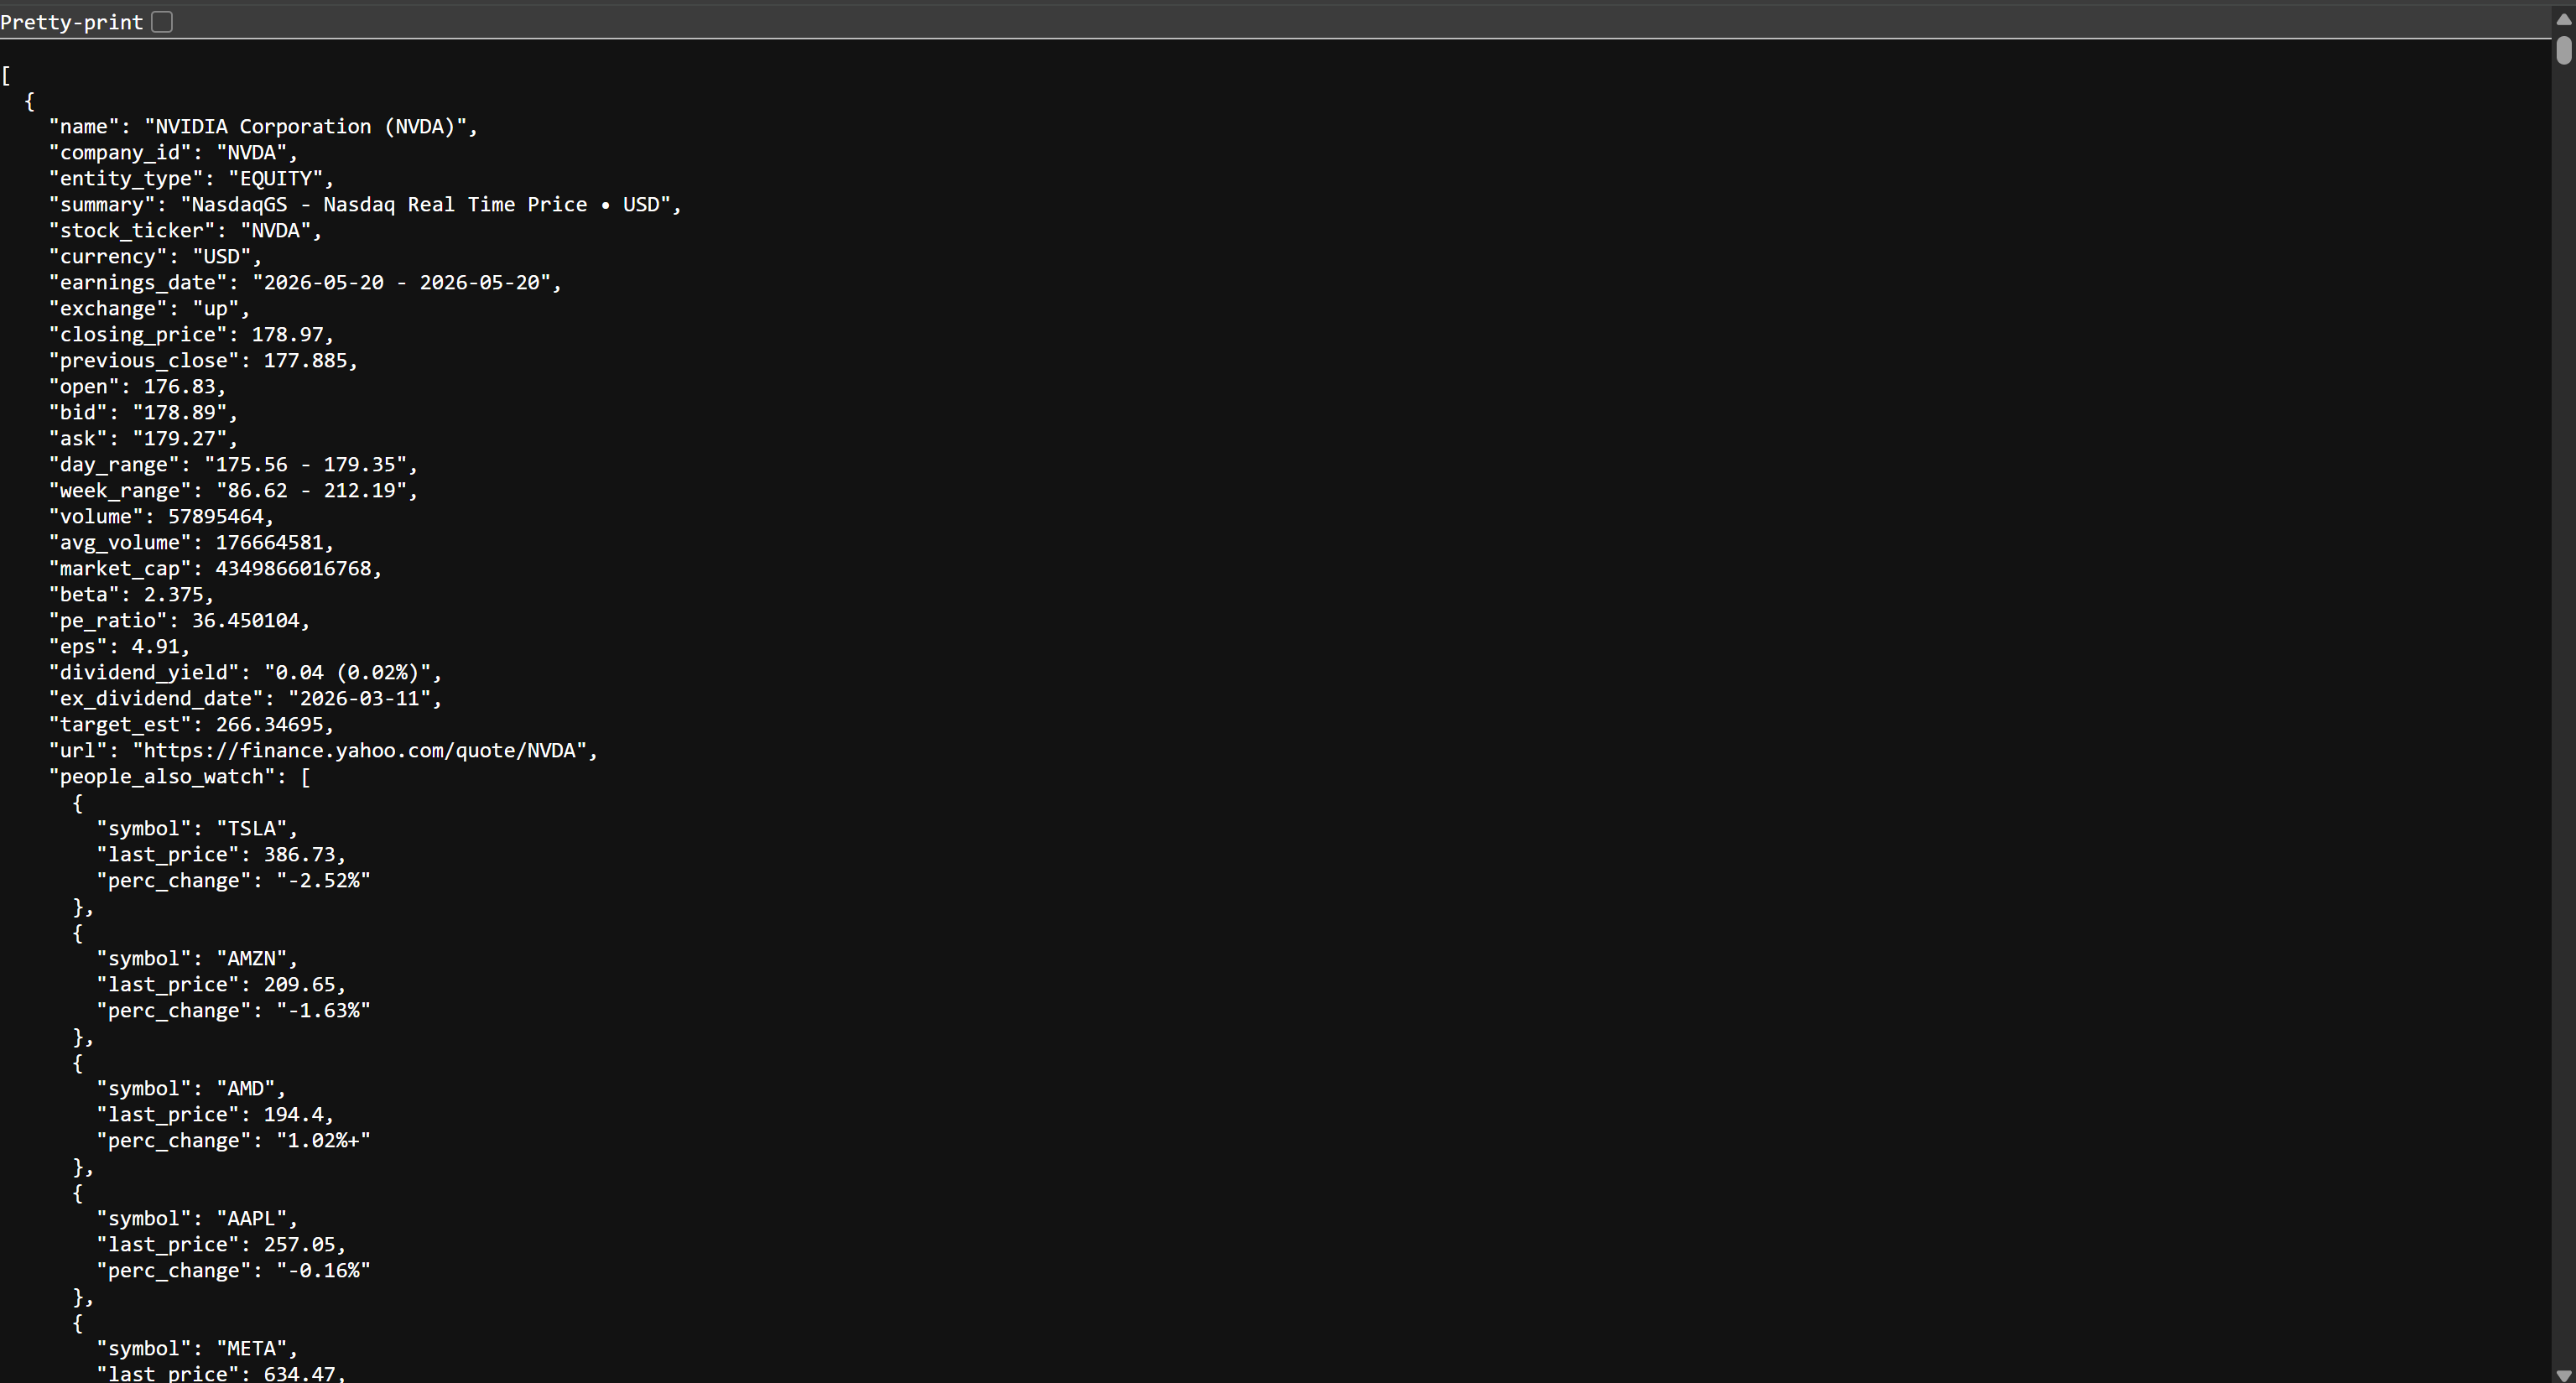
This is the same stock data available on Yahoo Finance, but structured in JSON format. That data was scraped by the Bright Data Web Scraping API. Mission accomplished! You now have the data required to build your AWS Glue ETL pipeline.
Step #4: Initialize Your AWS Glue Job
Log in to the AWS Console and search for the “AWS Glue” string. Select the service to open its main page.
From there, click the “Go to ETL jobs” button to open AWS Glue Studio, the official interface to create ETL workflows:
Here, you can initialize a new AWS Glue job. For this tutorial, select the “Visual ETL” option. That is recommended for building pipelines through a simplified drag-and-drop interface.
You will then be taken to a blank canvas, where you can visually define your AWS Glue ETL workflow by connecting different nodes: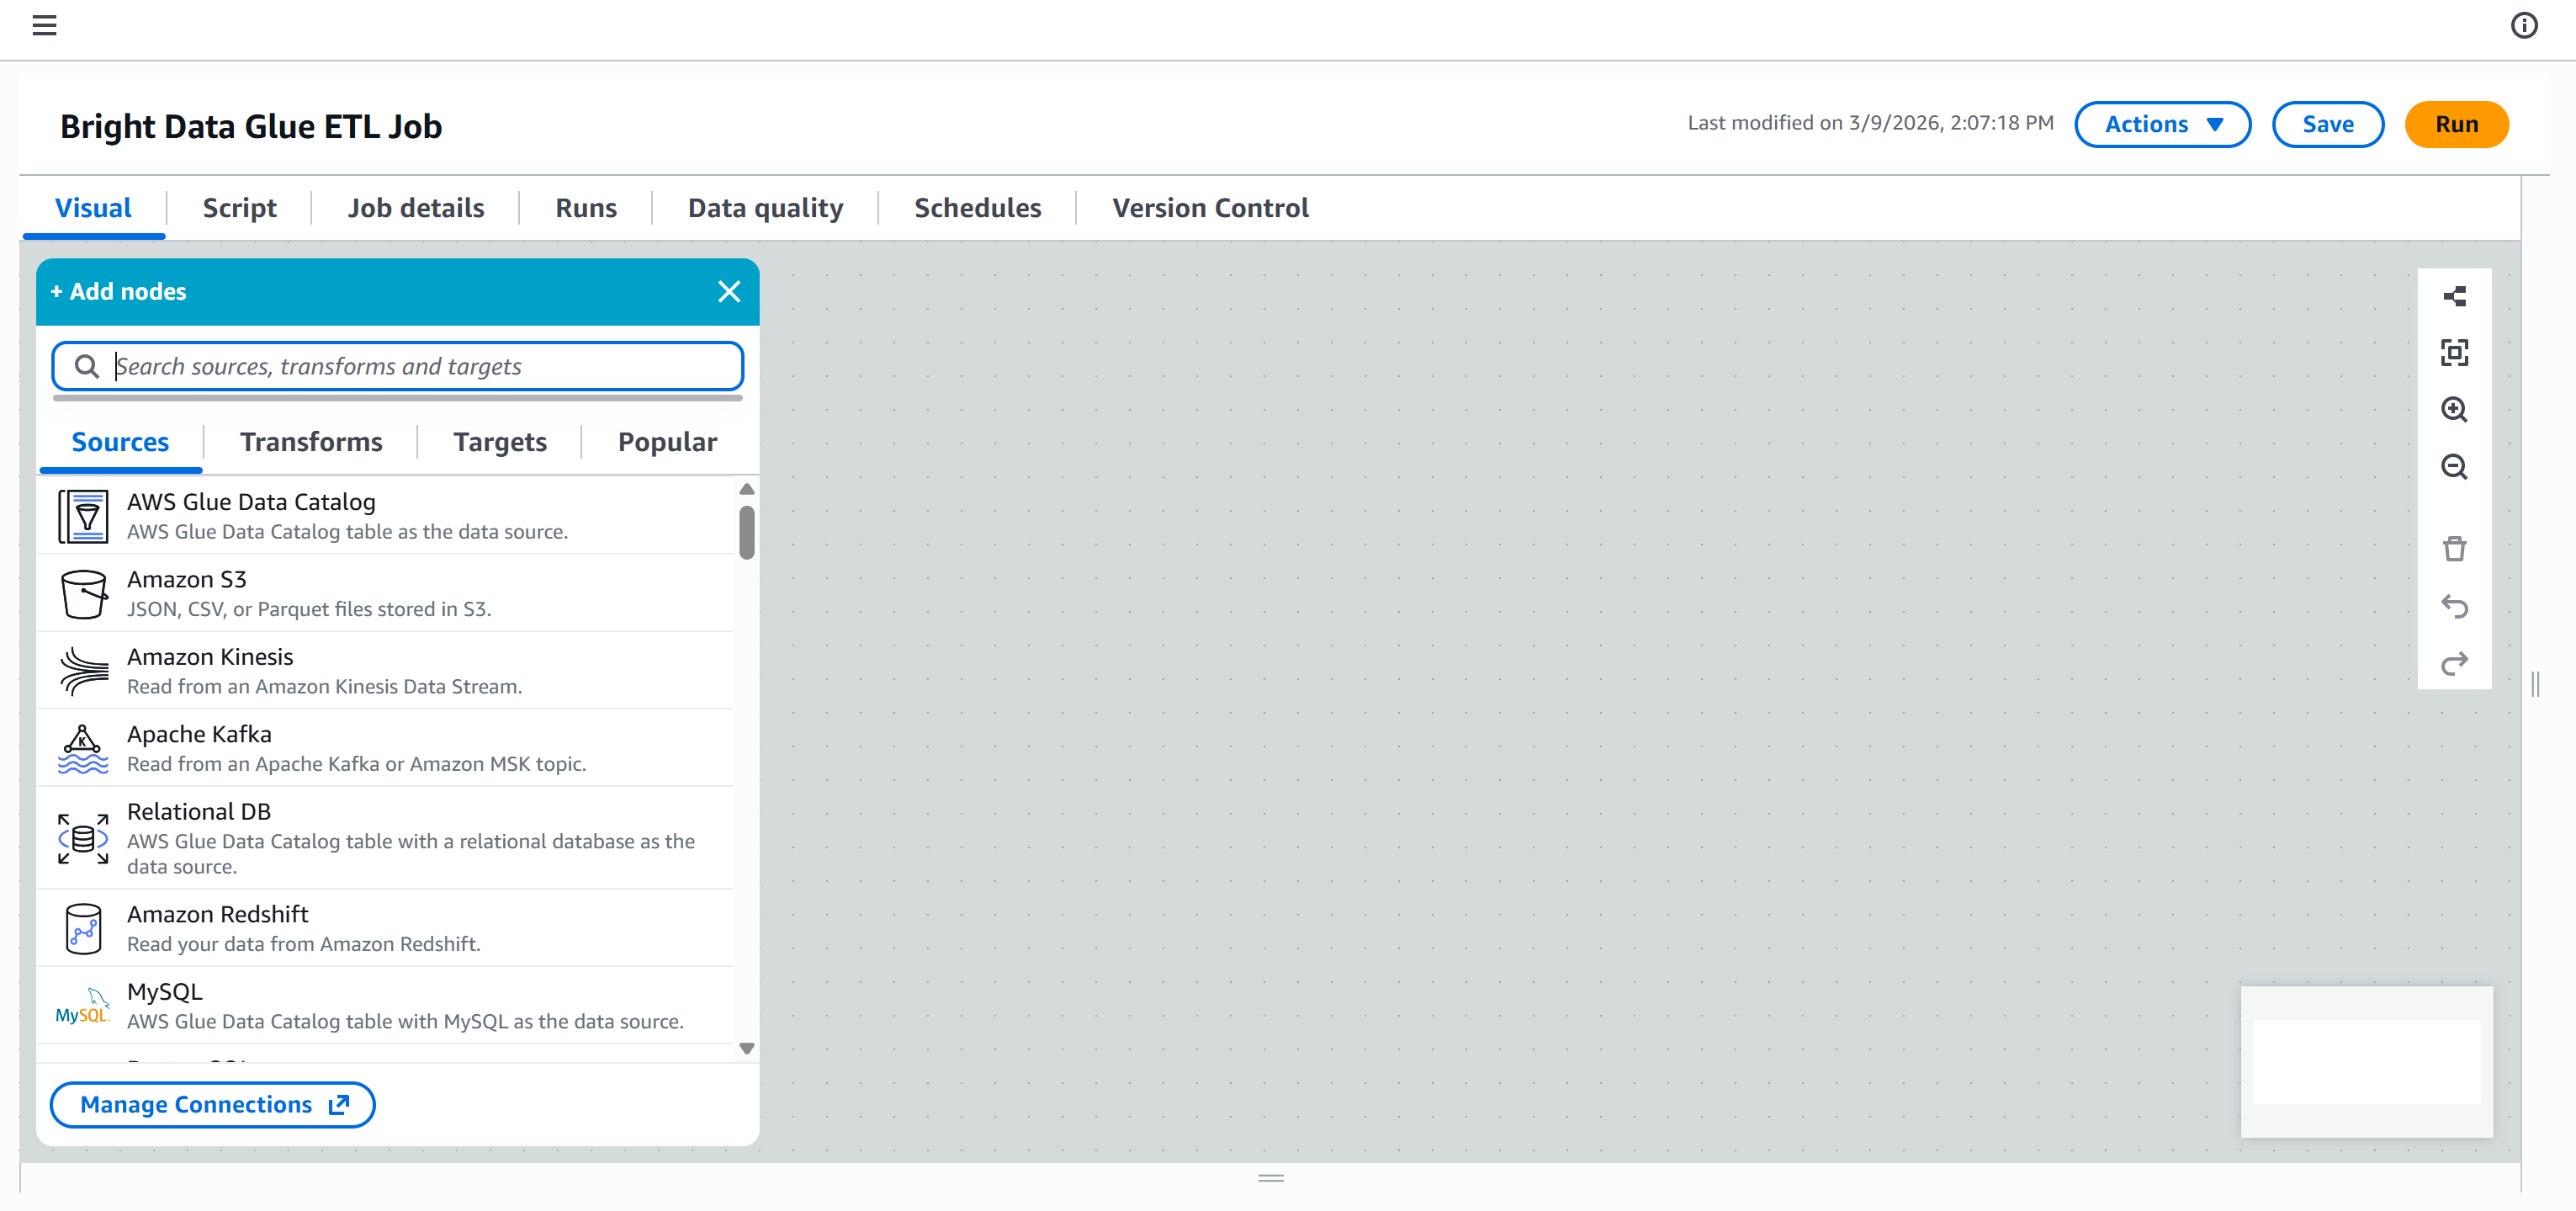
Give your ETL job a descriptive name, such as “Bright Data Glue ETL Job.” Once that is done, you are ready to start building your ETL pipeline.
Step #5: Create an IAM Role
To run an AWS Glue job, you must provide an IAM role for accessing resources such as Amazon S3 and managing AWS Glue. These permissions are required for Glue components like jobs, crawlers, and development endpoints.
To create the role directly from Glue Studio, go to the “Job details” panel and click the “Create new role” button: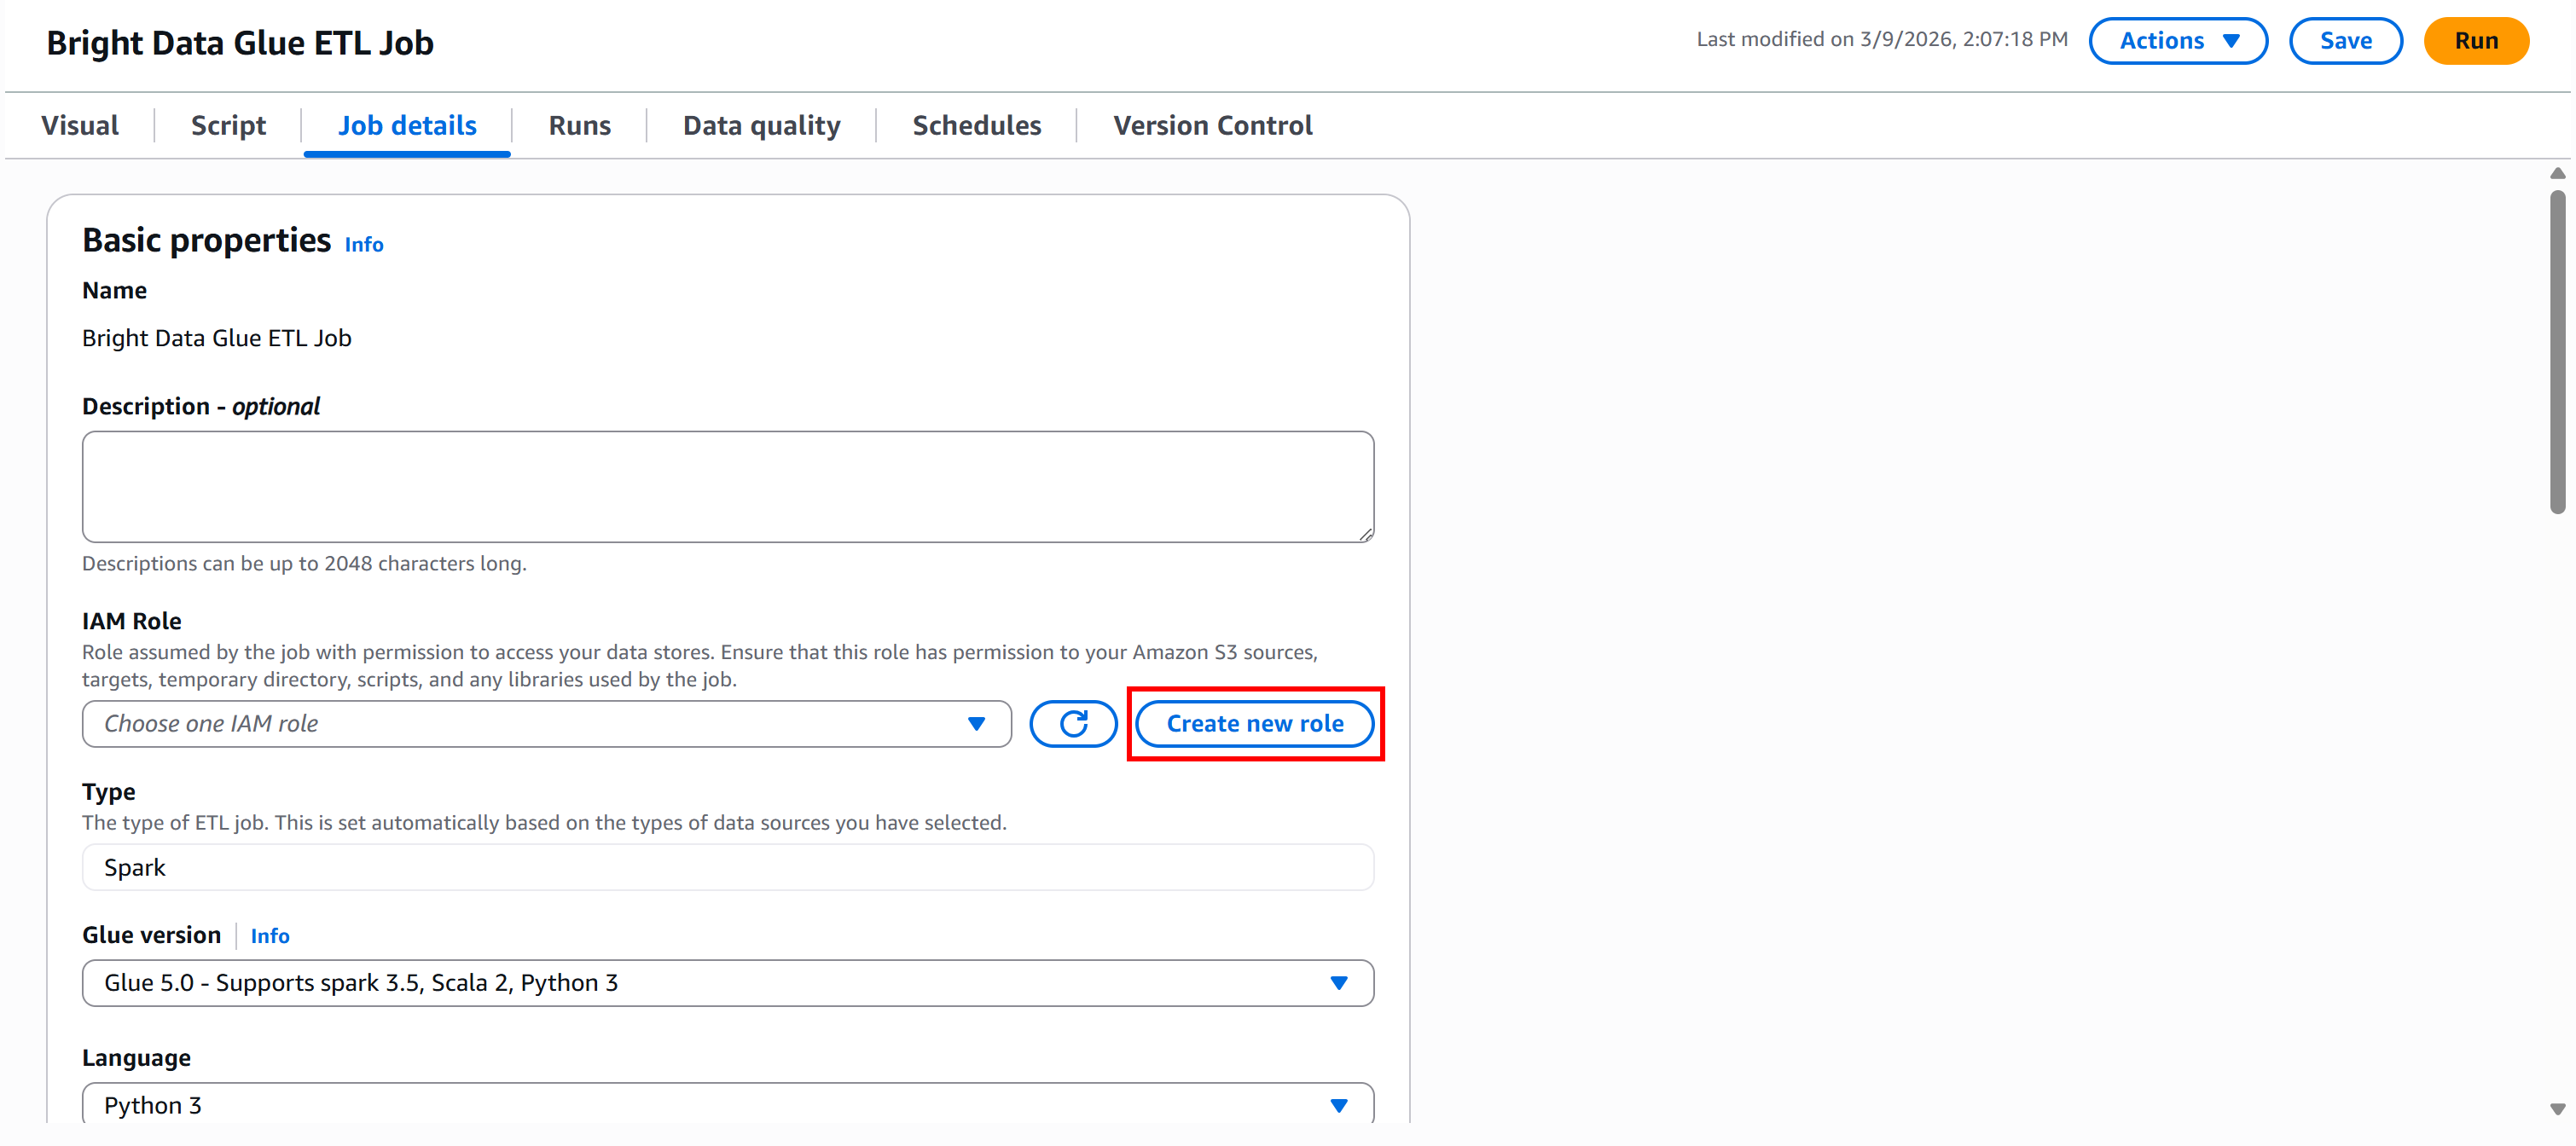
In the “Create role” section, give your IAM role a descriptive name, such as "bd-glue-role":
By default, AWS will attach the two required policies:
AWSGlueConsoleFullAccess: Provides full access to AWS Glue via the AWS Management Console.AWSGlueServiceRole: Policy for AWS Glue service role, which allows access to related services, including EC2, S3, and Cloudwatch Logs.

Next, retrieve the ARN of your S3 bucket. You can find it on the “Properties” page of your bucket in the S3 console: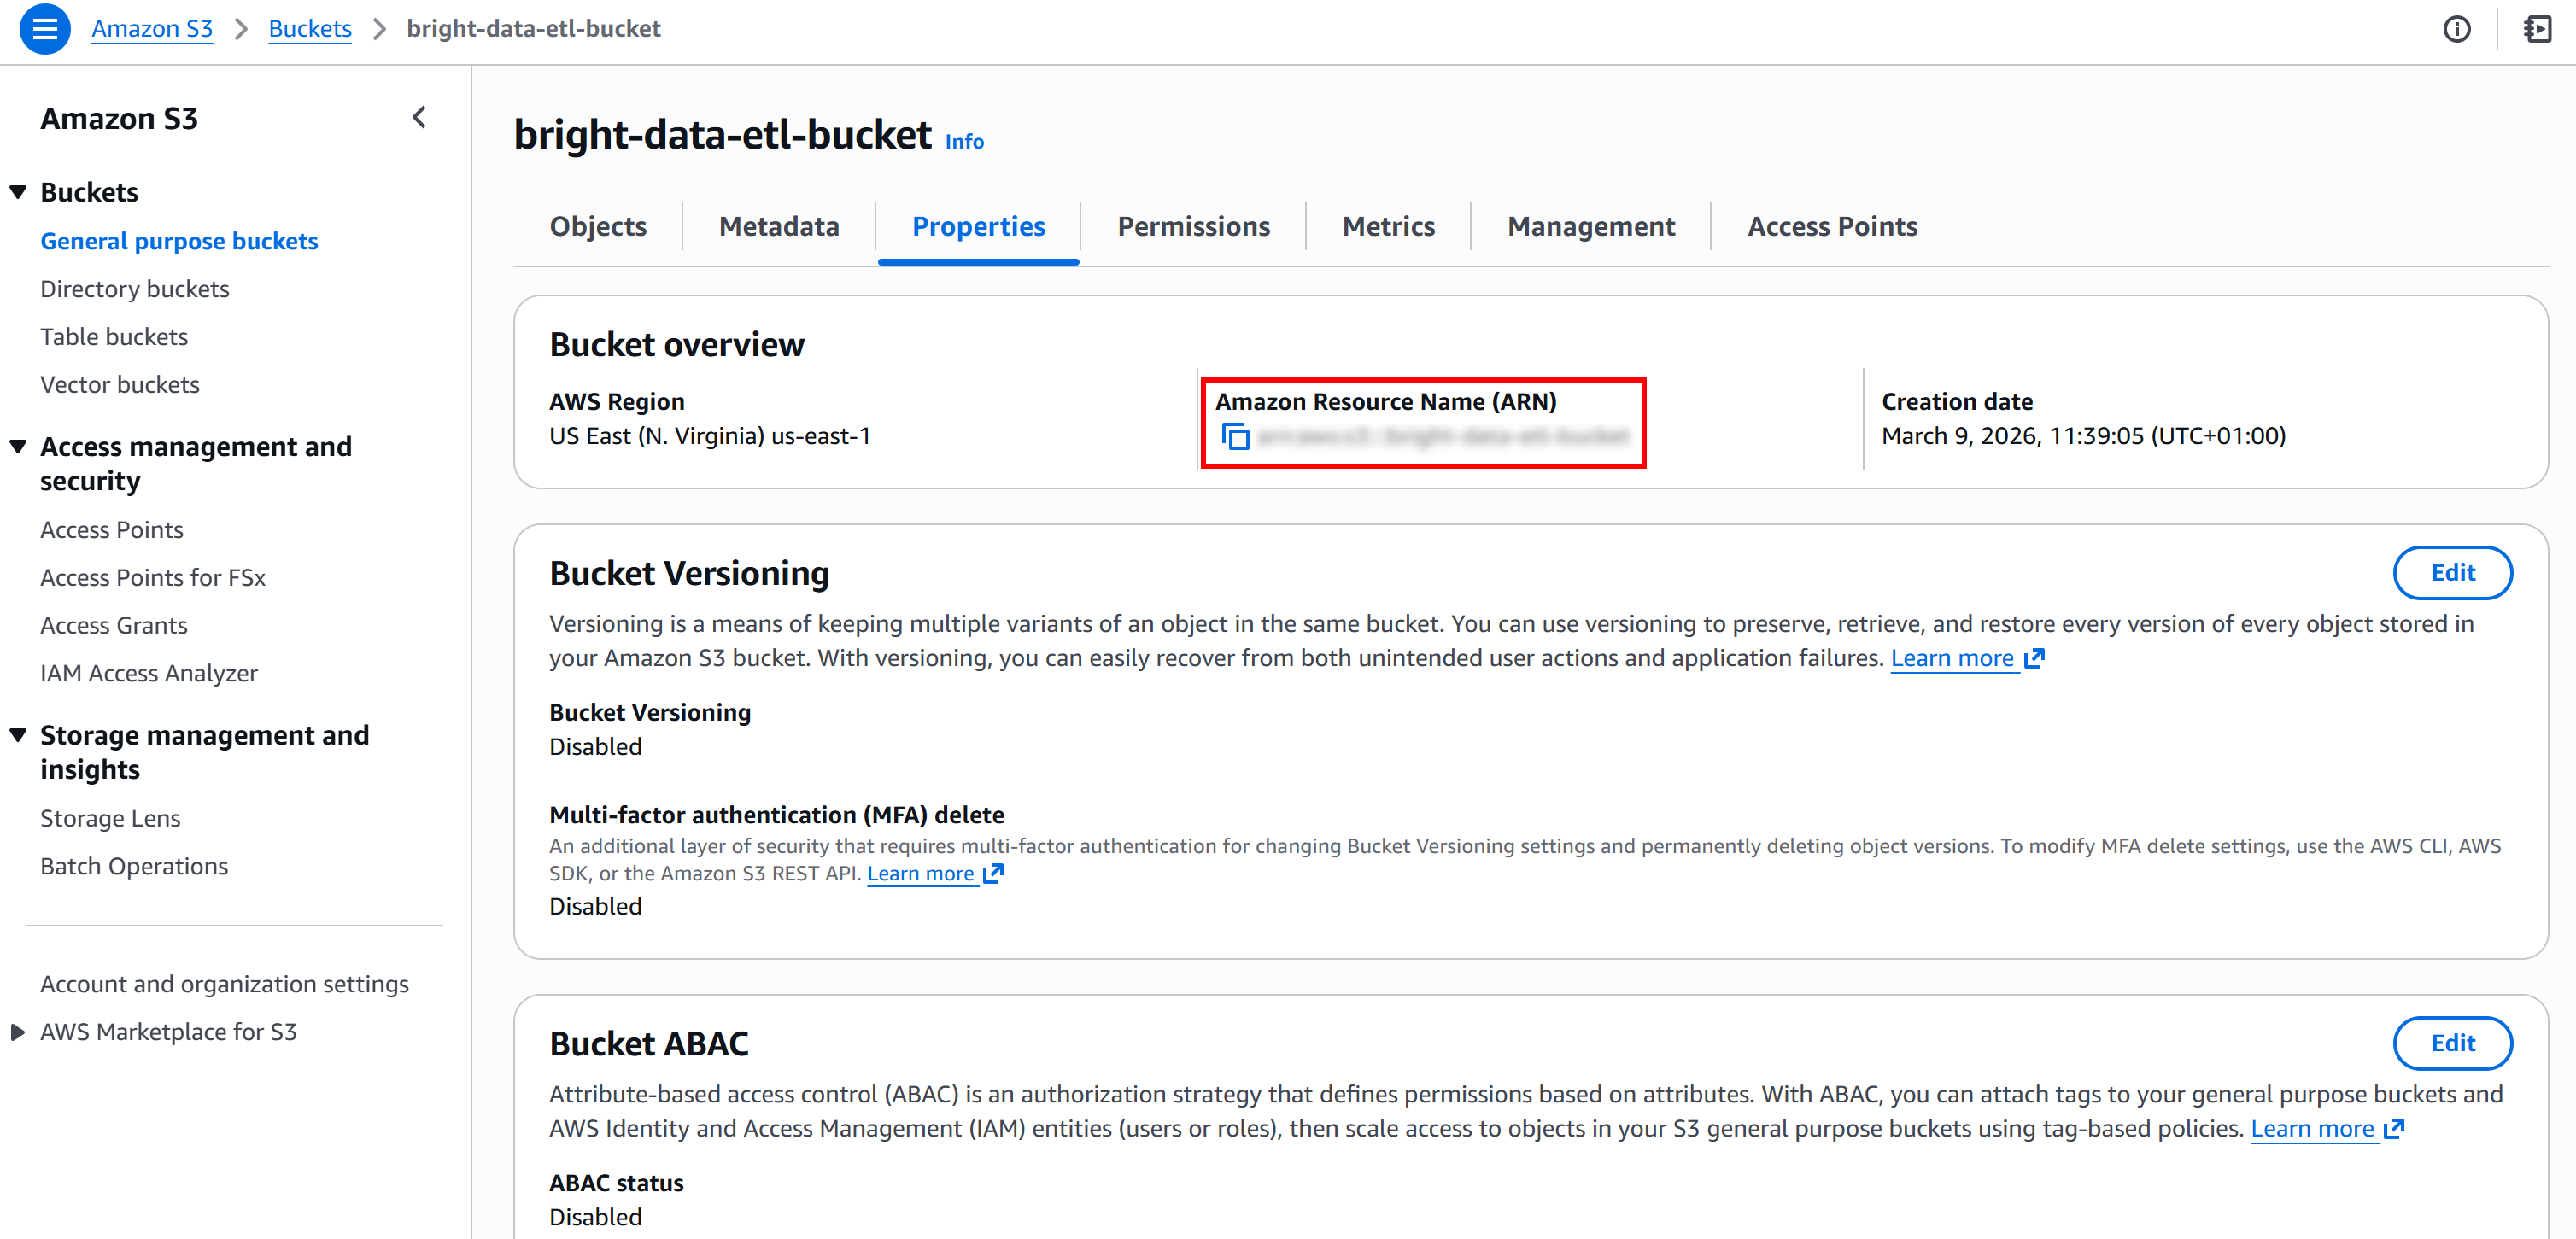
That information is what you need to override the default policy provided by AWS Glue. In detail, paste the S3 bucket ARN into the “Resource” field in the “Additional policy” text editor of the “Create role” page:
"Resource": {
    "<YOUR_S3_BUCKET_ARN>/*"
} 
Finally, click the “Create role” button. Once the role is created, it will automatically appear in your AWS Glue job configuration: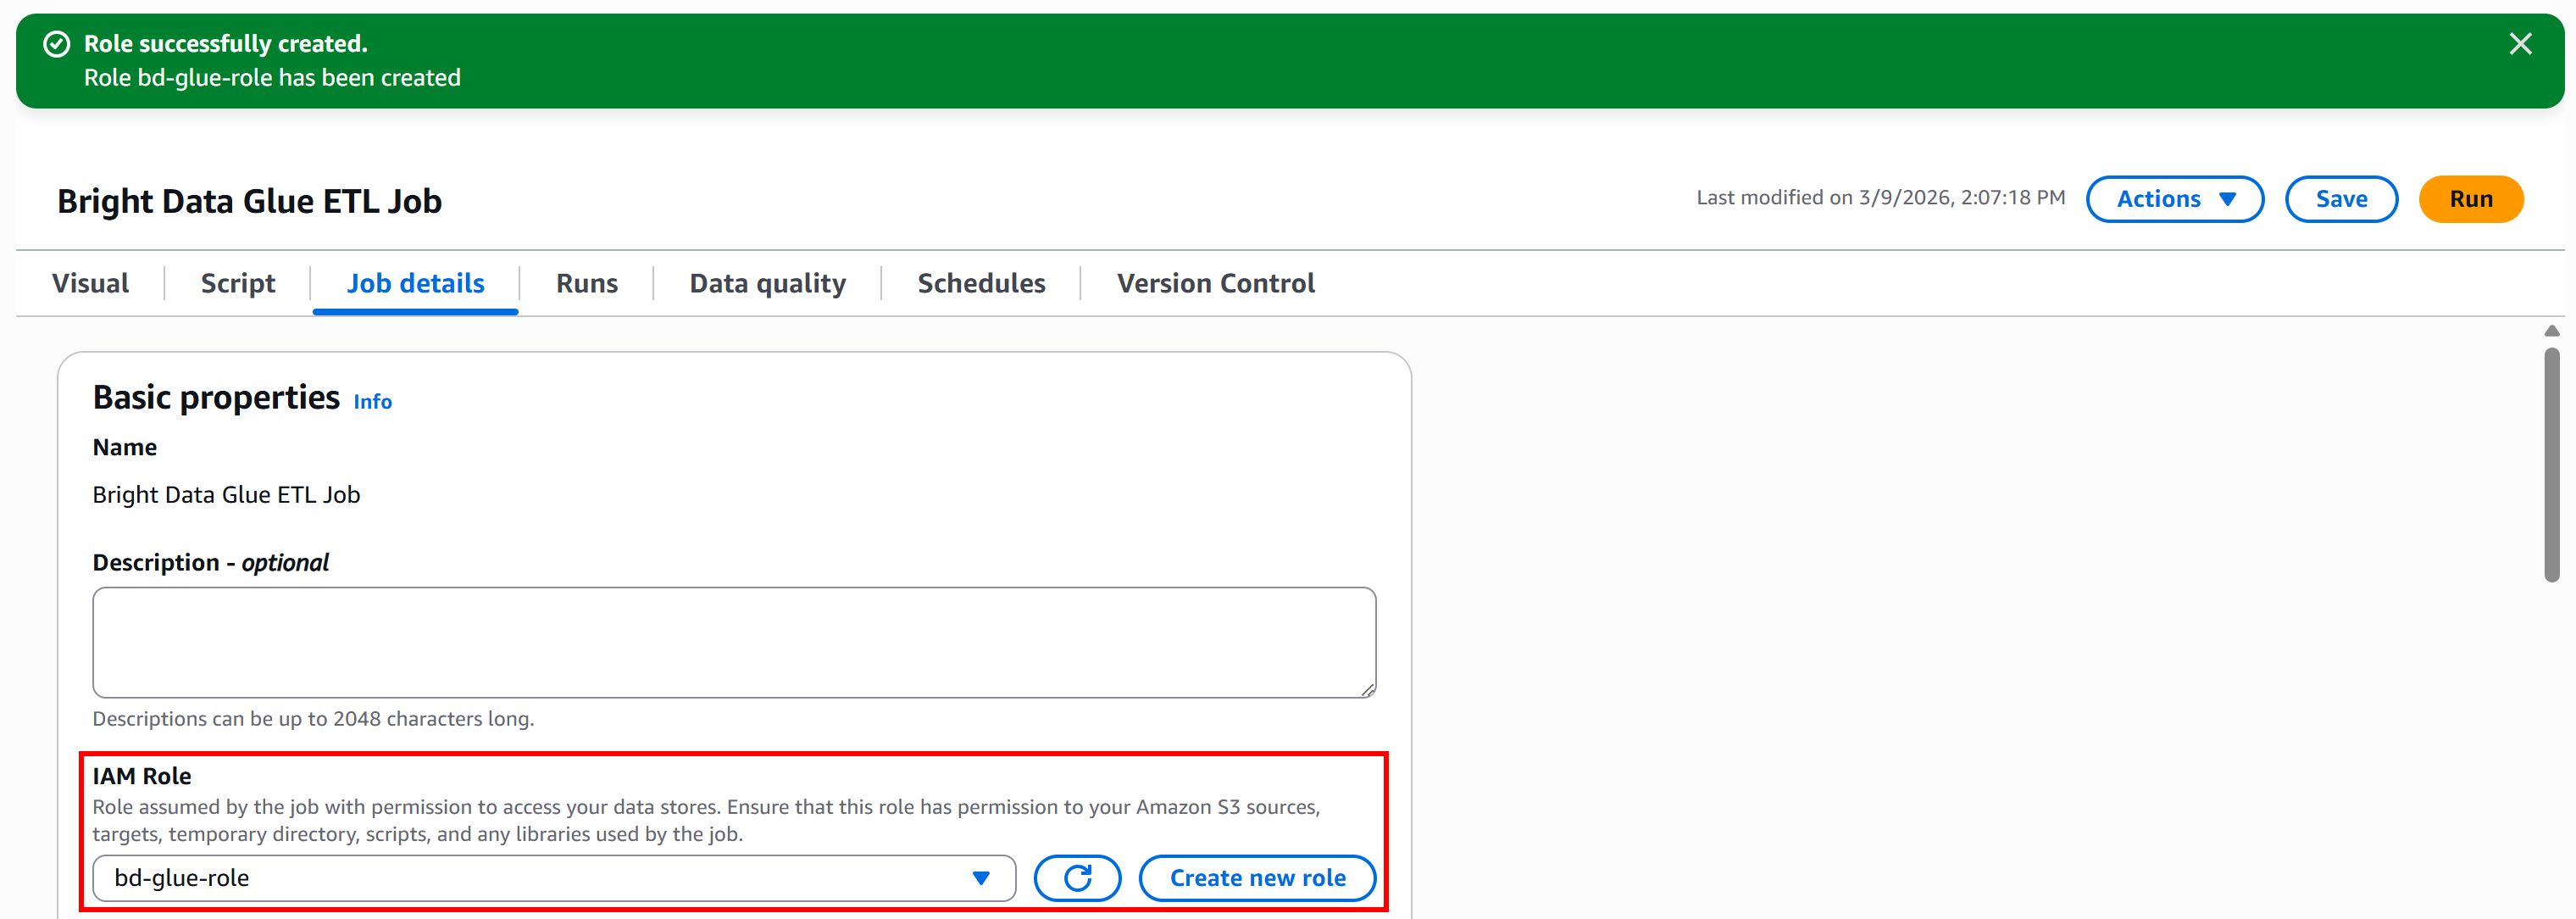
Great! Your AWS Glue job now has an IAM role with the permissions required to access S3 and run your ETL pipeline.
Step #6: Add the Extract (E) Node to Your Pipeline
The Extract (E) phase of the pipeline began when you ran the Bright Data scraper that collected stock data and uploaded it to Amazon S3.
Now, the goal is to connect your AWS Glue ETL pipeline to that data so it can be processed. To do that, go to the “Sources” tab in the “Add nodes” panel and select the “Amazon S3” node.
A “Data source – S3 bucket – Amazon S3” node will appear on the canvas. Click on it and configure the S3 source: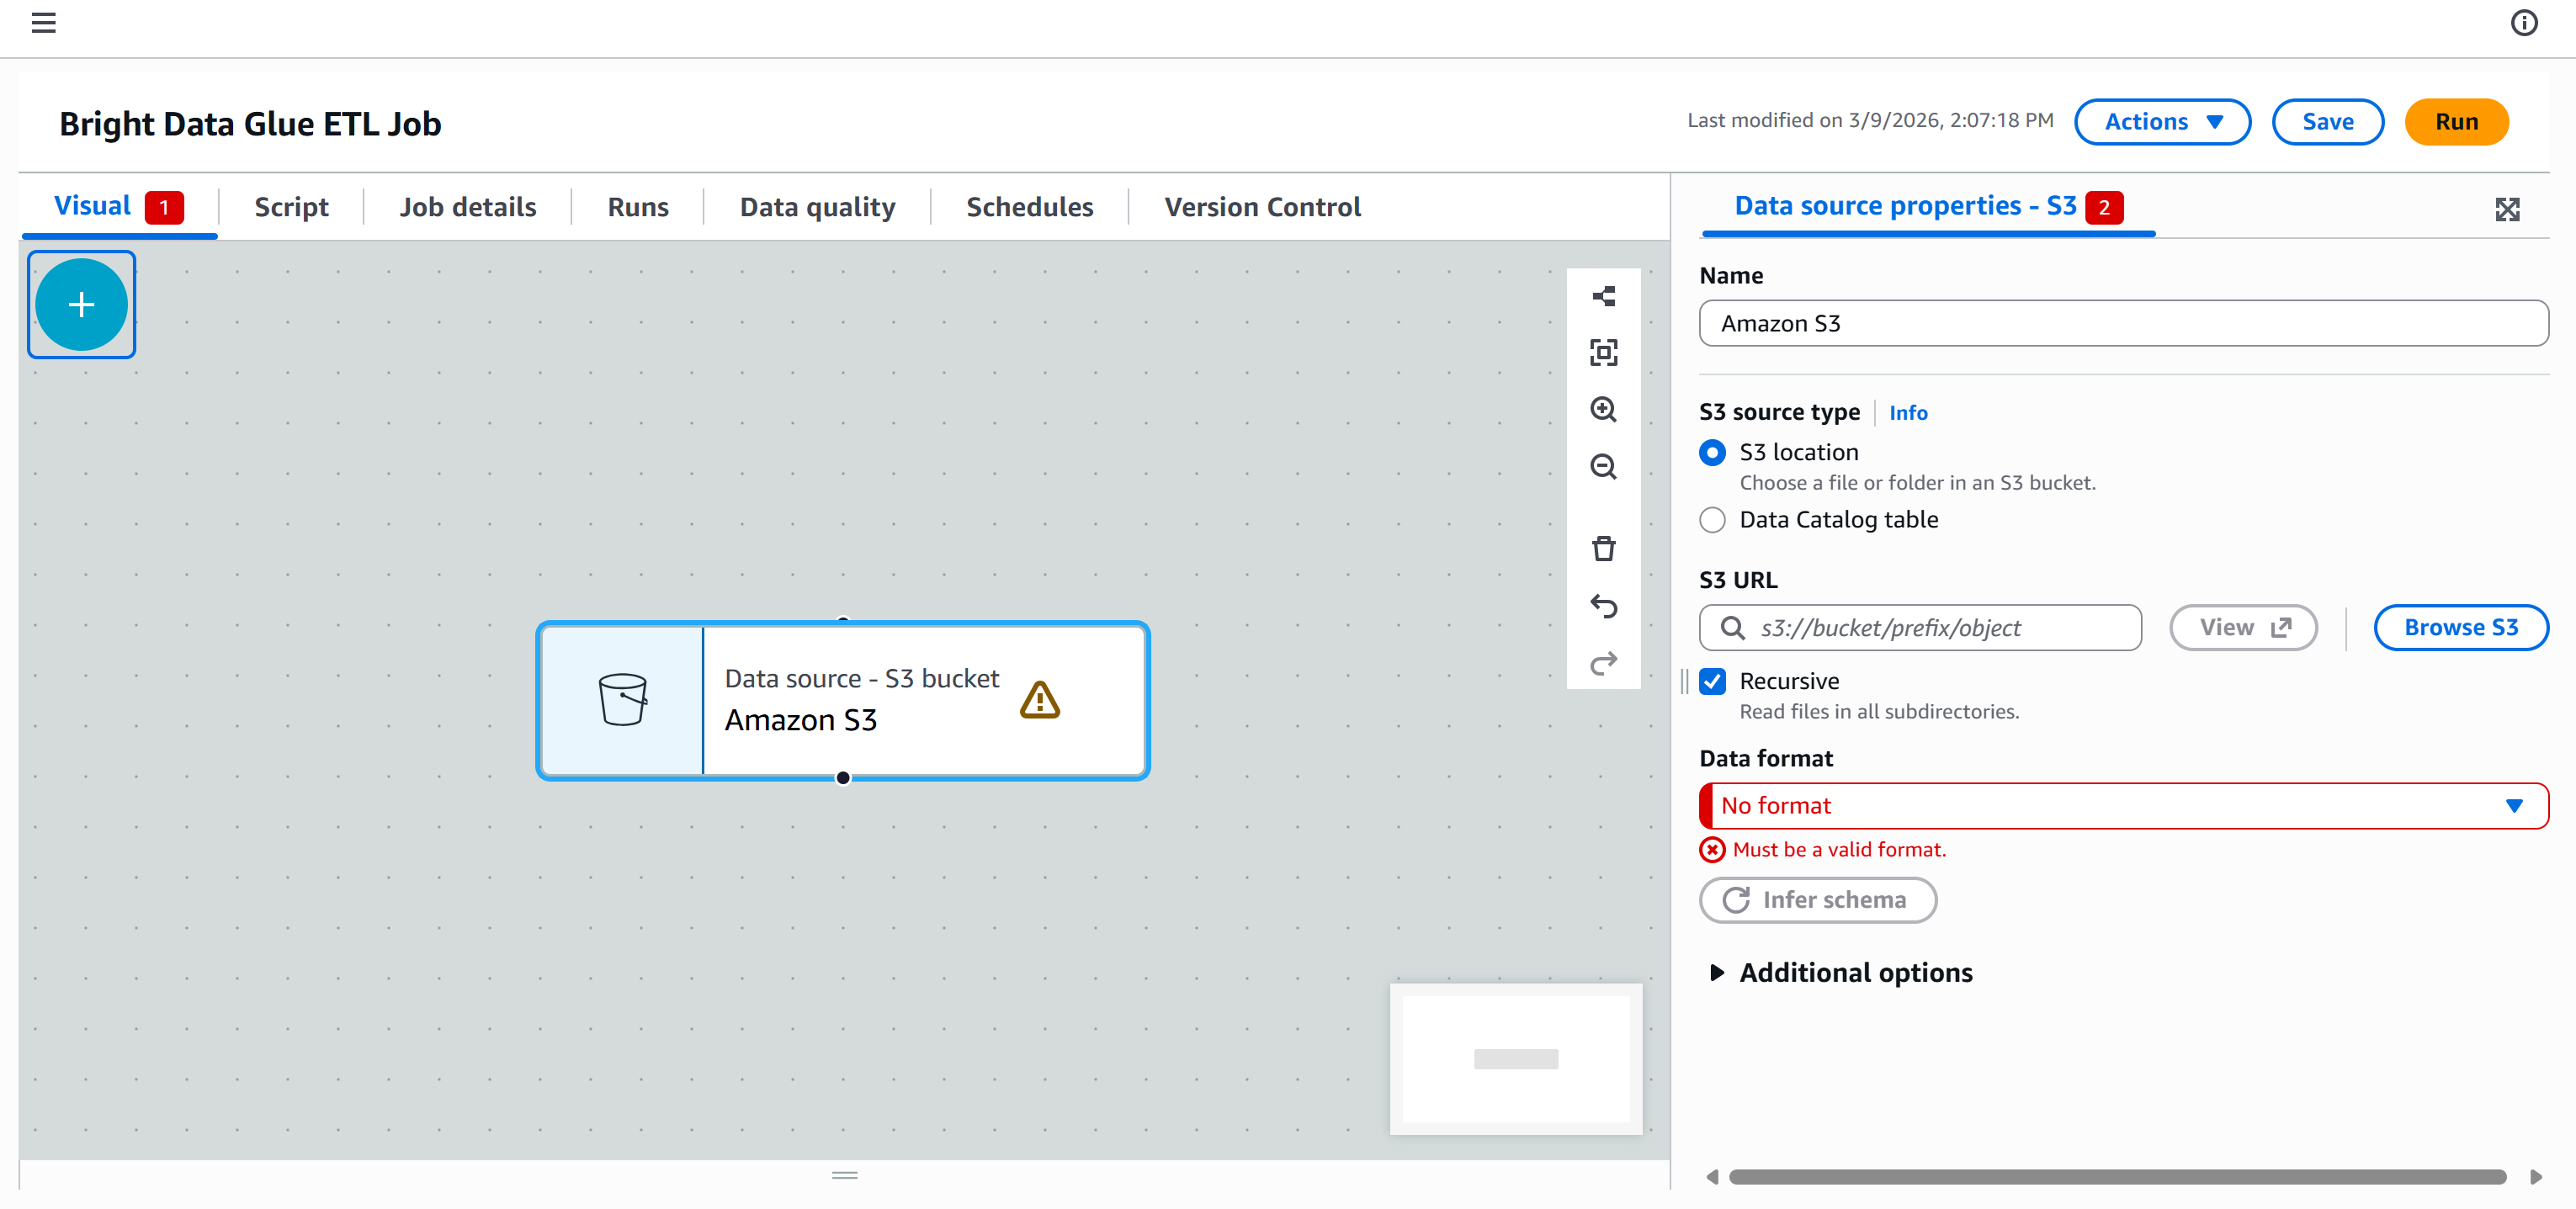
Press the “Browse S3” button and select your S3 bucket (e.g., bright-data-etl-bucket).
After selecting the bucket, AWS Glue will populate the “S3 URL” field with something like:
s3://bright-data-etl-bucketBy default, AWS Glue attempts to read all files inside the specified S3 path. Since we know the exact name of the input file, update the “S3 URL” field to point directly to it:
s3://bright-data-etl-bucket/stocks.jsonThis tells AWS Glue to use the stocks.json file uploaded earlier, which contains the data scraped with Yahoo Finance Scraper.
Next, configure the data format. Since the input dataset is a JSON file, select “JSON” as the input format.
Then, click the “Infer schema” button. AWS Glue will automatically analyze the input JSON file and generate the corresponding schema.
In the “Output schema” section of the node, you will see the structure inferred from the JSON data:
The inferred schema matches the output data schema returned by the Bright Data Yahoo Finance Scraper. Cool!
Step #7: Define the Transform (T) Logic
As mentioned earlier, this is just a simple example, so the Transform (T) step will be kept minimal. The goal is to filter the source data using an SQL query and keep only companies whose P/E ratio is less than 30.
To achieve that, go to the “Transforms” tab and select the “SQL Query” node:
The node will be added to the canvas. Click on it and configure it so that the parent node is “Amazon S3.” This means the output of the Amazon S3 node becomes the input of the “SQL Query” node. In other words, you will run an SQL query on the scraped JSON data.
Next, define the alias name for the input dataset as stocks, and add this SQL query:
select stock_ticker, pe_ratio from stocks
WHERE pe_ratio < 30;
This query selects the stock_ticker and pe_ratio fields from each scraped stock, keeping only those whose P/E ratio is less than 30.
If you are wondering where these fields come from, stock_ticker and pe_ratio are two of the attributes returned by the Bright Data Yahoo Finance Scraper (which AWS Glue automatically inferred in the previous step):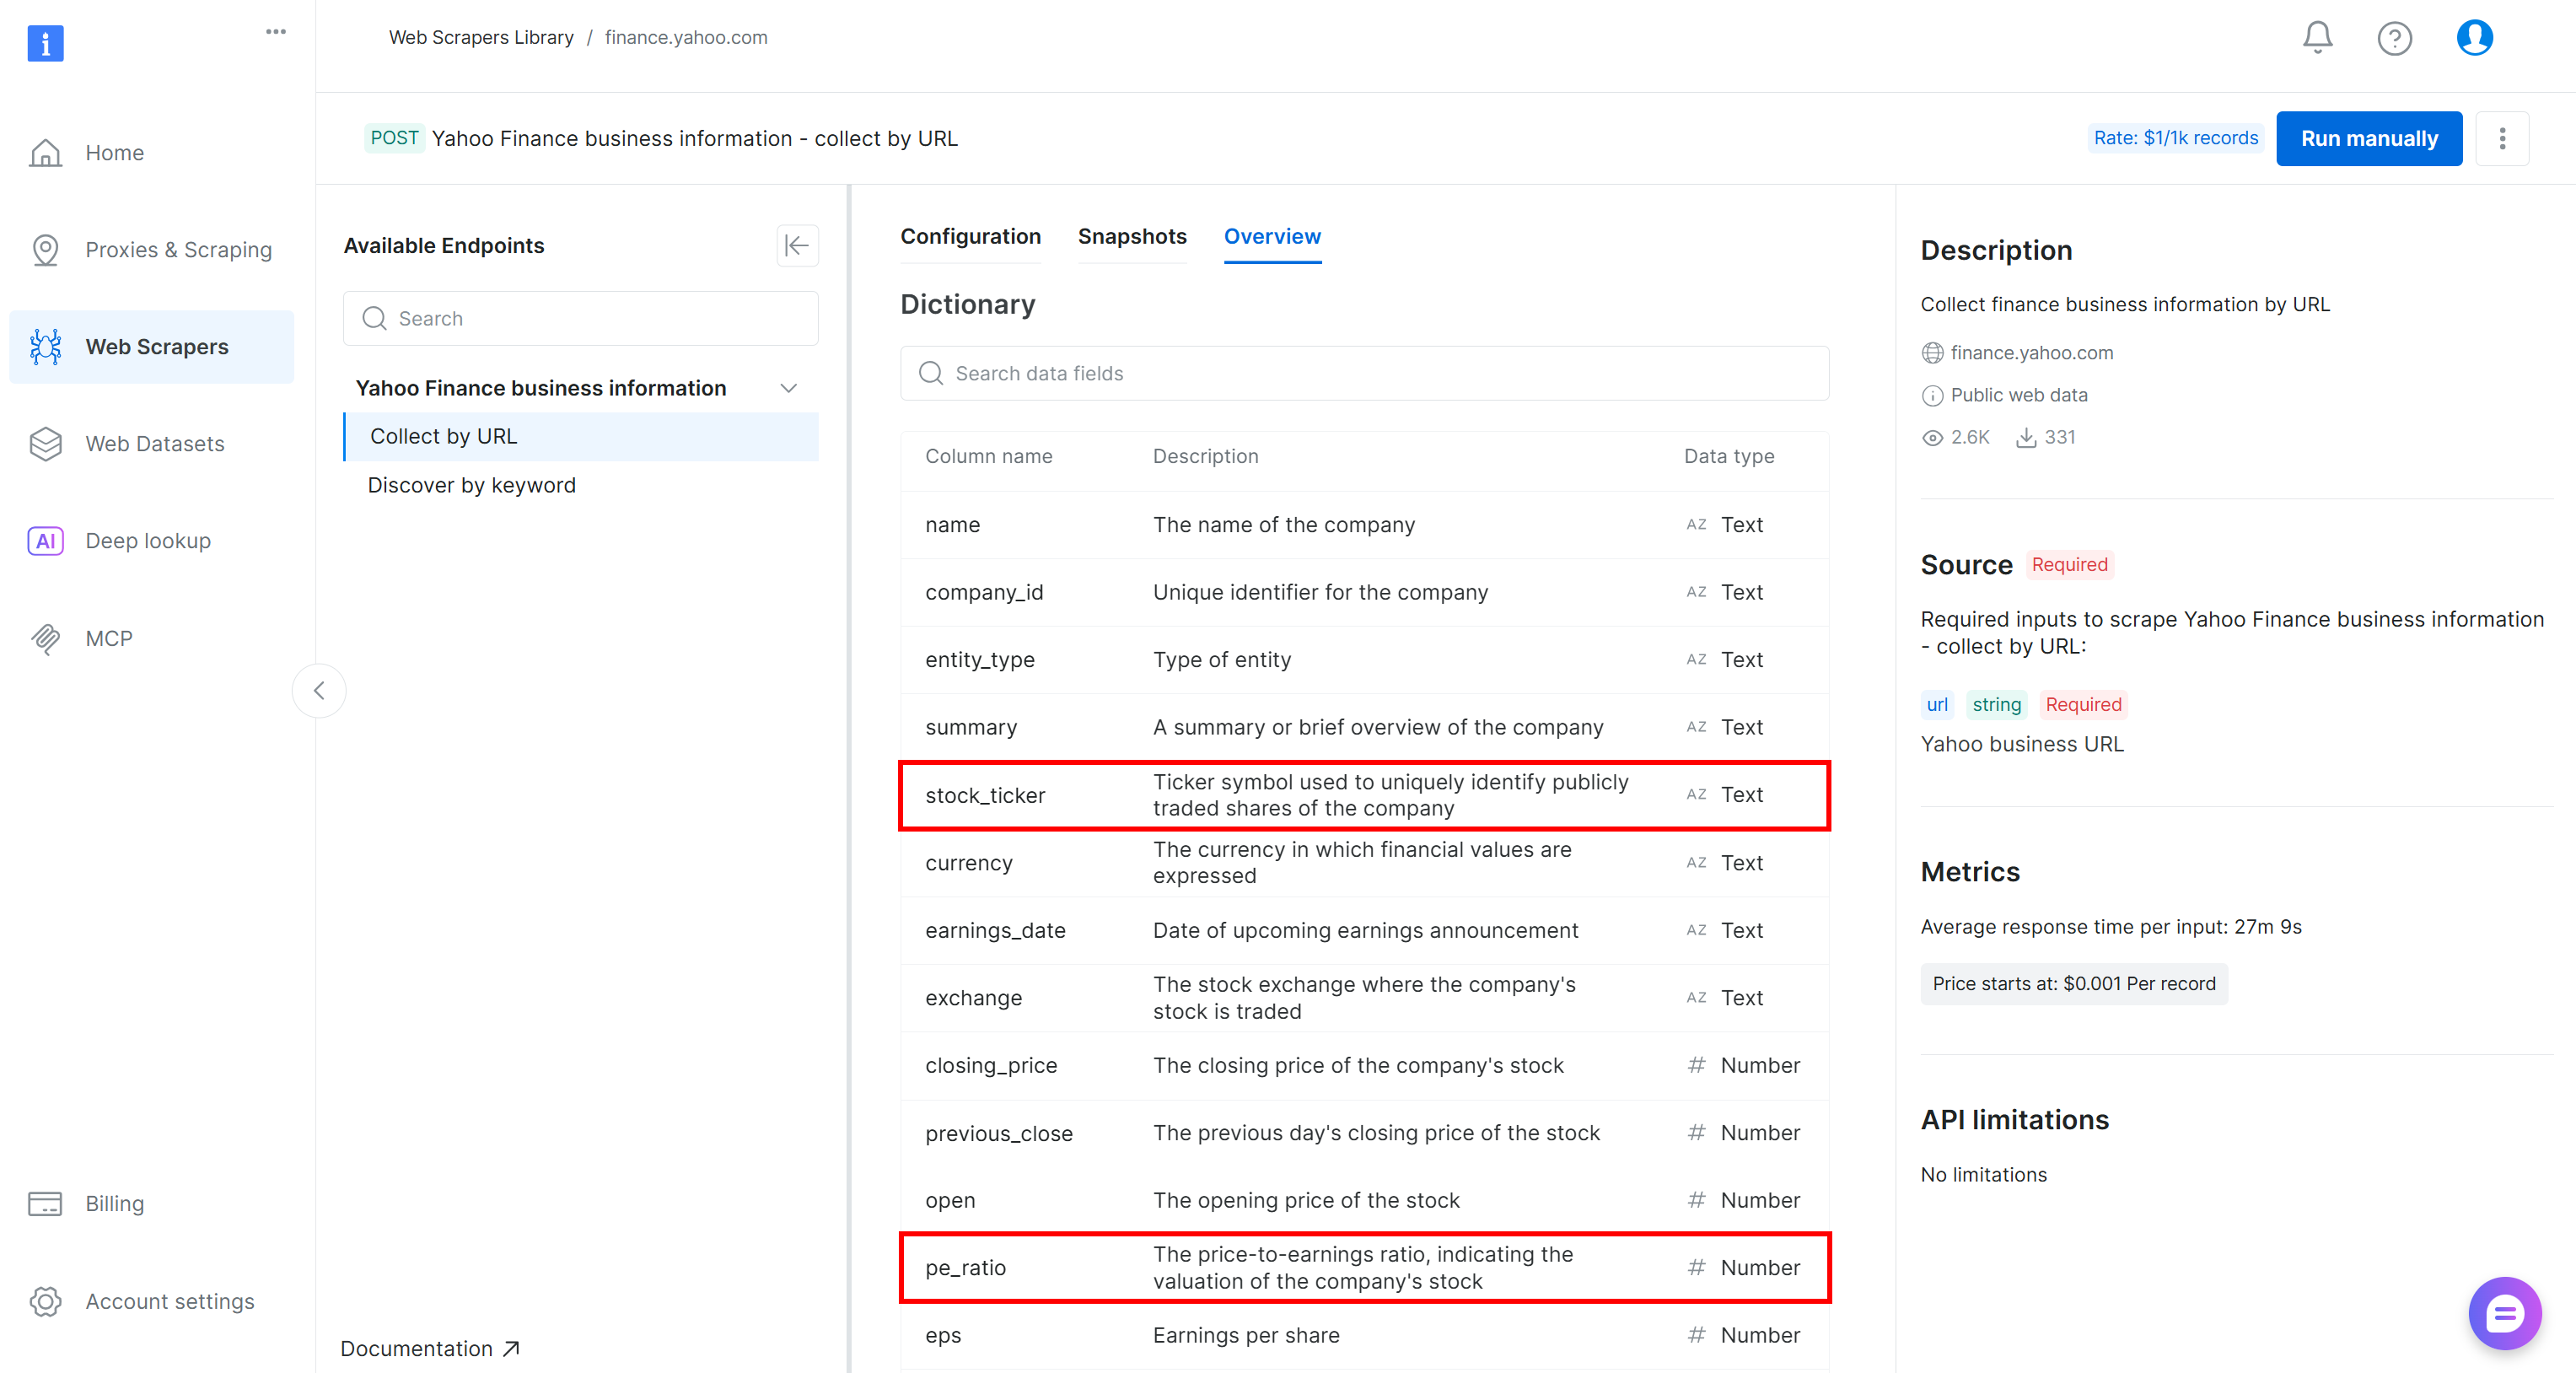
At this point, your ETL pipeline should look like this: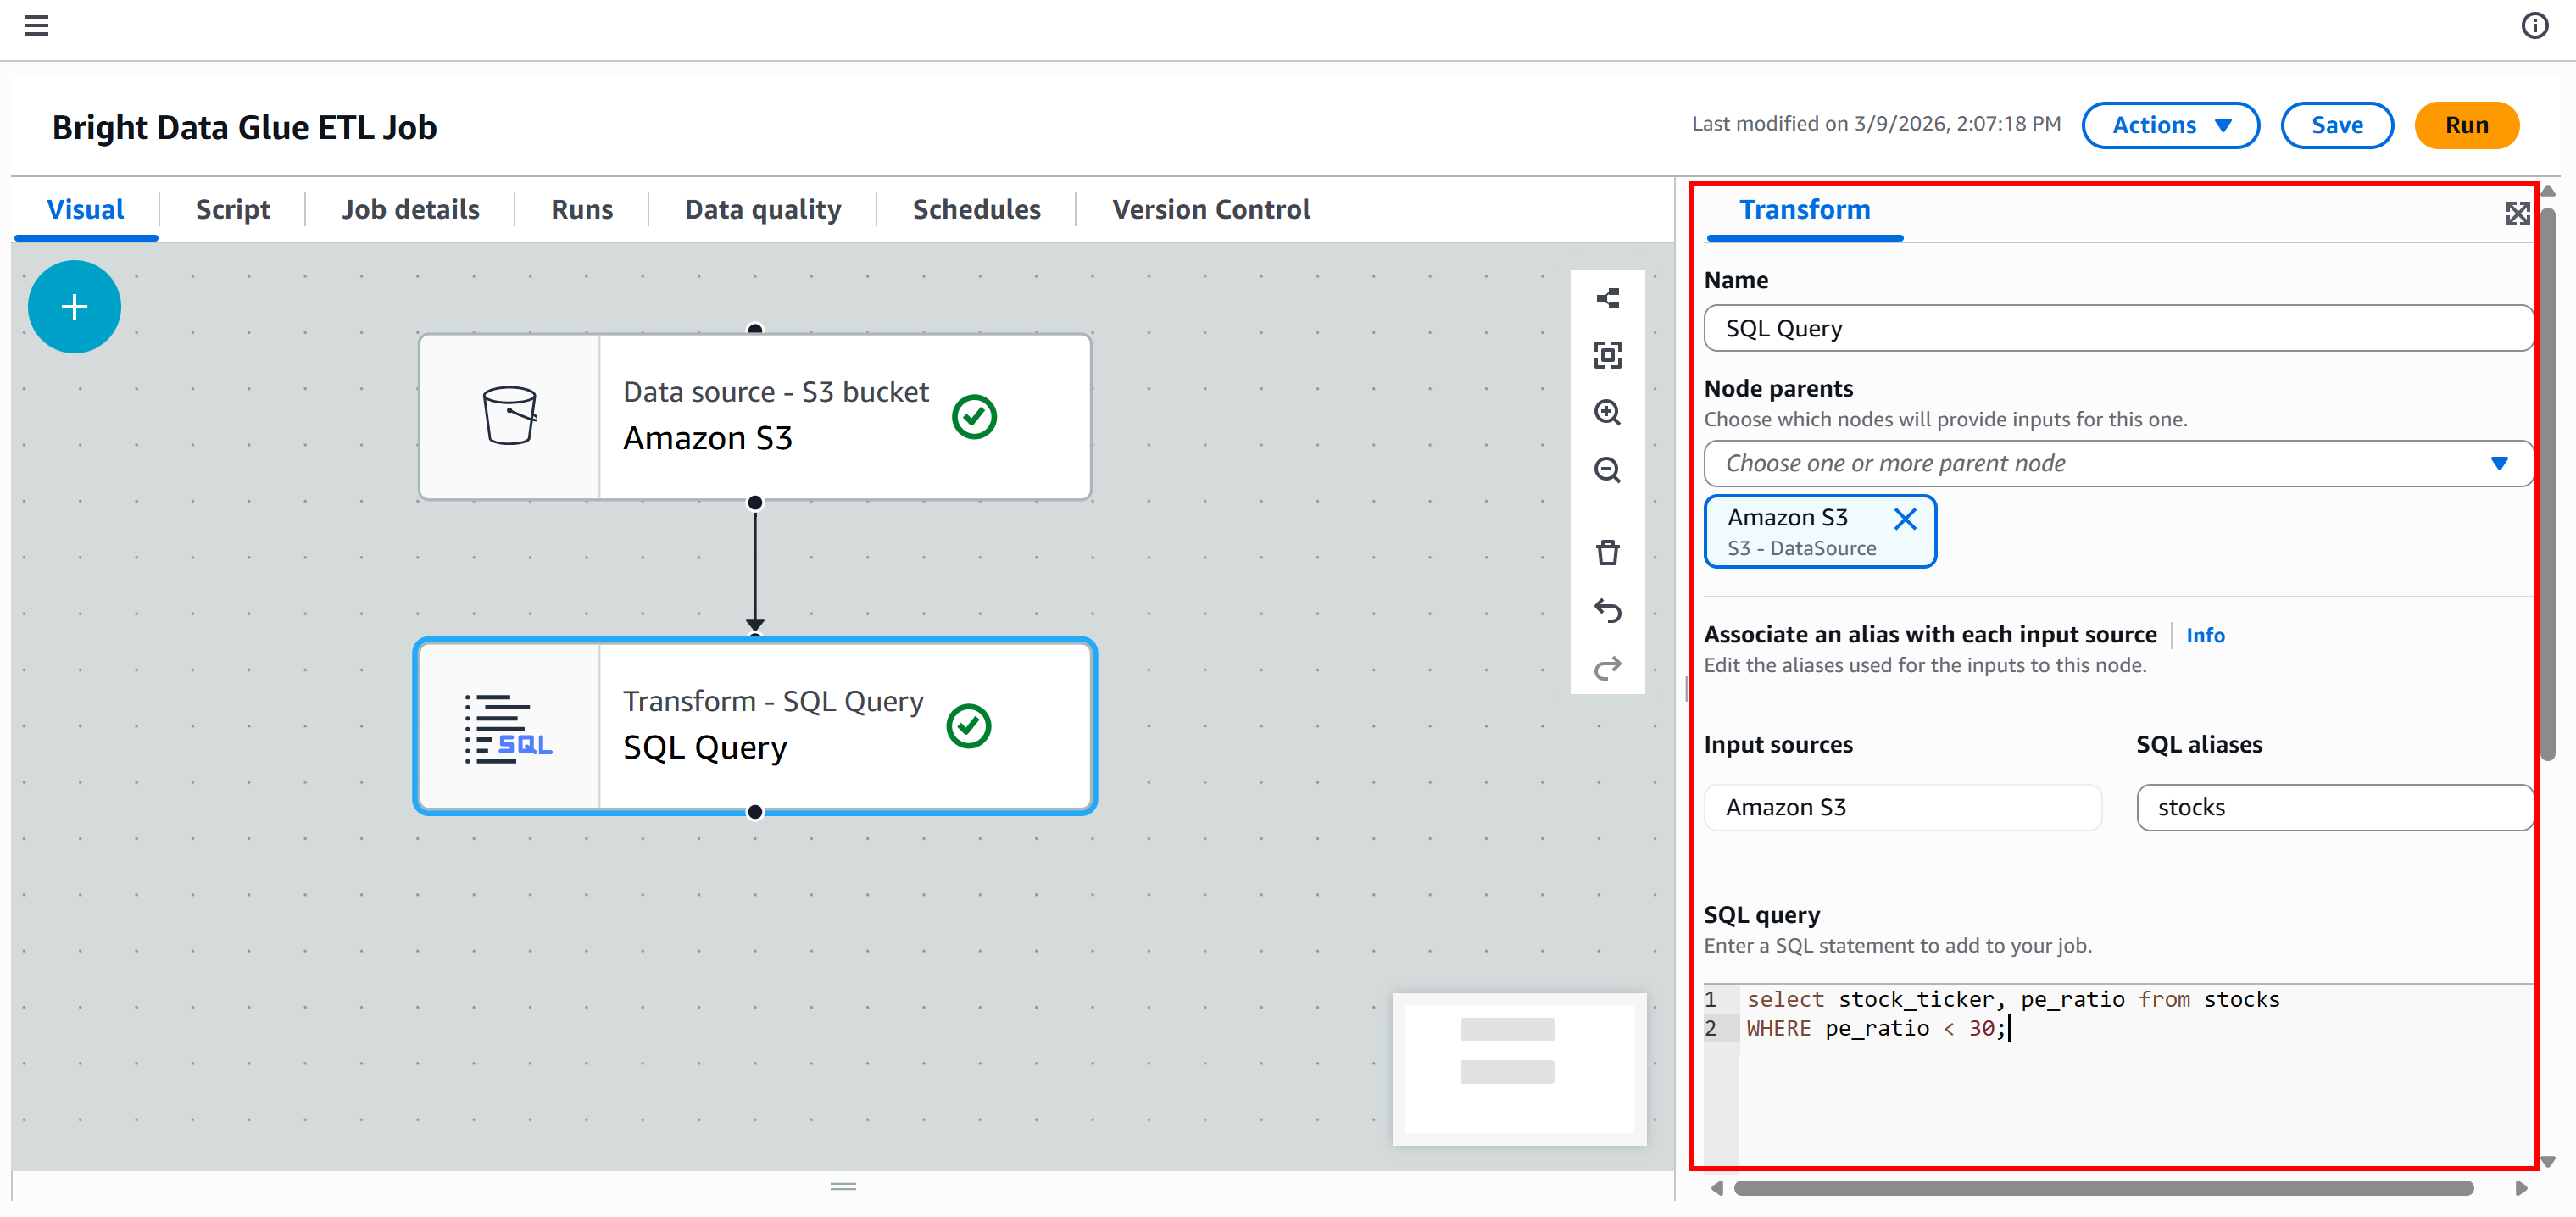
Note: In real-world pipelines, the Transform (T) phase usually includes multiple steps. You can implement them by adding several transform nodes and connecting them sequentially, or by creating multiple branches in the workflow.
Step #8: Connect to Your S3 Bucket in the Load (L) Phase
The output of your “SQL Query” node is the filtered, transformed data. The final step is to store this data in your S3 bucket to complete the Load (L) phase of your ETL pipeline.
In the “Targets” tab, add another Amazon S3 node:
Click on the new node to configure it. Set the parent node to be your “SQL Query” node. The output of the “SQL Query” node will be sent as input to the new Amazon S3 node.
Define the output format as “JSON” with no compression. Then, specify the target output S3 folder, such as:
s3://bright-data-etl-bucket/output/Note: Make sure to replace bright-data-etl-bucket with the name of your actual S3 bucket.
This way, the transformed data will be stored inside the /output folder.
Keep all other options as default, then press “Save” to update your AWS Glue ETL job: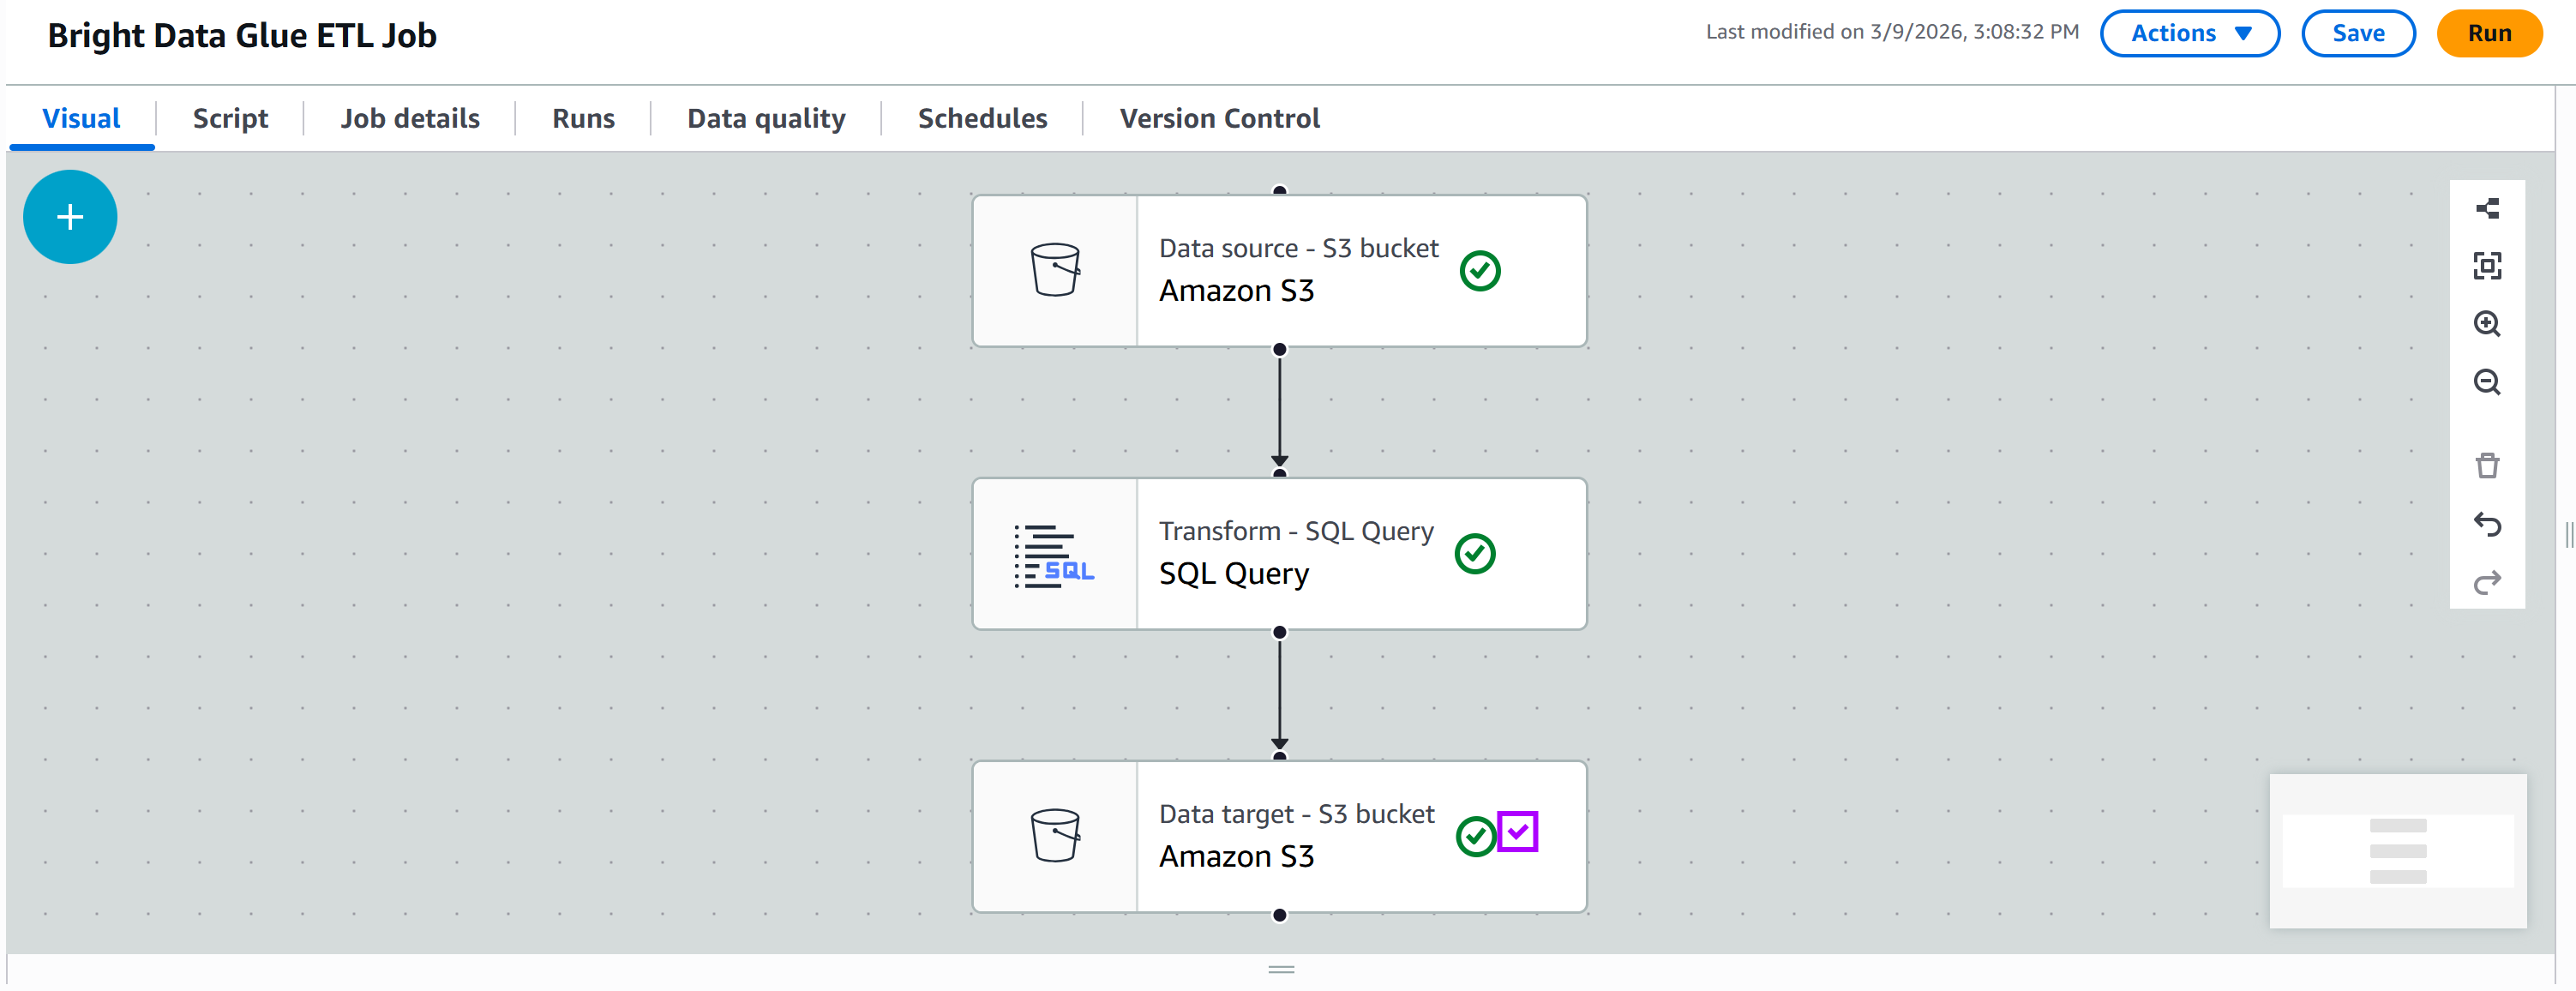
Terrific! Your ETL pipeline is now fully configured and ready to run.
Step #9: Run the Pipeline and Explore the Results
Press the “Run” button to launch your AWS Glue job. You should see a notification like this:
Move to the “Runs” tab to monitor the execution of your pipeline: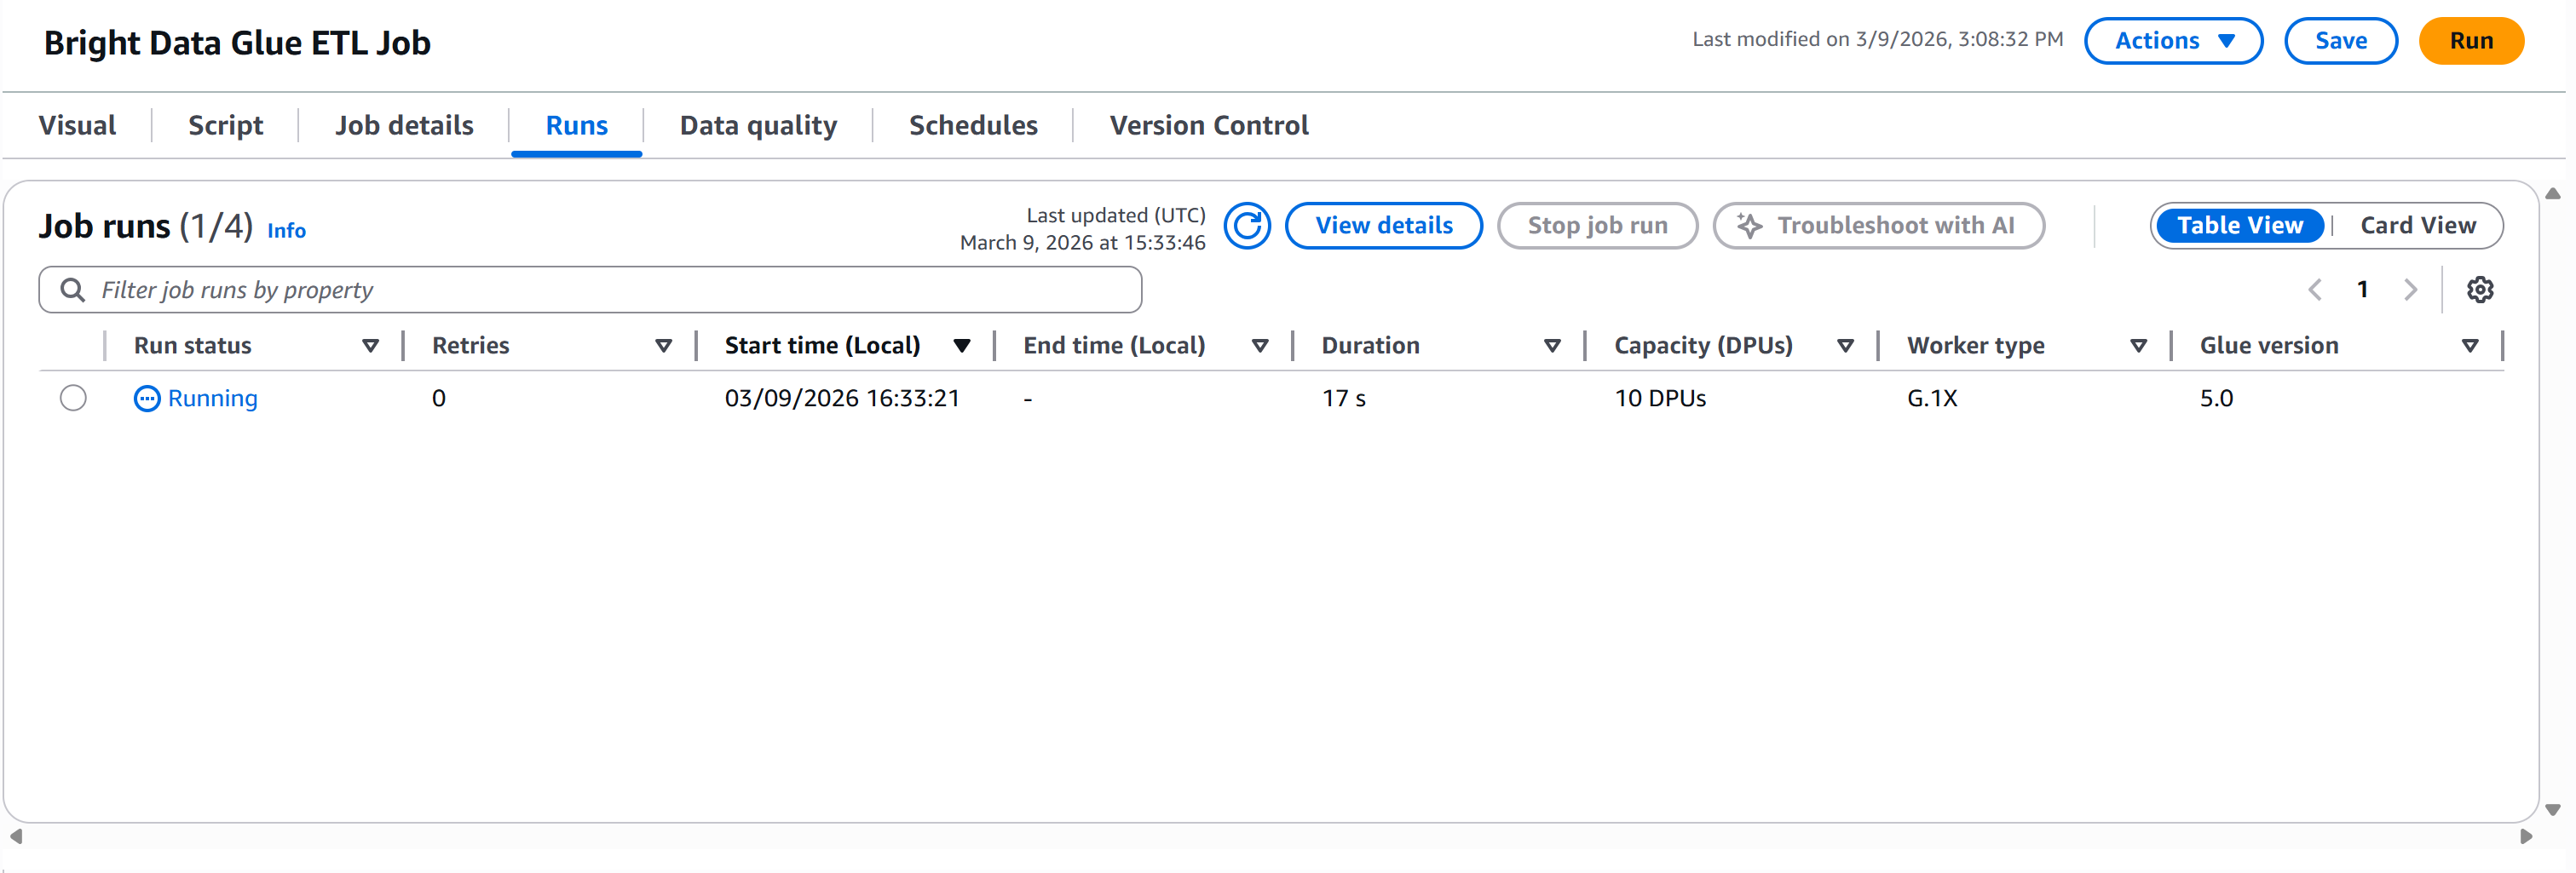
Wait for the “Run status” to reach the “Succeeded” status. This may take over a minute, so be patient:
Once complete, the output file will appear in the /output folder of your S3 bucket: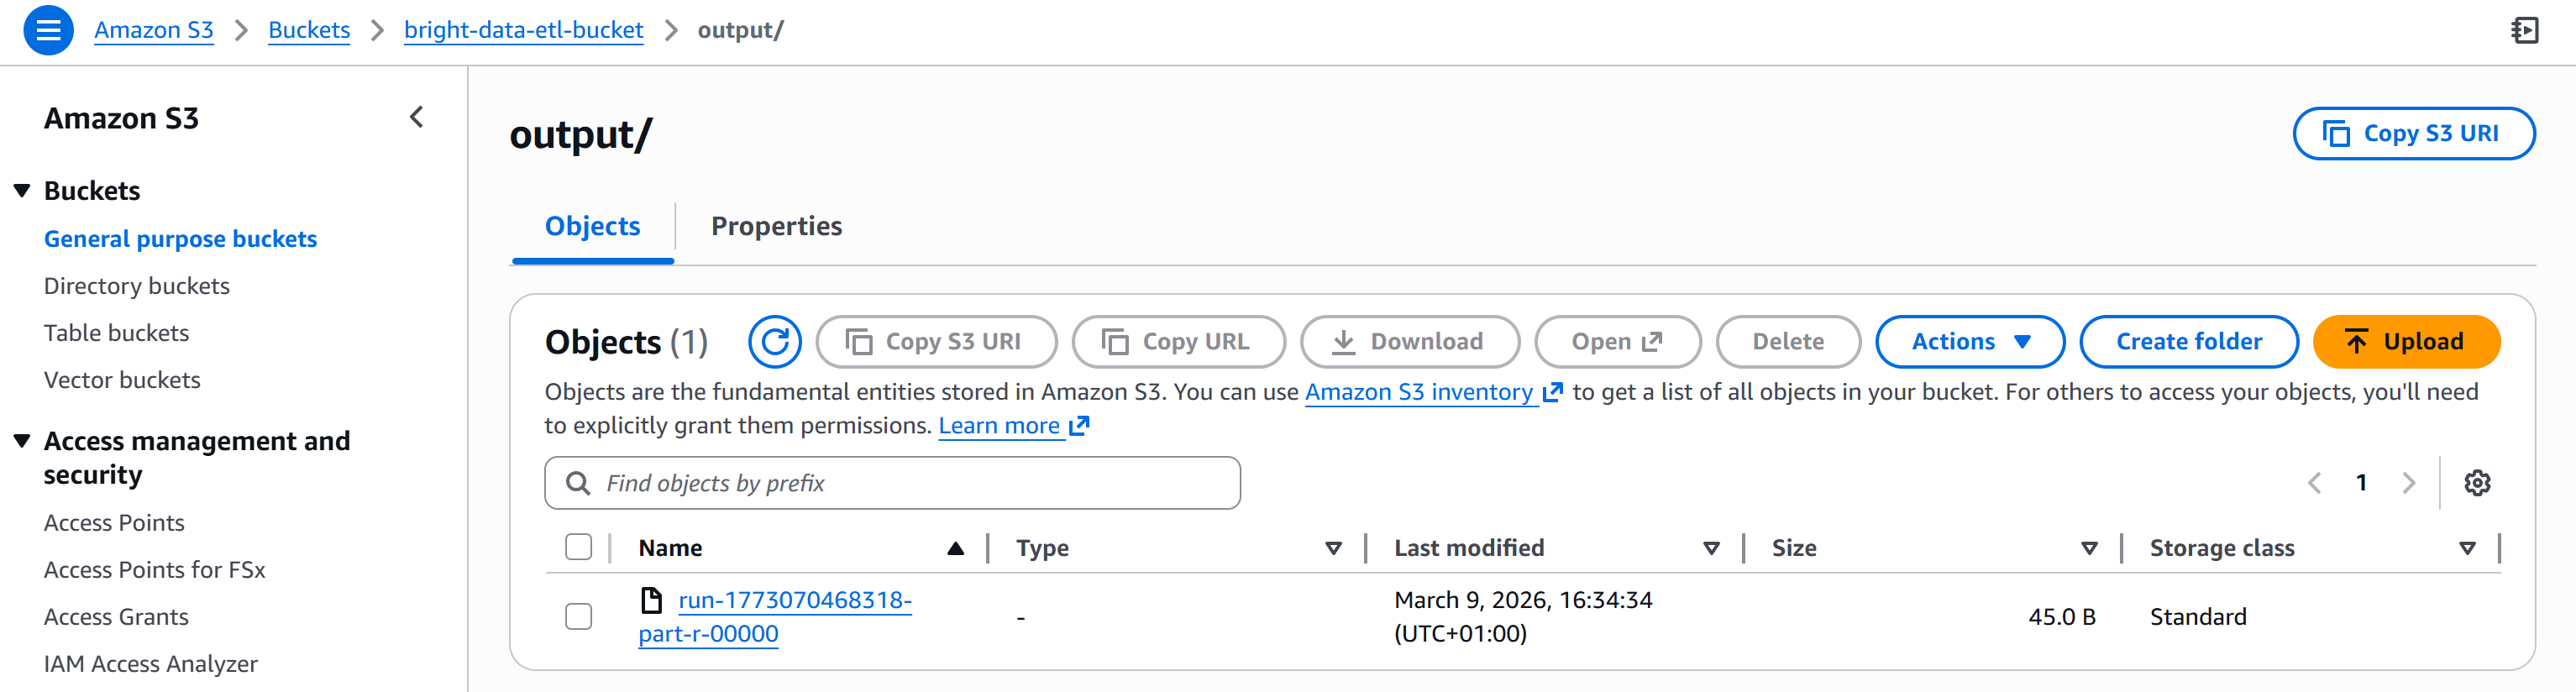
Open the produced file. You will see the list of stocks with a P/E ratio below your filter threshold (e.g., less than 30):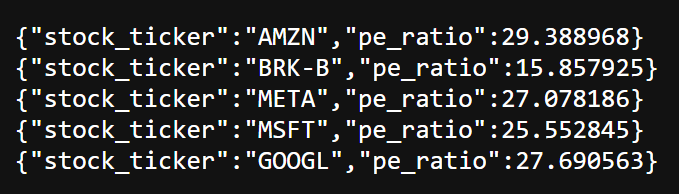
As you can see, the resulting stocks include AMZN, BRK.B, META, MSFT, and GOOGL.
Et voilà! You just built an AWS Glue ETL pipeline integrated with Bright Data. The Extract phase leverages Bright Data’s web scraping APIs, the Transform phase filters the data with SQL, and the Load phase stores the results back into S3.
Other Bright Data Integration Ideas in an AWS Glue ETL Job
There is no doubt that Bright Data can play a major role in the Extract phase of an ETL pipeline thanks to its web data retrieval capabilities.
However, Bright Data can also be leveraged beyond extraction, including in the Transform phase for data enrichment, validation, or verification. For example, you could:
- Enhance company profiles: Use the ZoomInfo Scraper to append firmographic data to records extracted from web sources.
- Validate employee information: Integrate the LinkedIn Profiles to verify job titles, emails, or social profiles.
- Retrieve competitor pricing or product details: Use the Amazon Scraper or Amazon Reviews Scraper to enrich your dataset with market insights.
- Add SEO or search data: Use the SERP API to include search engine ranking data or keyword insights as part of your transformed dataset, as well as for data verification.
If you are wondering how this integration is possible, refer to the official guide on defining custom visual transforms. All you need to do is include a JSON file with the descriptions and a Python file containing the logic for the Bright Data API integration.
Conclusion
In this tutorial, you learned what AWS Glue is and how Bright Data can enhance its capabilities through a wide range of web scraping solutions.
In particular, you saw how Bright Data’s Web Scraping APIs can support both the Extract (E) and Transform (T) phases of an ETL pipeline (whether it is retrieving raw data, enriching datasets, or verifying information).
Create a free Bright Data account today and start exploring our web data solutions!

Technical Writer
Antonello Zanini is a technical writer, editor, and software engineer with 5M+ views. Expert in technical content strategy, web development, and project management.


