







If your scraper receives an HTTP 429 or 403 with x-kpsdk-* headers, Kasada is blocking it, and the response doesn’t explain why. Kasada is an anti-bot platform that protects websites, APIs, and mobile apps from automated traffic. It runs an obfuscated JavaScript challenge in the browser, evaluates the client, and issues a short-lived token that every later request must include.
To bypass Kasada, you first need to know what that challenge script checks. I analyzed a real one, and what I found decides whether you build a solver or buy one.
TL;DR
- Kasada needs a valid token:
x-kpsdk-ctcomes only from completing its JavaScript challenge, so TLS impersonation alone can’t pass it. - The challenge changes on every request: it’s a custom virtual machine, so a copied solver stops working within hours.
- Automated browsers leave signals: a default setup exposes
navigator.webdriver, aHeadlessChromeuser agent, and automation framework names that Kasada can detect. - You can build or buy: maintaining a solver is ongoing work, while Bright Data’s Web Unlocker runs the challenge for you and bills per successful request.
How to confirm a site uses Kasada
A 403 or 429 tells you something blocked the request. It doesn’t tell you which system did, and that answer decides everything you do next. Cloudflare, DataDome, Akamai, and Kasada all return the same status codes, so the code alone can’t identify the system. Each vendor’s headers and cookies identify it, and you can read them with 1 request:
curl -sI https://target.example/ | grep -i \
  -e '^x-kpsdk' -e '^set-cookie: kp_uidz' \
  -e '^cf-ray:' -e '^set-cookie: __cf_bm' -e '^server: cloudflare' \
  -e '^x-datadome' -e '^set-cookie: datadome' \
  -e '^server: akamaighost' -e '^set-cookie: _abck'
Match from the start of the header line (that’s what the ^ does), not anywhere in the line. A broad grep -i akamai also matches unrelated headers that contain a CDN hostname, such as the page’s Content-Security-Policy, and returns false positives.
Each system has a different signature. The Kasada row comes from my own capture, and the other rows come from each vendor’s public documentation:
| What the response contains | The system is |
|---|---|
x-kpsdk-* headers and a KP_UIDz cookie, plus an ips.js script that sets window.KPSDK |
Kasada |
cf-ray header, __cf_bm cookie, server: cloudflare |
Cloudflare |
x-datadome header and a datadome cookie |
DataDome |
server: AkamaiGHost on a blocked response, or an _abck cookie on an allowed response |
Akamai |
If you see any x-kpsdk-* header, the system is Kasada. If you see one of the others, the Kasada-specific steps that follow don’t apply, and Bright Data’s guides to bypassing Cloudflare and Akamai bot detection cover those systems.
What Kasada checks before it grants a client access
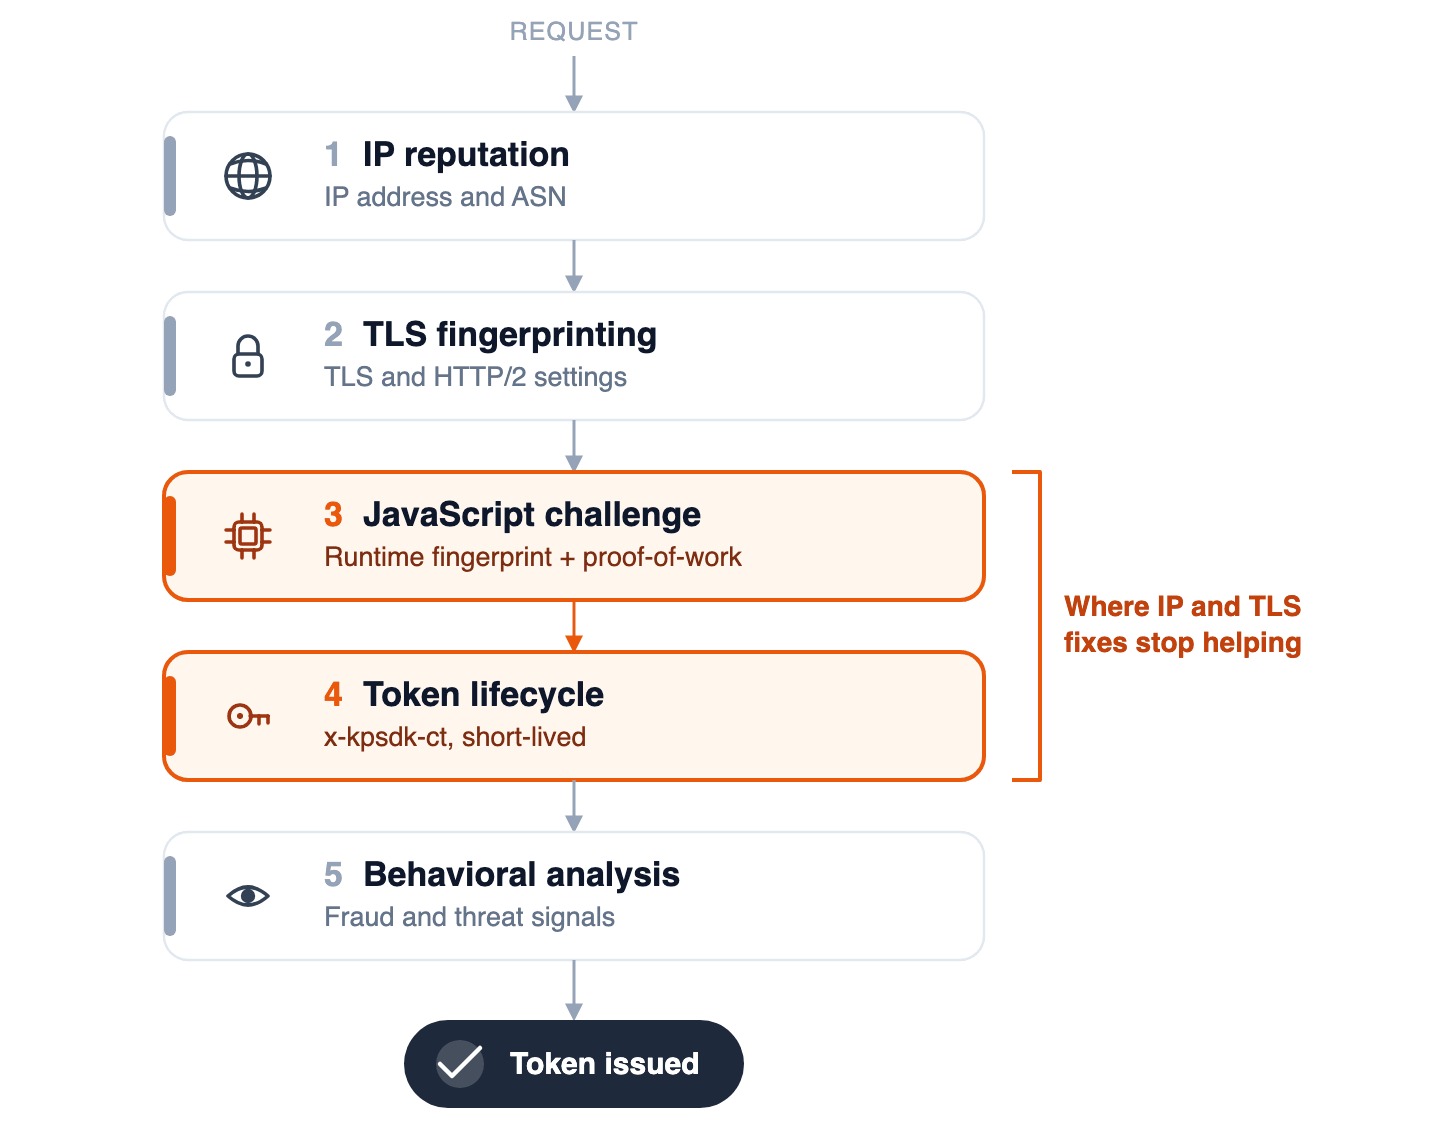
Kasada doesn’t rely on a single signal. It uses several layers, and a request has to pass all of them to receive a token. Understanding the layers explains why a fix that works against a simpler system has no effect here.
The first layer is IP reputation. Kasada checks the reputation of the IP address and its Autonomous System Number (the network the address belongs to). A datacenter IP range that many scrapers already used has a poor reputation before you send a single header. Residential IP addresses from real consumer ISPs have a better reputation, because real users connect from those same networks.
The second layer is TLS fingerprinting. Kasada reads the TLS handshake and the HTTP/2 settings, then compares them to what a real browser sends. A default Python client offers cipher suites and extensions in an order no browser uses, so the fingerprint doesn’t match the user agent it claims. How TLS fingerprinting works covers this in more detail.
The third layer is the JavaScript challenge. Kasada sends an obfuscated script to your client and checks what it returns. The script builds a fingerprint of the runtime, runs a proof-of-work computation (a puzzle the client must solve), and combines both into an encrypted bundle. The fourth layer is the token lifecycle, which I inferred from how the protocol works and didn’t capture directly, and the fifth is behavioral analysis, which I didn’t test. A good IP and a matching TLS handshake satisfy only layers 1 and 2, so the sections below focus on layers 3 and 4.
In the order a request passes through them, the layers look like this:
How the Kasada ips.js challenge works
The ips.js challenge is a custom virtual machine, so reading the script doesn’t show what it checks. To see it directly, I requested a Kasada-protected page and read the response. The target was a public real-estate website, and the response was a 429 rather than the page.
The 429 response and the ips.js script
The response included the Kasada headers and a small HTML body that starts the challenge:
HTTP/2 429
x-kpsdk-r: 1-AA
x-kpsdk-ct: <initial token>
content-type: text/html; charset=utf-8
access-control-expose-headers: x-kpsdk-ct,x-kpsdk-r,x-kpsdk-c,x-kpsdk-h,x-kpsdk-fc
set-cookie: KP_UIDz-ssn=<value>
You can see the same headers yourself in Chrome DevTools, on the first request in the Network tab (the red entry at the top of the list):
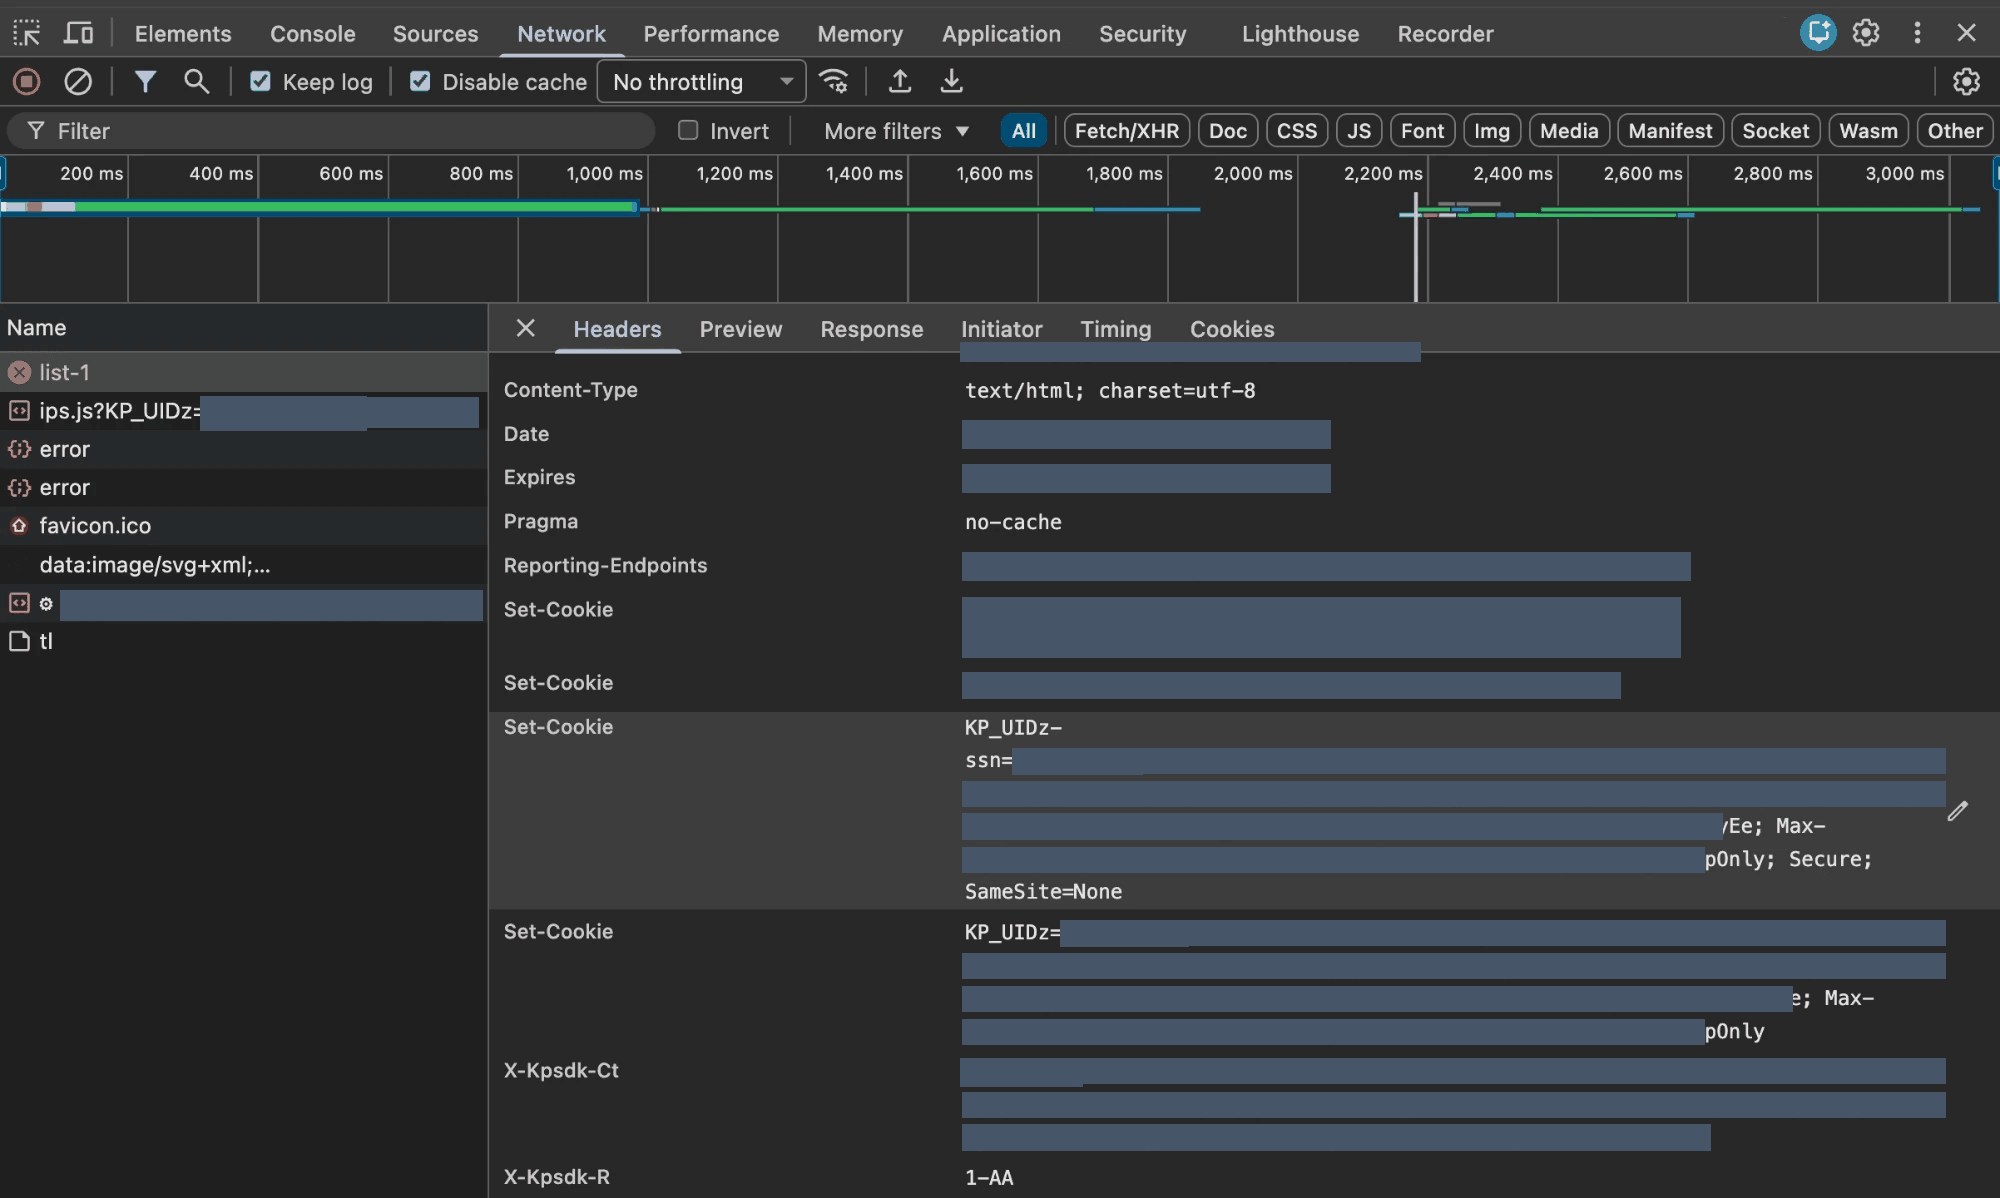
The 429 is the challenge itself, not a rate limit, and it includes an initial token and a script tag. The body sets a window.KPSDK object and loads the challenge script from a path that is unique to each protected site:
<script>window.KPSDK={};KPSDK.now=typeof performance!=='undefined'&&performance.now?performance.now.bind(performance):Date.now.bind(Date);KPSDK.start=KPSDK.now();</script>
<script src="/<site-id>/<script-id>/ips.js?KP_UIDz=...&x-kpsdk-im=..."></script>
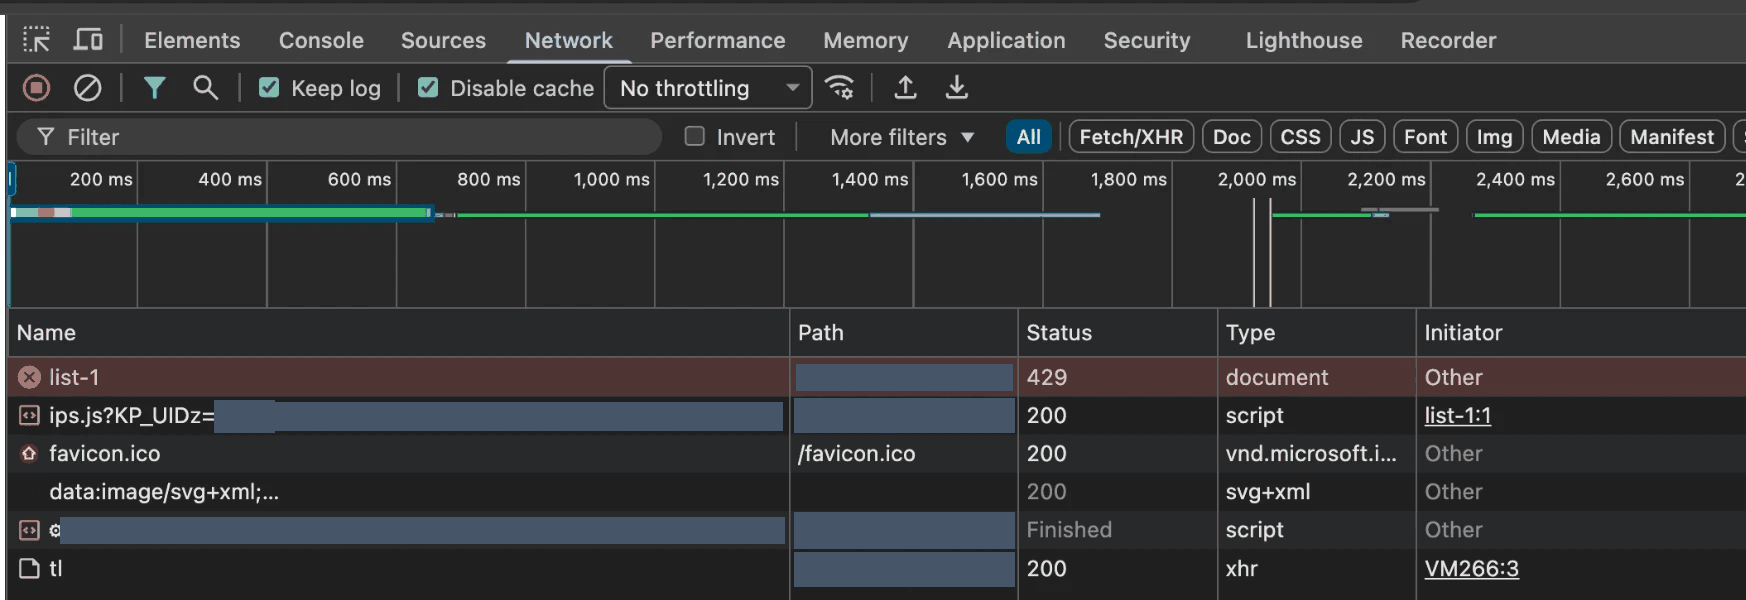
In DevTools the whole exchange appears as the 429 document followed by the script it loads, and the Initiator column links the script to that document:
The script, ips.js, is a 641 KB file with almost all of its code on 1 line. Opened in a text editor, it’s unreadable:
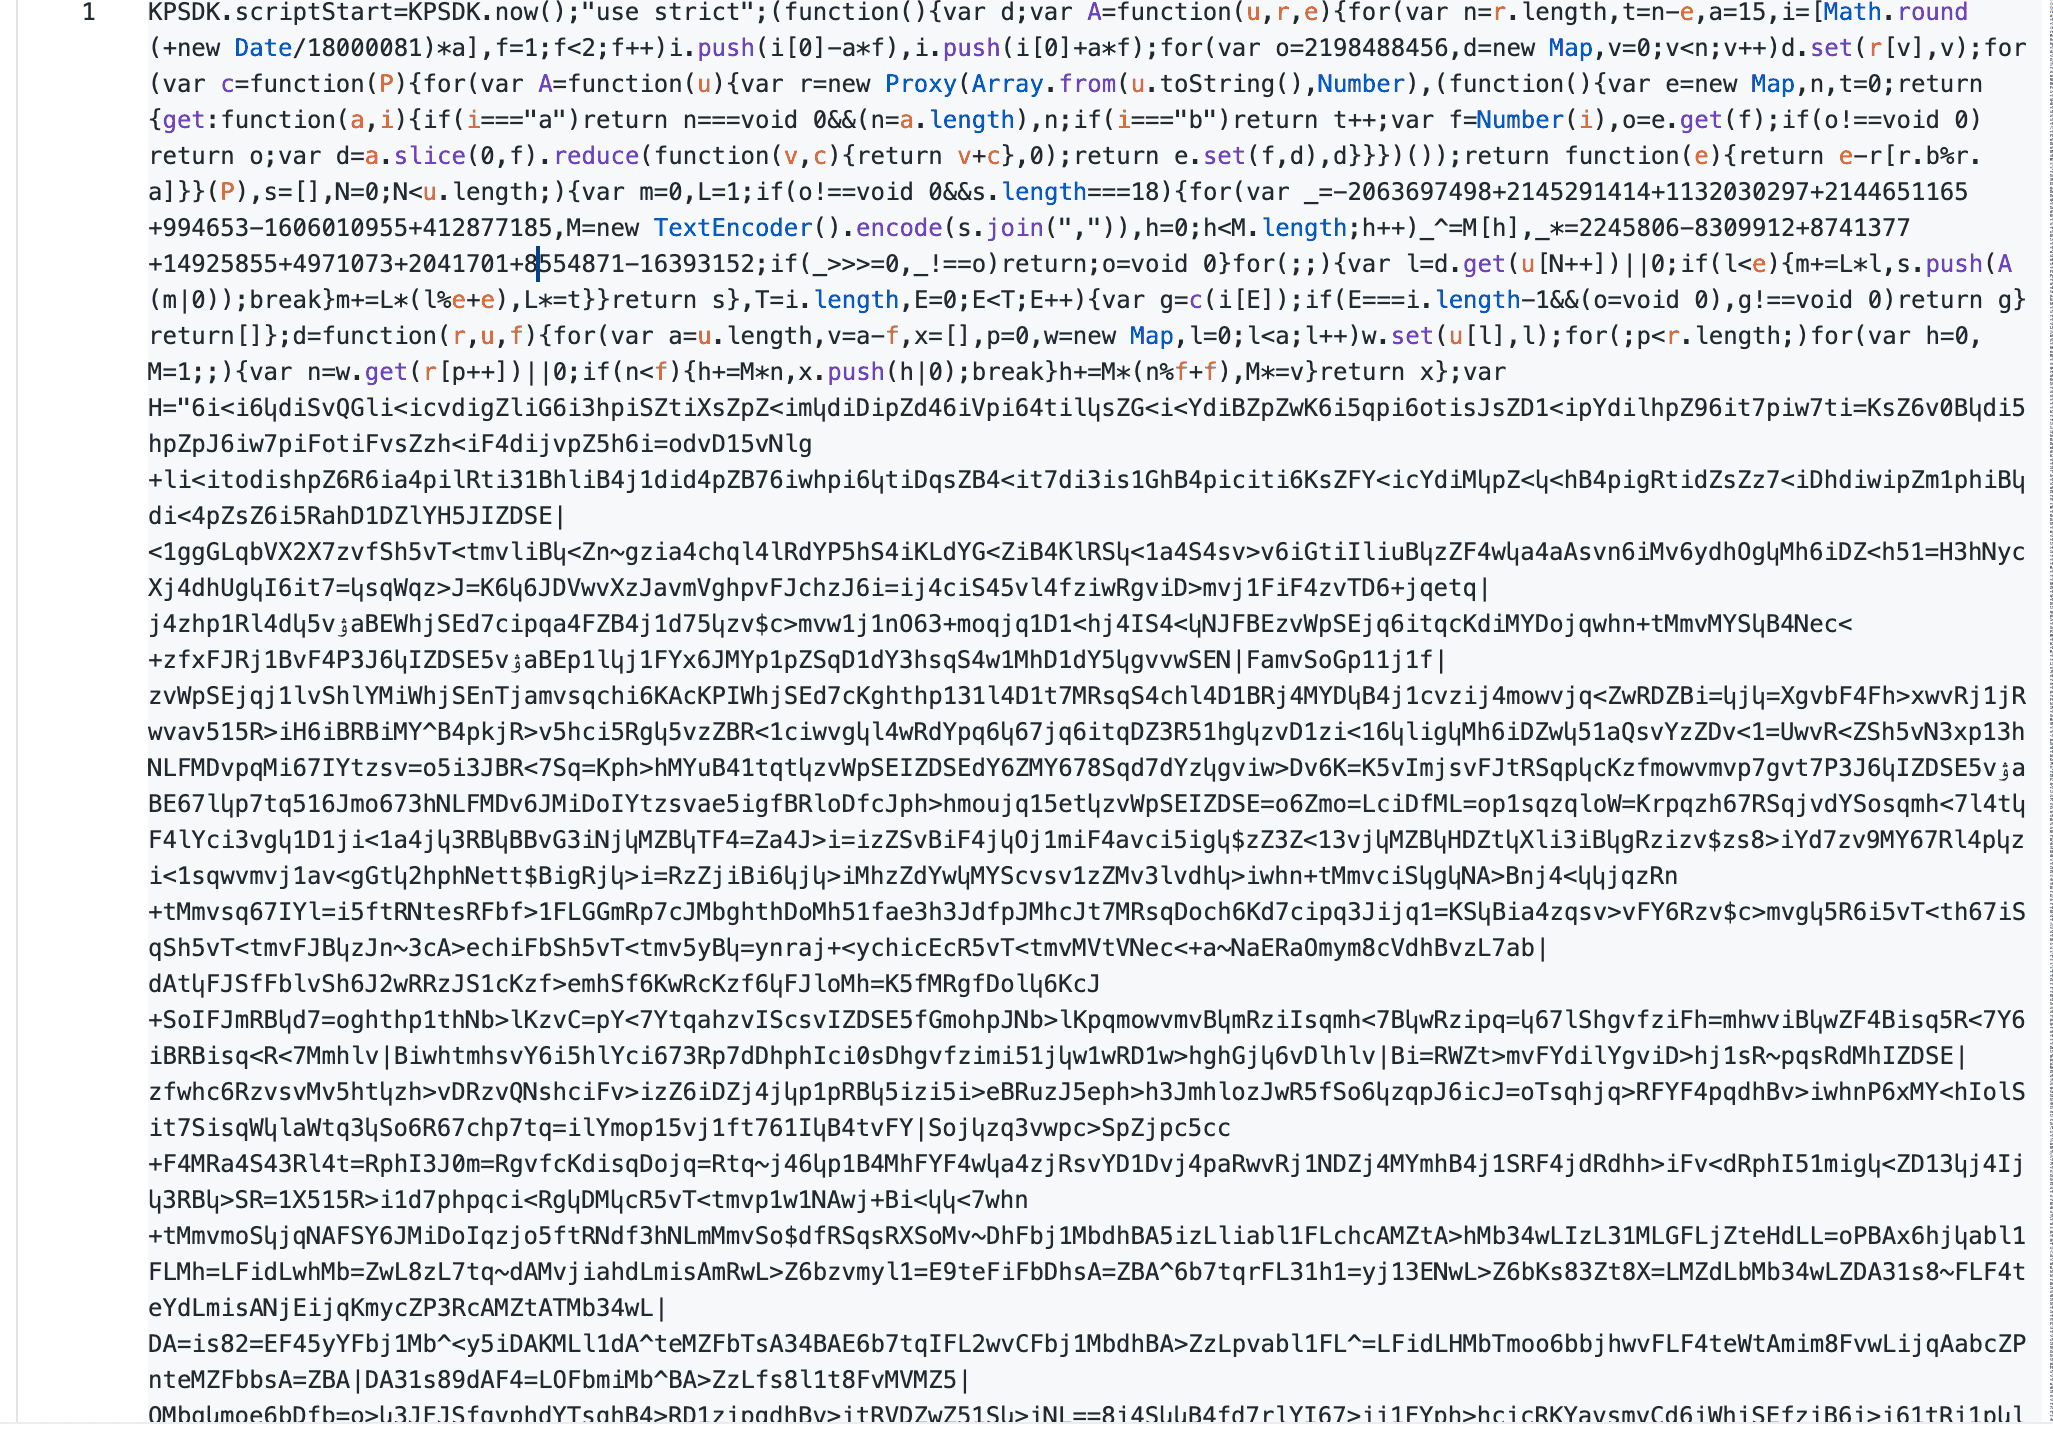
There are no readable names for the checks, no navigator.webdriver string, and no function called detectHeadless. The whole program is a custom virtual machine (VM) with its logic compiled to bytecode, so the source you can read is the interpreter, and the checks stay hidden in the bytecode.
Decoding the bytecode and string table
To look inside the interpreter, I ran its decoder stage in an isolated Node.js process and printed what it produced. The result shows the actual size of the program:
BYTECODE len: 268444
STRING POOL len: 38459
So the payload is a bytecode program plus a string table (the STRING POOL line), both decoded at runtime from a large string at the start of the script. Because the program decodes itself at runtime, the strings you’d search for don’t exist until the VM builds them while it runs. Fetch the same script again and the sizes change. In 3 further consecutive requests to the same URL, the decoded program had 266,322, 275,713, and 266,322 bytecode entries.
Different parts change on different schedules. A 5-hour window controls the key that decodes whatever content a request receives. The content itself, meaning the padding and values stored inside the script, changes randomly on every response, independent of that key. So a saved copy fails for two reasons: its key expires, and every new fetch has different content.
Why a saved copy of the script stops working
A few properties of the decoder matter if you plan to build a solver from a saved copy of the script. First, the key depends on the current time. The decoder derives it from Math.round(Date.now() / 18000081), and 18000081 milliseconds is almost exactly 5 hours. When I moved the system clock forward past that window and ran the decode again, it returned an empty program:
 0h  -> bytecode len 268444, pool len 38459
 6h  -> bytecode len 0, pool len undefined
The decoder accepts a key from about 1 time window before or after the current one, so how long a saved script keeps working depends on where in its window you captured it. In my re-run at 6 hours ahead, it already returned nothing, so a saved script stays useful for a few hours, not a day.
Second, the payload checks its own integrity. When I swapped 2 characters in the 72-character alphabet the decoder uses, the whole program failed to decode rather than producing wrong output. A verifier in the decoding loop keeps a running checksum and stops if any byte was changed.
None of this gives you code worth copying. The challenge is polymorphic (it changes on every fetch), so logic you copy from 1 capture won’t keep working for long. A solver that fetches the script fresh avoids the stale copy, but it then has to decode different content under a new key on every run, which is the maintenance work described in the build-versus-buy section. The numbers above come from 1 protected site and 1 run, and Kasada can change any of them in a later release. What applies to other sites is the design. The script checks itself, the key depends on the time, and the proof-of-work is linked to the fingerprint.
Why the token, not the proof of work, blocks scrapers
The proof-of-work is lightweight for a real browser and inexpensive for the server to verify, so it isn’t costly enough to block automation by cost alone. The token is what blocks a scraper, because Kasada issues a valid one only for a result from a complete VM run, and the proof-of-work is one part of that result.
The proof-of-work requires the client to run the VM. The VM computes the proof and collects the fingerprint, then combines both into 1 encrypted bundle. The script checks its own integrity as it decodes, so a client has to run the VM and let the fingerprinting work normally to return a valid result. Computing the proof on a server and attaching a separate fingerprint doesn’t help, because Kasada only accepts a token from 1 complete VM run.
That flow ends with a token. I didn’t capture this exchange directly, so what follows is inferred from how the protocol works. The client sends the encrypted bundle back with a POST request, and if it passes, Kasada replaces the initial x-kpsdk-ct value with a valid one that grants access. Every later request has to include that token in its header and cookie, and the token expires. Because the token expires, a scraper has to repeat the exchange to get a new one.
From the first 429 to a valid token, the exchange between client and server looks like this:
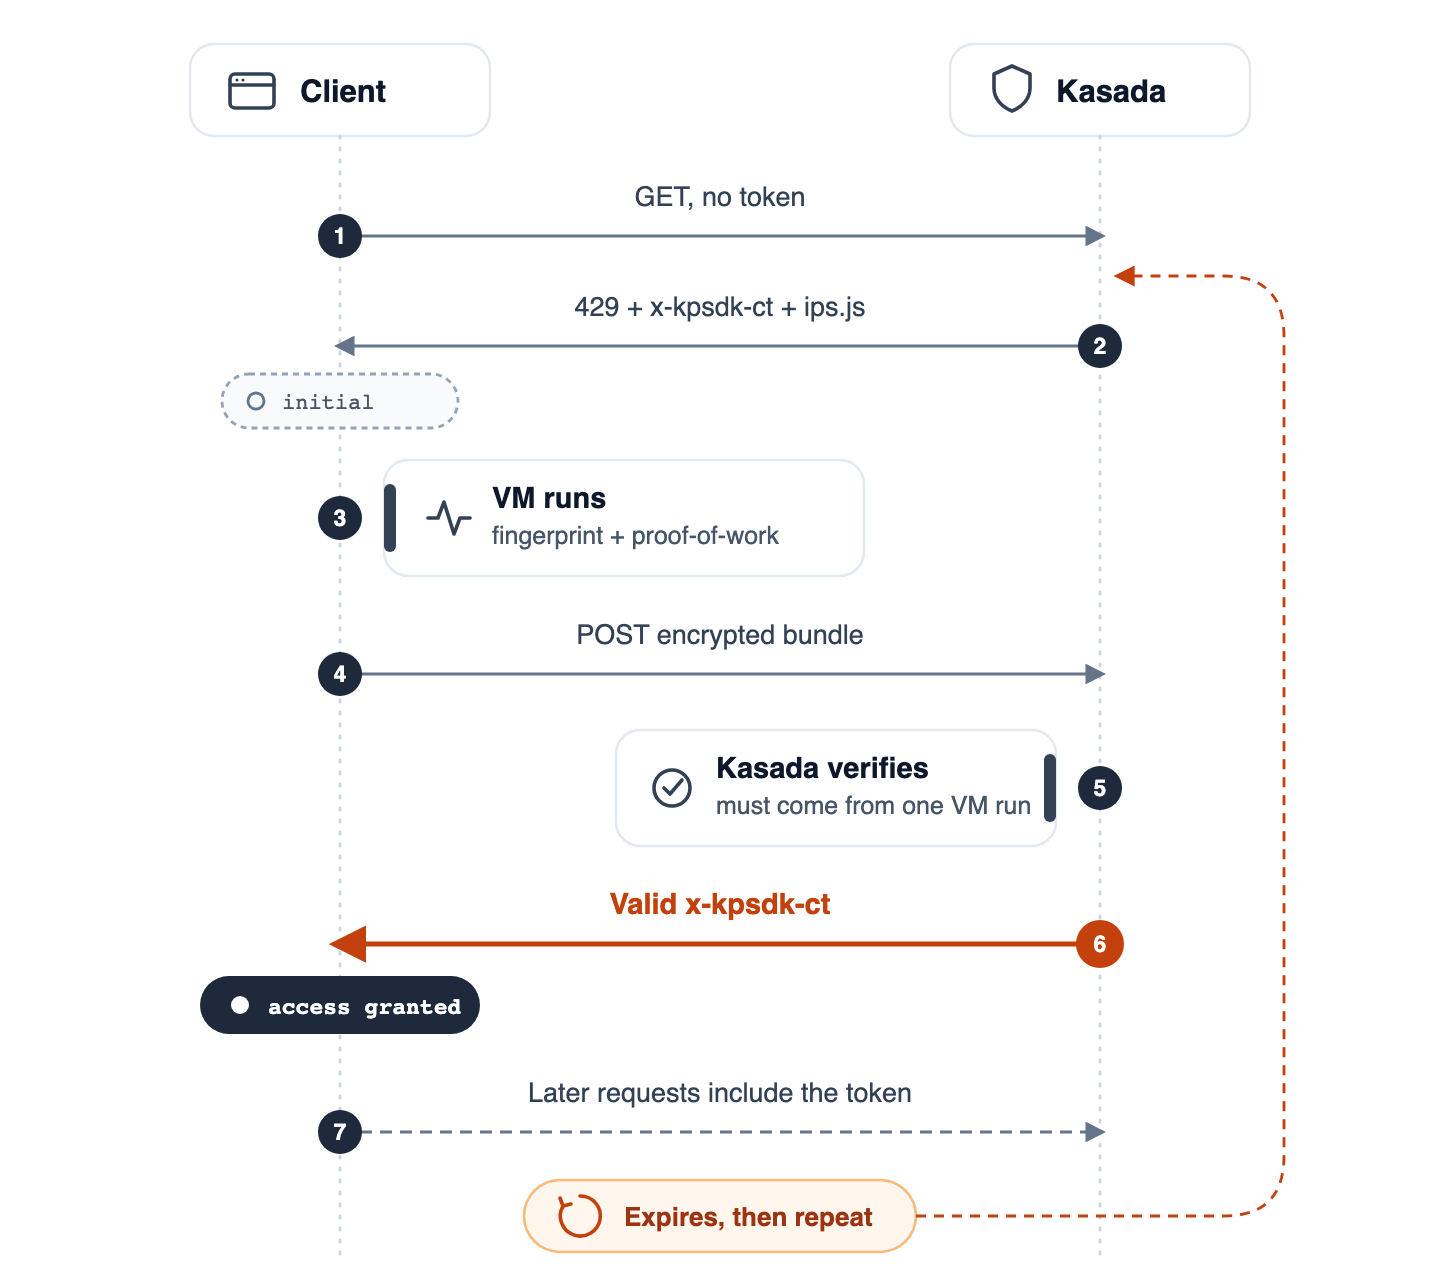
The token also differs between responses. Across 3 consecutive requests, the same Kasada 429 returned 3 different x-kpsdk-ct values, so the token isn’t a fixed value you can capture once and send again.
How Kasada detects headless browsers
If the VM needs a runtime that behaves like a real browser, the obvious move is to automate a real browser. That works better than an HTTP client, but a default automated browser still sends signals, and the decoded string table contains the names Kasada checks for.
Signals in a default headless browser
An unmodified headless Chromium shows that it’s automated. I launched one with Playwright and read the browser properties that the payload checks:
# pip install playwright, if you don't already have it
from playwright.sync_api import sync_playwright

with sync_playwright() as p:
    page = p.chromium.launch().new_page()
    print(page.evaluate("[navigator.webdriver, navigator.userAgent, navigator.plugins.length, window.chrome]"))
The values it prints, shown here one per line:
navigator.webdriver     true
userAgent               ...HeadlessChrome/<version> Safari/537.36
navigator.plugins       0        (a real headed browser lists several)
window.chrome           null     (present on a normal desktop Chrome)
Each line is a signal. navigator.webdriver is true under automation and false on a normal browser. The user agent string contains HeadlessChrome. The plugin list is empty, and the window.chrome object that a desktop Chrome exposes is missing.
You can hide these signals, but how you hide them matters when the target is Kasada. A stealth-patched Playwright changes these properties with JavaScript after the browser starts, so a check designed to find such overrides can still detect it. A source-level build, such as the Camoufox Firefox fork or a patched Chromium like BotBrowser, changes the values in the browser’s own C++ code before any script runs. That leaves no JavaScript override for the check to find. An outdated Chrome build is also a signal, because its version doesn’t match what real users run. But updating the browser doesn’t remove the automation framework’s own signals.
Signals from automation frameworks
Playwright leaves names in the page that a normal browser doesn’t have. When I added a single binding to a Playwright page, it created these global variables:
from playwright.sync_api import sync_playwright

with sync_playwright() as p:
    page = p.chromium.launch().new_page()
    page.expose_binding("demo", lambda source: None)
    print([k for k in page.evaluate("Object.keys(window)") if "playwright" in k.lower()])
It prints these names:
['__playwright__binding__', '__playwright__binding__controller__']The names above are only what a single binding creates. Separately, I searched the decoded string table for Playwright’s internal binding names. About half of the names in the Playwright release I tested appeared there as plain strings, next to webdriver, HeadlessChrome, and electron. The names that appeared are its recorder and devtools bindings.
A name in the decoded string table doesn’t prove the VM acts on it. Still, finding them there shows that Kasada knows these tools by name, so it doesn’t have to guess which automation library it’s detecting.
CDP detection and the tools that avoid it
Even without a binding, the Chrome DevTools Protocol (CDP) that automation frameworks use to control the browser exposes them. An article on CDP fingerprinting showed that calling Runtime.enable, which Playwright and Puppeteer do by default, makes the browser immediately serialize (convert to text) objects passed to console methods. A short script can detect this without timing measurements, by passing a Proxy object to a console call:
let detected = false;
const trap = new Proxy({}, { ownKeys() { detected = true; return []; } });
console.groupEnd(Object.create(trap));
// detected is true on older Chromium when a CDP client has called Runtime.enable
The author reported the technique working when they published it, and I confirmed it independently on older Chromium builds, where the snippet returns true on a default Playwright page because Playwright calls Runtime.enable by default. On the newer Chromium builds I tested, the same snippet returns false, even after I call Runtime.enable myself, so Chrome has changed how it handles console arguments. Run it on your own browser version before you rely on it. A check like this needs no permissions or extensions, so it’s inexpensive for an anti-bot system to run and hard for you to notice.
One answer is to control Chrome without the framework code that calls Runtime.enable. Tools like nodriver, its fork zendriver, and SeleniumBase’s CDP Mode communicate with Chrome directly over CDP and never call Runtime.enable. Patched Playwright forks such as patchright fix the same problem inside Playwright. On the older build where the snippet returned true for Playwright, it returned false against zendriver’s default page, because no Runtime.enable call is ever made. Each of these tools helps, but none is permanent, because the signal, the fix, and Kasada’s check all change on their own schedules, and the browser change above is an example.
Scraping with an HTTP client and its limits
Many teams try to skip the browser entirely, and for a good reason. A browser is slow and resource-intensive, and an HTTP client that presents the right fingerprint is much less expensive per request. The question is how well that approach works against Kasada.
You can pass the TLS fingerprint check with libraries such as curl_cffi in Python or surf in Go, which change the TLS handshake to match a real browser. To verify this, use a service that reports the TLS handshake it receives. It reports JA4, a fingerprint computed from the handshake alone, and it lists the HTTP/2 settings (which Kasada reads too) as a separate fingerprint:
# pip install curl_cffi, if you don't already have it
from curl_cffi import requests as cf

r = cf.get("https://tls.peet.ws/api/all", impersonate="chrome")
print(r.json()["tls"]["ja4"])
# remove impersonate= to see the default client's JA4 instead
Run it both ways and compare. These are the values I got, and yours will differ as browsers and libraries update, so check them against real Chrome on the same service:
curl_cffi impersonate="chrome"  JA4=t13d1516h2_8daaf6152771_806a8c22fdea
curl_cffi (no impersonate)      JA4=t13d2712h2_b4f9224df7c1_9ced094328c9
The impersonated client sends a JA4 that matches a real browser, while the default client sends a JA4 that no browser uses. If you pin a specific browser version, the User-Agent keeps claiming that version after real Chrome has updated, which makes your client look outdated. Using impersonate="chrome" instead lets the library choose the Chrome version, so you don’t have to update a version number. The curl_cffi guide shows the full setup.
I re-ran the snippet through a second service, https://tls.browserleaks.com/json, and the impersonated JA4 was identical. It reports the value as r.json()["ja4"], so it works as a fallback if tls.peet.ws is unreachable, which happened from my network once.
The problem is that the TLS handshake isn’t where Kasada makes its decision. An HTTP client that passes the TLS check still receives the challenge, and it can’t run the VM.
To get a token with an HTTP-only approach, you’d have to port the interpreter, the fingerprint collection, and the proof-of-work into your own code, then update that code each time the payload changes. Specialist solver services sell exactly this as an API, generating the token and proof-of-work over HTTP. Either way you pay an ongoing cost, which is your own maintenance or a per-solve fee, and the solver has to adapt to each payload change. The HTTP approach handles the TLS check quickly and correctly, but it can’t produce the token Kasada requires.
One more point affects how you decide whether a request succeeded. Kasada’s own field CTO has described the approach they prefer. Instead of blocking with an error, they serve a page that looks right but is wrong, so the operator keeps believing the bot works. A response with content isn’t always a correct response, so any test against Kasada has to compare the content with what a browser shows, not just check that something was returned.
Build versus buy for Kasada
Together, the analysis shows that a solver you build yourself isn’t a single hard problem. It’s ongoing maintenance work. You’d have to maintain all of these:
- A VM interpreter that adapts to a self-checking payload and a frequently rotating key
- A fingerprint profile that matches Kasada’s changing checks
- Token handling that works when a token expires during a session
- A proxy pool with a good enough reputation to pass the IP reputation check
Building can make sense when you target a single site and have engineers who can keep the solver current. When you target several sites or can’t dedicate engineering time, a managed service moves that work off your team.
Web Unlocker for single requests
A managed service is the alternative to hiring engineers for that ongoing work. Bright Data’s Web Unlocker takes a target URL and handles the challenge, the session, and the choice of exit IP (the address the target sees) for you, so your code sends 1 request and reads the result:
curl -H "Content-Type: application/json" \
  -H "Authorization: Bearer YOUR_API_KEY" \
  -d '{"zone":"YOUR_ZONE_NAME","url":"https://target.example/listing","format":"raw"}' \
  https://api.brightdata.com/request
Replace both placeholders with your own zone name and API key, and set url to your own target, before you run it.
Both values are on the Overview tab of your Web Unlocker zone. The Direct API access panel lists your key and a ready-to-run request that already includes your zone name:
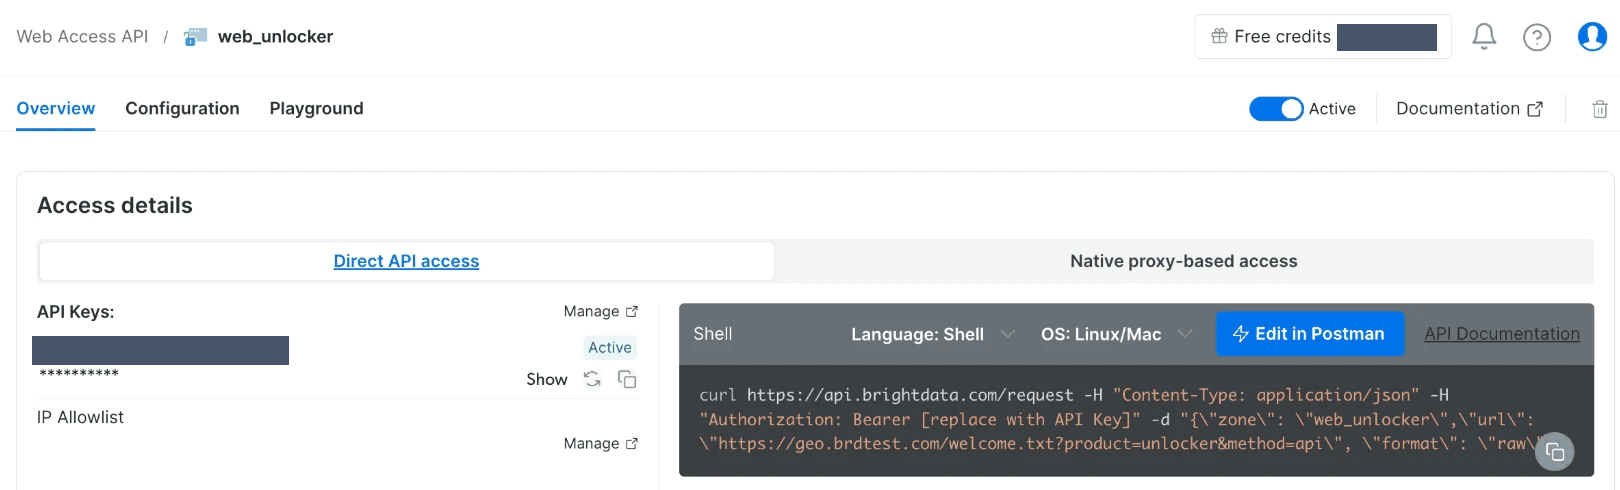
To see a call succeed before you use it on a real target, the zone’s Playground tab runs the same request against Bright Data’s test URL and shows the response:
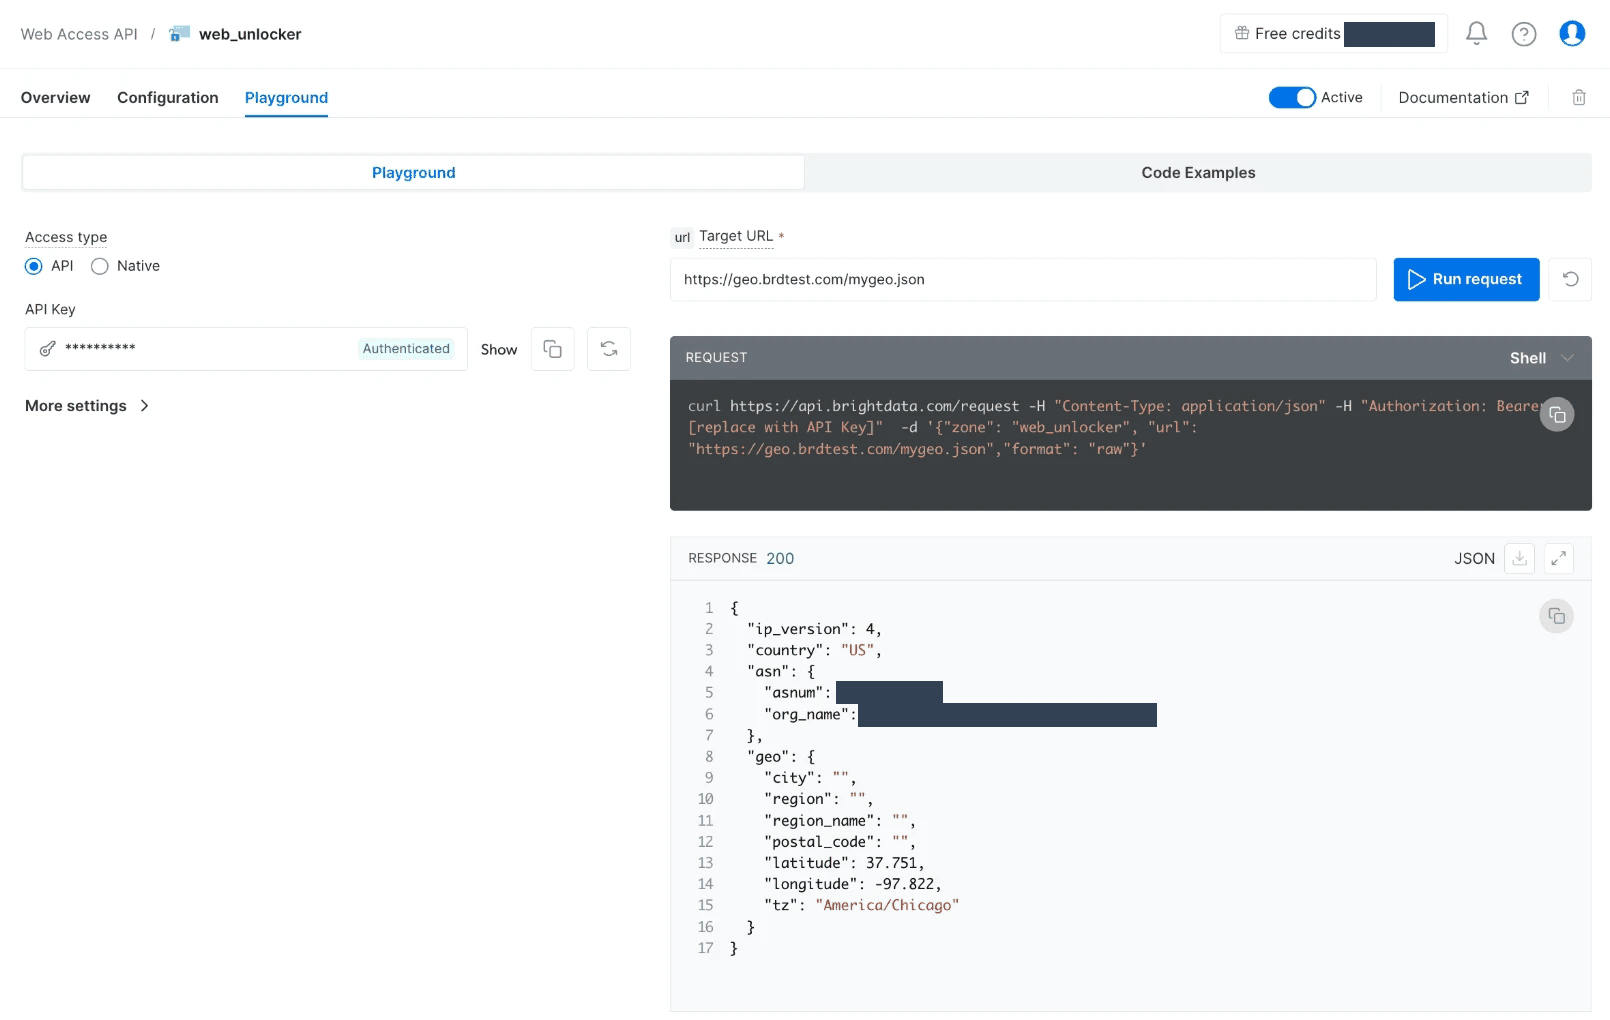
A successful call returns the unblocked page body. Web Unlocker bills per successful request, and its free tier includes 5,000 requests a month with no credit card required, so you can try it against your own target. Kasada solving is built in, as described on Bright Data’s Kasada solver page. Current plans and rates are on the Web Unlocker pricing page. Optional request fields let you choose the exit country with country and load pages that need JavaScript with render, both listed in the API reference.
For more challenging sites, enable the Premium domains option on the zone’s Configuration tab to add the extra resources those sites need:
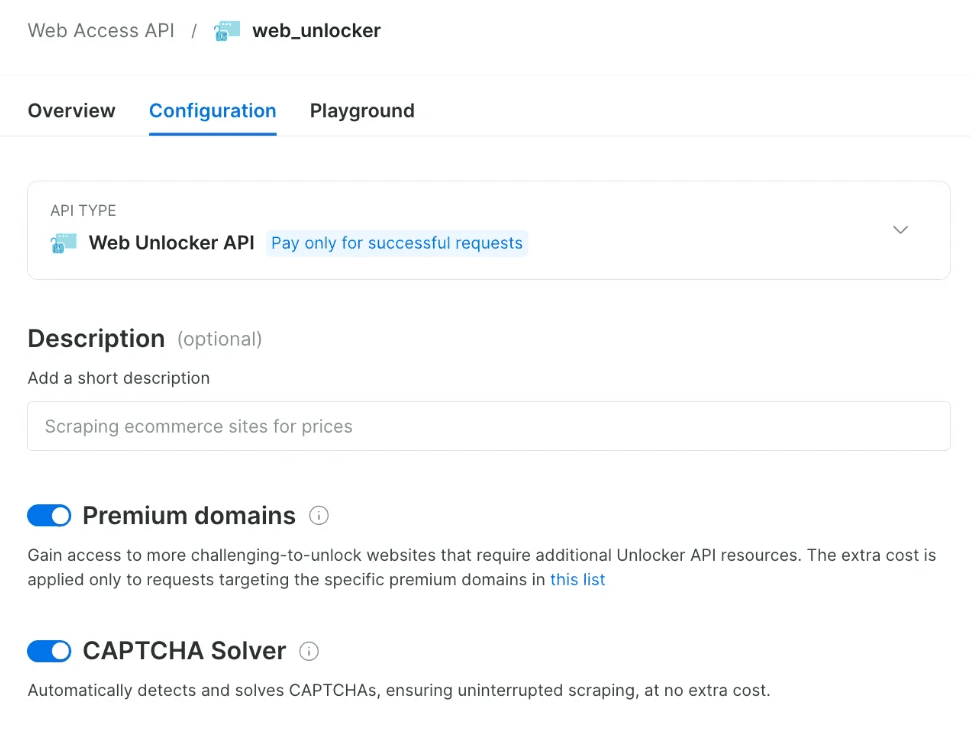
Browser API for interactive pages
When the target needs full page interaction, such as a login flow or a multi-step search, the Browser API runs a managed browser you connect to. Playwright and Puppeteer control it over CDP. The connection URL contains your customer ID, the zone name, and the zone password, and the zone’s Overview tab lists them all under Access details:
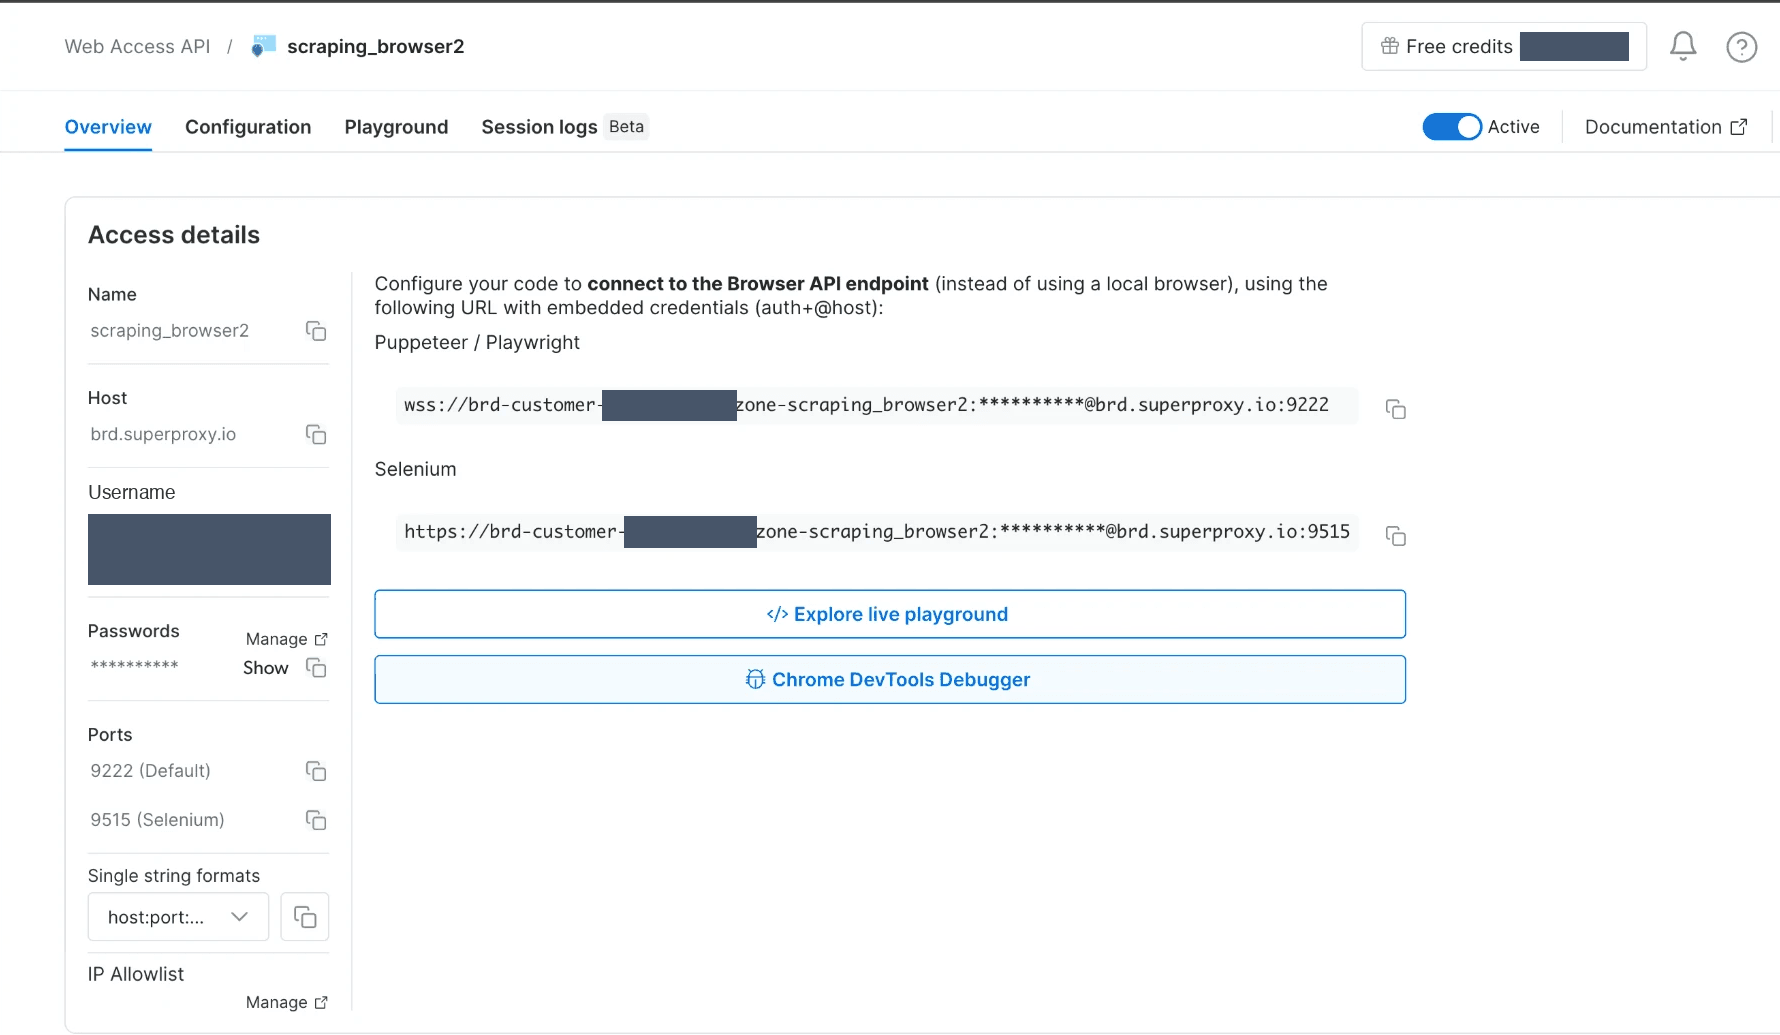
After you enter those values, it connects like any remote browser:
# pip install playwright, if you don't already have it
from playwright.sync_api import sync_playwright

CDP = "wss://brd-customer-CUSTOMER_ID-zone-ZONE_NAME:[email protected]:9222"
with sync_playwright() as p:
    browser = p.chromium.connect_over_cdp(CDP)
    page = browser.new_page()
    page.goto("https://target.example/search")
    page.wait_for_selector("YOUR_CONTENT_SELECTOR")  # replace with a selector for the content you need
    print(page.title())
    browser.close()
When you connect this way, the Browser API’s built-in unlocking handles the Kasada challenge, so your script works with an ordinary page. Wait for the content you need with a selector, and use that content, not a status code, to confirm success. The Browser API also supports Selenium, and for a Kasada target, start with the CDP connection shown above. The zone’s Overview tab also links to a live playground and a Chrome DevTools debugger, so you can watch a session while you build.
Current Browser API rates are on its pricing page. For simpler pages, a single Web Unlocker request is the fastest option, and standard anti-blocking techniques handle the remaining cases.
AI agents and verified bots
Kasada is still evolving, and traffic from AI agents changes what it has to detect. It launched AI Agent Trust, a product that manages AI-agent traffic. It classifies agents by how well they can prove their identity, and it lets a site allow some agents and block others.
Identifying agents depends on a standard called Web Bot Auth. It lets a bot prove its identity with every request, using HTTP Message Signatures (defined in RFC 9421), a signed header, and a published key directory. The Internet Engineering Task Force (IETF) working group maintains the drafts, so check the current status before you rely on it. Cloudflare already verifies these signatures for bots that register with it. The direction is a web where a verified agent is allowed access and an unverified agent must complete the full challenge. None of this makes a Kasada token optional for a scraper.
Final thoughts
Kasada blocks requests that lack a valid token, and it issues one only after the client completes its self-checking challenge. TLS impersonation passes only the TLS check, so the problem to fix is the x-kpsdk-ct token. Compare a solver you build and maintain, which can stop working within hours, with Bright Data’s Web Unlocker, which runs the challenge for you and includes 5,000 free requests a month with no credit card required. If you’re deciding where to focus your engineering time, start with the managed option by sending 1 request to the exact URL that’s returning your 429s, and check the response body rather than the status code.
FAQ
How does Kasada work?
Kasada serves an obfuscated JavaScript challenge from a path like /ips.js. The script runs a virtual machine that fingerprints the runtime, computes a proof-of-work, and sends an encrypted bundle back. If it passes, Kasada issues an x-kpsdk-ct token, and every request must include it or receive a 429 response.
Can you bypass Kasada with a free open-source solver?
A free solver from GitHub may work at first, but it stops working quickly. The payload changes its decoder key often (about every 5 hours in my capture) and checks its own integrity, so captured logic stops decoding within hours. A public solver can be out of date, so use it to study, not in production.
Does updating Chrome bypass Kasada?
Updating helps but doesn’t solve the problem. An old Chrome build is a signal by itself, so a current build removes that signal. It doesn’t remove the other signals, such as navigator.webdriver, an empty plugin list, or the automation framework’s own signals, which the challenge also checks.
What are the x-kpsdk headers?
They’re Kasada’s headers. x-kpsdk-ct is the client token (a valid one grants access), x-kpsdk-r and x-kpsdk-c are related challenge headers, and the matching KP_UIDz cookies track the session. Seeing any x-kpsdk-* header on a 429 or 403 is a reliable sign that Kasada refused the request.
What is the fastest way to bypass a Kasada 429?
Route the request through Bright Data’s Web Unlocker, which takes the URL, handles the challenge for you, and bills per successful request. For pages that need a login or a multi-step interaction, use the Browser API over CDP, whose built-in unlocking handles the challenge.


Technical Writer
 5 years experience
Satyam Tripathi helps SaaS and data startups turn complex tech into actionable content, boosting developer adoption and user understanding.