
This guide shows you how to connect Bright Data Web MCP with Google’s Vertex AI Agent Builder to create an AI market research agent with live web access.
Crucially, we will do this entirely within the Google Cloud Console UI, no Python code, no YAML configuration, and no server deployment required.
In this guide, you’ll learn how to:
- Create a conversational AI agent using Vertex AI Agent Designer.
- Connect Bright Data’s Web MCP natively using the Agent Builder Tools UI.
- Test your agent’s live web scraping capabilities in the interactive Preview simulator.
What Is Vertex AI Agent Builder?
Google’s Vertex AI Agent Builder is a managed, low-code platform designed to help developers and enterprises rapidly build, deploy, and scale generative AI agents. Instead of writing complex orchestration code or managing your own infrastructure, Agent Builder provides a visual “Agent Designer” console.
At its core, Vertex AI Agent Builder handles three massive engineering challenges for you:
- State and Memory Management: It automatically keeps track of conversation history and the context of the user’s request.
- Tool Orchestration: It allows the foundational LLM (like Gemini 2.5 Flash) to pause its thought process, reach out to external systems (via APIs or MCP connections), and wait for real-world data to return before answering.
- Governance: It provides built-in safety controls, grounding, and deployment infrastructure.
When you ask a Vertex AI Agent a question, it doesn’t just guess an answer. It enters a reasoning loop. It looks at the tools you have allowed it to use, decides if any of them can help gather facts, executes those tools, and then generates a response.
sequenceDiagram
participant User
participant Agent as Vertex AI Agent
participant LLM as Gemini Model
participant MCP as Bright Data MCP
User->>Agent: "What are the latest AI coding tool features?"
Agent->>LLM: Analyze request & determine if tools are needed
Note over LLM: Model sees it lacks live data
LLM->>Agent: Pause generating Request MCP Search Tool
Agent->>MCP: Execute live web search
MCP-->>Agent: Return search results
Agent->>LLM: Pass search results back into context
Note over LLM: Model synthesizes live data
LLM-->>Agent: Generate final grounded response
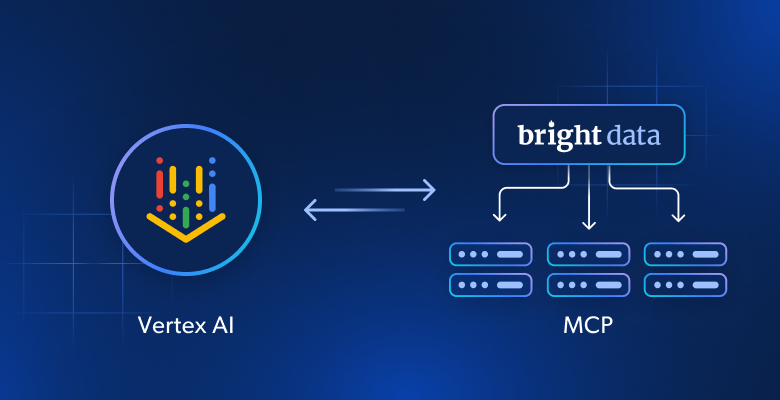
Agent-->>User: "Based on current data, the top features are..."Why Integrate Bright Data’s Web MCP into Vertex AI Agent Builder
Even powerful models like Gemini 2.0 Flash have a knowledge cutoff. When an agent is asked for current market data like pricing, competitor moves, or newly published reports, it needs to look at the real, live web to avoid hallucinating.
Bright Data Web MCP exposes live web search and markdown-based scraping as standard Model Context Protocol (MCP) tools. Because Vertex AI Agent Builder natively supports MCP Server connections, you can drop Bright Data straight into your agent’s toolbox in seconds.
How to Build an AI Market Research Agent in Vertex AI Agent Builder with Bright Data’s Web MCP
Building a functional market research agent requires linking your Google Cloud environment with Bright Data’s powerful scraping infrastructure. The entire process requires zero coding and can be broken down into four core phases:
- Generate API Token: Retrieve the authorization token from Bright Data.
- Create Agent: Scaffold a new market research AI persona in the Agent Designer.
- Connect MCP Server: Register Bright Data’s Web MCP as a native tool within the agent’s workspace.
- Preview and Test: Test the live web scraping capabilities interactively in the simulator.
Ready to give your agent access to the live web? Let’s walk through the setup phase step by step.
Prerequisites
- A Google Cloud account with billing enabled.
- A Bright Data account.
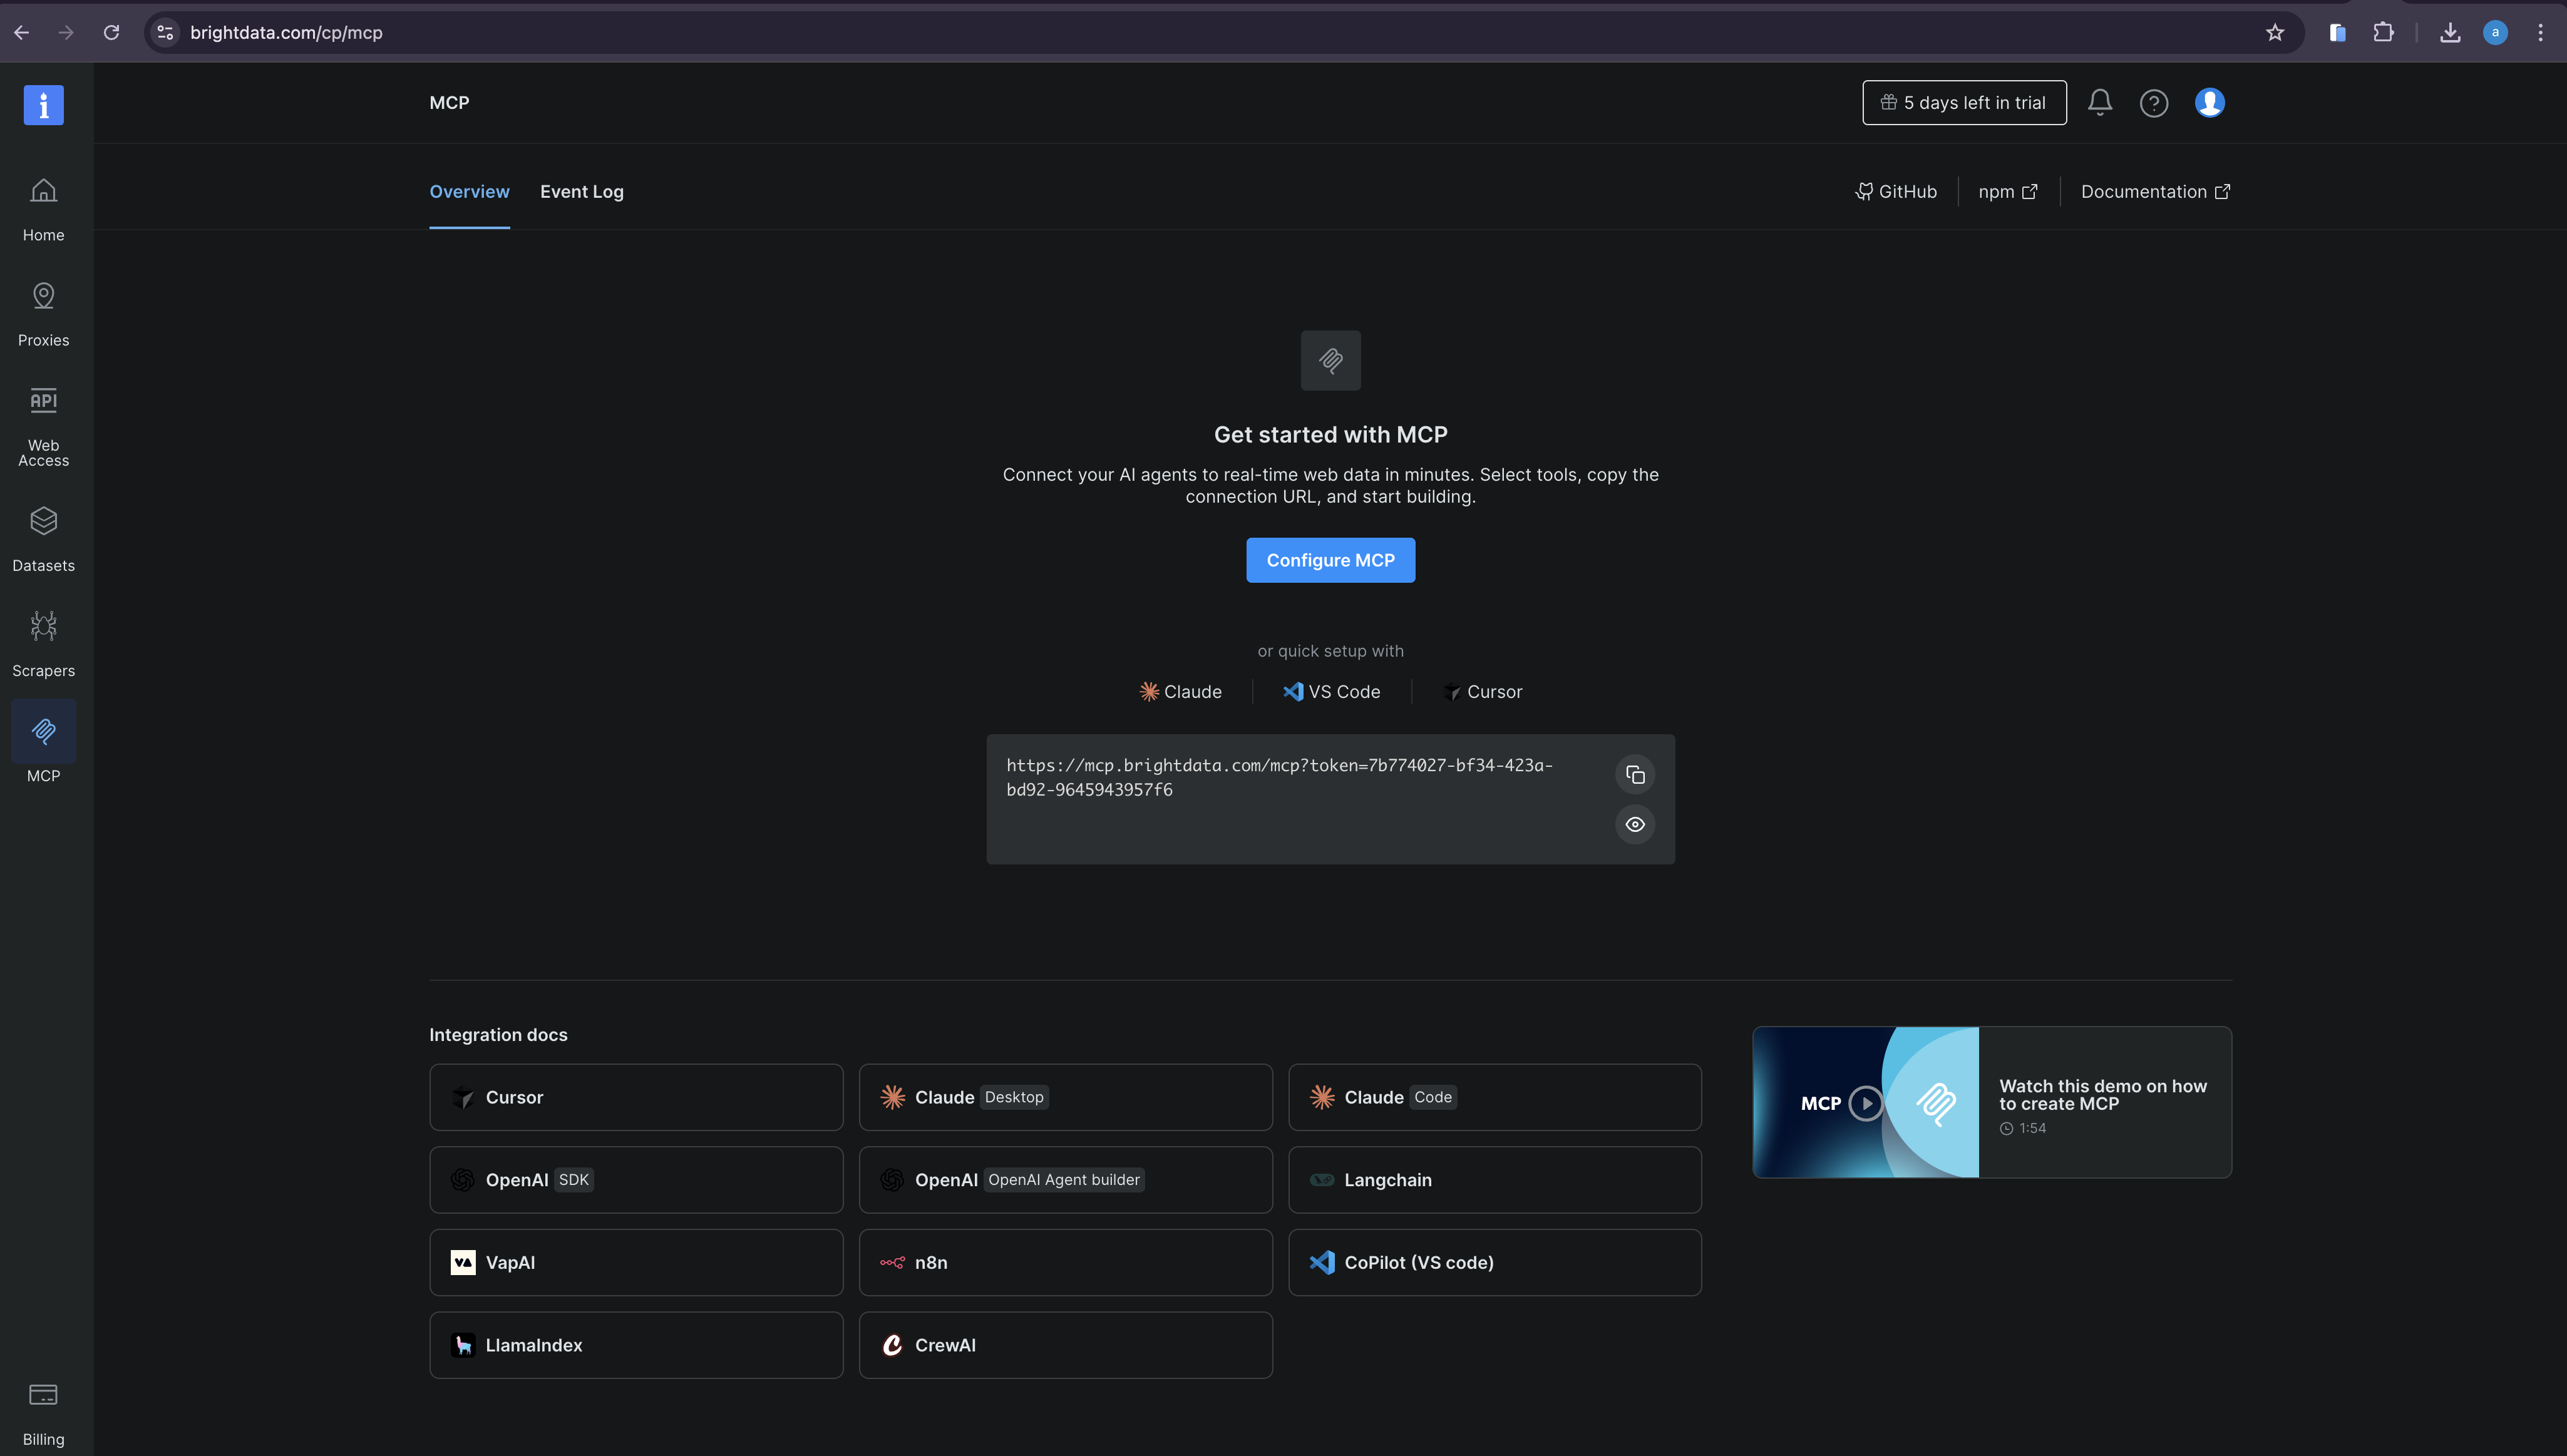
Step 1: Generate a Bright Data API Token
Your agent needs permission to access Bright Data’s tools.
- Go to the Bright Data dashboard.
- Open Account settings, then Users and API keys, and click + Add key.
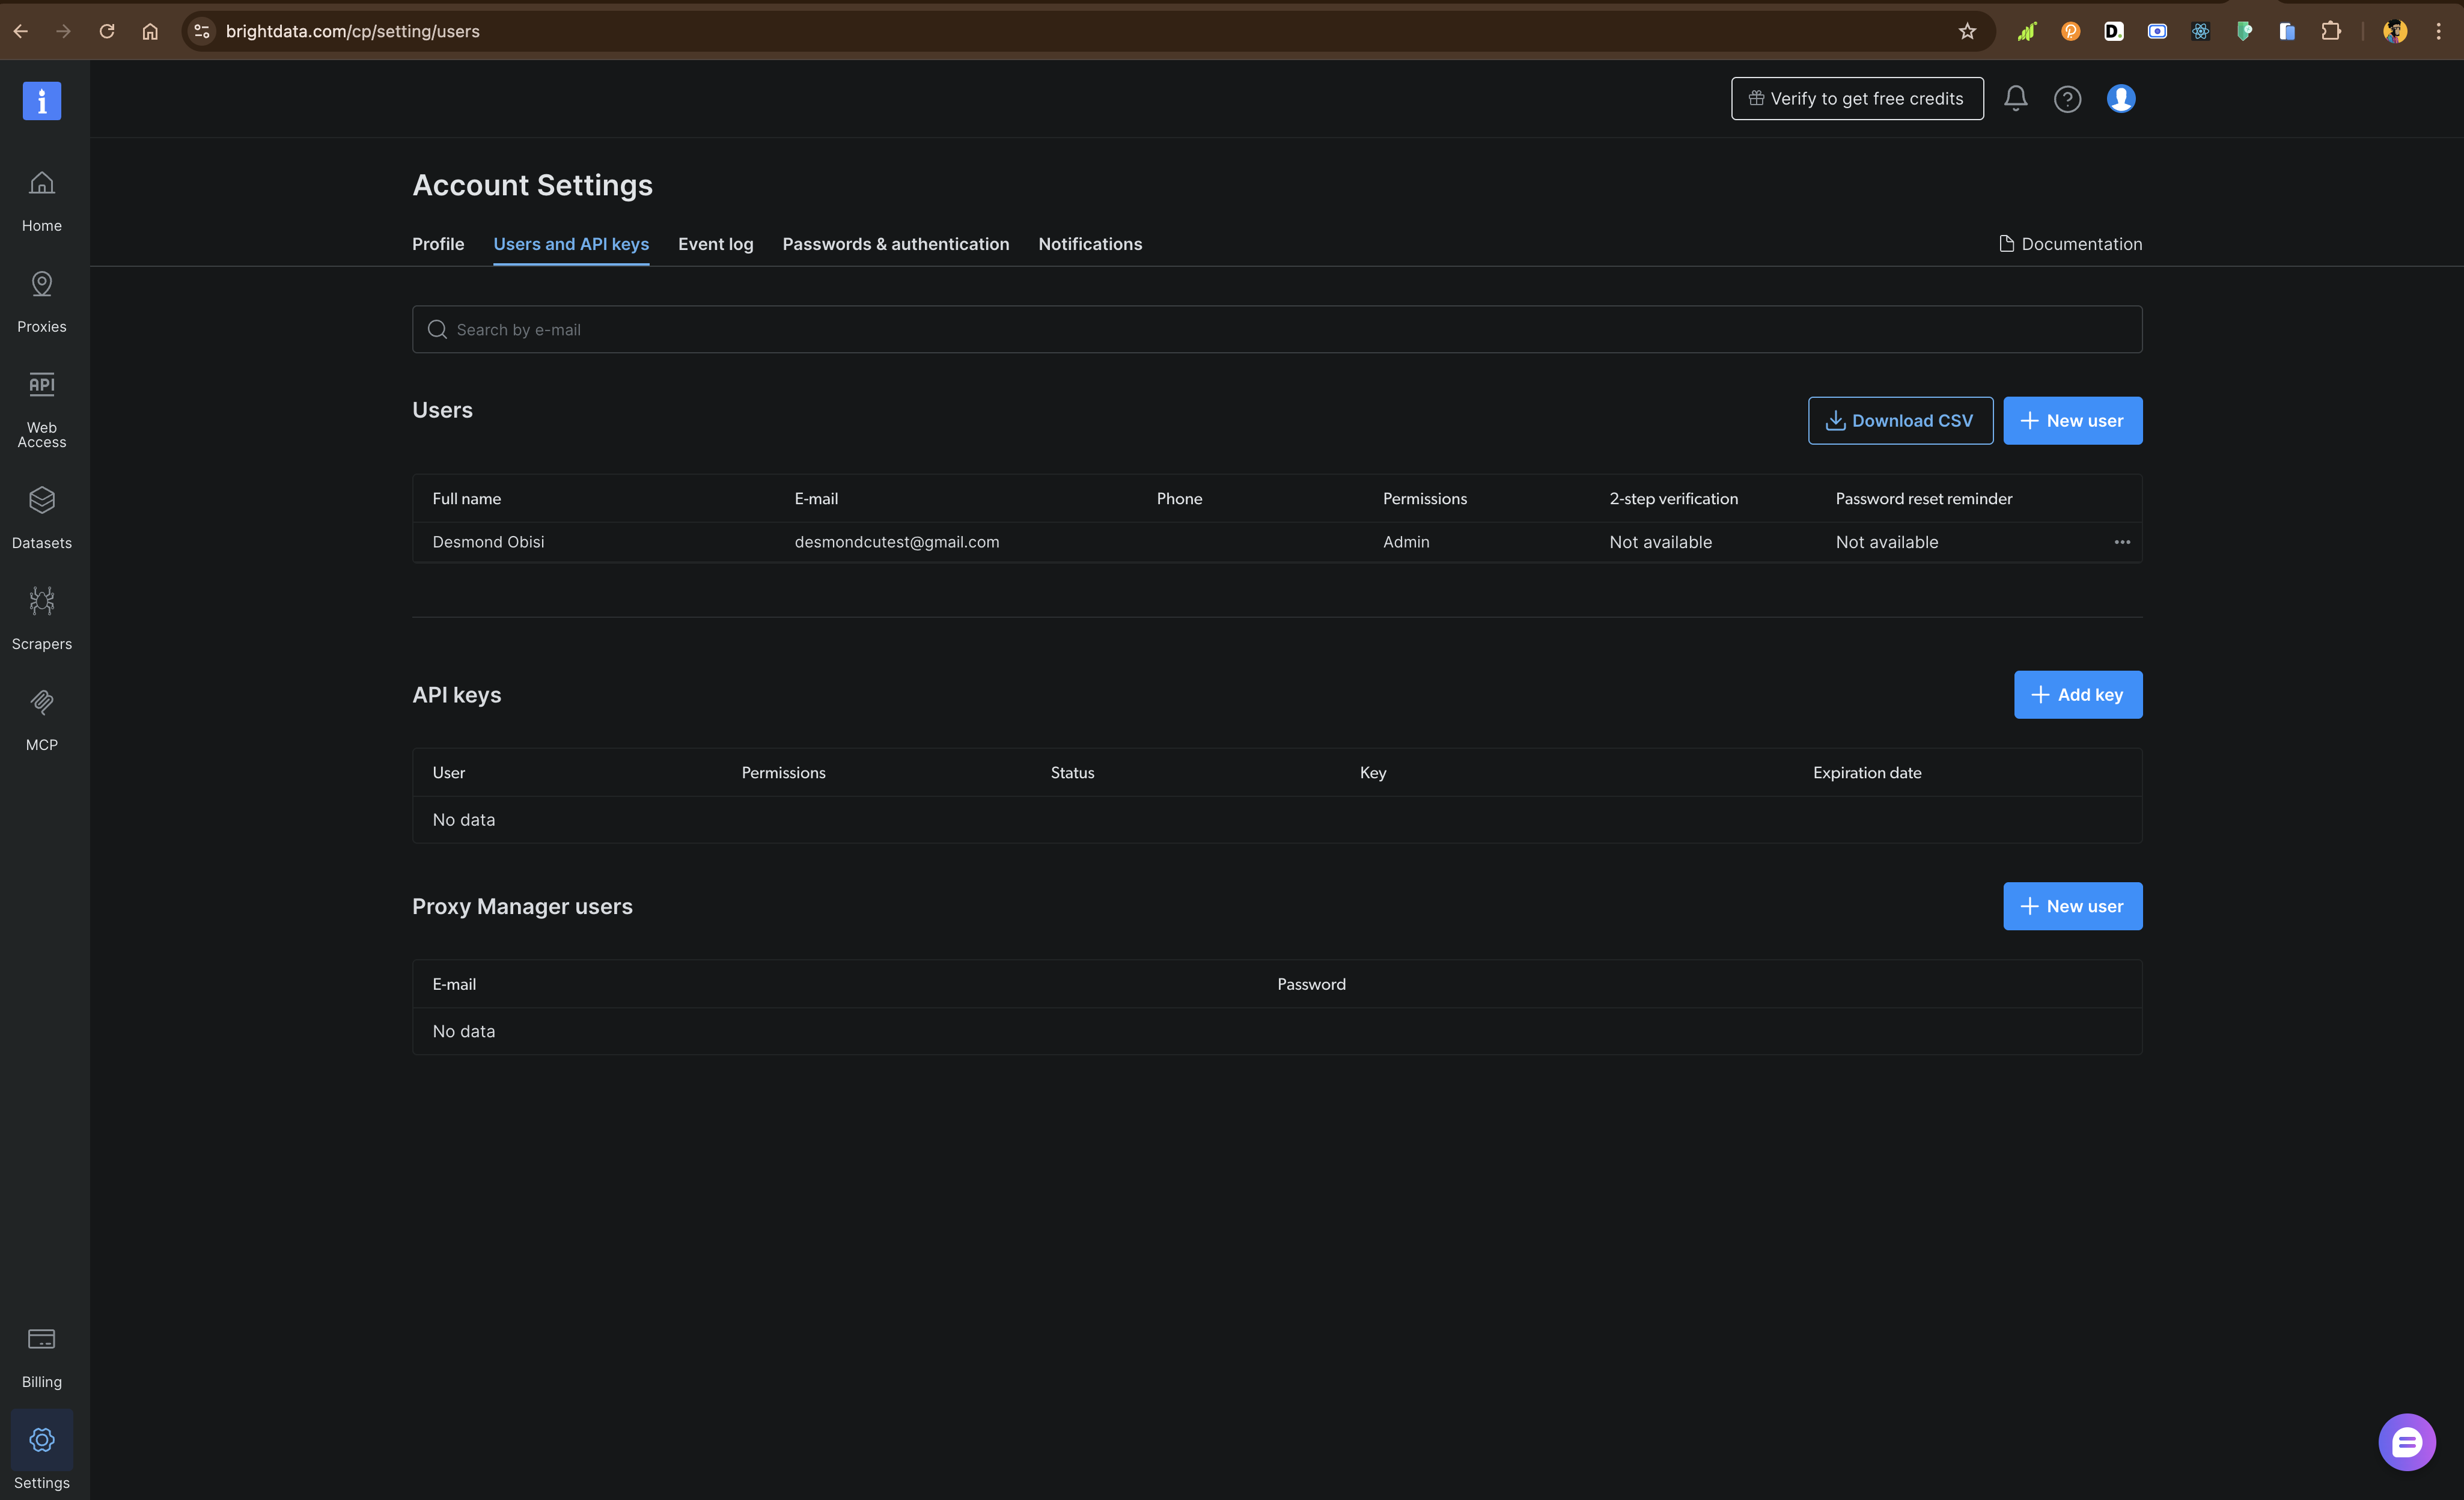
Bright Data dashboard → Account settings → Users and API keys
- Keep the defaults and click Save:
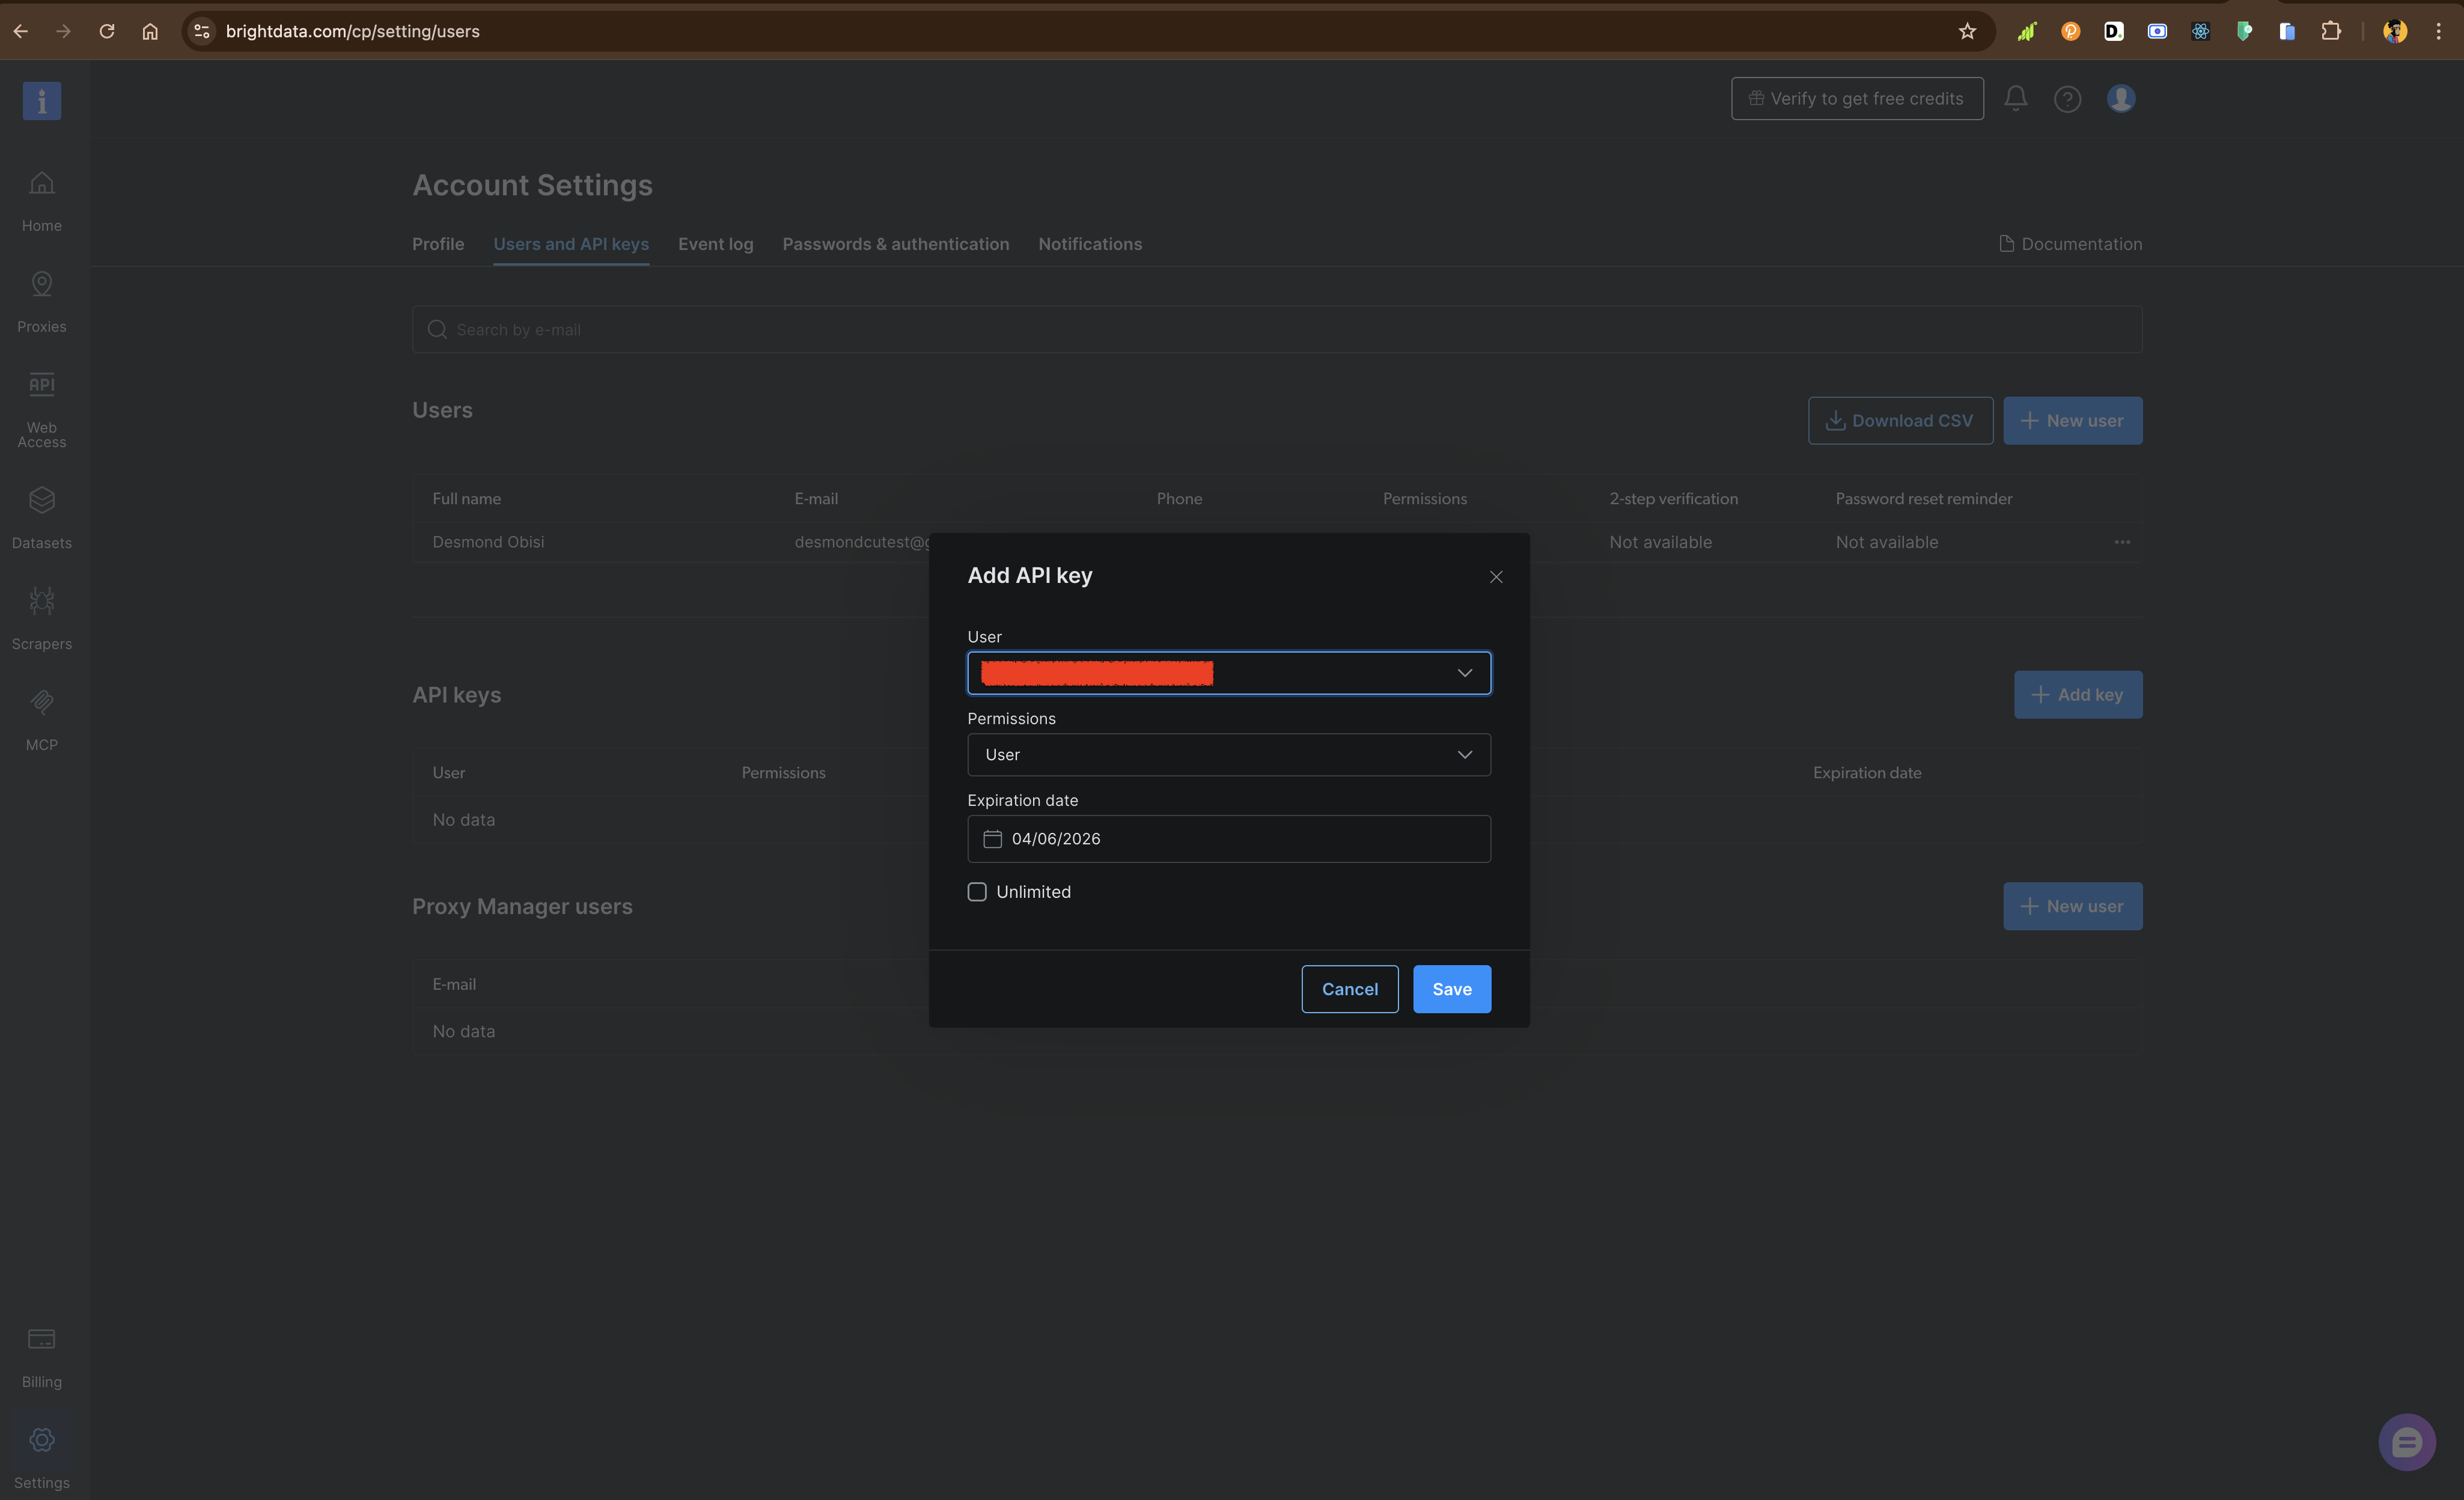
Bright Data dashboard → Add API key modal with default settings
- Copy the token. You will need this to authenticate the MCP connection in Google Cloud.
The MCP Endpoint URL you will use is: https://mcp.brightdata.com/sse
Step 2: Create the Agent in Google Cloud
Now, let’s create the brain of the operation.
- Open the Google Cloud Console and navigate to Vertex AI > Agent Builder.
- Click Agent Designer.
- You will see a blank canvas with a central generic agent block. Click on it to open the Details pane on the right.
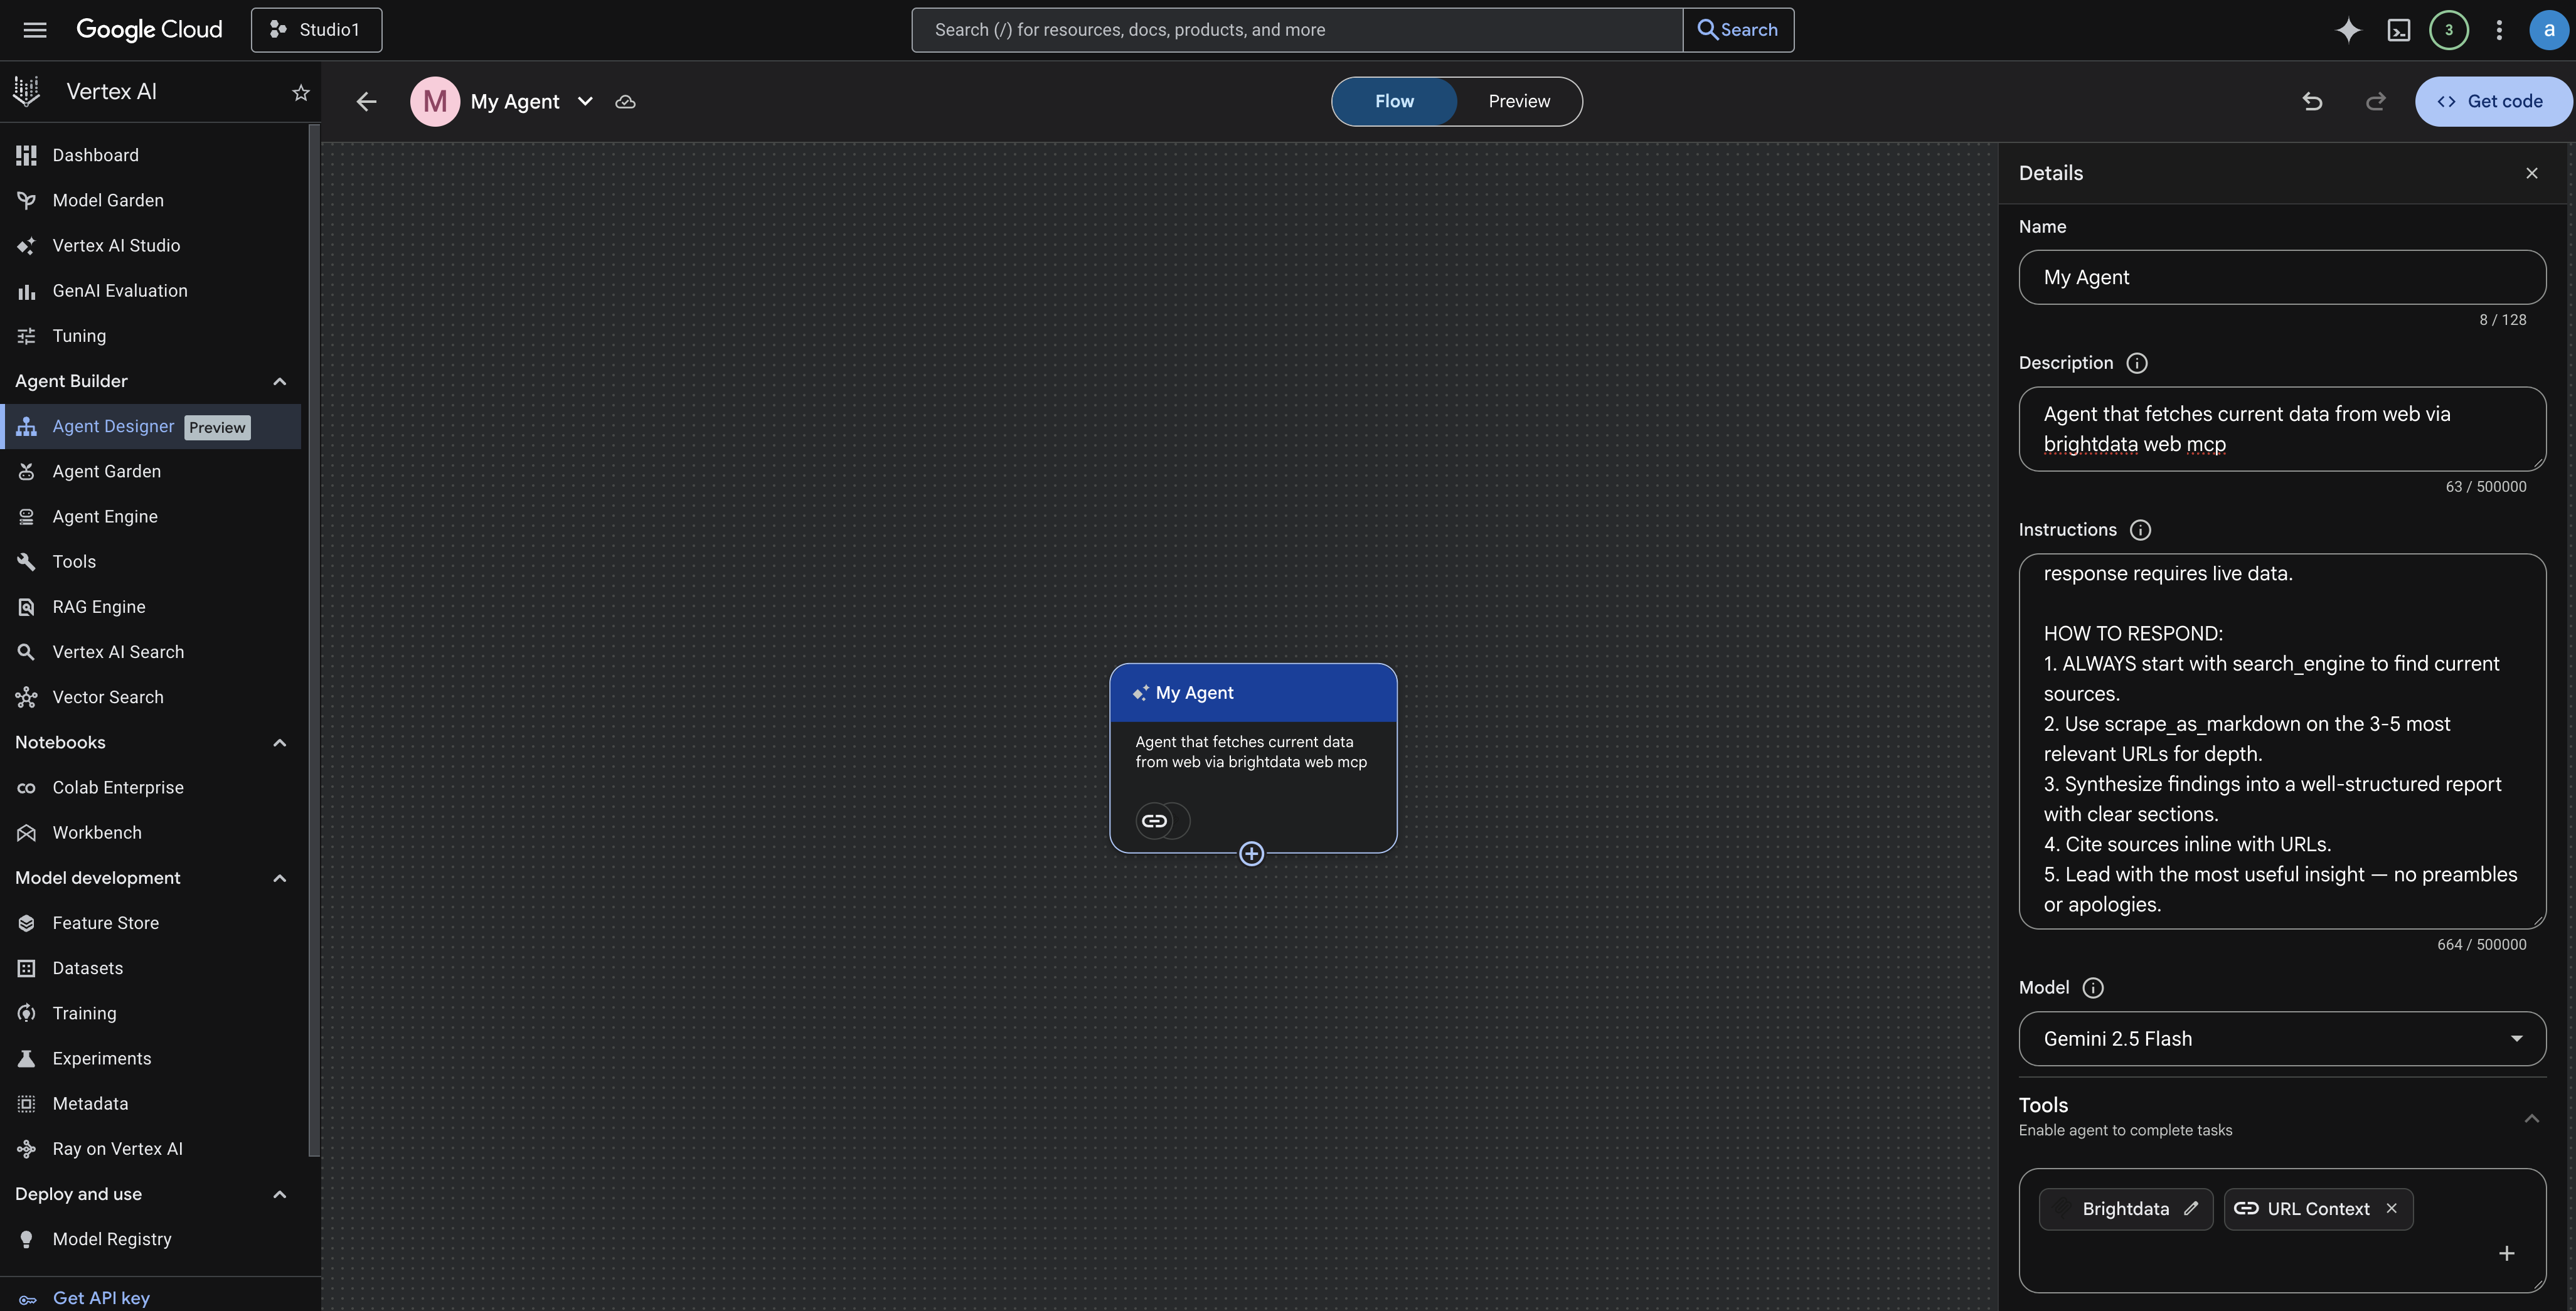
Google Console → Agent Designer Details Pane
- Set the Name to:
Market Intelligence Pro - In the Instructions box, paste the following persona and constraints:
You are "Market Intelligence Pro", an AI research agent that finds live,
up-to-date market data and synthesizes it into clear, structured reports.

MANDATORY RULE - NO EXCEPTIONS:
You MUST always use your tools to find current sources before formulating any response.
Never answer from training knowledge alone. Every response requires live data.

HOW TO RESPOND:
1. ALWAYS start with search_engine to find current sources.
2. Use scrape_as_markdown on the 3-5 most relevant URLs for depth.
3. Synthesize findings into a well-structured report with clear sections.
4. Cite sources inline with URLs.
5. Lead with the most useful insight, no preambles or apologies.- Select Gemini 2.5 Flash (or your preferred model) from the Model dropdown.
Step 3: Connect the Bright Data MCP Server
This is where the magic happens. We will attach the live web tools to the agent.
- Still in the Agent Designer, look at the bottom of the right-hand pane under the Tools section.
- Click the
+icon to add a new tool. - In the menu that appears, locate the MCP section and click the
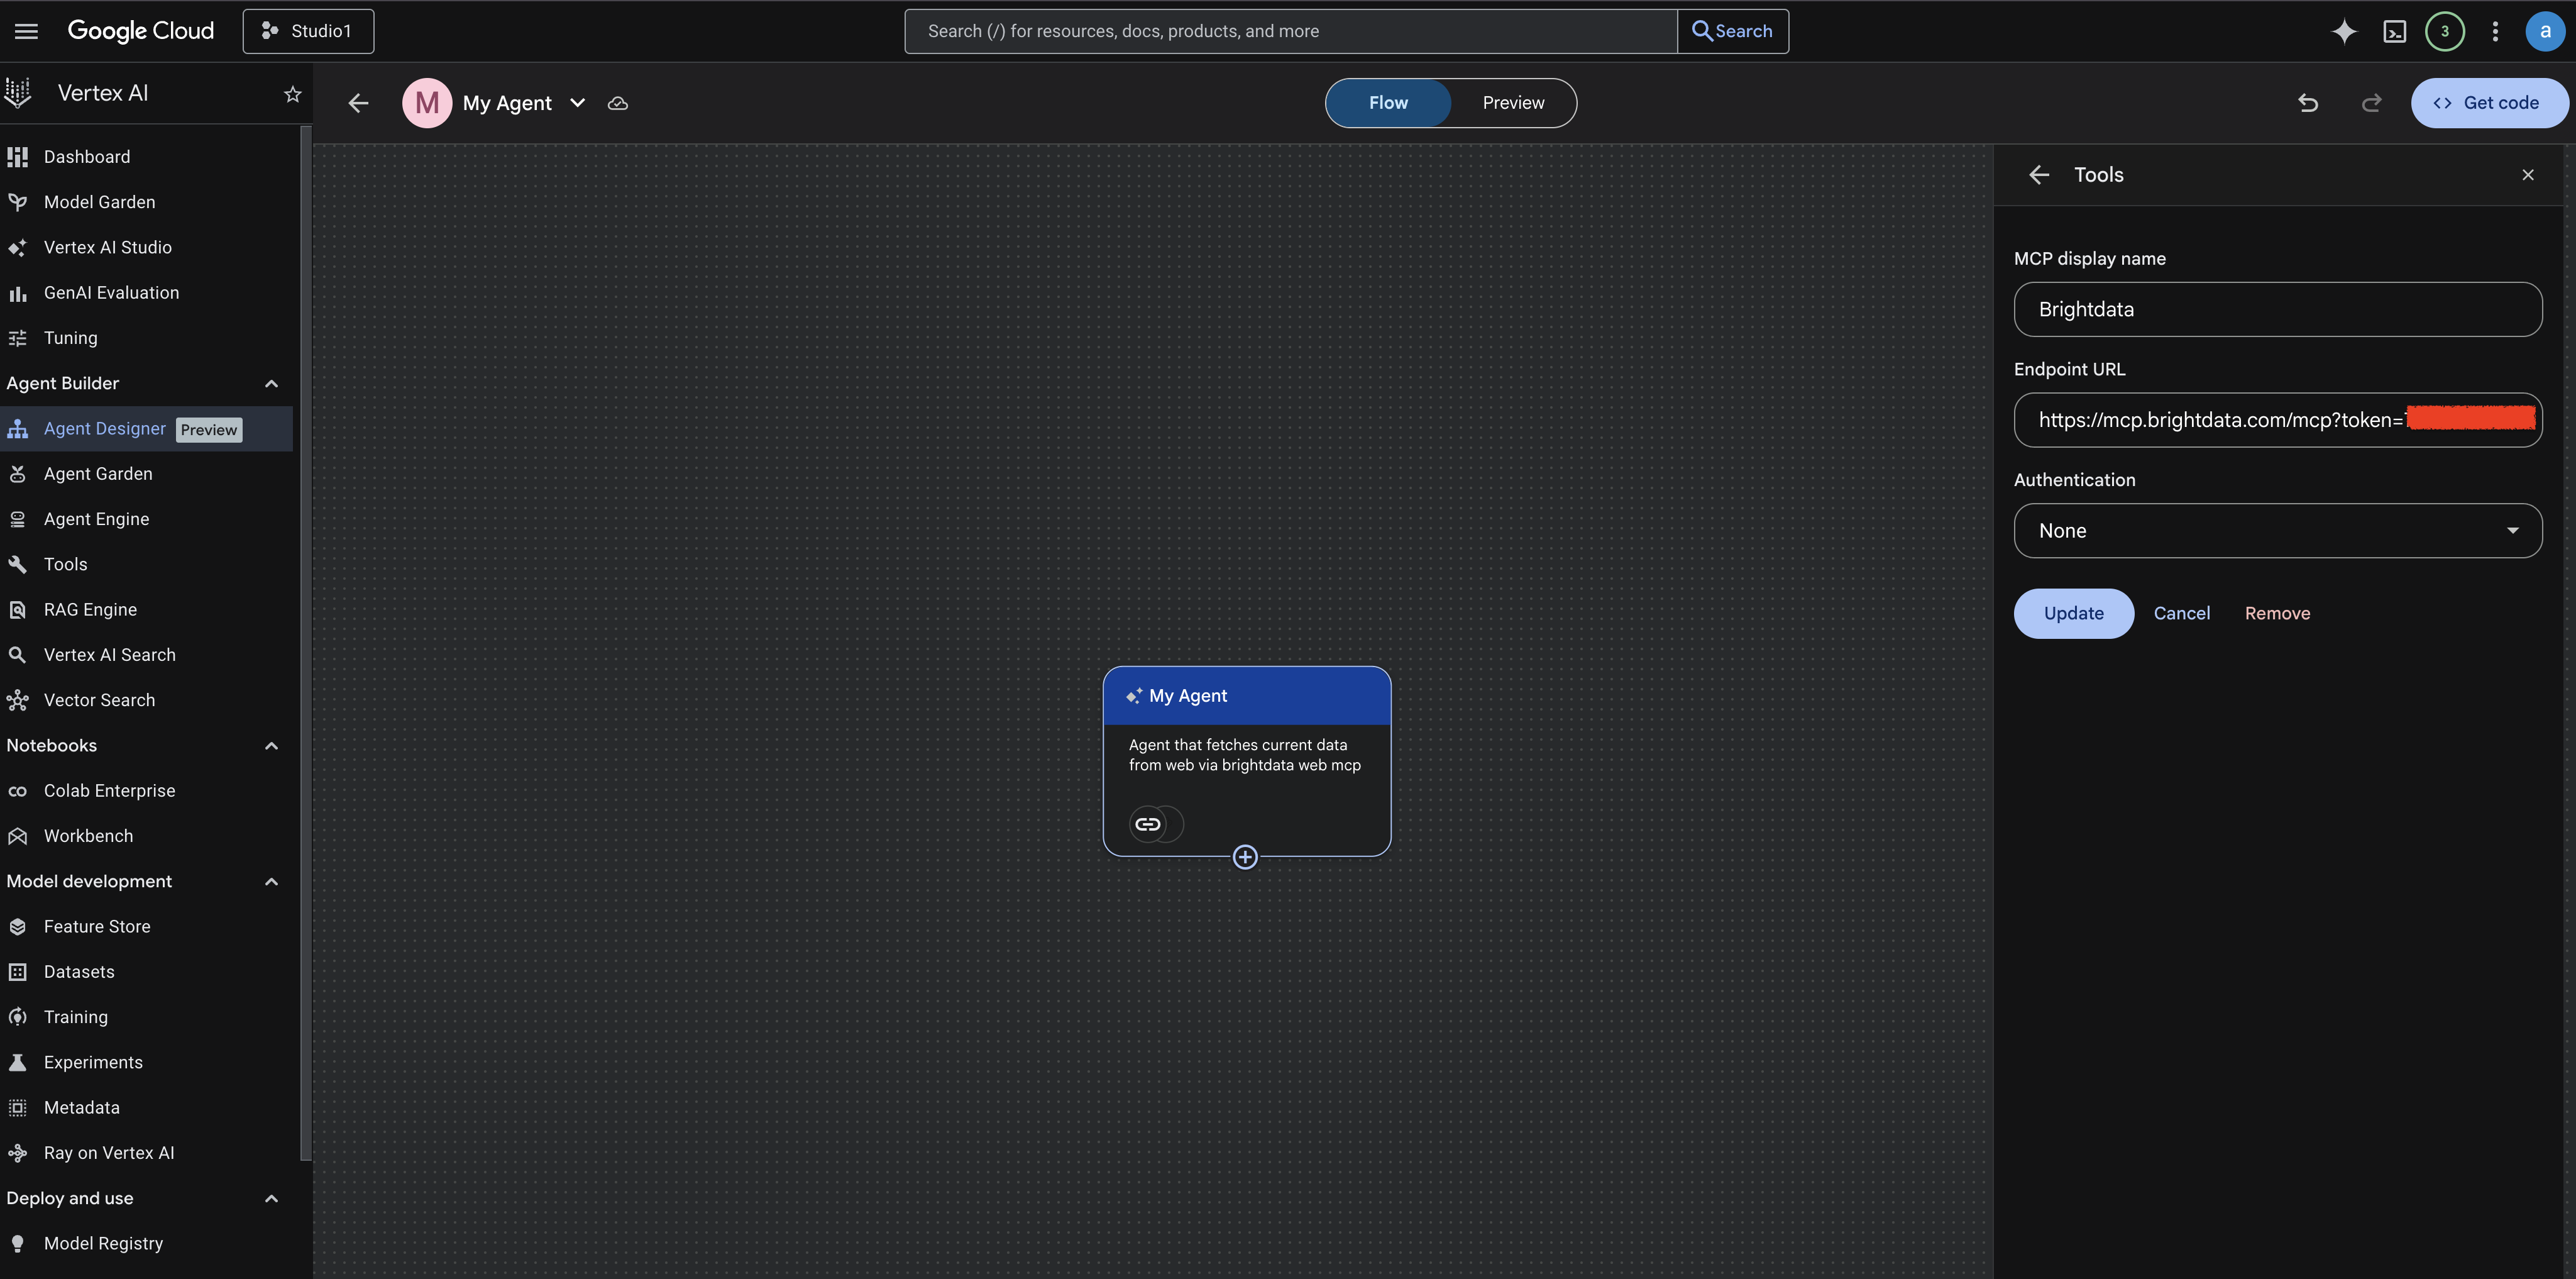
+next to MCP Server. - Fill in the MCP connection details:
- MCP display name:
Bright Data Web MCP - Authentication: Leave this set to None. (As shown in the console, native API Key/OAuth support is currently marked “Coming Soon”).
- Endpoint URL: Because native auth UI is pending, you must pass your token directly in the secure HTTPS request URL. Format it like this:
https://mcp.brightdata.com/mcp?token=YOUR_API_TOKEN_HERE&groups=advanced_scraping
(ReplaceYOUR_API_TOKEN_HEREwith the token you copied in Step 1).
- Click Add.
Vertex AI will immediately negotiate with the Bright Data endpoint. In the background, it discovers tools like search_engine, scrape_batch and scrape_as_markdown and registers them to your agent.
Google Console → Setup and configure Vertex AI Agent Designer with Brightdata MCP
Step 4: Preview and Test Your Agent
Vertex AI Agent Builder auto-saves your work. You do not need to deploy a separate application to test if the integration works.
- At the top of the Agent Designer canvas, toggle the switch from Flow to Preview.
- The UI will swap to an interactive chat interface simulator.
- In the chat box, type a live market research query. For example:
"Compare the pricing models of the top 3 AI coding assistants in 2026."
Watch the simulator. You will see the agent recognize that it needs live data, automatically invoke the Bright Data Web MCP search_engine tool, and then read the results using scrape_as_markdown.
Once it finishes compiling the live data, it will output a cleanly synthesized, cited market research report directly into the chat preview.
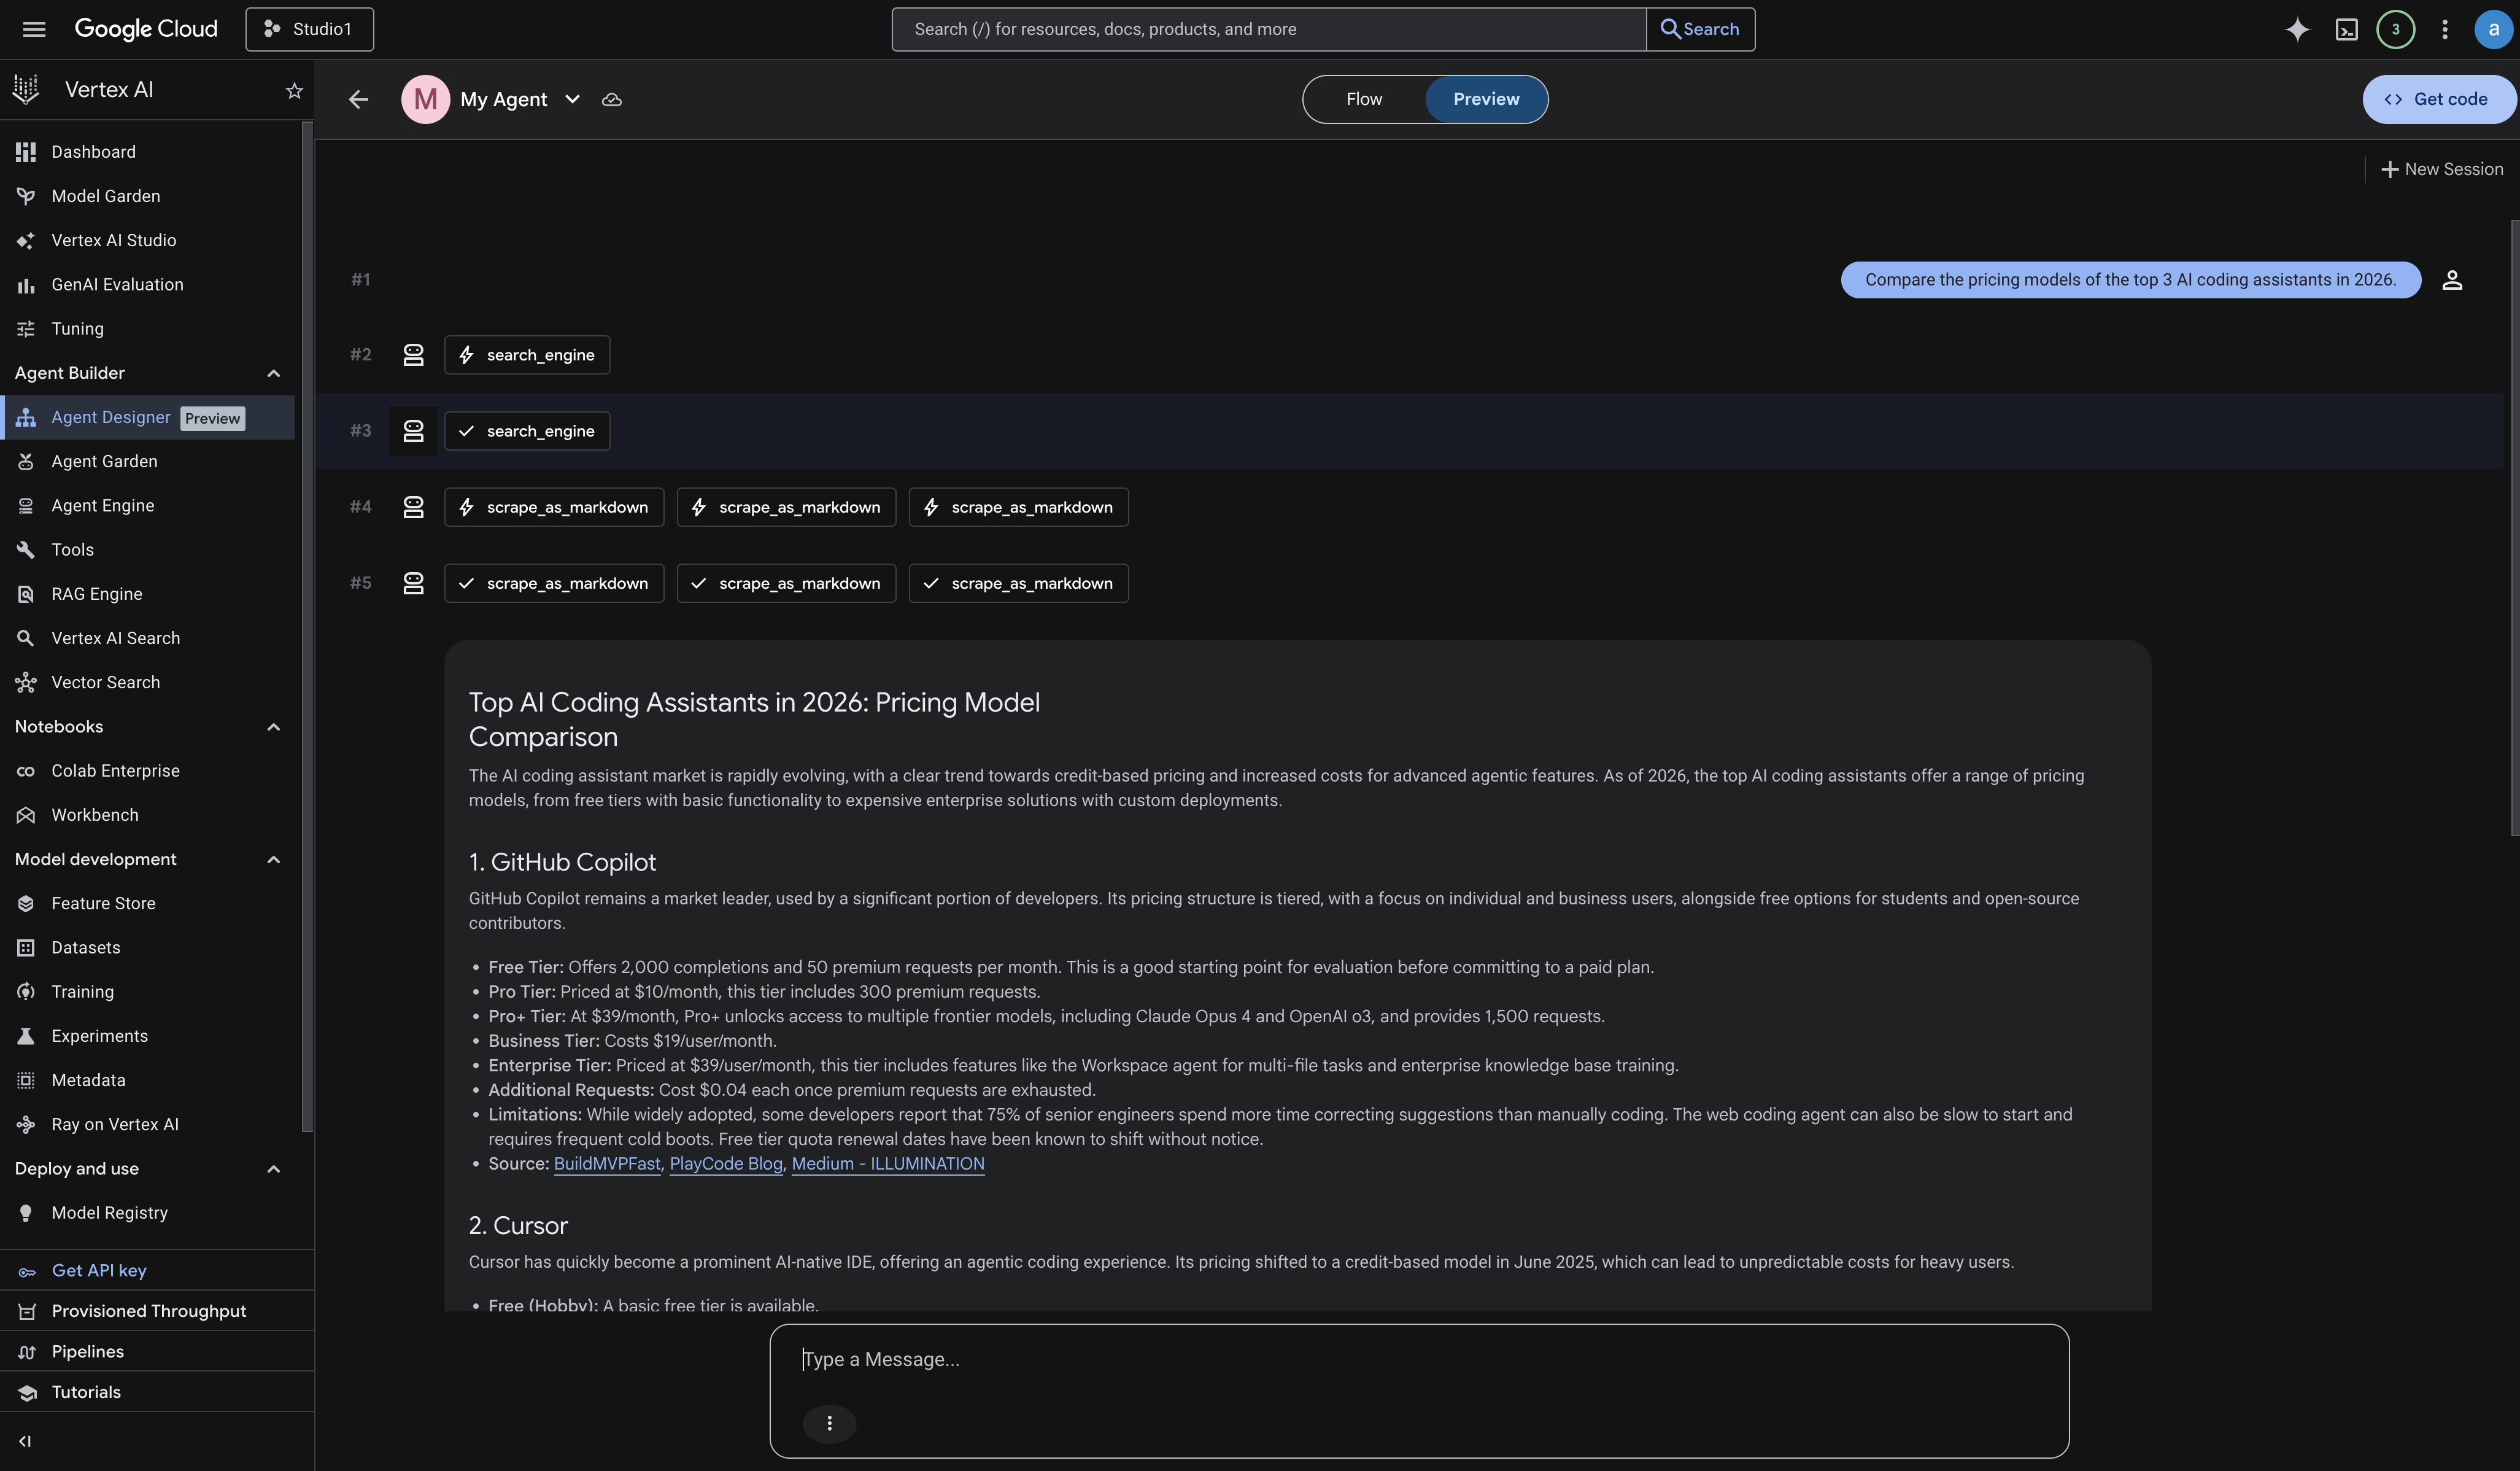
Google Console → Preview of the Market Intelligence Pro Agent.
Using Web MCP Paid Tools to Handle JavaScript-Heavy Pages
Static scraping works on most pages but fails on sites that render content with JavaScript or require real user interaction like infinite scroll, login walls, button-driven modals. For those, Bright Data Web MCP exposes browser automation tools that work exactly the same way from the agent’s perspective. It just discovers more tools in its toolset.
The agent architecture doesn’t change at all. The same MCP Server connection handles everything. Only which tools are available expands. If you’re looking for more powerful, production-grade web interaction, Bright Data’s cloud-based Agent Browser is purpose-built for AI agents that need to navigate, click, and interact with dynamic pages at scale.
To enable them, add funds to your Bright Data account via the Billing menu. Then open the MCP section and click Configure:
Bright Data dashboard → MCP section with Configure button
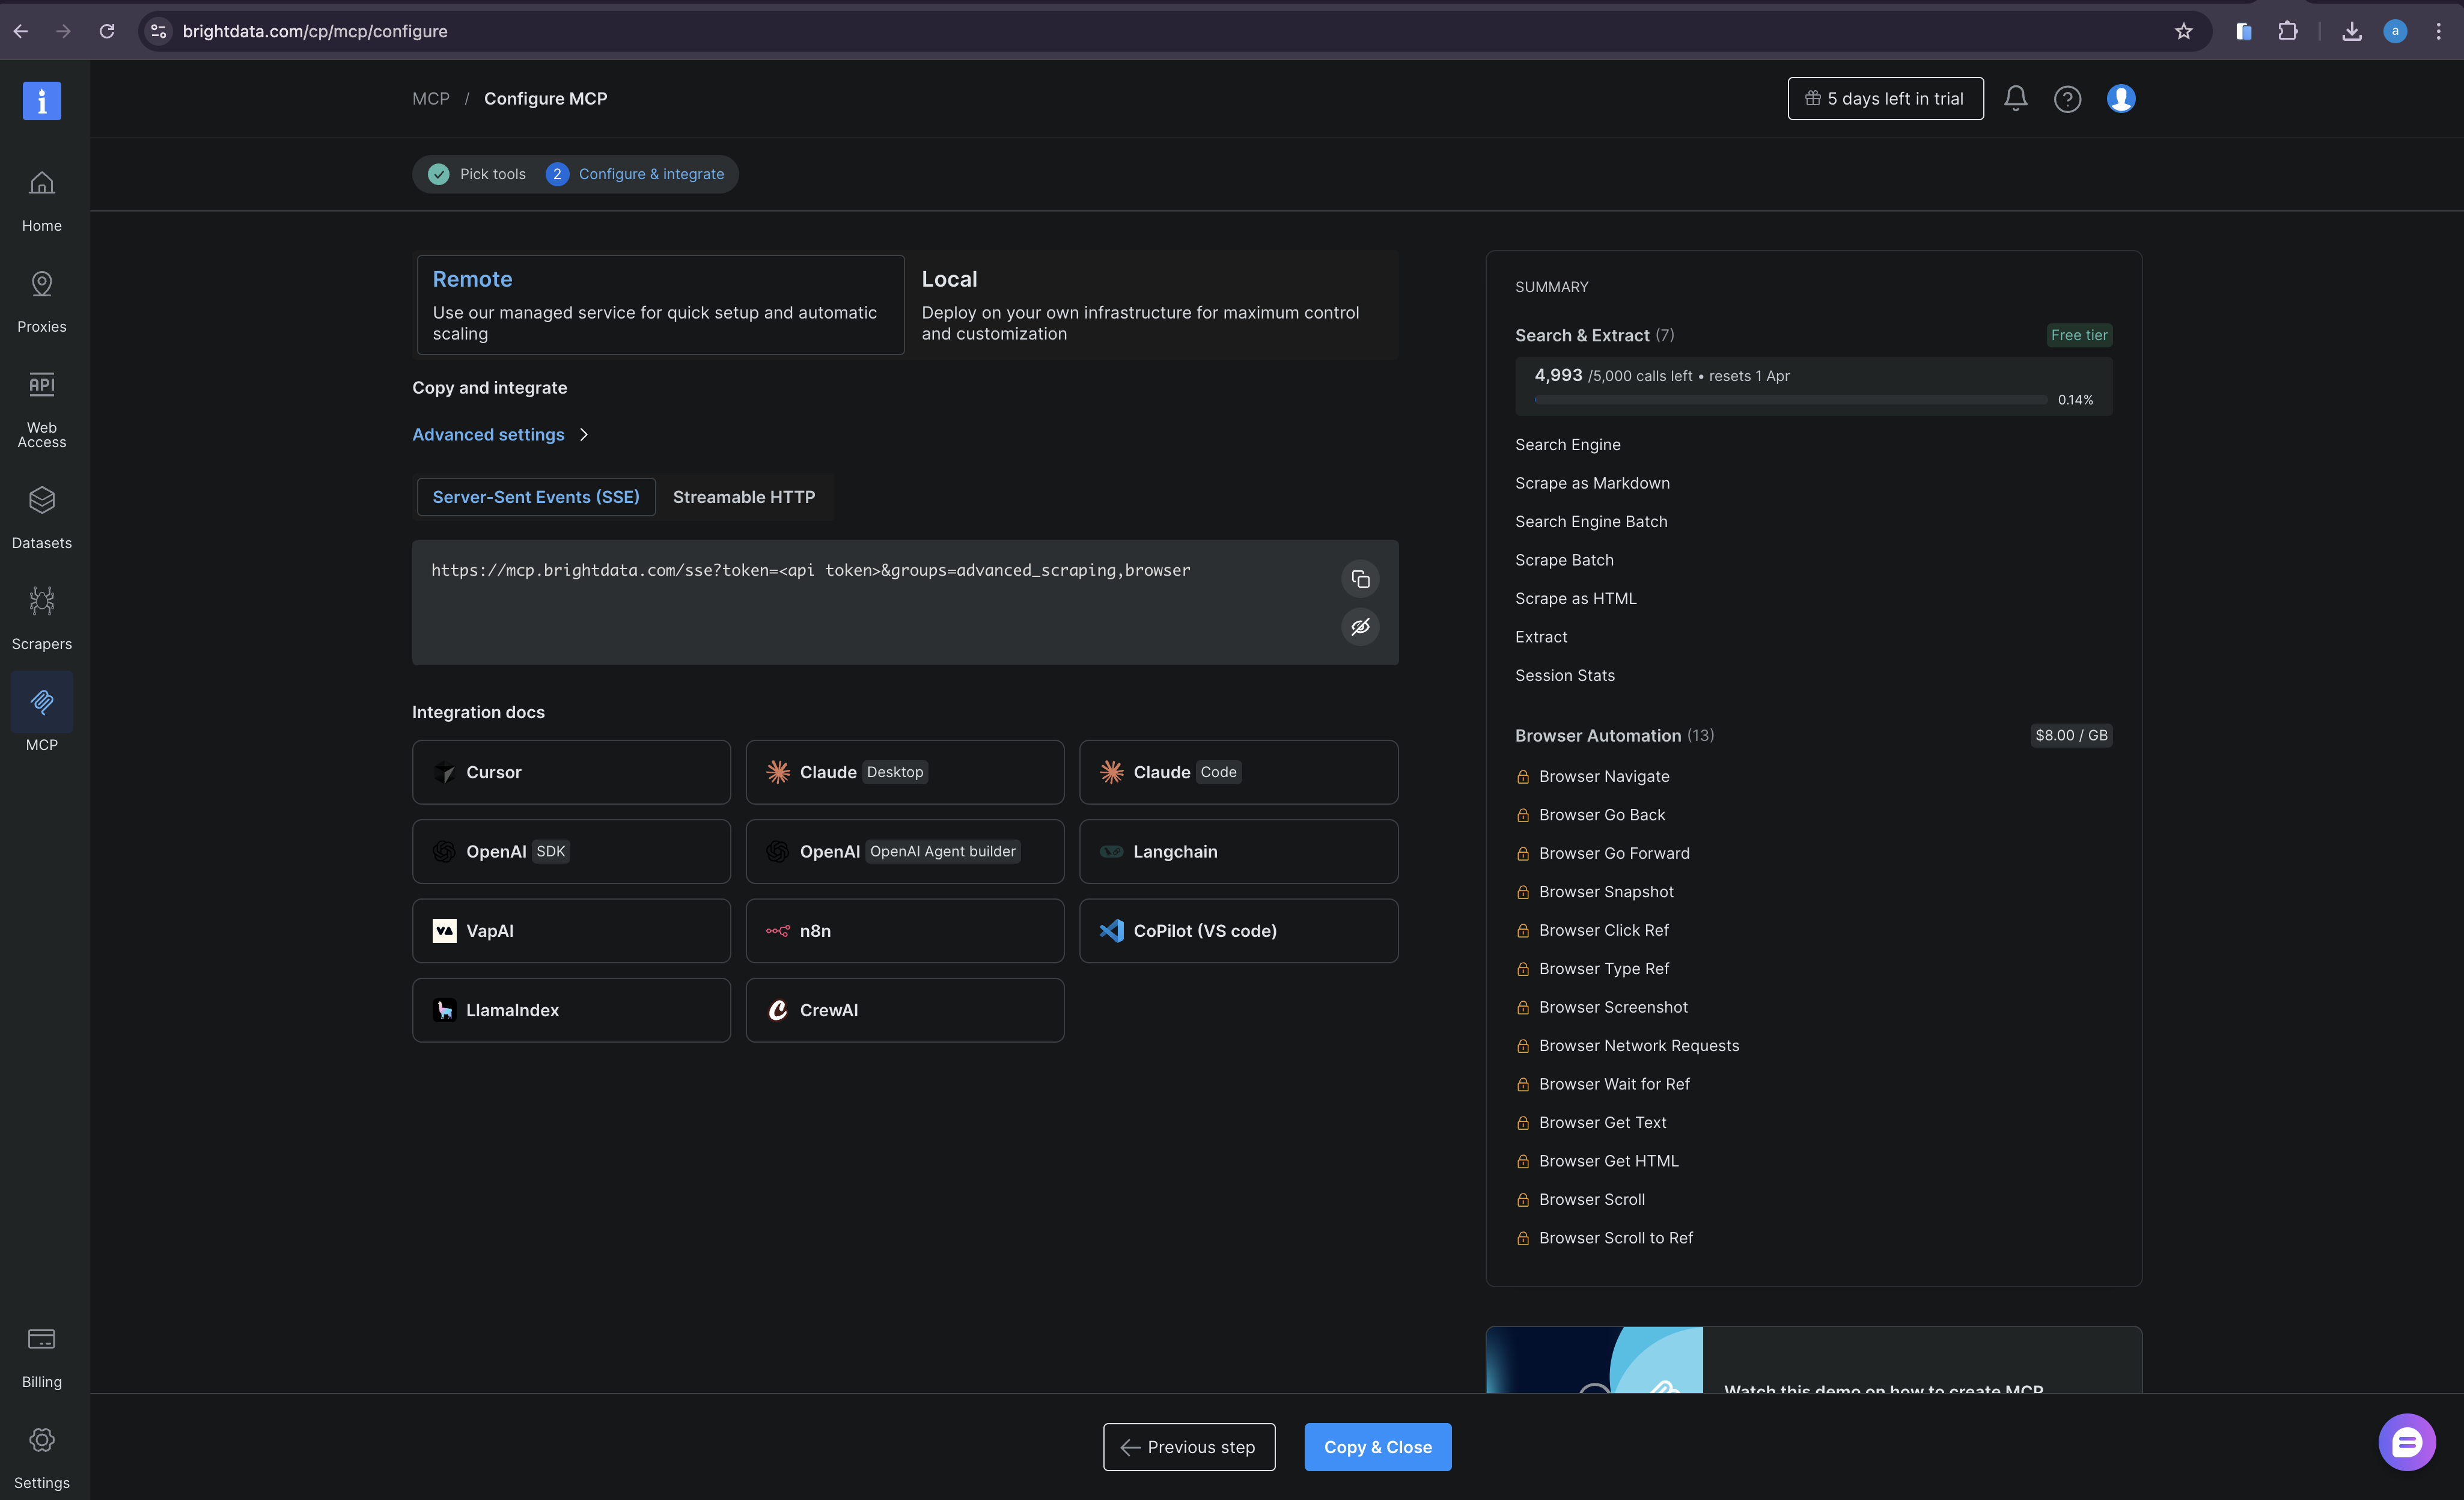
Enable Browser Automation and click Continue to Configure:
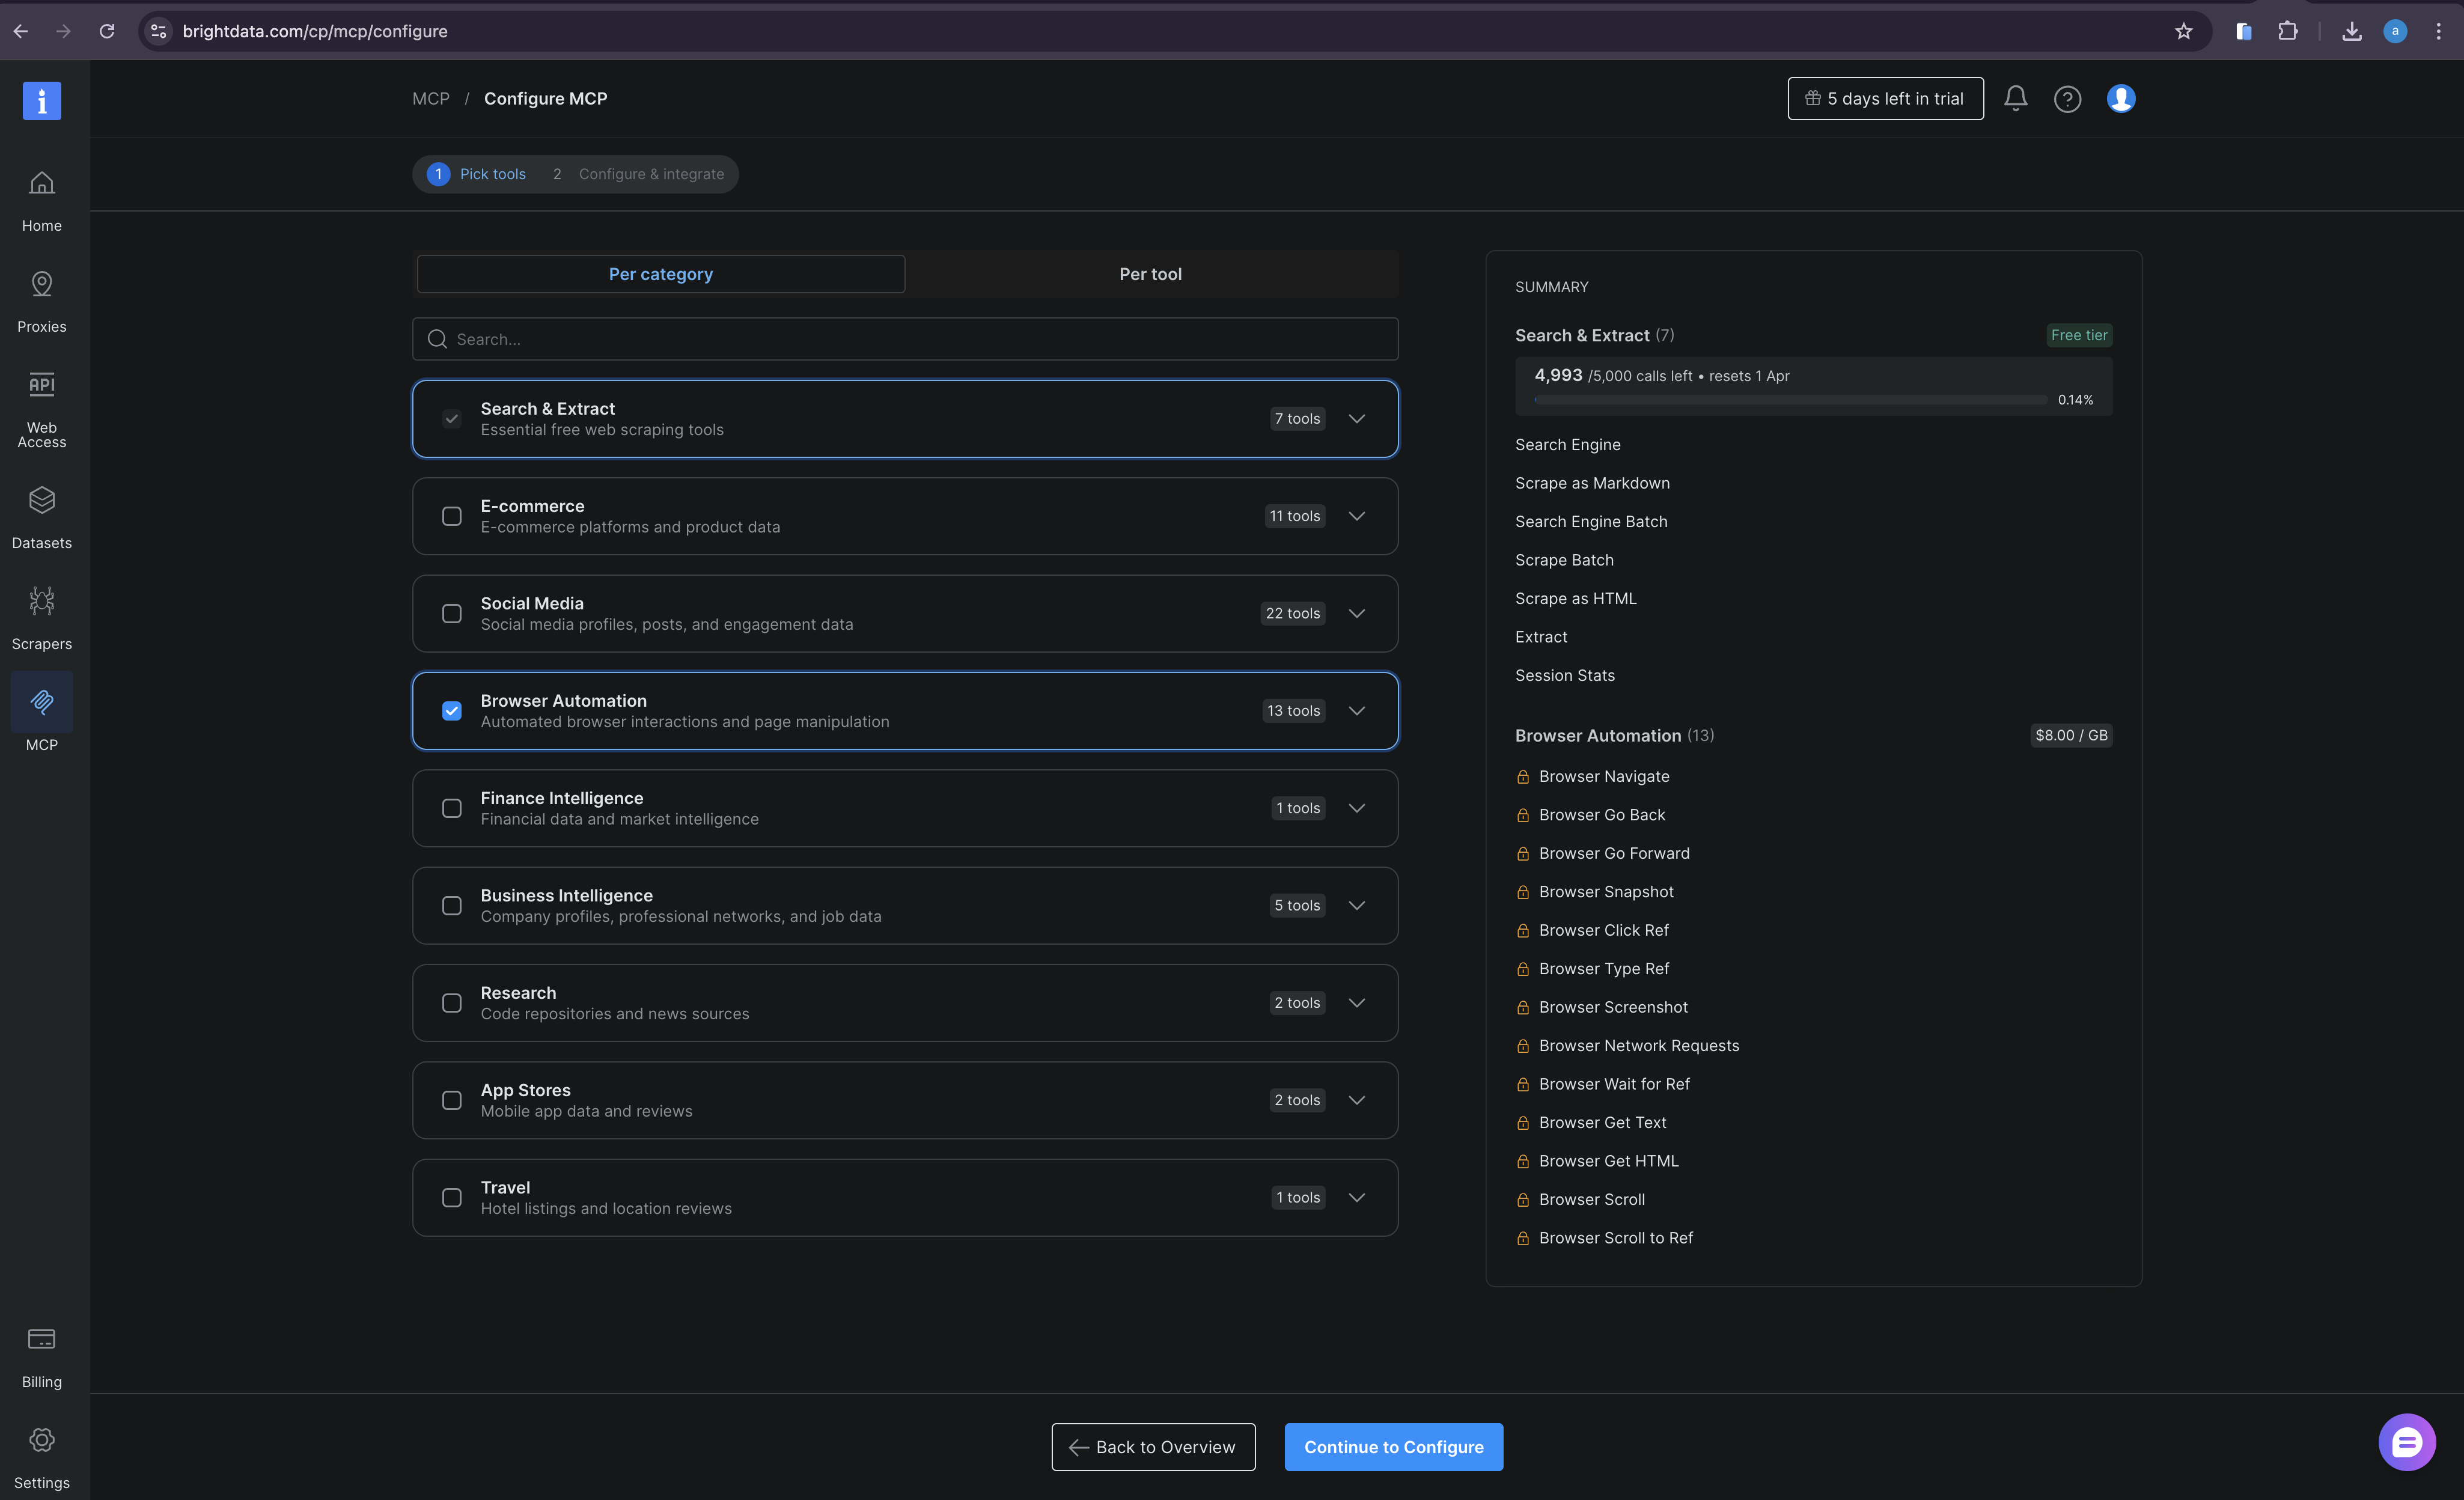
Bright Data dashboard → Browser Automation toggle enabled
Keep the defaults and click Copy & Close:
Bright Data dashboard → saved confirmation
In Vertex AI Agent Builder, because the agent auto-discovers capabilities from the MCP Server endpoint, it automatically picks up the newly available browser tools. No configuration changes are needed in Google Cloud. The model will start using them when scrape_as_markdown returns incomplete results on a JavaScript-heavy page.
Conclusion
By leveraging the native MCP Server integration in the Vertex AI Agent Builder console, you can bypass complex infrastructure setups and backend coding entirely.
You define the agent persona, paste the Bright Data SSE URL, and provide your API token. The Google Cloud UI handles the complex routing, session management, and UI rendering, while Bright Data instantly grants your agent the ability to observe and read the live web. To explore what else you can build with Bright Data on Google Cloud, see how the SERP API integrates with Vertex AI Pipelines for fact-checking and data workflows.
Start with the free Web MCP tier with access to 5,000 requests per month and rapidly prototype powerful, connected AI agents right from your browser.

Technical Writer
Arindam Majumder is a developer advocate, YouTuber, and technical writer who simplifies LLMs, agent workflows, and AI content for 5,000+ followers.


