

In this article, you will learn:
- What Vertex AI Pipelines are.
- Why you can integrate the Bright Data SERP API into them for fact-checking (and many other use cases).
- How to build a fact-checking pipeline in Vertex AI using the Bright Data SERP API to retrieve up-to-date web search context.
Let’s dive in!
What Are Vertex AI Pipelines?
Vertex AI Pipelines is a managed service on Google Cloud that automates, orchestrates, and reproduces end-to-end machine learning workflows.
This service enables you to break down complex ML processes—such as data processing, training, and deployment—into a series of modular components that can be tracked, versioned, and run in a serverless environment.
In short, Vertex AI Pipelines simplifies the MLOps lifecycle, making it easier to build repeatable and scalable ML systems.
Building a Fact-Checking Pipeline in Vertex AI: Why and How
LLMs are surely powerful, but their knowledge is static. Therefore, an LLM trained in 2024 has no awareness of yesterday’s stock market movements, last night’s sports results, etc. This leads to “stale” or “hallucinated” replies.
To address that, you can build a system that “grounds” an LLM with up-to-the-minute data from the Internet. Before the LLM generates a response, it is given external information to make certain its output is based on current facts. That is what RAG (Retrieval-Augmented Generation) is all about!
Now, Gemini provides a grounding tool to connect Gemini models to Google Search. However, that tool is not production-ready, has scalability issues, and does not give you full control over the source of the grounding data. See that tool in action in our GEO/SEO content optimization agent.
A more professional and flexible alternative is Bright Data’s SERP API. This API allows you to programmatically execute search queries on search engines and retrieve the full SERP content. In other terms, it gives you a reliable source of fresh, verifiable content that can be integrated into your LLM workflows. Discover everything it has to offer by exploring its documentation.
For example, you can integrate the SERP API into Vertex AI Pipelines as part of a fact-checking pipeline. This will consist of three steps:
- Extract queries: An LLM reads the input text and identifies the main factual claims, converting them into Google-searchable queries.
- Fetch web search context: This component takes these queries and calls the Bright Data SERP API to fetch real-time search results.
- Fact check: A final LLM step takes the original text and the retrieved search context and generates a fact-check report.
Note: This is just one of the many possible use cases for the SERP API in a data/ML pipeline.
How to Integrate Bright Data’s SERP API for Web Search into a Vertex AI Pipeline
In this section, you will be walked through each step needed to implement a fact-checking pipeline in Vertex AI Pipelines. This will rely on Bright Data’s SERP API, which will be used to fetch factual web search context.
Remember, fact-checking is just one of many use cases (such as news discovery, content summarization, trend analysis, or research assistance) where you can utilize the SERP API in a Vertex AI pipeline node. Thus, you can easily adapt this implementation to many other scenarios.
Clarified that, follow the steps below!
Prerequisites
To follow along with this tutorial section, make sure you have:
- A Google Cloud Console account.
- A Bright Data account with an active API key (ideally with admin permissions).
Follow the official Bright Data guide to learn how to retrieve your API key. Store it in a safe place, as you will need it shortly.
Step #1: Create and Configure a New Google Cloud Project
Sign in to Google Cloud Console and create a new project. Also, make sure billing is enabled (it is also fine to use a free trial).
In this example, call the Google Cloud project “Bright Data SERP API Pipeline” and set the project ID to bright-data-pipeline:
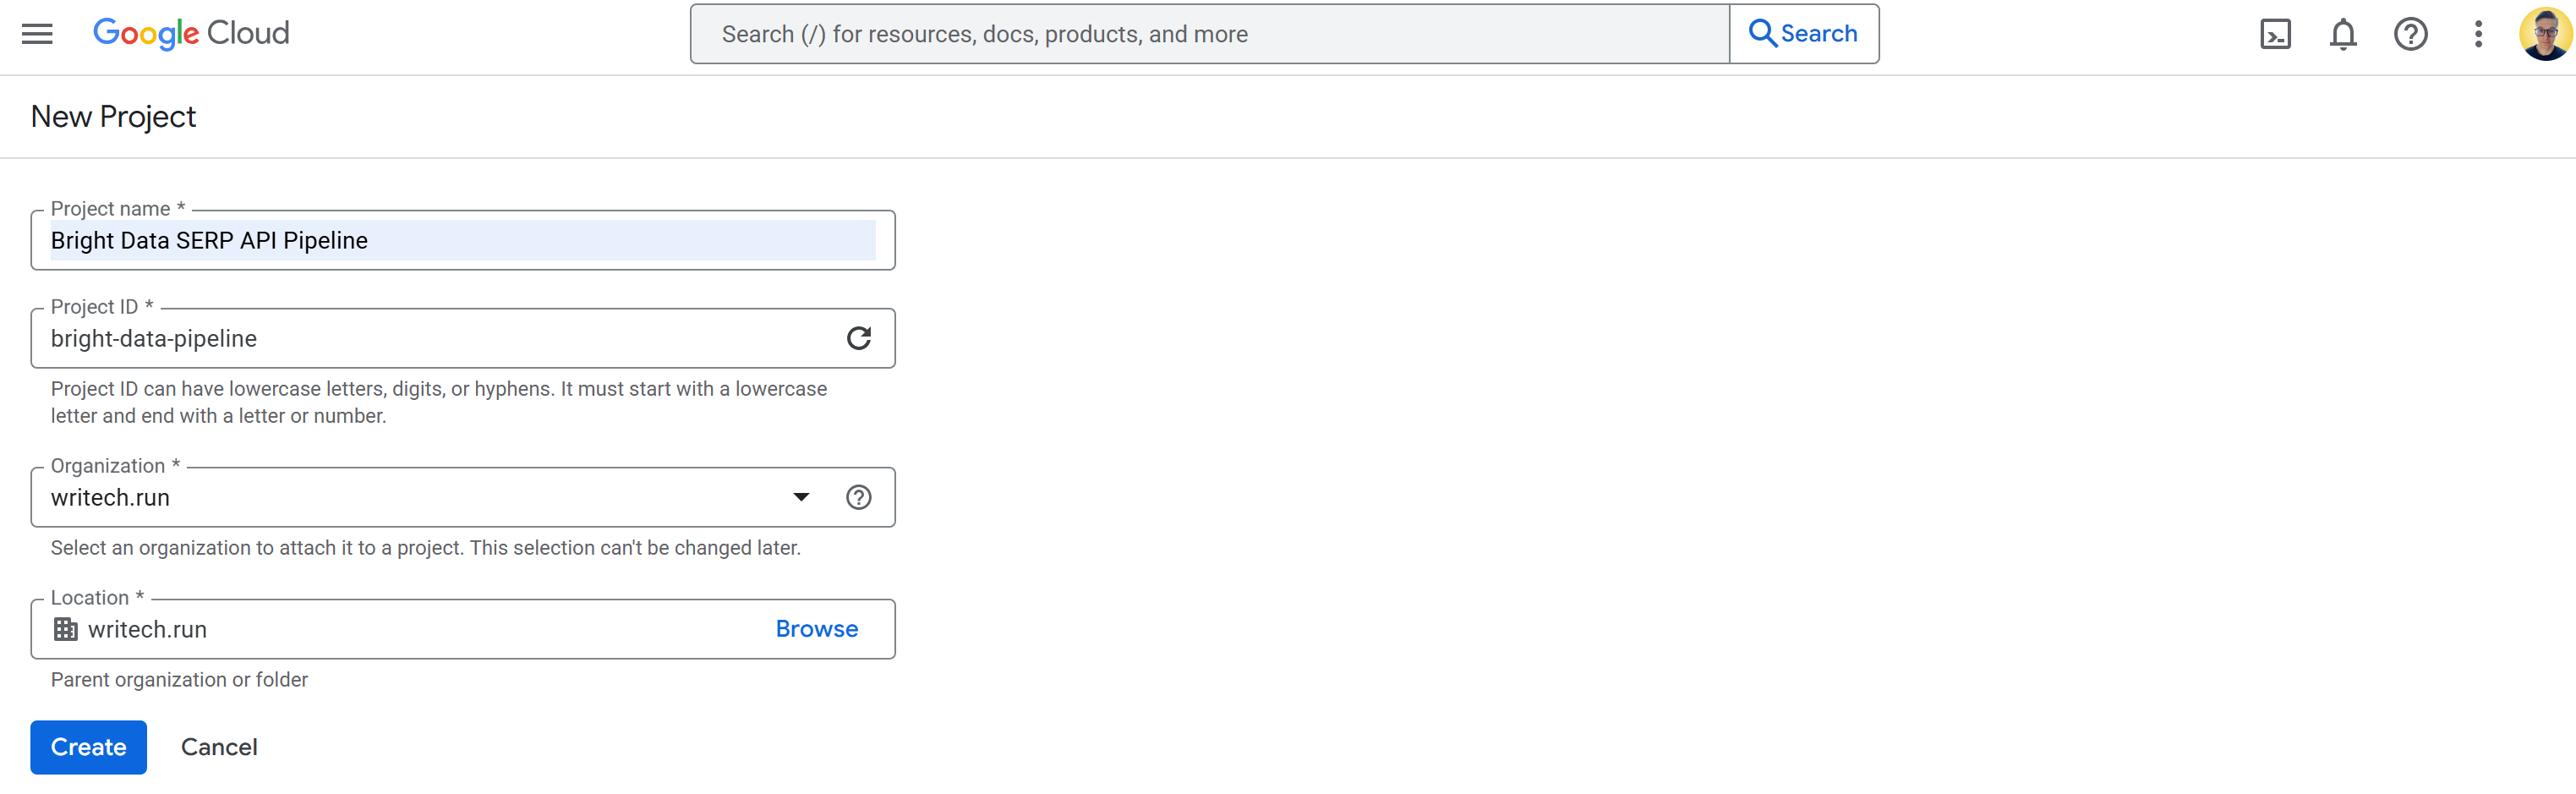
Once the project is created, select it to start working on it. You should now see a view like this:
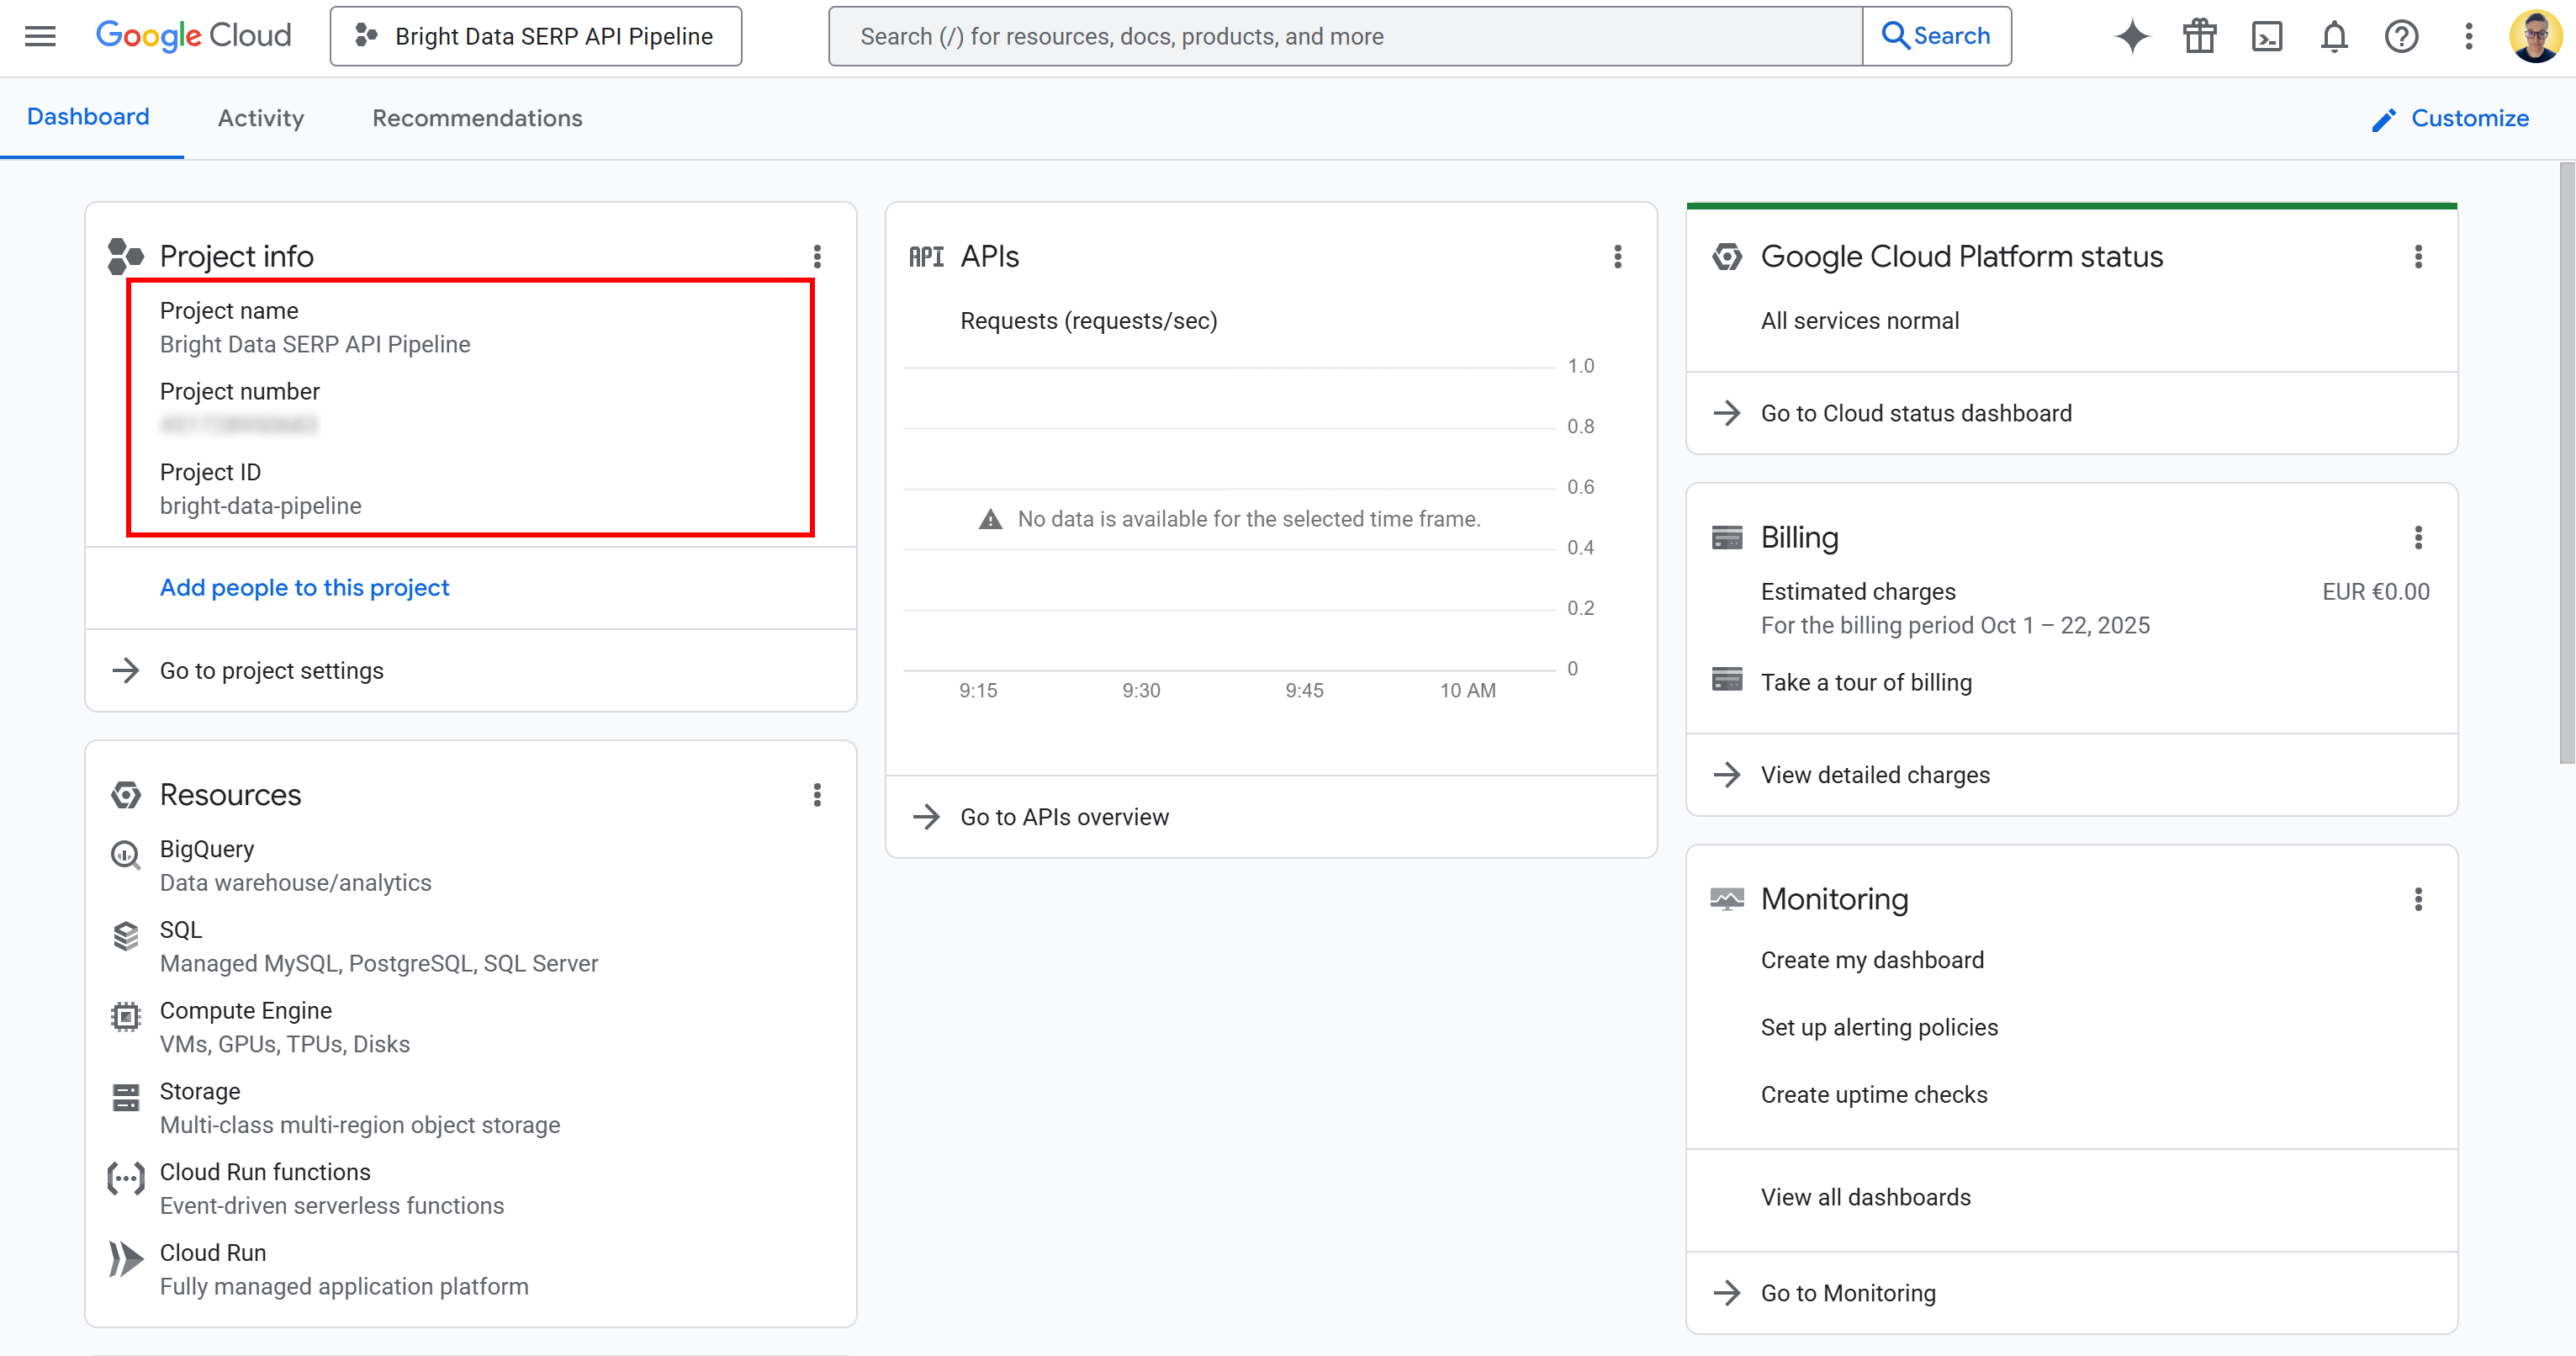
On this page, you can find your project name, project number, and project ID. You will need both the project number and ID later in the tutorial, so note them down and store them in a safe place.
Now that your Google Cloud project is ready, the next step is to activate the required APIs. In the search bar, type “APIs & Services,” reach the page, and click “Enable APIs and services” button:

Search for and enable the following APIs:
These two APIs are necessary to use and develop with Vertex AI in the Vertex AI Workbench.
Note: The pipeline also depends on several other APIs, which are usually enabled by default. In case of issues, verify that these are enabled as well:
- “Cloud Resource Manager API”
- “Cloud Storage API”
- “Service Usage API”
- “Compute Engine API”
- “Gemini for Google Cloud API”
- “Cloud Logging API”
If any of them are disabled, enable them manually before continuing.
Done! You now have a Google Cloud project.
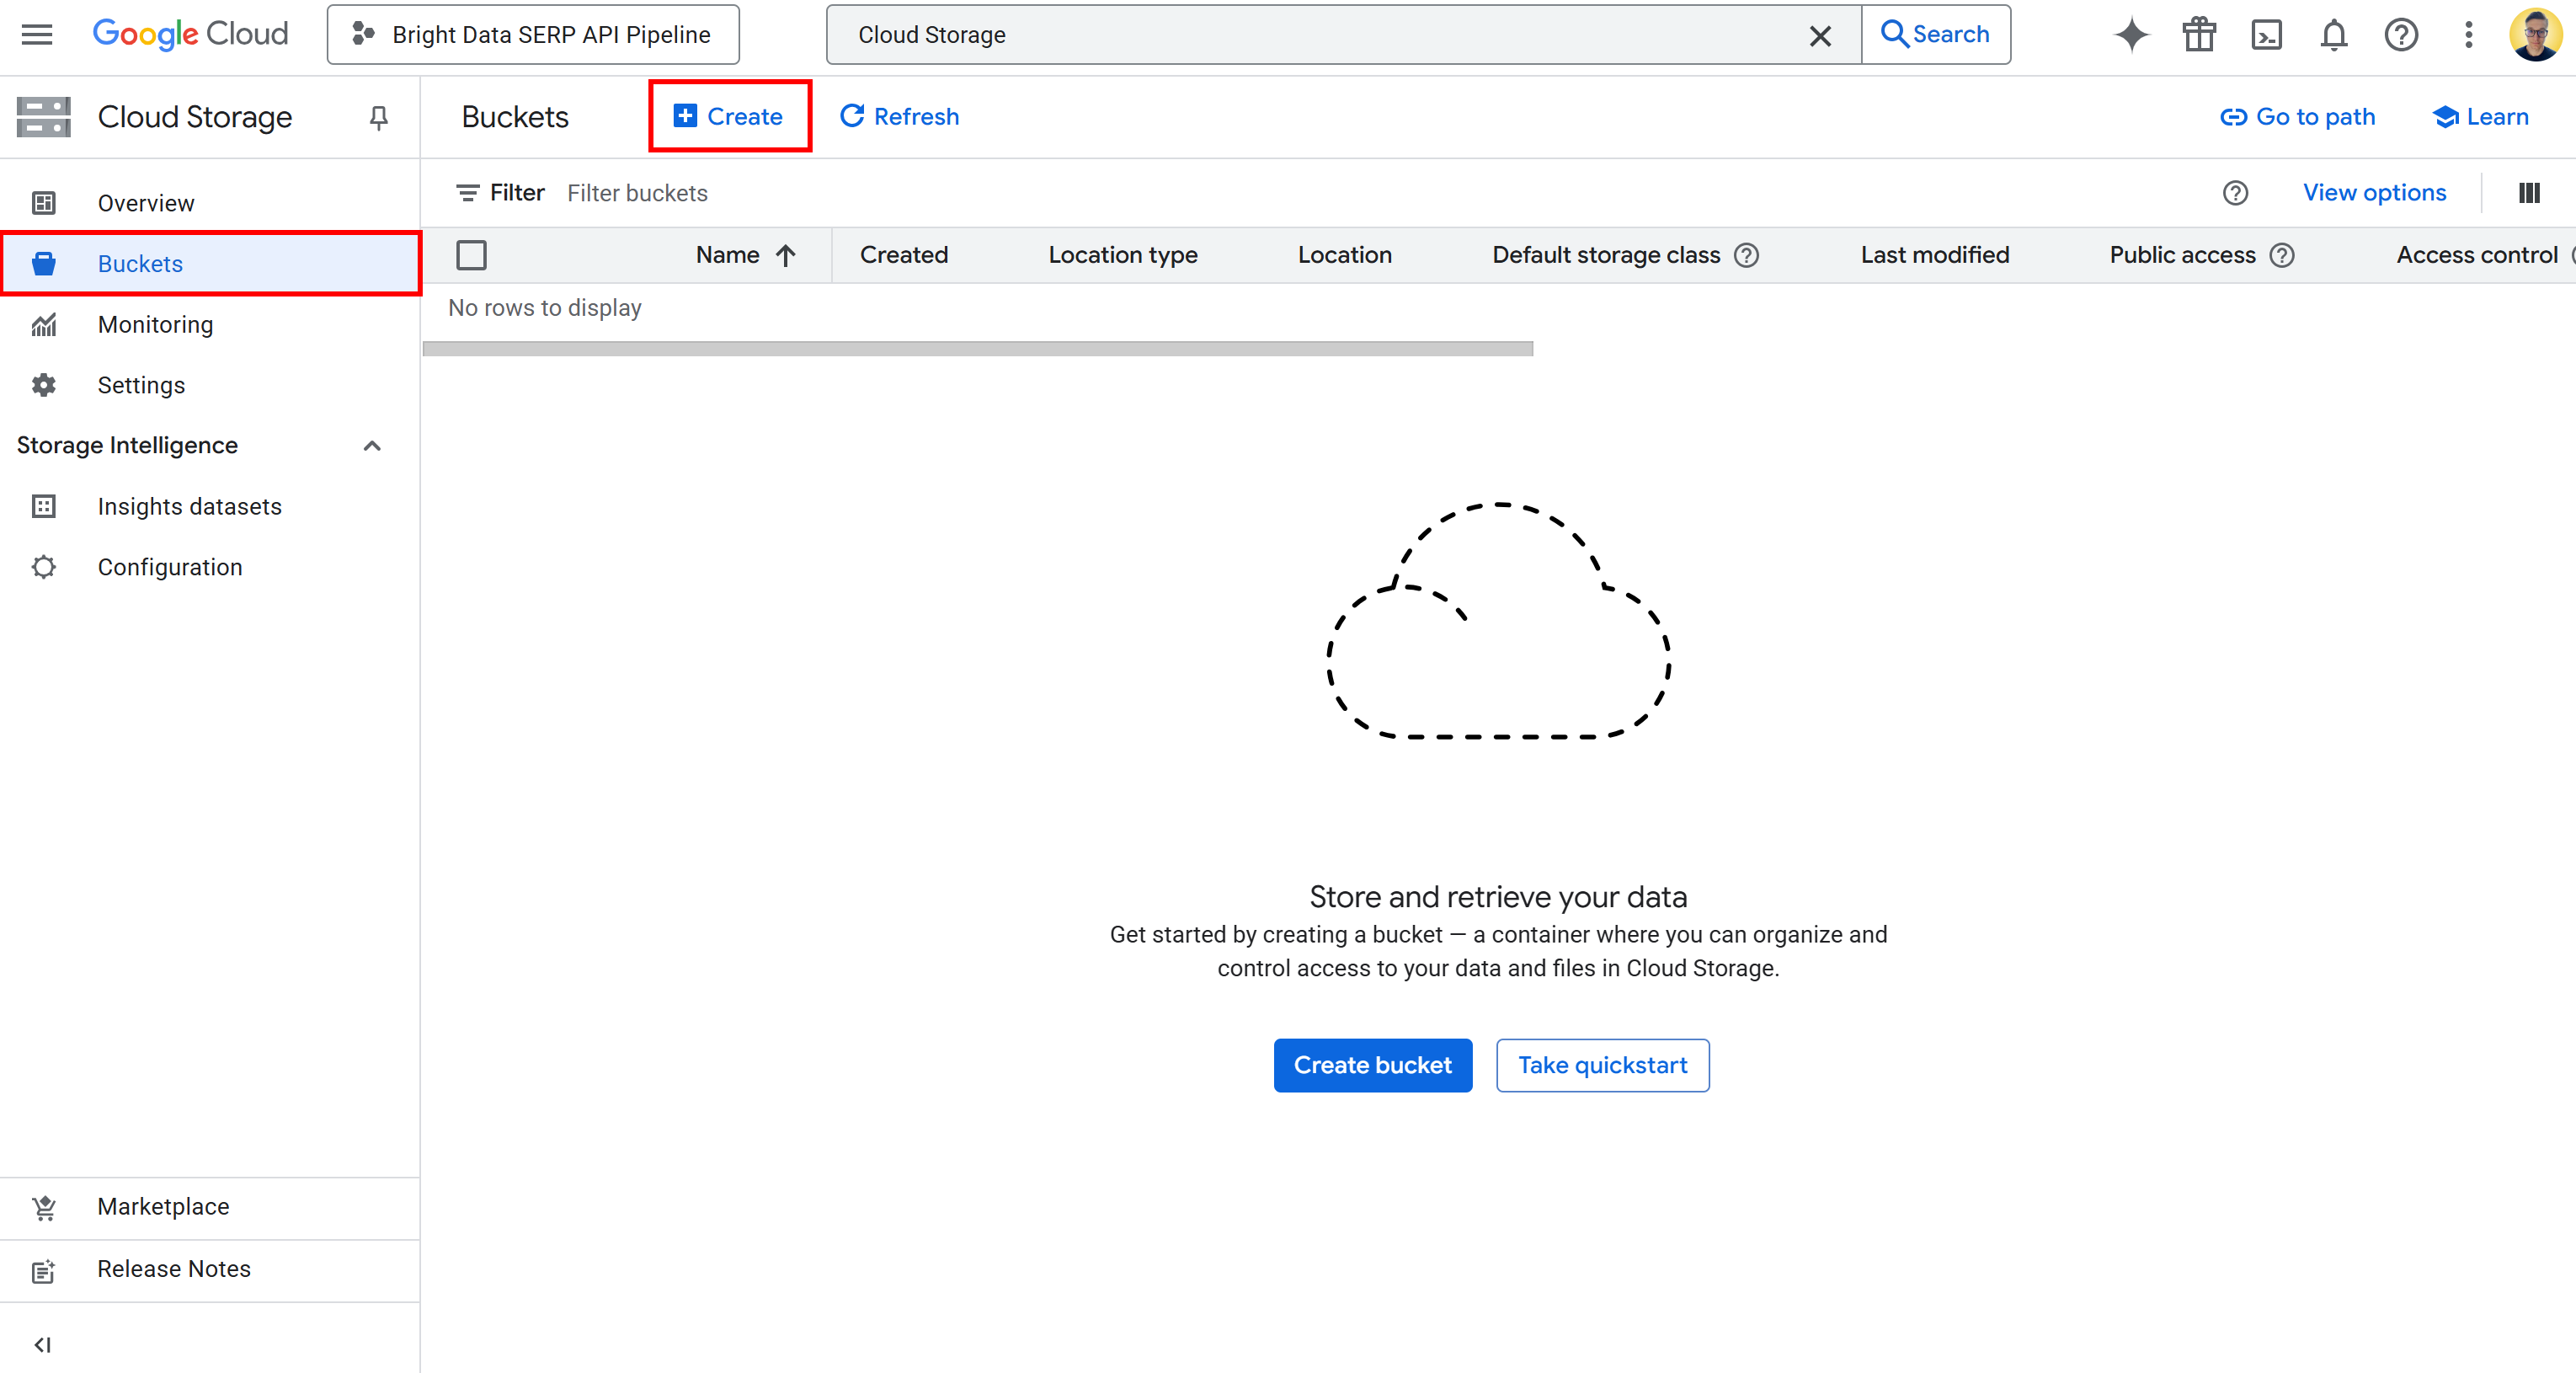
Step #2: Set Up the Cloud Storage Bucket
To run Vertex AI Pipelines, you need a Cloud Storage bucket. That is because Vertex AI has to store pipeline artifacts, such as intermediate data, model files, logs, and metadata generated during pipeline execution. In other words, the configured bucket acts as the workspace where your pipeline components read and write data.
To create a bucket, search for “Cloud Storage” in the Google Cloud Console. Open the first result, select “Buckets” from the left-hand menu, and then press the “Create” button:
In the bucket creation form:
- Give it a globally unique name, such as
bright-data-pipeline-artifacts. - Choose a location type and region. For simplicity, we recommend selecting the “us (multiple regions in United States)” option.
Once created, write down the bucket name, as you will need it later in the pipeline configuration. You should now see something like this:
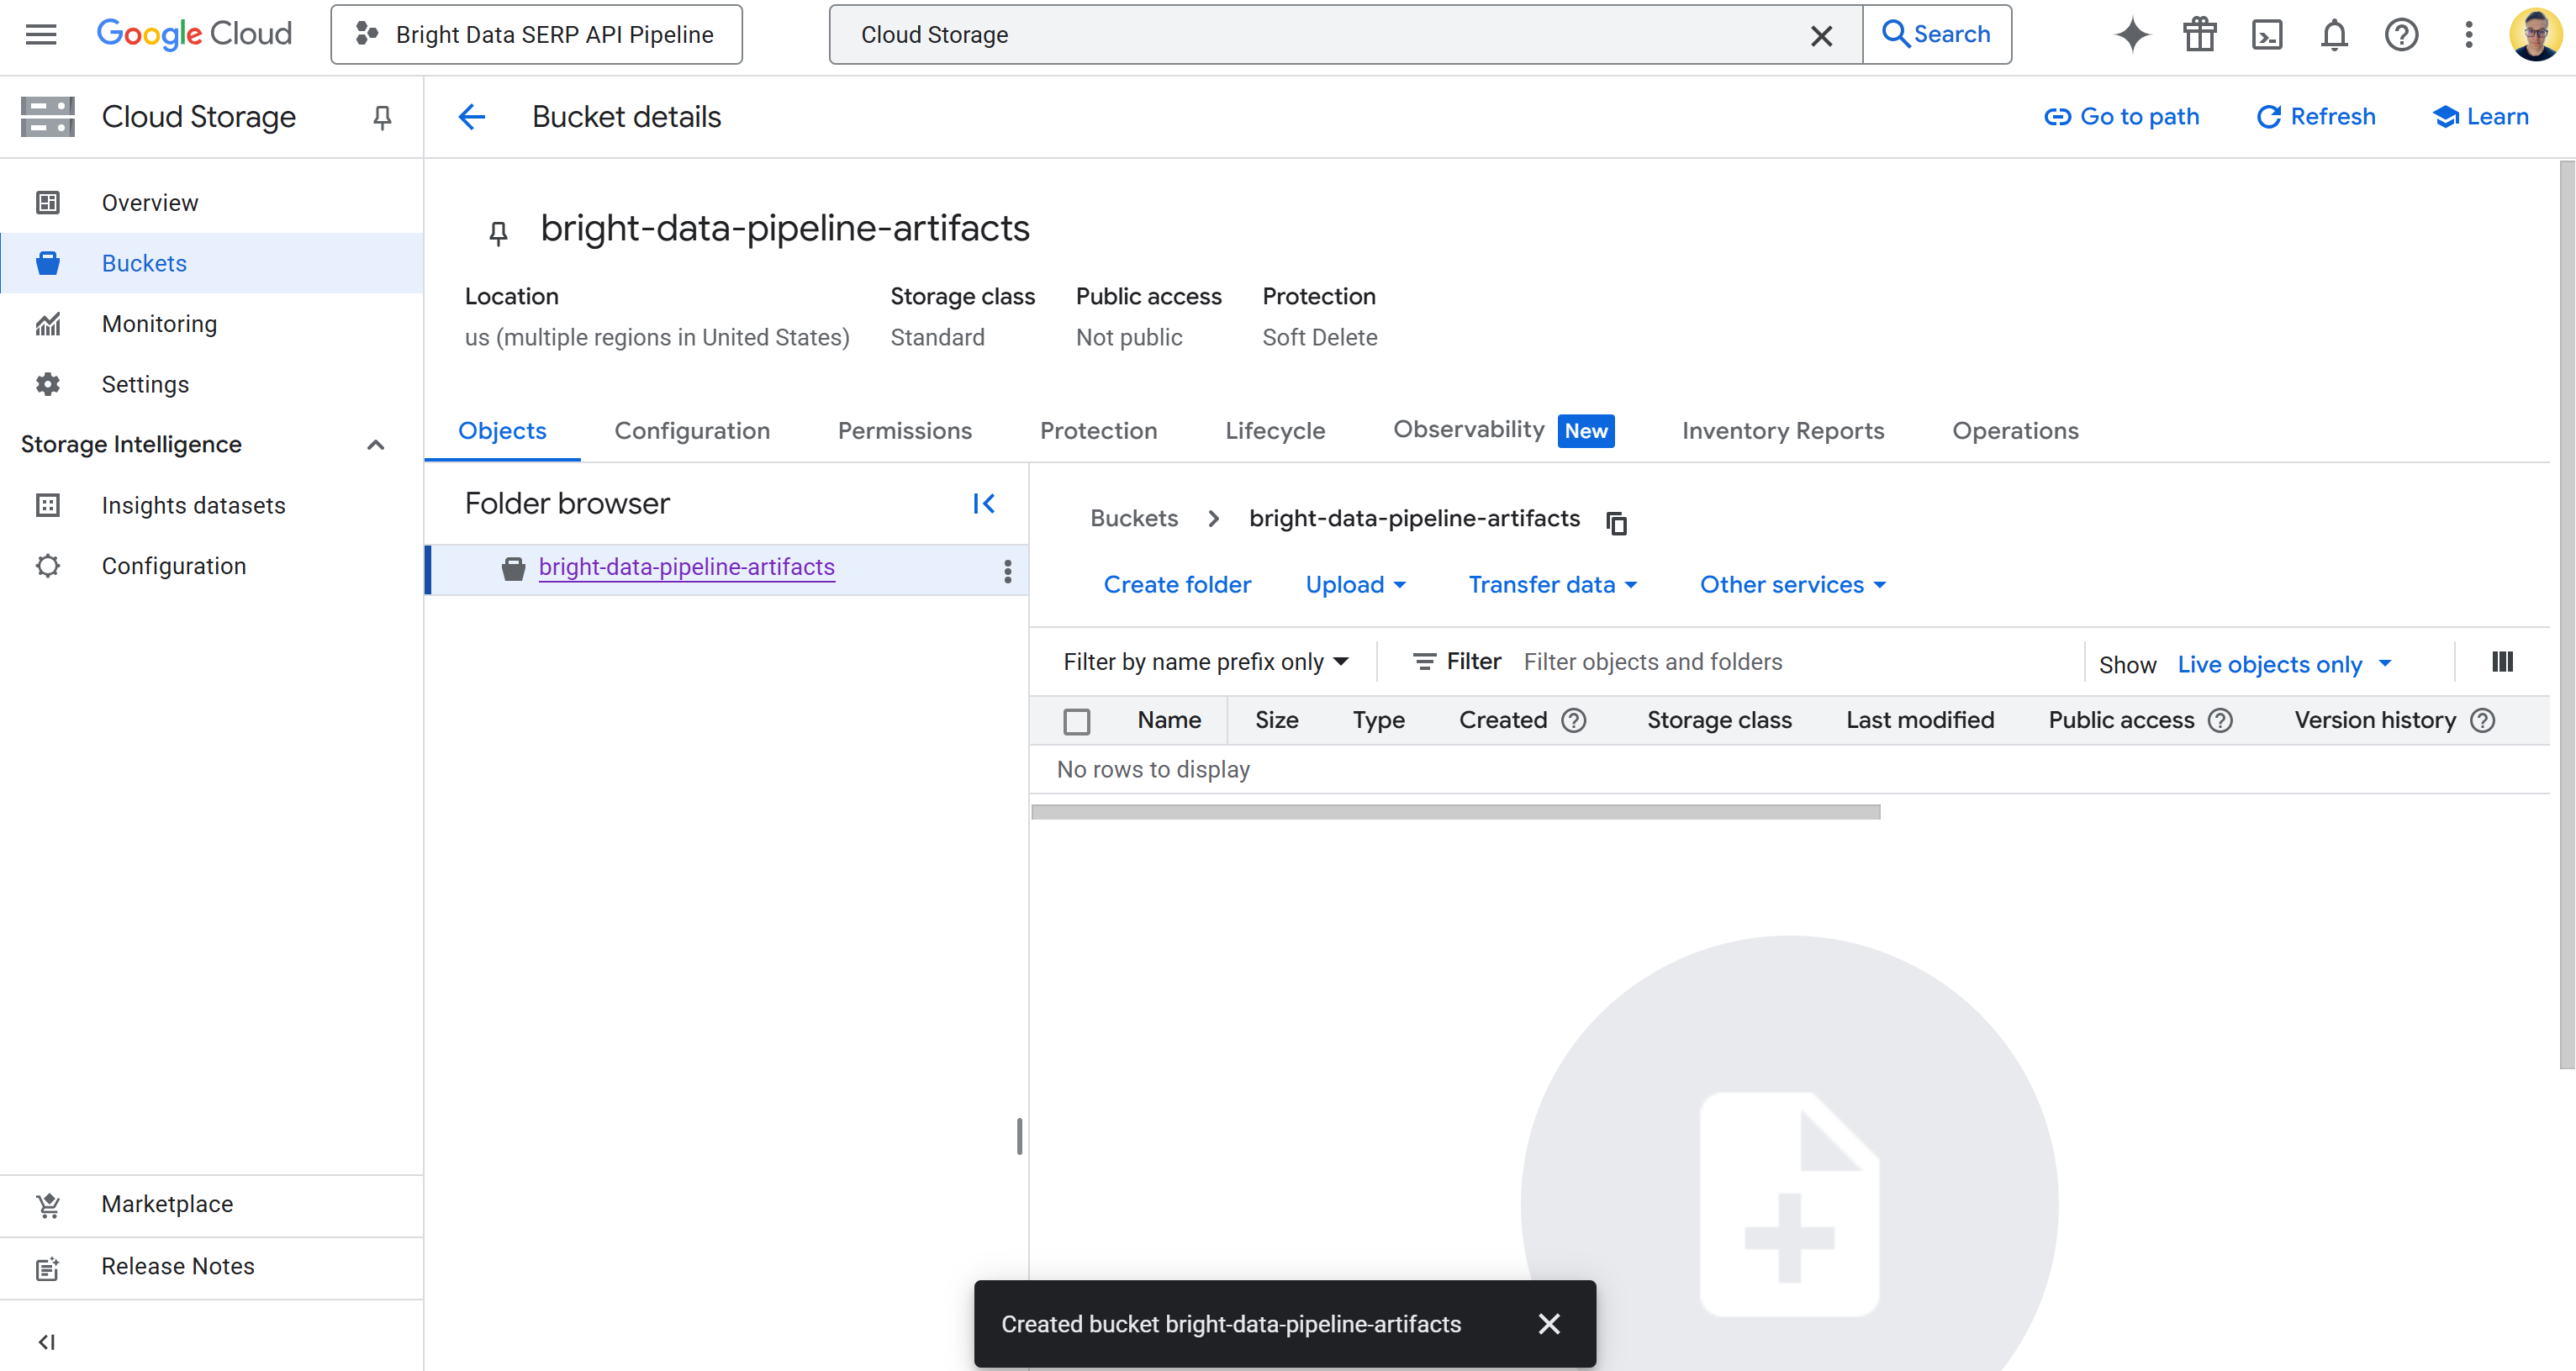
In this case, the bucket name is:
bright-data-pipeline-artifacts While the bucket URI is:
gs://bright-data-pipeline-artifactsBecause you chose the “us” multi-region, you can access this bucket through any supported us-* region. That includes us-central1, us-east1, …, us-west1 …, etc. We recommend setting us-central1.
Now, you need to give Vertex AI permission to read and write data in your bucket. To do that, click on the bucket name to open its details page, then go to the “Permissions” tab:
Click the “Grant access” button and add a new permission rule as follows:
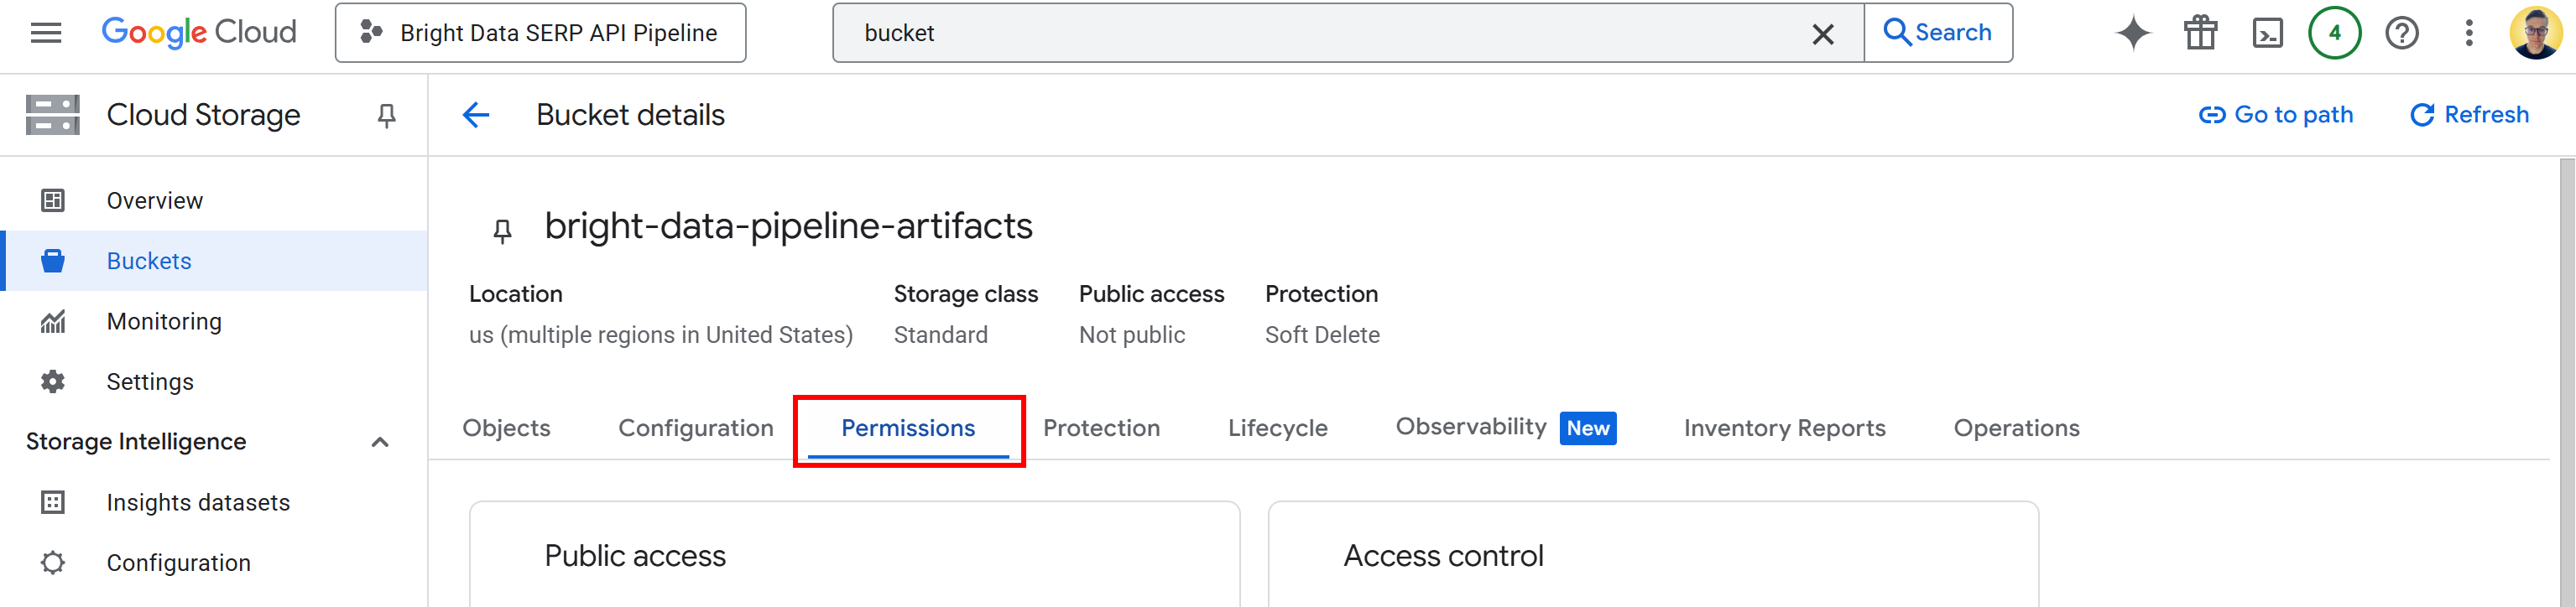
- Principal:
<YOUR_GC_PROJECT_NUMBER>[email protected] - Role:
Storage Admin
(Important: For production environments, assign only the minimum roles required. Using full “Storage Admin” access is just for simplicity in this setup.)
Click “Save” to confirm the new role, which grants your project’s Compute Engine service the ability to access and manage objects in your Cloud Storage bucket.
Without that permission, your Vertex AI pipeline would not be able to read or write data during execution, leading to 403 Forbidden errors like the one below:
google.api_core.exceptions.Forbidden: 403 GET https://storage.googleapis.com/storage/v1/b/bright-data-pipeline-artifacts?fields=name&prettyPrint=false: <YOUR_GC_PROJECT_NUMBER>[email protected] does not have storage.buckets.get access to the Google Cloud Storage bucket. Permission 'storage.buckets.get' denied on resource (or it may not exist).Amazing! Google Cloud Storage bucket configured.
Step #3: Configure the IAM Permissions
Just like with the Cloud Storage bucket, you also have to give your project’s Compute Engine service account the proper IAM permissions.
Those permissions allow Vertex AI to create and manage pipeline jobs on your behalf. Without them, the pipeline will not have the authority to launch or control its execution within your Google Cloud project.
To set them up, search for “IAM & Admin” in the Google Cloud Console and open the page.
Click the “Grant access” button, then add the following two roles to your Compute Engine default service account (i.e., <YOUR_GC_PROJECT_NUMBER>[email protected]):
- “Service Account User”
- “Vertex AI User”

After assigning the roles, press the “Save” button. This way, your Vertex AI pipeline will be able to use your project’s compute resources and run managed workloads.
In short, it tells Google Cloud that your Vertex AI pipelines are authorized to act on behalf of your project’s compute service account. Without these permissions, you will encounter 403 Forbidden errors like the one below when trying to launch a pipeline job:
403 POST https://us-central1-aiplatform.googleapis.com/v1/projects/bright-data-pipeline/locations/us-central1/pipelineJobs?pipelineJobId=XXXXXXXXXXXXXXXXXXXXXXX&%24alt=json%3Benum-encoding%3Dint: Permission 'aiplatform.pipelineJobs.create' denied on resource '//aiplatform.googleapis.com/projects/bright-data-pipeline/locations/us-central1' (or it may not exist). [{'@type': 'type.googleapis.com/google.rpc.ErrorInfo', 'reason': 'IAM_PERMISSION_DENIED', 'domain': 'aiplatform.googleapis.com', 'metadata': {'resource': 'projects/bright-data-pipeline/locations/us-central1', 'permission': 'aiplatform.pipelineJobs.create'}}]All set! IAM is now configured and ready for Vertex AI pipeline execution.
Step #4: Get Started with Vertex AI Workbench
To simplify development, you will build our Vertex AI pipeline directly in the cloud, with no local setup required.
Specifically, you will use Vertex AI Workbench, a fully-managed JupyterLab-based development environment within Google Cloud’s Vertex AI platform. This is built to support entire data science workflows, from prototyping to model deployment.
Note: Before you proceed, make sure that the “Notebooks API” is enabled, as that API is required for Vertex AI Workbench to function.
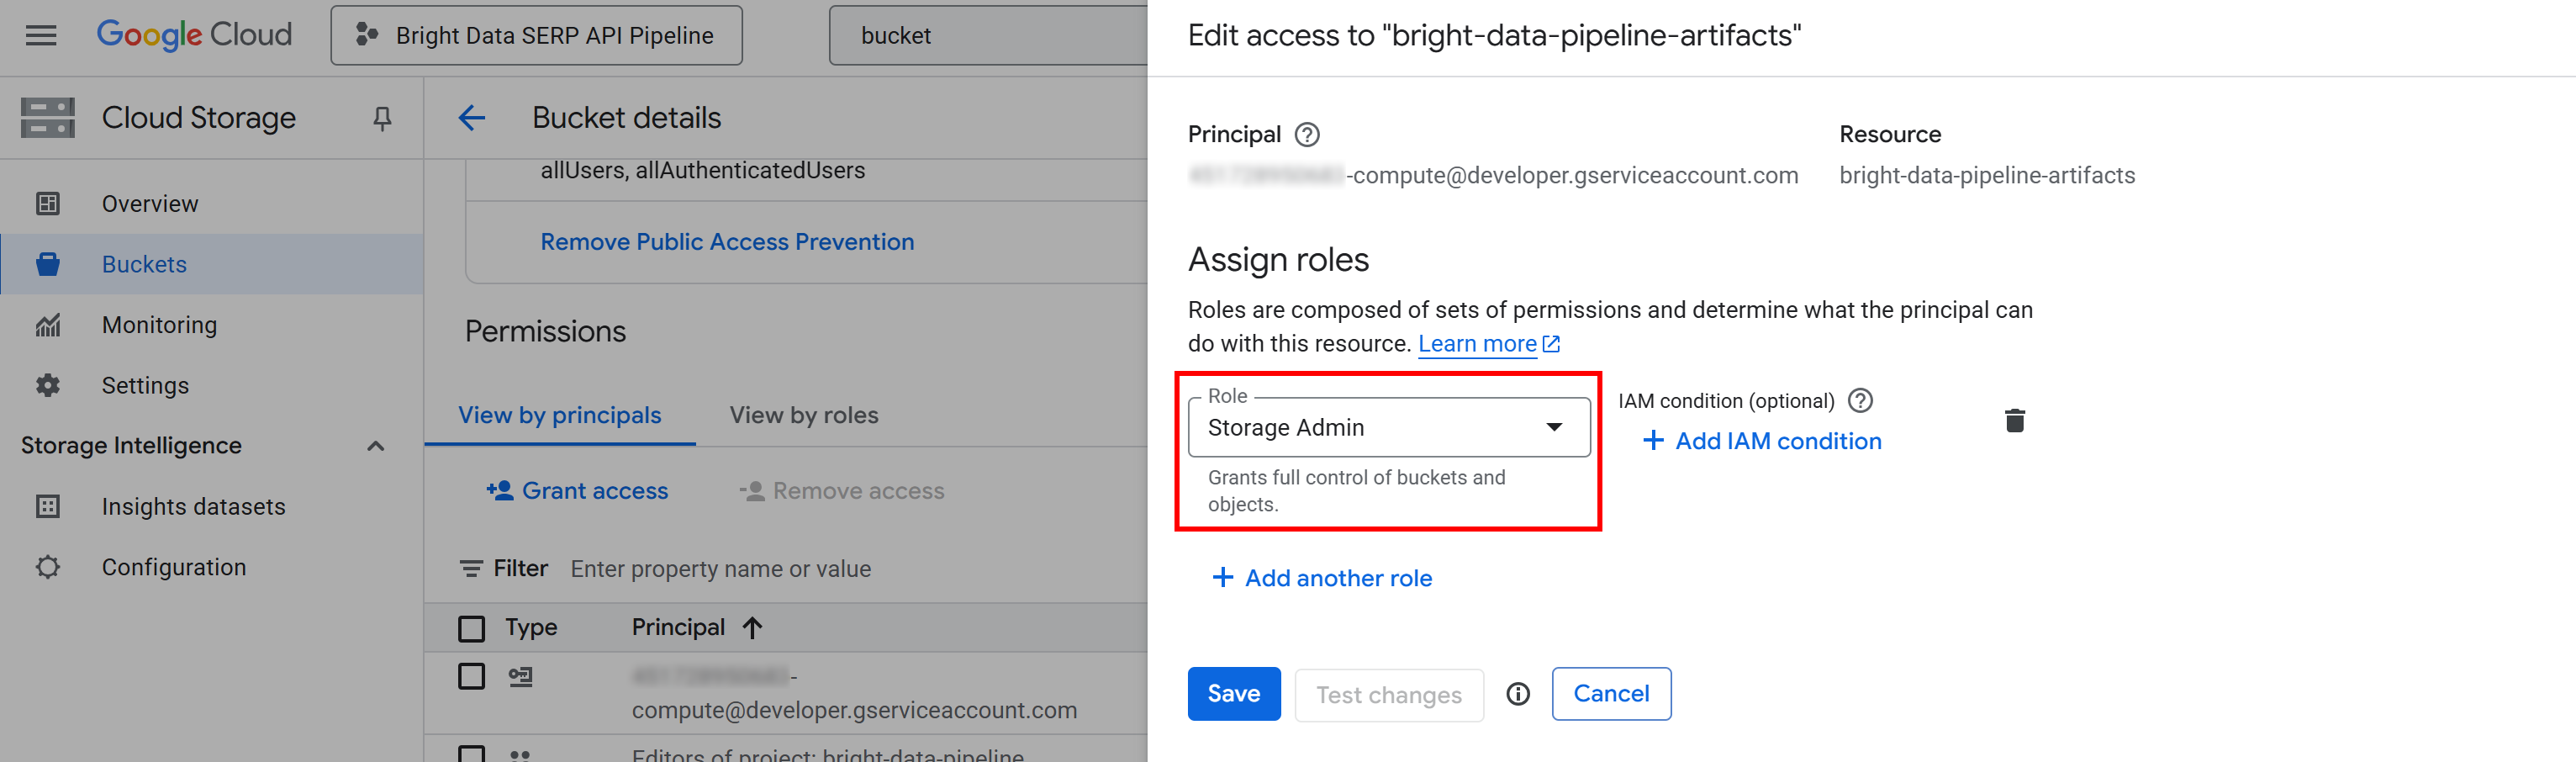
To access Vertex AI Workbench, search for “Vertex AI Workbench” in the Google Cloud Console, and open the page. Next, under the “Instances” tab, click “Create New” to launch a new instance:
Note: While Vertex AI Workbench supports Jupyter 4 for new instances, all environments currently use JupyterLab 3 by default. This version already comes with the latest NVIDIA GPU and Intel libraries and drivers preinstalled. Thus, for this tutorial, you should go for JupyterLab 3.
In the instance creation form, leave all the default configuration values, including the default machine type (that should be n1-standard-4). That machine is more than sufficient for this guide.
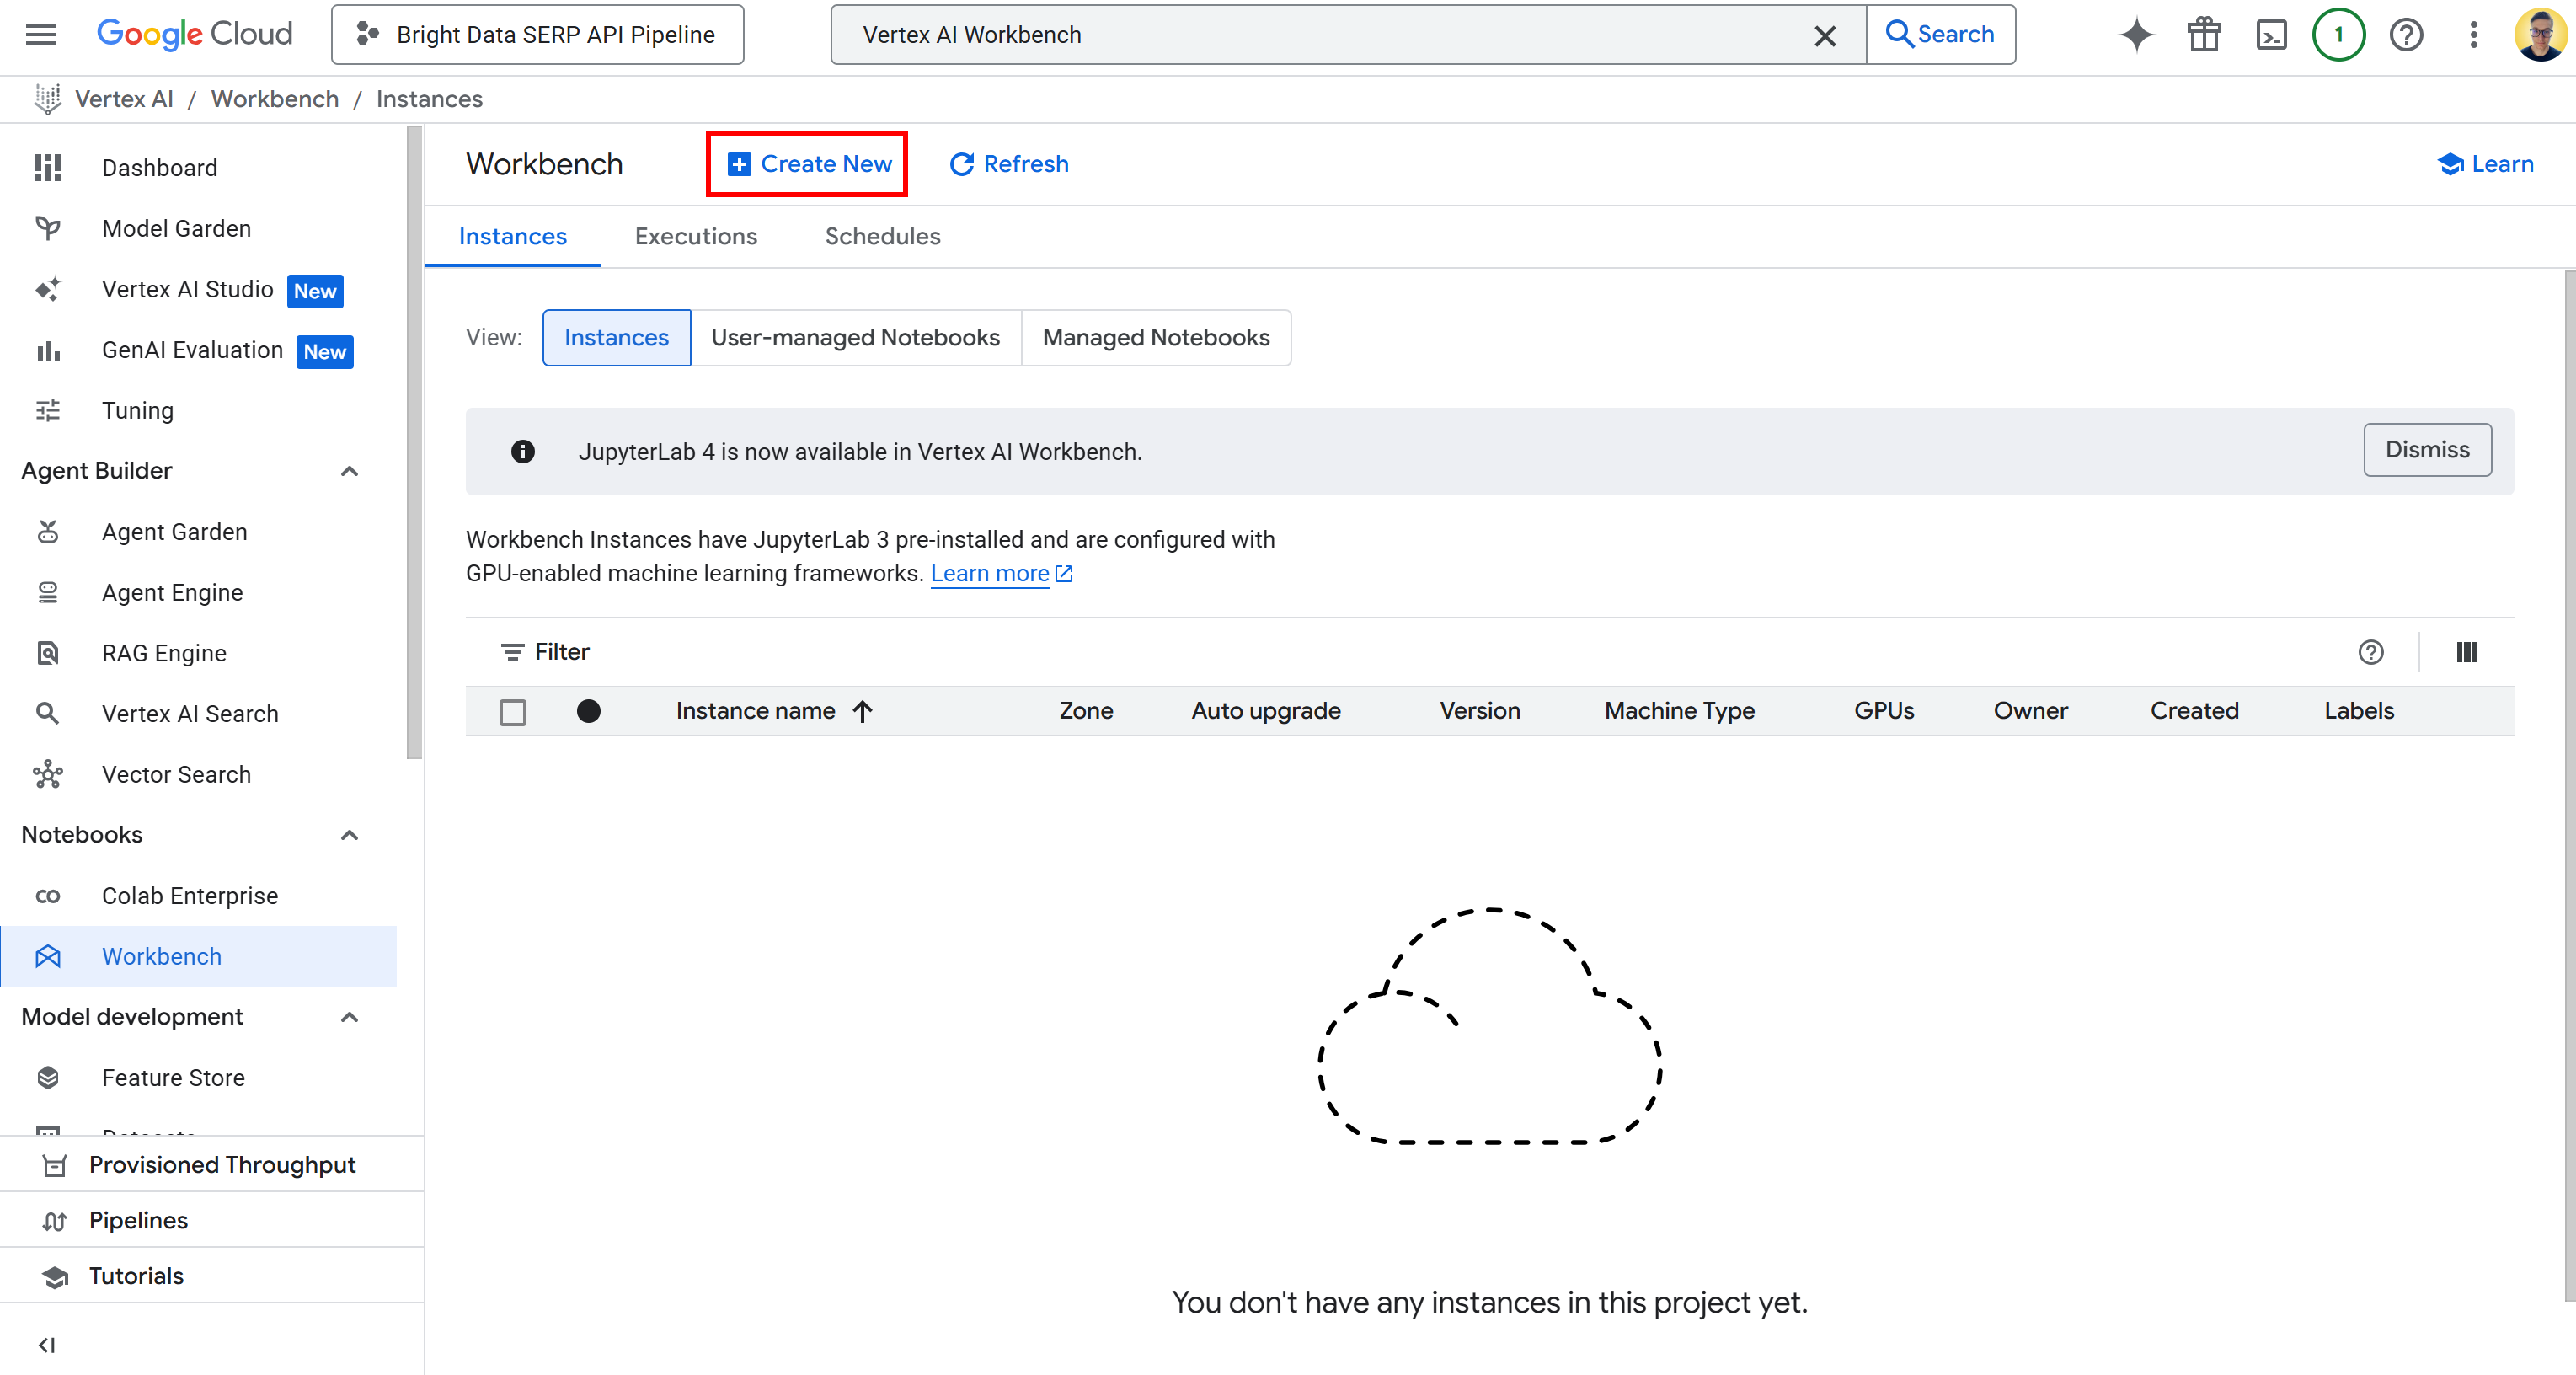
Click “Create” and keep in mind that it will take a few minutes for the instance to be provisioned and started. Once it is ready, you will see a new entry in the “Instances” table with a link labeled “Open JupyterLab.” Click it:
You will be redirected to your cloud-based JupyterLab environment, fully hosted on Google Cloud:
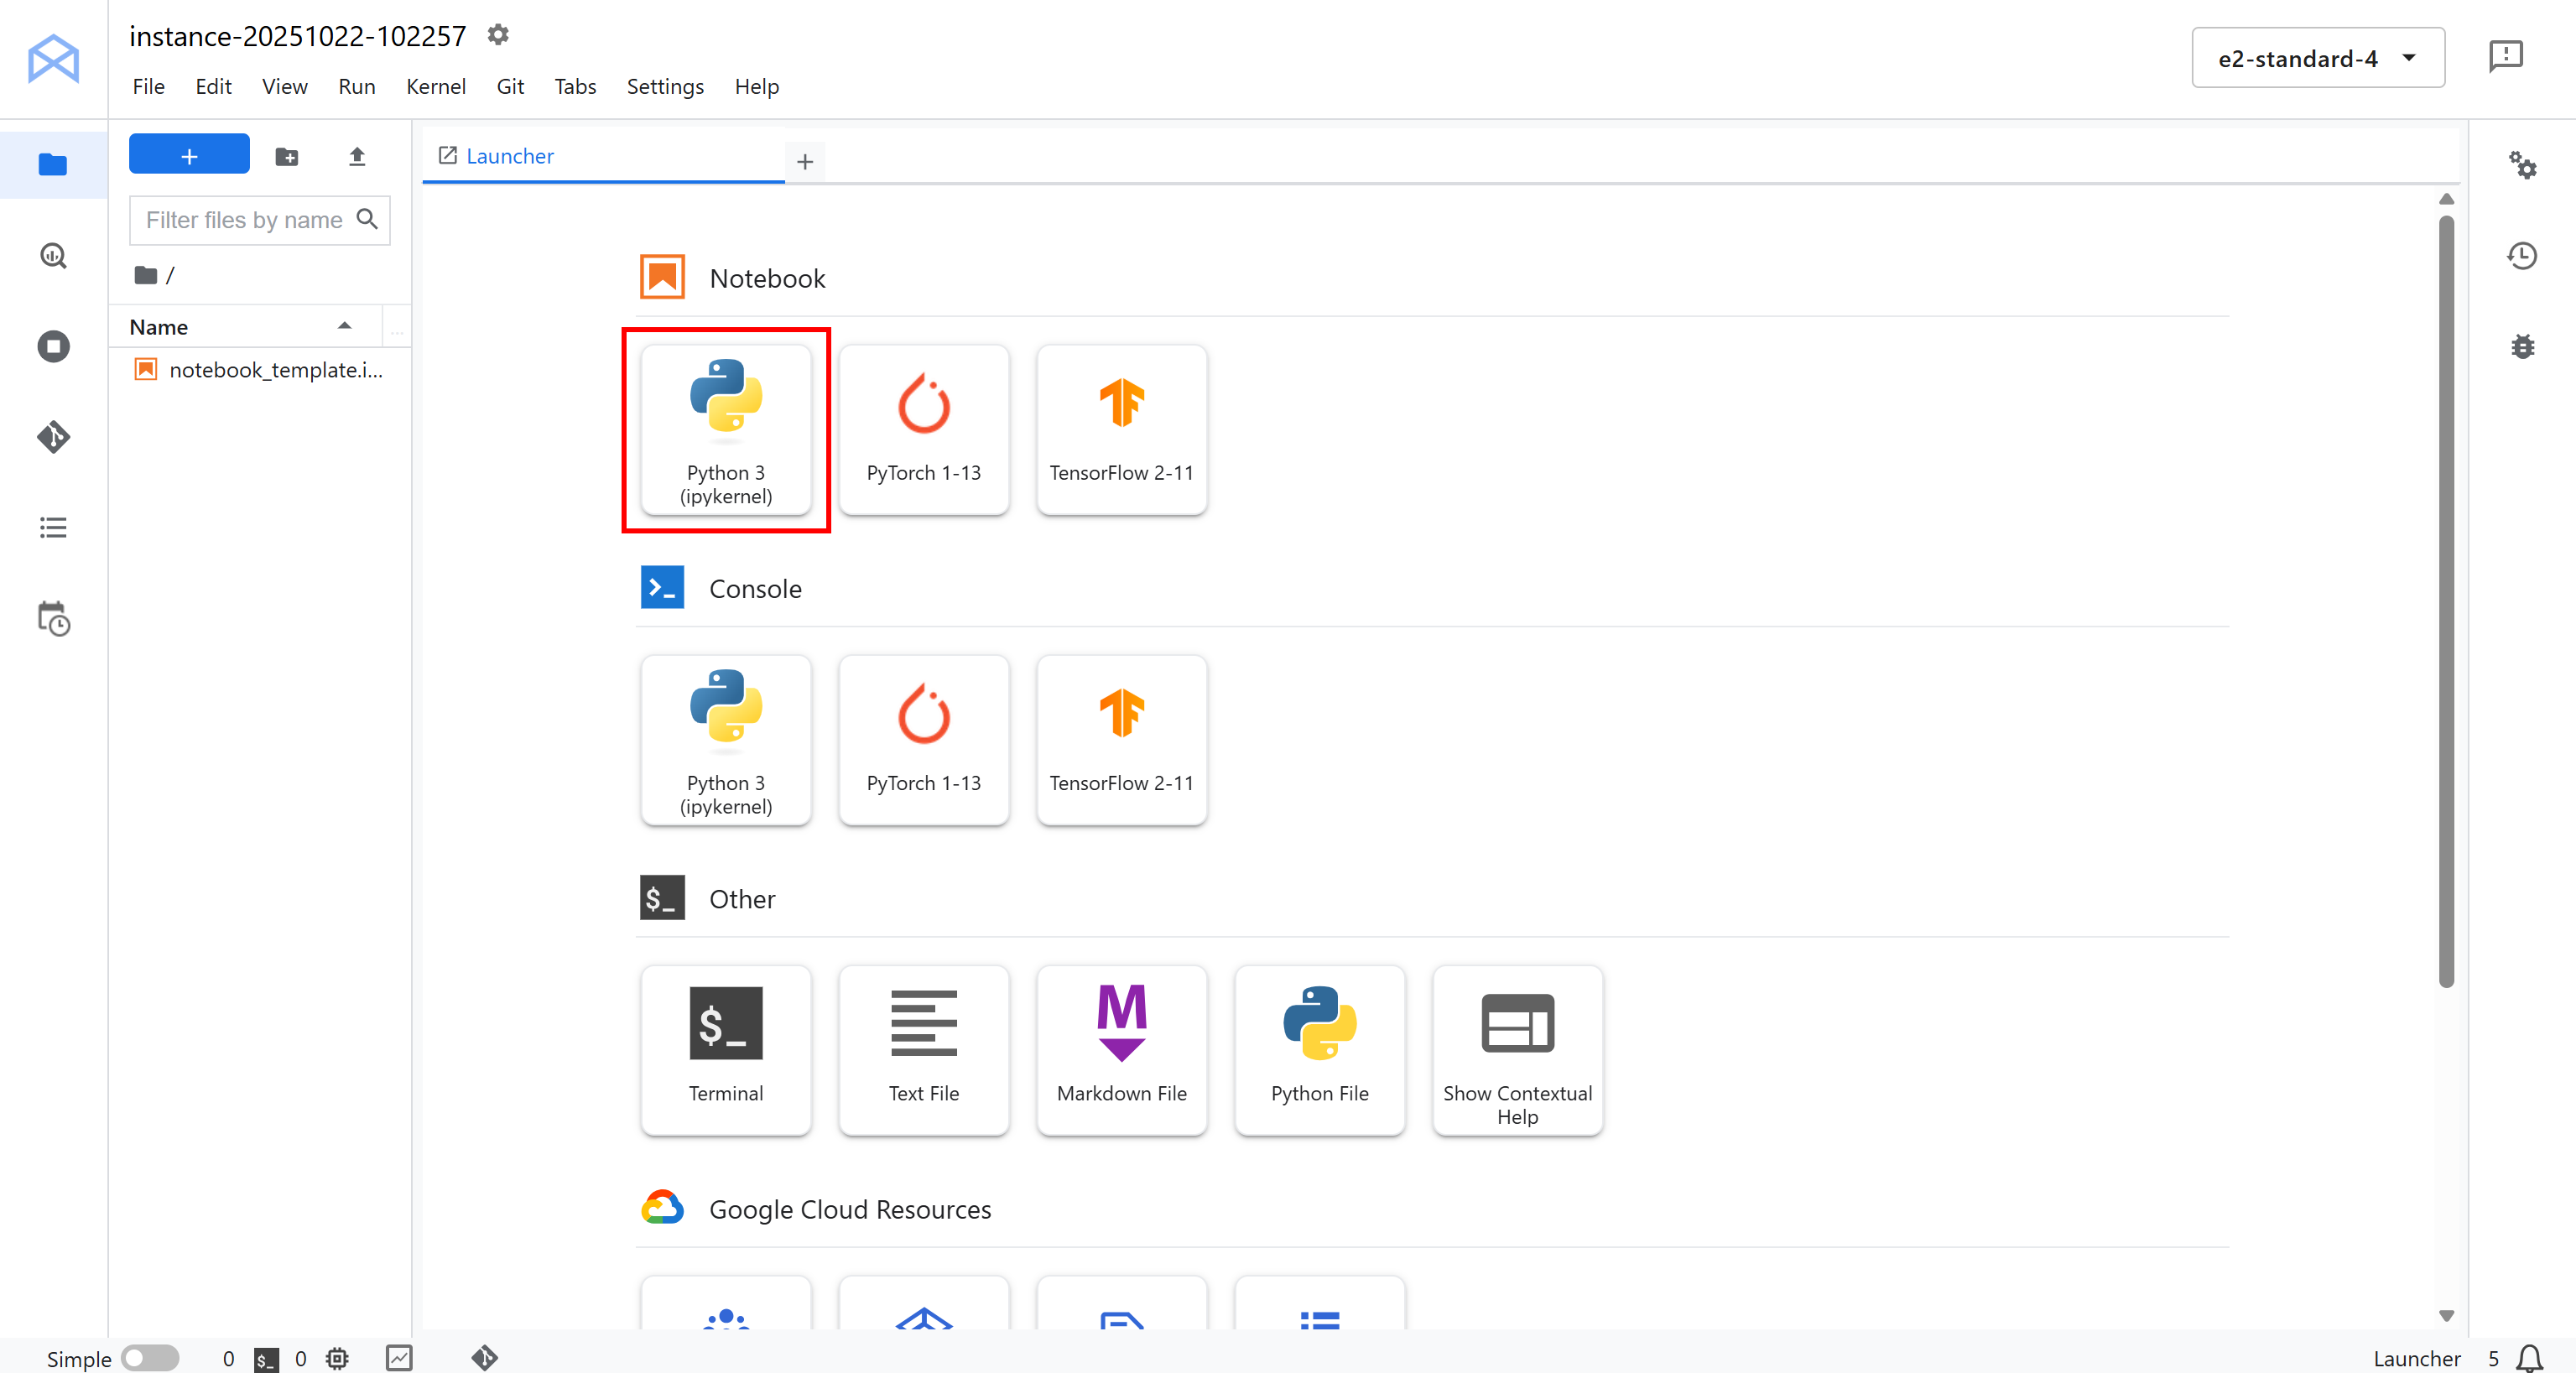
Here, click “Python 3 (ipykernel)” under “Notebook” to create a new notebook. This notebook will serve as your development environment for writing and testing your Vertex AI pipeline integrated with Bright Data:
Fantastic! You are ready to start coding and building the logic for your Vertex AI data pipeline.
Step #5: Install and Initialize the Required Python Libraries
In your notebook, start by adding and running the following cell to install all the Python libraries you will need for this project:
!pip install kfp google-cloud-aiplatform google-genai brightdata-sdk --quiet --upgradeThis may take a few minutes, so be patient while the environment sets everything up.
There is what each library does and why it is needed:
kfp: This is the Kubeflow Pipelines SDK, which lets you define, compile, and run machine learning pipelines programmatically in Python. It comes with decorators and classes to create pipeline components.google-cloud-aiplatform: The Vertex AI SDK for Python. It provides what you need to interact directly with Google Cloud’s Vertex AI services, including training models, deploying endpoints, and running pipelines.google-genai: Google’s Generative AI SDK, which lets you use and orchestrate Gemini and other generative models (also in Vertex AI). This is useful, as the pipeline includes LLM tasks. (Remember: Vertex AI SDK is now deprecated).brightdata-sdk: The Bright Data SDK, used to connect and fetch real-time data via Bright Data’s SERP API or other web data sources directly from within your pipeline.
Once all libraries are installed, import them and initialize the Vertex AI SDK with the following code in a dedicated cell:
import kfp
from kfp.dsl import component, pipeline, Input, Output, Artifact
from kfp import compiler
from google.cloud import aiplatform
from typing import List

# Replace with your project's secrets
PROJECT_ID = "<YOUR_GC_PROJECT_ID>"
REGION = "<YOUR_REGION>" # (e.g., "us-central1")
BUCKET_URI = "<YOUR_BUCKET_URI>" # (e.g., "gs://bright-data-pipeline-artifacts")

# Initialize the Vertex AI SDK
aiplatform.init(project=PROJECT_ID, location=REGION, staging_bucket=BUCKET_URI)
The aiplatform.init() function configures your Python environment to communicate with Vertex AI. It sets up the project, region, and staging bucket so that all subsequent Vertex AI operations, such as creating pipelines, training jobs, or deploying models, automatically use the correct context.
In short, that single line of code connects your notebook session to your Google Cloud project and tells Vertex AI where to store pipeline artifacts and temporary data. Well done!
Step #6: Define the Query Extraction Component
Remember that a Vertex AI Pipeline is built from components, where a component is just a Python function that performs one specific task. As explained earlier, this pipeline will have three components.
Let’s start with the first one, the extract_queries component!
The extract_queries component:
- Takes the text to be fact-checked as input.
- Uses a Gemini model (via the
google-genailibrary) to generate a list of Google-able search queries that would help verify the factual claims in that text. - Returns that list as a Python array (
List[str])
Implement it as follows:
@component(
    base_image="python:3.10",
    packages_to_install=["google-genai"],
)
def extract_queries(
    input_text: str,
    project: str,
    location: str,
) -> List[str]:
    from google import genai
    from google.genai.types import GenerateContentConfig, HttpOptions
    from typing import List
    import json

    # Initialize the Google Gen AI SDK with Vertex integration
    client = genai.Client(
        vertexai=True,
        project=project,
        location=location,
        http_options=HttpOptions(api_version="v1")
    )

    # The output schema, which is an array of strings
    response_schema = {
        "type": "ARRAY",
        "items": {
            "type": "STRING"
        }
    }

    # The query extractor prompt
    prompt = f"""
    You are a professional fact-checker. Your job is to read the following text and extract
    a list of specific, google-able search queries that would be needed
    to verify the main factual claims.

    Return *only* a Python list of strings, and nothing else.

    Example:
    Input: "The Eiffel Tower, built in 1889 by Gustave Eiffel, is 300 meters tall."
    Output: ["when was the eiffel tower built", "who built the eiffel tower", "how tall is the eiffel tower"]

    Here is the text to fact-check:
    ---
    "{input_text}"
    ---
    """

    response = client.models.generate_content(
        model="gemini-2.5-flash",
        contents=prompt,
        config=GenerateContentConfig(
            # Force the model to return a JSON array of strings
            response_mime_type="application/json",
            response_schema=response_schema,
        ),
    )

    # The 'response.text' will reliably contains a JSON string conforming to the schema (e.g., '["query_1", ..., "query_n"]')
    query_list: List[str] = json.loads(response.text.strip())

    return query_list
Keep in mind that KFP components must be self-contained. That means all imports must be declared inside the component function, not globally.
Notice that the vertexai=True, project=project, and location=location parameters in genai.Client() are required to connect the google-genai client with your Vertex AI environment. They ensure that the configured model runs in the same region and project as your pipeline.
As for the model choice, you should use Gemini 2.5 Flash here because it is lightweight and fast. Anyway, you can set another Gemini model for higher accuracy if needed.
One component down, two more to go!
Step #7: Create the SERP API–Powered Web Search Context Retriever Component
Now that you have generated a list of Google-able queries, it is tiem to search the web for context. To do so, use Bright Data’s SERP API, which lets you programmatically scrape search results (Google, by default) in a structured and scalable way.
The easiest way to access the SERP API from Python is via the official and open-source Bright Data SDK. This library equips you with simple methods to call Bright Data products, including the SERP API. Learn more about it in the docs.
In particular, the fetch_web_search_context component:
- Accepts a list of search queries generated in the previous step.
- Uses the Bright Data SDK to call the SERP API in parallel for each query.
- Retrieves the search results (by default from Google).
- Saves all the results as a JSON artifact, a file that other components in the pipeline can use.
Create such a component in a dedicated notebook cell like this:
@component(
    base_image="python:3.10",
    packages_to_install=["brightdata-sdk"],
)
def fetch_web_search_context(
    queries: List[str],
    api_key: str,
    output_file: Output[Artifact],
):
    """
    Takes a list of queries, searches each one using Bright Data SDK,
    and writes all results as a JSON file artifact.
    """
    from brightdata import bdclient
    import json

    # Initialize the Bright Data SDK client
    client = bdclient(api_token=api_key)
    # Call the SERP API on the input queries
    results = client.search(
        queries,
        data_format="markdown"
    )

    # Write results to an artifact file
    with open(output_file.path, "w") as f:
        json.dump(results, f)
Note that the SERP API has been configured to return the content in Markdown format, which is ideal for ingestion in LLMs.
Also, since the output of this component can be quite large, it is best to store it as an artifact. Artifacts are stored in your Google Cloud Storage bucket and allow components in a Vertex AI pipeline to pass data between each other efficiently without overloading memory or exceeding data transfer limits.
Here we go! Thanks to the power of Bright Data’s web search capabilities, you now have Google-backed search context ready to be used as input for the next component, where an LLM will perform fact-checking.
Step #8: Implement the Fact Checker Component
Similar to the query extraction component, this step also involves calling an LLM. However, instead of generating queries, this component uses the web search results gathered in the previous step as contextual evidence to fact-check the original input text.
Essentially, it runs a SERP-based RAG-style workflow where the retrieved web content guides the model’s verification process.
In a new notebook cell, define the fact_check_with_web_search_context component as follows:
@component(
    base_image="python:3.10",
    packages_to_install=["google-genai"],
)
def fact_check_with_web_search_context(
    input_text: str,
    web_search_context_file: Input[Artifact],
    project: str,
    location: str,
) -> str:
    import json
    from google import genai

    # Load the web search context from artifact
    with open(web_search_context_file.path, "r") as f:
        web_search_context = json.load(f)

    client = genai.Client(
        vertexai=True,
        project=project,
        location=location
    )

    prompt = f"""
    You are an AI fact-checker. Compare the Original Text to the JSON Search Context
    and produce a fact-check report in Markdown.

    [Original Text]
    "{input_text}"

    [Web Search Context]
    "{json.dumps(web_search_context)}"
    """

    response = client.models.generate_content(
        model="gemini-2.5-pro",
        contents=prompt
    )

    return response.text
This task is more complex and requires reasoning over multiple sources of evidence. So, it is better to use a more capable model like Gemini 2.5 Pro.
Excellent! You have now defined all three components that make up your Vertex AI pipeline.
Step #9: Define and Compile the Pipeline
Connect all three components into a single Kubeflow pipeline. Each component will be executed sequentially, with the output of one step that becomes the input of the next.
This is how to define the pipeline:
@pipeline(
    name="bright-data-fact-checker-pipeline",
    description="Fetches SERP context to fact-check a text document."
)
def fact_check_pipeline(
    input_text: str,
    bright_data_api_key: str,
    project: str = PROJECT_ID,
    location: str = REGION,
):
    # Step 1: Extract Google-able queries from the input text to verify
    step1 = extract_queries(
        input_text=input_text,
        project=project,
        location=location
    )

    # Step 2: Fetch Bright Data SERP results on the search queries
    step2 = fetch_web_search_context(
        queries=step1.output,
        bright_data_api_key=bright_data_api_key
    )

    # Step 3: Perform fact-check using the web search context retrieved earlier
    step3 = fact_check_with_web_search_context(
        input_text=input_text,
        web_search_context_file=step2.outputs["output_file"],
        project=project,
        location=location
    )
In essence, this function wires together the three components you built earlier. It starts by generating fact-checking queries, then retrieves search results for each query using Bright Data’s SERP API, and finally runs a Gemini model to verify the claims based on the collected evidence.
Next, you need to compile the pipeline into a JSON specification that Vertex AI can execute:
compiler.Compiler().compile(
    pipeline_func=fact_check_pipeline,
    package_path="fact_check_pipeline.json"
)
This command converts your Python pipeline definition into a JSON pipeline specification file called fact_check_pipeline.json .
That JSON file is a blueprint that Vertex AI Pipelines trusts to understand how to orchestrate the workflow. It describes every component, its inputs and outputs, dependencies, container images, and execution order.
When running this JSON file in Vertex AI, Google Cloud automatically provisions the infrastructure, runs each component in the right order, and handles data passing between steps. Pipeline complete!
Step #10: Run the Pipeline
Suppose you want to test the Vertex AI pipeline on a clearly false statement like this one:
“Paris is the capital of Germany, which uses the yen as its currency.”
Add the following cell to your Jupyter notebook. This Add defines the logic to launch the pipeline:
TEXT_TO_CHECK = """
Paris is the capital of Germany, which uses the yen as its currency.
"""

# Replace with your Bright Data API key
BRIGHT_DATA_API_KEY = "<YOUR_BRIGHT_DATA_API_KEY>"

print("Starting the pipeline job...")

# Define the pipeline job
job = aiplatform.PipelineJob(
    display_name="fact-check-pipeline-run",
    template_path="fact_check_pipeline.json",
    pipeline_root=BUCKET_URI,
    parameter_values={
        "input_text": TEXT_TO_CHECK,
        "bright_data_api_key": BRIGHT_DATA_API_KEY
    }
)

# Run the job
job.run()

print("\nJob submitted! You can view its progress in the Vertex AI UI.")
This code creates a new Vertex AI Pipeline job, specifying the pipeline JSON you compiled earlier (fact_check_pipeline.json), your storage bucket as the pipeline root, and the parameters required for this particular run (i.e., the input text to verify and your Bright Data API key).
Once you run this cell, Vertex AI will automatically orchestrate your entire pipeline in the cloud.
Security note: This example hardcodes the Bright Data API key directly into the notebook for simplicity, but this is not secure for production environments. In a real-world deployment, you should store and retrieve sensitive credentials like API keys using Google Cloud Secret Manager to avoid accidental exposure (e.g., in logs).
To run your pipeline, select all cells and press the “▶” button in your Jupyter notebook. You will get this output on the last cell:
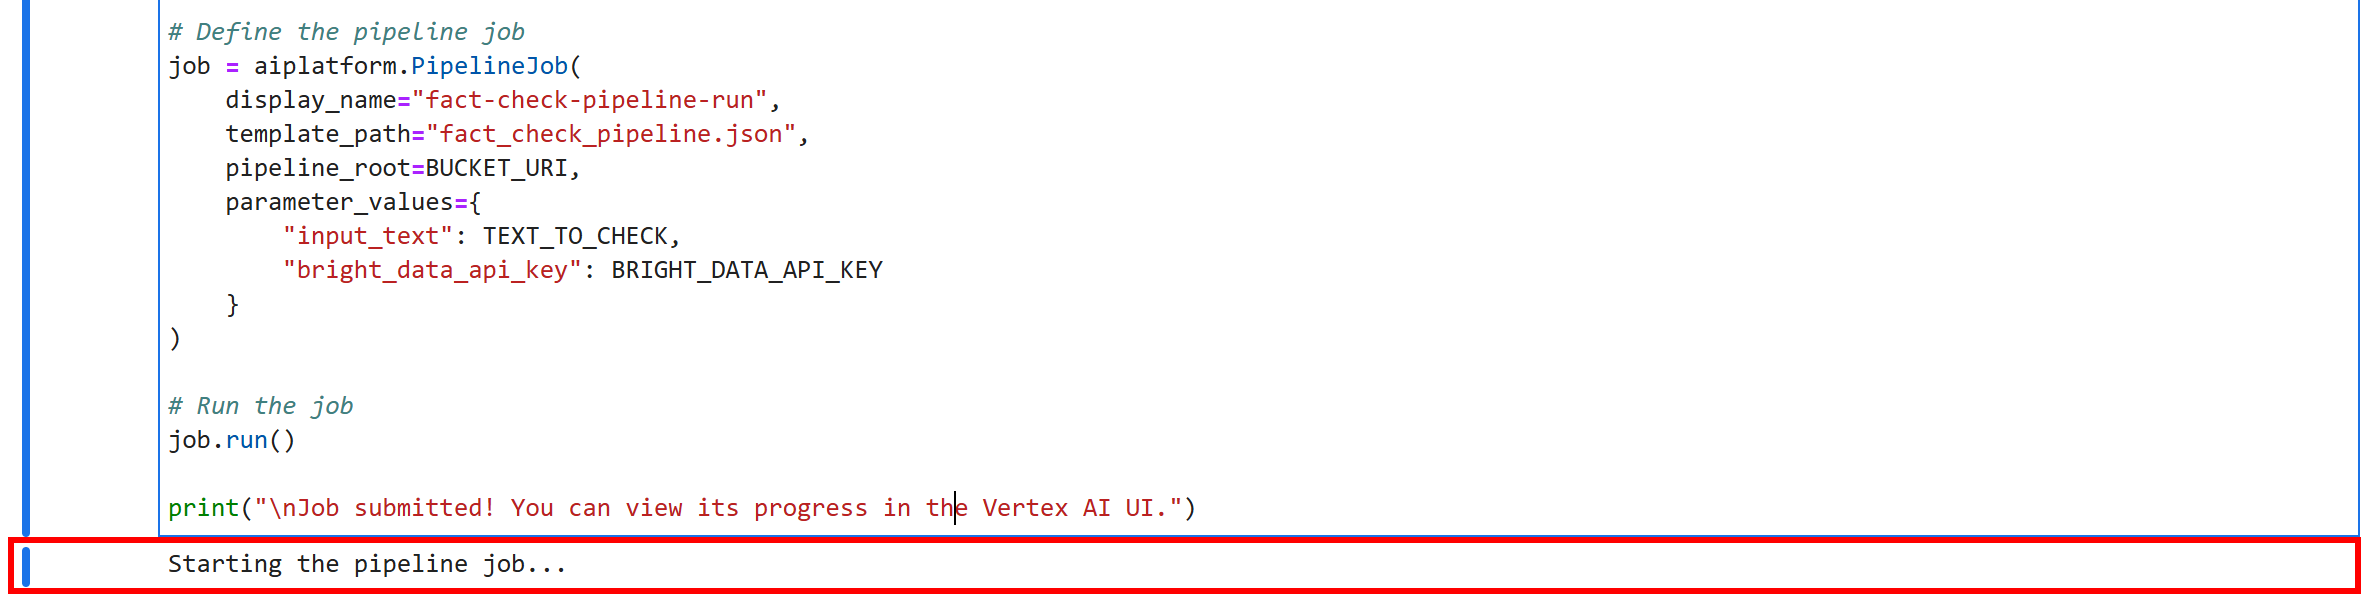
This means your Vertex AI fact-checking pipeline is running successfully. Wow!
Step #11: Monitor the Pipeline Execution
To check the status of your pipeline job, reach the Vertex AI Pipelines page in the Google Cloud Console for your project:
https://console.cloud.google.com/vertex-ai/pipelines?project={PROJECT_ID}So, in this case, the URL is:
https://console.cloud.google.com/vertex-ai/pipelines?project=bright-data-pipelinePaste the URL in the browser, and you will see a page like this:

Click on the first entry in the “Runs” table to open the pipeline job execution page:
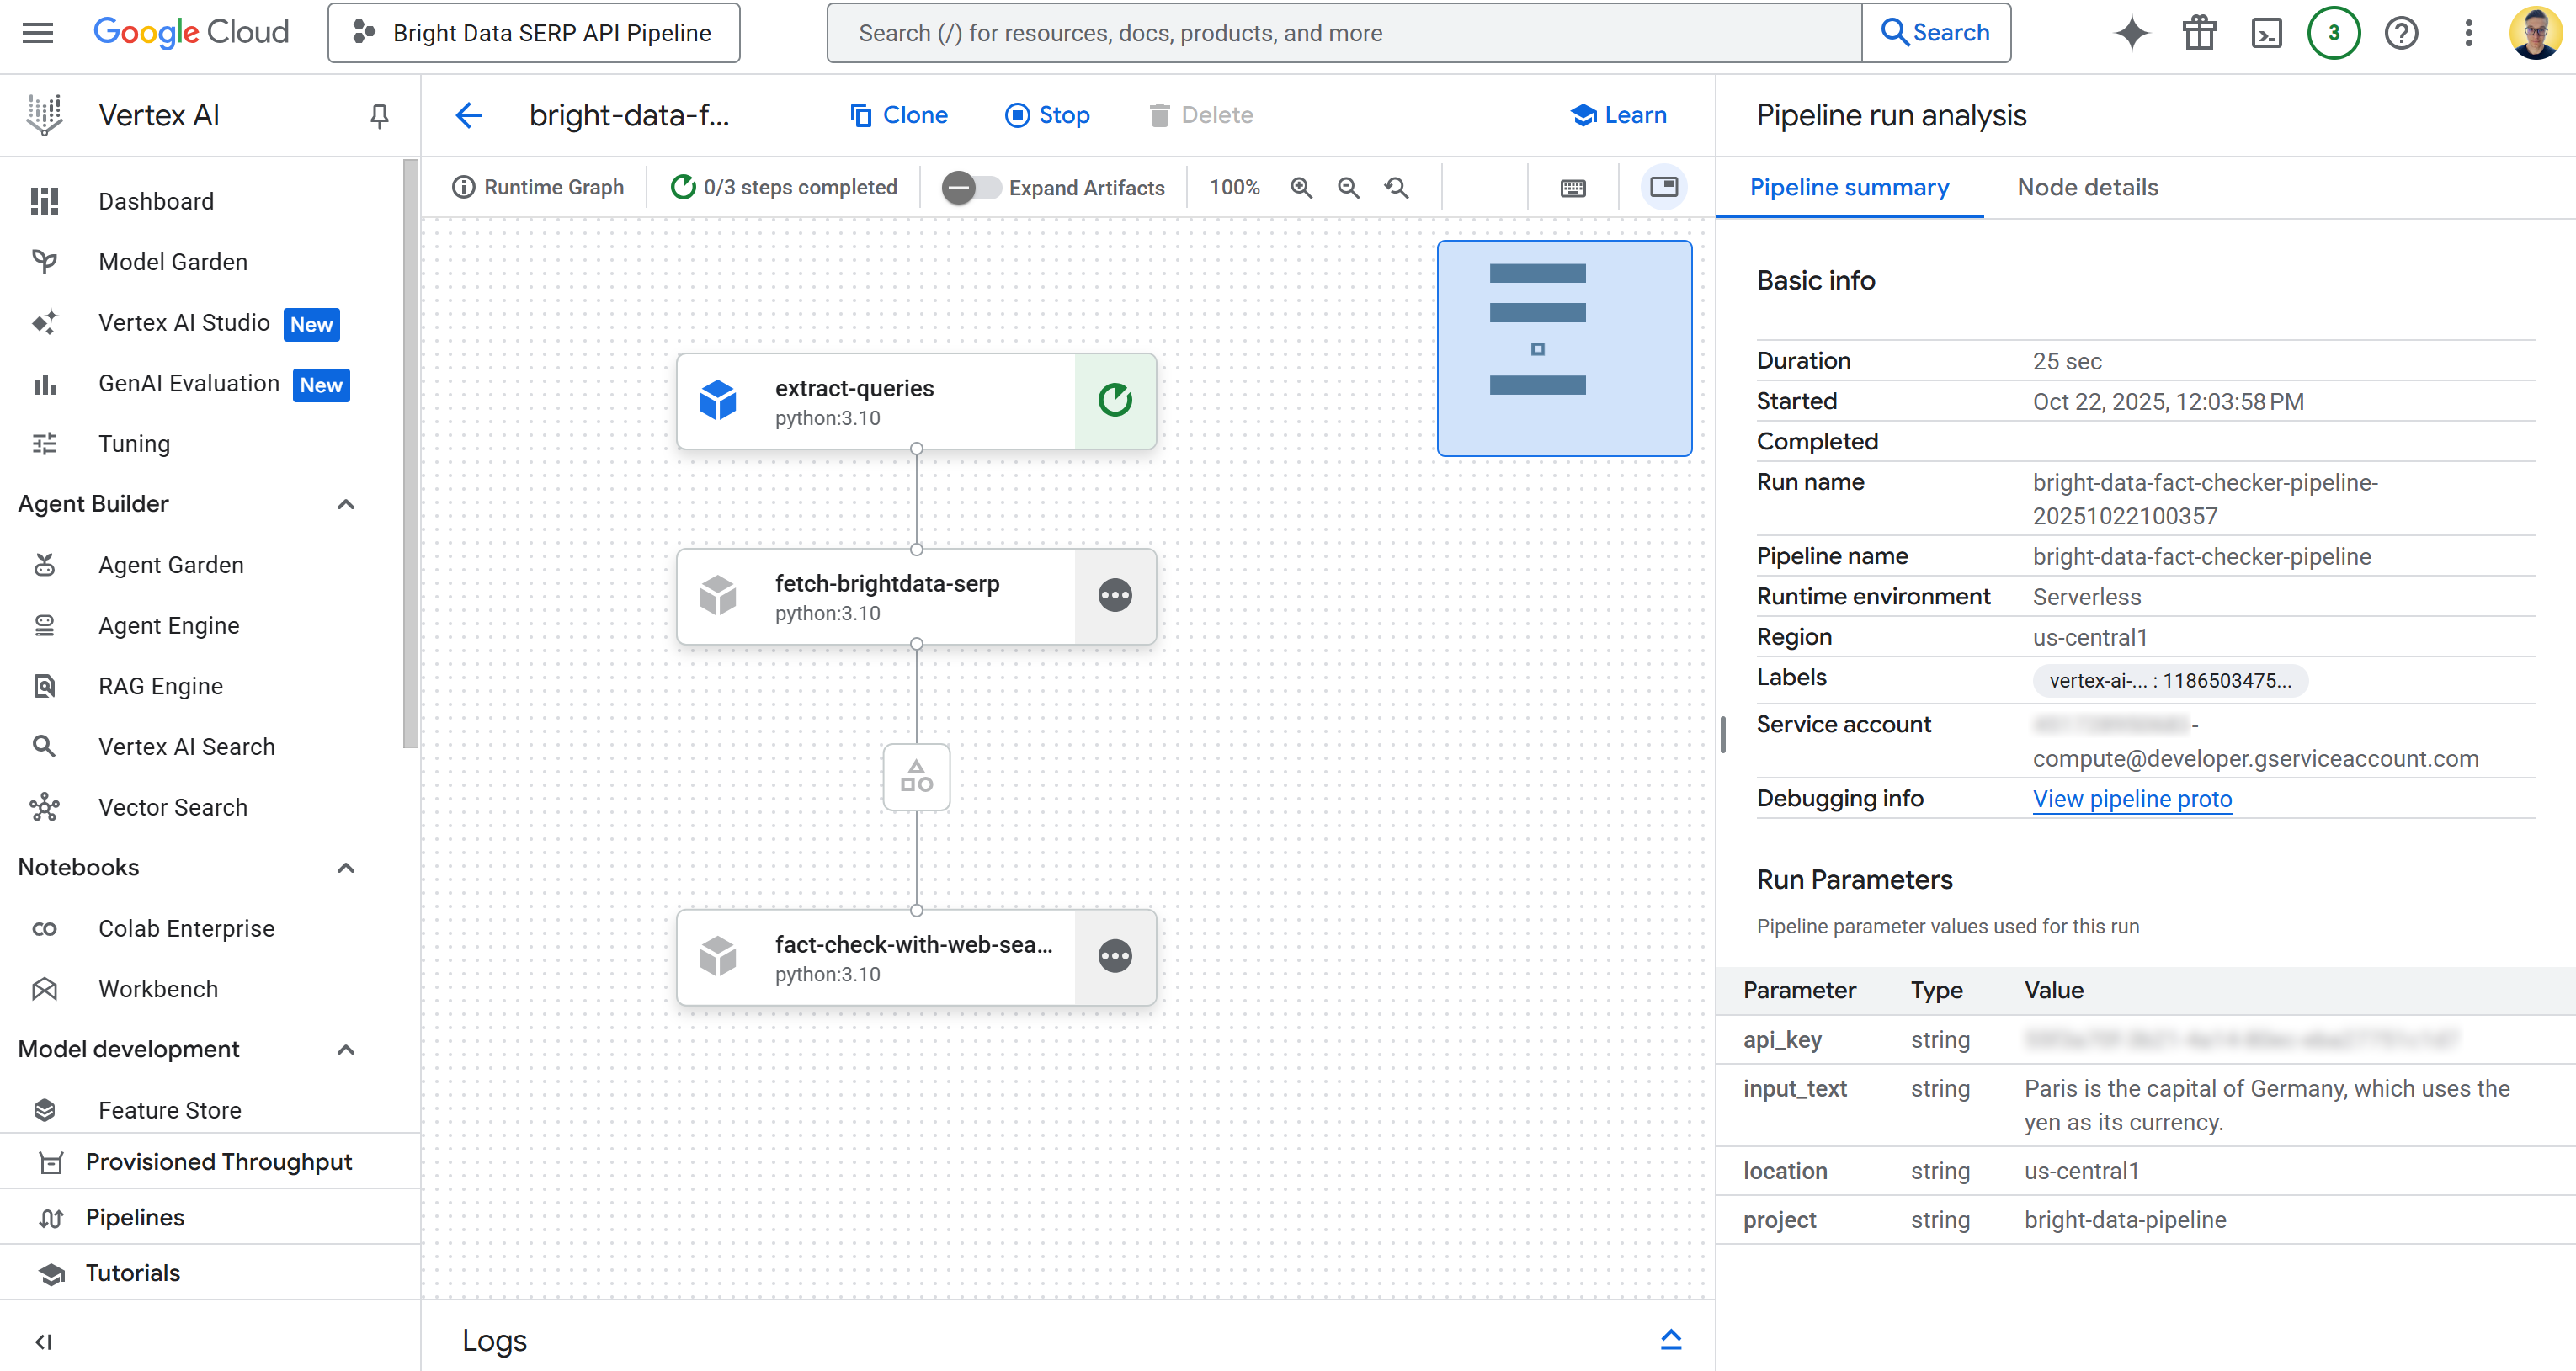
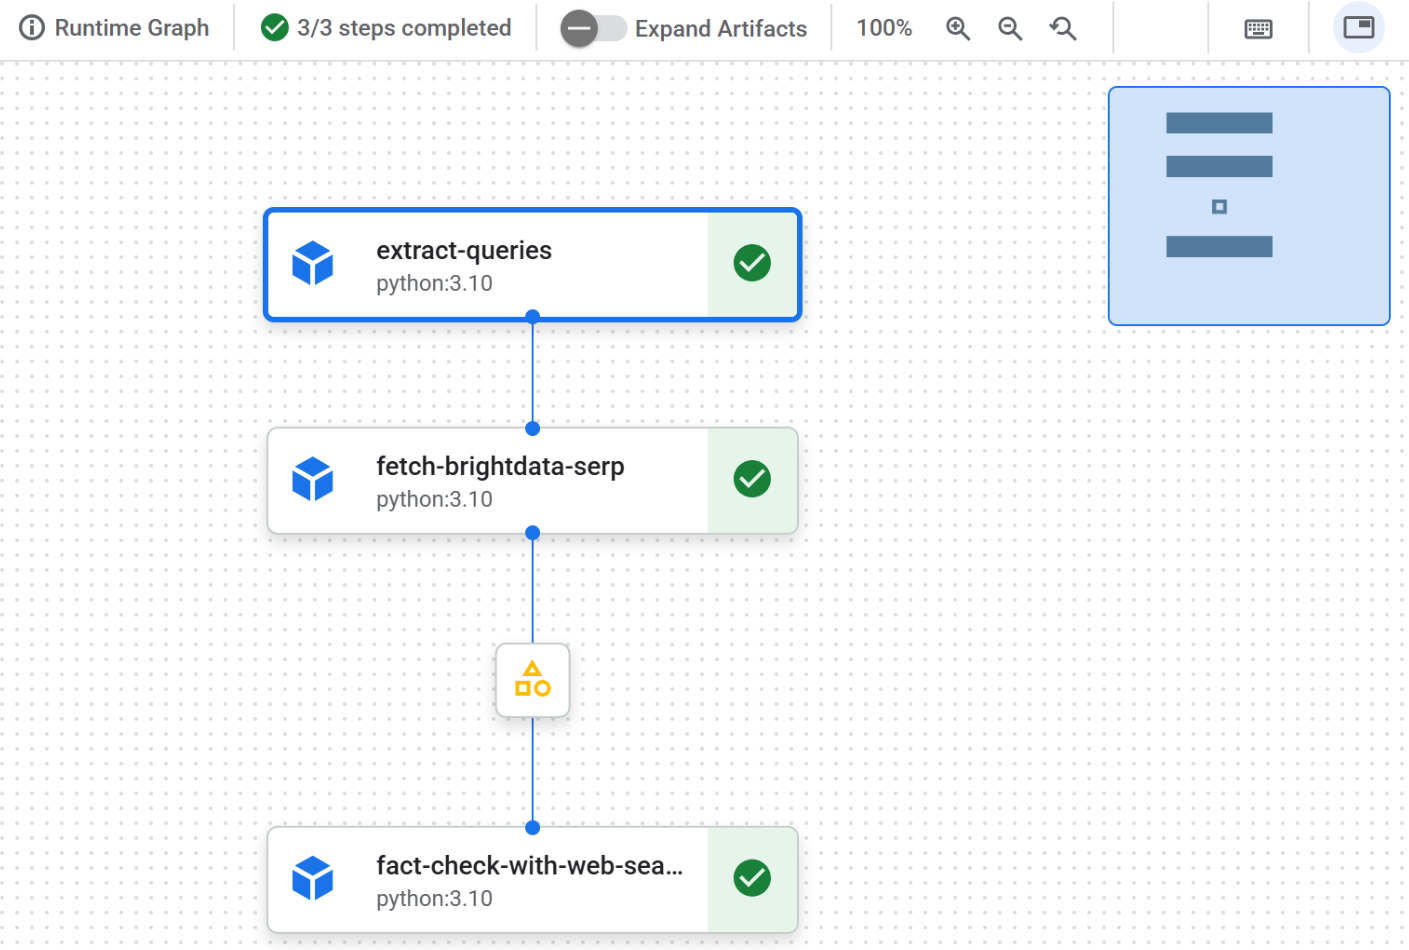
Here, you can visually see the components that your pipeline consists of. You can also check the status of each node, view detailed logs, and observe the flow of data from the beginning to the end of the pipeline as it executes.
Step #12: Explore the Output
Once the pipeline execution is complete, each node will show a check mark indicating successful completion:
Click on the first node to inspect the extracted Google-able queries from the input text. In this example, the queries generated were:
"what is the capital of Germany""what currency does Germany use"
These queries are perfectly suited to verify the factual claims in the input statement:

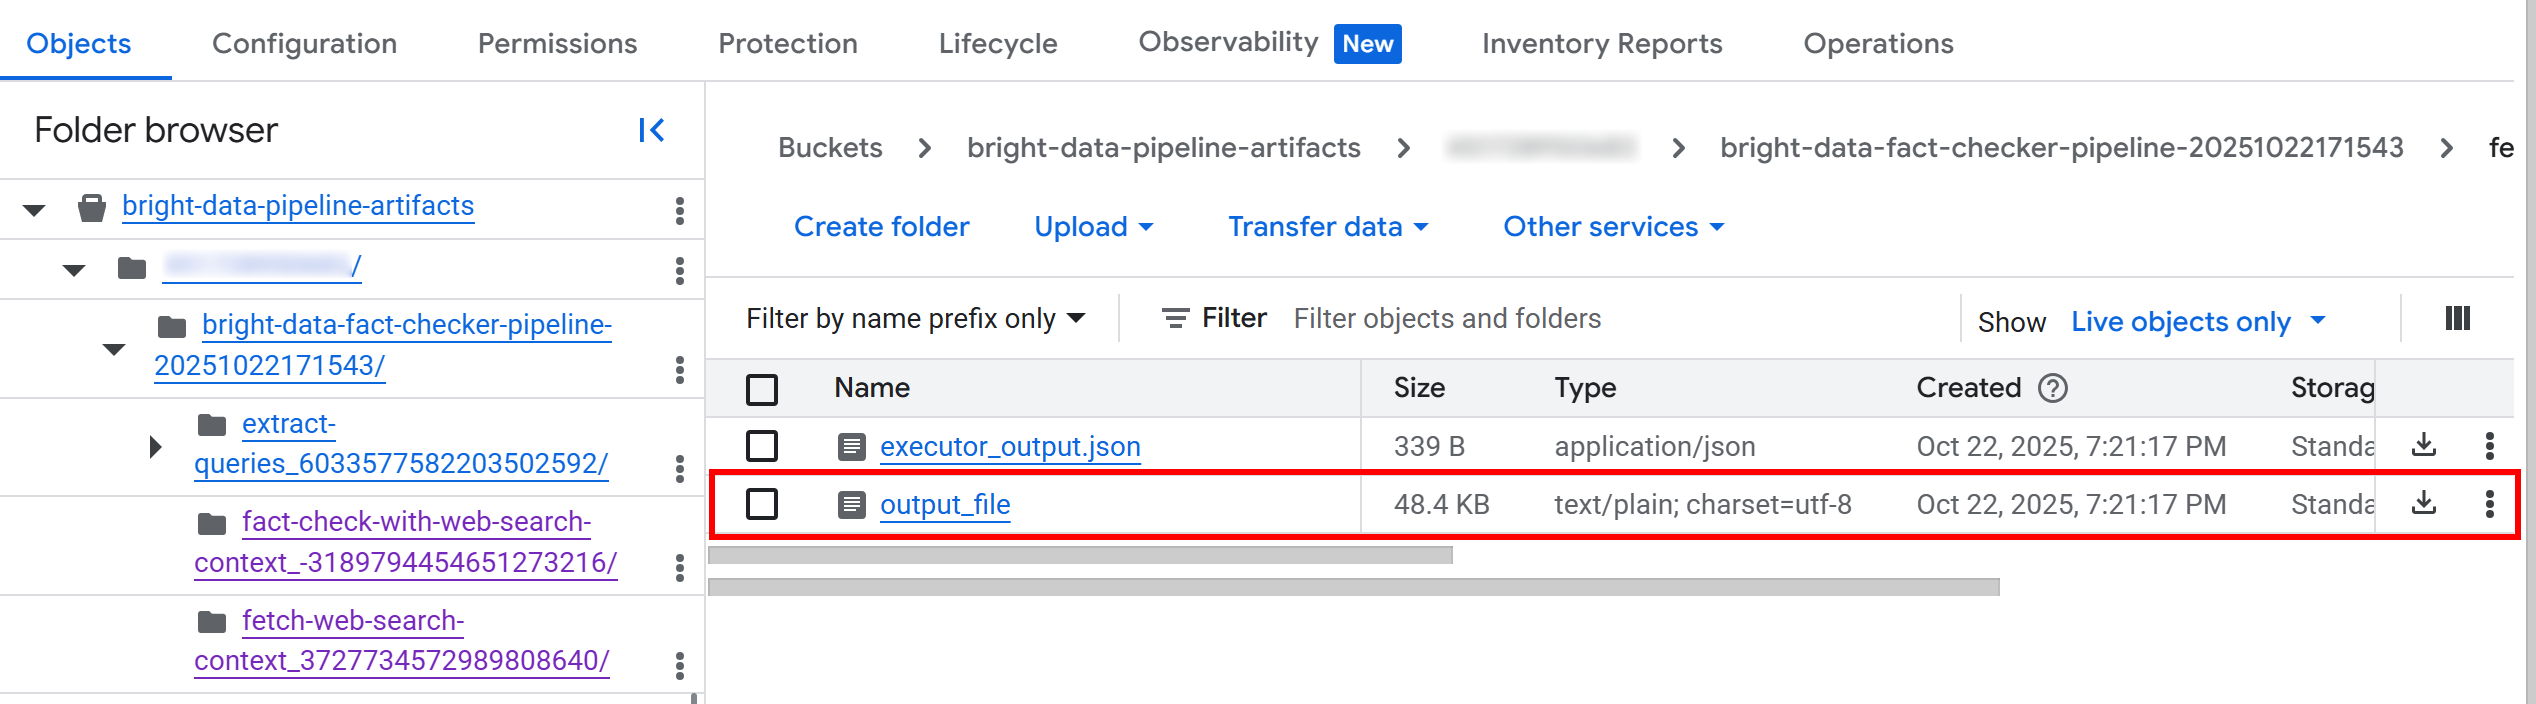
Next, click on the artifact node between the second and the third node. You will get a link to the JSON file stored in your configured Google Cloud Storage bucket (in this case, bright-data-pipeline-artifacts).
You can also access the desired page directly by navigating to the bucket in the Cloud Console:

Inside the bucket, you will see a folder for each component. In detail, the folder for the fetch_web_search_context component contains a JSON file with the web search context retrieved via the SERP API, stored as an array of Markdown-formatted strings:
If you download and open the file, you will notice something like this:
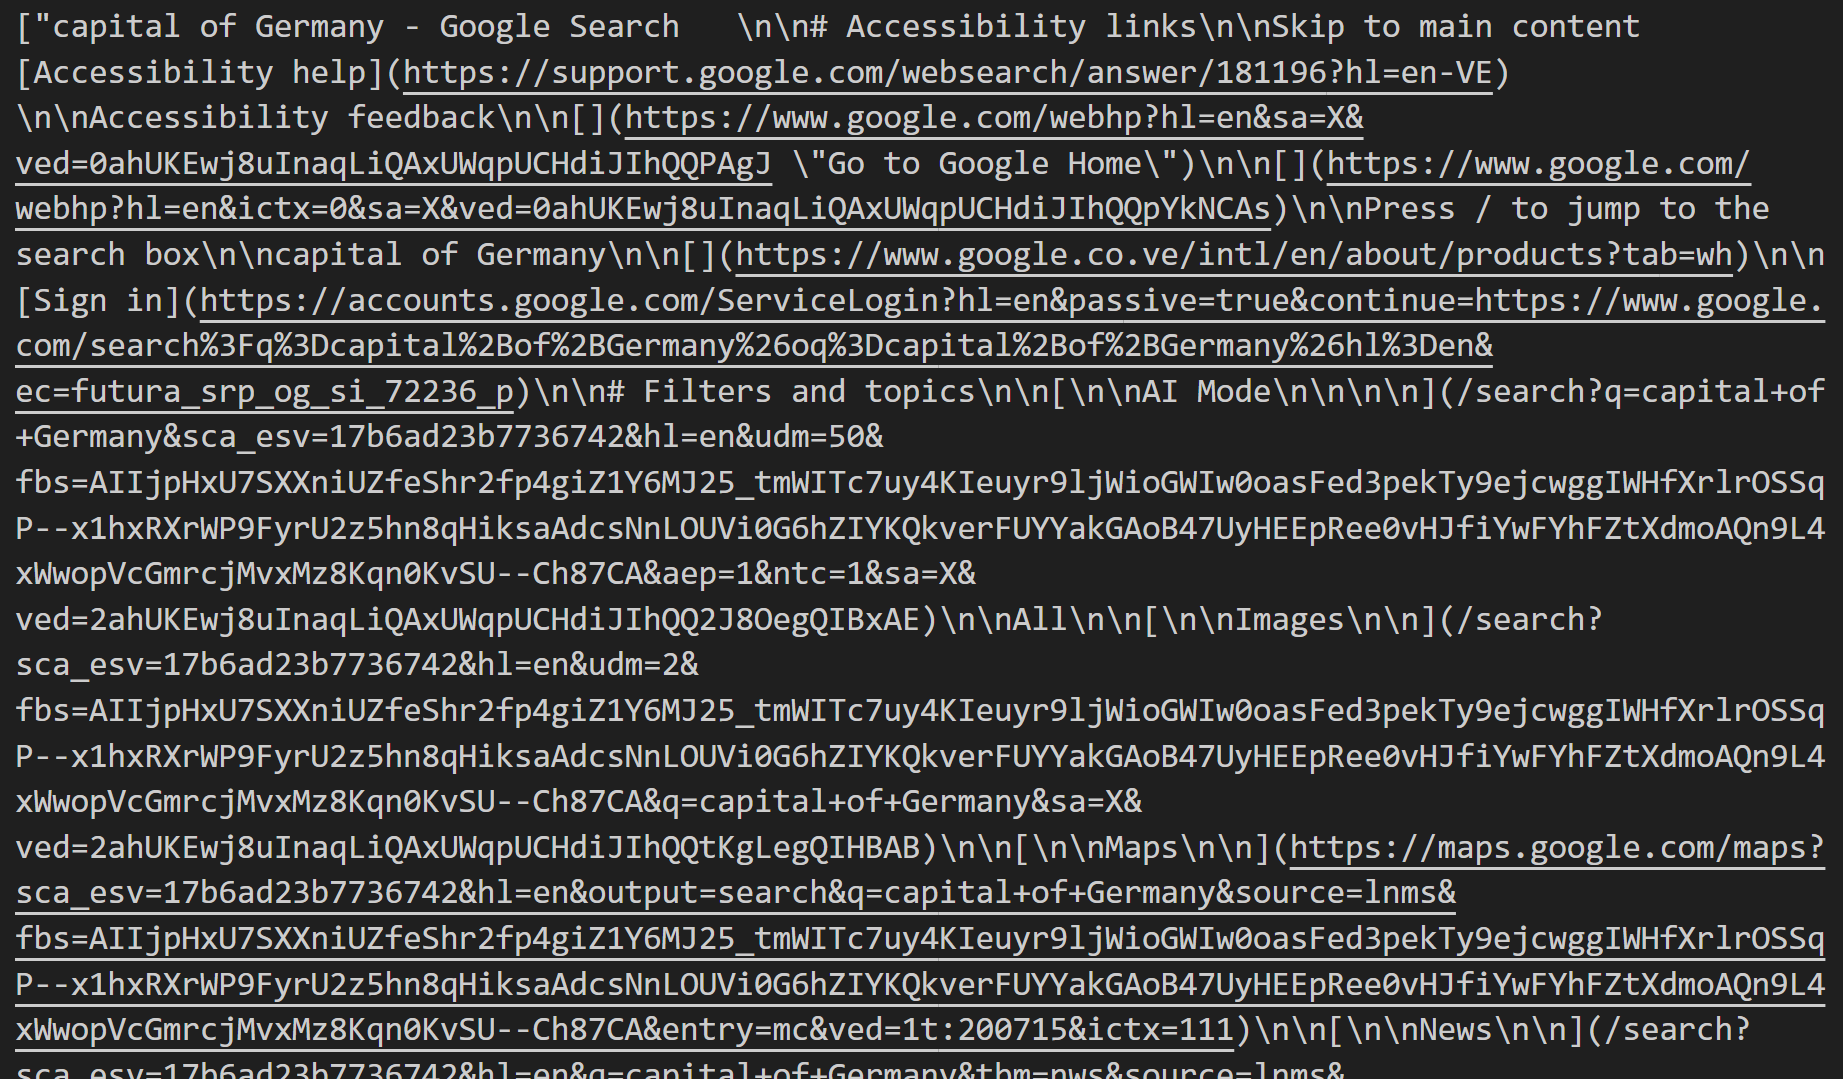
This content is the Markdown representation of the SERPs retrieved for each identified search query.
Back in the Vertex AI pipeline UI, click on the output node to inspect the overall results:
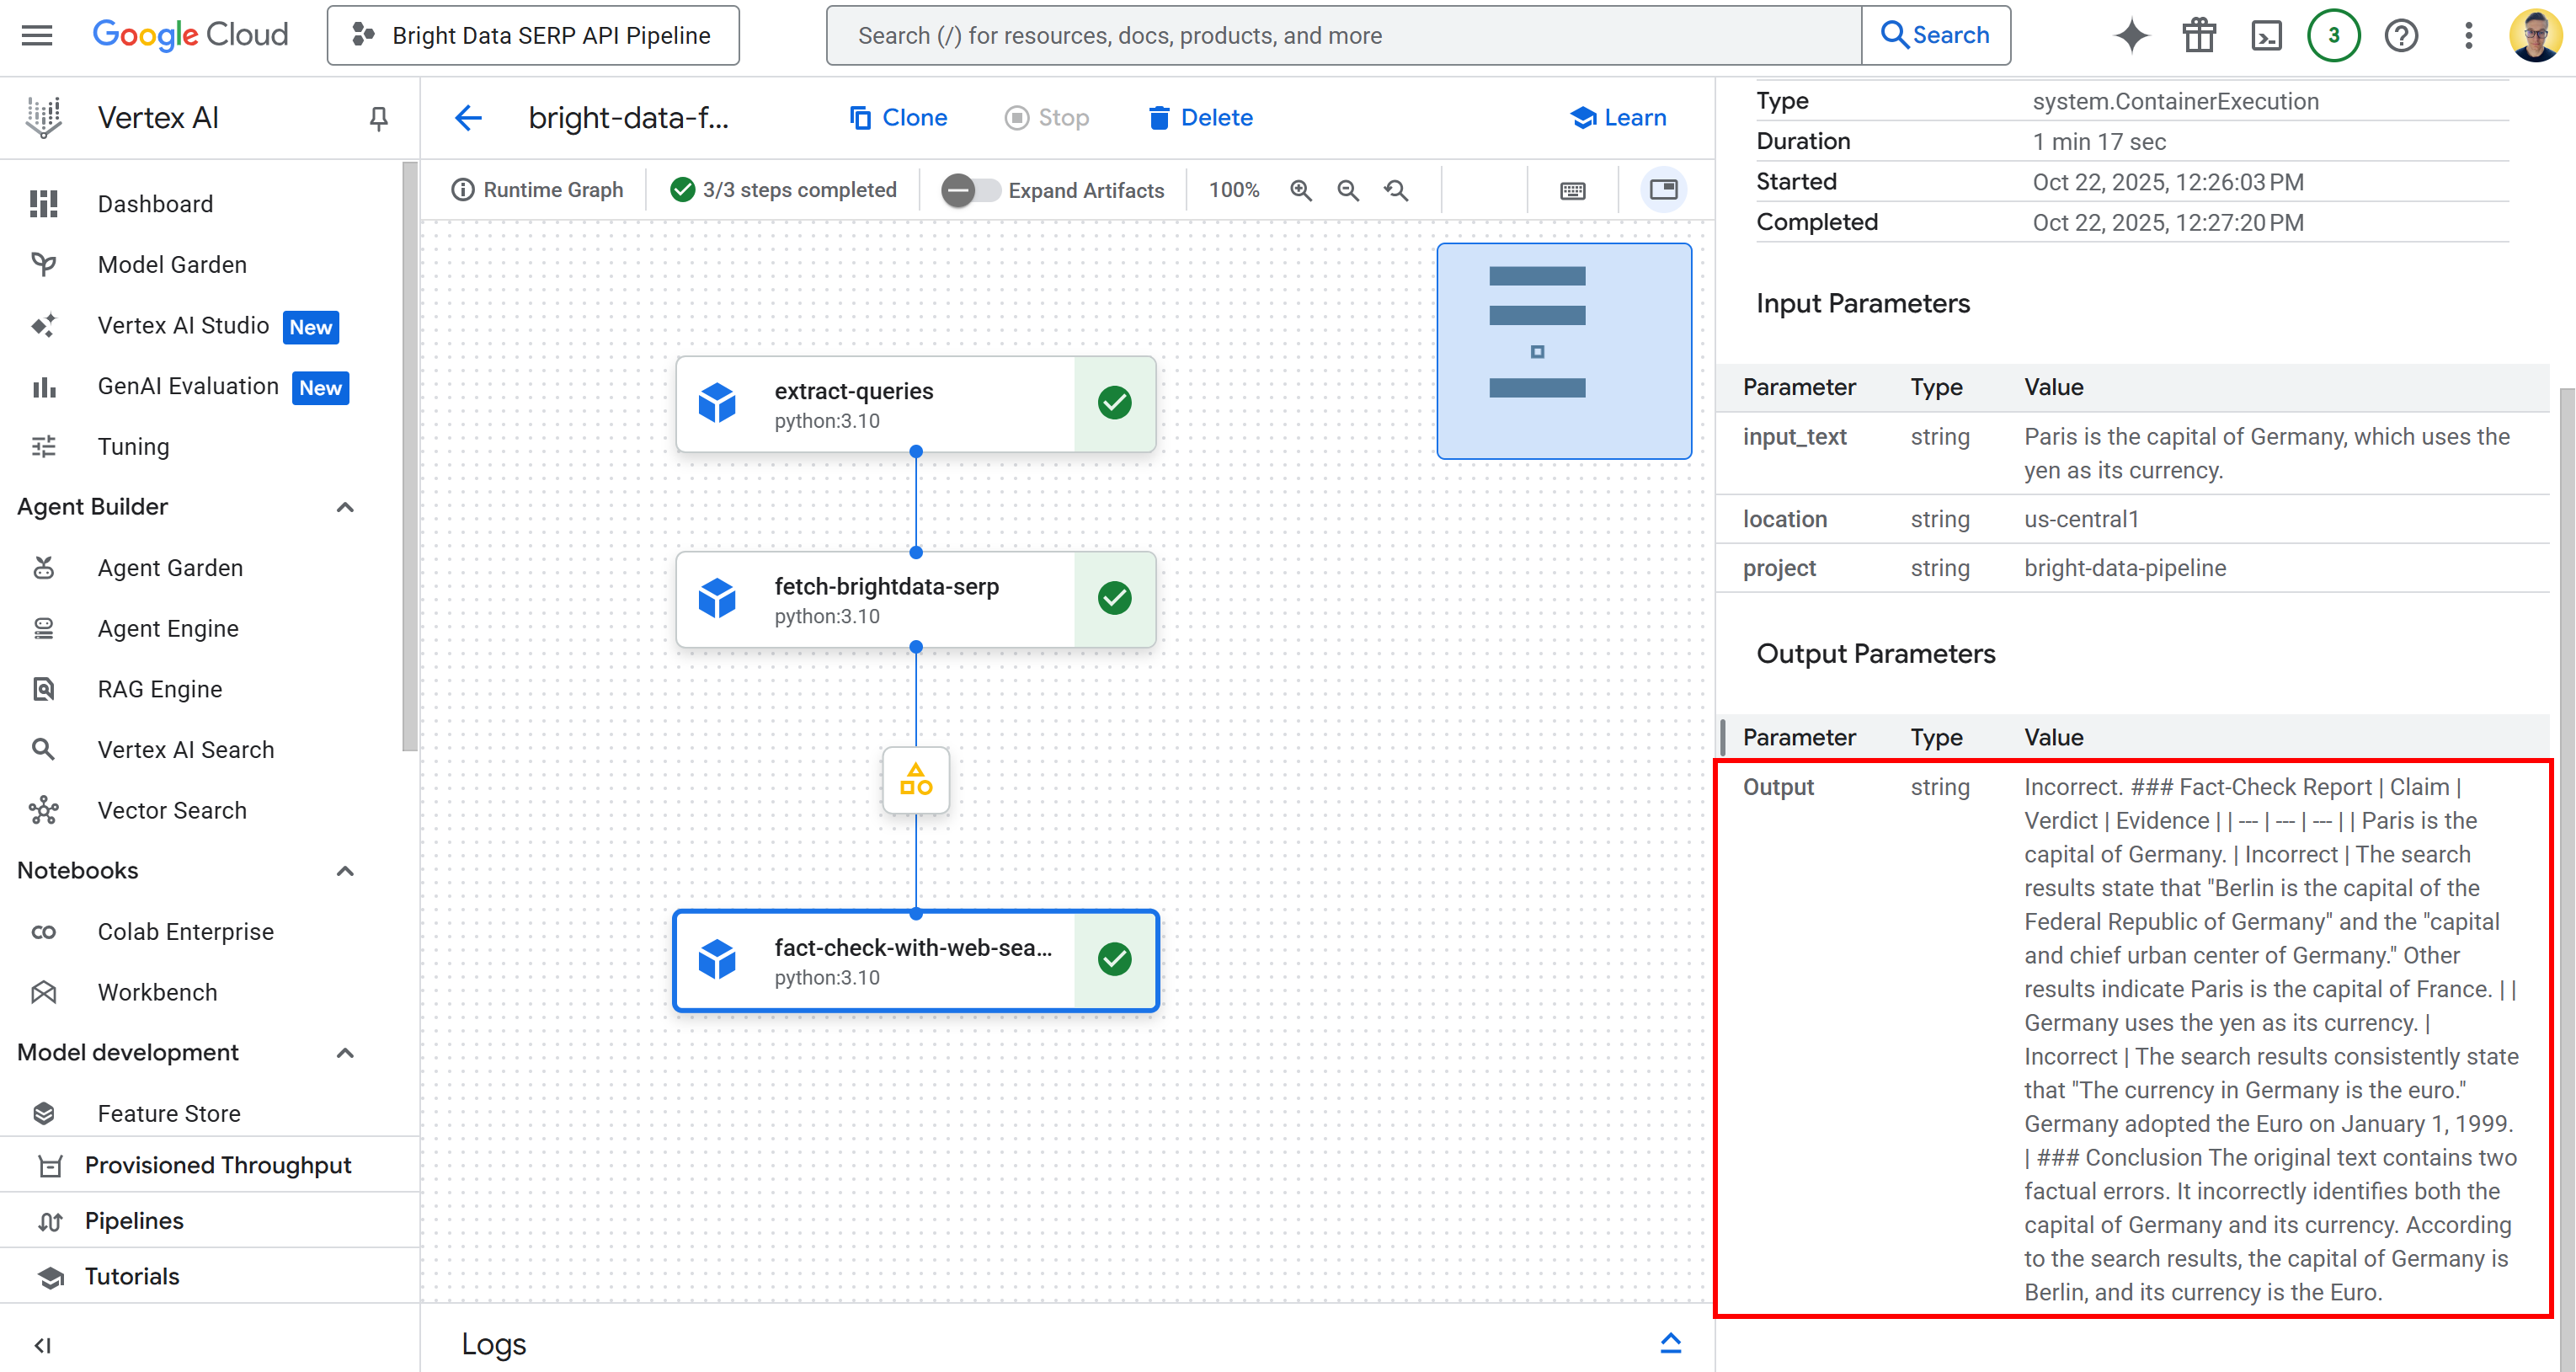
As you can tell, the output is a detailed Markdown fact-check report. The same output is also saved in the executor_output.json file in the bucket folder for the pipeline run. Download it and open it in an IDE like Visual Studio Code to inspect it:
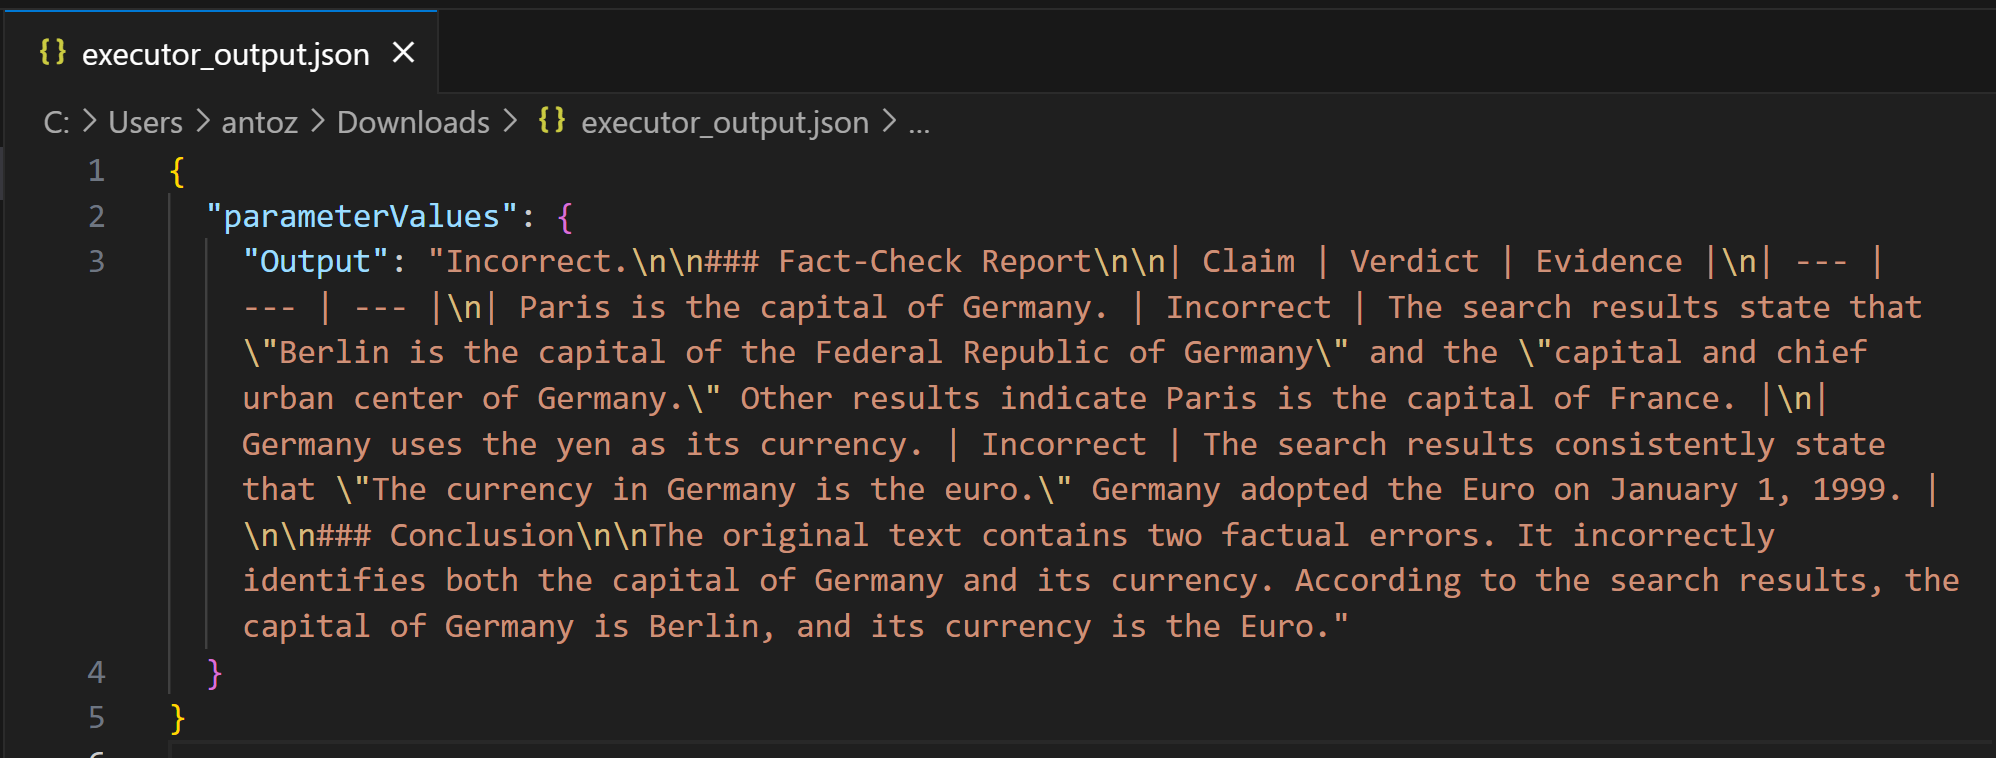
Copy the Markdown string into a .md file (e.g., report.md) to view it more clearly:
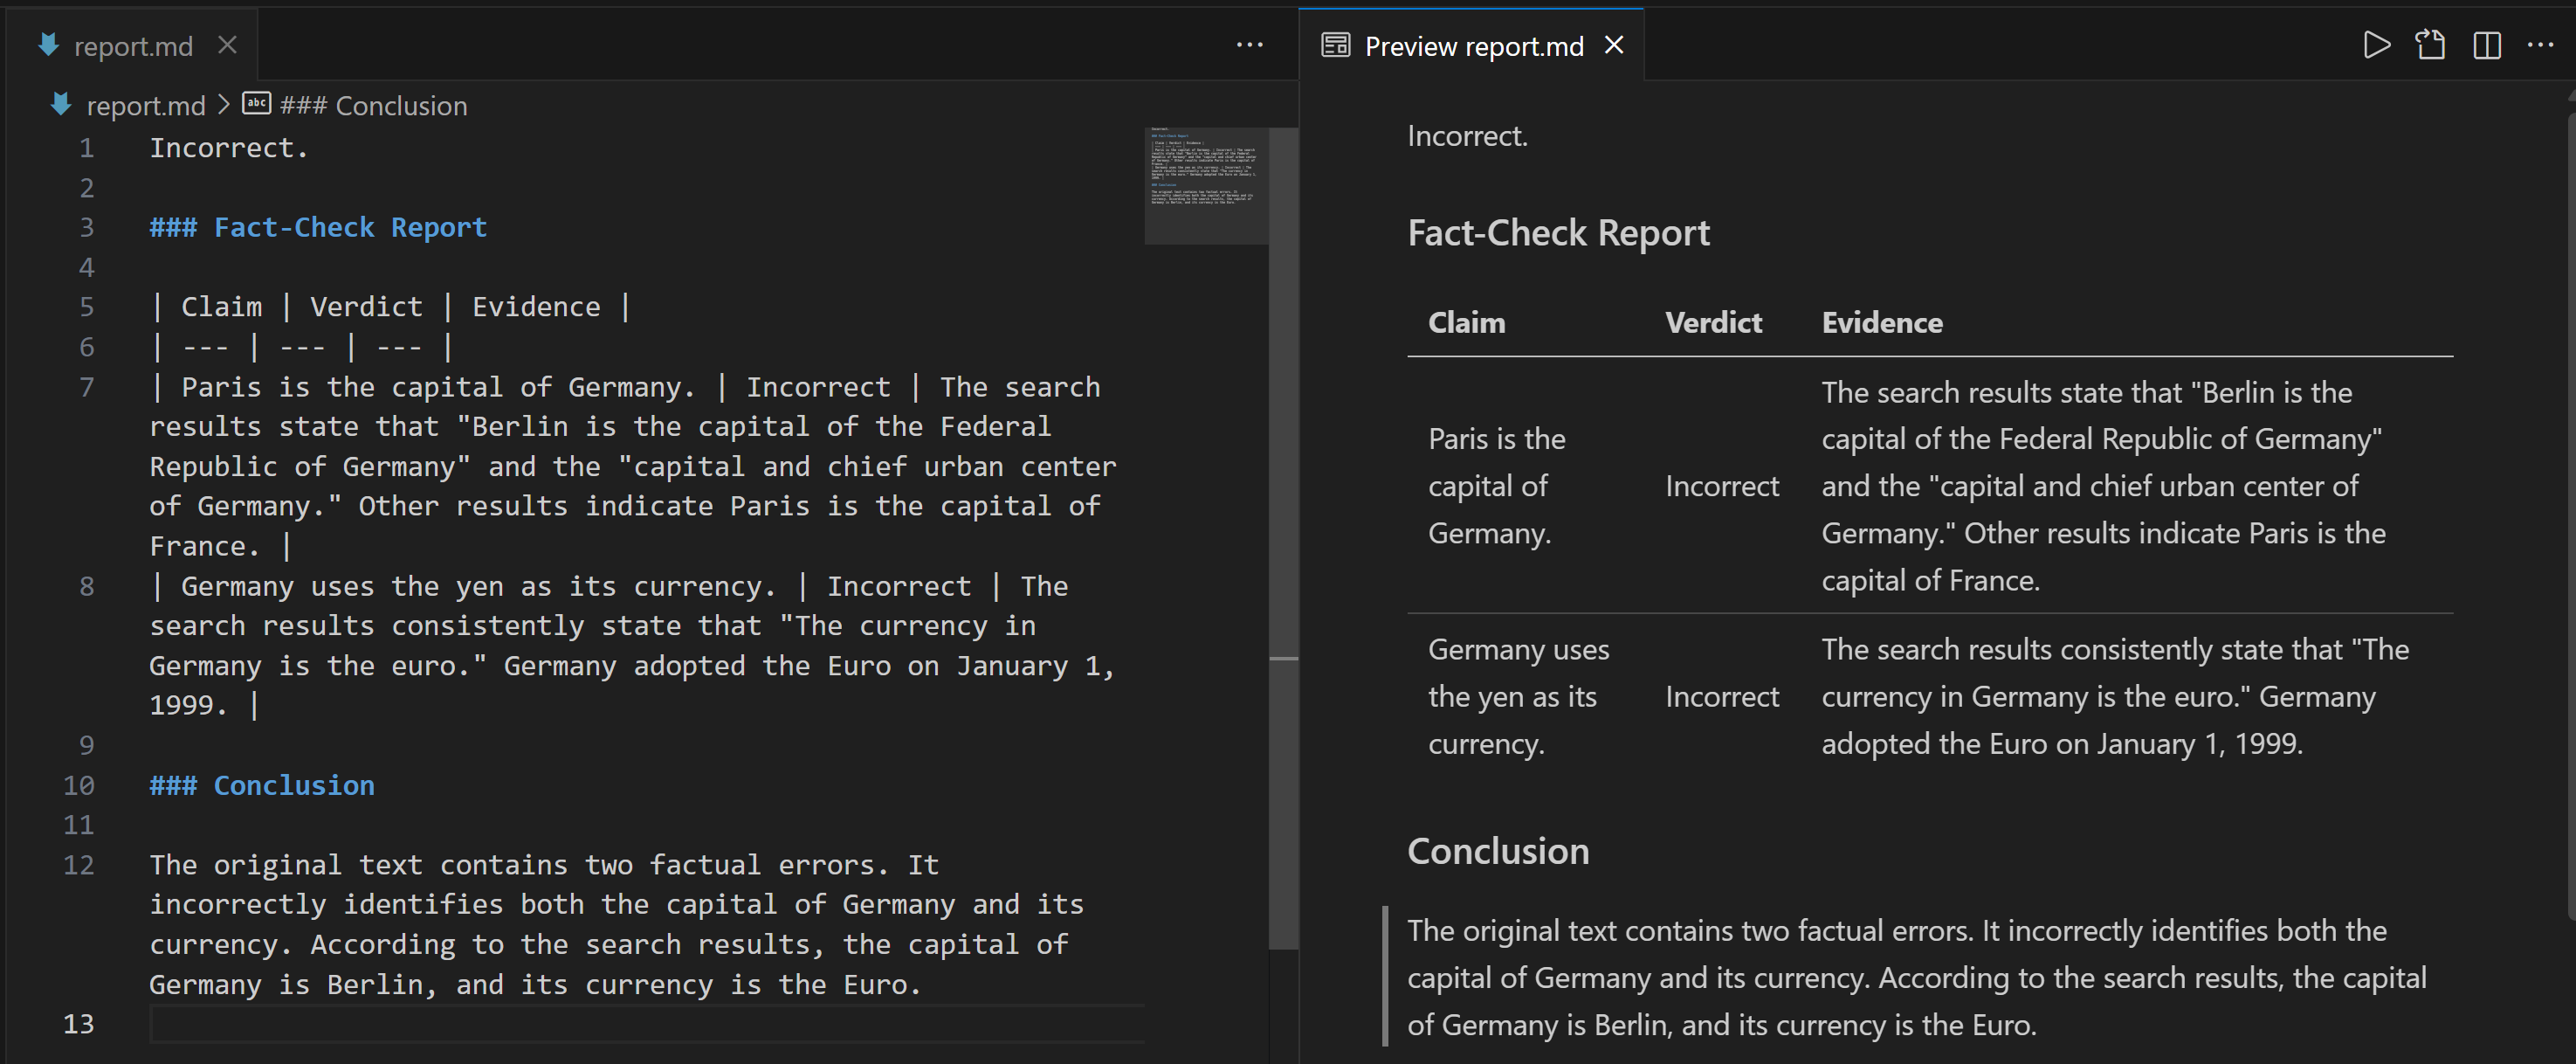
The report provides detailed information on which parts of the input statement were incorrect and what the verified facts are.
Et voilà! This demonstrates the power of Bright Data’s web search integration for retrieving contextual information in a RAG-based Vertex AI pipeline.
Next Steps
Do not forget that this was just a simple example to demonstrate the feasibility of using Bright Data’s web search data retrieval in a Vertex AI pipeline. In real-world scenarios, these components would likely be part of a much longer, more complex pipeline.
The input data could come from various sources, such as business documents, internal reports, databases, files, and more. Additionally, the workflow could include many other steps and would not necessarily end with just a fact-checking report.
Conclusion
In this blog post, you learned how to leverage Bright Data’s SERP API to retrieve web search context within a Vertex AI pipeline. The AI workflow presented here is ideal for anyone looking to build a programmatic, reliable fact-checking pipeline to ensure their data is accurate.
To create similar advanced AI workflows, explore the full range of solutions for retrieving, validating, and transforming live web data using Bright Data’s AI infrastructure.
Create a free Bright Data account today and start experimenting with our AI-ready web data tools!

Technical Writer
Antonello Zanini is a technical writer, editor, and software engineer with 5M+ views. Expert in technical content strategy, web development, and project management.


