

In this tutorial, you will learn:
- How an approach based on query fan-out and Google AI Overview comparison can be used to improve GEO and SEO.
- How to build this workflow at a high level using six AI agents.
- How to implement this AI content optimization workflow with CrewAI, integrated with Gemini and Bright Data.
- Some ideas and advice to enhance the workflow even further.
Let’s dive in!
TL;DR
Want to skip straight to the ready-to-use project files? Check out the project on GitHub.
Explaining Query Fan-Out and AI Overview Comparison for Better GEO and SEO
We all know that SEO (Search Engine Optimization) is the art of improving a website’s visibility in organic search results. But the world is now transitioning toward GEO (Generative Engine Optimization).
If you are not familiar with GEO, it is a digital marketing strategy focused on making content more visible within AI-powered search engines such as Google AI Overviews, ChatGPT, and others.
Since LLMs are essentially black boxes, there is no straightforward way to “optimize” a web page for GEO (much like SEO was before keyword volume search tools became available).
What you can do is follow an empirical approach: look at real-world AI-generated summaries and query fan-outs for your target keywords. Given a specific search term, if certain topics keep appearing in the AI results, you should optimize your page content around those topics.
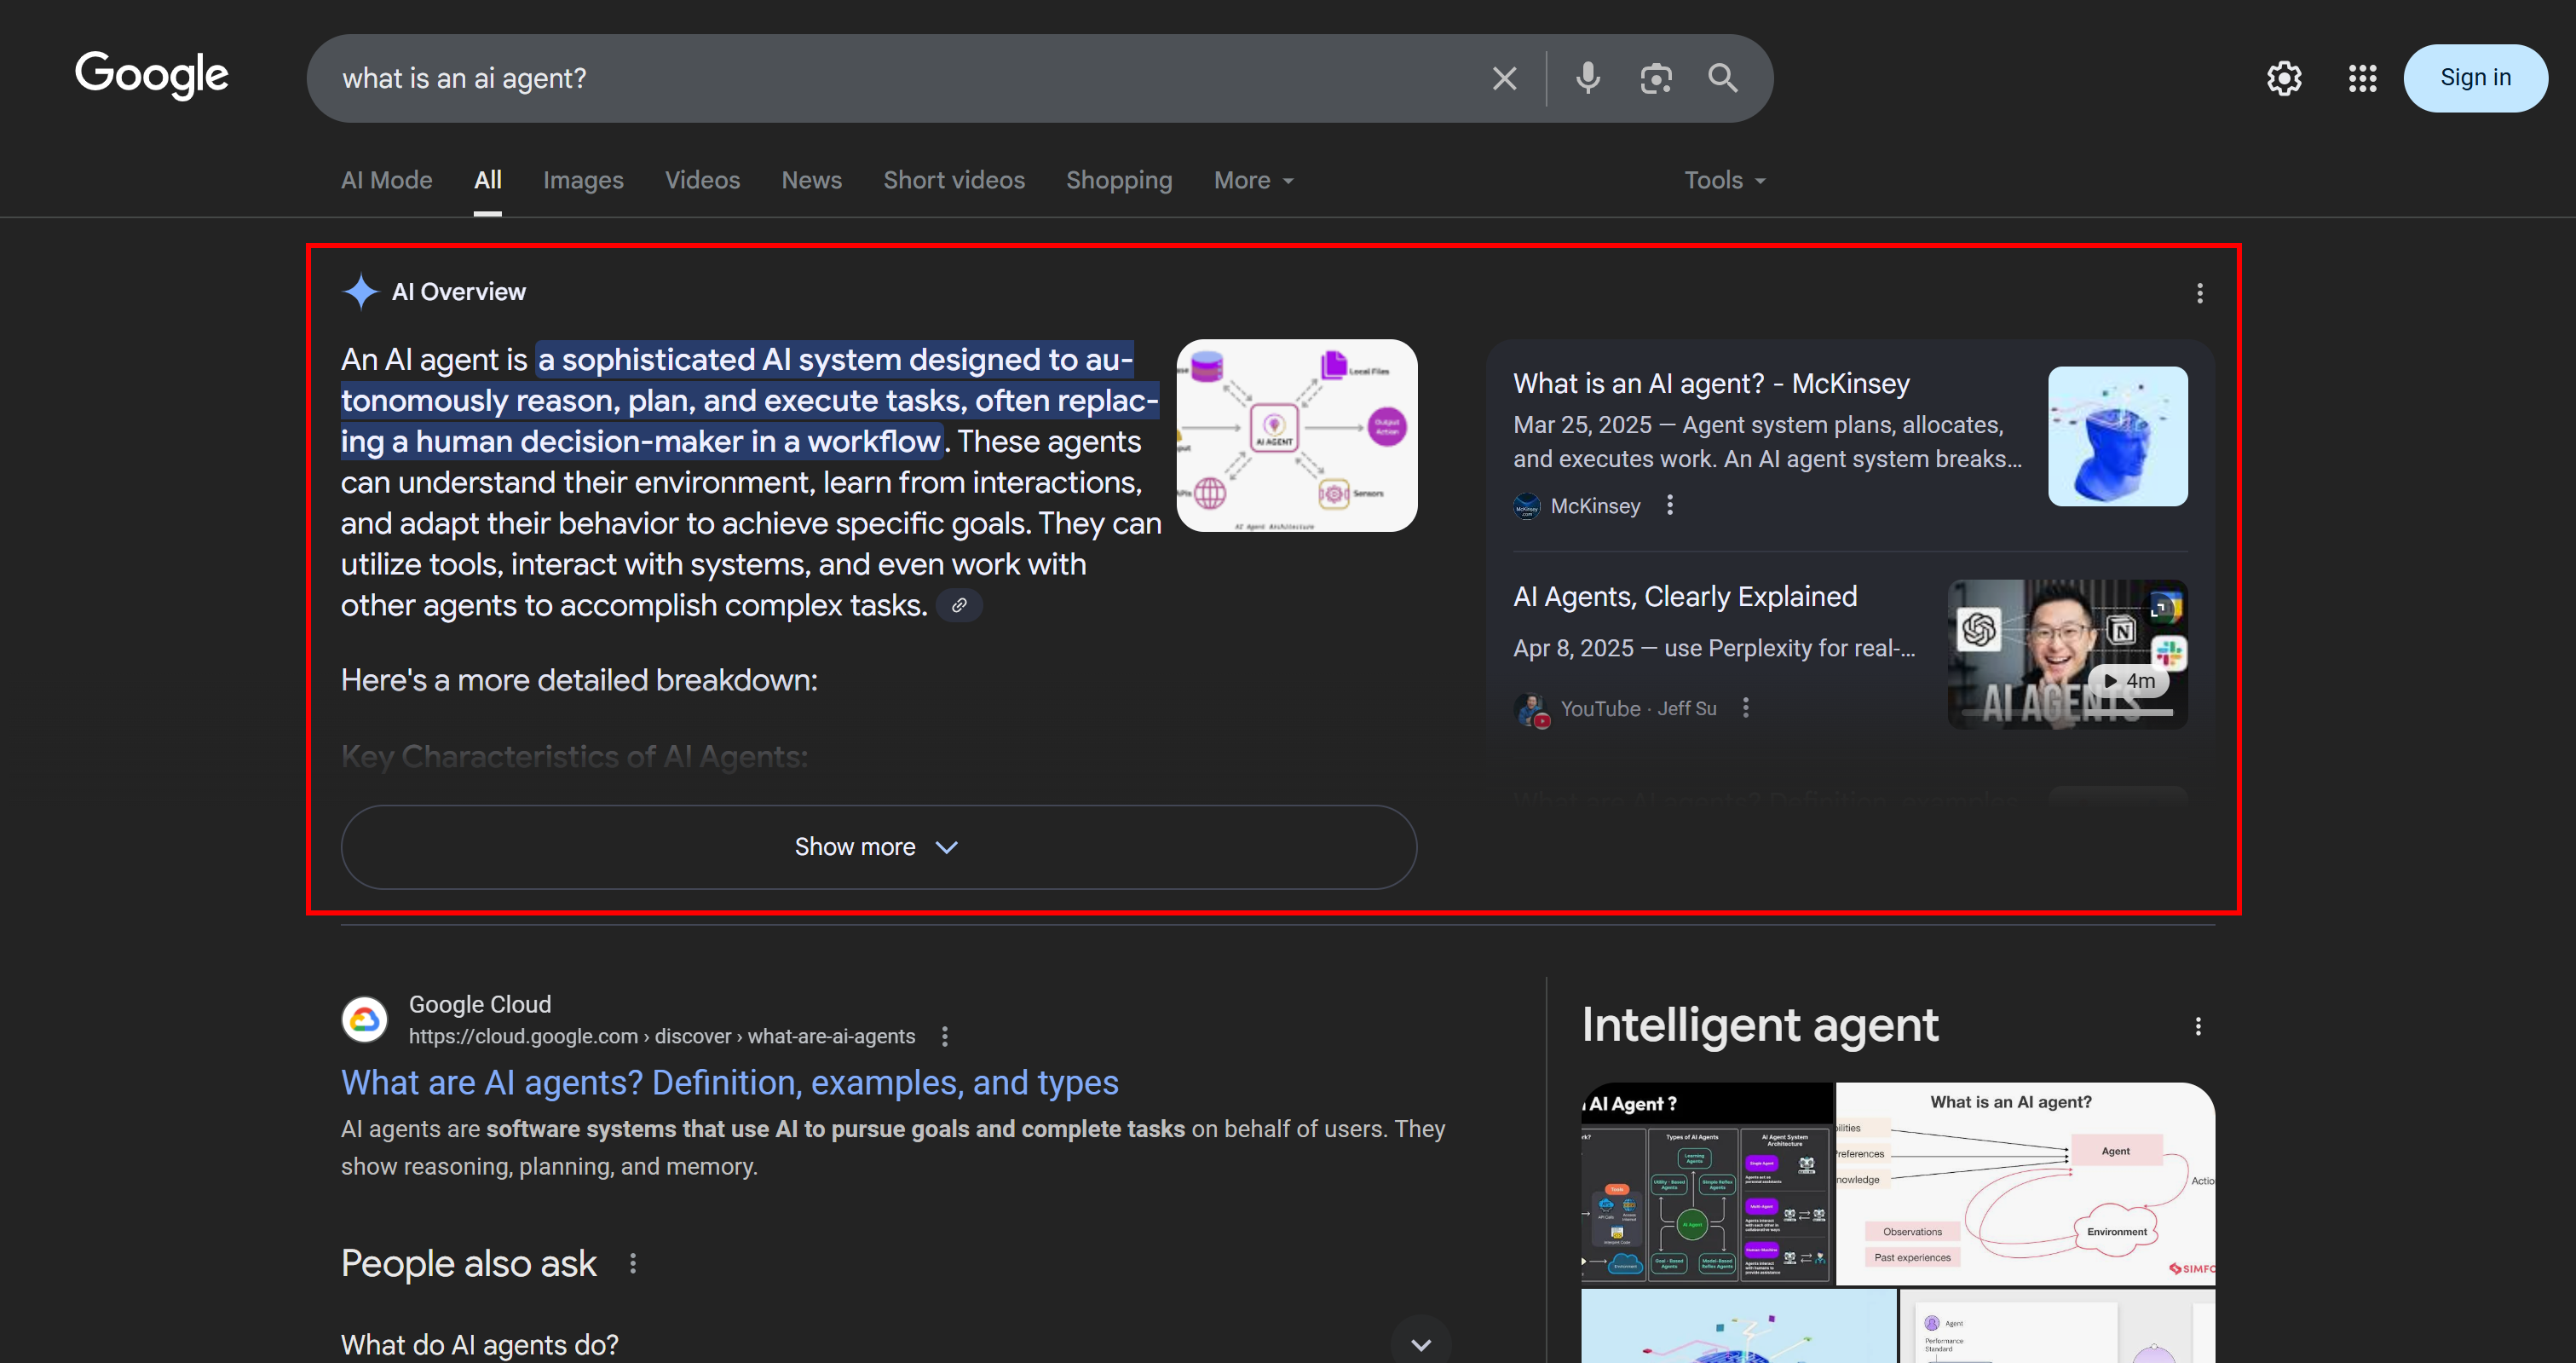
In the context of Google’s AI-powered search, a query fan-out is a technique that turns a single user query into a network of related sub-queries. Instead of simply matching the original query to the best answer, Google AI Mode goes further by generating and searching for multiple related questions at once.
As you can see in the example below, Google AI Mode usually returns around 10 related links with short summaries to help you explore the topic more in depth:
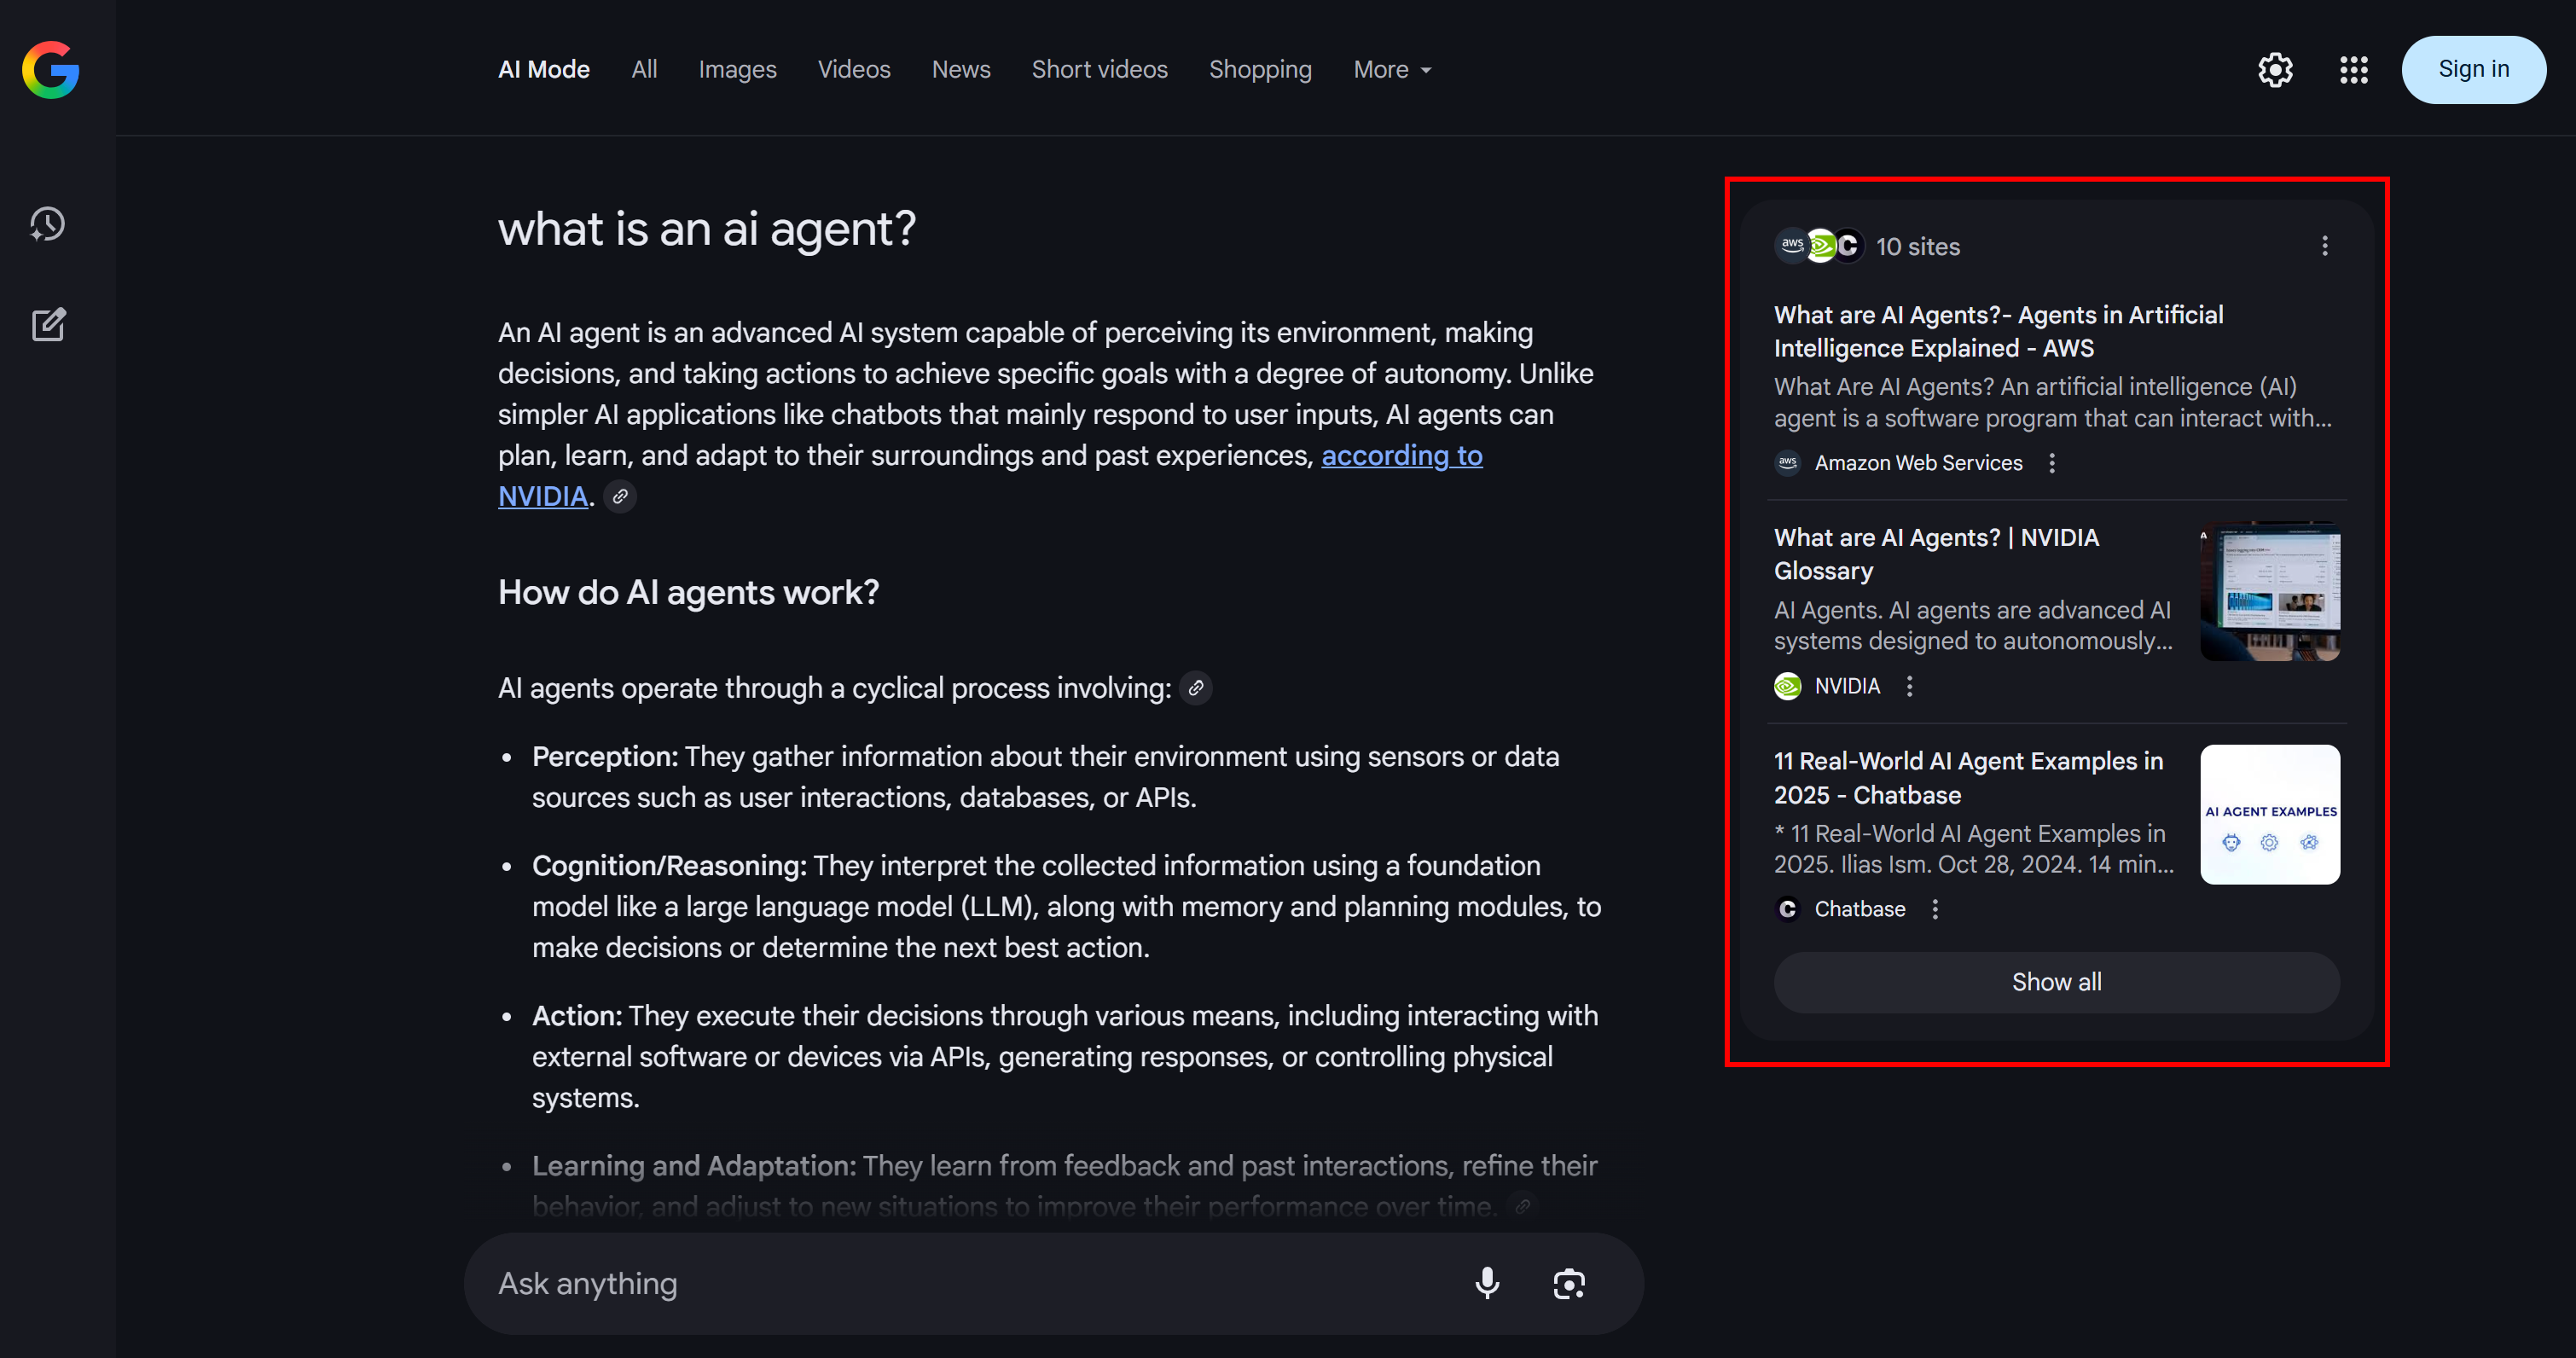
That is what a Google query fan-out is, which can be defined in simpler terms as a collection of related sub-queries generated from a single AI search.
If certain topics keep recurring in the query fan-outs and AI overviews, it makes sense to structure a content page around them. As a positive side effect, this approach can also improve traditional SEO, since engines like Google are likely to boost pages in SERPs that already perform well in their AI-powered search results.
Now that you understand the basics, dig into the technical specifics of this approach to GEO!
How to Build a Multi-Agent GEO Optimization System
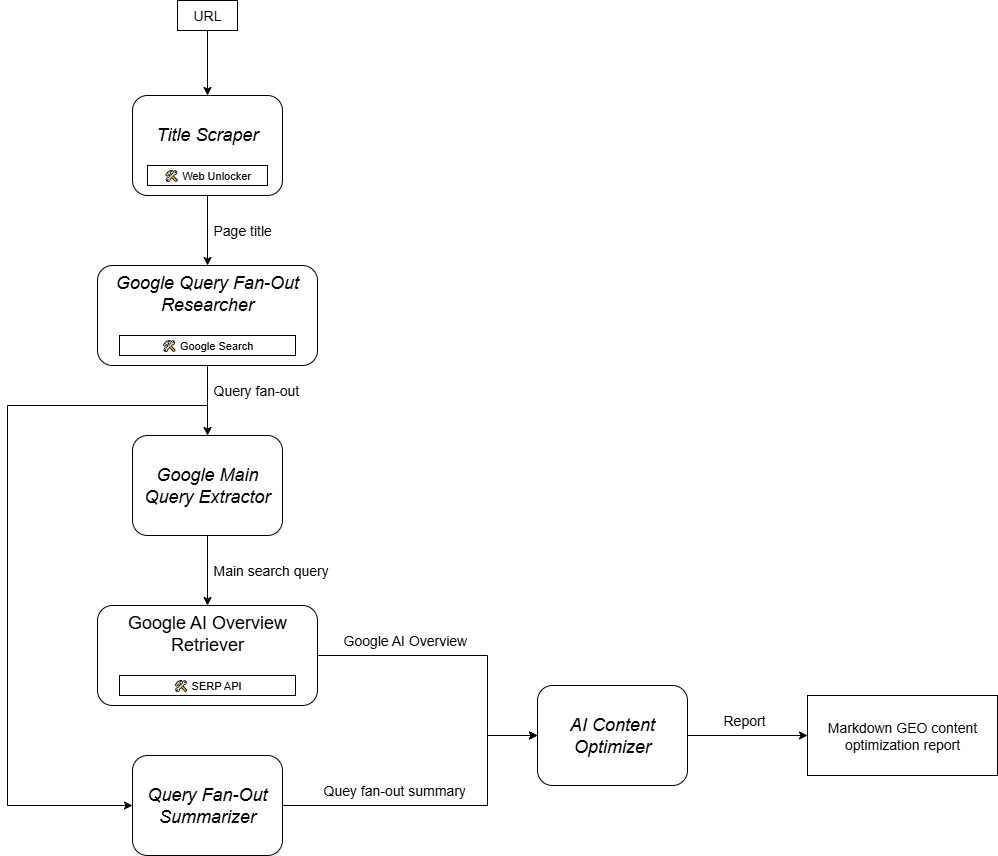
As you can imagine, implementing an AI agent to support your GEO content optimization workflow is not simple. One effective approach is to rely on a multi-agent system based on six specialized agents:
- Title Scraper: Extracts the main heading or title from a web page, given its URL.
- Google Query Fan-Out Researcher: Utilizes the extracted title to call the Google Search tool available in Gemini and generate a query fan-out.
- Google Main Query Extractor: Parses the query fan-out to identify and extract the primary Google-like search query.
- Google AI Overview Retriever: Uses the main query to perform a Google SERP search and retrieves the AI Overview section from it.
- Query Fan-Out Summarizer: Condenses the query fan-out content (which is typically quite long) into an optimized Markdown summary, highlighting key topics.
- AI Content Optimizer: Compares the query fan-out summary with the Google AI Overview to identify patterns and recurring topics. It generates an output Markdown document containing actionable insights for GEO content optimization.
Now, some of the agents described above are fairly generic and can be implemented with most LLMs (e.g., Google Main Query Extractor, Query Fan-Out Summarizer, and AI Content Optimizer). However, other agents require more specialized capabilities and access to specific models or tools.
For instance, the Google Main Query Extractor needs access to the google_search tool, which is only available in Gemini models. Similarly, the Title Scraper agent must access the web page content to extract the title. That task can be challenging, as many websites have anti-AI measures in place. To avoid issues, you can integrate Title Scraper with Web Unlocker. This Bright Data scraping API retrieves content in raw HTML or AI-optimized Markdown format, bypassing all blocks for you.
In the same way, the Google AI Overview Retriever requires a tool like Bright Data SERP API to perform the search query and scrape the AI Overview in real time.
In other words, thanks to Gemini and Bright Data’s AI infrastructure, you can implement this GEO/SEO use case. What you now need is an AI agent building system to orchestrate these agents, as outlined in this summary graph:
Since CrewAI is specifically designed to orchestrate multi-agent systems, it is the ideal framework to build and manage this workflow.
Implementing a Multi-Agent GEO Content Optimization System in CrewAI Using Gemini, and Bright Data
Follow the steps below to learn how to build a multi-agent system that provides a repeatable workflow for optimizing web pages for AI-powered search engines. By systematically analyzing query fan-outs and AI overviews, this approach helps you uncover high-priority topics and structure content to achieve higher AI-driven rankings.
The code below is written in Python using CrewAI, with Bright Data and Gemini integration to provide the agents with the necessary tools and capabilities.
Prerequisites
To follow along with this tutorial, make sure you have:
- Python 3.10+ installed locally.
- A Gemini API key (no credits are required).
- A Bright Data account.
Do not worry, if you do not have a Bright Data account. You will be guided through the process of setting one up.
Also, it is very important to have some understanding of how CrewAI works. Before getting started, we recommend reviewing the official docs.
Step #1: Set Up Your CrewAI Application
CrewAI requires uv for installation. You can install it globally with the following command:
pip install uvAlternatively, follow the official installation guide for your operating system.
Next, install CrewAI globally on your system:
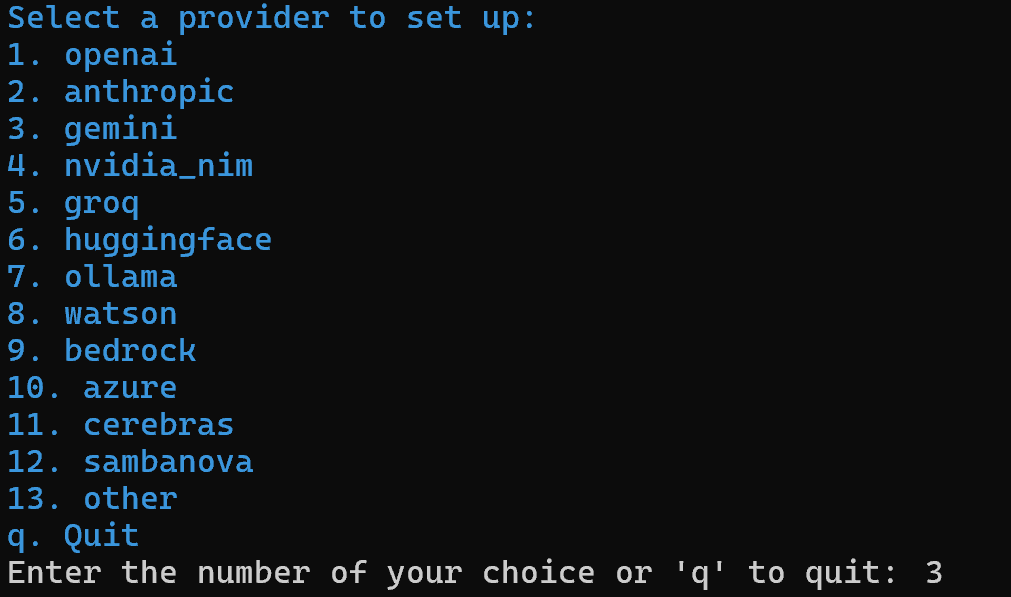
uv tool install crewai Now, create a new CrewAI project called ai_content_optimization_agent:
crewai create crew ai_content_optimization_agentYou will be asked to select an AI provider. Since the current workflow operates on Gemini, choose option 3:
Next, select a Gemini model:
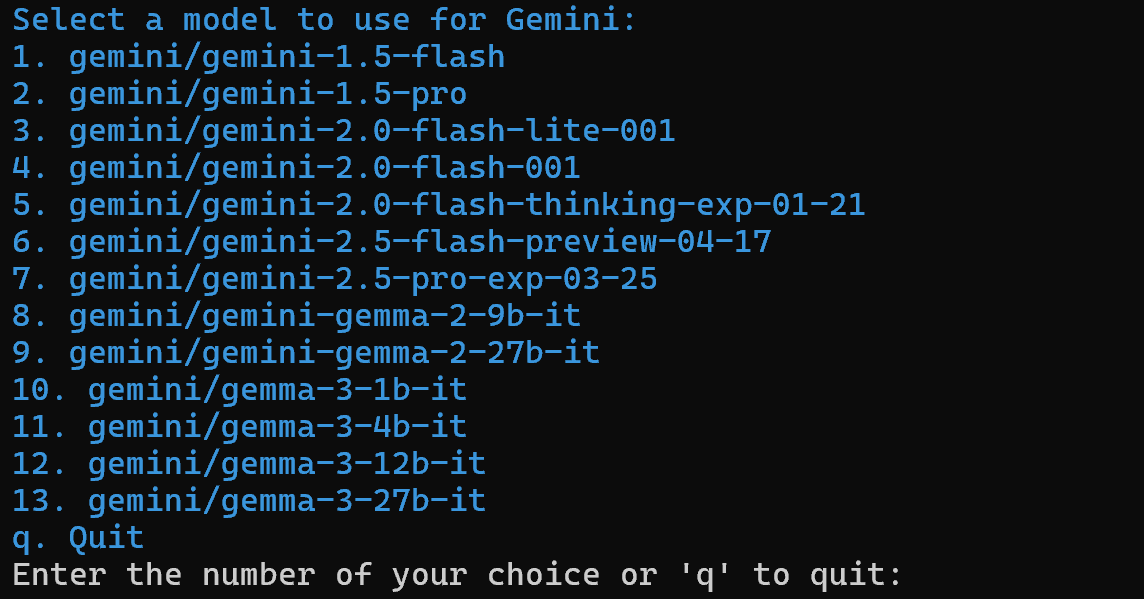
You can choose any of the available models, as you will replace it later in the article. So, it is not important.
Continue by pasting your Gemini API key:

After this step, your project in the ai_content_optimization_agent/ folder structure will look like this:
ai_content_optimization_agent/
├── .gitignore
├── knowledge/
├── pyproject.toml
├── README.md
├── .env
└── src/
    └── ai_content_optimization_agent/
        ├── __init__.py
        ├── main.py
        ├── crew.py
        ├── tools/
        │   ├── custom_tool.py
        │   └── __init__.py
        └── config/
            ├── agents.yaml
            └── tasks.yaml
Load the project in your favorite Python IDE and get familiar with it. Explore the current files and note that .env already contains the selected Gemini model and your Gemini API key:
MODEL=<SELECTED_GEMINI_MODEL>
GEMINI_API_KEY=<YOUR_GEMINI_API_KEY>
If you are not familiar with the files in CrewAI or encounter issues, refer to the official installation guide.
Navigate into your project folder in your terminal:
cd ai_content_optimization_agentThen, initialize a Python virtual environment inside it:
python -m venv .venv Note: The virtual environment must be named .venv. Otherwise, the crewai run command to start the CrewAI workflow will fail.
On Linux and macOS, activate the virtual environment with:
source .venv/bin/activateAlternatively, on Windows, execute:
.venv\Scripts\activateDone! You now have a blank CrewAI project in place.
Step #2: Integrate Gemini
As mentioned before, by default, CrewAI adds the selected Gemini model to the .env file. To configure the latest model, overwrite the MODEL environment variable in the .env file like this:
MODEL=gemini/gemini-2.5-flashThis way, your AI agents orchestrated with CrewAI will be able to connect to gemini-2.5-flash. As of this writing, that is the latest Gemini Flash model. Plus, it has very generous rate limits when interrogated via API (as in this CrewAI integration).
In crew.py, load the MODEL name from the environment using:
MODEL = os.getenv("MODEL")This variable will be used later to set the LLM in the agents.
Do not forget to import os from the Python Standard Library:
import osCool! The Gemini setup is over.
Step #3: Install and Configure the CrewAI Bright Data Tools
Extracting the title from a web page via AI is not straightforward. Most LLMs cannot directly access web page content. And even when they have built-in tools to do so, these often fail due to advanced anti-scraping measures like browser fingerprinting and CAPTCHAs. The same challenges apply to live SERP scraping, as Google actively prevents automated scraping.
This is where Bright Data becomes fundamental. Thankfully, it is officially supported via CrewAI’s Bright Data tools.
To get started, sign up for a Bright Data account (or log in if you already have one). Then, reach your profile’s dashboard and follow the official instructions to set up a Web Unlocker zone:

Make sure the zone is set to “Active”:
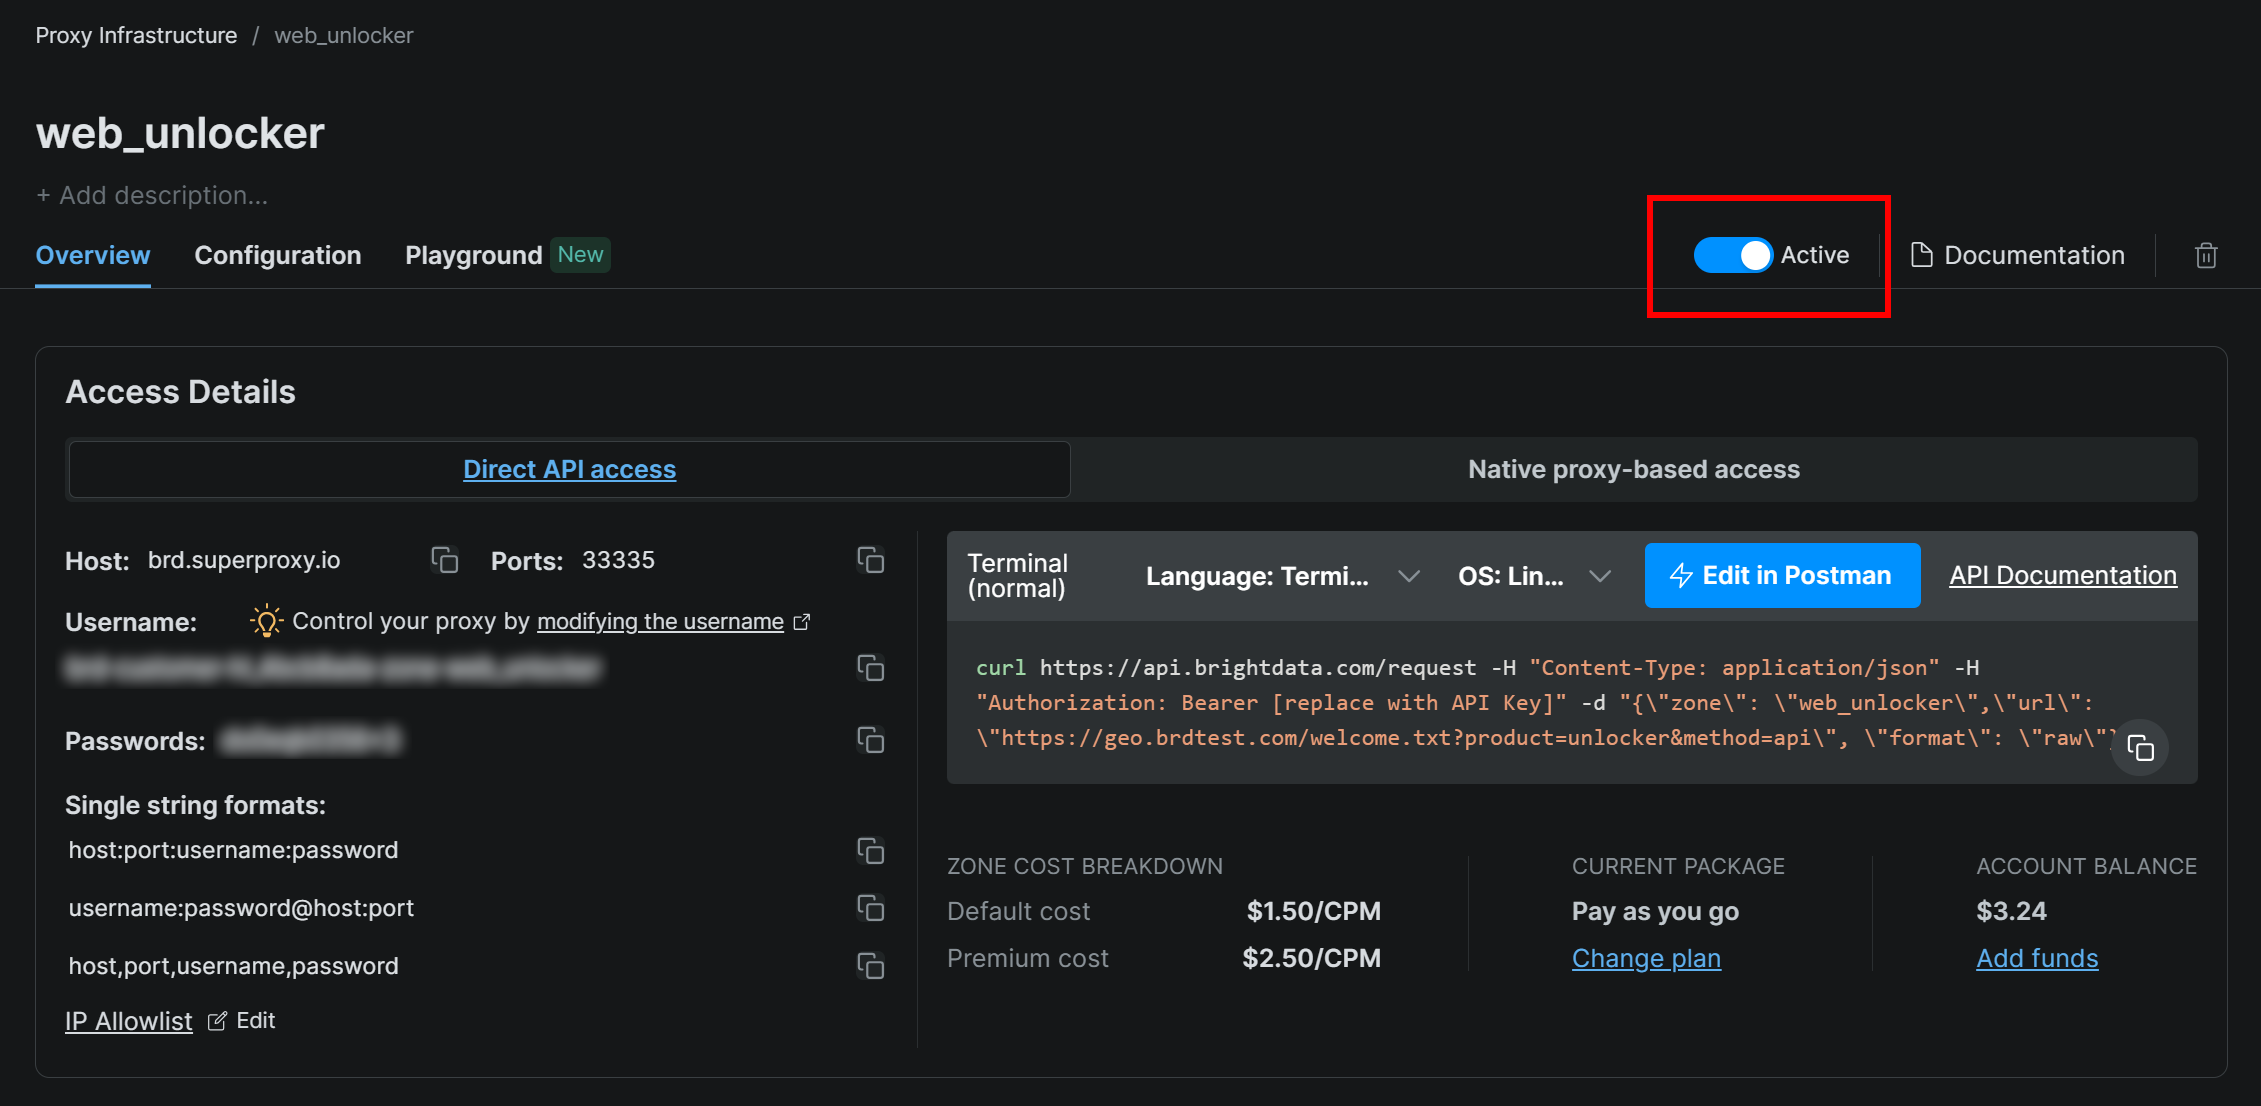
In this case, the Web Unlocker zone name is "web_unlocker", but you can name it whatever you like. Keep this name in mind, as you will need it soon.
Once you complete the setup, follow the official guide to generate your Bright Data API key. Store it securely, as you will need it shortly.
Now, in your activated virtual environment, install the CrewAI Bright Data tool requirements:
pip install crewai[tools] aiohttp requestsFor the integration to work, add your Bright Data credentials to the .env file via the following two envs:
BRIGHT_DATA_API_KEY="<BRIGHT_DATA_API_KEY>"
BRIGHT_DATA_ZONE="<YOUR_BRIGHT_DATA_ZONE>"
Replace the <YOUR_BRIGHT_DATA_API_KEY> and <YOUR_BRIGHT_DATA_ZONE> placeholders with your actual Bright Data API key and Web Unlocker zone name, respectively.
Next, in crew.py, import the Bright Data tools:
from crewai_tools import BrightDataWebUnlockerTool, BrightDataSearchToolInitialize them as below:
web_unlocker_tool = BrightDataWebUnlockerTool()
serp_search_tool = BrightDataSearchTool()
You can now provide web unlocking and SERP retrieval capabilities to your agents simply by passing these tools to them. Fantastic!
Step #4: Build the Title Scraper Agent
You now have everything in place to build your first agent. Start with the Title Scraper agent, which is responsible for extracting the title from a web page.
To get the page title, there are two main ways:
- Retrieve the text content from the
<h1>HTML element. - If the
<h1>is missing, ask the AI to infer the page title from the rest of the page content.
Do not forget that this requires Web Unlocker tool integration. In crew.py, define the CrewAI agent and task as follows:
@agent
def title_scraper_agent(self) -> Agent:
    return Agent(
        config=self.agents_config["title_scraper_agent"],
        tools=[web_unlocker_tool], # <--- Web Unlocker tool integration
        verbose=True,
        llm=MODEL,
    )

@task
def scrape_title_task(self) -> Task:
    return Task(
        config=self.tasks_config["scrape_title_task"],
        agent=self.title_scraper_agent(),
        max_retries=3,
    )
Since this task involves calling a third-party tool, it makes sense to enable retry logic (up to 3 times) via the max_retries option. That prevents the entire workflow from failing due to temporary network issues or tool errors. The same logic should be applied to all other tasks that rely on third-party services (via tools) or involve complex AI operations that may fail because of LLM processing errors.
Next, in your agents.yaml configuration file, define the Title Scraper agent like this:
title_scraper_agent:
  role: "Title Scraper"
  goal: "Extract the main H1 heading or title from a given web page URL."
  backstory: "You are an expert scraper with a specialization in identifying and extracting the main heading (H1) or title of a webpage."
Then, in tasks.yaml, describe its main task as follows:
scrape_title_task:
  description: |
    1. Visit the URL: '{url}'.
    2. Scrape the page's full content using the Bright Data Web Unlocker tool (using the Markdown data format).
    3. Locate and extract only the text within the `<h1>` tag. If no `<h1>` tag is present, infer a title from the page content.
    4. Output the extracted text as a plain string.
  expected_output: "The plain string containing the extracted text from the specified URL."
Note how this task reads the URL from a CrewAI input thanks to the {url} syntax. You will see how to populate that input argument in one of the next steps.
Great! The Title Scraper agent is complete. You will now apply similar logic to define all remaining agents.
Step #5: Implement the Google Query Fan-Out Researcher Agent
CrewAI does not provide a built-in way to access the Google Search tool available in the Gemini models. Instead, you need to define a custom Gemini LLM integration as shown in the official Gemini CrewAI integration repository.
Essentially, you have create a class that extends the CrewAI LLM class. This will connect to Gemini and enable the google_search tool. You can place this class in a file called gemini_google_search_llm.py inside a custom llms/ subfolder (or you can put the class directly at the top of crew.py).
Define your custom Gemini LLM integration class like this:
# src/ai_content_optimization_agent/llms/gemini_google_search_llm.py

from crewai import LLM
import os
from typing import Any, Optional

# Define a custom Gemini LLM integration with Google Search grounding
class GeminiWithGoogleSearch(LLM):
    """
    A Gemini-specific LLM that has the "google_search" tool enabled.
    """

    def __init__(self, model: str | None = None, **kwargs):
        if not model:
            # Use a default Gemini model.
            model = os.getenv("MODEL")

        super().__init__(model, **kwargs)


    def call(
        self,
        messages: str | list[dict[str, str]],
        tools: list[dict] | None = None,
        callbacks: list[Any] | None = None,
        available_functions: dict[str, Any] | None = None,
        from_task: Optional[Any] = None,
        from_agent: Optional[Any] = None,
    ) -> str | Any:
        if not tools:
            tools = []

        # LiteLLM will throw a warning if it sees `google_search`,
        # so you must use camel case here
        tools.insert(0, {"googleSearch": {}})

        return super().call(
            messages=messages,
            tools=tools,
            callbacks=callbacks,
            available_functions=available_functions,
            from_task=from_task,
            from_agent=from_agent,
        )
This allows you to access the Google Search tool in your configured Gemini model.
Note: The Google Search tool includes some quota on the free tier of the API, so you can use it in your app without needing a premium plan.
Then, in crew.py, import the GeminiWithGoogleSearch class:
from llms.gemini_google_search_llm import GeminiWithGoogleSearchUse it to specify the Query Fan-Out Researcher agent as follows:
@agent
def query_fanout_researcher_agent(self) -> Agent:
    return Agent(
        config=self.agents_config["query_fanout_researcher_agent"],
        verbose=True,
        llm=GeminiWithGoogleSearch(MODEL), # <--- Gemini integration with the Google Search tool
    )

@task
def google_search_task(self) -> Task:
    return Task(
        config=self.tasks_config["google_search_task"],
        context=[self.scrape_title_task()],
        agent=self.query_fanout_researcher_agent(),
        max_retries=3,
        markdown=True,
        output_file="output/query_fanout.md",
    )
Note that the LLM used in the Agent class is an instance of the custom GeminiWithGoogleSearch class. Since the query fan-out generation task produces a valuable output for debugging and further analysis, you should export it to a custom output file. In this case, the produced output will be stored in the output/query_fanout.md file.
Also, notice how the agent’s main task context is exactly the output of the main task from the previous agent in the workflow. This way, the current agent will have access to the output produced by the Title Scraper agent. In particular, it will utilize that as the input when performing the fan-out retrieval via the Google Search tool.
Next, in agents.yaml, add:
query_fanout_researcher_agent:
  role: "Google Query Fan-Out Researcher"
  goal: "Given a title, perform a comprehensive web search to get the query fan-out."
  backstory: "You are an AI research assistant, powered by the Google Search tool from Gemini."
And in tasks.yaml:
google_search_task:
description: |
1. Use the title from the previous task as your search query.
2. Perform a web search using the Google Search tool.
3. Return the results from the Google Search tool.
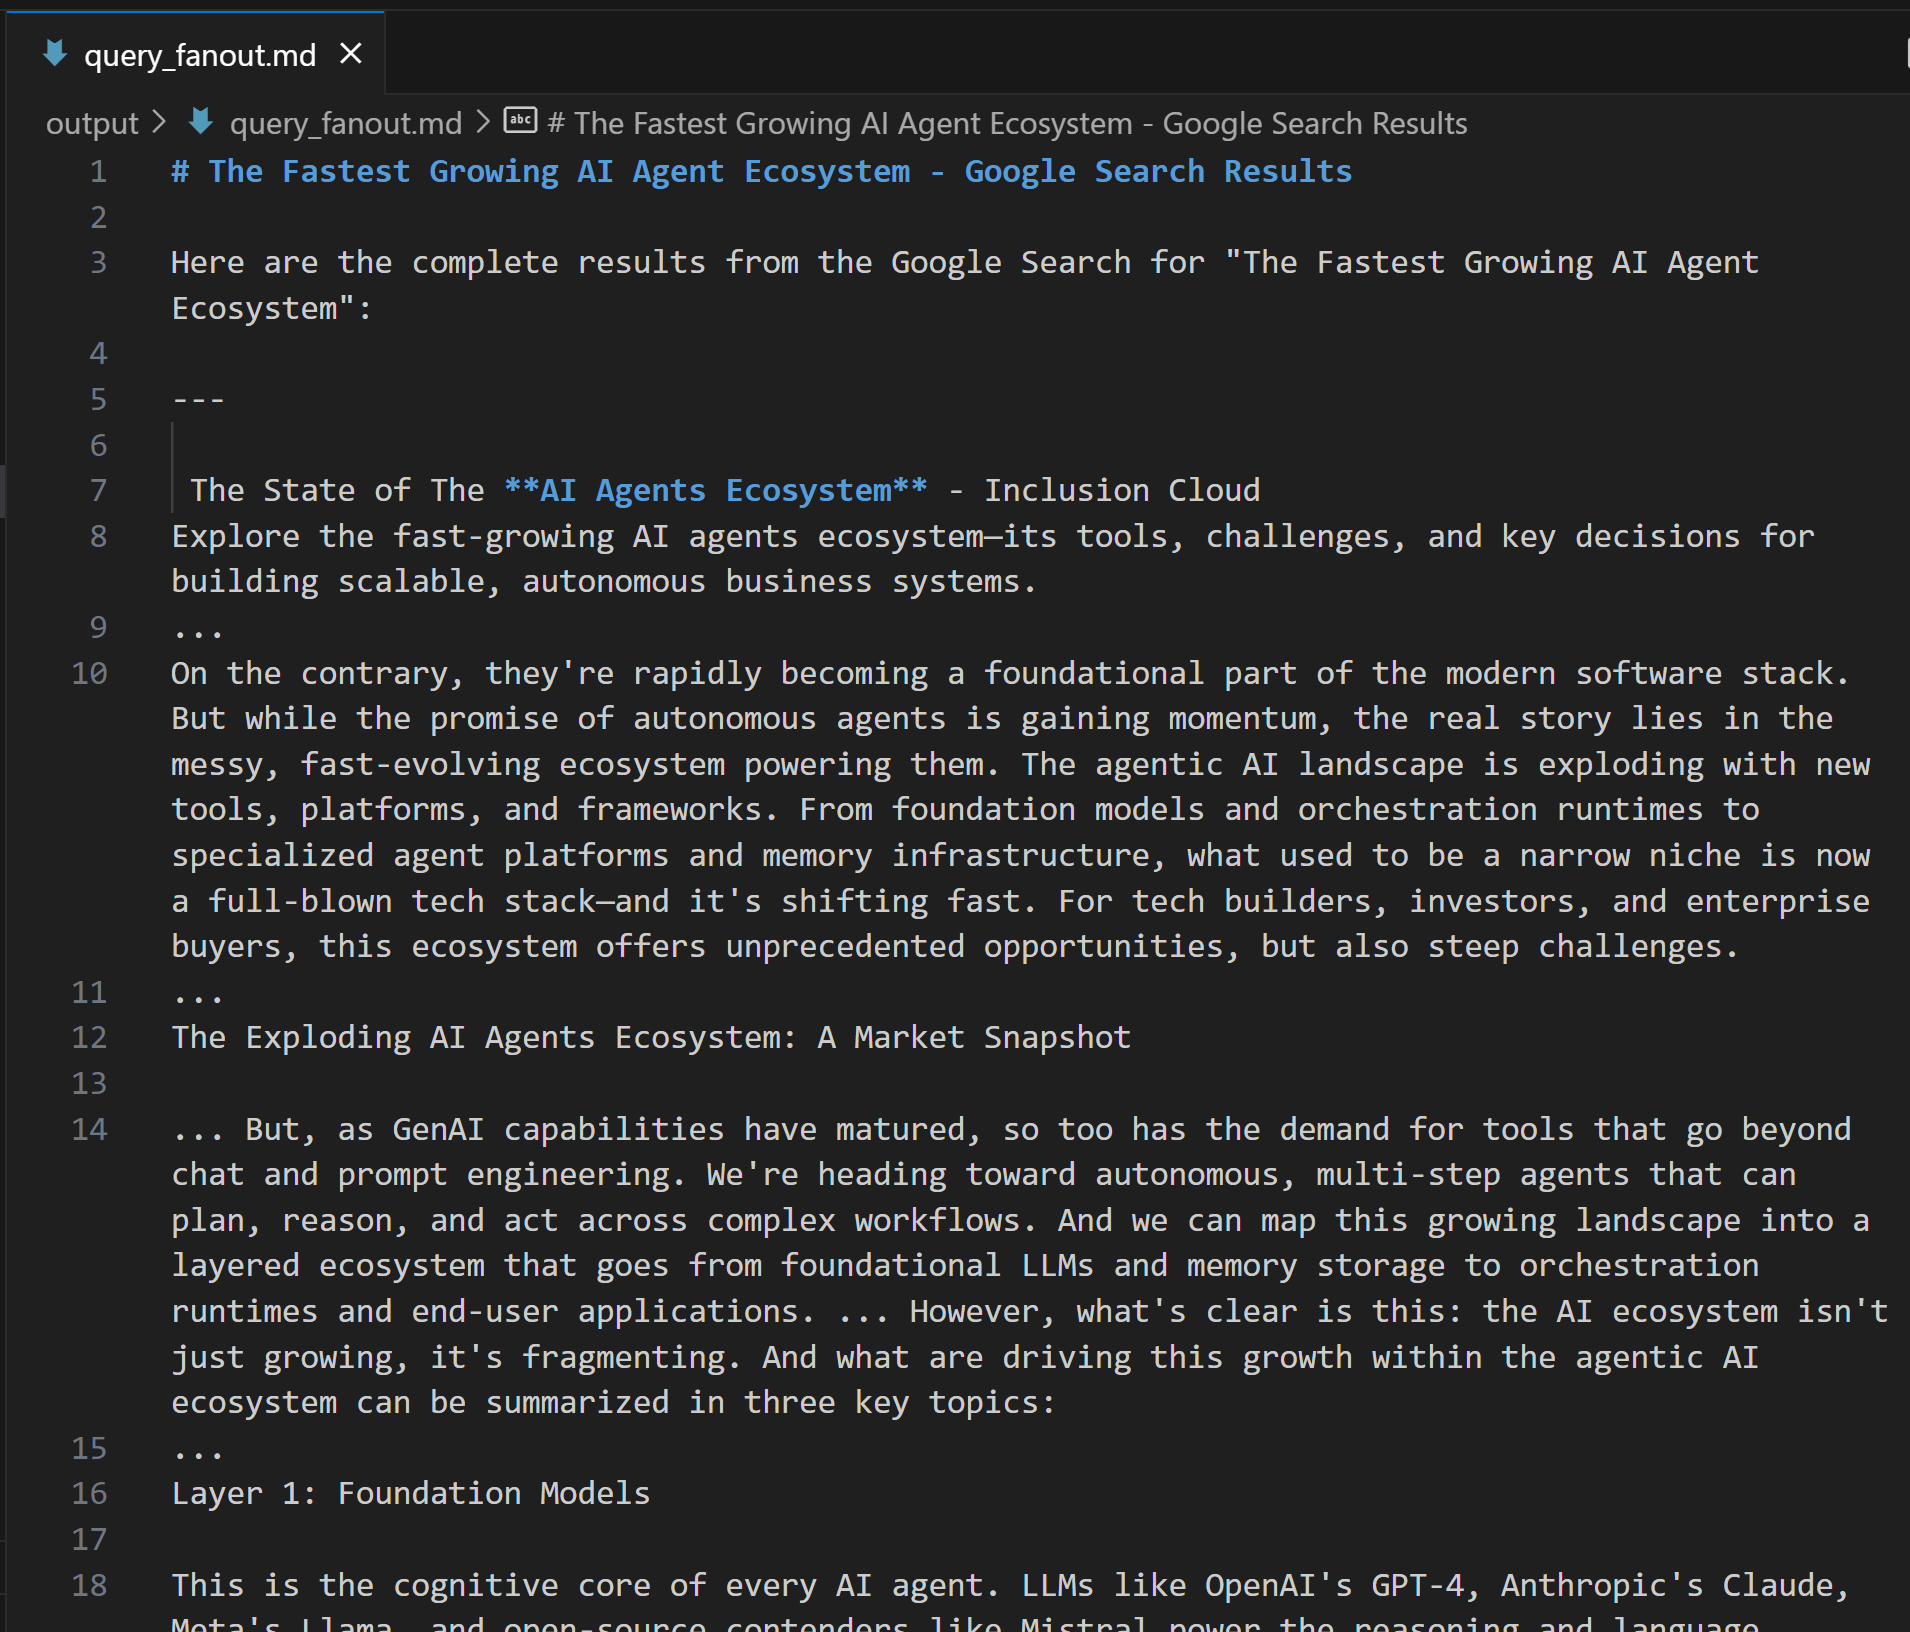
expected_output: "The output from the Google Search tool in Markdown format."If you are wondering what a query fan-out looks like, below is a short snippet from a real-world google_search tool output:
Perfect! The Google Query Fan-Out Researcher agent is ready.
Step #6: Define the Remaining Agents
Just like before, proceed by defining the remaining agents in crew.py:
@agent
def main_query_extractor_agent(self) -> Agent:
    return Agent(
        config=self.agents_config["main_query_extractor_agent"],
        verbose=True,
        llm=MODEL,
    )

@task
def main_query_extraction_task(self) -> Task:
    return Task(
        config=self.tasks_config["main_query_extraction_task"],
        context=[self.google_search_task()],
        agent=self.main_query_extractor_agent(),
    )

@agent
def ai_overview_retriever_agent(self) -> Agent:
    return Agent(
        config=self.agents_config["ai_overview_retriever_agent"],
        tools=[serp_search_tool], # <--- SERP API tool integration
        verbose=True,
        llm=MODEL,
    )

@task
def ai_overview_extraction_task(self) -> Task:
    return Task(
        config=self.tasks_config["ai_overview_extraction_task"],
        context=[self.main_query_extraction_task()],
        agent=self.ai_overview_retriever_agent(),
        max_retries=3,
        markdown=True,
        output_file="output/ai_overview.md",
    )

@agent
def query_fanout_summarizer_agent(self) -> Agent:
    return Agent(
        config=self.agents_config["query_fanout_summarizer_agent"],
        verbose=True,
        llm=MODEL,
    )

@task
def query_fanout_summarization_task(self) -> Task:
    return Task(
        config=self.tasks_config["query_fanout_summarization_task"],
        context=[self.google_search_task()],
        agent=self.query_fanout_summarizer_agent(),
        markdown=True,
        output_file="output/query_fanout_summary.md",
    )

@agent
def ai_content_optimizer_agent(self) -> Agent:
    return Agent(
        config=self.agents_config["ai_content_optimizer_agent"],
        verbose=True,
        llm=MODEL,
    )

@task
def compare_ai_overview_task(self) -> Task:
    return Task(
        config=self.tasks_config["compare_ai_overview_task"],
        context=[self.query_fanout_summarization_task(), self.ai_overview_extraction_task()],
        agent=self.ai_content_optimizer_agent(),
        max_retries=3,
        markdown=True,
        output_file="output/report.md",
    )
Respectively, the above code specifies:
- The Google Main Query Extractor agent and its main task.
- The Google AI Overview Retriever agent and its main task.
- The Query Fan-Out Summarizer agent and its main task.
- The AI Content Optimizer agent and its main task.
Complete the agent definitions by adding these lines to agents.yaml:
main_query_extractor_agent:
  role: "Google Main Query Extractor"
  goal: "Extract the main Google-like search query from a provided query fan-out."
  backstory: "You are an AI assistant specialized in parsing query fan-outs and identifying the main, concise search query suitable for Google searches."

ai_overview_retriever_agent:
  role: "Google AI Overview Retriever"
  goal: "Given a query fan-out, extract the main search query and use it to perform a SERP search on Google to retrieve the AI Overview section."
  backstory: "You are an AI SERP search assistant with the ability to retrieve SERPs from Google."

query_fanout_summarizer_agent:
  role: "Query Fan-Out Summarizer"
  goal: "Generate a concise and structured summary from the provided query fan-out."
  backstory: "You are an AI summarization expert focused on condensing query fan-outs into clear, actionable summaries in Markdown format."

ai_content_optimizer_agent:
  role: "AI Content Optimizer"
  goal: "Compare a summary generated from a query fan-out with the Google AI Overview, identify patterns and similarities, and generate a list of action items based on common topics."
  backstory: "You are an AI assistant that analyzes content summaries and AI overviews to find recurring themes, patterns, and actionable insights to optimize content strategies."
And these lines to tasks.yaml:
main_query_extraction_task:
  description: |
    1. From the provided query fan-out, extract the main search query.
    2. Transform the search query into a concise, Google-like keyphrase that users would type into Google.
  expected_output: "A short, clear, Google-style search query."

ai_overview_extraction_task:
  description: |
    1. Use the search query from the previous task to perform a SERP search on Google via the Bright Data SERP Search tool by setting the `brd_ai_overview` argument to 2.
    2. Retrieve and return an aggregated Markdown version of the AI Overview section from the search results.
    3. After all attempts, if none of the responses contain a Google AI Overview, generate one based on the results from the SERP API, and include a note indicating it was generated.
  expected_output: "The AI Overview section Markdown format (either retrieved from the SERP API or generated if unavailable)."

query_fanout_summarization_task:
  description: |
    1. Generate a summary from the query fan-out received as input.
  expected_output: "A Markdown summary containing the main information from the query fan-out."

compare_ai_overview_task:
  description: |
    1. Compare the previously generated summary with the Google AI Overview provided as input.
    2. Identify patterns and similarities (such as sub-topics or recurring themes), as well as differences between the two sources.
    3. Generate a list of action items based on the comparison, focusing on topics that appear in both the Google AI Overview and the initial summary.
    4. Produce a summary table to compare the patterns, similarities, and differences, containing these columns: Aspect, Query Fan-Out Summary, Google AI Overview, Similarities/Patterns, Differences.
  expected_output: |
    A comparison report in Markdown that highlights patterns, similarities, and a list of action items derived from the query fan-out.
    The document must with a summary table presenting the main similarities and differences, and then all remaining content.
See how the ai_overview_extraction_task task includes technical specifications to retrieve the AI Overview in the SERP API response. Learn more in the official docs.
Wonderful! All your AI agents in the GEO content optimization workflow have now been created. Next, it is time to add a Crew to orchestrate them.
Step #7: Aggregate All Agents in a Crew
Inside crew.py, define a new Crew function to run the agents sequentially:
@crew
def crew(self) -> Crew:
    return Crew(
        agents=self.agents,
        tasks=self.tasks,
        process=Process.sequential,
        verbose=True,
    )
Amazing! The AiContentOptimizationAgent class in the crew.py file is complete. You only have to run its crew() method in the main.py file to start the workflow.
Step #8: Define the Run Flow
Override the main.py file to:
- Read the input URL from the terminal using Python’s
input()function. - Use the provided URL to construct the required agent input.
- Initialize an
AiContentOptimizationAgentinstance and call itscrew()method, passing an input object with the required{url}field populated. - Run the AI workflow.
Implement all the above logic in main.py as follows:
#!/usr/bin/env python

import warnings
from ai_content_optimization_agent.crew import AiContentOptimizationAgent
warnings.filterwarnings("ignore", category=SyntaxWarning, module="pysbd")

def run():
    # Read URL from the terminal
    url = input("Please enter the URL to process: ").strip()

    if not url:
        raise ValueError("No URL provided. Exiting.")


    # Build the required agent input
    inputs = {
        "url": url,
    }

    try:
        print(f"Analyzing '${url}' for AI content optimization...")

        # Run the multi-agent workflow
        AiContentOptimizationAgent().crew().kickoff(inputs=inputs)
    except Exception as e:
        raise Exception(f"An error occurred while running the crew: {e}")
Step #9: Test Your Agent
In your activated virtual environment, before starting your agent, install the required dependencies with:
crewai installThen, launch your multi-agent GEO optimization system:
crewai runYou will be prompted to enter the input URL:

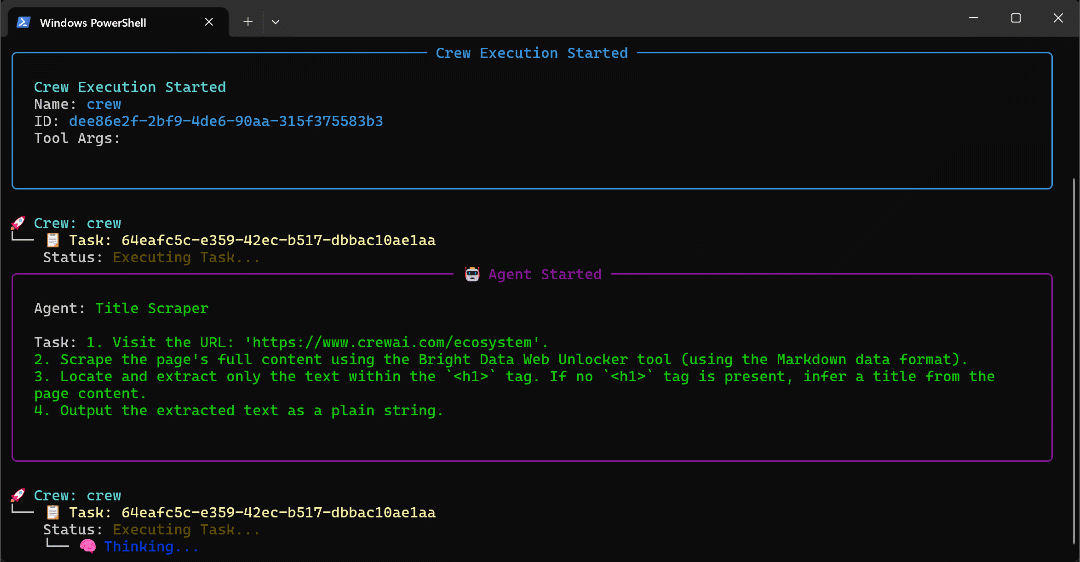
In this example, we will use a page from the CrewAI site itself as the input:
https://www.crewai.com/ecosystem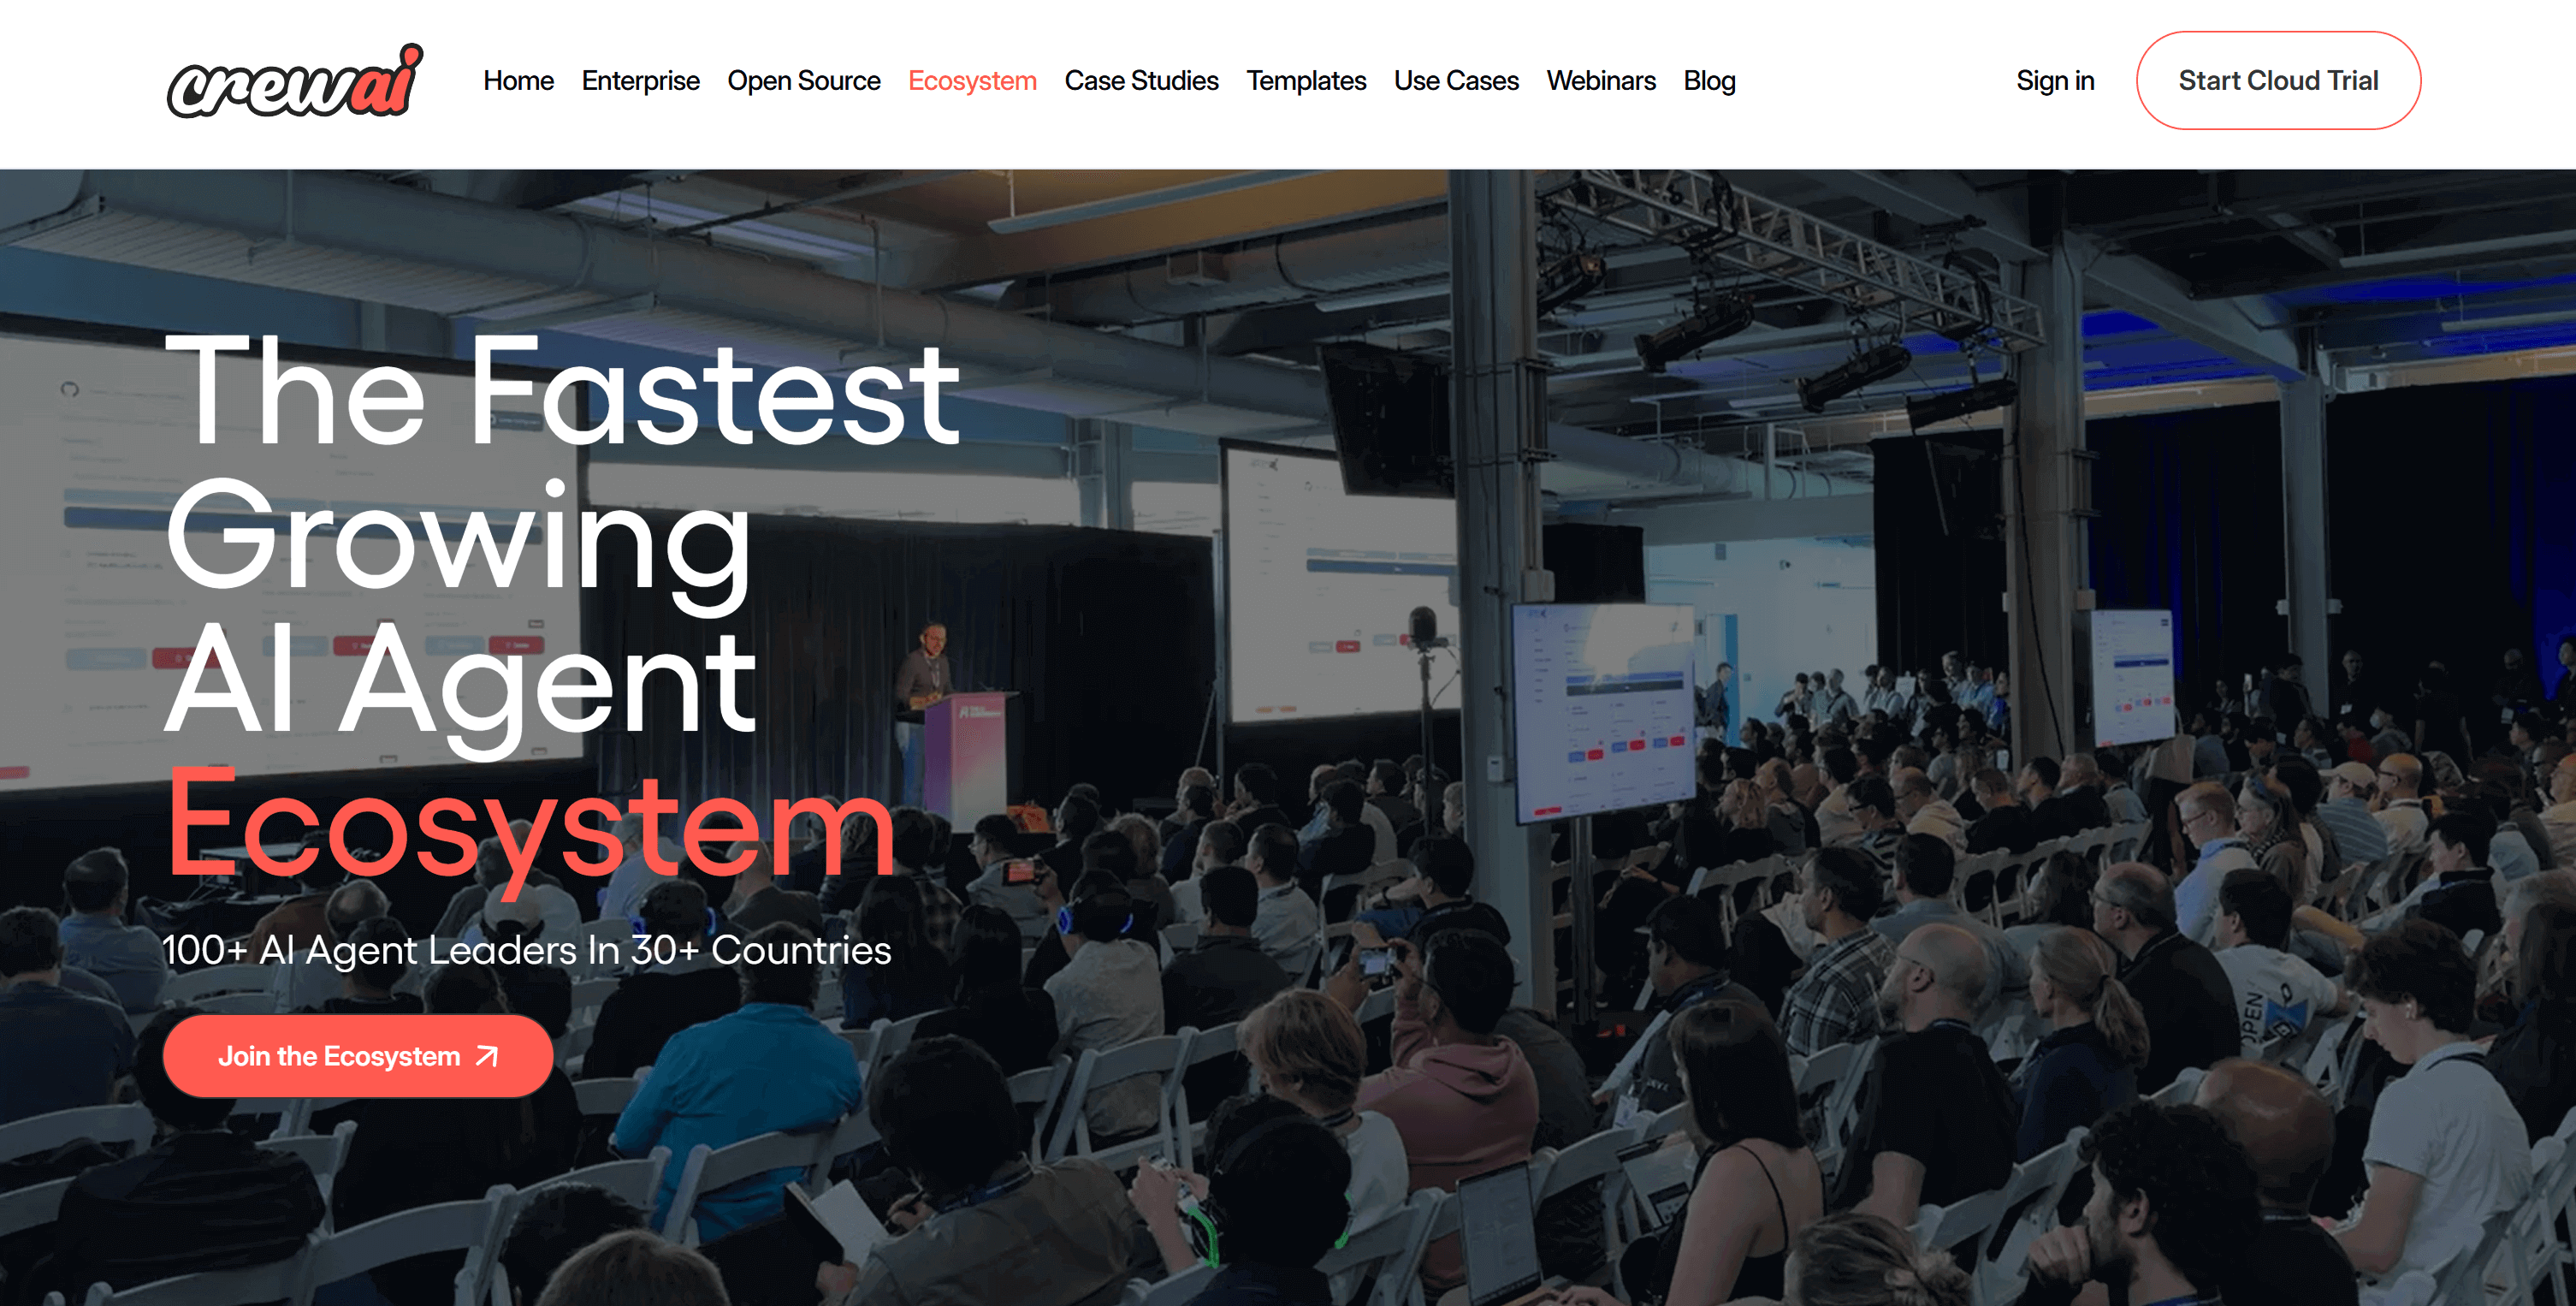
This page presents the main actors in the AI agent ecosystem.
Run the agent on this page, and you will see an output like this:
The GIF above has been sped up, but this is what happens step by step:
- The Title Scraper agent collects the page title via the Bright Data Web Unlocker tool. The result is
"The Fastest Growing AI Agent Ecosystem"(exactly as shown in the page screenshot). - Google Query Fan-Out Researcher generates the query fan-out output from the
google_searchtool. This produces thequery_fanout.mdfile in theoutput/folder. - Google Main Query Extractor identifies the primary Google-like search query from the query fan-out. The result is
"AI agent ecosystem growth". - Google AI Overview Retriever gets the AI Overview for the search query via the Bright Data SERP API. The output is stored in
ai_overview.md. - The Query Fan-Out Summarizer agent condenses the query fan-out content into a detailed Markdown summary in
query_fanout_summary.md. - AI Content Optimizer compares the query fan-out summary with the Google AI Overview to generate the final
report.mdfile.
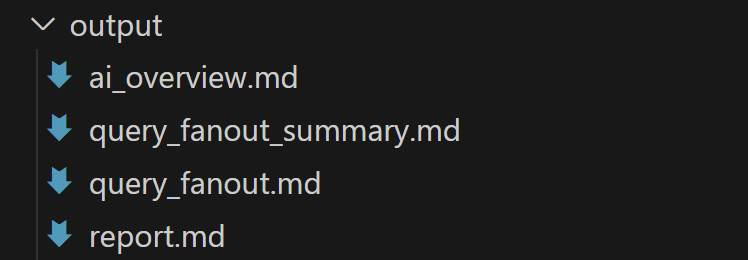
At the end of execution, the output/ folder should contain the following four files:
Open report.md in preview mode in Visual Studio Code and scroll through it:
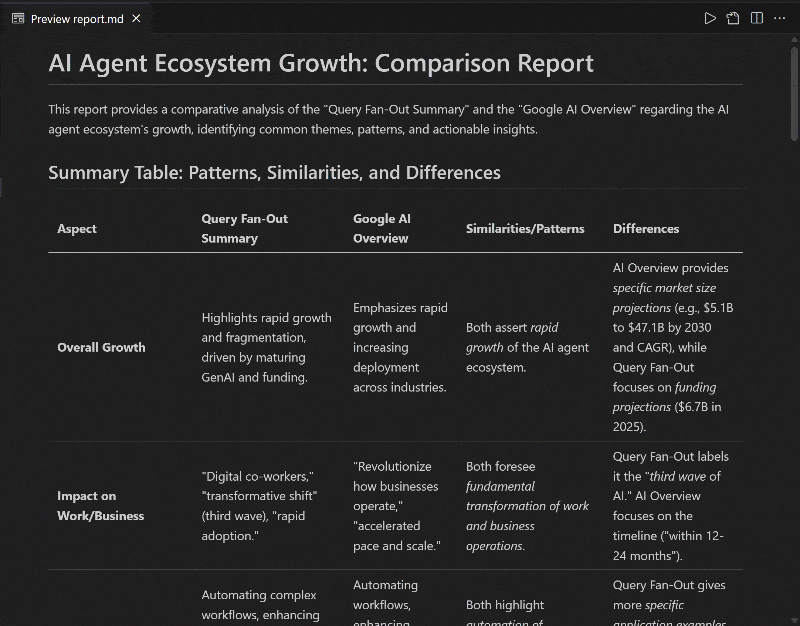
As you can see, it contains a detailed Markdown report to help you optimize the content of the given input page for GEO (and SEO)!
Now, use this agent on the URLs of the web pages you want to improve for AI ranking, and you will enhance your GEO and SEO positioning.
Et voilà! Mission accomplished.
Next Steps
The AI content optimization agent built above is already quite powerful, but it can always be improved. One idea is to add another agent at the beginning of the workflow that takes a sitemap as input (optionally using a regex to filter URLs, for example, to select only blog posts). This agent could then pass the URLs to the existing workflow, potentially in parallel, allowing you to analyze multiple pages for AI content optimization at the same time.
In general, keep in mind that you can experiment with the instructions in agents.yaml and tasks.yaml to tailor the behavior of each of the six agents to your specific use case. No advanced technical skills are required to make these adjustments!
Conclusion
In this article, you learned how to leverage Bright Data’s AI integration capabilities to build a complex multi-agent workflow for GEO/SEO optimization in CrewAI.
The AI workflow presented here is ideal for anyone looking for a programmatic way to improve web page content for both traditional search engines and AI-powered searches.
To create similar advanced workflows, explore the full range of solutions for retrieving, validating, and transforming live web data in the Bright Data AI infrastructure.
Create a free Bright Data account today and start experimenting with our AI-ready web tools!

Technical Writer
Antonello Zanini is a technical writer, editor, and software engineer with 5M+ views. Expert in technical content strategy, web development, and project management.


