
In this blog post, you will learn:
- What OpenAI Agent Builder is and what it offers.
- Why you should consider integrating Bright Data’s Web MCP into it.
- How to build a multi-purpose AI workflow in OpenAI’s Agent Builder that leverages Web MCP tools.
Let’s dive in!
What Is OpenAI’s Agent Builder?
Agent Builder is a web platform for visually creating, testing, and deploying multi-step, autonomous AI agents and workflows. It is available as a free OpenAI service and is part of AgentKit, a complete suite of tools for developers and enterprises to build, deploy, and optimize AI agents.
Specifically, OpenAI’s Agent Builder provides a visual canvas where you can design agentic AI workflows without writing any code. It enables you to start from templates, drag and drop nodes for each step in your workflow, define typed inputs and outputs, and preview runs directly on the web app.
For deployment, you can either embed the workflow into your site using ChatKit or download the SDK code to run it on your own infrastructure.
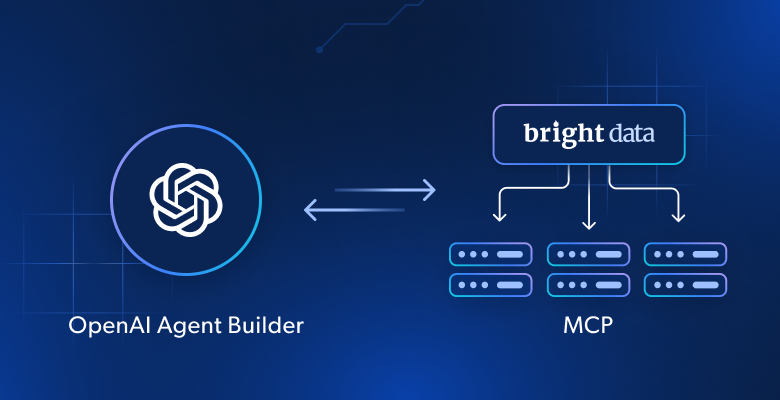
Why Connect Your Agent to Bright Data’s Web MCP in OpenAI’s Agent Builder
AI agents and workflows are only as powerful as the LLMs fueling them, and LLMs are in turn limited by the knowledge and capabilities they have access to. This represents the biggest limitation of AI agents. The reason is that LLM engines are constrained by outdated knowledge, which reflects the static data used during training.
To overcome that limitation, an agent must be able to fetch contextually relevant, up-to-date information from the Web, the largest source of data on the planet. Only then can an AI agent or workflow truly overcome the inherent knowledge limitations of its underlying LLM.
If an agent could also interact with web pages, perform searches on popular search engines, and access structured data feeds from major sites like Amazon, YouTube, and more, it would become unstoppable. That is exactly what Bright Data Web MCP provides to any LLM, and it explains why it has become so widely adopted!
With over 1.5k stars on GitHub, Web MCP from Bright Data powers a long list of both experimental and production-ready AI agents and workflows.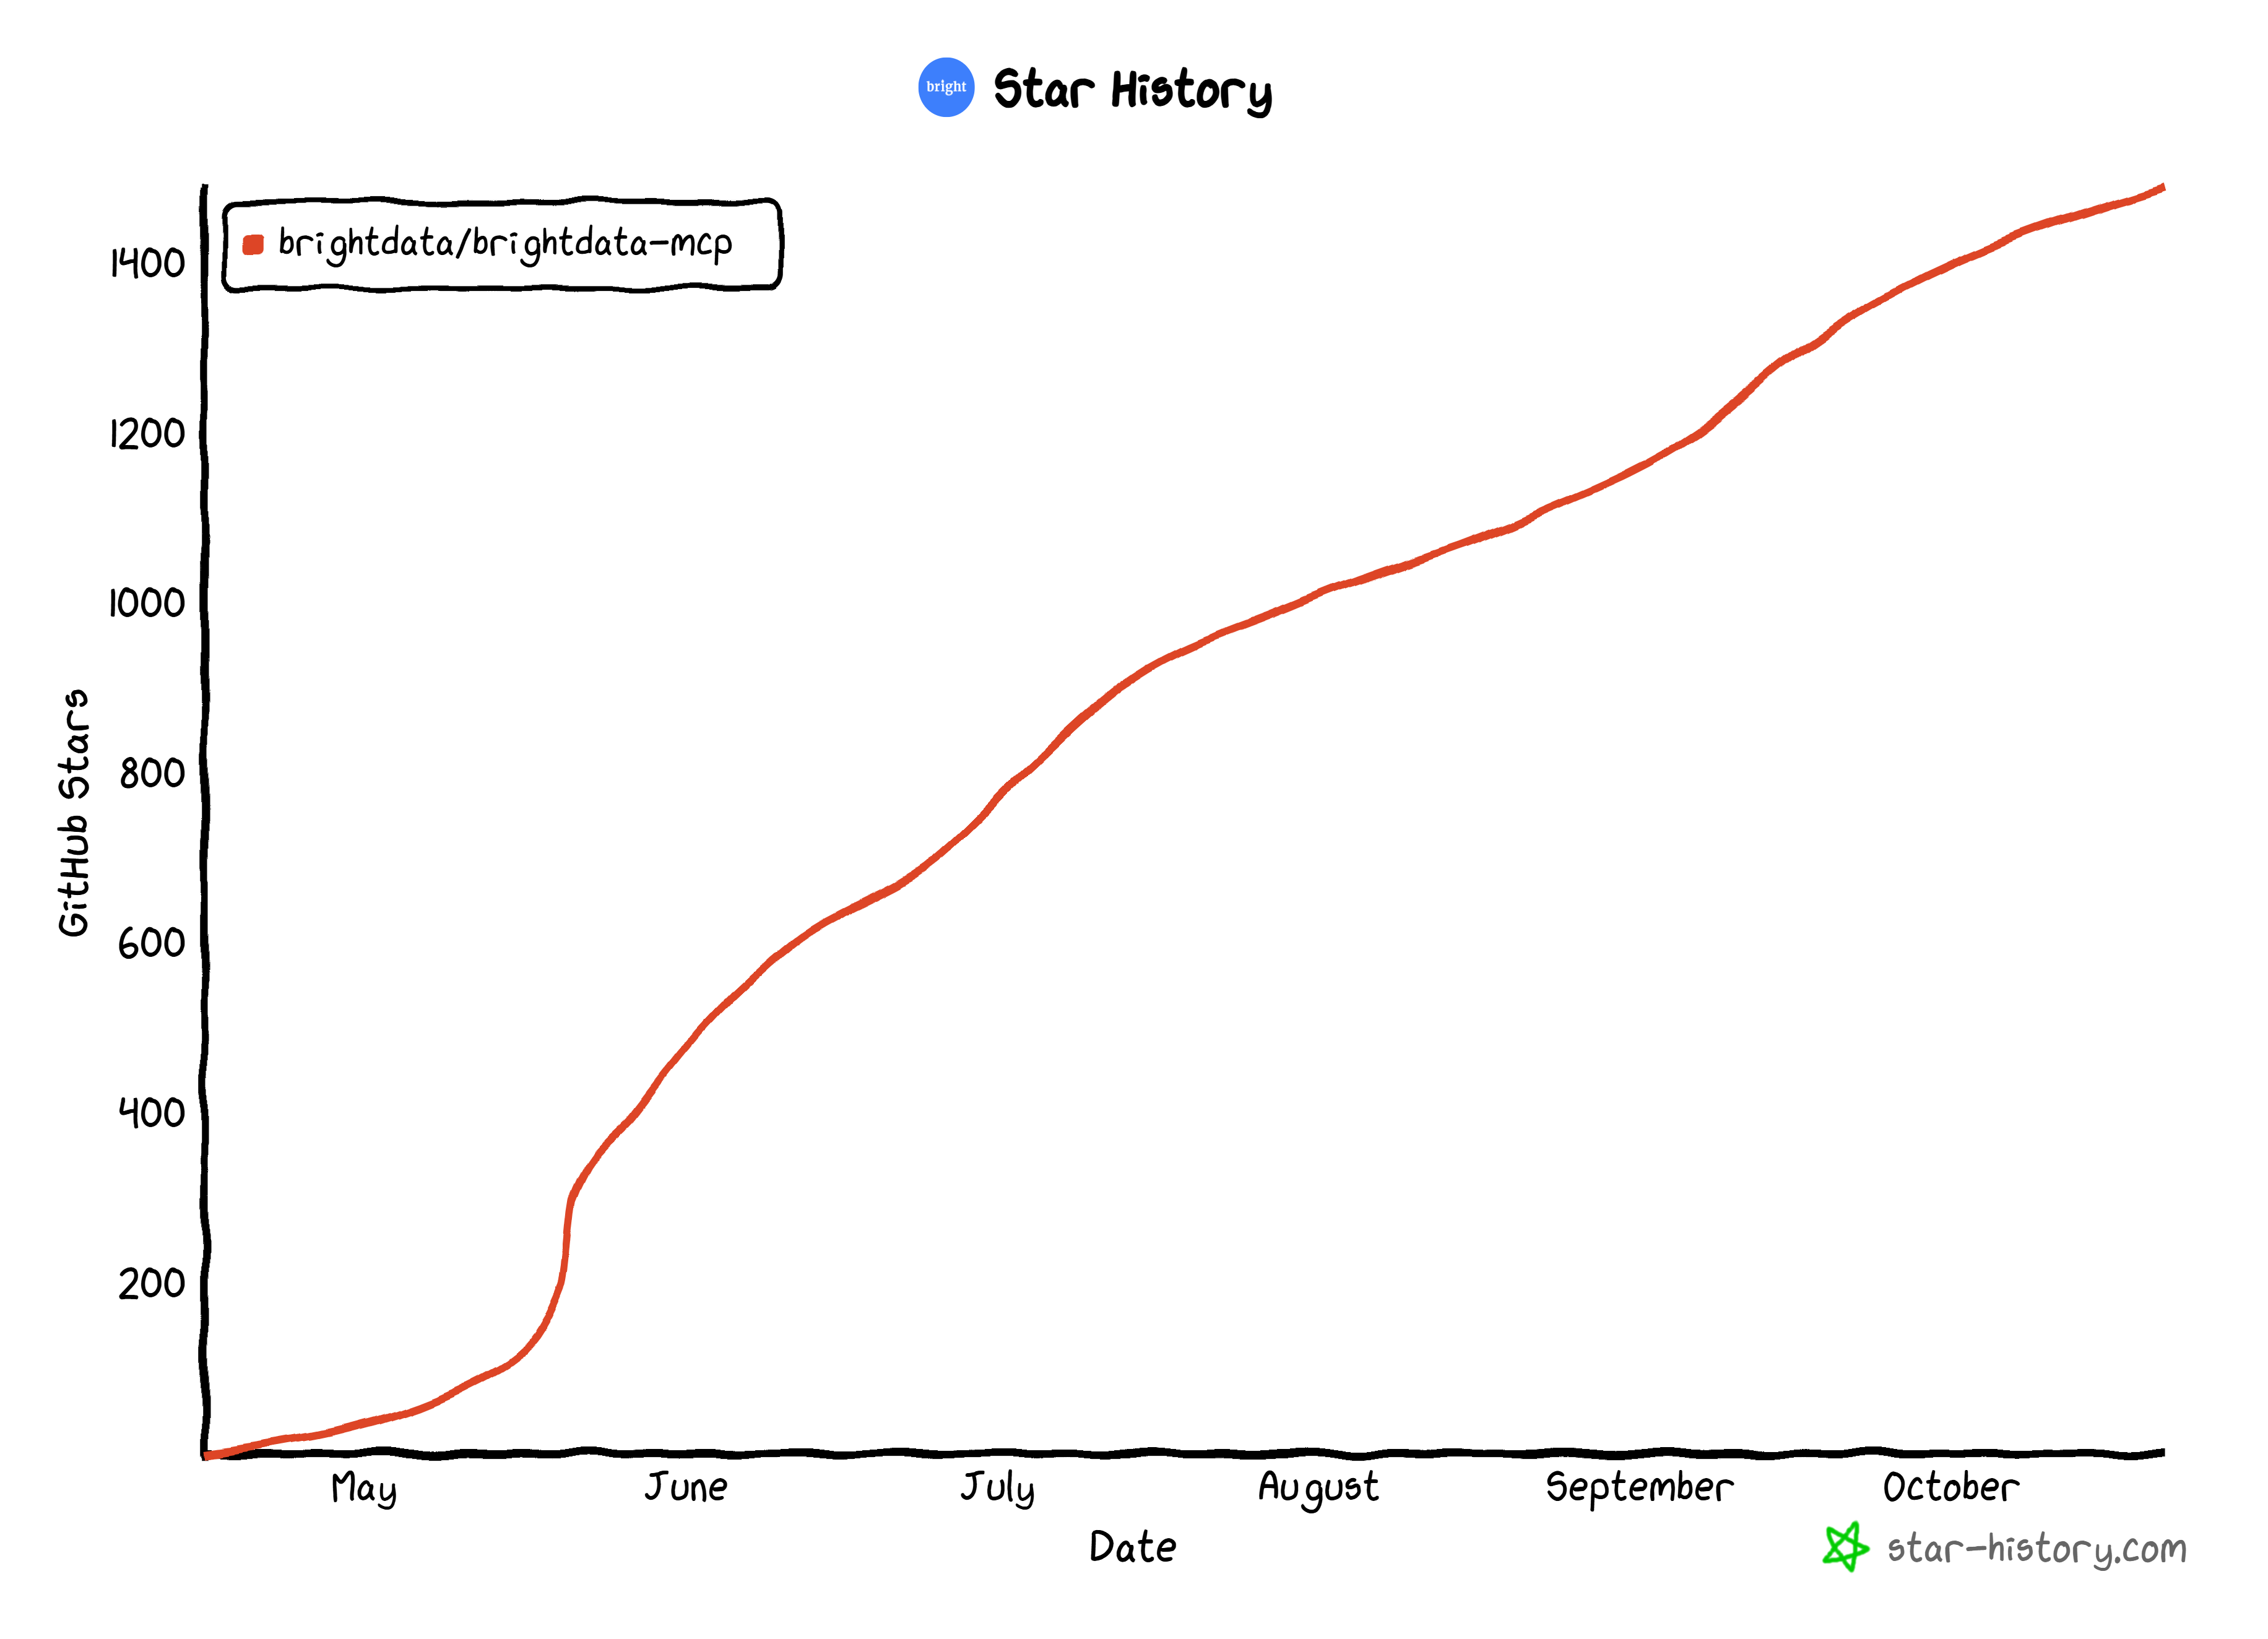
In detail, Web MCP exposes over 60 tools for searching the web, navigating websites, taking actions, and retrieving structured data. All that without being blocked by anti-bot or anti-scraping measures.
By integrating it into OpenAI’s Agent Builder, which supports custom MCP integration, you can equip your OpenAI models with the tools they need to overcome the inherent limitations of OpenAI (or any other provider’s) AI models!
Web MCP: Rapid Mode vs Pro Mode
Bright Data’s Web MCP offers two operation modes:
- Rapid mode (default): Provides access to core tools like
scrape_as_markdown(to scrape any web page into Markdown) andsearch_engine(to perform search engine queries). This mode is completely free. Learn more in the Web MCP free tier announcement. - Pro mode: Unlocks all 60+ tools, including advanced browser automation and web data APIs. This mode incurs usage-based costs.
For more details, refer to the comparison table below:
| Rapid Mode (Free Tier) | Pro Mode | |
|---|---|---|
| Pricing | $0/month (up to 5,000 requests) | Pay-as-you-go |
| Available capabilities | – Web search – Scraping with Web Unlocker |
– Web search – Scraping with Web Unlocker – Browser control – Web data Scraper APIs |
| Enabled by | Default | PRO_MODE=true configuration or &pro=1 in the URL |
How to Integrate Web MCP into an AI Workflow Designed with OpenAI’s Agent Builder
In this step-by-step section, you will be guided through the process of crafting an AI workflow in OpenAI Agent Builder that integrates with Bright Data’s Web MCP tools.
The example workflow will demonstrate how to retrieve and analyze the sentiment of an Instagram post, but many other use cases are supported. This is just one example of the several tasks you can carry out with such a setup.
Follow the instructions below!
Prerequisites
To build an AI workflow in OpenAI Agent Builder, you need the following:
- An OpenAI account with billing information set up. (Ideally, your organization should also be verified to access all models and features.)
- A Bright Data account with an API key (which should have Admin permissions) configured.
To set up your account and retrieve your API key, follow the official guide. Save your Bright Data API key in a safe place, as you will need it shortly. For additional details, refer to the Web MCP documentation.
Since OpenAI Agent Builder integrates only with remote Web MCP servers, you will not need to install anything locally (such as Python or Node.js). Plus, no coding skills are required for the current tutorial.
Having a basic understanding of how MCP works, as well as familiarity with the tools exposed by Bright Data’s Web MCP and how it operates remotely, will be helpful.
Step #1: Create a New Workflow
Reach the Agent Builder platform in your browser, and log in with your OpenAI account. On your first login, you should get the following screen:
To create a new workflow, press the “Create” button:
By default, a “New workflow” page will appear showing this setup: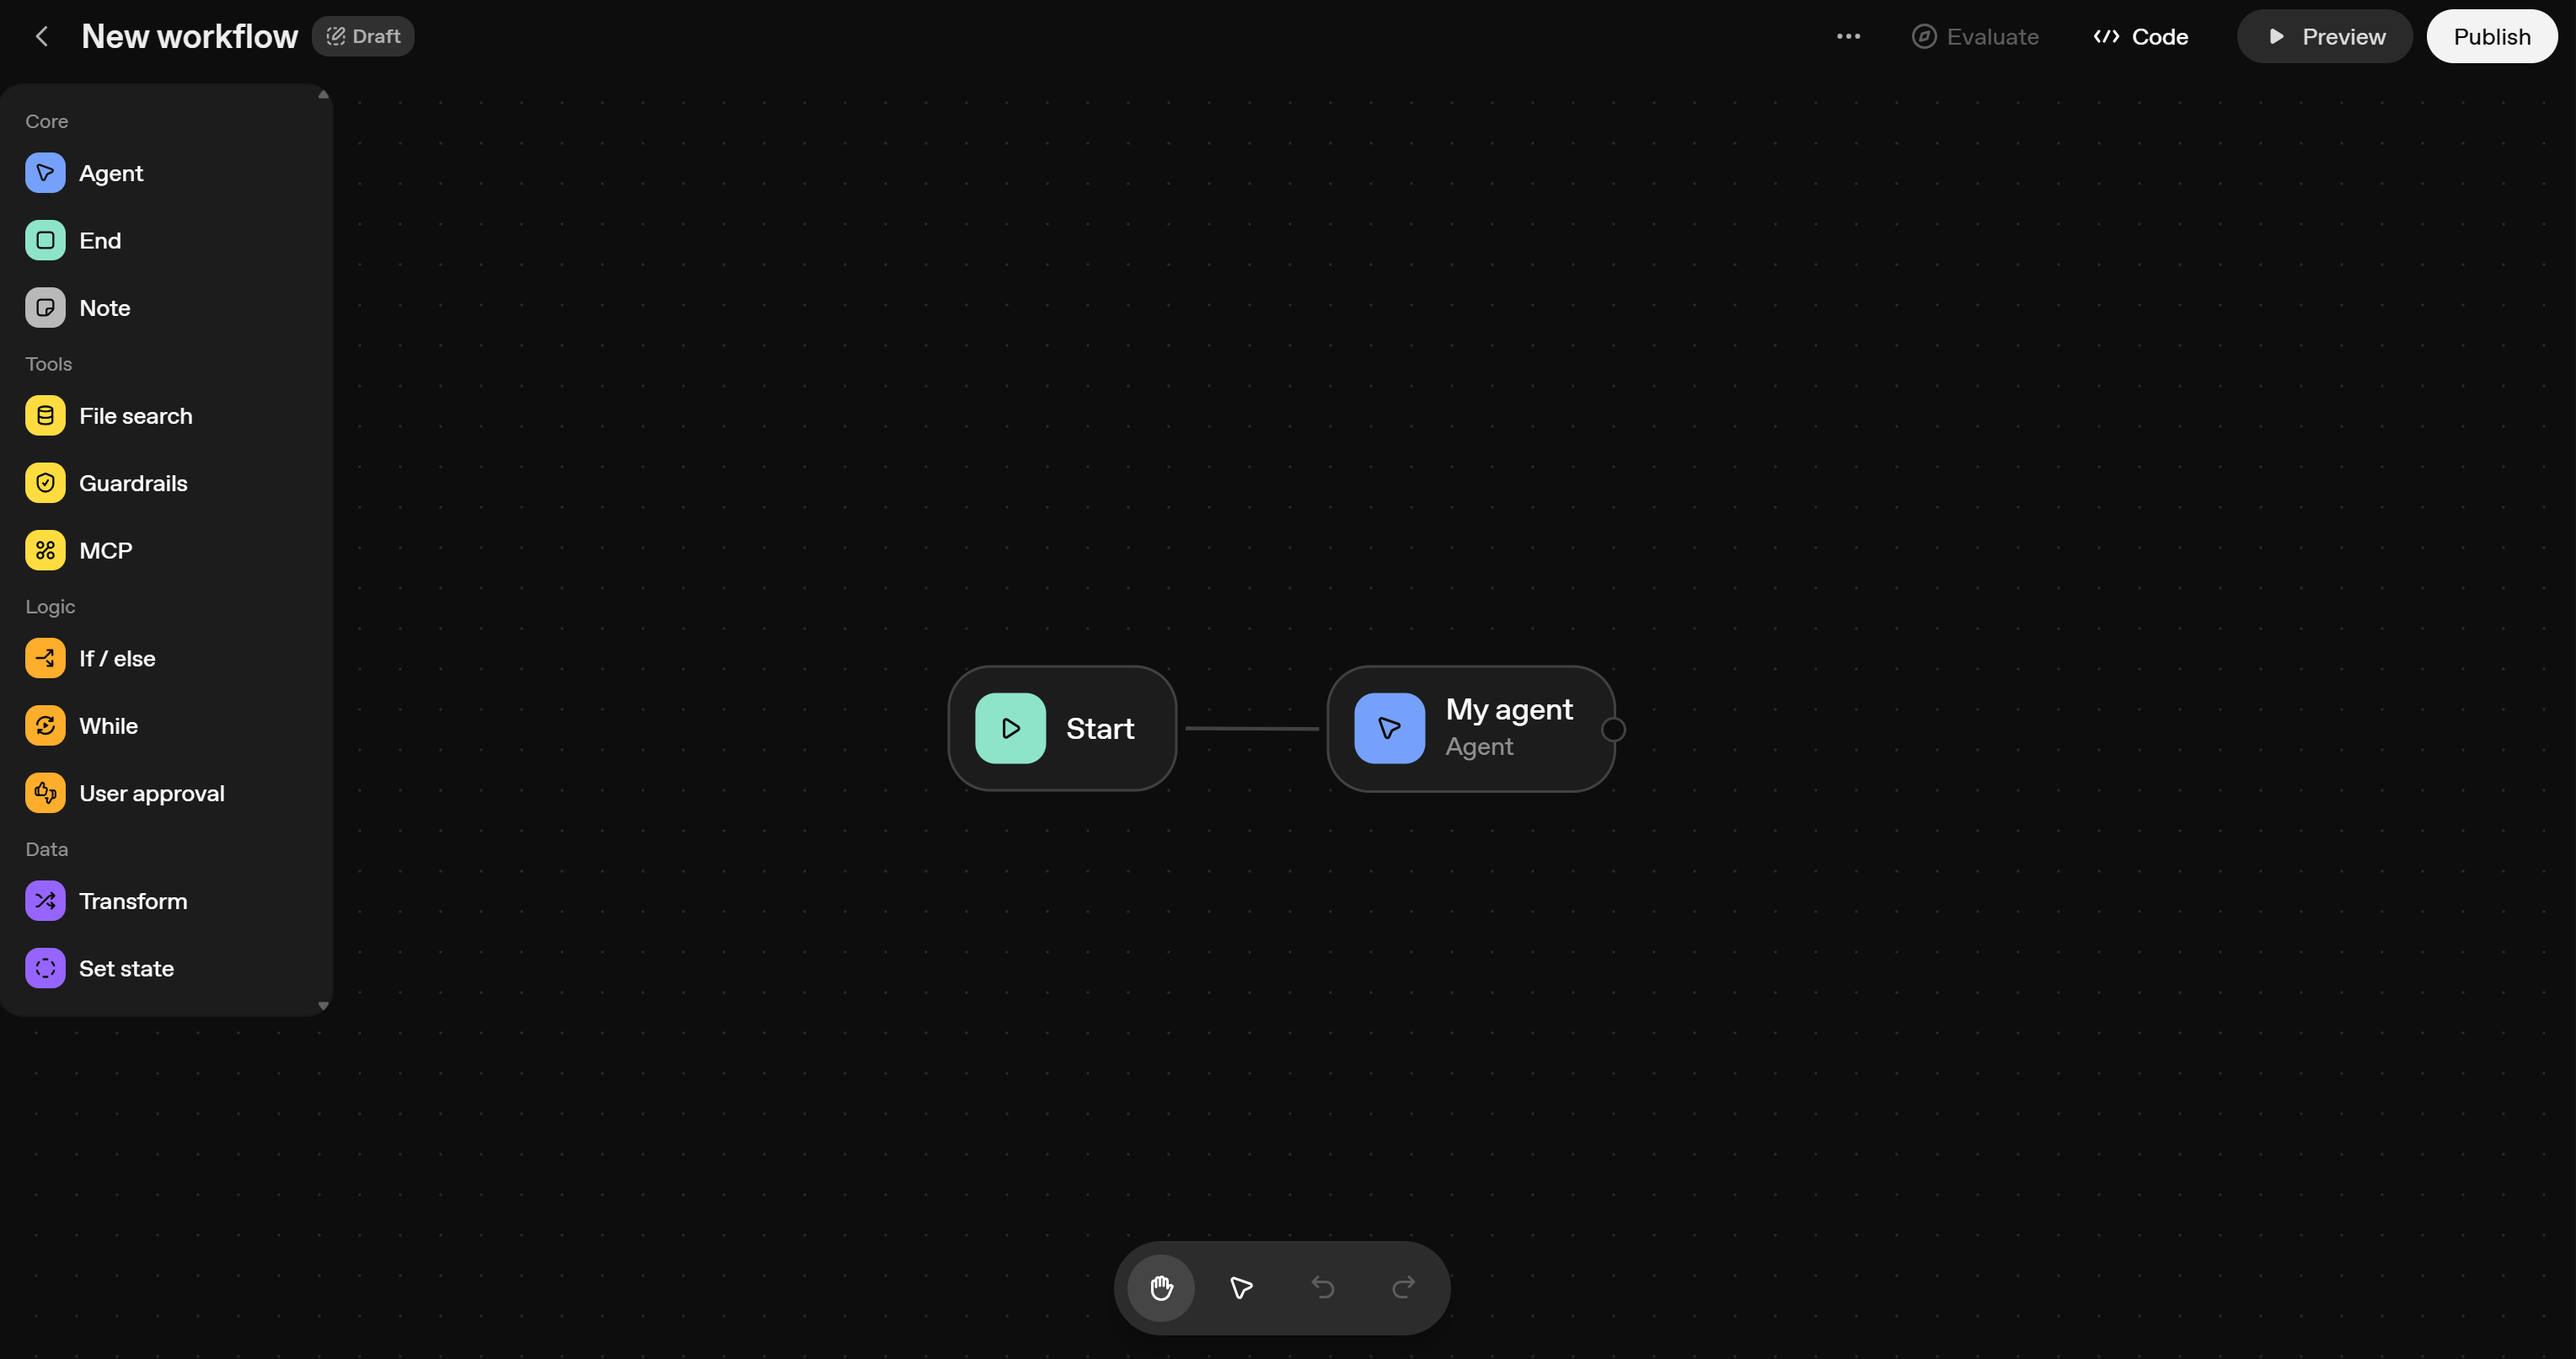
OpenAI Agent Builder automatically defines a basic AI workflow with two default nodes:
- Start: Accepts the input prompt from the user.
- Agent: Processes the input prompt received from the “Start” node using GPT models. This represents a single OpenAI-powered AI agent.
In that canvas, you can add and connect nodes to define your single- or multi-agent AI workflow—all without writing any code.
Cool! That is already a great starting point.
Step #2: Web MCP Integration
By default, the Agent node is powered by one of the OpenAI models. It can also gain access to supported OpenAI tools. Instead, for MCP integration, you will need to perform some additional configuration.
To give the Agent node access to a remote MCP server, click on the node element in the canvas. That will open a configuration panel on the right. In that panel, click the “+” button in the “Tools” section, then select the “MCP server” option:
Next, the “Add MCP Server” modal below will appear:
Here, you can either select one of the preconfigured MCP servers or define a custom connection. To do so, press the “+ Server” button: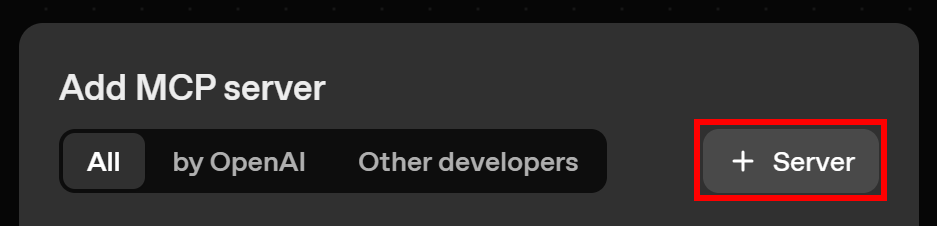
Then, fill out the form for connecting to Bright Data’s Web MCP like this:
- URL:
- For free tier integration:
https://mcp.brightdata.com/mcp?token=<YOUR_BRIGHT_DATA_API_TOKEN> - For Pro mode:
https://mcp.brightdata.com/mcp?token=<YOUR_BRIGHT_DATA_API_TOKEN>&pro=1Remember to replace<YOUR_BRIGHT_DATA_API_TOKEN>with your actual Bright Data API key. Note: The URLs above connect to the Streamable HTTP version of the remote Web MCP server. To connect to the SSE version, replace “mcp” with “sse” in the URL. For more details, refer to the official documentation. Also, consider reading our comparison article on SSE vs Streamable HTTP.
- For free tier integration:
- Label: Something like “bright_data_web_mcp” (must follow snake_case format).
- Description: For example, the “Bright Data Web MCP” string.
- Authentication: “None” (as the
tokenquery parameter in the URL already handles authentication).
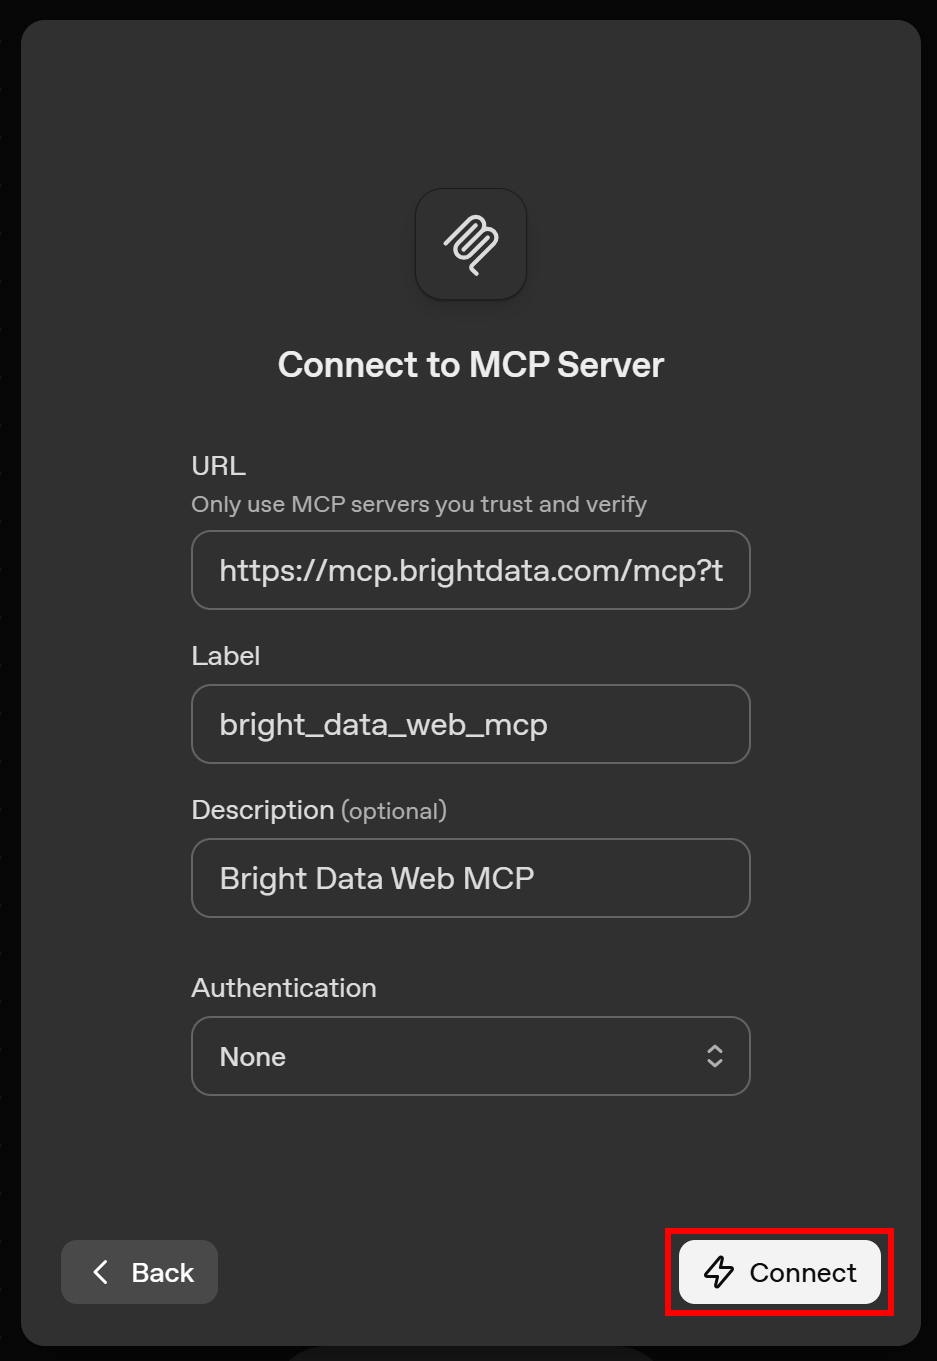
Once complete, click the “Connect” button. You will see a short “Establishing connection…” message while OpenAI Agent Builder connects to the Bright Data Web MCP remote server to verify the setup.
If everything works correctly, you will get a summary of the available tools. In Pro mode (&pro=1), it should look like this: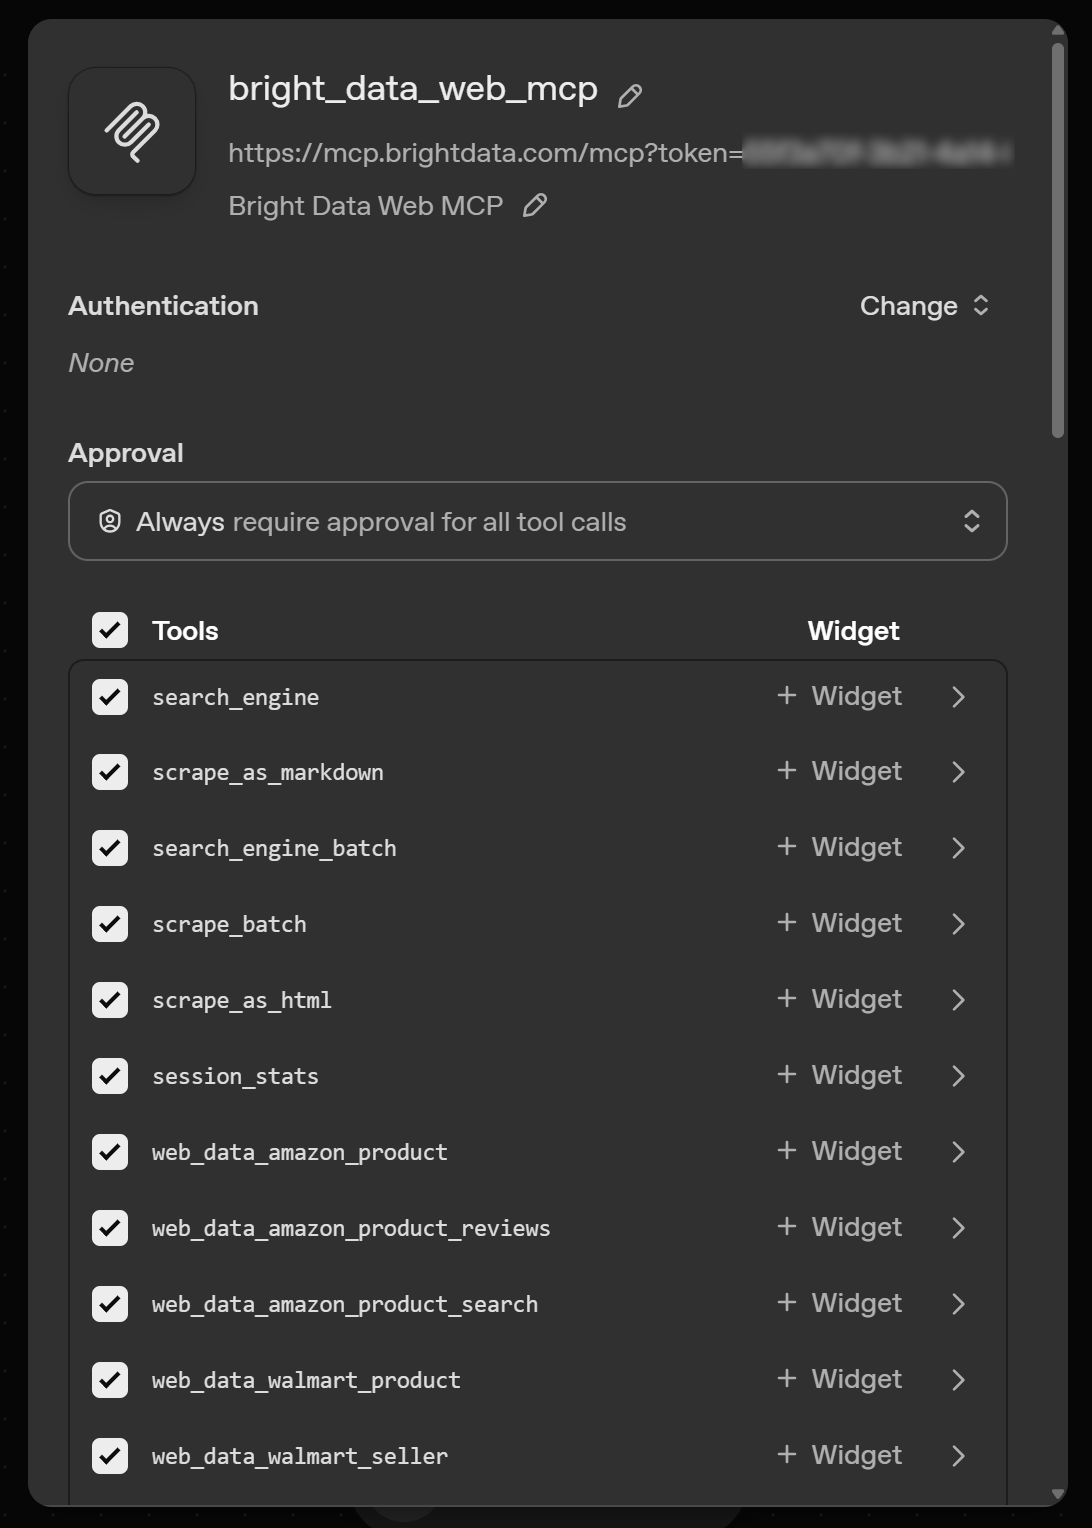
If you are taking advantage of the free tier (Rapid mode), the list will only show the 4/5 tools available (i.e., scrape_as_markdown, search_engine, and their batch versions).
On the above view, you can enable or disable individual tools so that your Agent node has access only to the ones you want. Keep them all active, scroll down, and click “Add” to complete the integration.
Fantastic! Your Agent node now has access to all Bright Data’s Web MCP server tools.
Step #3: Configure the Agent Node
The Agent node is now connected to the Web MCP server: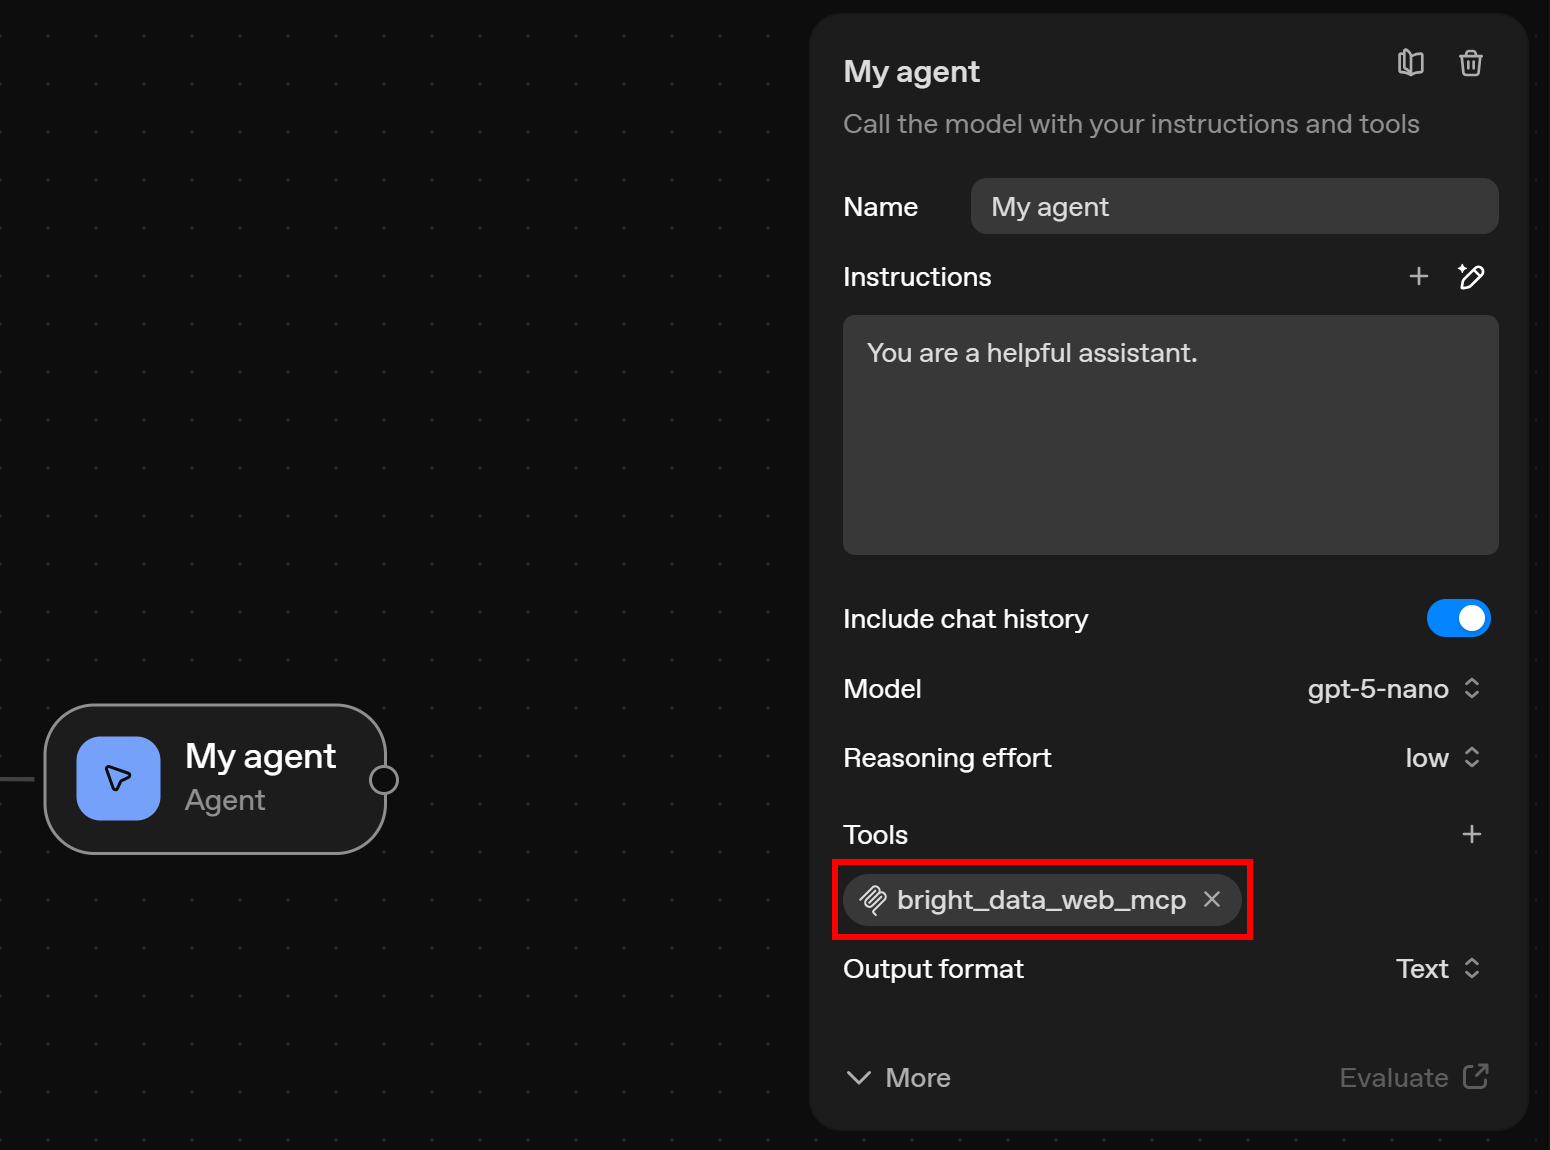
So, it is time to configure its other options as well. On the “My agent” configuration tab, give it a a name like “Web data agent”, and udpate its description to something like:
You are an assistant that can search the web, access web data feeds, and scrape or interact with web pages onlineThis is important because it tells the Agent that it is no longer a default AI assistant. Instead, it now has web data retrieval and interaction capabilities provided by the Web MCP server.
Next, select a GPT model that supports tool usage. In this example, we will use gpt-5-nano, though gpt-5 or gpt-5-mini will work as well. Discover how GTP-5 models compare in our benchmark.
The final configuration for your Agent node should look like this:
Perfect! The Agent node, which is the core engine of this AI workflow, is now fully configured and ready for use.
Step #4: Complete the Workflow
To complete your AI workflow, you must add an “End” node. Connect it to the output of the Agent node (now called “Web Data Agent”).
In the end, your AI workflow should look as follows: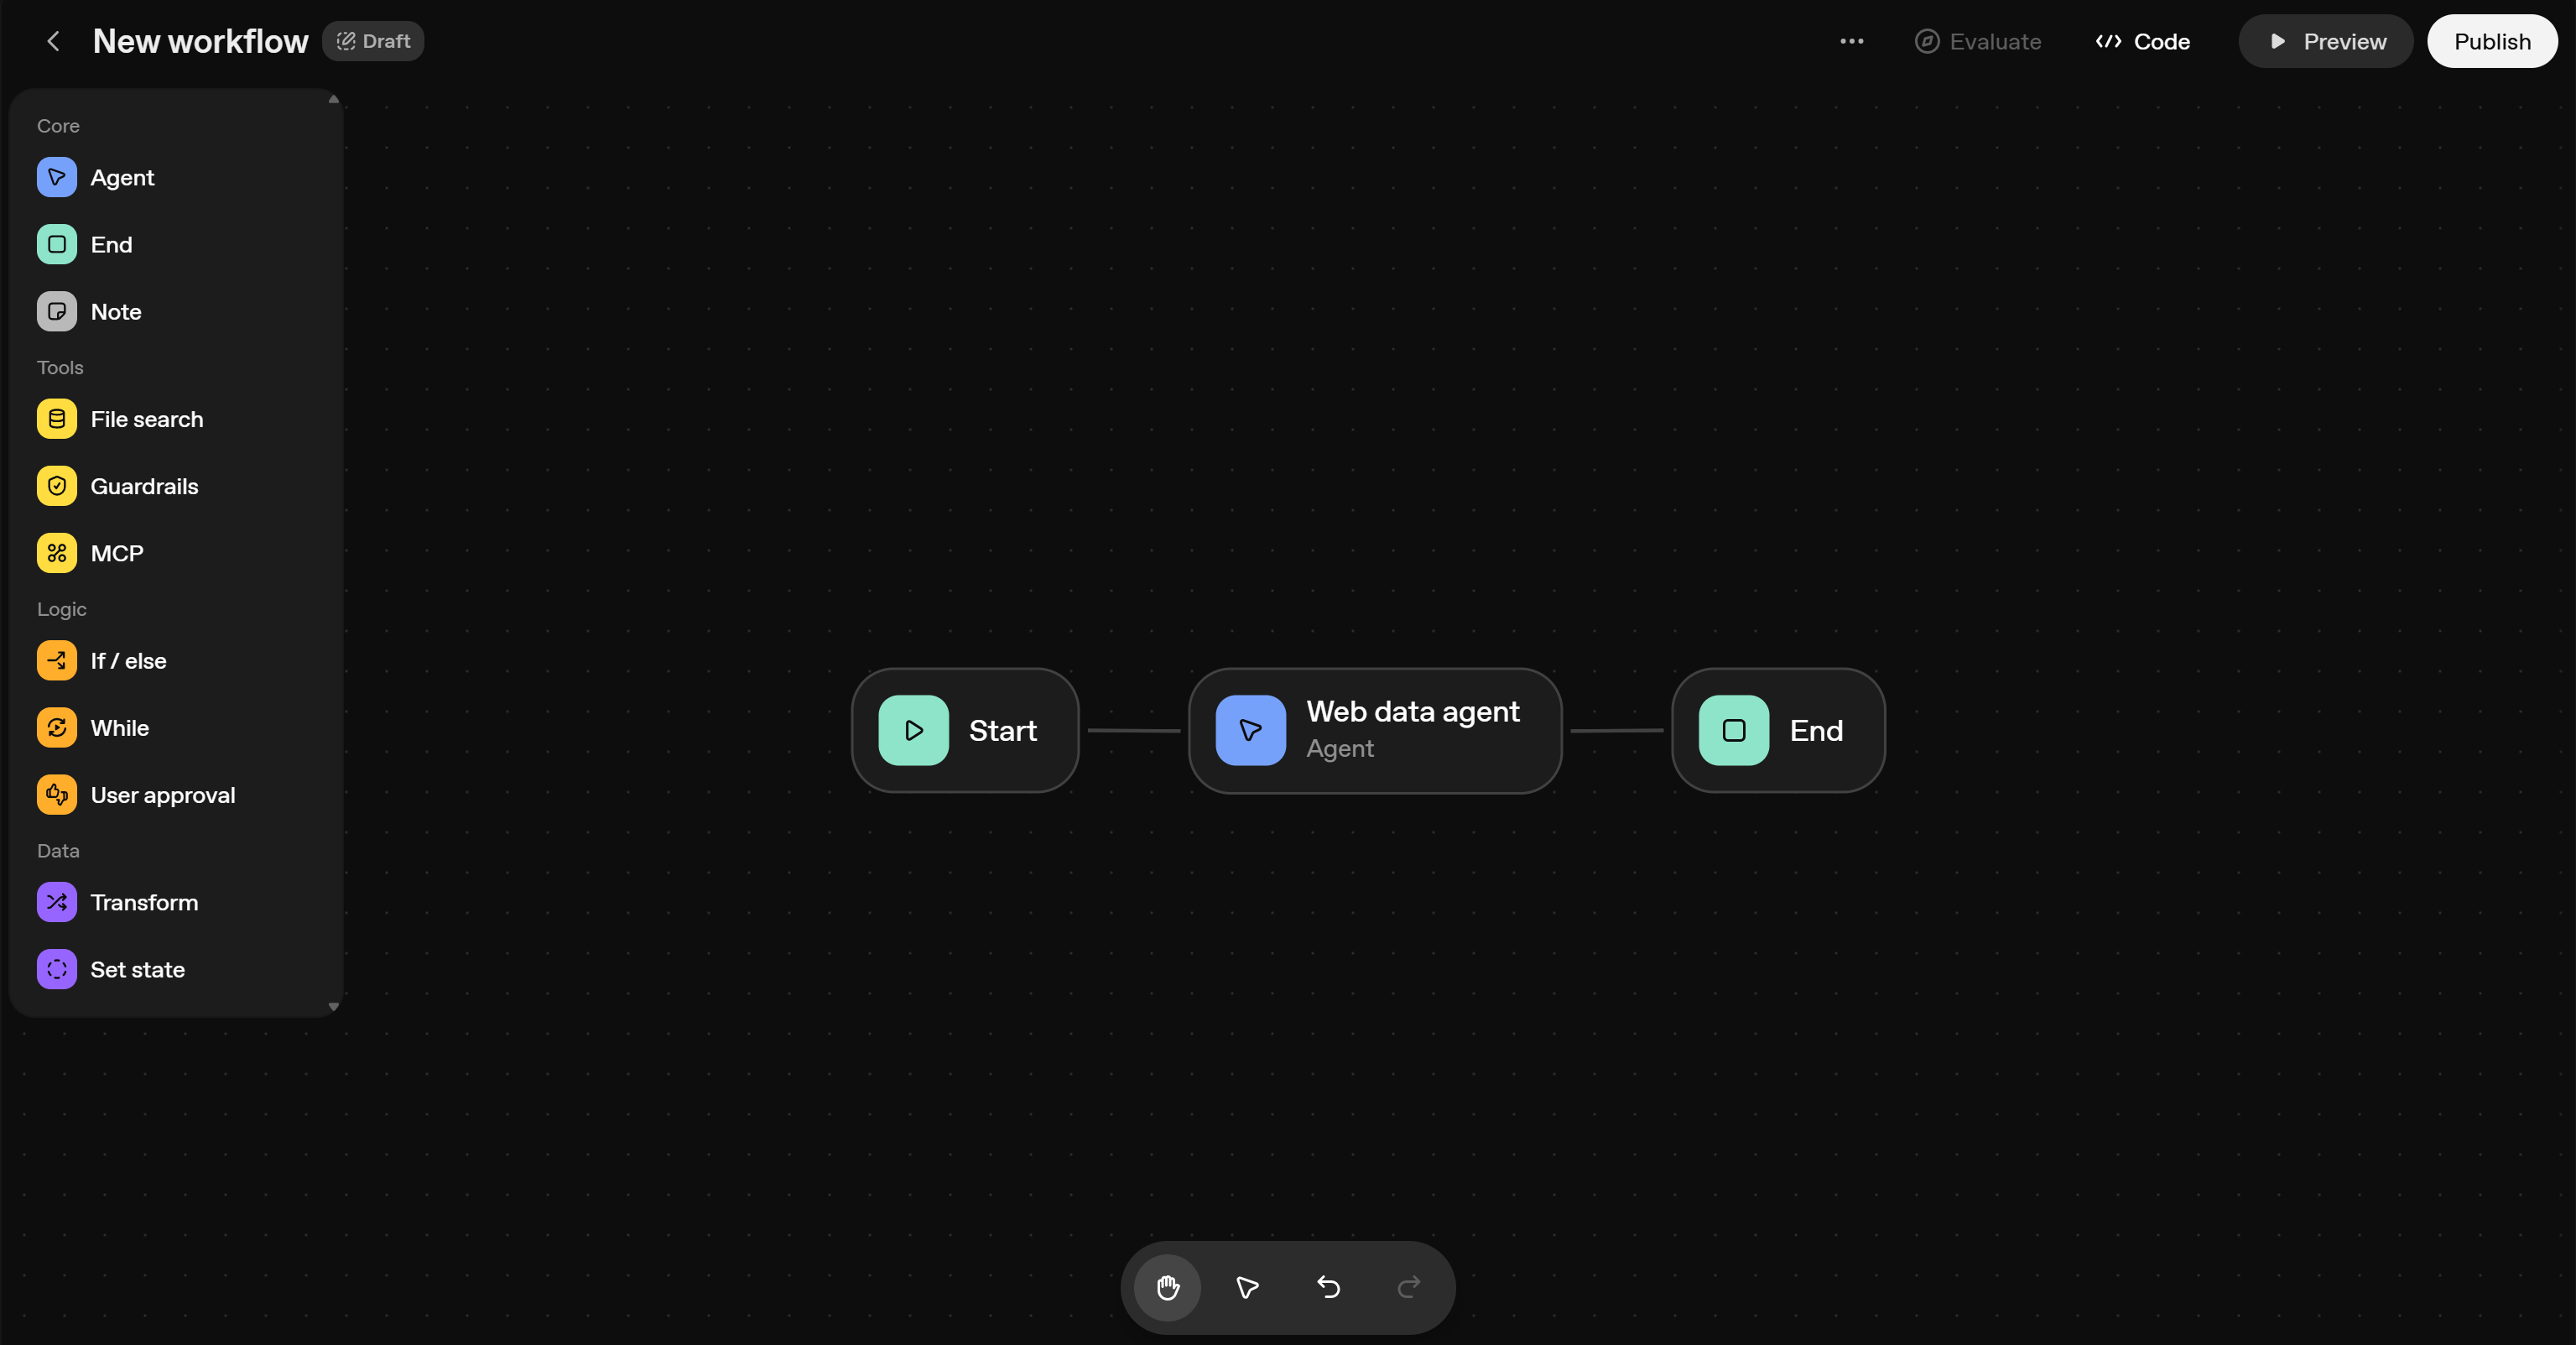
Remember that this is just a simple example to demonstrate how to use Bright Data Web MCP in OpenAI’s Agent Builder. Still, thanks to the Web MCP tools, this basic 3-node workflow can already handle a wide variety of use cases.
At the same time, real-world, production-ready workflows are generally more complex. They usually involve multiple agents, several steps, and even loops. For some examples, take a look at our AI agent showcase page.
What matters is that OpenAI Agent Builder provides everything you need to build these advanced AI workflows. So, refer to the documentation to explore all available features.
Step #5: Test the AI Workflow
It only remains to verify that the designed AI workflow works. To test it, click the “Preview” button on the top-right corner:
This will open a chat component on the right, through which you can interact with your AI workflow: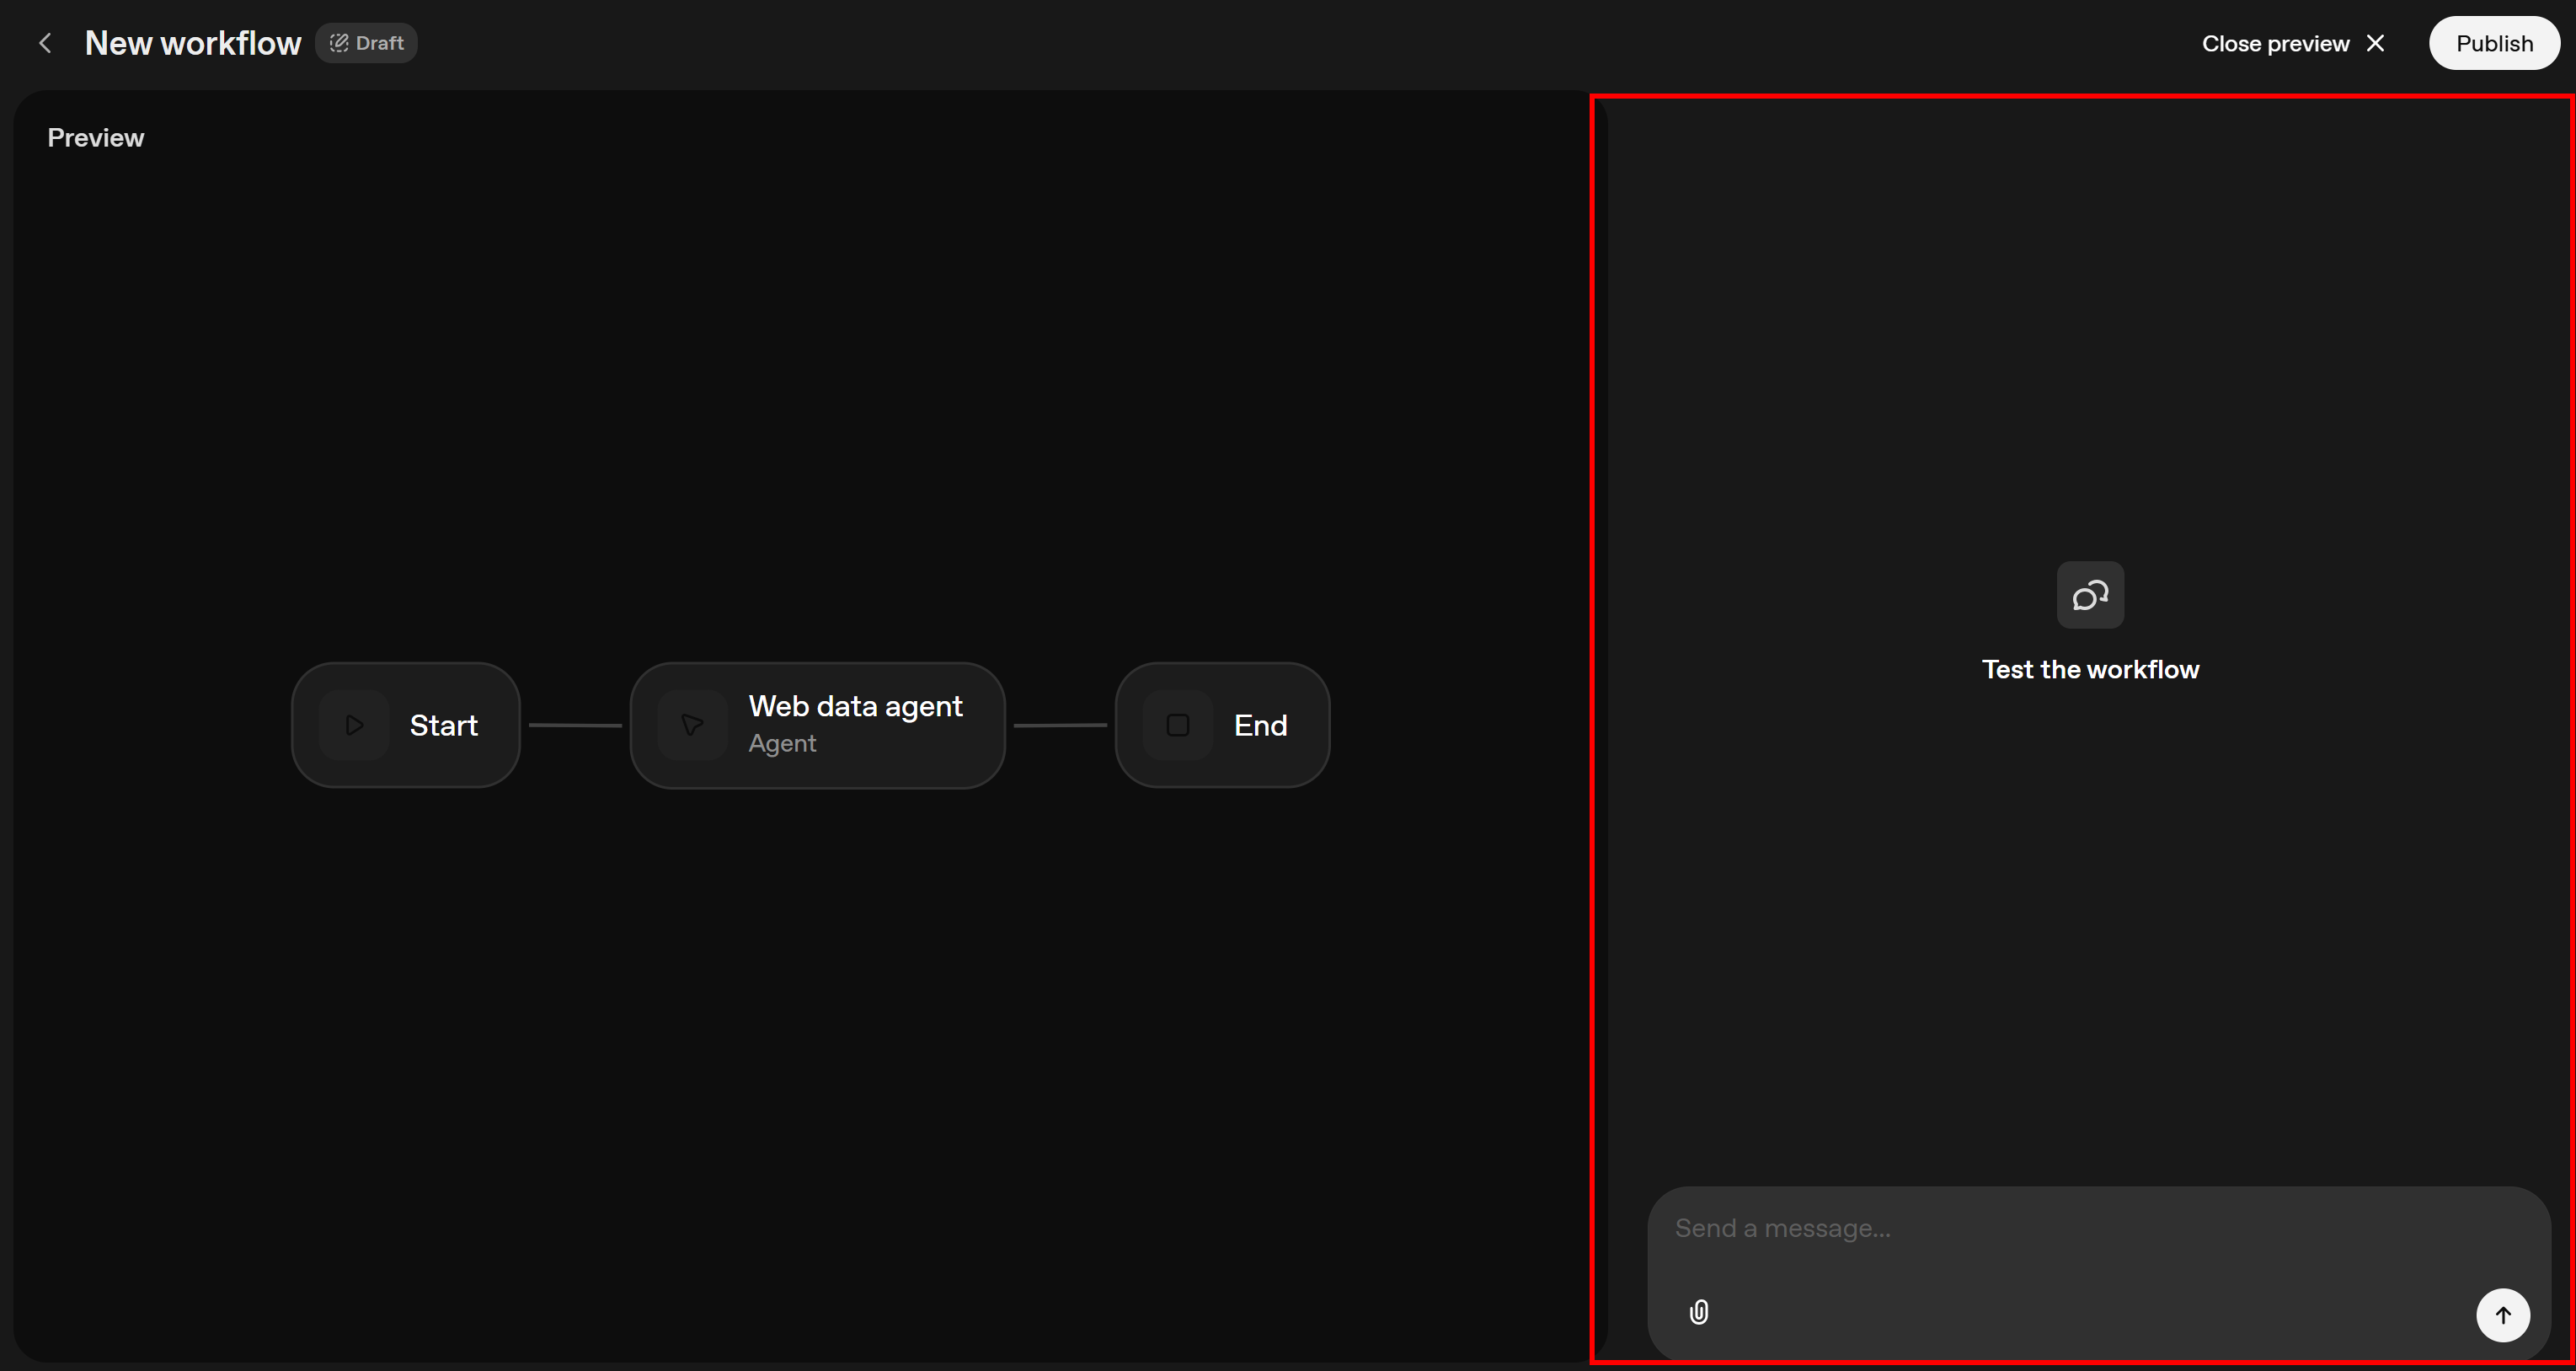
To verify that the configured Agent node has access to the powerful tools provided by Bright Data Web MCP, you need to pass the right prompt. For example, suppose you want to test an Instagram post sentiment analysis workflow. You could write a prompt like this:
Retrieve the main data and comments from the following Instagram post:
"https://www.instagram.com/sportscenter/p/DQDjScTDEmQ/"
Then return a Markdown report with the post’s main information and a sentiment analysis of the most relevant comments.
Assume you configured the Web MCP remote server in Pro mode. In that case, executing this prompt in Agent Builder will produce results similar to this: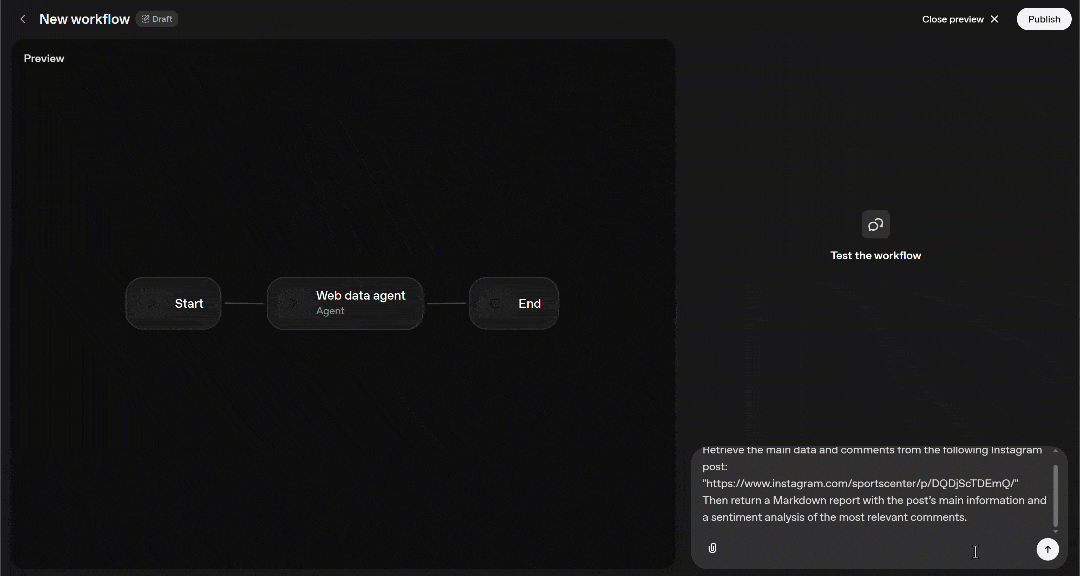
The GIF has been sped up, so it may not be easy to understand what is going on. For a complete summary, take a look at the numbered list that follows:
- The prompt moves from the “Start” node to the “Web Data Agent” node.
- “Web Data Agent” executes the prompt, passing it to the configured GPT model.
- The model identifies the
web_data_instagram_postspremium tool from Web MCP as the appropriate tool to complete the task. That tool is described as: “Quickly read structured Instagram post data. Requires a valid Instagram URL. This can be a cached lookup, making it more reliable than scraping.” Thus, it is perfect for the goal. (The tool works by connecting to Bright Data’s Instagram Scraper). - The tool returns the Instagram post data in JSON format, which the model analyzes.
- The model produces the required Markdown report, which is displayed in the chat.
Since the Agent node is configured to produce a text result, the final output reaching the “End” node should look like this: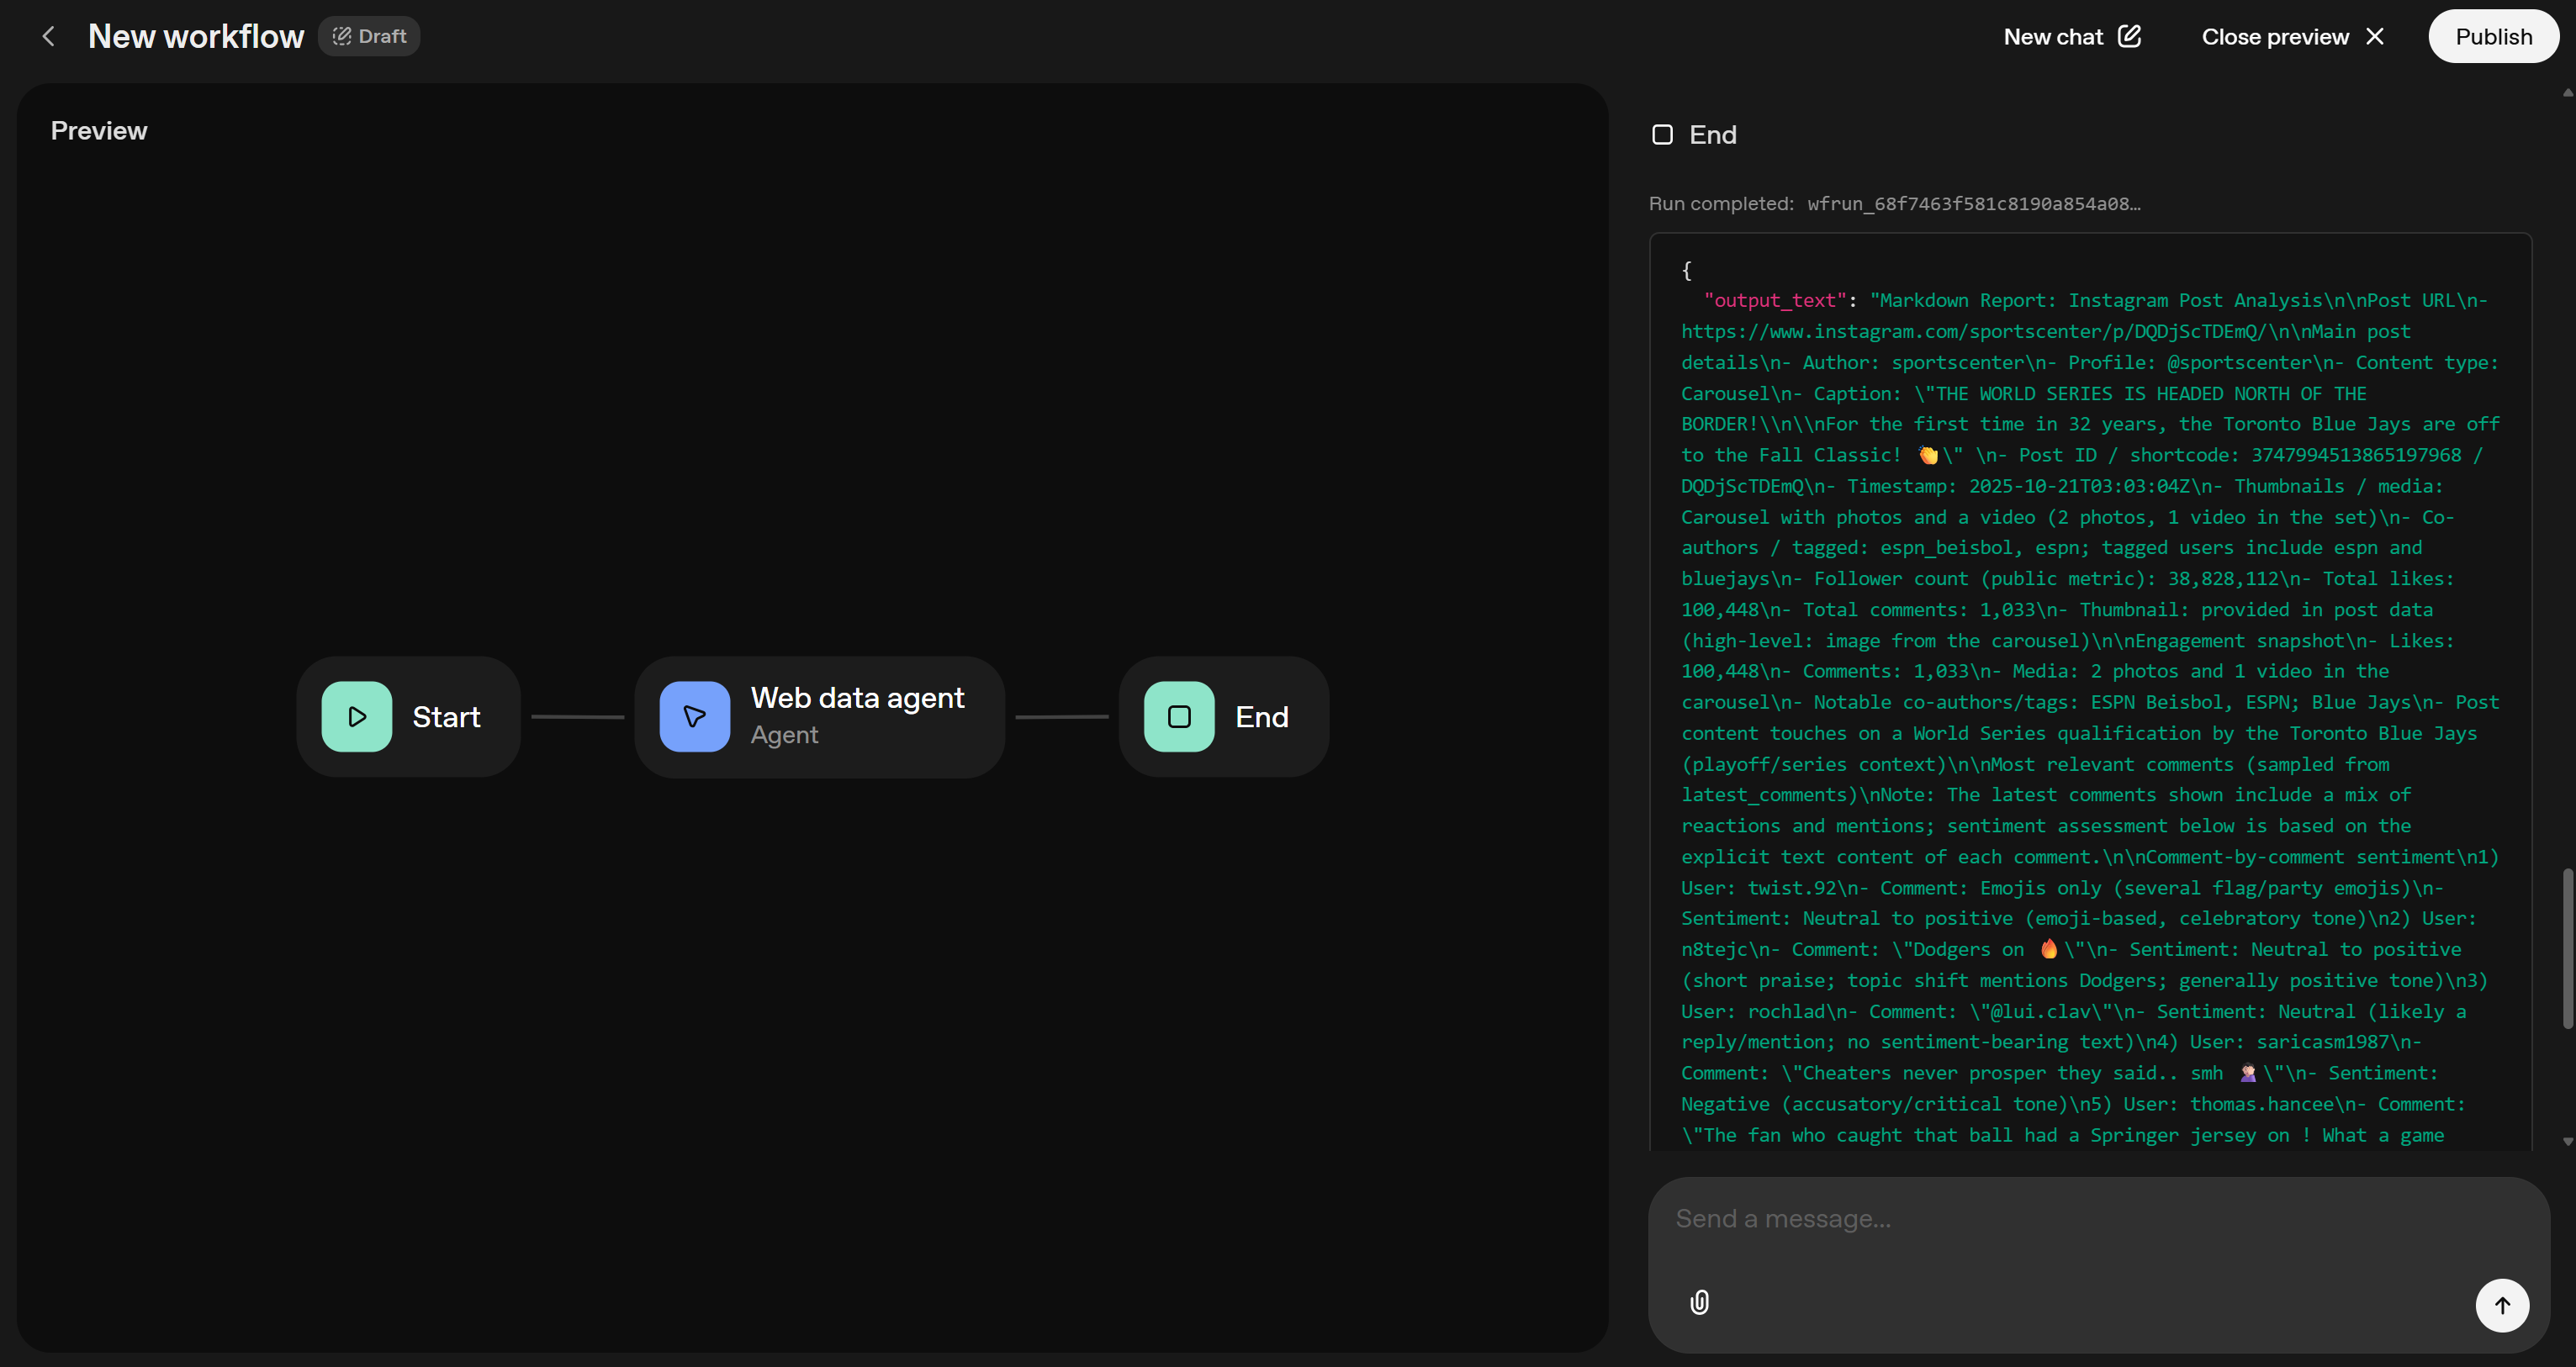
Notice that the output_text field contains the output as a Markdown string. Copy that to a local report.md file to inspect it in Visual Studio Code (or any other Markdown viewer):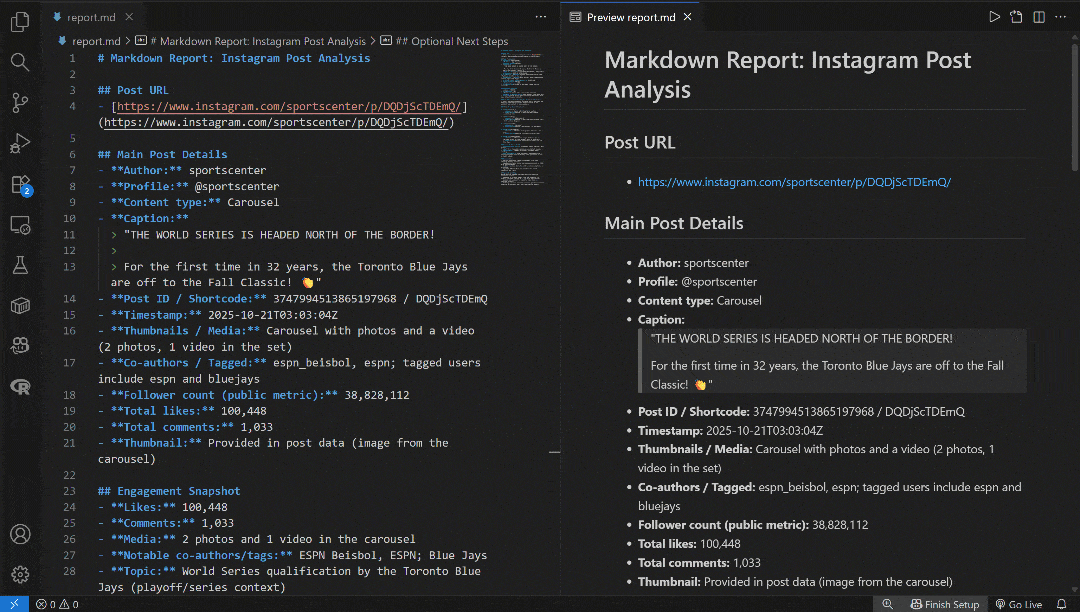
By comparing it to the source Instagram post, you will notice that it contains all the correct post data—including metrics like views and comments—as well as sentiment analysis for the most important comments:
Mission complete!
If you have ever tried scraping Instagram, you know how challenging that can be. Surely, vanilla GPT-5 models alone could not handle that, which highlights the power of Bright Data Web MCP. This integration allows you to retrieve AI-ready data for public Instagram posts and many other platforms in seconds.
Note: By chaining prompts, you can test many other scenarios, taking advantage of all 60+ tools available. This was just a straightforward example!
Et voilà! The Bright Data Web MCP integration in OpenAI Agent Builder works like a charm and helps you create resourceful AI workflows.
Next Steps
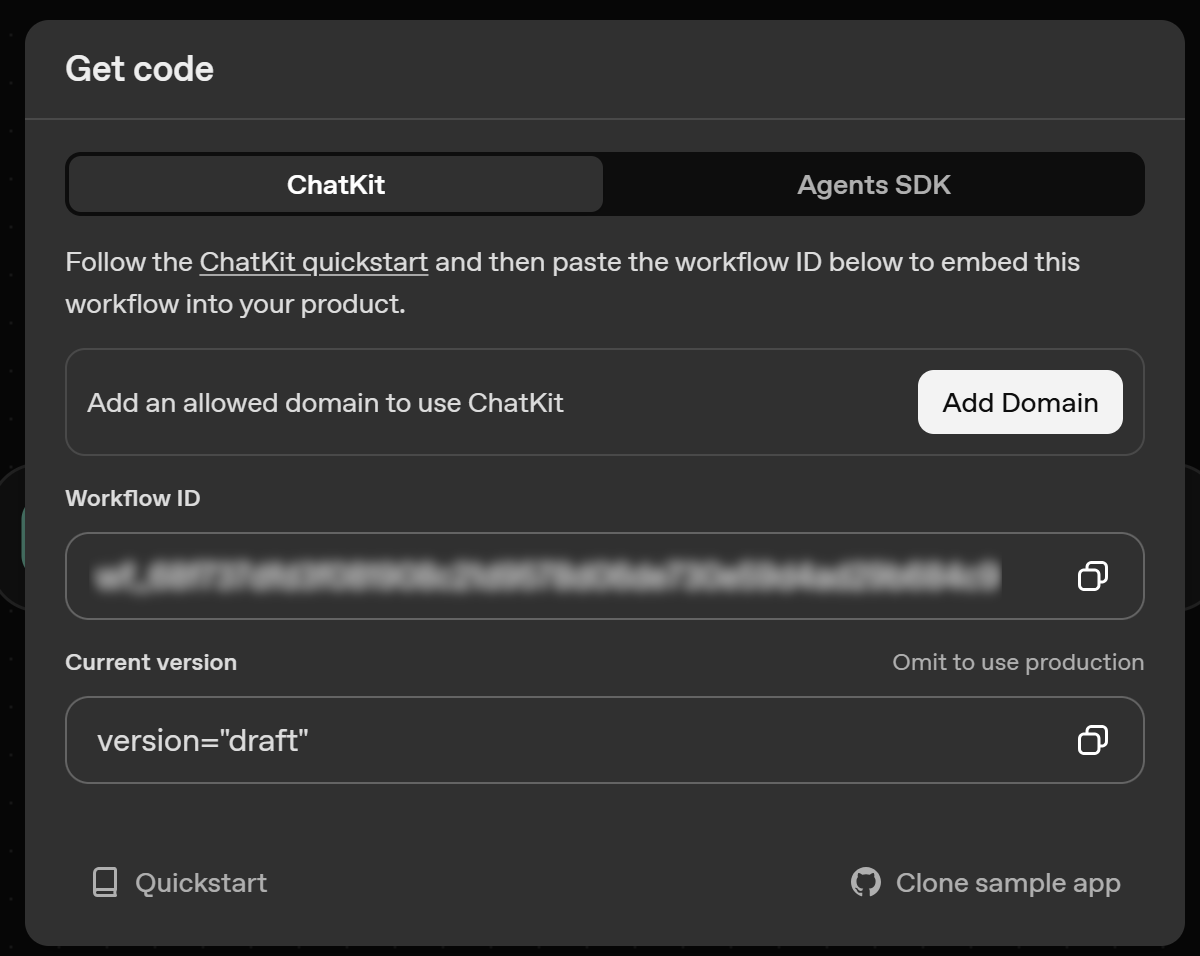
To create a new major version of a workflow, press the “Publish” button in the top-right corner. This generates a snapshot you can deploy or roll back to.
For deployment, click “Code” in the top navigation:
You have two options to deploy your workflow in production:
- ChatKit: Gives you an ID you use to embed this workflow into your ChatKit application. This is the recommended deployment option.

- Advanced integration: Gets the workflow code written through the Agents SDK library to build and customize agent chat experiences.
For more guidance on the SDK, see our tutorial: “Integrating OpenAI Agents SDK With a Web Unlocker for High Performance.”

Conclusion
In this blog post, you learned how to take advantage of MCP integration in OpenAI Agent Builder. Specifically, you saw how to create an AI workflow enhanced with Bright Data’s Web MCP tools simply by dragging and dropping nodes on a canvas.
This integration gives the GPT model selected in the Agent node access to powerful tools for web search, structured data extraction, live web data feeds, automated web interactions, and more.
To build even more advanced AI agents, explore the full range of AI-ready products and services available in Bright Data’s ecosystem.
Sign up for Bright Data for free today and start experimenting with our web data tools!

Technical Writer
Antonello Zanini is a technical writer, editor, and software engineer with 5M+ views. Expert in technical content strategy, web development, and project management.


