
In this article, you will learn:
- What Microsoft TaskWeaver is and what makes it unique.
- Why extending TaskWeaver with Bright Data services allows you to overcome LLM limitations.
- How to integrate Bright Data into TaskWeaver through a custom plugin.
Let’s dive in!
What Is Microsoft TaskWeaver?
Microsoft TaskWeaver is an open-source, code-first agent framework that transforms natural language requests into executable Python code. Its ultimate goal is to power AI agents that independently plan and execute complex tasks.
This technology works by taking your prompt and breaking it down into actionable steps. Then, it selects the appropriate plugins to accomplish the goal, generates Python code to execute the plan, runs the code in a secure environment, and returns the results.
TaskWeaver is open-source and has garnered over 6,000 stars on GitHub. Some of the core features that set it apart include:
- Code-first approach: Converts user requests into Python code, giving agents the ability to generate and execute solutions directly.
- Plugin ecosystem: Supports specialized tasks through plugins, making the framework highly extensible.
- Rich data handling: Works natively with Python data structures like DataFrames, opening the door to advanced data analysis.
- Domain adaptation: Integrates domain-specific knowledge for more precise results.
- Stateful and reflective execution: Maintains context and can reflect on its own code execution to self-correct.
- Secure and open: Runs code in a safe environment while offering an open-source, ready-to-use experience.
Find out more in the official documentation.
Why Add Web Data Retrieval Capabilities to TaskWeaver
LLMs are inherently limited by the data they were trained on. While they can generate text, code, or multimedia, the output is always based on their outdated knowledge. Plus, they cannot interact with live web pages like a human user. Those two are the main constraints of current AI models.
TaskWeaver overcomes those limitations by enabling agents to integrate with custom plugins. You can think of plugins as specialized tools that the LLM can use to perform tasks beyond its built-in capabilities, effectively extending its scope and practical usefulness.
By calling these plugins, the code generated by a TaskWeaver agent can interact with external environments and perform complex operations. For instance, Bright Data offers a range of powerful tools:
- Web Unlocker API: Scrape any website in a single request and receive clean HTML or Markdown, with automated handling of proxies, unblocking, headers, and CAPTCHAs.
- SERP API: Collect search engine results from Google, Bing, and others at scale, without worrying about blocks.
- Web Scraping APIs: Retrieve structured, parsed data from known sites like Amazon, Instagram, LinkedIn, Yahoo Finance, and more.
- And other Bright Data solutions…
With access to plugins connecting to such services, a TaskWeaver agent could search the web, extract content, and retrieve structured data in real time from popular domains. That lets the AI handle complex, enterprise-ready workflows that go far beyond what a standard LLM could accomplish on its own.
How to Integrate Bright Data into TaskWeaver Through a Custom Plugin
In this tutorial section, you will learn how to integrate a TaskWeaver agent with Bright Data for web data retrieval.
Specifically, you will see how to extend a TaskWeaver application with a custom tool that connects to the Bright Data Web Unlocker API. This allows your code-first agent to fetch data from any web page on the Internet and process it according to your needs.
Note: For a similar approach, refer to our integration guide with smoleagents, another code-first AI technology agent.
Follow the instructions below carefully!
Prerequisites
To follow along with this tutorial, you need:
- Python 3.10 or higher installed locally: Required to run TaskWeaver and its plugins.
- Git installed locally: Necessary for cloning the TaskWeaver repository from GitHub.
- The Docker daemon running: Must be running to avoid errors with the code verification feature (which is optional).
- An OpenAI API key (or the API key from any other supported LLMs).
To work with Bright Data, you will also require:
- A Bright Data account with an API key.
- A Web Unlocker zone configured in your account.
Do not worry about configuring Bright Data just yet, as that will be covered in a dedicated step.
Step #1: Create a Microsoft TaskWeaver Project
Start by creating a project folder for your TaskWeaver project and navigate into it in the terminal:
mkdir taskweaver-bright-data-example
cd taskweaver-bright-data-example
Inside the project folder, create a virtual environment:
python -m venv .venvNext, activate it. In Linux/macOS, run this command:
source .venv/bin/activateOr, alternatively, in Windows, execute:
.venv\Scripts\activateNow, install TaskWeaver via the following commands:
git clone https://github.com/microsoft/TaskWeaver.git
cd TaskWeaver
pip install -r requirements.txt
This will clone TaskWeaver/ into your project folder and install all dependencies into the virtual environment you just created through pip.
TaskWeaver runs as a process and requires a project directory to store plugins, configuration files, and session data. The repository you just cloned provides a sample project in the TaskWeaver/project/ directory: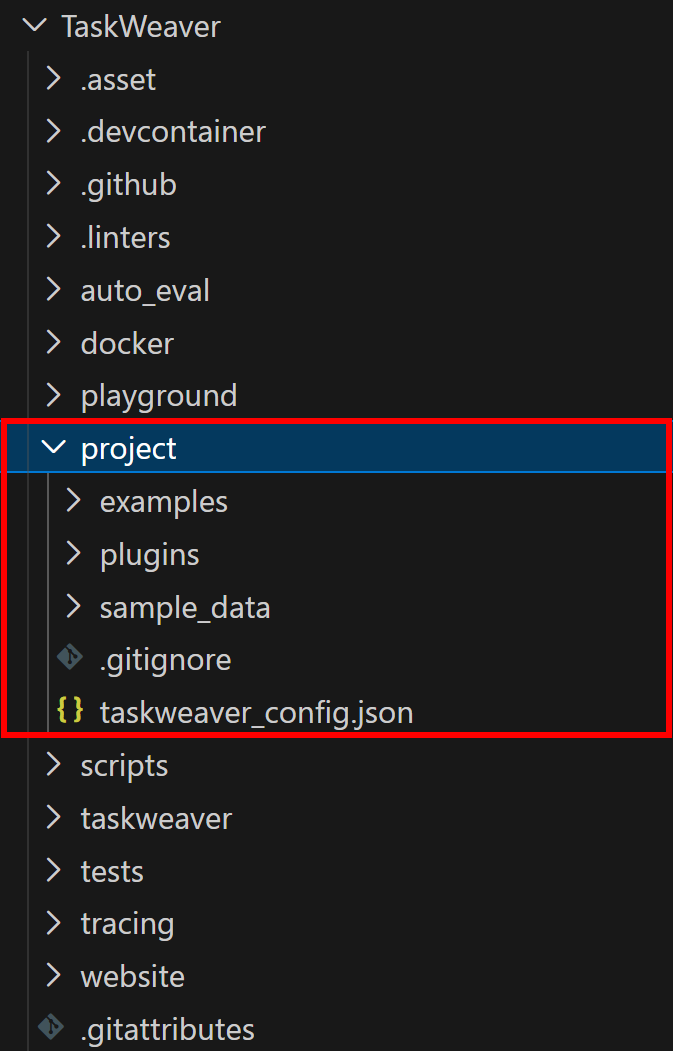
Copy the contents of the project folder into your workspace. After this, your taskweaver-bright-data-example/ folder should look like this:
taskweaver-bright-data-example/
├─ .venv/
├─ TaskWeaver/
├─ plugins/                 # Folder to store your plugins
├─ examples/
│   ├─ planner_examples/    # Example planner scripts
│   └─ code_generator_examples/ # Example code generator scripts
├─ sample_data/             # Optional sample datasets
├─ .gitignore
└─ taskweaver_config.json   # Project configuration file
In particular, a typical Microsoft TaskWeaver project directory contains specific folders and files as described in the official documentation.
Load taskweaver-bright-data-example/ in your favorite Python IDE, such as Visual Studio Code or PyCharm.
With your virtual environment active, start the application while still inside the /TaskWeaver folder with:
python -m taskweaverThis will start the TaskWeaver process from the /TaskWeaver folder, which will load the project files and directory from the taskweaver-bright-data-example/ folder.
If everything is working, you should see this in your terminal:
Success! Microsoft TaskWeaver works. After running the application for the first time, the following folders will be created:
workspace/: Stores session data for your project.logs/: Stores log files generated by the program.
Note: If you try to enter a prompt now, it will fail because you still need to configure a connection to an LLM. That will be covered in the next step.
Step #2: Configure the LLM in TaskWeaver
TaskWeaver supports a wide range of LLMs. In this tutorial, we will integrate an OpenAI model, but you can easily adapt the instructions for any other supported LLM provider.
To configure the GPT-4.1 mini model in TaskWeaver, make sure your taskweaver_config.json file inside taskweaver-bright-data-example/ contains the following:
{
    "llm.api_key": "<YOUR_OPENAI_API_KEY>",
    "llm.model": "gpt-4.1-mini"
}
Replace <YOUR_OPENAI_API_KEY> with your actual OpenAI API key.
Note: As of this writing, TaskWeaver does not support GPT-5 models. If you try to configure a GPT-5 model, you will encounter the error below:
{'error': {'message': "Unsupported parameter: 'max_tokens' is not supported with this model. Use 'max_completion_tokens' instead.", 'type': 'invalid_request_error', 'param': 'max_tokens', 'code': 'unsupported_parameter'}}Fantastic! Your TaskWeaver project is now powered by the OpenAI GPT-4.1 mini model and ready to process prompts.
Step #3: Set Up a Bright Data Web Unlocker API Zone
To connect your TaskWeaver agent to Bright Data for web scraping capabilities, you first need to complete some preliminary steps. In detail, you need to prepare your Bright Data account by configuring a Web Unlocker zone.
If you do not already have an account, create a Bright Data account. Otherwise, simply log in. Once in your account, navigate to the “Proxies & Scraping” page. In the “My Zones” section, check for a row labeled “Web Unlocker API” in the table: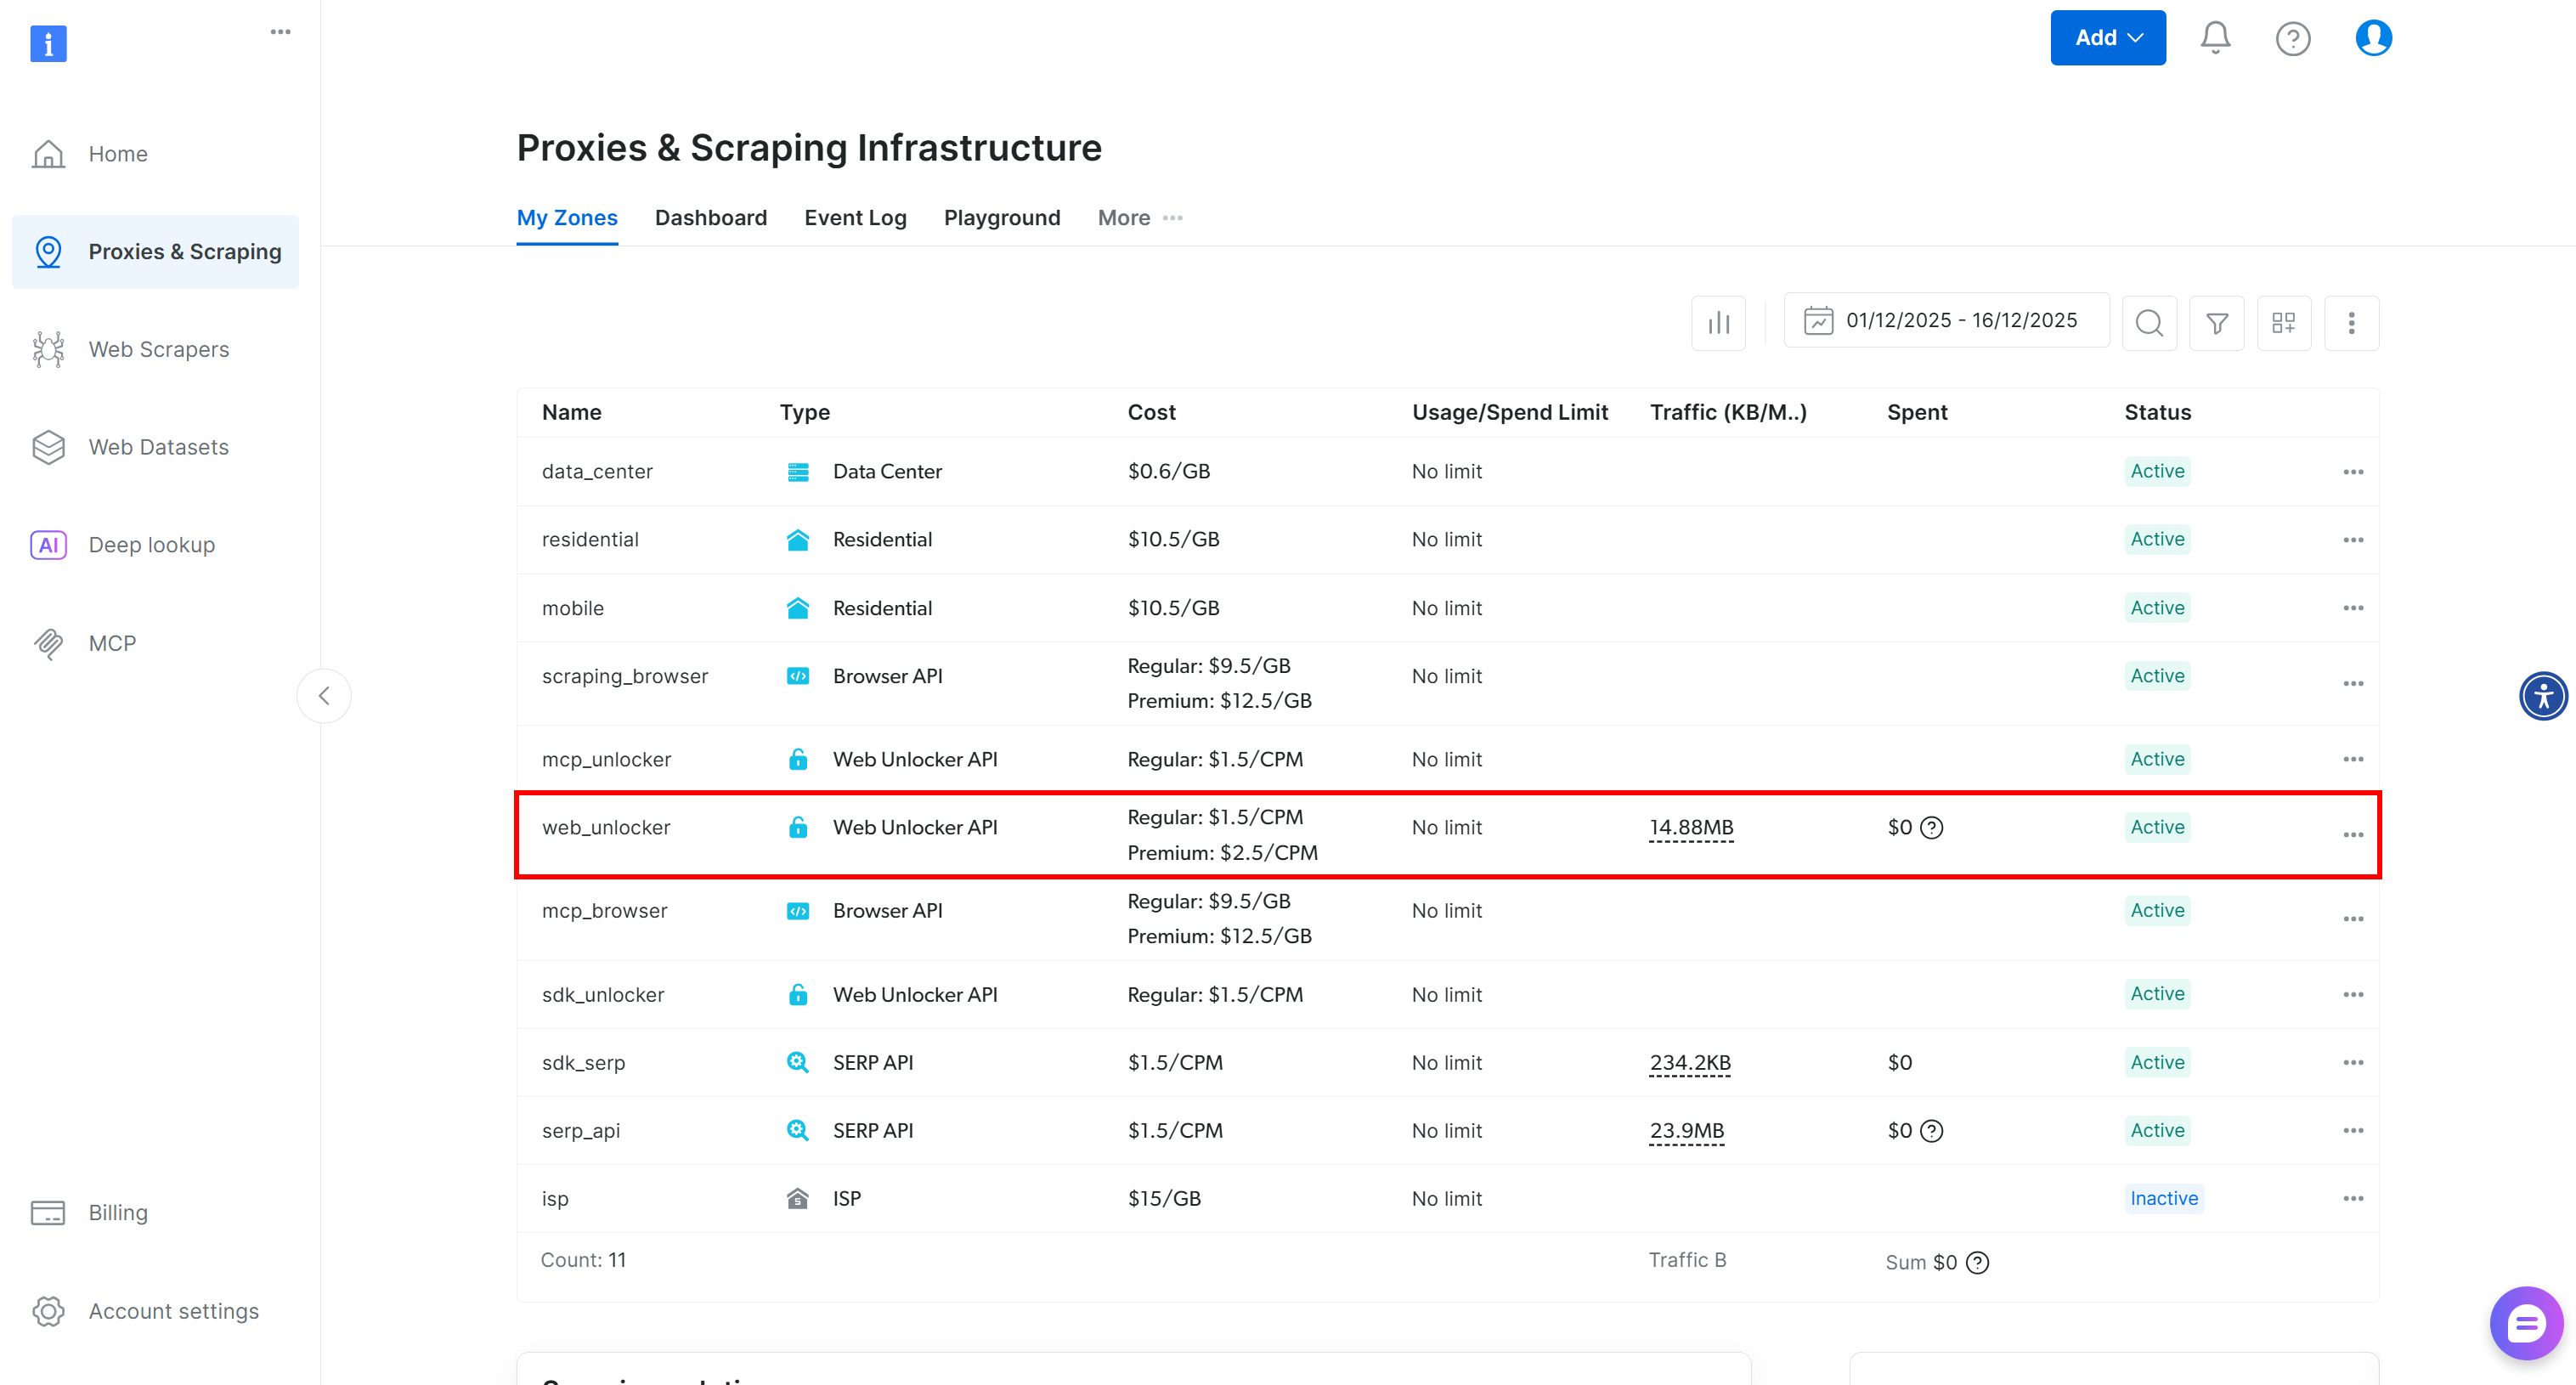
If you do not see a row labeled “Web Unlocker API”, it means such a zone has not been set up yet in your Bright Data account. To create one, scroll down to the “Unlocker API” section and click “Create zone” to add one: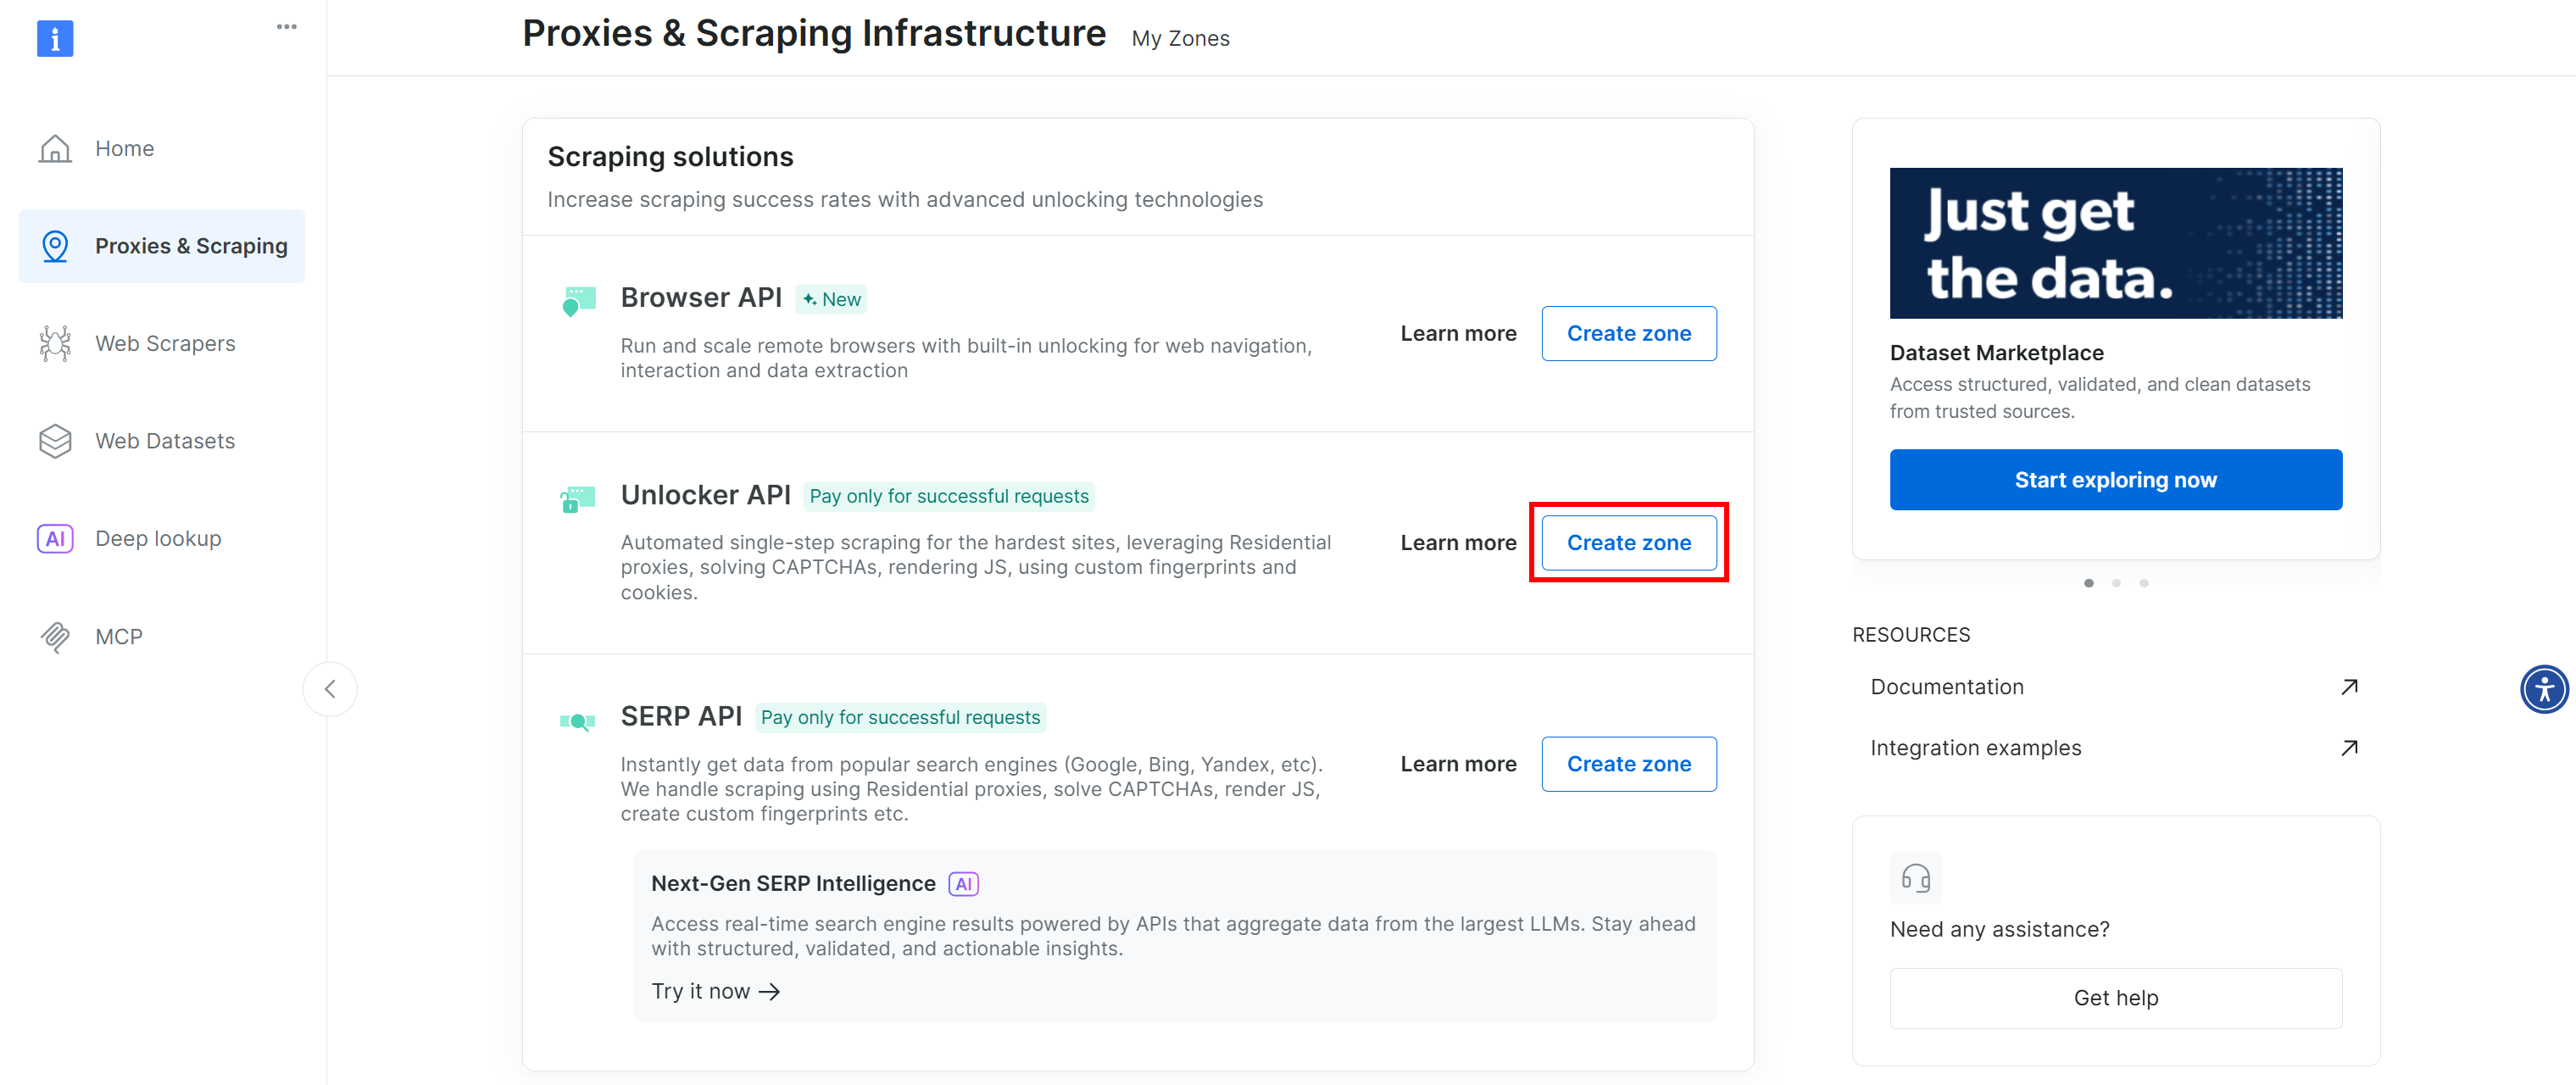
Create a Web Unlocker API zone and give it a name, such as web_unlocker (or any name you prefer). Remember the zone name, as you will need it to access the service via the API in a custom plugin.
On the Web Unlocker zone page, make sure the toggle is set to “Active” to confirm that the zone is enabled.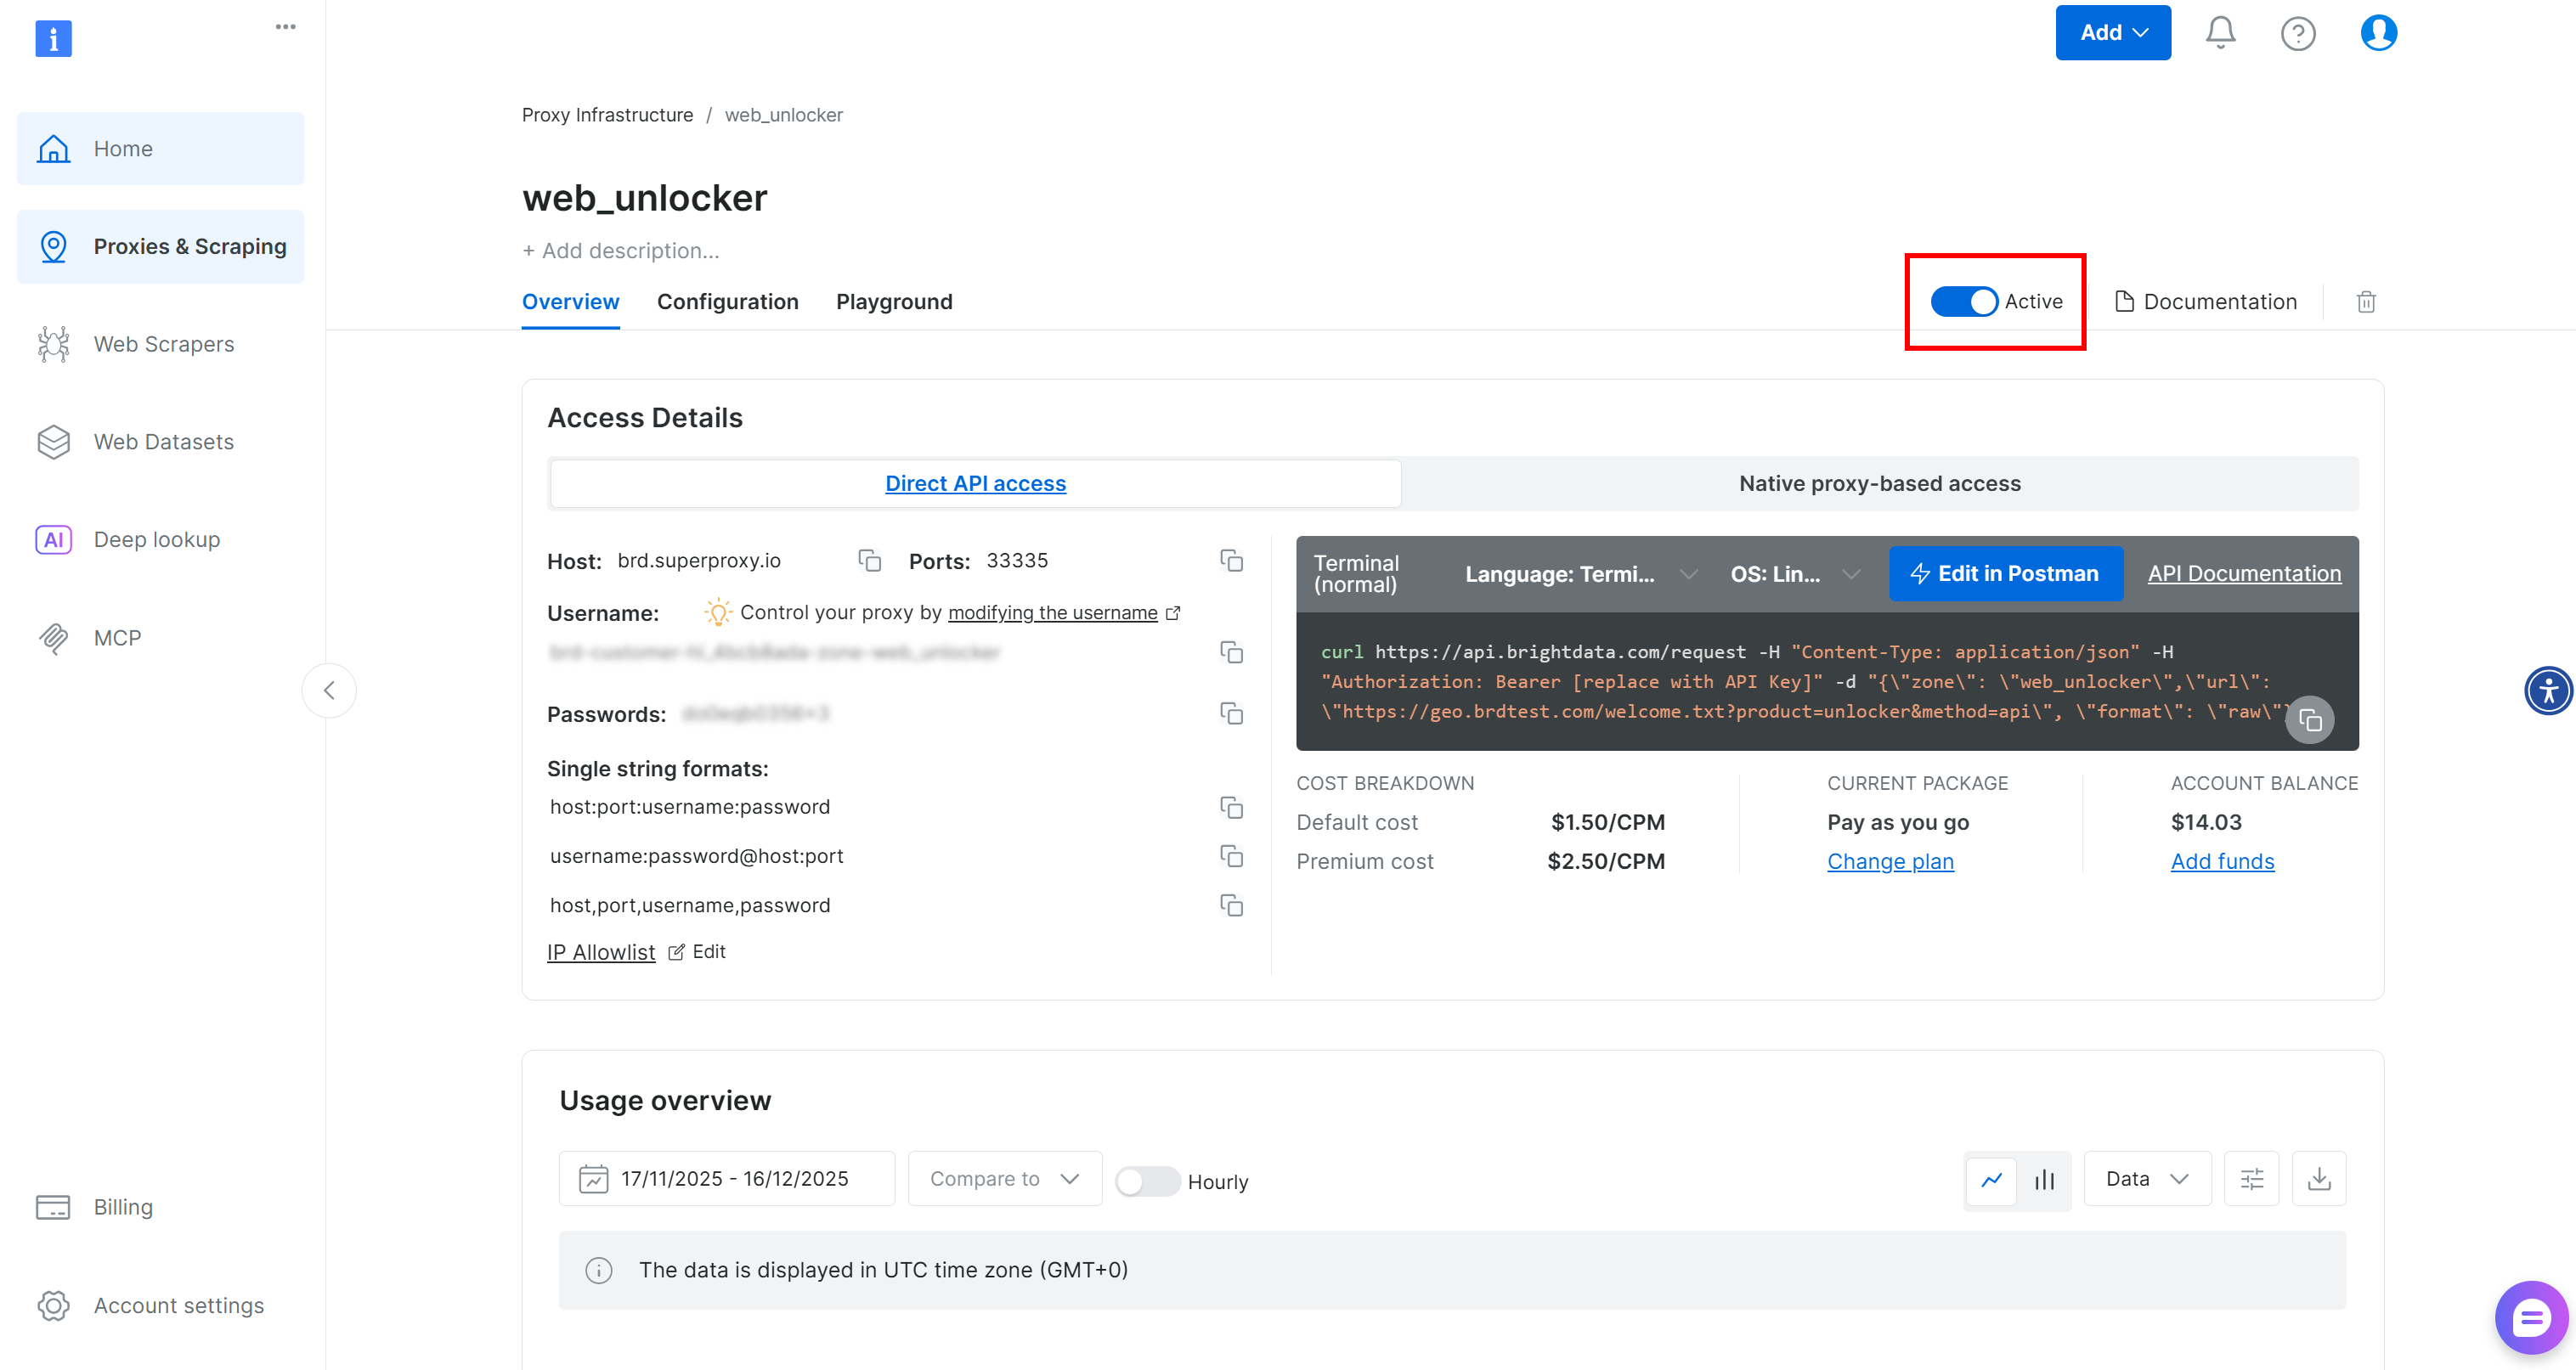
Finally, follow the official guide to generate your Bright Data API key. Store it securely, as you will need it shortly.
Great! You now have everything set up to use Bright Data’s Web Unlocker API plugin in your TaskWeaver application.
Step #4: Define the TaskWeaver Web Unlocker Plugin for Bright Data Integration
Plugins are units that can be orchestrated by TaskWeaver’s code interpreter. More specifically, each plugin is a Python function that can be called within the generated code.
In TaskWeaver, a plugin involves two files:
- Plugin implementation: A Python file that defines the plugin.
- Plugin schema: A YAML file that defines the plugin’s inputs, outputs, and metadata.
Both files should be placed in the plugins/ subfolder inside your project.
In this case, you need to add a plugin that calls the Bright Data Web Unlocker API. For more information on how to call that API endpoint, refer to the official docs.
In your active virtual environment, first install a Python HTTP client like Requests:
pip install requestsThen, add a web_unlocker.py plugin file inside the plugins/ folder. Define it as follows:
# taskweaver-bright-data-example/plugins/web_unlocker.py

import requests
from taskweaver.plugin import Plugin, register_plugin


@register_plugin
class WebUnlockerPlugin(Plugin):
    def __call__(
        self,
        url: str,
        data_format: str = None
    ):
        # Read configuration values for API call
        bright_data_api_key = self.config.get("api_key")
        zone = self.config.get("zone", "web_unlocker")
        default_format = self.config.get("data_format", "markdown")

        # HTTP headers required by the Bright Data API for authentication
        headers = {
            "Authorization": f"Bearer {bright_data_api_key}",
            "Content-Type": "application/json"
        }

        # Request payload sent to Bright Data Web Unlocker
        payload = {
            "zone": zone,
            "url": url,
            "format": "raw", # To get the response directly in the body
            "data_format": data_format or default_format
        }

        # Send the request to Bright Data Web Unlocker API
        response = requests.post(
            "https://api.brightdata.com/request",
            json=payload,
            headers=headers,
        )

        # Raise an exception for non-2xx HTTP responses
        response.raise_for_status()

        # Extract response content and HTTP status code
        content = response.text
        status = response.status_code

        # Natural-language summary returned to the LLM
        description = (
            f"Fetched page successfully using Bright Data Web Unlocker "
            f"(HTTP {status}, {len(content)} characters)."
        )

        # Persist the fetched page as an artifact in the session workspace
        self.ctx.add_artifact(
            name="web_unlocker_page",
            file_name="page_content.md",
            type="txt",
            val=content
        )

        # Return both the raw content and a human-readable description
        return content, description
This plugin fetches a web page through the Bright Data Web Unlocker API. First, it reads configuration values from the plugin’s YAML configurations section (to be defined shortly) using self.config.get().
Then, it sends an HTTP request, checks for errors, and saves the fetched page as an artifact in the workspace via self.ctx.add_artifact(), allowing you to review the result during and after execution. Finally, it returns both the raw page content and a human-readable summary for use by the LLM.
Note: By default, the Bright Data Web Unlocker API call has been configured to return web page content in Markdown format, which is ideal for LLM ingestion. This is a useful feature provided by the Web Unlocker API to support AI integrations and simplify content processing.
Amazing! Before the TaskWeaver agent can use this plugin, you also need to specify the plugin’s YAML schema file.
Step #5: Continue with the Plugin Schema Definition
The plugin schema specifies how the LLM in TaskWeaver understands and calls the plugin. This must be written in YAML format, so create a file named web_unlocker.yaml inside the plugins/ folder as follows:
# taskweaver-bright-data-example/plugins/web_unlocker.yaml

name: web_unlocker
enabled: true
plugin_only: true
description: >-
  Fetches and unlocks web pages using Bright Data Web Unlocker API,
  bypassing anti-bot protections and returning clean page content.

parameters:
  - name: url
    type: str
    required: true
    description: The full URL of the web page to retrieve.

  - name: data_format
    type: str
    required: false
    description: Output format of the page content ("markdown" or raw HTML, if omitted).

returns:
  - name: content
    type: str
    description: The unlocked page content.

  - name: description
    type: str
    description: A natural-language summary of the fetch operation.

configurations:
  api_key: <YOUR_BRIGHT_DATA_API_KEY> # Replace with your Bright Data API key
  zone: web_unlocker # Replace with your Web Unlocker zone name
  data_format: markdown
The above YAML file describes the inputs and outputs of the __call__() function in the WebUnlockerPlugin class defined earlier. Thanks to this schema, TaskWeaver’s LLM will understand how the web_unlocker.py plugin works and how to call it in the generated Python code.
In the configurations section, specify your Bright Data API key, Web Unlocker zone name, and desired output format. Replace the api_key and zone fields with the values you set up in Step #3.
Here we go! Your TaskWeaver + Bright Data integration is complete.
Note: You can use the same approach to integrate other Bright Data services via API, such as the SERP API or Web Scraping APIs.
Step #6: Test the TaskWeaver Agent
It is time to verify that the code-first agent in TaskWeaver can now call the Bright Data-powered plugin. The idea is that the generated code will invoke the plugin function and access web-unlocking capabilities provided by the Web Unlocker API.
To test that, try a prompt like this:
Fetch the latest MCP changelog from "https://modelcontextprotocol.io/specification/2025-11-25/changelog" and list the changes.This task would normally be impossible for a standard LLM, as it requires a custom tool to navigate to a URL and extract information from it. However, with TaskWeaver + Bright Data, the agent can handle it!
Launch the TaskWeaver application with:
python -m taskweaverPaste the prompt and press Enter. You should see something like this: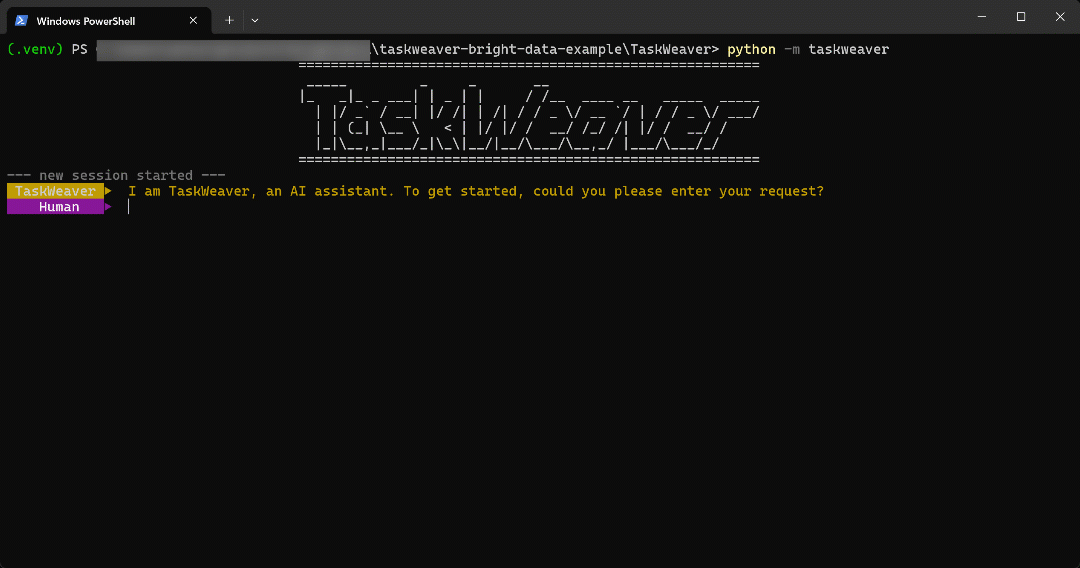
As you can see, the agent:
- The TaskWeaver
Plannerstarts by producing a plan to carry out the task. - The plan is then sent to the
CodeInterpreterinternal agent, which generates Python code to achieve the goal. - The Python code calls the Web Unlocker API plugin and then extracts all bullet points in the article using a regex.
- The code is executed, and the desired data is retrieved via the Web Unlocker API and stored in the workspace folder as configured with
self.ctx.add_artifact(). - The returned Markdown data, containing the content of the page specified by the URL, is sent back to the
Planner, which continues with the next step. - The list of bullet points extracted from the target page is returned to the user as intended.
Terrific! The TaskWeaver agent works perfectly. Let’s take some time to inspect the produced output.
Step #7: Explore the Output
The final output of the agent run is: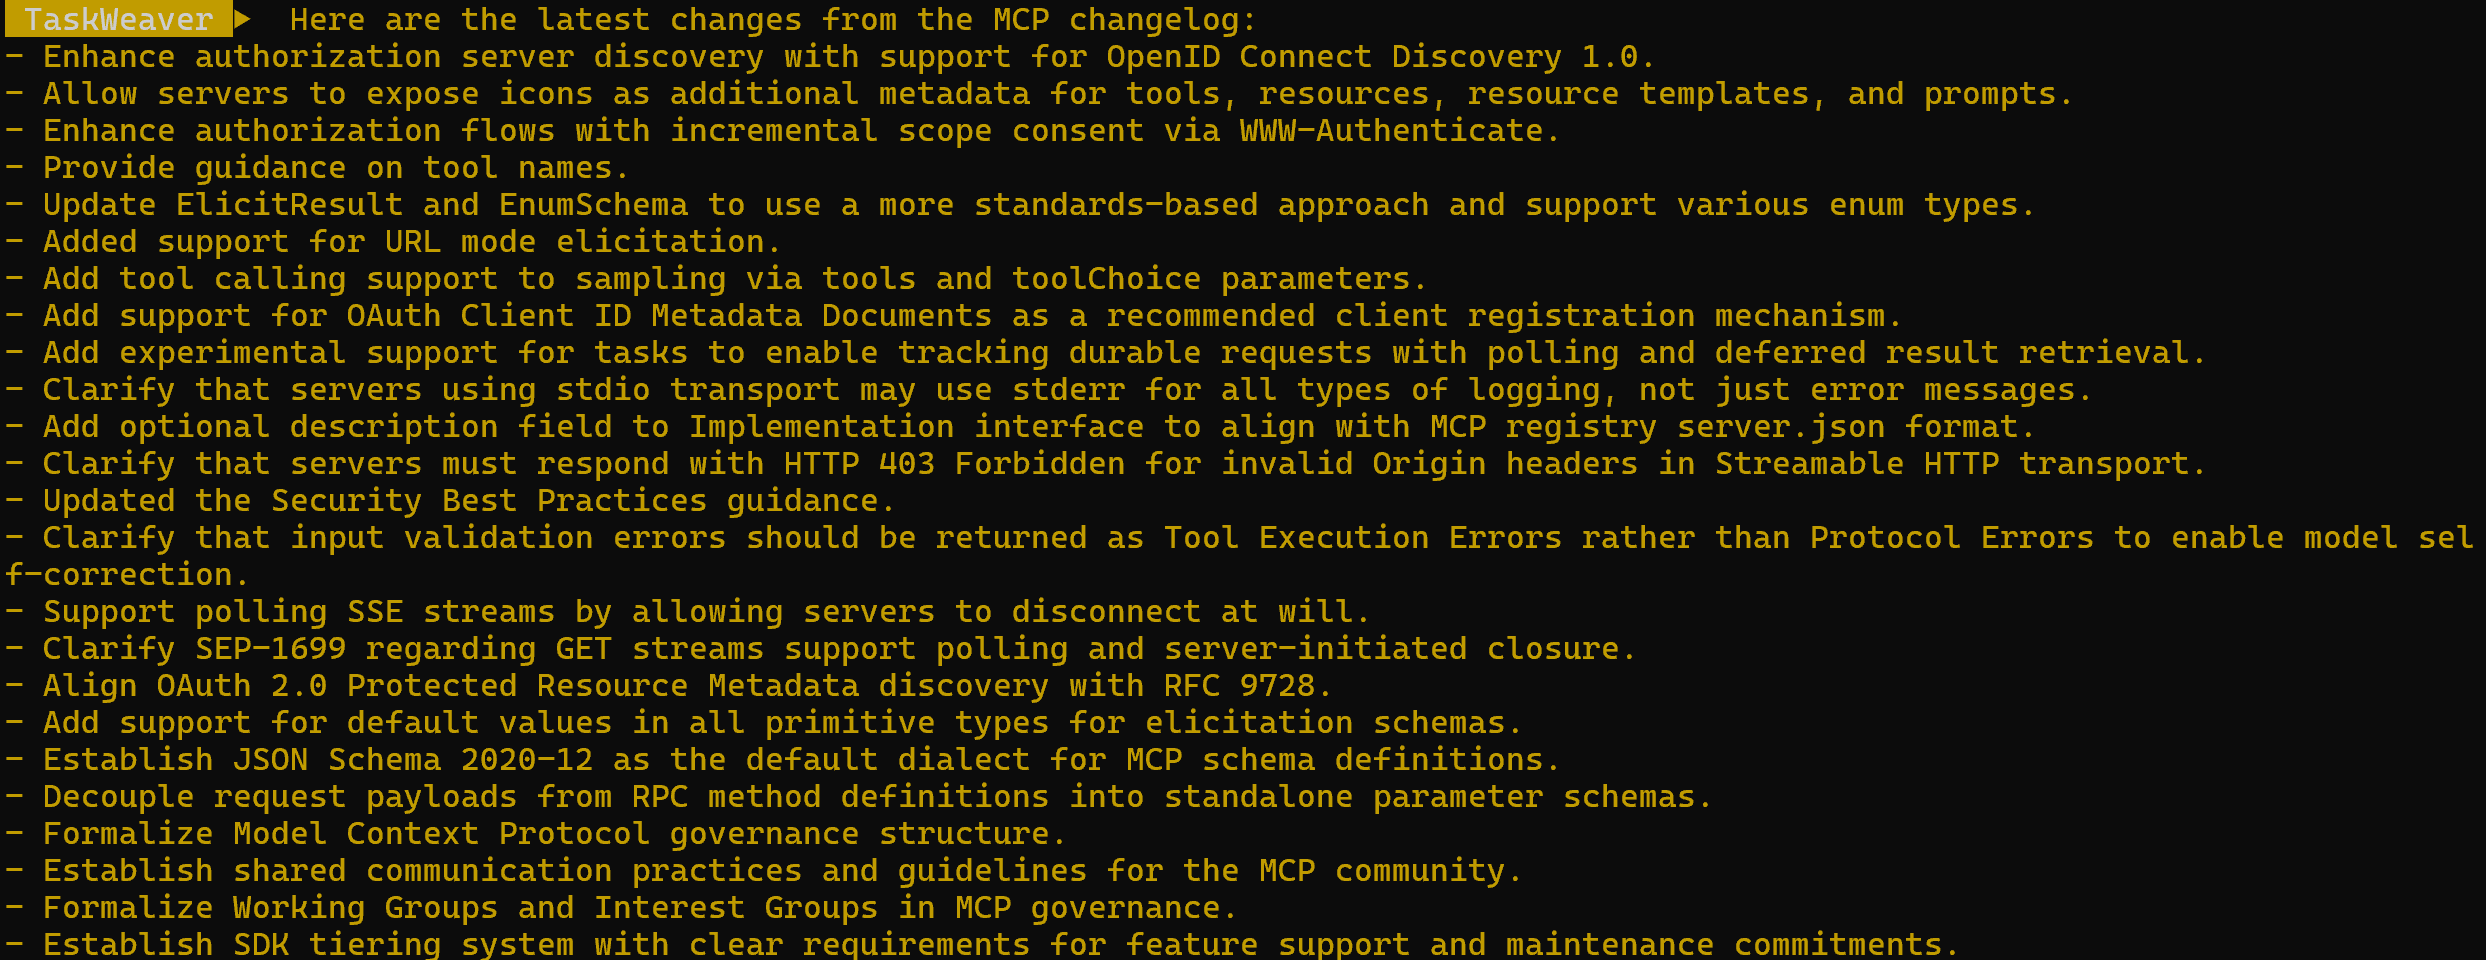
As you can verify on the target page, that list corresponds exactly to the information found on the MCP changelog: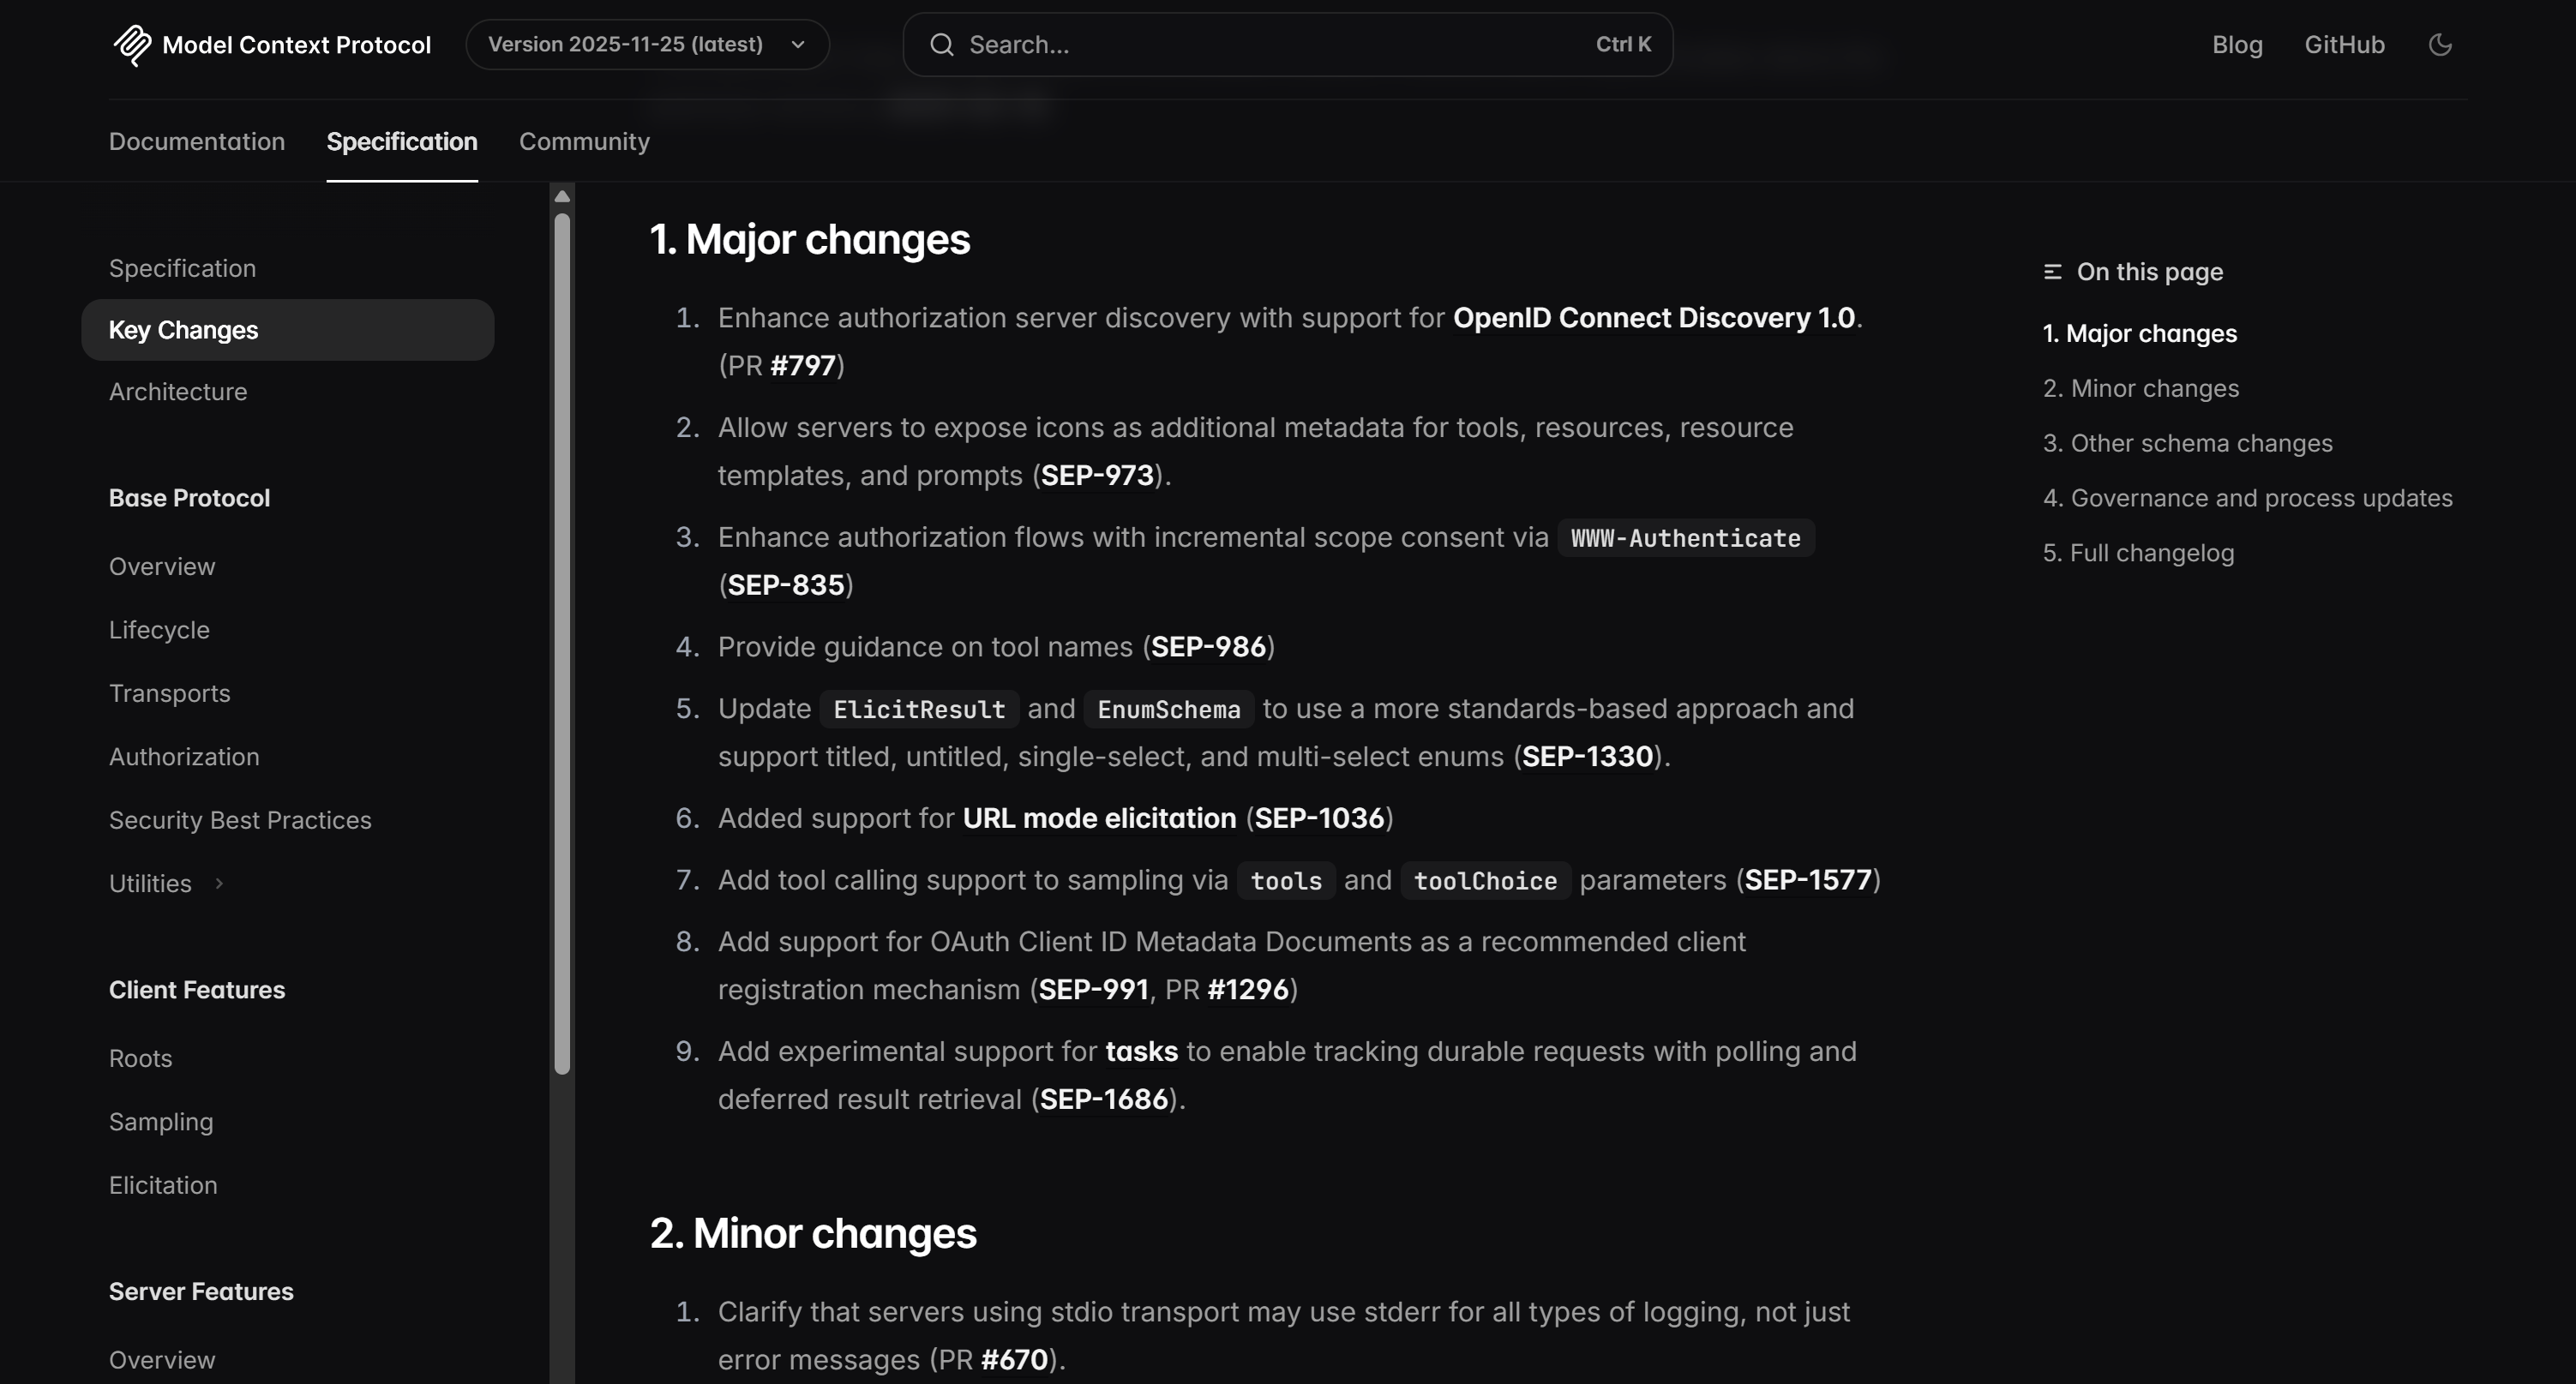
In particular, the agent produced the output through the following Python code:
url = "https://modelcontextprotocol.io/specification/2025-11-25/changelog"
content, description = web_unlocker(url, "markdown")

# Extract the changes from the content assuming it is in markdown format
# We will extract lines that look like list items (starting with -, *, or numbers)
import re
changes = re.findall(r'^[-*\d\.]+\s+(.*)', content, re.MULTILINE)

changes, description
Notice how the generated snippet calls the web_unlocker() function plugin to retrieve the input page in Markdown format. Then, it processes it using a simple regex to extract the relevant information.
To verify that the Web Unlocker API returned the page content in Markdown, check the files inside the workspace/ folder. Each agent run produces a session subfolder under workspace/sessions/, containing a subfolder for that specific run.
In the cwd/ folder, you will find the .md file created via the self.ctx.add_artifact() call. Open it to view the returned content from the Web Unlocker API: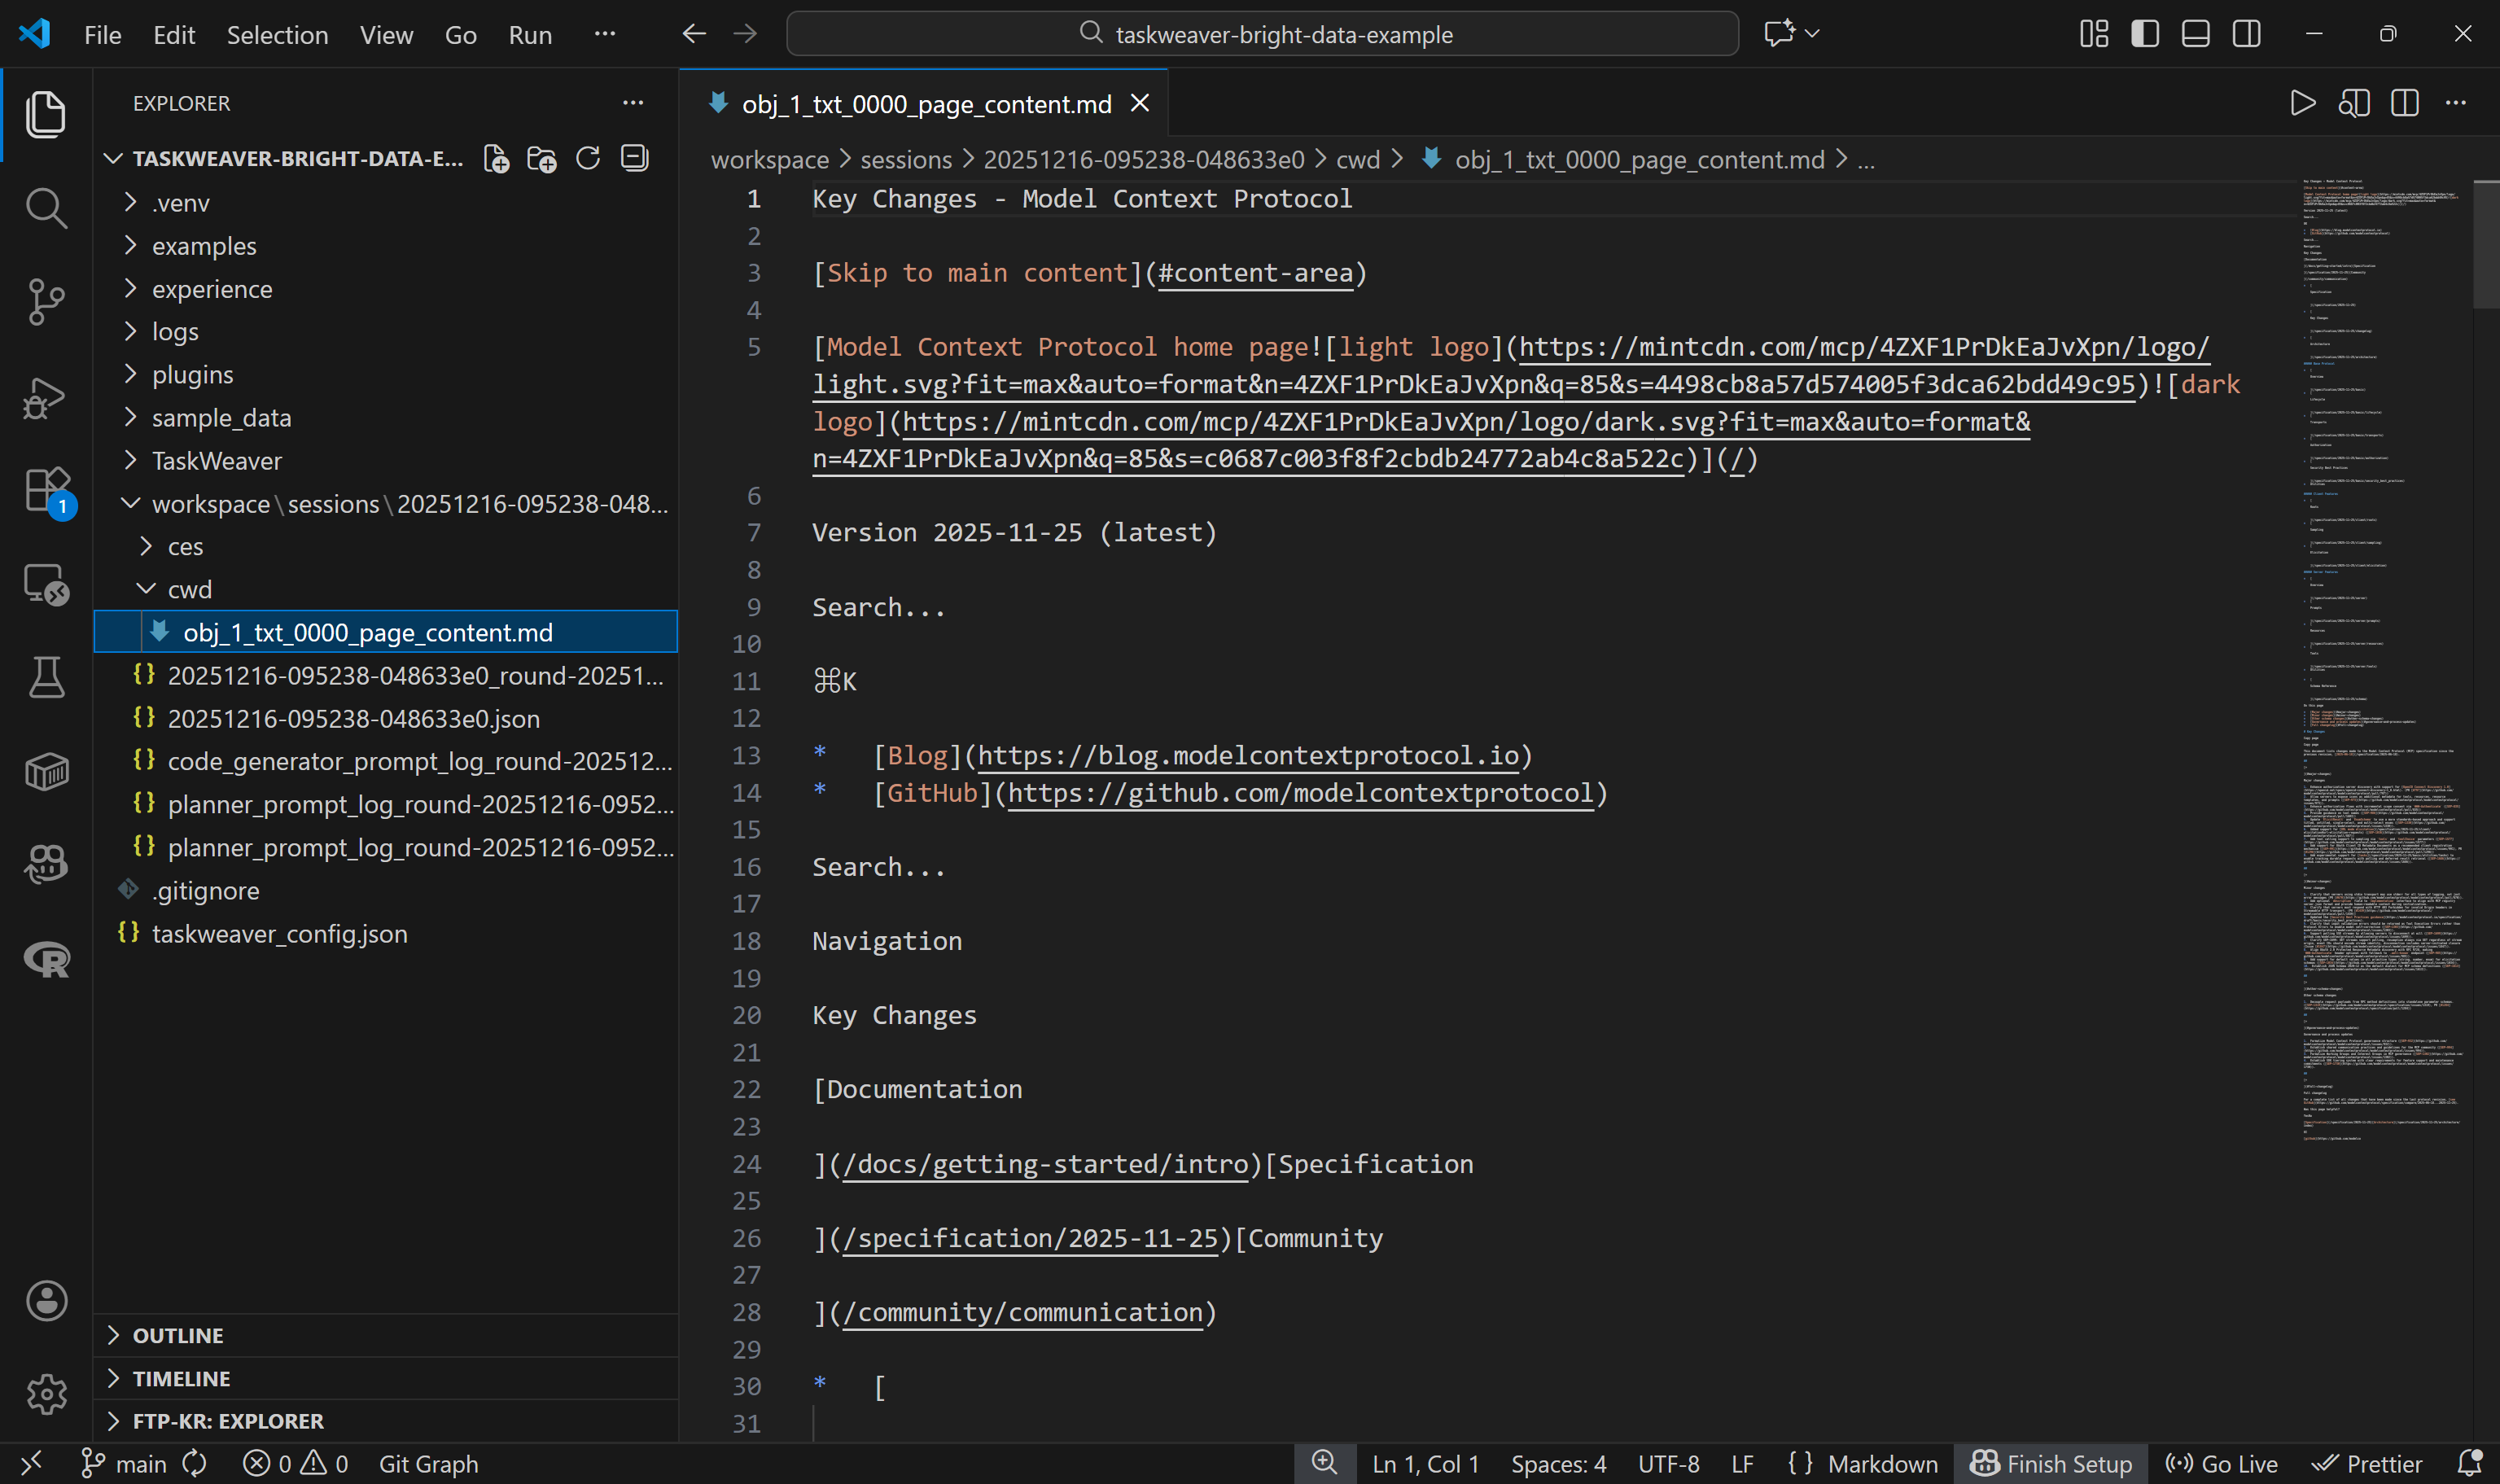
This matches exactly the Markdown version of the target page, which means the Web Unlocker API function in the generated Python code worked perfectly. Wow!
Now, take your agent further. Experiment with different prompts to handle more realistic, enterprise-ready scenarios.
Et voilà! You have successfully built a code-first AI agent integrated with Bright Data using TaskWeaver. This agent can reliably retrieve AI-ready data from any web page.
Next Steps
The integration demonstrated here is a basic example. To take your TaskWeaver agent to the next level and make it production-ready, consider the following enhancements:
- Integrate additional Bright Data solutions, such as the SERP API, to give the agent the ability to search the web and collect live data.
- Configure the Web UI as a playground for simplified development, testing, and monitoring of your agent.
- Enable advanced features like prompt compression, automatic plugin selection, and telemetry/observability to improve performance, scalability, and maintainability.
Conclusion
In this tutorial, you saw how to integrate Bright Data with TaskWeaver through custom plugins that connect to external APIs.
This setup enables real-time web searches, structured data extraction, live web feed access, and automated web interactions. By leveraging the full suite of Bright Data services for AI, you unlock the full potential of your code-first AI agents!
Create a Bright Data account for free today and get your hands on our AI-ready web data solutions.

Technical Writer
Antonello Zanini is a technical writer, editor, and software engineer with 5M+ views. Expert in technical content strategy, web development, and project management.


