
In this blog post, you will learn:
- What smolagents is and why it is gaining so much popularity.
- How its agents rely on tool execution and how to retrieve tools via Bright Data’s Web MCP.
- How to integrate Web MCP tools into smolagents to build an AI code agent.
Let’s dive in!
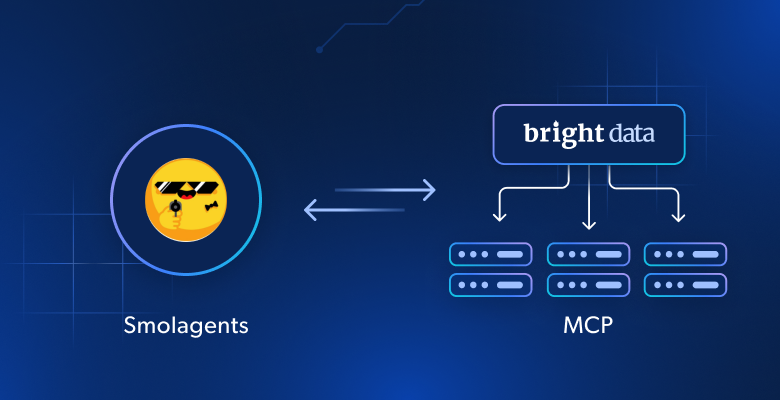
What Is smolagents?
smolagents is a lightweight Python library that enables building powerful AI agents with minimal code. What makes it unique is its CodeAgent, which writes the actions needed to execute a prompt as executable Python code snippets (instead of just returning a textual response).
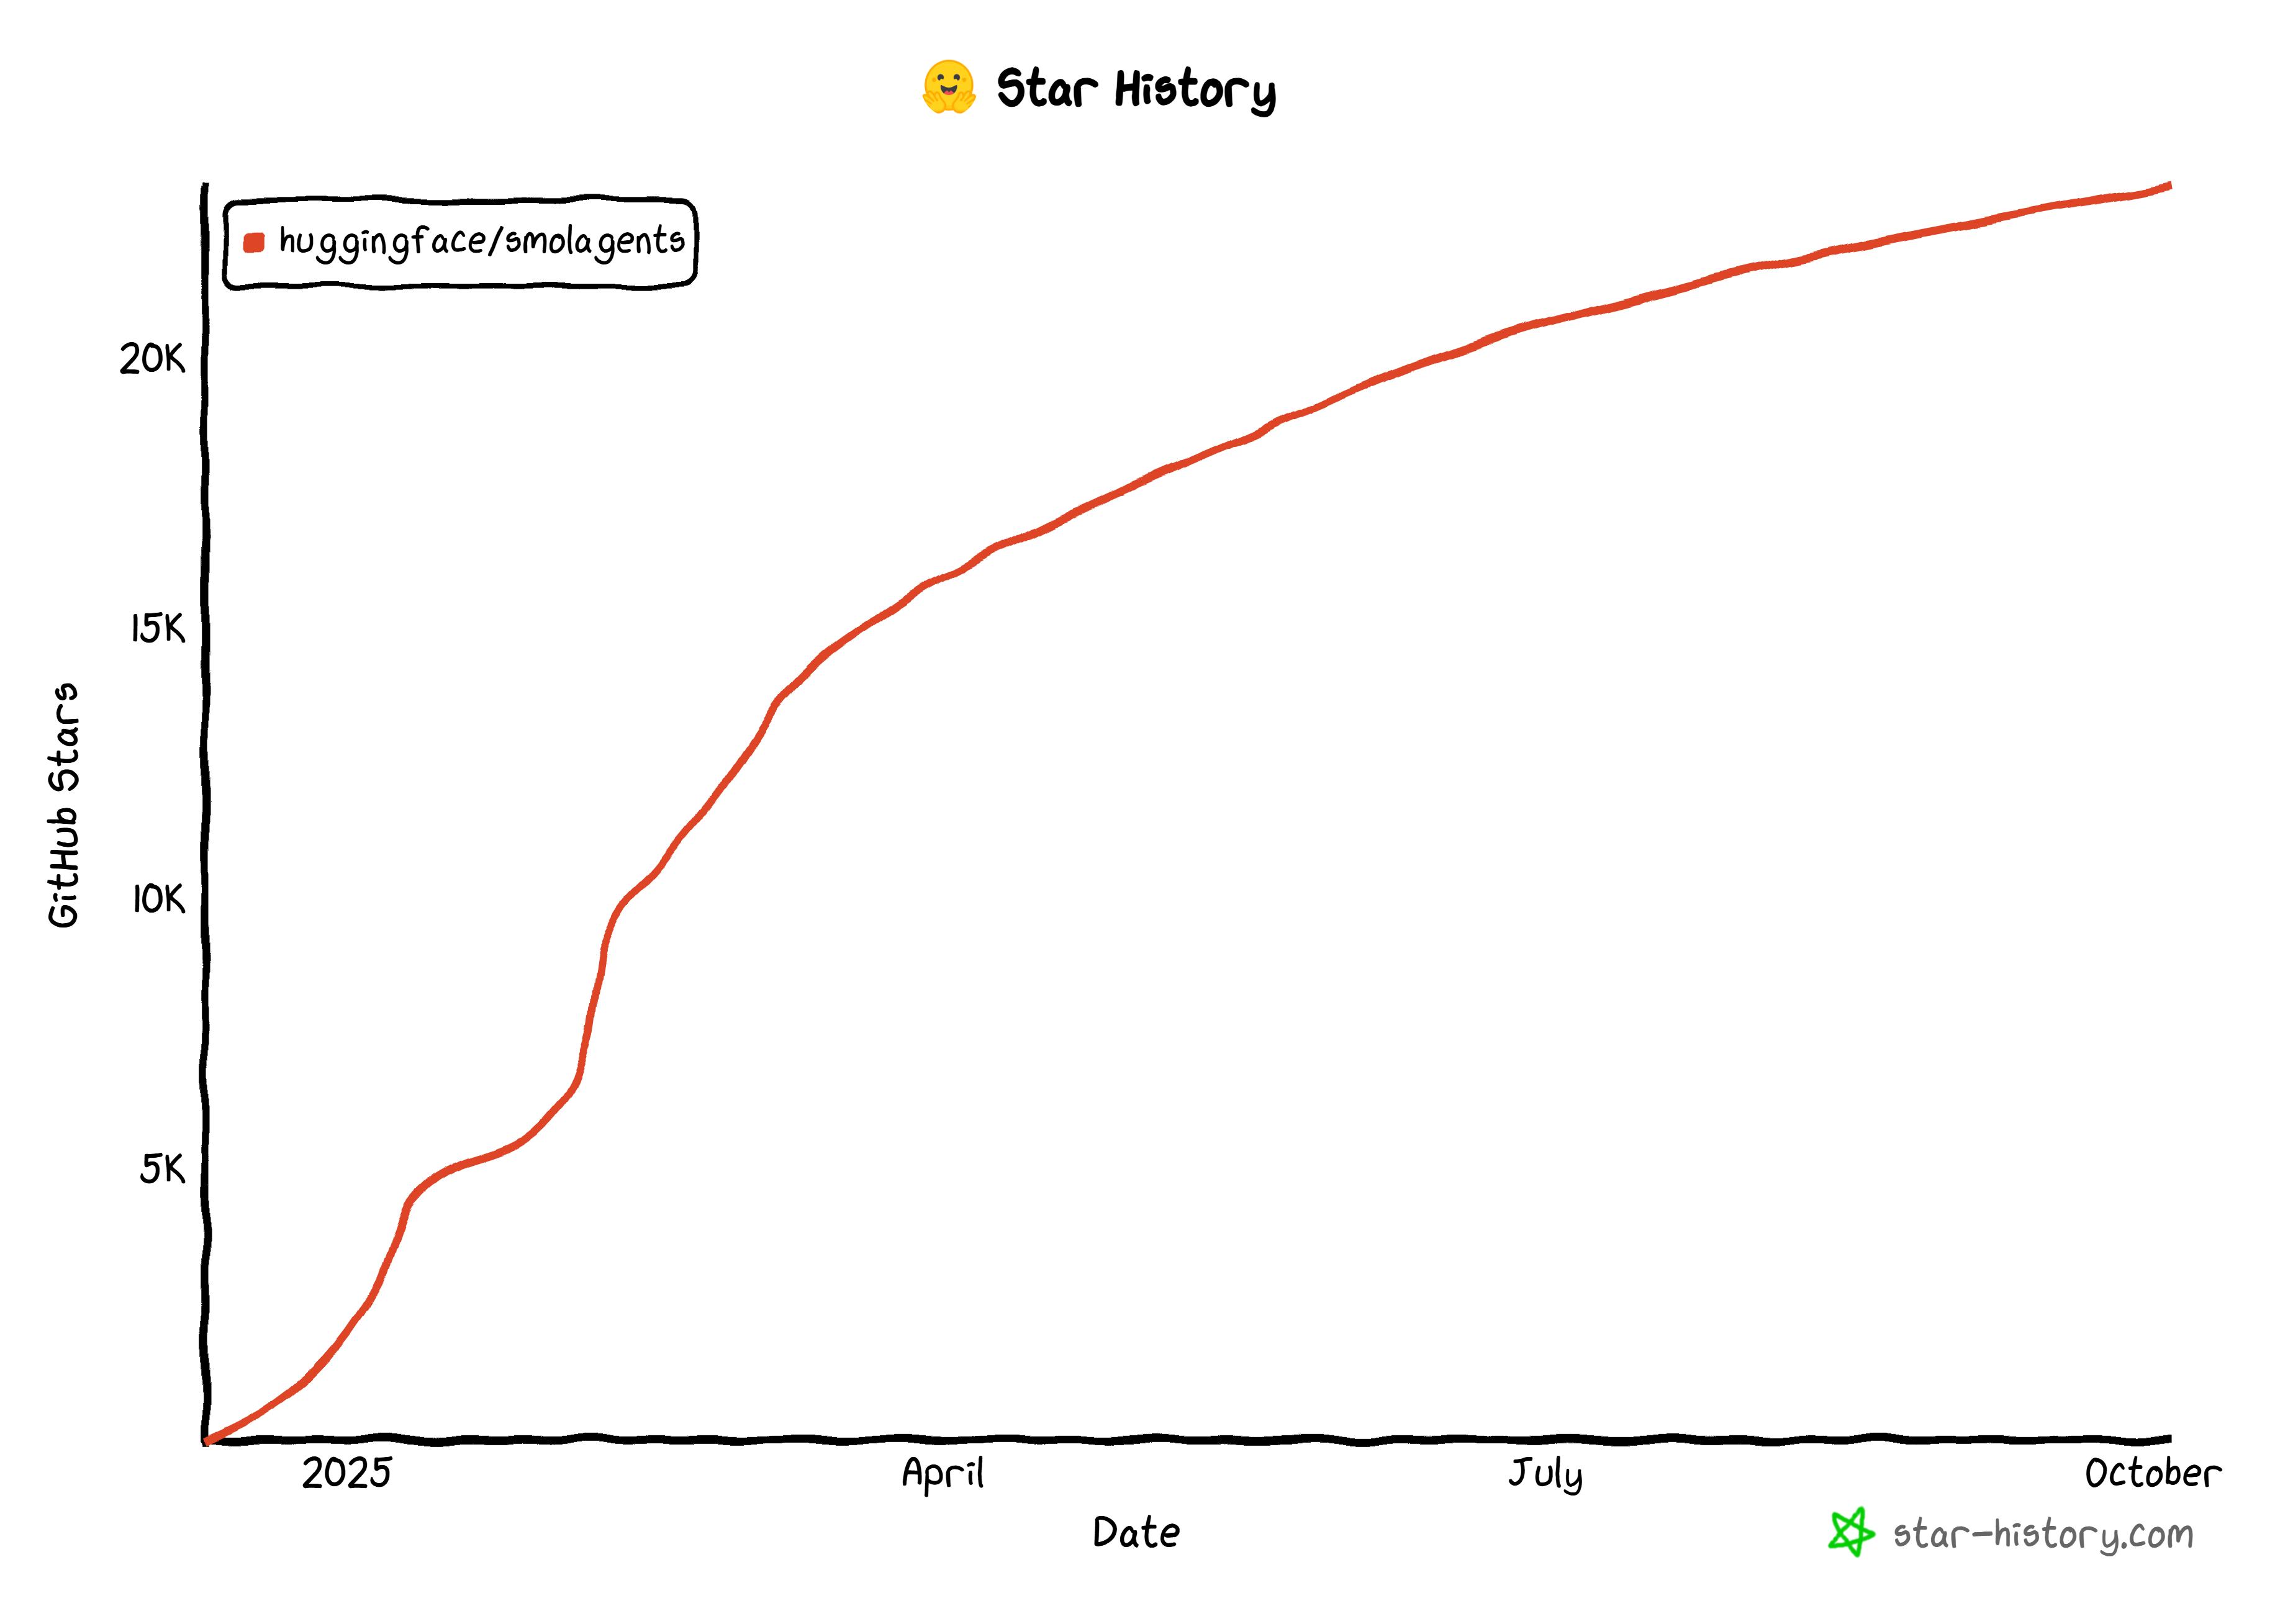
That approach improves efficiency, reduces LLM calls, and allows agents to interact directly with tools and environments safely through sandboxed execution. The community has embraced this new approach to building AI agents, as evidenced by the 23k stars the library has received on GitHub in just a few months:
Keep in mind that smolagents is:
- Model-agnostic, supporting OpenAI, Anthropic, local transformers, or any LLM on the Hugging Face Hub.
- Modality-agnostic, supporting text, vision, audio, and video.
- Tool-agnostic, supporting tools from MCP servers, LangChain, or Hub Spaces.
Learn more about the philosophy behind this library in the announcement post on the Hugging Face blog.
Why smolagents Pushes for Tool Usage
LLMs are limited by the data they were trained on. They can generate responses, content, code, or multimedia based on that knowledge. That makes them powerful, sure, but it also represents one of the biggest limitations of current AI.
smolagents addresses that by providing agents built around tools. That is so pivotal that every agent class in the library accepts a list of tools as a required argument. Thanks to toll calling, your AI model can interact with the environment and perform tasks beyond content generation.
In particular, remember that smolagents can connect to tools from MCP servers, LangChain, or even a Hub Space. It also supports standard JSON/text-based tool calling.
Now, what is missing from typical AI today? Accurate, recent data and the ability to interact with web pages like humans. That is precisely what Bright Data’s Web MCP tools provide!
The Web MCP is an open-source server offering over 60 AI-ready tools, all powered by Bright Data’s infrastructure for web interaction and data collection. Even on the free tier, you get access to two game-changing tools:
| Tool | Description |
|---|---|
search_engine |
Retrieve search results from Google, Bing, or Yandex in JSON or Markdown. |
scrape_as_markdown |
Scrape any webpage into clean Markdown format, bypassing bot detection and CAPTCHA. |
Beyond these, Web MCP exposes tools for interaction in a cloud browser and dozens of specialized tools for structured data collection across platforms like YouTube, Amazon, LinkedIn, TikTok, Yahoo Finance, and more. Discover more on the official GitHub page.
See Web MCP in action with smolagents!
How to Extend a smolagents AI Code Agent with Web MCP Tools
In this tutorial section, you will learn how to build a smolagents AI agent that integrates with Bright Data Web MCP. Specifically, the agent will use tools exposed by the MCP server to retrieve web data on the fly and perform sentiment analysis on it.
Note: That is just an example, and you can easily adapt it to other use cases by changing the input prompt.
Follow the instructions below!
Prerequisited
To follow this tutorial, make sure you have:
- Python 3.10+ installed locally.
- Node.js installed on your machine (we recommend the latest LTS version) for Web MCP execution.
- A Gemini API key (or an API key from any of the other supported models).
You will also need a Bright Data account with an API key. Do not worry, as we will guide you through that shortly. Having a basic understanding of how MCP works and the tools provided by the Web MCP will also be useful.
Step #1: Project Setup
Open the terminal and create a new folder for your smolagents project:
mkdir smolagents-mcp-agentsmolagents-mcp-agent/ will contain the Python code for your AI agent extended via Web MCP tools.
Then, enter the project directory and initialize a virtual environment inside it:
cd smolagents-mcp-agent
python -m venv .venv
Add a new file called agent.py. The file structure in your project should now be:
smolagents-mcp-agent/
├── .venv/
└── agent.py
agent.py will represent your main Python file and contain the AI agent definition.
Load the project folder in your favorite Python IDE. We recommend Visual Studio Code with the Python extension or PyCharm Community Edition.
Time to activate the virtual environment you created earlier. In Linux or macOS, fire:
source .venv/bin/activateEquivalently, on Windows, run:
.venv/Scripts/activateWith the virtual environment activated, install the required PyPI libraries:
pip install "smolagents[mcp,openai]" python-dotenvThe dependencies are:
"smolagents[mcp,openai]": Thesmolagentpackage, extended with sections for MCP integration and connecting to any provider offering OpenAI-like APIs.python-dotenv: To read environment variables from a local.envfile.
Done! You now have a Python environment for AI agent development with smolagents.
Step #2: Configure Environment Variable Reading
Your agent will connect to third-party services like Gemini and Bright Data. To authenticate those connections, you need to set some API keys. Hard-coding them in your agent.py file is a code smell, as that can create security issues. So, configure your script to read secrets from environment variables.
This is exactly why we installed the python-dotenv package. In your agent.py file, import the library and call load_dotenv() to load your environment variables:
from dotenv import load_dotenv

load_dotenv()
Your script can now access environment variables from a local .env file.
Add a .env file to your project directory:
smolagents-mcp-agent/
├── .venv/
├── .env         # <------
└── agent.py
You can then access environment variables in your code using:
import os

os.getenv("ENV_NAME")
Great! Your script now securely loads third-party integration secrets from environment variables.
Step #3: Test Bright Data’s Web MCP Locally
Before configuring the connection to the Bright Data Web MCP, ensure that your machine can run the server. This is required since you will instruct smolagents to start the Web MCP locally. Your agent will then connect to it via STDIO.
If you do not have a Bright Data account, create a new one. If you have, just log in. For a quick setup, follow the instructions in the “MCP” section of your account:
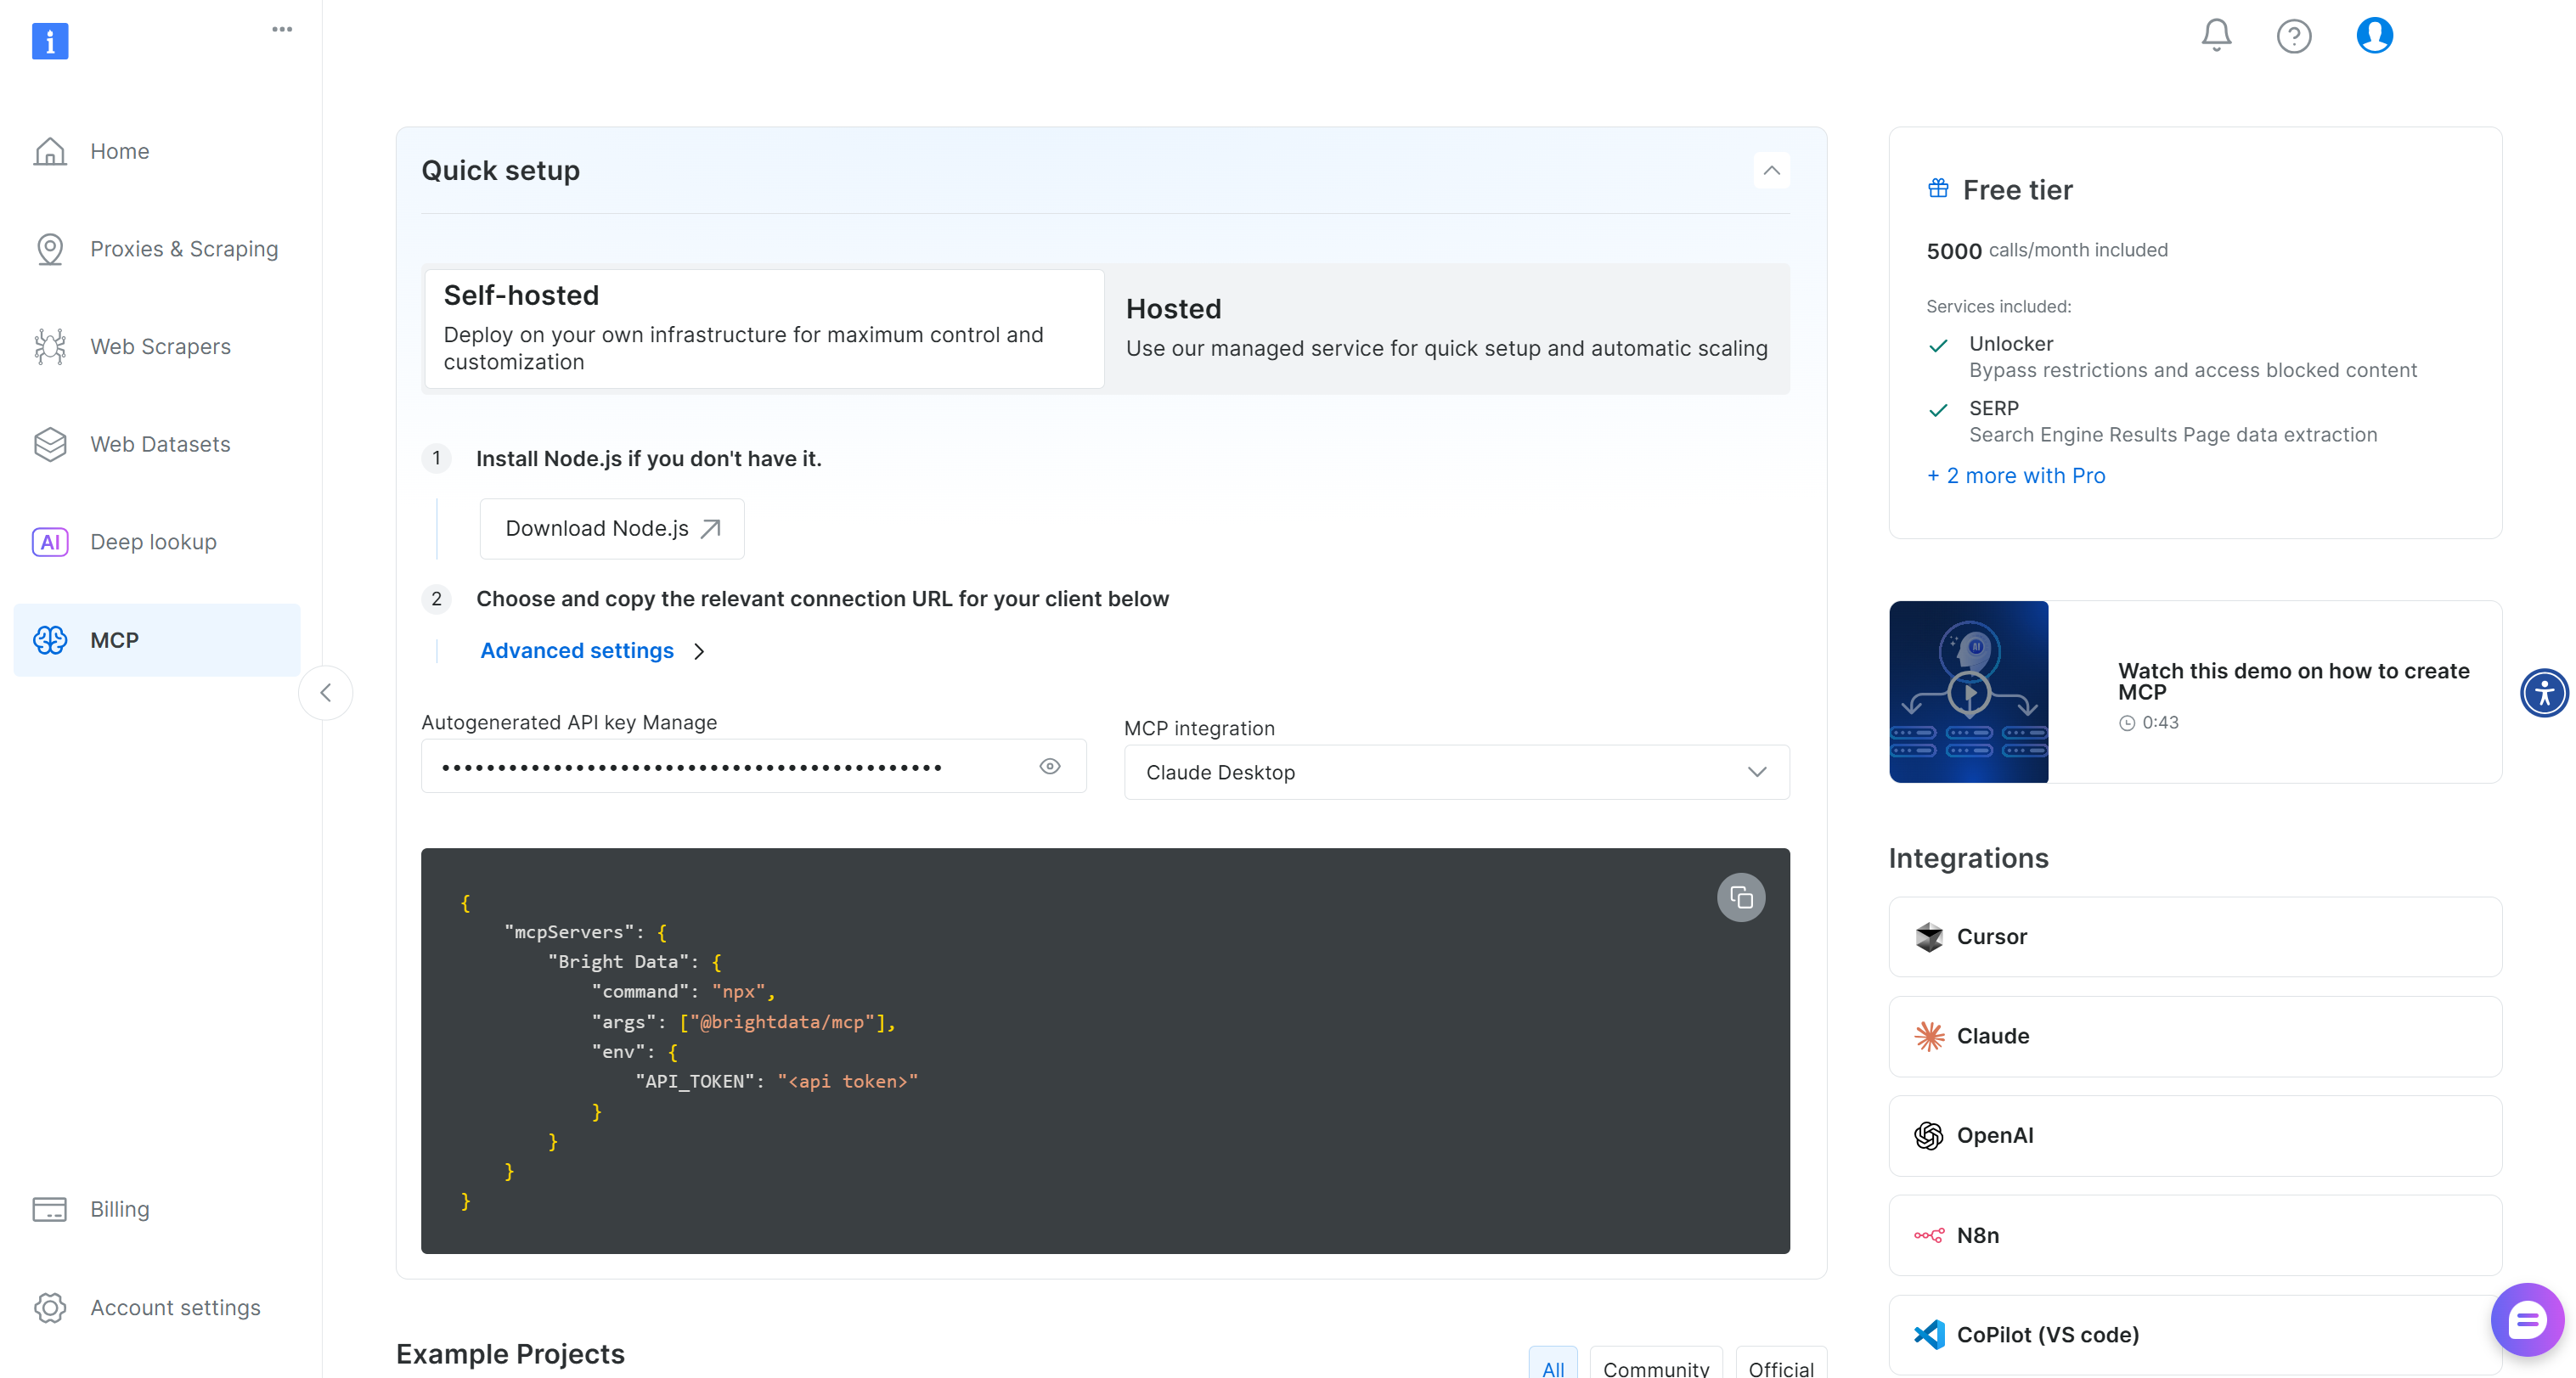
Otherwise, for more guidance, follow the instructions below.
First, generate a Bright Data API key. Store it in a safe place, as you will need it shortly. Here, we assume your API key has Admin permissions because that simplifies the Web MCP integration process.
Proceed by installing the Web MCP globally on your machine via the @brightdata/mcp package:
npm install -g @brightdata/mcpNext, check that the local MCP server works by launching it:
API_TOKEN="<YOUR_BRIGHT_DATA_API>" npx -y @brightdata/mcpOr, equivalently, in PowerShell:
$Env:API_TOKEN="<YOUR_BRIGHT_DATA_API>"; npx -y @brightdata/mcpReplace the <YOUR_BRIGHT_DATA_API> placeholder with your Bright Data API token. These commands set the required API_TOKEN environment variable and launch the Web MCP locally by executing its npm package.
If successful, you should see logs like this:

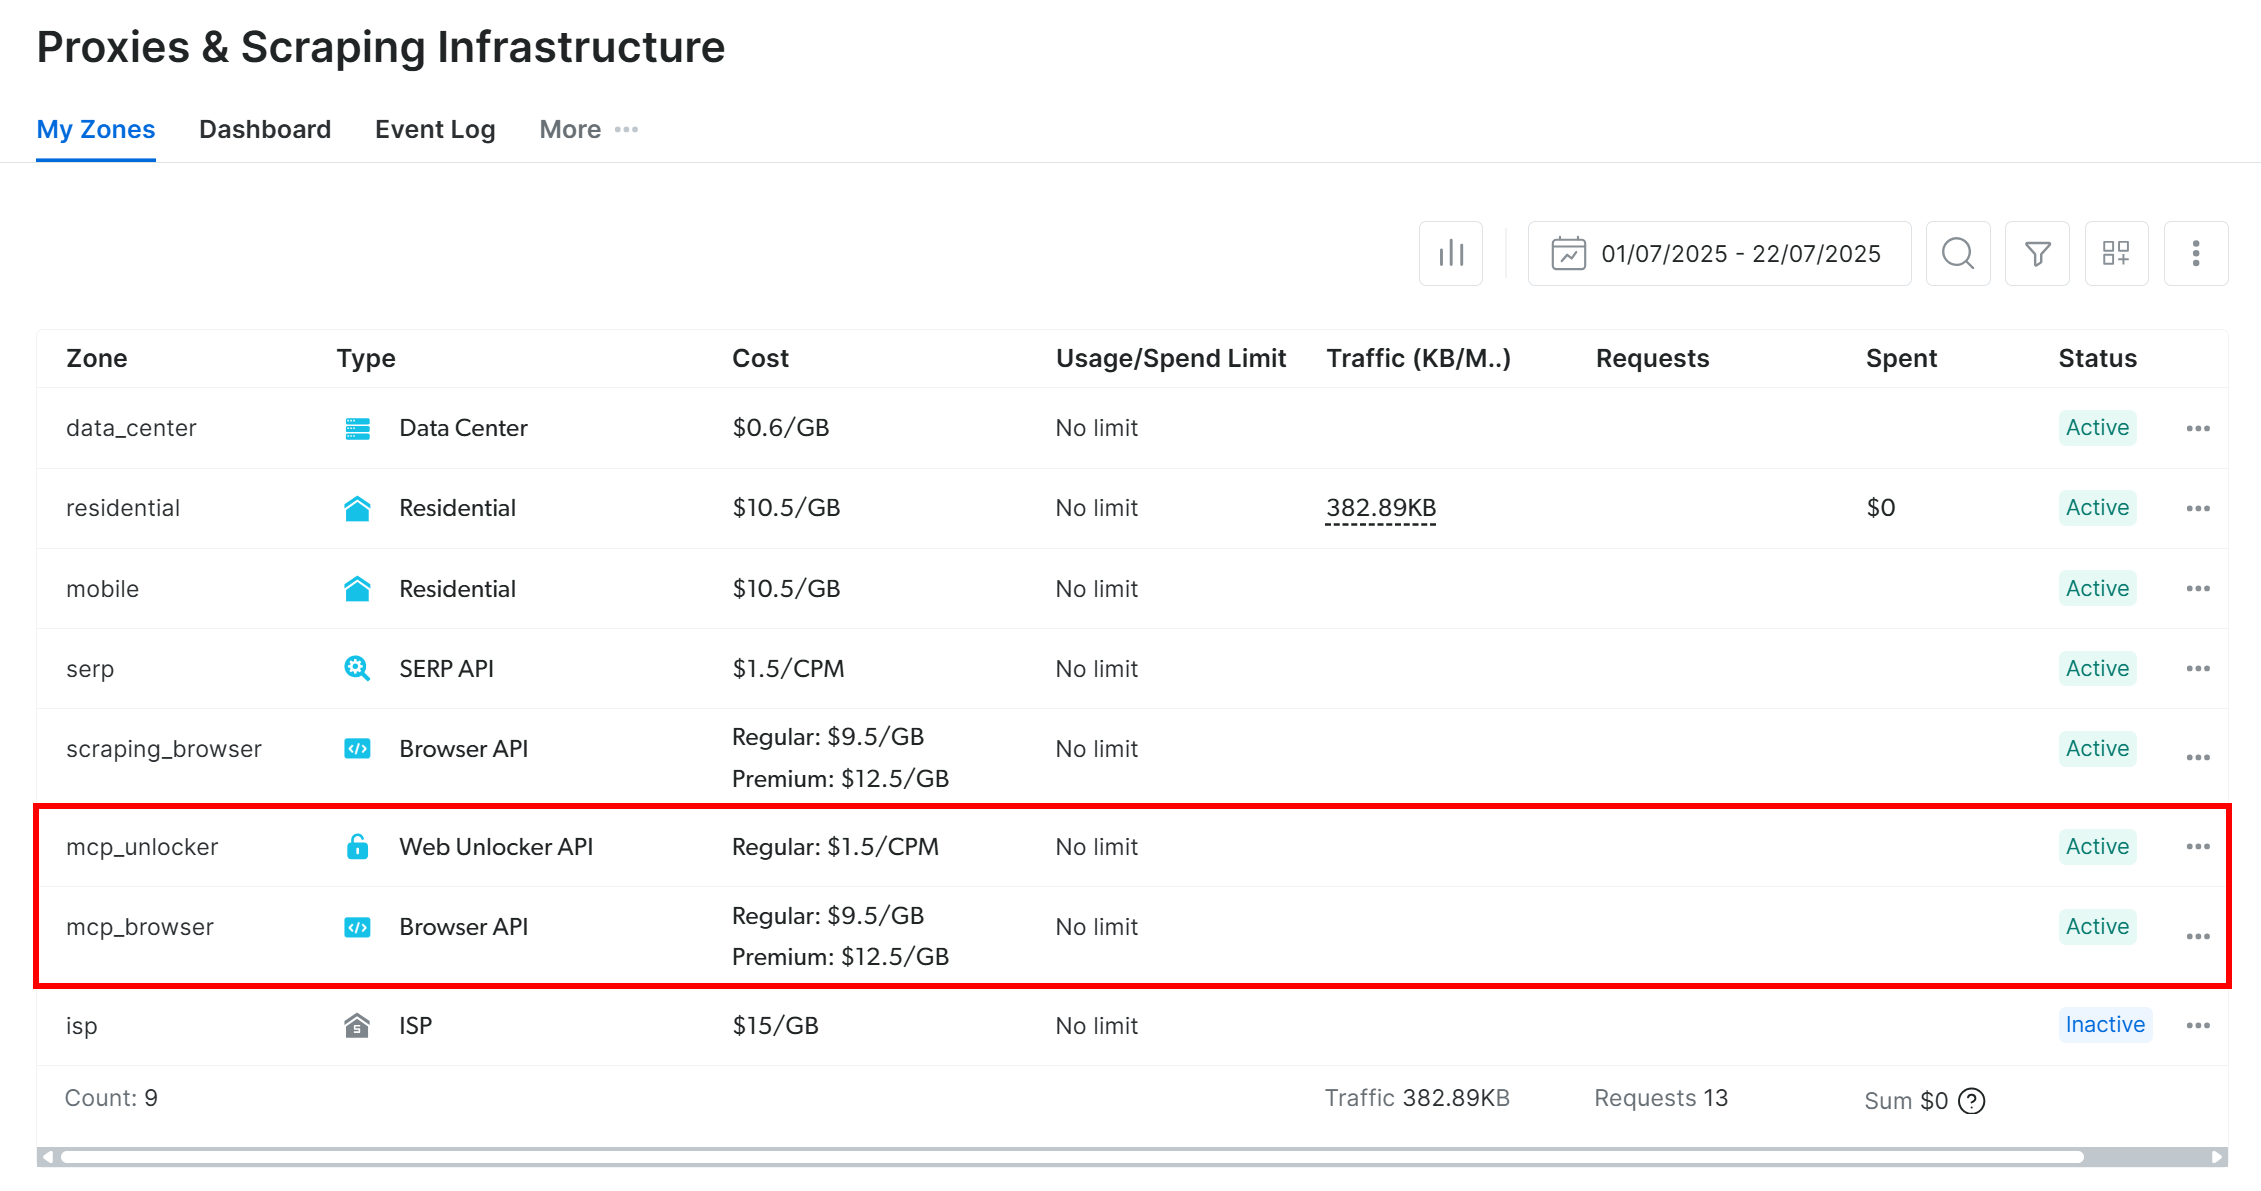
On the first launch, the Web MCP automatically creates two default zones in your Bright Data account:
mcp_unlocker: A zone for Web Unlocker.mcp_browser: A zone for Browser API.
To power its 60+ tools, Web MCP relies on those two Bright Data products.
If you want to verify that the zones were created, log in to your Bright Data dashboard. Reach the “Proxies & Scraping Infrastructure” page, and you should spot the two zones in the table:
Note: If your API token does not have Admin permissions, the two zones will not be created. In this case, you must set them up manually and configure their names via environment variables as explained on GitHub.
By default, the MCP server only exposes the search_engine and scrape_as_markdown tools (and their batch versions). Those tools are included in the Web MCP free tier, so you can use them at no cost.
To unlock advanced tools, such as tools for browser automation and structured data feeds, you must enable Pro mode. To do so, set the PRO_MODE="true" environment variable before starting the Web MCP:
API_TOKEN="<YOUR_BRIGHT_DATA_API>" PRO_MODE="true" npx -y @brightdata/mcpOr, on Windows:
$Env:API_TOKEN="<YOUR_BRIGHT_DATA_API>"; $Env:PRO_MODE="true"; npx -y @brightdata/mcpPro mode unlocks all 60+ tools, but it is not included in the free tier and will incur additional charges.
Wonderful! You just verified that the Web MCP server runs on your system. Kill the MCP process, as you are about to configure your script to launch and connect to it.
Step #4: Connect to Web MCP
Instruct your Python script to connect to the Web MCP server via STDIO.
Begin by adding the Bright Data API key you got earlier to your .env file:
BRIGHT_DATA_API_KEY="<YOUR_BRIGHT_DATA_API_KEY>"Replace the <YOUR_BRIGHT_DATA_API_KEY> placeholder with your actual key.
In agent.py, load the API key with:
BRIGHT_DATA_API_KEY = os.getenv("BRIGHT_DATA_API_KEY")Then, define a StdioServerParameters object to configure the STDIO connection:
from mcp import StdioServerParameters

server_parameters = StdioServerParameters(
    command="npx",
    args=["-y", "@brightdata/mcp"],
    env={
      "API_TOKEN": BRIGHT_DATA_API_KEY,
      "PRO_MODE": "true", # Optional
    },
)
This setup mirrors the npx command from earlier, using the environment variable for the API token. Note that API_TOKEN is required, while PRO_MODE is optional.
Use an MCPClient instance to apply these connection settings and retrieve the list of tools exposed by the server:
from smolagents import MCPClient

with MCPClient(server_parameters, structured_output=True) as tools:
Your agent.py script will now launch a Web MCP process and connect via STDIO. The result is an array of tools you can pass to any smolagents AI agent.
Verify the connection by printing the available tools:
for bright_data_tool in bright_data_tools:
    print(f"TOOL: {bright_data_tool.name} - {bright_data_tool.description}\n")
If you run the script with Pro mode disabled, you should see a limited set of tools:
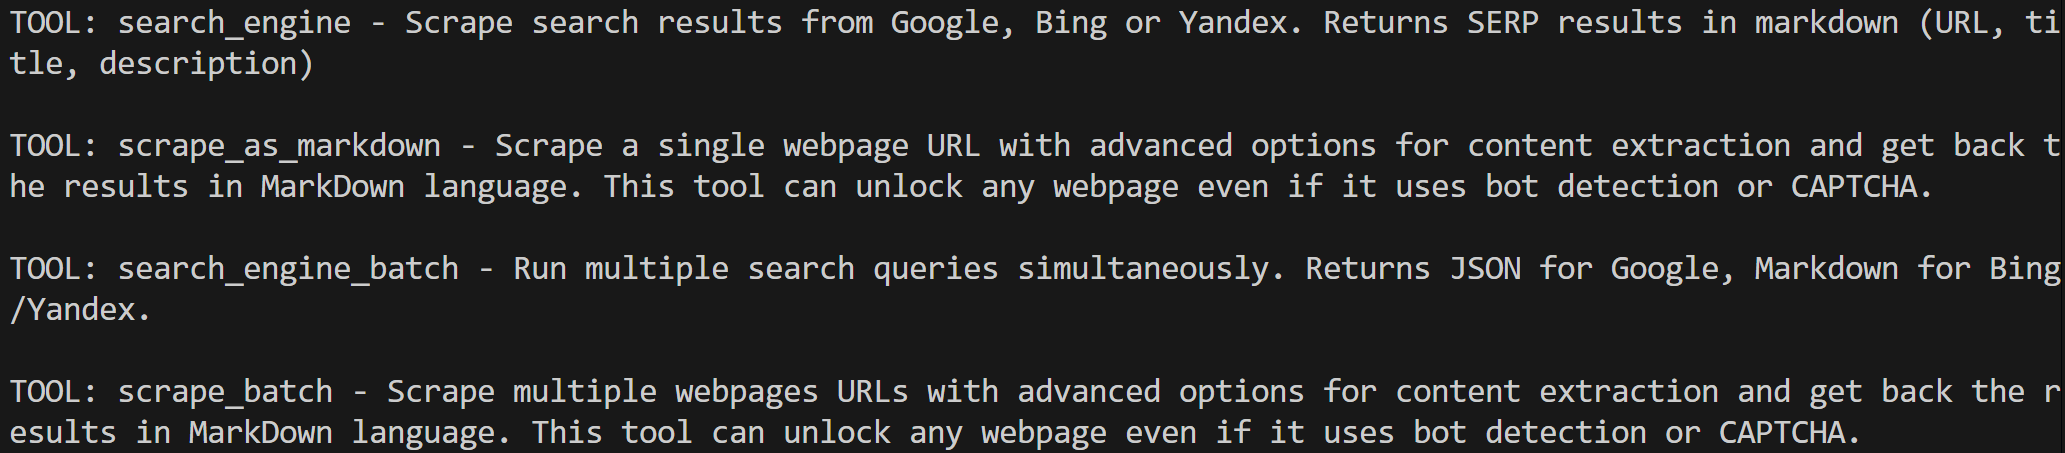
With Pro mode enabled, all 60+ tools will be displayed:
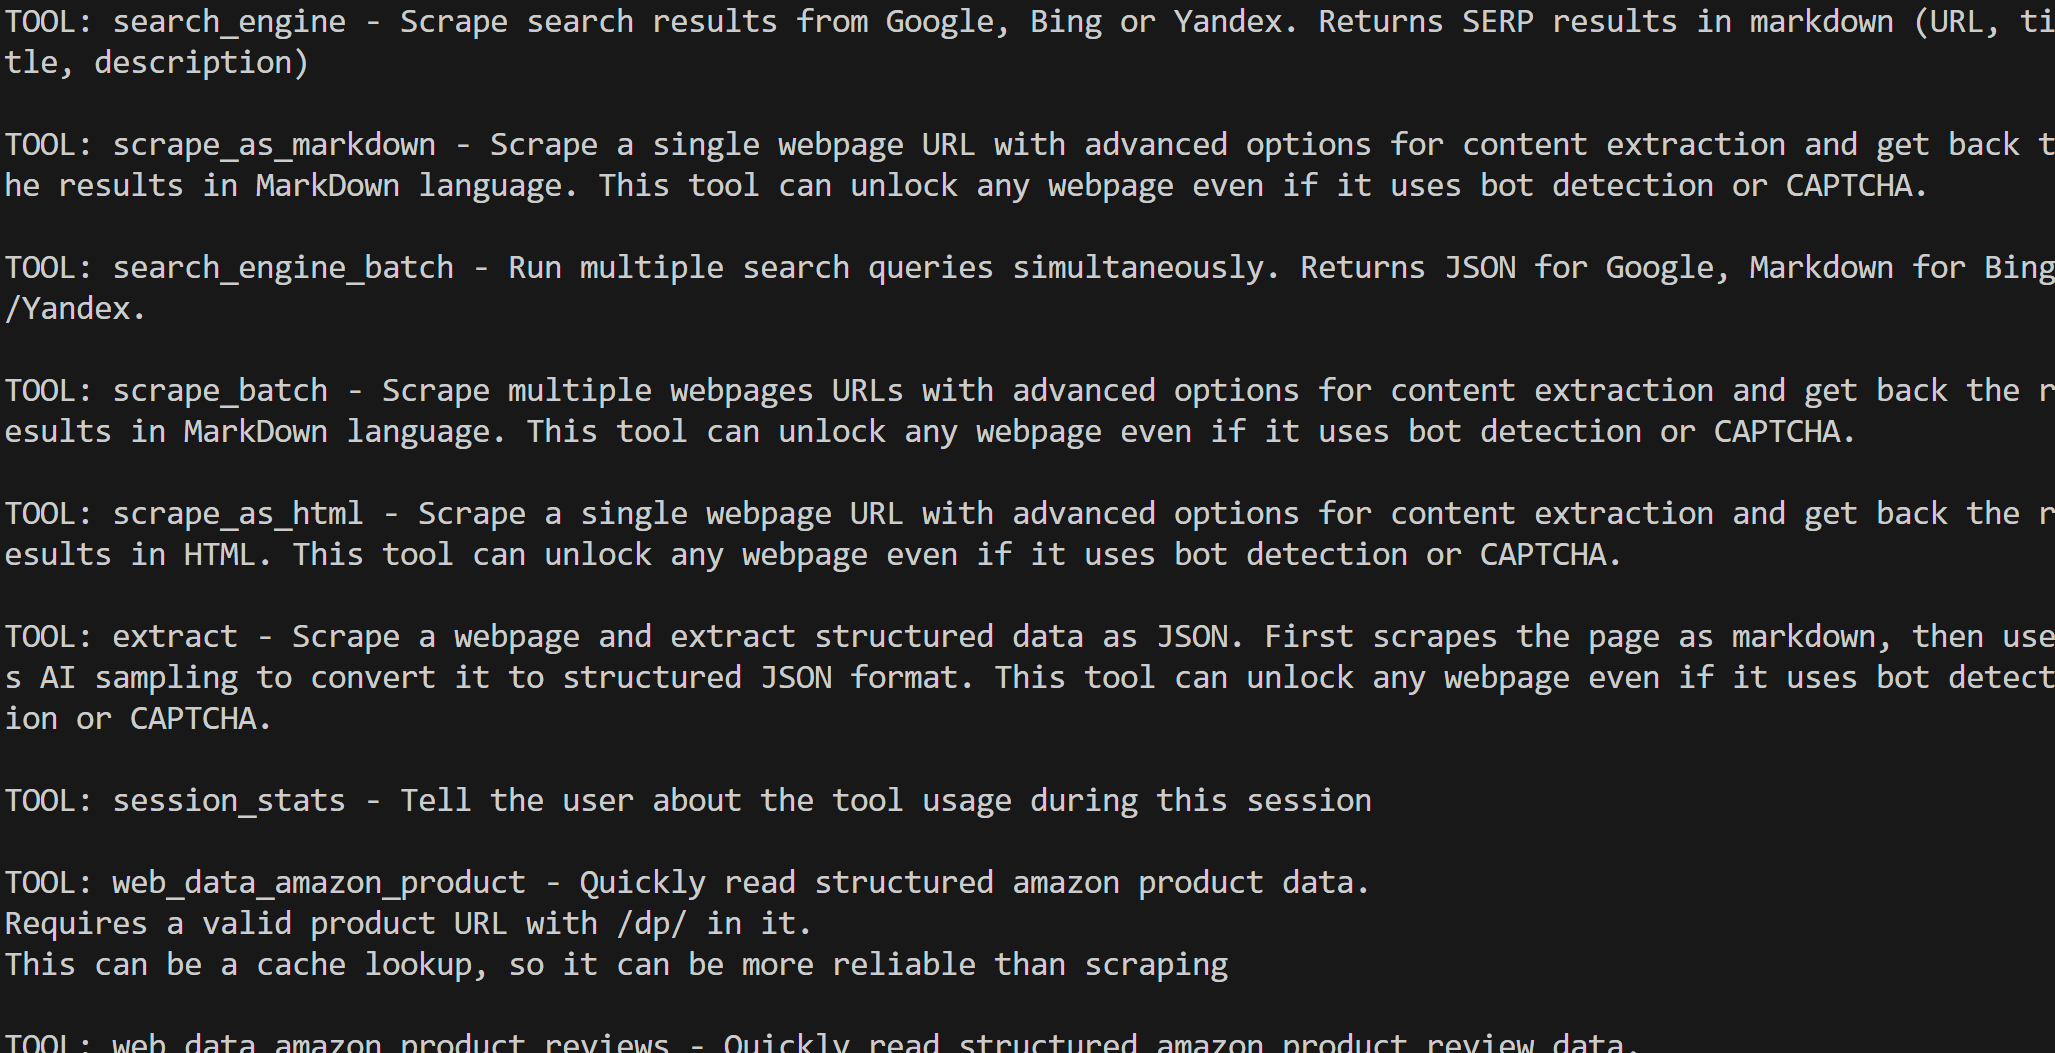
Terrific! This confirms that your Web MCP integration is working correctly.
Step #5: Define the LLM Integration
Your script now has access to the tools, but your agent also needs a brain. This means it is time to configure a connection to an LLM service.
Start by adding your Gemini API key to the .env file:
GEMINI_API_KEY="<YOUR_GEMINI_API_KEY>"Then, load it in your agent.py file:
GEMINI_API_KEY = os.getenv("GEMINI_API_KEY")Next, define an OpenAIServerModel instance to connect to the Gemini APIs:
from smolagents import OpenAIServerModel

model = OpenAIServerModel(
    model_id="gemini-2.5-flash",
    # Google Gemini OpenAI-compatible API base URL
    api_base="https://generativelanguage.googleapis.com/v1beta/openai/",
    api_key=GEMINI_API_KEY,
)
Even if you are using a model class for OpenAI, this will work. That is thanks to the specific api_base you set, which gives you access to OpenAI-compatible endpoints for Gemini integration. Cool!
Step #6: Create the AI Agent with the Web MCP Tools
You now have all the building blocks to create a smolagents code AI agent. Use the Web MCP tools and the LLM engine to define one:
from smolagents import CodeAgent

agent = CodeAgent(
  model=model,
  tools=tools,
  stream_outputs=True,
)
CodeAgent is the main smolagents AI agent type. This generates Python code snippets to perform actions and solve tasks. The pros and cons of this approach are:
Pros:
- Highly expressive: Can handle complex logic, control flow, and combine multiple tools. Plus, it supports loops, transformations, reasoning, etc.
- Flexible: No need to predefine every action, as it can dynamically generate new actions and tools.
- Emergent reasoning: Well-suited for multi-step problems or dynamic decision-making.
Cons:
- Risk of errors: May produce Python syntax errors or exceptions that need handling.
- Less predictable: Outputs can be unexpected or unsafe.
- Requires secure environment: Must run in a safe execution context.
All that is left is to run your agent and let it execute tasks!
Step #7: Execute a Task in the Agent
To test your agent’s web data retrieval capabilities, you need to write a proper prompt. For example, suppose you want to analyze the sentiment of comments on a YouTube video.
A Web MCP tool will retrieve the comments, and a Python script generated by the CodeAgent will perform the sentiment analysis. Finally, the code will be executed. Having the generated Python code is also useful for understanding the process and making future extensions easier.
Achieve this by running a prompt like the following in your agent:
prompt = """
Retrieve the top 10 comments from the following YouTube video:
https://www.youtube.com/watch?v=9txkGBj_trg
Provide a concise report that includes sentiment analysis, along with excerpts from the actual comments
"""

# Execute the prompt in the agent
agent.run(prompt)
The input video is a trailer announcement for Black Ops 7, a video game that has not been well-received by the community.
Since most comments are quite biased, the sentiment analysis is expected to produce results that highlight primarily negative reactions.
Step #8: Put It All Together
Right now, your agent.py file should contain:
# pip install "smolagents[mcp,openai]" python-dotenv
from dotenv import load_dotenv
import os
from smolagents import OpenAIServerModel, MCPClient, CodeAgent, ToolCallingAgent
from mcp import StdioServerParameters

# Load environment variables from the .env file
load_dotenv()

# Read the API keys from the envs
GEMINI_API_KEY = os.getenv("GEMINI_API_KEY")
BRIGHT_DATA_API_KEY = os.getenv("BRIGHT_DATA_API_KEY")

server_parameters = StdioServerParameters(
    command="npx",
    args=["-y", "@brightdata/mcp"],
    env={
      "API_TOKEN": BRIGHT_DATA_API_KEY,
      "PRO_MODE": "true", # Optional
    },
)

# Initialize the connection to Gemini
model = OpenAIServerModel(
    model_id="gemini-2.5-flash",
    # Google Gemini OpenAI-compatible API base URL
    api_base="https://generativelanguage.googleapis.com/v1beta/openai/",
    api_key=GEMINI_API_KEY,
)

# Initialize the MCP client and retrieve the tools
with MCPClient(server_parameters, structured_output=True) as tools:
  # Define the AI agent, extended with the MCP tools
  agent = CodeAgent(
    model=model,
    tools=tools,
    stream_outputs=True,
  )

  prompt = """
  Retrieve the top 10 comments from the following YouTube video:
  https://www.youtube.com/watch?v=9txkGBj_trg
  Provide a concise report that includes sentiment analysis, along with excerpts from the actual comments
  """

  # Execute the prompt in the agent
  agent.run(prompt)
As promised, smolagents meets expectations and allows you to build a complete AI agent with MCP integration in under 50 lines of code.
Test it by executing:
python agent.pySuppose you are running it with Pro mode enabled for the Web MCP. The result will be a multi-step output like this:
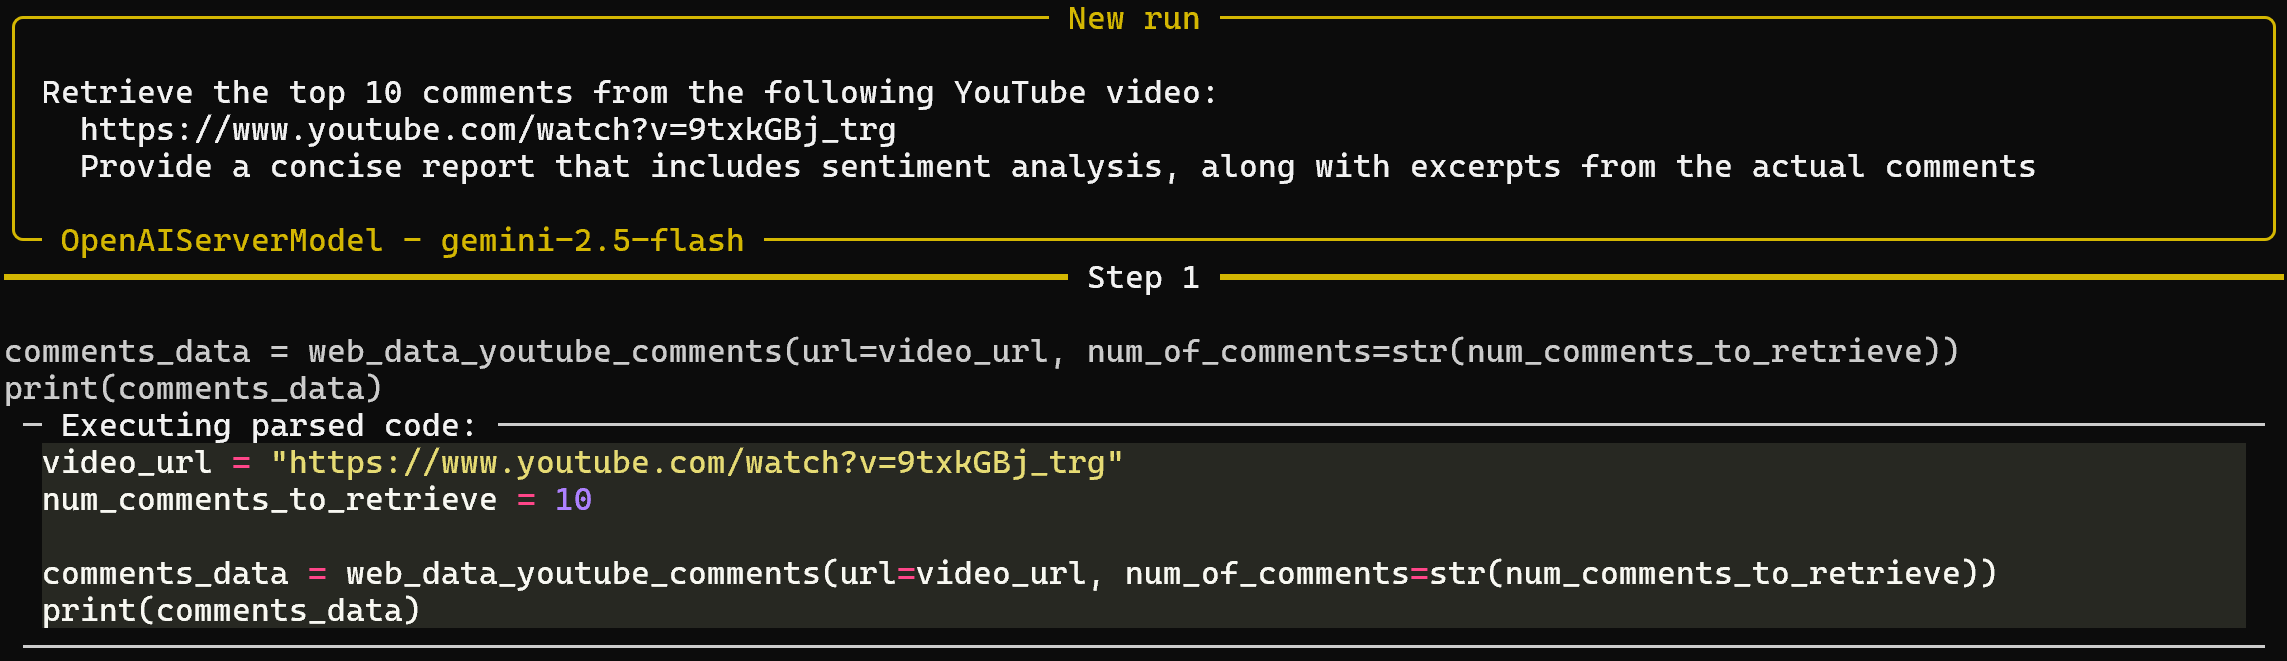
Notice that, based on the prompt, the agent successfully selected web_data_youtube_comments Web MCP tool. It called it with the correct arguments to reach the goal. That tool is described as: “Quickly read structured youtube comments data. Requires a valid youtube video URL. This can be a cache lookup, so it can be more reliable than scraping.” So, it made a good decision!
After the tool returned the comments data, Step 2 for report generation begins:
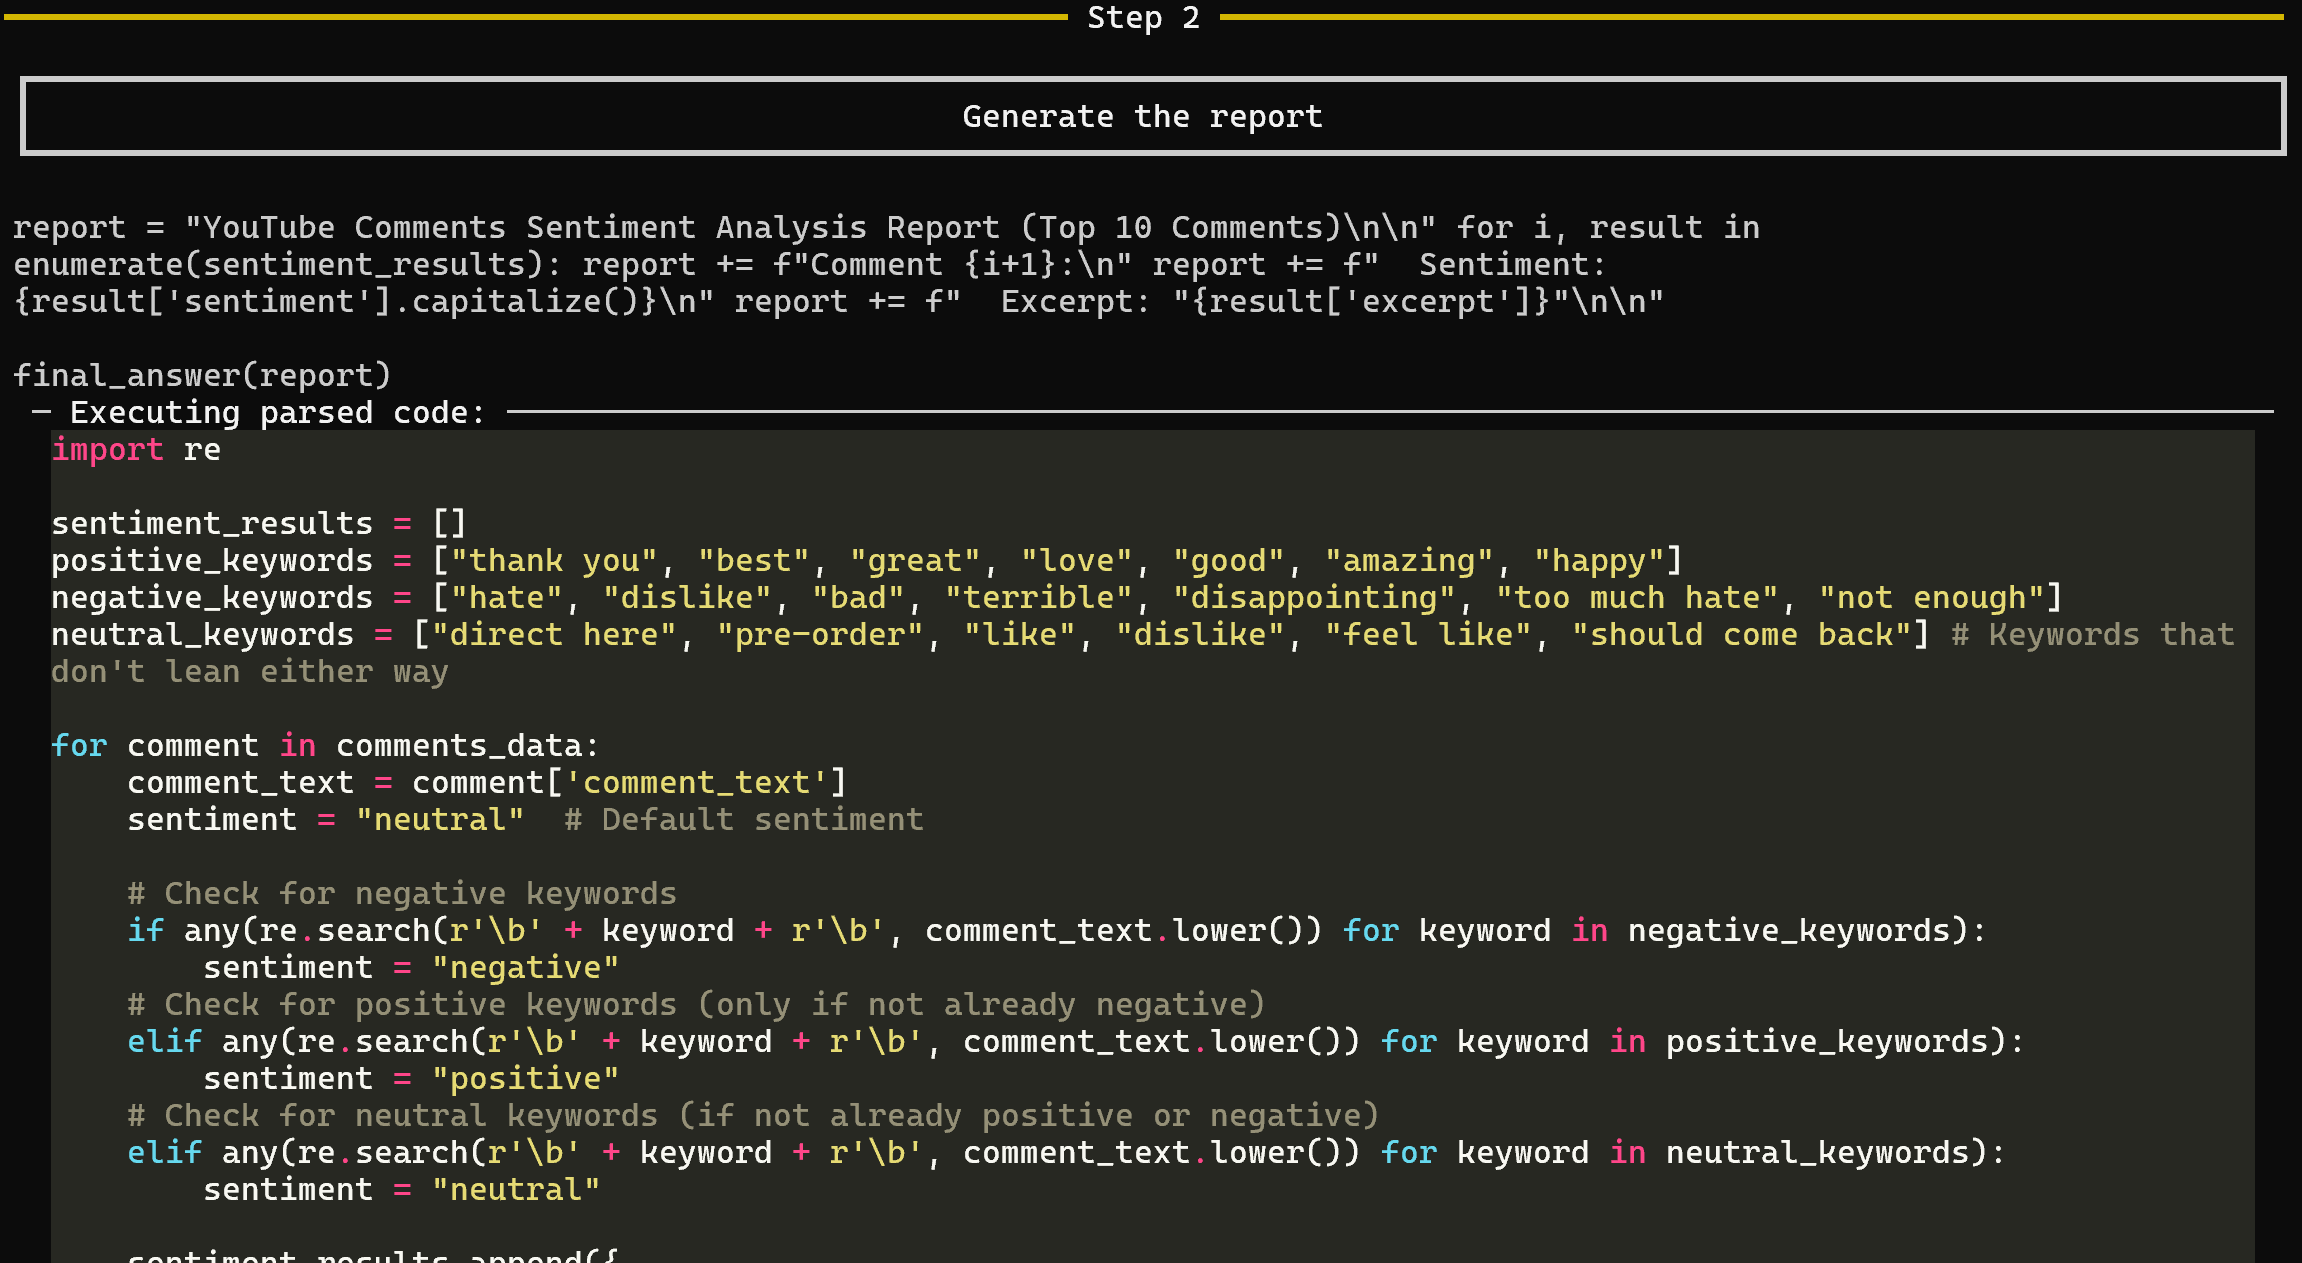
This step generates the final sentiment analysis report. In particular, CodeAgent produces all the Python code for generating the report and executes it on the data retrieved by web_data_youtube_comments.
This approach lets you clearly understand the process the AI used to produce the output, removing much of the usual “black box” effect of LLMs.
The result will be something like:
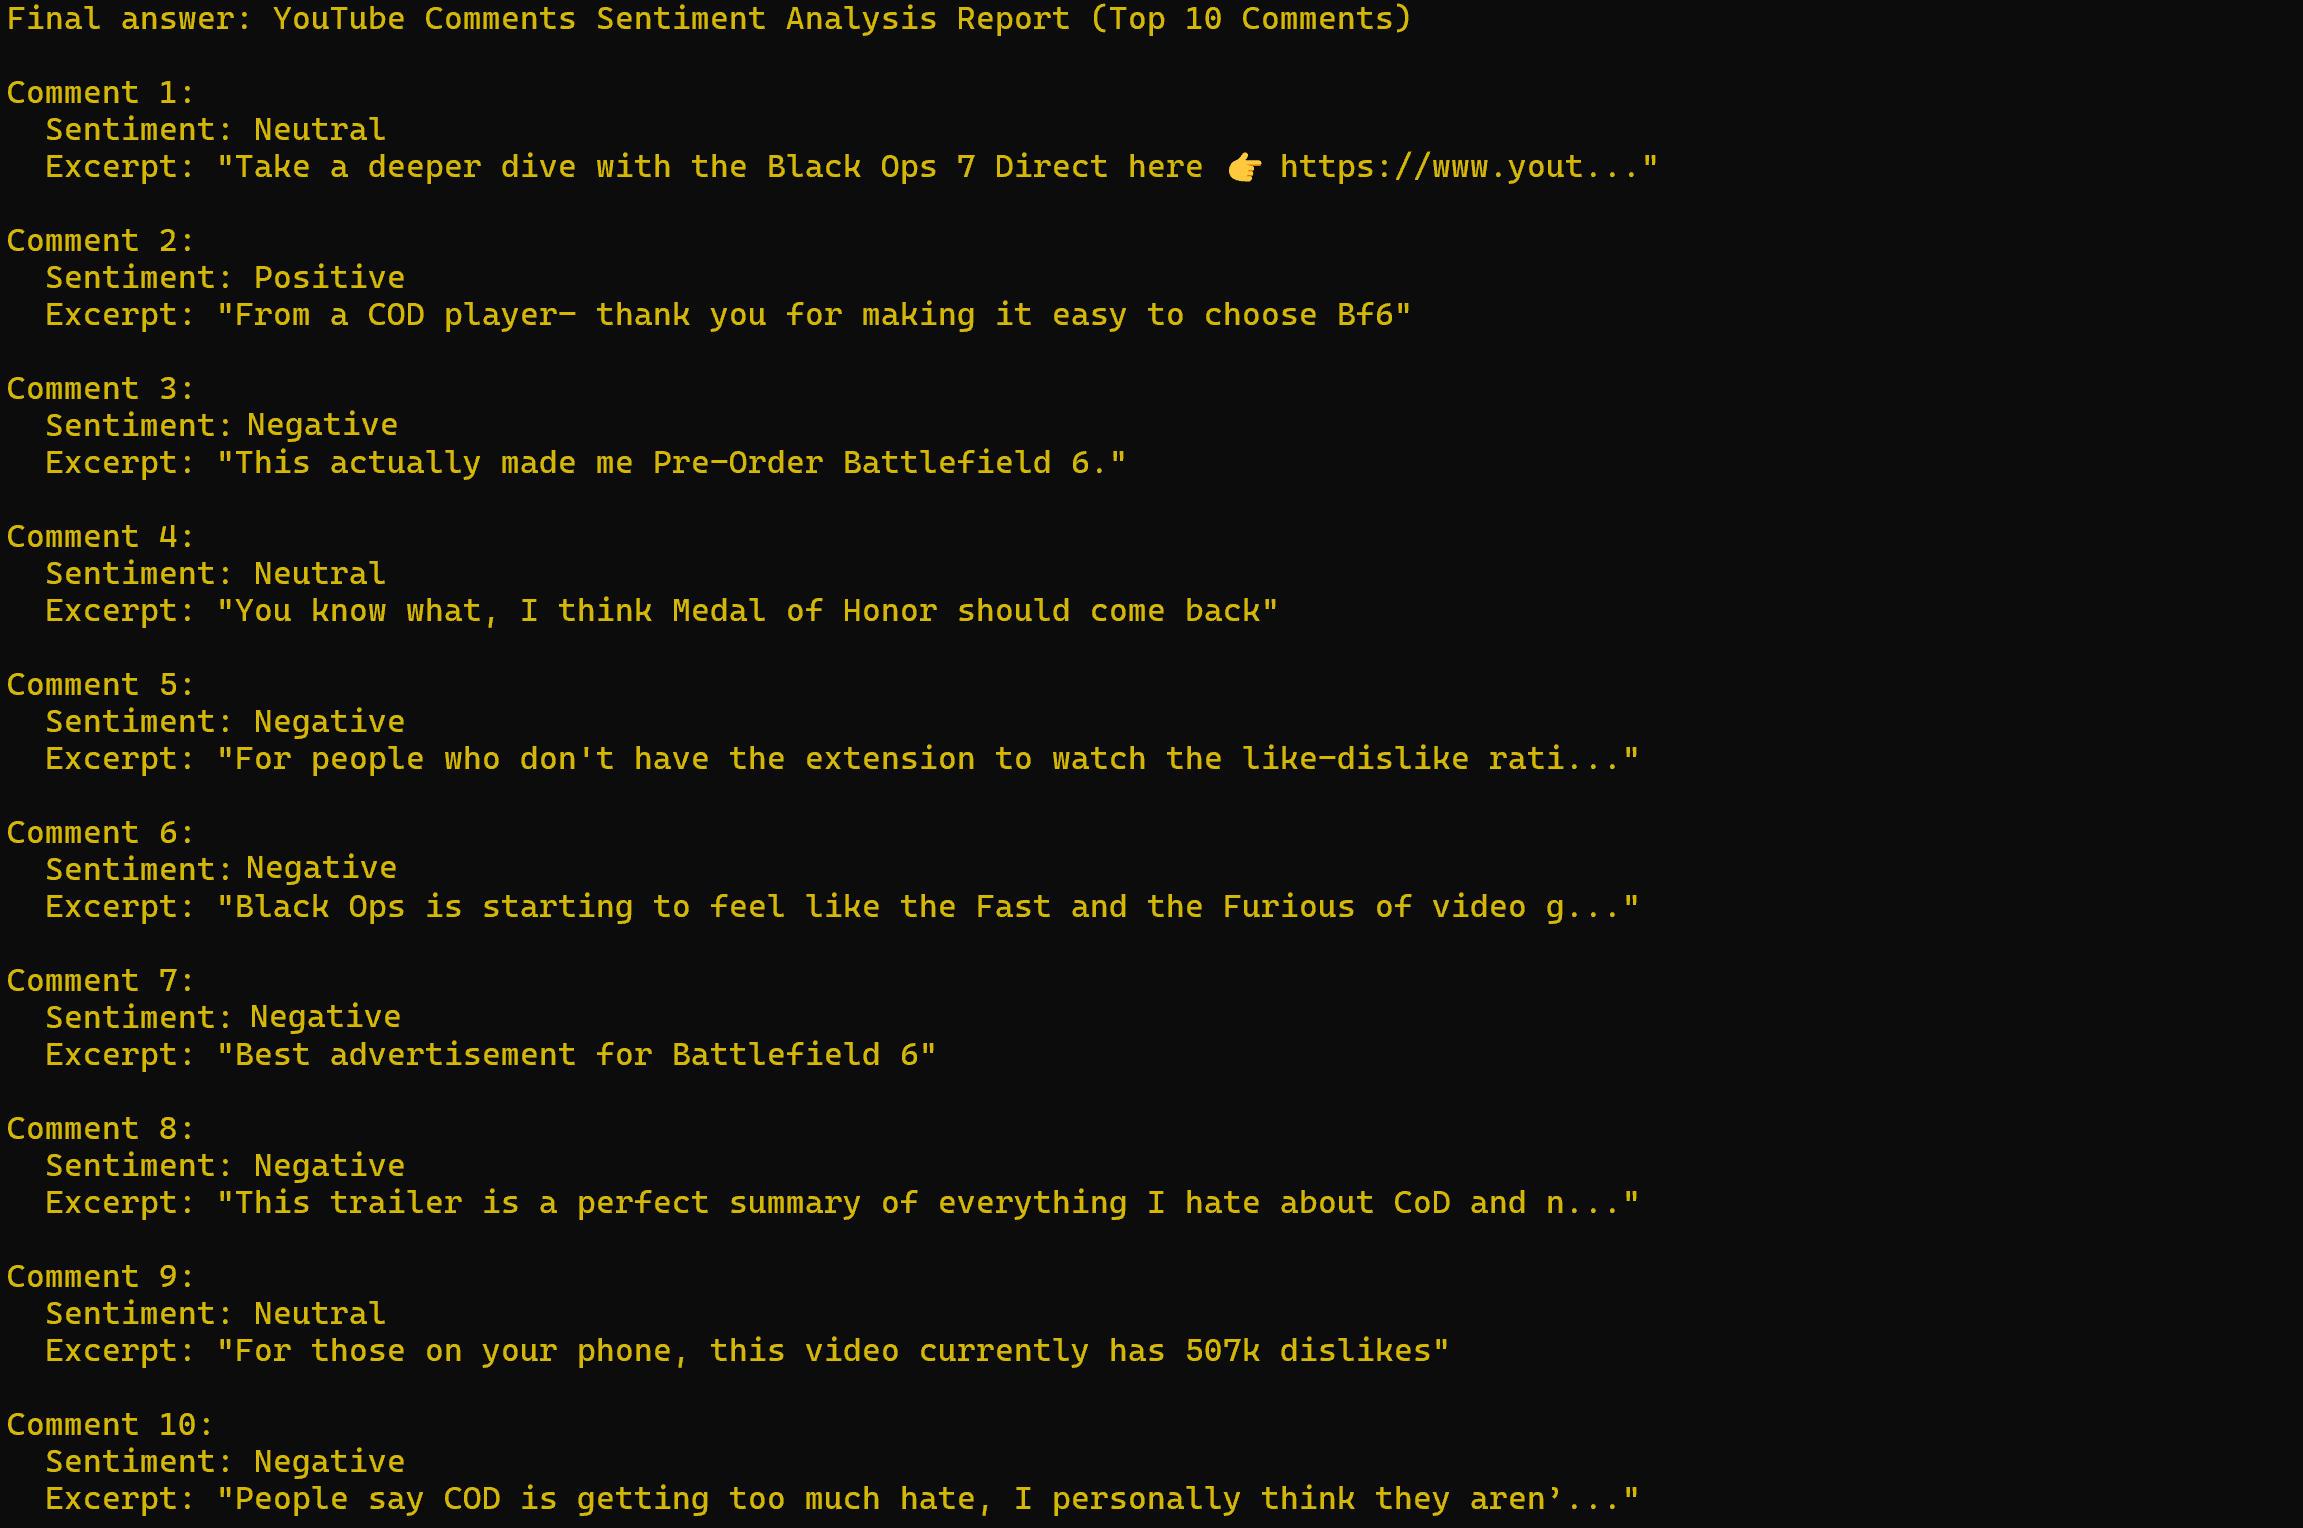
As expected, the sentiment analysis is largely negative.
Note that the comments referenced in the report match exactly what you can see on the YouTube page for the video:

Now, if you have ever tried scraping YouTube, you know how difficult it can be due to anti-bot protections and the required user interactions. This is something that vanilla LLMs cannot handle, which demonstrates the power and effectiveness of integrating Bright Data’s Web MCP into a smolagents AI agent.
Feel free to experiment with different input prompts. With the wide range of Bright Data Web MCP tools, you can address a variety of real-world use cases.
Et voilà! You’ve just seen the power of combining Bright Data’s Web MCP with a smolagents code AI agent in Python.
Conclusion
In this blog post, you learned how to build a code-based AI agent using smolagents. You saw how to enhance it with tools from Bright Data’s Web MCP, which even offers a free tier.
This integration empowers your agent with web search, structured data extraction, access to live web data feeds, automated web interactions, and more. To create even more sophisticated AI agents, explore the wider range of AI-ready products and services available within Bright Data’s ecosystem.
Create a Bright Data account today and begin experimenting with our web data tools!

Technical Writer
Antonello Zanini is a technical writer, editor, and software engineer with 5M+ views. Expert in technical content strategy, web development, and project management.


