
In this tutorial, you will learn:
- What BabyAGI is and what makes it a truly unique AI agent-building framework.
- Why extending BabyAGI with Bright Data services opens the door to a wide range of interesting scenarios.
- How to integrate Bright Data into BabyAGI through custom functions.
Let’s dive in!
What Is BabyAGI?
BabyAGI is an experimental Python framework engineered to create self-building autonomous AI agents capable of generating, prioritizing, and executing tasks to achieve user-defined goals.
It functions like a minimalist, self-improving task manager, leveraging LLMs such as OpenAI’s models for reasoning and vector databases for memory. In general, it operates in an intelligent loop to automate complex workflows.
At its core, BabyAGI introduces a function-based framework called functionz for storing, managing, and executing functions from a database. These functions also support code generation, enabling the AI agent to register new functions, call them, and evolve autonomously.
Then, a built-in dashboard allows you to manage functions, monitor execution, and register secrets. It features a graph-based structure to track imports, dependent functions, and authentication secrets, with automatic loading and detailed logging.
What makes BabyAGI particularly interesting is its simplicity, self-building capability, and user-friendly web dashboard. The core idea is that the most effective autonomous agents are those that can extend themselves with minimal structure.
BabyAGI is open source and actively maintained, with over 22k stars on GitHub.
Empower Better Self-Building AI Agents Through Web Data Access
LLMs are inherently limited by the static data they were trained on, which often leads to hallucinations and other common LLM issues.
BabyAGI overcomes these constraints through its self-building function framework. It employs an LLM to write custom functions, which are then passed back to the agent as tools to extend its capabilities.
However, the logic for generating these functions is still limited by the LLM’s outdated knowledge. To address that major limitation, BabyAGI needs the ability to search the web and retrieve accurate, up-to-date information, enabling it to produce more reliable functions.
That is made possible by connecting with Bright Data services, such as:
- SERP API: Collect search engine results from Google, Bing, and more at scale without getting blocked.
- Web Unlocker API: Access any website in a single request and receive clean HTML or Markdown, with automatic handling of proxies, headers, and CAPTCHAs.
- Web Scraping APIs: Retrieve structured, parsed data from popular platforms like Amazon, LinkedIn, Instagram, Yahoo Finance, and others.
- And other solutions…
With these integrations, combined with BabyAGI’s self-building architecture, the AI can autonomously evolve, add new functions, and handle complex workflows far beyond what a standard LLM could achieve on its own.
How to Extend BabyAGI with Bright Data for Web Data Retrieval Capabilities
In this step-by-step section, you will be guided through the integration of Bright Data into BabyAGI via custom functions. These connect to two Bright Data products: the SERP API and the Web Unlocker API.
Follow the instructions below to get started!
Prerequisites
To follow along with this tutorial, you need:
- Python 3.10+ installed locally.
- An OpenAI API key.
- A Bright Data account configured with a SERP API zone, a Web Unlocker API zone, and an active API key.
Do not worry if your Bright Data account is not set up yet, as you will be guided through this process in a dedicated step.
Step #1: Set Up a BabyAGI Project
Open the terminal and create a new folder for your BabyAGI project. For example, call it babyagi-bright-data-app:
mkdir babyagi-bright-data-appbabyagi-bright-data-app/ will contain the Python code for launching the BabyAGI dashboard and defining the Bright Data integration functions.
Next, enter the project directory and initialize a virtual environment inside it:
cd babyagi-bright-data-app
python -m venv .venv
Add a new file called main.py in the project root, which should now contain:
babyagi-bright-data-app/
├── .venv/
└── main.py
main.py will contain the BabyAGI launching and extension logic.
Load the project folder in your favorite Python IDE, such as Visual Studio Code with the Python extension or PyCharm Community Edition.
Now, activate the virtual environment you created earlier. In Linux or macOS, execute:
source .venv/bin/activateEquivalently, on Windows, run:
.venv/Scripts/activateWith the virtual environment activated, install the required PyPI libraries:
pip install babyagi requestsThe dependencies for this application are:
babyagi: Install BabyAGI and all its requirements so that you can launch the dashboard.requests: Help you make HTTP requests to connect to Bright Data services.
Done! You now have a Python environment for self-agent development in BabyAGI.
Step #2: Launch the BabyAGI Dashboard
In your main.py file, add the following code to initialize and launch the BabyAGI dashboard:
import babyagi

if __name__ == "__main__":
    app = babyagi.create_app("/dashboard")
    app.run(host="0.0.0.0", port=8080)
This instructs BabyAGI to expose the dashboard application at:
http://localhost:8080/dashboardVerify that the application works by running:
python main.pyIn the terminal, you should see logs indicating that the dashboard is listening at http://localhost:8080/dashboard:
Visit that URL in your browser to access the dashboard: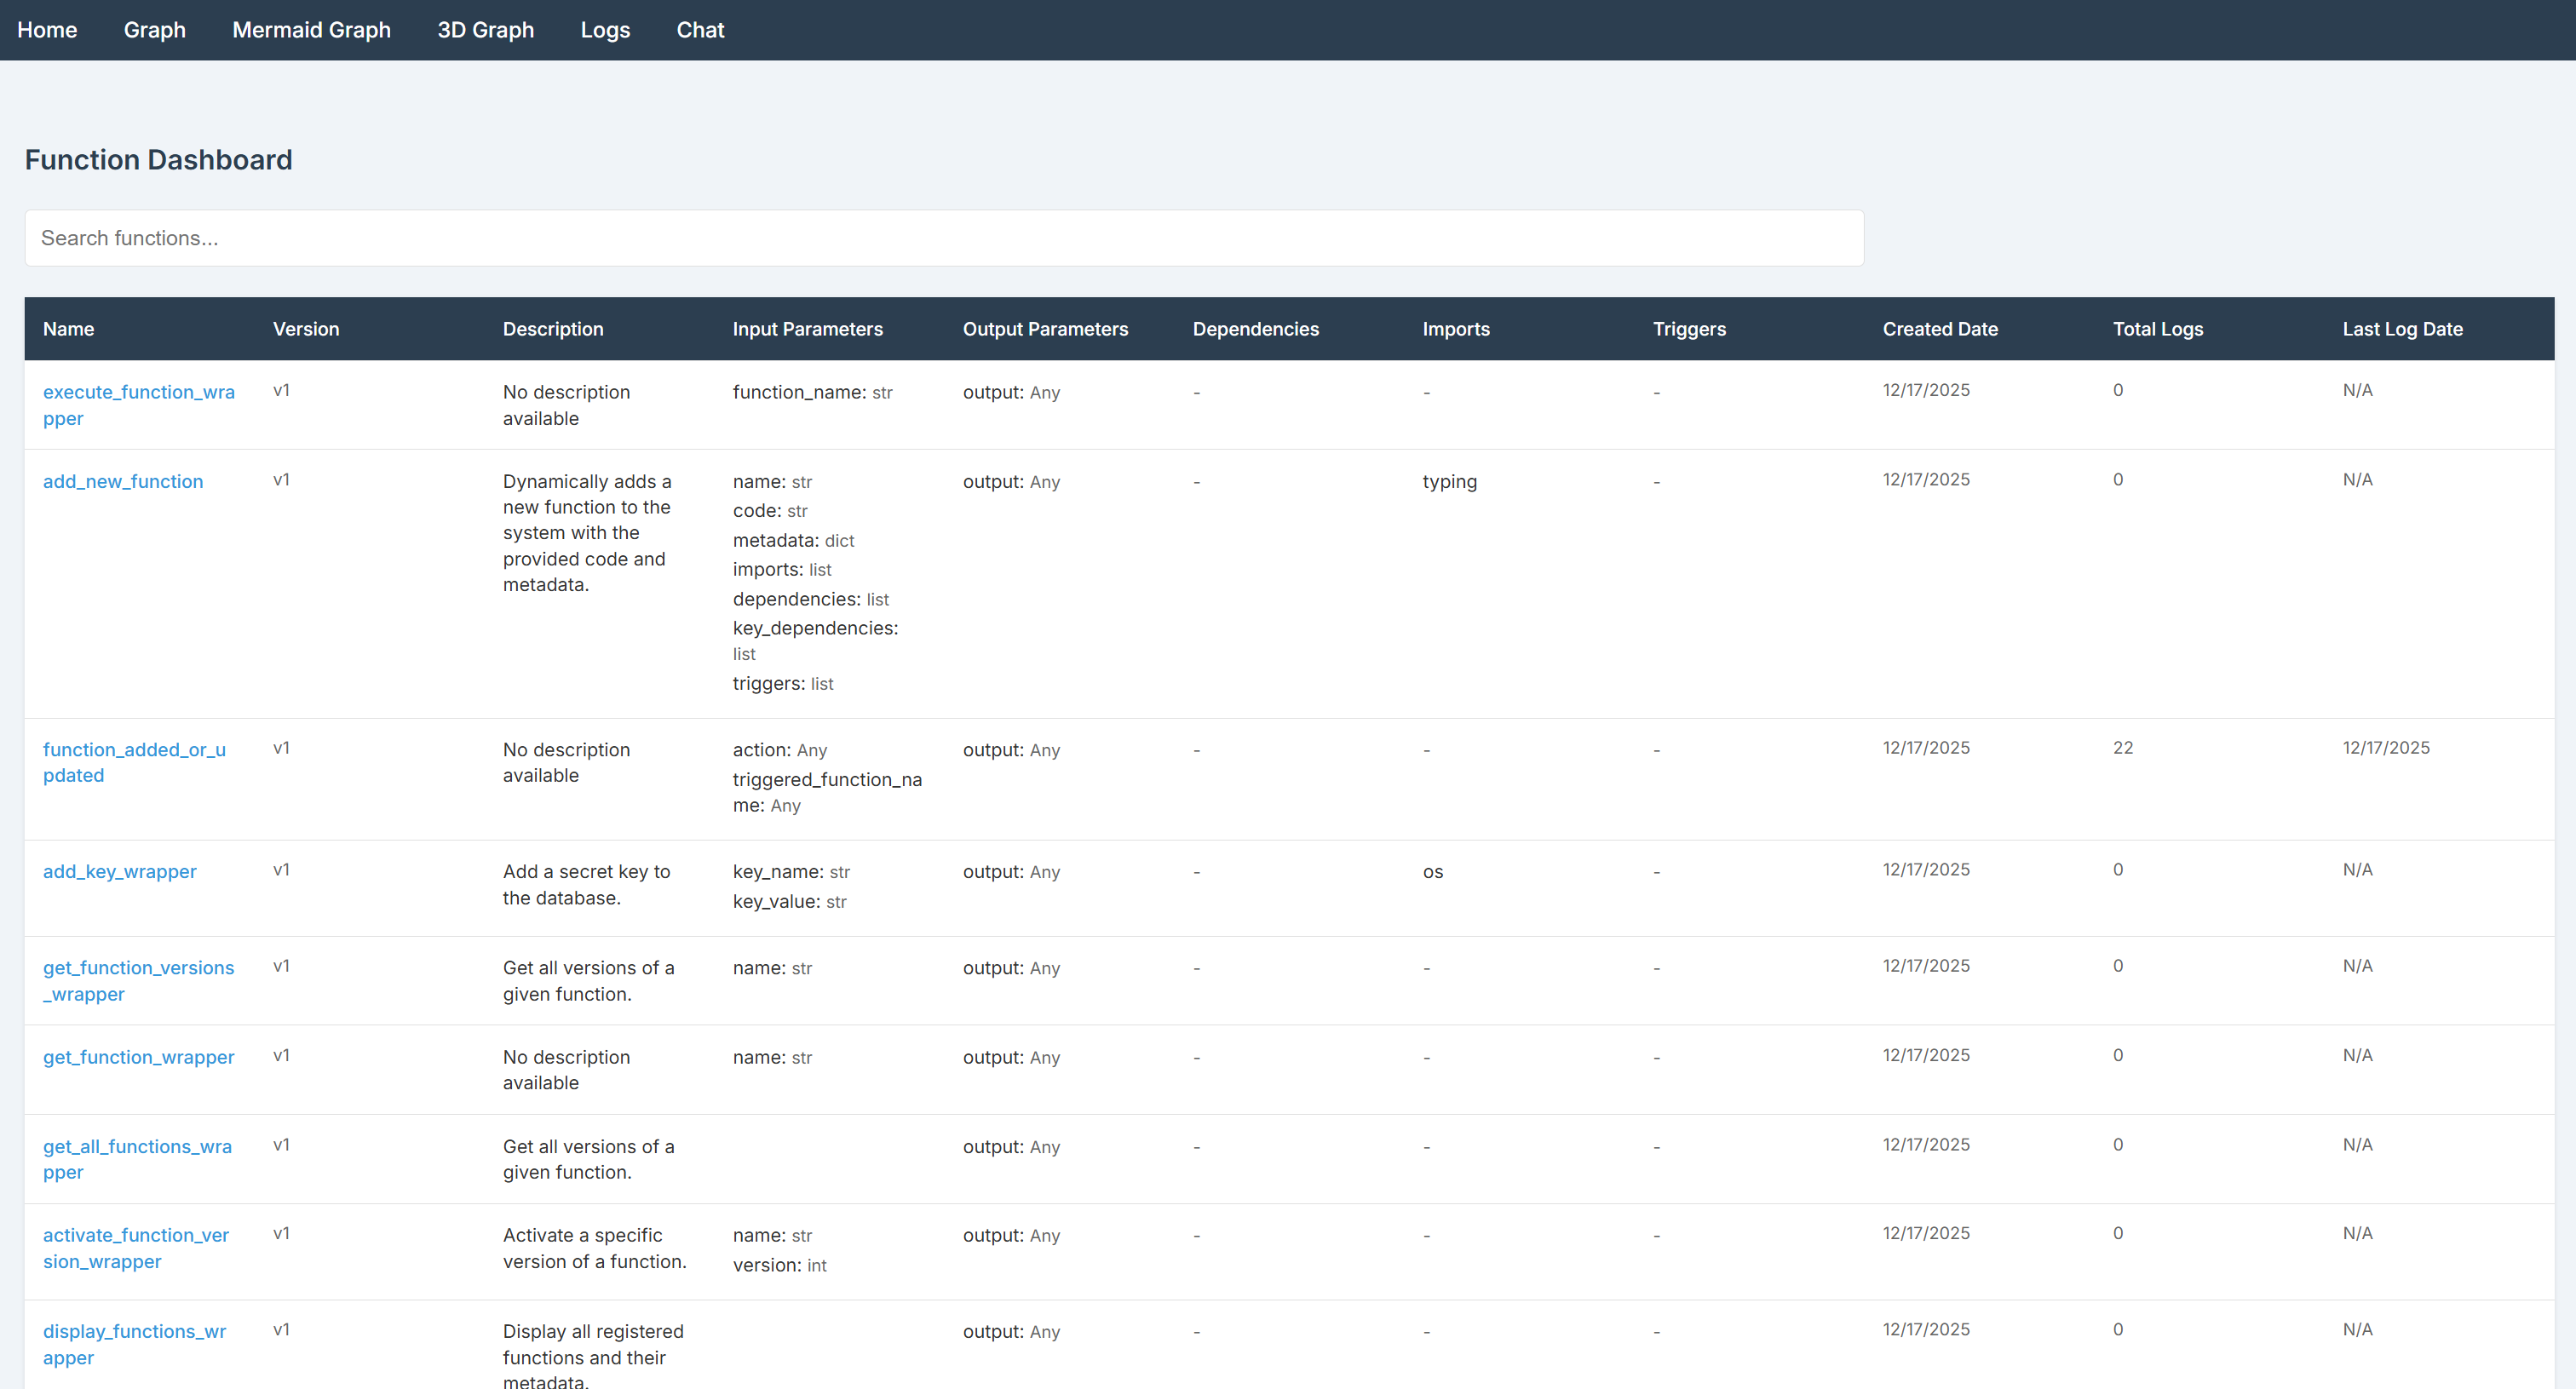
The BabyAGI dashboard homepage lists all functions available. By default, the library ships with two preloaded function packs:
- Default functions:
- Function execution: Run, add, update, and retrieve functions and their versions.
- Key management: Add and retrieve secret keys.
- Triggers: Configure triggers to execute functions based on other functions.
- Logs: Retrieve execution logs with optional filters.
- AI functions:
- AI descriptions and embeddings: Automatically generate function descriptions and embeddings.
- Function selection: Find or recommend similar functions based on a prompt.
The BabyAGI dashboard provides a user-friendly interface for managing functions, monitoring executions, handling secrets, configuring triggers, and visualizing dependencies. Explore the available pages to become familiar with their features and options!
Step #3: Configure Secret Management
Your BabyAGI agent will connect to third-party services such as OpenAI and Bright Data. These connections are authenticated using external API keys. Hard-coding API keys directly in your main.py file is not a best practice, as it can lead to security issues. Instead, you should load them from environment variables.
BabyAGI includes a built-in mechanism to read secrets from environment variables or from a local .env file, without requiring any additional dependencies. To use this feature, add a .env file to your project directory:
babyagi-bright-data-app/
├── .venv/
├── .env # <----
└── main.py
After adding your variables to the .env file, you can access them in your code like this:
import os

ENV_VALUE = os.getenv("ENV_NAME")
That is it! Your script now securely loads third-party integration secrets from environment variables instead of hard-coded values.
Alternatively, you can set these secrets directly from the dashboard. First, you need to configure an OpenAI API key (this is covered in the next step). Once that is done, reach the “Chat” page in the dashboard. From the function selector, choose the add_key_wrapper function and prompt it to define your secret using a message like:
Define an ENV_NAME secret whose value is ENV_VALUE.After submitting the prompt, you should see a result similar to the following:
As shown, the secret has been successfully created. Verify that the secret exists by adding the get_all_secrets_keys function and calling it.
Step #4: Connect BabyAGI to an OpenAI Model
The “Chat” page in the BabyAGI dashboard allows you to select functions and invoke them through a conversational interface: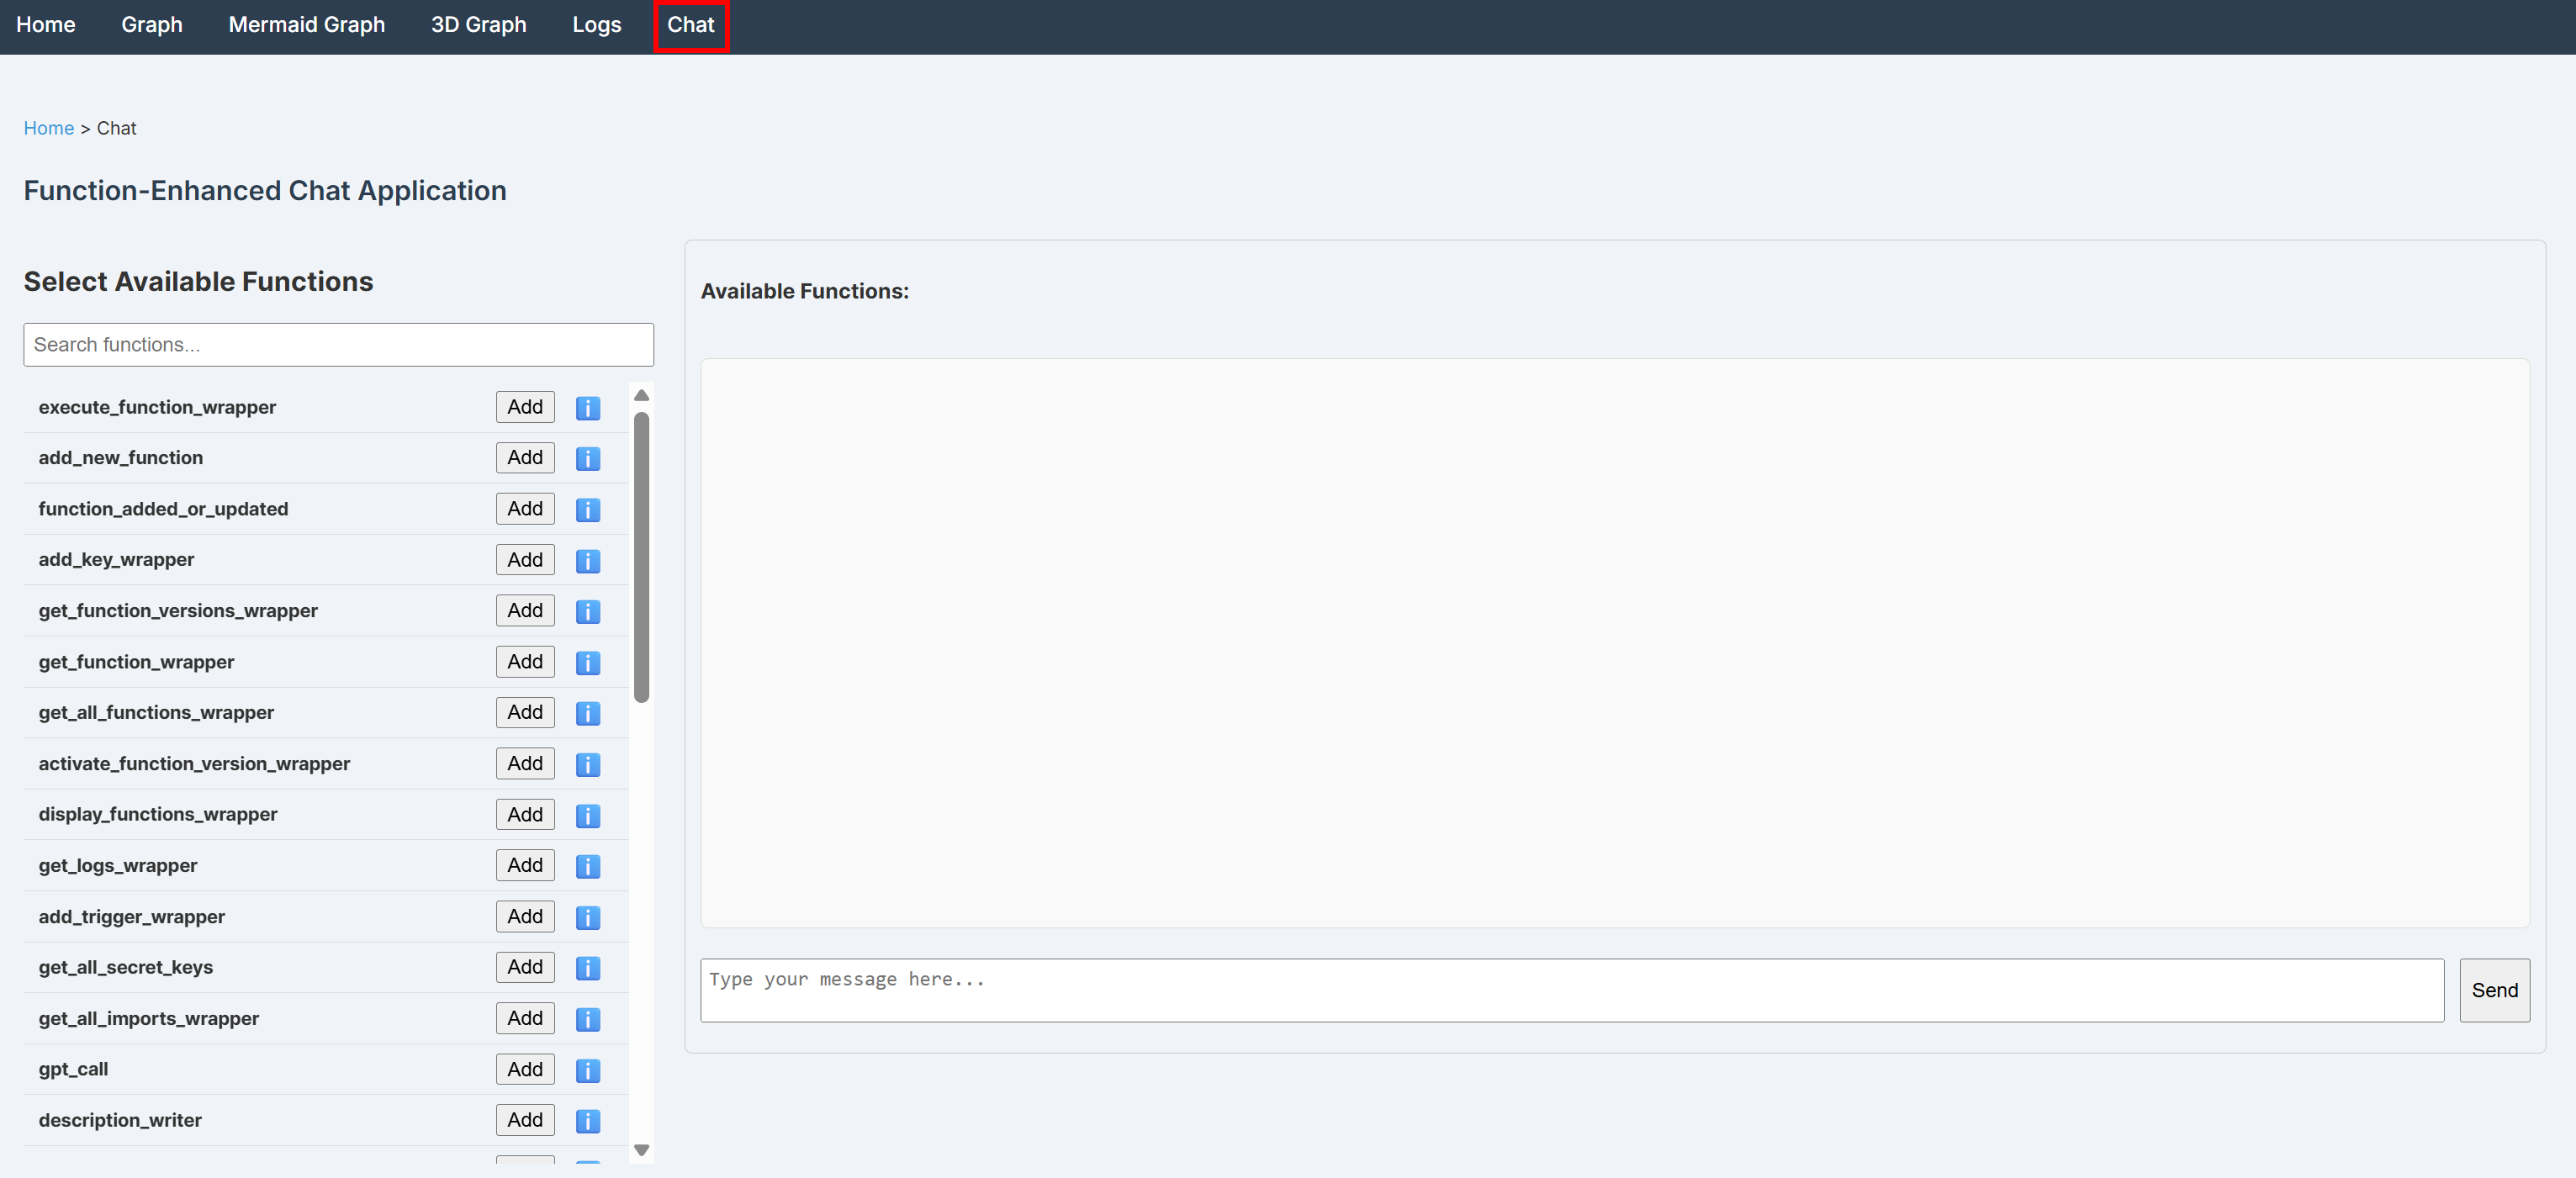
Behind the scenes, this interface is backed by LiteLLM through an OpenAI integration. For this reason, you must configure an OpenAI API key in your secrets.
If the OPENAI_API_KEY secret is missing, any message sent through the Chat page will fail with an error similar to the following:
{"error":"litellm.AuthenticationError: AuthenticationError: OpenAIException - The api_key client option must be set either by passing api_key to the client or by setting the OPENAI_API_KEY environment variable"}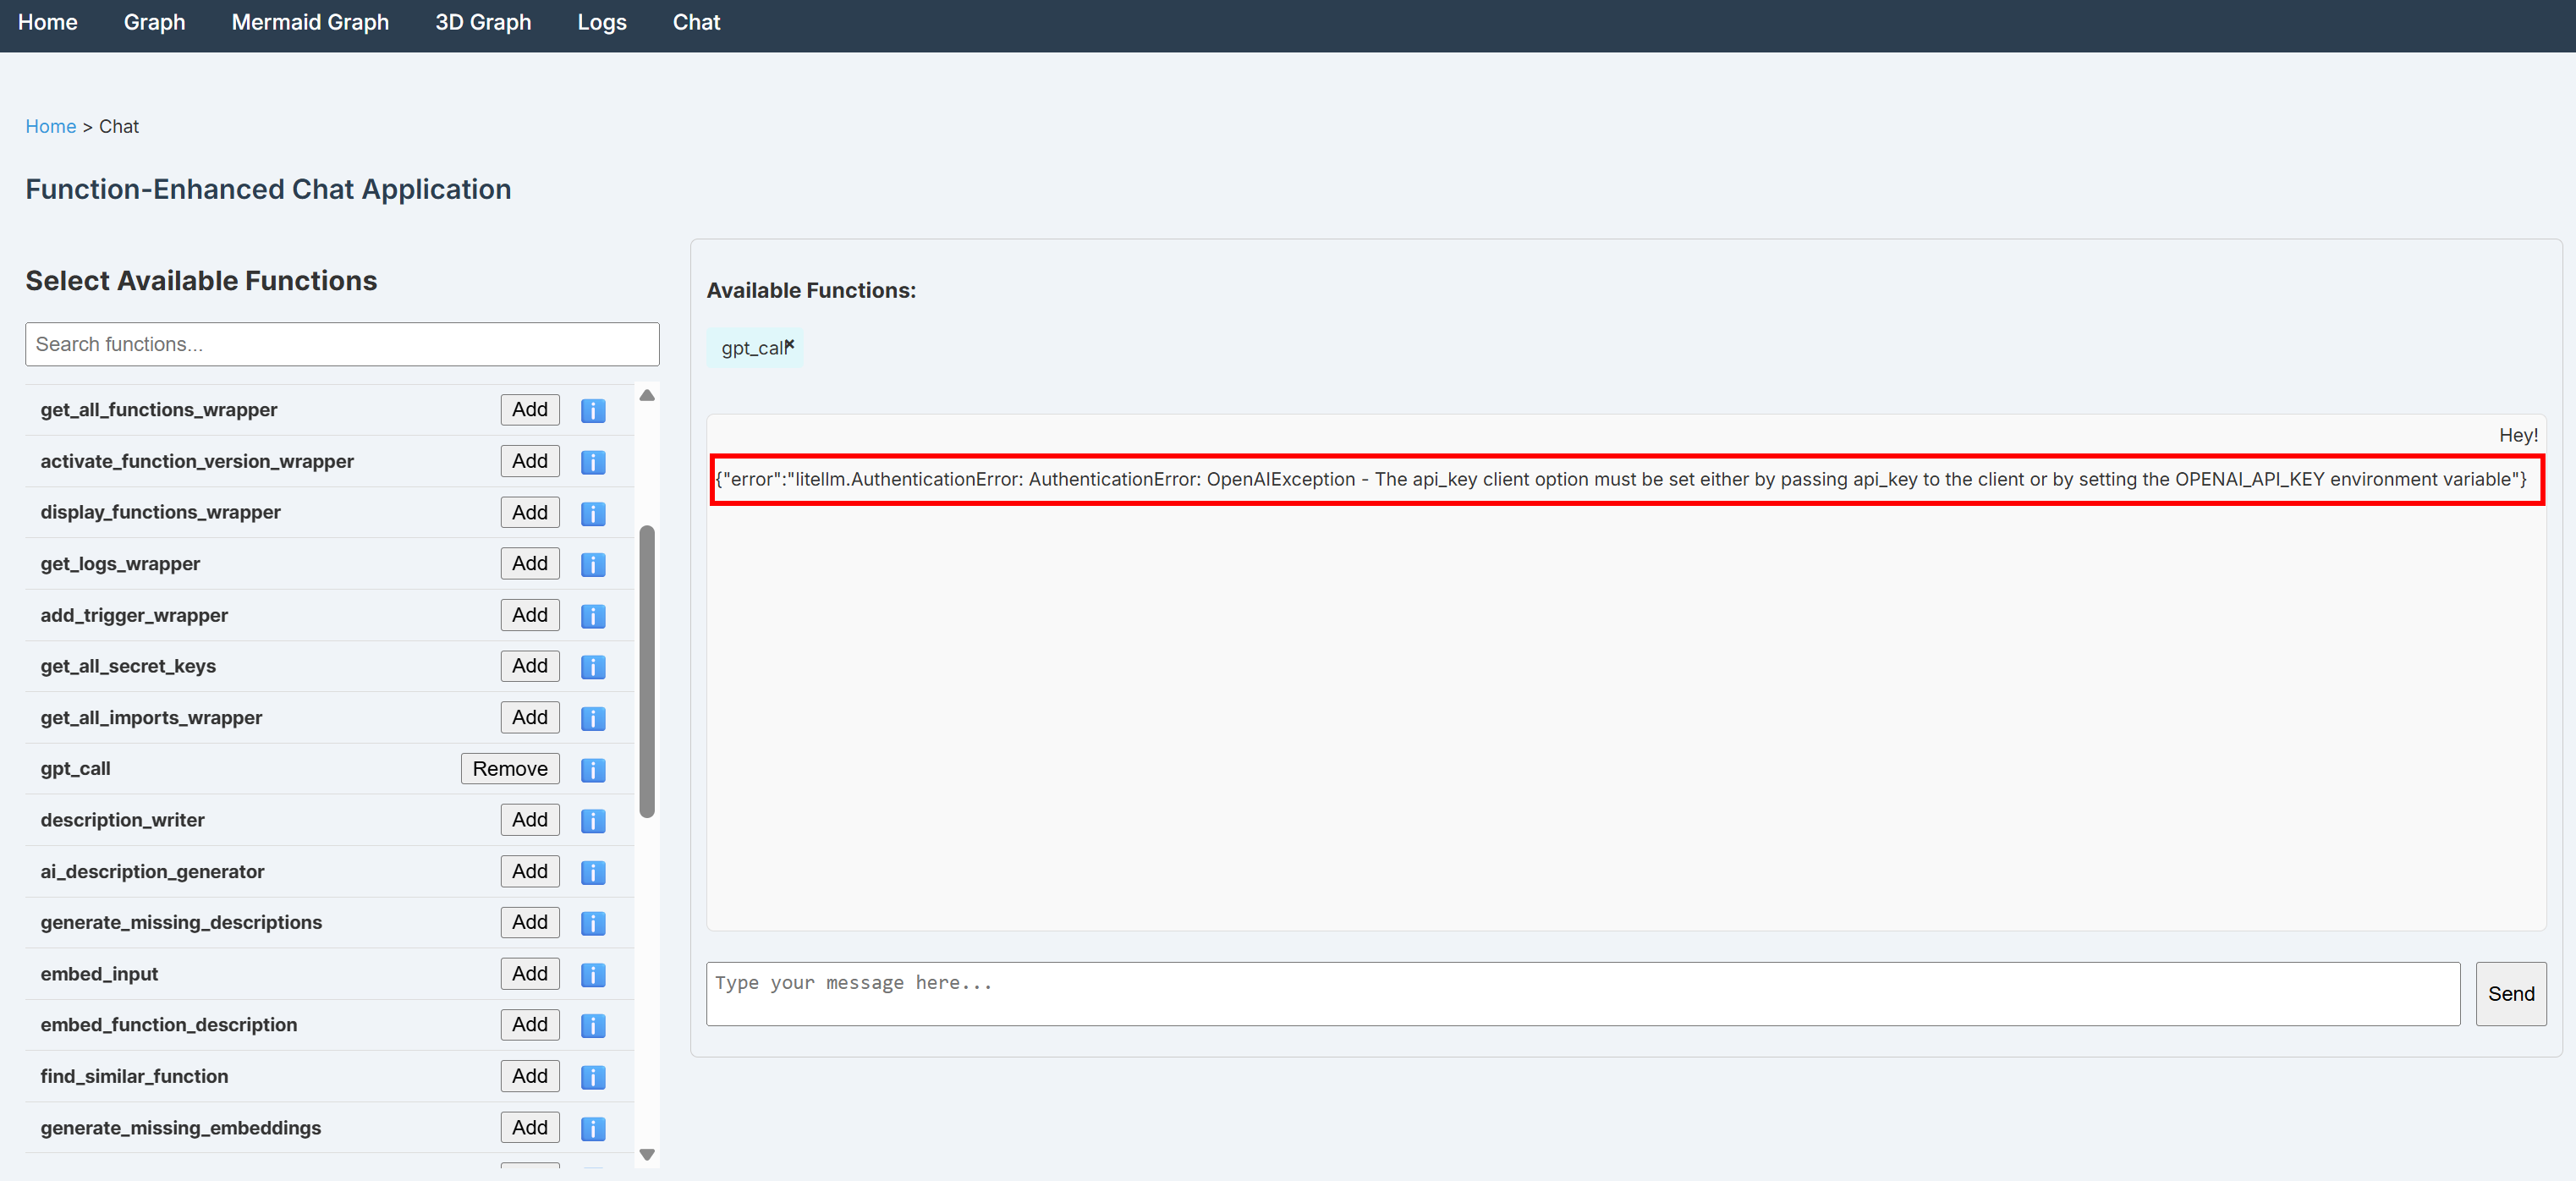
To resolve that, add the OPENAI_API_KEY environment variable to your .env file:
OPENAI_API_KEY="<YOUR_OPENAI_API_KEY>"After saving the file, restart BabyAGI. To confirm that the integration is working, open the “Chat” page in the dashboard again. Select the get_call function—which invokes the configured OpenAI model directly—and send a simple message such as “Hey!”
You should receive a response similar to the one below: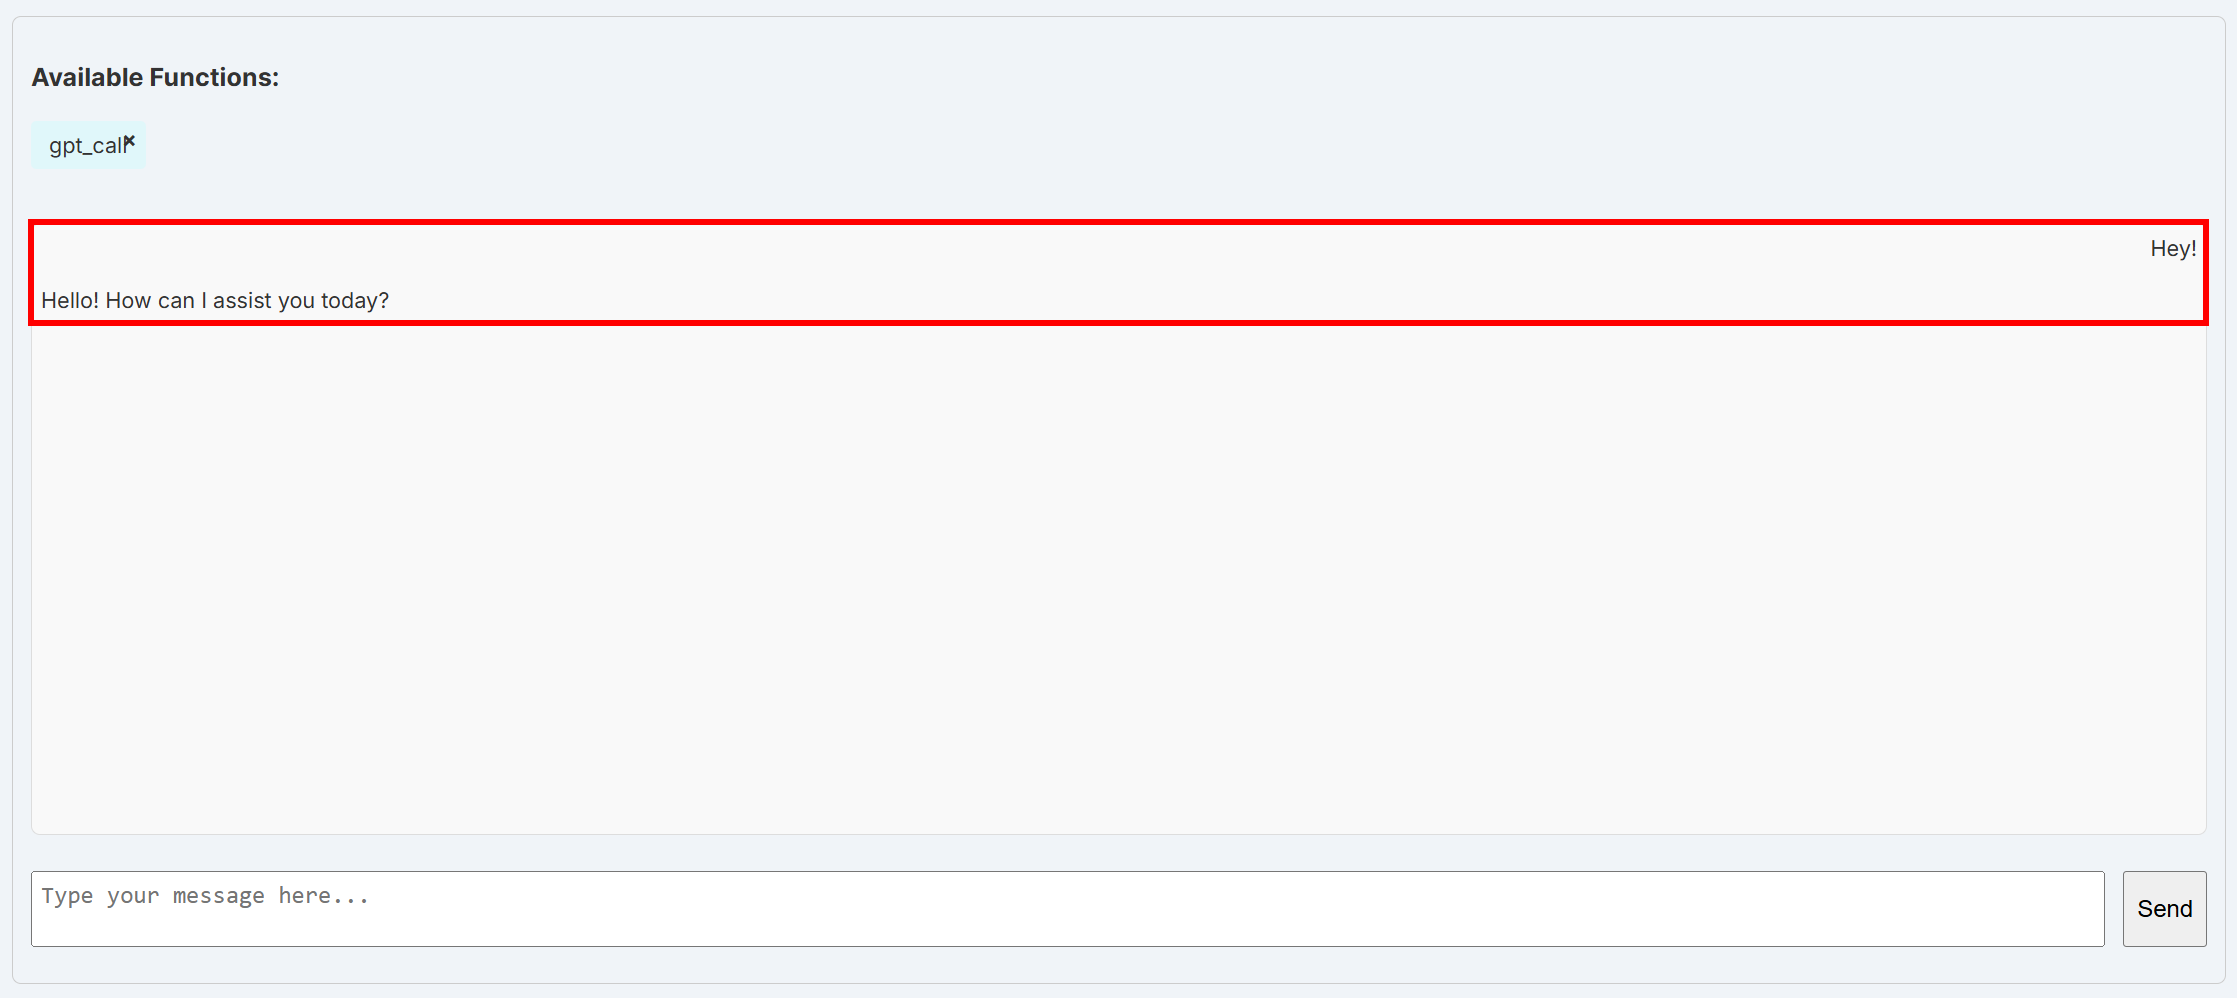
At this point, the underlying LiteLLM layer can successfully connect to the default OpenAI model. This works because LiteLLM automatically reads the OpenAI API key from the OPENAI_API_KEY environment variable.
Amazing! Your BabyAGI application is now correctly connected to an OpenAI model.
Alternatively, achieve the same result by defining the key directly in code:
babyagi.add_key_wrapper("openai_api_key", "<YOUR_OPENAI_API_KEY>")This calls the add_key_wrapper function, which is equivalent to defining the key through it in the dashboard. However, note that you cannot use the dashboard approach before the OpenAI integration is configured, since the dashboard itself relies on the OpenAI connection to function.
Step #5: Get Started with Bright Data
To utilize the SERP API and Web Unlocker services in BabyAGI, you first require a Bright Data account with both a SERP API zone and a Web Unlocker API zone configured, along with an API key. Let us set everything up!
If you do not have a Bright Data account, create one. Otherwise, log in and go to your dashboard. Then, navigate to the “Proxies & Scraping” page and review the “My Zones” table:
If the table already contains a Web Unlocker API zone (in this example, unlocker) and a SERP API zone (in this example, serp), you are good to go. Those two services will be used to call the Web Unlocker and SERP API services via custom BabyAGI functions.
If either one or both of these zones are missing, you need to create them. Scroll down to the “Unblocker API” and “SERP API” cards, then click the “Create zone” buttons. Follow the wizard to add both zones:
For step-by-step guidance, refer to the following documentation pages:
Next, add your Web Unlocker API and SERP API zone names to your .env file as follows:
SERP_API_ZONE="serp"
WEB_UNLOCKER_ZONE="unlocker"Important: In this example, we assume that the SERP API zone is called "serp" and the Web Unlocker API zone is called "unlocker". Replace these values with the actual names of your zones (if they are different).
Finally, you need to generate your Bright Data API key and store it as an environment variable in .env:
BRIGHT_DATA_API_KEY="<YOUR_BRIGHT_DATA_API_KEY>"These three environment variables will be read by custom BabyAGI functions and used to connect to your SERP API and Web Unlocker API services in your Bright Data account. You are now ready to define and use them in BabyAGI!
Step #6: Define the SERP API Function
Start by defining a BabyAGI function to perform web searches using the Bright Data SERP API:
@babyagi.register_function(
    imports=["os", "urllib", "requests"],
    key_dependencies=["bright_data_api_key", "serp_api_zone"],
    metadata={"description": "Search the web for a given query using Bright Data's SERP API."}
)
def bright_data_serp_api(query: str) -> str:
    import requests
    import os
    import urllib

    # Read the Bright Data API key from the env
    BRIGHT_DATA_API_TOKEN = os.getenv("bright_data_api_key")

    # Make a request to the Bright Data SERP API
    url = "https://api.brightdata.com/request"
    data = {
        "zone": os.getenv("serp_api_zone"),
        "url": f"https://www.google.com/search?q={urllib.parse.quote_plus(query)}&brd_json=1",
        "format": "raw"
    }
    headers = {
        "Authorization": f"Bearer {BRIGHT_DATA_API_TOKEN}",
        "Content-Type": "application/json"
    }
    response = requests.post(url, json=data, headers=headers)
    response.raise_for_status()

    return response.text
That function relies on the Requests HTTP client to make a POST HTTP request to your SERP API zone. In particular, it sends a query to Google and retrieves the parsed SERP results through Bright Data. For more details, refer to the Bright Data SERP API documentation.
Note that a BabyAGI function must be registered using the @babyagi.register_function decorator. This accepts the following fields:
imports: A list of external libraries the function depends on. These are required because BabyAGI functions run in an isolated environment.dependencies: A list of other BabyAGI functions that this function depends on.key_dependencies: A list of secret keys required for the function to operate. In this case, the required secrets are"bright_data_api_key"and"serp_api_zone", which correspond to theBRIGHT_DATA_API_KEYandSERP_API_ZONEenvironment variables defined earlier in your.envfile.metadata["description"]: A human-readable description of what the function does. This helps the OpenAI model understand its purpose.
Fantastic! Your BabyAGI application now includes the bright_data_serp_api function, through which it can search the web via the Bright Data SERP API.
Step #7: Define the Web Unlocker API Function
Similarly, define a custom function to call the Web Unlocker API:
@babyagi.register_function(
    imports=["os", "requests"],
    key_dependencies=["bright_data_api_key", "web_unlocker_zone"],
    metadata={"description": "Fetch web page content through the Bright Data Web Unlocker API."}
)
def bright_data_web_unlocker(page_url: str, data_format: str = "markdown") -> str:
    import requests
    import os

    # Read the Bright Data API key from the env
    BRIGHT_DATA_API_TOKEN = os.getenv("bright_data_api_key")

    # Make a request to the Bright Data Web Unlocker API
    url = "https://api.brightdata.com/request"
    data = {
        "zone": os.getenv("web_unlocker_zone"),
        "url": page_url,
        "format": "raw",
        "data_format": data_format
    }
    headers = {
        "Authorization": f"Bearer {BRIGHT_DATA_API_TOKEN}",
        "Content-Type": "application/json"
    }
    response = requests.post(url, json=data, headers=headers)
    response.raise_for_status()

    return response.text
This works just like the bright_data_serp_api function, with the main difference being that it calls the Web Unlocker API. For more guidance on available parameters and options for that API, refer to the Bright Data documentation.
Note that this function relies on the web_unlocker_zone secret, which corresponds to the WEB_UNLOCKER_ZONE environment variable defined in Step #5. Also, the data_format argument is automatically set to markdown. This enables the special “Scrape as Markdown” feature to return the scraped content from a given web page in an optimized Markdown format, which is ideal for LLM ingestion.
Tip: Through a similar setup, you can extend BabyAGI to integrate other API-based Bright Data solutions, such as Web Scraping APIs.
Mission complete! The desired Bright Data-powered functions have been added to BabyAGI.
Step #8: Full Code
The final code of your main.py file will be:
import babyagi

@babyagi.register_function(
    imports=["os", "urllib", "requests"],
    key_dependencies=["bright_data_api_key", "serp_api_zone"],
    metadata={"description": "Search the web for a given query using Bright Data's SERP API."}
)
def bright_data_serp_api(query: str) -> str:
    import requests
    import os
    import urllib

    # Read the Bright Data API key from the env
    BRIGHT_DATA_API_TOKEN = os.getenv("bright_data_api_key")

    # Make a request to the Bright Data SERP API
    url = "https://api.brightdata.com/request"
    data = {
        "zone": os.getenv("serp_api_zone"),
        "url": f"https://www.google.com/search?q={urllib.parse.quote_plus(query)}&brd_json=1",
        "format": "raw"
    }
    headers = {
        "Authorization": f"Bearer {BRIGHT_DATA_API_TOKEN}",
        "Content-Type": "application/json"
    }
    response = requests.post(url, json=data, headers=headers)
    response.raise_for_status()

    return response.text

@babyagi.register_function(
    imports=["os", "requests"],
    key_dependencies=["bright_data_api_key", "web_unlocker_zone"],
    metadata={"description": "Fetch web page content through the Bright Data Web Unlocker API."}
)
def bright_data_web_unlocker(page_url: str, data_format: str = "markdown") -> str:
    import requests
    import os

    # Read the Bright Data API key from the env
    BRIGHT_DATA_API_TOKEN = os.getenv("bright_data_api_key")

    # Make a request to the Bright Data Web Unlocker API
    url = "https://api.brightdata.com/request"
    data = {
        "zone": os.getenv("web_unlocker_zone"),
        "url": page_url,
        "format": "raw",
        "data_format": data_format
    }
    headers = {
        "Authorization": f"Bearer {BRIGHT_DATA_API_TOKEN}",
        "Content-Type": "application/json"
    }
    response = requests.post(url, json=data, headers=headers)
    response.raise_for_status()

    return response.text

if __name__ == "__main__":
    app = babyagi.create_app("/dashboard")
    app.run(host="0.0.0.0", port=8080)
Instead, the .env file will contain:
OPENAI_API_KEY="<YOUR_OPENAI_API_KEY>"
SERP_API_ZONE="<YOUR_SERP_API_ZONE_NAME>"
WEB_UNLOCKER_ZONE="<YOUR_WEB_UNLOCKER_ZONE_NAME>"
BRIGHT_DATA_API_KEY="<YOUR_BRIGHT_DATA_API_KEY>"
Launch the BabyAGI dashboard with:
python main.pyOpen http://localhost:8080/dashboard in the browser, reach the “Chat” page, and search for “bright_data.” You will notice the two functions defined in the code for the Bright Data integration: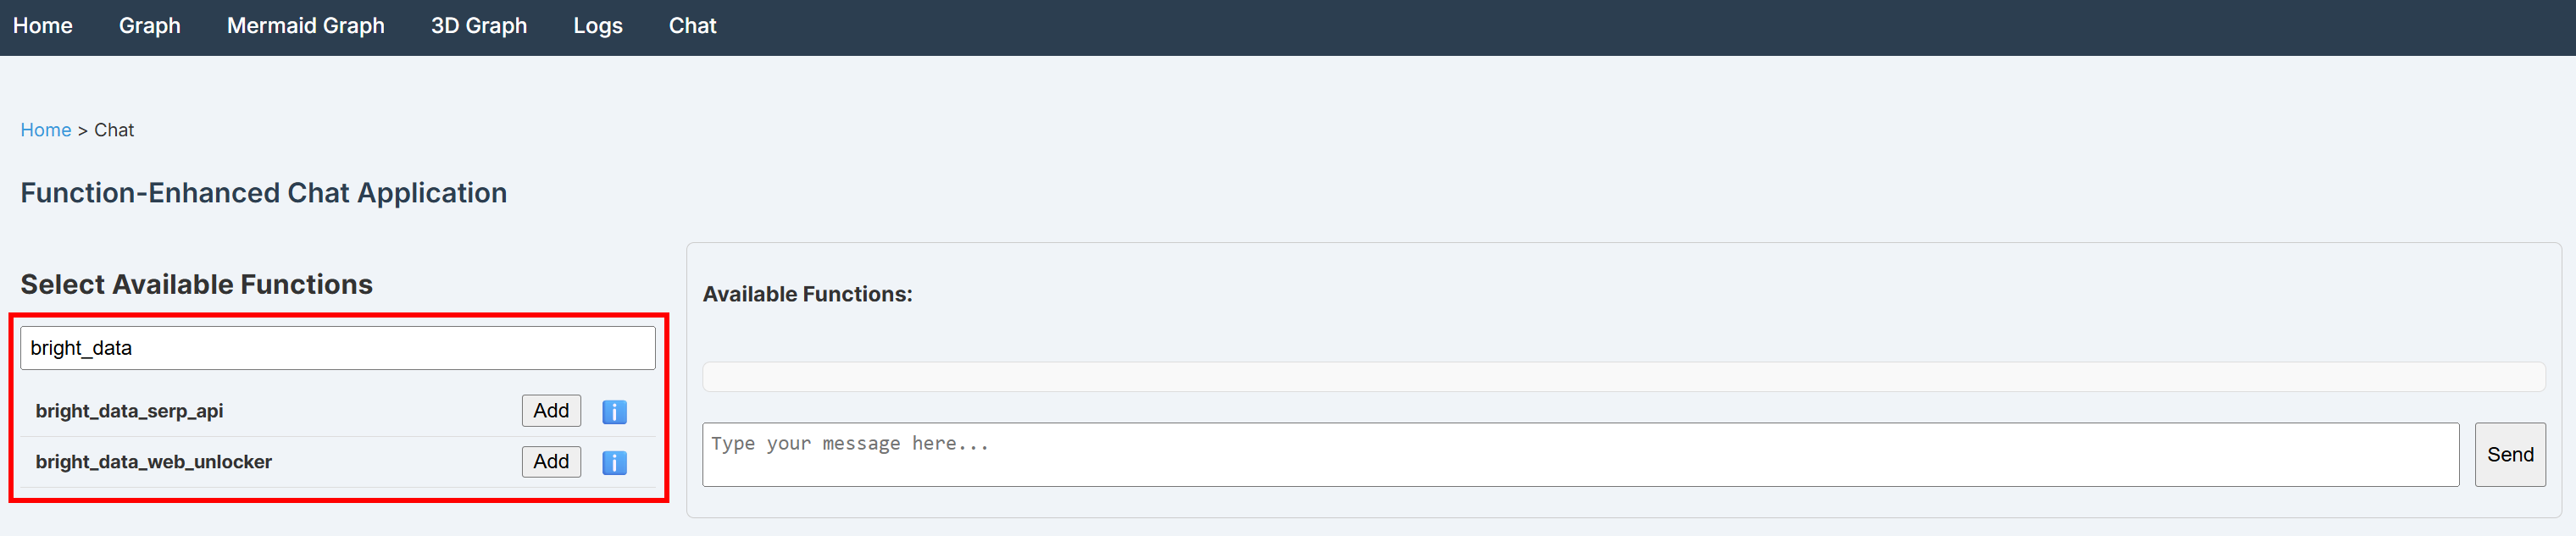
Cool! The two custom functions were registered correctly.
Step #9: Test the BabyAGI + Bright Data Integration
Check that your BabyAGI application works by testing the Bright Data functions using the default chat_with_functions function. This starts a chat interaction that connects with LiteLLM and executes selected functions from your function database.
Thus, begin by choosing the bright_data_serp_api and bright_data_web_unlocker functions. Then, select chat_with_functions:
Next, you must use a prompt that triggers both web searches and data extraction. For example, try with:
Search the web for the latest Google AI announcements (2025), select the top 3 reliable news or blog articles, access each one, and summarize the key insights about the future of Google AI (mentioning the URLs of the source articles)Note: A vanilla LLM without external tools for web access would not be able to complete this task.
Execute the prompt in the chat, and you should see output similar to this: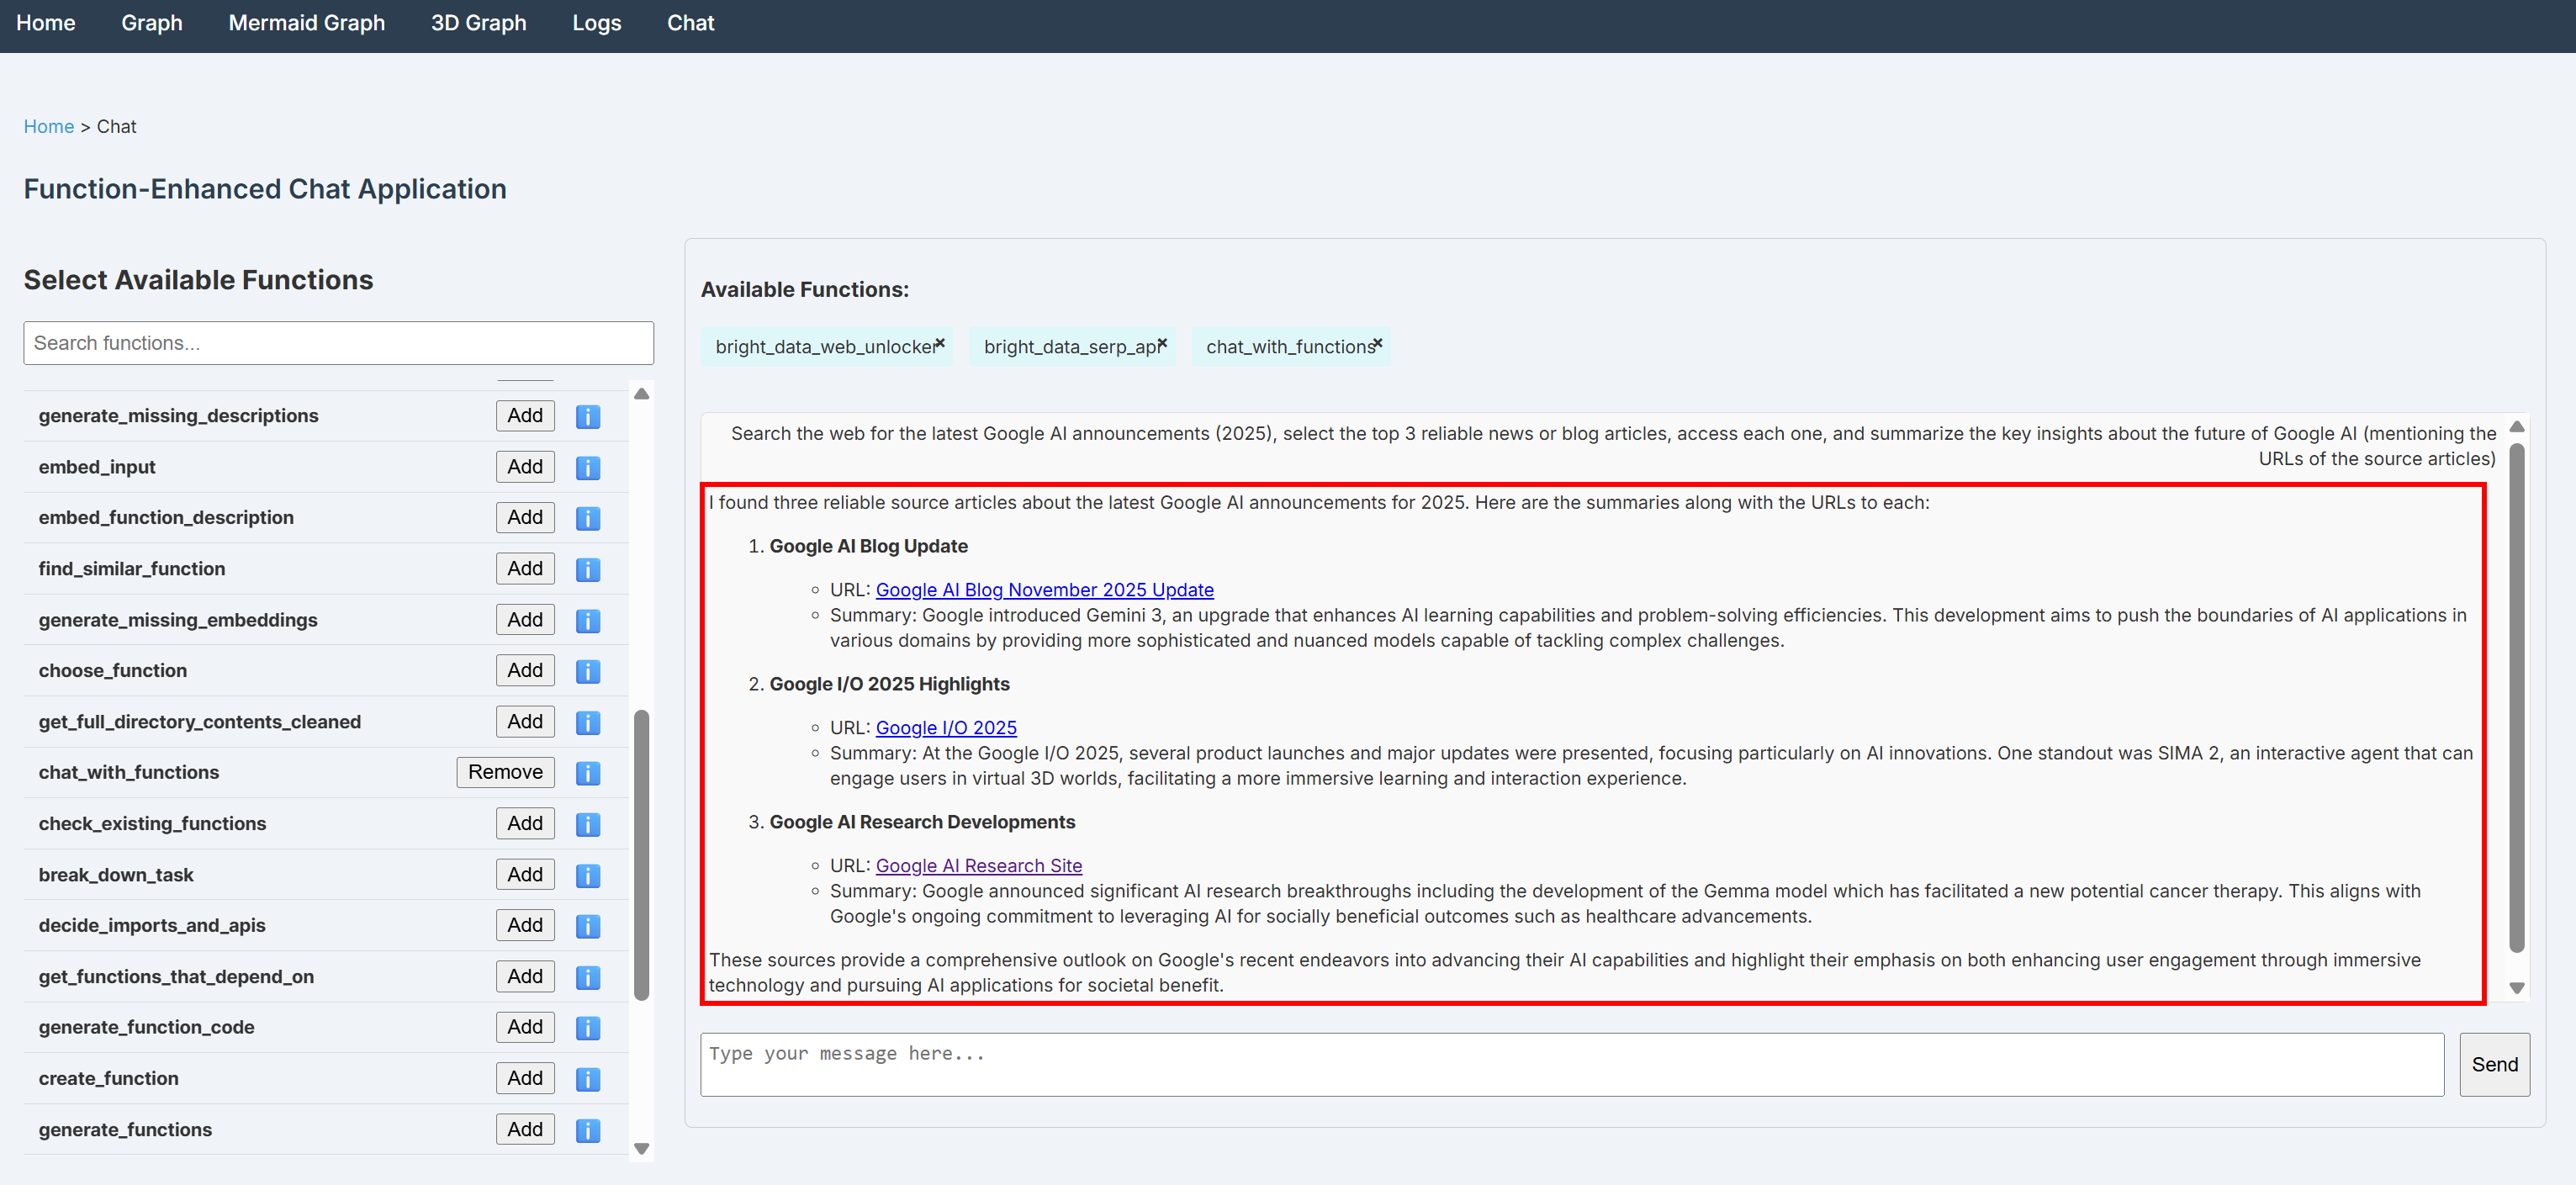
Notice how the output contains grounded insights retrieved by searching Google through the SERP API and scraping information from the selected news pages via the Web Unlocker API.
Now that you have verified the agent can interact with current web content and learn from it, it means the agent has the ability to self-build functions that can interact with other services by accessing their documentation to learn technical details it did not know initially. Test that through the self_build function for self AI agent building, as explained in the BabyAGI documentation.
Feel free to experiment with different input prompts and other BabyAGI functions. Thanks to the Bright Data functions, your BabyAGI self-building agents can handle a variety of real-world use cases.
Et voilà! You have just experienced the power of combining Bright Data with BabyAGI.
Conclusion
In this blog post, you saw how to enable Bright Data capabilities in BabyAGI through custom functions that call the SERP API and Web Unlocker API.
That setup enables content retrieval from any web page and real-time web searches. To extend functionality further—such as accessing live web feeds and automating web interactions—integrate BabyAGI with the full suite of Bright Data services for AI.
Unlocks the full potential of self-building AI agents!
Sign up for a Bright Data account for free today and start experimenting with our AI-ready web data solutions!

Technical Writer
Antonello Zanini is a technical writer, editor, and software engineer with 5M+ views. Expert in technical content strategy, web development, and project management.


