
In this article, you will learn:
- What Snowflake Cortex Code CLI is and what it offers.
- Why extending it with web access leads to more accurate and enterprise-ready outputs.
- How Bright Data enhances Cortex Code CLI with web search, scraping, and discovery capabilities.
- How to connect Bright Data to Cortex Code CLI through MCP.
- How to equip Cortex Code CLI with Bright Data product knowledge using agent skills.
- What the Bright Data + Cortex Code CLI integration enables, demonstrated through a real-world example.
Let’s dive in!
What Is Snowflake Cortex Code CLI?
Snowflake Cortex Code CLI is an AI-powered command-line interface that lets you interact with Snowflake data stacks using natural language. Instead of manually writing SQL, configuring pipelines, or navigating complex data systems, you can ask for tasks conversationally.
It combines awareness of your Snowflake environment with local development access, making it useful for data engineering, analytics, machine learning, governance, and application development.
The main features that it provides are:
- Natural language orchestration: Explore databases, generate SQL, optimize queries, debug workflows, and automate data tasks through plain-English prompts.
- Deep Snowflake awareness: Understands Snowflake schemas, tables, roles, catalogs, lineage, permissions, and semantic context to deliver environment-aware responses.
- CLI and local execution: Runs directly in a terminal with access to local repositories, shell commands, files, and Git workflows.
- AI and ML workflows: Helps build ML pipelines, Snowflake Intelligence agents, and analytics applications.
- Extensibility via MCP and ACP: Connects to external tools, APIs, GitHub, Jira, and IDEs through open protocols.
- Skills and customization: Supports reusable agent skills, organizational standards, hooks, and specialized workflows.
- Enterprise-ready governance: Respects RBAC permissions, centralized controls, sandboxing, and model selection for security and compliance.
For more information, check out the docs.
Why Cortex Code CLI Needs Web Access
Cortex Code CLI can deeply understand Snowflake semantics and data structures. Still, its reasoning is limited by its pre-trained knowledge, which is typical of all large language models. This comes from the fact that LLMs are trained on static datasets. Thus, they cannot inherently keep up with rapidly changing external information.
In enterprise environments, an LLM’s limited and potentially outdated knowledge can represent a serious risk. Regulatory guidance evolves, security practices change, and internal data landscapes shift continuously. Relying only on outdated insights can lead to incorrect data governance and management decisions.
This is where integrating fresh, external intelligence from the web becomes essential. By connecting Cortex Code CLI to a web data infrastructure provider like Bright Data, the underlying AI agent gains live web connectivity for grounded, up-to-date information and analysis.
What makes Bright Data integration stand out is its global infrastructure of 400M+ residential IPs. It delivers enterprise-grade reliability, with support for unlimited concurrency, massive scalability, and SLA-backed uptime of 99.99%.
How Bright Data Supports Cortex Code CLI
Bright Data supports Cortex Code CLI through two integrations:
- Bright Data Web MCP: MCP server exposing 70+ tools for web search, scraping, discovery, and browser automation.
- Bright Data skills: Agent Skills that help the Cortex Code CLI agent understand when and how to use Bright Data products effectively.
Important: These two integrations are not alternatives. They work best together. In fact, one of the Bright Data skills is specifically designed to guide the optimal use of Web MCP tools.
Bright Data Web MCP
The Bright Data Web MCP exposes over 70 tools. Under the hood, these interact with Bright Data’s API-based products.
Even in Rapid mode (tier with 5,000/requests a month for free), the available tools include:
| Tool | Description |
|---|---|
search_engine + batch version for parallel usage |
Retrieve Google, Bing, or Yandex results in structured JSON or Markdown |
scrape_as_markdown + batch version for parallel usage |
Convert any web page into clean Markdown while handling anti-bot protection bypass |
discover |
AI-powered search returning ranked, relevant web results |
Then, [Pro mode](https://github.com/brightdata/brightdata-mcp?tab=readme-ov-file#-pricing, modes) unlocks advanced capabilities for structured data extraction from platforms like Amazon, LinkedIn, Yahoo Finance, YouTube, Zillow, Google Maps, and 40+ others.
Bright Data Skills
The Bright Data skills include:
| Skill | Description |
|---|---|
agent-onboarding |
Teaches agents how to access and correctly use Bright Data tools across MCP, CLI, and APIs. |
search |
Enables AI to retrieve real-time search engine results as structured, machine-readable web intelligence. |
scrape |
Enables extraction of clean, readable webpage content with automated anti-bot handling. |
data-feeds |
Provides continuously updated structured datasets from 40+ major websites via scheduled extraction. |
bright-data-mcp |
Gives AI access to 60+ integrated tools for search, scraping, extraction, and browser automation. |
bright-data-best-practices |
Teaches correct usage patterns for Bright Data APIs, tools, and integration strategies. |
brightdata-proxy |
Tells AI how to configure and generate proxy-based request routing across global IP networks. |
brightdata-cli |
Enables AI to operate Bright Data CLI for scraping, proxies, datasets, and account management. |
competitive-intel |
Helps AI generate real-time market and competitor insights from live web data. |
Common Steps
In the next two chapters, you will see how to integrate Bright Data into Cortex Code CLI via MCP and Agent Skills, respectively. For now, let’s focus on a few common setup steps required before we get started.
Prerequisites
To follow this tutorial, make sure you have:
- Node.js 22+ installed locally.
- A Snowflake account with Cortex Code enabled (a free trial is enough).
- A Bright Data account with an API key configured. Follow the official guide to generate your Bright Data API key.
Install Cortex Code CLI
To install Cortex Code CLI on macOS, Linux, or WSL, run the following command:
curl -LsS https://ai.snowflake.com/static/cc-scripts/install.sh | shThis downloads and runs the installation script. The output will be something like:

Similarly, to install Cortex Code CLI on Windows, execute this command in PowerShell:
irm https://ai.snowflake.com/static/cc-scripts/install.ps1 | iexThe cortex command should now be available globally on your system. Great!
Authenticate and Configure Cortex Code CLI
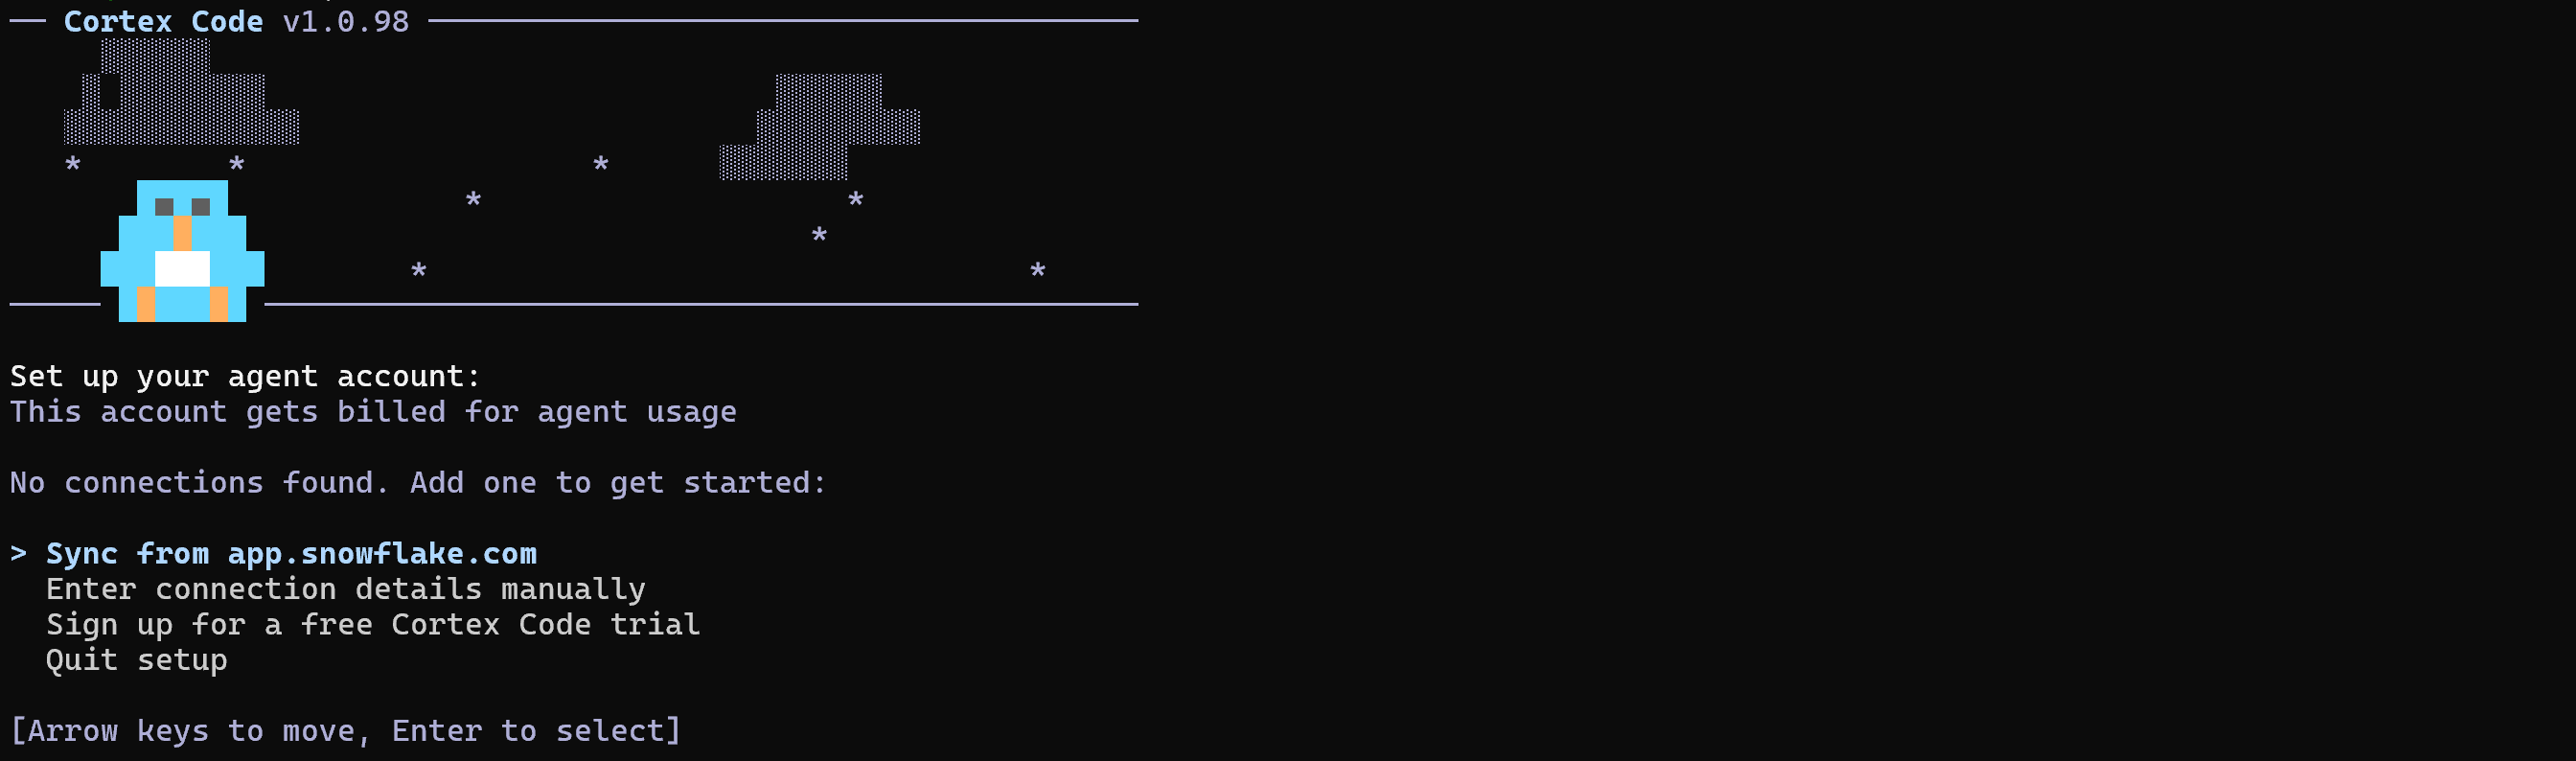
Launch Cortex Code CLI for the first time by running:
cortexYou will be prompted to choose a theme and to accept the terms and conditions. After that, you will be guided through the authentication flow to connect your Snowflake account:
Select your preferred authentication method and ensure you connect to a Snowflake account with Cortex Code enabled.
After successful authentication, you will have access to the Cortex Code TUI:
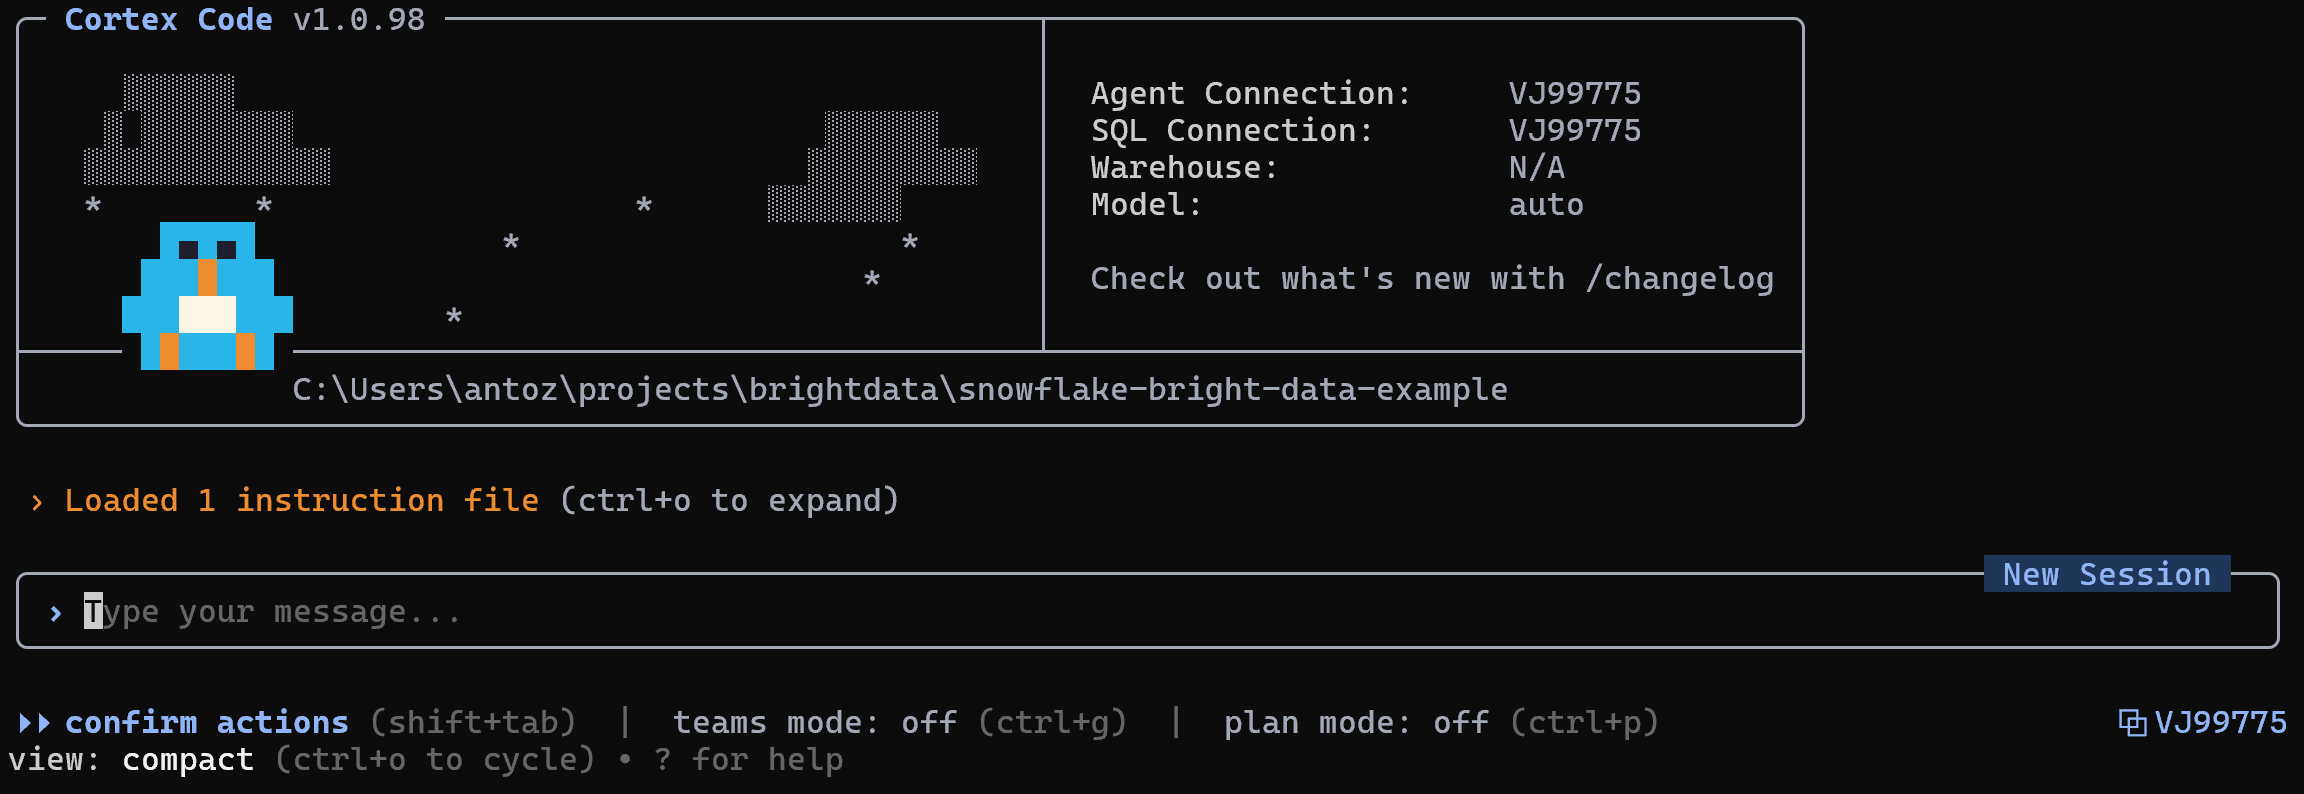
Next, configure Cortex Code CLI based on your preferences (e.g., run the /model command to select the LLM model you want to use).
Cortex Code CLI is now installed and configured locally. Well done!
Verify Cortex Code CLI Works
To test that the Cortex Code CLI is connected to your Snowflake account, launch a command like this:
/sql SELECT C_FIRST_NAME AS first_name, C_LAST_NAME AS surname, C_EMAIL_ADDRESS AS email, C_CUSTOMER_ID AS customer_id FROM SNOWFLAKE_SAMPLE_DATA.TPCDS_SF10TCL.CUSTOMER LIMIT 10;That corresponds to running the following query in your Snowflake database:
SELECT
    C_FIRST_NAME AS first_name,
    C_LAST_NAME AS surname,
    C_EMAIL_ADDRESS AS email,
    C_CUSTOMER_ID AS customer_id
FROM SNOWFLAKE_SAMPLE_DATA.TPCDS_SF10TCL.CUSTOMER
LIMIT 10;
The /sql command above targets the default SNOWFLAKE_SAMPLE_DATA.TPCDS_SF10TCL schema available in most Snowflake accounts after setup. In detail, it fetches data from the CUSTOMER table:
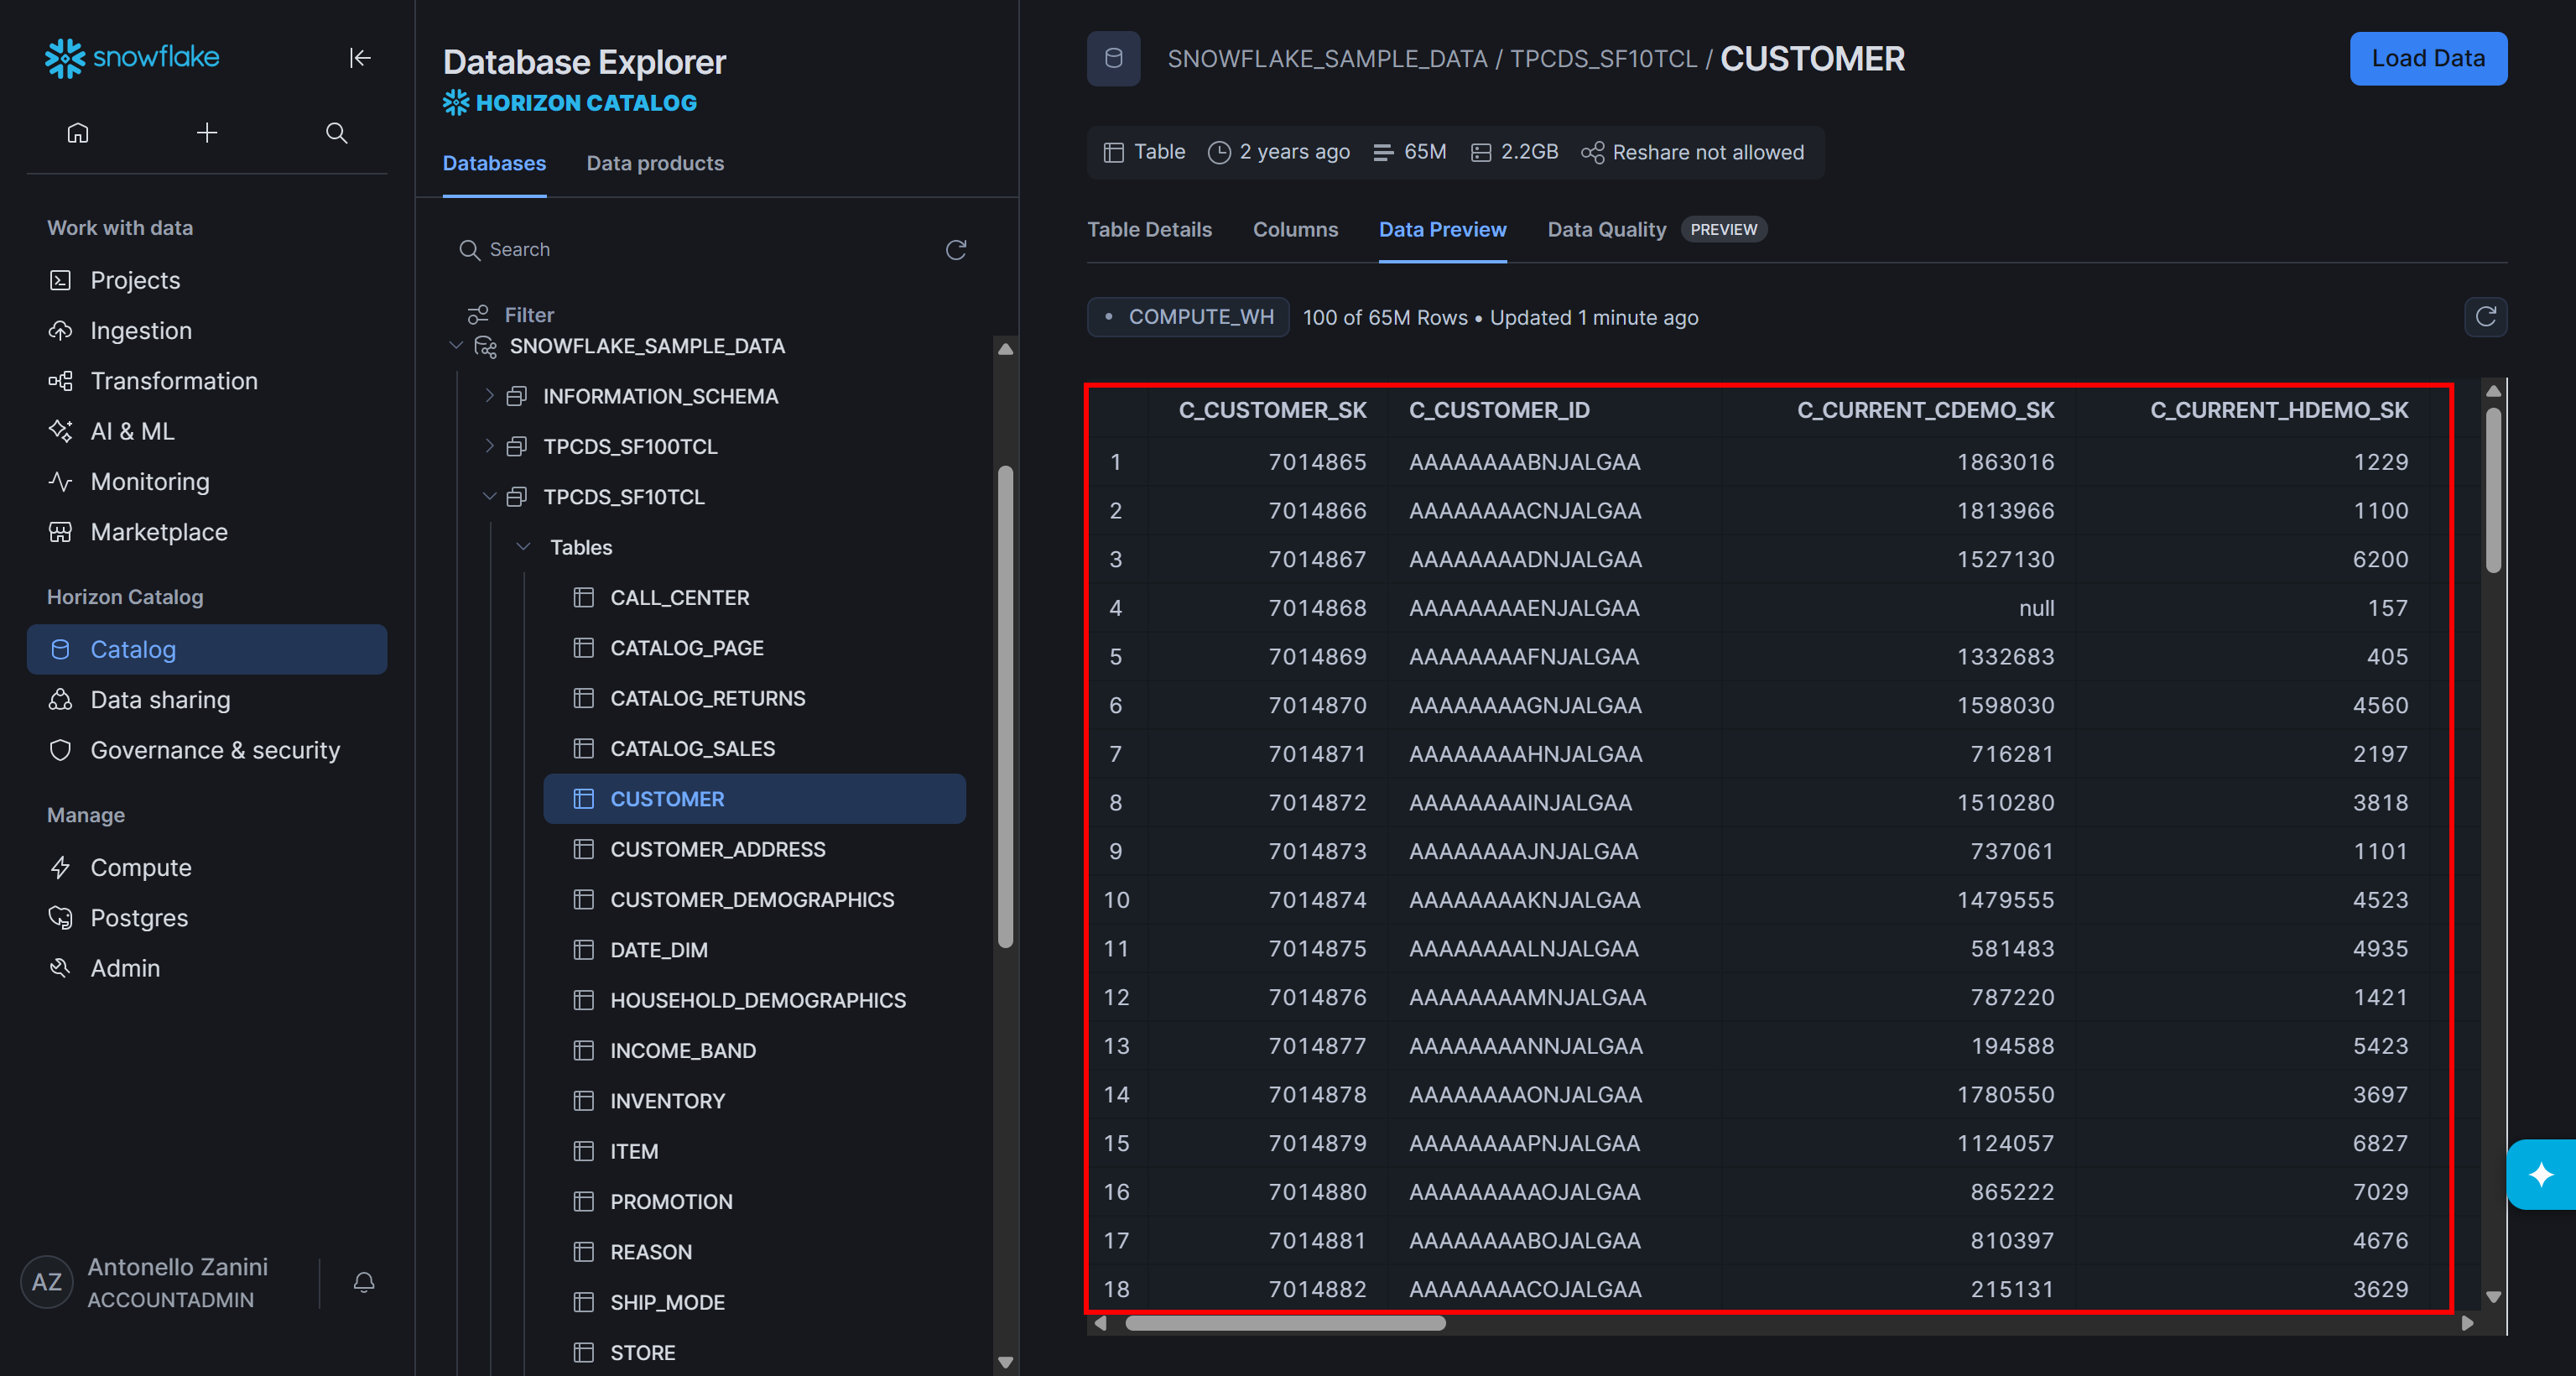
The expected result in the CLI is:
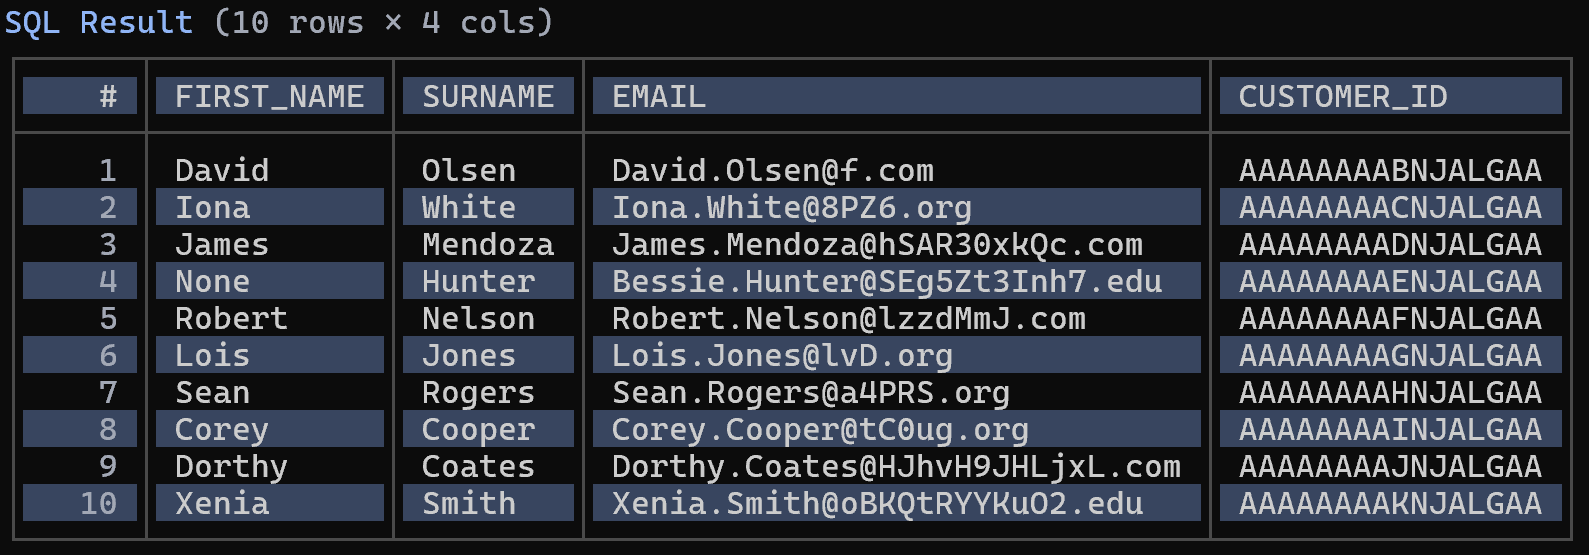
The outcome confirms that the Cortex Code CLI is successfully connected to your Snowflake account. Excellent!
Connect Bright Data to Cortex Code CLI via the Web MCP
In this section, you will be guided through setting up the Bright Data Web MCP in Cortex Code.
Prerequisites
To follow along more easily, it is recommended that you have:
- Basic knowledge of how MCP works.
- Familiarity with the tools exposed by the Bright Data Web MCP.
Note: The prerequisites outlined in the “Common Steps” chapter also apply here.
Step #1: Get Started with Bright Data’s Web MCP
Before connecting Bright Data’s Web MCP to Cortex Code, ensure the MCP server can run on your machine. For more information, consider exploring the Web MCP docs.
Start by installing the Web MCP globally via the @brightdata/mcp package:
npm install -g @brightdata/mcpIn Linux/macOS/WSL, check that the MCP server starts with:
API_TOKEN="<YOUR_BRIGHT_DATA_API>" npx -y @brightdata/mcpOr, equivalently, in PowerShell:
$Env:API_TOKEN="<YOUR_BRIGHT_DATA_API>"; npx -y @brightdata/mcpReplace the <YOUR_BRIGHT_DATA_API> placeholder with your actual Bright Data API key. This command sets the required API_TOKEN environment variable and starts the Web MCP server locally.
If everything works as expected, you should receive these logs:

On first run, the @brightdata/mcp package sets up two APIs in your Bright Data account:
mcp_unlocker: To connect to the Bright Data Web Unlocker API (and SERP API).mcp_browser: To interact with the Bright Data Browser API.
These two APIs power the 70+ tools available in Web MCP. Remember that you can also configure custom API names, as described in the official repository.
To verify that the APIs were created, go to the “Web Access > Web Access API” section in the Bright Data control panel. You should see the two APIs listed in the “My APIs” table:
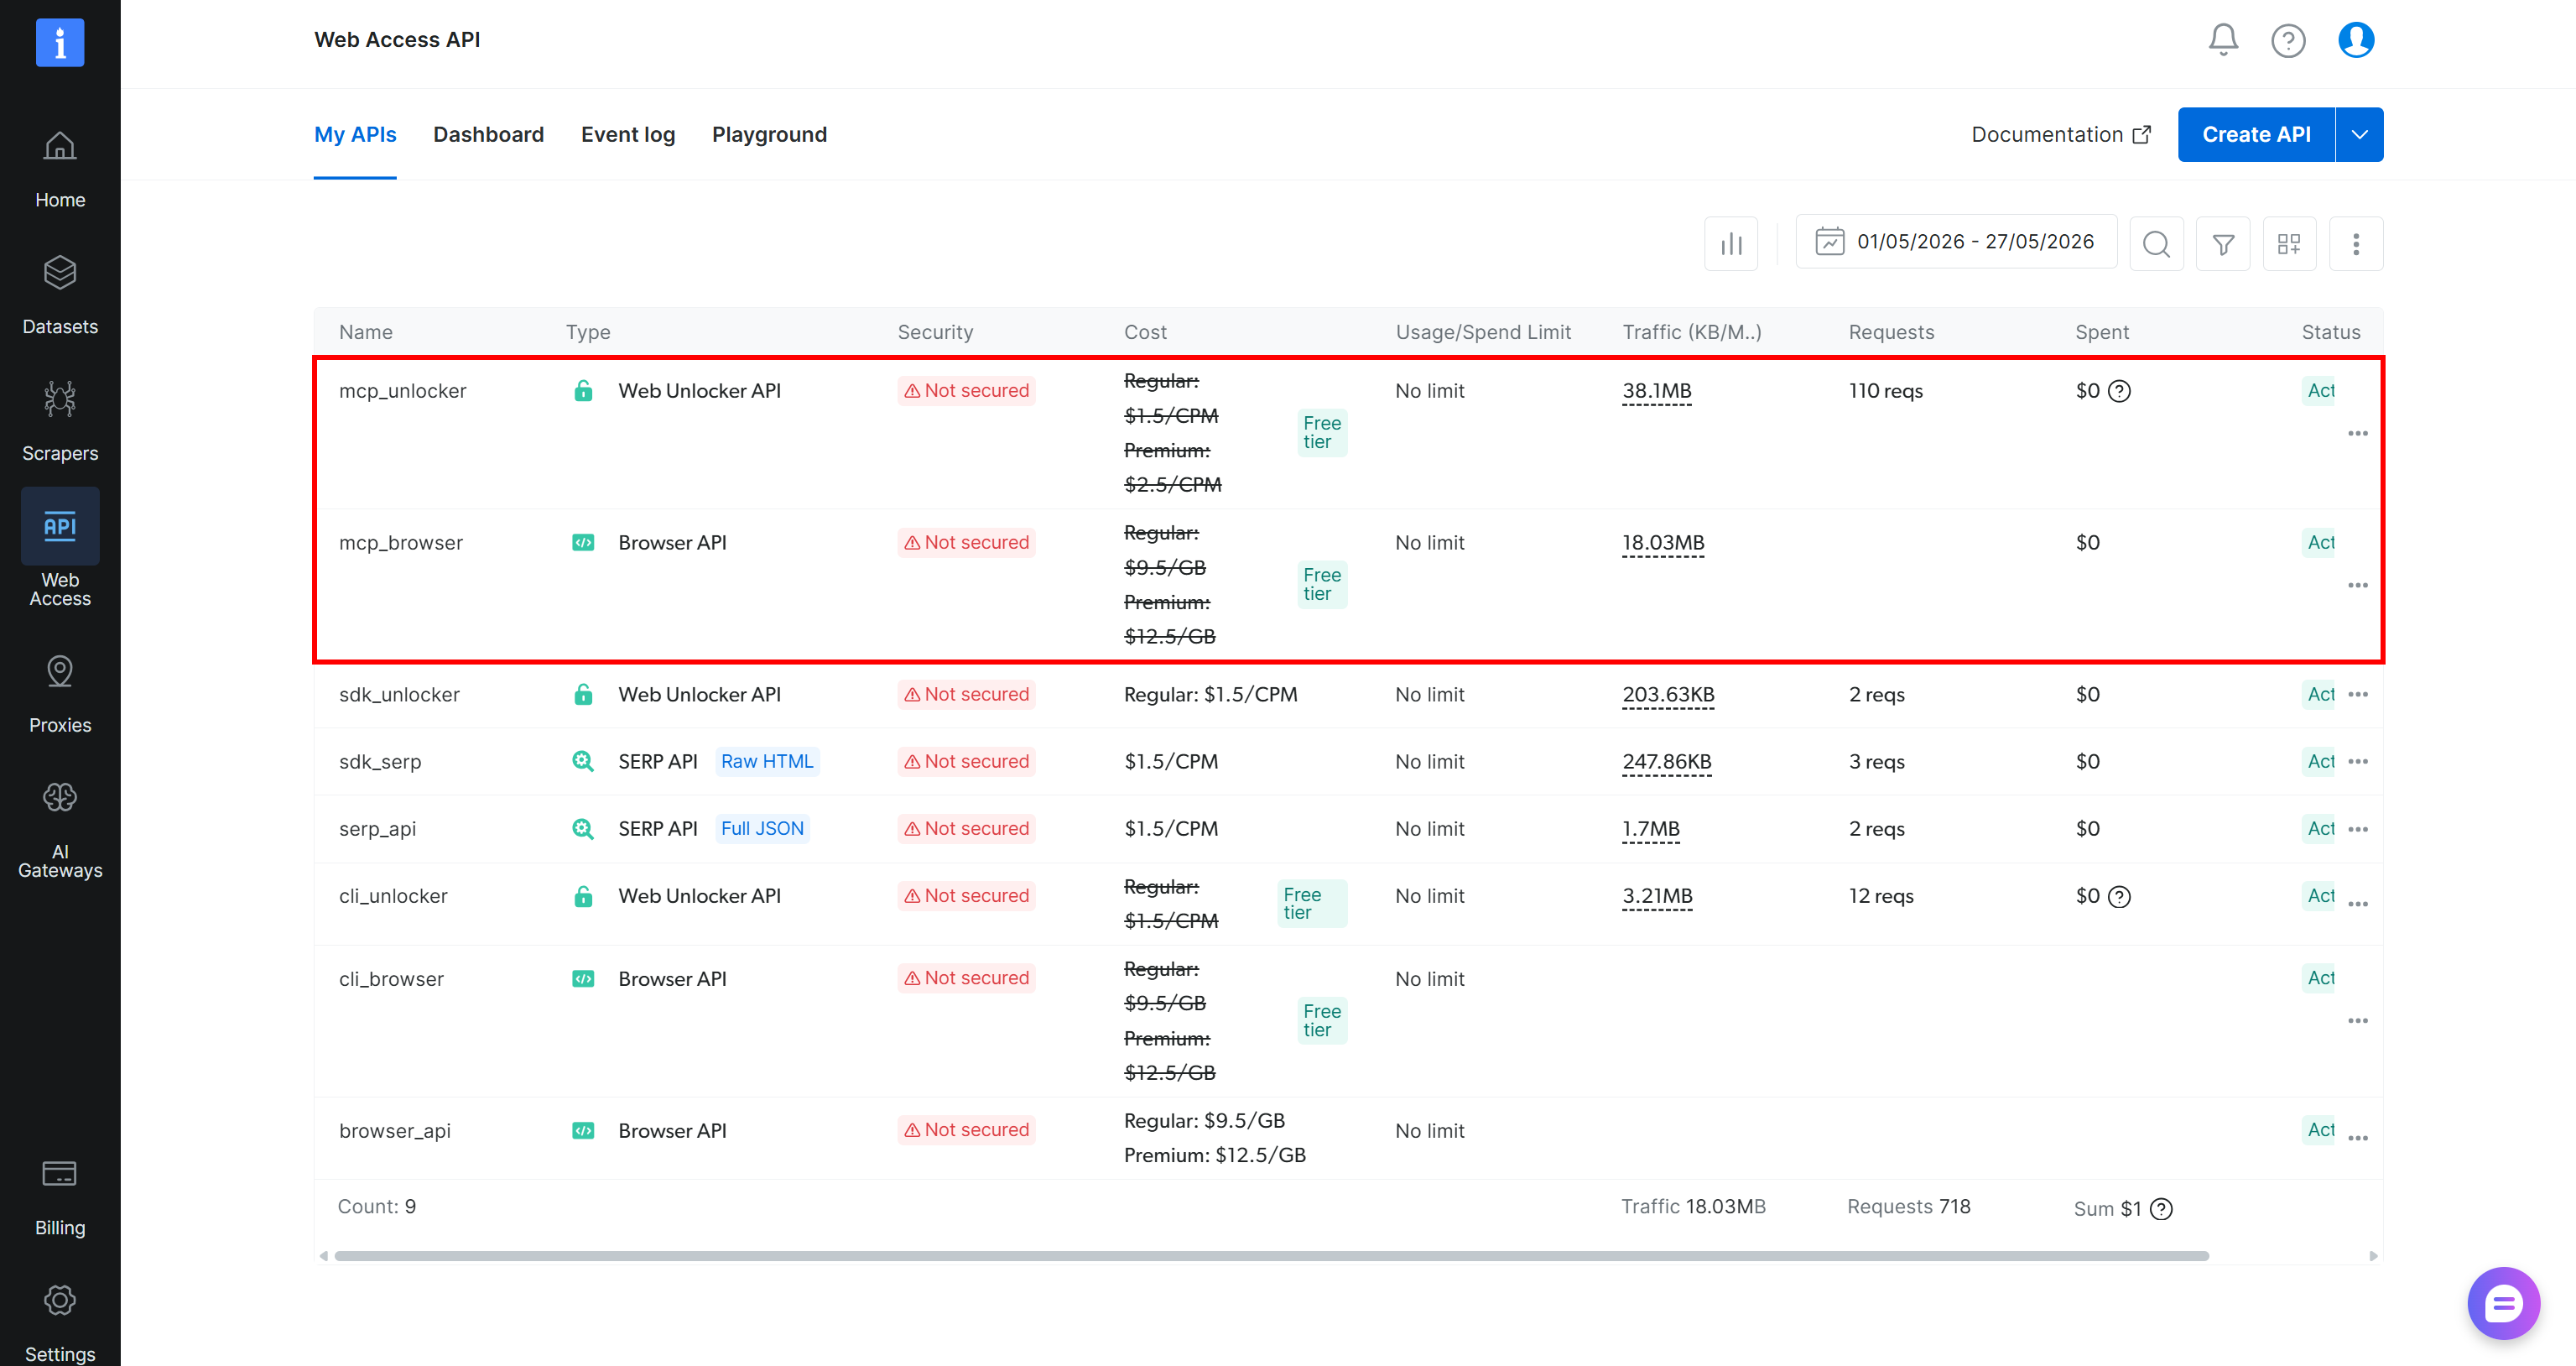
Remember that on the Web MCP free tier (Rapid mode), you have access to a limited set of tools.
To unlock all 70+ tools, you must enable Pro mode. To do so, set the PRO_MODE="true" environment variable:
API_TOKEN="<YOUR_BRIGHT_DATA_API>" PRO_MODE="true" npx -y @brightdata/mcpOr, on Windows:
$Env:API_TOKEN="<YOUR_BRIGHT_DATA_API>"; $Env:PRO_MODE="true"; npx -y @brightdata/mcpNote: Pro mode is not included in the free tier and [incurs additional charges](https://github.com/brightdata/brightdata-mcp?tab=readme-ov-file#-pricing, modes).
Cool! You just verified that the Bright Data Web MCP runs on your machine. Next, you will configure it in Cortex Code CLI.
Step #2: Configure the Web MCP in Cortex Code CLI
Cortex Code CLI supports MCP configuration either via the dedicated cortex mcp CLI command or by manually editing the configuration file at ~/.snowflake/cortex/mcp.json (%USERPROFILE%\.snowflake\cortex\mcp.json on Windows).
To configure the Web MCP stdio setup using the CLI, run:
cortex mcp add bright-data npx -y "@brightdata/mcp" -e API_TOKEN=<YOUR_BRIGHT_DATA_API_KEY> -e PRO_MODE=trueThe output will be:
MCP server 'bright-data' added. (stdio)The cortex mcp command above configures the bright-data MCP server to be launched via npx -y @brightdata/mcp, while setting these envs:
API_TOKEN(required): Your Bright Data API key.PRO_MODE(optional): Set totrueto enable Pro features. Remove-e PRO_MODE=trueto run the Web MCP in Rapid (free) mode.
Now, open the configuration file at ~/.snowflake/cortex/mcp.json (%USERPROFILE%\.snowflake\cortex\mcp.json on Windows). It should contain the following:
{
  "mcpServers": {
    "bright-data": {
      "type": "stdio",
      "command": "npx",
      "args": [
        "-y",
        "@brightdata/mcp"
      ],
      "env": {
        "API_TOKEN": "<YOUR_BRIGHT_DATA_API_KEY>",
        "PRO_MODE": "true"
      }
    }
  }
}
Pro tip: You can configure Web MCP in Cortex Code CLI directly by editing the configuration file shown above.
Cortex Code CLI will now automatically launch the local Web MCP server using the specified npx command and connect to it. Perfect!
Step #3: Verify Web MCP Connection
Relaunch Cortex Code CLI by closing it and starting it again with:
cortexThen run the /mcp command inside the CLI to access the “MCP Manager” view. You should notice the bright-data MCP server listed:
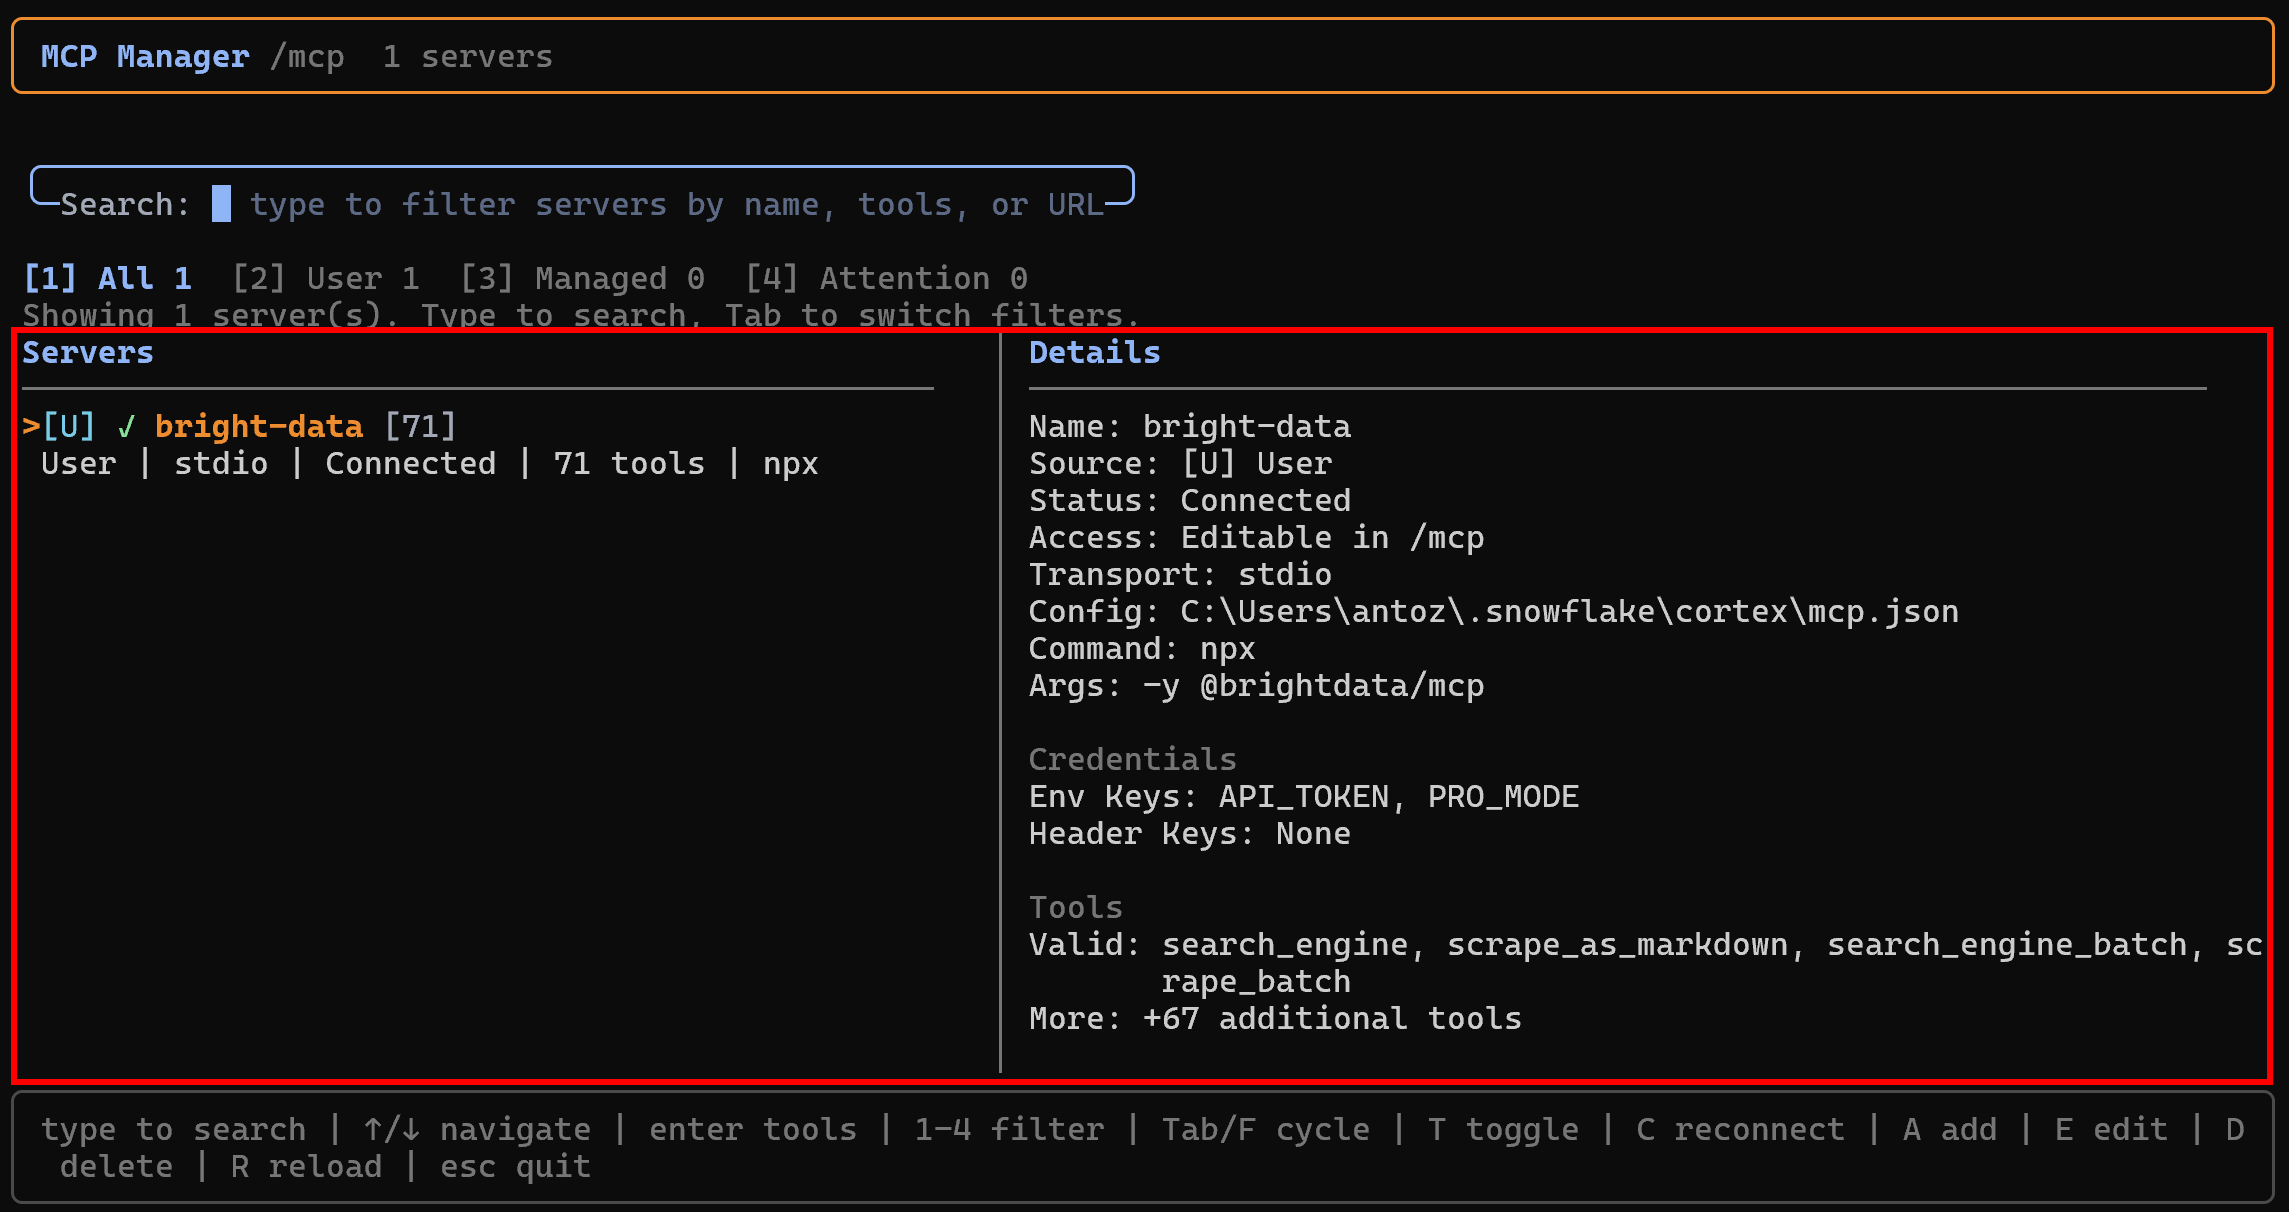
Press Enter to inspect it, which allows you to explore all exposed tools:
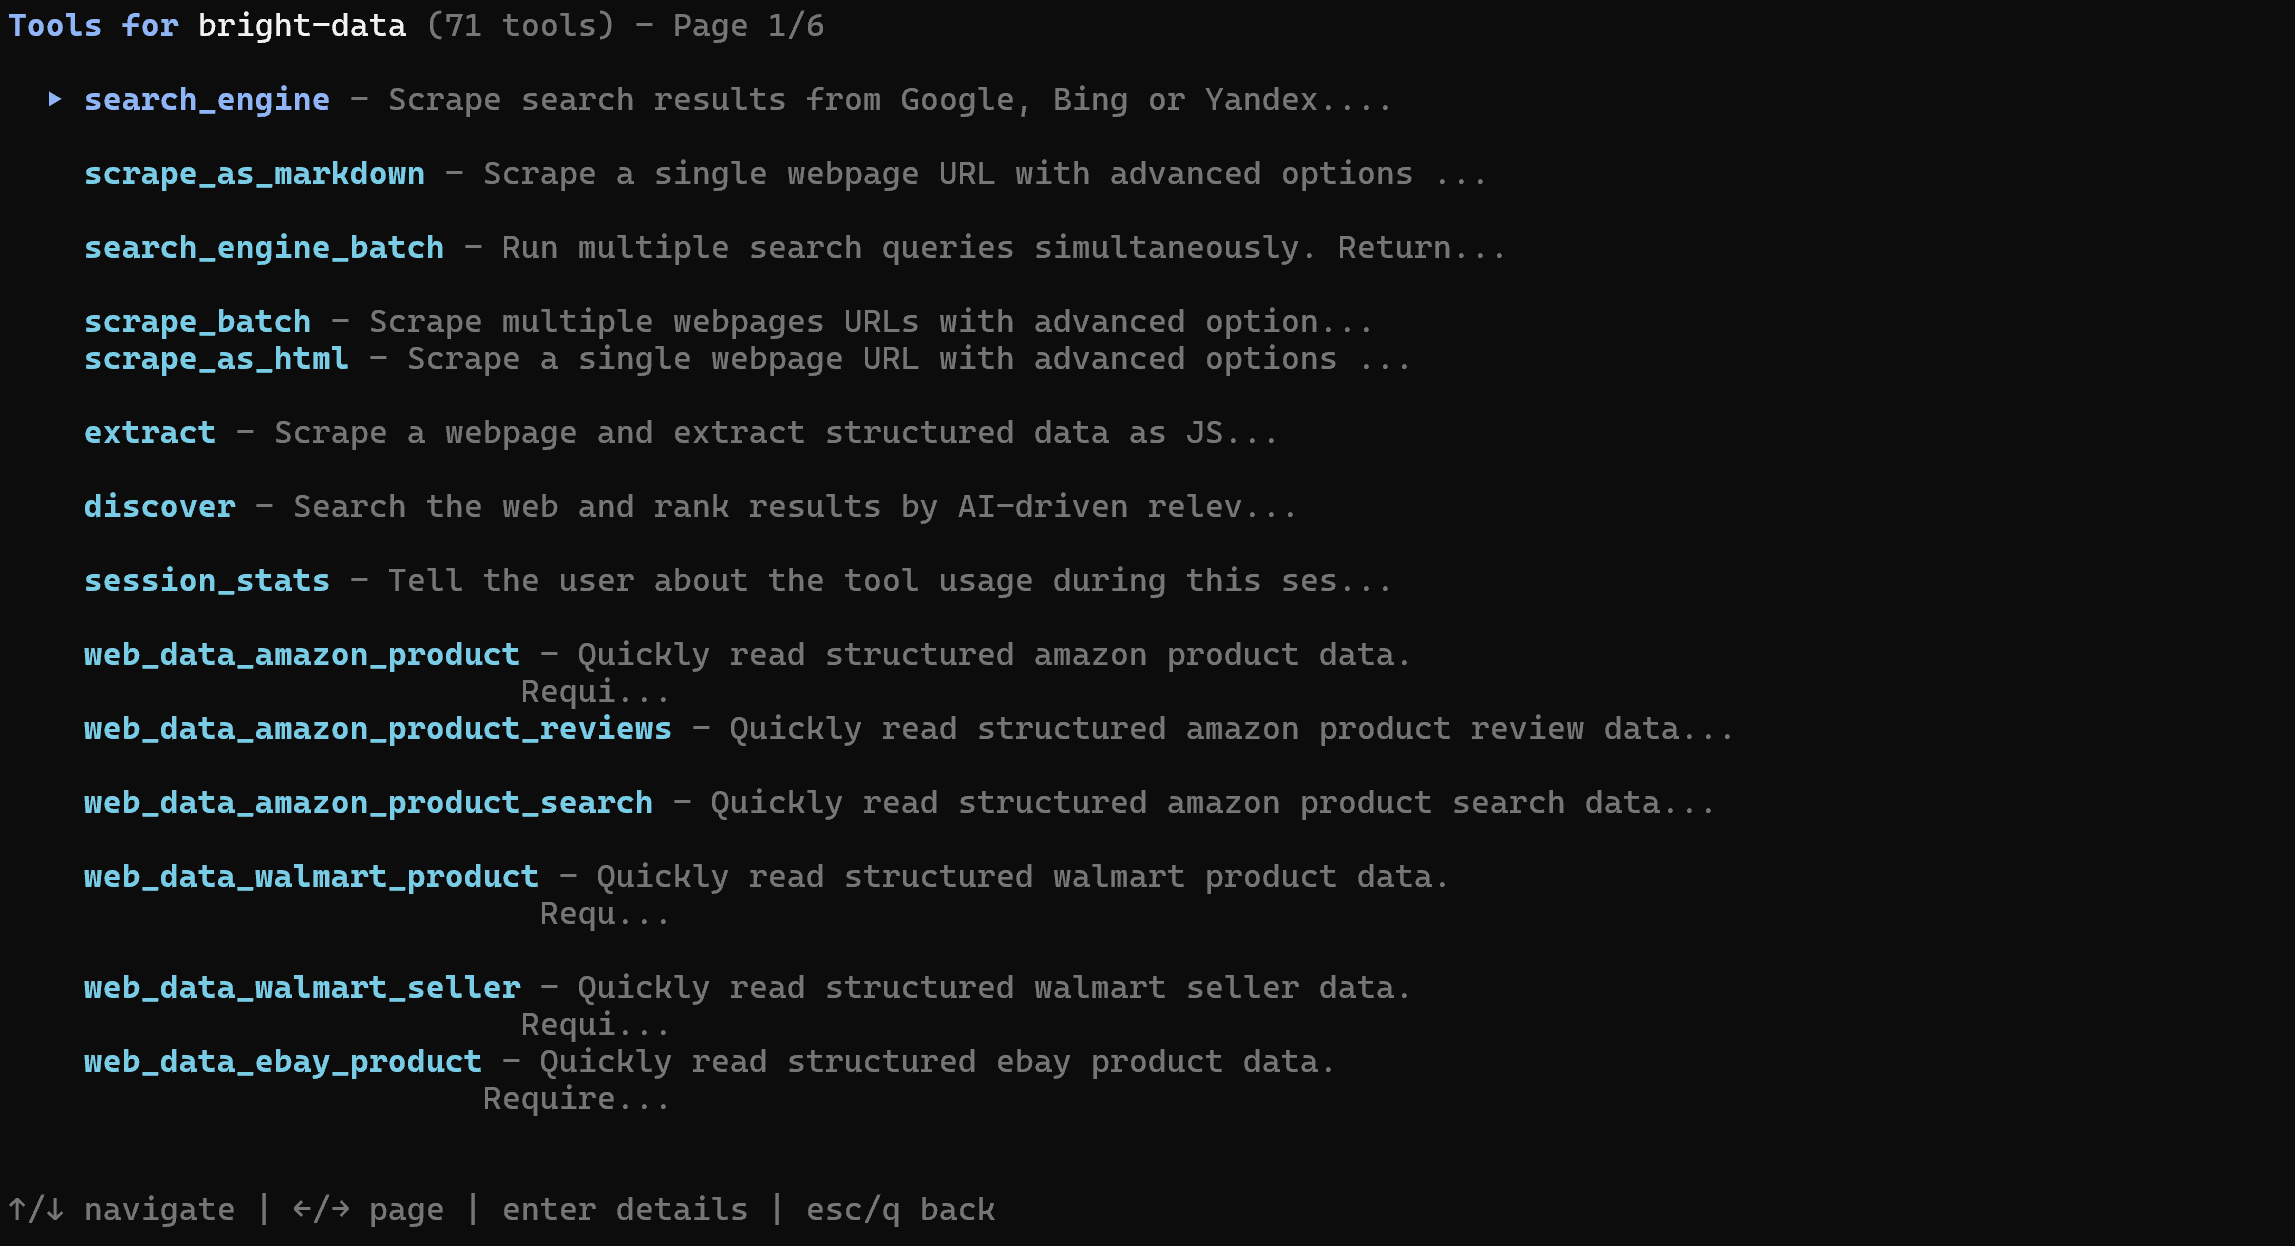
The response will display all available MCP tools. In Pro mode, you will see 70+ Web MCP tools. Instead, in Rapid mode, only the limited set of free tools will be available.
This confirms that the Bright Data Web MCP is correctly exposing tools to Cortex Code CLI. Later in this tutorial, you will see how to use Web MCP together with the Bright Data skills.
Add the Bright Data Skills to Cortex Code CLI
Here, you will learn how to add Bright Data skills to Cortex Code using Vercel’s skills tool.
Prerequisites
Make sure you have:
- The Bright Data CLI installed and set up locally (this is the main prerequisite for the Bright Data skills). For a quick setup of the Bright Data CLI, refer to the “Bright Data CLI: Installation & Setup” guide. Otherwise, consult the dedicated blog post.
- A basic understanding of what the Bright Data skills provide.
Some knowledge of the Agent Skills standard and familiarity with Vercel’s skills CLI tool will also be helpful.
Quick manual setup: If you prefer a manual approach, start by cloning the Bright Data skills repository. Then, copy the skills into the .snowflake\cortex\skills directory (%USERPROFILE%\.snowflake\cortex\skills on Windows):
git clone https://github.com/brightdata/skills
cp -r skills/skills/* ~/.snowflake/cortex/skills
Otherwise, follow the steps below!
Step #1: Install the Bright Data Skills
To add the Bright Data Skills in Snowflake Cortex Code CLI via skills, run:
npx skills add brightdata/skills -a cortexThis command installs the skills npm package and launches the setup process, which will:
- Download the Bright Data skills from the Agent Skills Directory.
- Configure them for use globally or in your local project.
You will be prompted to choose which skills to install:
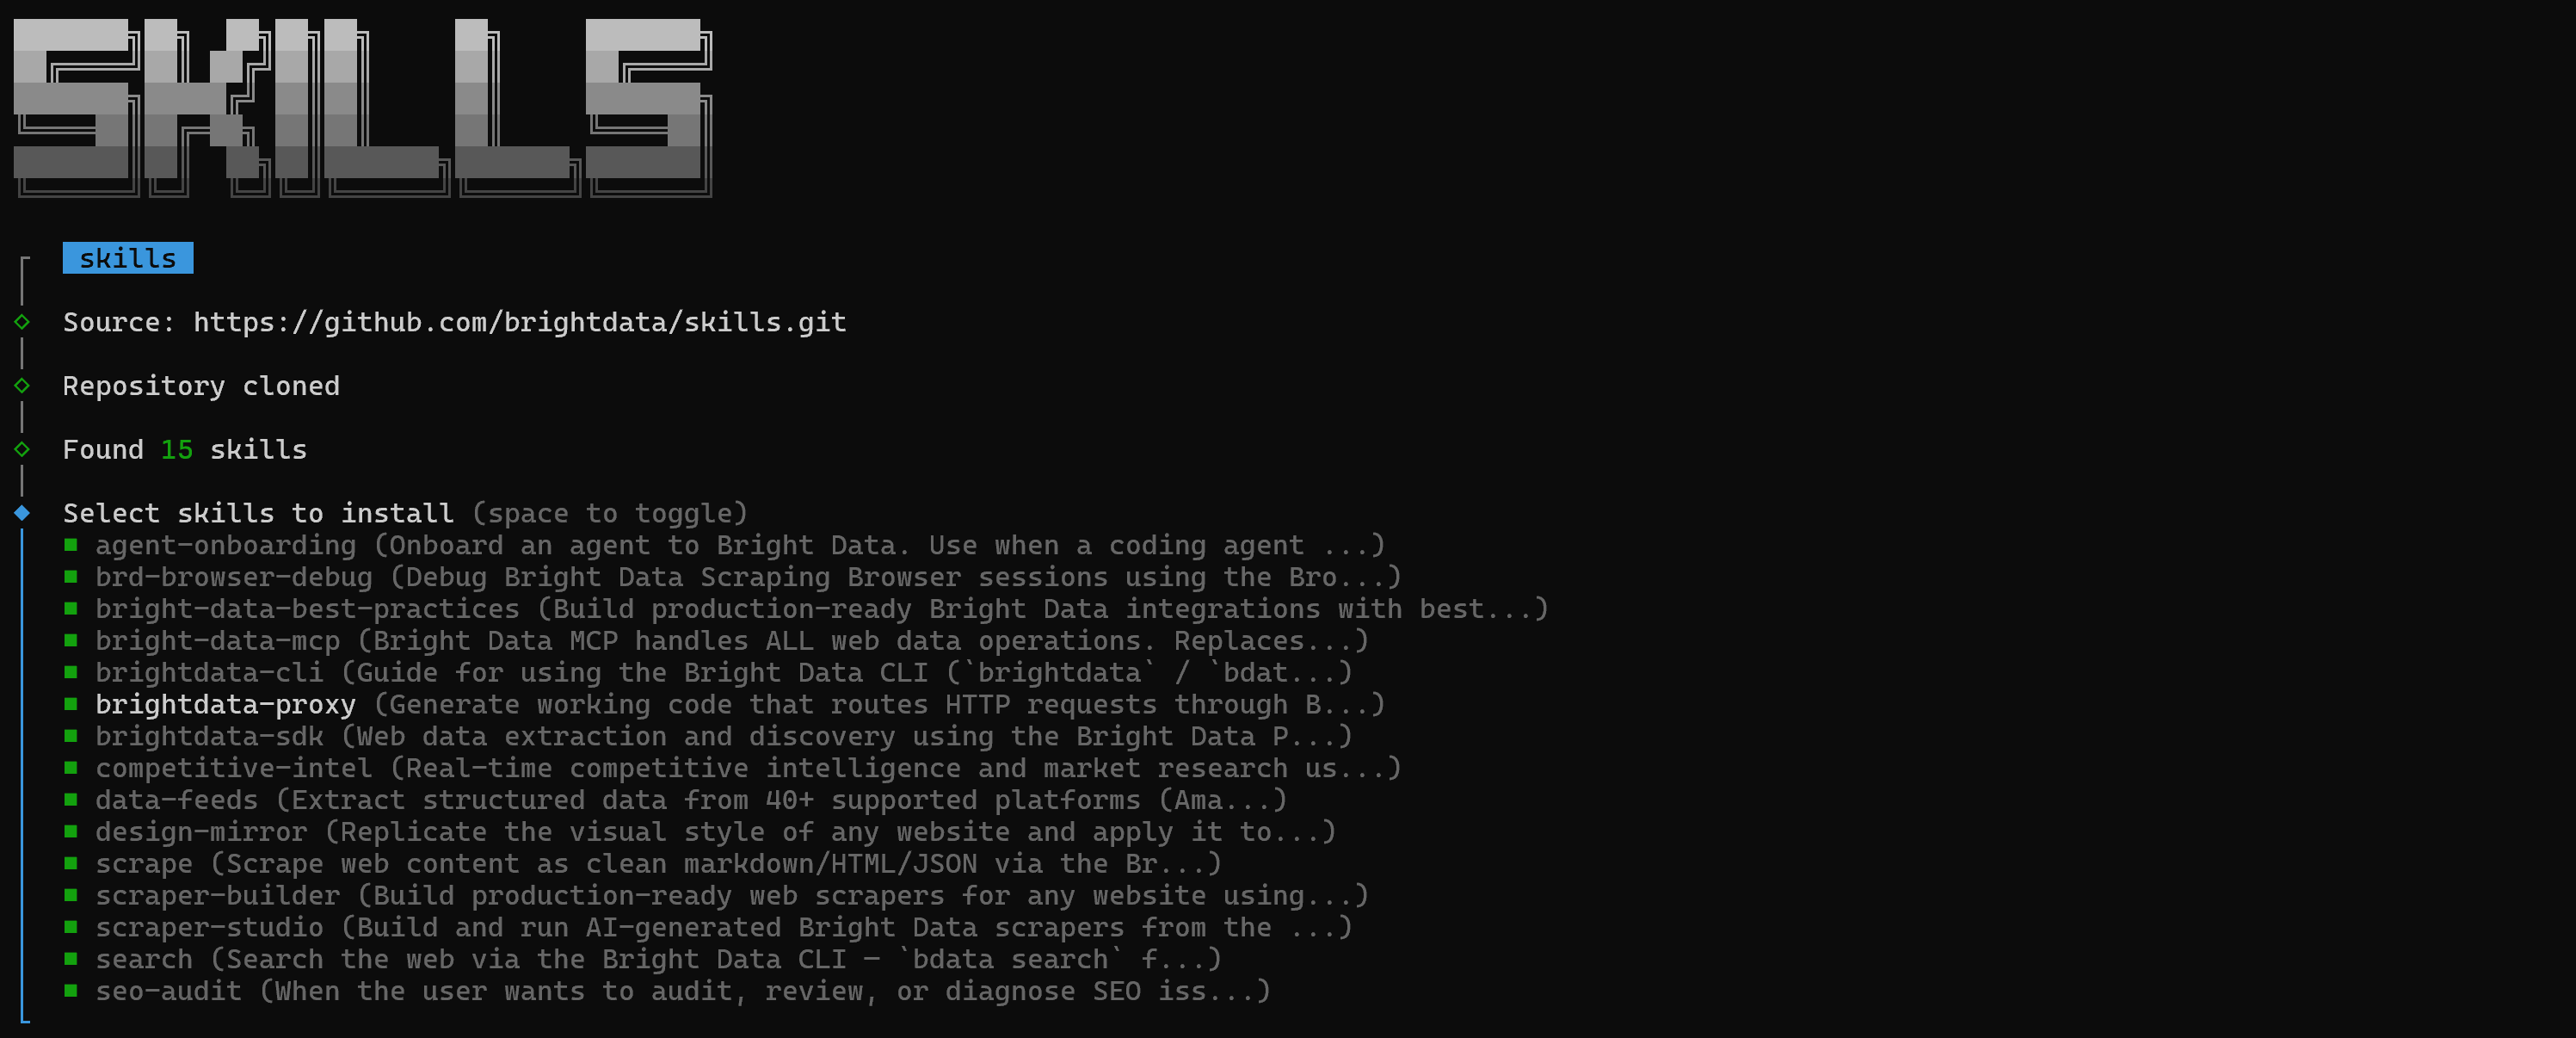
To install all of them, use the spacebar to toggle each skill, then press Enter.
Next, you will have to choose the installation scope. The Web MCP integration was configured globally, so you should install the Bright Data skills globally as well. For that reason, select the “Global” option and press Enter:

You will be shown the “Installation Summary” and “Security Risk Assessment” sections. Review both carefully and press Enter to confirm. Finally, you will get a confirmation message for the installation:

The Bright Data skills will be added to the ~/.snowflake/cortex/skills directory. Awesome!
Step #2: Confirm the Skills Are Available
Launch Cortex Code CLI and run the following command:
/skillThat will list all available skills. Keep in mind that Snowflake Cortex Code CLI comes with several built-in skills. However, you should see the Bright Data skills added before:
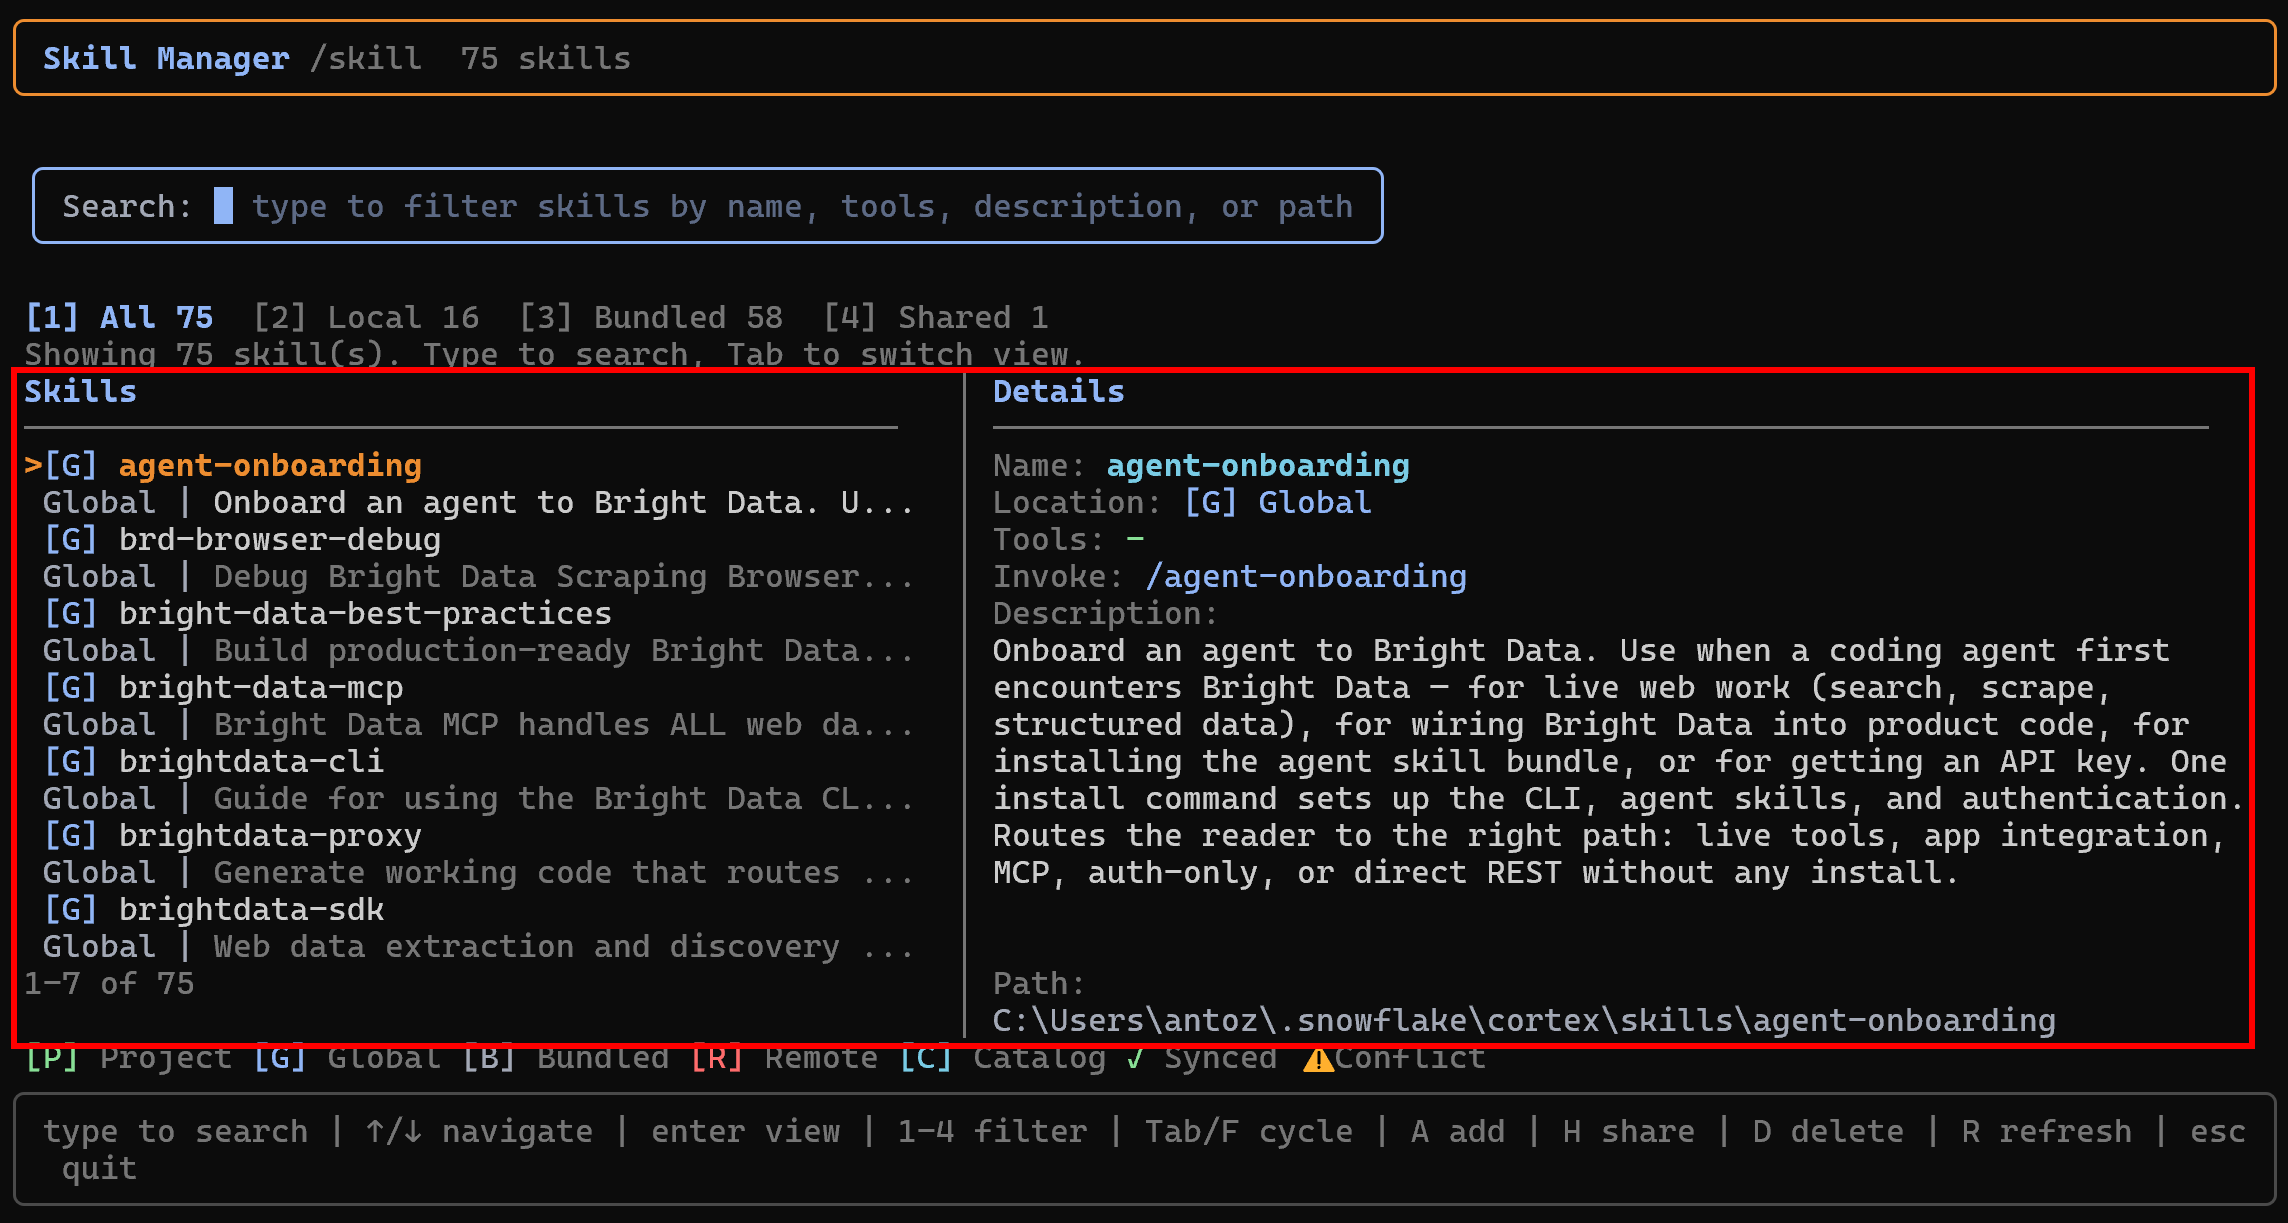
Optional: If you have not yet configured the Bright Data CLI, run the onboarding skill as a command within the Cortex Code CLI with:
/agent-onboardingThis special skill will guide you through the process of setting up everything required for the other Bright Data skills.
Mission accomplished! In the next chapter, you will see how to make full use of the Bright Data Web MCP and skills within Cortex Code CLI.
Cortex Code CLI + Bright Data: Next-Level Snowflake Database Management Experience
To experience how powerful the Cortex Code CLI + Bright Data setup is, consider a practical task that requires web grounding.
A common challenge when working with databases is ensuring data is stored and governed in compliance with privacy and security regulations. This becomes especially important when handling PII (Personally Identifiable Information), where poor governance can lead to data leaks and even regulatory fines.
Now, imagine you want a contextual report with actionable recommendations for securing sensitive data in your specific Snowflake schema. Ideally, the agent should understand your database structure, identify potential PII, search the web for trusted regulatory guidance and Snowflake best practices, and combine everything into an implementation-ready report.
Achieve that with a prompt like:
Search for tables containing PII data in the SNOWFLAKE_SAMPLE_DATA.TPCDS_SF10TCL schema. Then search online for regulatory guidance on PII data management and Snowflake best practices for handling PII. Scrape the most relevant sources in Markdown. Produce a clear, actionable report explaining how to properly identify, tag, secure, and govern PII data within that schema.Execute it in Cortex Code CLI, and this is the type of result you should expect:
This is what happened:
- The agent performs schema discovery on the target Snowflake schema to understand its structure and data.
- Concurrently, it calls the
search_engine_batchtool from the Bright Data Web MCP (backed by the Bright Data SERP API) to run multiple Google searches for Snowflake PII management best practices and official privacy regulations. - It selects the most relevant sources and scrapes them using the Web MCP
scrape_as_markdowntool (via Bright Data’s Web Unlocker API). - It combines the retrieved information into a contextual, actionable report tailored to your schema.
In particular, this is the generated report:
The resulting report provides a complete PII governance assessment for the SNOWFLAKE_SAMPLE_DATA.TPCDS_SF10TCL schema. It highlights potentially sensitive columns across six tables, classifies their risk level, and maps them to relevant regulations such as GDPR, CCPA/CPRA, HIPAA, FCRA, and PCI-DSS.
The report also includes actionable Snowflake implementation guidance for PII detection, tagging, masking, RBAC, auditing, and monitoring. Recommendations are grounded in scraped sources from the Snowflake documentation and best-practice materials, as well as GDPR.eu and other official regulatory websites.
Et voilà! This example proves the value of integrating Bright Data’s web search, scraping, and discovery capabilities into your Snowflake Cortex Code CLI setup. By having access to the web, the Cortex Code CLI agent can now produce more reliable, contextual, and enterprise-ready results across a wide range of use cases.
Conclusion
In this blog post, you learned what Cortex Code CLI is and what capabilities it offers. Specifically, you saw how to extend it by connecting with Bright Data through the Web MCP and its agent skills.
By adding Bright Data, the Cortex Code CLI AI agent gains web access for grounding and research. That enables enrichment and deeper analysis of your Snowflake data. For even more advanced workflows, explore the full range of AI-ready services in Bright Data’s ecosystem.
Sign up for a Bright Data account today and start exploring our AI-powered web data tools!

Technical Writer
Antonello Zanini is a technical writer, editor, and software engineer with 5M+ views. Expert in technical content strategy, web development, and project management.


