
In this guide, you will discover:
- What the Bright Data CLI is, how it works, the features it offers, and the commands it exposes.
- How to install and get started with it on Linux, macOS, WSL, and Windows.
- How to take the first steps with the CLI in a simple, guided way.
- The use cases and scenarios it supports, demonstrated with real-world examples.
Let’s dive in!
An Introduction to the Bright Data CLI
Before seeing it in action, understand what the Bright Data CLI brings to the table and how it works.
What Is the Bright Data CLI?
The Bright Data CLI is an all-in-one terminal tool that provides streamlined access to the full Bright Data API surface. In other words, it simplifies integration with Bright Data products and services by exposing direct terminal commands to use, control, and integrate them.
At a high level, it provides commands to:
- Scrape any website while bypassing CAPTCHAs and anti-bot protections via the Web Unlocker API.
- Perform structured searches across major engines like Google, Bing, Yandex, and others using the SERP API.
- Extract data from 40+ platforms (e.g., Amazon, LinkedIn, Instagram) through Web Scraping APIs.
- Programmatically interact with web pages using an unblockable remote browser via the Browser API.
- Simplify setup and orchestration with Bright Data Web MCP.
- And much more…
Further reading:
How It Works
@brightdata/cli is the official npm package for the Bright Data CLI. Once installed, it gives you access to the brightdata command (with bdata as a shorthand), allowing you to interact with the full Bright Data API surface directly from your terminal.
The brightdata CLI tool wraps the entire Bright Data web data platform, exposing it via simple, developer-friendly commands. Under the hood, it:
- Authenticates once via OAuth, device flow, or API key, storing credentials locally so you do not need to re-enter them. After that, every command works out of the box—no need to manage tokens, create zones, or configure proxies!
- Automatically provisions the required zones in your Bright Data account (
cli_unlockerandcli_browser) on first login so you can start immediately. - Routes requests through Bright Data’s infrastructure, handling CAPTCHAs, bot detection, IP rotation, JavaScript rendering, and all other web scraping challenges.
- Returns clean, usable output, including formatted tables in the terminal or structured JSON, CSV, or Markdown (great data formats for downstream analysis and processing, including AI workflows).
Features and Capabilities
Below is a list of the core features provided by the Bright Data CLI:
- Infrastructure and cost management: Monitor proxy usage, inspect configurations, and track account balance, bandwidth, and per-zone costs from a single CLI-based interface.
- Universal web scraping: Access data from any website with built-in handling of anti-bot protections, delivering clean, ready-to-use outputs.
- Search engine data access: Run queries across major search engines and receive structured results, including organic listings, ads, and more.
- Structured data extraction: Pull web data feeds from dozens of platforms, ready for analysis.
- Remote browser automation: Interact programmatically with live web pages through a managed browser, performing navigation, clicks, typing, and handling dynamic content.
- Automation-friendly workflows: Integrate commands into Bash scripts and pipelines, supporting chaining and large-scale data processing.
- AI agent integration: Add prebuilt skills or MCP connections to AI coding assistants in a simplified way.
- Easy setup and configuration: Quickly initialize the CLI and manage environment settings with guided setup and centralized configuration for credentials and defaults.
Main Commands
The Bright Data CLI is available via the brightdata command (or the bdata alias). You can use it like this:
brightdata <COMMAND> <ARGUMENTS>The supported commands are:
| Command | What it does |
|---|---|
scrape <url> |
Scrape any website while handling CAPTCHAs, JavaScript rendering, and other anti-scraping protections. |
search <query> |
Run structured searches on Google, Bing, or Yandex and receive organized JSON results. |
pipelines <type> [params...] [options] |
Extract structured data from over 40 platforms, such as Amazon, LinkedIn, TikTok, and more. |
browser |
Control a real browser remotely to navigate, click, type, and interact with web pages programmatically. |
add mcp |
Connect the Bright Data Web MCP server to AI coding agents like Claude Code, Cursor, or Codex. |
skill |
Install prebuilt Bright Data AI agent skills into coding assistants for enhanced automation. |
zones |
List and inspect your Bright Data proxy zones and their current configurations. |
budget |
View your account balance, per-zone costs, and bandwidth usage at a glance. |
For a complete list of commands, along with their supported options and arguments, refer to the docs.
Getting Started with the Bright Data CLI: Step-by-Step Guide
In the following tutorial sections, you will be guided through the process of setting up the Bright Data CLI on your local machine.
The installation procedure depends on your environment:
- On Linux or macOS, you can rely on a dedicated CLI installer to get started quickly.
- On Windows, or on Linux/macOS using Node.js, you need to install the npm package globally and complete the configuration with a specific command.
In both cases, the initial setup takes only a few minutes!
The next two chapters will present both approaches, starting with the common prerequisites.
Prerequisites
To operate the Bright Data CLI on your machine (regardless of the environment), you need:
- Node.js version 20+ installed locally (LTS version recommended).
- A Bright Data account (you can create a new one for free).
Setting Up the Bright Data CLI on Linux/macOS/WSL
On macOS, Linux, and other Unix-based systems (including WSL), install the Bright Data CLI with:
curl -fsSL https://cli.brightdata.com/install.sh | shThis command downloads the Bright Data CLI installer and runs it. This will install and set up the CLI.
This is the output you should get: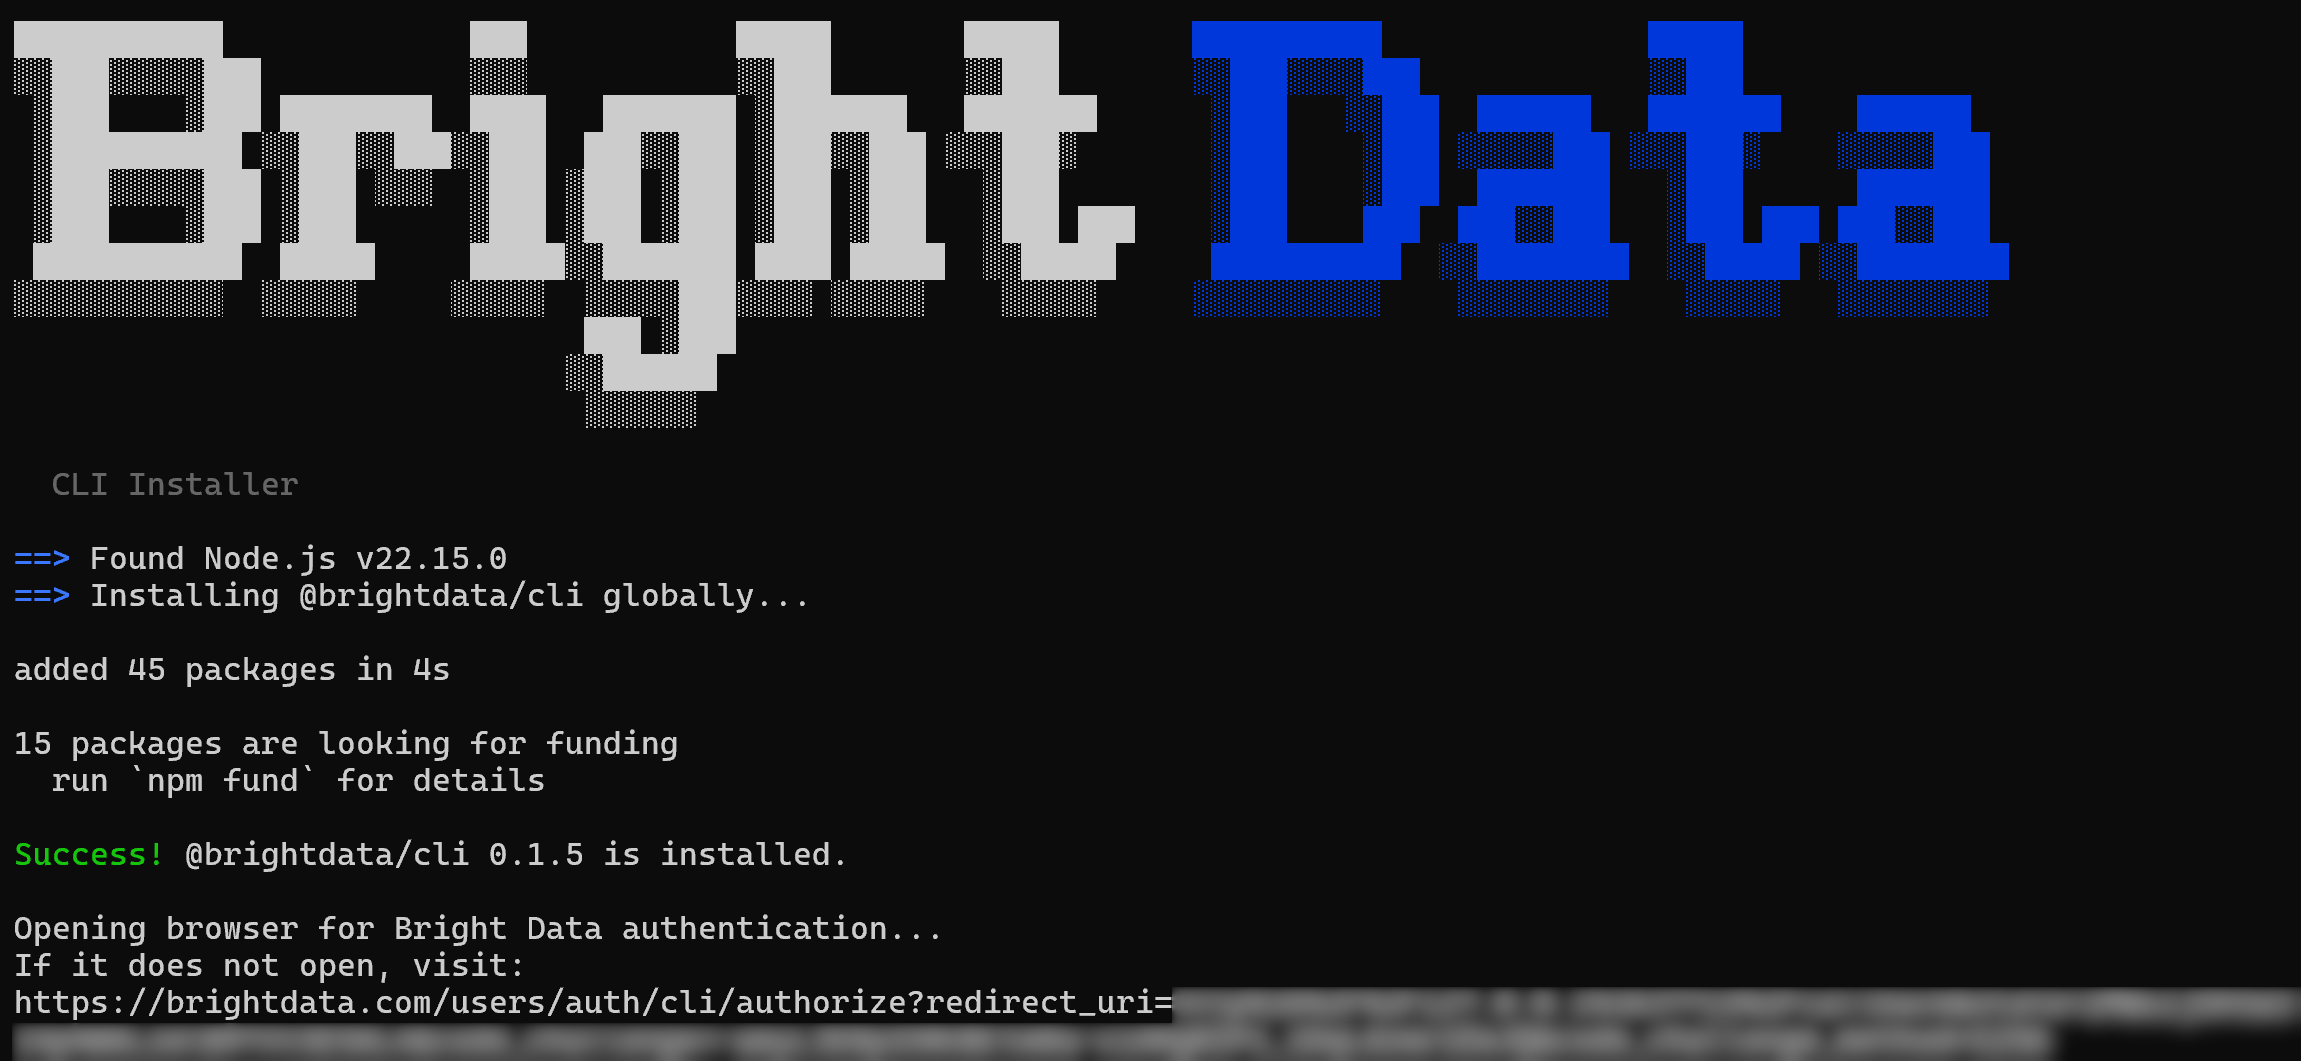
Notice that the @brightdata/cli npm package has been installed globally. Then, a URL will be shown to authenticate with your Bright Data account. A browser page should open automatically to the Bright Data login page. If it does not, copy the URL and open it manually.
After logging in, you should see the following confirmation: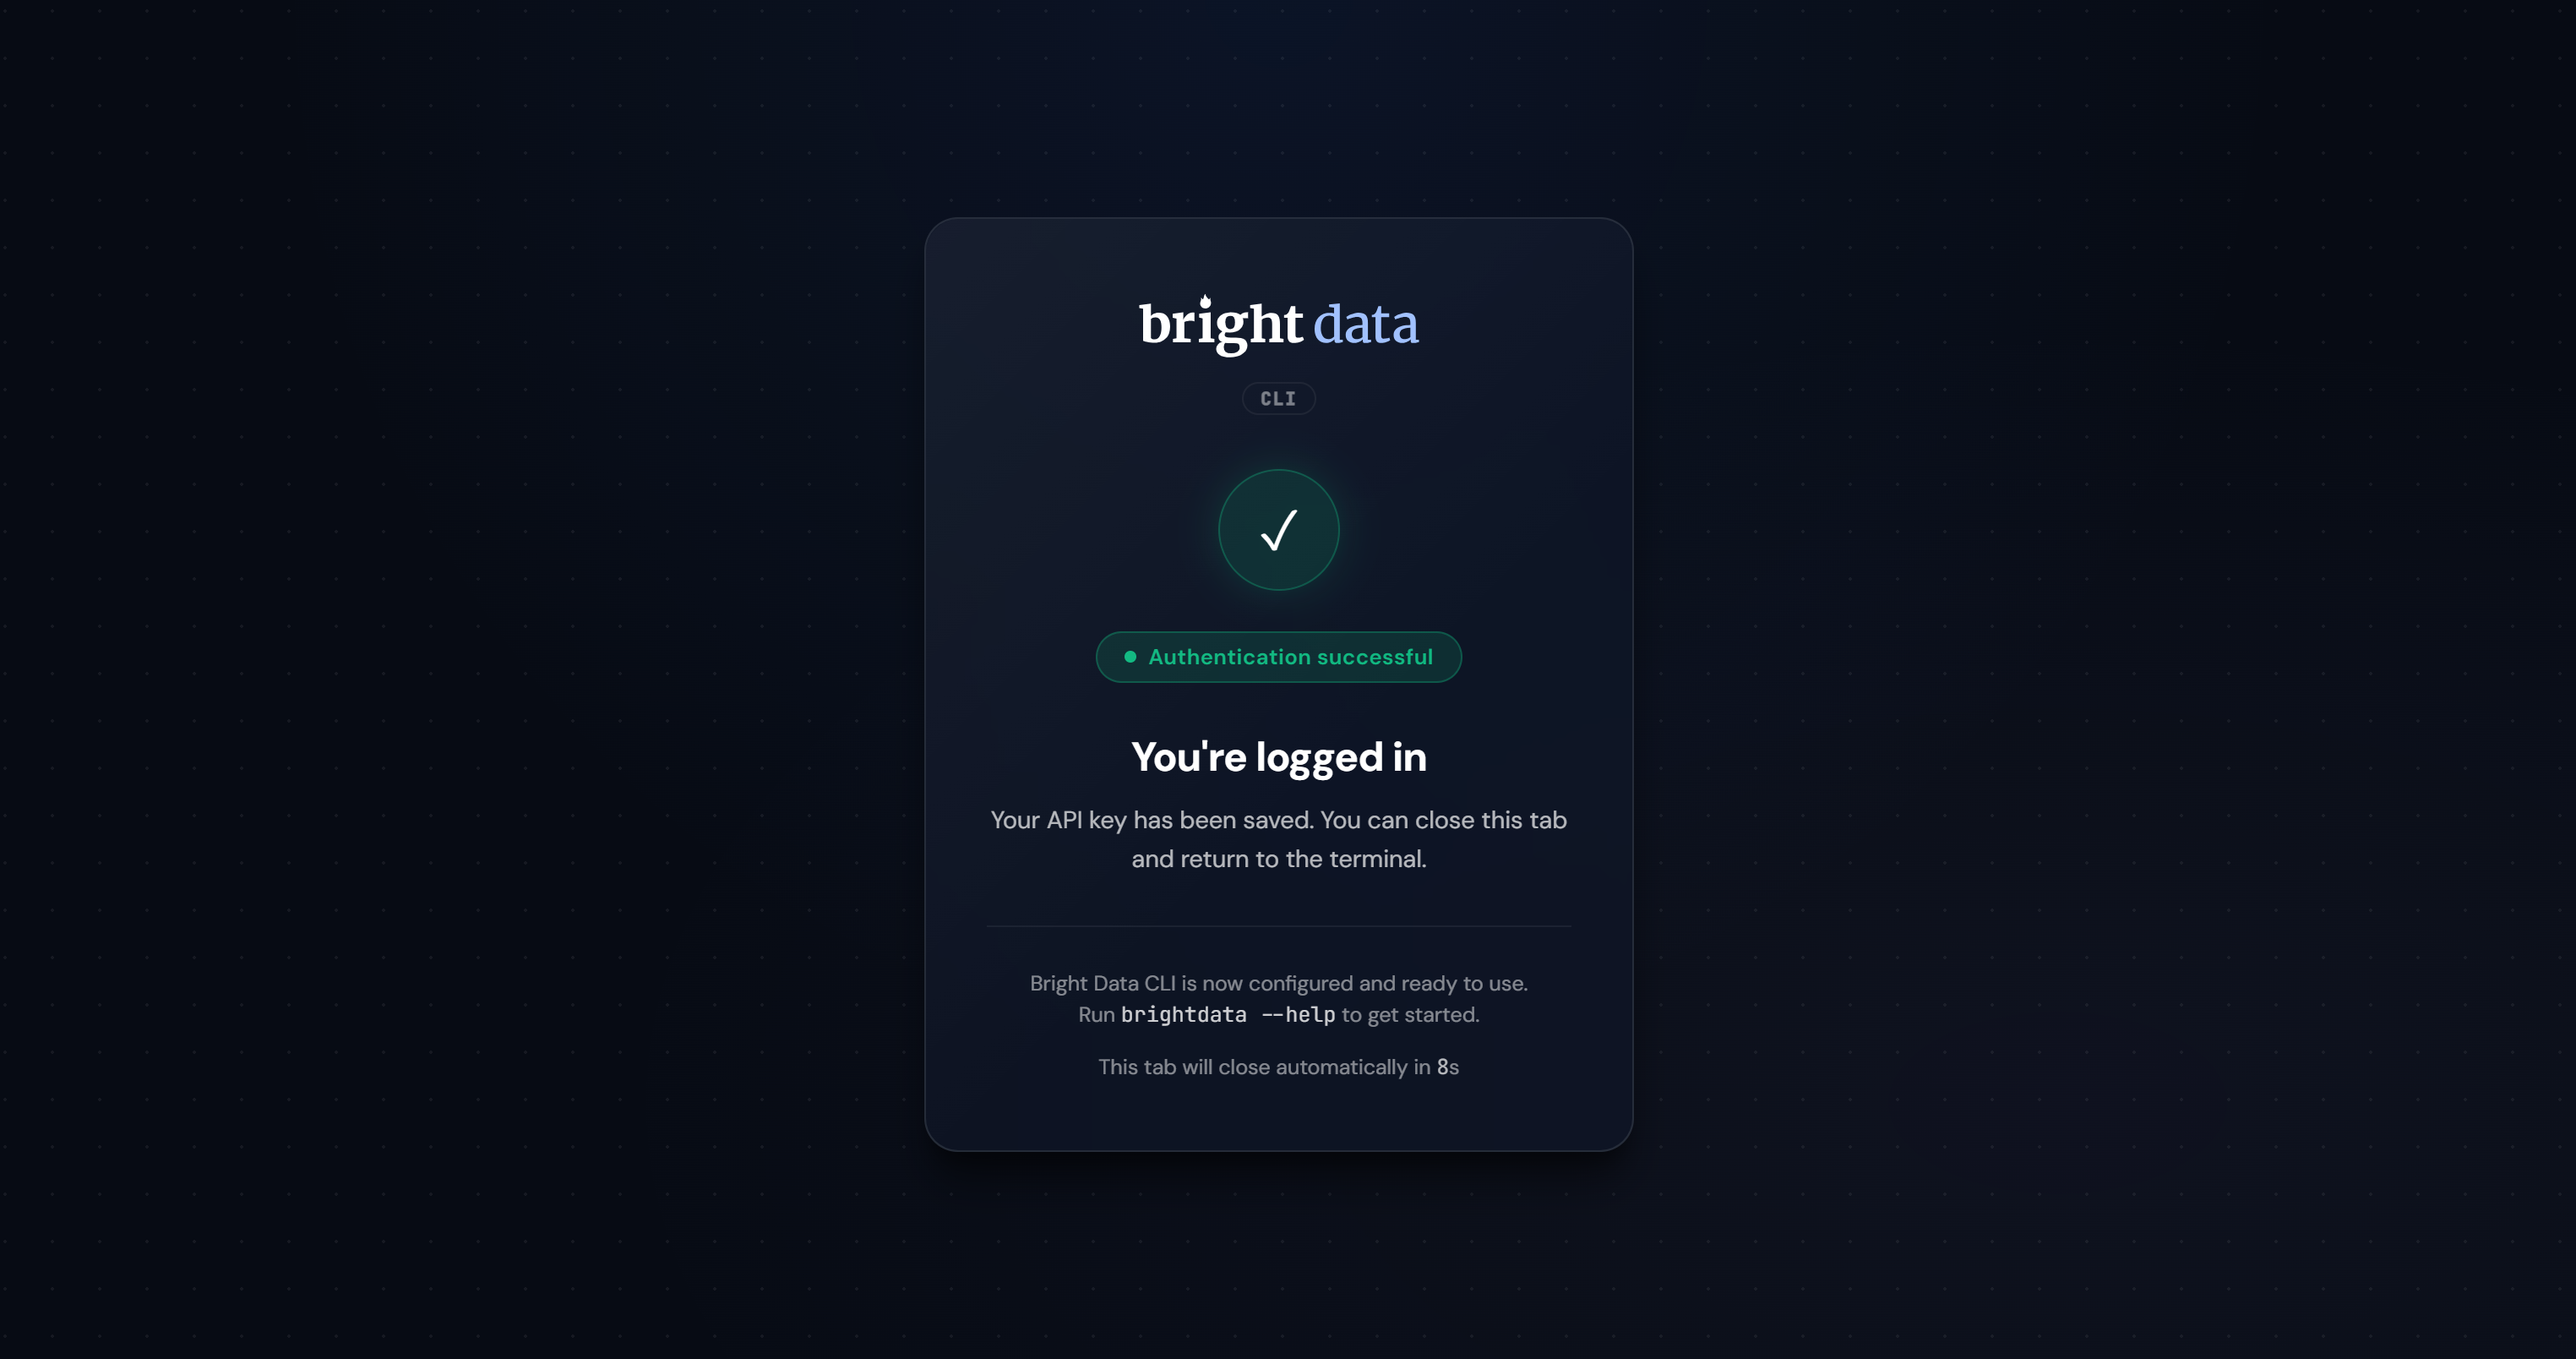
If the authentication succeeds, the Bright Data CLI will create the required zones and be fully operational on your system:
Check that the setup completed successfully with:
brightdata --versionOr the equivalent alias:
bdata --versionIn both cases, the result should look something like this:
0.1.5In this case, 0.1.5 is the version of the Bright Data CLI installed locally.
The Bright Data CLI is installed locally, your Bright Data account is configured, and the CLI is authenticated. Mission complete!
Setting Up the Bright Data CLI on Windows or Any Other OS via Node.js
Follow the steps below to get started with the Bright Data CLI on Windows, or manually on any other operating system via Node.js.
Step #1: Install the CLI via npm
On Windows or any platform, install the Bright Data CLI globally using npm:
npm install -g @brightdata/cliThis sets up the brightdata command so it can be used from anywhere on your machine.
Note: You can also run the CLI without installing it via:
npx --yes --package @brightdata/cli brightdata <command>Check that the brightdata command (or its alias bdata) is available globally with:
brightdata --versionThe result will show the installed package version, like:
0.1.5Great! The Bright Data CLI is now installed locally and accessible as a global command.
Step #2: Connect to Your Bright Data Account
Run the following command to link the CLI with your Bright Data account:
brightdata loginYou should see this output:
A browser page will open automatically to the Bright Data login page. If it does not, copy the provided URL and open it manually. This allows you to authenticate via OAuth with your Bright Data account.
After logging in, you should see a confirmation page like this:
A new Bright Data Agent API key is created and stored locally on your machine for authentication. Once successful, the CLI automatically sets up the required zones and is ready to use:
In summary, the login command:
- Validates and stores your API key locally
- Automatically creates required proxy zones (
cli_unlocker,cli_browser) - Configures sensible defaults so you can start immediately
Note: To log out and reset authentication, run:
brightdata logoutExcellent! The Bright Data CLI is now installed, authenticated, and ready for use.
Post-Setup Overview and First Steps (Optional)
After setting up the Bright Data CLI, your Bright Data account will now include two new zones ( cli_unlocker and cli_browser):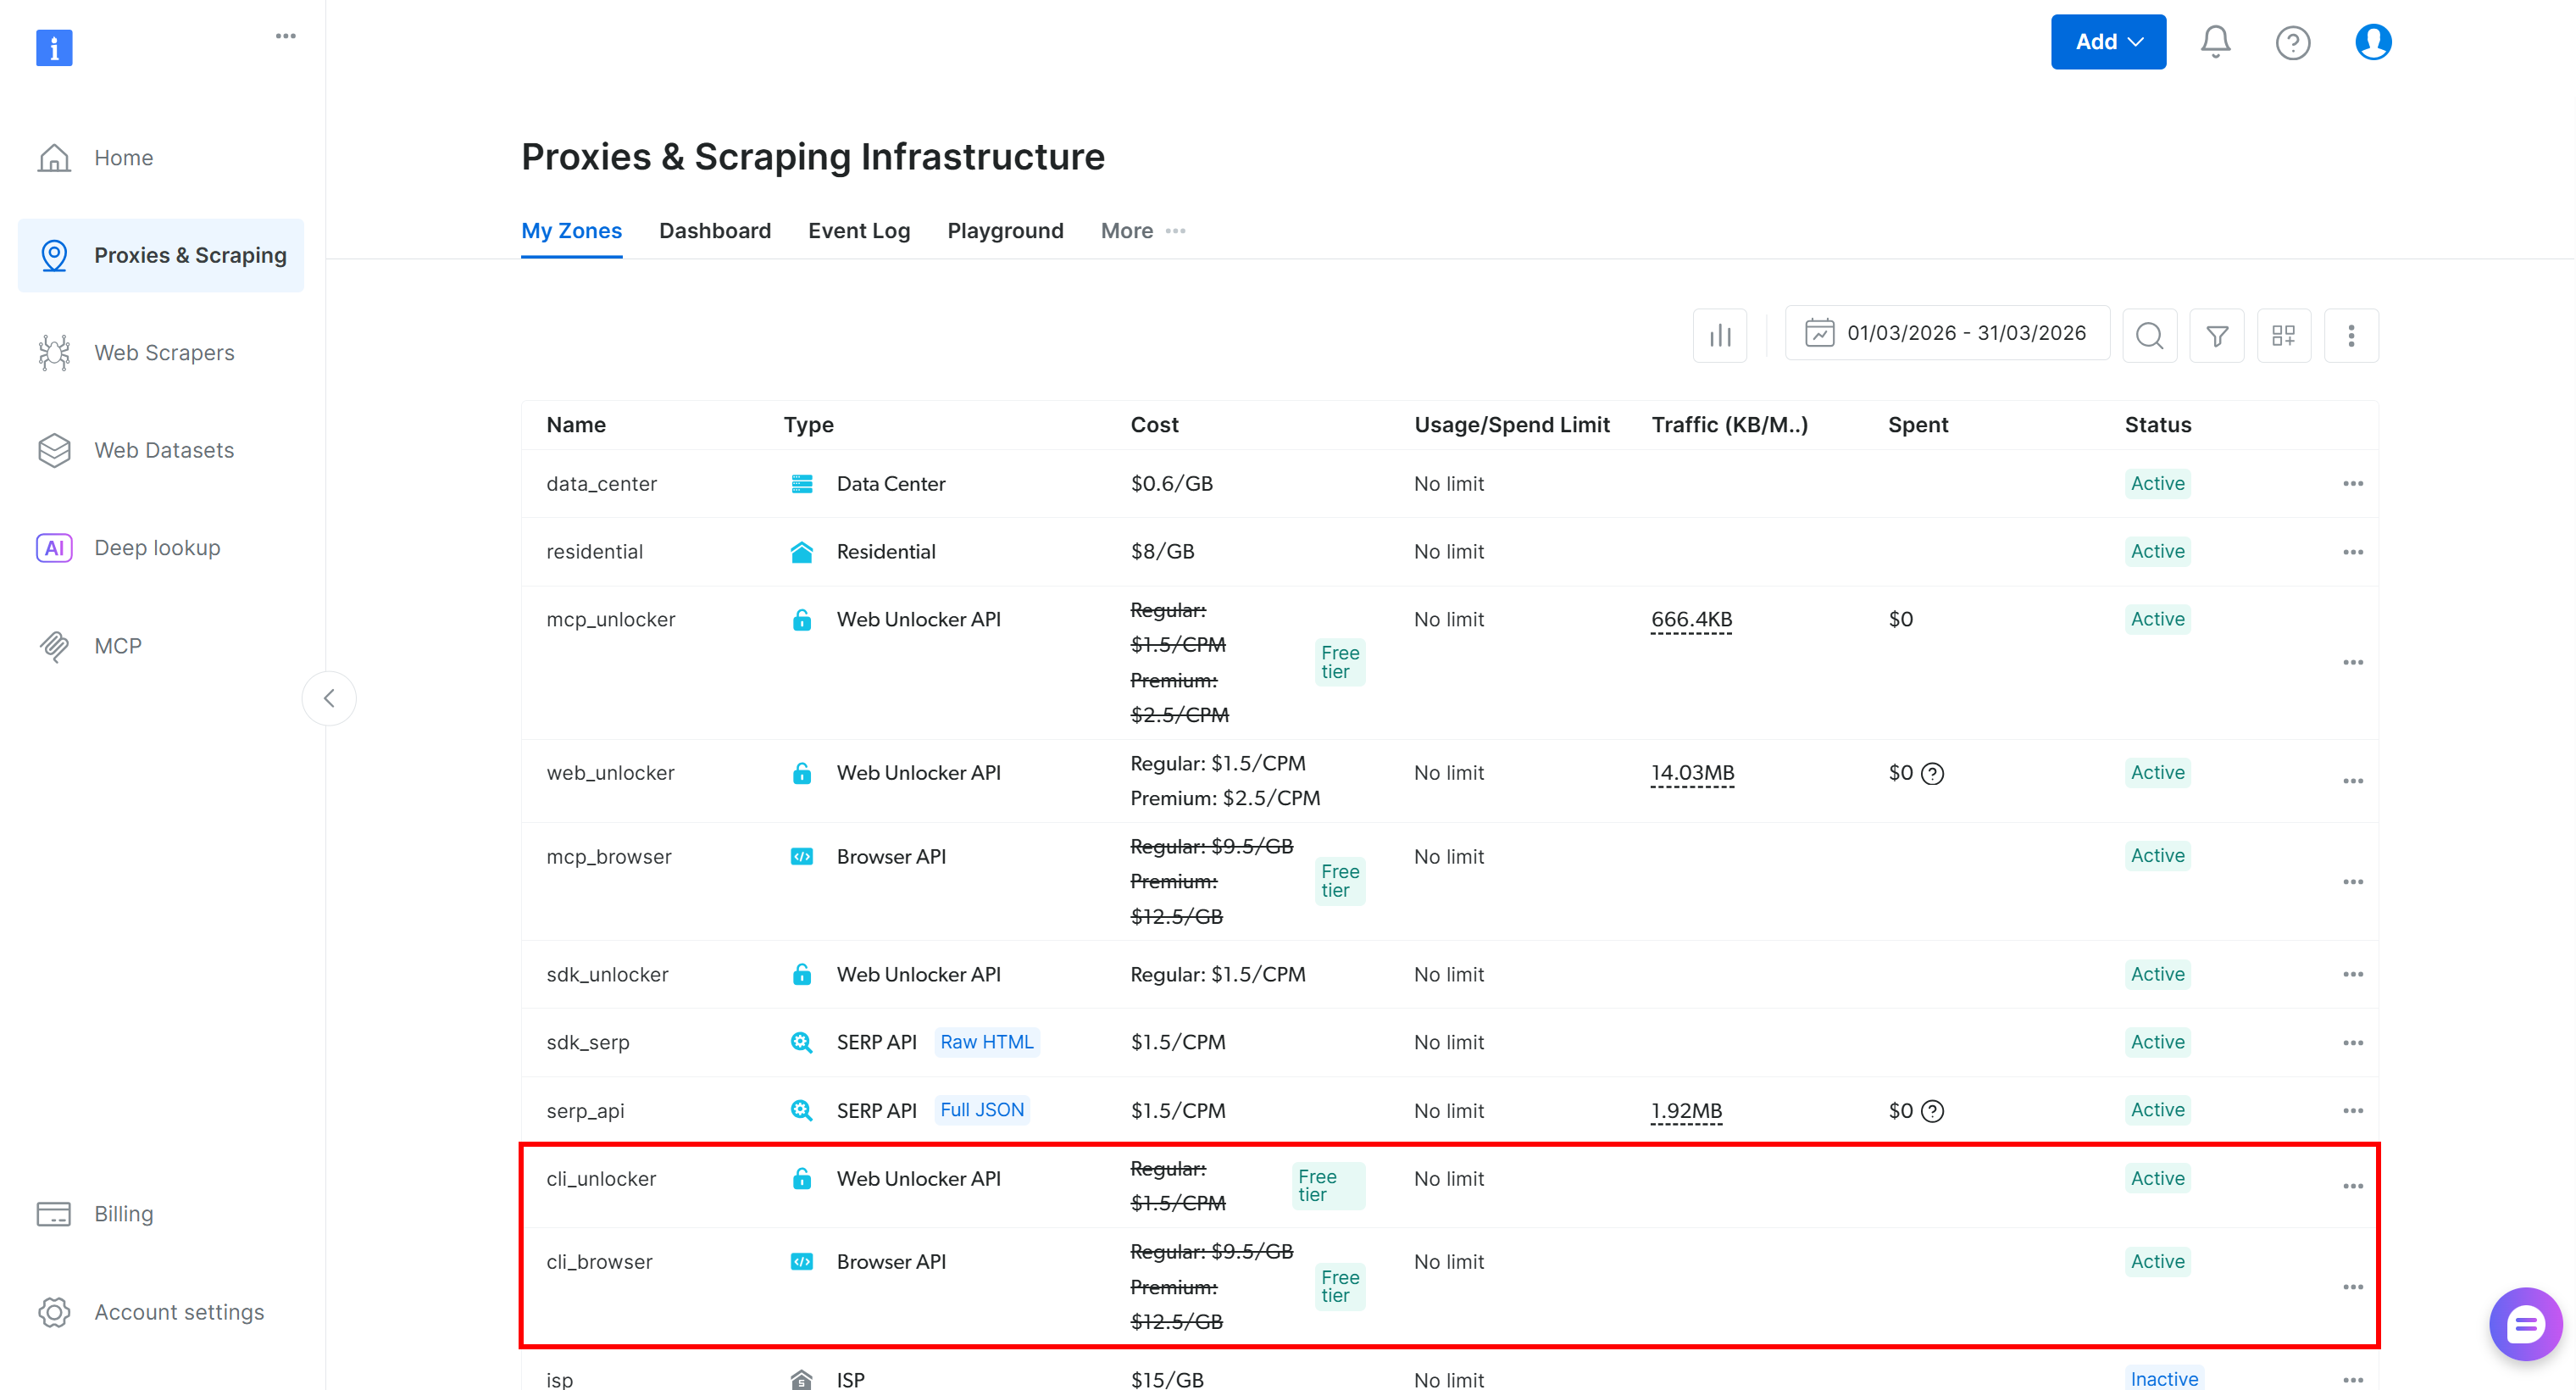
You will also have a new Agent API key, a special Bright Data API key created via OAuth that can manage the zones, send requests, retrieve budget information, and more: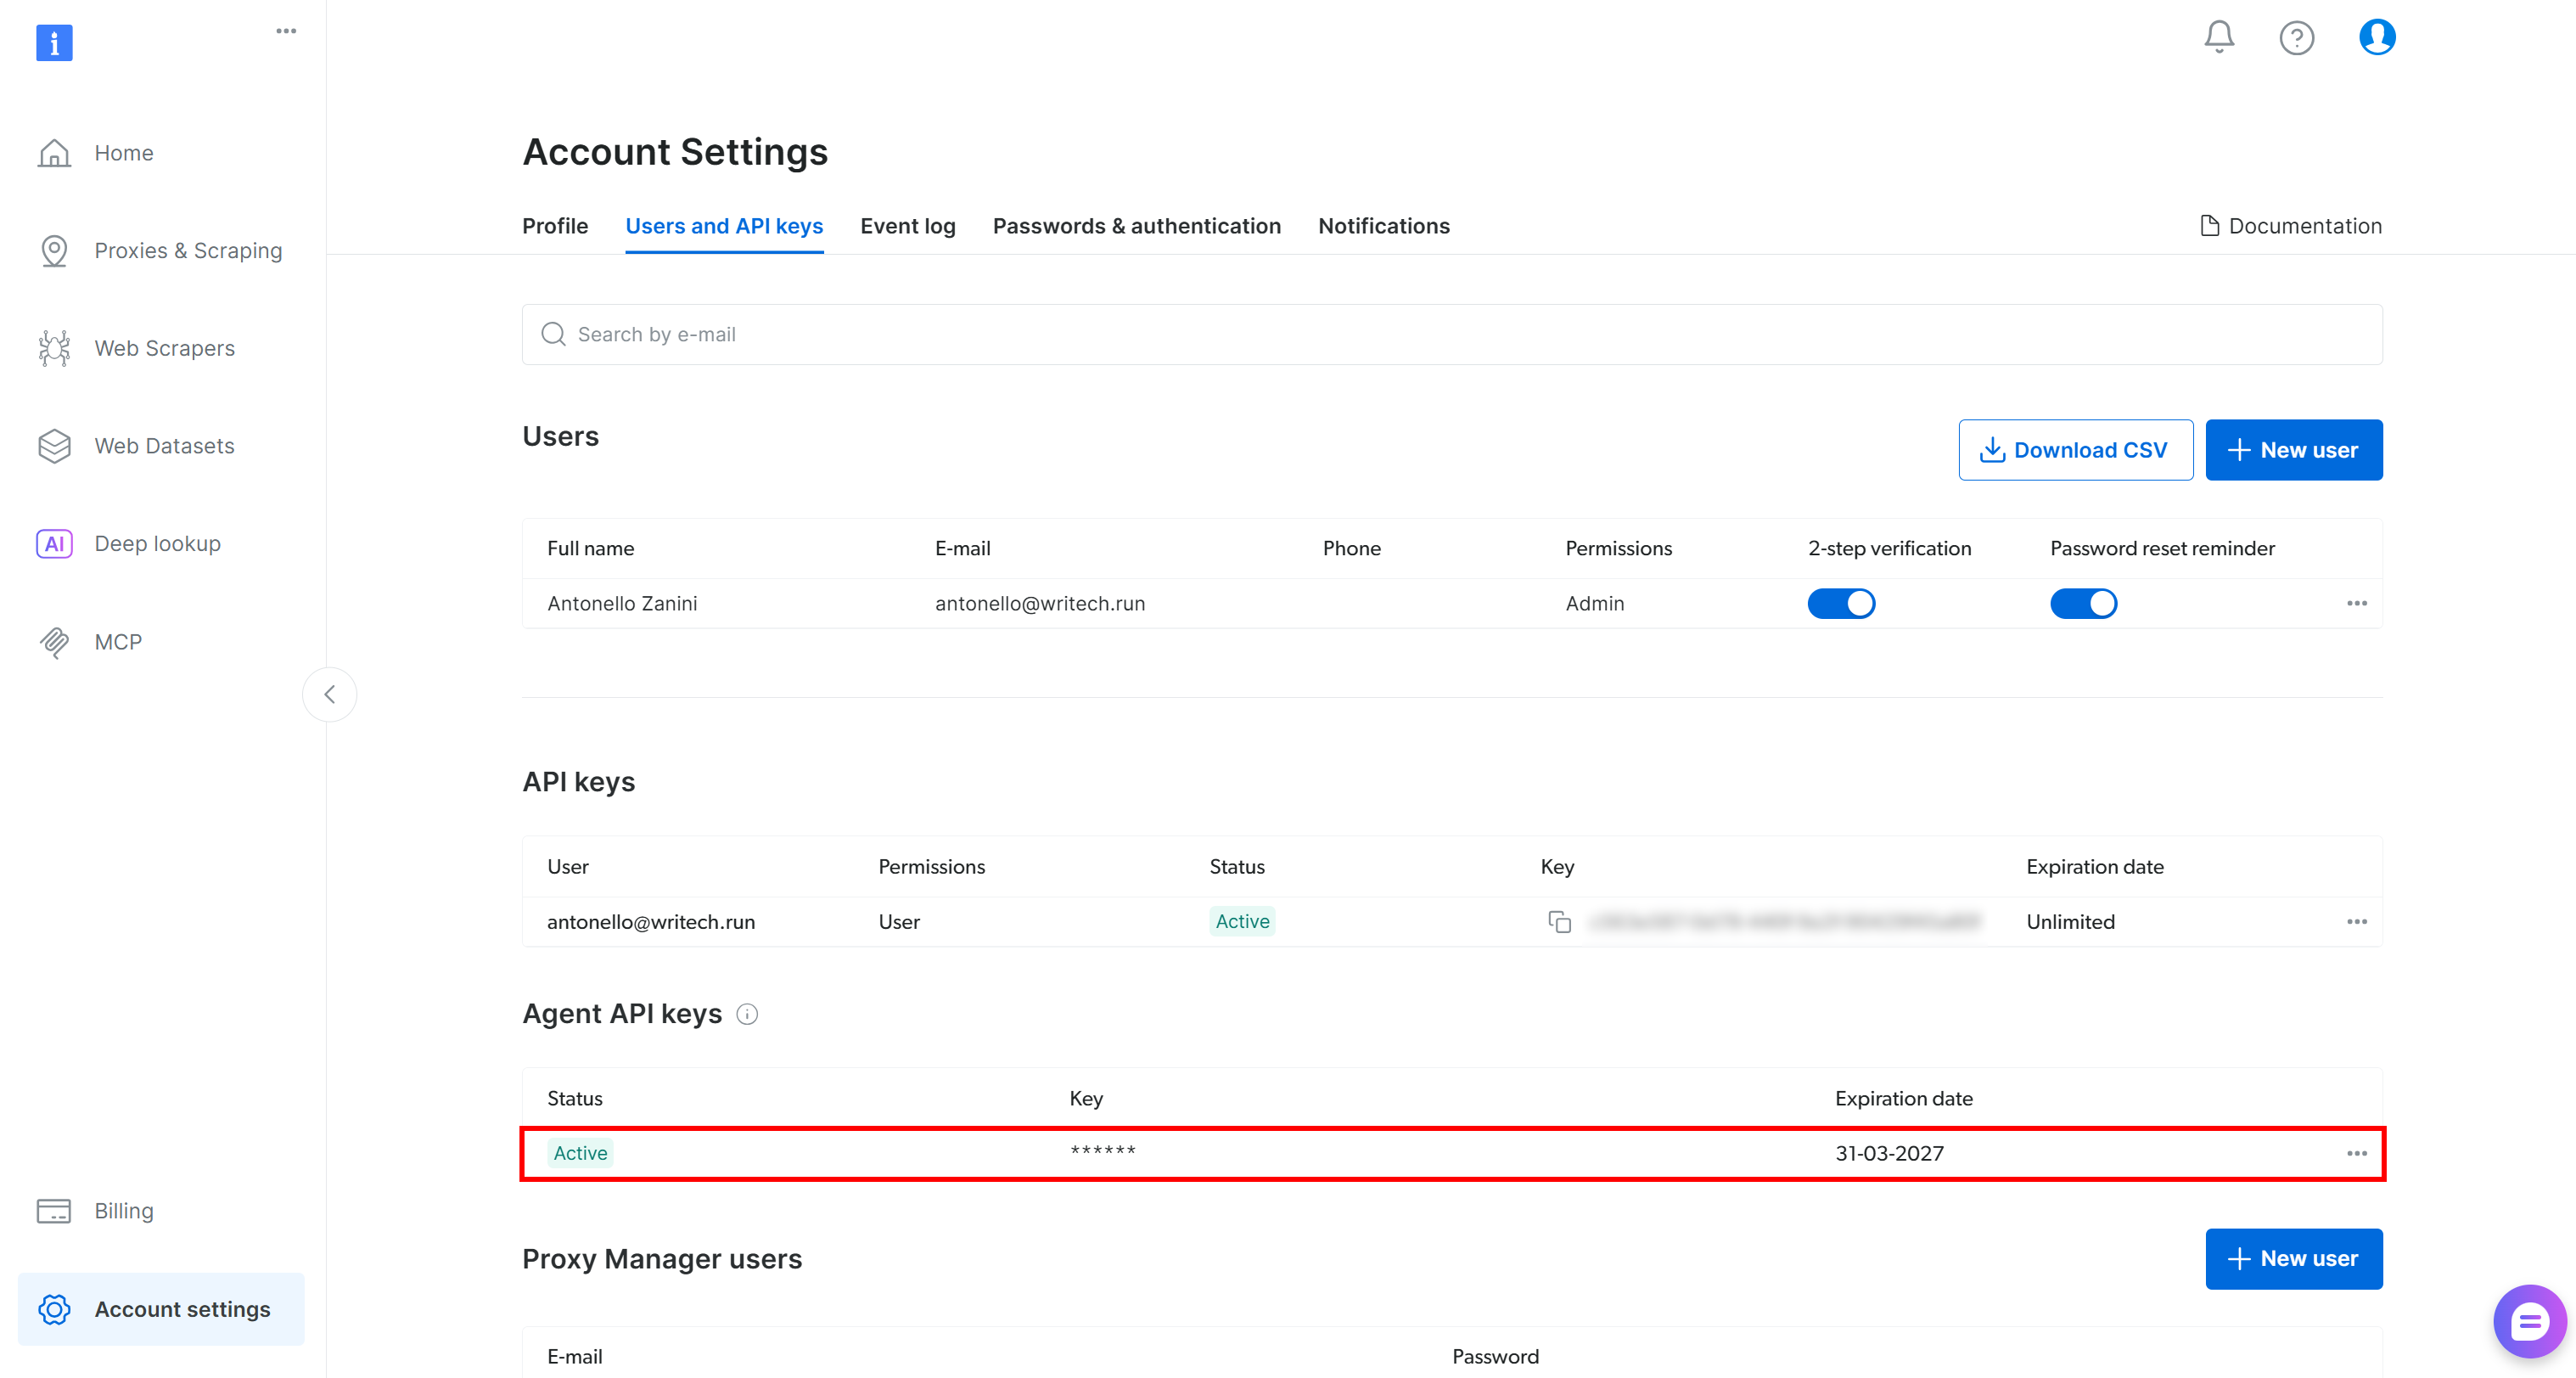
If this is your first time running the CLI, get started with the init command:
brightdata initThis launches an interactive wizard to configure the Bright Data CLI and provides some examples for testing.
During the setup, you will be asked to:
- Confirm the configured Bright Data Agent API key or update it.
- Select the default Web Unlocker zone (default:
cli_unlocker). - Choose whether to use the same zone as the default for the SERP API.
- Select a default output format (Markdown or JSON).
Once completed, you will see a concise setup summary followed by example Bright Data CLI commands to test and verify the installation.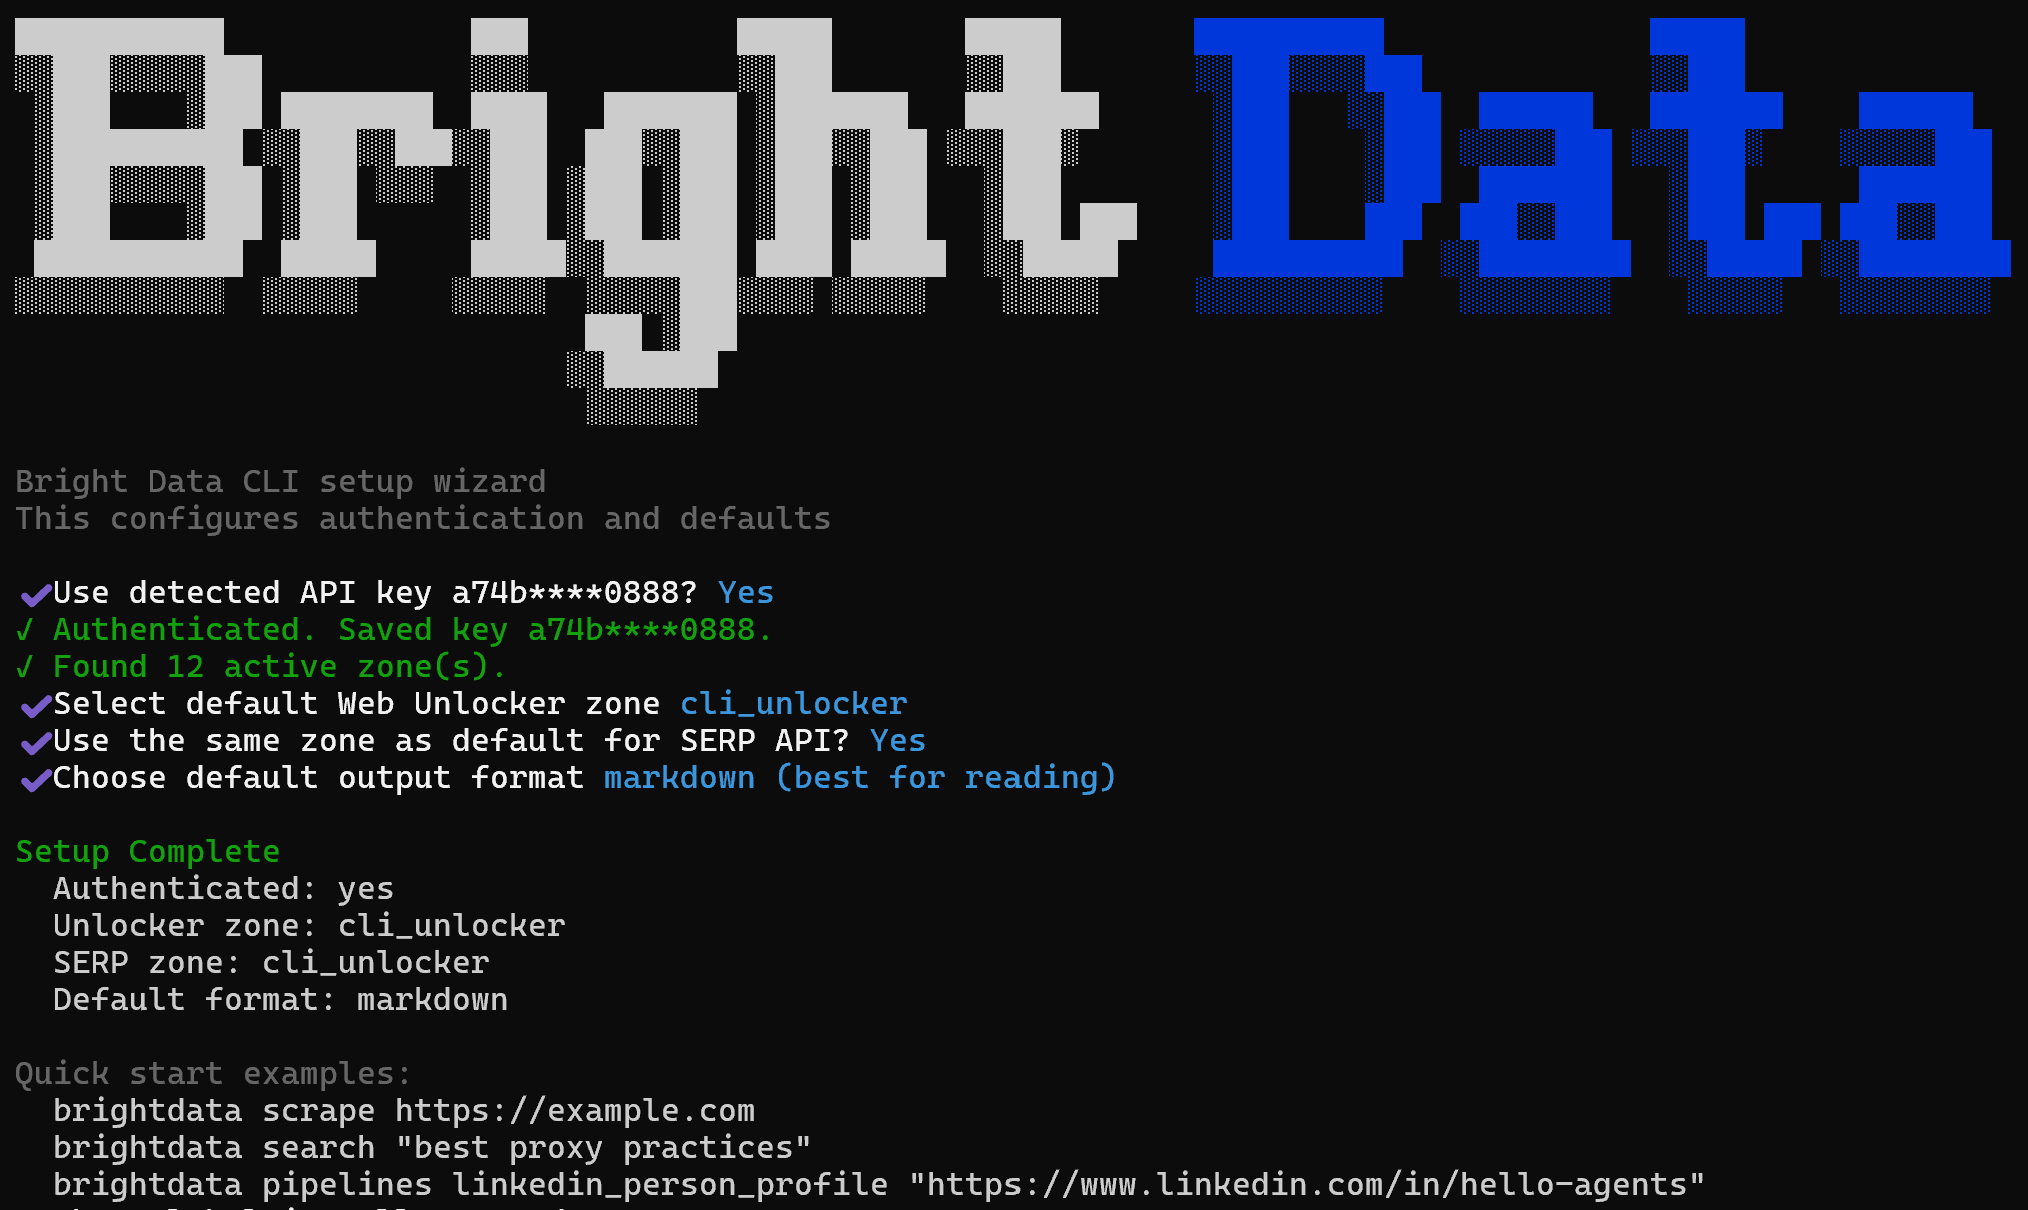
Note: To view the current configuration, use the brightdata config command. To update a setting, run:
brightdata config set <CONFIG_NAME> <CONFIG_VALUE>Otherwise, override them using global environment variables.
Bright Data CLI in Action: Real-World Examples
The Bright Data CLI supports several commands, each with many options. Here, we will explore some of the most relevant ones. For a complete list of examples, explore the documentation.
Note: The use of the Bright Data CLI is free for up to 5,000 requests per month on a recurring basis. So, you can get started for free!
Scraping Any Website
To retrieve content from a web page, use the scrape command like this:
brightdata scrape https://nodejs.org/enThe result is output to STDOUT in Markdown format (the default data format):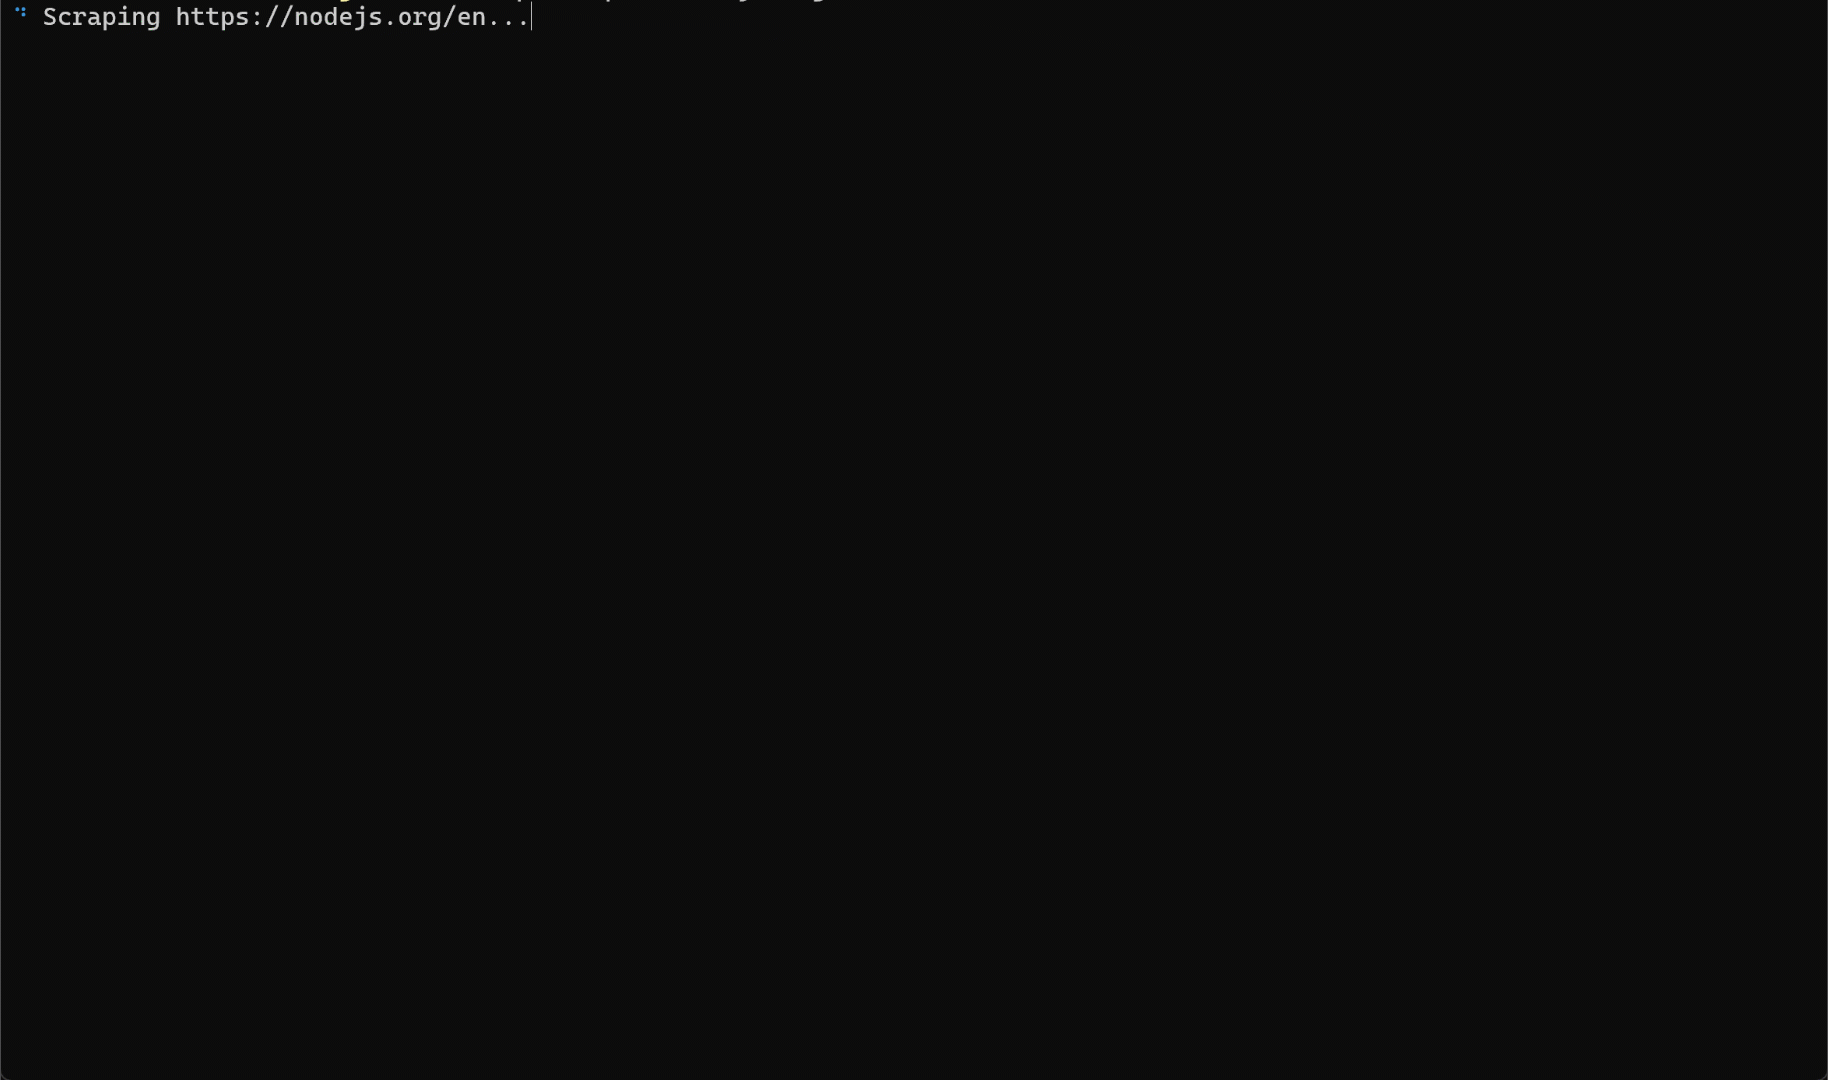
That corresponds to the Markdown version (ideal for LLM ingestion) of the page specified in the command:
If you instead want to geolocalize the request in a specific country (e.g., the US), use the --country argument:
brightdata scrape amazon.com/Apple-Cellular-Multisport-Smartwatch-Titanium/dp/B0FQF9TJ86 --country usYou will get the result as if you were navigating the page from the US (useful for bypassing geo-restrictions or viewing content that changes based on location).
To export the result to a file, use the -o argument:
brightdata scrape https://www.w3schools.com/sql/sql_where.asp -o tutorial.mdA tutorial.md file will be created and populated with the scraped content in Markdown format: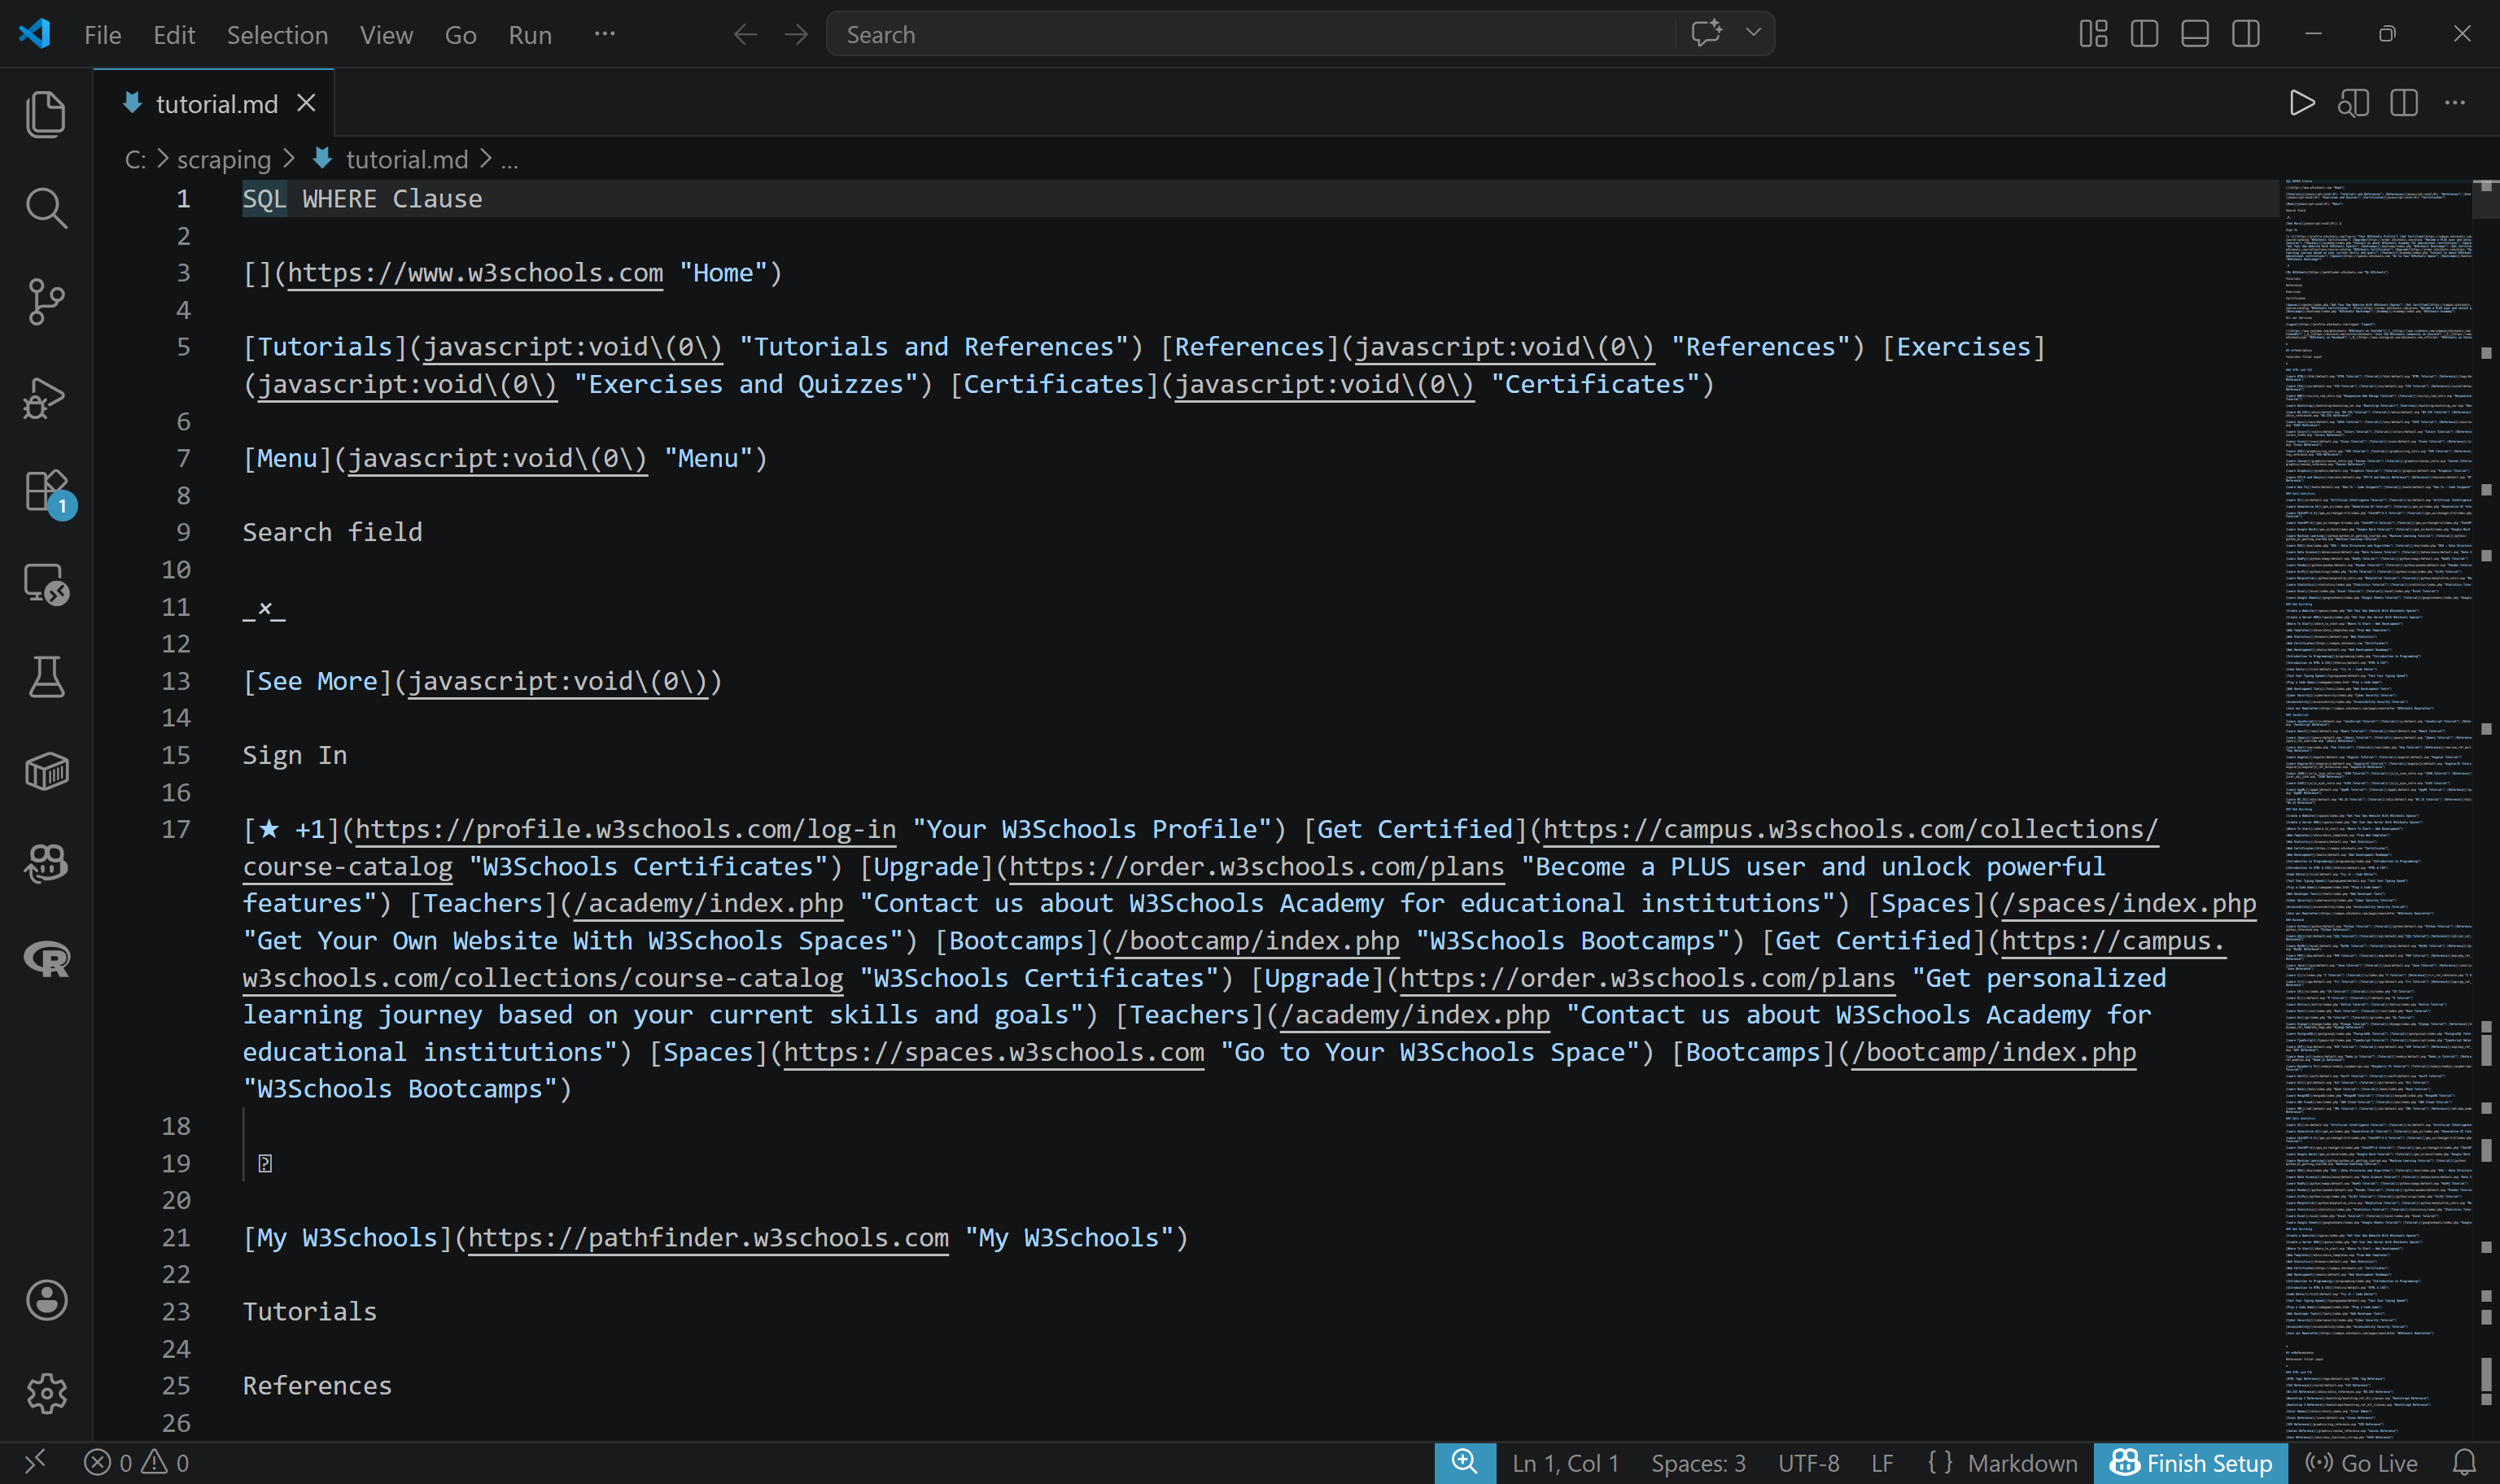
To get the raw HTML, specify the format using the -f argument. Also, consider writing the output to a file:
brightdata scrape https://developer.mozilla.org/en-US/ -f html -o index.htmlThe output will be a file named index.html containing the raw HTML of the scraped page: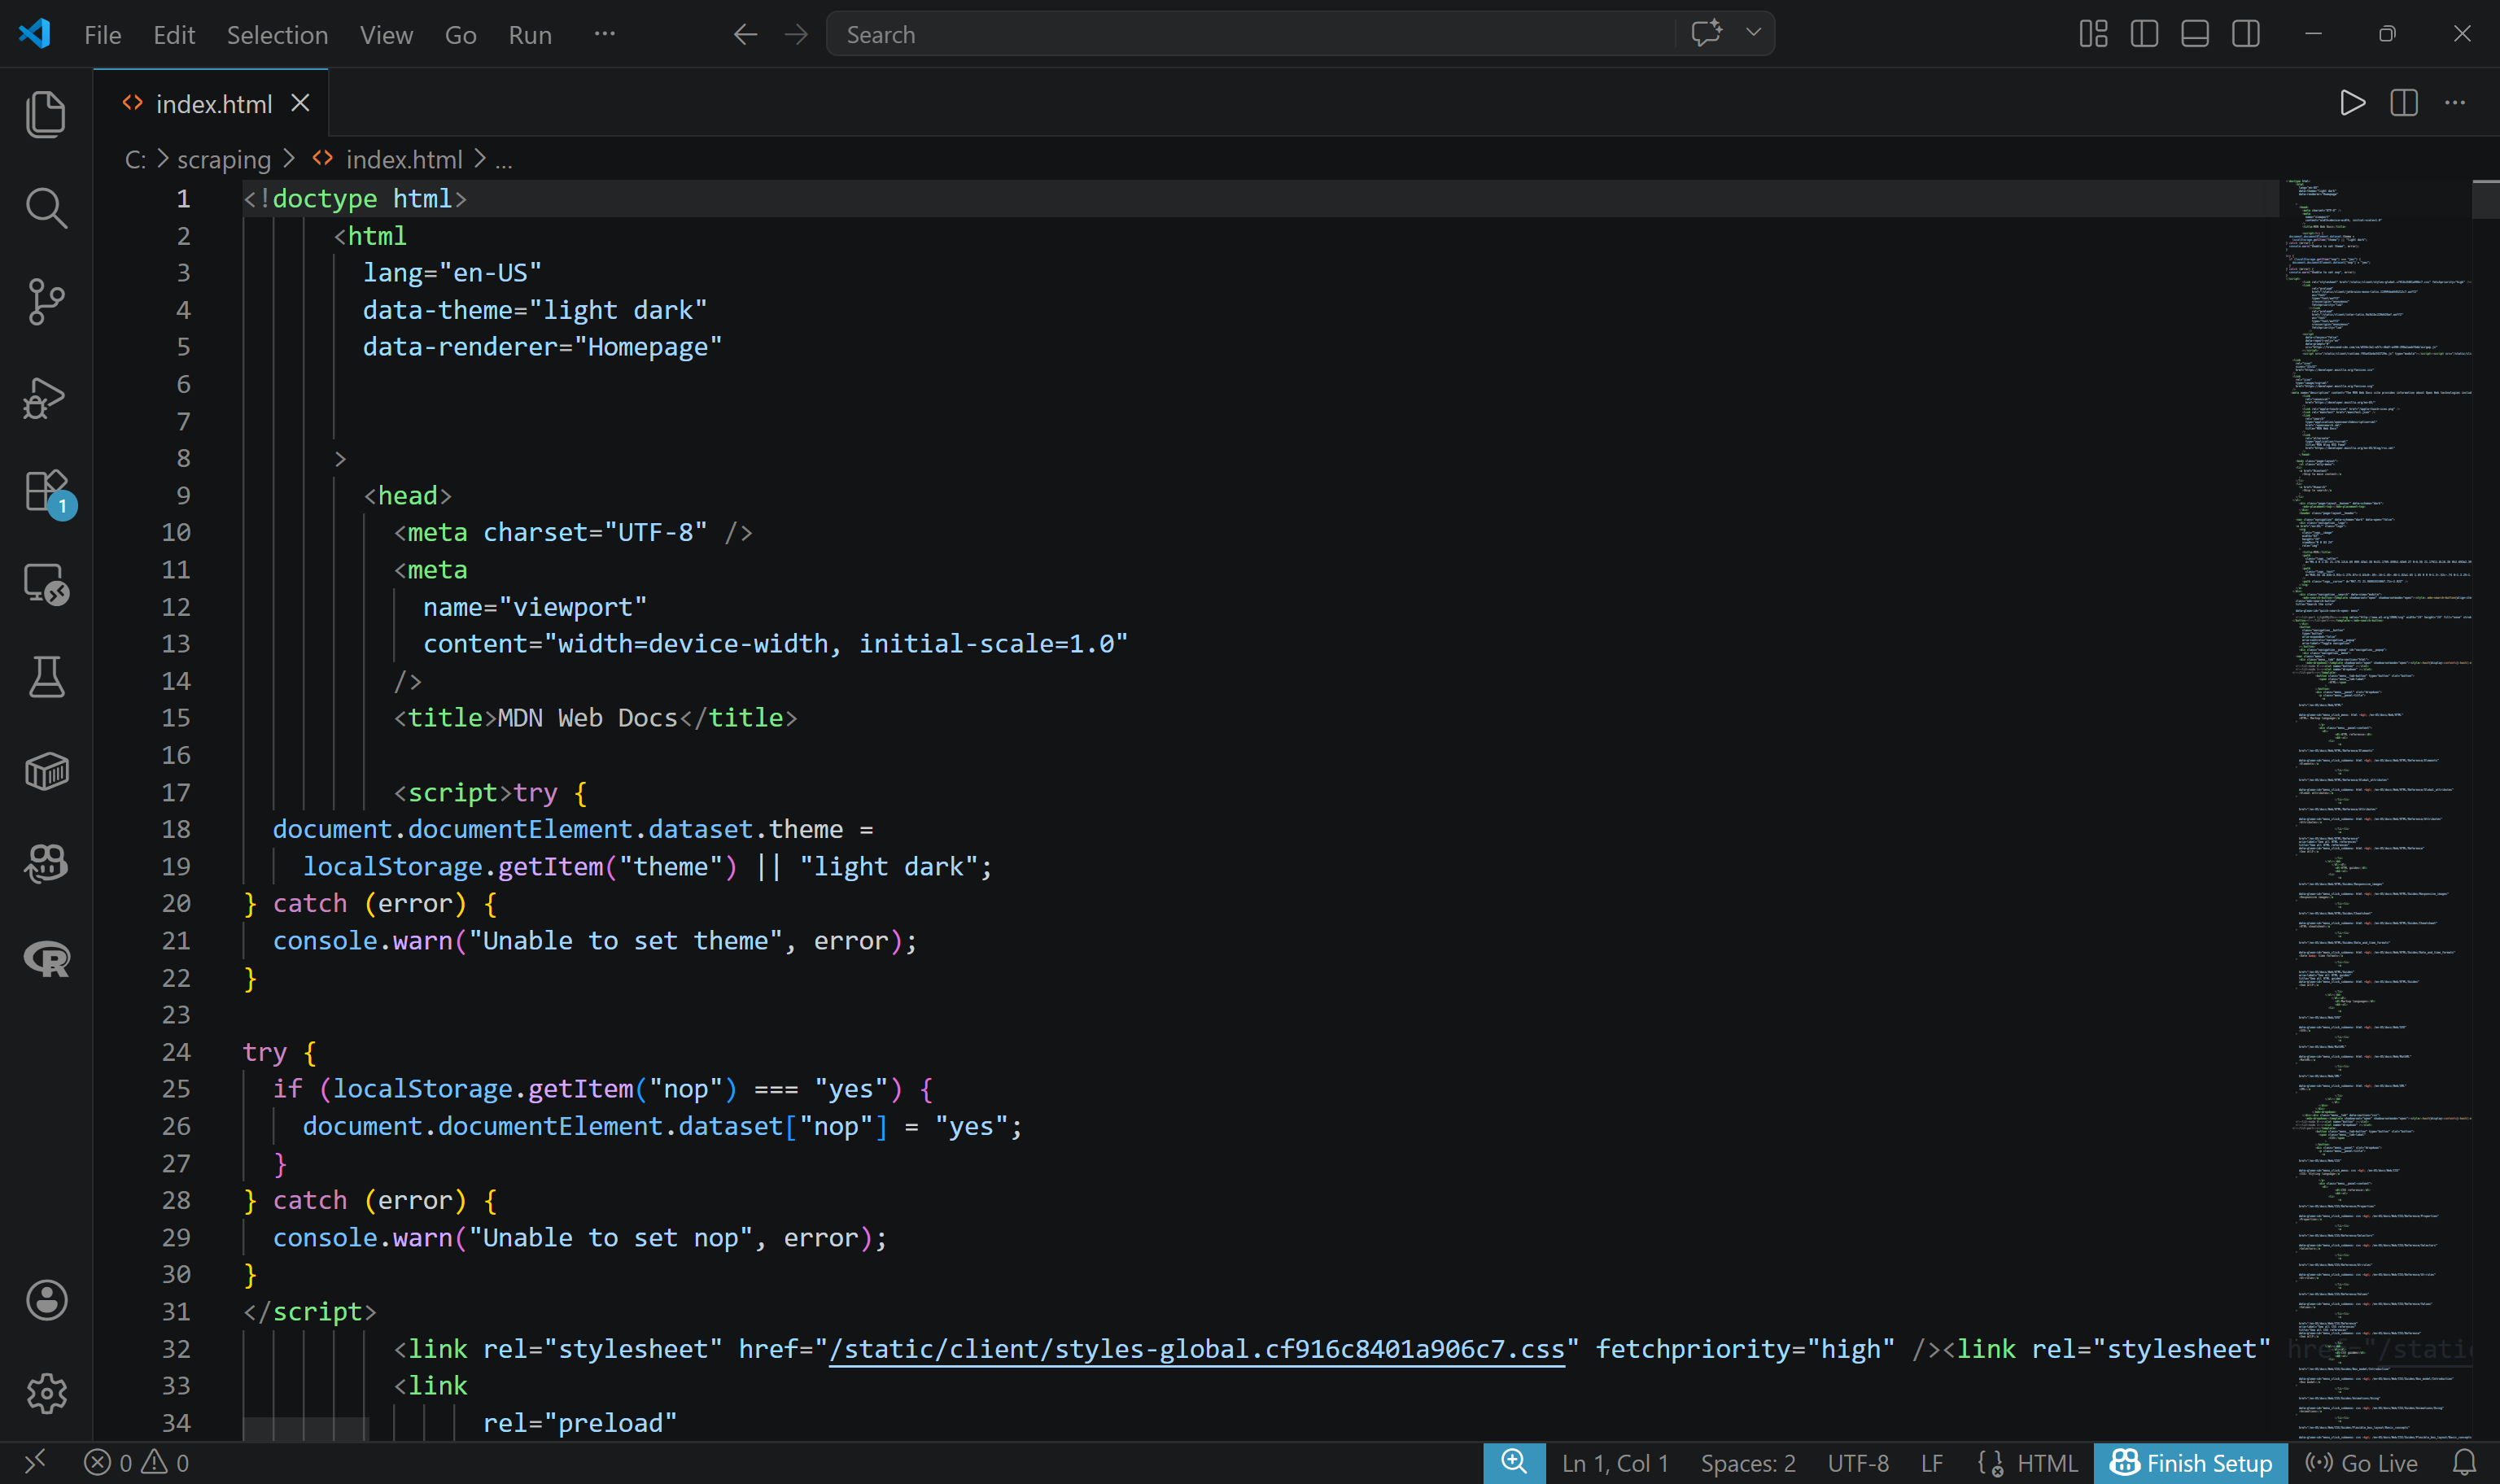
With a similar mechanism, you can also take a screenshot of a given page:
brightdata scrape https://www.amazon.com/Apple-2026-MacBook-13-inch-Laptop/dp/B0GR6BVYS5?th=1 -f screenshot -o page.pngpage.png will contain: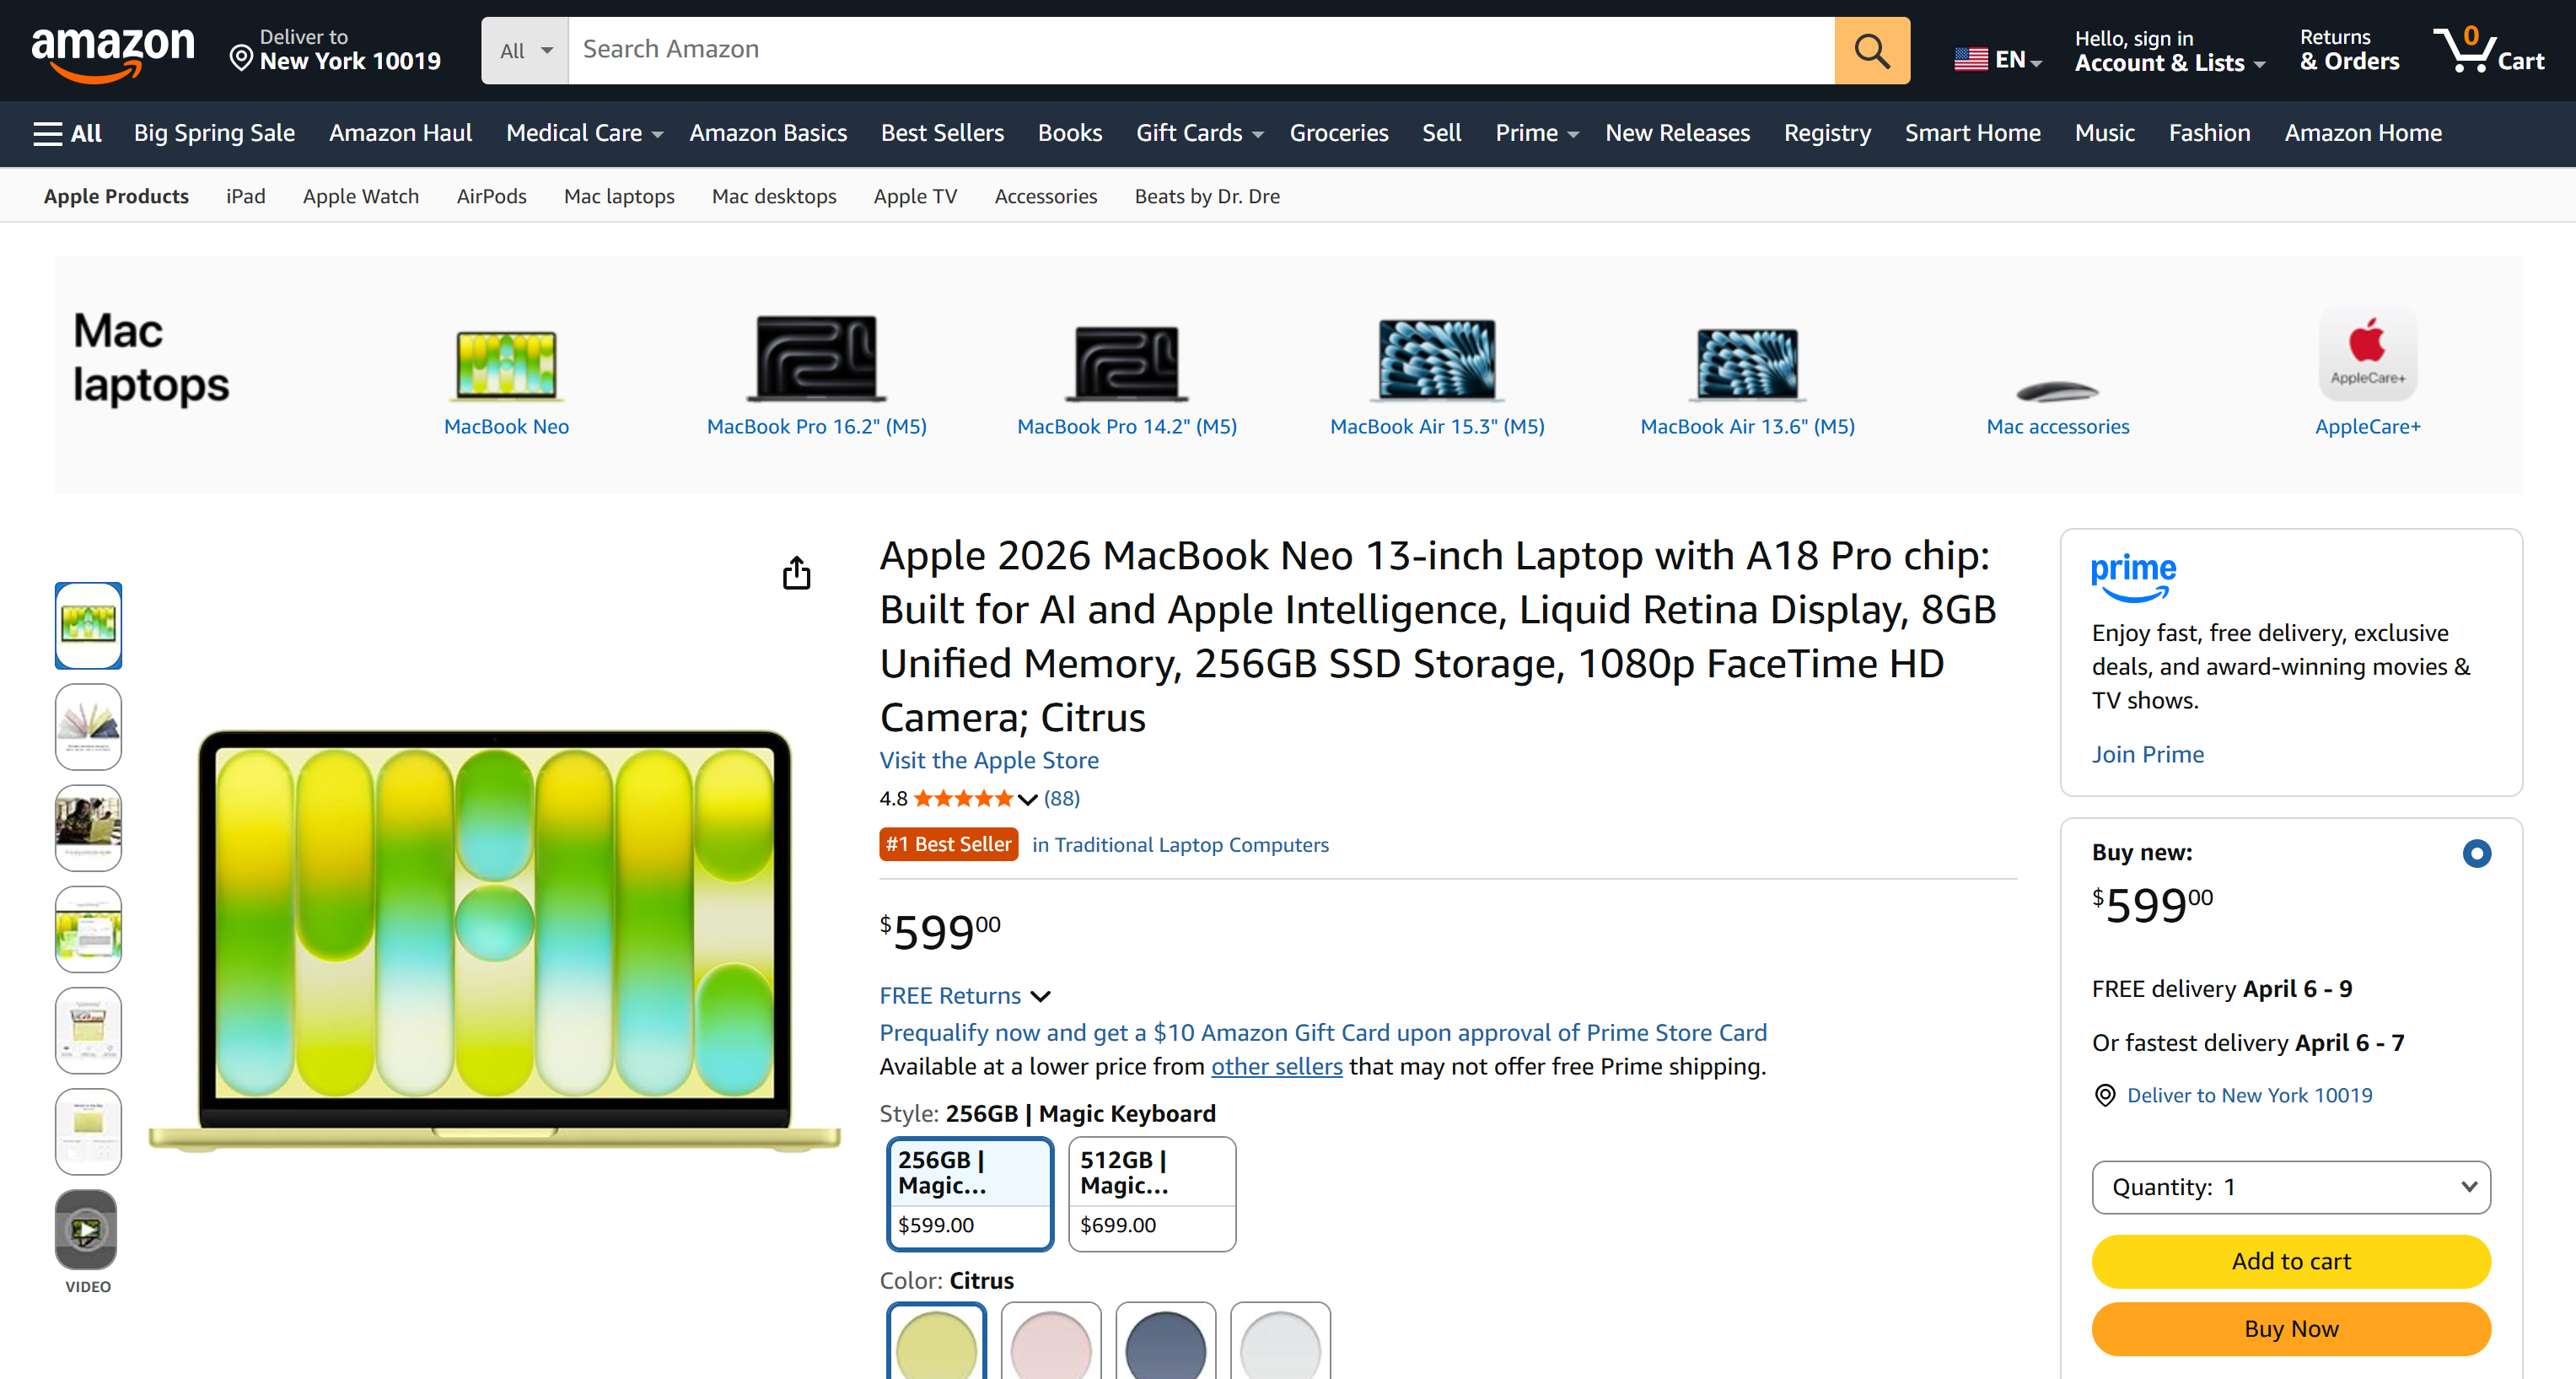
Searching the Web
Perform web searches directly from the CLI using the search command:
brightdata search "best chatgpt scrapers"The results are returned as a formatted table, making them easy to read and inspect:
The resulting table corresponds to the Google SERP for the “best cheap scrapers” query: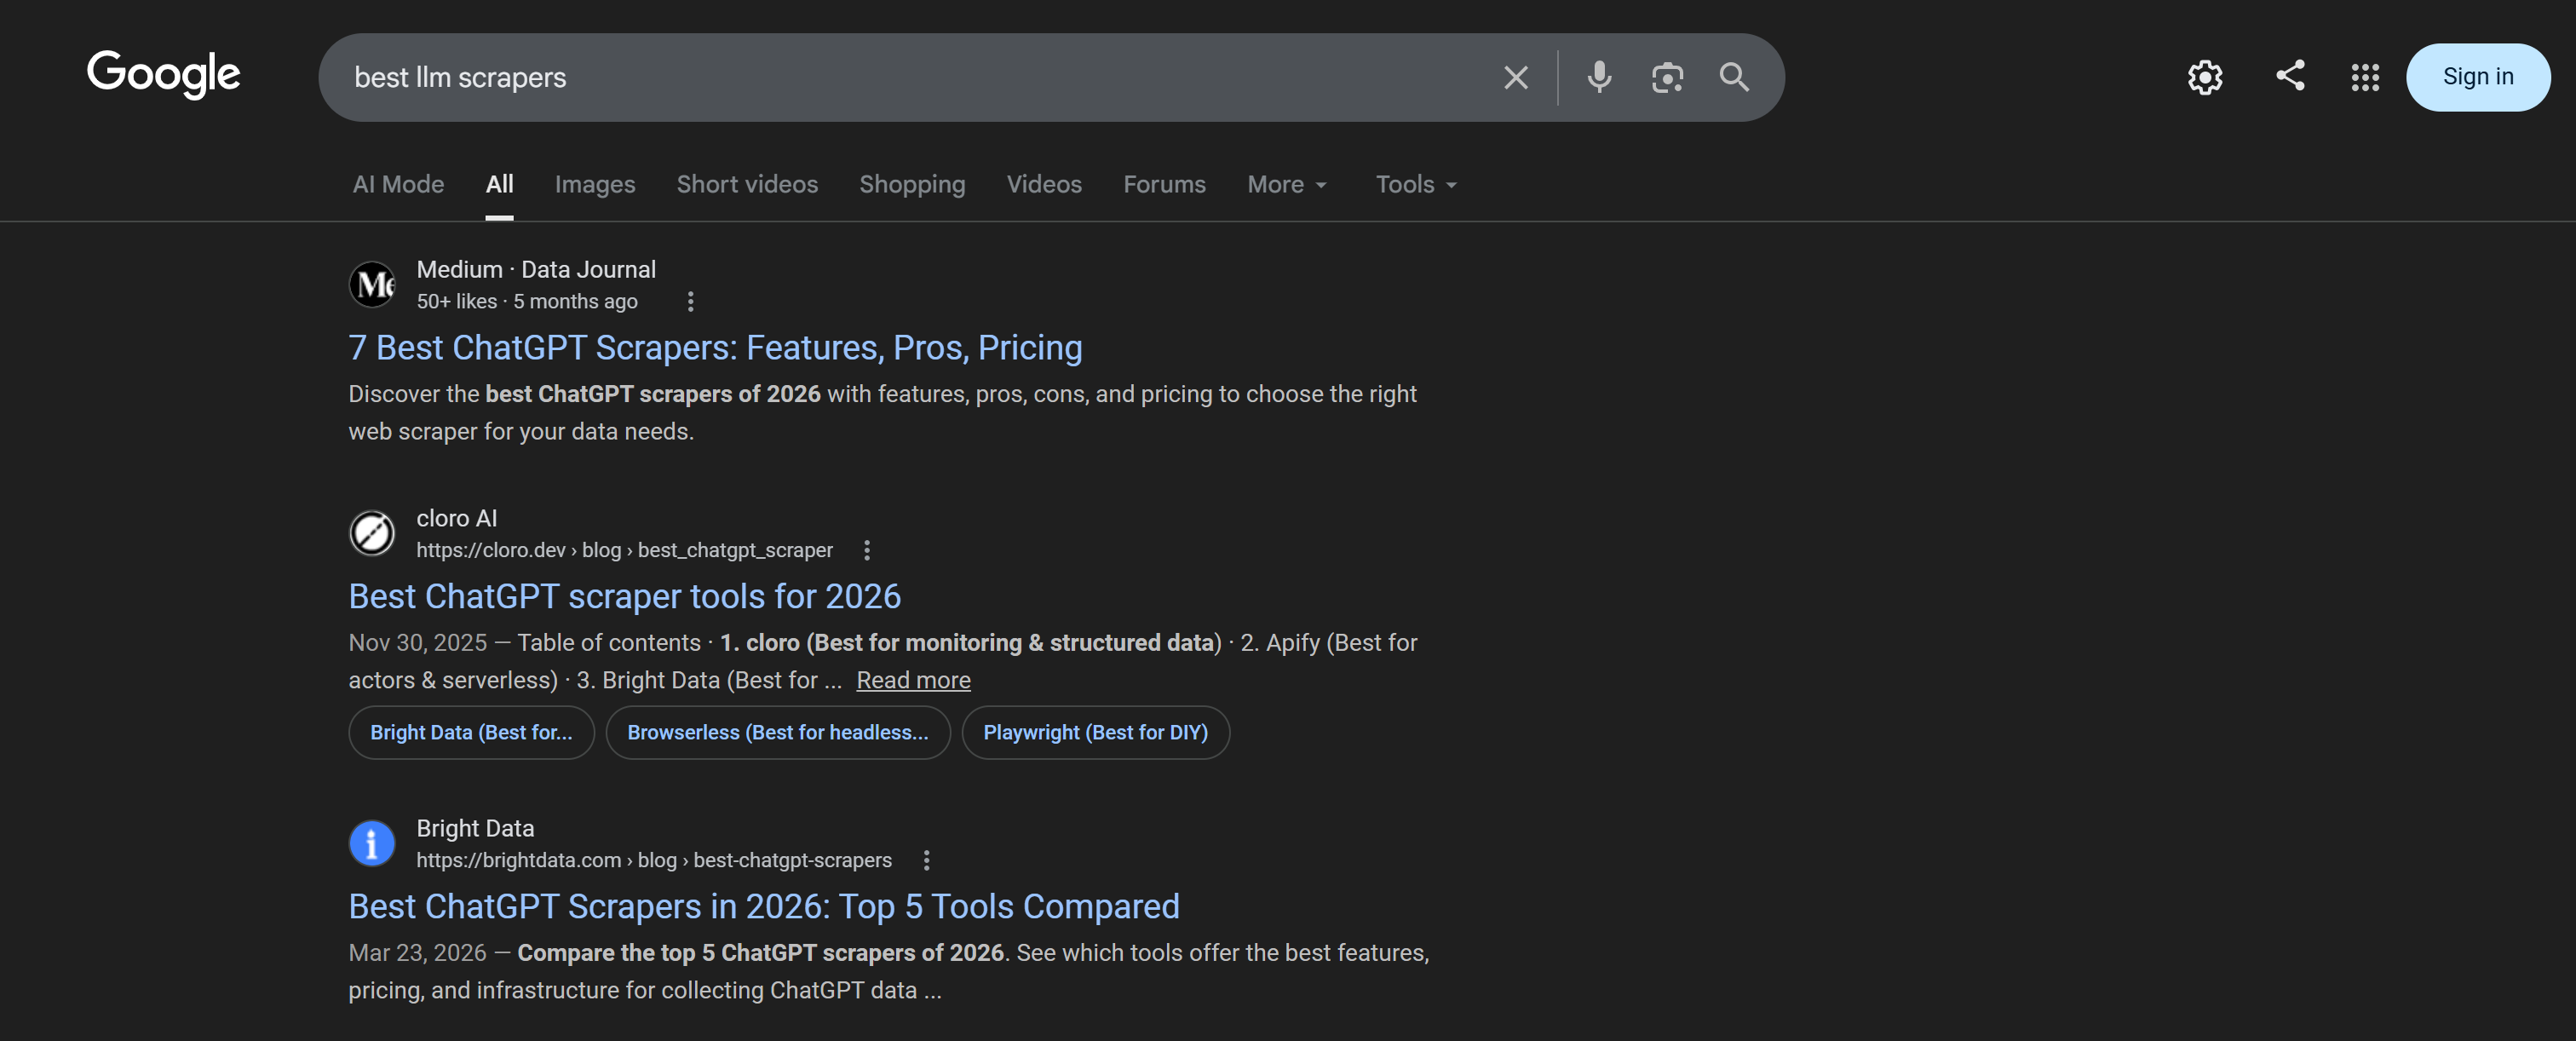
To control the Google results page, specify the --page argument:
brightdata search "best llms" --page 2
If you need structured data for further processing, get the raw JSON output using the --json flag:
brightdata search "node.js security best practices" --jsonThat is perfect for piping results into scripts or integrating with other tools: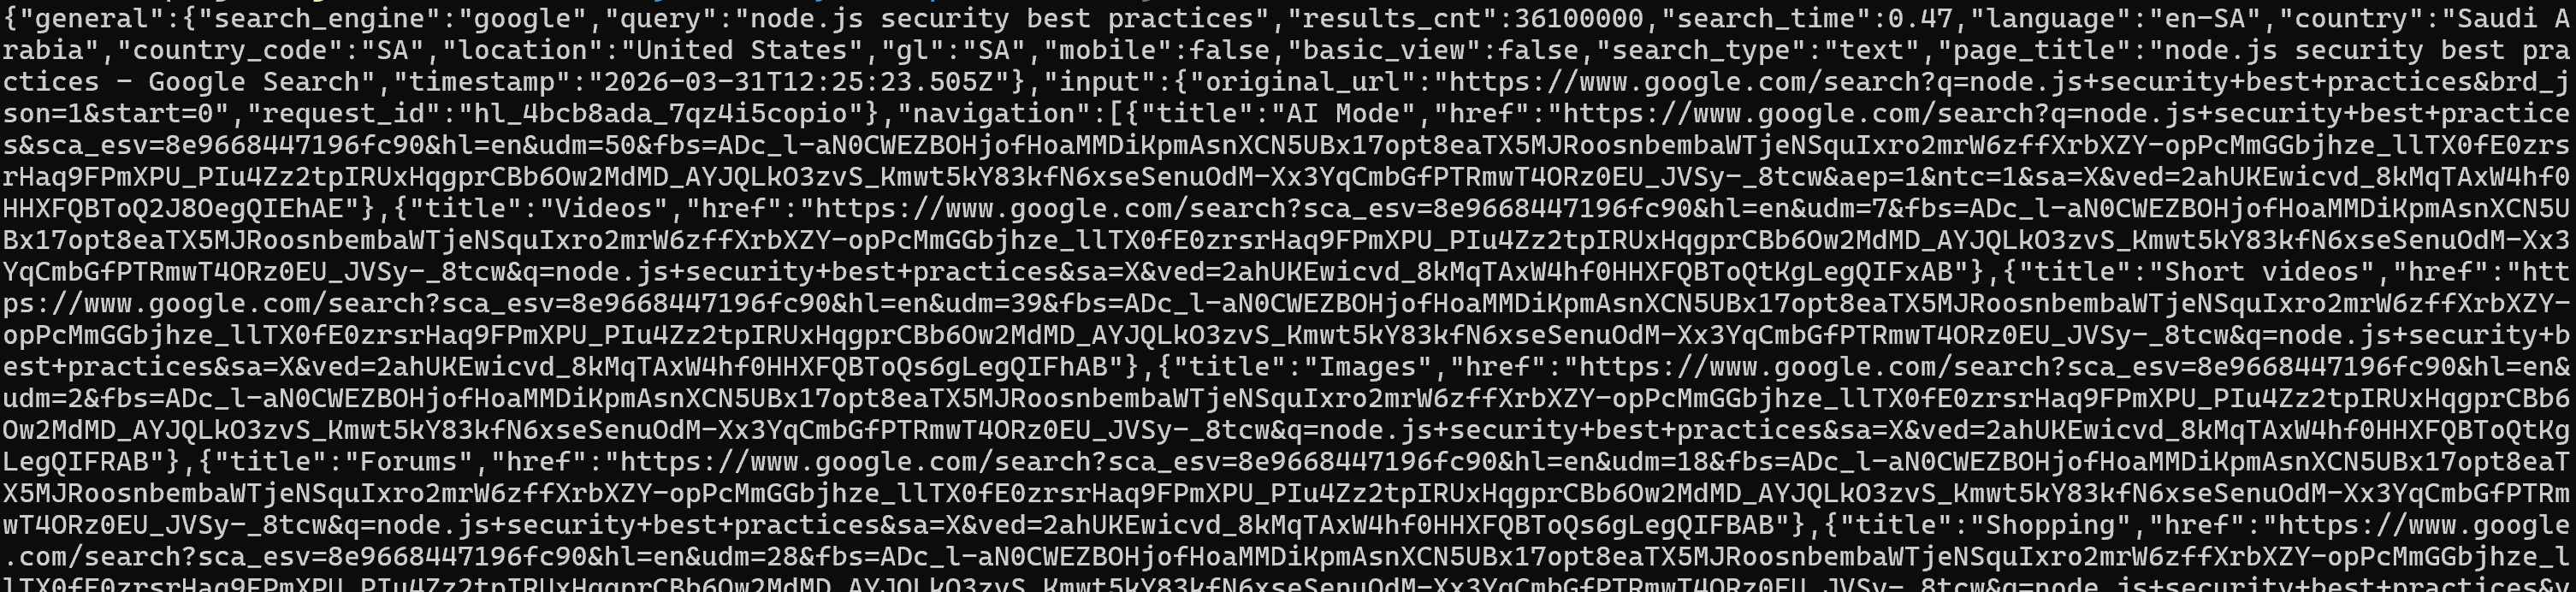
For a more readable version of the raw output, set the --pretty flag:
brightdata search "best llm scrapers" --prettyThe above command produces the results in a nicely formatted way, which is helpful during debugging or exploration: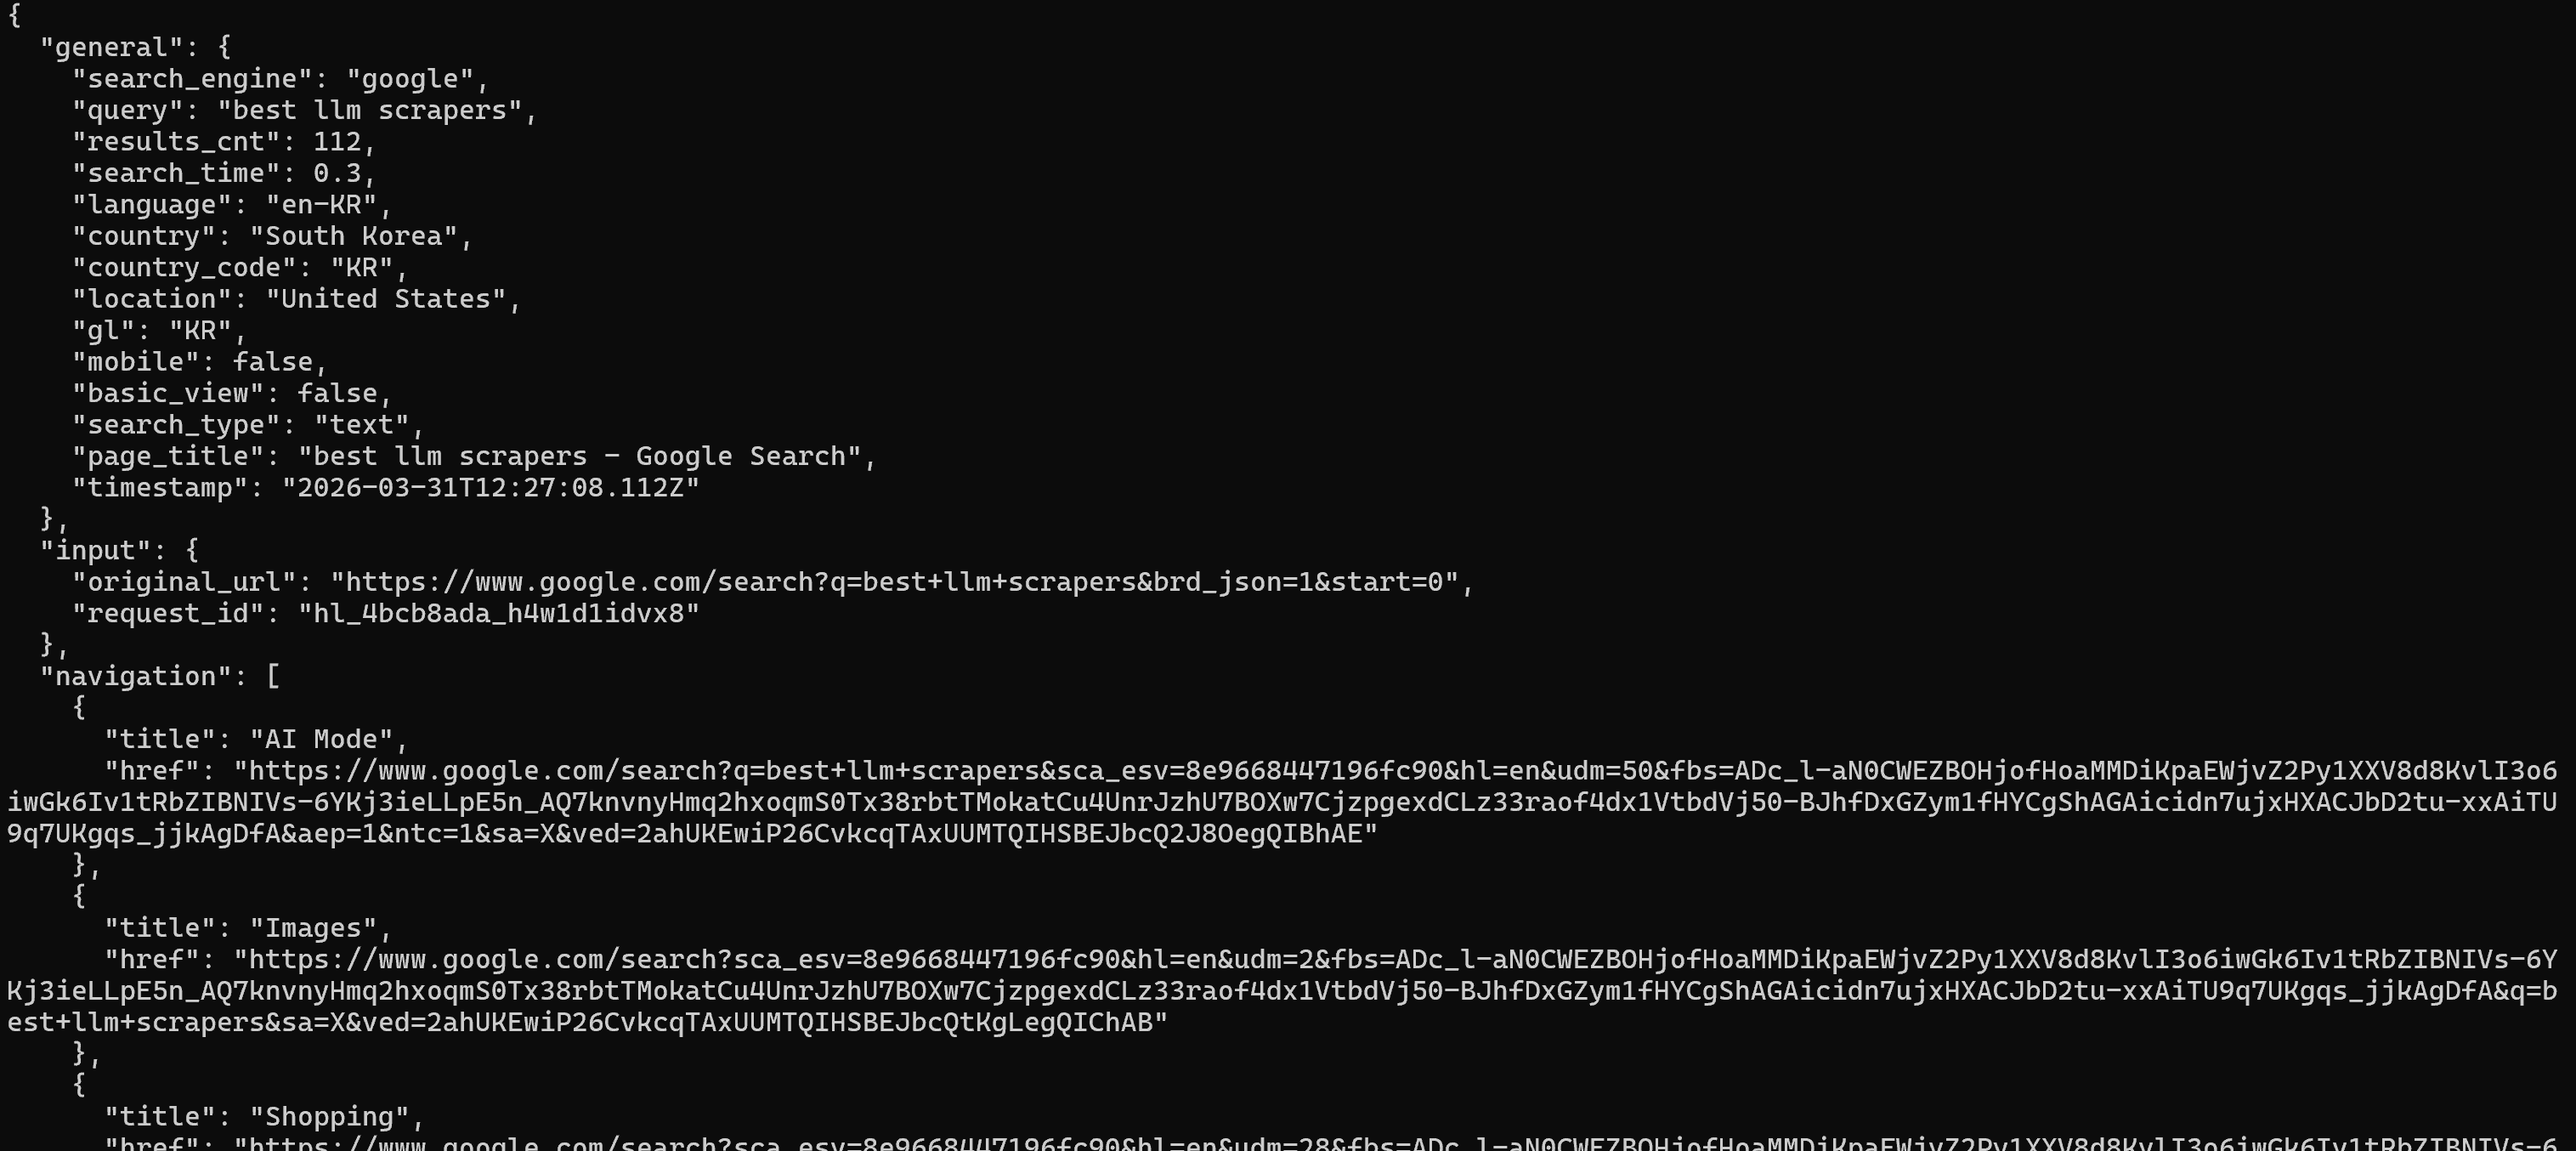
You can also customize the search context. For example, to run a localized query in a specific country and language:
brightdata search "mejores restaurantes italianos en Madrid" --country es --language esThe command returns results as if the search were performed from Spain, in Spanish:
Finally, you can specialize the type of results you want. For instance, to retrieve only news results:
brightdata search "barcelona beaches" --type imagesOther supported types include shopping and news, depending on your use case.
Getting Structured Data Feeds
Beyond raw scraping, you can use the pipelines command to extract structured data from popular platforms. This returns clean, ready-to-use datasets for specific applications.
For example, to collect structured details from an Amazon product page, run:
brightdata pipelines amazon_product "https://www.amazon.com/Apple-2025-MacBook-Laptop-10%E2%80%91core/dp/B0FWD726XF/"This will trigger an async task on the Bright Data Amazon Web Scraper and automatically poll it until the response is ready: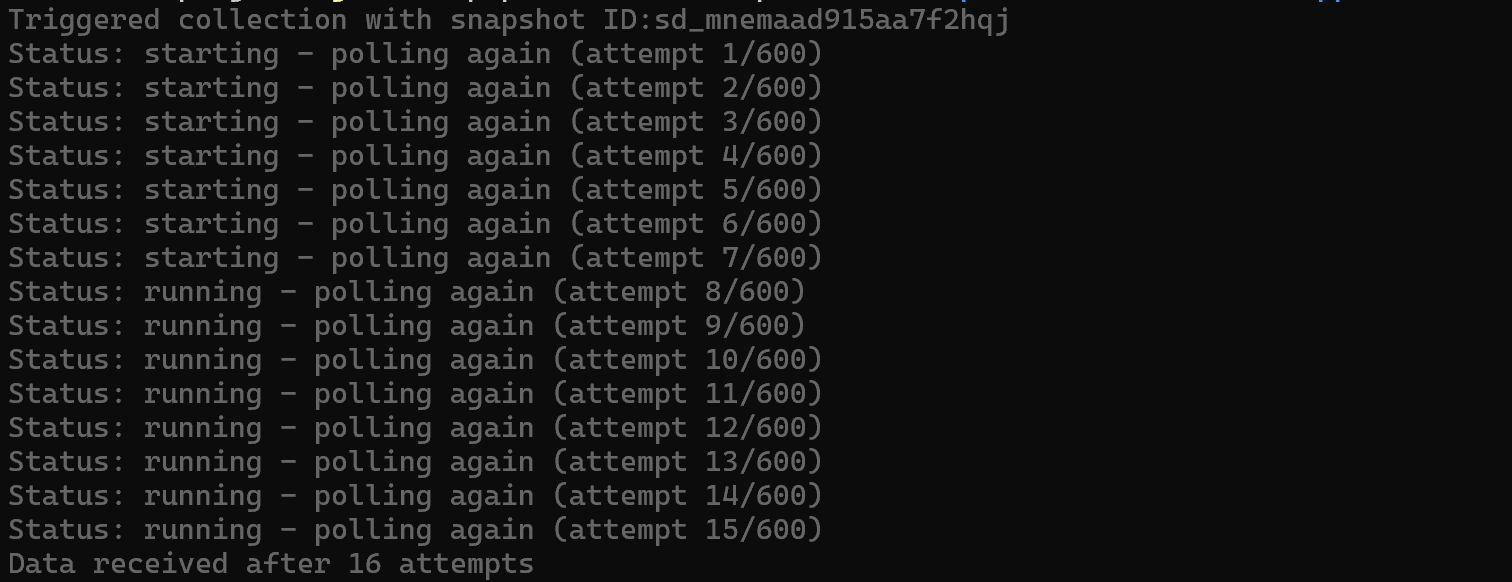
Once the target dataset is ready, it will be printed in the terminal (in JSON, the default format):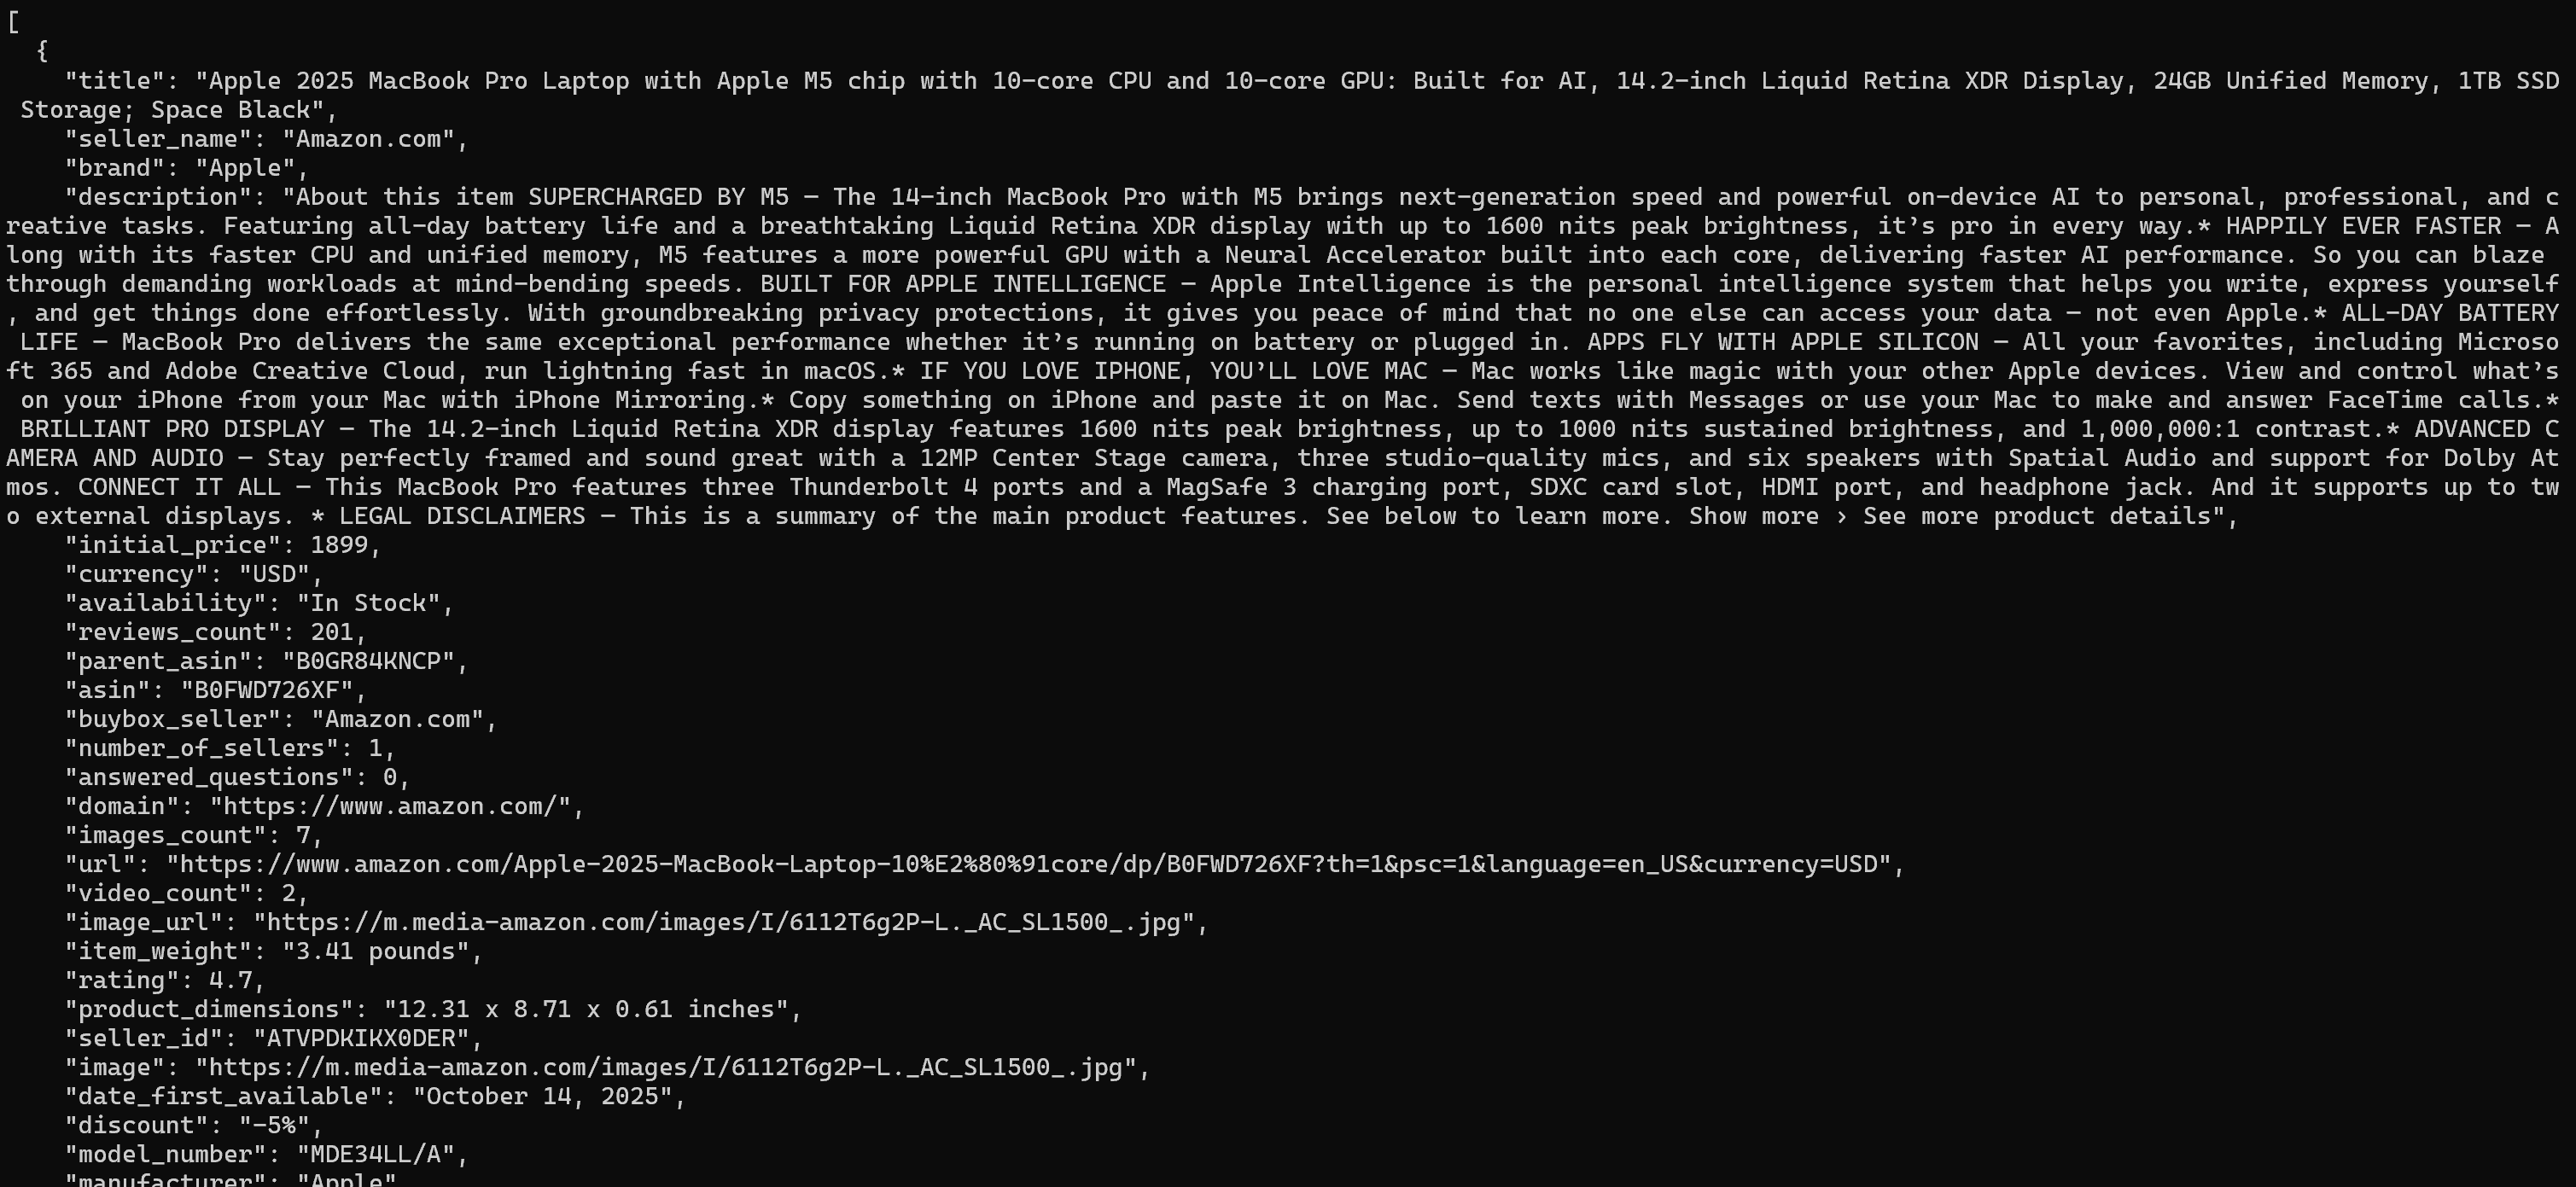
The output includes product title, price, rating, specifications, and more in a structured format.
Similarly, for company-level insights, you can use pipelines targeting business intelligence sources like Crunchbase:
brightdata pipelines crunchbase_company "https://www.crunchbase.com/organization/brightdata"The above pipelines command gathers key details such as funding, industry, and company overview: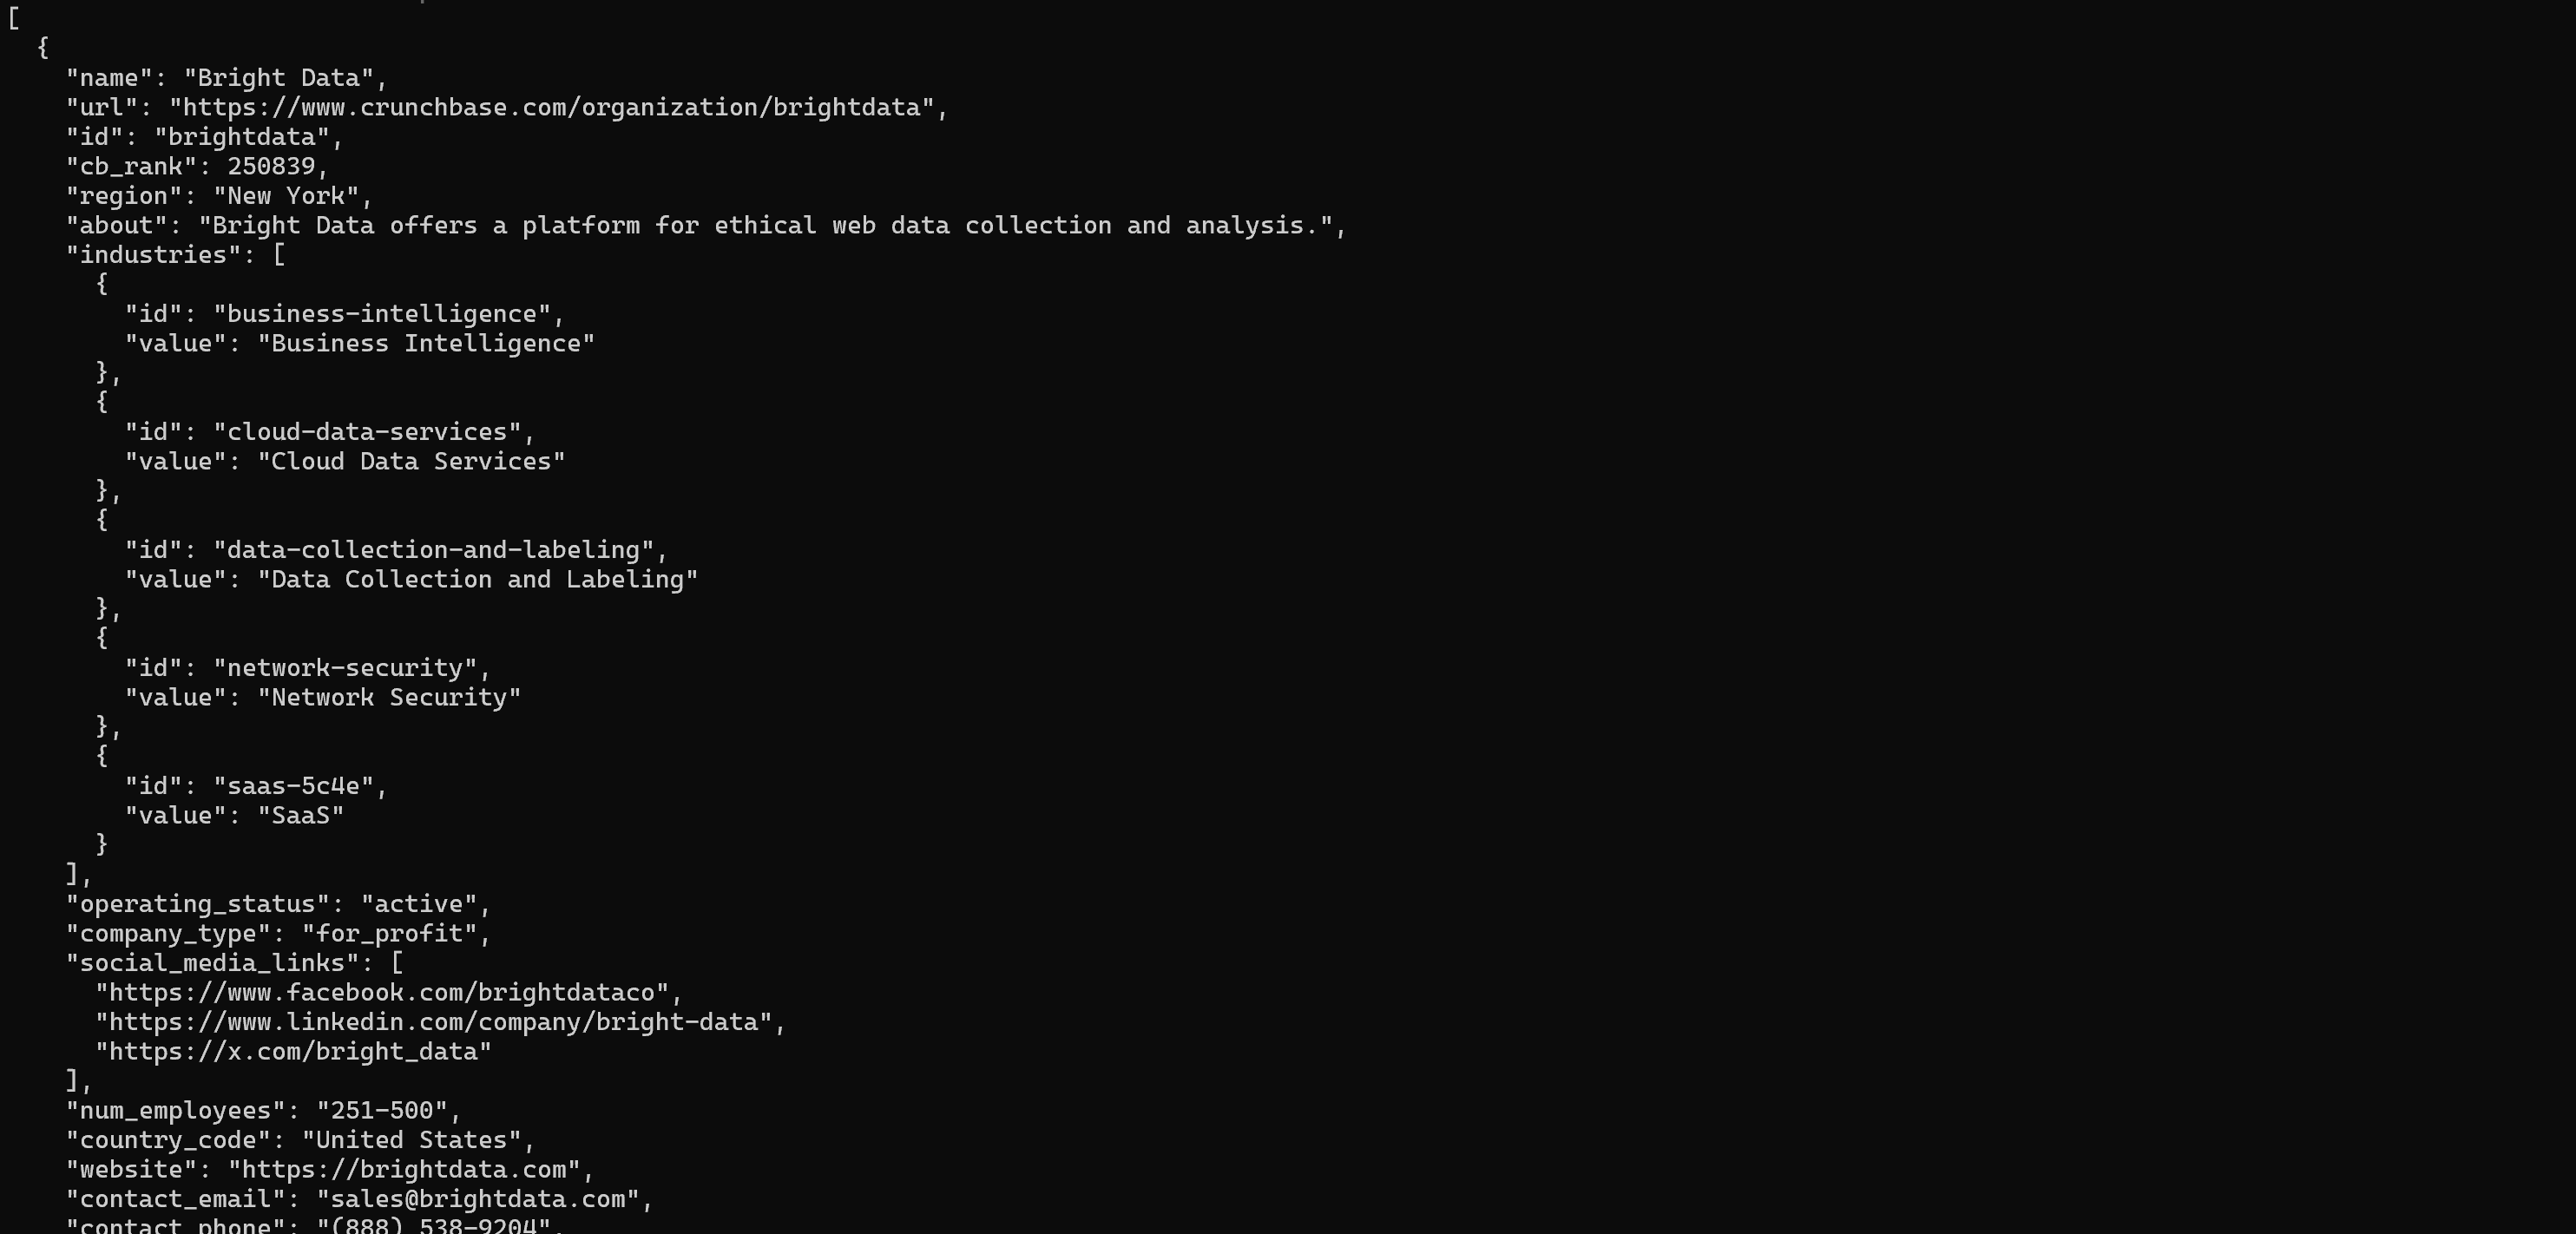
That matches the public information you can find on the Crunchbase company page: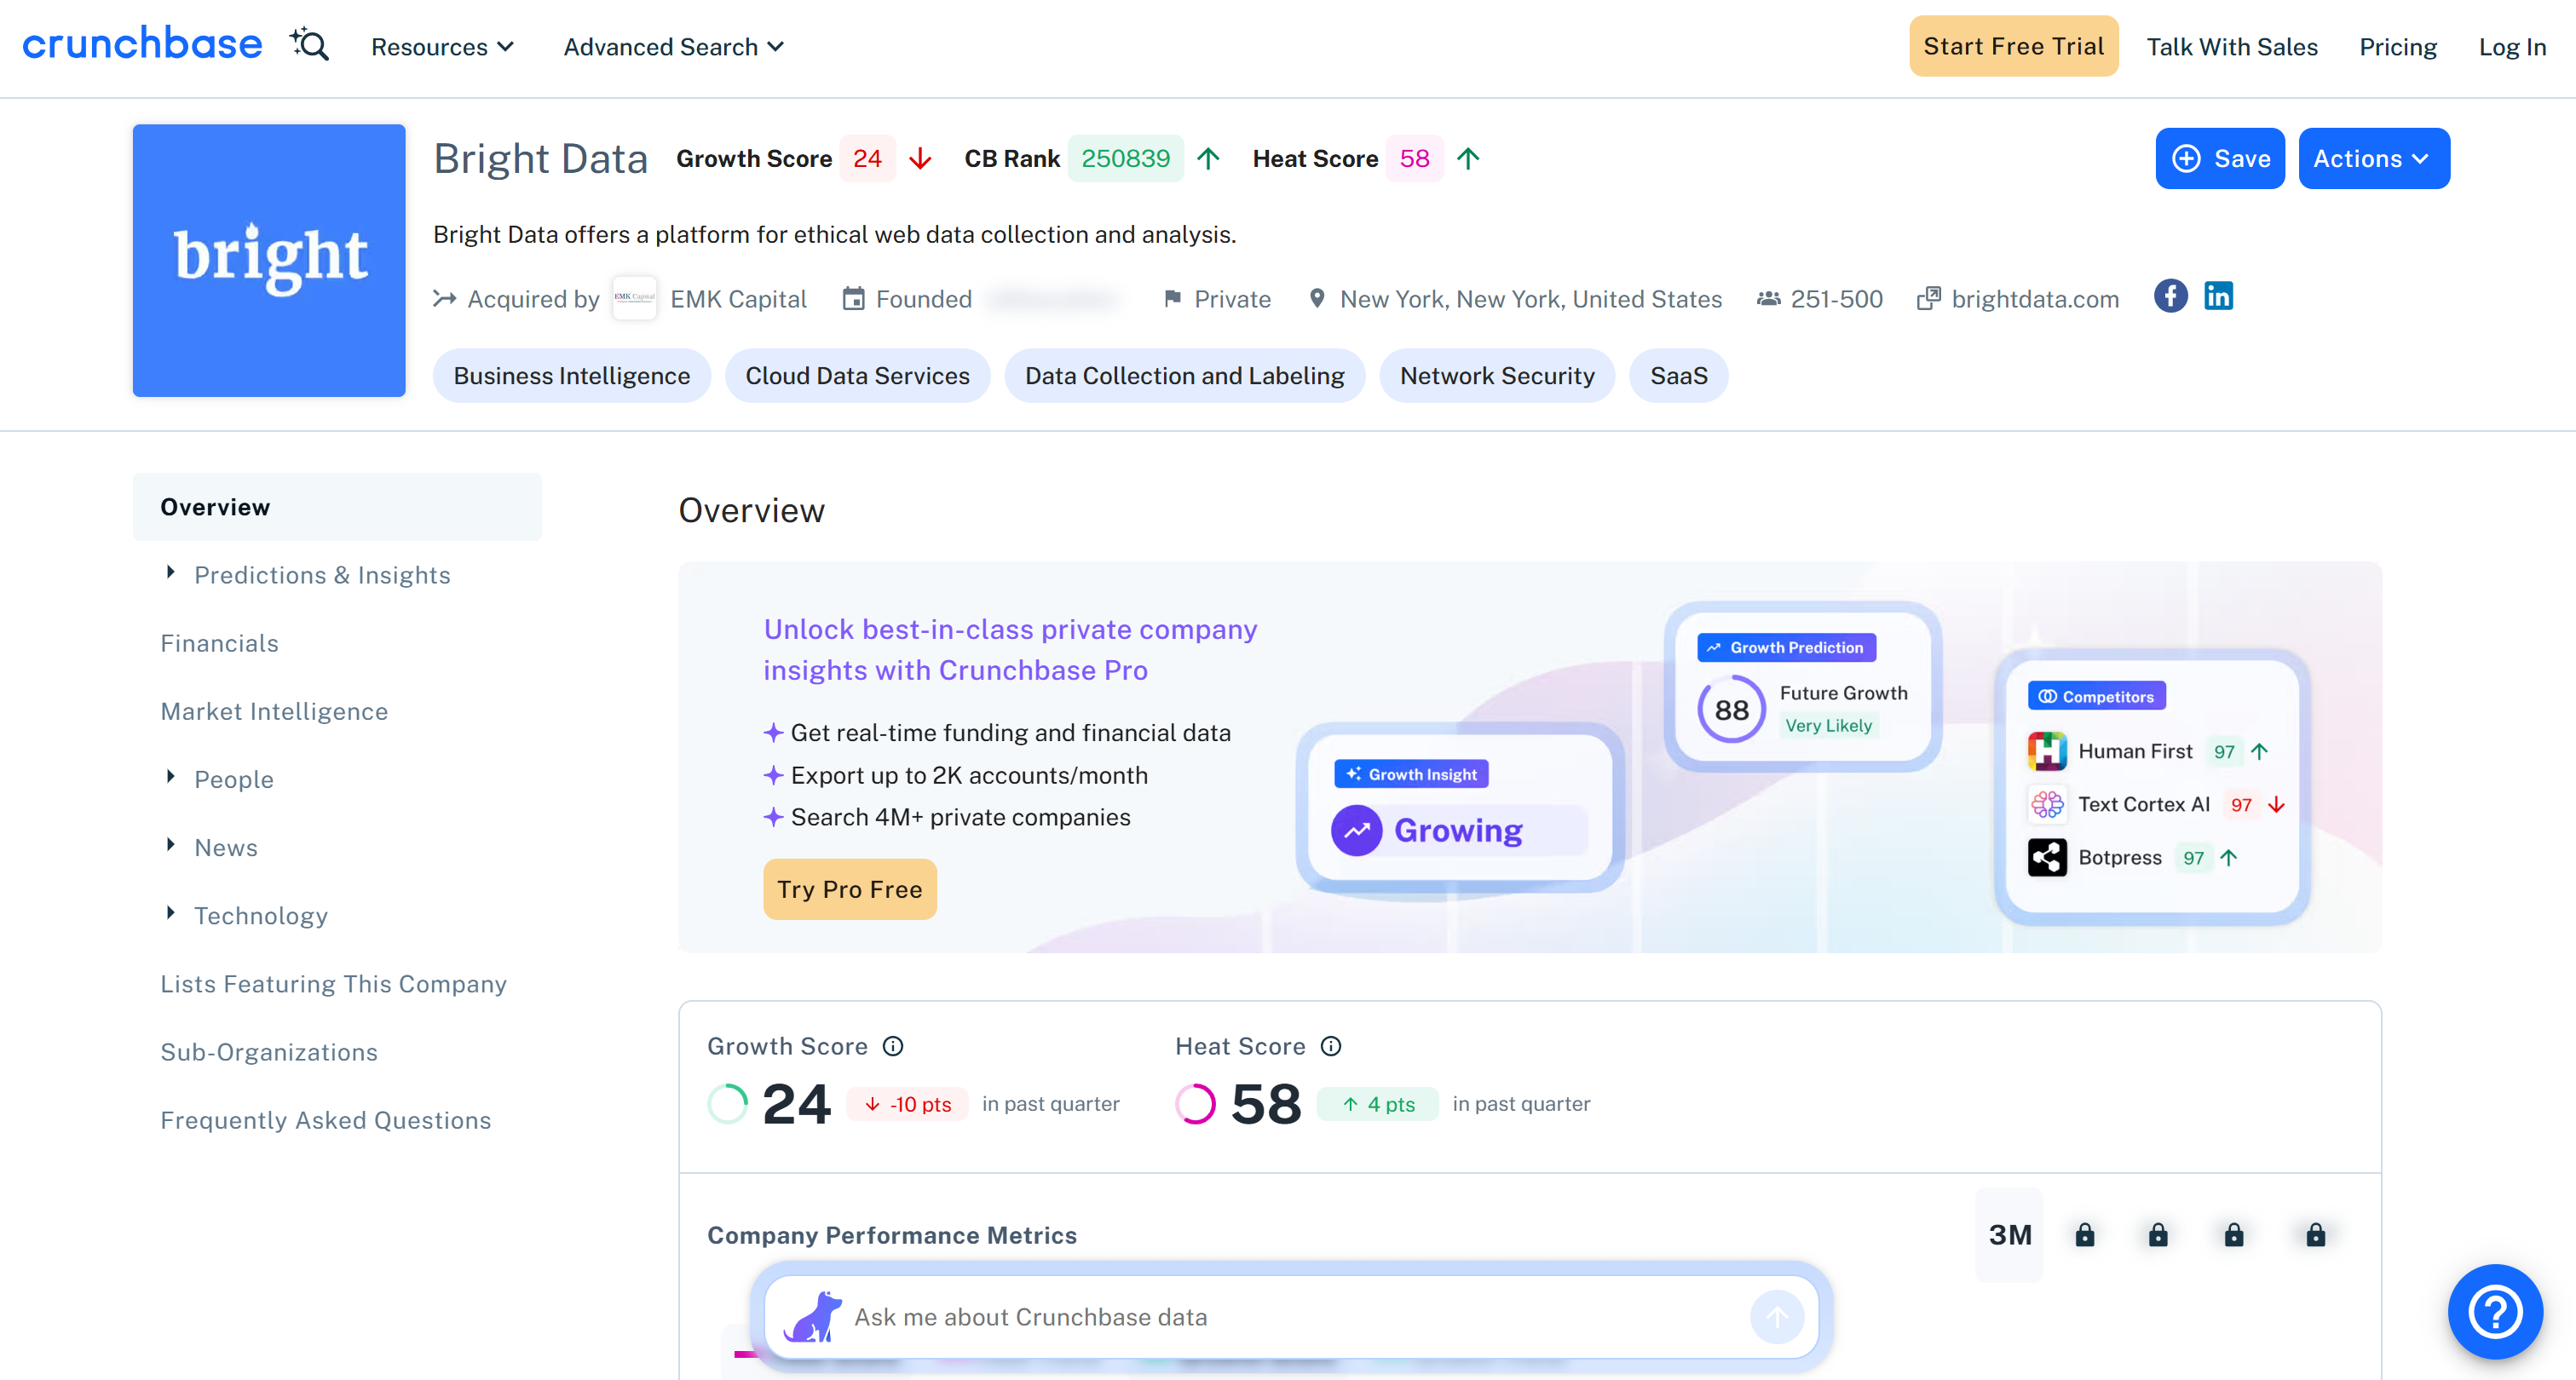
If you instead want to get structured data from LinkedIn profiles, run:
brightdata pipelines linkedin_person_profile "https://es.linkedin.com/in/antonello-zanini"The returned information includes name, role, experience, and education: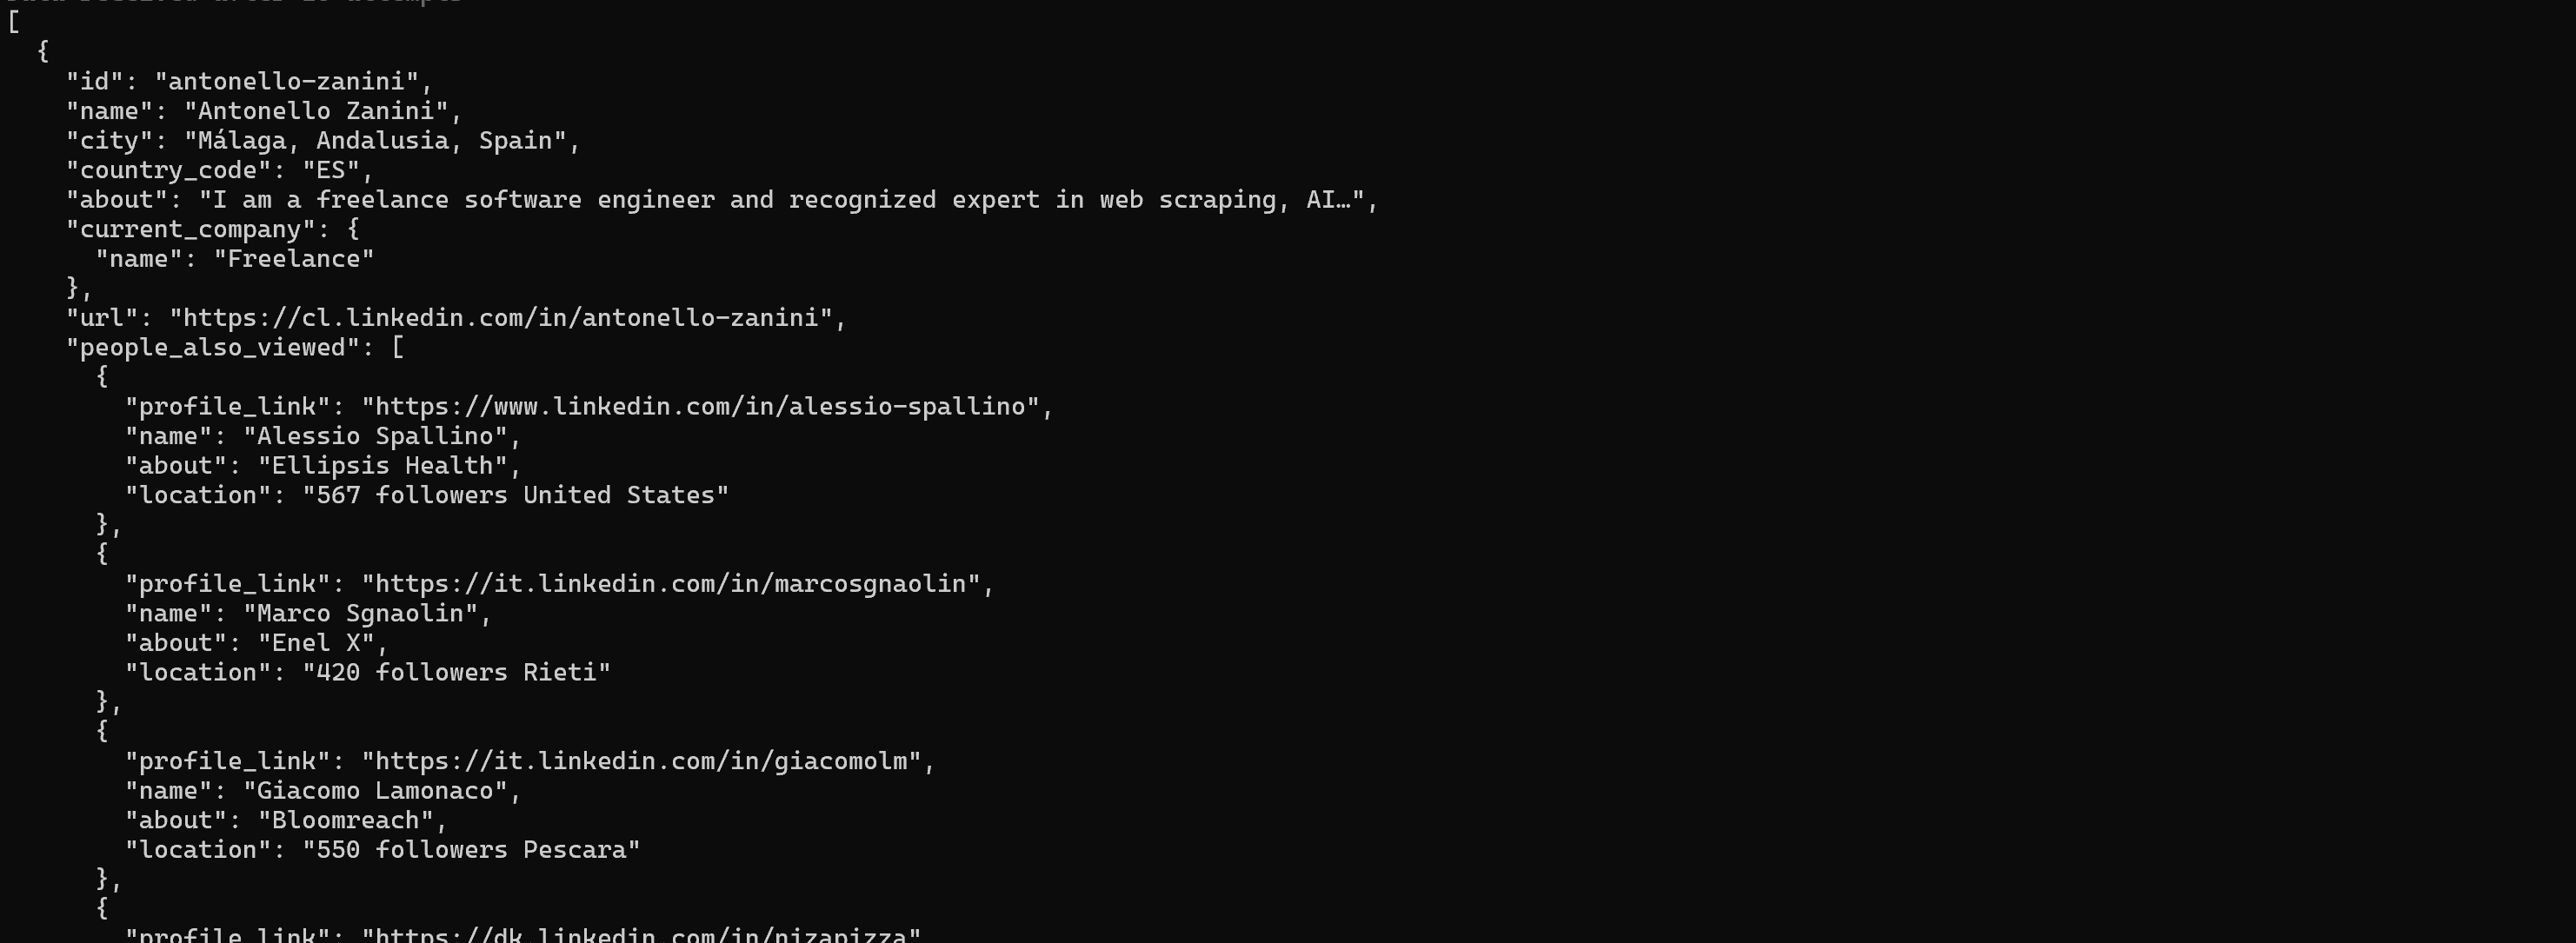
As with scraping, you can export structured results to a file:
brightdata pipelines crunchbase_company "https://www.crunchbase.com/organization/brightdata" --format csv -o company.csvThis creates a company.csv file with structured company data, ready for downstream analysis and processing:
Control a Real Browser Session
The browser command lets you control a real, remote browser powered by Bright Data’s Scraping Browser API. It maintains a persistent session, so you can interact with pages step by step without reconnecting on every command.
To start a session and navigate to a page, run:
brightdata browser open https://example.comThis automatically launches a browser session and loads the target page:

To read the page content in a structured and token-efficient way, write:
brightdata browser snapshot --compactThat returns an accessibility tree of the page, where each interactive element is assigned a reference ID (e.g., e1, e2) that you can use for further actions: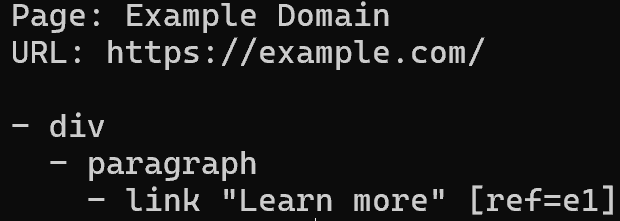
Note how the returned tree matches the target webpage:
You can now interact with the page, such as by clicking an element:
brightdata browser click e1Or typing into an input field, take a screenshot, and many other actions.
Finally, when you are done, close the session:
brightdata browser closeThis stops the remote browser:
Chaining Commands with Unix Pipes
The Bright Data CLI is engineered to be pipe-friendly. When STDOUT is not a TTY, colors and spinners are automatically disabled, making it ideal for scripting and automation.
This mechanism helps you can chain commands together to build simple data pipelines. Here is how to go from searching to scraping in one flow:
brightdata search "best python scraping libraries" --json \
  | jq -r ".organic[0].link" \
  | xargs brightdata scrape
The above pipeline performs a Google search, extracts the first result URL (a Reddit page, in this case), and immediately scrapes it (returning its content in Markdown):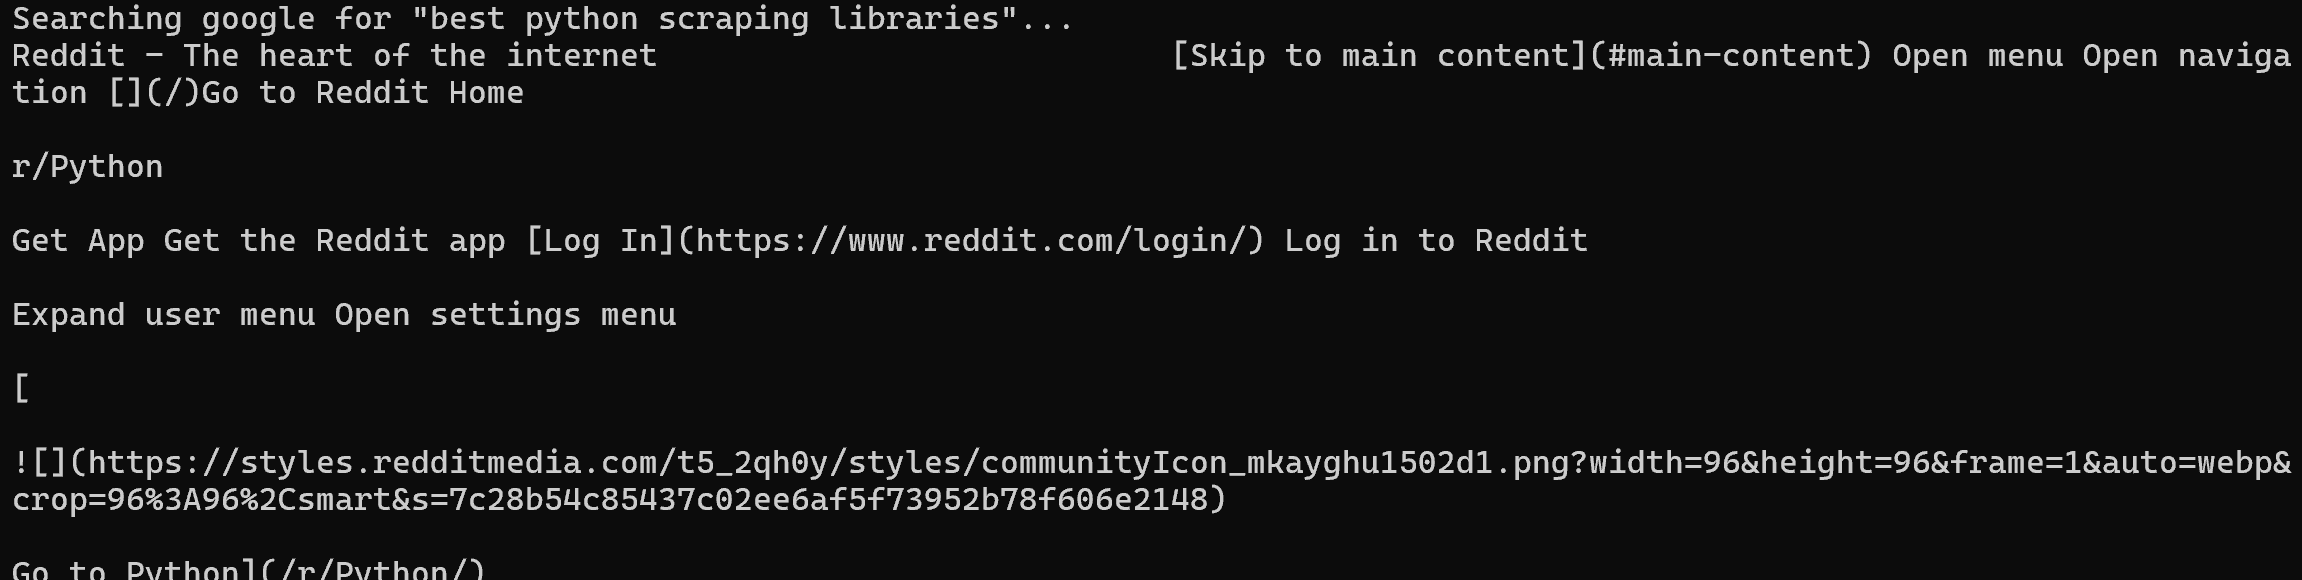
This pattern is especially powerful when integrating Bright Data into shell scripts, cron jobs, or larger data workflows. To run it, you must have jq installed locally:
sudo apt-get install jqExtending Your Coding Agents with Skills
Enhance your AI coding agents by installing the Bright Data skills directly from the CLI.
To select and install skills interactively, run:
brightdata skill addThis opens an interactive picker where you can choose which skills to install and which agentic solution (Claude Code, Amp, Cline, Codex, and others) to target: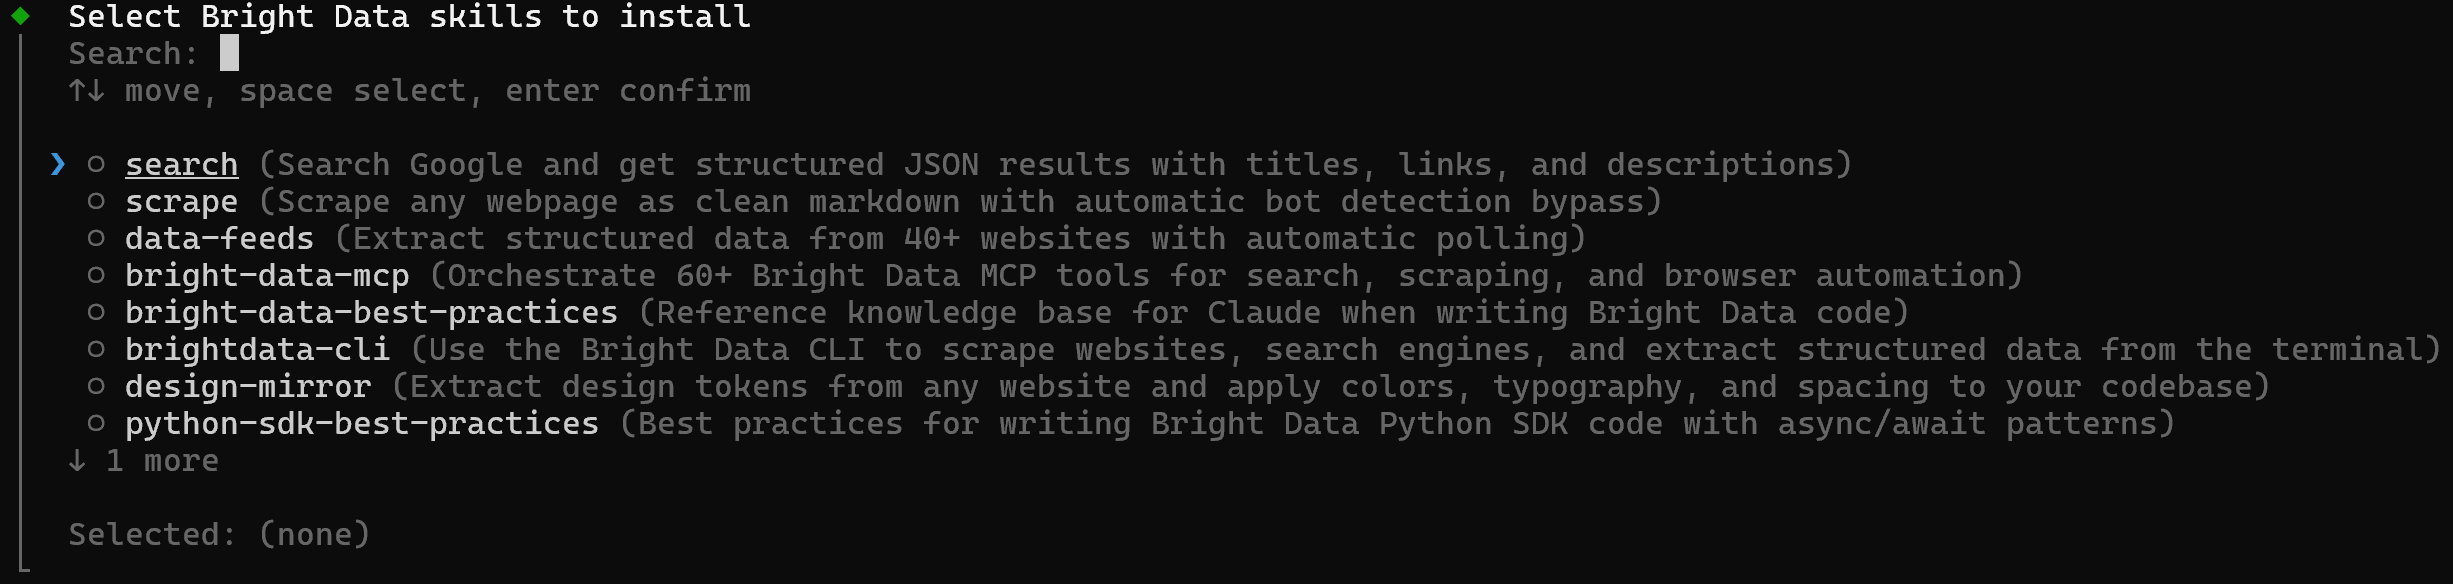
Alternatively, you can connect Bright Data directly to your agentic solution via the Web MCP:
brightdata mcp addThat links the Bright Data MCP server to Claude Code, Cursor, or Codex, enabling them to access scraping, search, and data pipelines as native tools: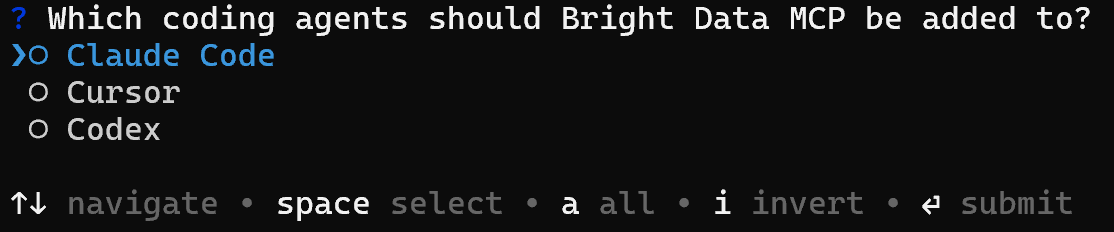
Account Management and Monitoring
Harness the CLI to monitor your Bright Data account, keeping track of usage, balance, and costs in real time.
To see all available zones, use:
brightdata zonesA possible output is: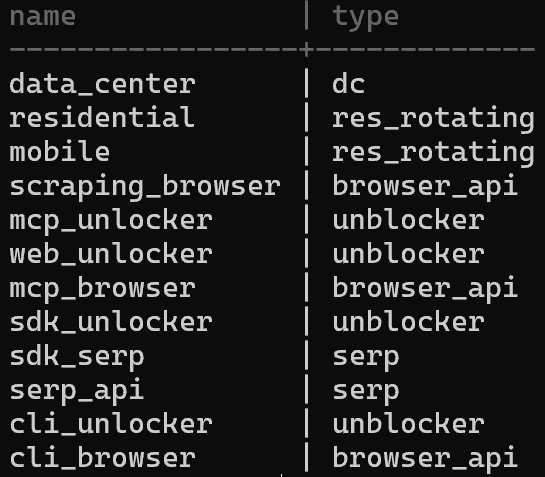
That matches the “My Zones” table in your Bright Data control panel: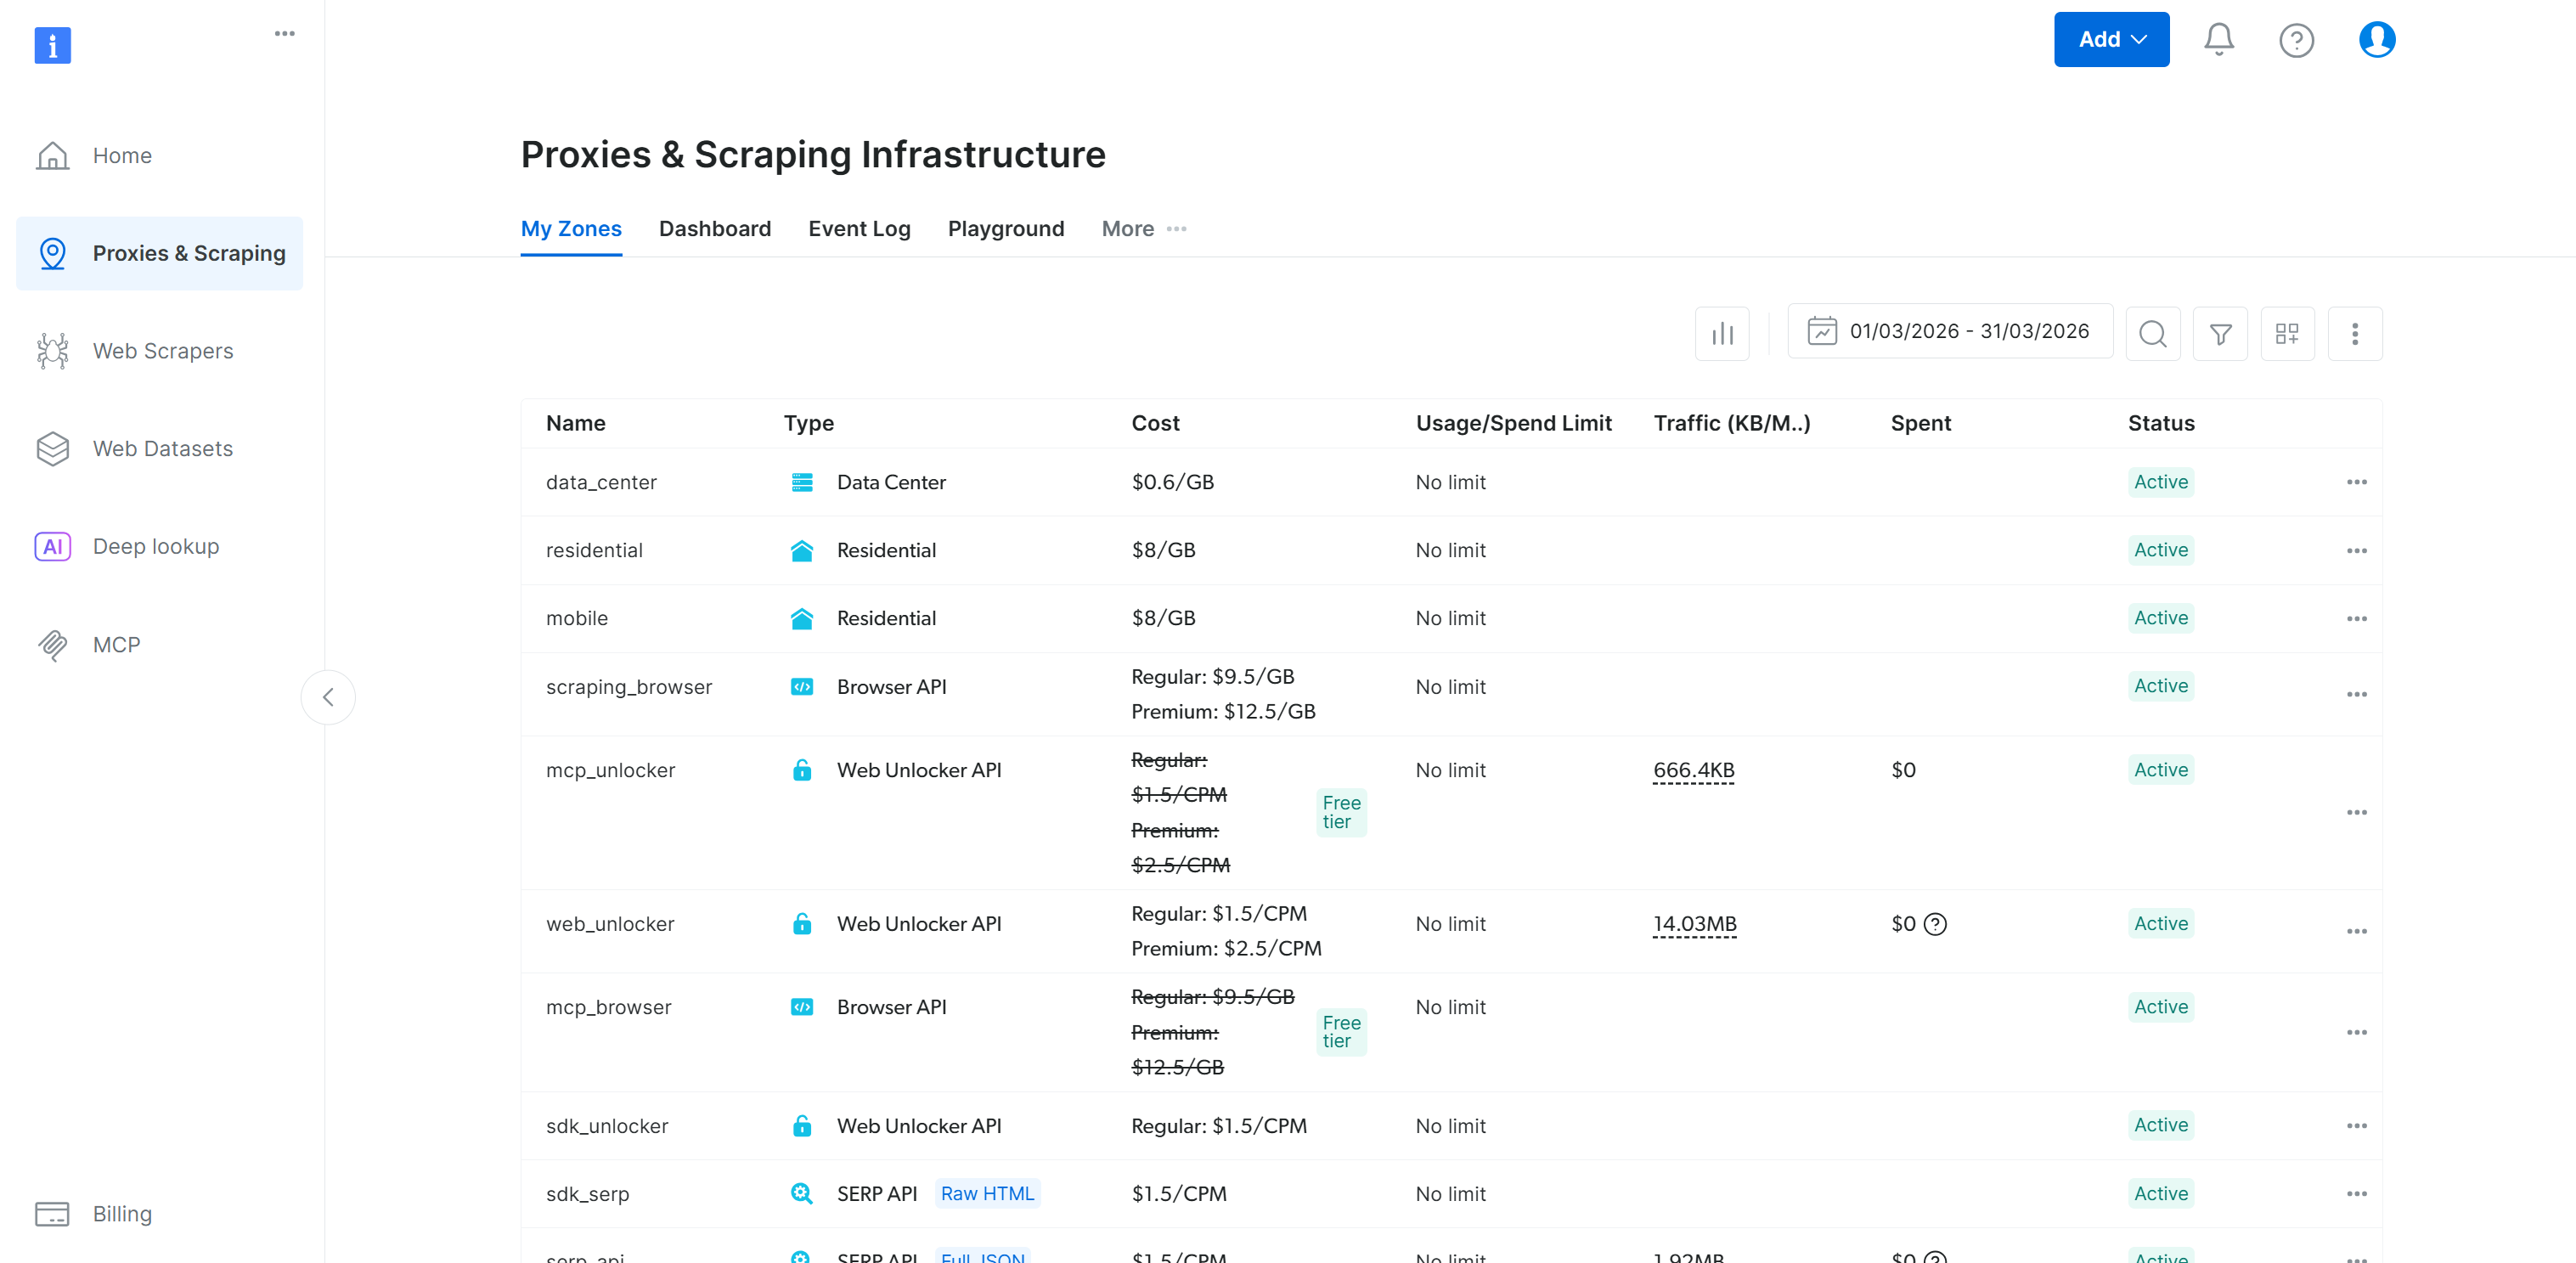
To quickly check your remaining balance, run:
brightdata budgetThis returns a high-level overview of your current credits:
If you want to analyze the spending across different zones, inspect the cost distribution with:
brightdata budget zonesThis shows how your usage is split by zone, making it easier to identify where your credits are being consumed: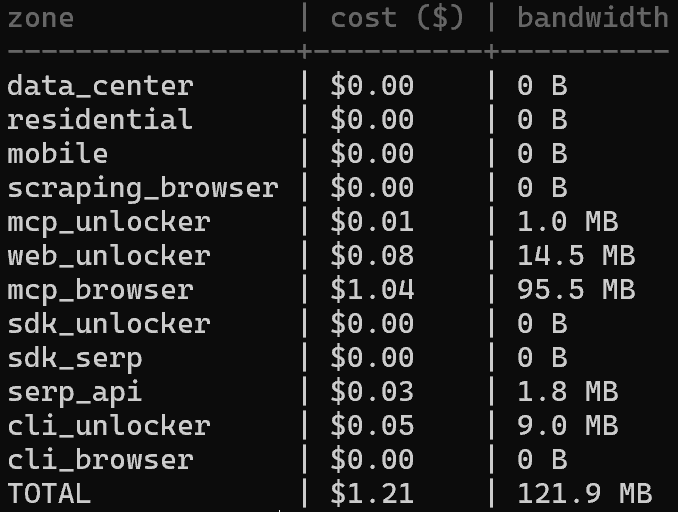
Conclusion
In this blog post, you learned what the Bright Data CLI delivers and the main benefits it provides. You now know it allows you to connect, interact, and operate all Bright Data API-based solutions directly from your terminal.
The CLI is fully pipe-friendly, supporting even complex Bash-based data workflows. Discover all supported scenarios, commands, and integrations in the Bright Data CLI documentation. Also, consider leaving a star on the GitHub repository!
Create a Bright Data account for free today and try out their web data products—even via the CLI!
FAQ
For more FAQs and troubleshooting, check the official documentation.
Do I need a Bright Data account to use the CLI?
Yes! The CLI uses Bright Data’s infrastructure to manage web requests. You can create a free account and begin with the free tier.
Where are my Bright Data CLI credentials stored?
Credentials are stored locally on your machine, with permissions set to owner read/write only (0o600):
- macOS:
~/Library/Application Support/brightdata-cli/credentials.json - Linux:
~/.config/brightdata-cli/credentials.json - Windows:
%APPDATA%\brightdata-cli\credentials.json
How do I log in on a remote server without a browser?
Use the login command with the device option:
brightdata login --deviceThis prints a URL and verification code. Open the URL on any device with a browser, enter the code, and authentication will complete on the server.
What output formats are supported?
The output data formats supported by the Bright Data CLI are:
- For the
scrapecommand:markdown(default),html,json, andscreenshot. - For the
searchcommand: formatted table (default),json(raw JSON), andpretty(indented JSON). - For the
pipelinescommand:json(default),csv,ndjson, andjsonl.
Keep in mind that all commands support the-o <path>option to write the scraped output directly to a file.

AI Engineer
Meir is an AI Engineer at Bright Data, building agents that transform live web data into actionable answers using cutting-edge GenAI and automation.


