

In this guide, you will learn:
- What Pipedream is and why use it.
- The reason why you should integrate it with a built-in scraping plugin.
- Benefits of integrating Pipedream with the Bright Data scraping architecture.
- A step-by-step tutorial to create a web scraping workflow with Pipedream.
Let’s dive into it!
Pipedream at a Glance: Automate and Integrate with Ease
Pipedream is a platform for building and running workflows that connect various applications and third-party providers. In detail, it provides both no-code and low-code functionalities. Thanks to those capabilities, you can automate processes and integrate systems through pre-built components or custom code.
Below is a breakdown of its main features:
- Visual workflow builder: Define workflows using a visual interface, connecting pre-built components for popular applications. Currently, it provides integrations for 2700+ applications.
- No-code/low-code: It does not require technical knowledge. Still, for complex needs, Pipedream’s applications can incorporate custom code nodes. Supported programming languages are Node.js, Python, Go, and Bash.
- Event-driven architecture: Workflows are triggered by events such as HTTP/webhooks, scheduled time, incoming emails, and more. Thus, the workflow remains dormant and consume no resources until a specific trigger event occurs.
- Serverless execution: Pipedream’s core functionality revolves around its serverless runtime. This means you do not need to provision or manage servers. Pipedream executes workflows in a scalable, on-demand environment.
- AI building workflows: Deal with String, an AI dedicated to writing custom agents that require you only to insert prompts. You can also use it if you do not have a particular familiarity with Pipedream. You can write a prompt and let the AI build a workflow for you.
Why Not Just Code It? The Benefits of a Ready-to-Use Scraping Integration
Pipedream supports code actions. These allow you to write complete scripts from scratch in your preferred language (among those supported). Technically, this means you could build a scraping bot entirely within Pipedream using these nodes.
On the other hand, doing so does not necessarily simplify the process of building a scraping workflow. You would still face the usual challenges and obstacles related to anti-scraping protections.
So, it is more practical, effective, and faster to rely on a built-in scraping plugin that handles these complexities for you. That is precisely the experience provided by the Bright Data integration in Pipedream.
Below is a list of the most important reasons to rely on the Bright Data ready-to-use scraping plugin:
- Easy authentication: Pipedream safely stores your Bright Data API key (required for authentication) and provides you with easy usability. You do not need to write any custom code for authentication, and you are sure not to expose your key.
- Overcoming anti-bot systems: Under the hood, Bright Data APIs handle all the web scraping challenges, from proxy rotation and IP management to solving CAPTCHAs and parsing data. This way, it ensures your Pipedream workflow receives consistent and high-quality web data.
- Structured data: After scraping, you get structured, organized data without writing any line of code. The plugin takes care of data structuring for you.
Key Advantages of Combining Pipedream with the Bright Data Plugin
When you connect Pipedream automation capabilities with Bright Data, you can:
- Access fresh data: The purpose of web scraping is to retrieve data from the web, and Bright Data helps you with that. Still, data changes over time. So, if you do not want your analyses to be outdated, you need to keep extracting fresh data. This is where the power of Pipedream comes in handy (e.g., via scheduling triggers).
- Integrate AI into your scraping workflows: Pipedream integrates with several LLMs, like ChatGPT and Gemini. This enables you to automate several tasks that would require hours of manual work. For example, you could build an RAG workflow to monitor a list of competitor products on an e-commerce site.
- Simplify technicalities: Websites employ sophisticated anti-scraping blocking techniques that are updated almost every week. The Bright Data integration bypasses the blocks for you, as it takes care of all the anti-bot solutions.
Time to see the Bright Data integration in action in a Pipedream scraping workflow!
Build an AI-Powered Scraping Workflow with Pipedream and Bright Data: Step-by-Step Tutorial
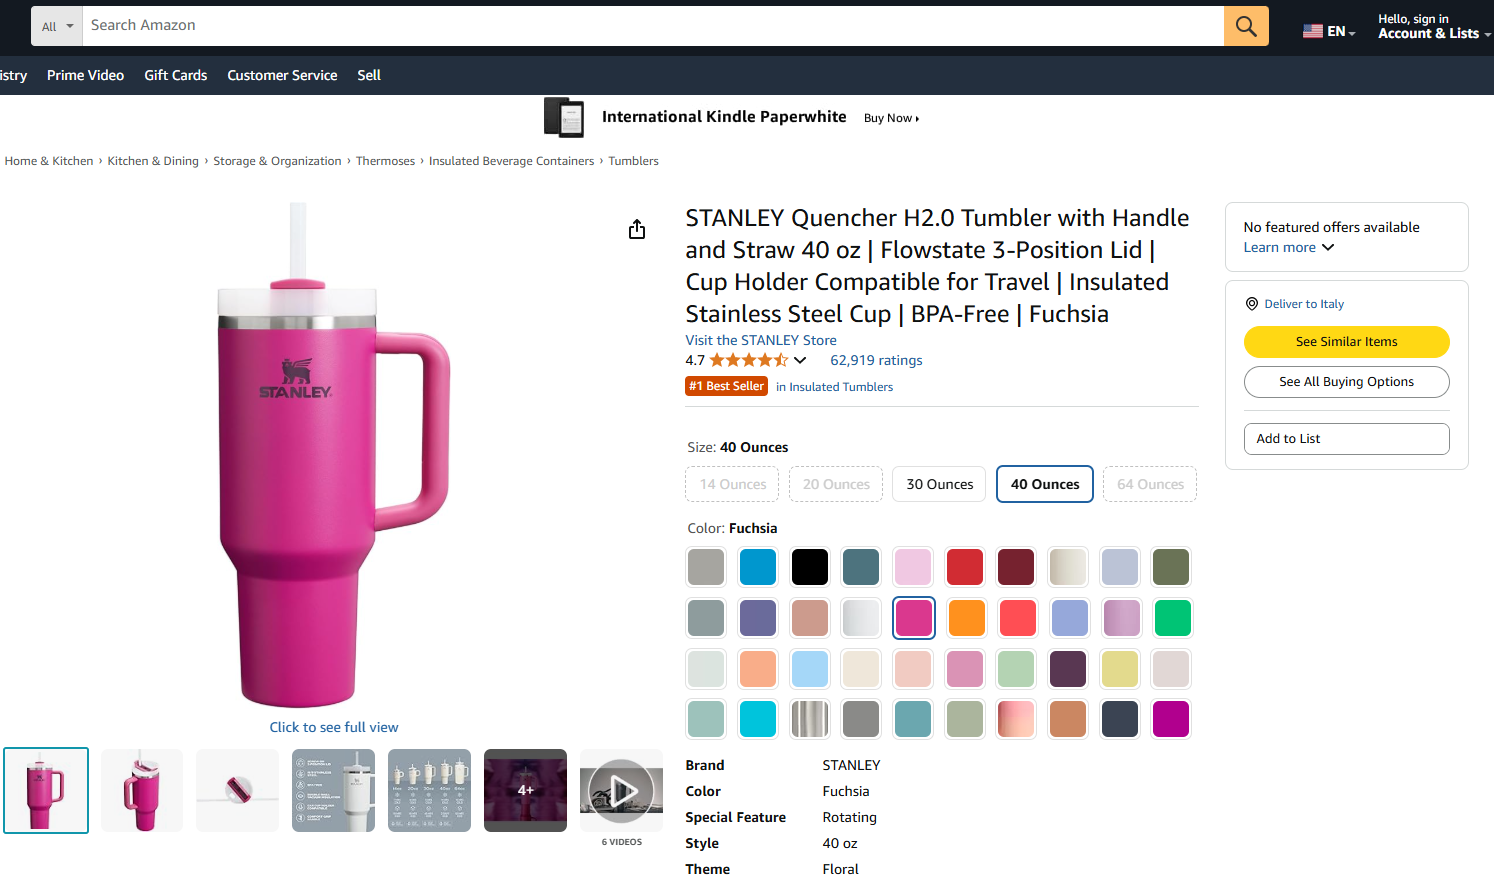
In this guided section, you will learn how to build a Pipedream workflow that uses Bright Data to retrieve data from an Amazon product. In particular, the target page will be:
The goal is to show you how to create a Pipedream workflow that does the following:
- Retrieves the data from the target web page using the Bright Data integration.
- Ingests the data into an LLM.
- Asks the LLM to analyze the data and create a product summary from it.
Follow the steps below to learn how to create, test, and deploy such a workflow in Pipedream.
Requirements
To reproduce this tutorial, you need:
- A Pipedream account (a free account is enough).
- A Bright Data API key.
- An OpenAI API key.
If you do not have these yet, use the links above and follow the instructions to get everything set up.
It also helps to have this knowledge to follow the tutorial:
- Familiarity with Bright Data’s infrastructure and products (especially the Web Scraper API).
- A basic understanding of AI processing (e.g., LLMs).
- Knowledge of how triggers and API calls via webhooks work.
Step #1: Create a New Pipedream Workflow
Log in to your Pipedream account and go to your dashboard. Then, create a new workflow by clicking the “New workflow” button:

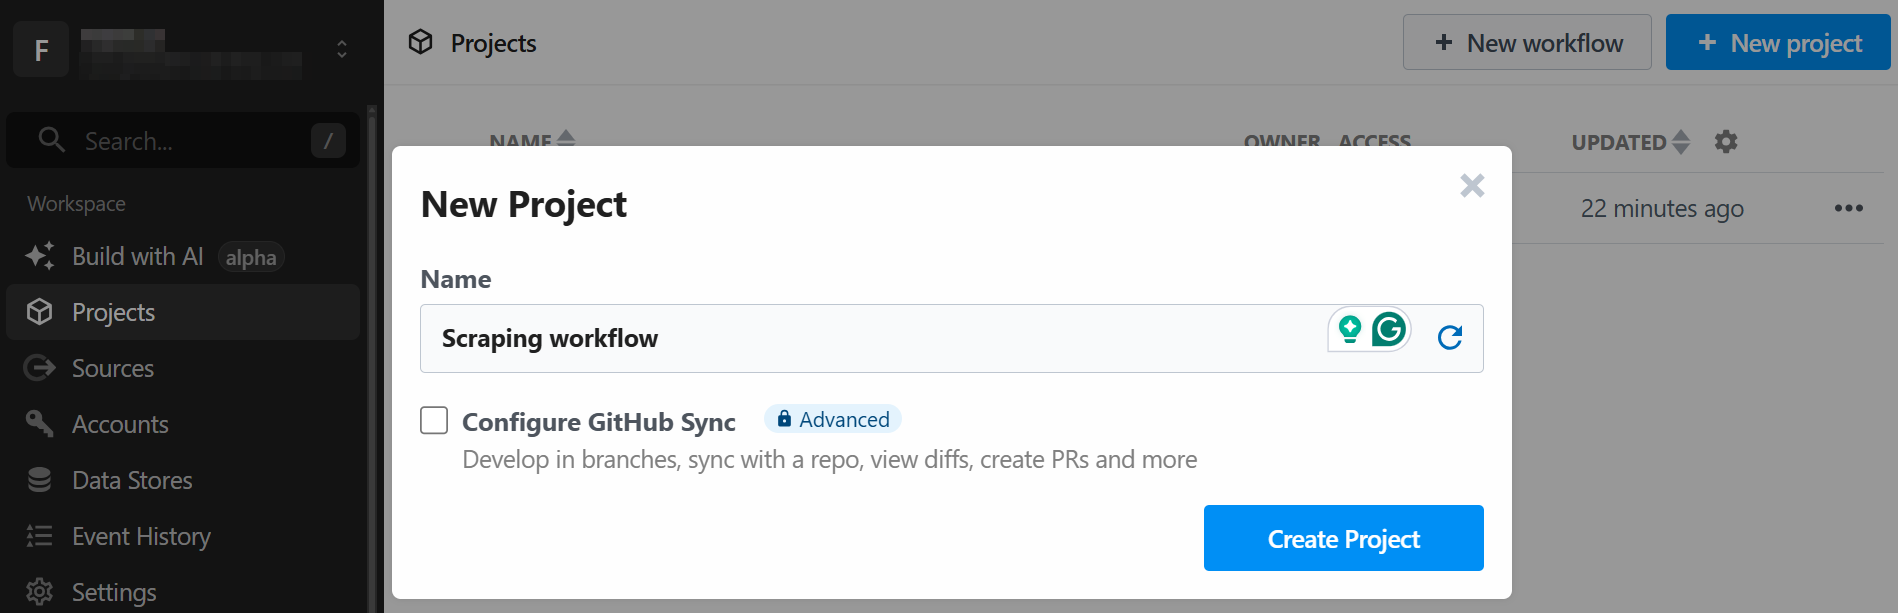
The system will ask you to create a new project. Give it a name and click on the “Create Project” button when done:
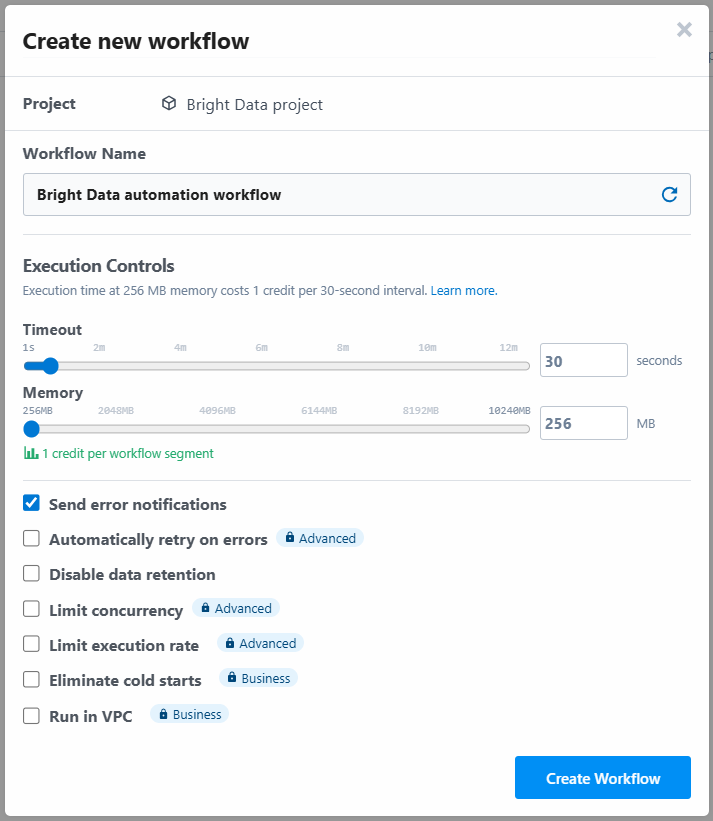
The tool will ask you to assign a name to the workflow and to define its settings. You can leave the settings as they are and press the “Create Workflow” button in the end:
Below is how the UI of your new workflow appears:
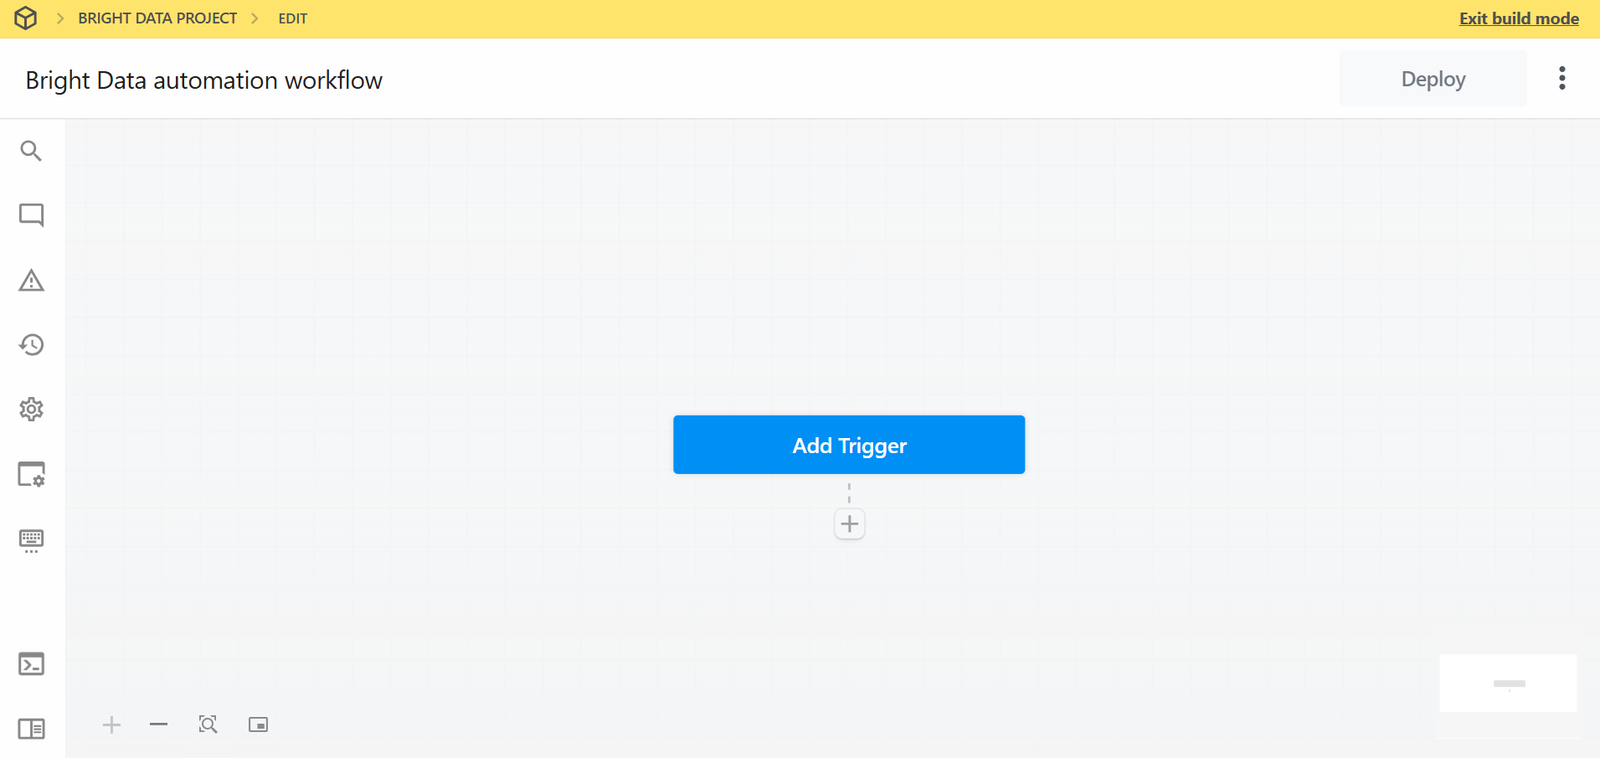
Very well! You created a new workflow in Pipedream. You are now ready to add plugin integrations to it.
Step #2: Add a Trigger
In Pipedream, every workflow starts with a trigger. Clicking on “Add trigger” will show you the triggers you can choose:
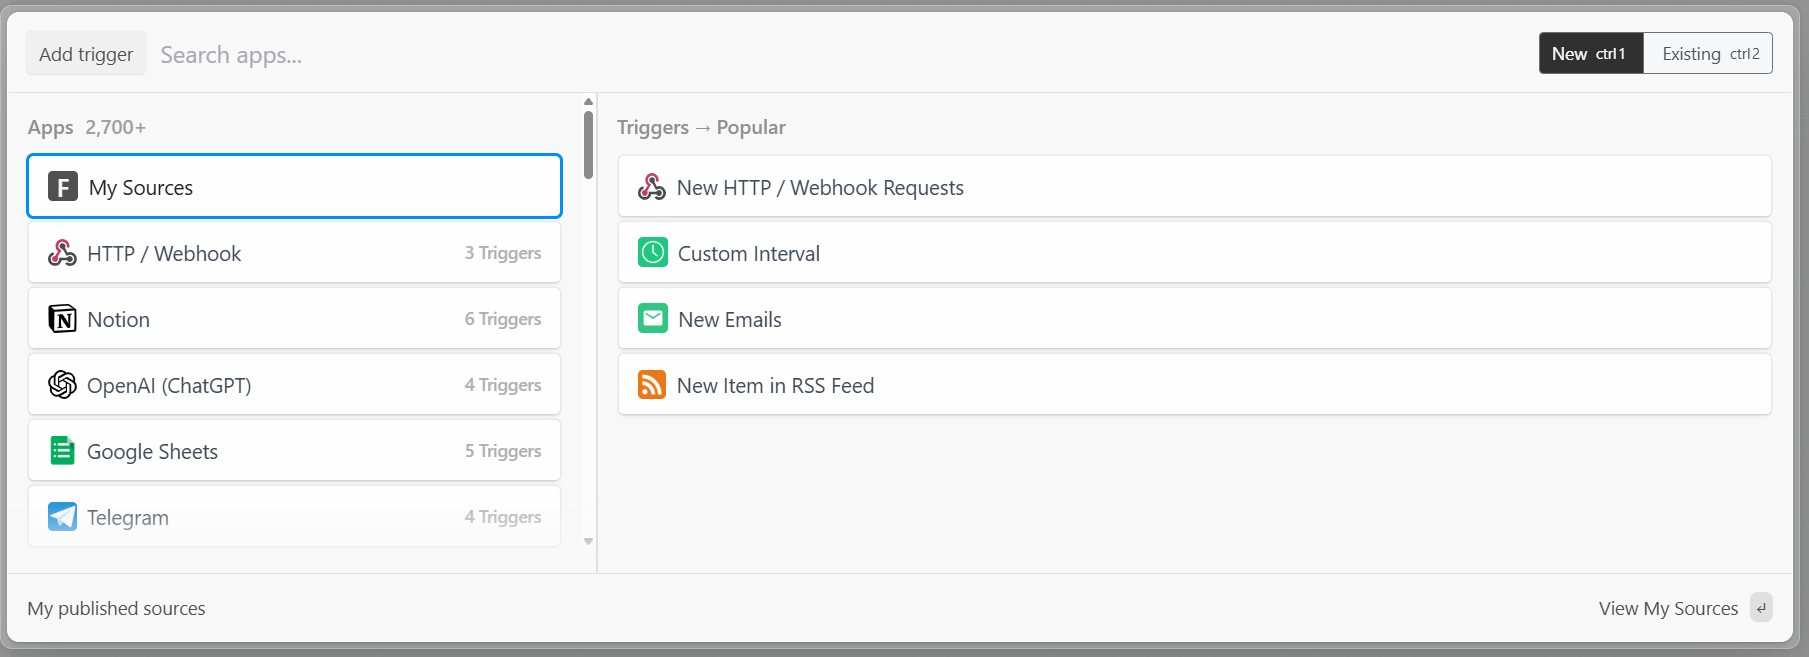
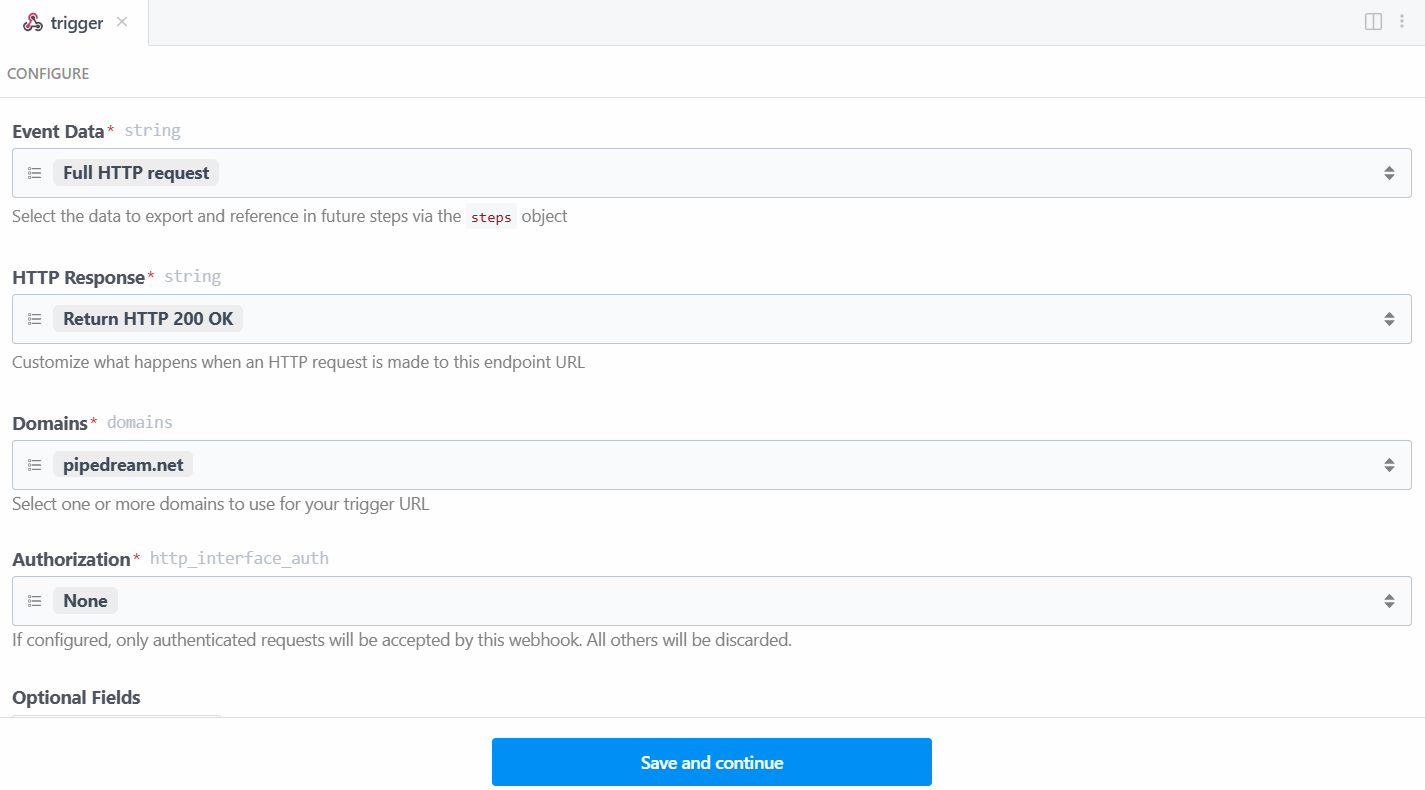
In this case, select the “New HTTP/Webhook Requests” trigger, which is required to connect with Bright Data. Leave the placeholder data as is, and click on the “Save and continue” button:
To make the trigger work, you have to generate an event. So, click on “Generate Test Event”:
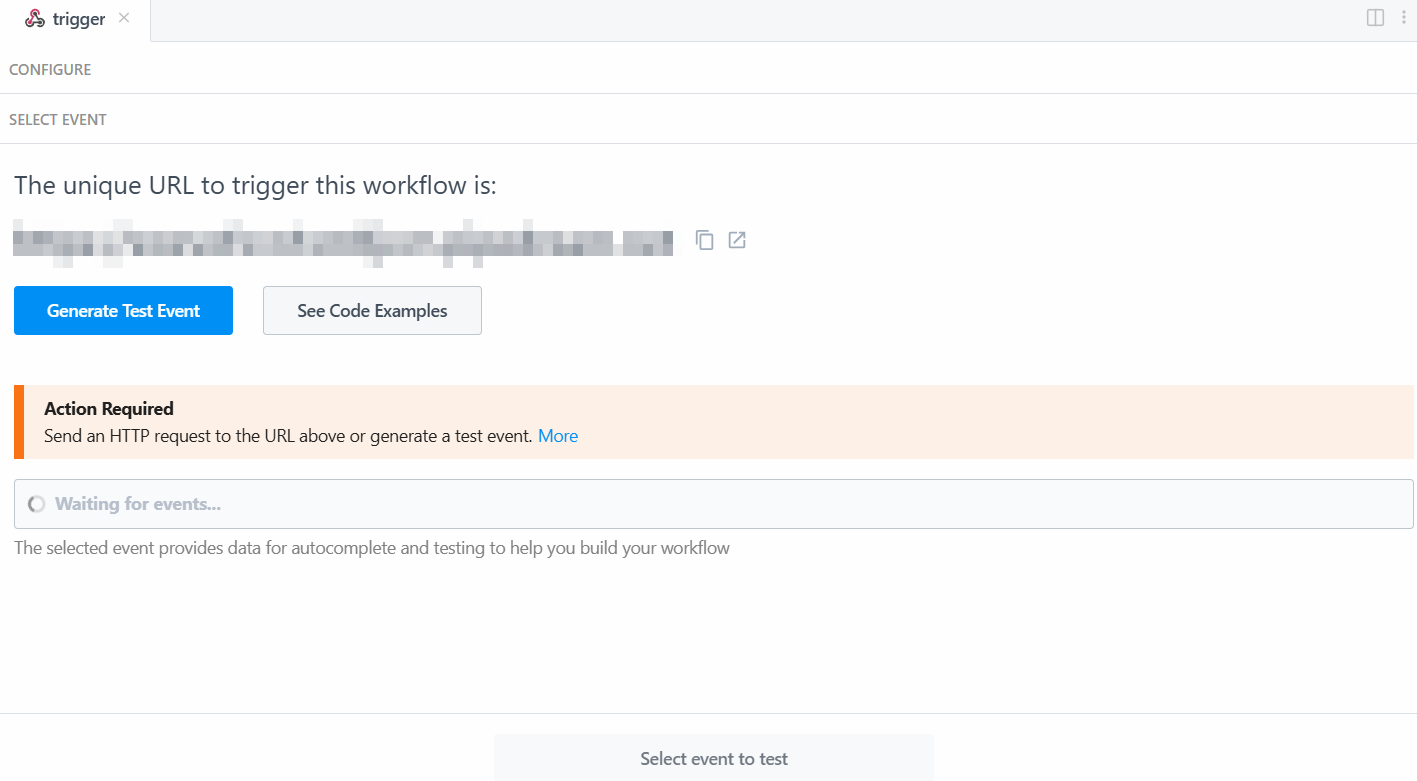
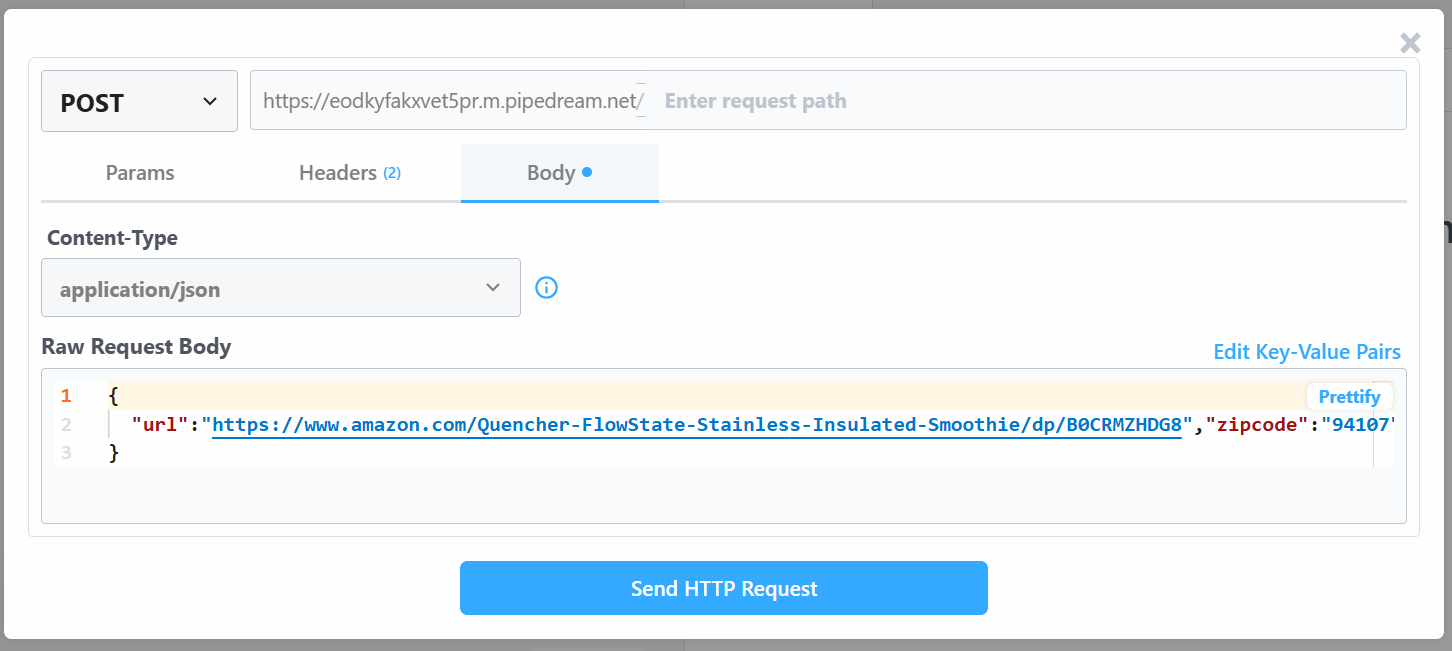
The system provides you with a pre-defined value of a test event as follows:
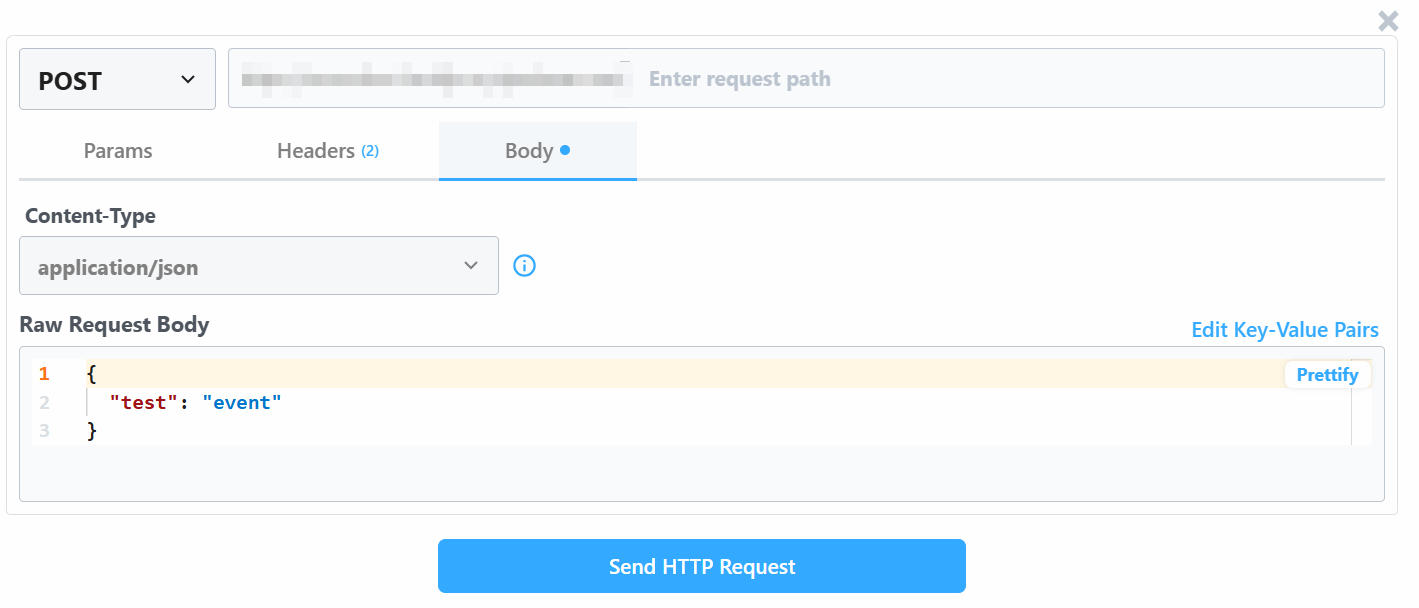
Change the “Raw Request Body” value with:
{
  "url": "https://www.amazon.com/Quencher-FlowState-Stainless-Insulated-Smoothie/dp/B0CRMZHDG8",
  "zipcode": "94107",
  "language": ""
}
The reason is that the trigger generated by Pipedream will initiate the call to Bright Data’s Amazon Scraper API. The endpoint (which will be configured later on) requires input data in that specific payload format. You can verify this by checking the “API Request Builder” section of the “Collect by URL” scraper in Bright Data’s Aamzon Web Scrapers:

Back to the Pipedream window, when done, click on the “Send HTTP Request” button. If everything goes as expected, you will see a success message in the results section. The trigger will also become colored green:
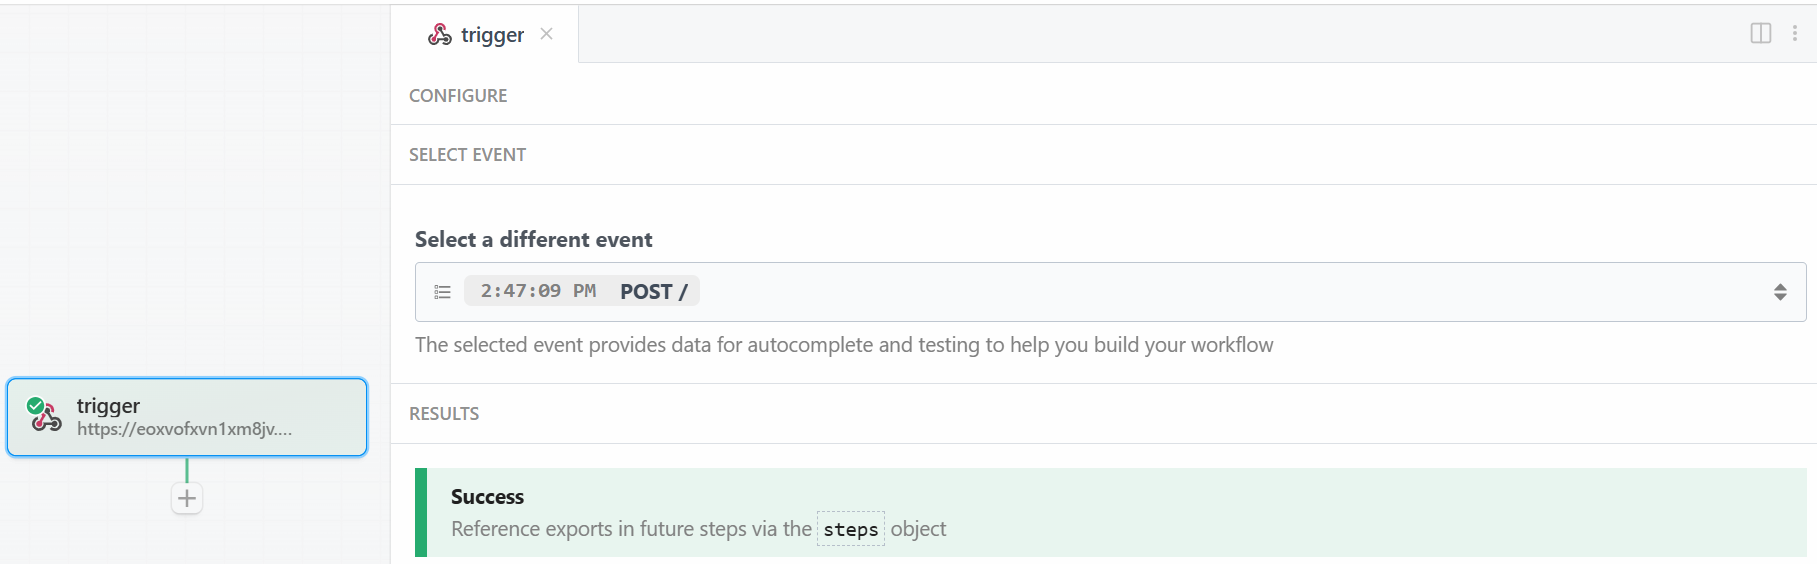
Perfect! The trigger for starting the Bright Data integration in the Pipedream scraping workflow has been correctly set up. Now you are ready to add an action.
Step #3: Add the Bright Data Action Step
After the trigger, you can add an action step in the Pipedream workflow. What you want now is to connect the Bright Data step to the trigger. To achieve that, click on the “+” under the trigger and search for “bright data”:
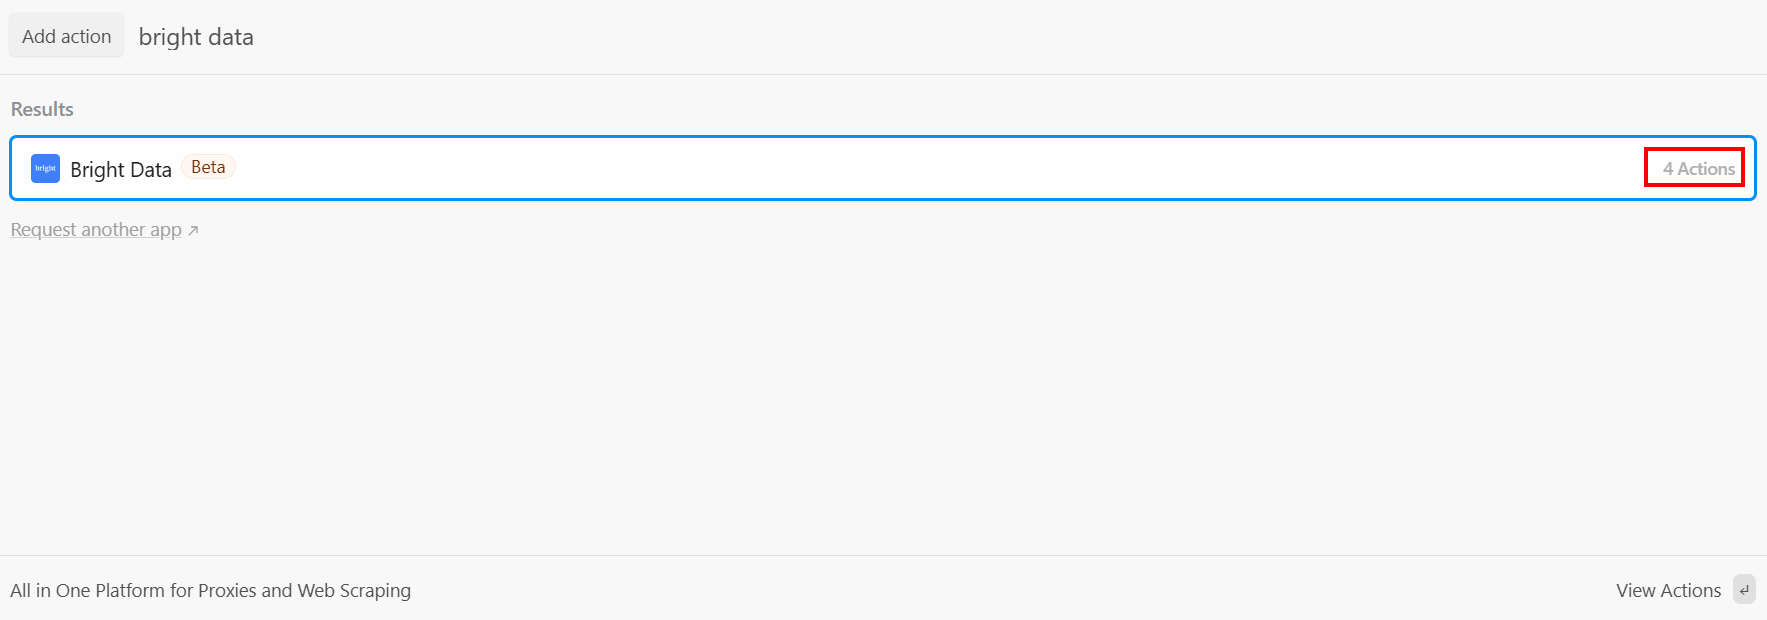
Pipedream provides you with several actions from the Bright Data plugin. Select it to see them all:
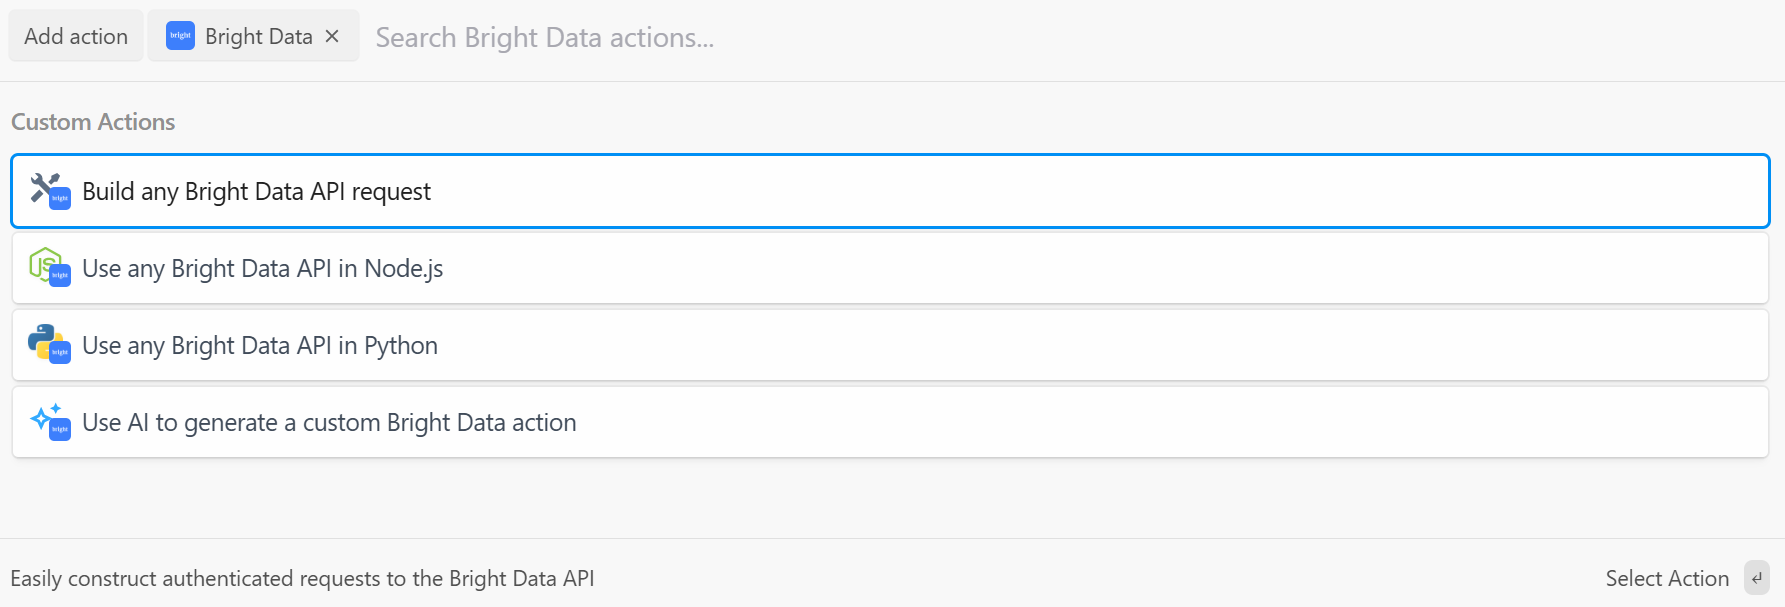
The options you have are:
- Build any Bright Data API request: Create authenticated requests to Bright Data’s APIs.
- Use any Bright Data API in Node.js/Python: Connect your Bright Data account to Pipedream and customize the requests in Node.js/Python.
- Use AI to generate a custom Bright Data action: Ask AI to generate custom code for Bright Data.
For this tutorial, select the “Use any Bright Data API in Python” option. This is what you will see:
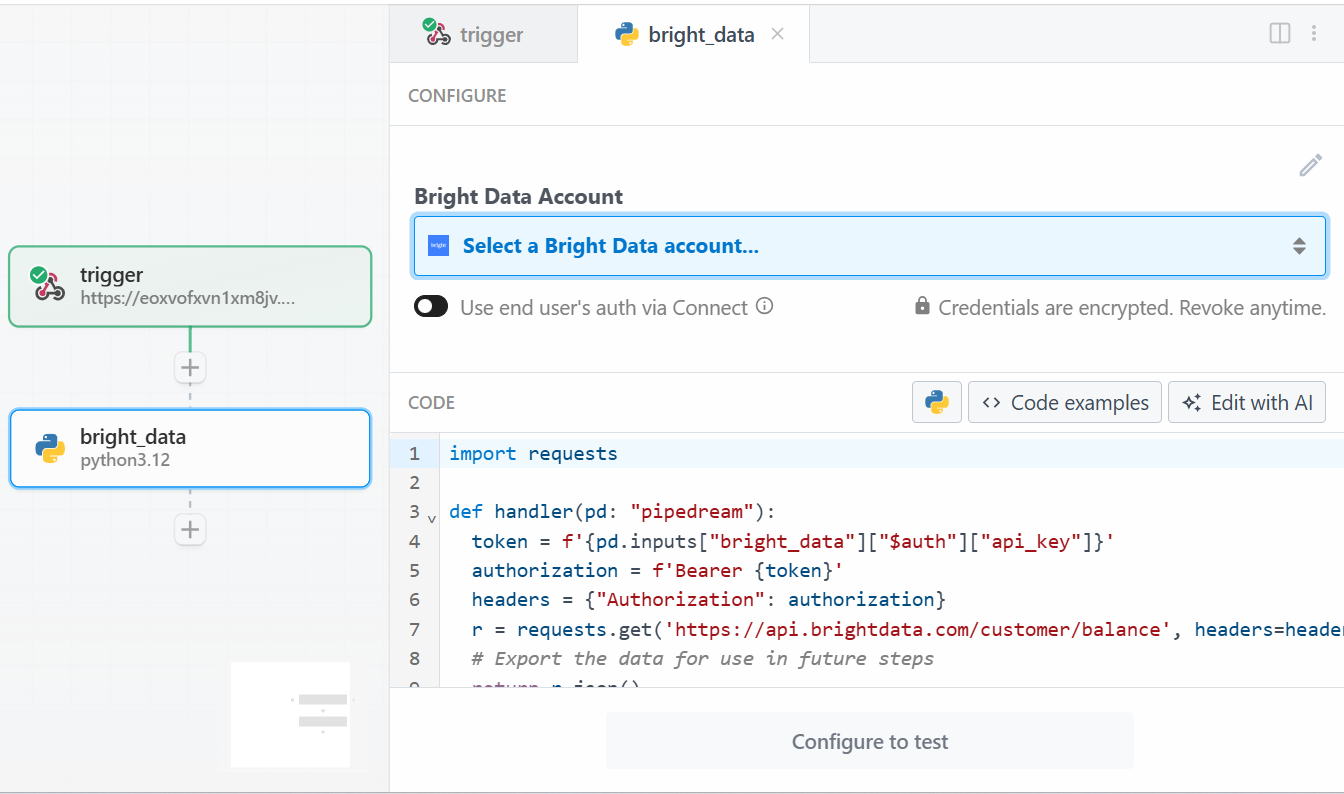
First, click on “Select a Bright Data account” under “Bright Data Account” and add your Bright Data API key. If you have not done it already, make sure to follow the official guide to set up a Bright Data API key.
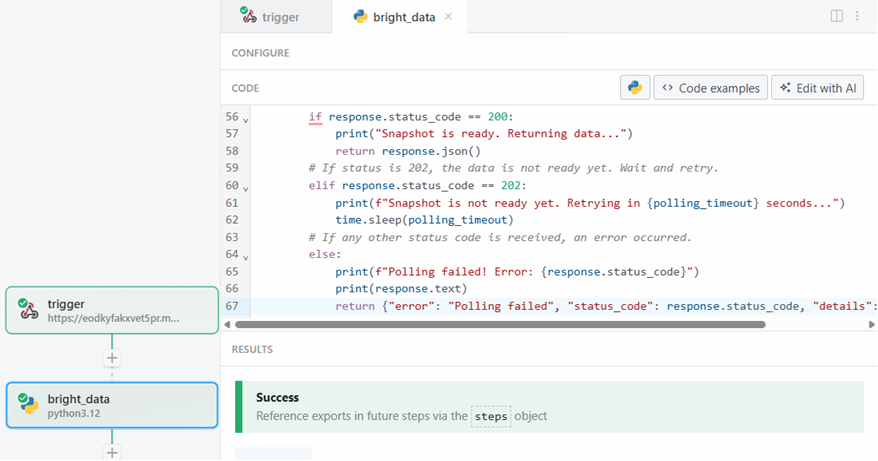
Then, delete the code in the “CODE” section and write the following:
import requests
import json
import time

def handler(pd: "pipedream"):
    # Retrieve the Bright Data API key from Pipedream's authenticated accounts
    api_key = pd.inputs["bright_data"]["$auth"]["api_key"]
    # Get the target Amazon product URL from the trigger data
    amazon_product_url = pd.steps["trigger"]["event"]["body"]["url"]

    # Configure the Bright Data API request
    brightdata_api_endpoint = "https://api.brightdata.com/datasets/v3/trigger"
    params = { "dataset_id": "gd_l7q7dkf244hwjntr0", "include_errors": "true" }
    payload_data = [{"url": amazon_product_url}]
    headers = { "Authorization": f"Bearer {api_key}", "Content-Type": "application/json" }

    # Initiate the data collection job
    print(f"Triggering Bright Data dataset with URL: {amazon_product_url}")
    trigger_response = requests.post(brightdata_api_endpoint, headers=headers, params=params, json=payload_data)

    # Check if the trigger request was successful
    if trigger_response.status_code == 200:
        response_json = trigger_response.json()
        # Extract the snapshot ID, which is needed to poll for results.
        snapshot_id = response_json.get("snapshot_id")

        # Handle cases where the trigger is successful but no snapshot ID is provided
        if not snapshot_id:
            print("Trigger successful, but no snapshot_id was returned.")
            return {"error": "Trigger successful, but no snapshot_id was returned.", "response": response_json}

        # Begin polling for the completed snapshot using its ID
        print(f"Successfully triggered. Snapshot ID is {snapshot_id}. Now starting to poll for results.")
        final_scraped_data = poll_and_retrieve_snapshot(api_key, snapshot_id)

        # Return the final scraped data from the workflow
        return final_scraped_data
    else:
        # If the trigger failed, log the error and exit the Pipedream workflow
        print(f"Failed to trigger. Error: {trigger_response.status_code} - {trigger_response.text}")
        pd.flow.exit(f"Error: Failed to trigger Bright Data scrape. Status: {trigger_response.status_code}")

def poll_and_retrieve_snapshot(api_key, snapshot_id, polling_timeout=20):
    # Construct the URL for the specific snapshot
    snapshot_url = f"https://api.brightdata.com/datasets/v3/snapshot/{snapshot_id}?format=json"
    # Set the authorization header for the API request
    headers = { "Authorization": f"Bearer {api_key}" }
    print(f"Polling snapshot for ID: {snapshot_id}...")

    # Loop until the snapshot is ready
    while True:
        response = requests.get(snapshot_url, headers=headers)
        # If status is 200, the data is ready
        if response.status_code == 200:
            print("Snapshot is ready. Returning data...")
            return response.json()
        # If status is 202, the data is not ready yet. Wait and retry
        elif response.status_code == 202:
            print(f"Snapshot is not ready yet. Retrying in {polling_timeout} seconds...")
            time.sleep(polling_timeout)
        # If any other status code is received, an error occurred.
        else:
            print(f"Polling failed! Error: {response.status_code}")
            print(response.text)
            return {"error": "Polling failed", "status_code": response.status_code, "details": response.text}
This code does the following:
- The
handler()function manages the workflow at Pipedream’s level. It:- Retrieves the Bright Data API key, after you stored it in Pipedream.
- Configures the Bright Data API request on the side of the target URL, dataset ID, and all the specific data needed for it.
- Manages the response. If anything goes wrong, you will see the errors in Pipedream’s logs.
- The
poll_and_retrieve_snapshot()function polls the Bright Data API for a snapshot until it is ready. When it is ready, it returns the requested data. If anything goes wrong, it manages errors and shows them in the logs.
When you are ready, click on the “Test” button. You will see a success message in the “RESULTS” section, and the Bright Data action step will be colored green:
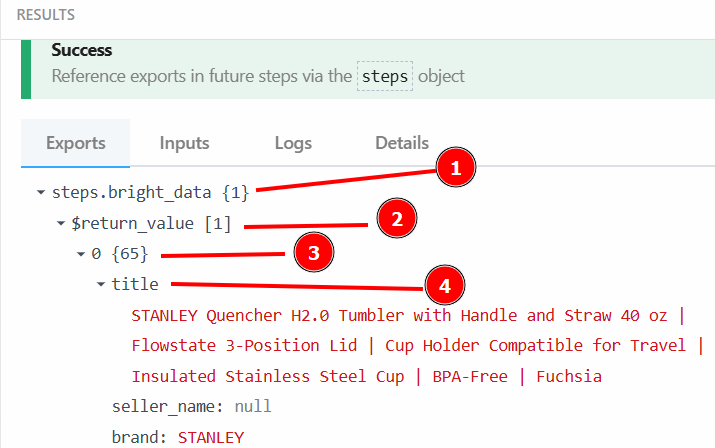
In the “Exports” section under “RESULTS”, you can see the scraped data:
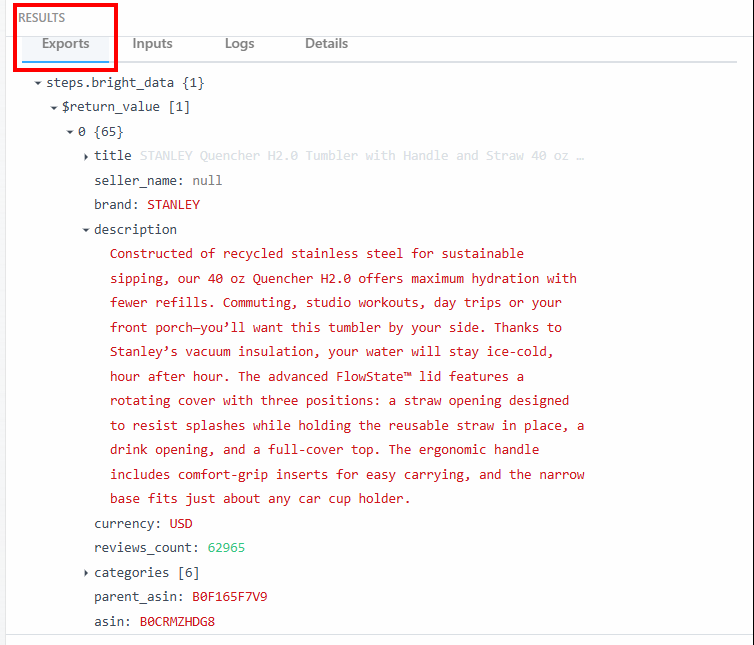
Below is the scraped data as text:
steps.bright_data{
   $return_value{
      0{
         "title":"STANLEY Quencher H2.0 Tumbler with Handle and Straw 40 oz | Flowstate 3-Position Lid | Cup Holder Compatible for Travel | Insulated Stainless Steel Cup | BPA-Free | Fuchsia",
         "seller_name":"null",
         "brand":"STANLEY",
         "description":"Constructed of recycled stainless steel for sustainable sipping, our 40 oz Quencher H2.0 offers maximum hydration with fewer refills. Commuting, studio workouts, day trips or your front porch—you’ll want this tumbler by your side. Thanks to Stanley’s vacuum insulation, your water will stay ice-cold, hour after hour. The advanced FlowState™ lid features a rotating cover with three positions: a straw opening designed to resist splashes while holding the reusable straw in place, a drink opening, and a full-cover top. The ergonomic handle includes comfort-grip inserts for easy carrying, and the narrow base fits just about any car cup holder.",
         "currency":"USD",
         "reviews_count":"62965",

        ..OMITTED FOR BREVITY...

      }

   }
}
You will use this data and its structure in the next step of the workflow.
Cool! You have correctly scraped the target data thanks to the Bright Data action in Pipedream.
Step #4: Add The OpenAI Action Step
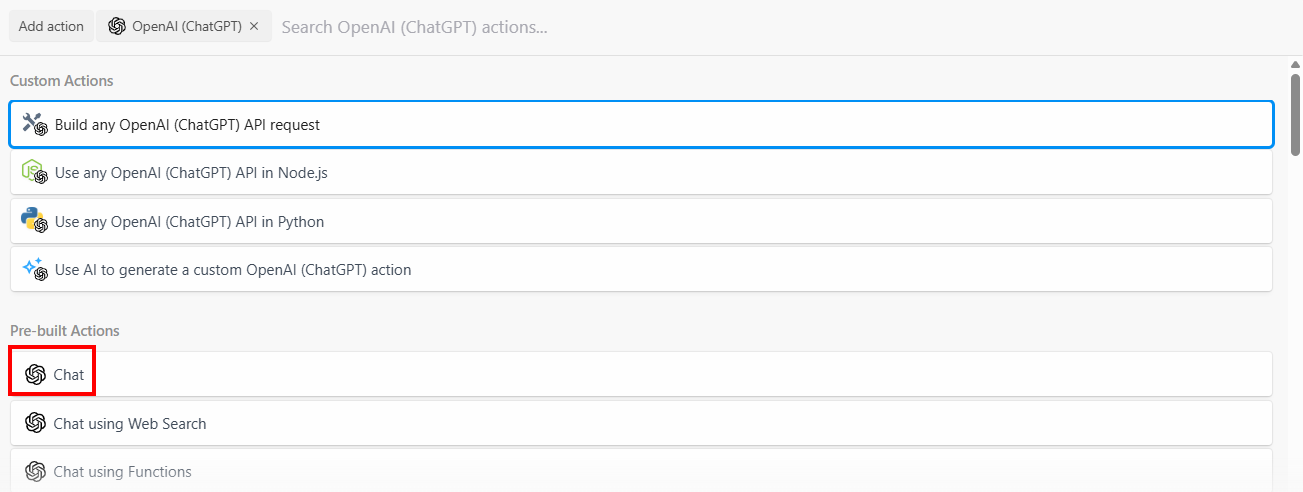
The Amazon product data has been scraped successfully by the Beight Data integration. Now, you can feed it to an LLM. To do so, add a new action by clicking on the “+” button and search for “openai”. Here, you can choose among different options:

Select the “Build any OpenAI (ChatGPT) API request” option, then select the “Chat” option:
Below is the configuration section of this action step:
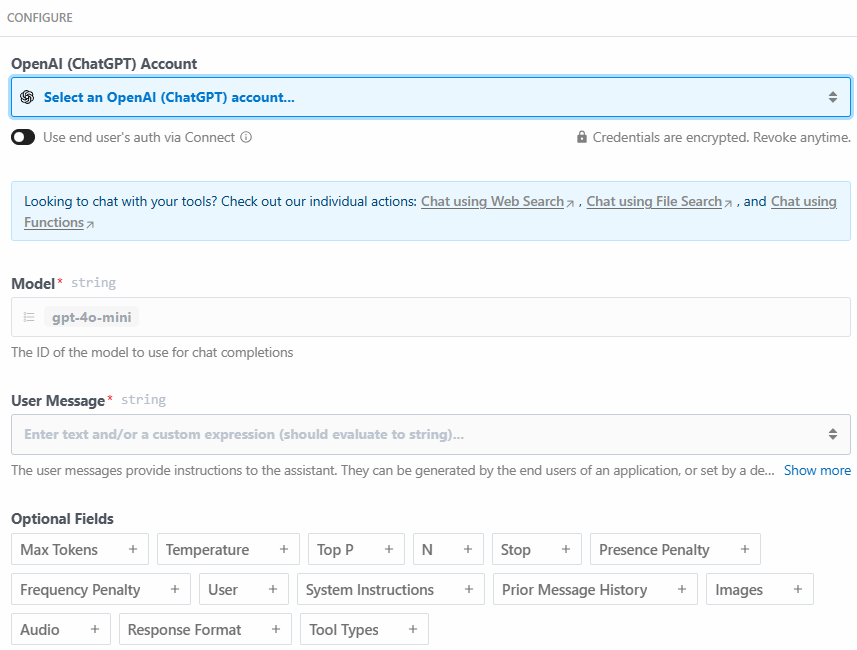
Click on “Select an OpenAI (ChatGPT) account…” to add your OpenAI platform API key. Then, write the following prompt in the “User Message” section:
Act as an expert product analyst. Consider the following data from an Amazon product page:

PRODUCT TITLE:
{{steps.bright_data.$return_value[0].title}}

BRAND:
{{steps.bright_data.$return_value[0].brand}}

DESCRIPTION:
{{steps.bright_data.$return_value[0].description}}

REVIEWS COUNT
{{steps.bright_data.$return_value[0].reviews_count}}

Based on this data, provide a concise summary of the product that should entice potential customers to buy it. The summary should include what the product is, and its most important features.
The prompt asks the LLM to:
- Act as an expert product analyst. This is important because, with this instruction, the LLM will behave as an expert product analyst would. This helps make its response specific to the industry.
- Consider the data extracted by the Bright Data step, such as the product title and the description. This helps the LLM focus on specific data you need.
- Provide a summary of the product, based on the scraped data. The prompt is also specific about what the summary must contain. This is where you will see the power of AI-automation for product summarization. The LLM will create a summary of the product, based on the scraped data, acting as a product specialist.
You can retrieve the product title with {{steps.bright_data.$return_value[0].title}} because, as specified in the previous step, the structure of the output data by the Bright Data action step is:
After clicking on “Test”, find the output of the LLM in the “RESULTS” section of the OpenAI Chat action step under “Generated message” > “content”:
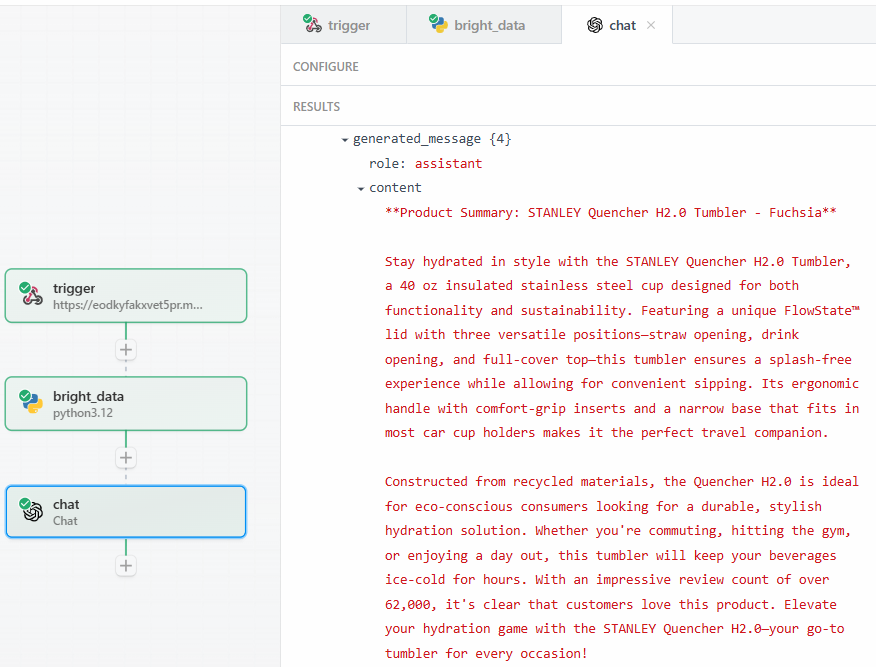
Below is a possible textual result:
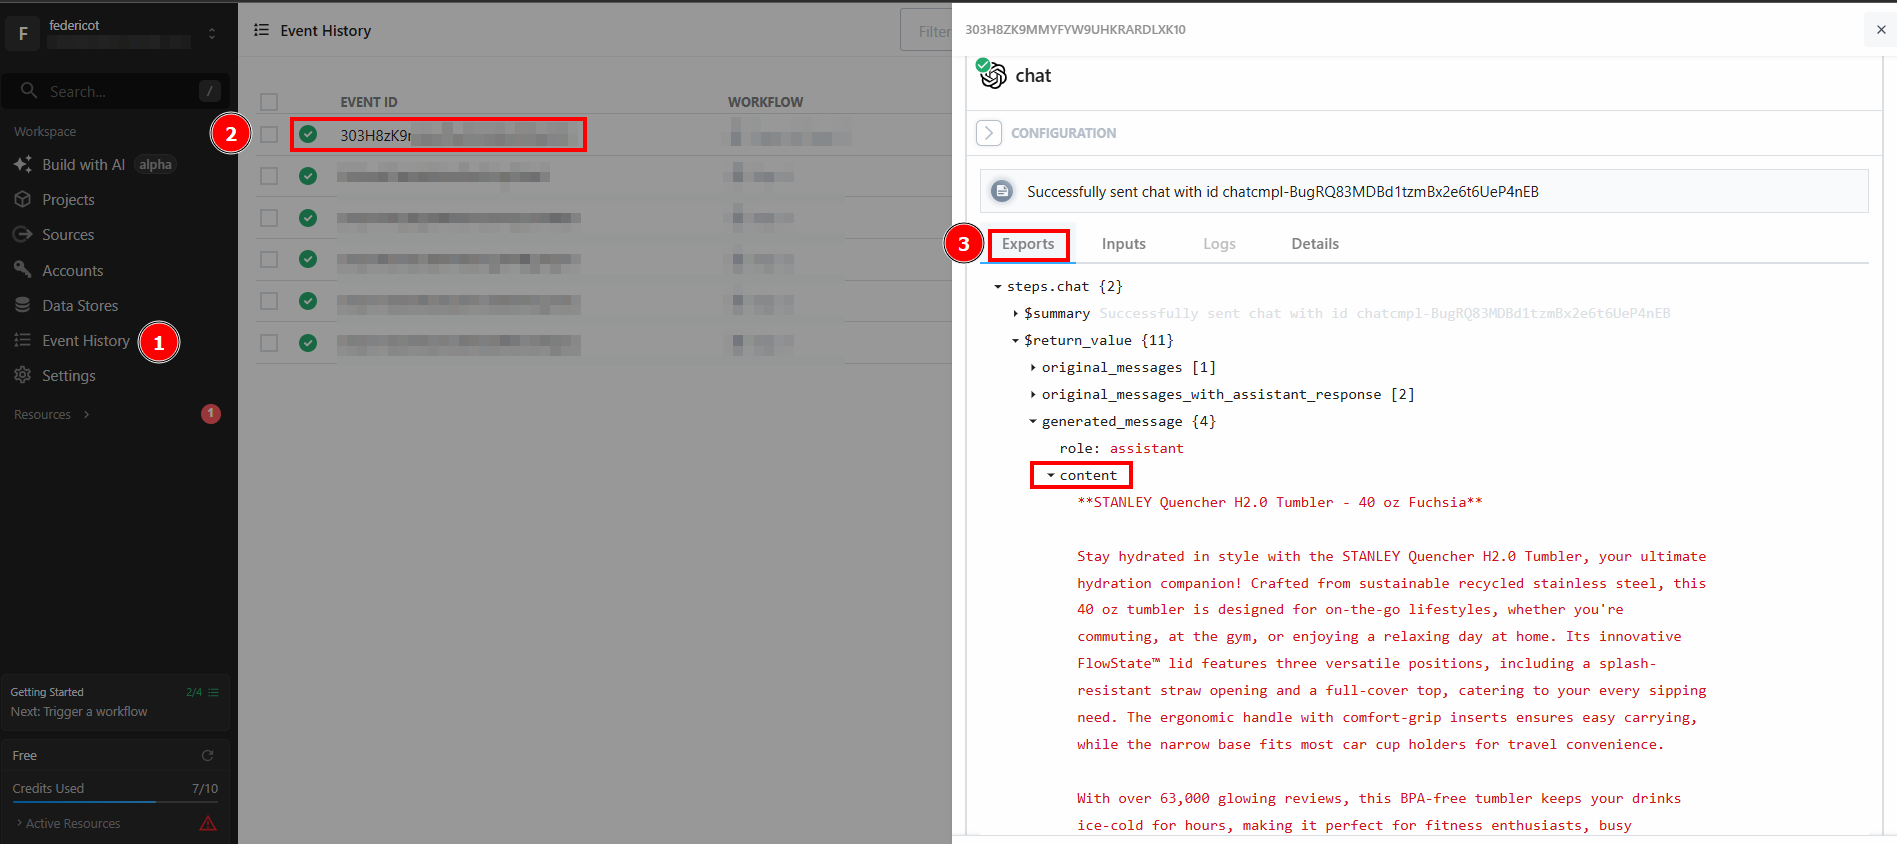
**Product Summary: STANLEY Quencher H2.0 Tumbler - Fuchsia**

Stay hydrated in style with the STANLEY Quencher H2.0 Tumbler, a 40 oz insulated stainless steel cup designed for both functionality and sustainability. Featuring a unique FlowState™ lid with three versatile positions—straw opening, drink opening, and full-cover top—this tumbler ensures a splash-free experience while allowing for convenient sipping. Its ergonomic handle with comfort-grip inserts and a narrow base that fits in most car cup holders makes it the perfect travel companion.

Constructed from recycled materials, the Quencher H2.0 is ideal for eco-conscious consumers looking for a durable, stylish hydration solution. Whether you're commuting, hitting the gym, or enjoying a day out, this tumbler will keep your beverages ice-cold for hours. With an impressive review count of over 62,000, it's clear that customers love this product. Elevate your hydration game with the STANLEY Quencher H2.0—your go-to tumbler for every occasion!
As you can see, the LLM provided the summary of the product, acting as a product specialist. The summary reports exactly what the prompt asks:
- What the product is.
- Some of its important features.
The reason why you want to extract exact data—like the ratings count—is to be sure the LLM is not hallucinating. The summary says that the reviews are over 62’000. If you want to see the exact number, you can verify it under the “content” field in the results:
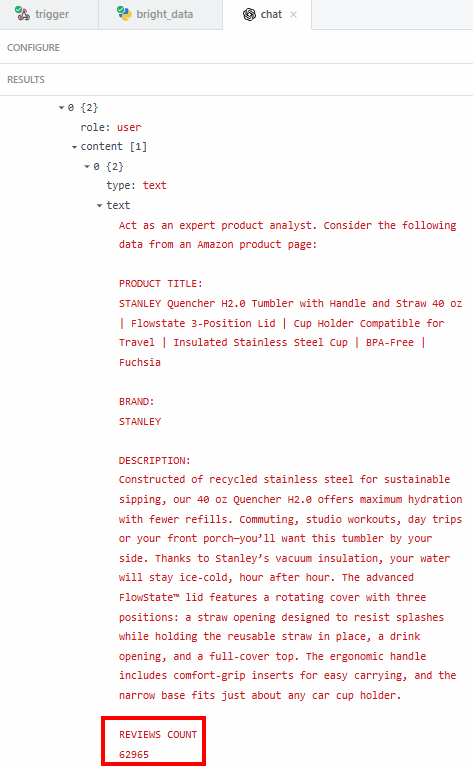
Then, you need to verify if that number matches the one shown on the Amazon product page.
Finally, if you have ever tried to scrape major e-commerce sites like Amazon, you know how hard it is to do so on your own. For example, you may encounter the notorious Amazon CAPTCHA, which can block most scrapers:
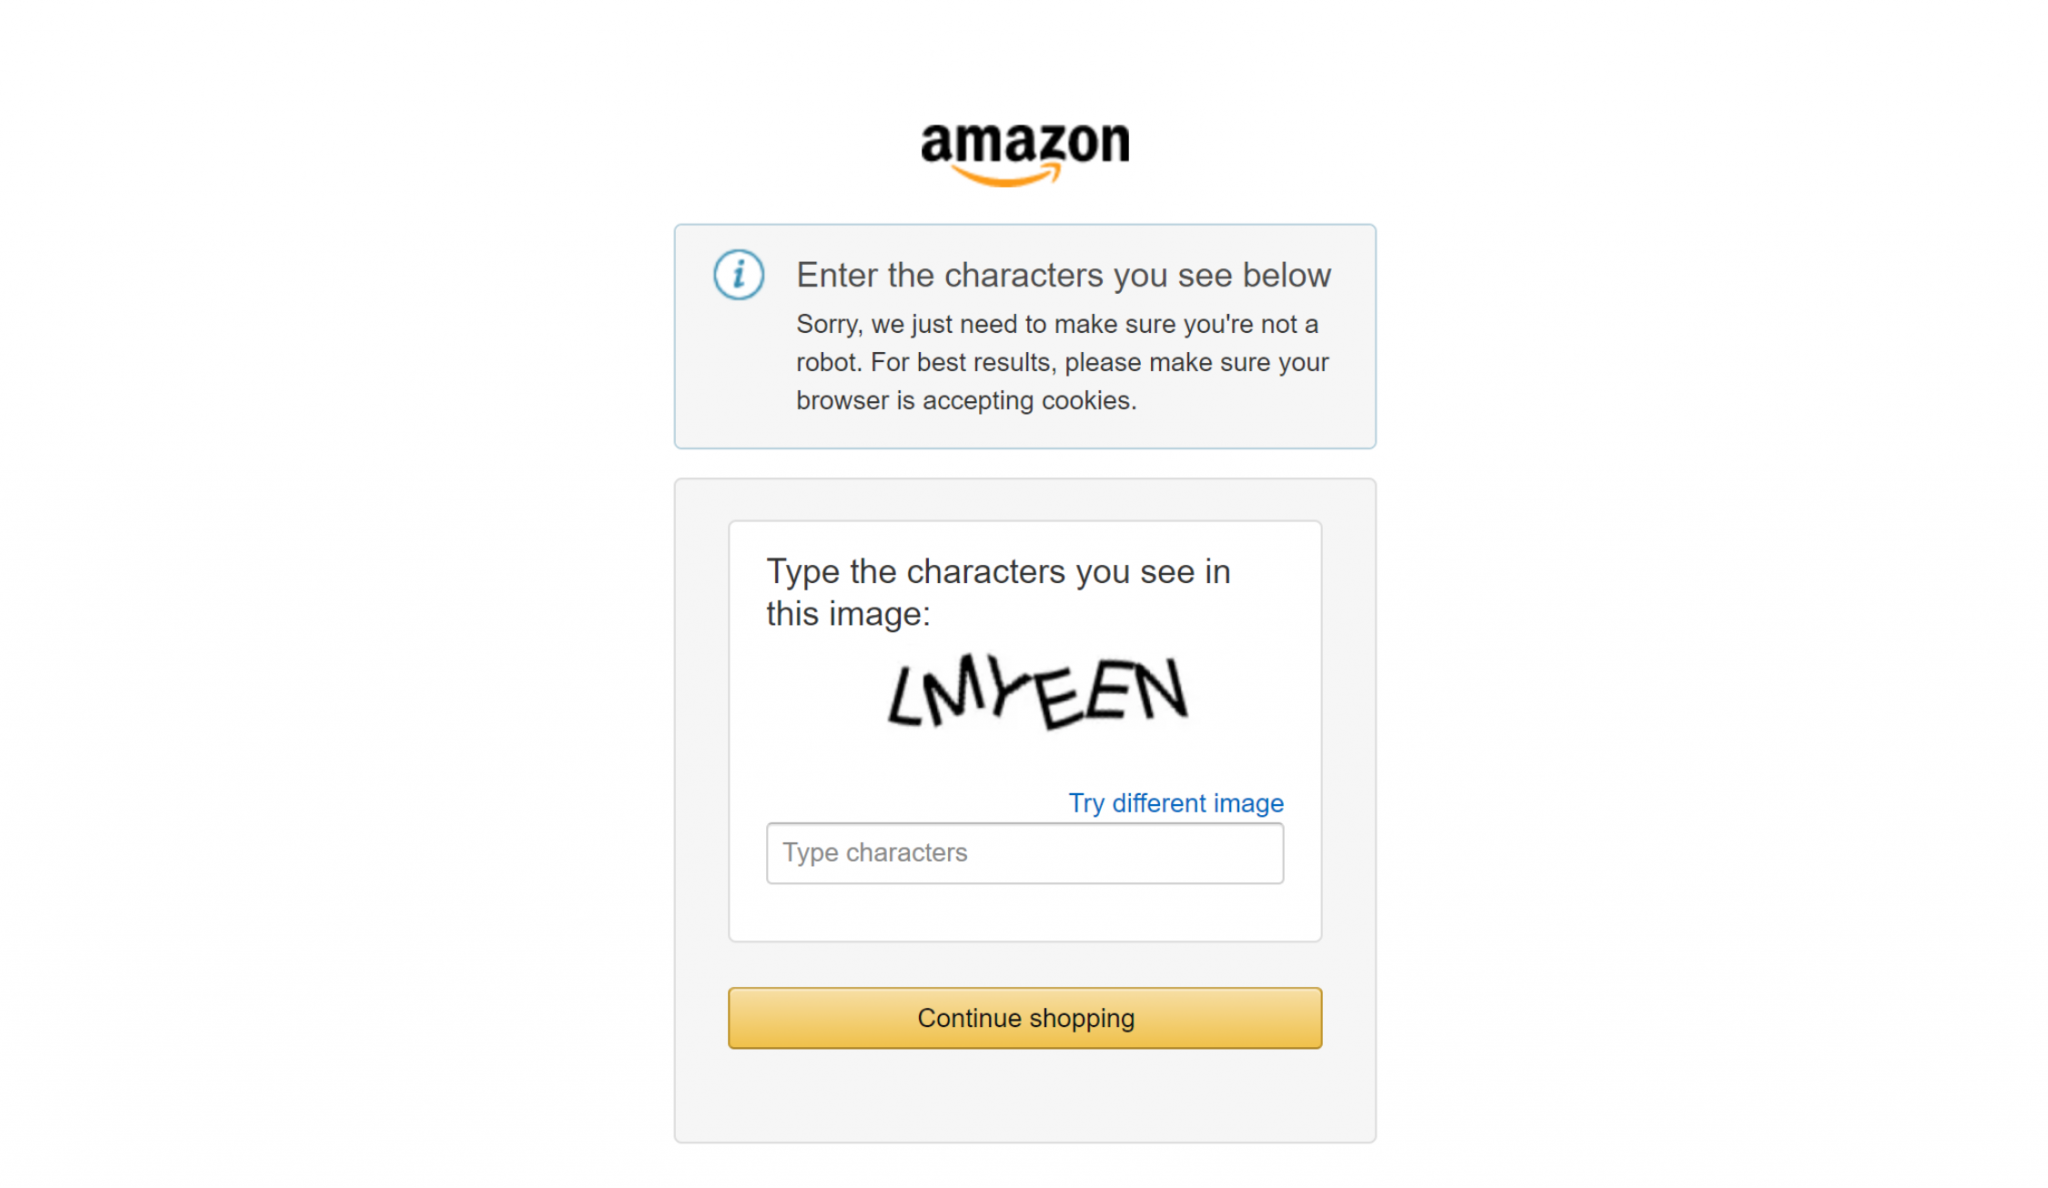
This is where the Bright Data integration makes all the difference in your scraping workflows. It handles all the anti-scraping measures behind the scenes and makes sure the data retrieval process works smoothly.
Terrific! You have successfully tested the LLM step. You are now ready to deploy the workflow.
Step #5: Deploy The Workflow
To deploy your workflow, click on one of the “Deploy” buttons:
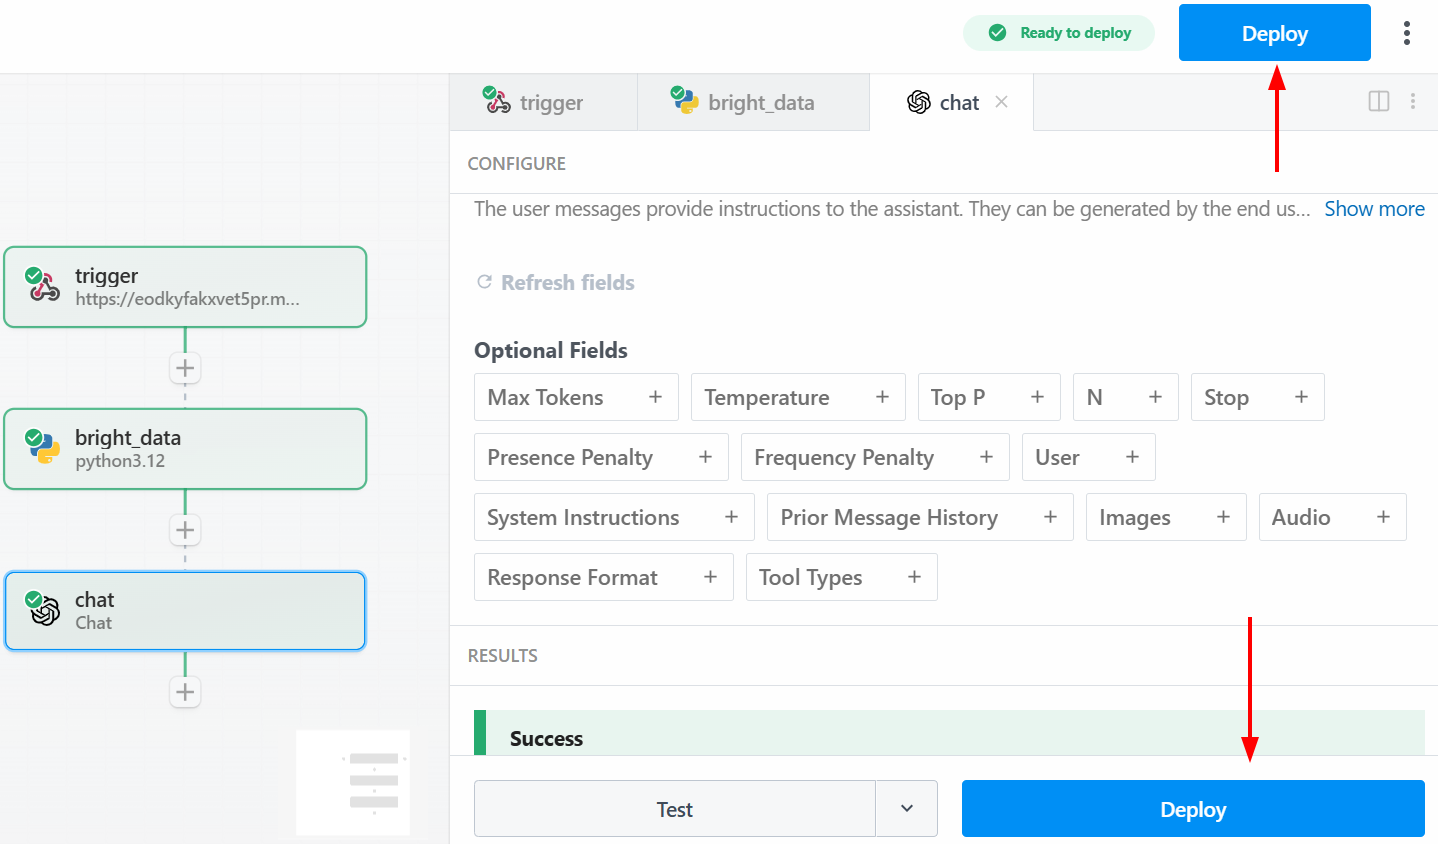
Below is what you will see after deployment:
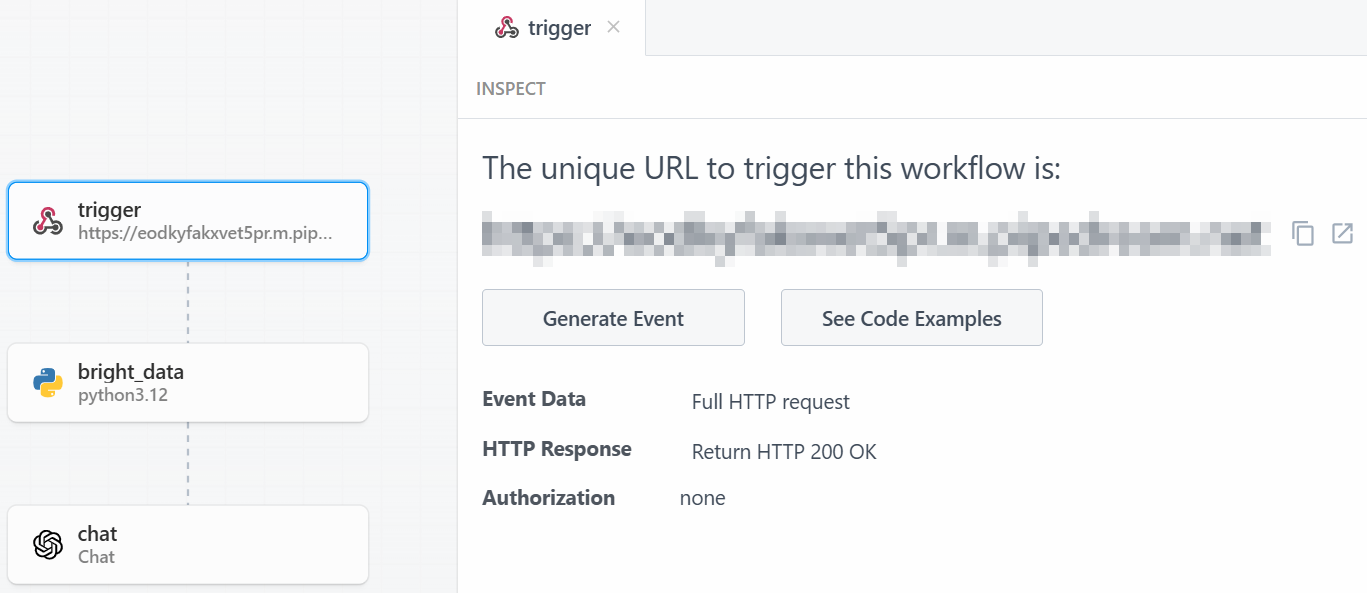
To run the entire workflow, click on “Generate Event”:
Click on “Send HTTP Request” to trigger the workflow, and it will run entirely. To see the results of deployed workflows, go to “Events history” on the homepage. Select the workflow of your interest and see the results under “Exports”:
Et voilà! You have created and deployed your first scraping workflow in Pipedream using Bright Data.
Conclusion
In this guide, you have learned how to build an automated web scraping workflow using Pipedream. You saw firsthand how the platform’s intuitive interface, combined with Bright Data’s scraping integration, makes it easy to build sophisticated scraping pipelines in a matter of minutes.
The primary challenge in any data-driven automation is ensuring a consistent flow of clean, reliable data. Pipedream provides the automation and scheduling engine, while Bright Data’s AI infrastructure handles the complexities of web scraping and delivers ready-to-use data. This synergy allows you to focus on creating value from data, rather than on the technical hurdles of acquiring it.
Create a free Bright Data account and start experimenting with our AI-ready data tools today!

Technical Writer
Federico Trotta is a technical writer, editor, and data scientist. Expert in technical content management, data analysis, machine learning, and Python development.


