
In this tutorial, you will see:
- What OpenClaw is and why it has become one of the most popular libraries on GitHub.
- What makes OpenClaw stand out compared to other AI agent–building libraries.
- How Bright Data supports OpenClaw through dedicated skills.
- How to integrate Bright Data’s web data retrieval and search capabilities into an OpenClaw AI assistant on WhatsApp.
Let’s dive in!
What Is OpenClaw?
OpenClaw, previously known as ClawdBot or MoltBot, is an open-source personal AI assistant that runs directly on your devices (Linux, Windows, macOS, iOS, Android). In detail, it lets you build a personal AI assistant that integrates with popular platforms like WhatsApp, Telegram, Slack, Discord, Signal, iMessage, and more.
The AI backend runs locally on your machine and connects to popular LLM providers, bringing AI capabilities directly into your favorite chat applications for a personalized conversational experience.
The OpenClaw AI agent running on your device can be extended with tools, skills, and hooks to unlock advanced functionality. It can learn, adapt, and execute complex workflows across multiple apps over time.
Unsurprisingly, the project has seen rapid community adoption, reaching the staggering number of 140k GitHub stars in just a few weeks: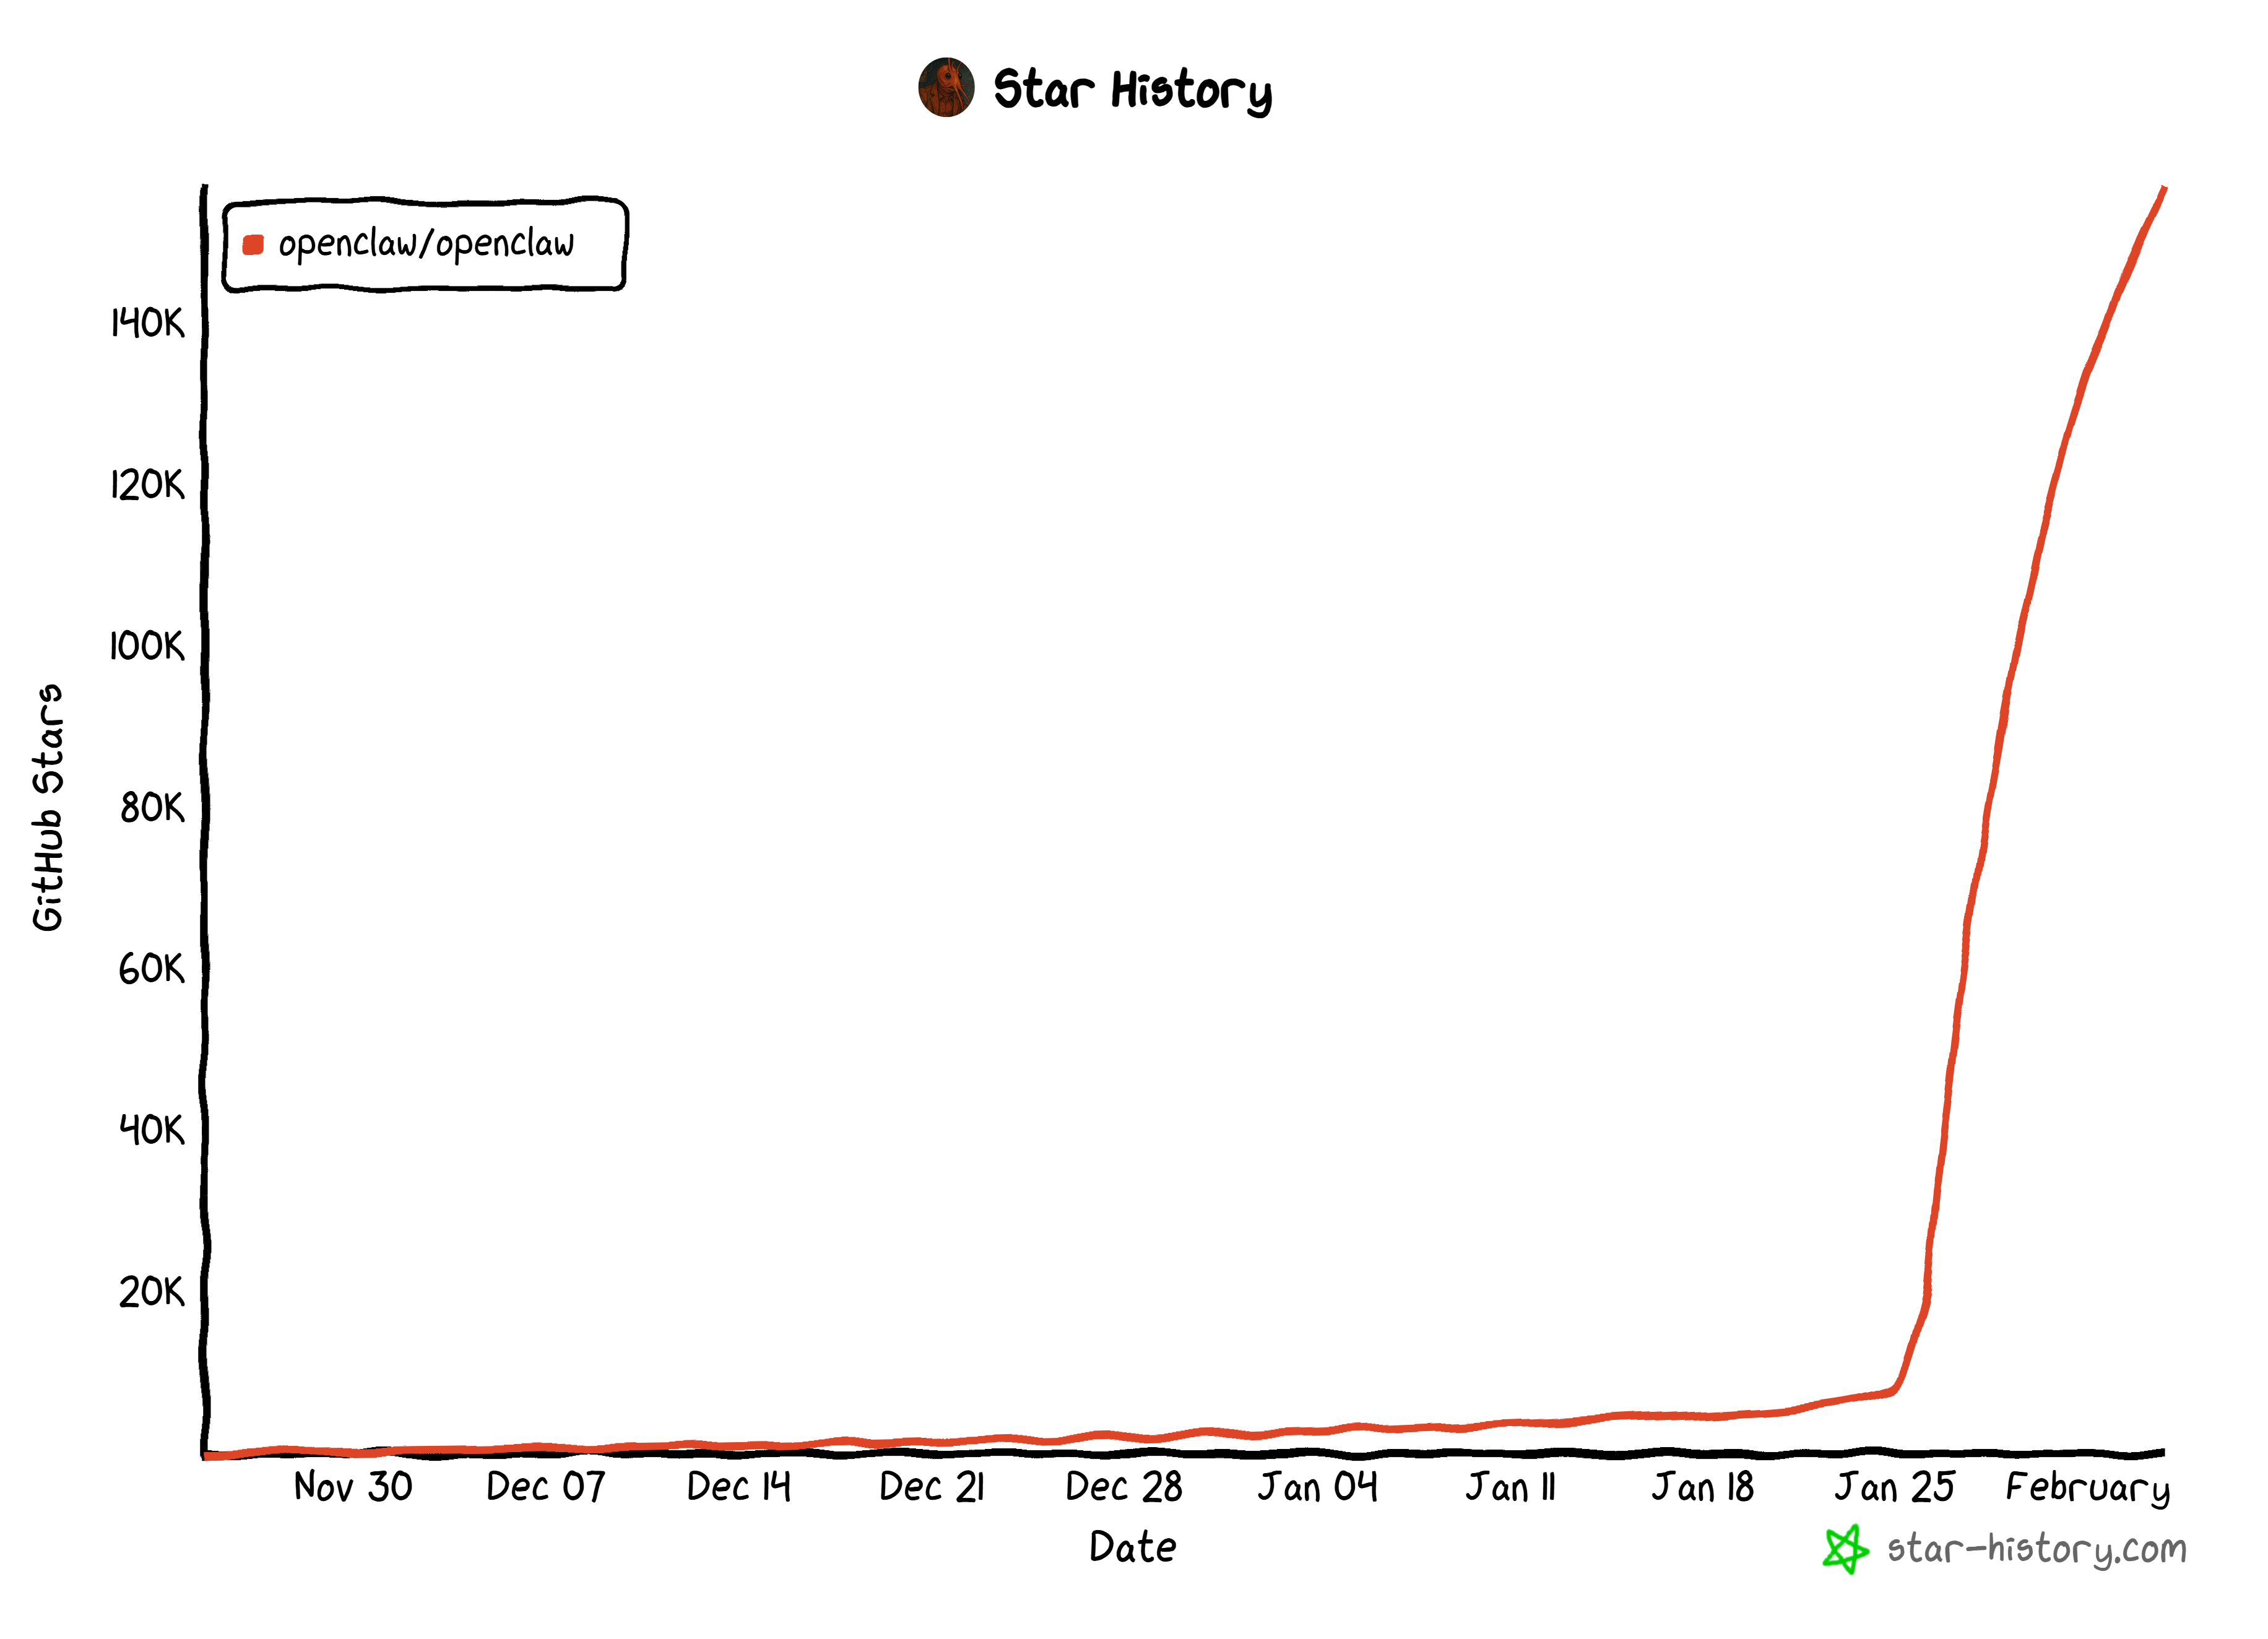
What Makes OpenClaw Unique
The main aspects and features that characterize OpenClaw compared to other AI agent-building libraries are:
- Runs fully on your own device: OpenClaw runs locally on your hardware, giving you full control over data, context, files, credentials, and execution.
- Deep multi-channel chat integration: Talk to your assistant from WhatsApp, Telegram, Slack, Discord, Signal, iMessage, and more, while keeping a single, shared brain and memory.
- Persistent memory across conversations: The AI agent remembers facts, preferences, goals, and past conversations over time, enabling long-term context instead of stateless, forgetful chat sessions.
- Skill-based extensibility: You can add, edit, or generate custom skills that define tools, workflows, and guardrails.
- Agent workspace with hot-reloaded prompts: Prompts, personas, and tool definitions live in editable files that update instantly, opening the door to rapid iteration without restarting the assistant or redeploying anything.
- Real system access: The agent can run shell commands, edit files, browse the web, control apps, and interact with your OS like a capable digital coworker.
- Strong sandbox and security model: Group chats and non-main sessions can run inside isolated Docker sandboxes, limiting tool access and reducing risk when exposing the assistant to others.
- Model-agnostic LLM backend: OpenClaw works with multiple LLM providers and models, letting you swap engines freely without rewriting workflows or retraining your assistant’s behavior.
- Proactive automation and background tasks: The assistant can run scheduled jobs, heartbeats, reminders, and background workflows, acting without being explicitly prompted every time.
- Massive open-source ecosystem and momentum: With explosive community adoption and constant contributions, the library is evolving rapidly, benefiting from shared skills, ideas, and real-world use cases.
For more information, explore the official documentation.
Introducing Bright Data Skills for OpenClaw
All AI agents, regardless of the LLM powering them, struggle with two fundamental limitations:
- Outdated knowledge, because models are trained on static datasets and have no inherent awareness of current events.
- No native access to the web, which prevents them from performing live searches or interacting with dynamic web content.
This is where Bright Data comes in!
OpenClaw’s Bright Data skills add useful web search and scraping capabilities by integrating with:
- Web Unlocker API: Scrape virtually any web page and receive LLM-optimized Markdown. It handles proxies, fingerprints, and CAPTCHAs, so that you do not need to worry about anti-bot defenses.
- SERP API: Collect search engine results from Google, Bing, and other engines at scale, without dealing with blocks or rate limits.
Together, these Bright Data services unlock a wide range of scenarios. They allow OpenClaw agents to actively search the web for fresh information and retrieve content from discovered pages.
As a result, the AI assistant stays aware of what is happening right now. This unlocks a much broader range of use cases and workflows.
How to Integrate Bright Data into OpenClaw for a Powerful WhatsApp AI Assistant
In this step-by-step section, you will learn how to set up OpenClaw. You will then use it to build an AI assistant available in WhatsApp and powered by Bright Data tools for web search and scraping. This way, the agent will be ready for a wide range of tasks and able to handle business-ready tasks.
Follow the instructions below!
Prerequisites
To follow along with this tutorial, you will need:
- A Linux or macOS machine (on Windows, you can use WSL 2).
- Node.js 22+ installed locally.
- An OpenAI API key, or an API key from one of the many supported LLM providers.
- A Bright Data account with an API key and a Web Unlocker in place (do not worry, you will be guided through the account setup in a dedicated chapter).
- A WhatsApp account with the app installed on your phone.
Step #1: Install OpenClaw
Note: If you do not want to install OpenClaw locally and prefer to run it remotely on a DigitalOcean VPS, skip ahead to the “Extra” chapter at the end for step-by-step guidance.
The recommended way to install OpenClaw is via the CLI using:
curl -fsSL https://openclaw.ai/install.sh | bashAlternatively, install it with a simple npm command:
npm install -g openclaw@latestIn both cases, you can verify that the installation worked by running:
openclaw --versionYou should see an output similar to:
2026.2.1Great! OpenClaw is now available on your operating system.
Step #2: Begin the OpenClaw Onboarding
The easiest way to configure OpenClaw is through the built-in onboarding wizard. To start it and install the OpenClaw daemon gateway service, run:
openclaw onboard --install-daemonYou will be shown a security warning. Accept it by selecting the “Yes” option, then choose the “Quickstart” onboarding mode for a quick setup: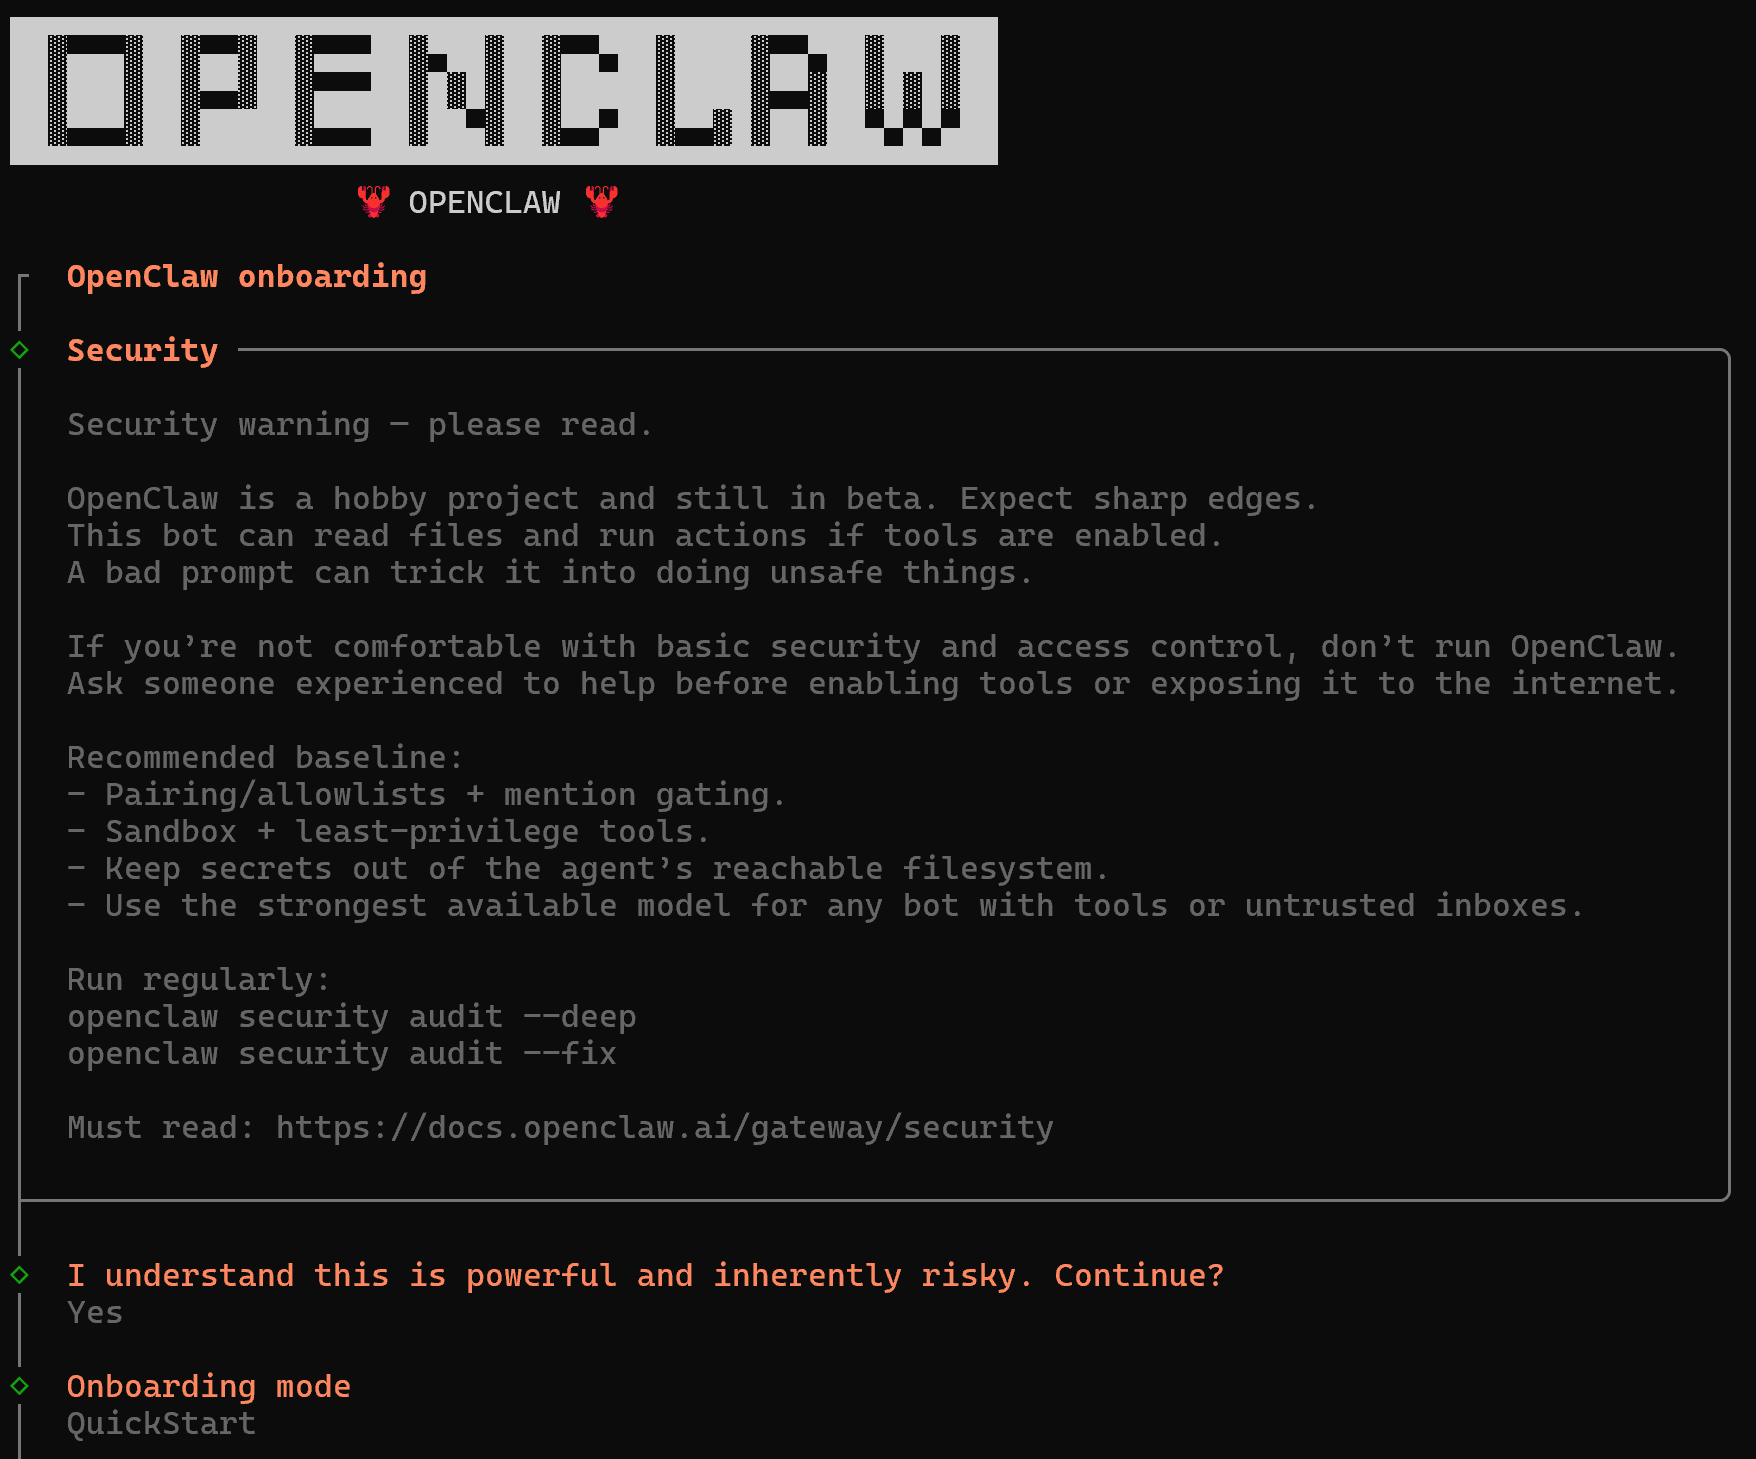
If you have more complex requirements, select the “Advanced” option instead.
Well done! You are now ready to continue with the LLM integration for powering your AI assistant.
Step #3: Configure the LLM Integration
First, you will be asked to add an LLM model provider. In this tutorial, we will use an OpenAI model, but you can choose an LLM from any supported provider.
Select the LLM provider, paste your API key (or let OpenClaw read it from an already configured environment variable), and then choose a model:
In this case, we configured OpenAI using API-based authentication and selected the GPT-5 mini model, but any other setup will work just as well. Nice! You are all set to move on.
Step #4: Prepare the Channel for Interacting with the Assistant
Continue the onboarding wizard by selecting a chat channel. This is where you will interact with your AI assistant.
Here, we will assume you want to build a WhatsApp AI assistant. Select the QR code connection option:
You will then be shown a QR code to connect to the agent. Open WhatsApp, select the QR code option, go to the “SCAN CODE” section, and frame the QR code with your camera. The connection with your WhatsApp application will be established: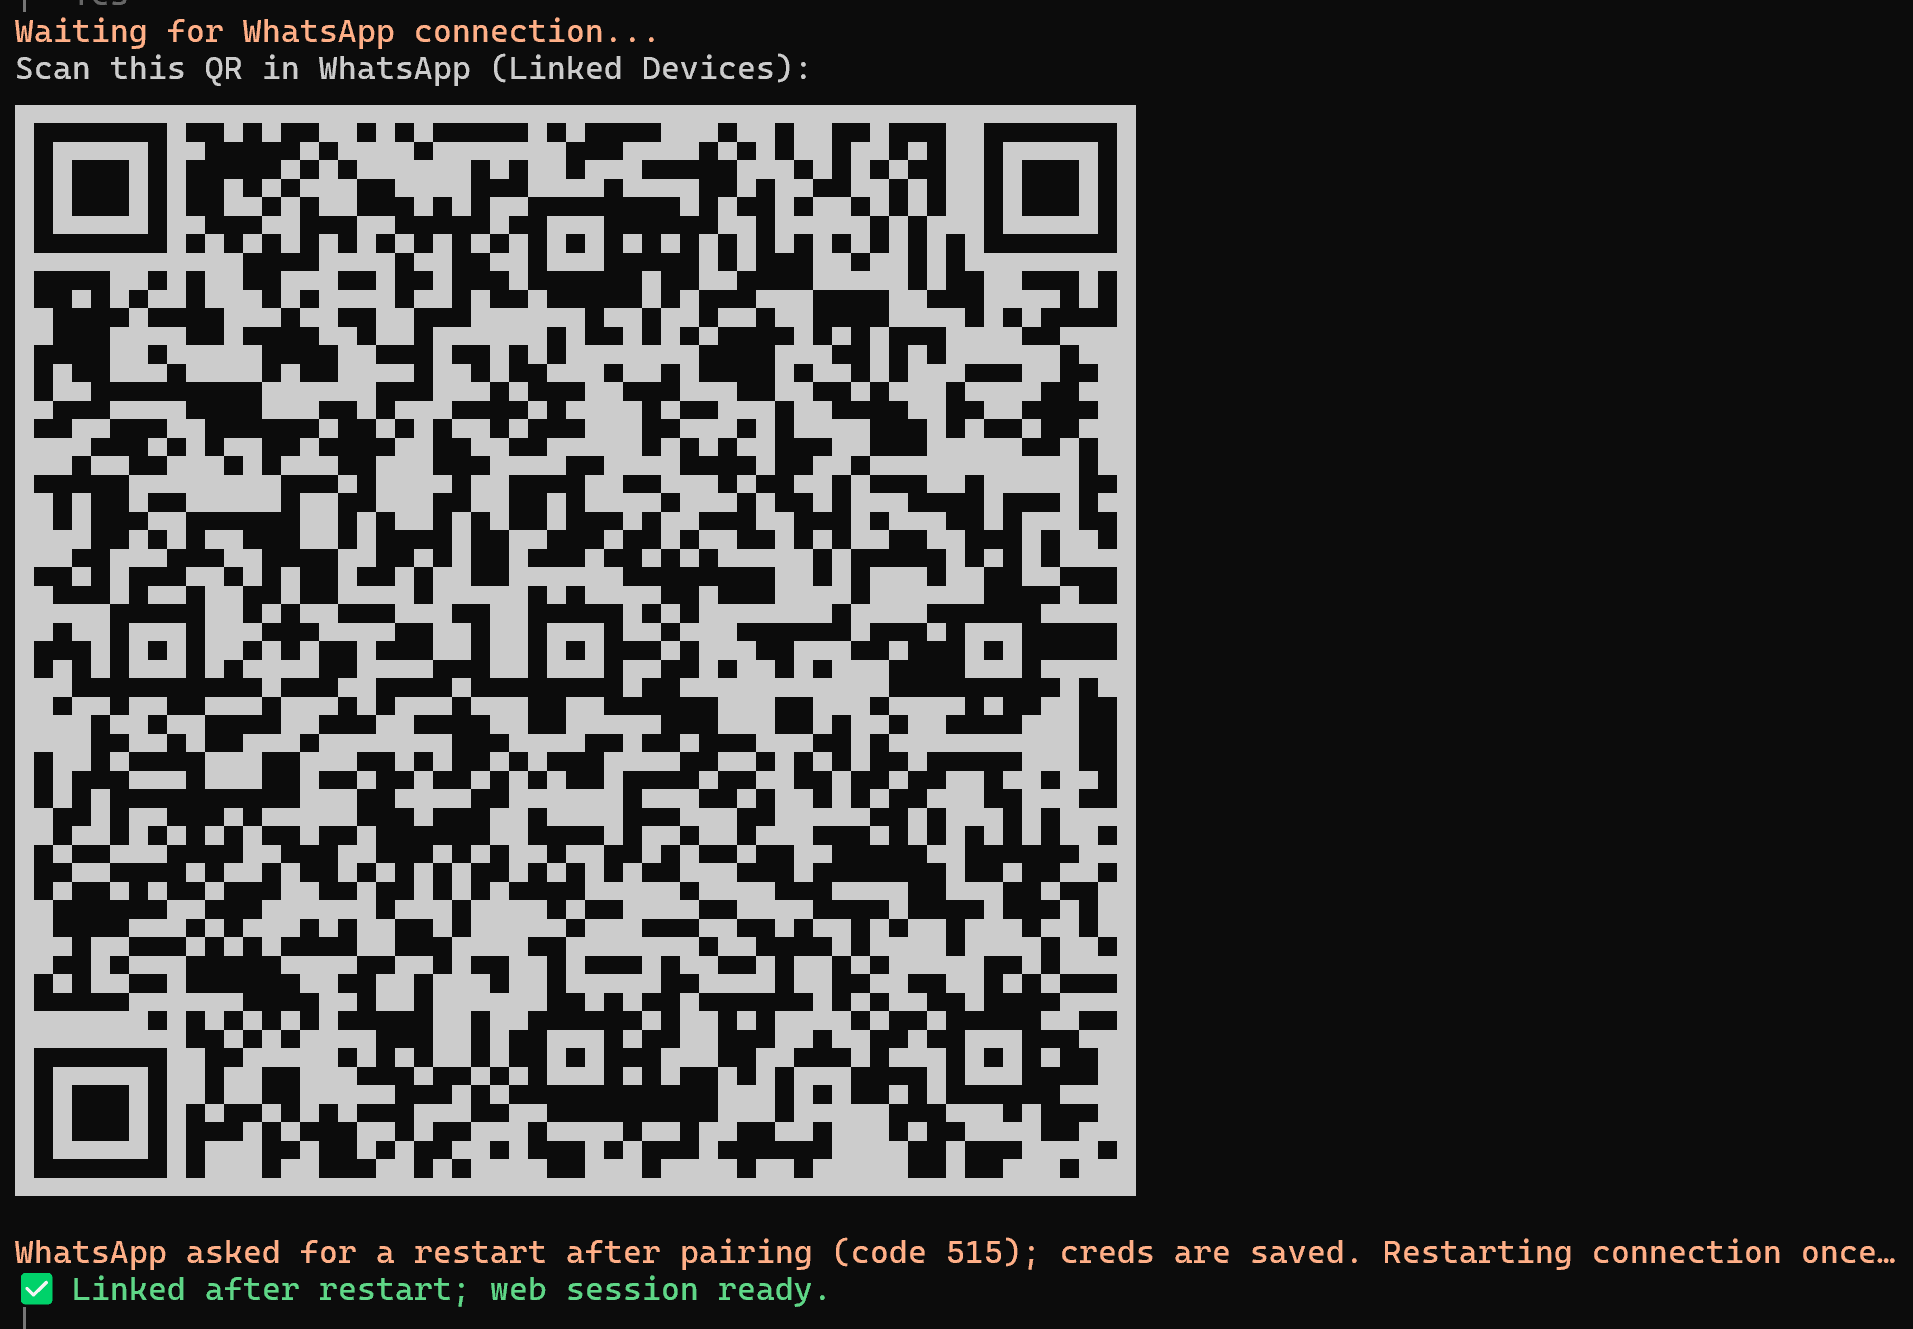
Next, you will be prompted to enter your personal phone number: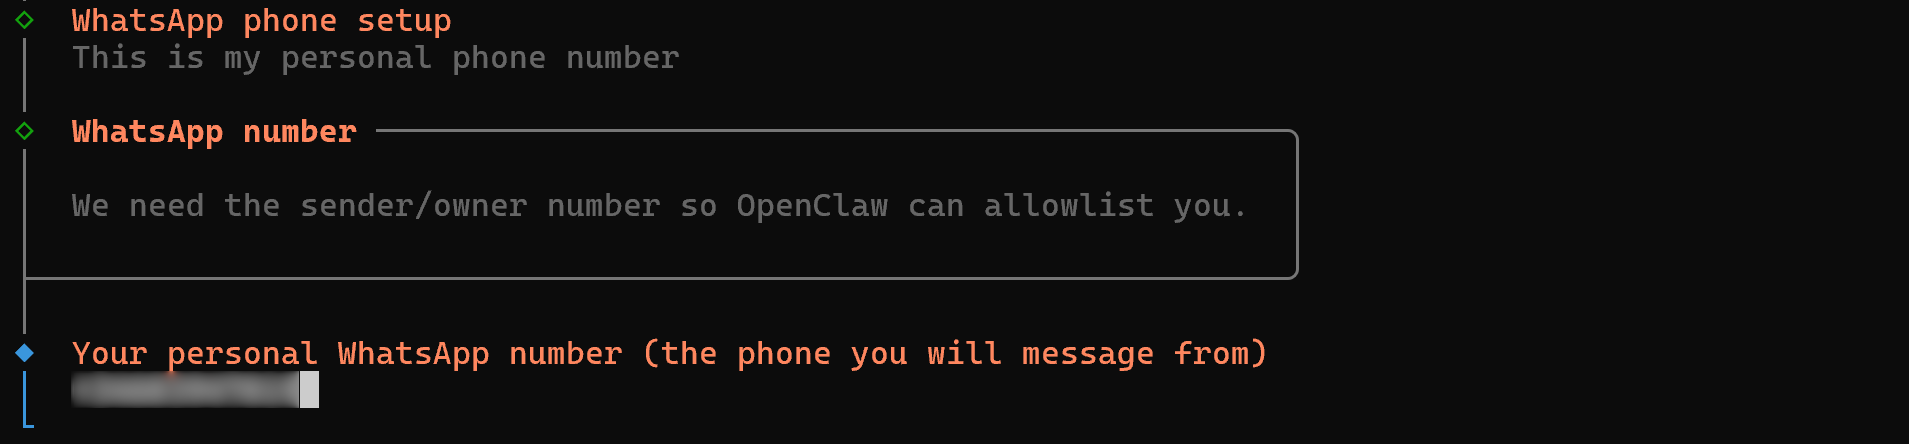
OpenClaw will use this to create a chat with yourself, where you will be able to text with your AI assistant. Fantastic! You are almost there.
Step #5: Enable the Required OpenClaw Skills
OpenClaw uses AgentSkills-compatible skills to teach the agent how to use tools. These skills define how the AI assistant interacts with specific services and capabilities. By default, OpenClaw ships with a wide range of built-in skills.
To use them, simply select the skills you want to add. Their required dependencies will be installed automatically: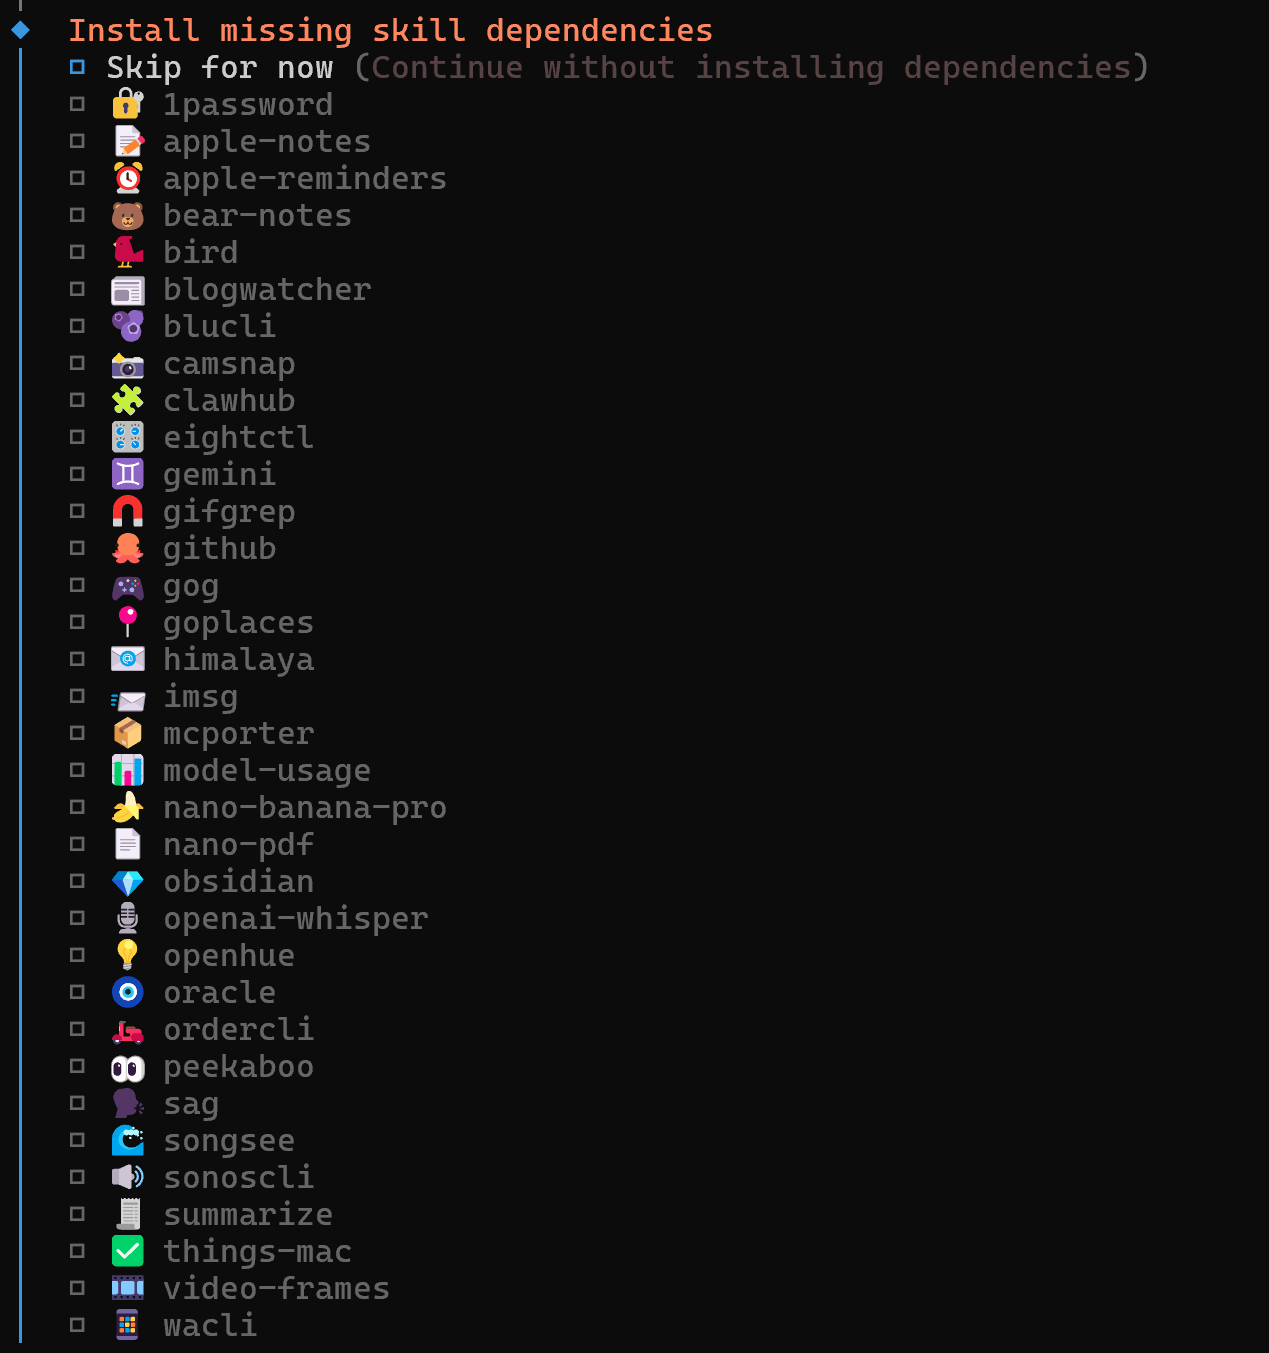
In this guide, we will only utilize the Bright Data skills for web data search and retrieval. So, you can skip configuring other skills. The same applies to OpenClaw’s hooks, which are not important for this setup: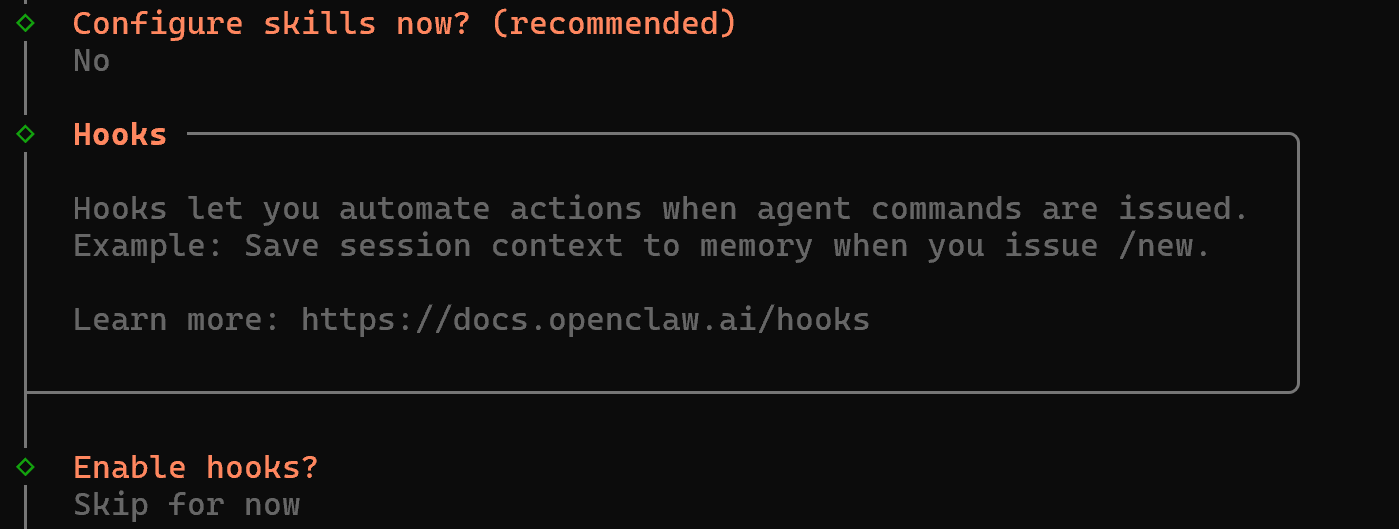
Terrific! The only step left is to install and run the OpenClaw gateway so you can interact with your AI assistant directly on WhatsApp.
Step #6: Launch the OpenClaw Gateway
The OpenClaw Gateway is the always-on process that manages the Baileys/Telegram connection and acts as the control and event plane for OpenClaw. (Baileys is a WebSockets-based TypeScript library for interacting with the WhatsApp Web API.)
Under the hood, it communicates using the Gateway WS protocol, which serves as the single control plane and node transport for OpenClaw. All OpenClaw clients (i.e., CLI, web UI, desktop apps, mobile nodes, and headless nodes) connect to the Gateway over WebSocket and declare their role and scope during the handshake. Then, the communication continues via JSON messages.
In short, you want the OpenClaw Gateway to run as a daemon that is always active. This is what powers the AI assistant you interact with through the channel configured during onboarding.
Because you used the --install-daemon option earlier, the Gateway will be installed as a daemon during the onboarding process. Next, you have several ways to interact with it. Here, we will employ the “Web UI” option, which launches a lightweight web application in your browser to configure the Gateway.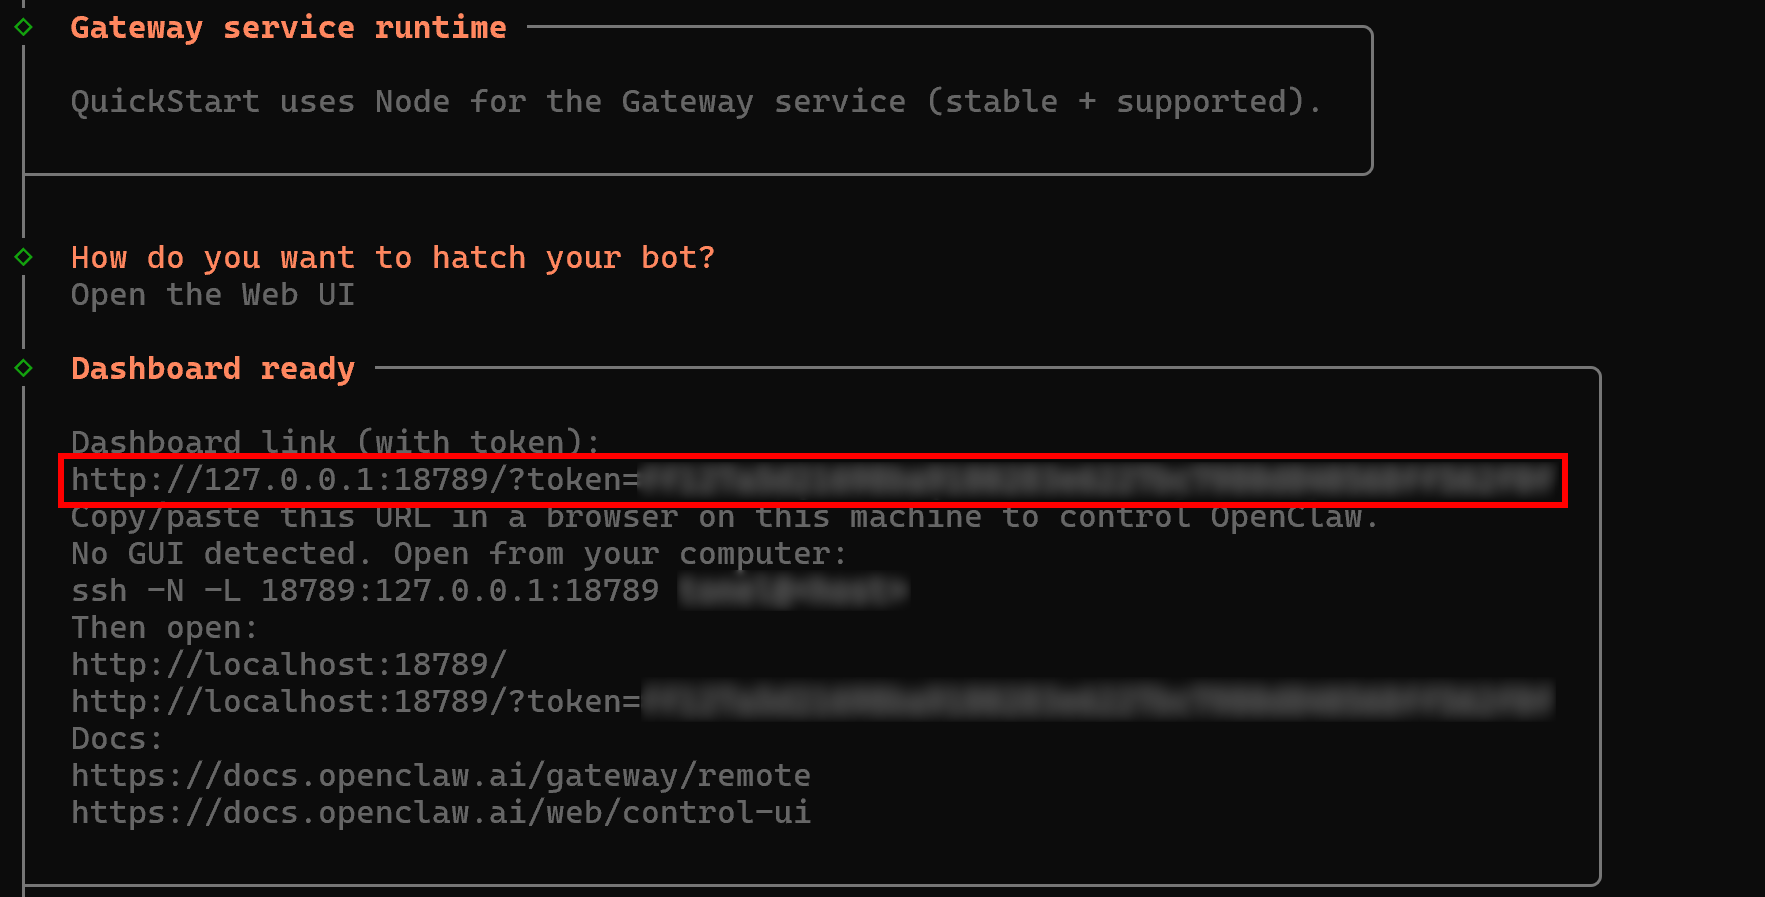
In the “Dashboard ready” section, you will notice a URL in the following format:
http://127.0.0.1:18789/?token=<YOUR_OPENCLAW_GATEWAY_TOKEN>Open this URL in your browser. In the “Overview” section, you should see something like this: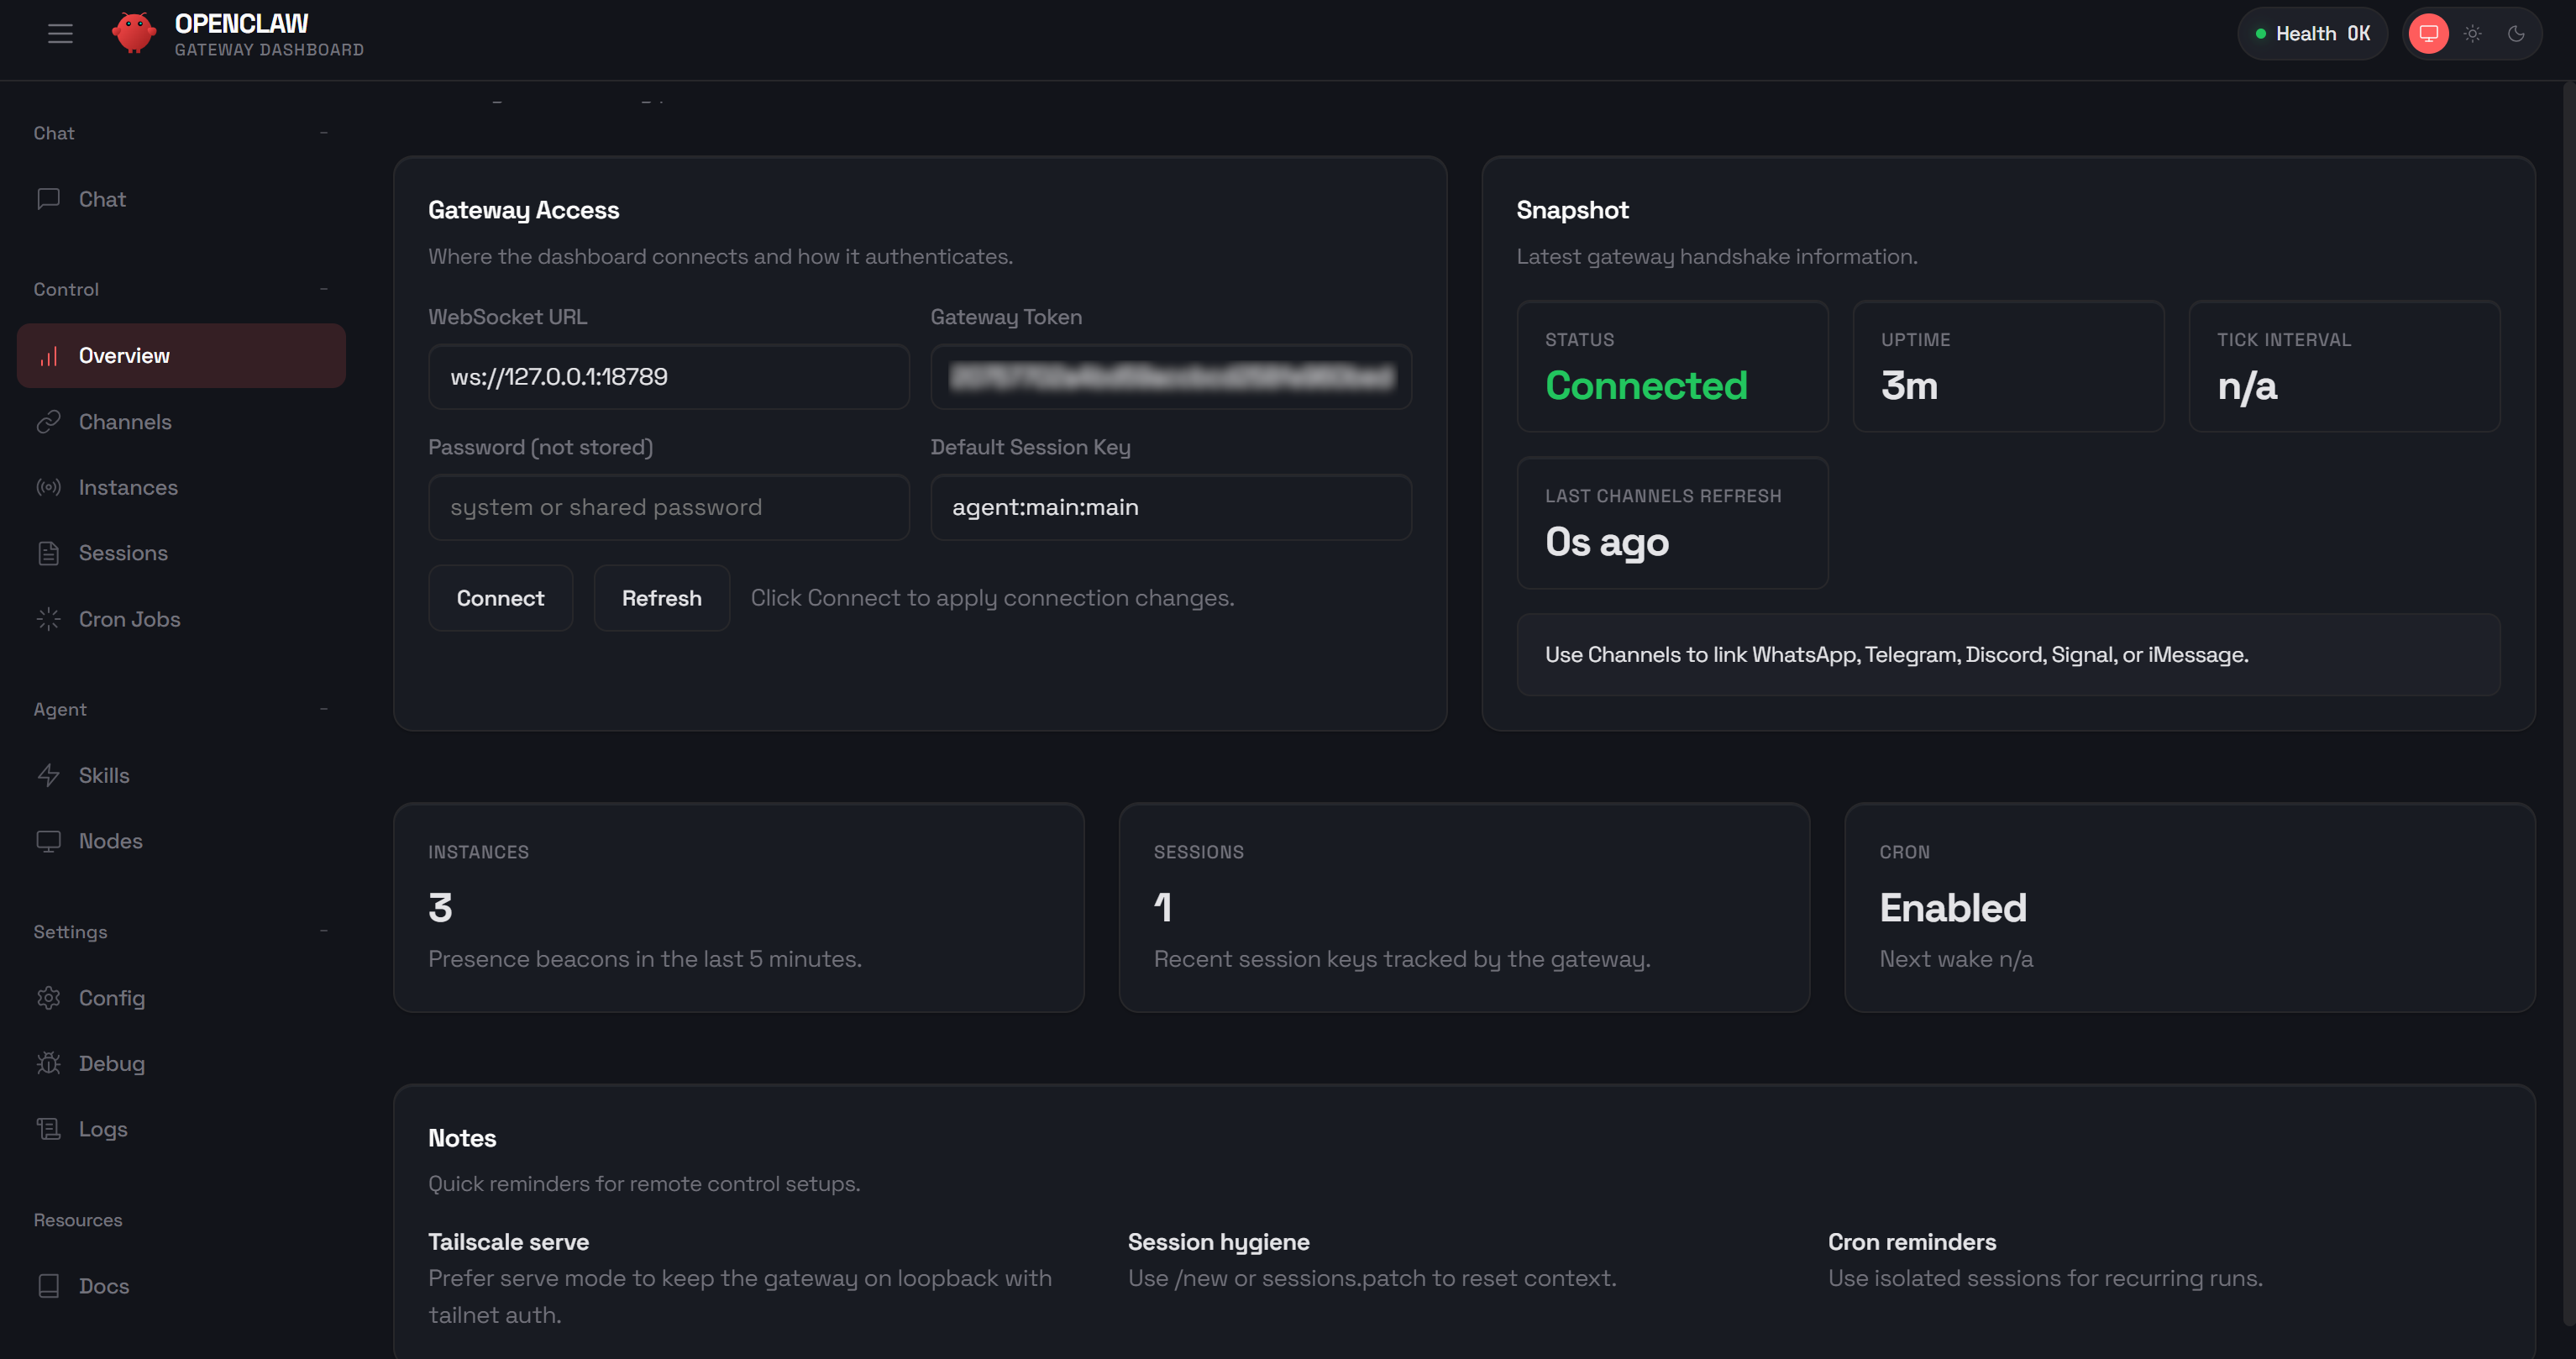
This application is called the “Control UI”. This is a small Vite + Lit single-page app served directly by the Gateway. From there, you can visually configure your AI assistant, chat with it, inspect debug information, monitor logs, and more.
At any time, you can check the OpenClaw Gateway status via the gateway CLI command by running:
openclaw gateway statusThe result should be: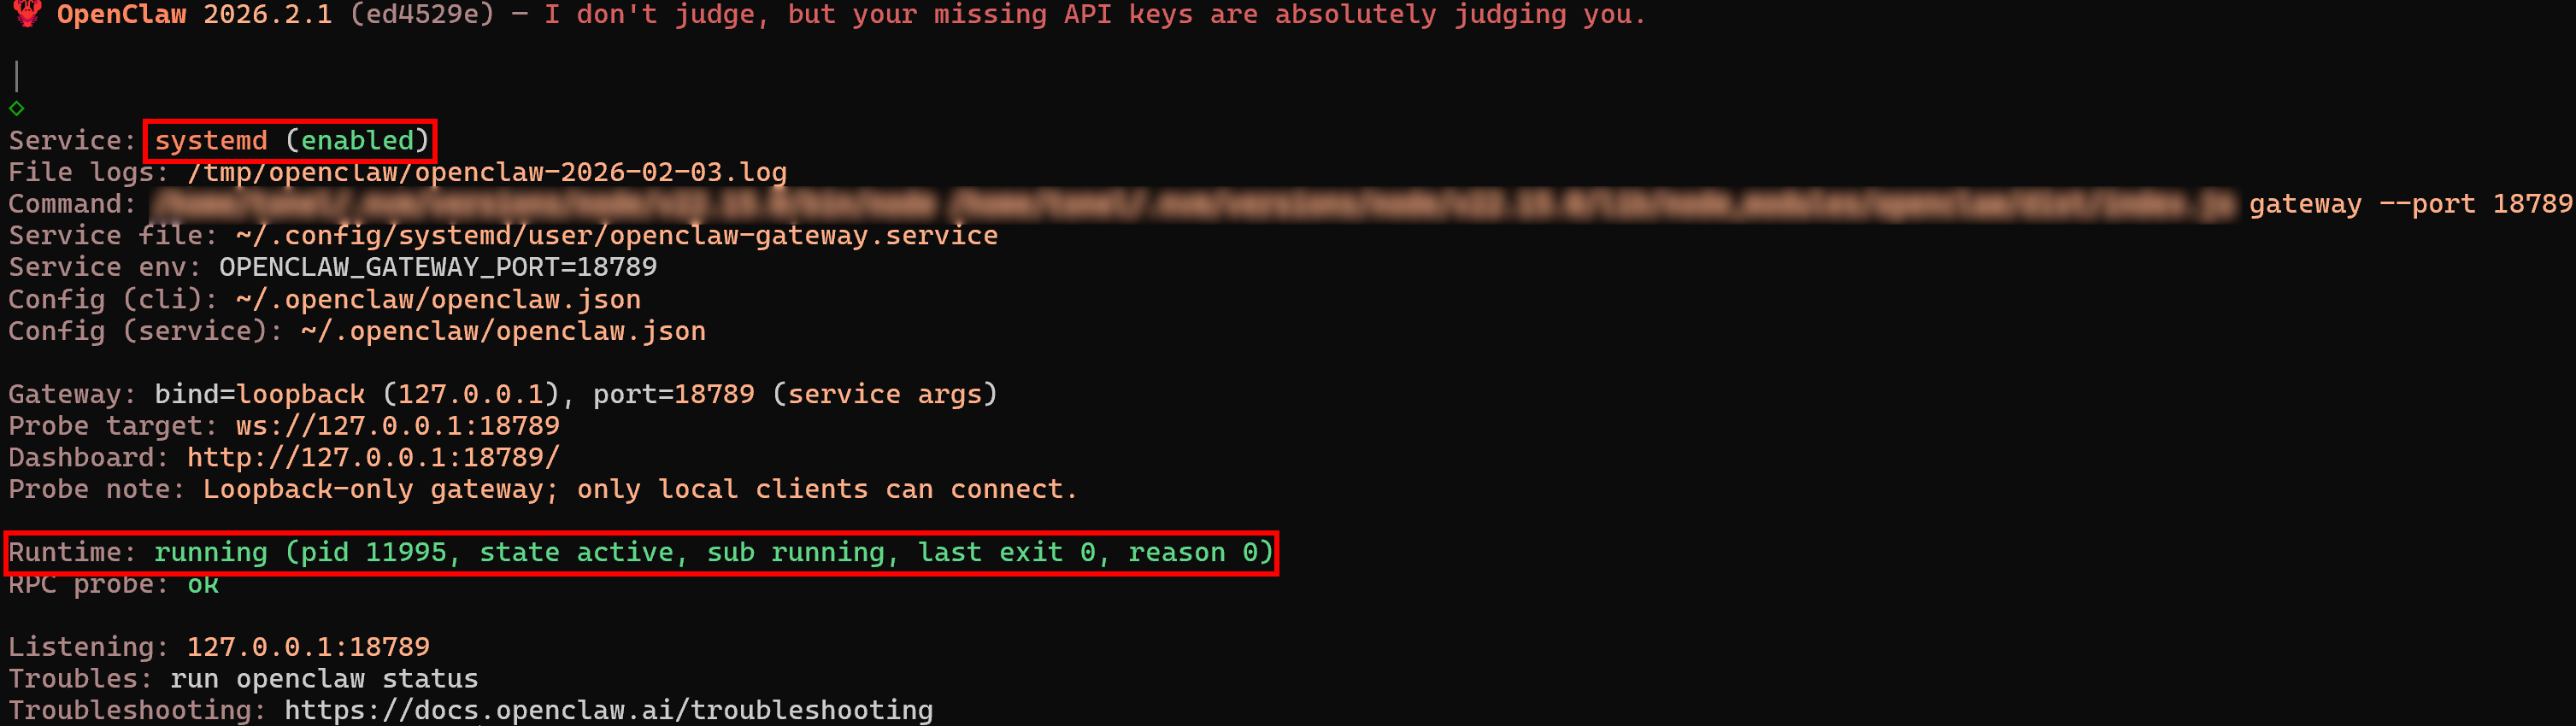
Notice that the service is “enabled” and the runtime status is “running.”
Note: If you are running OpenClaw on a system without a GUI, choose the “TUI” option to configure the Gateway directly from the CLI.
To update or change the existing configuration at any time, run:
openclaw configureGood job! OpenClaw is now running on your machine and exposing its AI capabilities directly to your WhatsApp phone number.
Step #7: Test the WhatsApp Integration
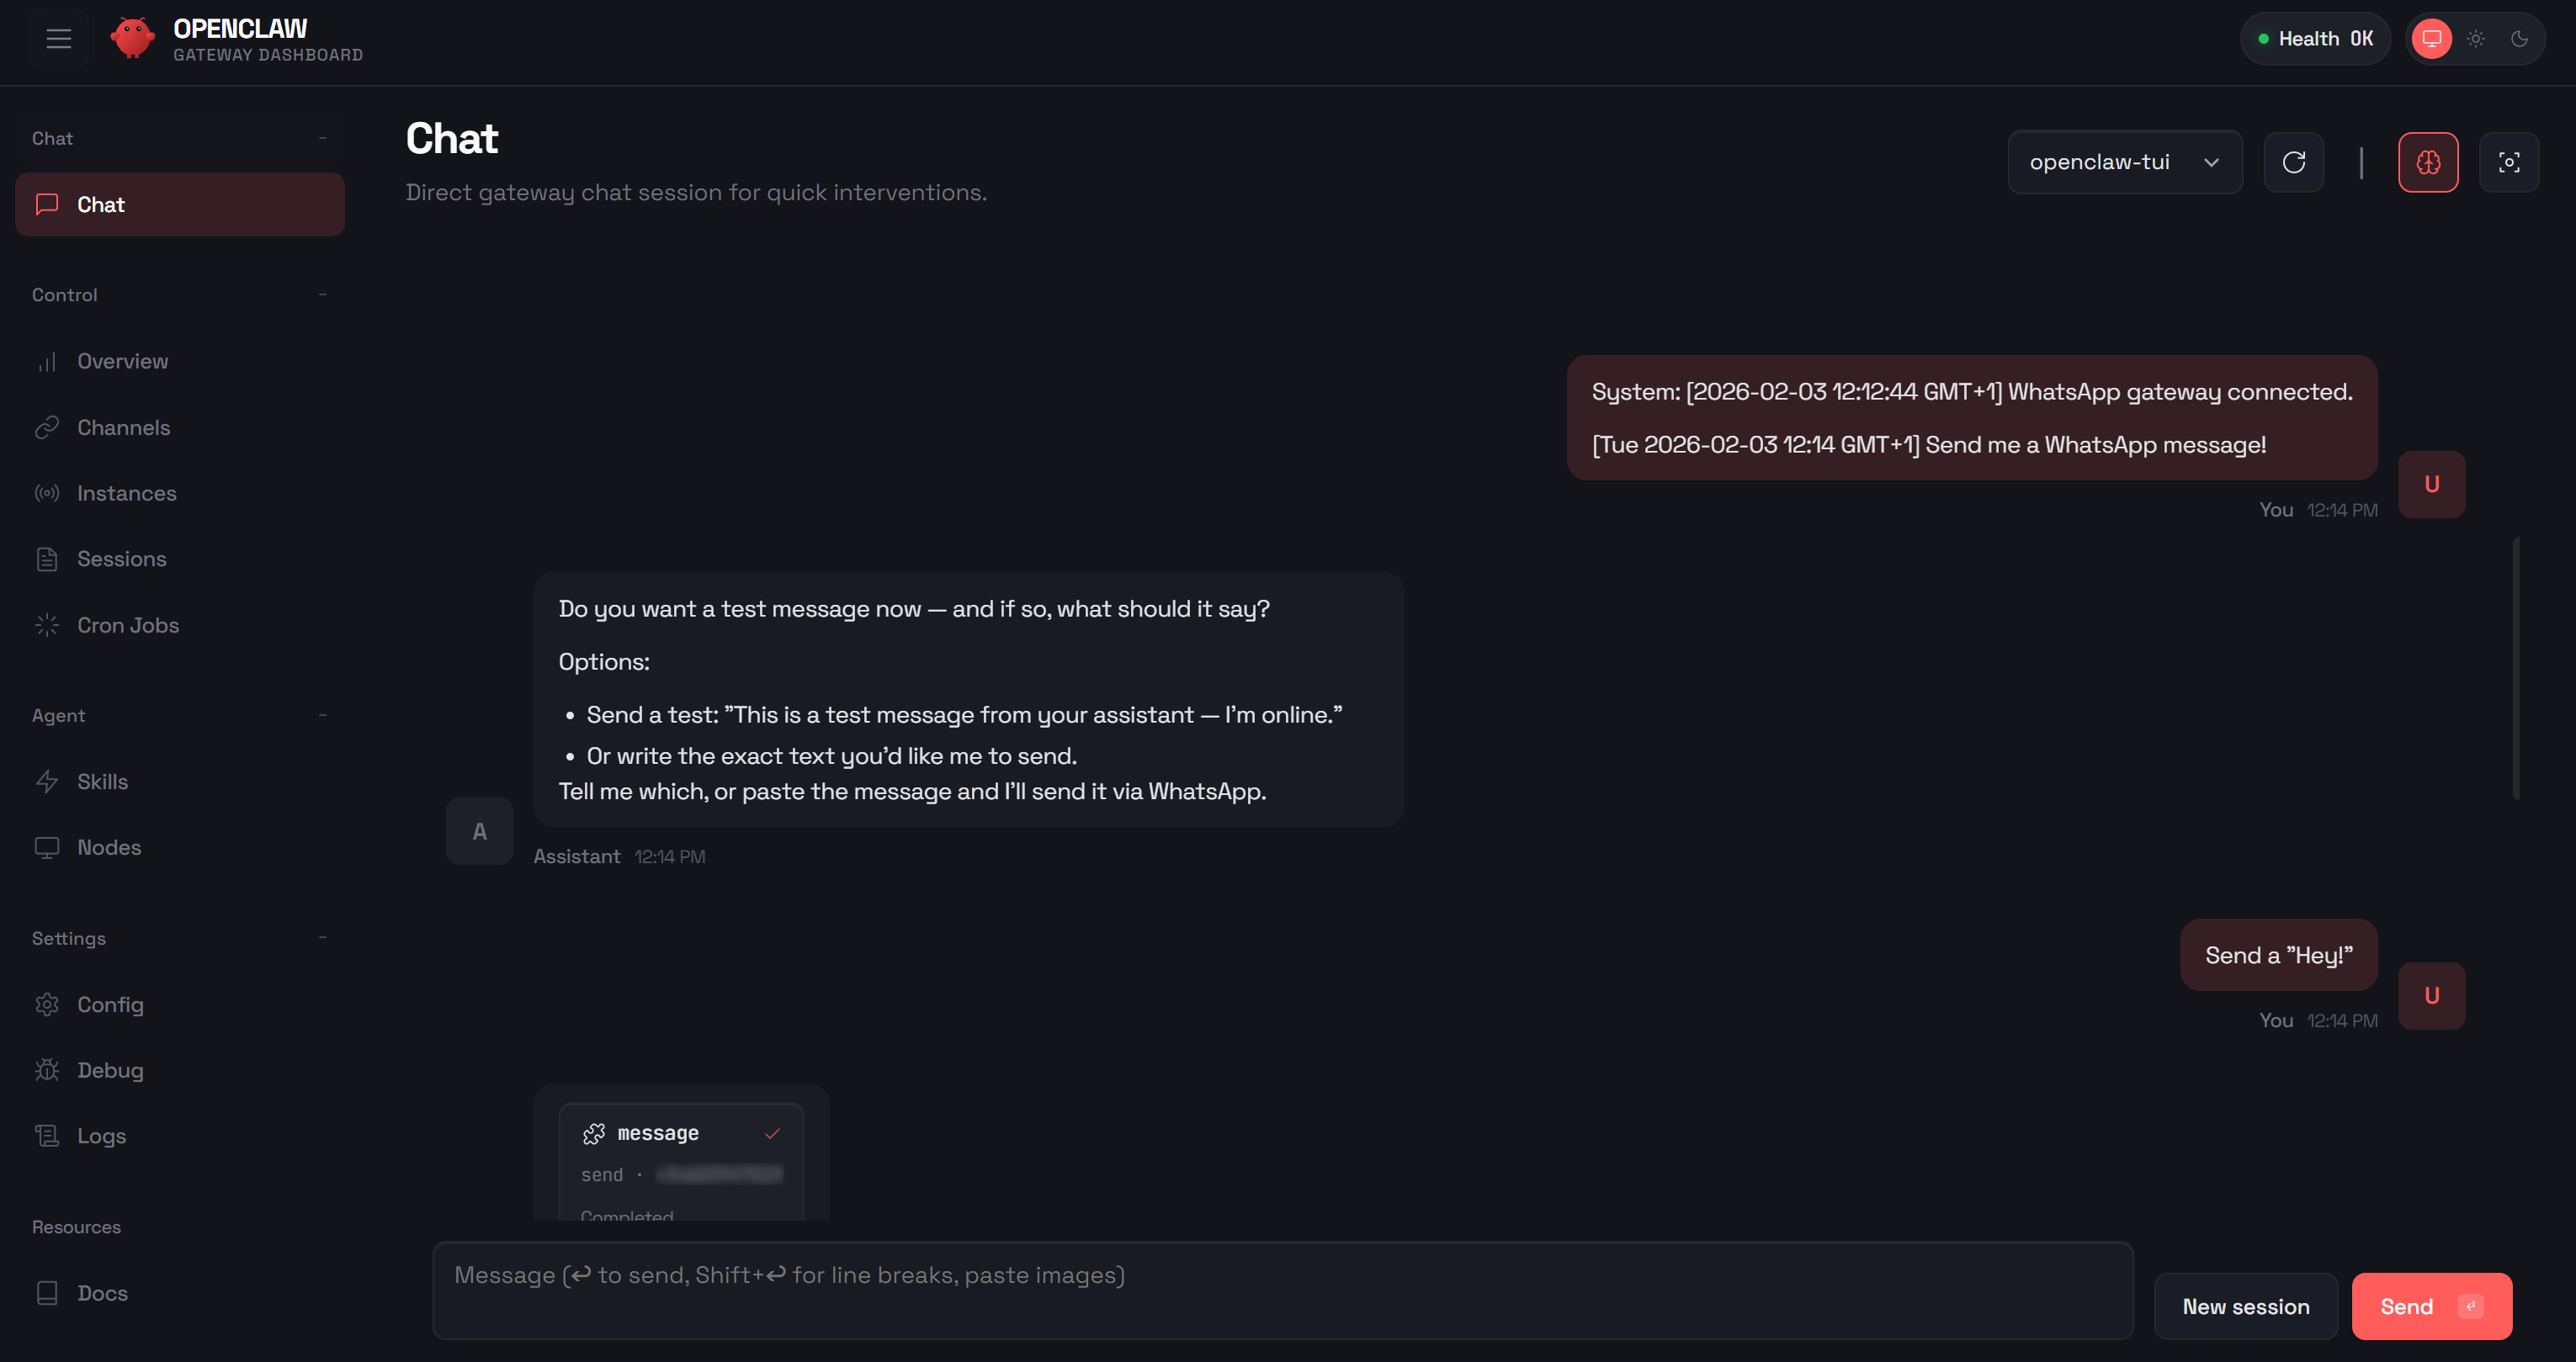
Time to verify that your AI agent can connect to your WhatsApp account. Go to the “Chat” section in the OpenClaw Control UI and send a test message like:
Send me a WhatsApp messageThe OpenClaw AI assistant will ask you what message you want to send. Reply with something like:
Send a "Hey!"You will see the AI agent in OpenClaw call the necessary tools to send the WhatsApp message:
If you open WhatsApp and check the chat with yourself, you should see the “Hey” message delivered. Now, send another message directly on WhatsApp, for example:
How's it going?The AI’s response should look something like this:
[openclaw] All good — I'm here and ready. What can I do for you right now?Note: The “[openclaw]” tag indicates that this message is coming from your OpenClaw AI agent.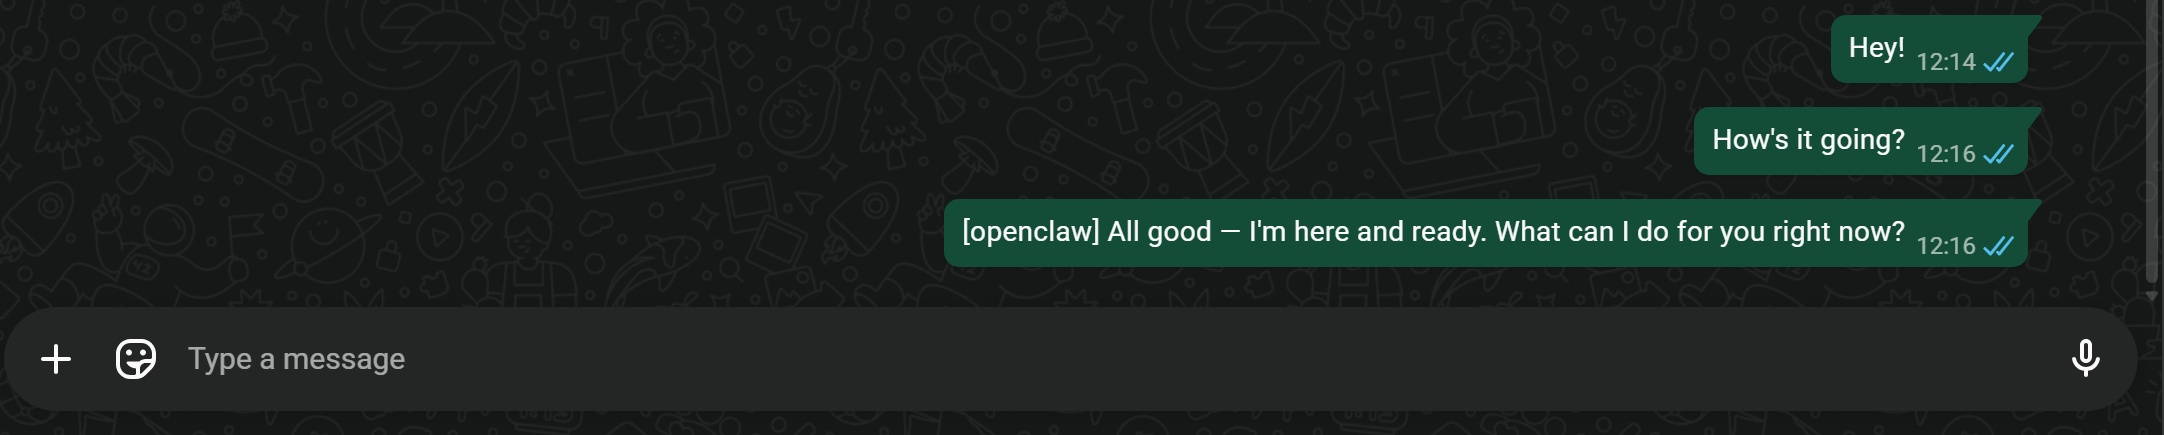
If you inspect the “Chat” section in the OpenClaw Control UI, you will notice the same input message and the AI response: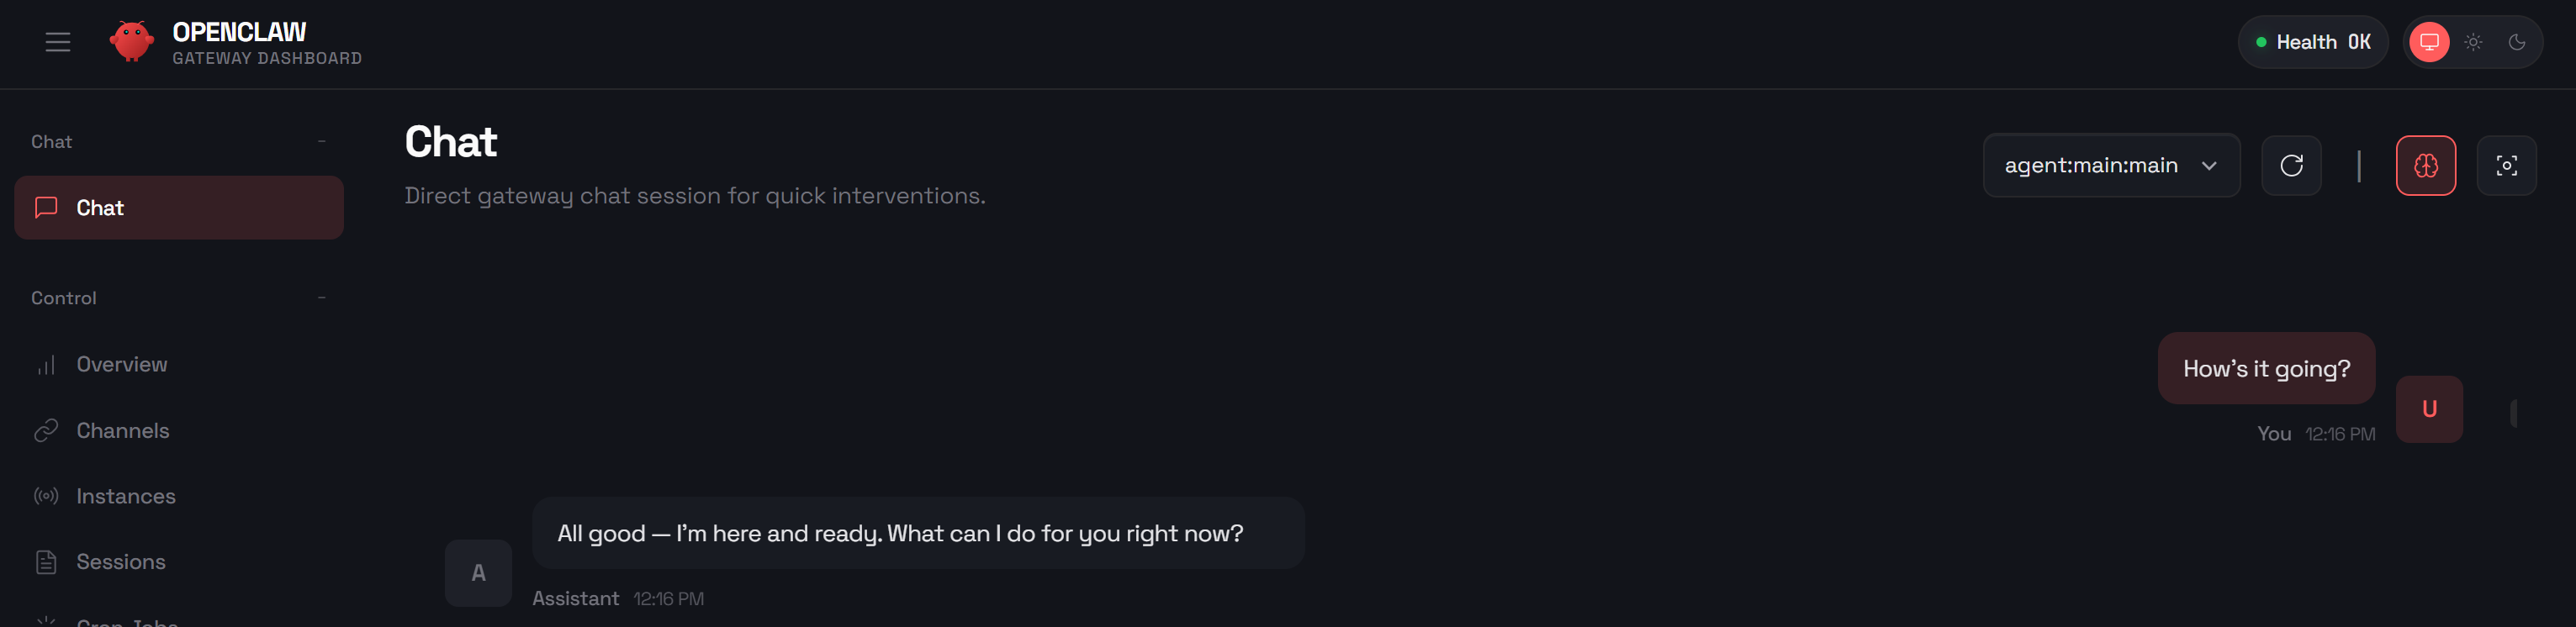
When tools are used by the AI, the Control UI allows you to monitor the reasoning process and see all the details that led to the response.
Perfect! Your WhatsApp AI assistant works like a charm.
Step #8: Add the Bright Data Skills
So far, your OpenClaw AI assistant is configured to interact only with OpenAI and has no special skills, tools, or hooks. To give your AI agent access to the web, we need to extend it with the Bright Data skills.
The Bright Data skills are officially available on ClawHub, the public skill registry for OpenClaw. You can add them by manually downloading them from the official website and copying the unzipped folder to ~/.openclaw/workspace/skills/.
Equivalently, for a simplified setup, install them via the ClawHub CLI utility with:
npx clawhub@latest install bright-dataThis will automatically install the Bright Data skills and make them available to OpenClaw.
The only requirement for those skills is the jq utility to parse and handle JSON data from the Bright Data API. Install it with:
apt-get install jqIf you go to the “Skills” page in the Control UI and search for “brightdata,” you should see: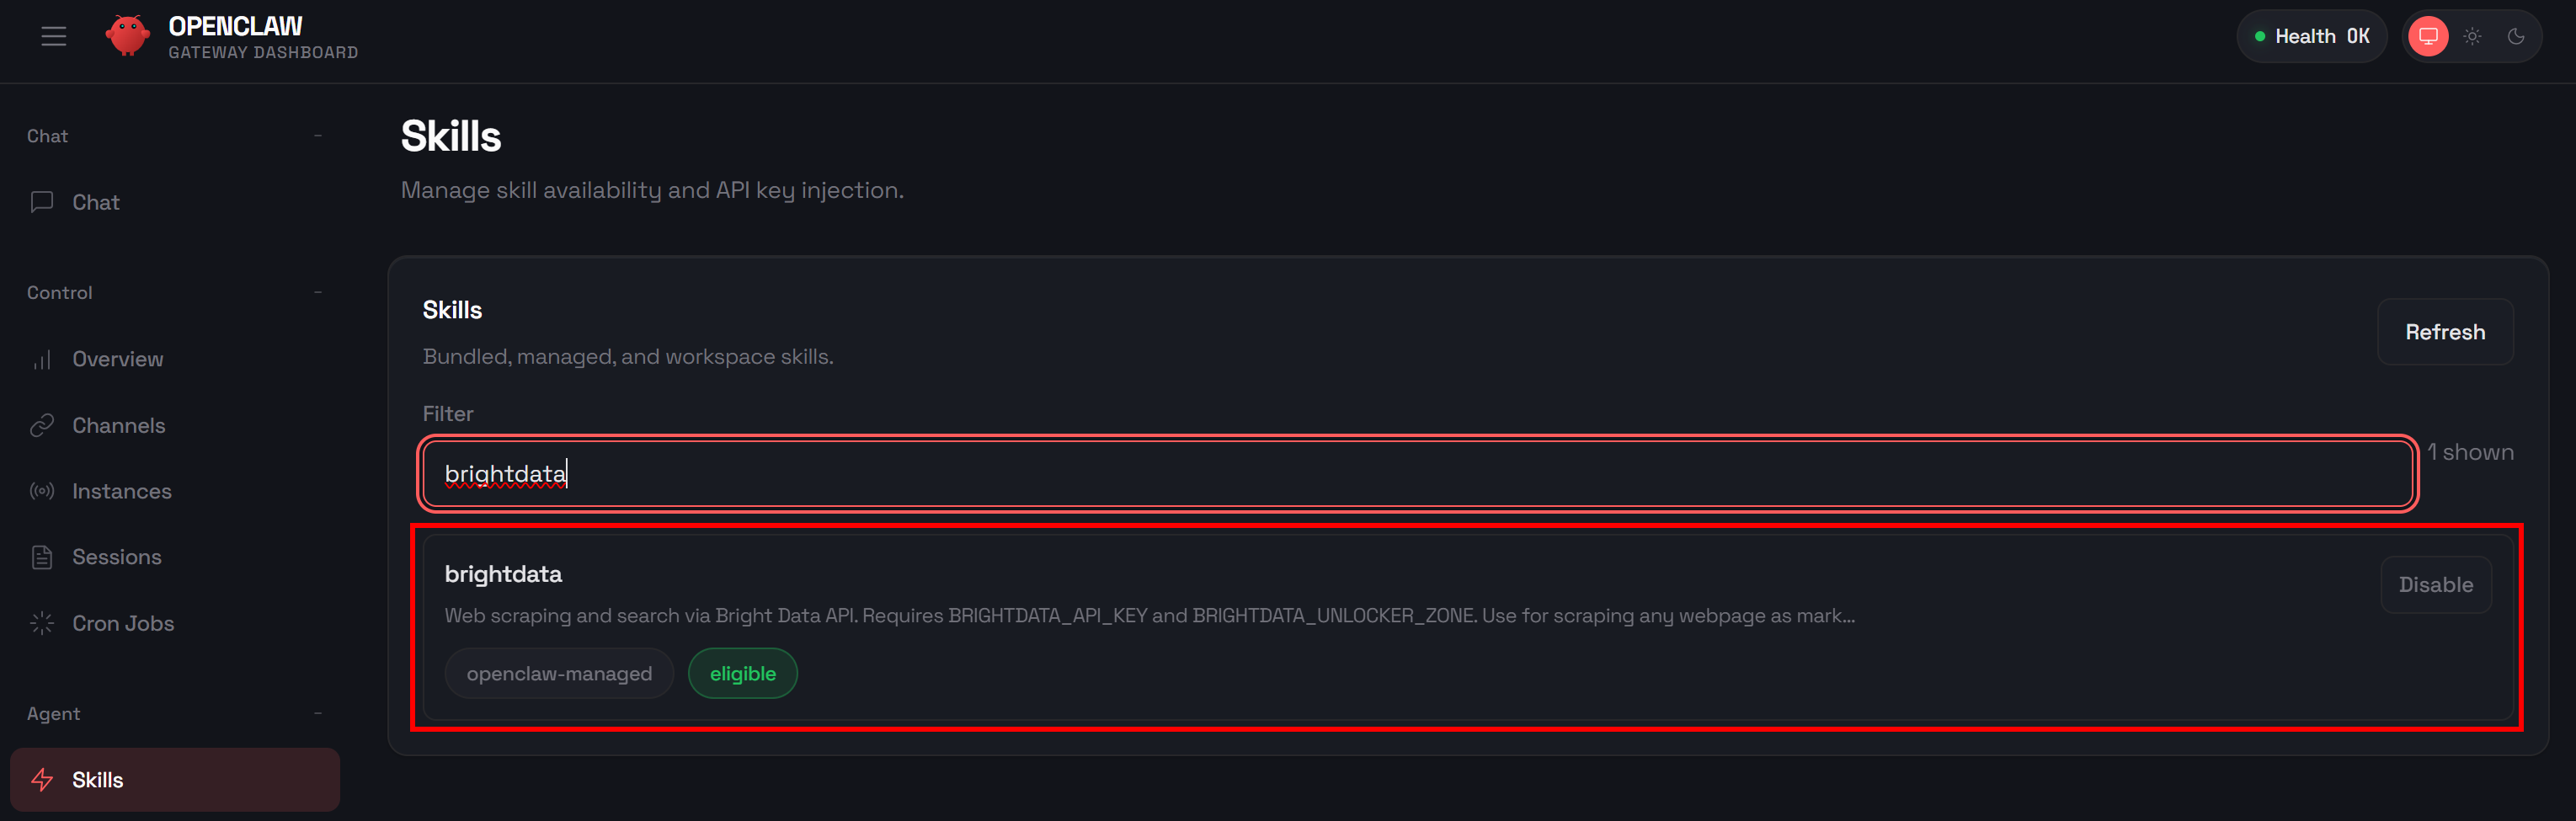
The skill will be enabled by default, so no further configuration is needed. Still, before you can use it, you must prepare your Bright Data account and set up the required credentials in your environment. Let’s do that!
Step #9: Prepare the Bright Data Account Integration
The OpenClaw Bright Data skills work by connecting to the Bright Data API. To enable this, as explained in the official README.md, you need to:
- Obtain your API key from the Bright Data dashboard.
- Create a Web Unlocker zone.
- Set the Bright Data API key and Web Unlocker zone as environment variables so OpenClaw can access them when calling the Bright Data skills.
If you do not have a Bright Data account yet, create one. Otherwise, log in and go to your dashboard. Next, navigate to the “Proxies & Scraping Infrastructure” page and check the “My Zones” table: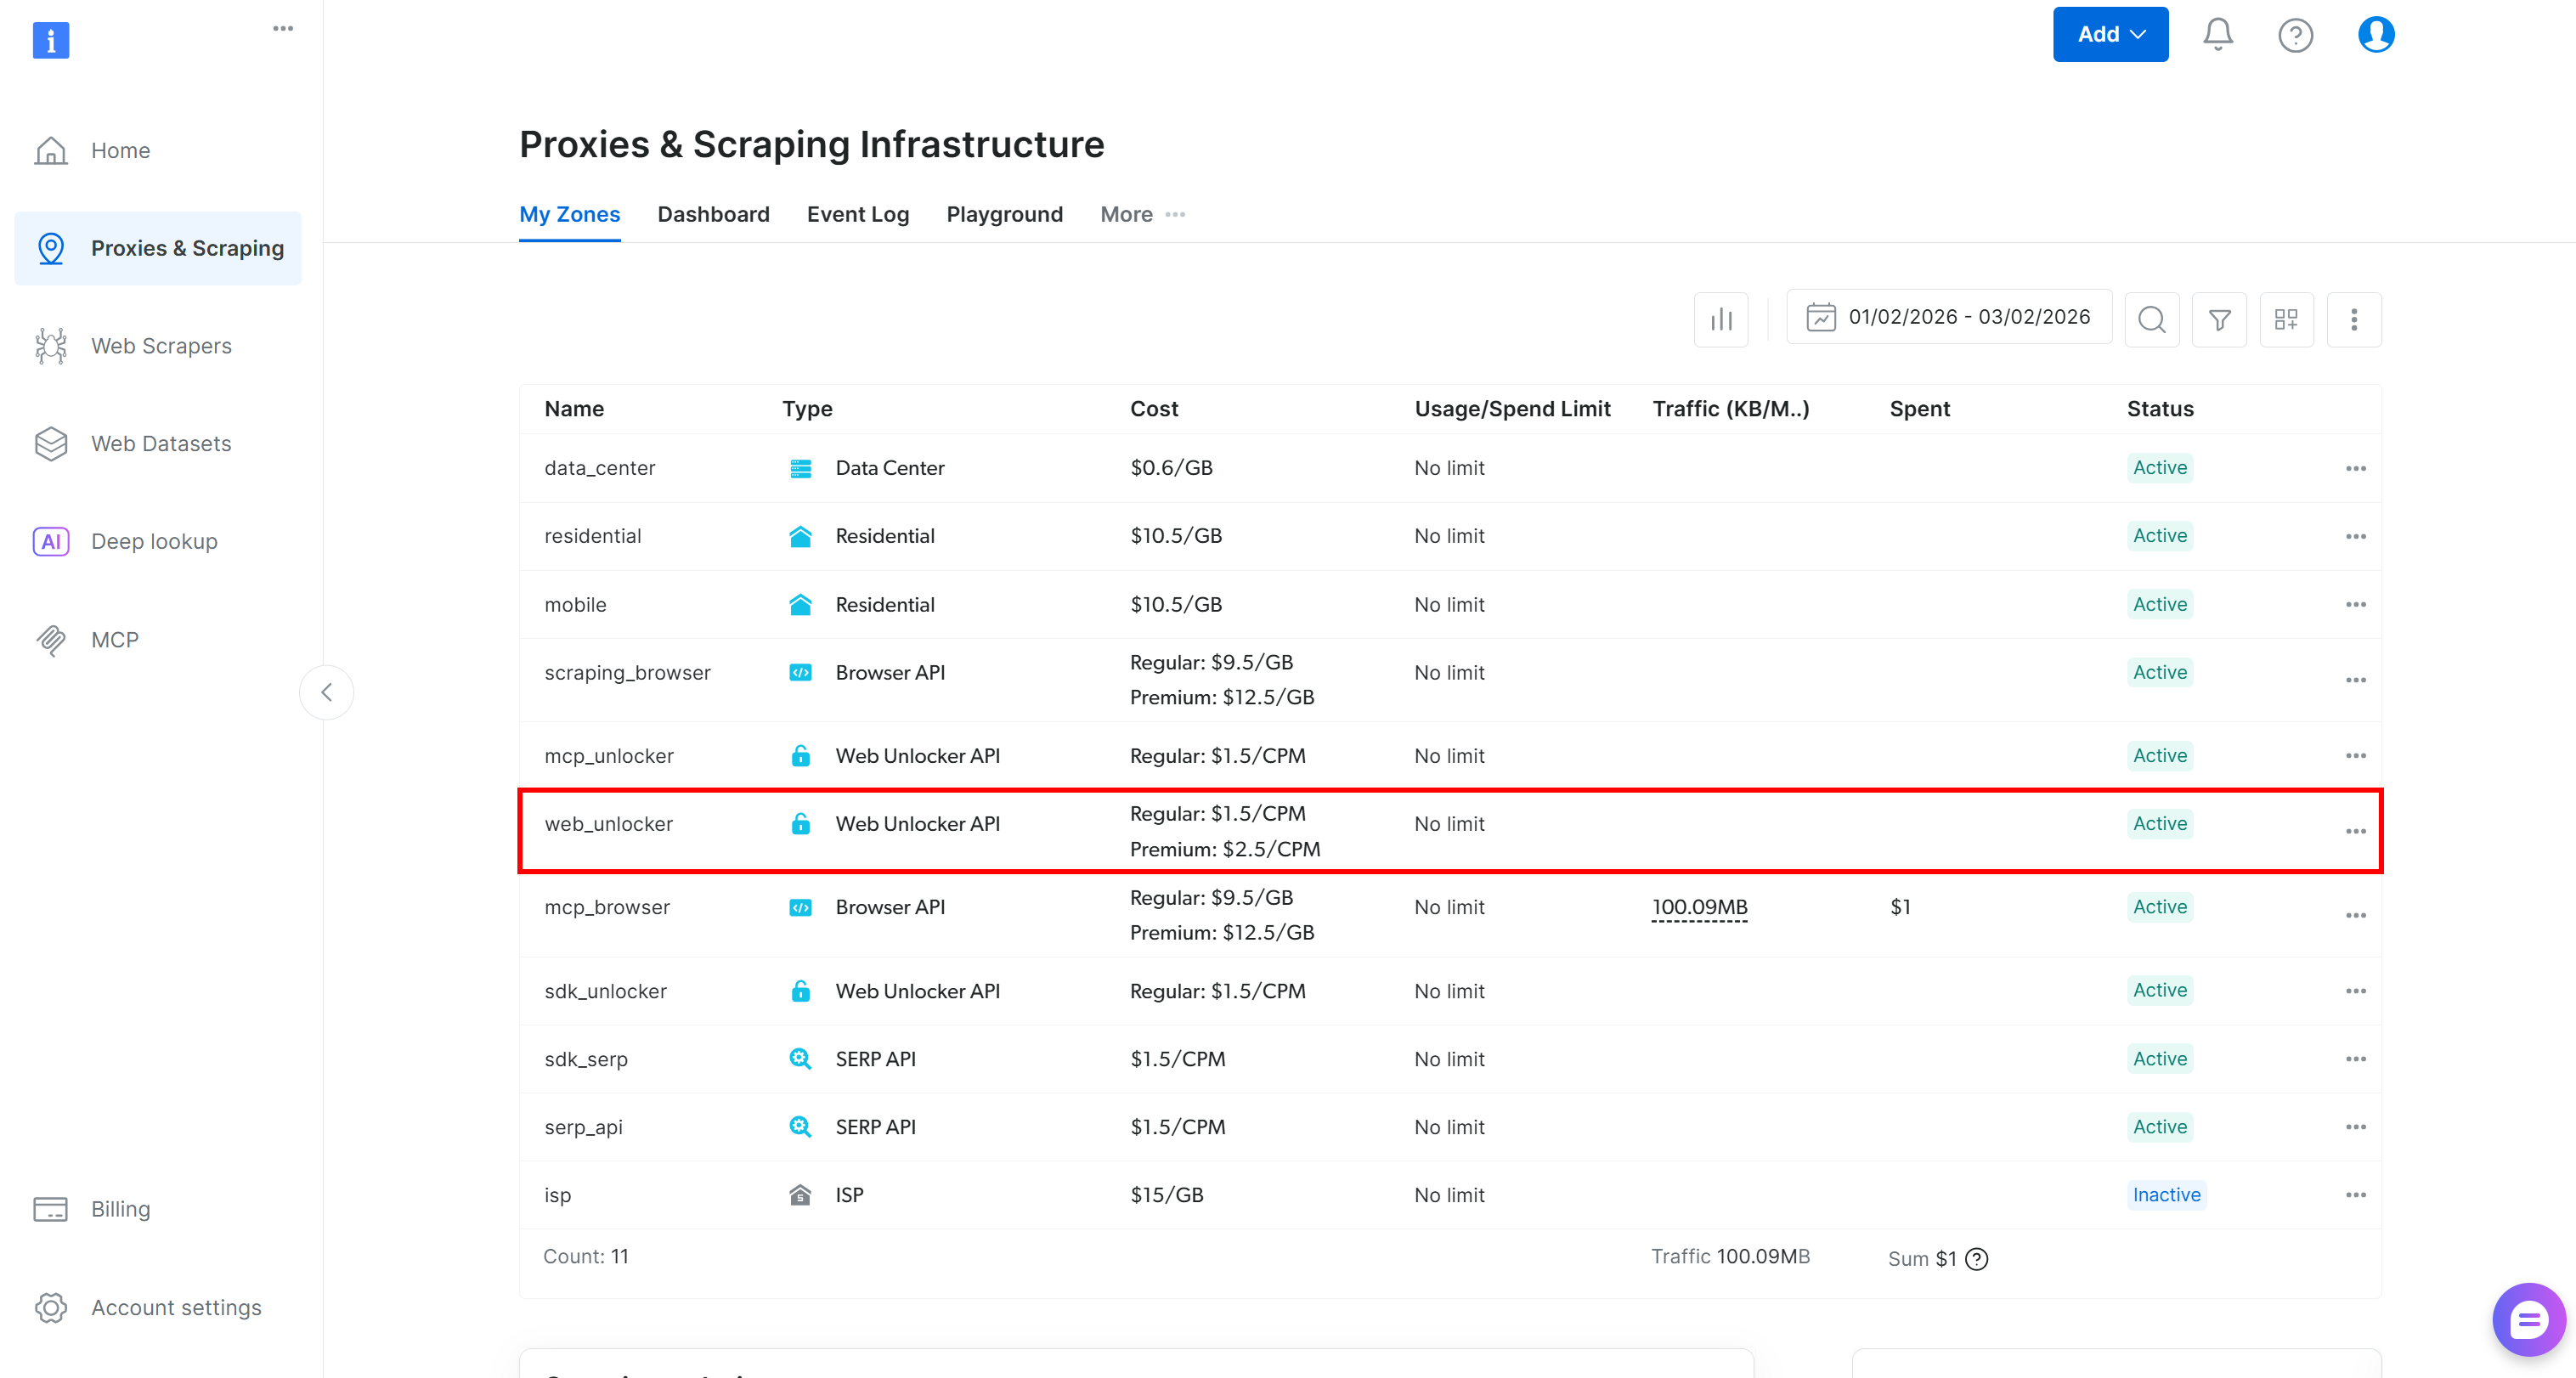
If the table already contains a Web Unlocker API zone (e.g., the web_unlocker one), you are all set.
Otherwise, create one. Scroll down to the “Unblocker API” cards, click the “Create zone” button, and follow the wizard to add the zone: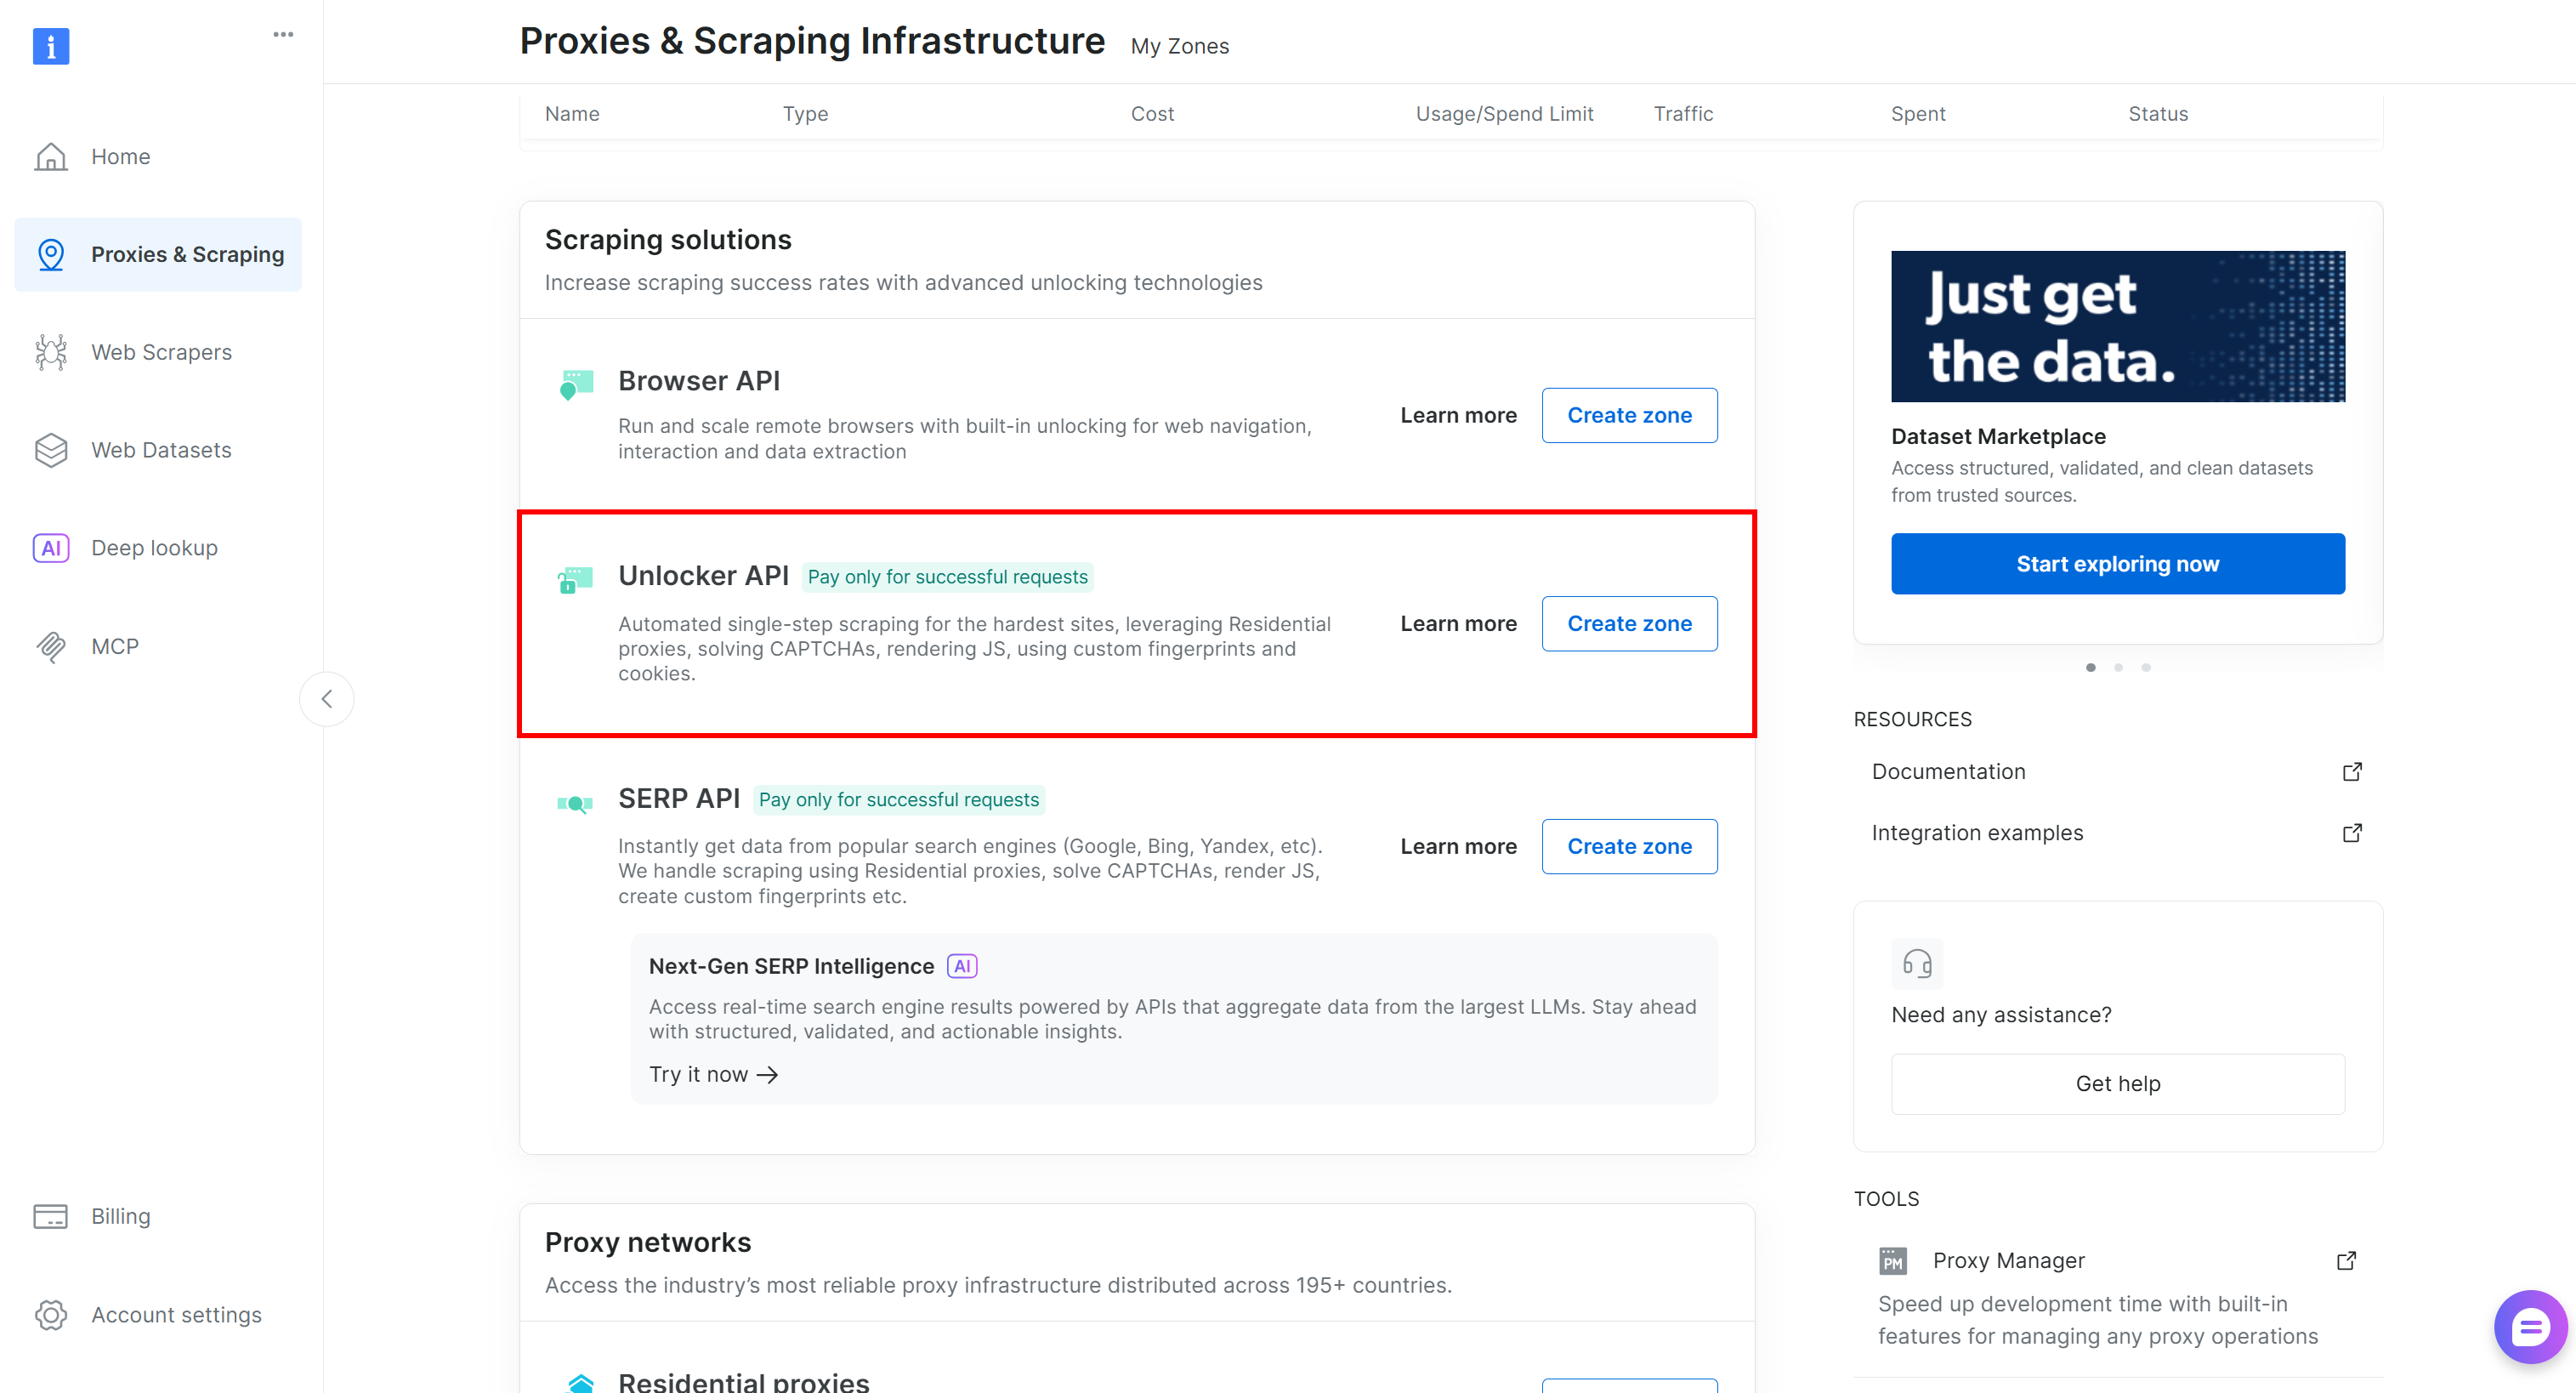
Finally, generate your Bright Data API key from your account. Once you have both the API key and the Web Unlocker zone, set them as environment variables:
export BRIGHTDATA_API_KEY="<YOUR_BRIGHT_DATA_API_KEY>"
export BRIGHTDATA_UNLOCKER_ZONE="<YOUR_BRIGHT_DATA_UNLOCKER_ZONE>"
Note that these environment variables will be lost on system restart. To make them persistent, as an alternative approach, add them to OpenClaw’s environment file ~/.openclaw/.env (or use any other supported method).
Edit the file with:
nano ~/.openclaw/.envEnsure it contains:
BRIGHTDATA_API_KEY="<YOUR_BRIGHT_DATA_API_KEY>"
BRIGHTDATA_UNLOCKER_ZONE="<YOUR_BRIGHT_DATA_UNLOCKER_ZONE>"
Now, restart the Gateway service to ensure the environment variables have been loaded:
openclaw gateway restartSweet! OpenClaw can now call the Bright Data tools via the configured skills.
⚠️ Important:
When attempting to use the Bright Data tools, the AI assistant may fail with a message like:
I can't access Bright Data. That skill requires BRIGHTDATA_API_KEY + unlocker zone which aren't available in this environment.This can happen even if you correctly configured the required environment variables. The reason is due to OpenClaw’s advanced context system. Simply put, the AI may think it does not have access to the skills or environment variables because it was initially loaded before they were set.
To fix this issue, you have a couple of options:
- Start a new session.
- Ask the AI assistant in the Chat to check if it can access the environment variables. It should confirm that it now has access and can correctly use the Bright Data tools.
Step #10: Test the Agent
Now it is time to test your new AI assistant. Assume you are an executive who wants to monitor competitors.
This is your first interaction with the AI assistant, so you will start by defining who your competitors are. OpenClaw will learn this information and store it in its context, so you will not need to repeat it every time.
For this example, suppose your competitors are Adidas, Nike, and Reebok, and you want to stay up to date with the latest news about them. Begin by sending the AI assistant an initial message to set the context:
Hey! Remember that my competitors are Adidas, Nike, and ReebokThis step is required only once. After that, the AI assistant will remember this information.
Next, ask the assistant to find the latest news:
Search for today’s most important, specific, and relevant news articles about my competitors from known publicationsWhen sending this message, you may be prompted to select which tools the AI assistant should use. Choose the Bright Data option: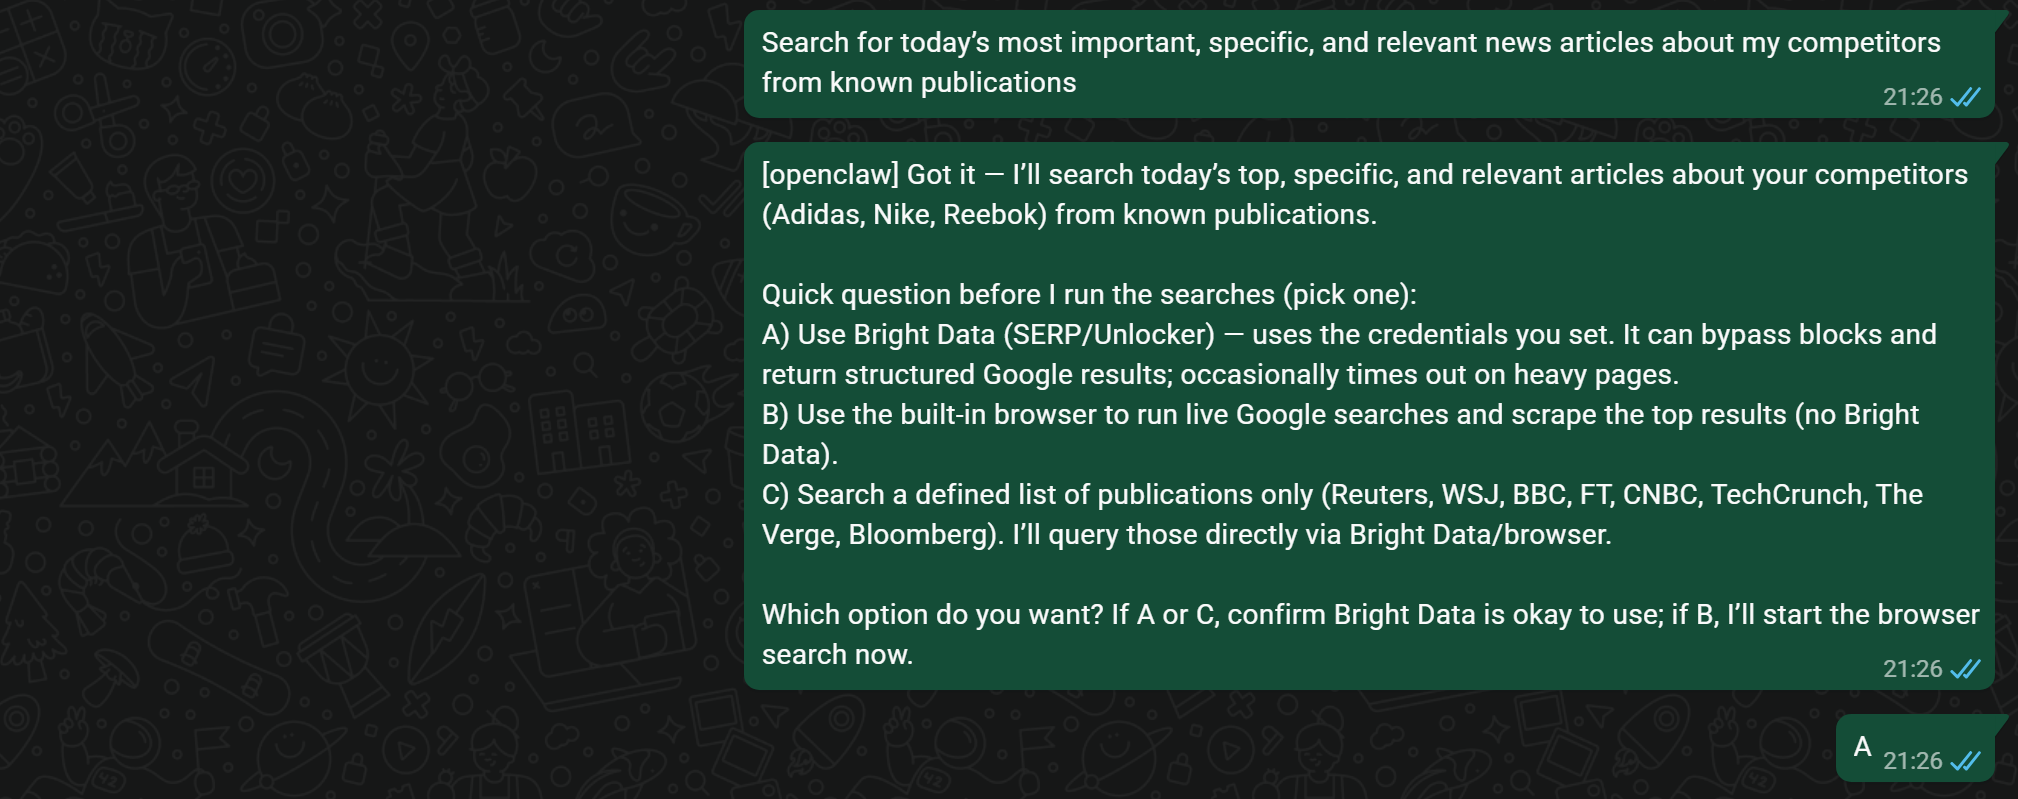
The agent will keep this preference in mind for future interactions, so this extra step usually happens only the first time. More generally, you can chat with the agent to adapt its behavior to your goals, or even define specific personas via configuration files.
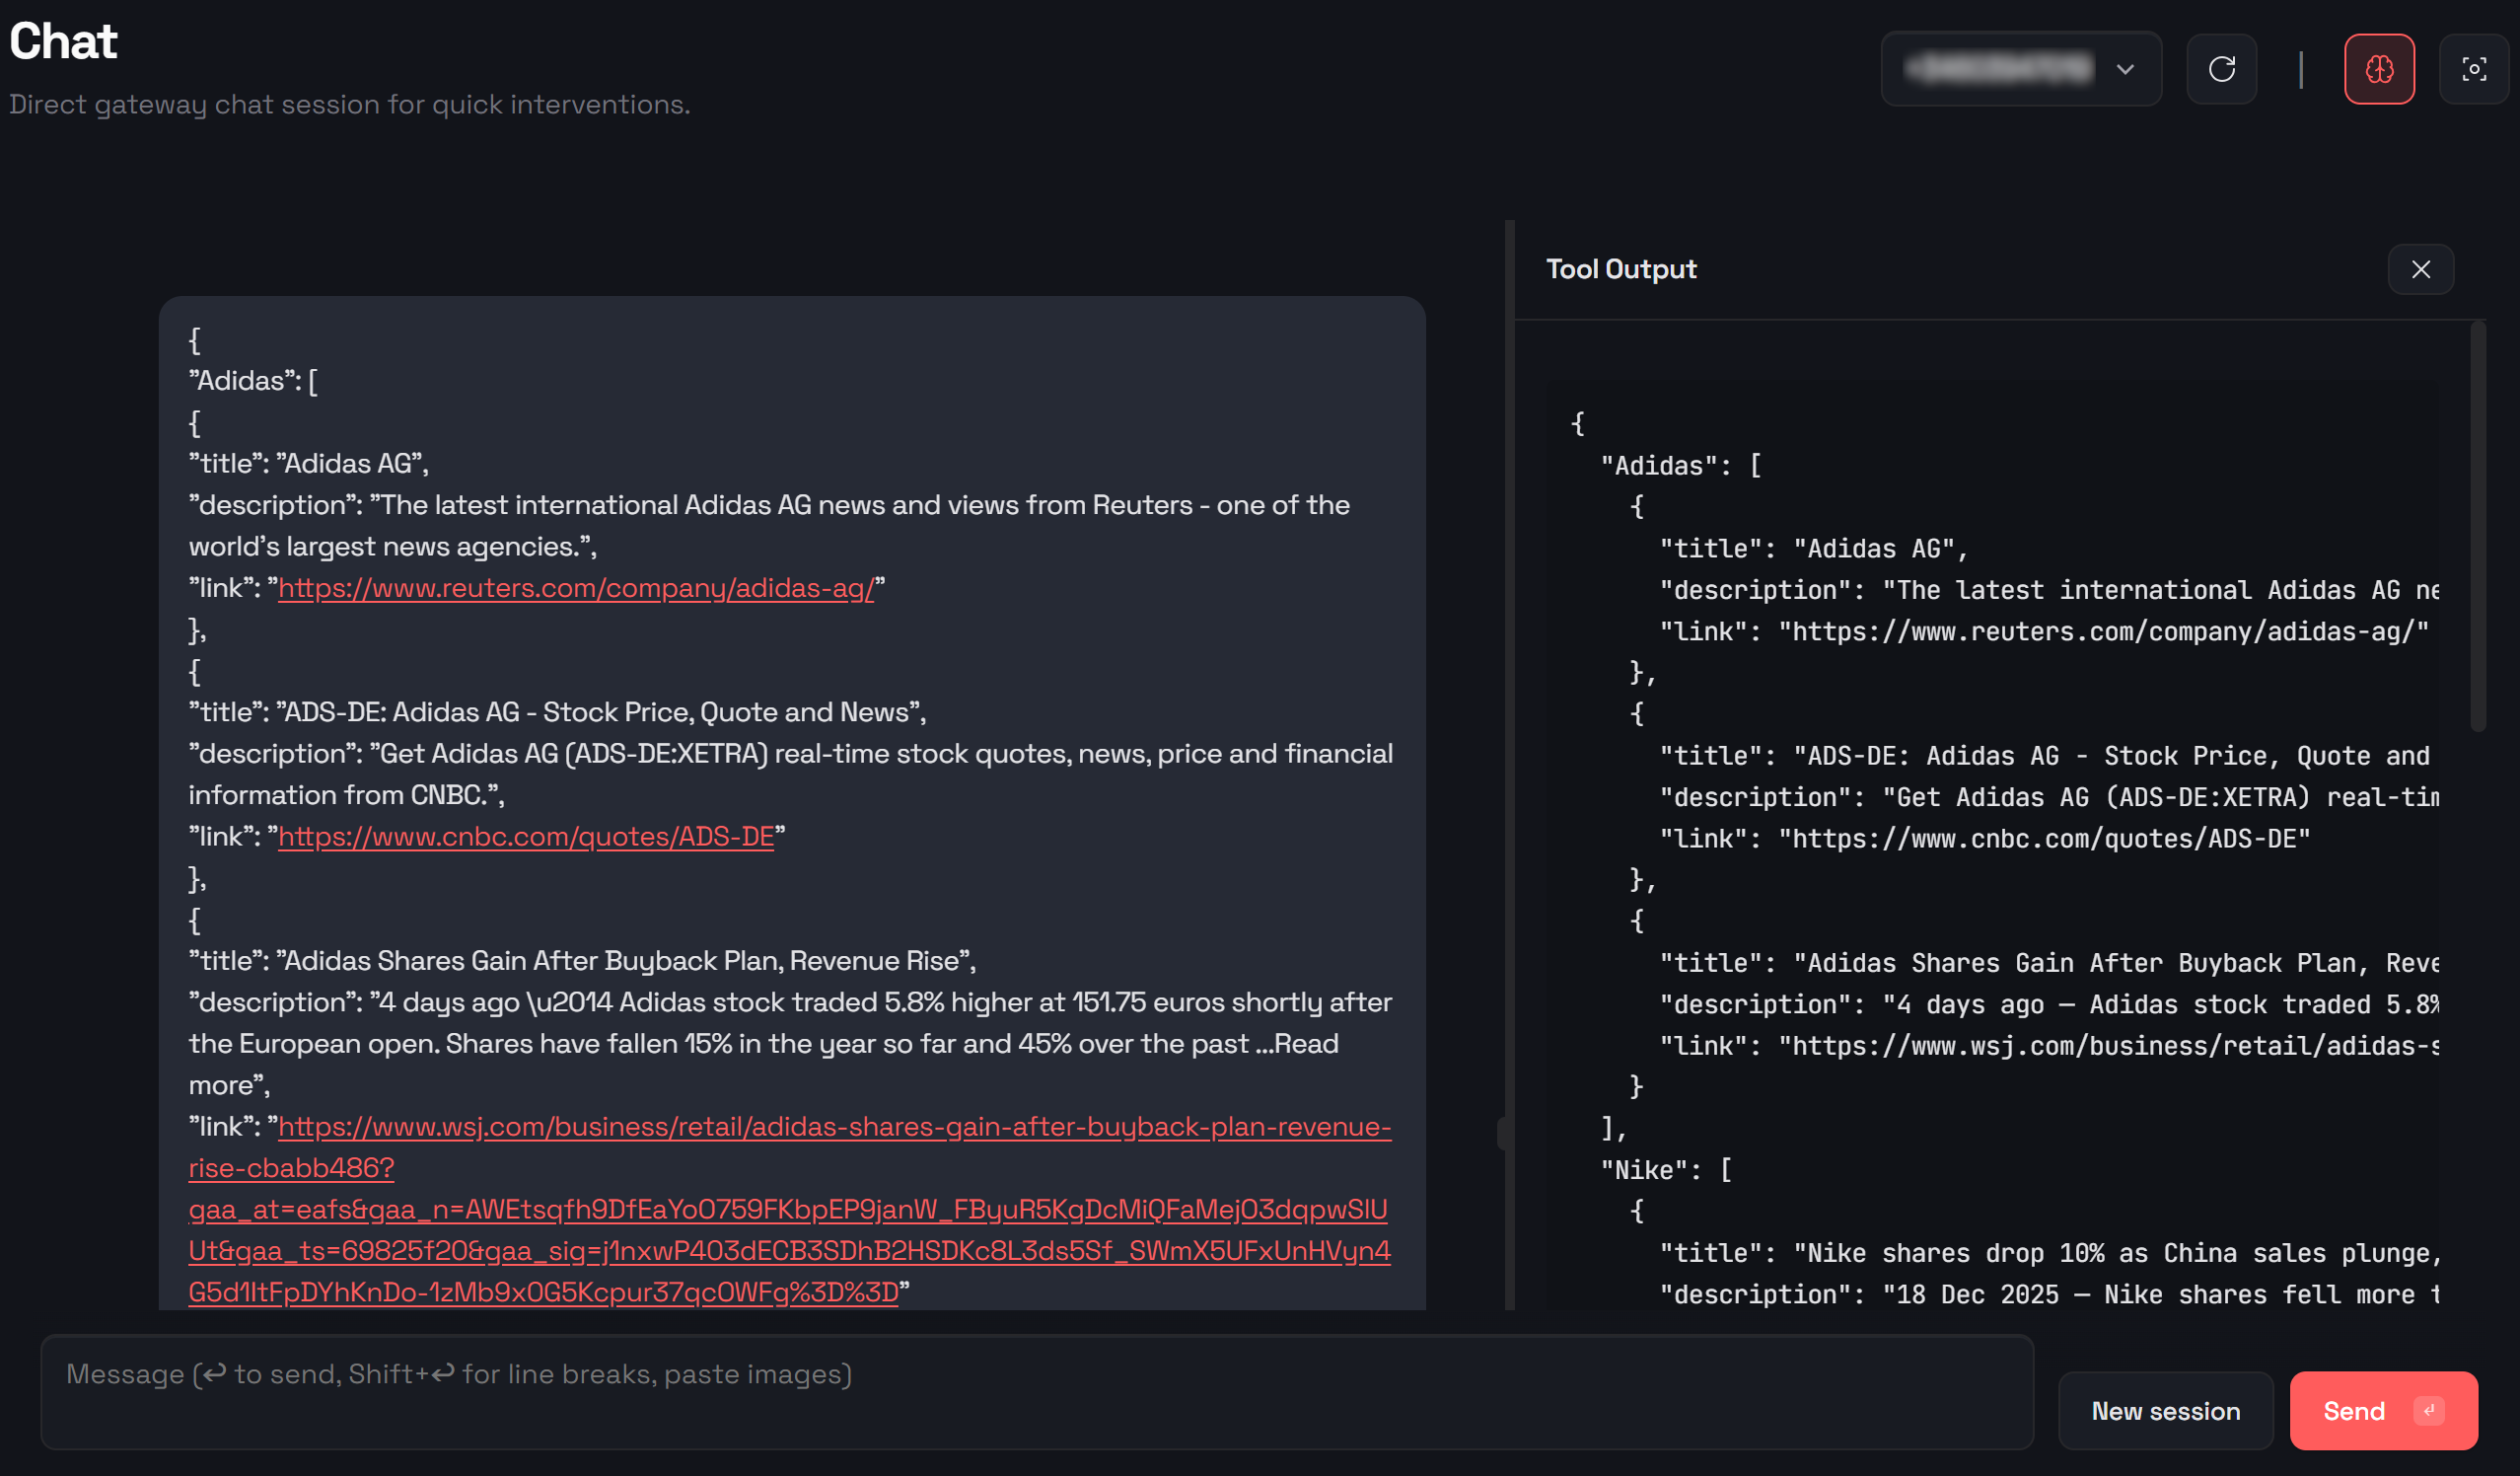
Behind the scenes, OpenClaw interacts with Bright Data skills—particularly the SERP API—to search Google News for articles related to your competitors. It then selects the most relevant results and presents them to you: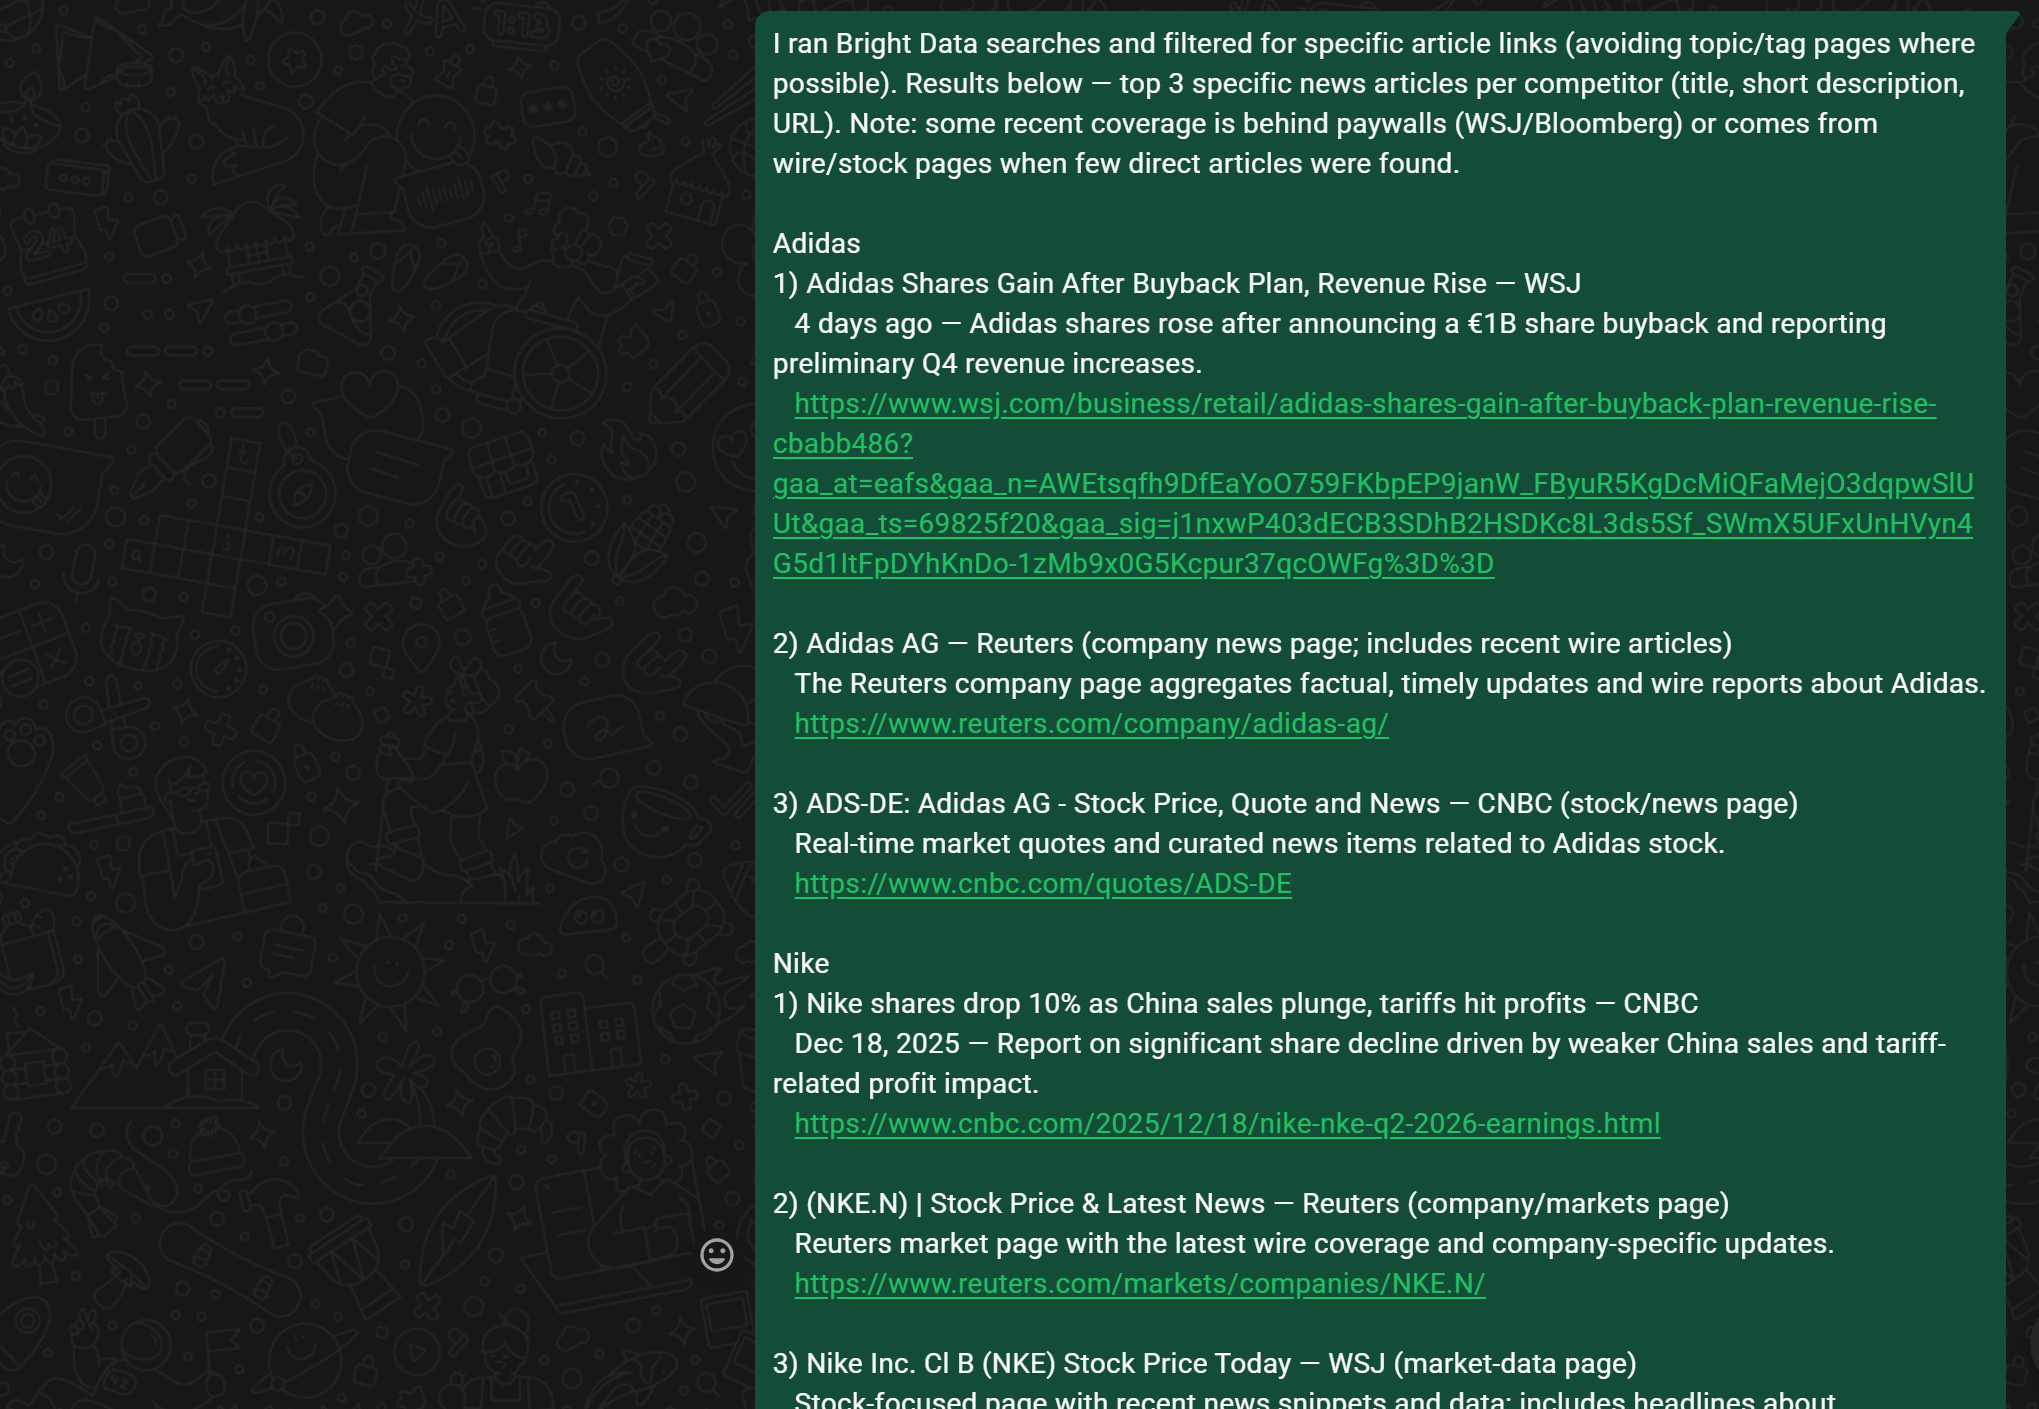
All the listed articles are sourced from fresh Google News results related to Adidas, Nike, and Reebok at the time the agent is running.
Now, assume you are short on time and only want summaries of specific articles:
I’m only interested in news article 1 for Adidas, article 1 for Nike, and article 2 for Reebok, but I don’t have time to read them. Access them and give me a quick summary of each!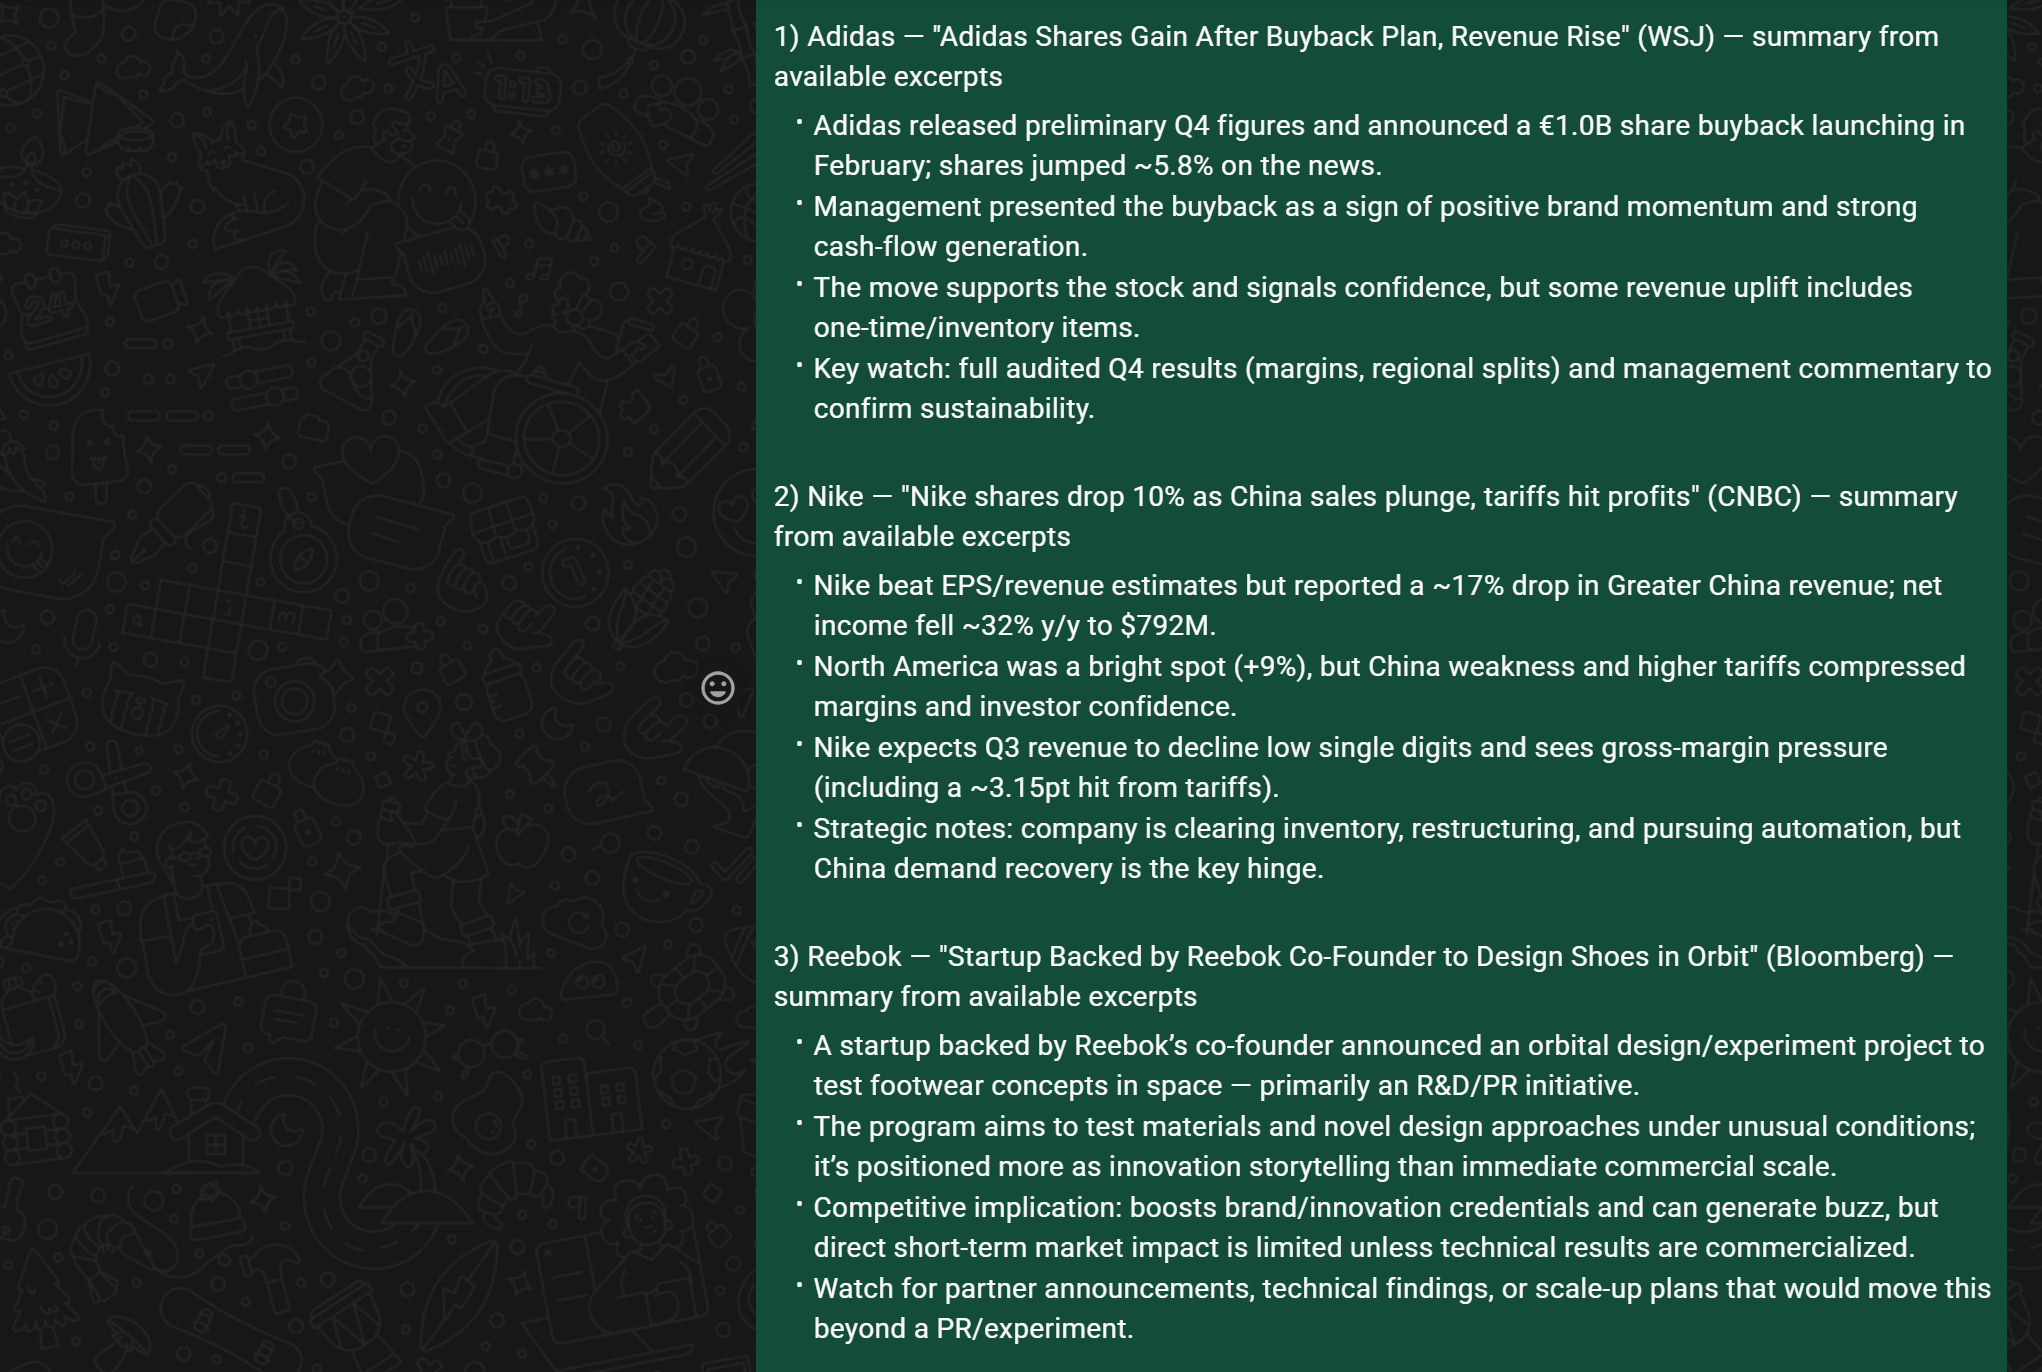
At this stage, the agent uses Bright Data’s Web Unlocker API to visit each page, extract the content, and summarize it as requested.
Finally, ask for high-level insights:
Now, provide some general key insights to help me understand how my competitors are doingThe result will be a detailed, executive-style report, such as: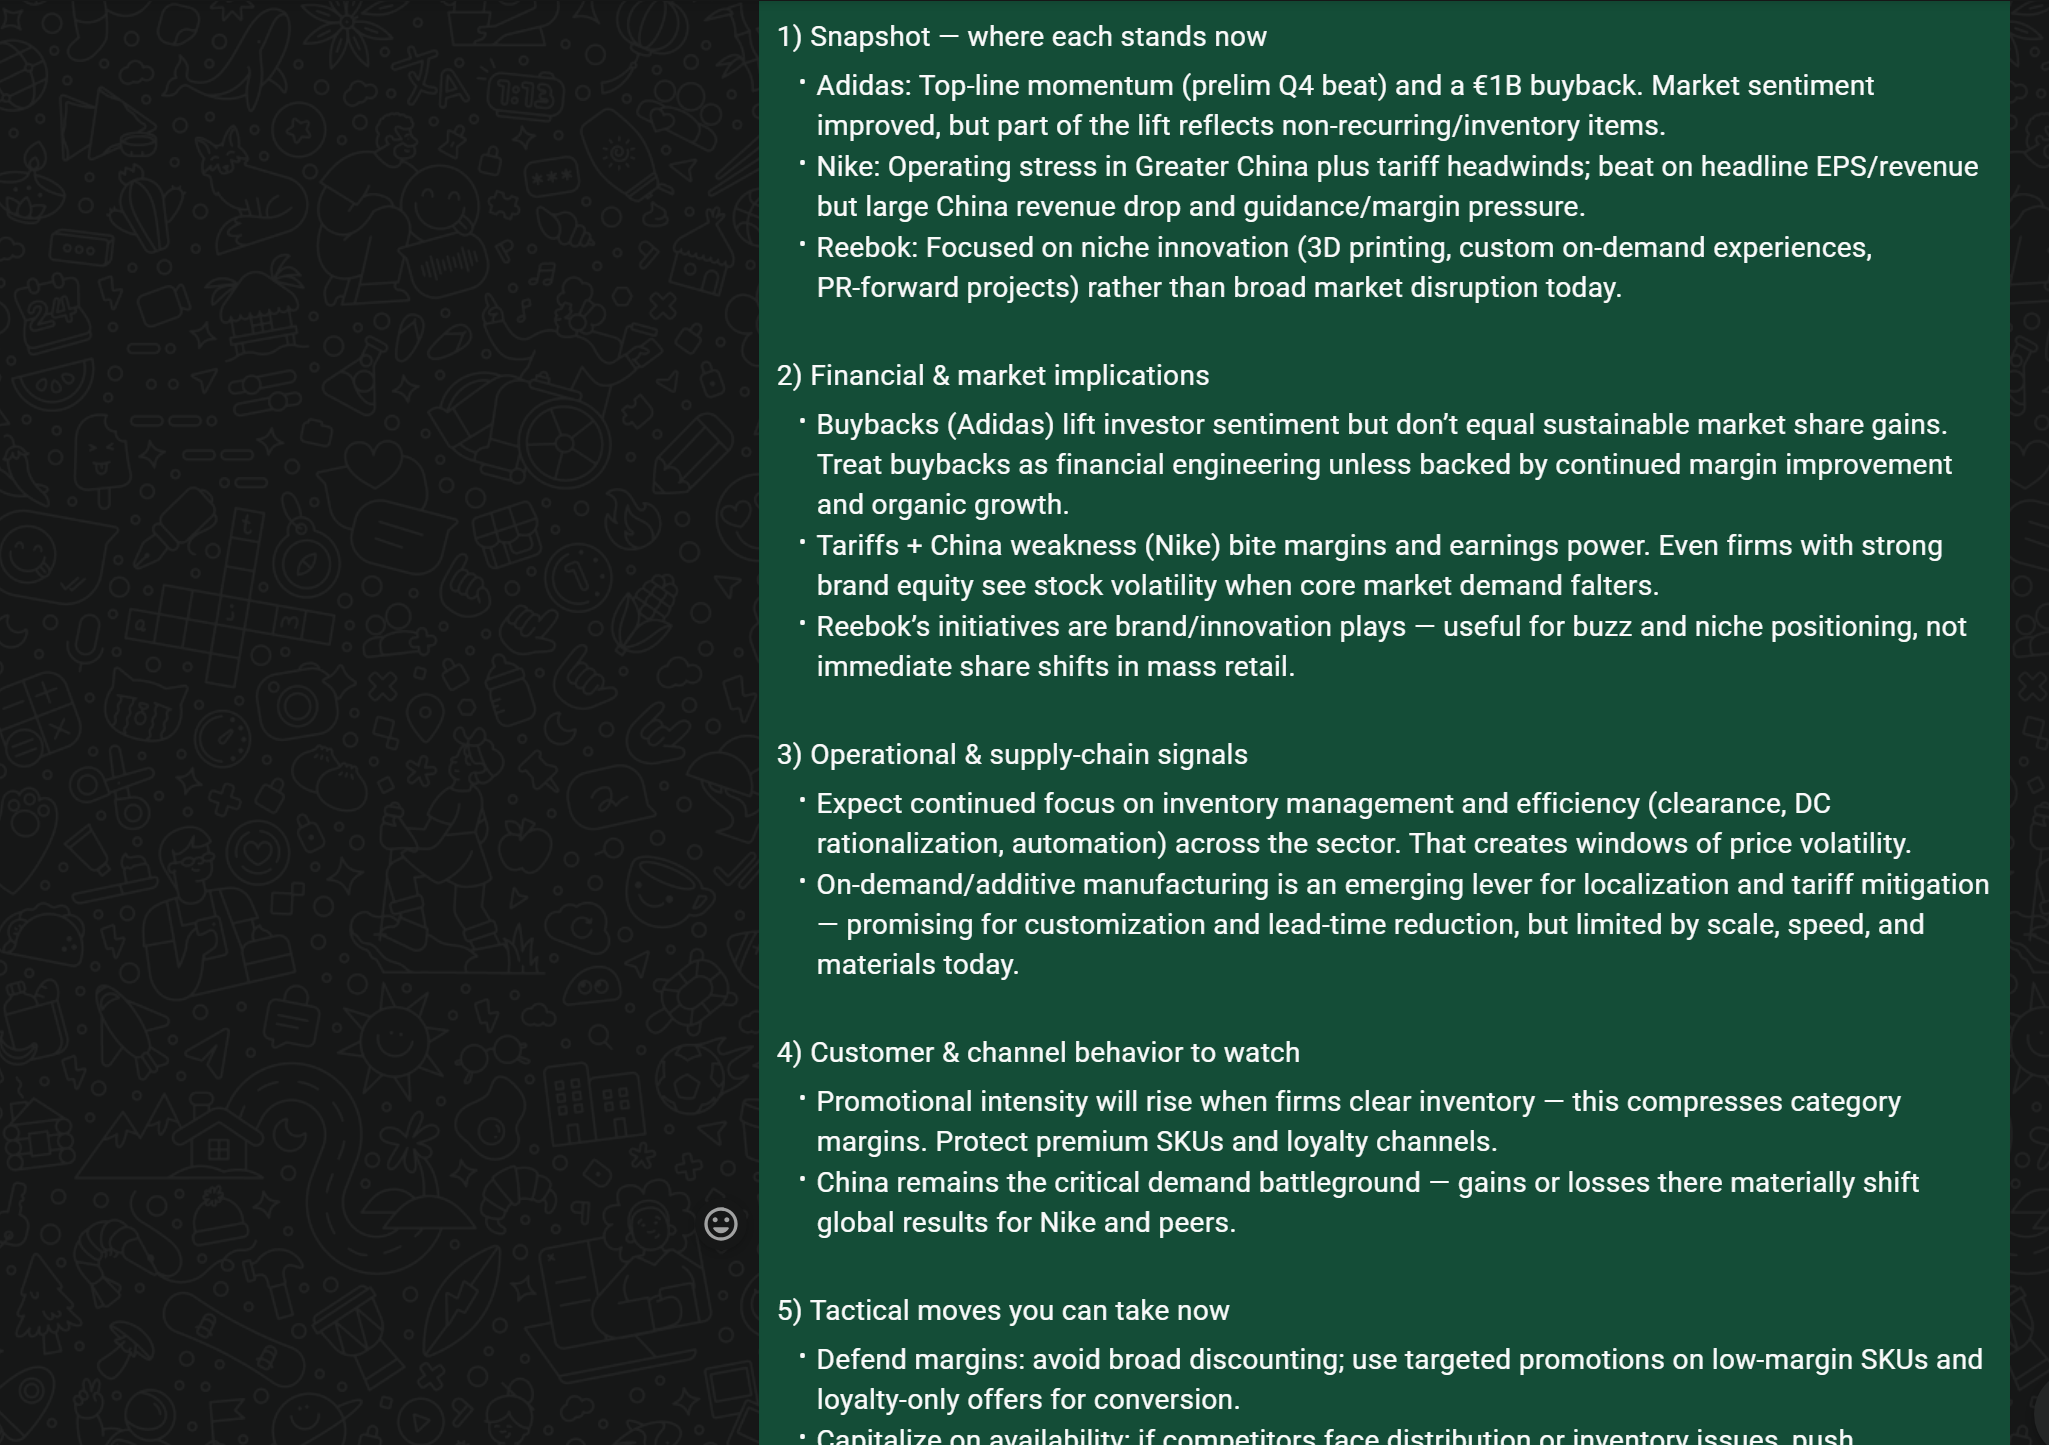
With integrations to additional tools, you could even ask the AI assistant to generate a PDF report, email it to your marketing team, or trigger other automated workflows. This is next-level productivity, supported by OpenClaw’s agent capabilities combined with Bright Data’s web search and scraping tools!
If you are wondering whether the AI assistant actually connects to Bright Data (instead of making up results), you can verify this easily. Open the “Chat” section in the Control UI to see detailed logs of every tool call:
Et voilà! You just saw how to build a real-world, business-ready, productivity-boosting WhatsApp AI assistant, all powered by OpenClaw and Bright Data!
[Extra] Deploying the OpenClaw AI Assistant to DigitalOcean
If you do not want to run OpenClaw locally, you can easily set it up on DigitalOcean to make it accessible remotely. For detailed instructions on deploying OpenClaw on DigitalOcean, refer to the official deployment guide.
Prerequisites
To follow this section, make sure you have a DigitalOcean account and some familiarity with its platform. As of this writing, OpenAI models are not supported with this deployment method. You will need a Claude API key or a Gradient AI API key instead.
Step #1: Create a Droplet for Running OpenClaw
Sign in to your DigitalOcean account or create a new one if this is your first time. Navigate to the project where you want to deploy OpenClaw, or create a new project.
Then, press the “Create” button in your dashboard and select “Droplets” to add a new one: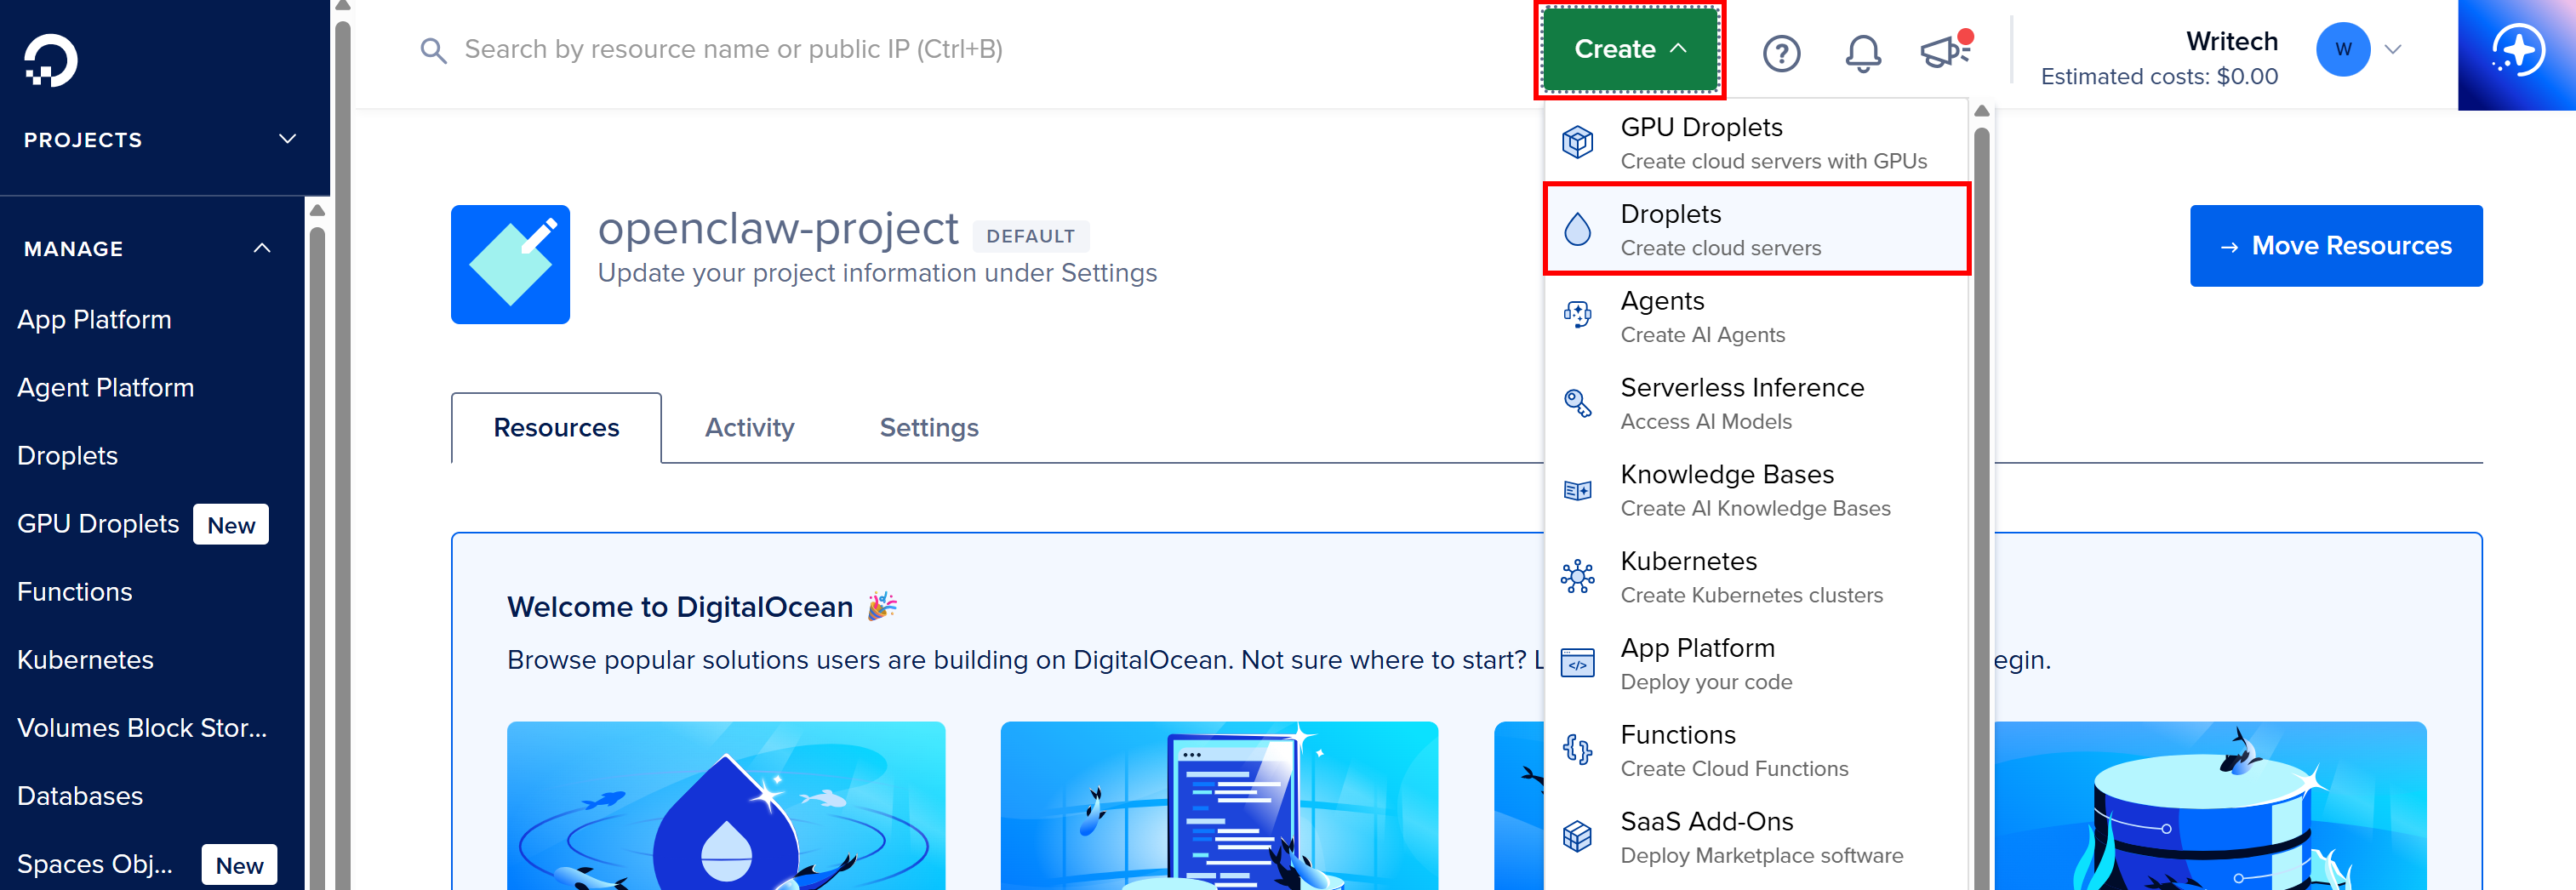
On the “Create Droplets” page, choose a Region close to you or your users (for example, “New York”).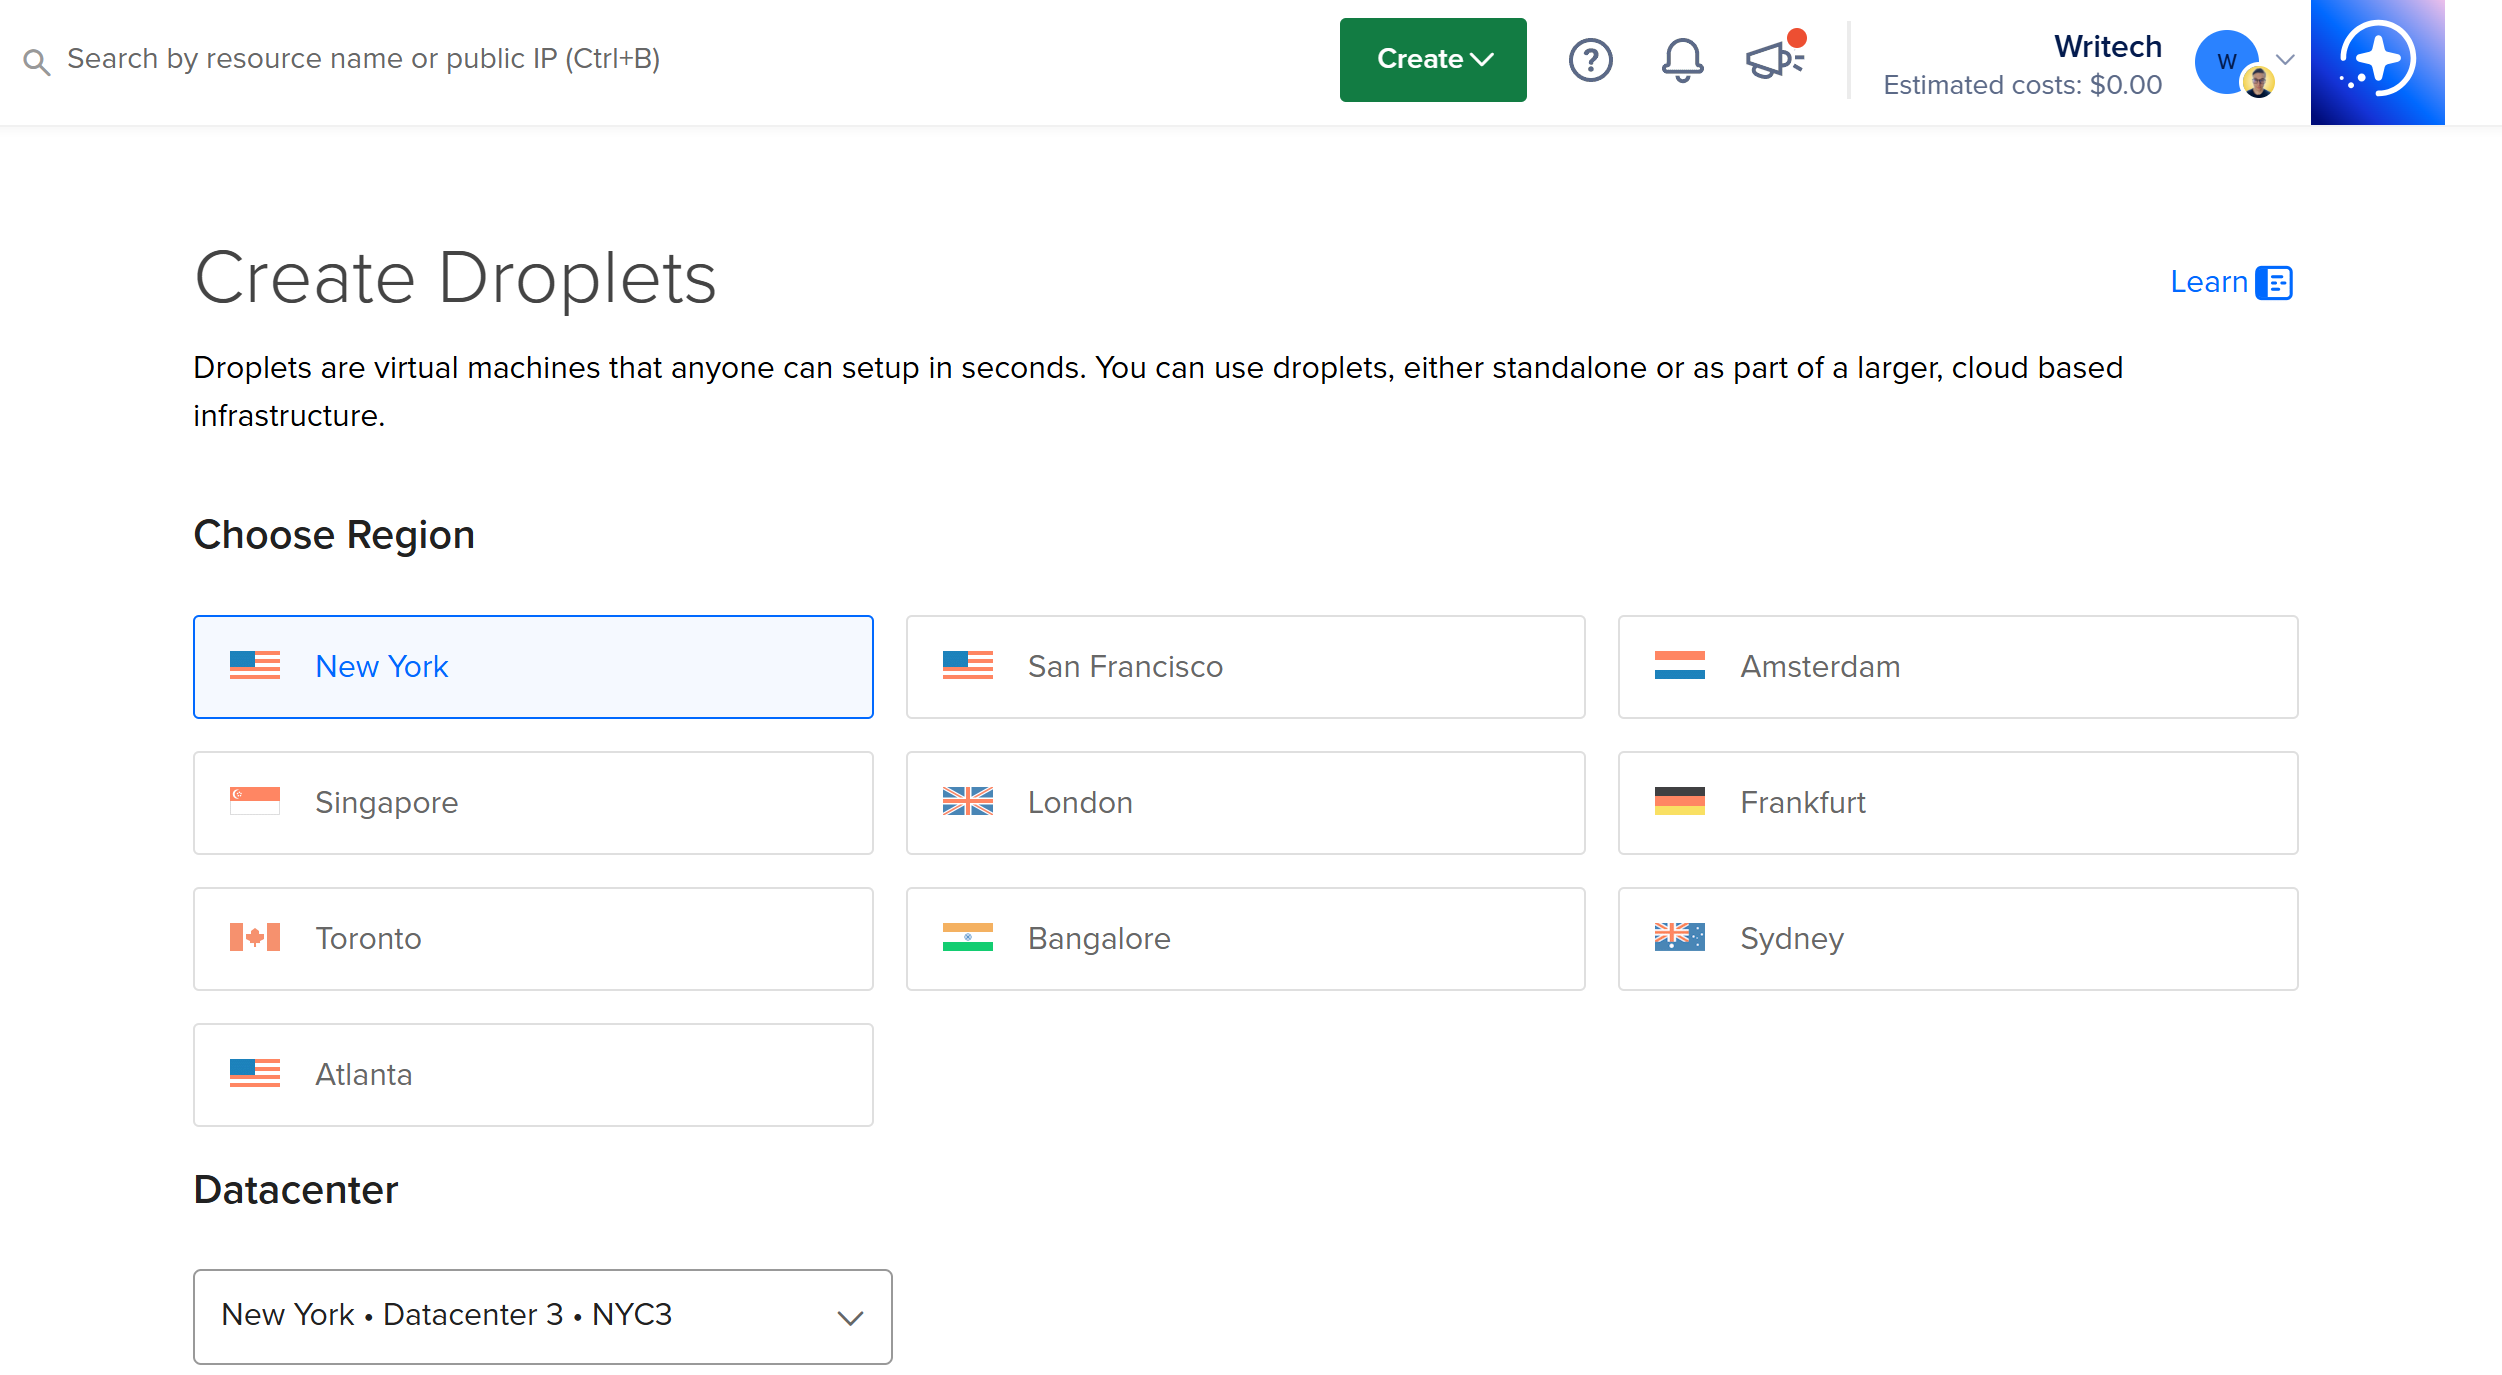
Under the “Choose an image” section, go to the “Marketplace” tab. In the search bar, type “Moltbot” (the former name of OpenClaw) and select the Moltbot image from the results.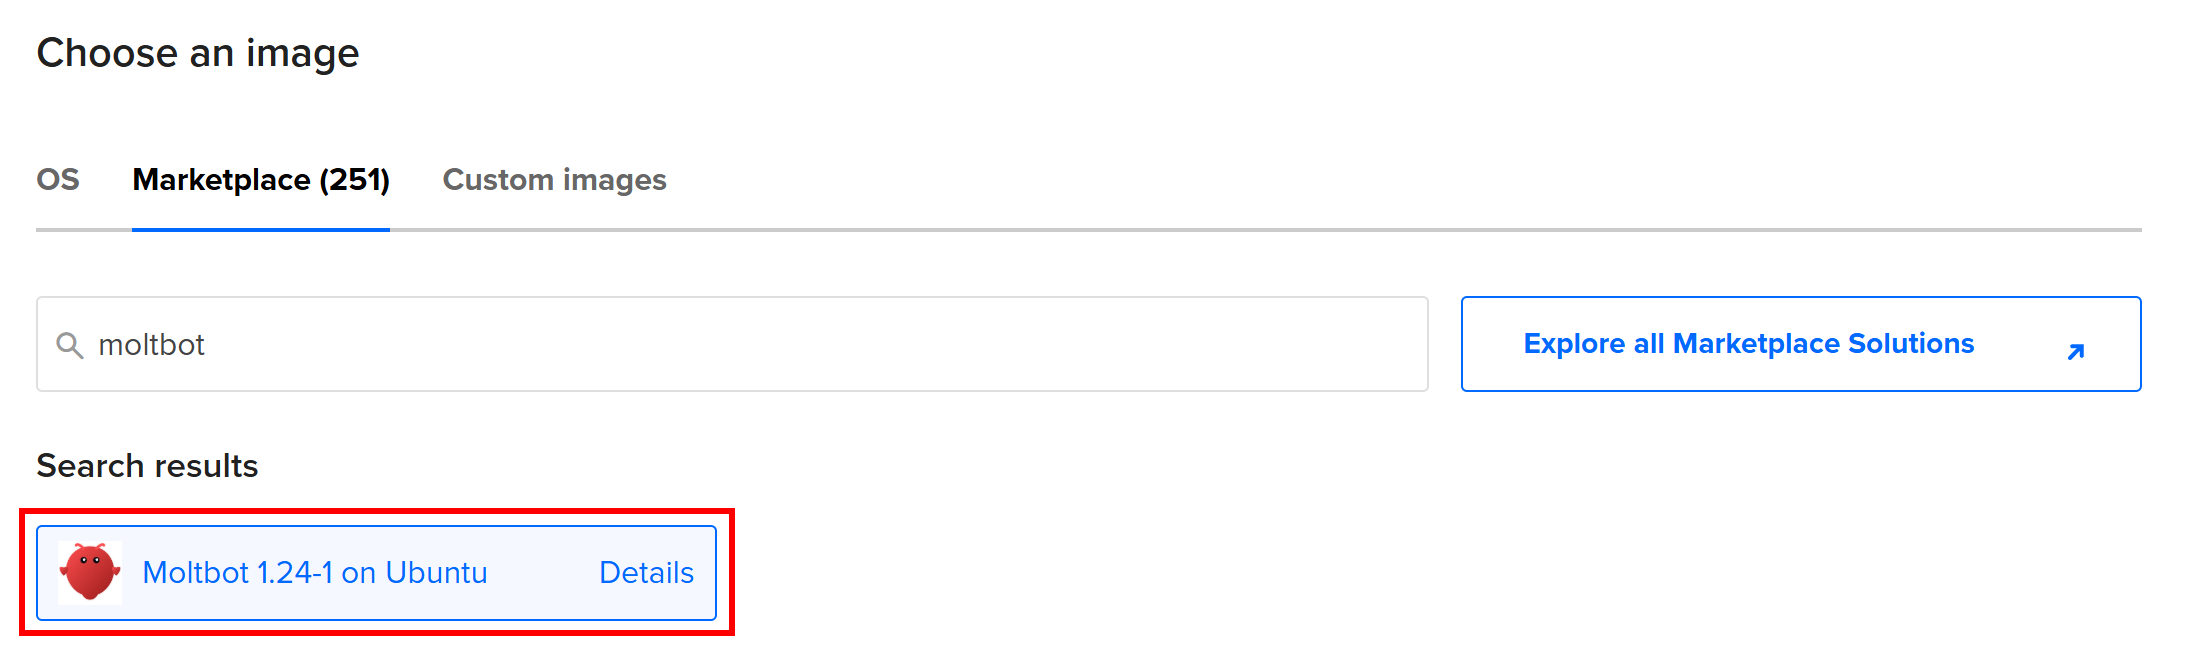
Next, you need to choose a plan for your Droplet. For OpenClaw, a Basic plan with at least 4GB RAM is recommended for smooth performance: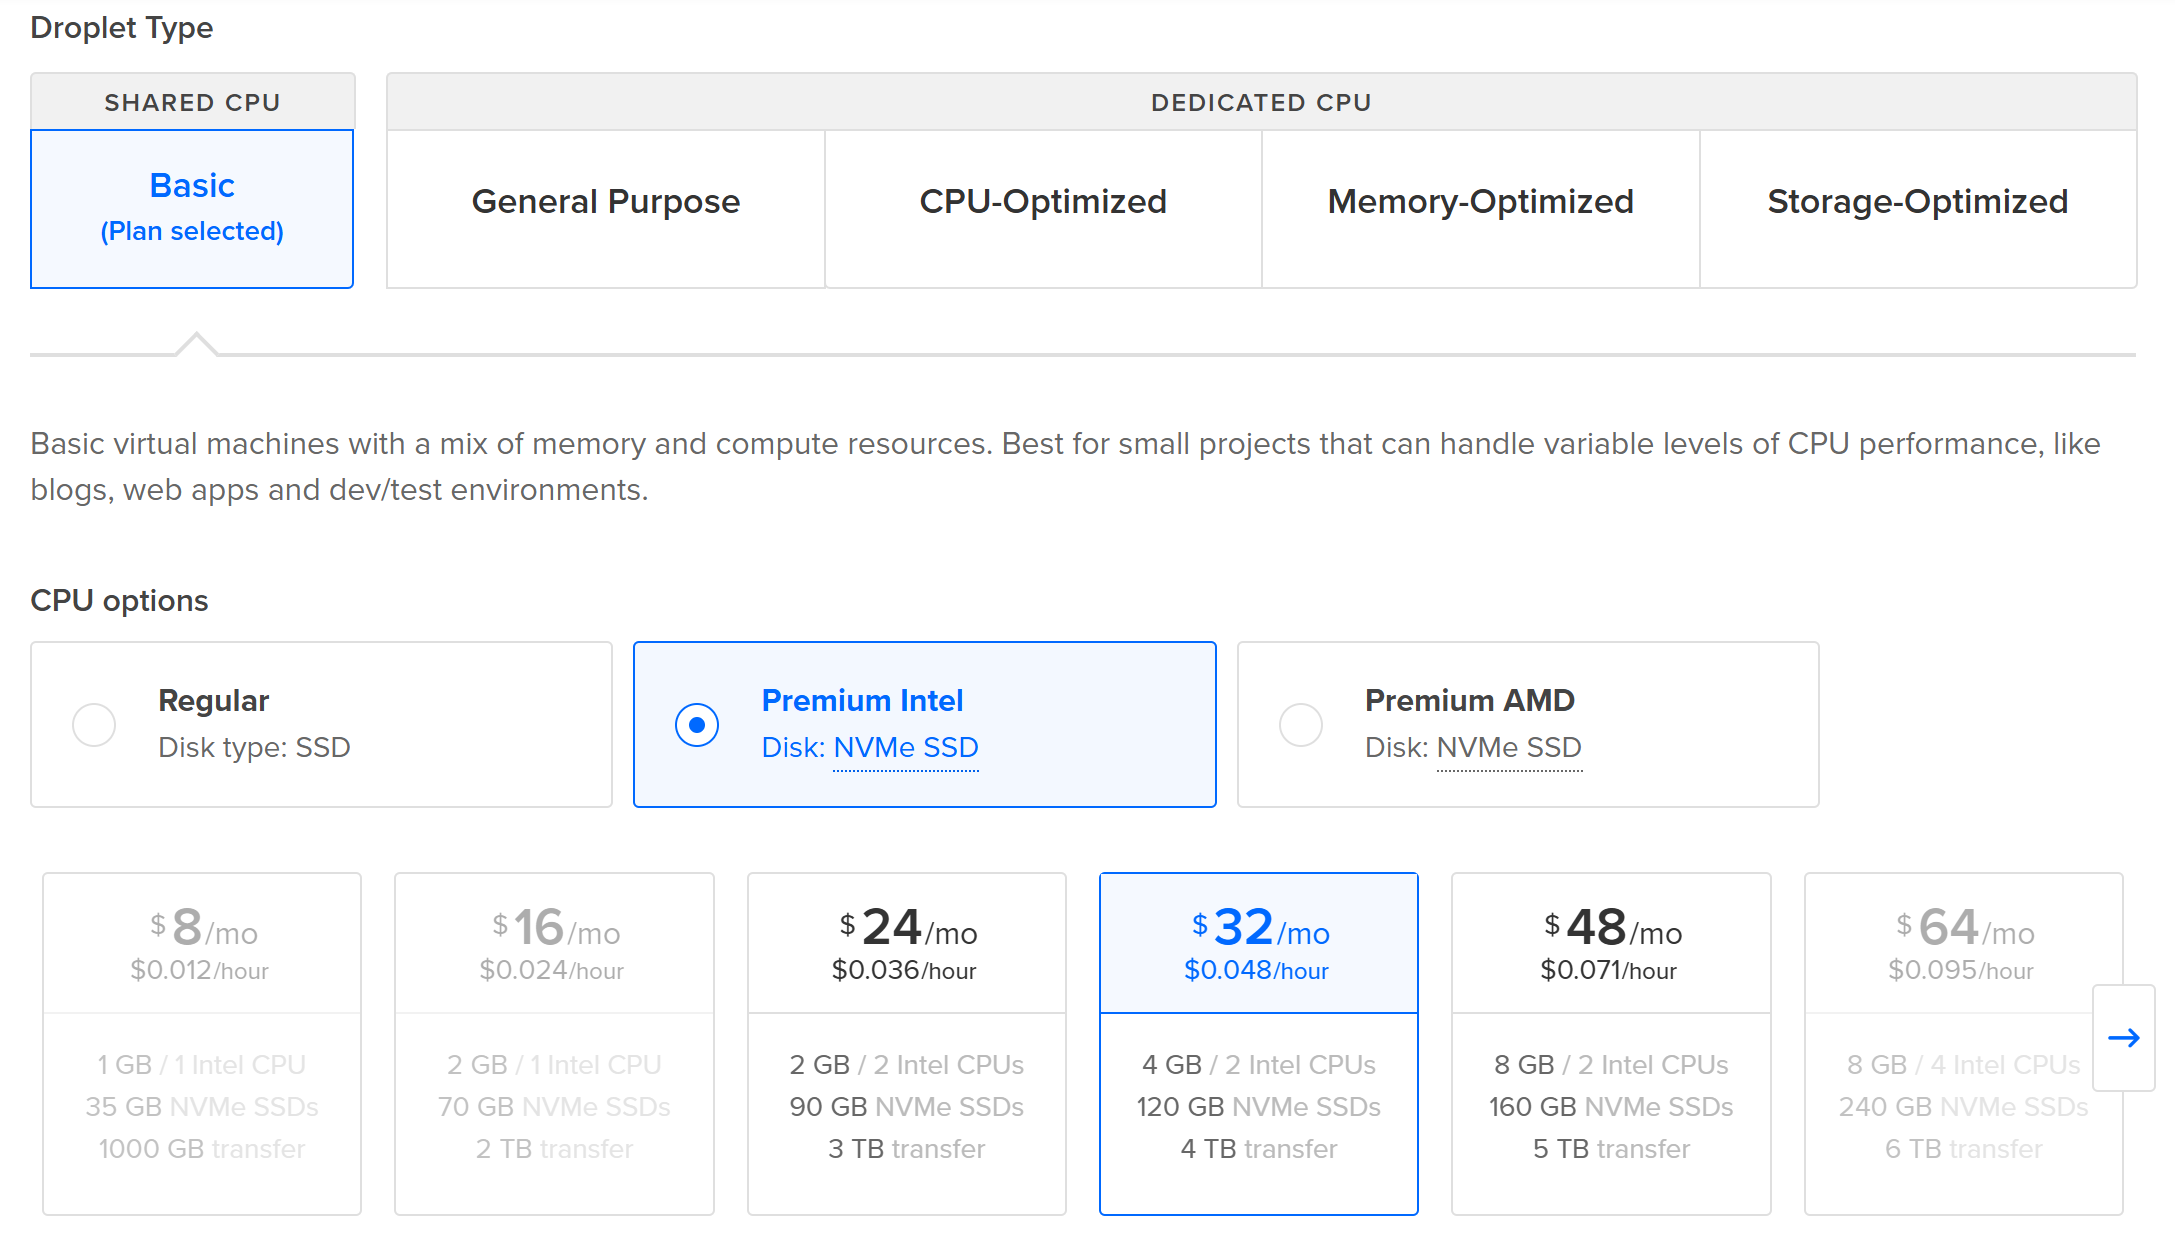
Under the “Choose Authentication Method” section, select the “SSH Key” option. Add your SSH key if you have not done so already, or just select the right one: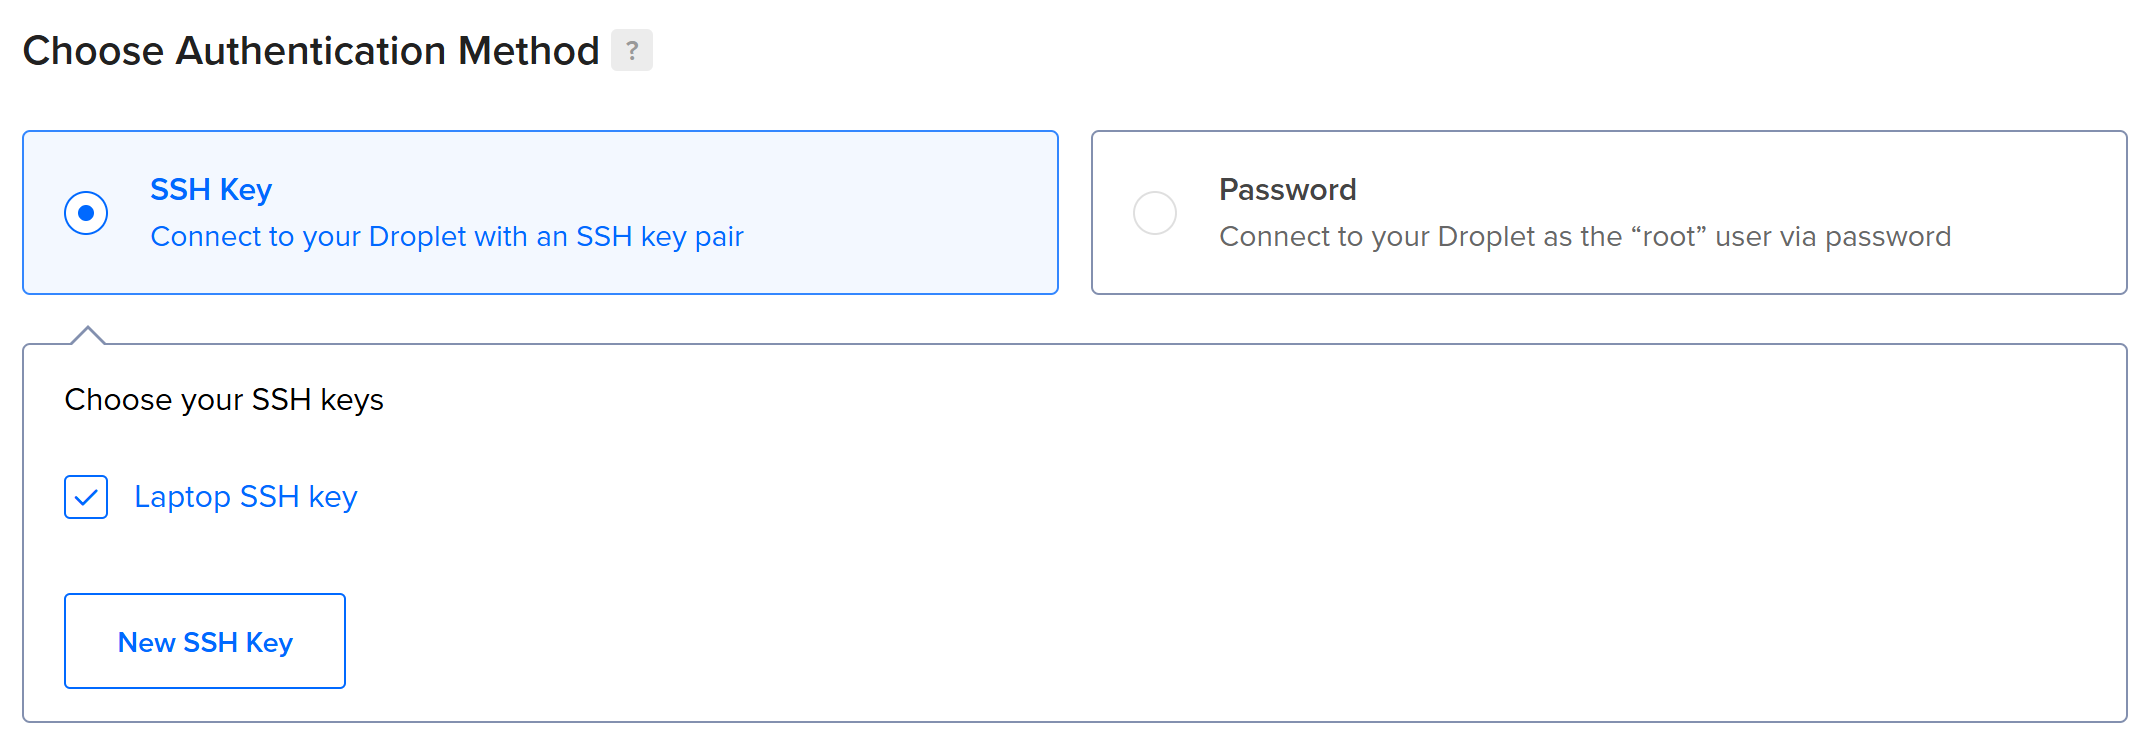 Note: If you need to create an SSH key, follow DigitalOcean’s guide on adding SSH keys.
Give your Droplet a descriptive hostname (e.g., “openclaw-server”) and press the “Create Droplet” button: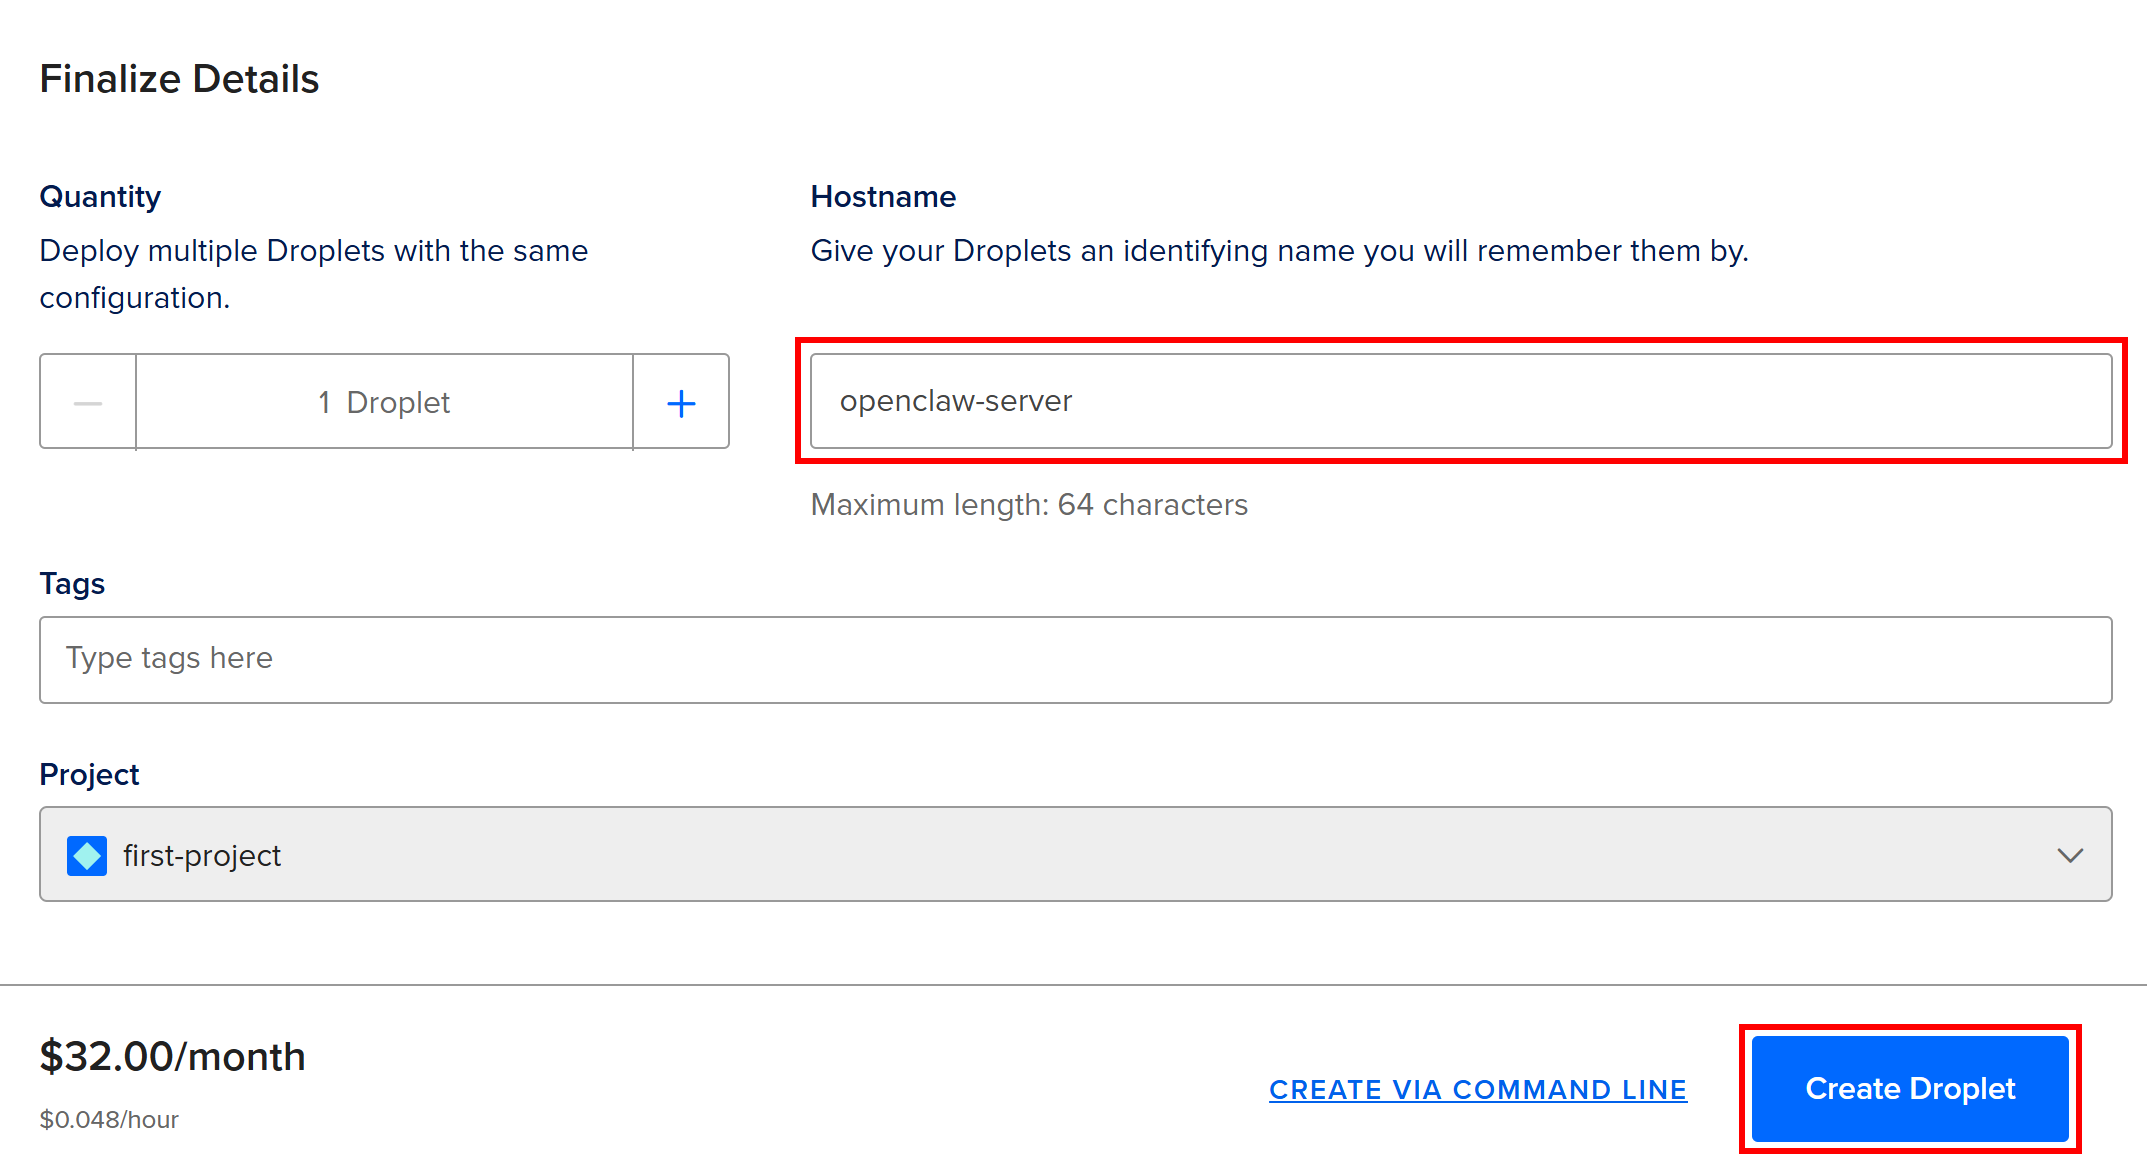
Alternatively, you can also create an OpenClaw Droplet using the DigitalOcean API. Refer to the official DigitalOcean docs for details.
Here we go! You now have an OpenClaw Droplet in place in DigitalOcean.
Step #2: Access Your Droplet
Droplet creation and initialization take a few minutes, so please be patient.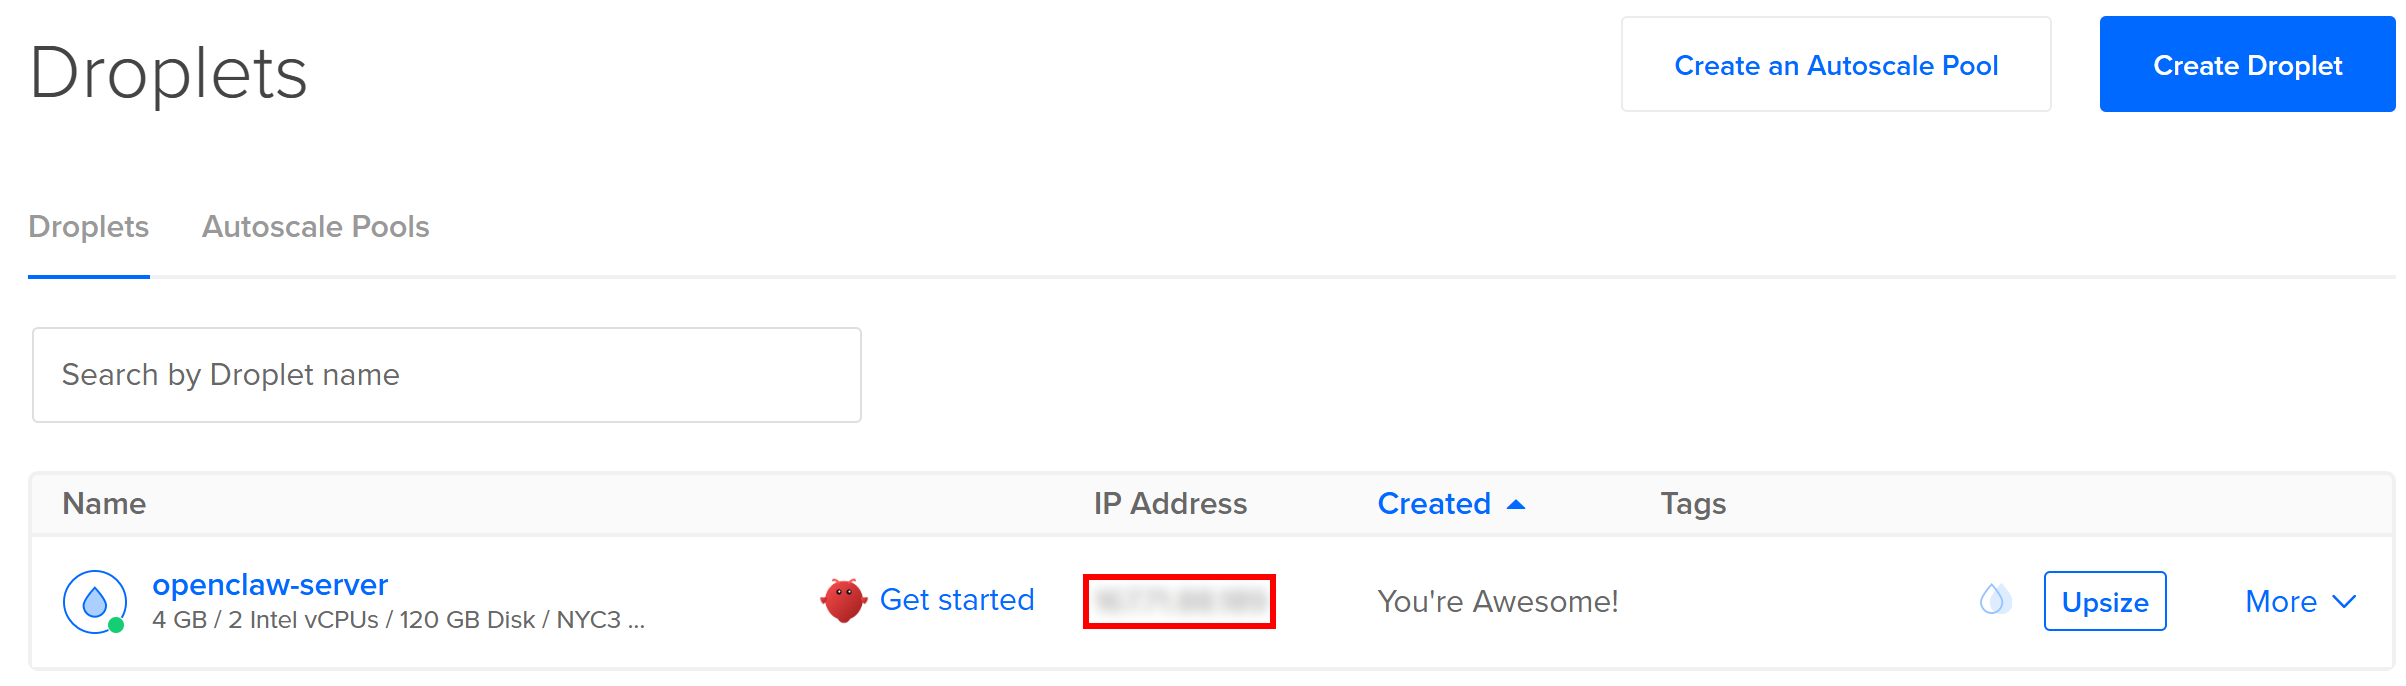
Once the Droplet is ready, connect to it via SSH using the IPv4 address shown in your DigitalOcean dashboard under the “IP Address” column. To do so, open the terminal on your machine and run:
ssh root@<YOUR_DROPLET_ID>Replace <YOUR_DROPLET_IP> with the actual IP address of your Droplet.
After logging in, you should see something like this: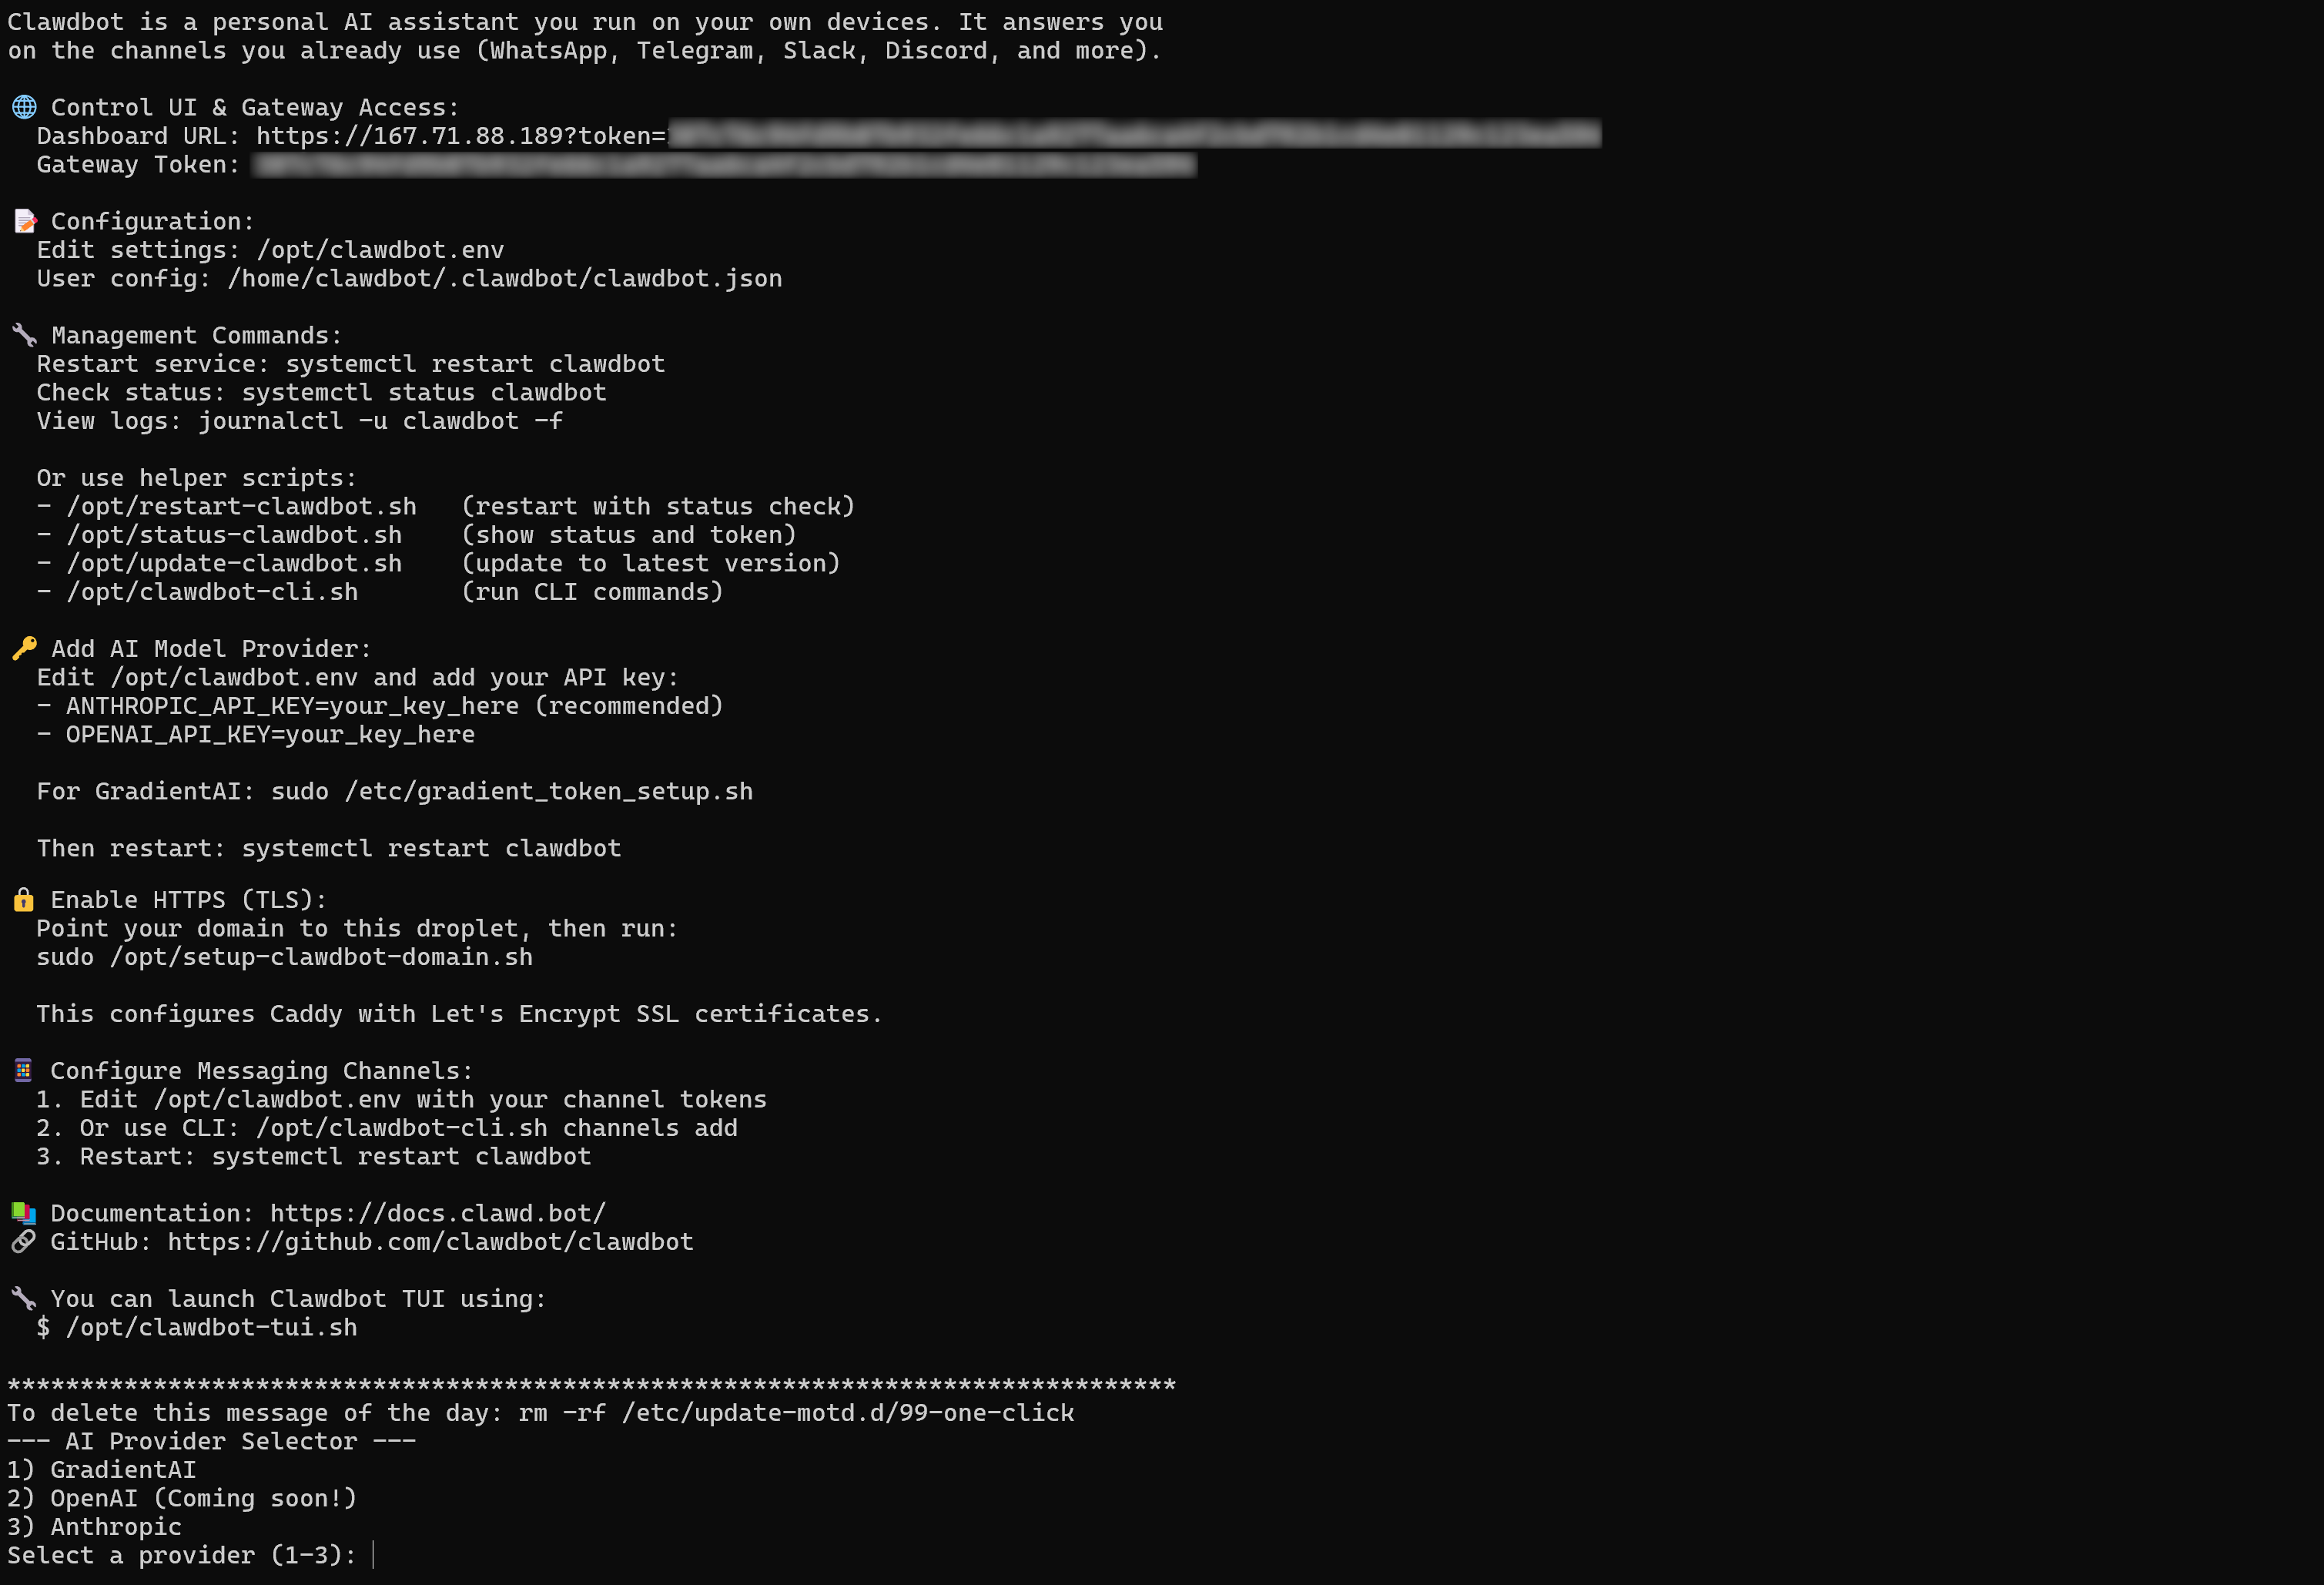
To complete the setup, add your Anthropic or Gradient AI API key when prompted:
Next, copy the “Dashboard URL” from the “Control UI & Gateway Access” section and paste it into your browser:
This will give you access to the OpenClaw Control UI: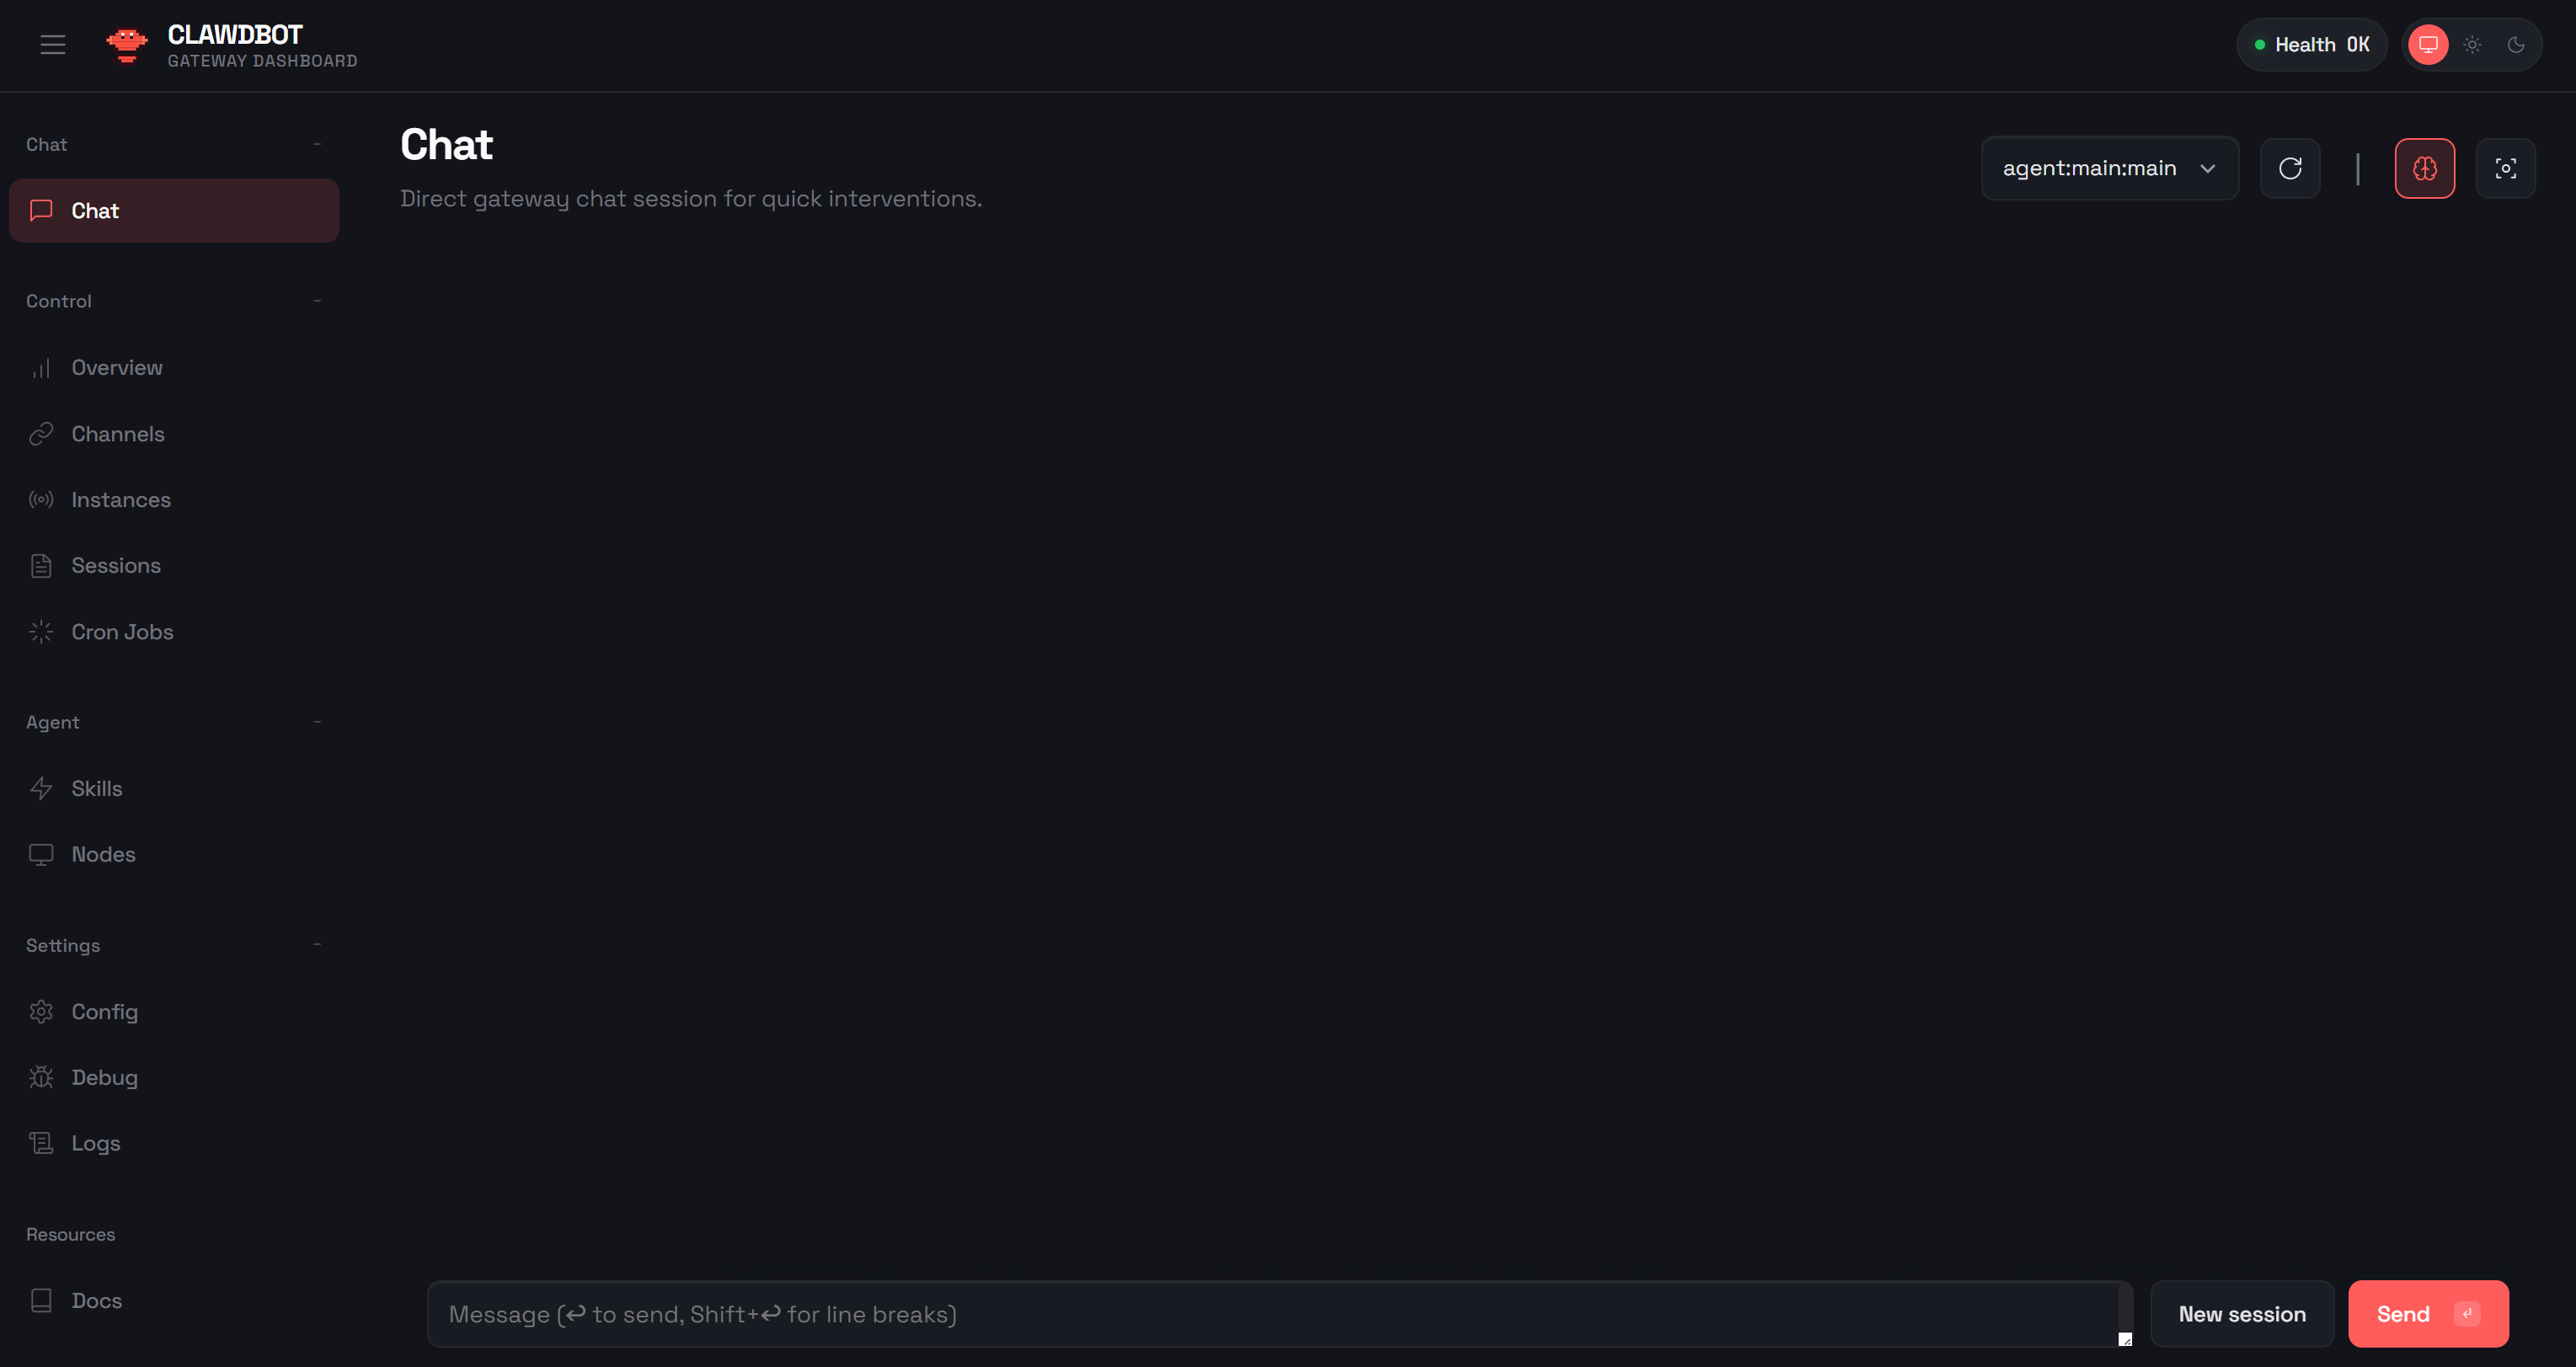
From here, you can configure your OpenClaw setup, including the WhatsApp connection and any other required settings: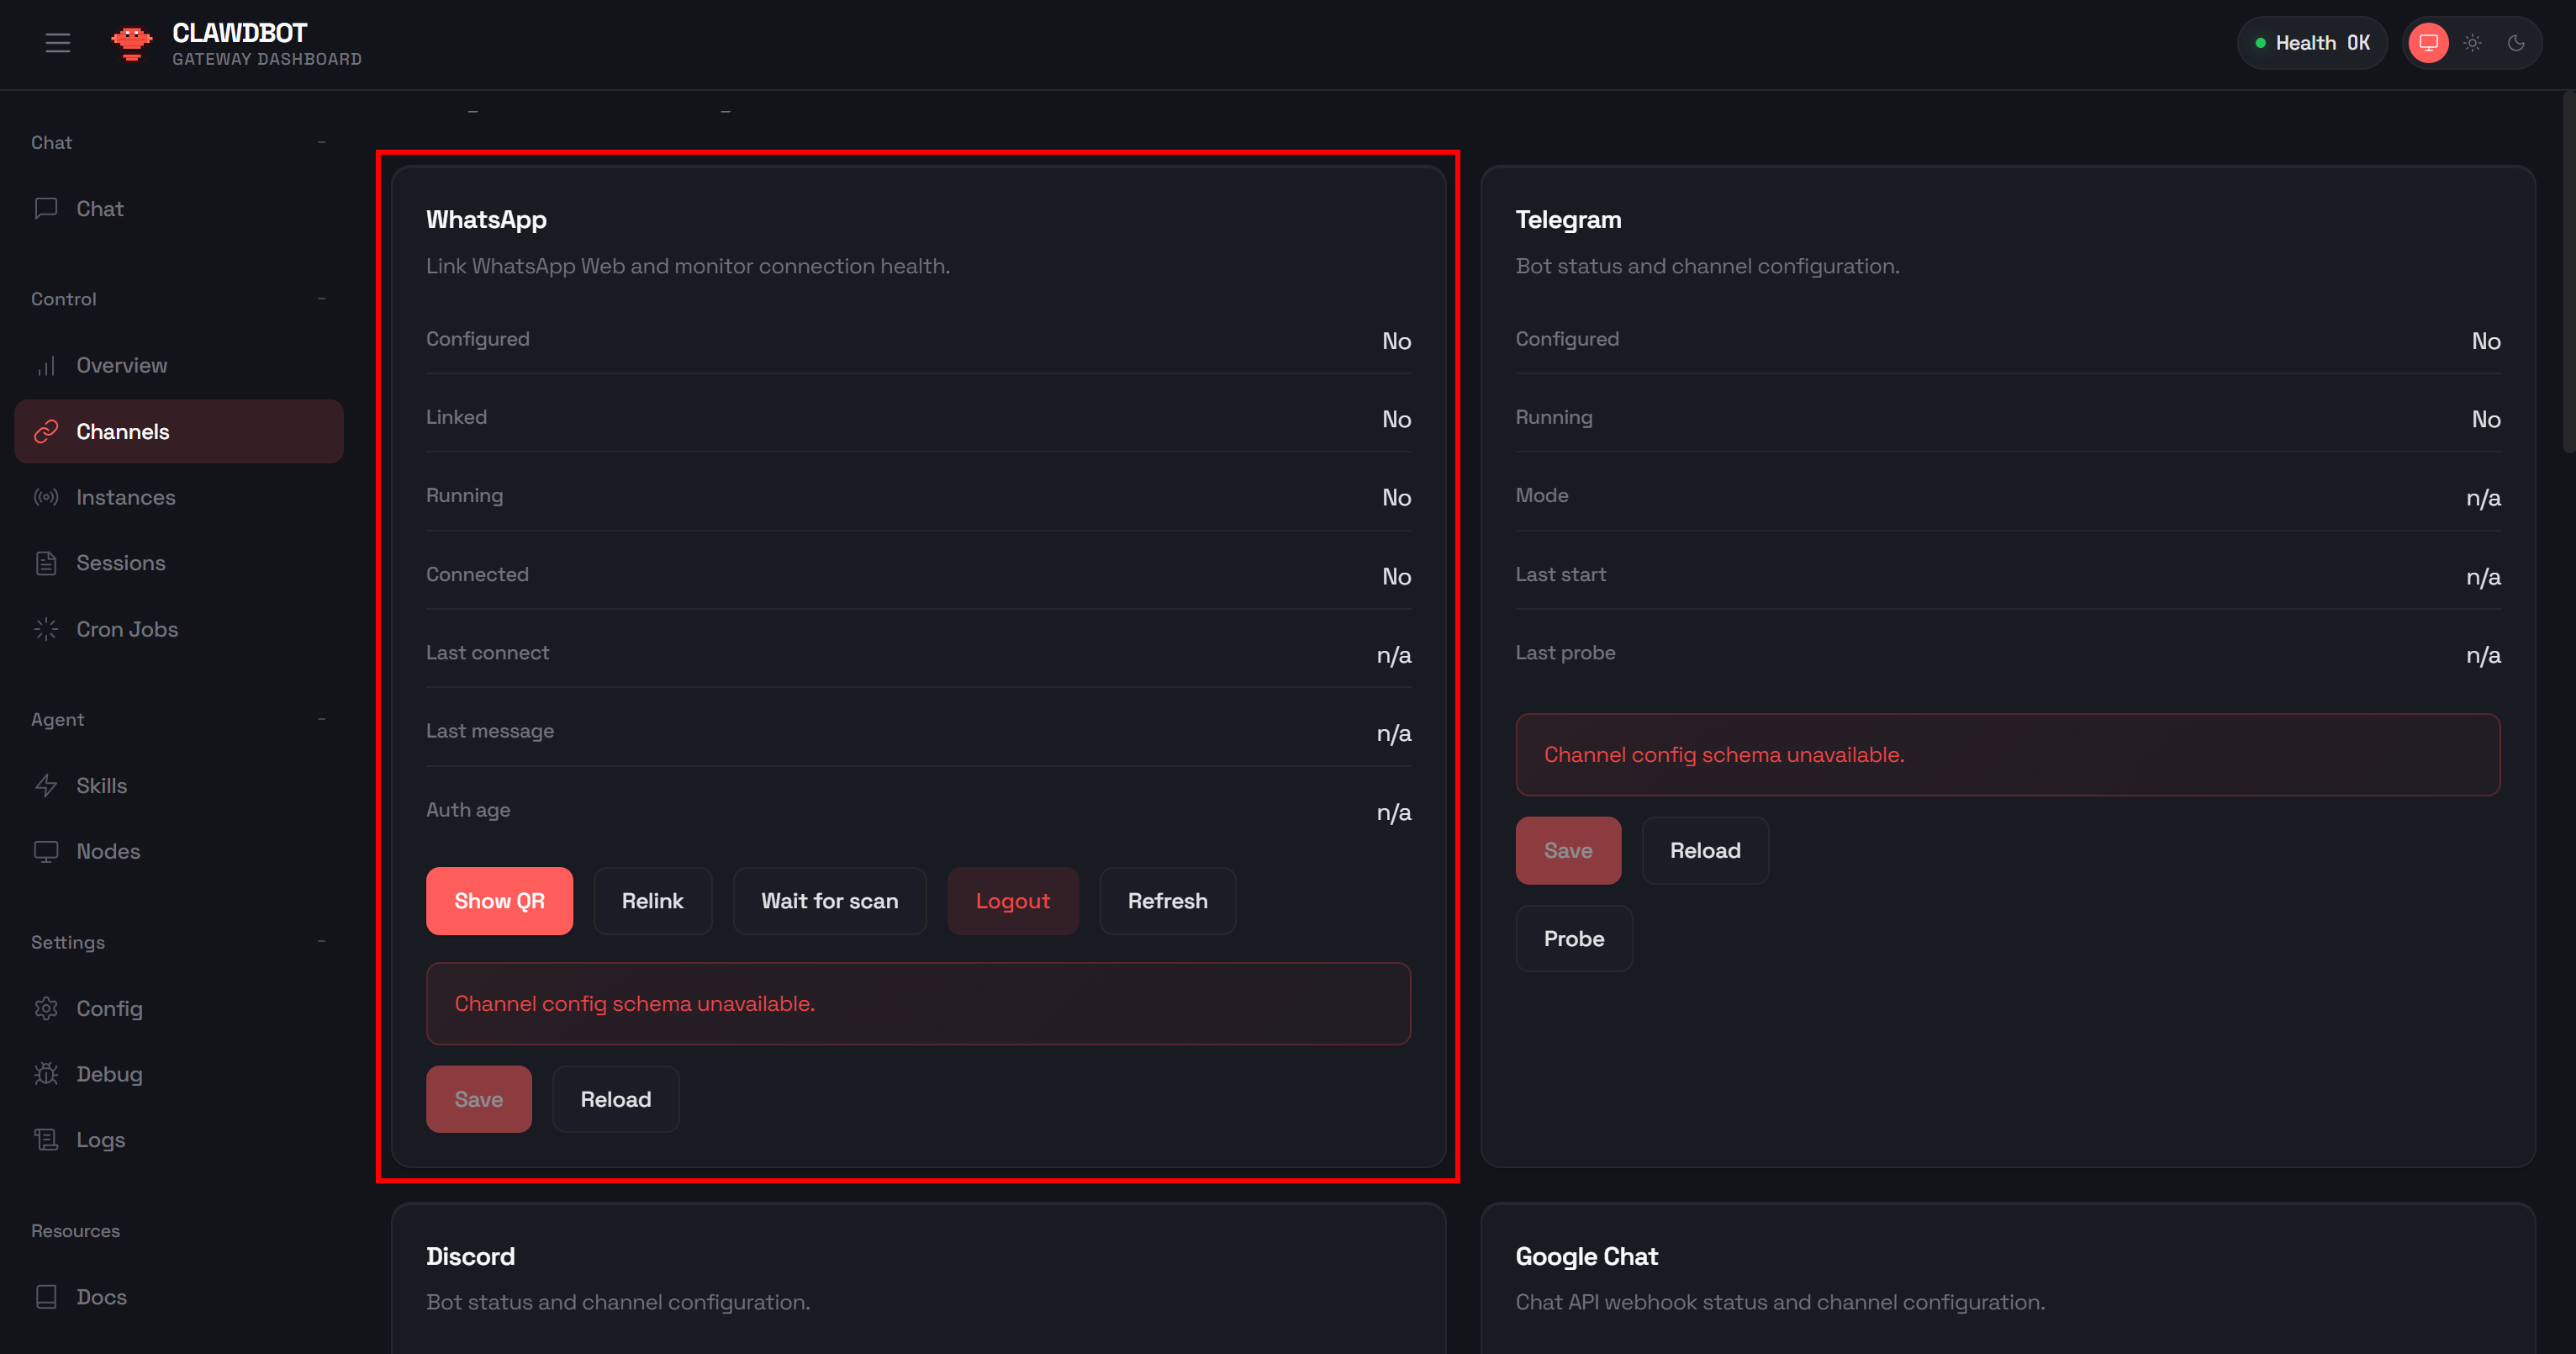
Otherwise, you can access the OpenClaw TUI directly from the terminal by running:
/opt/clawdbot-tui.shOnce the WhatsApp integration is configured, you can jump to Step #7 from the previous chapter. Follow the same testing flow as before, this time with an OpenClaw AI agent running remotely on DigitalOcean. Mission complete!
Conclusion
In this blog post, you learned what OpenClaw (ClawBot or MoltBot) is and what makes it truly unique. Its ability to build AI assistants that can chat on Slack, Telegram, WhatsApp, and many other messaging platforms sets it apart from other AI libraries.
Specifically, OpenClaw AI agents become even more powerful when they have access to the right tools through dedicated skills. Bright Data supports the library with a set of skills that enable integration with its enterprise-ready web scraping tools.
Thanks to OpenClaw’s Bright Data skills, your AI agents can search the web and retrieve data autonomously, unlocking a wide range of scenarios. An example? Competitor monitoring through a simple chat, as shown here.
For more complex use cases and advanced scenarios, you can explore the full spectrum of agentic workflows.
Create a Bright Data account for free today and start integrating our AI-ready web data tools!

Technical Writer
Antonello Zanini is a technical writer, editor, and software engineer with 5M+ views. Expert in technical content strategy, web development, and project management.


