
In this tutorial, you will learn:
- What the Onyx AI platform is and what it offers as a search and AI assistant.
- Why extending Onyx with web discovery, data extraction, and integration capabilities elevates your AI agents to the next level.
- How to connect Bright Data to Onyx for that purpose, either via MCP or OpenAPI specifications.
Let’s dive in!
Onyx: What It Is and What Features It Provides
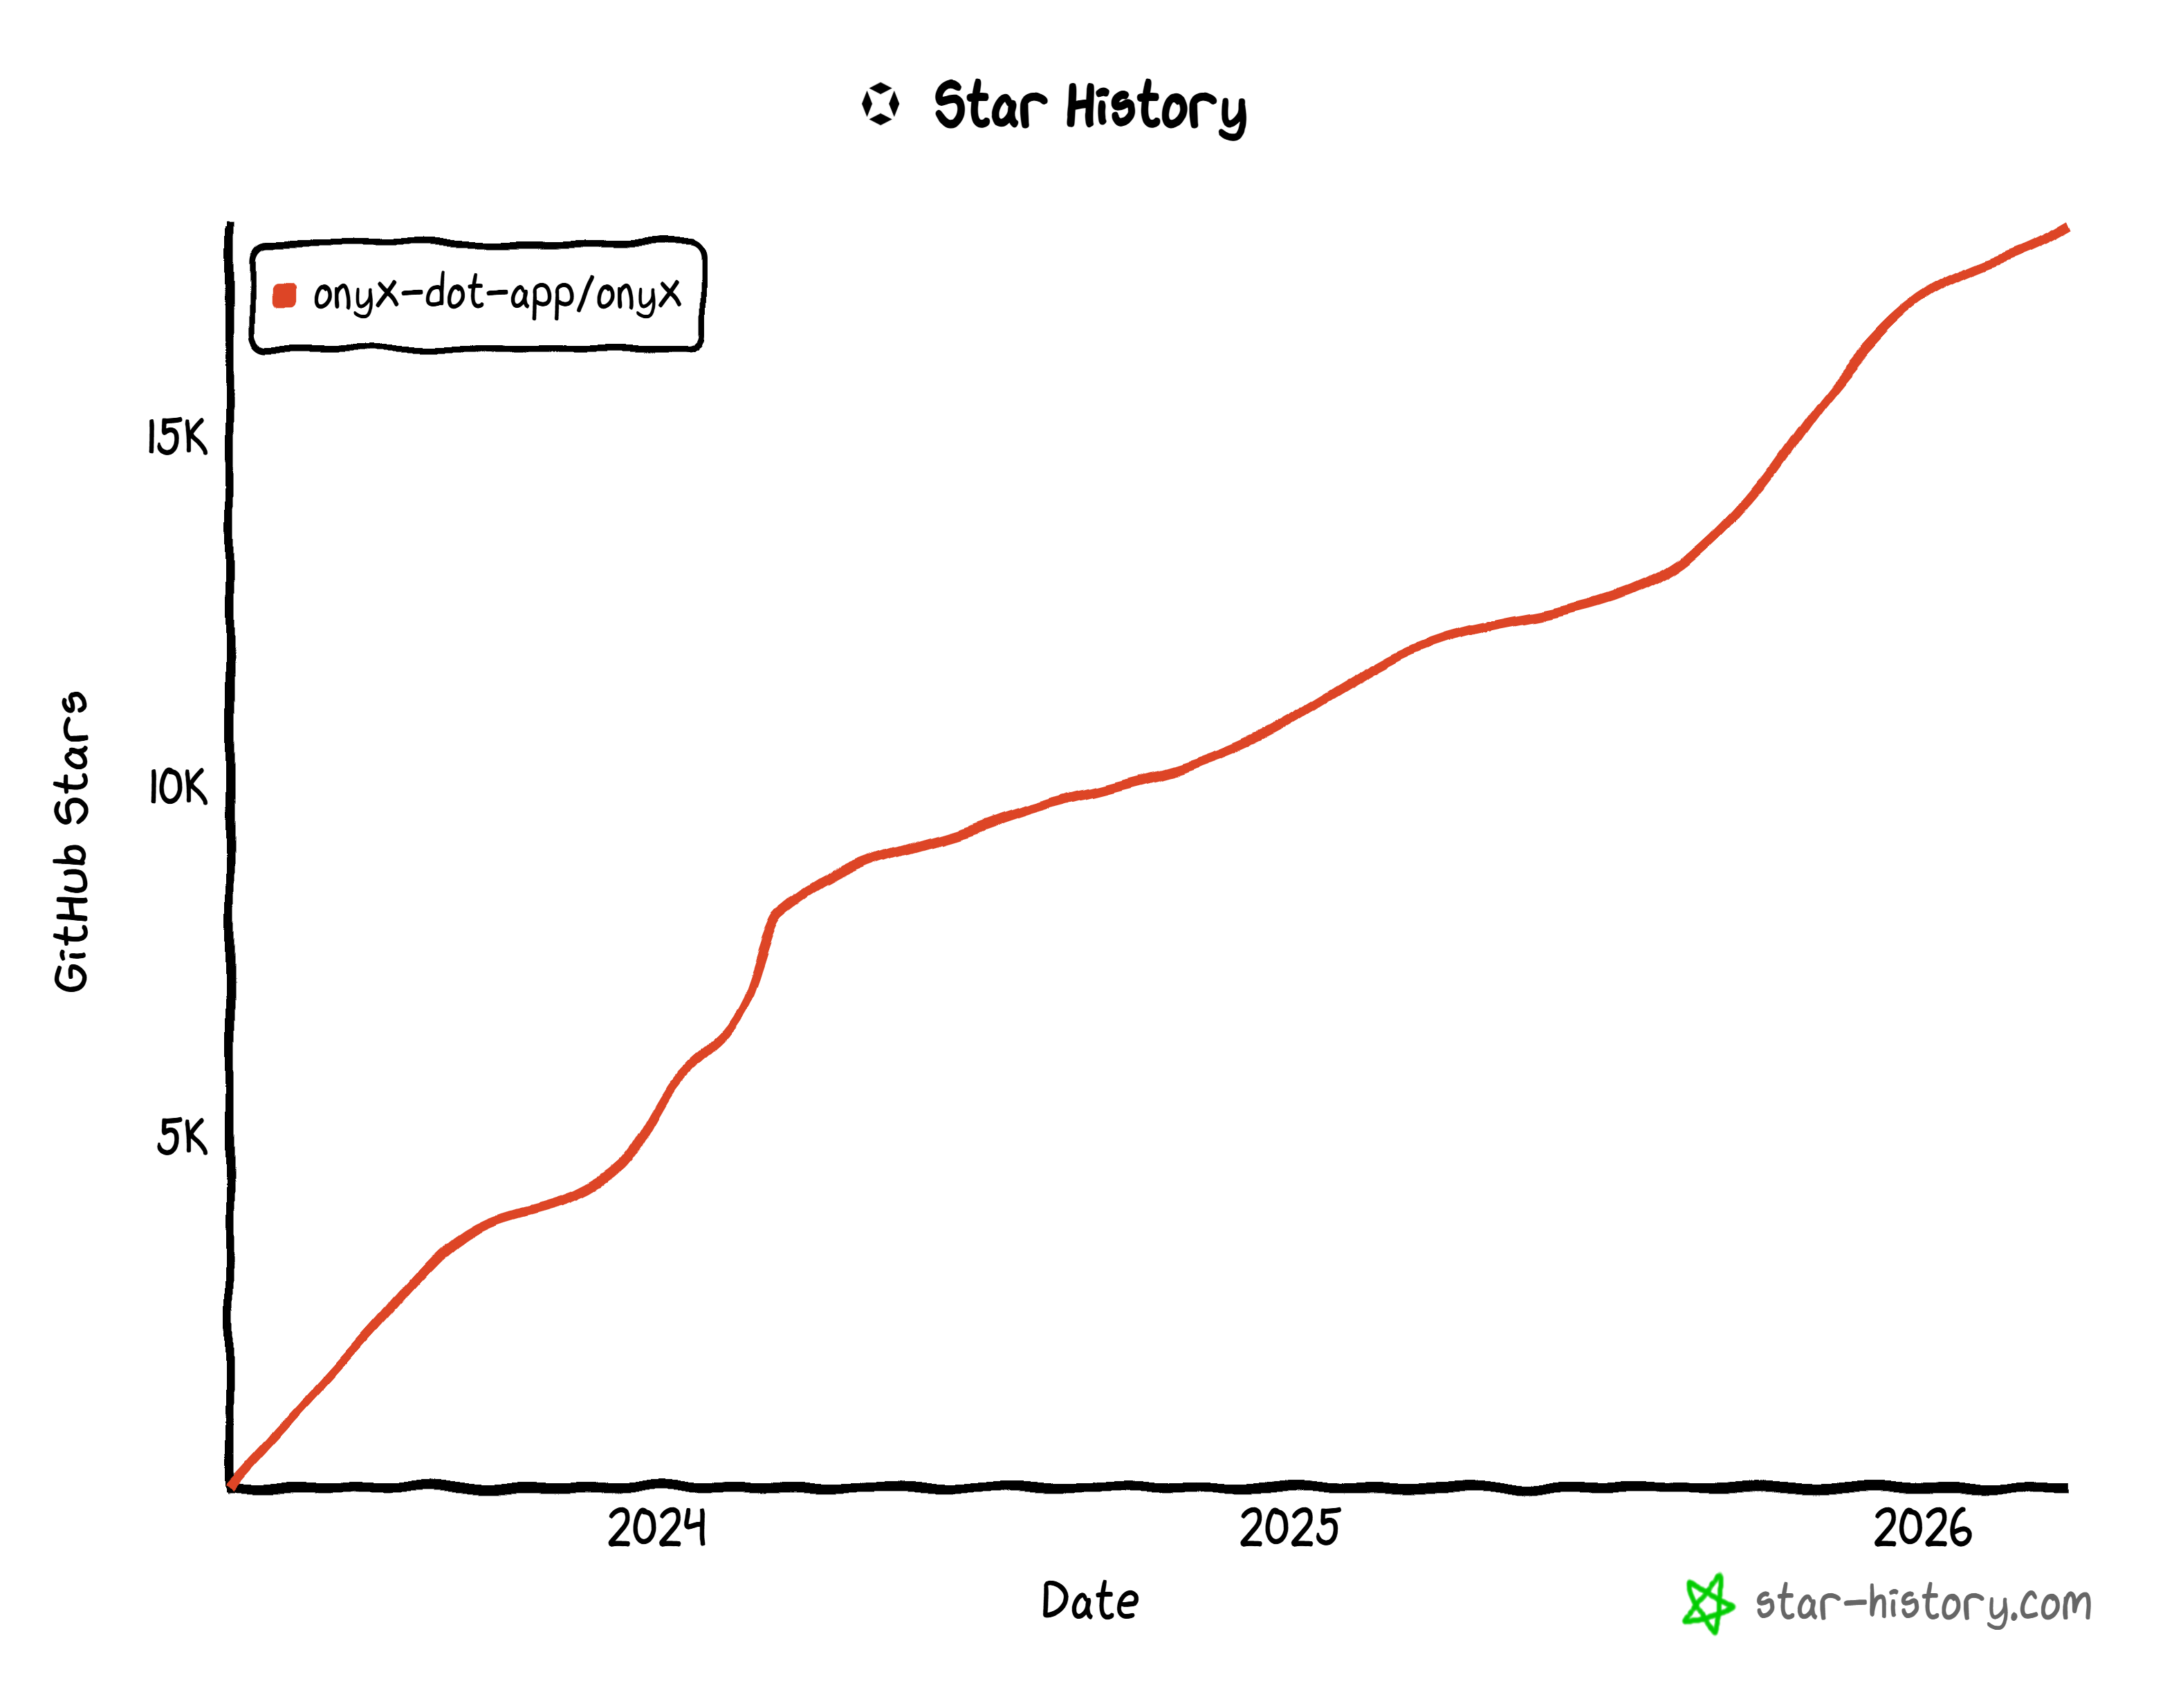
Onyx is an enterprise search and AI assistant platform that connects to a company’s internal documents, apps (like Slack, Drive, GitHub, etc.), and personnel to provide instant, contextual answers. It has an open-source nature (with 18k+ GitHub stars) and is built to be self-hostable and fully transparent.
Onyx integrates with your documents, apps, and team members while giving you full control over deployment, data privacy, and customization. It focuses on reliability, security, and extensibility, helping you create tailored AI agents that can conduct deep research, automate tasks, and access up-to-date information. All that, within a single, web-based interface.
The top features offered by the platform include:
- Custom agents: Build AI agents with unique instructions, knowledge, and actions tailored to your workflows.
- Web and internal search: Retrieve up-to-date information from the web or your organization’s knowledge base using hybrid search, RAG, and AI-generated knowledge graphs.
- Connectors: Integrate with 40+ apps to pull documents, metadata, and access-controlled information.
- Deep research: Conduct multi-step, agentic searches to deliver in-depth answers and insights.
- Actions and MCP support: Enable agents to interact with external systems and automate workflows.
- Code interpreter: Run scripts, analyze data, render graphs, and create files directly in chat.
- Image generation: Create images from user prompts within the platform.
- Collaboration tools: Share chats, gather feedback, track usage, and manage user roles.
- Flexible LLM support: Works with many LLMs, including OpenAI, Anthropic, Gemini, and self-hosted models like vLLM or Ollama.
- Deployment options: Deploy on Docker, Kubernetes, Terraform, cloud providers, or fully air-gapped environments for enterprise security.
Discover more on the official docs.
Extending the Onyx AI Platform with Web Data Retrieval, Search, and Interaction Capabilities
Onyx is, without a doubt, a powerful AI platform. At the same time, like all LLM-based systems, its knowledge is fixed at the time the model was trained. This can lead to outdated responses, hallucinations, or gaps when your AI agents need to handle current, real-world tasks.
LLMs also cannot natively browse the web or interact with external systems, which limits their effectiveness in dynamic workflows. To overcome that, Onyx supports integrations with external services through MCP servers, actions, and tools.
This is where Bright Data comes into play! By connecting Onyx to Bright Data, your AI agents gain access to real-time information, search results, and structured data from virtually any website.
The main Bright Data products you can enable for Onyx agents include:
- SERP API: Gather search engine results from Google, Bing, and more to fuel informed responses.
- Web Unlocker API: Access raw HTML or Markdown content from any site, bypassing CAPTCHAs and anti-bot measures.
- Web Scraping APIs: Extract structured data from platforms like Amazon, LinkedIn, and Instagram.
- Crawl API: Convert entire websites into structured datasets for downstream AI workflows.
- Browser API: Programmatically control a remote browser for automated, unlocked interaction on any website.
What sets these services apart is Bright Data’s enterprise-grade infrastructure. Built on a global proxy network of over 400 million IPs across 195 countries, it supports unlimited scalability while maintaining 99.99% uptime and a 99.95% success rate.
With these integrations, Onyx agents are no longer limited to static knowledge. They can explore, retrieve, reason with live web data, and interact with websites to provide accurate, context-aware, and actionable responses.
How to Integrate Bright Data into Onyx
Onyx supports several integration methods with third-party providers. When it comes to Bright Data, the options are:
- MCP: Connect Onyx to the Bright Data Web MCP server (remotely, as Onyx does not support local MCP connections).
- OpenAPI: Create custom actions in Onyx using an OpenAPI 3.0 or 3.1 specification of Bright Data API products.
The OpenAPI method involves more configuration but gives you access to Bright Data’s services directly. On the other hand, the Web MCP approach is simpler to get started with,providing access to 60+ tools with just a single setup.
In the dedicated step-by-step chapters below, you will see how to implement both approaches! But first, let’s install and set up Onyx on your local machine.
Common Steps: Getting Started with Onyx
No matter whether you want to integrate Bright Data into Onyx via MCP or OpenAPI, you first need the solution installed and running on your machine. You must also have an admin account.
These are the preliminary steps we will cover in this section!
Prerequisites
Make sure you meet the following requirements before following the instructions below:
- A Linux/macOS operating system, or Windows with Bash installed (even Git Bash is enough).
- Docker and Docker Compose installed locally, with the Docker daemon running.
- An API key from a supported LLM provider (here, we will use an OpenAI API key).
Your machine will also need to meet the hardware requirements for a smooth experience:
- CPU: At least 4 vCPUs (recommended: 8+ vCPUs).
- RAM: At least 10 GB (recommended: 16+ GB).
- Storage: At least 32 GB + ~2.5× indexed data free space (or 500 GB for organizations with fewer than 5,000 users).
Step #1: Install Onyx
Make sure that the Docker daemon is running. Then, launch the following command in Bash to start the official Onyx installation script:
curl -fsSL https://raw.githubusercontent.com/onyx-dot-app/onyx/main/deployment/docker_compose/install.sh > install.sh && chmod +x install.sh && ./install.shYou should see a message like this:
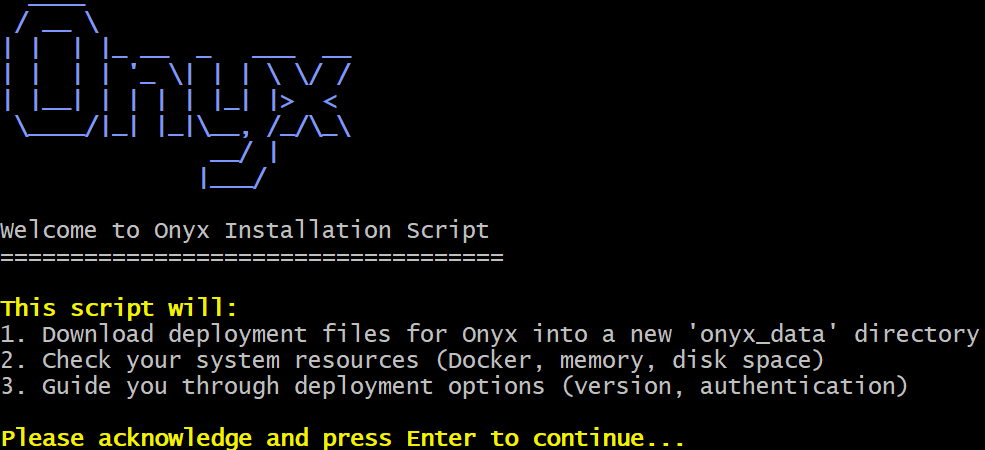
Press Enter to continue. The Onyx installation script will check that your machine meets the prerequisites and guide you through the installation process in 10 steps.
At Step 4, you will be asked which version of Onyx you want to install:
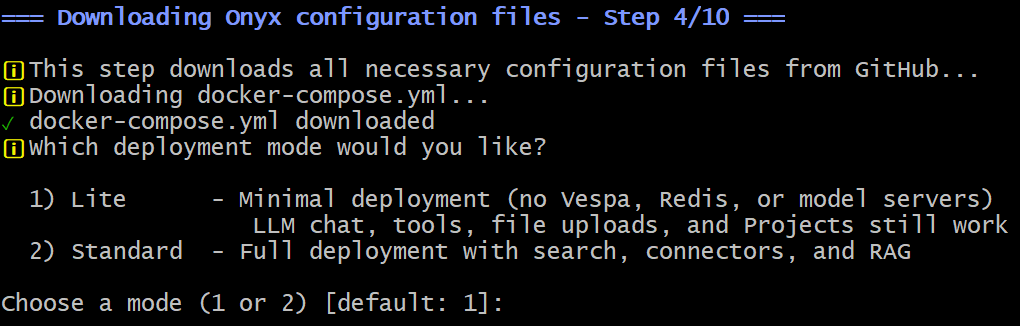
For Bright Data integration, the Lite version is sufficient. Thus, type 1 or just press Enter (as the default option is 1). Continue with the default options until the Docker images are downloaded, configured, and spun up.
If everything worked as expected, you should see:
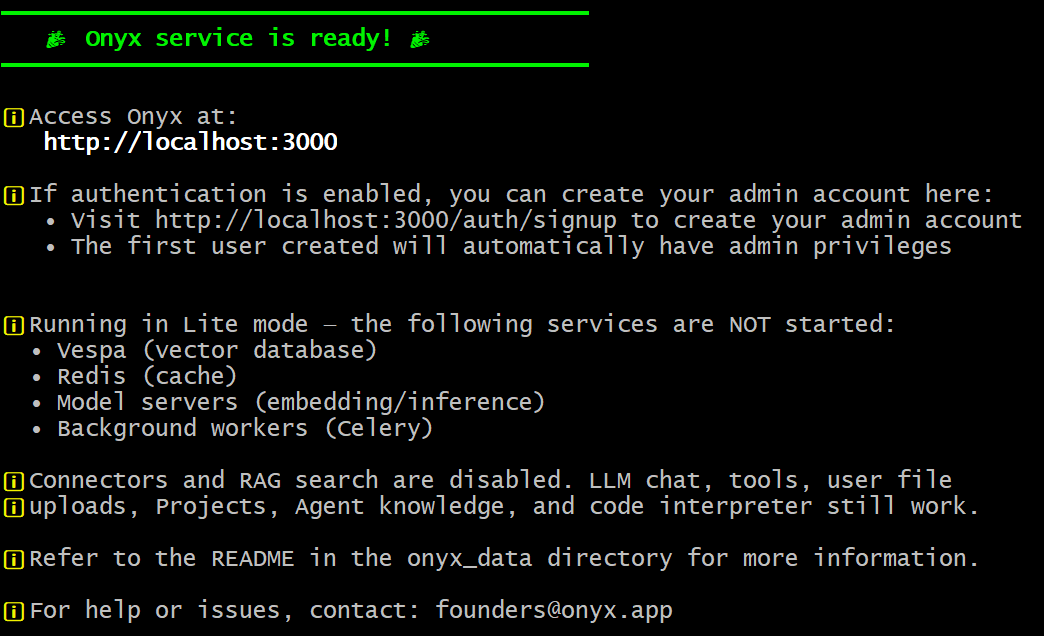
Fantastic! Onyx has now been installed locally and is accessible at http://localhost on your machine.
Step #2: Create an Admin Account
To administer Onyx, you must create an admin account. To do that, visit http://localhost in your browser. You should see the following form:
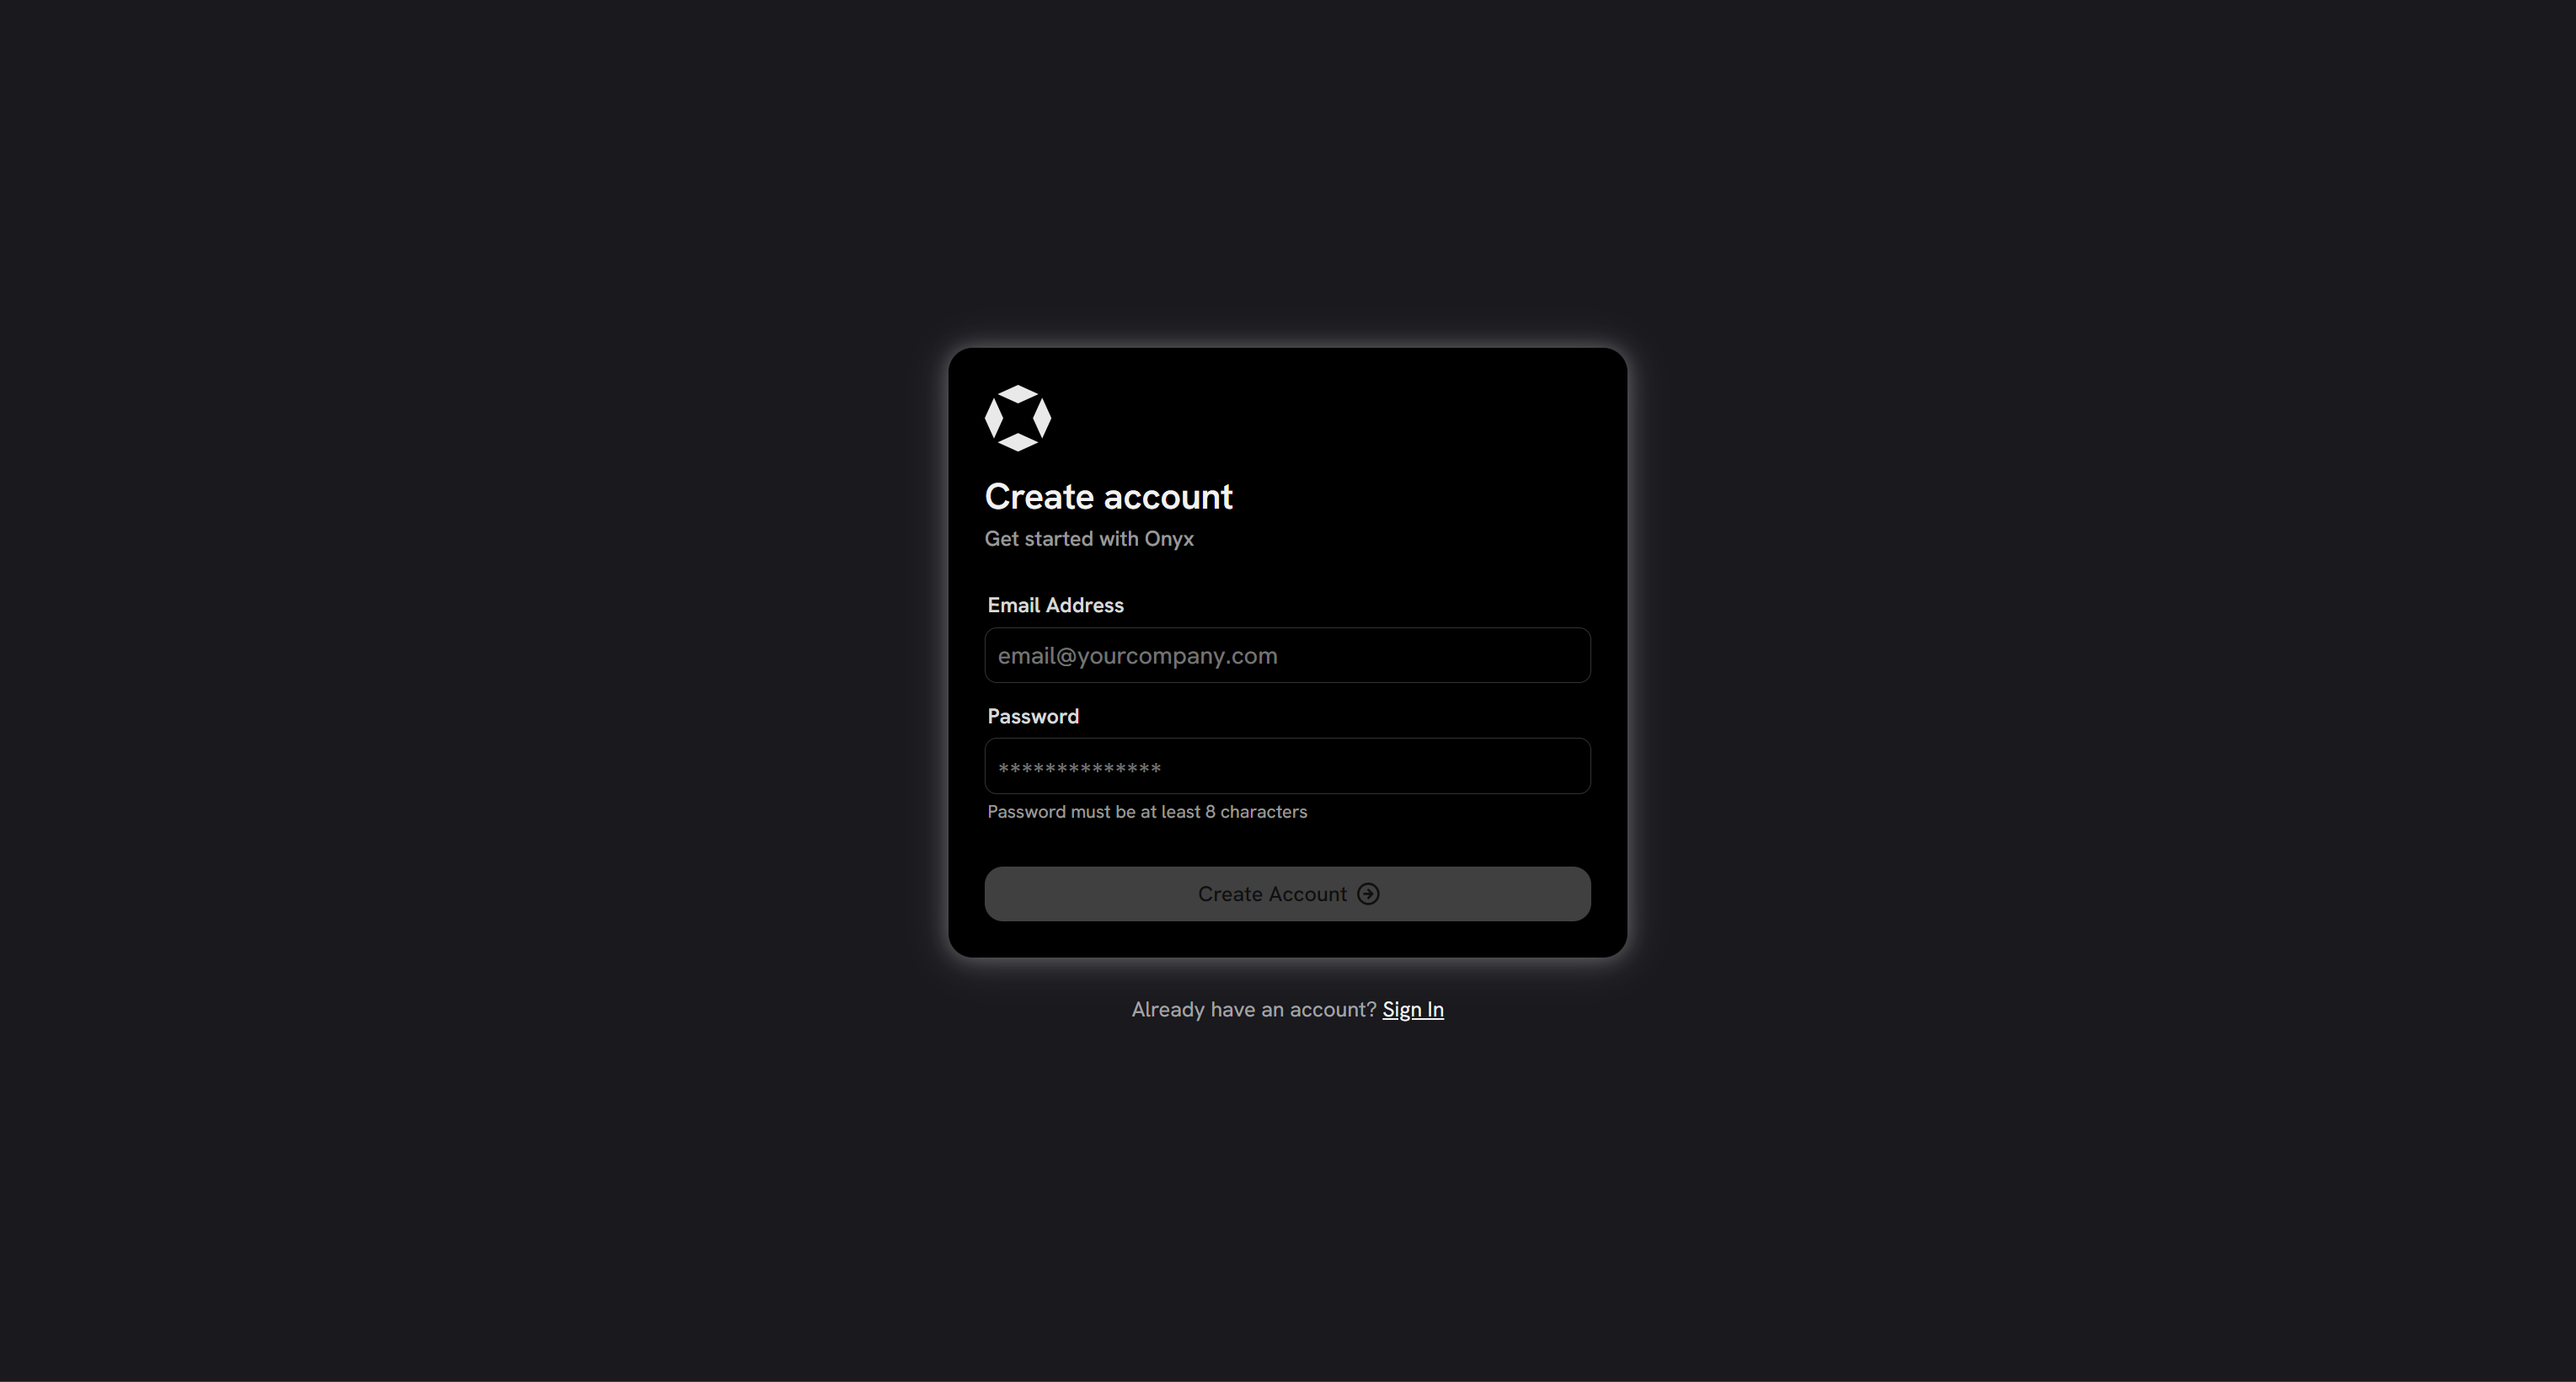
Create an account and log in. You will then reach the Onyx dashboard:
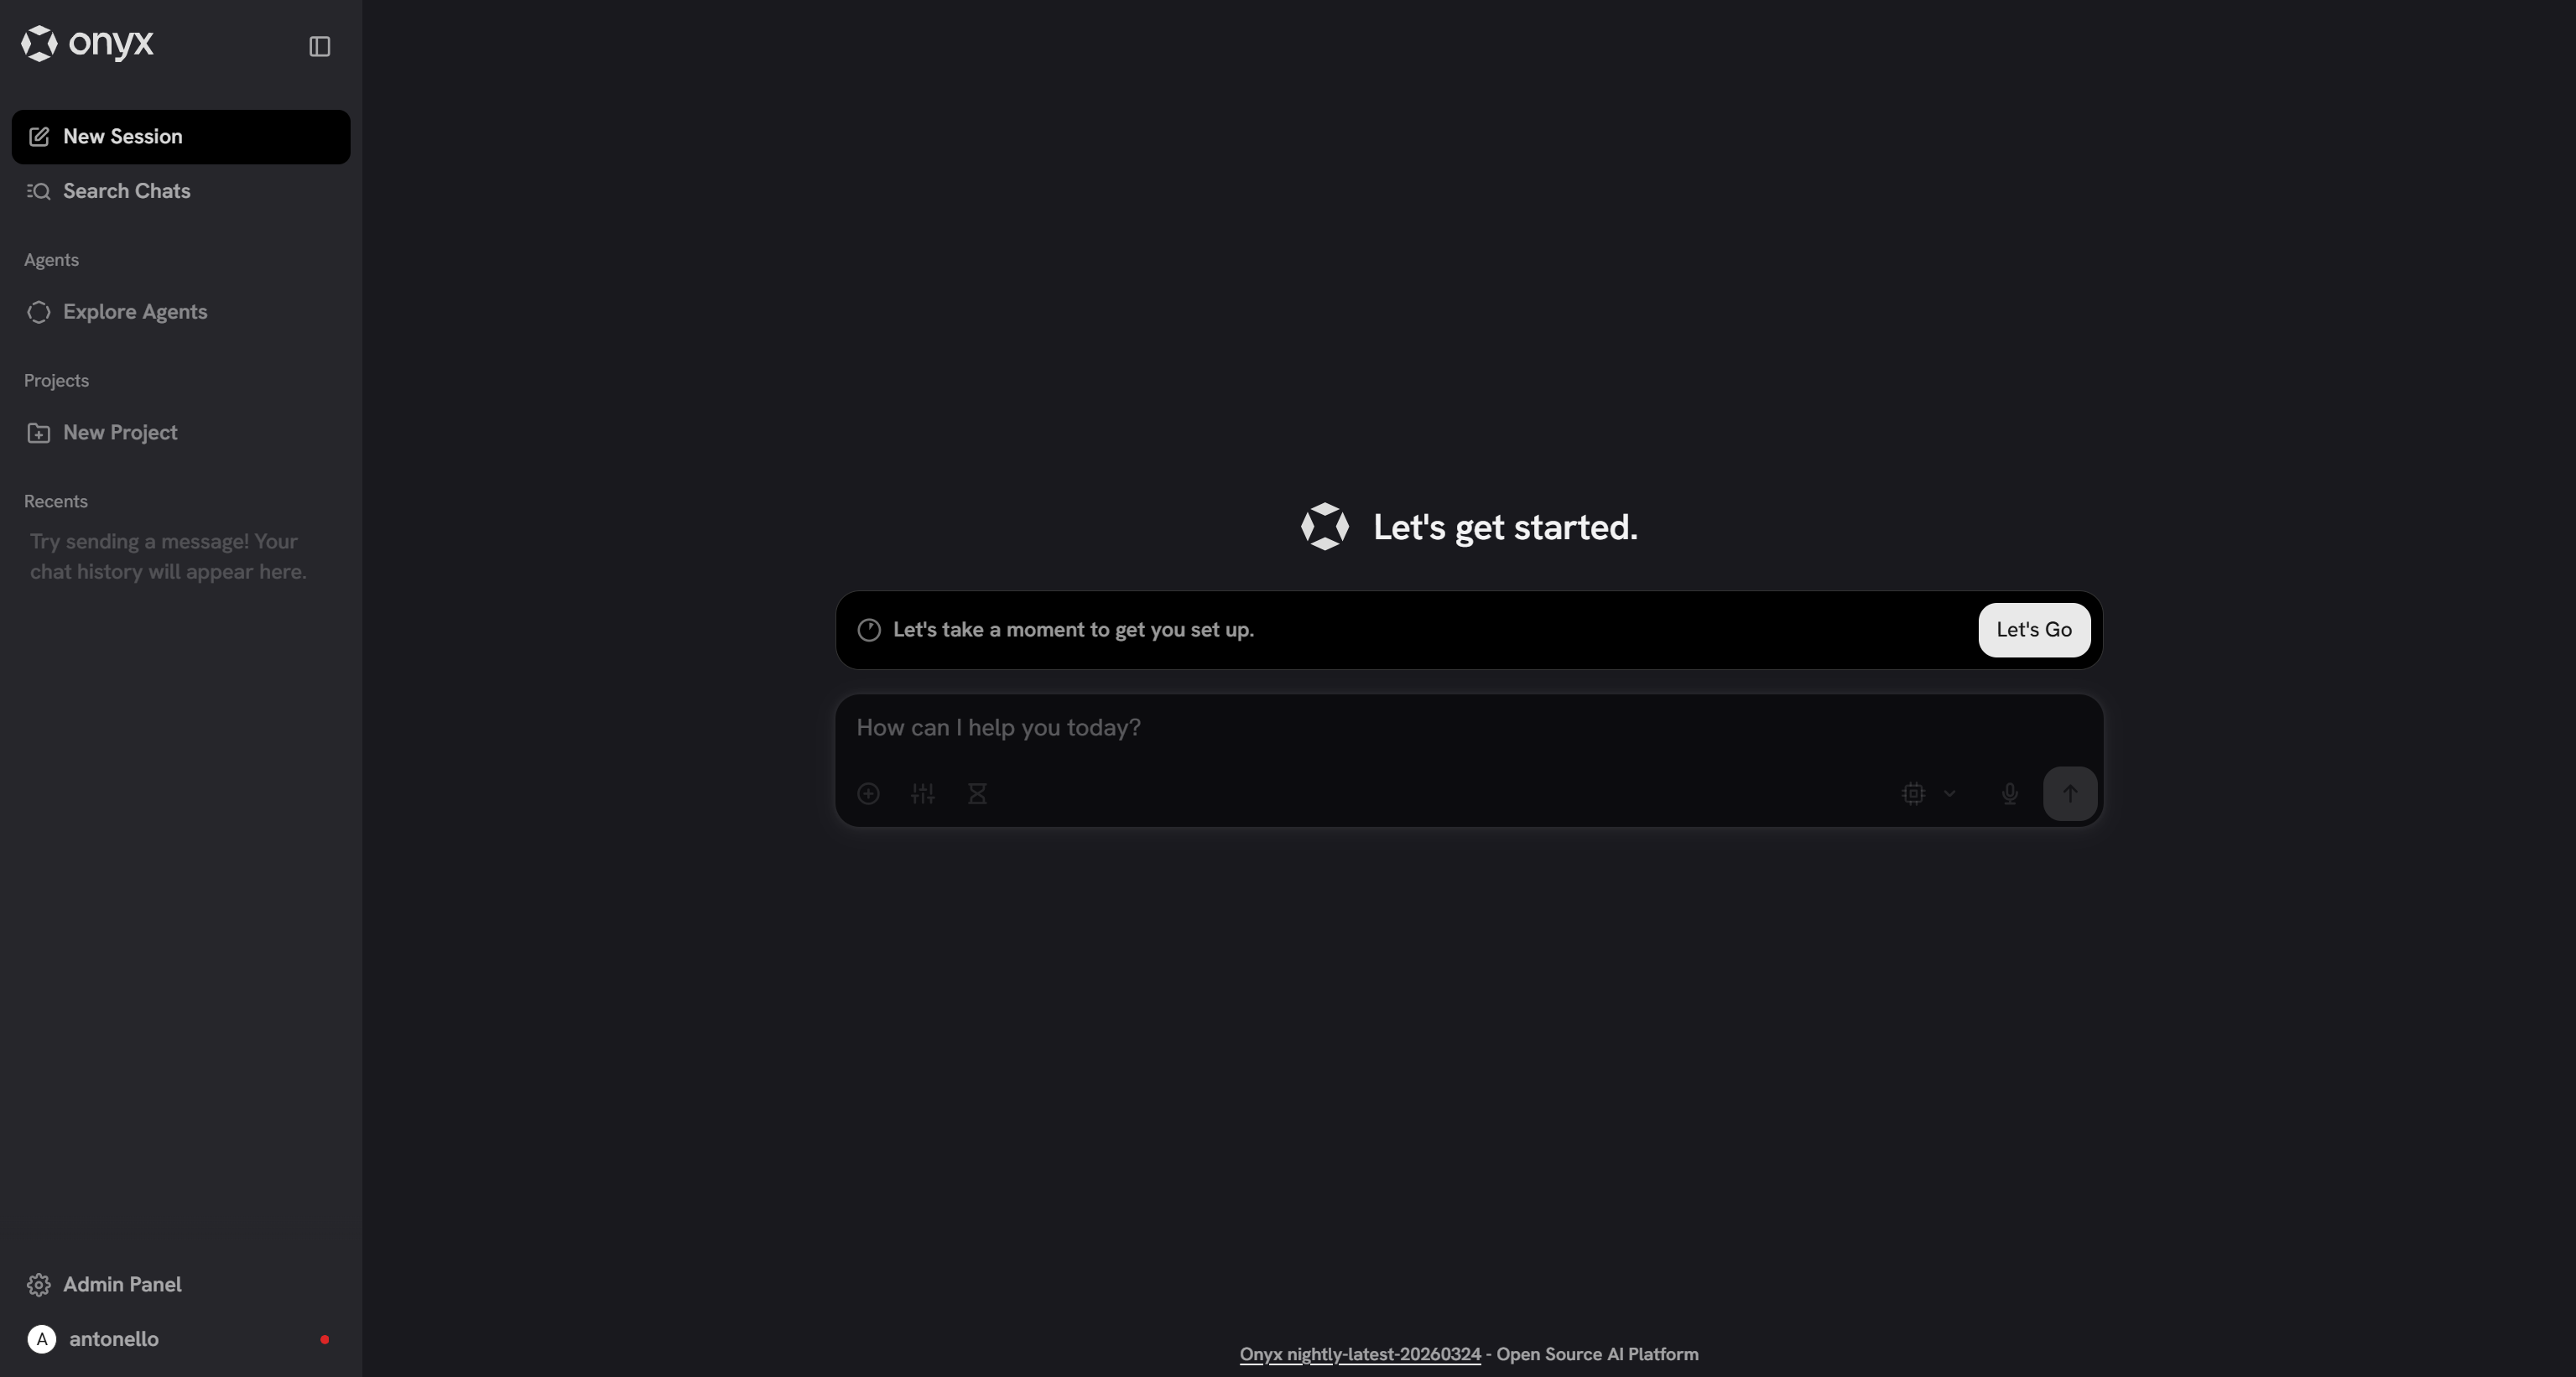
Here, you have access to all Onyx features. In particular, from the Admin Panel, you can set up the Bright Data integration,either via MCP or OpenAPI Tools.
Keep in mind that the initial configuration is not complete yet, as you still need to connect Onyx to your chosen LLM. That is what you will do in the next step!
Step #3: Complete the Setup by Connecting to an LLM
To complete the configuration, press the “Let’s Go” button:

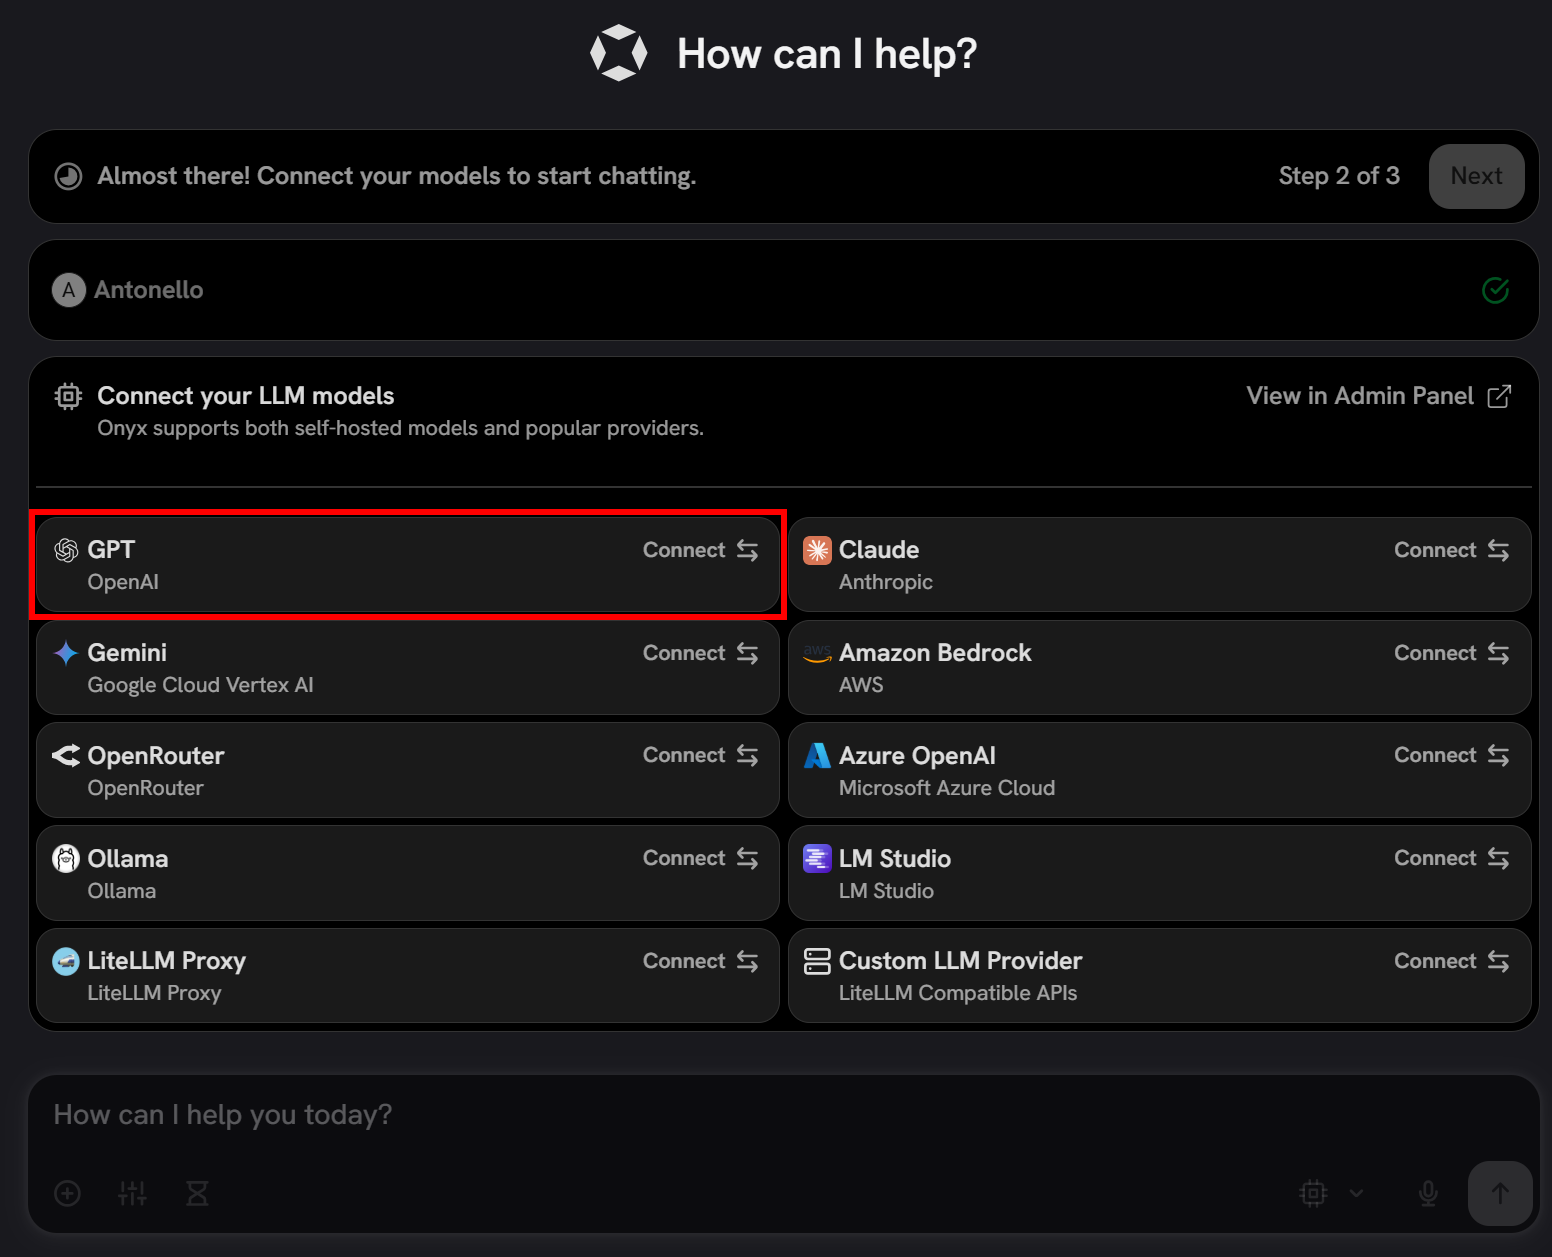
You will be prompted to enter your name. Type it in and click “Next”. Then, you will be asked to configure LLM integration.
Note: Below, you will be shown how to configure an OpenAI model. If you plan to use any other supported LLM, press on the provider card and follow the wizard.
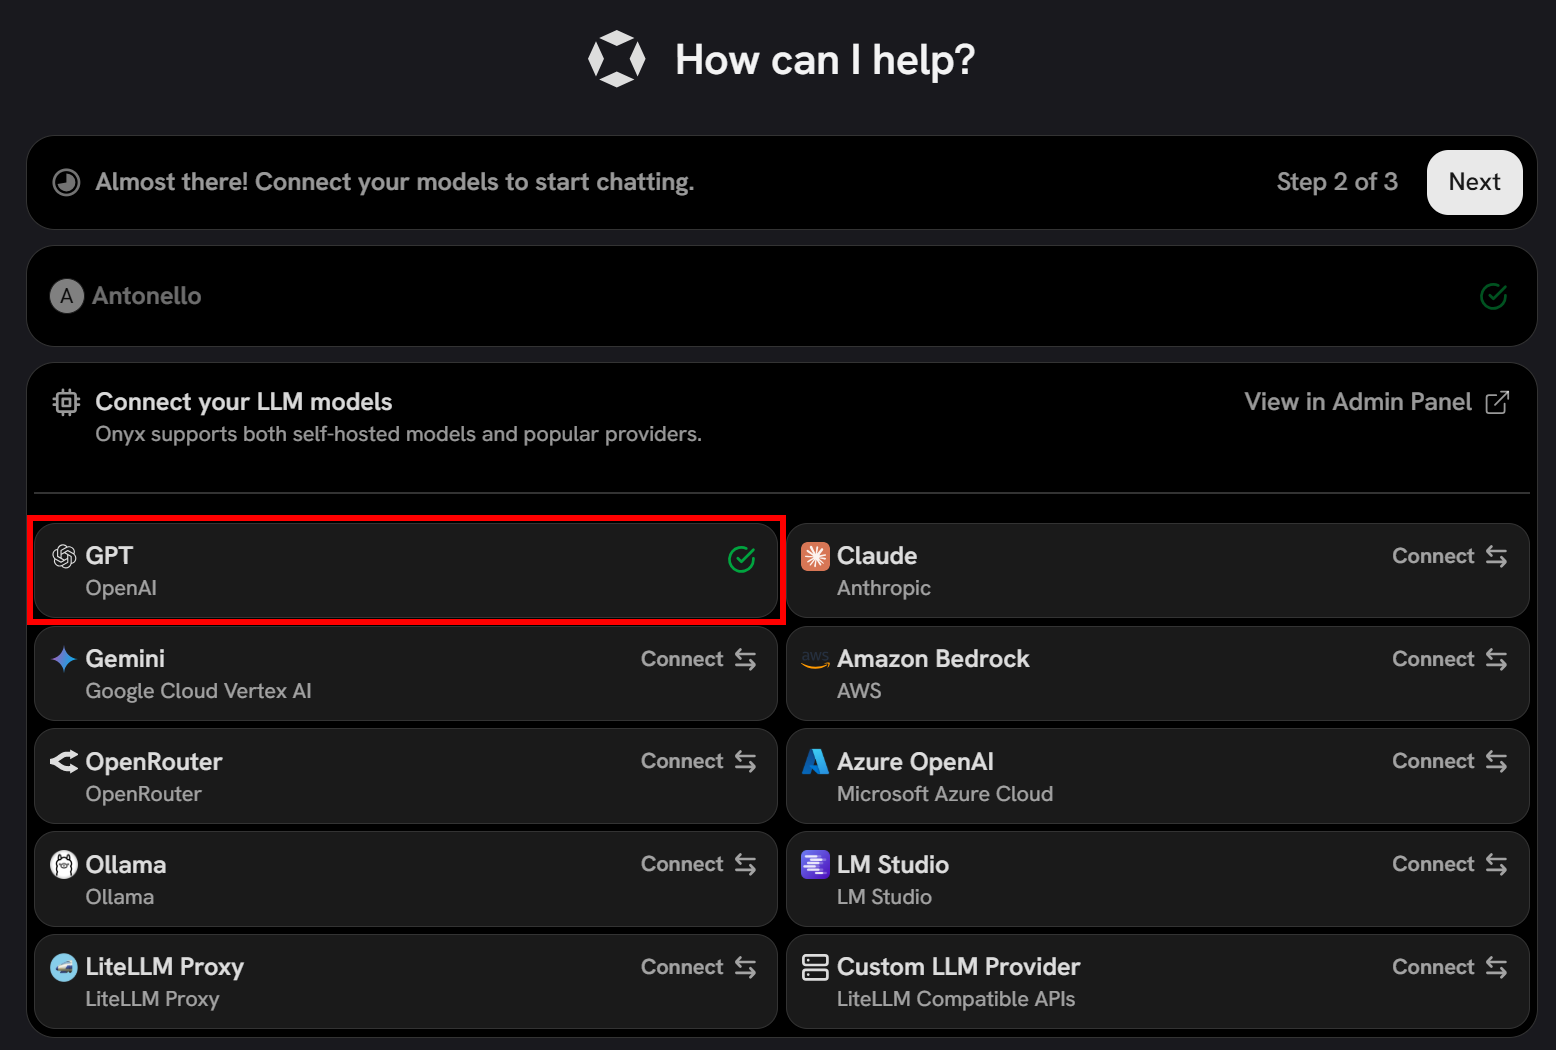
In this case, select the “GPT” option from the OpenAI card:
Paste your OpenAI API key and configure the model (e.g., gpt-5-mini):
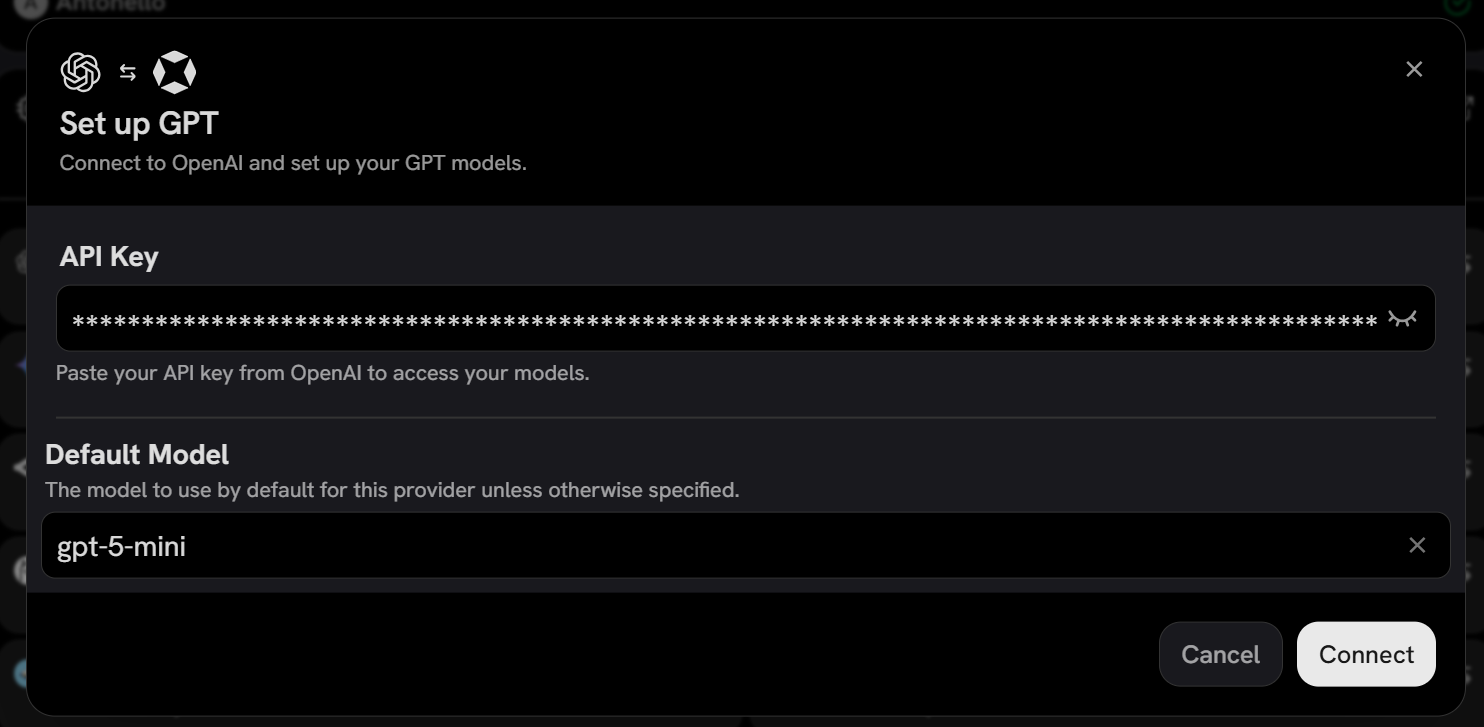
Press “Connect”, and you should see that Onyx has successfully connected to the selected LLM provider:
Finally, proceed with the last step of the configuration and click “Finish Setup”:
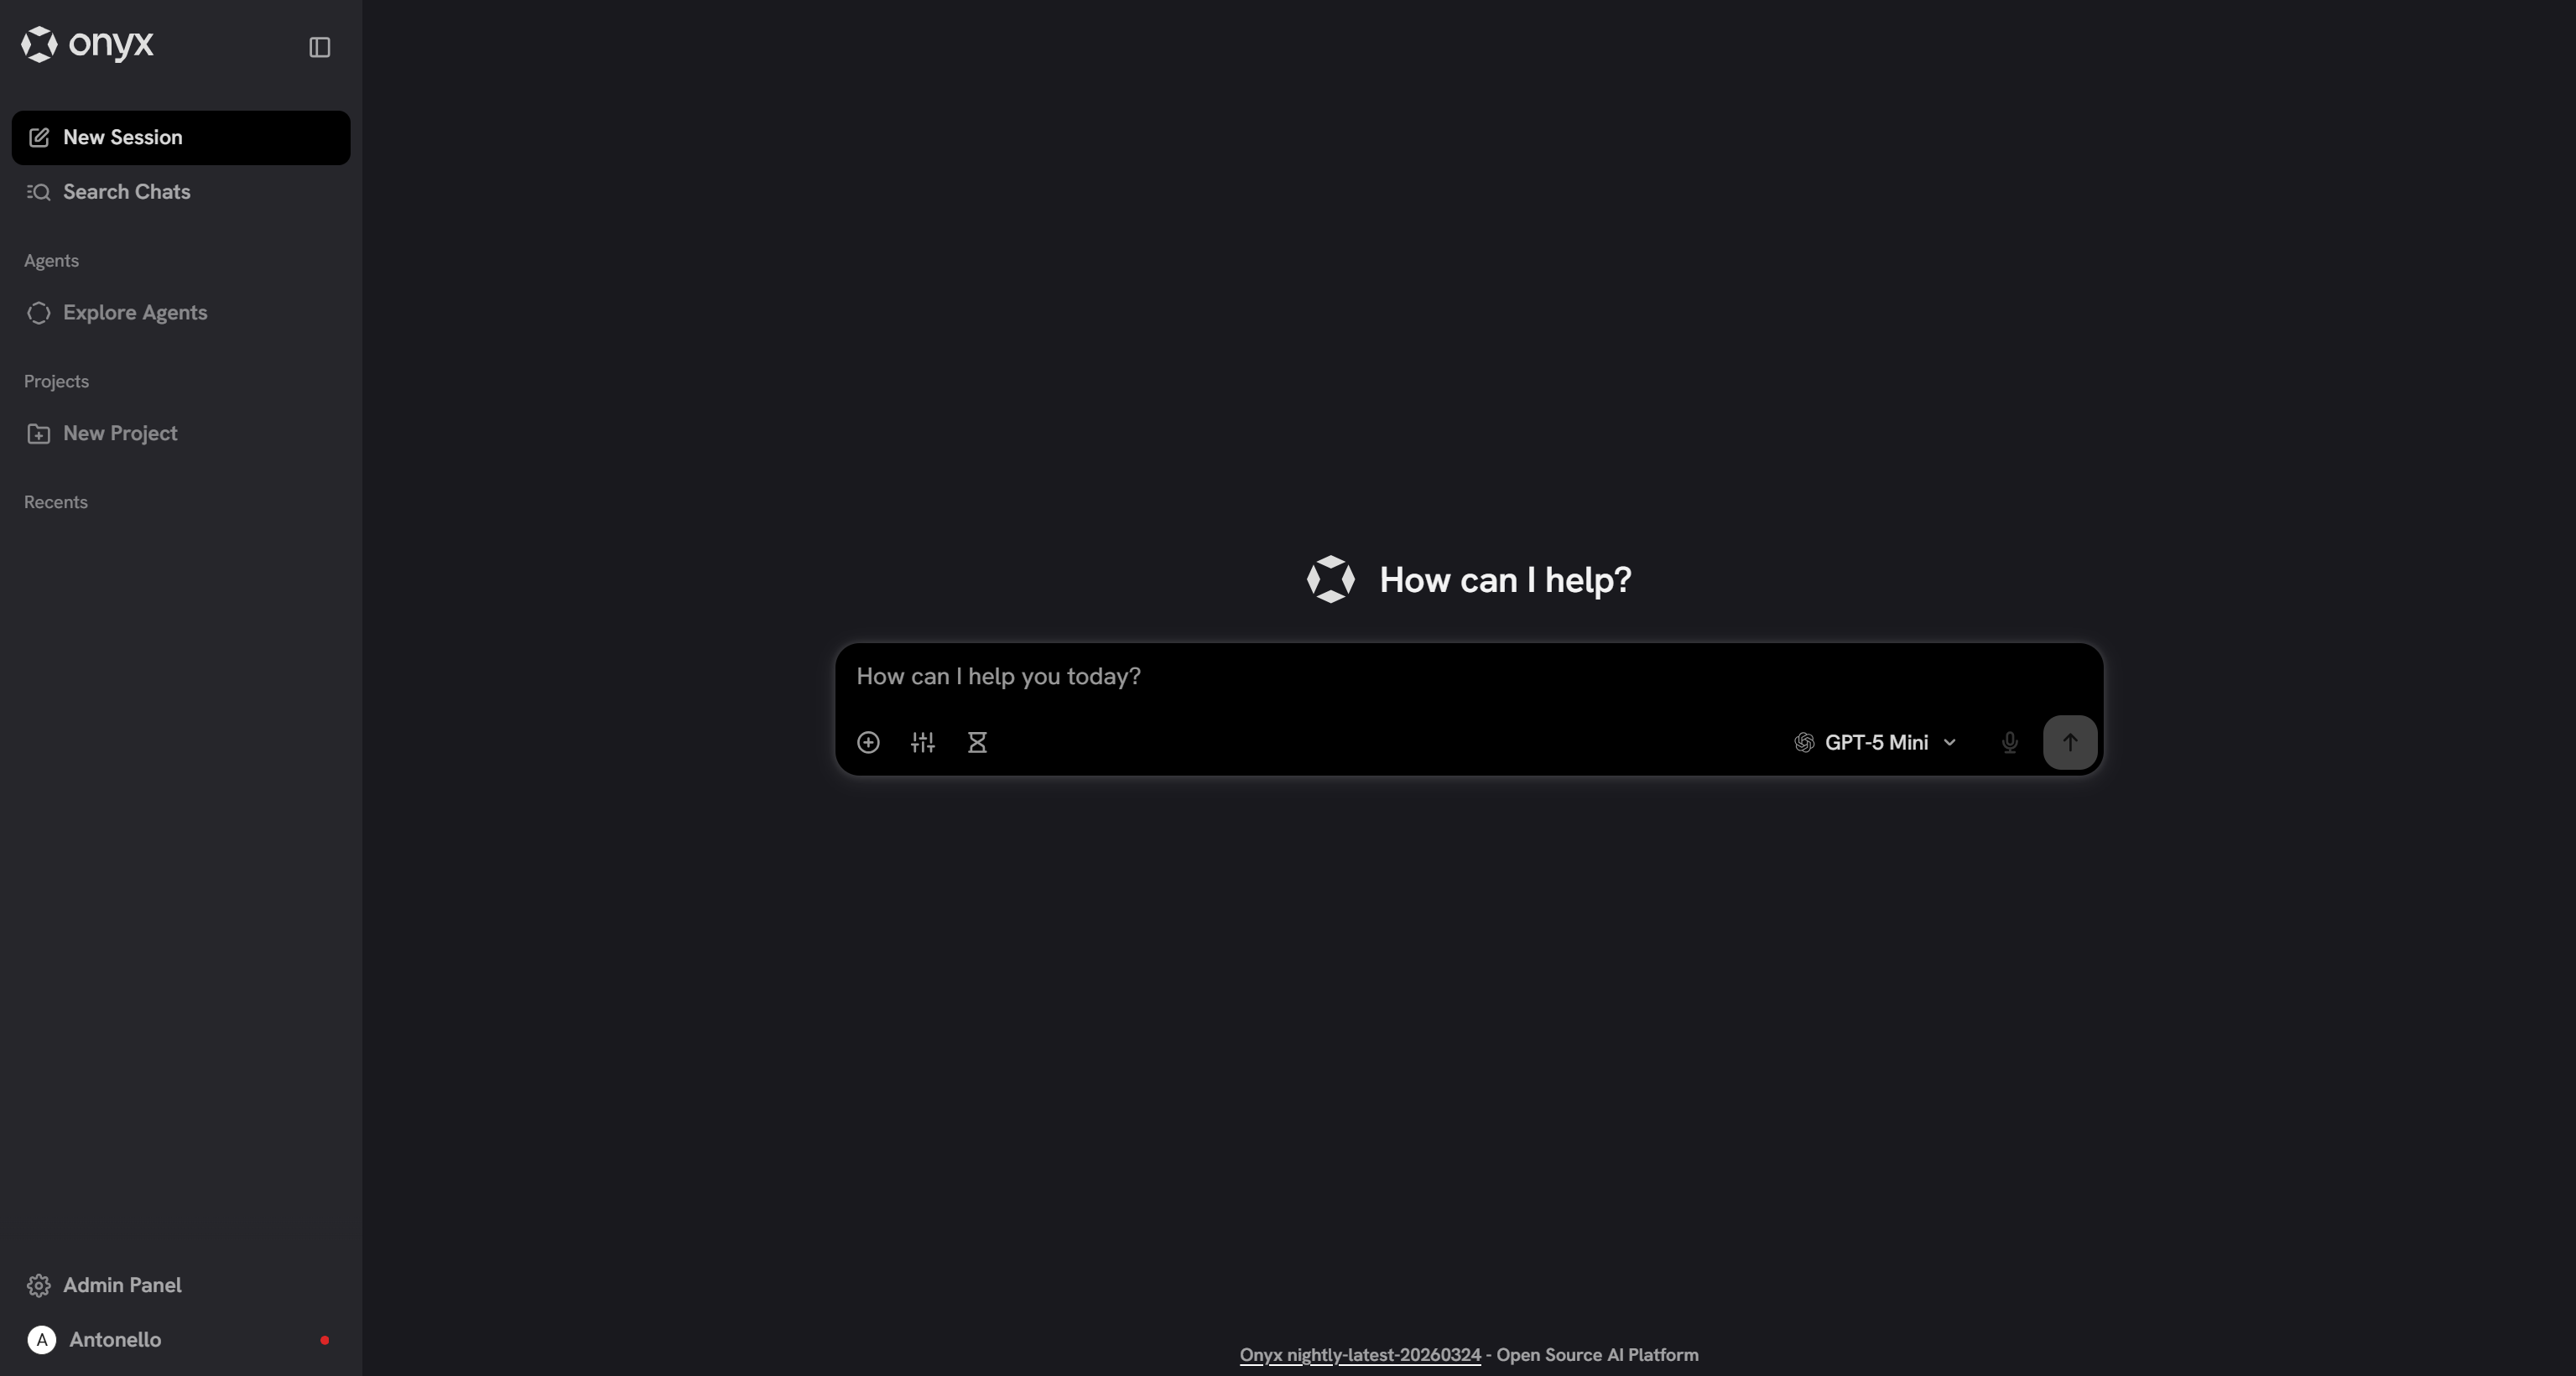
Amazing! You can now start chatting and interacting with the configured LLM model in Onyx. Before you start, proceed with setting up the Bright Data integration!
Approach #1: Connect Bright Data to Onyx via Web MCP
The following steps will guide you through the process of integrating Bright Data into Onyx via its remote Web MCP server.
Prerequisites
To follow this section, you need:
- A Bright Data account with an API key configured.
- Familiarity with how MCP works.
- Knowledge of the tools exposed by the Bright Data Web MCP server.
Follow the links above for more guidance and instructions.
Step #4: Add the Web MCP Server
To connect Bright Data’s Web MCP to Onyx, navigate to the “MCP Actions” page in the Admin Panel:
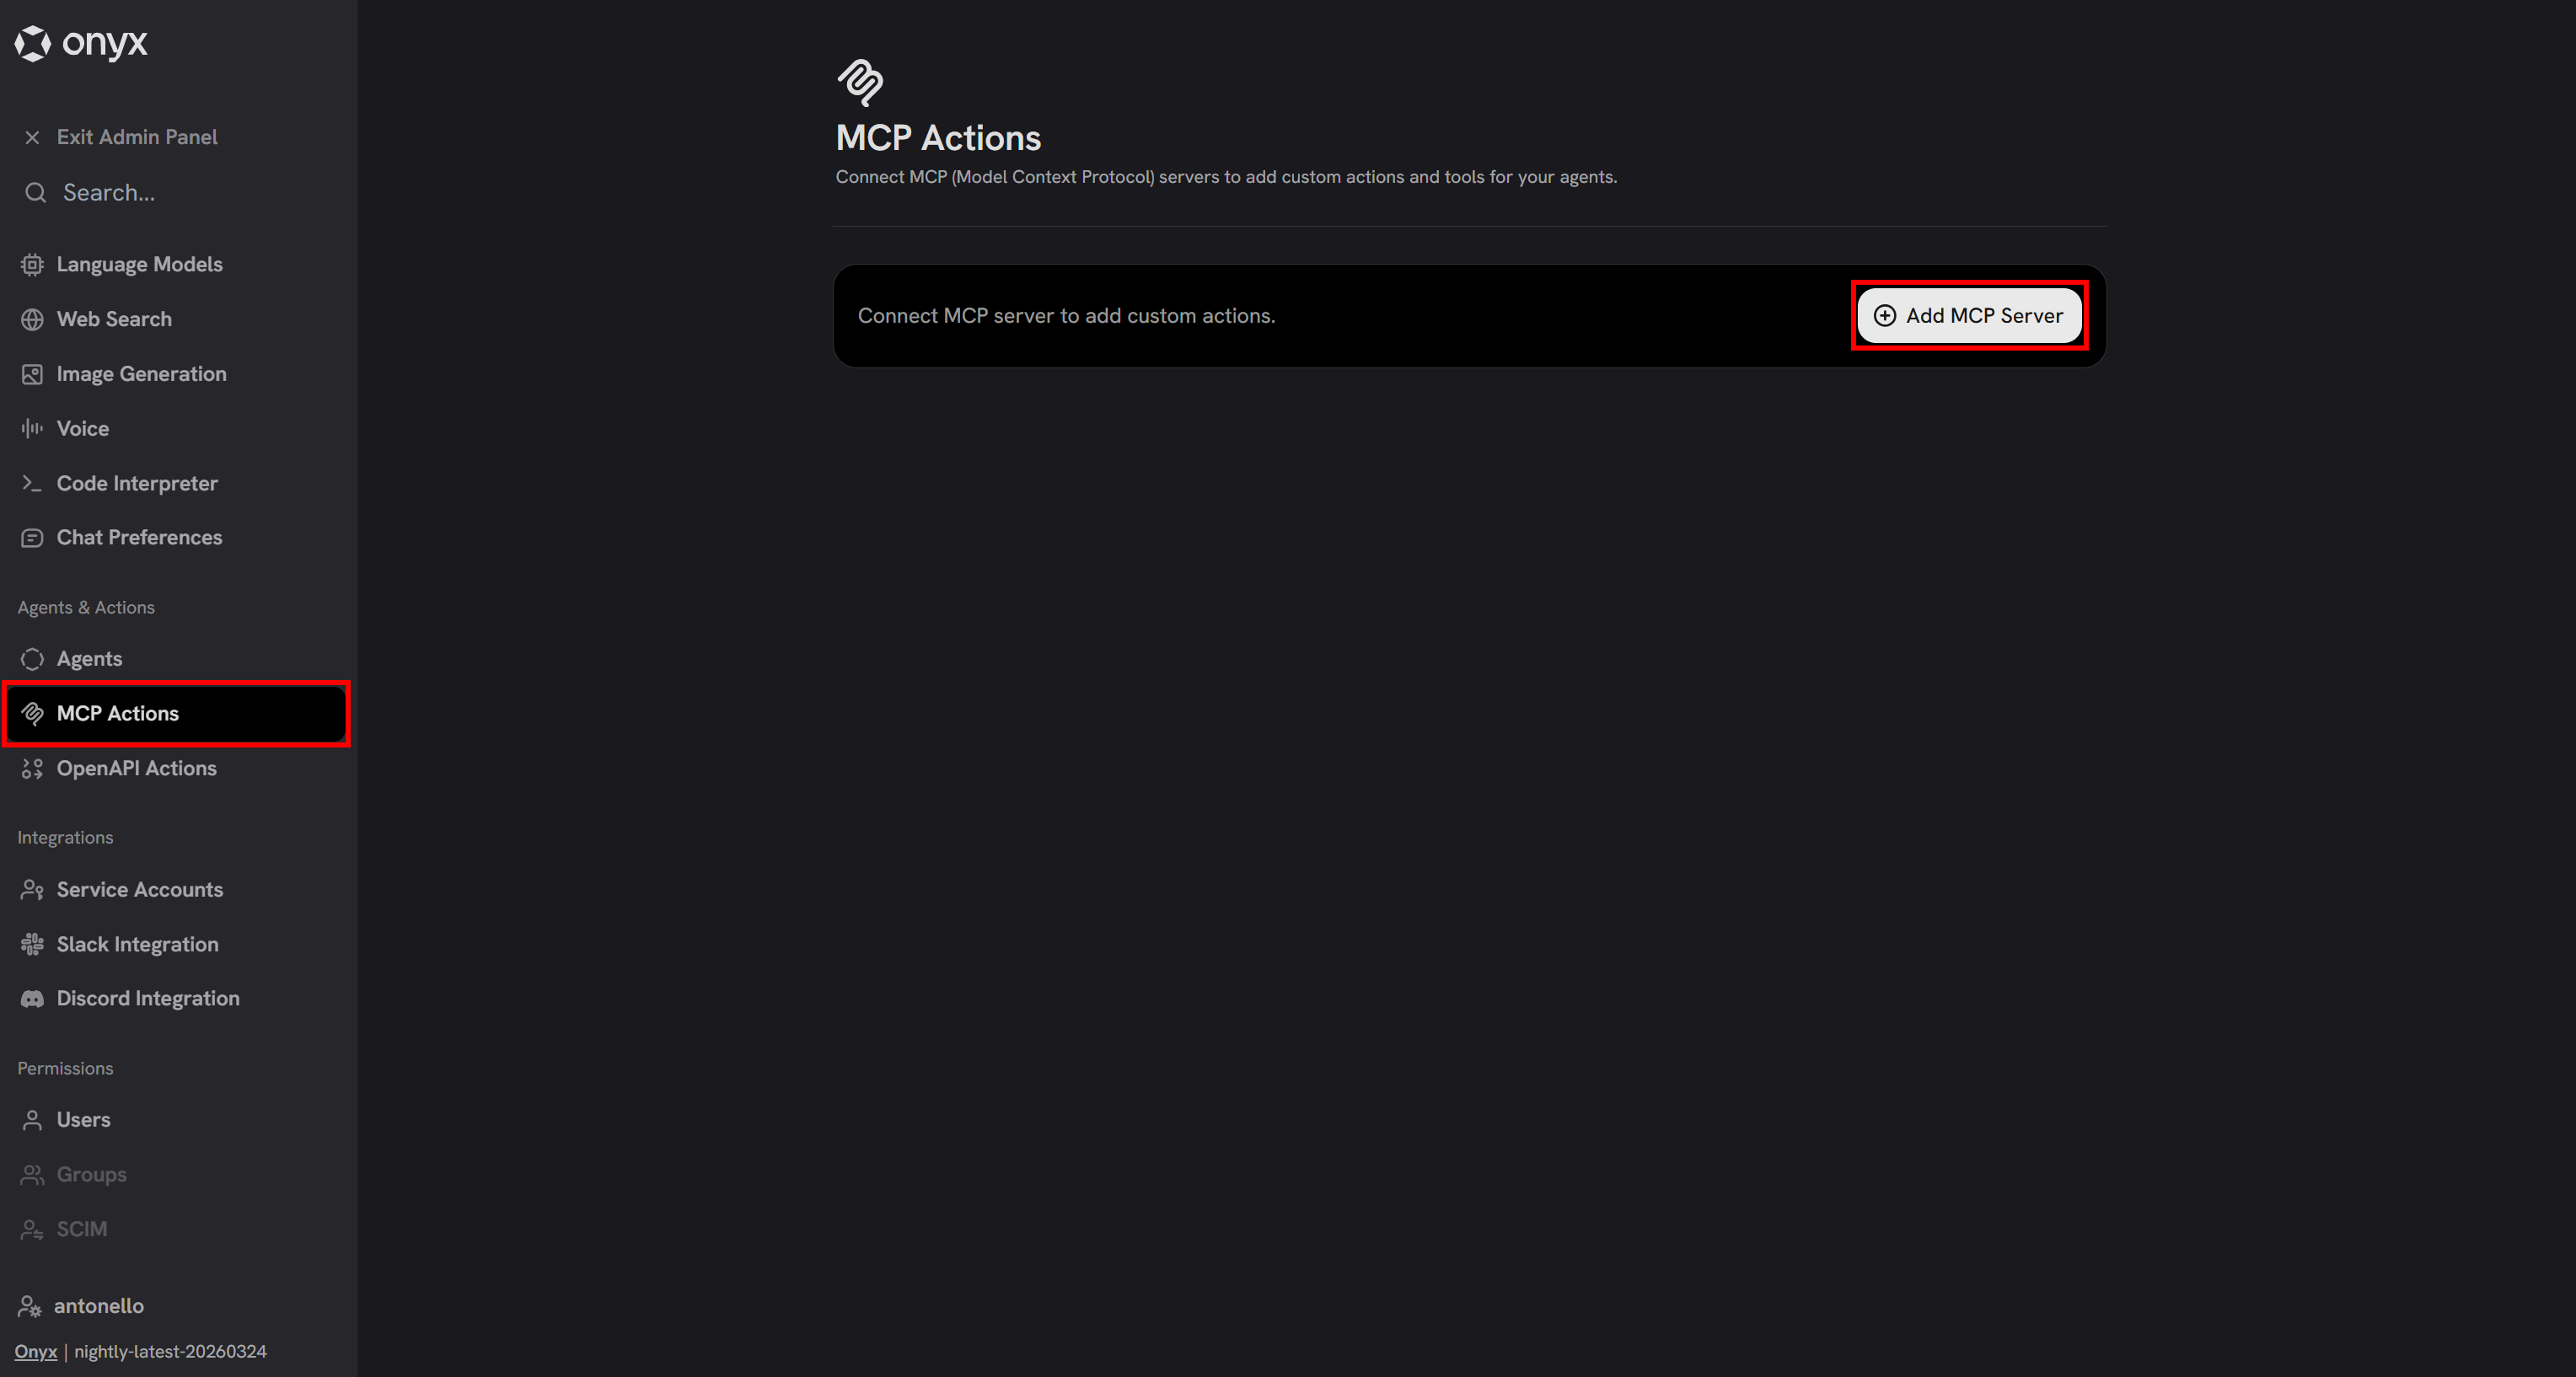
Click “Add MCP Server” to create a new integration. A configuration modal will appear. Configure it as follows:
- Server Name:
Bright Data Web MCP - Description:
Bright Data's Web MCP gives your AI agents real-time, reliable access to public web data via scraping tools and search, while also enabling web interactions in remote browsers. - MCP Server URL:
https://mcp.brightdata.com/mcp?token=<YOUR_BRIGHT_DATA_API_TOKEN>&pro=1
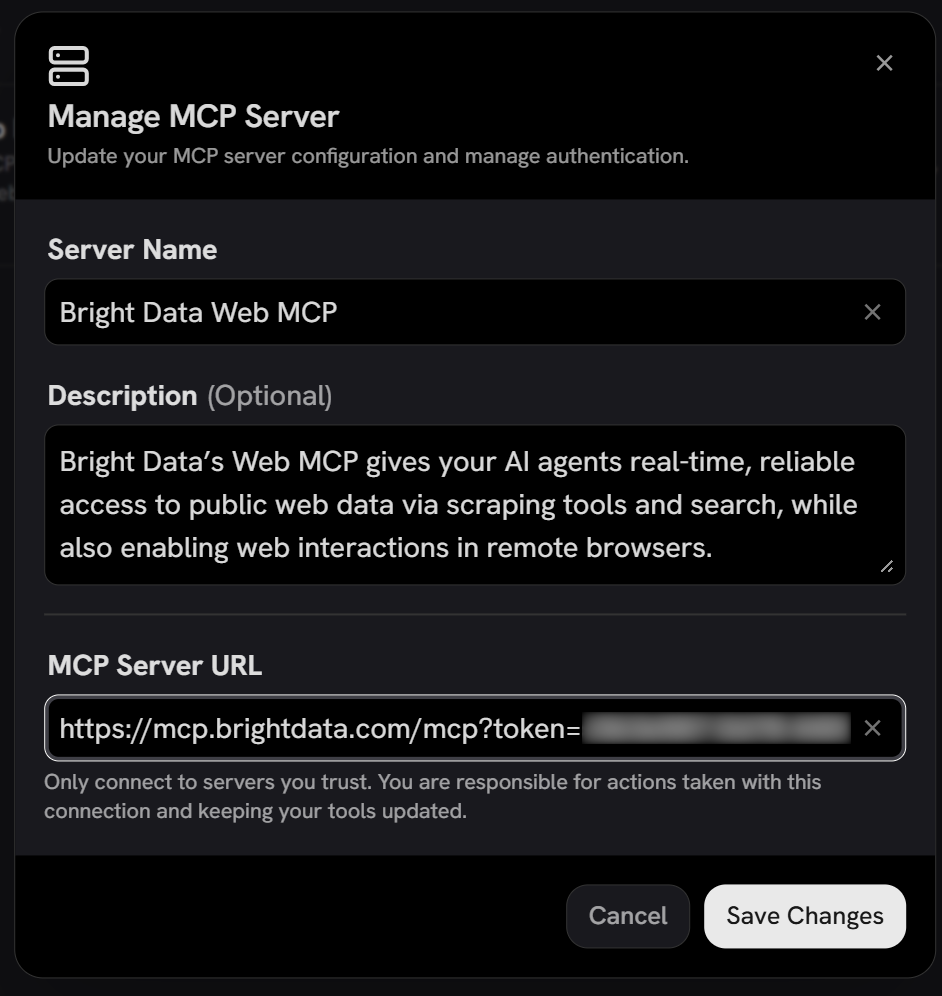
Keep in mind that Onyx only supports remote MCP servers. In this case, you are configuring the Bright Data Web MCP via the SSE protocol.
To authenticate requests to your Bright Data account, you must include your API key in the token query parameter of the URL. The &pro=1 parameter is optional and enables Pro mode. That provides access to all Web MCP tools, including tools for web interaction and direct data feeds from many supported domains.
If you prefer to use the free tier (Rapid mode), which includes only scrape_as_markdown and search_engine (and their batch versions), set this URL instead:
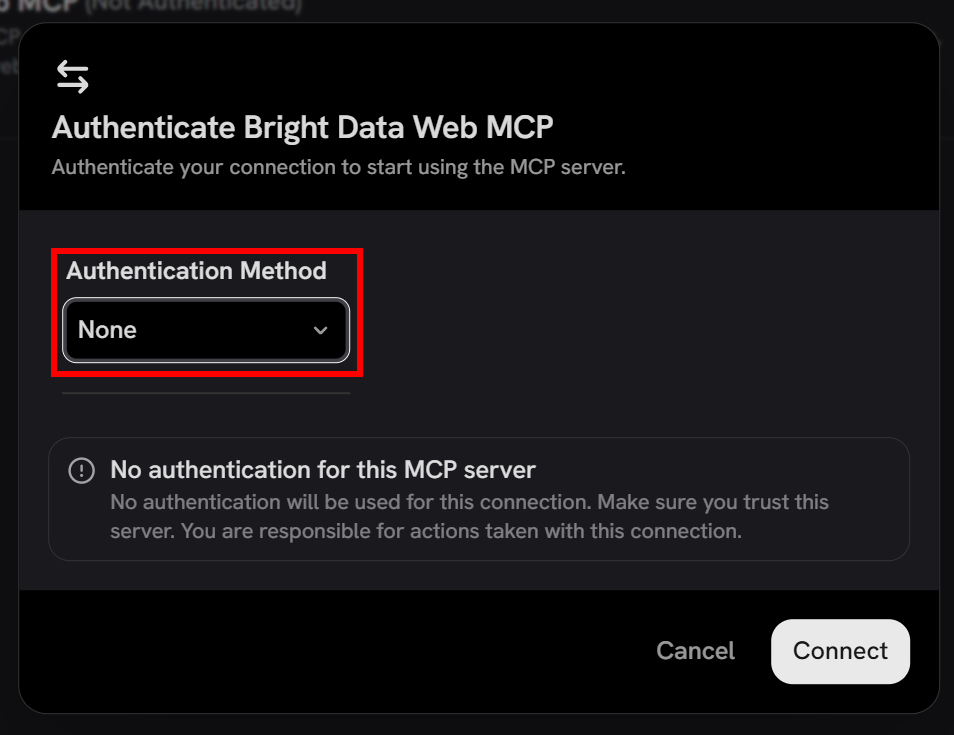
https://mcp.brightdata.com/mcp?token=<YOUR_BRIGHT_DATA_API_TOKEN>Now click “Save Changes” to continue. You will then see the authentication settings modal.
Since authentication is handled via the API key in the URL, set the “Authentication Method” field to “None”, and click “Connect”:
In the “Bright Data Web MCP” entry, you will notice a “Fetching tools…” message. Shortly after, the available tools (60+ in Pro mode, or 4 in Rapid mode) will appear:
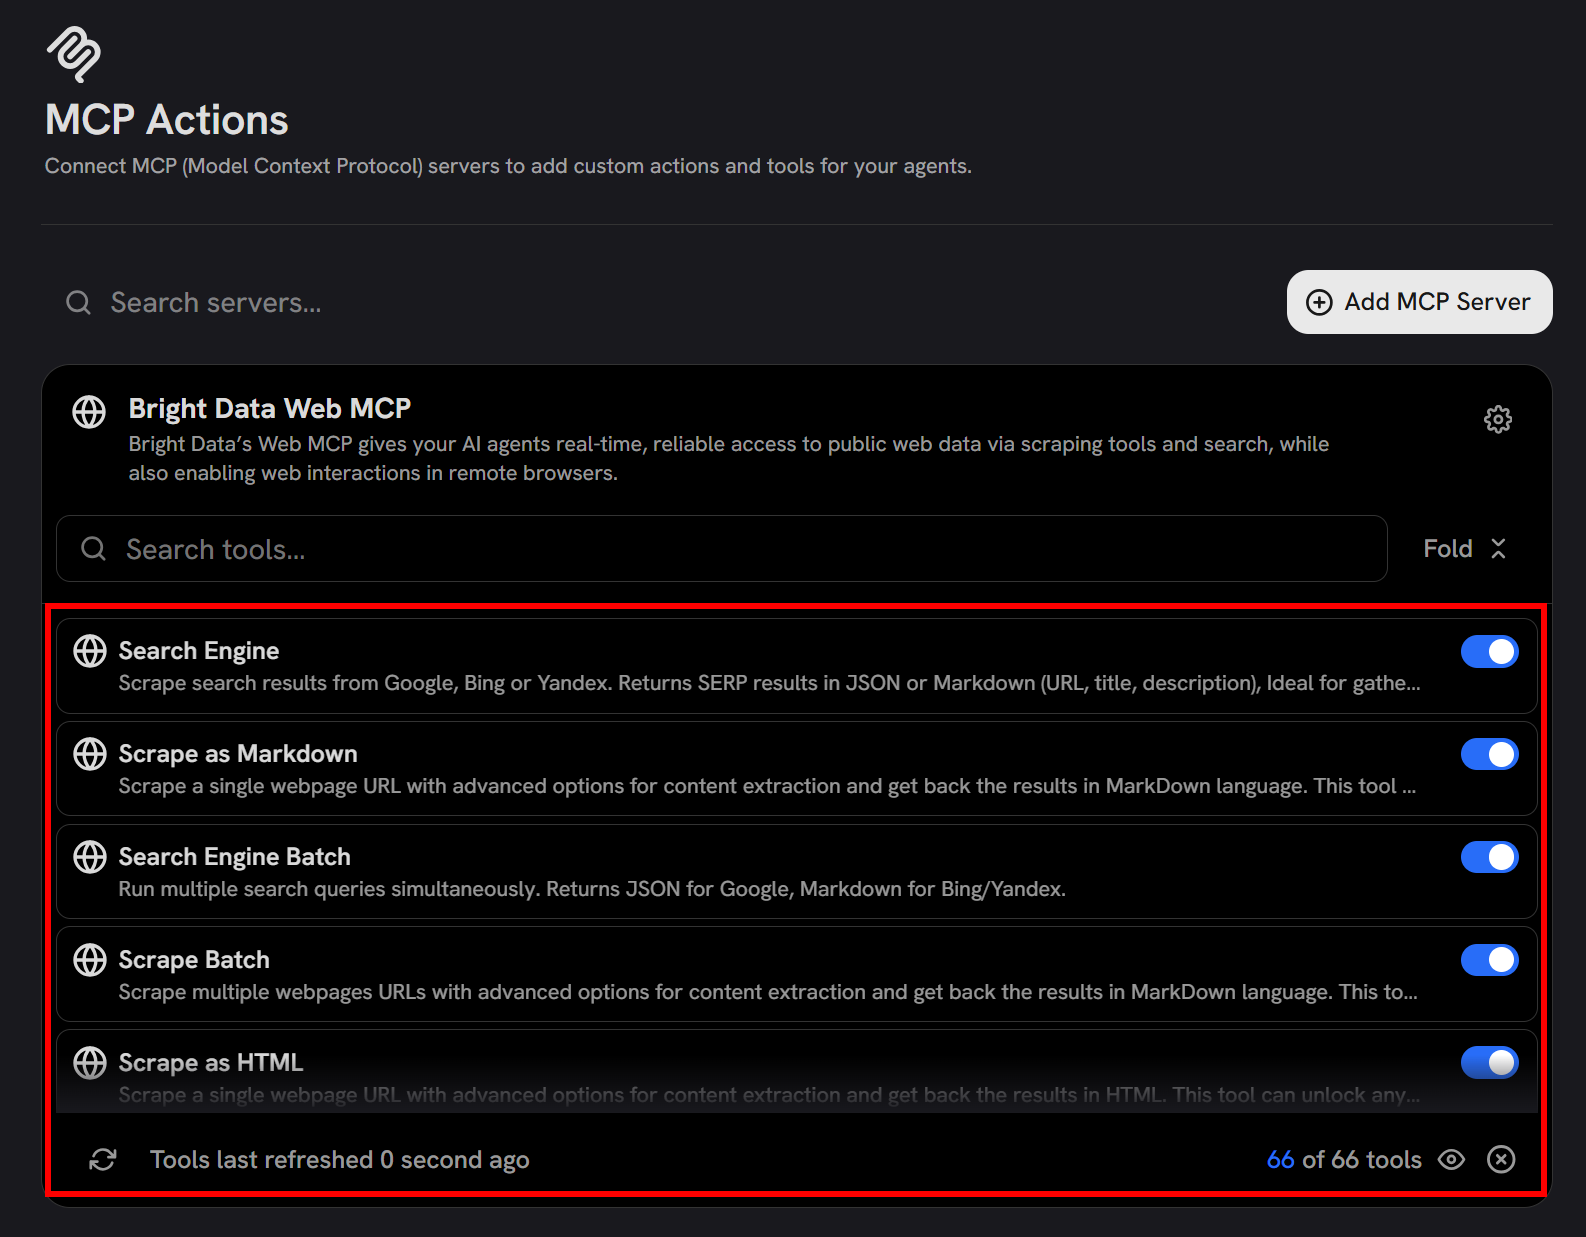
This confirms that Onyx has successfully connected to the remote Web MCP server and can access its tools. From this interface, you can also choose which tools to enable or disable.
Mission complete! Bright Data is now exposing its web search, data retrieval, and interaction capabilities to your Onyx instance via MCP.
Step #5: Enable the Web MCP Integration
By default, configured MCP servers are disabled in the Onyx chat. To enable them and give the underlying LLM access to Bright Data tools, go to the “Chat Preferences” page in the Admin Panel.
Scroll down to the “Actions & Tools” section and make sure to toggle and enable the “Bright Data Web MCP” entry:
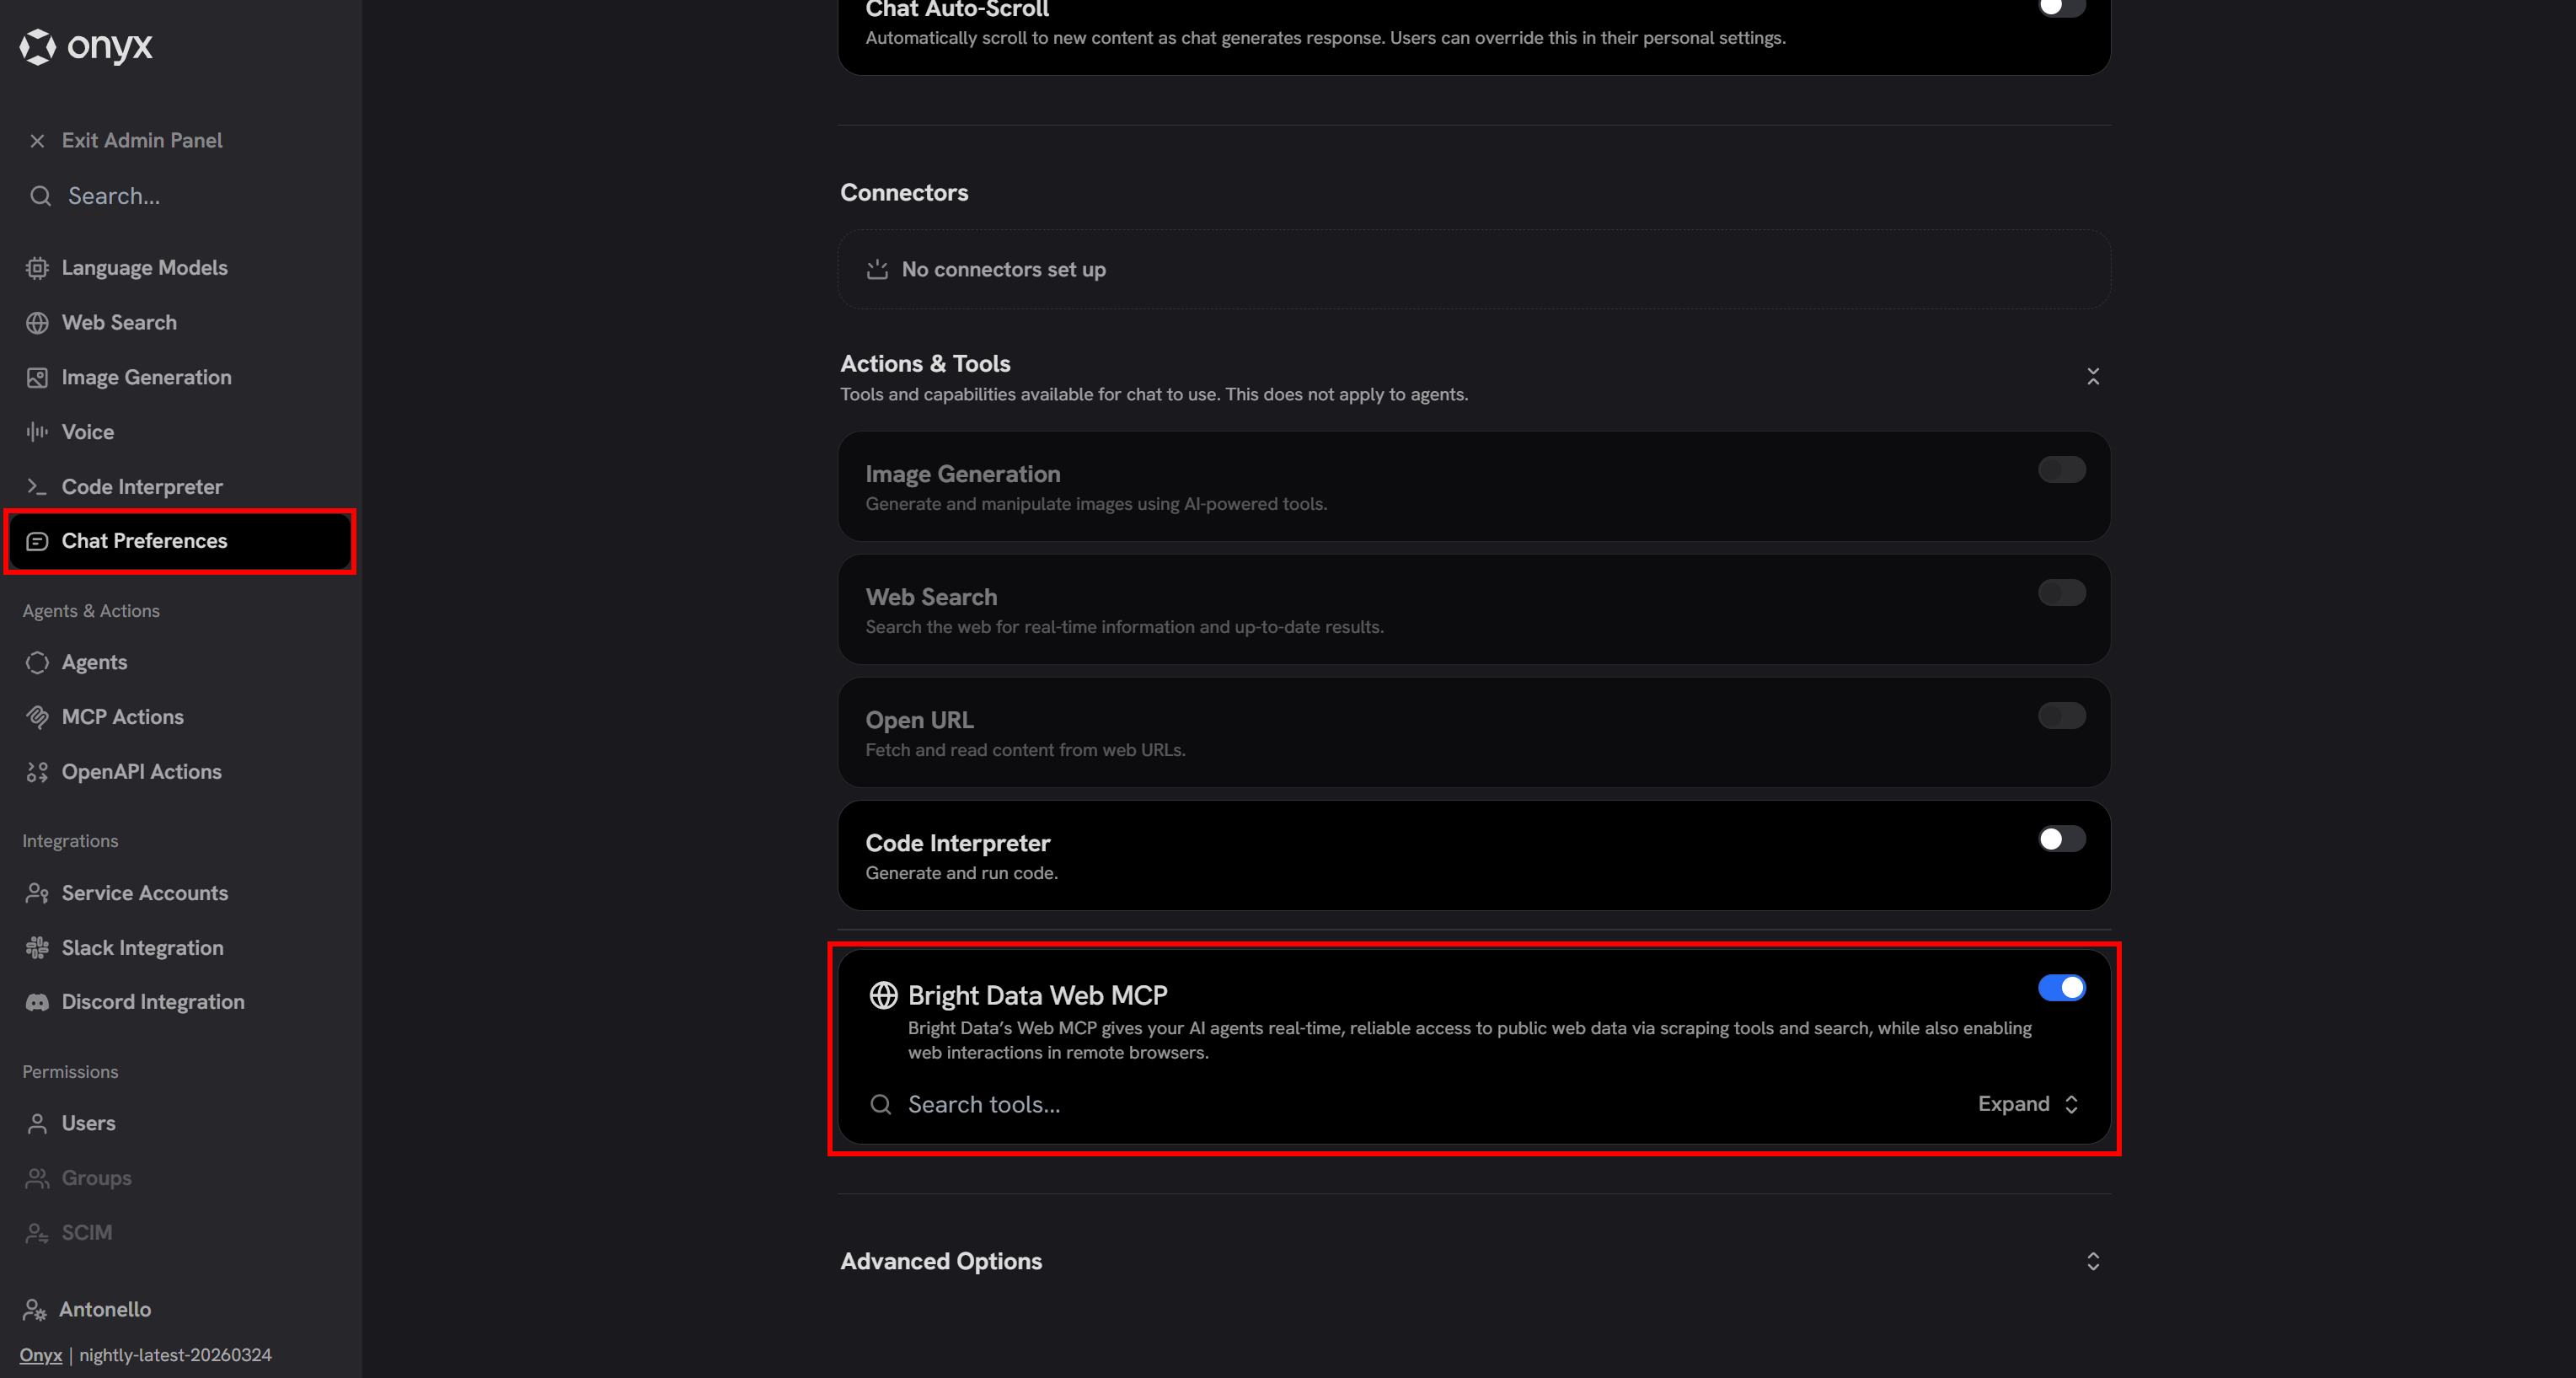
Awesome! The LLM configured in Onyx (gpt-5-mini, in this case) can now utilize the Bright Data tools available via Web MCP.
Step #6: Test the Integration
Back in the Onyx chat interface, try running a prompt like this:
Retrieve company information from the following Crunchbase page:
"https://www.crunchbase.com/organization/browser-use"

Next, search for recent news and opinions about the company. Select the 3–4 most relevant sources, including news articles and Reddit discussions, to capture both updates and public sentiment.

Generate a structured report including:
1. Company overview and key details (from Crunchbase)
2. Summary of recent news
3. Analysis of public sentiment and opinions from online sources
This is something a regular LLM cannot do by default, as it requires access to web scraping and search tools. In particular, the expected behavior is for the LLM to:
- Call the Crunchbase scraping tools available in Pro mode (or
scrape_as_markdownin Rapid mode). - Use the
search_enginetool (or its batch variant) to retrieve Google search results. - Scrape the content of relevant pages via
scrape_as_markdown(or its batch variant). - Aggregate all the collected data into a structured report.
Launch the prompt, and you should get:

The GIF above is sped up, but it shows exactly the process described earlier. This confirms that the Bright Data integration in Onyx is working correctly!
To explore further, expand the plan dropdown to see all the steps performed by the agent:
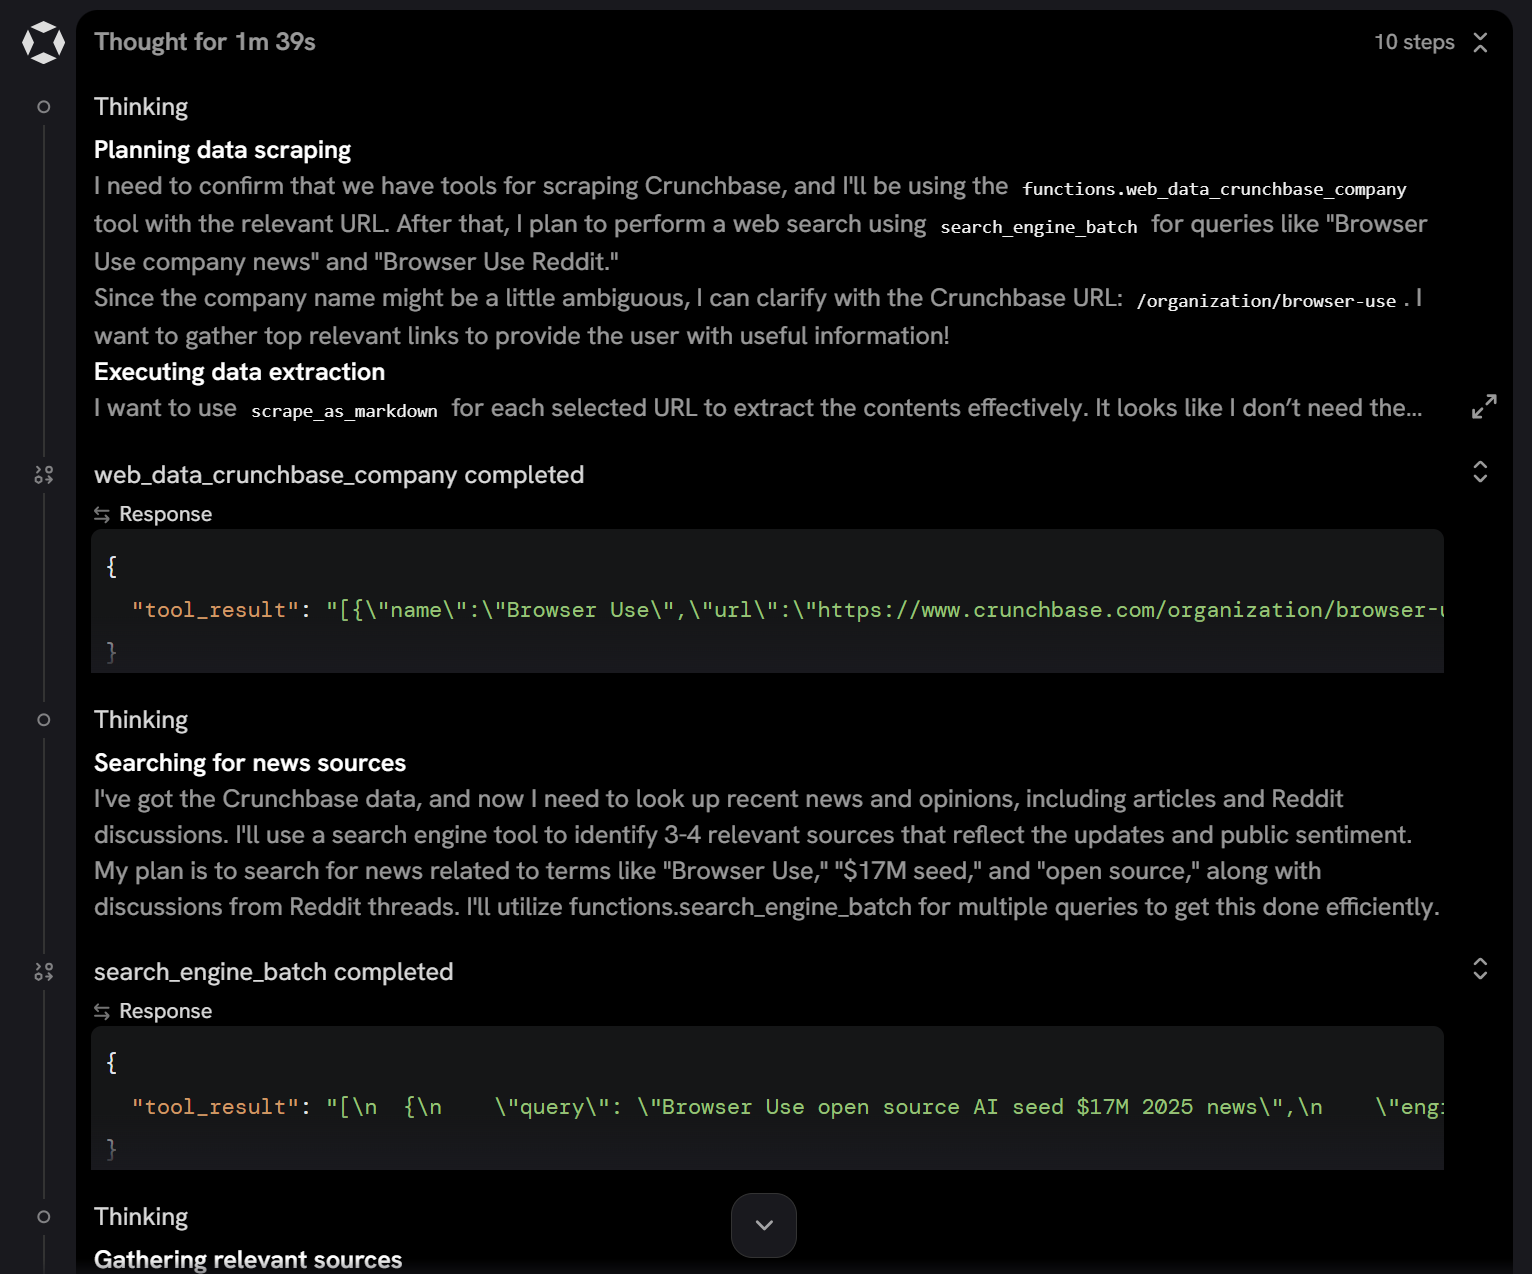
By scrolling through it, you can observe that the agent:
- Called the
web_data_crunchbase_companytool (available in Pro mode) to retrieve structured JSON data from the Crunchbase URL. - Performs relevant search queries in parallel using the
search_engine_batchtool (the batch version ofsearch_engine). - Selects the most relevant results and extracts their content via
scrape_batch(the batch version ofscrape_as_markdown).
Take a look at a snippet of the generated report:
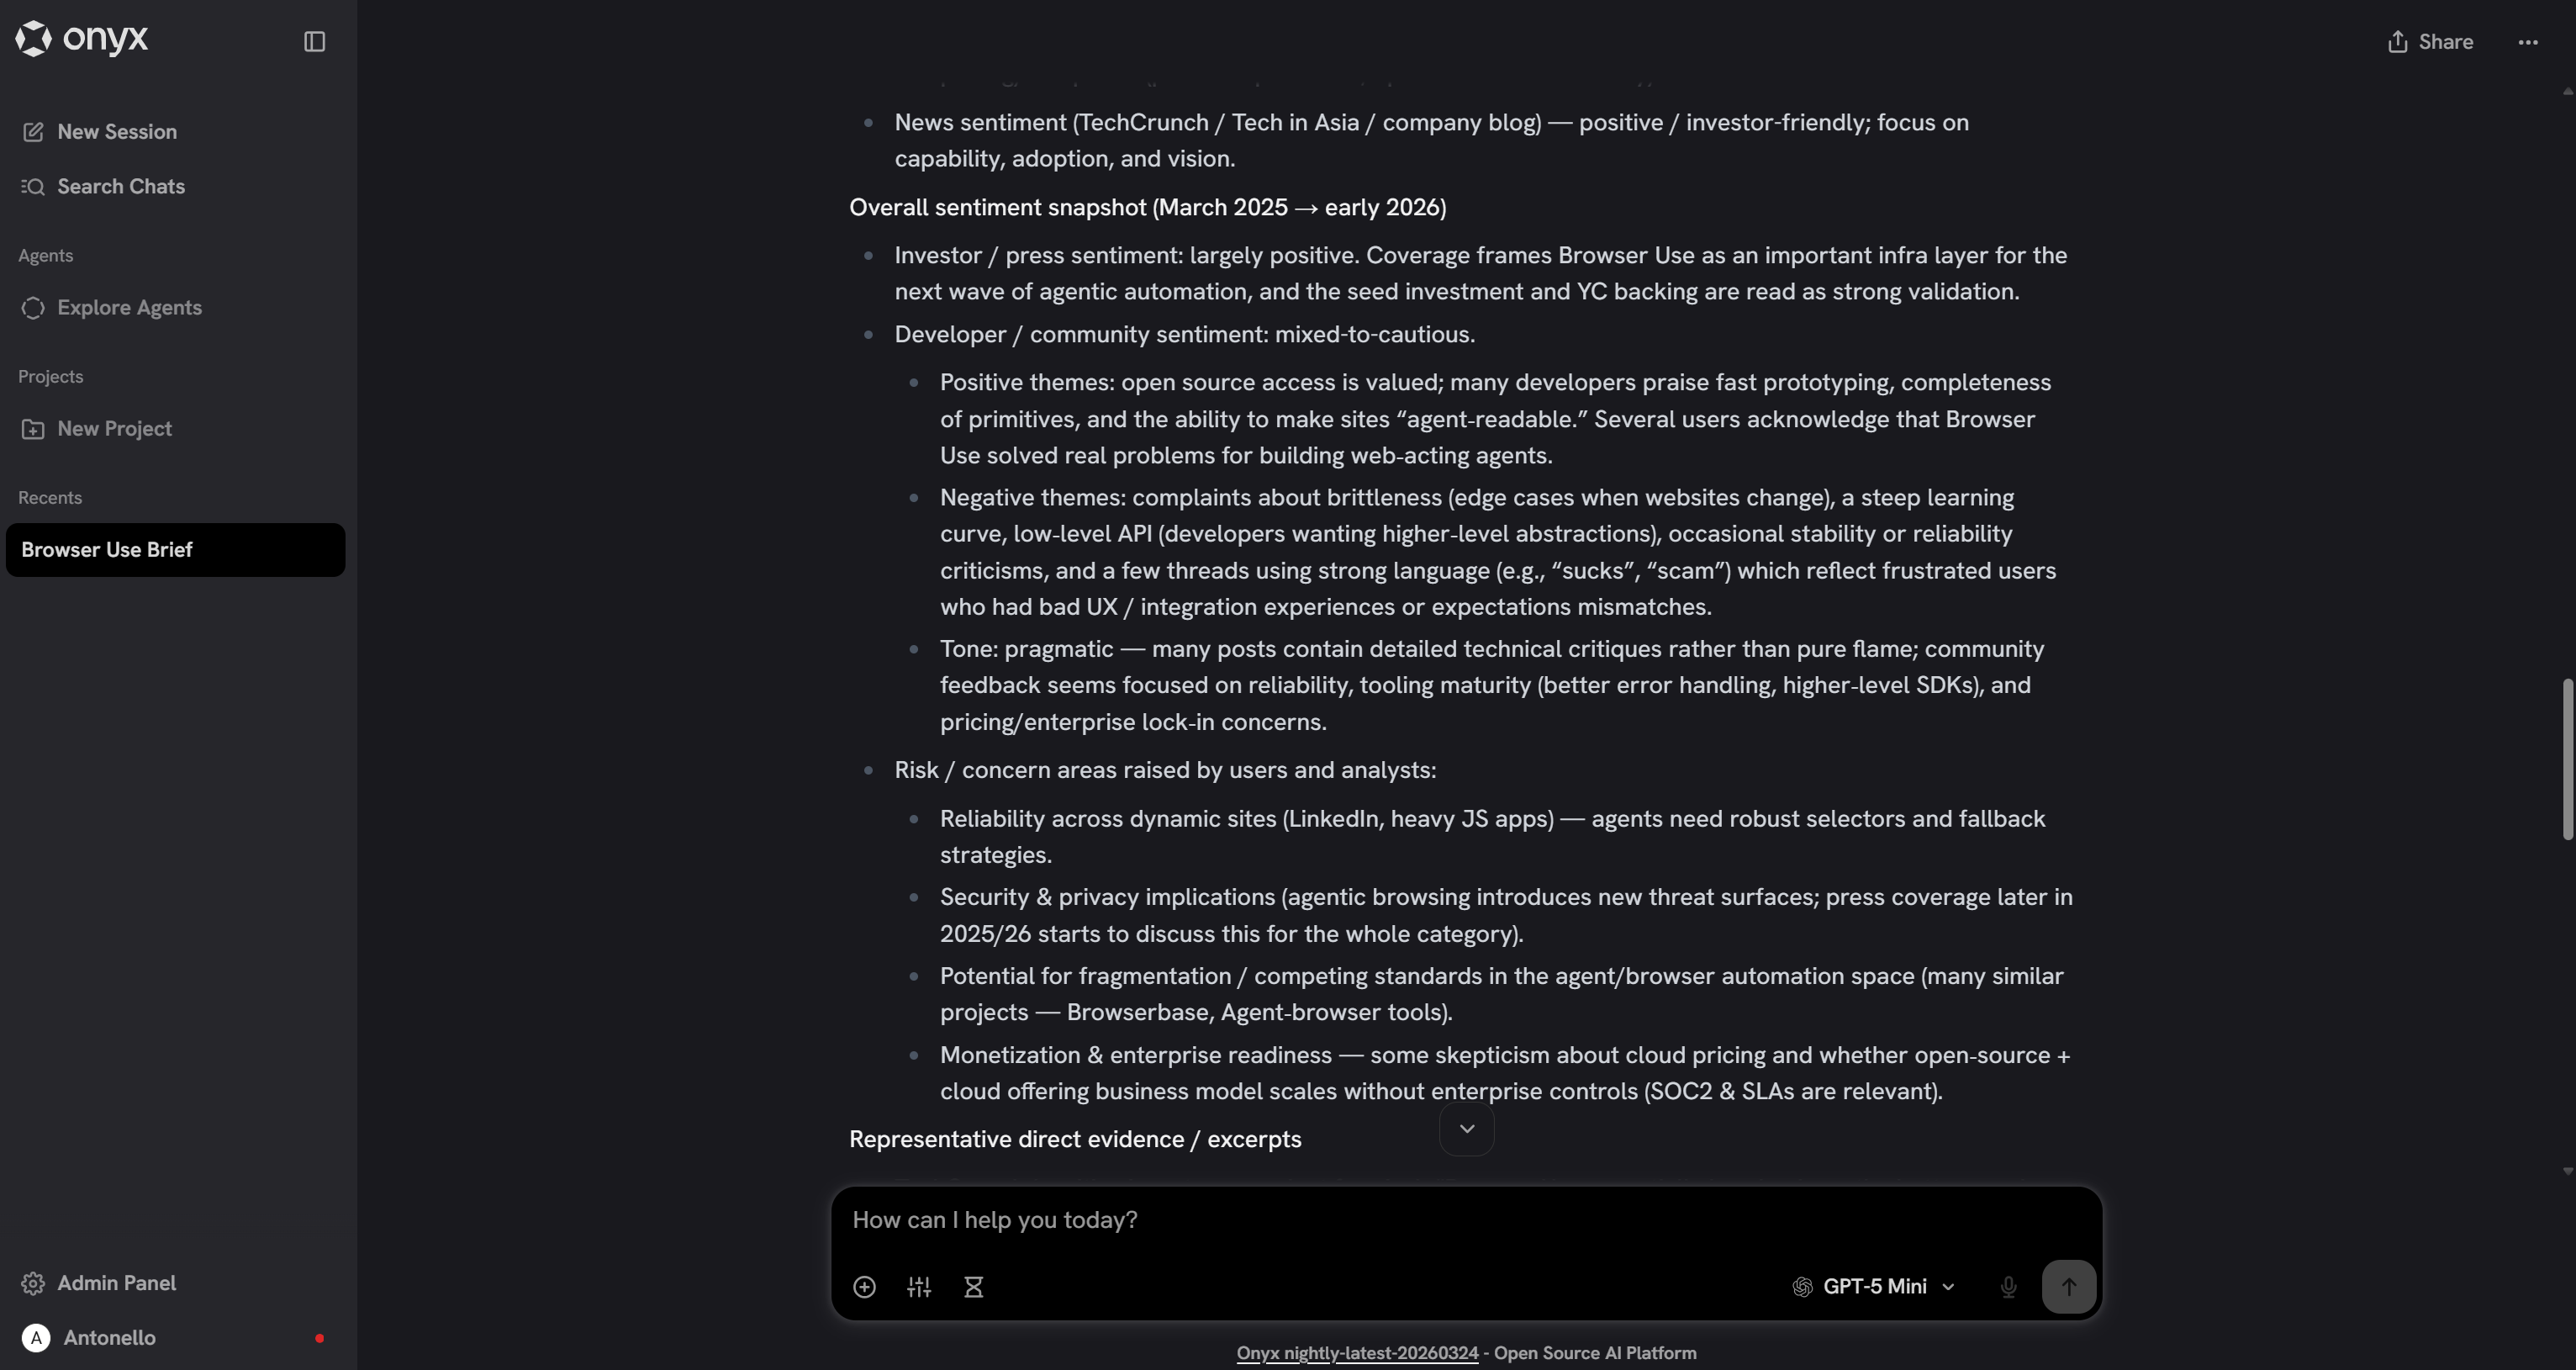
The output contains high-quality, data-backed insights, enabling a truly professional evaluation of the company.
And this is just one example. Many other use cases are supported by Bright Data through its Web MCP server!
Approach #2: Connect Bright Data Tools to Onyx via OpenAPI Specs
As an alternative integration method to the one seen earlier, connect Bright Data tools in Onyx via custom actions defined using OpenAPI specifications.
Note: The steps below focus on integrating Bright Data’s Web Unlocker and SERP API, but they can be easily adapted to other API-based Bright Data solutions.
Prerequisites
Before following the instructions below, you must have a Bright Data account with both Web Unlocker and SERP API zones set up, as well as an API key. A basic understanding of OpenAPI specifications is also helpful.
To set up the required Bright Data zones, follow the instructions below. Alternatively, for more detailed guidance, refer to these documentation pages:
If you do not have a Bright Data account, create a new one. If you already have, just log in. Go to your control panel, navigate to the “Proxies & Scraping” page, and explore the “My Zones” table:
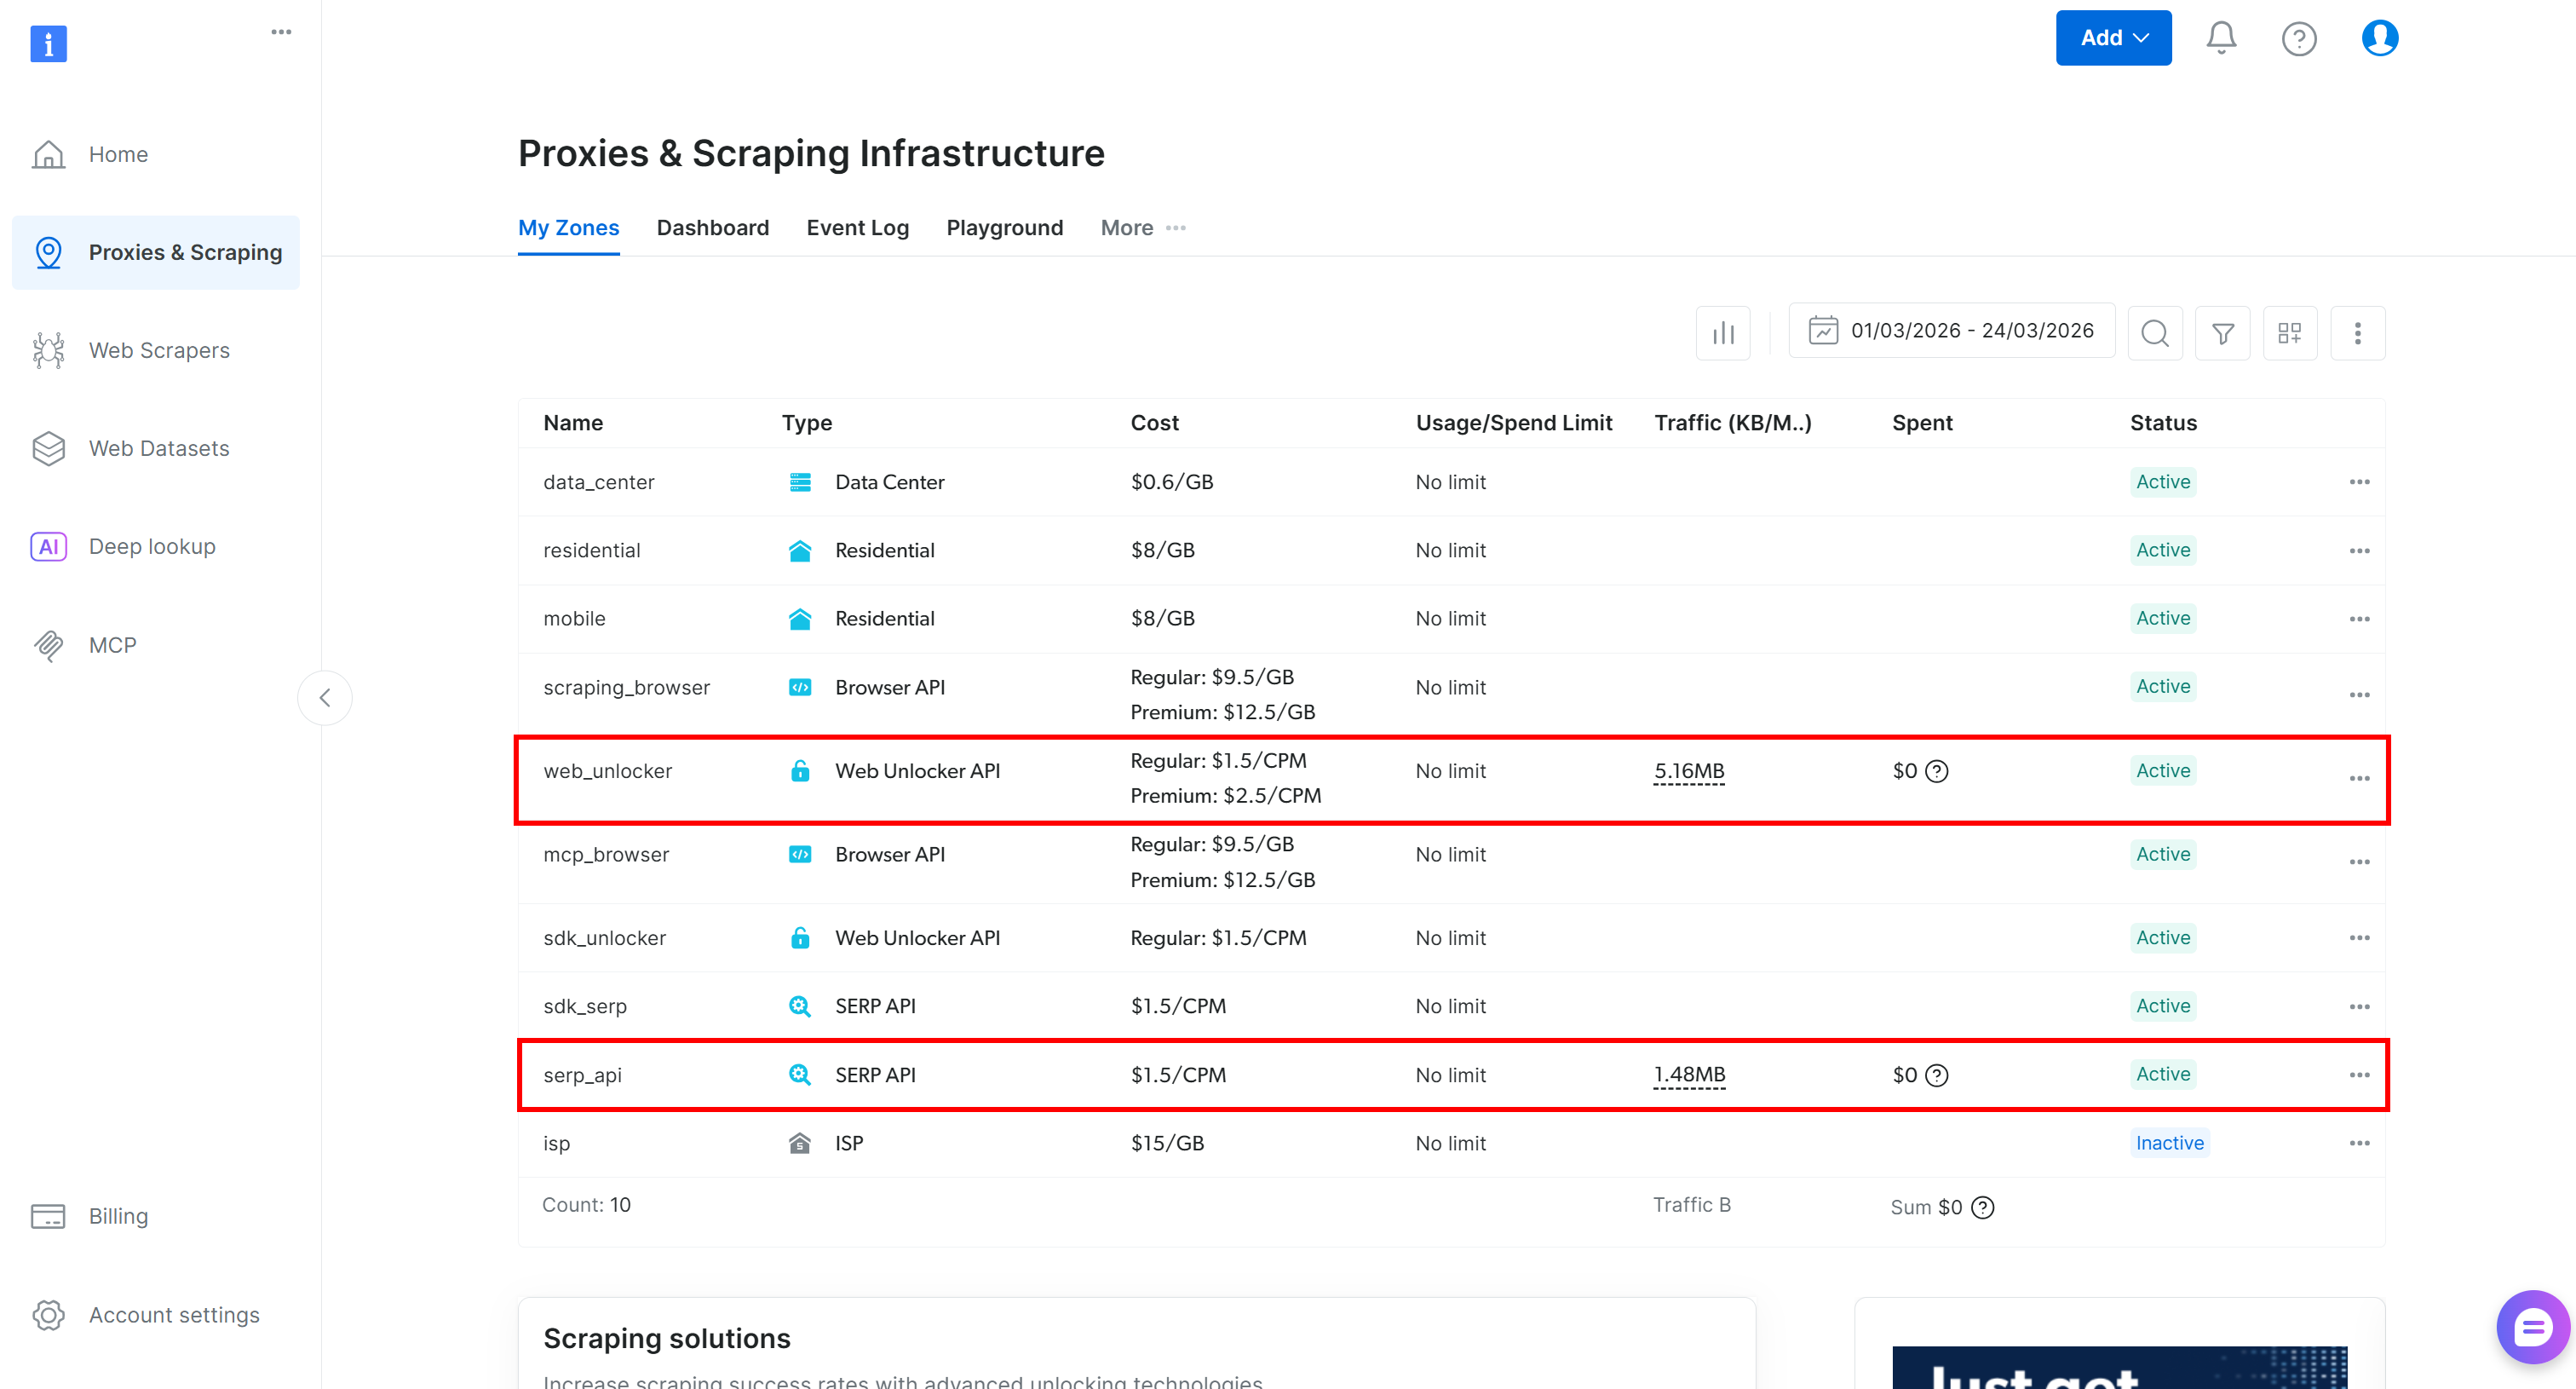
If the table already includes a Web Unlocker API zone (e.g., web_unlocker) and a SERP API zone (e.g., serp_api), you are good to go. These two zones will be used to connect to the Web Unlocker and SERP API services via custom OpenAPI tools.
If either zone is missing, create it. Scroll to the “Unblocker API” and “SERP API” cards, then press “Create zone”. Follow the wizard to add the zone:
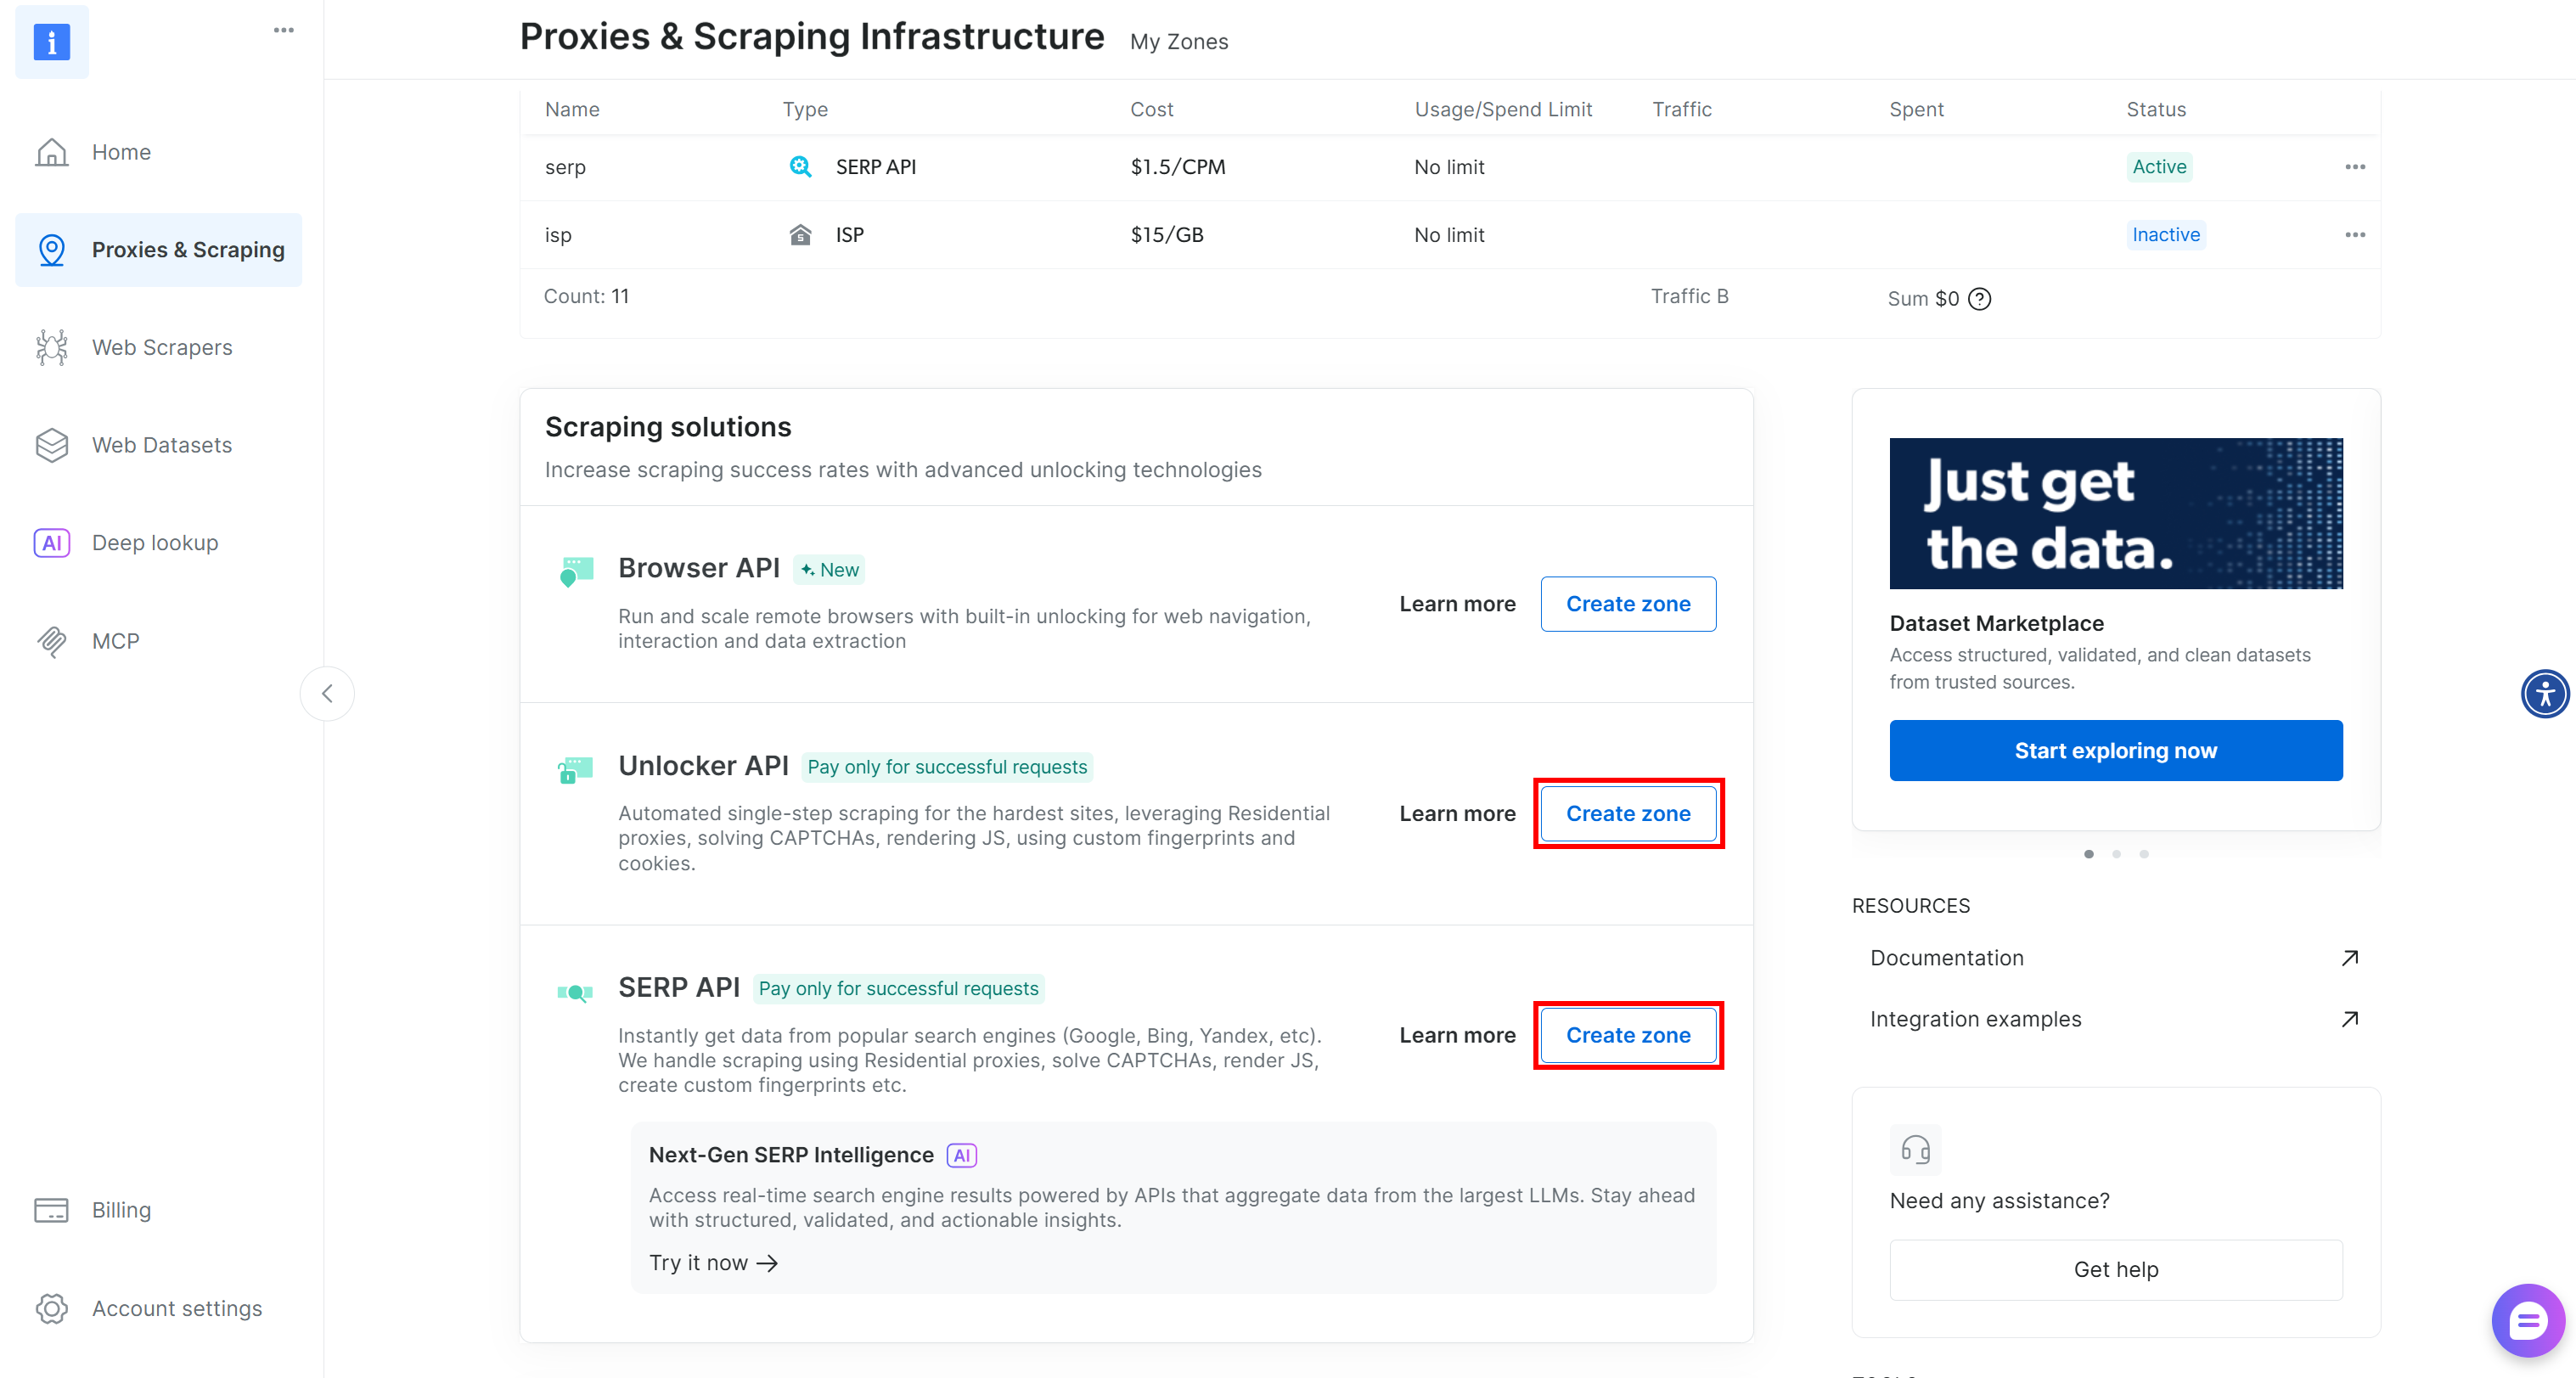
Make sure to note the names you assign to both zones, as you will need them in the next steps. Finally, generate your Bright Data API key and store it in a safe place.
Step #4: Add the Web Unlocker OpenAPI Action
To add a new action, open the Admin Panel and navigate to the “OpenAPI Actions” page. Then click the “Add OpenAPI Action” button:
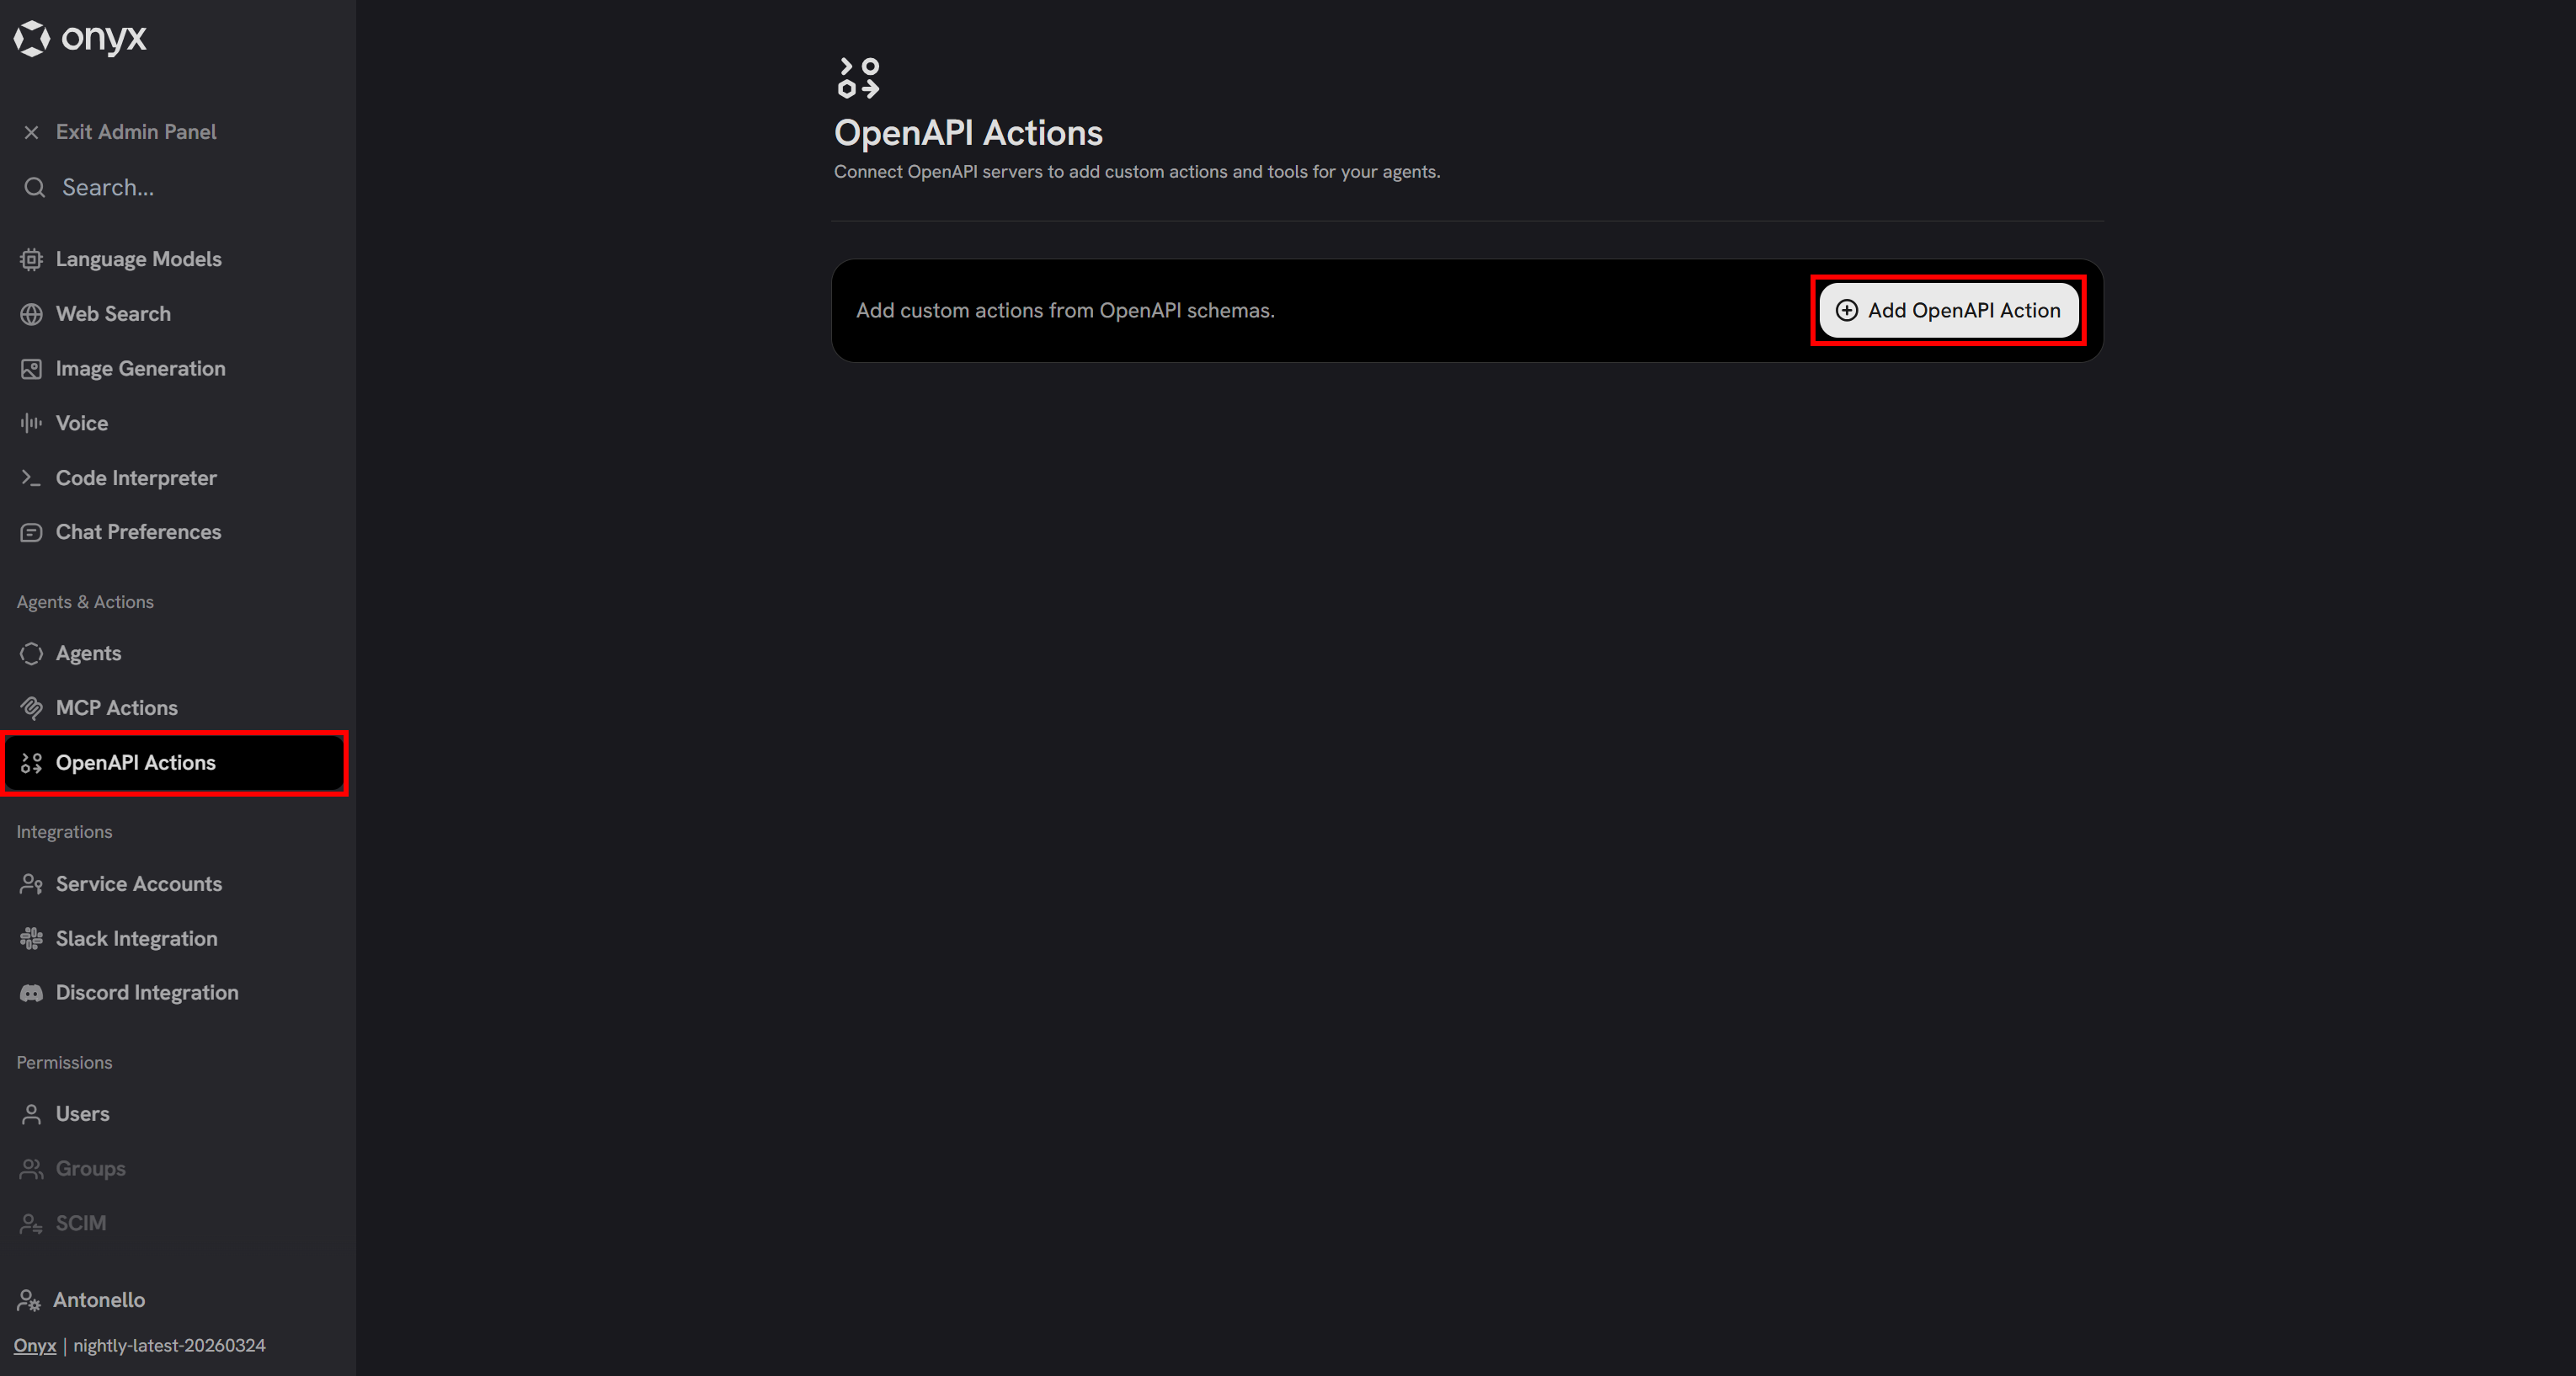
You will be asked to provide the OpenAPI schema definition. You can copy the JSON version of the Web Unlocker schema from the Bright Data OpenAPI specs article.
Important: The only change you need to make to the JSON spec is to set a default value for the zone field. This value should match the Web Unlocker API zone name you defined earlier. In detail, that section should look like this:
{
  // ...
  "properties": {
    "zone": {
      "type": "string",
      "description": "Your Web Unlocker zone name.",
      "default": "<YOUR_BRIGHT_DATA_WEB_UNLOCKER_API_ZONE_NAME> // e.g., "web_unlocker"
    }
  }
  // ...
}
This is required because Onyx does not provide a mechanism to set default values for request body fields at runtime. Thus, you have to specify a default value for the required fields.
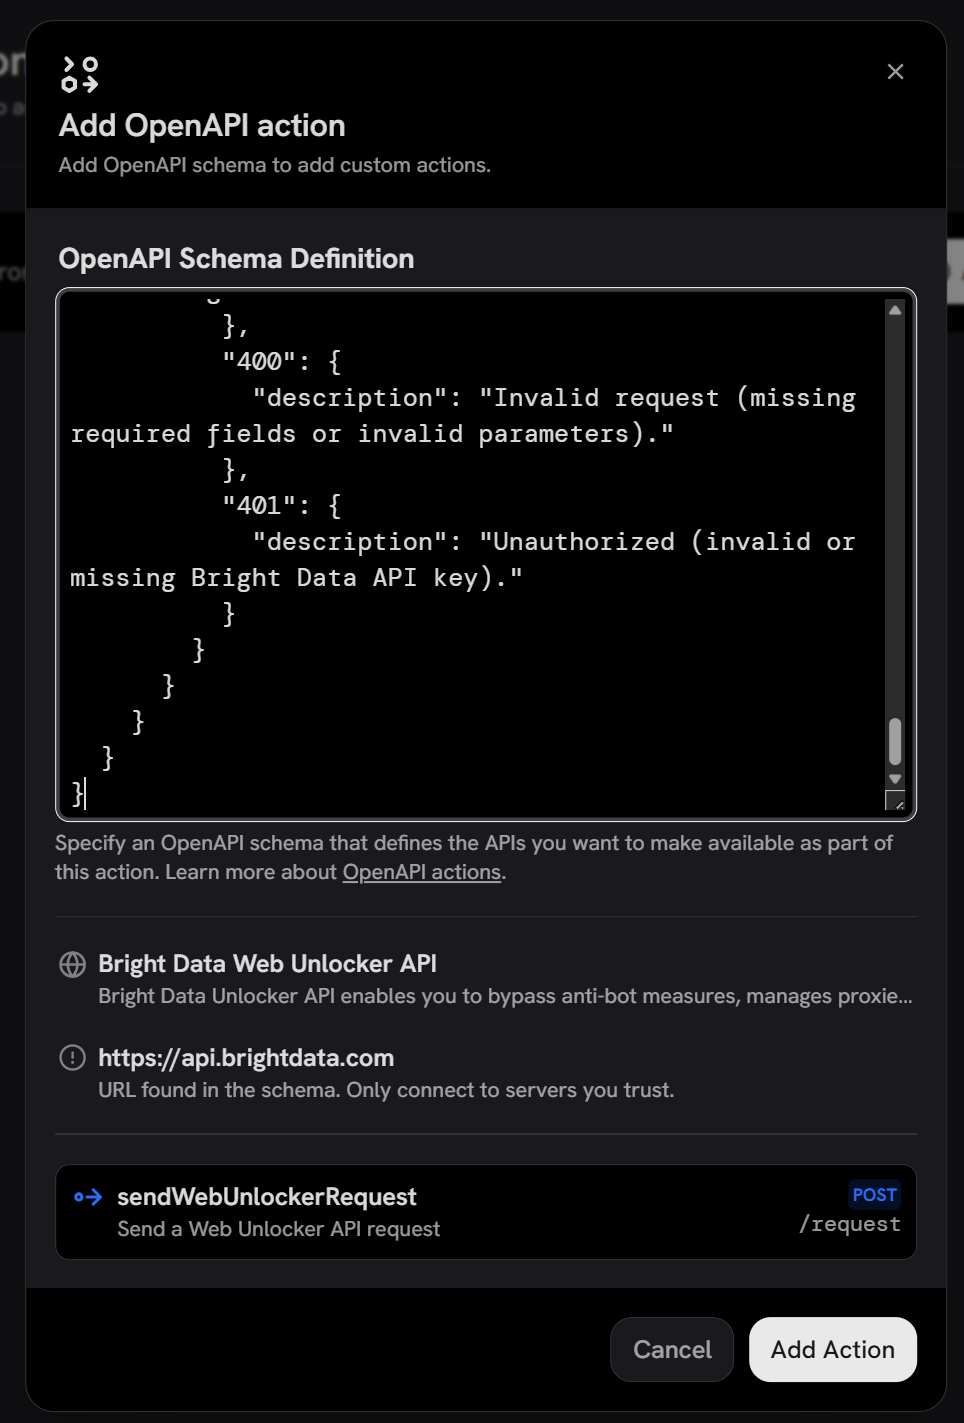
Click “Add Action”, and you will be prompted to configure the authentication method. Select “Custom Authentication Header” and define it as follows:
- Header:
Authorization - Value:
Bearer <YOUR_BRIGHT_DATA_API_KEY>

Note: Bearer <YOUR_BRIGHT_DATA_API_KEY> is the format used by Bright Data API for authentication via API key.
Click “Connect” to confirm. The Bright Data Web Unlocker API will now be authenticated for your account and available as a tool in Onyx. Well done!
Step #5: Add the SERP API OpenAPI Action
Repeat the previous step, but adapt it to the JSON specification of the SERP API. Make sure to set the default value of the zone field in the request body to your SERP API zone name from your Bright Data account.
Once added, the OpenAPI Actions section should now display both tools:
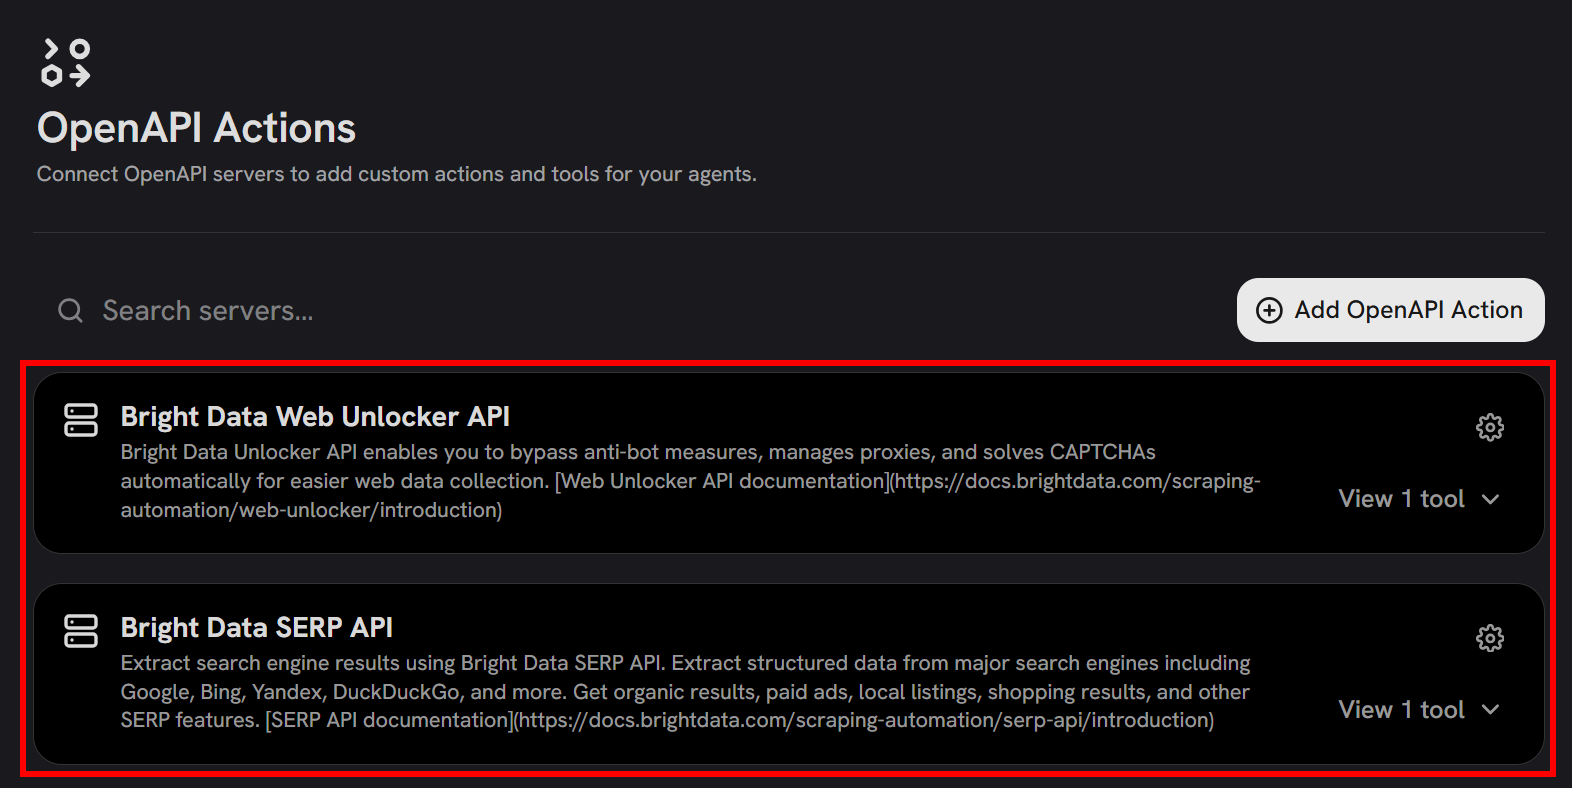
Terrific! The Bright Data Web Unlocker and SERP API tools are now available in Onyx.
Step #6: Enable the OpenAPI Tools
By default, OpenAPI tools are disabled in the Onyx chat. To enable them, go to the “Chat Preferences” page in the Admin Panel and toggle the OpenAPI tools on:
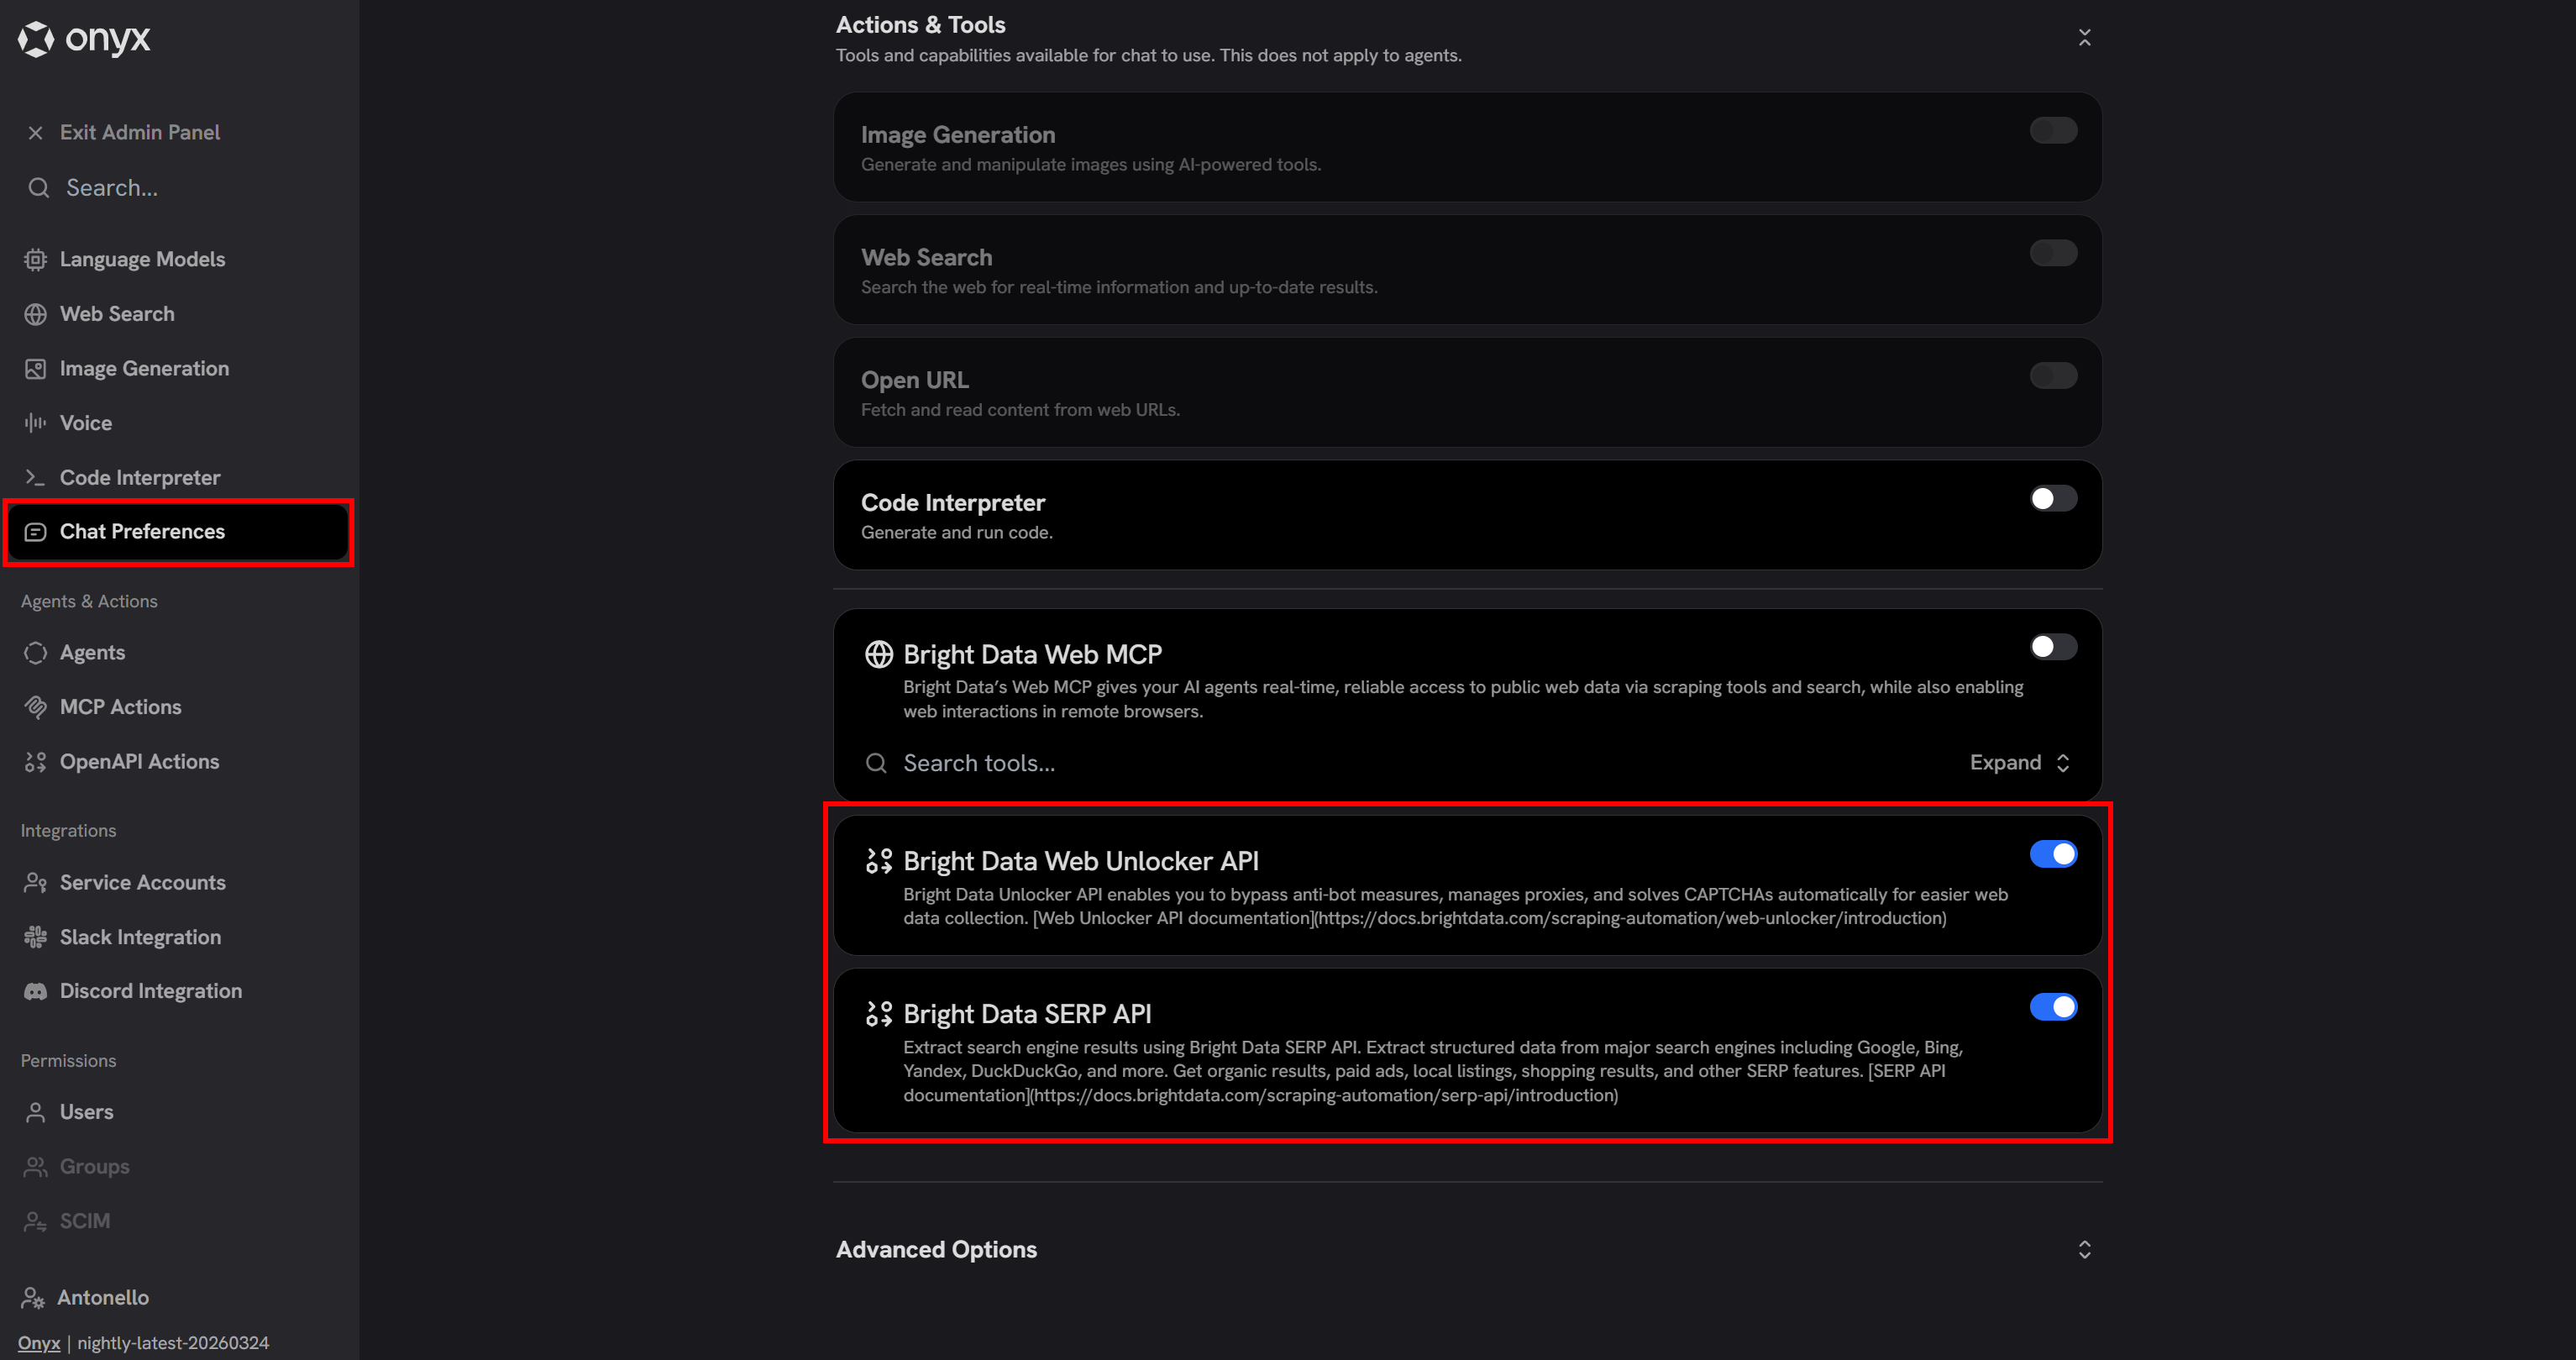
Cool! The Bright Data–powered OpenAPI tools can now be called by the LLM in Onyx.
Step #7: Test the Integration
To check that the LLM in Onyx can automatically call the Bright Data tools, try a prompt like this:
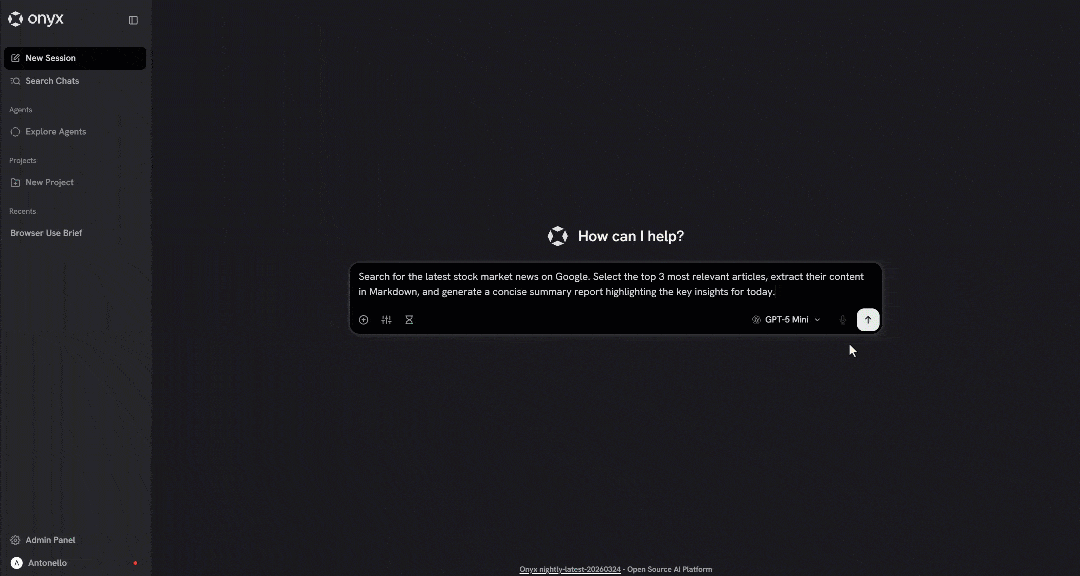
Search for the latest stock market news on Google. Select the top 3 most relevant articles, extract their content in Markdown, and generate a concise summary report highlighting the key insights for today.This represents a typical search-and-extract pattern an agent might use to fetch contextual, fresh, and verifiable information from the web. A regular LLM cannot perform this by default, as it requires both web search and scraping capabilities.
The expected behavior is that the LLM:
- Calls the SERP API to search for stock market news.
- Extracts the top results using the Web Unlocker API.
Launch the prompt, and you should see something like this:
If everything works correctly, you will notice that the LLM called the SERP API tool, selected the top news articles, and scraped their content with the Web Unlocker API as intended.
Et voilà! This confirms that the integration is working. Bright Data is now fully available in Onyx, enabling a supercharged chat experience.
Conclusion
In this article, you learned what Onyx is and what it brings to the table as an AI search and assistant platform. You also saw its limitations due to its LLM-powered nature and how to address them using Bright Data integrations.
As highlighted, Bright Data enables agents to access live web data for more accurate and contextual responses. In Onyx, this can be done either via the Web MCP or through OpenAPI specifications to directly integrate Bright Data products.
To extend functionality even further, connect Onyx agents with the full suite of Bright Data services for AI.
Create a Bright Data account for free today and start integrating our web data solutions!

Technical Writer
Antonello Zanini is a technical writer, editor, and software engineer with 5M+ views. Expert in technical content strategy, web development, and project management.


