
A step-by-step guide to building a serverless scraping pipeline on Google Cloud using Cloud Run, Firestore, BigQuery, Workflows, and Cloud Scheduler.
In this article, you will learn:
- Why a serverless architecture works well for web scraping pipelines.
- How to set up the required Google Cloud infrastructure from scratch.
- How to deploy a private scraper service and a public API service on Cloud Run.
- How to orchestrate scrape runs with Cloud Workflows and automate them with Cloud Scheduler.
- How to store and query scraped data using Firestore and BigQuery.
- How to verify that your entire pipeline is working end to end.
Let’s dive in!
Why Build a Serverless Scraping Pipeline?
Most scraping tutorials stop at the script. You get some HTML, maybe parse a few fields, and that’s it. But when it comes to running scrapers in production, you need answers to harder questions: Where does the data go? How do you run it on a schedule? How do you query results later? How do you keep costs low when the scraper isn’t running?
That’s where serverless comes in. Google Cloud Run only charges you when your services are handling requests. There are no servers to manage, no idle compute burning money overnight. Pair that with Firestore for job tracking, BigQuery for analytics, and Cloud Workflows for orchestration, and you get a data pipeline architecture that scales to zero when idle and spins up on demand.
By the end of this guide, you will have:
- A private
scraper-serviceon Cloud Run that does the actual scraping. - A public
api-serviceon Cloud Run that exposes your data. - Firestore collections tracking job state and results.
- A BigQuery table you can query for analytics.
- A Cloud Workflow that orchestrates the whole scrape run.
- A Cloud Scheduler job that triggers it on a cron.
Understanding the Architecture
Before we start running commands, it helps to see how all the pieces connect. We spent a good amount of time figuring out the right architecture when we first built this, so let us walk you through it.
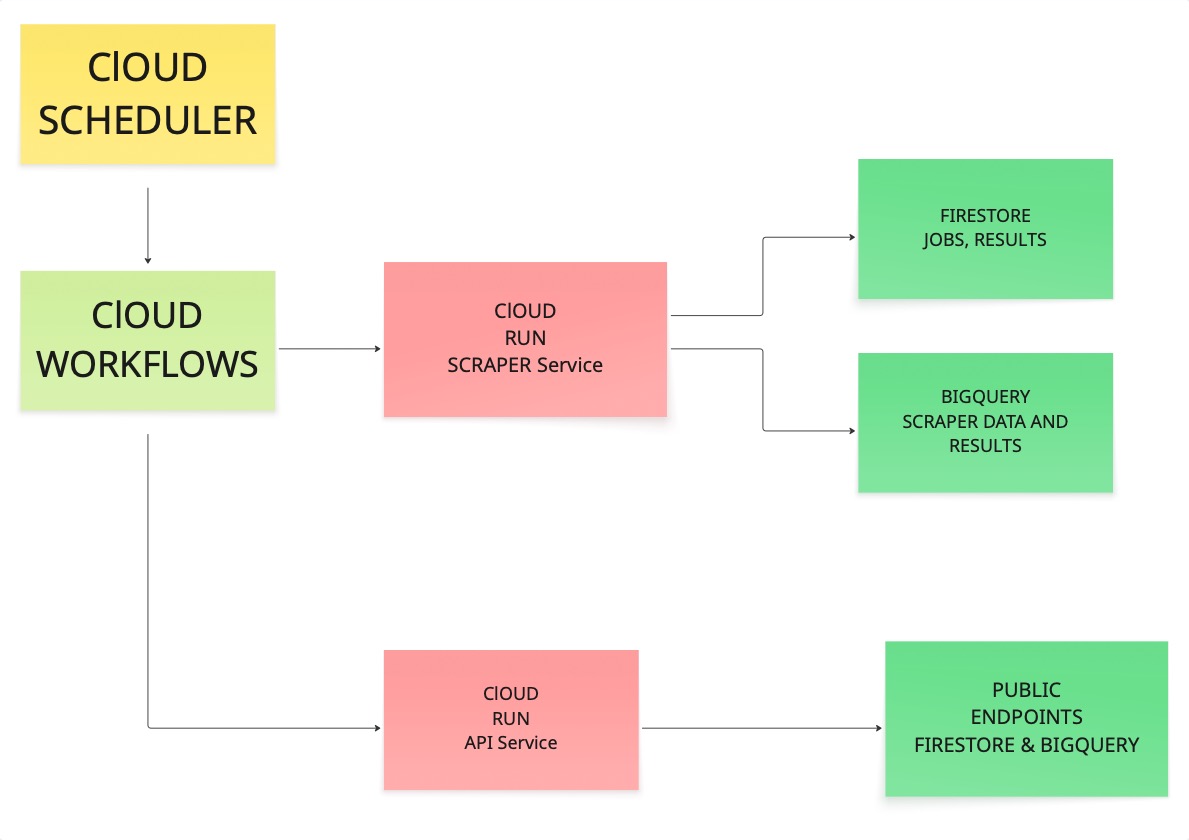
The scheduler triggers a workflow. The workflow calls the scraper. The scraper visits URLs, pulls content, and writes results to both Firestore and BigQuery. Then the API service reads from those stores and exposes the data through public endpoints.
If each link in that chain works, you have something you can rely on in production.
Prerequisites
Before getting started, make sure you have the following:
- A Google account.
- A GCP project with billing enabled (costs will be minimal, but billing must be active).
- Node.js 18 or higher.
- The
gcloudCLI installed on your machine.
Run a quick sanity check:
node --version
npm --version
gcloud --version
If all three print version numbers, you are good to go.
Setting Up Your Google Cloud Project
Head over to the Cloud Console and create a new project. We called ours cloud-run-scraper, but you can name it whatever makes sense for your use case.
Here is what to do:
- Enter your project name.
- Click Create.
- Copy the Project ID it generates (something like
cloud-run-scraper-123456). You will need this throughout the guide. - Go to Billing and link a billing account to the project.
Here is what that screen looks like:

Configuring Your Shell
We recommend setting a few environment variables up front so you are not copy-pasting project IDs everywhere. This keeps your commands clean and reusable:
export PROJECT_ID="YOUR_PROJECT_ID"
export REGION="us-central1"
export REPO_NAME="cloud-run-scraper-repo"
export BQ_DATASET="scraper_data"
export BQ_TABLE="scraped_results"
Then point gcloud at your project:
gcloud config set project "$PROJECT_ID"
gcloud config set run/region "$REGION"
And authenticate (this will open your browser):
gcloud auth login
gcloud auth application-default login
Enabling the Required APIs
One thing that trips people up with Google Cloud is that nothing works until you explicitly turn on the APIs you need. Think of it like flipping circuit breakers. Run this once and you are done:
gcloud services enable \
  run.googleapis.com \
  cloudbuild.googleapis.com \
  workflows.googleapis.com \
  artifactregistry.googleapis.com \
  cloudscheduler.googleapis.com \
  bigquery.googleapis.com \
  firestore.googleapis.com \
  secretmanager.googleapis.com
You can verify they are all enabled with:
gcloud services list --enabled | rg "run.googleapis.com|cloudbuild.googleapis.com|workflows.googleapis.com|artifactregistry.googleapis.com|cloudscheduler.googleapis.com|bigquery.googleapis.com|firestore.googleapis.com"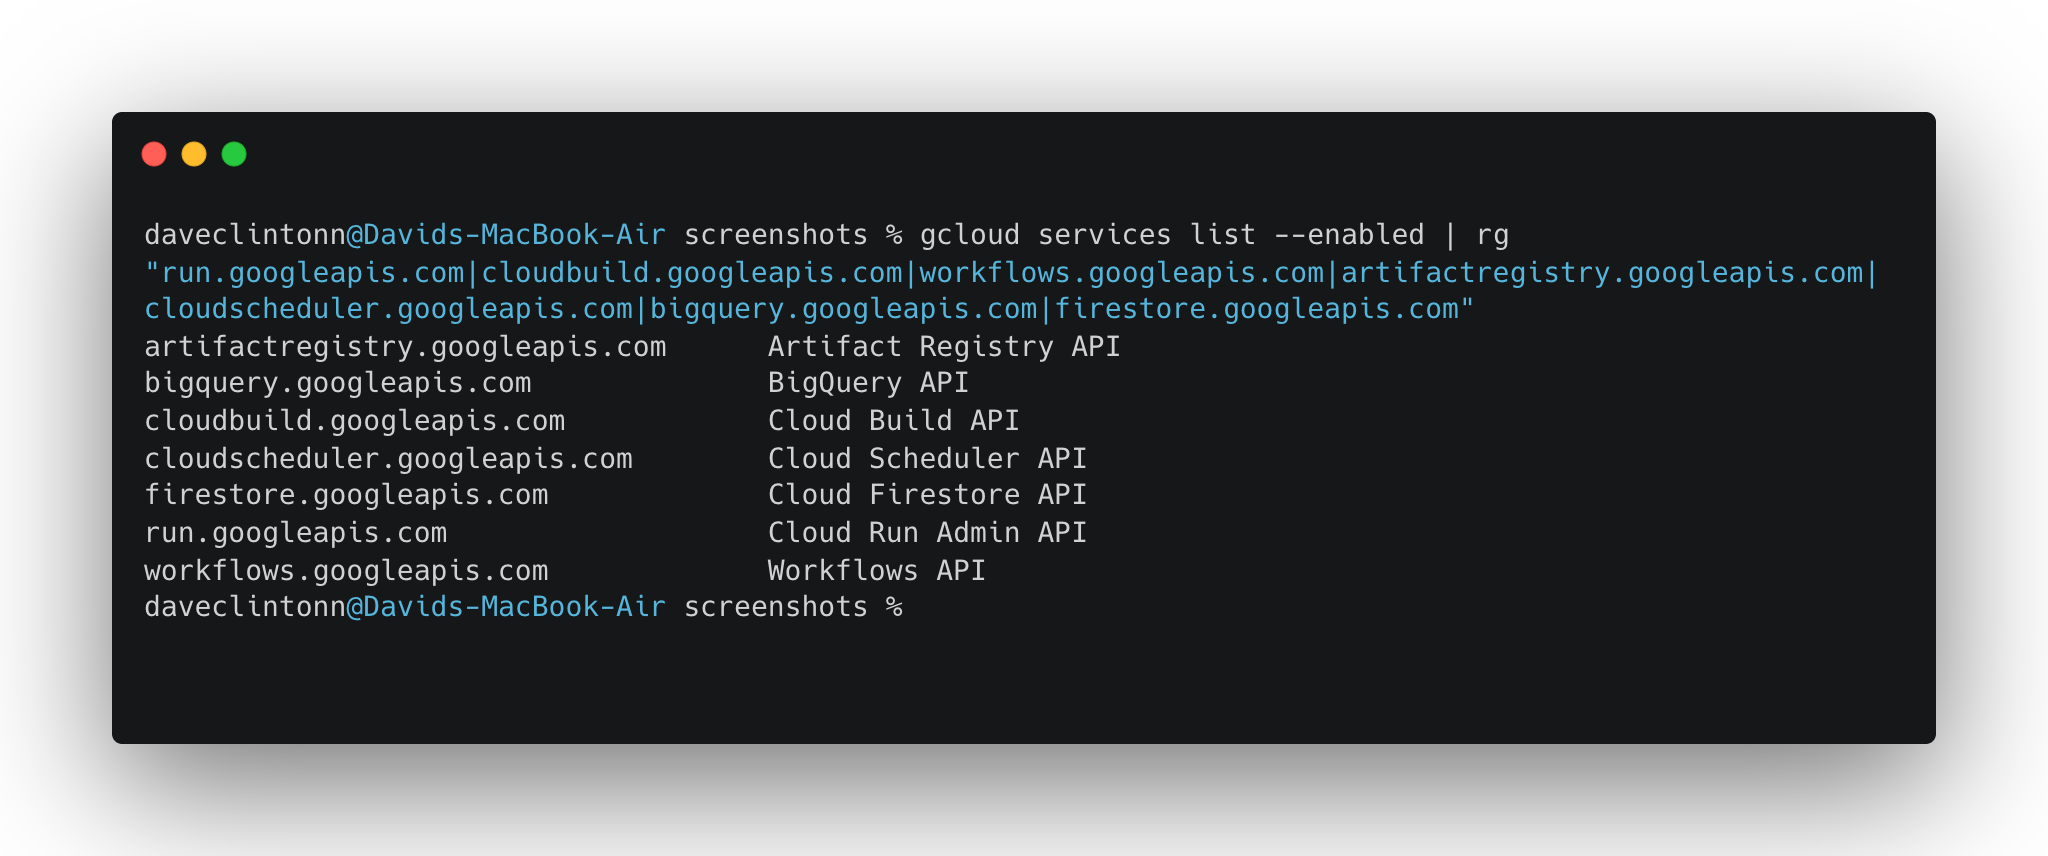
Setting Up Firestore
We need Firestore in Native mode to store job tracking data and scrape results:
gcloud firestore databases create --location="$REGION" --type=firestore-nativeIf you already have Firestore set up in this project, you can skip this step. It will throw an error saying the database already exists.
Creating the Artifact Registry
Artifact Registry is where your Docker images will live. Think of it as a private container registry on GCP:
gcloud artifacts repositories create "$REPO_NAME" \
  --repository-format=docker \
  --location="$REGION" \
  --description="Docker images for cloud-run-scraper"
Then tell Docker how to authenticate with it:
gcloud auth configure-docker "$REGION-docker.pkg.dev"Setting Up BigQuery
Now we will create the BigQuery dataset and table where scraped data will land. This is what makes the whole pipeline useful — a well-structured ETL pipeline flow lets you run SQL queries across all your scraped data to surface trends, filter by source, or build dashboards.
Create the dataset:
bq --location="$REGION" mk -d "$PROJECT_ID:$BQ_DATASET"Then create the table with the schema used by the scraper:
bq mk --table \
  "$PROJECT_ID:$BQ_DATASET.$BQ_TABLE" \
  url:STRING,title:STRING,content:STRING,scraped_at:TIMESTAMP,job_id:STRING,source:STRING,metadata:STRING
Quick check that it worked:
bq show "$PROJECT_ID:$BQ_DATASET.$BQ_TABLE"Getting the IAM Permissions Right
This part is not the most exciting, but it is critical. Your Cloud Run services need permission to talk to Firestore, BigQuery, and each other. Without these IAM bindings, you will get mysterious 403 errors with no clear explanation.
First, grab your compute service account:
PROJECT_NUMBER=$(gcloud projects describe "$PROJECT_ID" --format="value(projectNumber)")
COMPUTE_SA="${PROJECT_NUMBER}[email protected]"
echo "$COMPUTE_SA"
Then grant the roles it needs:
gcloud projects add-iam-policy-binding "$PROJECT_ID" \
  --member="serviceAccount:${COMPUTE_SA}" \
  --role="roles/datastore.user"

gcloud projects add-iam-policy-binding "$PROJECT_ID" \
  --member="serviceAccount:${COMPUTE_SA}" \
  --role="roles/bigquery.dataEditor"

gcloud projects add-iam-policy-binding "$PROJECT_ID" \
  --member="serviceAccount:${COMPUTE_SA}" \
  --role="roles/bigquery.jobUser"

gcloud projects add-iam-policy-binding "$PROJECT_ID" \
  --member="serviceAccount:${COMPUTE_SA}" \
  --role="roles/run.invoker"

gcloud projects add-iam-policy-binding "$PROJECT_ID" \
  --member="serviceAccount:${COMPUTE_SA}" \
  --role="roles/workflows.invoker"
That is five role bindings. Each one lets the service account do a specific thing: read/write Firestore, insert into BigQuery, invoke Cloud Run services, and trigger workflows.
Installing Dependencies
From the repo root, install the dependencies for both services:
npm --prefix scraper-service install
npm --prefix api-service install
Deploying the Scraper Service
This is the workhorse of the whole pipeline. It is the service that visits URLs, pulls content, and writes results to Firestore and BigQuery. If you want to handle more complex anti-bot scenarios in your scraper, tools like Bright Data’s Scraping Browser are worth exploring for cloud-based browser automation at scale.
We are deploying it as a private service. Notice the --no-allow-unauthenticated flag. Only authenticated requests, like the ones from our workflow, can call it:
gcloud run deploy scraper-service \
  --source ./scraper-service \
  --region "$REGION" \
  --memory 2Gi \
  --cpu 2 \
  --timeout 300 \
  --no-allow-unauthenticated \
  --set-env-vars NODE_ENV=production
Grab the URL once it is deployed:
SCRAPER_URL=$(gcloud run services describe scraper-service --region "$REGION" --format='value(status.url)')
echo "$SCRAPER_URL"
Save that URL. You will need it for the workflow configuration.
Deploying the API Service
The API service is the public-facing side of the pipeline. It reads from Firestore and BigQuery and exposes endpoints so you or your frontend can access the scraped data:
gcloud run deploy api-service \
  --source ./api-service \
  --region "$REGION" \
  --memory 512Mi \
  --cpu 1 \
  --timeout 60 \
  --allow-unauthenticated \
  --set-env-vars NODE_ENV=production
Get the URL:
API_URL=$(gcloud run services describe api-service --region "$REGION" --format='value(status.url)')
echo "$API_URL"
Testing Your Deployed Services
Now comes the fun part: actually hitting your live services and making sure everything works. Keep in mind that common web scraping challenges like IP blocking and rate limiting can affect your scraper even in a serverless setup, so it’s worth having a strategy for those from the start.
Try these against your API service:
curl -s "$API_URL/"
curl -s "$API_URL/jobs?limit=10"
curl -s "$API_URL/analytics/summary"
For the scraper, you need to pass an auth token since it is a private service:
curl -s -X POST \
  -H "Authorization: Bearer $(gcloud auth print-identity-token)" \
  -H "Content-Type: application/json" \
  -d '{"url":"http://books.toscrape.com"}' \
  "$SCRAPER_URL/scrape"
You can also pass custom CSS selectors if you want to target specific elements on a page:
curl -s -X POST \
  -H "Authorization: Bearer $(gcloud auth print-identity-token)" \
  -H "Content-Type: application/json" \
  -d '{"url":"http://books.toscrape.com","selectors":{"title":"h1, h2","content":"p, article"}}' \
  "$SCRAPER_URL/scrape"
Setting Up the Workflow
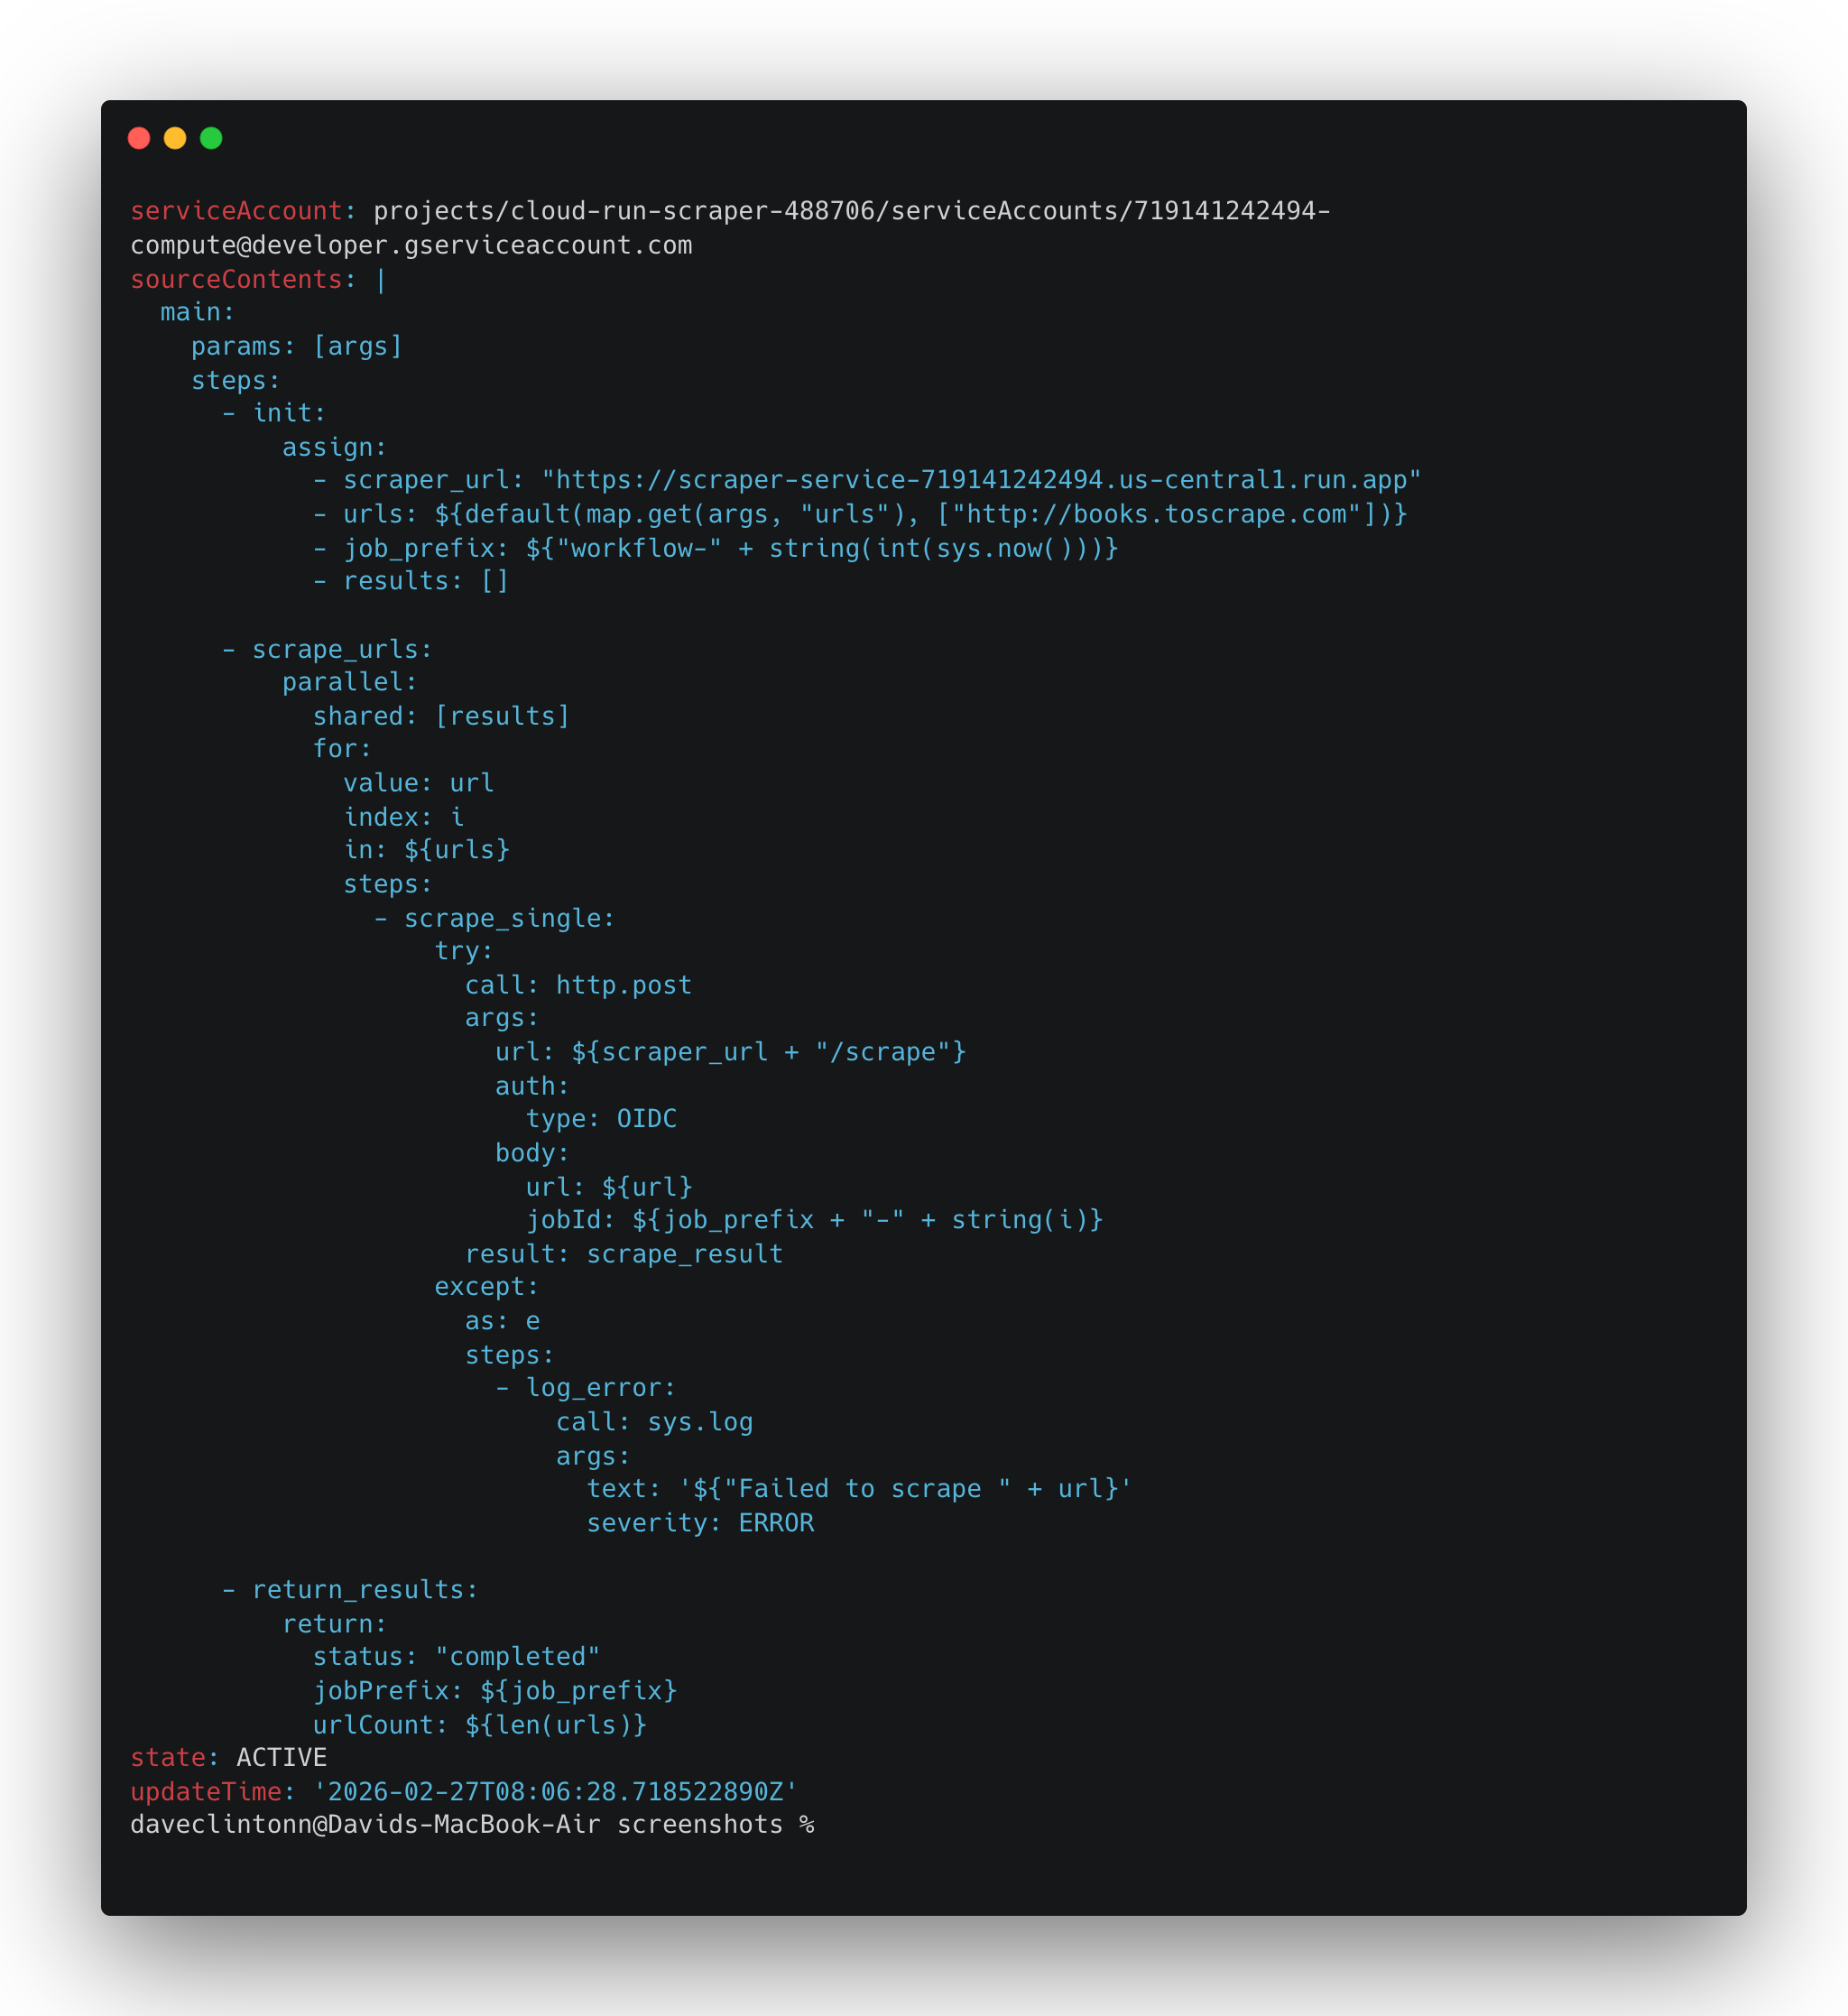
The workflow is what ties the scraper to a schedule. It is a YAML file that tells Cloud Workflows to call the scraper for each URL in the list.
Open workflows/scrape-pipeline.yaml and set the scraper_url to the URL you got from the scraper deployment step.
Then deploy it:
gcloud workflows deploy scrape-pipeline \
  --location "$REGION" \
  --source workflows/scrape-pipeline.yaml \
  --service-account "$COMPUTE_SA"
Creating the Scheduler Job
This is where the pipeline becomes fully automatic. We are setting up a cron job that runs the workflow every day at 6:00 AM UTC:
gcloud scheduler jobs create http scrape-pipeline-daily \
  --location "$REGION" \
  --schedule "0 6 * * *" \
  --uri "https://workflowexecutions.googleapis.com/v1/projects/${PROJECT_ID}/locations/${REGION}/workflows/scrape-pipeline/executions" \
  --http-method POST \
  --oauth-service-account-email "$COMPUTE_SA" \
  --oauth-token-scope "https://www.googleapis.com/auth/cloud-platform" \
  --message-body '{"argument":"{\"urls\":[\"http://books.toscrape.com\",\"http://quotes.toscrape.com\"]}"}'
If the job already exists and you just want to update it:
gcloud scheduler jobs update http scrape-pipeline-daily \
  --location "$REGION" \
  --schedule "0 6 * * *" \
  --uri "https://workflowexecutions.googleapis.com/v1/projects/${PROJECT_ID}/locations/${REGION}/workflows/scrape-pipeline/executions" \
  --http-method POST \
  --oauth-service-account-email "$COMPUTE_SA" \
  --oauth-token-scope "https://www.googleapis.com/auth/cloud-platform" \
  --message-body '{"argument":"{\"urls\":[\"http://books.toscrape.com\",\"http://quotes.toscrape.com\"]}"}'
Running Your First Full Test
Do not wait for the scheduler. Trigger the workflow manually and watch the whole pipeline run:
gcloud workflows run scrape-pipeline \
  --location "$REGION" \
  --data '{"urls":["http://books.toscrape.com","http://quotes.toscrape.com"]}'
You can monitor the execution with:
gcloud workflows executions list scrape-pipeline --location "$REGION"Give it a minute or two. Once the execution shows SUCCEEDED, your data should be flowing into Firestore and BigQuery.
Verifying the Data
Now let’s confirm that the data actually landed where it should.
Check BigQuery for row count:
bq query --use_legacy_sql=false "SELECT COUNT(*) AS total_rows FROM \`${PROJECT_ID}.${BQ_DATASET}.${BQ_TABLE}\`"See the latest scraped results:
bq query --use_legacy_sql=false "SELECT source, url, scraped_at, job_id FROM \`${PROJECT_ID}.${BQ_DATASET}.${BQ_TABLE}\` ORDER BY scraped_at DESC LIMIT 10"Check Firestore in the console. You should see two collections: jobs and results.
Then hit the API to confirm it can read everything:
curl -s "$API_URL/jobs?limit=1"Grab a jobId from the response and dig deeper:
curl -s "$API_URL/jobs/YOUR_JOB_ID"
curl -s "$API_URL/results/YOUR_JOB_ID"
If all of that returns data, your pipeline is working end to end.
CI/CD with Cloud Build
The repo includes a cloudbuild.yaml file that handles building and deploying both services in one shot. When you want to ship changes, just run:
gcloud builds submit --config cloudbuild.yaml .That single command will build both Docker images, push them to Artifact Registry, and deploy both Cloud Run services. If you’re looking to scale beyond a single pipeline, check out this overview of top web scraping tools to see how different solutions can complement a cloud-based setup like this one.
Final Checklist
Before you call it done, run through these verification steps:
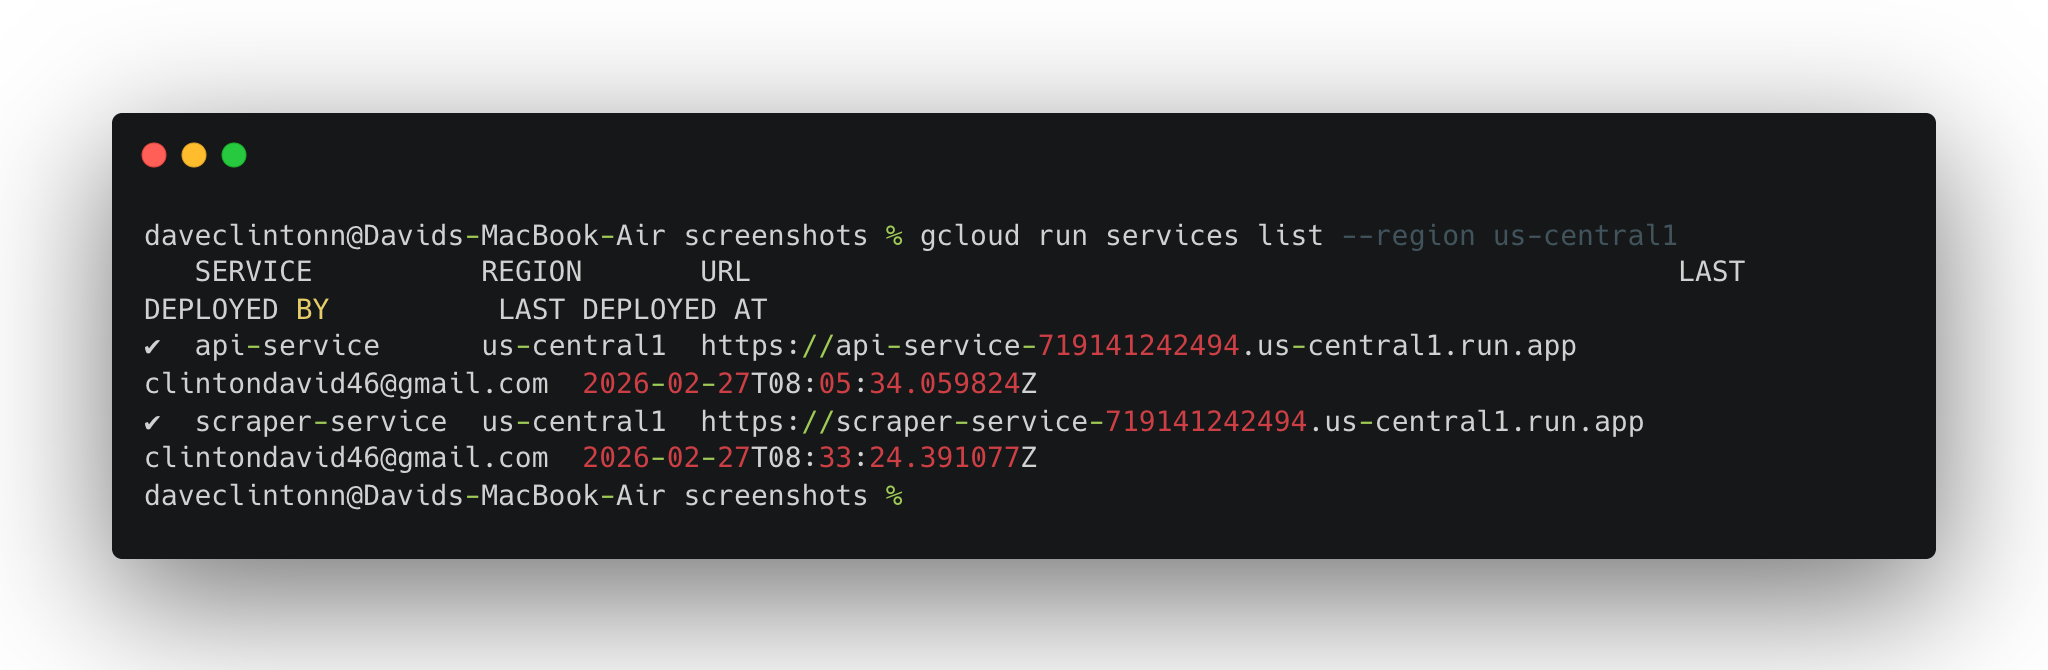
gcloud run services list --region us-central1should show both services.
gcloud workflows describe scrape-pipeline --location us-central1should return the workflow details.gcloud scheduler jobs list --location us-central1should show the scheduler job.- Firestore should have
jobsandresultscollections. - BigQuery table should have rows.
- The API
/jobsendpoint should return actual records.

If all six check out, you are not running a demo anymore. You have a real pipeline that scrapes on schedule, stores data in two places, and serves it through a public API.
Conclusion
In this guide, we walked through building a complete serverless web scraping pipeline on Google Cloud. We covered setting up the infrastructure, deploying two Cloud Run services, orchestrating scrape runs with Cloud Workflows, and automating everything with Cloud Scheduler.
If you prefer a managed approach rather than maintaining your own infrastructure, you can explore Bright Data’s pre-collected datasets or the Scraper Studio to turn any website into a ready-made data pipeline. You can also read our guide on serverless scraping with Scrapy and AWS to see how a similar architecture looks on a different cloud provider. Clone the project, swap in your own target URLs, and you will have a scraping pipeline up and running.

Technical Writer
Amitesh Anand is a developer advocate and technical writer sharing content on AI, software, and devtools, with 10k followers and 400k+ views.


