
In this tutorial, you will learn:
- What MLflow is and the tracking capabilities it provides.
- Why building ML/AI experiments around web-scraped datasets is a winning approach.
- How to perform experiment tracking using a scraped dataset with MLflow.
Let’s dive in!
What Is MLflow?
MLflow is an open-source platform for managing the entire machine learning lifecycle. It provides many features and a rich API to track, reproduce, and deploy models efficiently.
MLflow supports both traditional machine learning and deep learning workflows, offering tools for experimentation, versioning, evaluation, and deployment. All that in a reproducible and collaborative way.
MLflow is language-agnostic, working across Python, R, and Java, and supports local, cloud, and managed environments. That makes it vendor-neutral and highly flexible. Also, it conserves an open-source nature, with its GitHub repository boasting over 24k stars.
The main MLflow features include:
- Tracking: Log experiments, track parameters, metrics, code versions, and artifacts.
- Models: Standardize packaging of models for deployment across different platforms.
- Model registry: Centralized repository for model versioning, stage transitions, and annotations.
- Projects: Package reusable data science code for consistency and reproducibility.
- AI/LLM evaluation: Trace, compare, and evaluate generative AI or LLM outputs.
- Integration and autologging: Works with scikit-learn, TensorFlow, PyTorch, OpenAI, and more, automating logging.
Find out more in the official docs.
Why Datasets Containing Scraped Web Data Are Ideal for Experimenting with MLflow
When building ML/AI pipelines, the quality and variety of your datasets typically make or break your experiments. Scraped web data, by its nature, provides both diversity and scale. Those are the two main ingredients for meaningful experimentation.
Unlike small or synthetic datasets, web-derived datasets capture real-world distributions, edge cases, and natural variability. Those aspects make your models more robust and your MLflow experiments more informative. This is why web data is generally considered one of the best data sources.
Bright Data stands out as the best dataset provider. Its marketplace offers ML-ready and AI-ready structured datasets spanning over 150 domains, from e-commerce and retail to social media and travel. Each dataset contains millions of records, ensuring both breadth and depth.
These datasets are regularly updated, reflecting the dynamic nature of the web, so your ML/AI workflows can be trained and evaluated on the most current information. This combination of scale, freshness, and ML-ready formatting makes Bright Data datasets perfect for solid, reproducible, and high-impact experimentation with MLflow. Explore the available datasets in the marketplace!
How to Perform Experiment Tracking Using MLflow and a Bright Data Dataset
In this guided section, you will learn how to perform MLflow experiment tracking. In particular, you will build a machine learning pipeline using the Bright Data Amazon Best Product Seller dataset.
The goal of this pipeline is to train a model that predicts a product’s final price based on its rating, number of reviews, and brand. The underlying assumption is that these features contain predictive signals correlated with product pricing.
The pipeline combines preprocessing with a Random Forest model and evaluates its performance. Throughout the process, MLflow will track metrics, artifacts, the dataset, and system resource usage.
Follow the steps below!
Prerequisites
To follow along with this tutorial, you need:
- Python 3.10 or higher installed locally.
- A Bright Data account to access scraped datasets.
- Basic knowledge of training predictive ML models using scikit-learn.
Step #1: Project Setup
Begin by opening your terminal and creating a new folder for your MLflow experiment project:
mkdir mlflow-experiment-trackingNext, navigate into the project directory and create a Python virtual environment inside it:
cd mlflow-experiment-tracking
python -m venv .venv
Now, load the project folder in your preferred Python IDE. We recommend Visual Studio Code with the Python extension or PyCharm Community Edition.
Create a new file named experiment.py in the root of your project directory. Your project structure should look like this:
mlflow-experiment-tracking/
├── .venv/
└── experiment.py
In the terminal, activate the virtual environment. On Linux or macOS, execute:
source venv/bin/activateEquivalently, on Windows, run:
venv/Scripts/activateWith the virtual environment activated, install the project dependencies:
pip install mlflow pandas scikit-learn psutil nvidia-ml-pyThe required libraries are:
mlflow: For end-to-end experiment tracking, observability, and logging ML models and metrics.pandas: Loads, cleans, and manipulates tabular data from JSON/CSV for model training.scikit-learn: Builds ML pipelines, handles preprocessing, trains models, and computes evaluation metrics.psutil, nvidia-ml-py: Required by MLflow to monitor CPU and GPU resources and other system metrics during experiments.
Next, in experiment.py, import all required libraries with:
import json
import mlflow
import pandas as pd
import mlflow.sklearn
from mlflow.data.code_dataset_source import CodeDatasetSource
from sklearn.model_selection import train_test_split
from sklearn.preprocessing import OneHotEncoder
from sklearn.compose import ColumnTransformer
from sklearn.pipeline import Pipeline
from sklearn.ensemble import RandomForestRegressor
from sklearn.metrics import root_mean_squared_error, r2_score
from sklearn.impute import SimpleImputer
Well done! Your Python development environment is now ready to track ML and AI experiments in MLflow.
Step #2: Familiarize Yourself with the MLflow UI
To verify that MLflow is working, open a terminal with your virtual environment activated and launch the MLflow UI:
mlflow uiOn the first launch, MLflow will initialize a local SQLite database to store experiment data. In particular, you will notice that an mlflow.db file appeared in your project’s folder. That is the local database used by SQLite.
In the terminal, you will notice a log like this:
INFO: Uvicorn running on http://127.0.0.1:5000 (Press CTRL+C to quit)This means the UI is now running. Open your browser and visit http://127.0.0.1:5000/. You should see: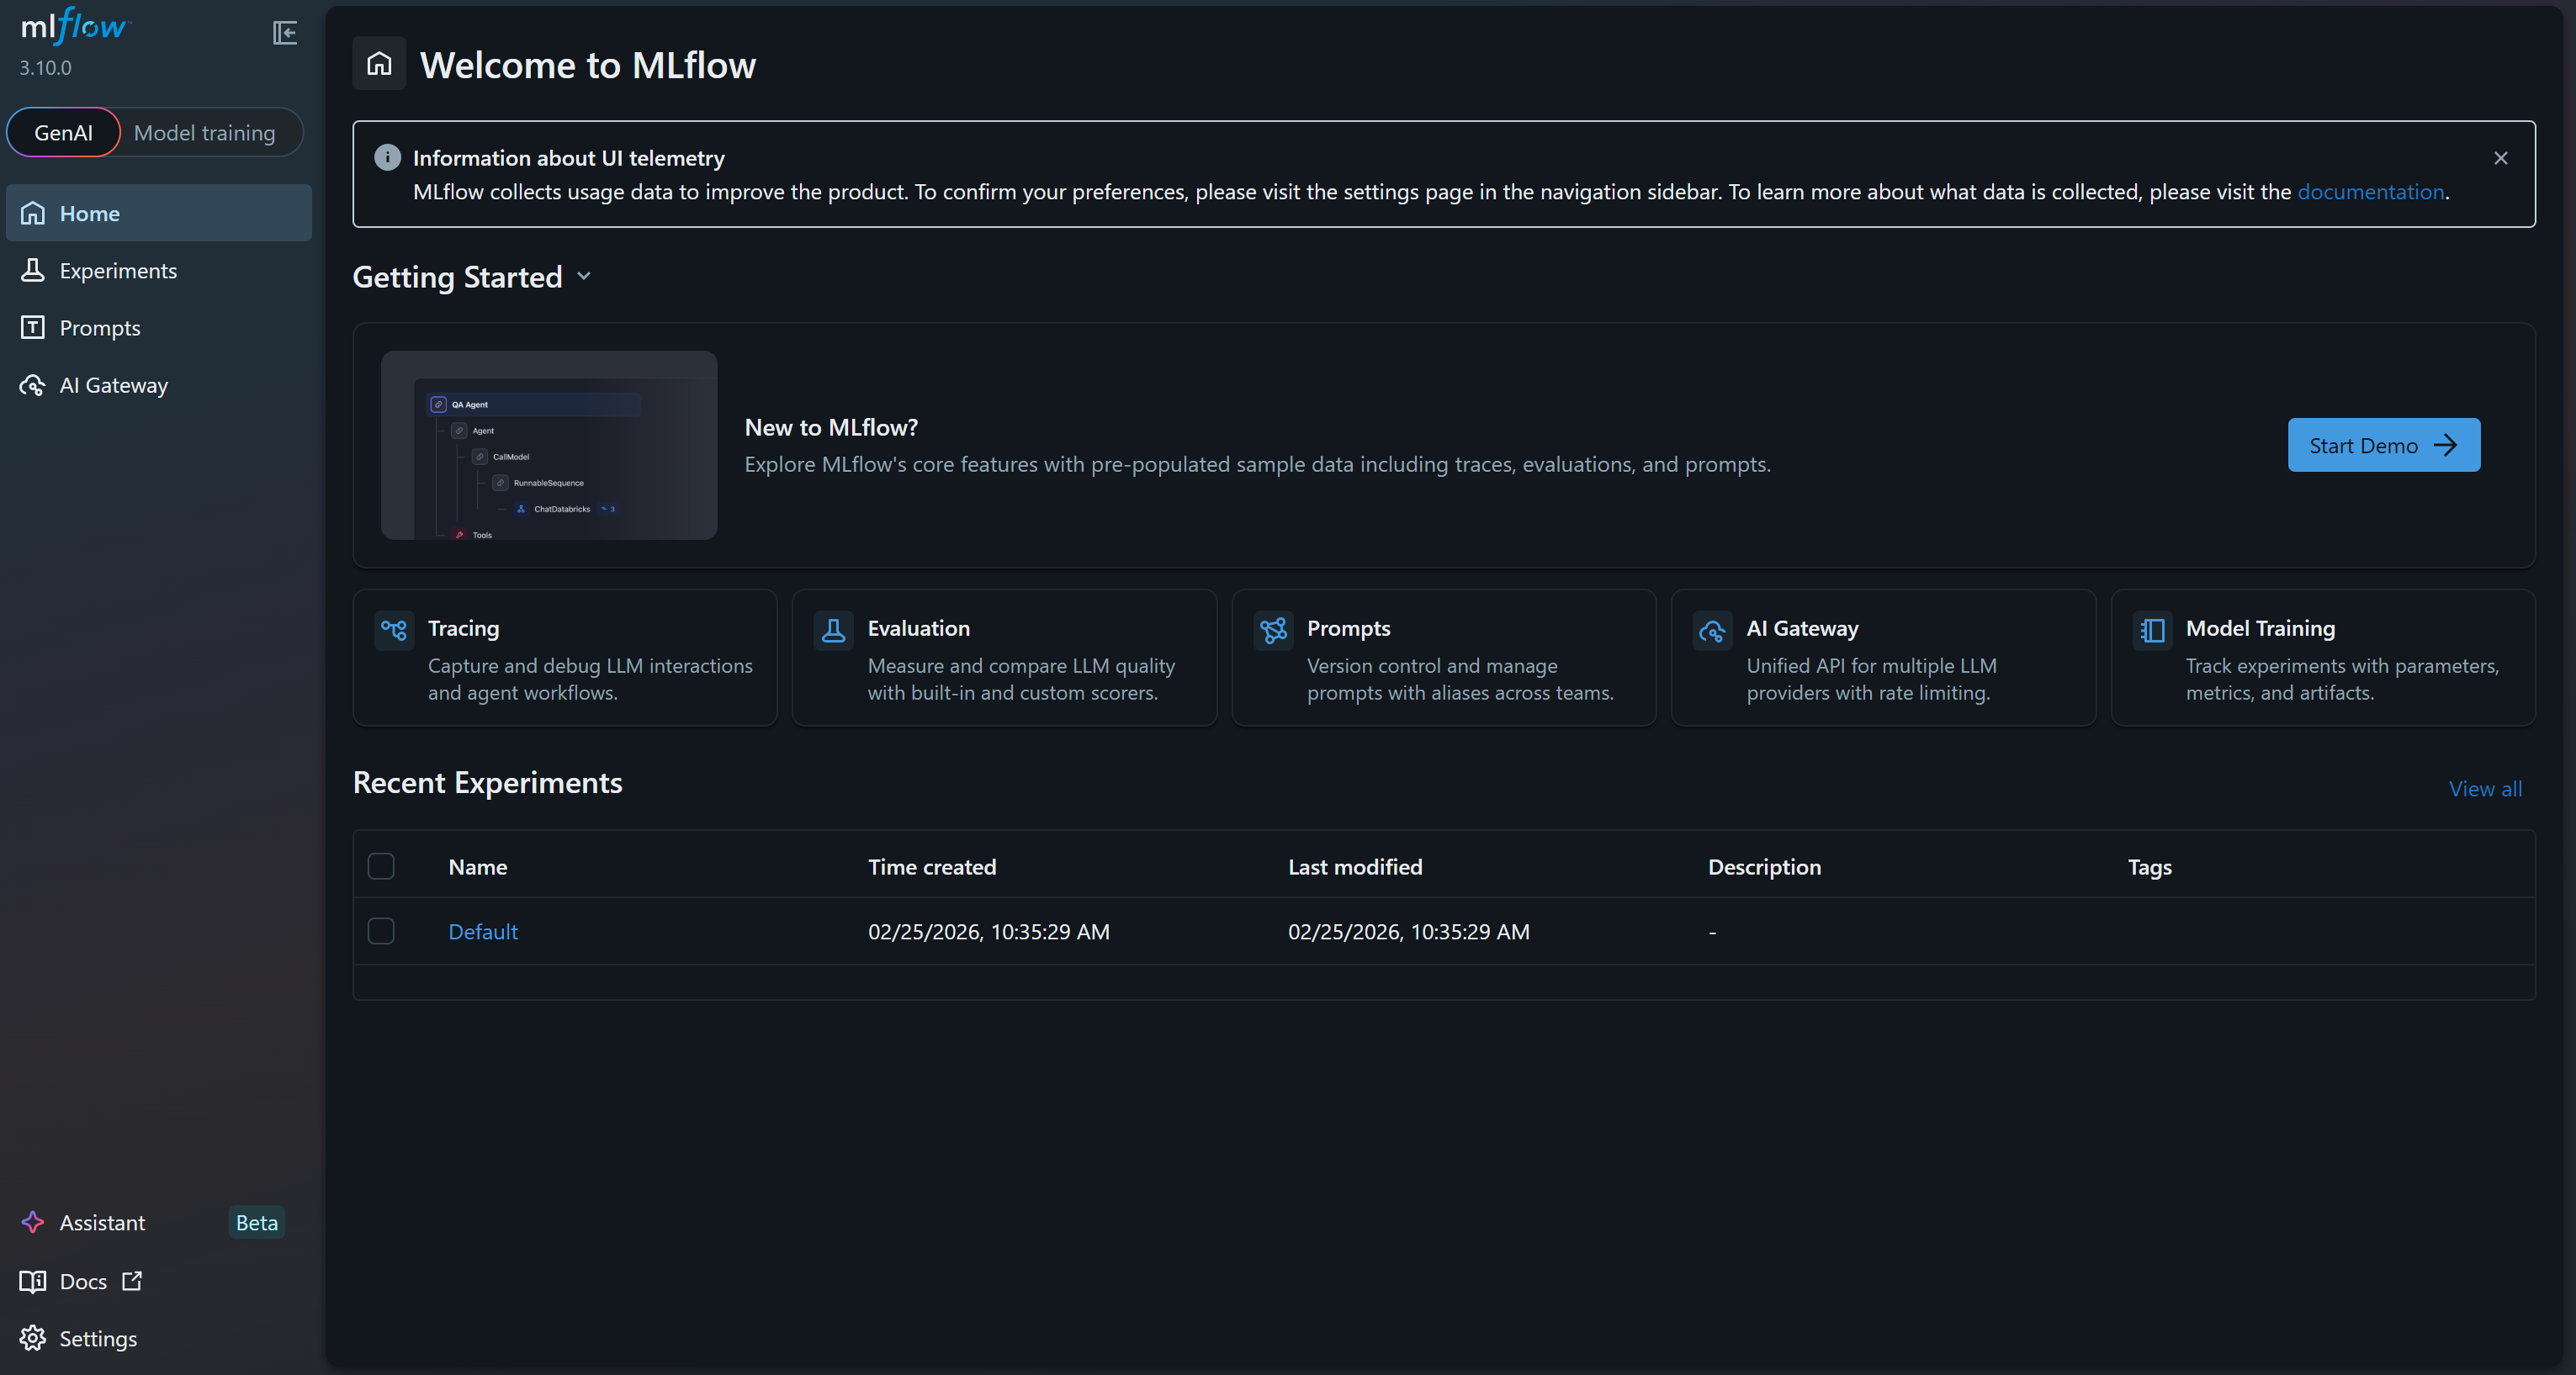
This is the MLflow UI, where you can observe and track your experiments. Take a few minutes to familiarize yourself with it by exploring the menu links and available features. Here, you will monitor metrics, logs, and artifacts effectively during your ML projects. Great!
Step #3: Enable MLflow Auto-Logging and System Tracing Capabilities
In your experiment.ml file, enable MLflow system metrics logging to track CPU usage, disk usage, RAM usage, and other system-level metrics during training.
# Enable automatic system metrics logging (CPU, memory, etc.)
mlflow.enable_system_metrics_logging()

# Automatically log events for sklearn
mlflow.sklearn.autolog()

# Configure how frequently system metrics are sampled and logged
mlflow.set_system_metrics_sampling_interval(1)
mlflow.set_system_metrics_samples_before_logging(1)
This snippet also activates autologging so MLflow automatically records scikit-learn events. Then, it sets the system metrics sampling interval to 1 second to ensure detailed and frequent monitoring.
Fantastic! Your MLflow application will now track useful information about your machine learning model training experiment.
Step #4: Retrieve the Source Dataset with Scraped Data from Bright Data
You now have an MLflow setup in place, ready to perform ML/AI experiments. What is missing is the data source for training your model. As mentioned earlier, we will use Bright Data’s Amazon Best Sellers dataset to build a price prediction model based on a Random Forest pipeline.
First, you need to retrieve the source dataset. In this case, it contains over 45 data fields and covers more than 171 million Amazon best-selling products.
If you do not already have a Bright Data account, create one. Otherwise, log in. In the Bright Data control panel, select the “Web Datasets” menu option. Then, navigate to the “Dataset Marketplace” tab: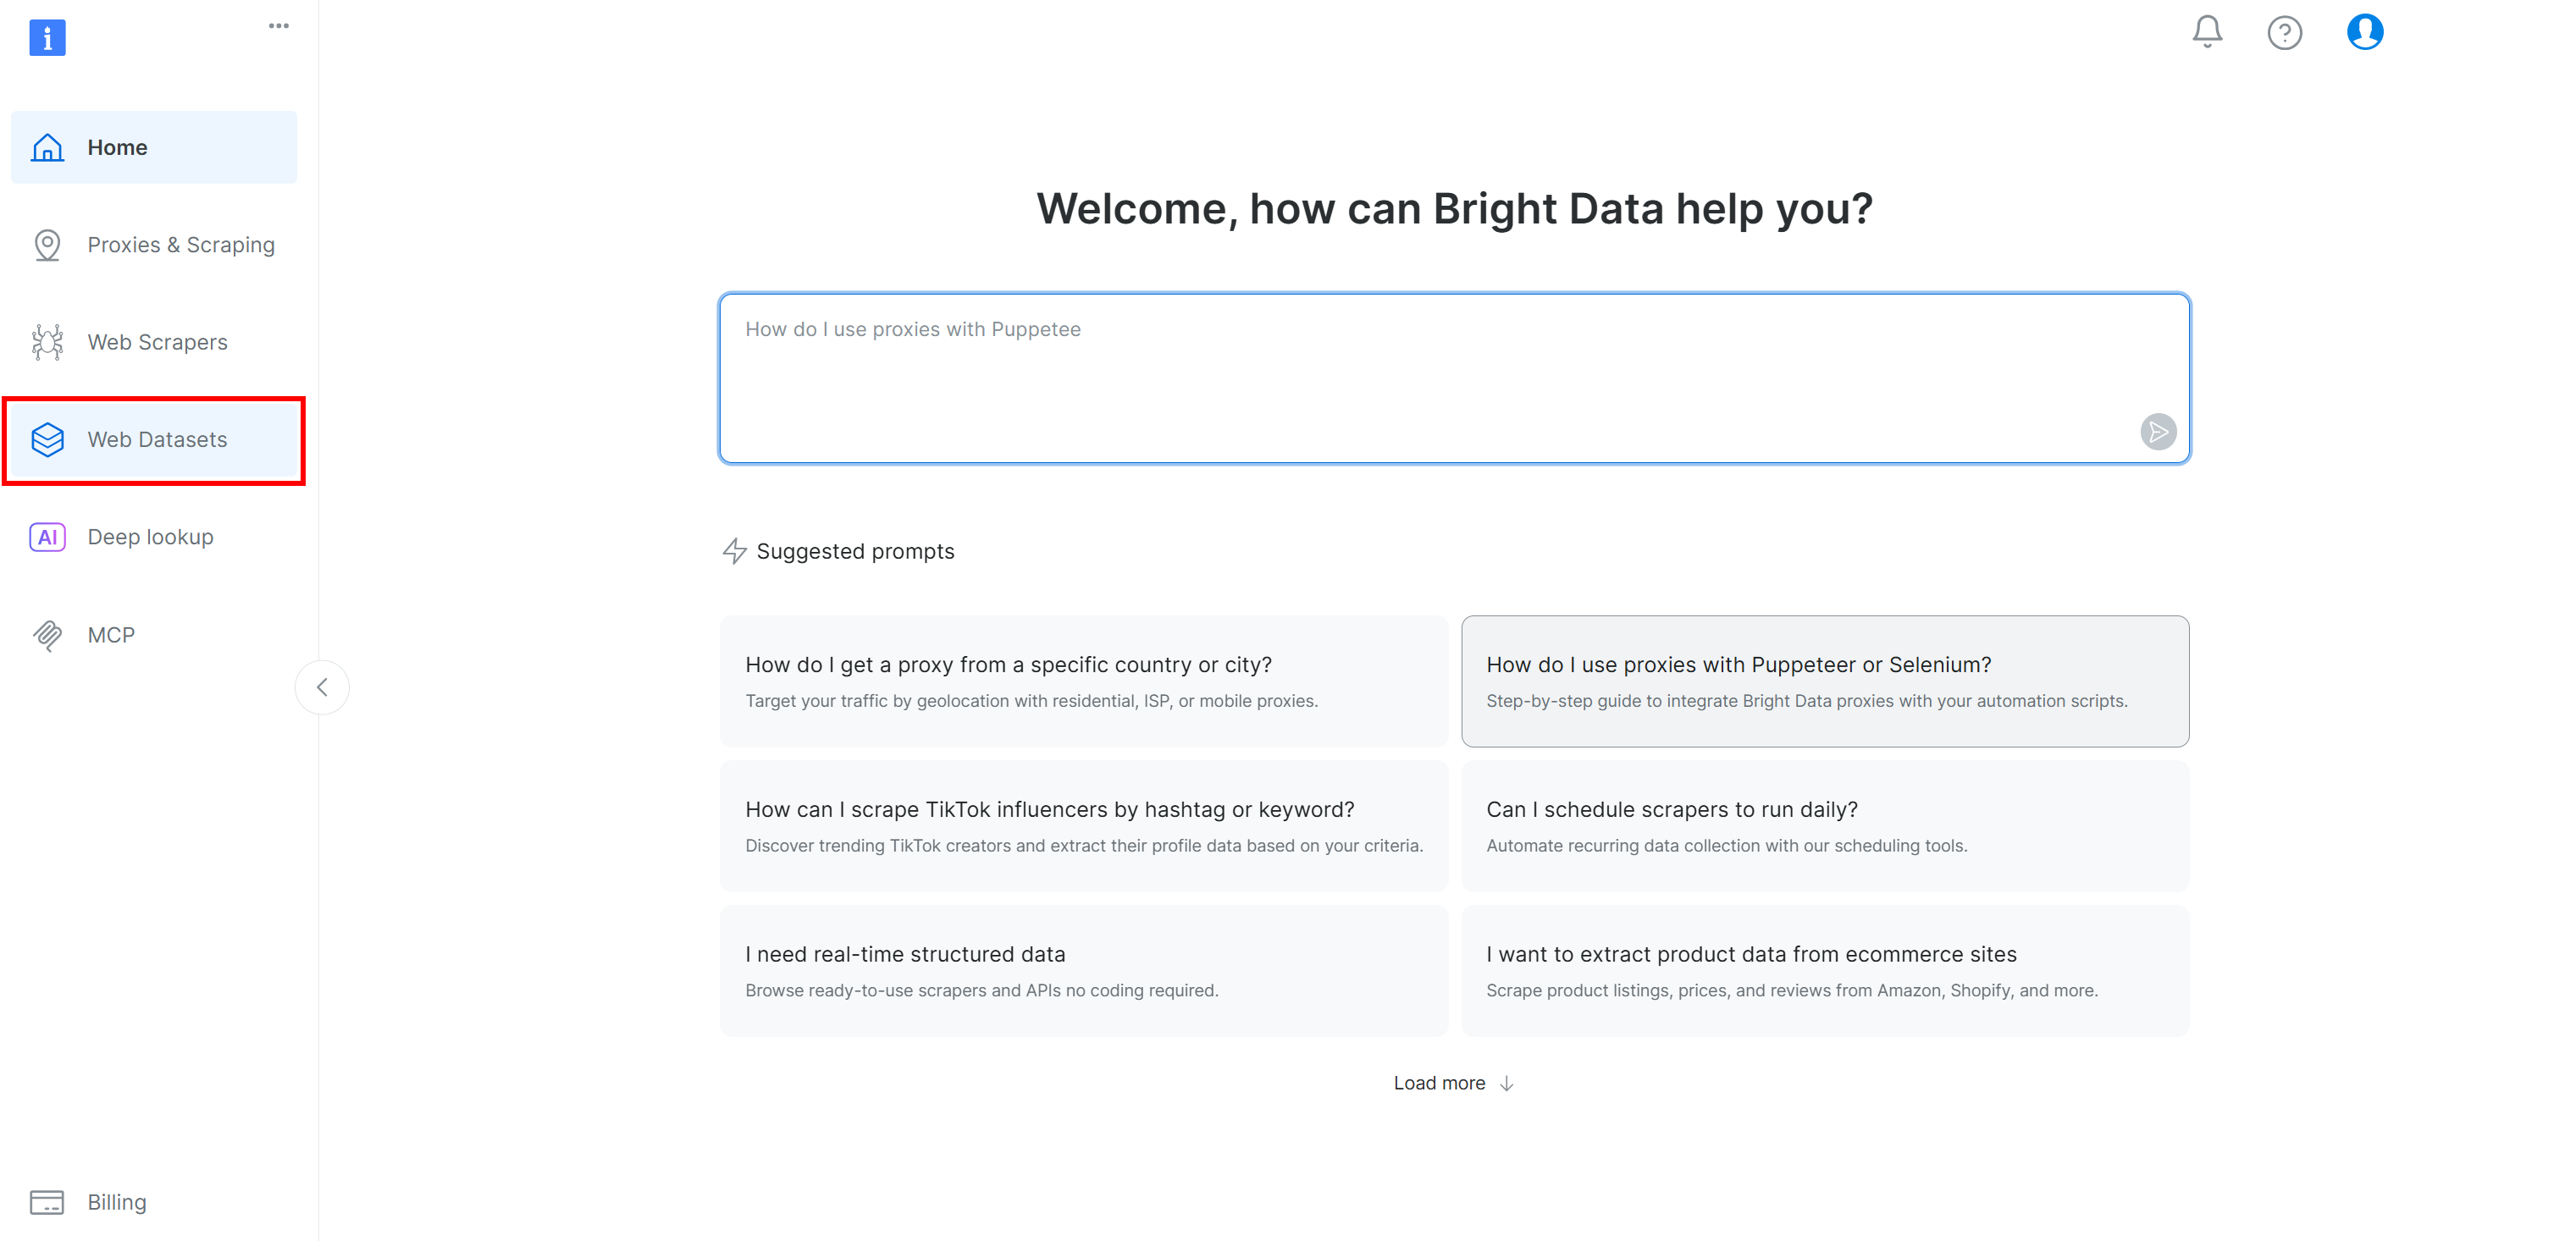
Move to the “Dataset marketplace” tab: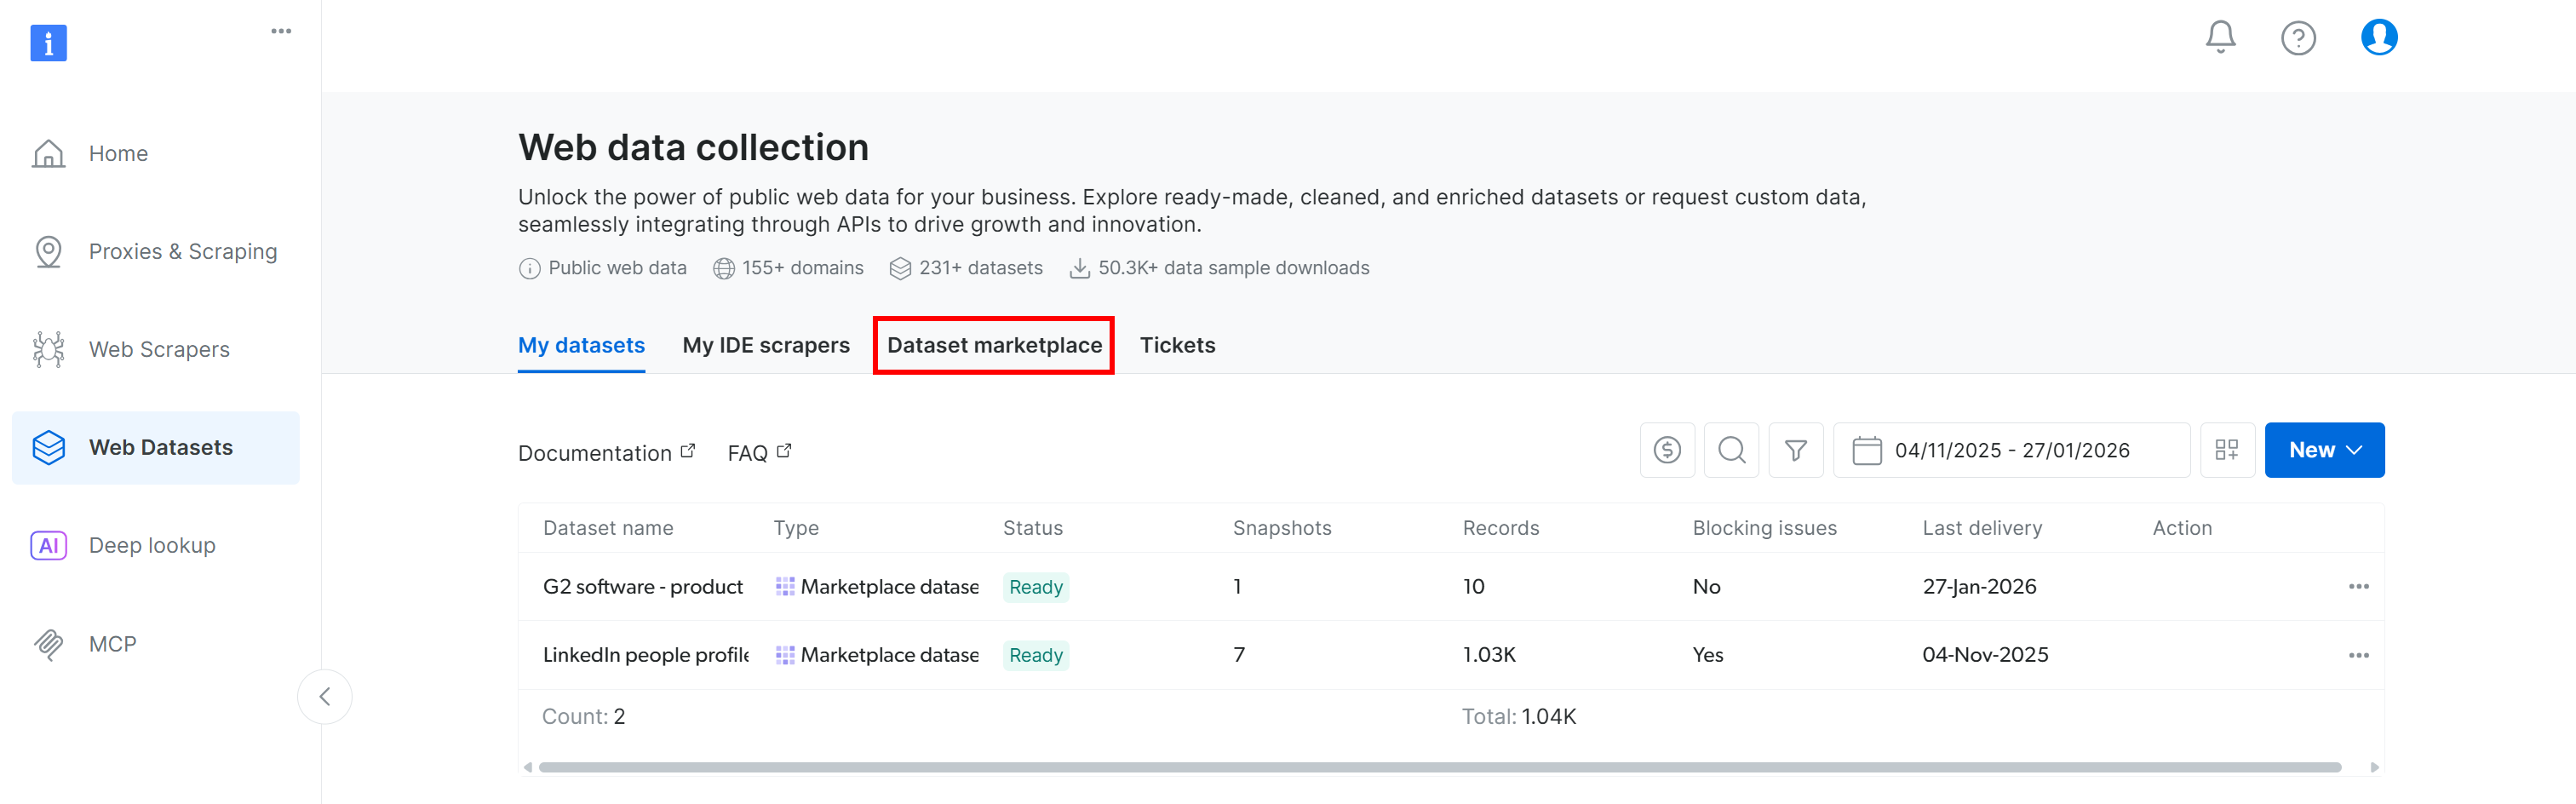
You will reach the “Dataset marketplace” page: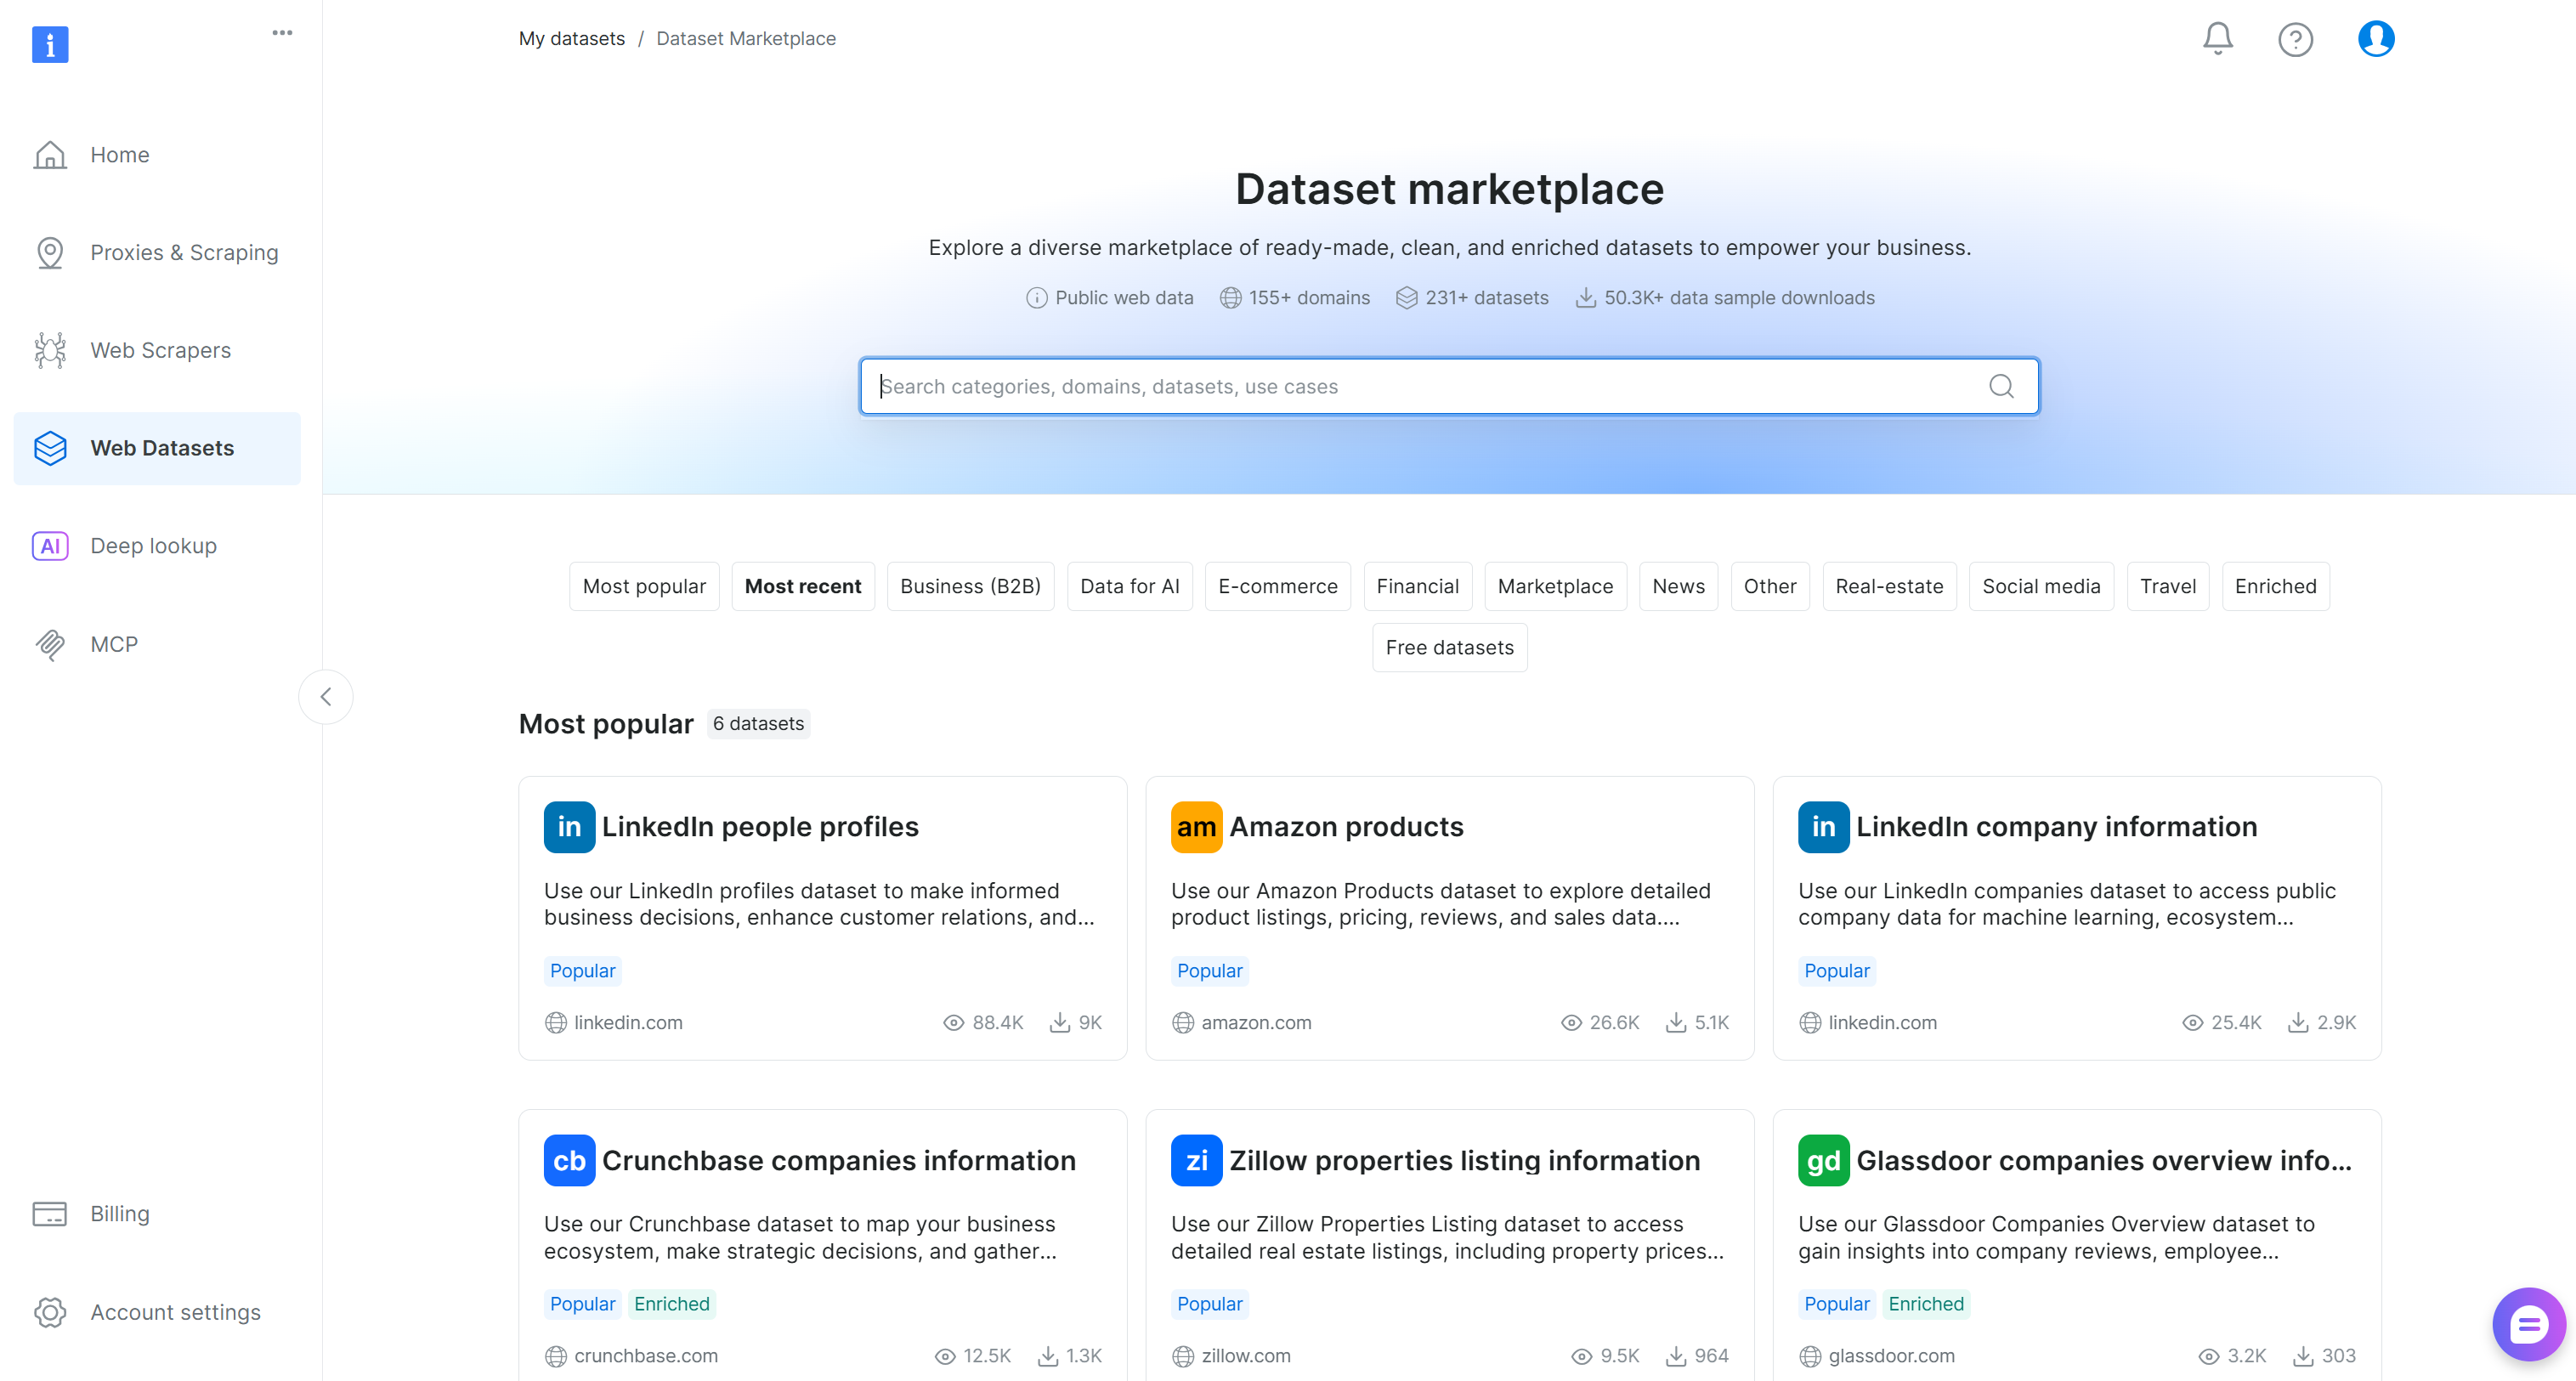
Here, you can browse 200+ scraped datasets from over 155 domains, with billions of records available.
Search for “Amazon best seller products” and select it. This will take you to the dataset’s page: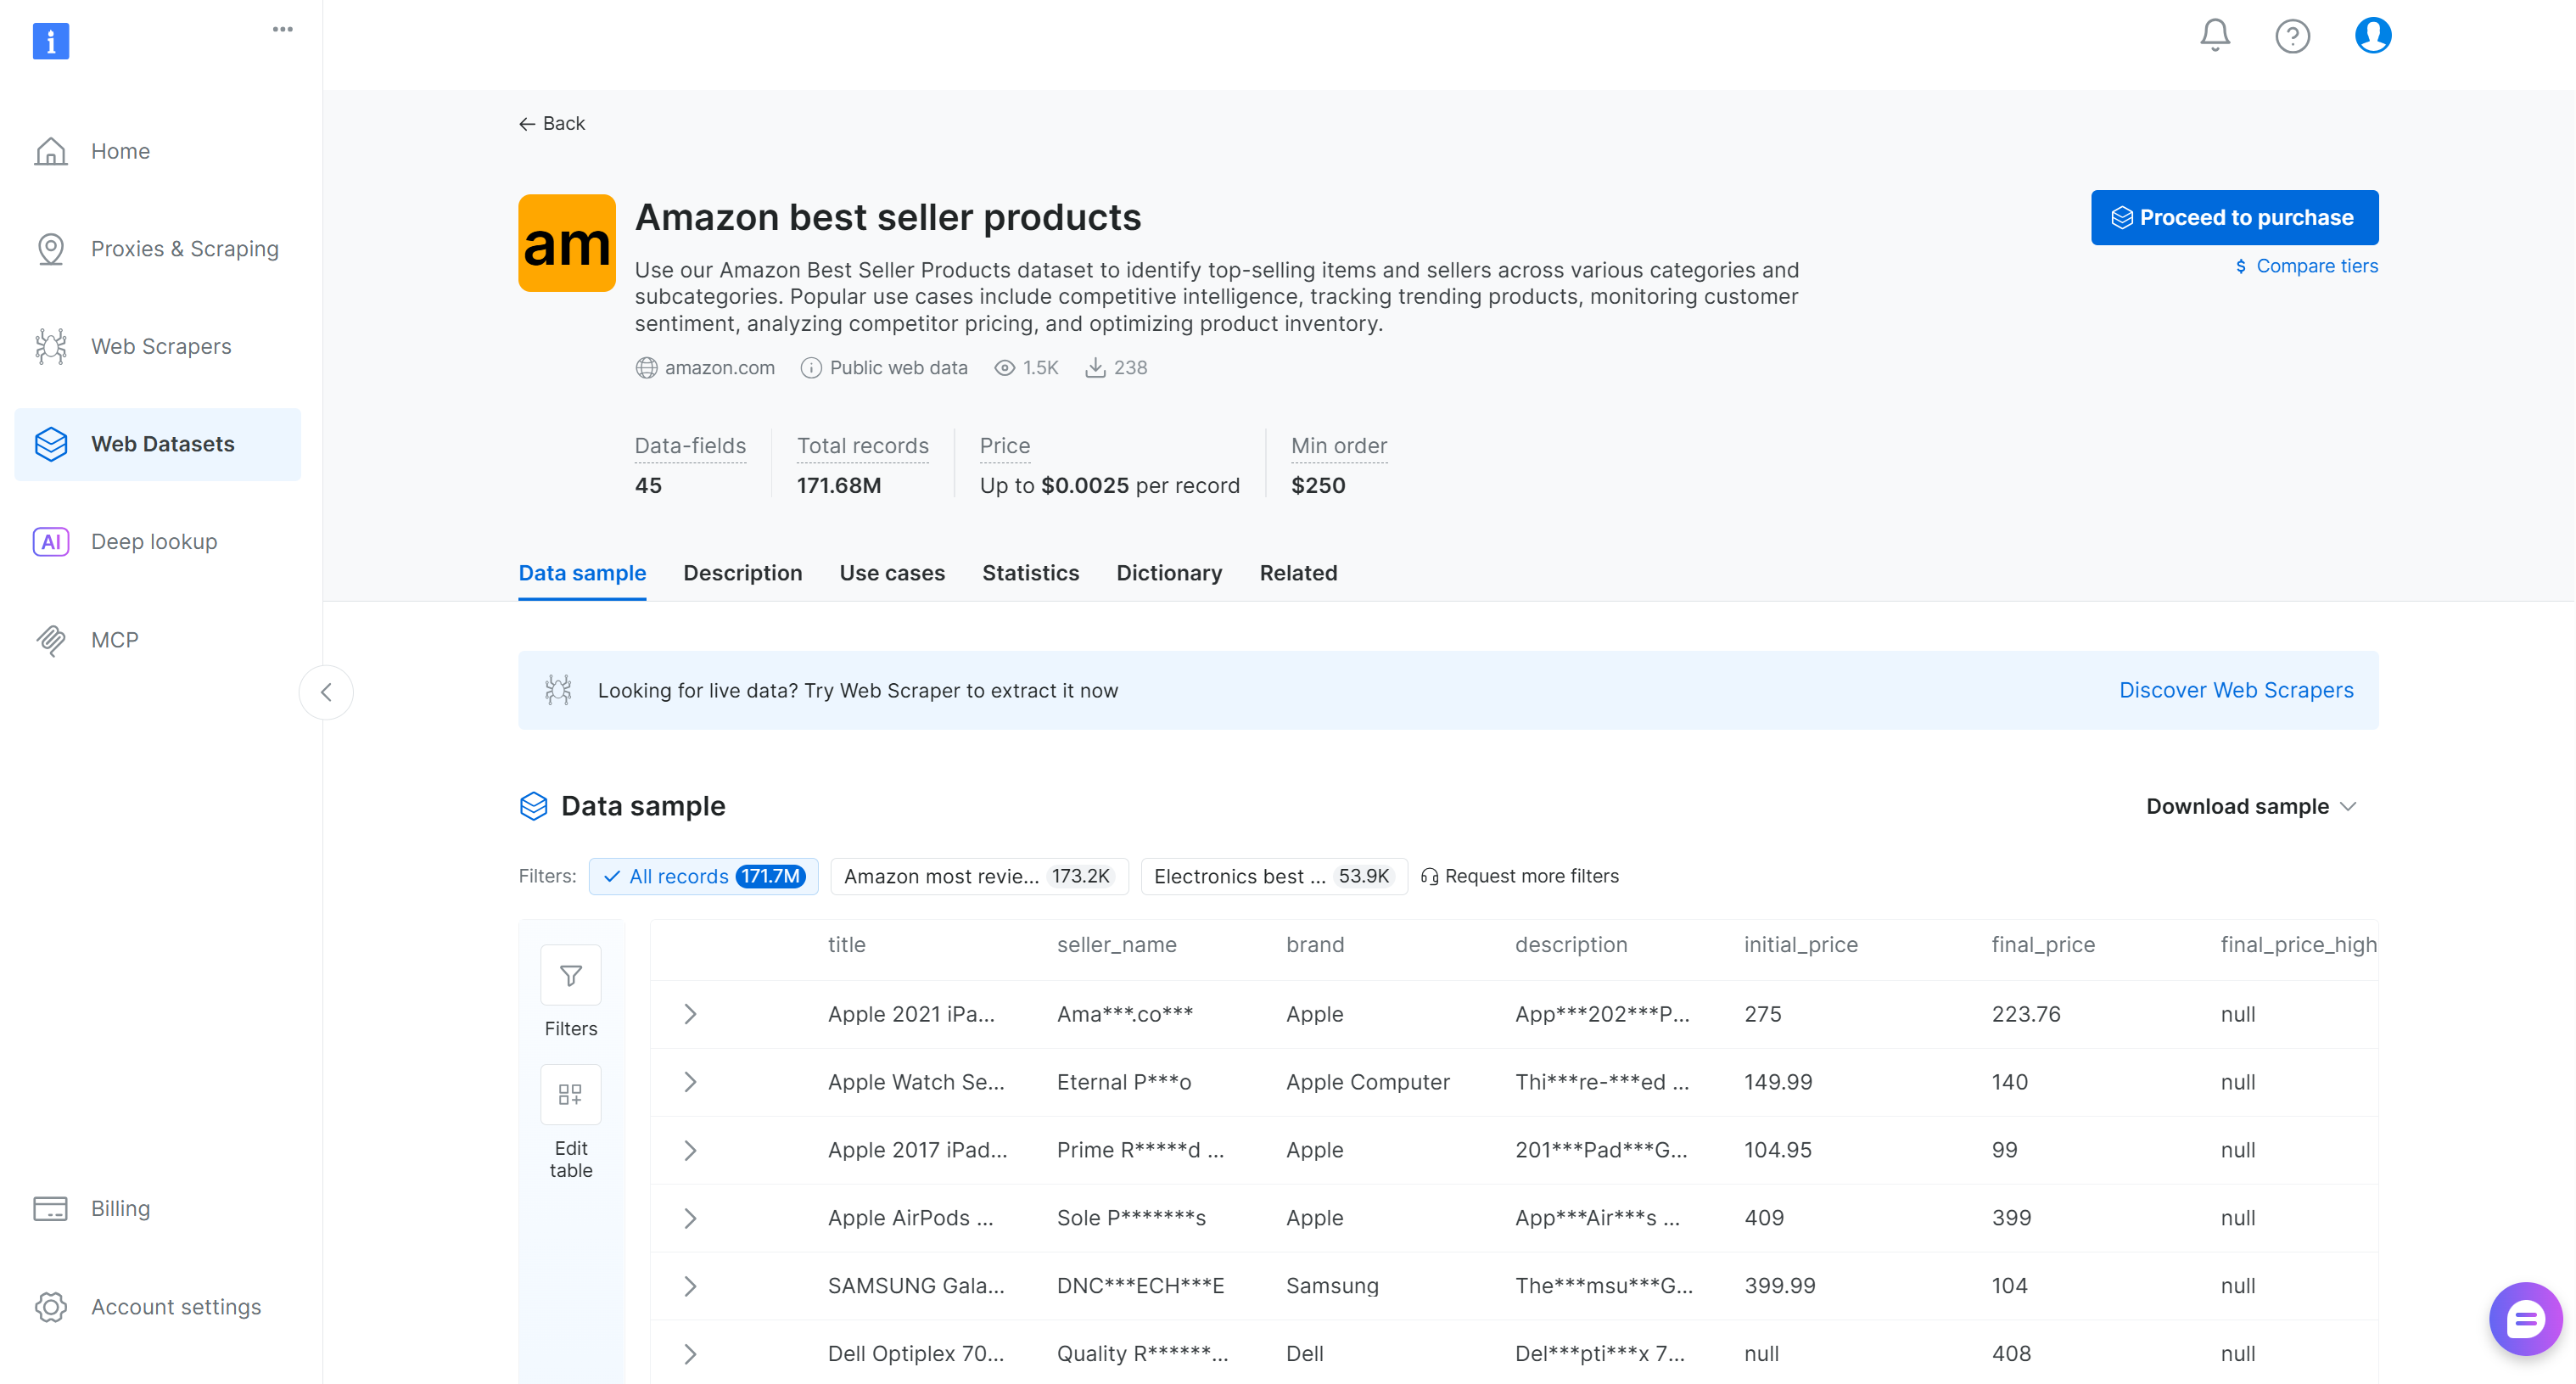
You can either purchase a filtered subset of records or download a free sample. Since this is just an example, we will use the free sample.
Click the “Download sample” dropdown and choose the “Download as JSON” option: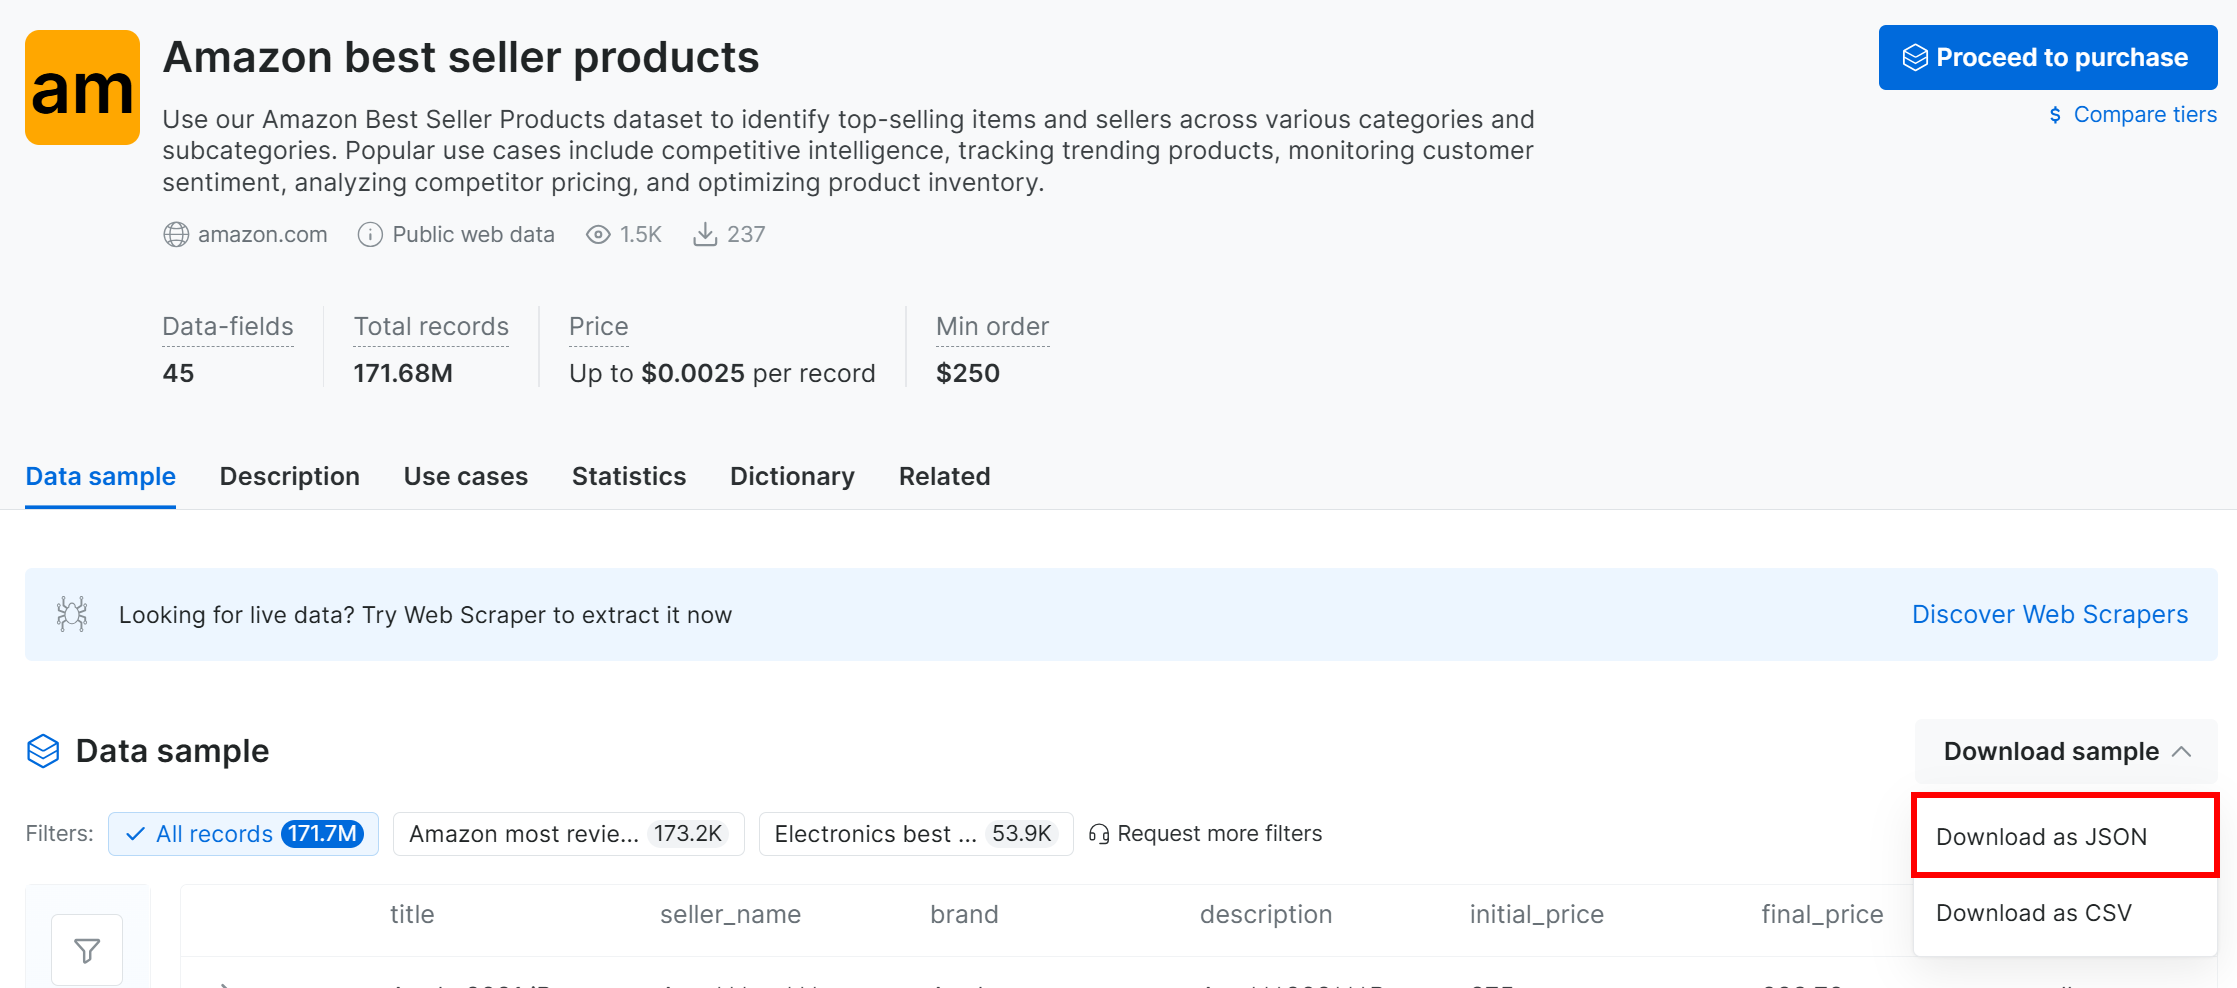
You will receive a sample dataset with 1,000 Amazon best-selling product records. Some fields are partially masked (via “***”) for privacy reasons, but the full dataset is available after payment. Still, the sample is sufficient for simple MLflow experimentation.
Alternatively, you can download a similar sample dataset from a dedicated GitHub repository.
Rename the downloaded dataset file to products.json and place it in your project folder:
mlflow-experiment-tracking/
├── .venv/
├── experiment.py
├── mlflow.db
└── products.json # <--------
Open the file, and you will see: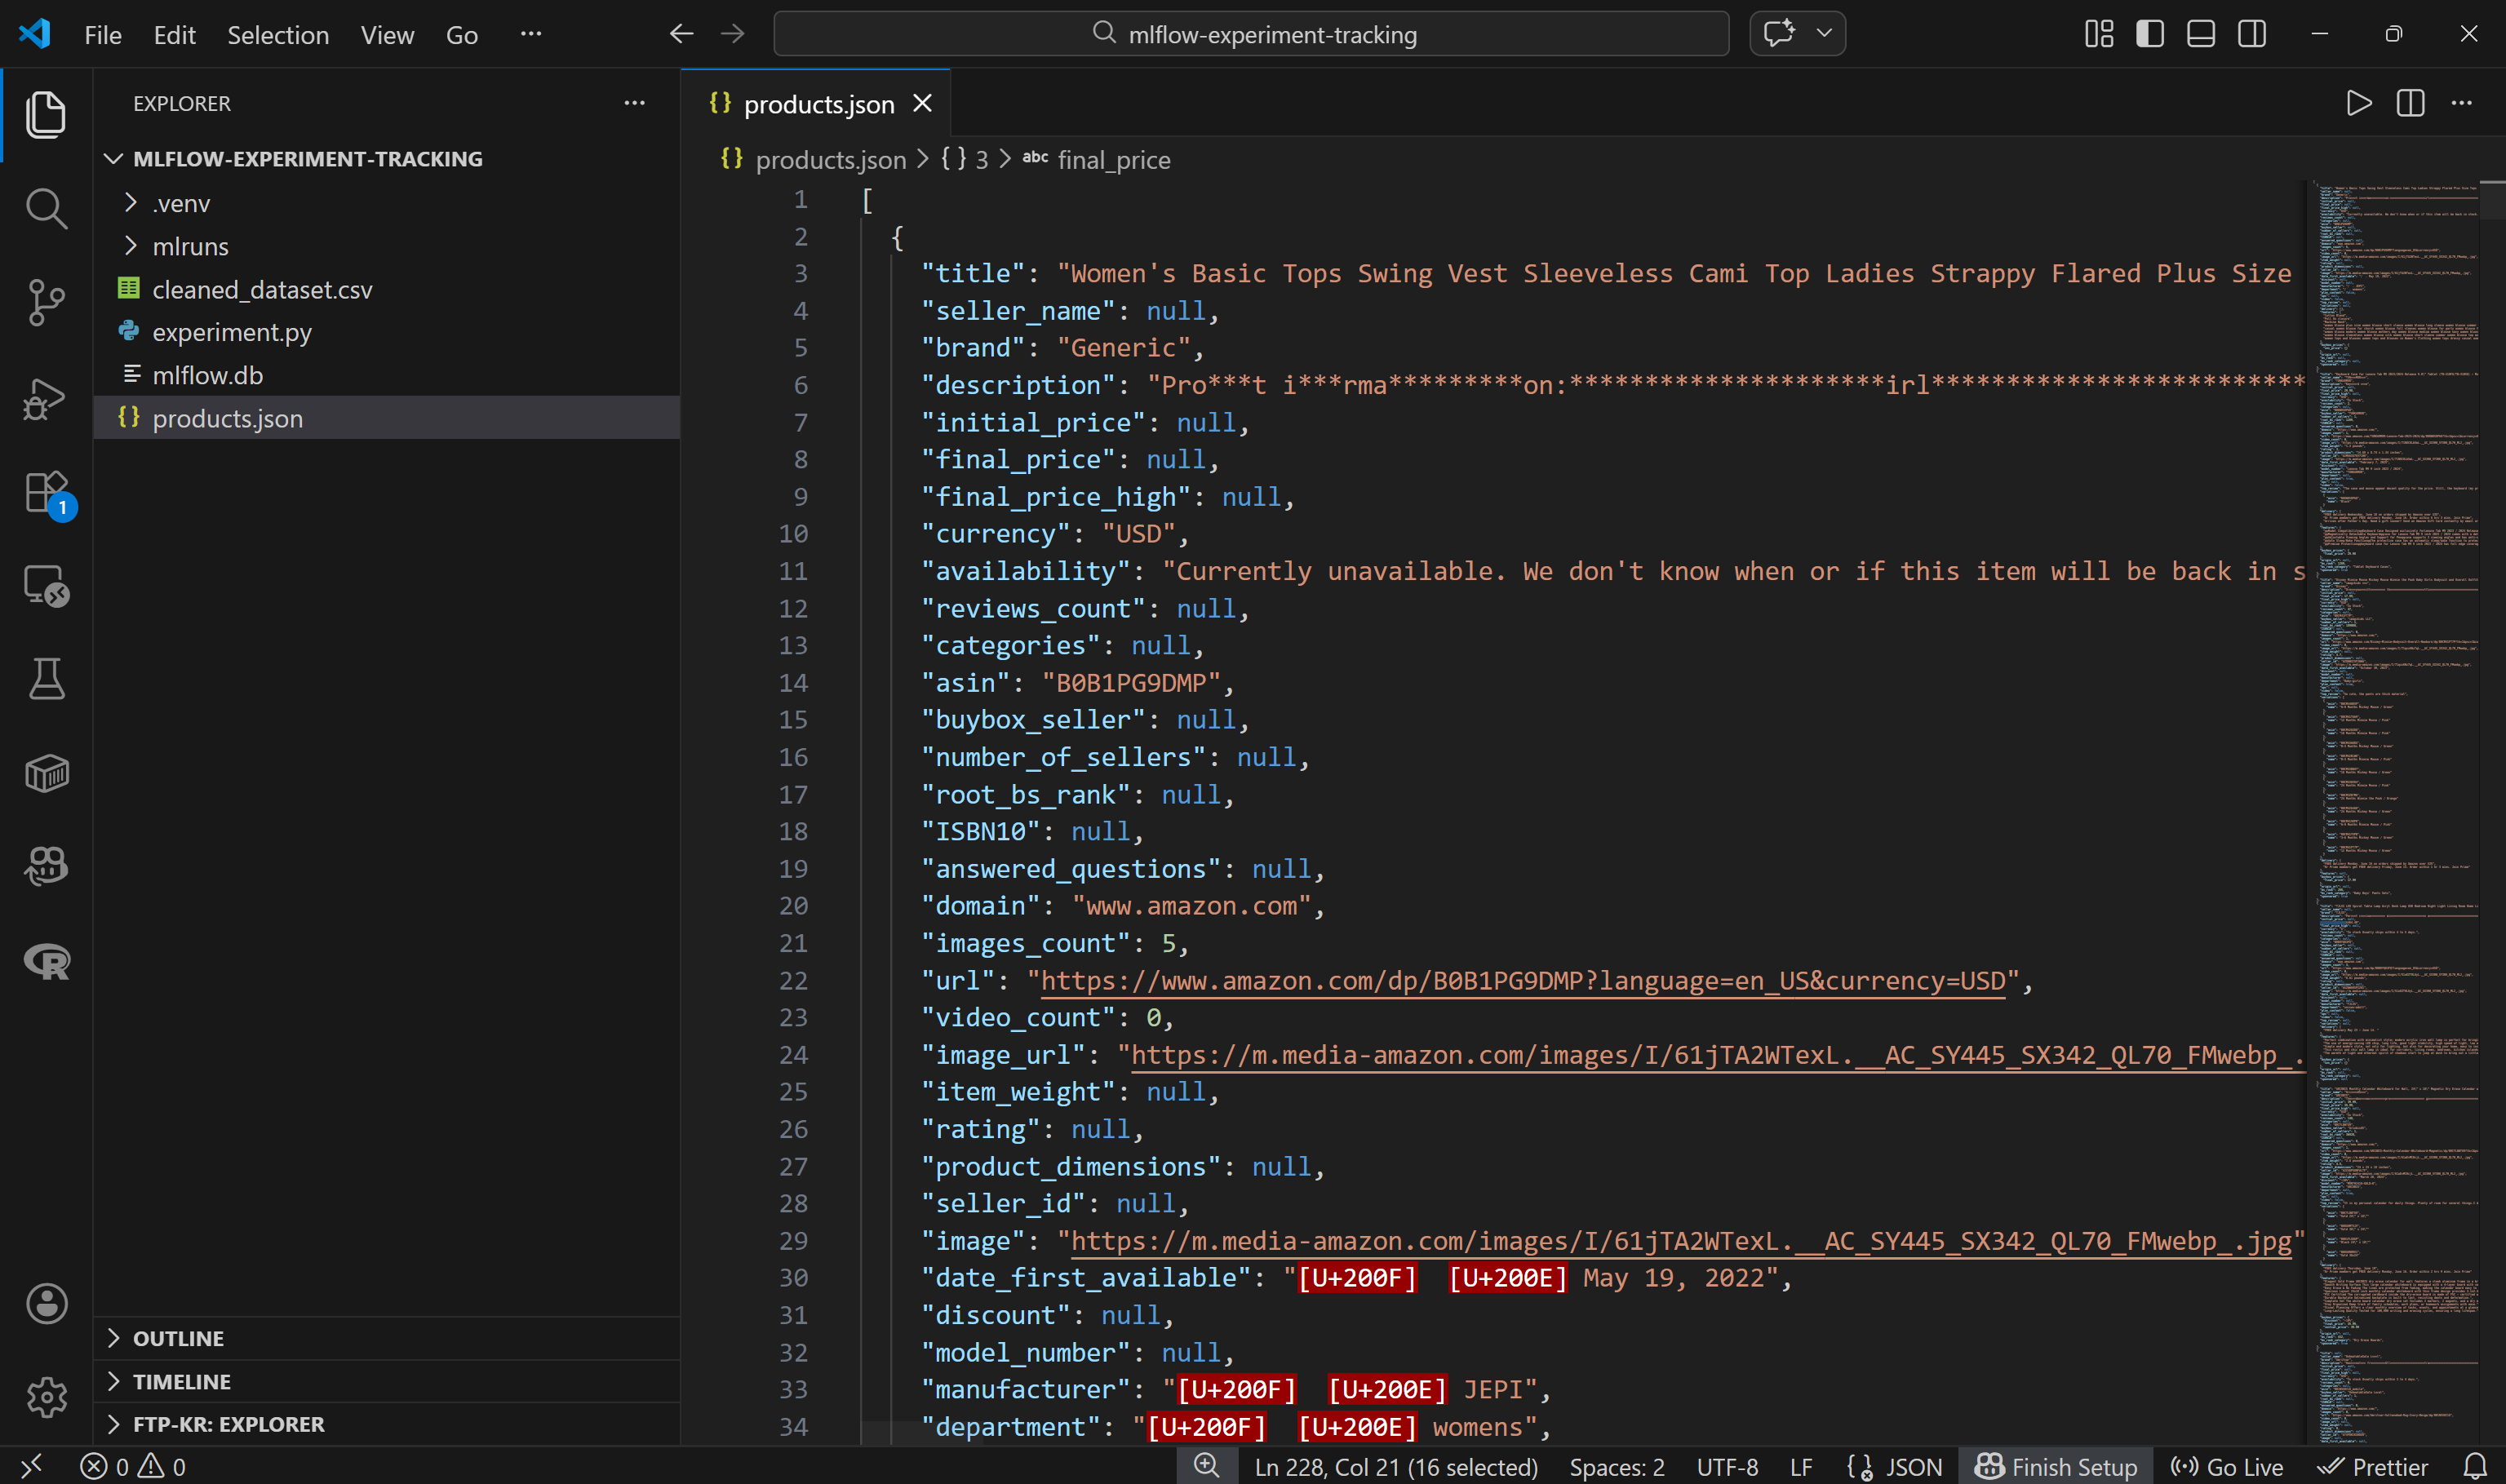
Note that each Amazon product is represented as a JSON object containing around 45 data fields. This provides a rich foundation for experimentation.
Perfect! You are now ready to load this dataset into your code and begin processing it.
Step #5: Load and Preprocess the Dataset
Before loading the dataset into your code, take some time to explore the available columns. Move to the “Dictionary” tab to view detailed information about each column, including its description and percentage of presence: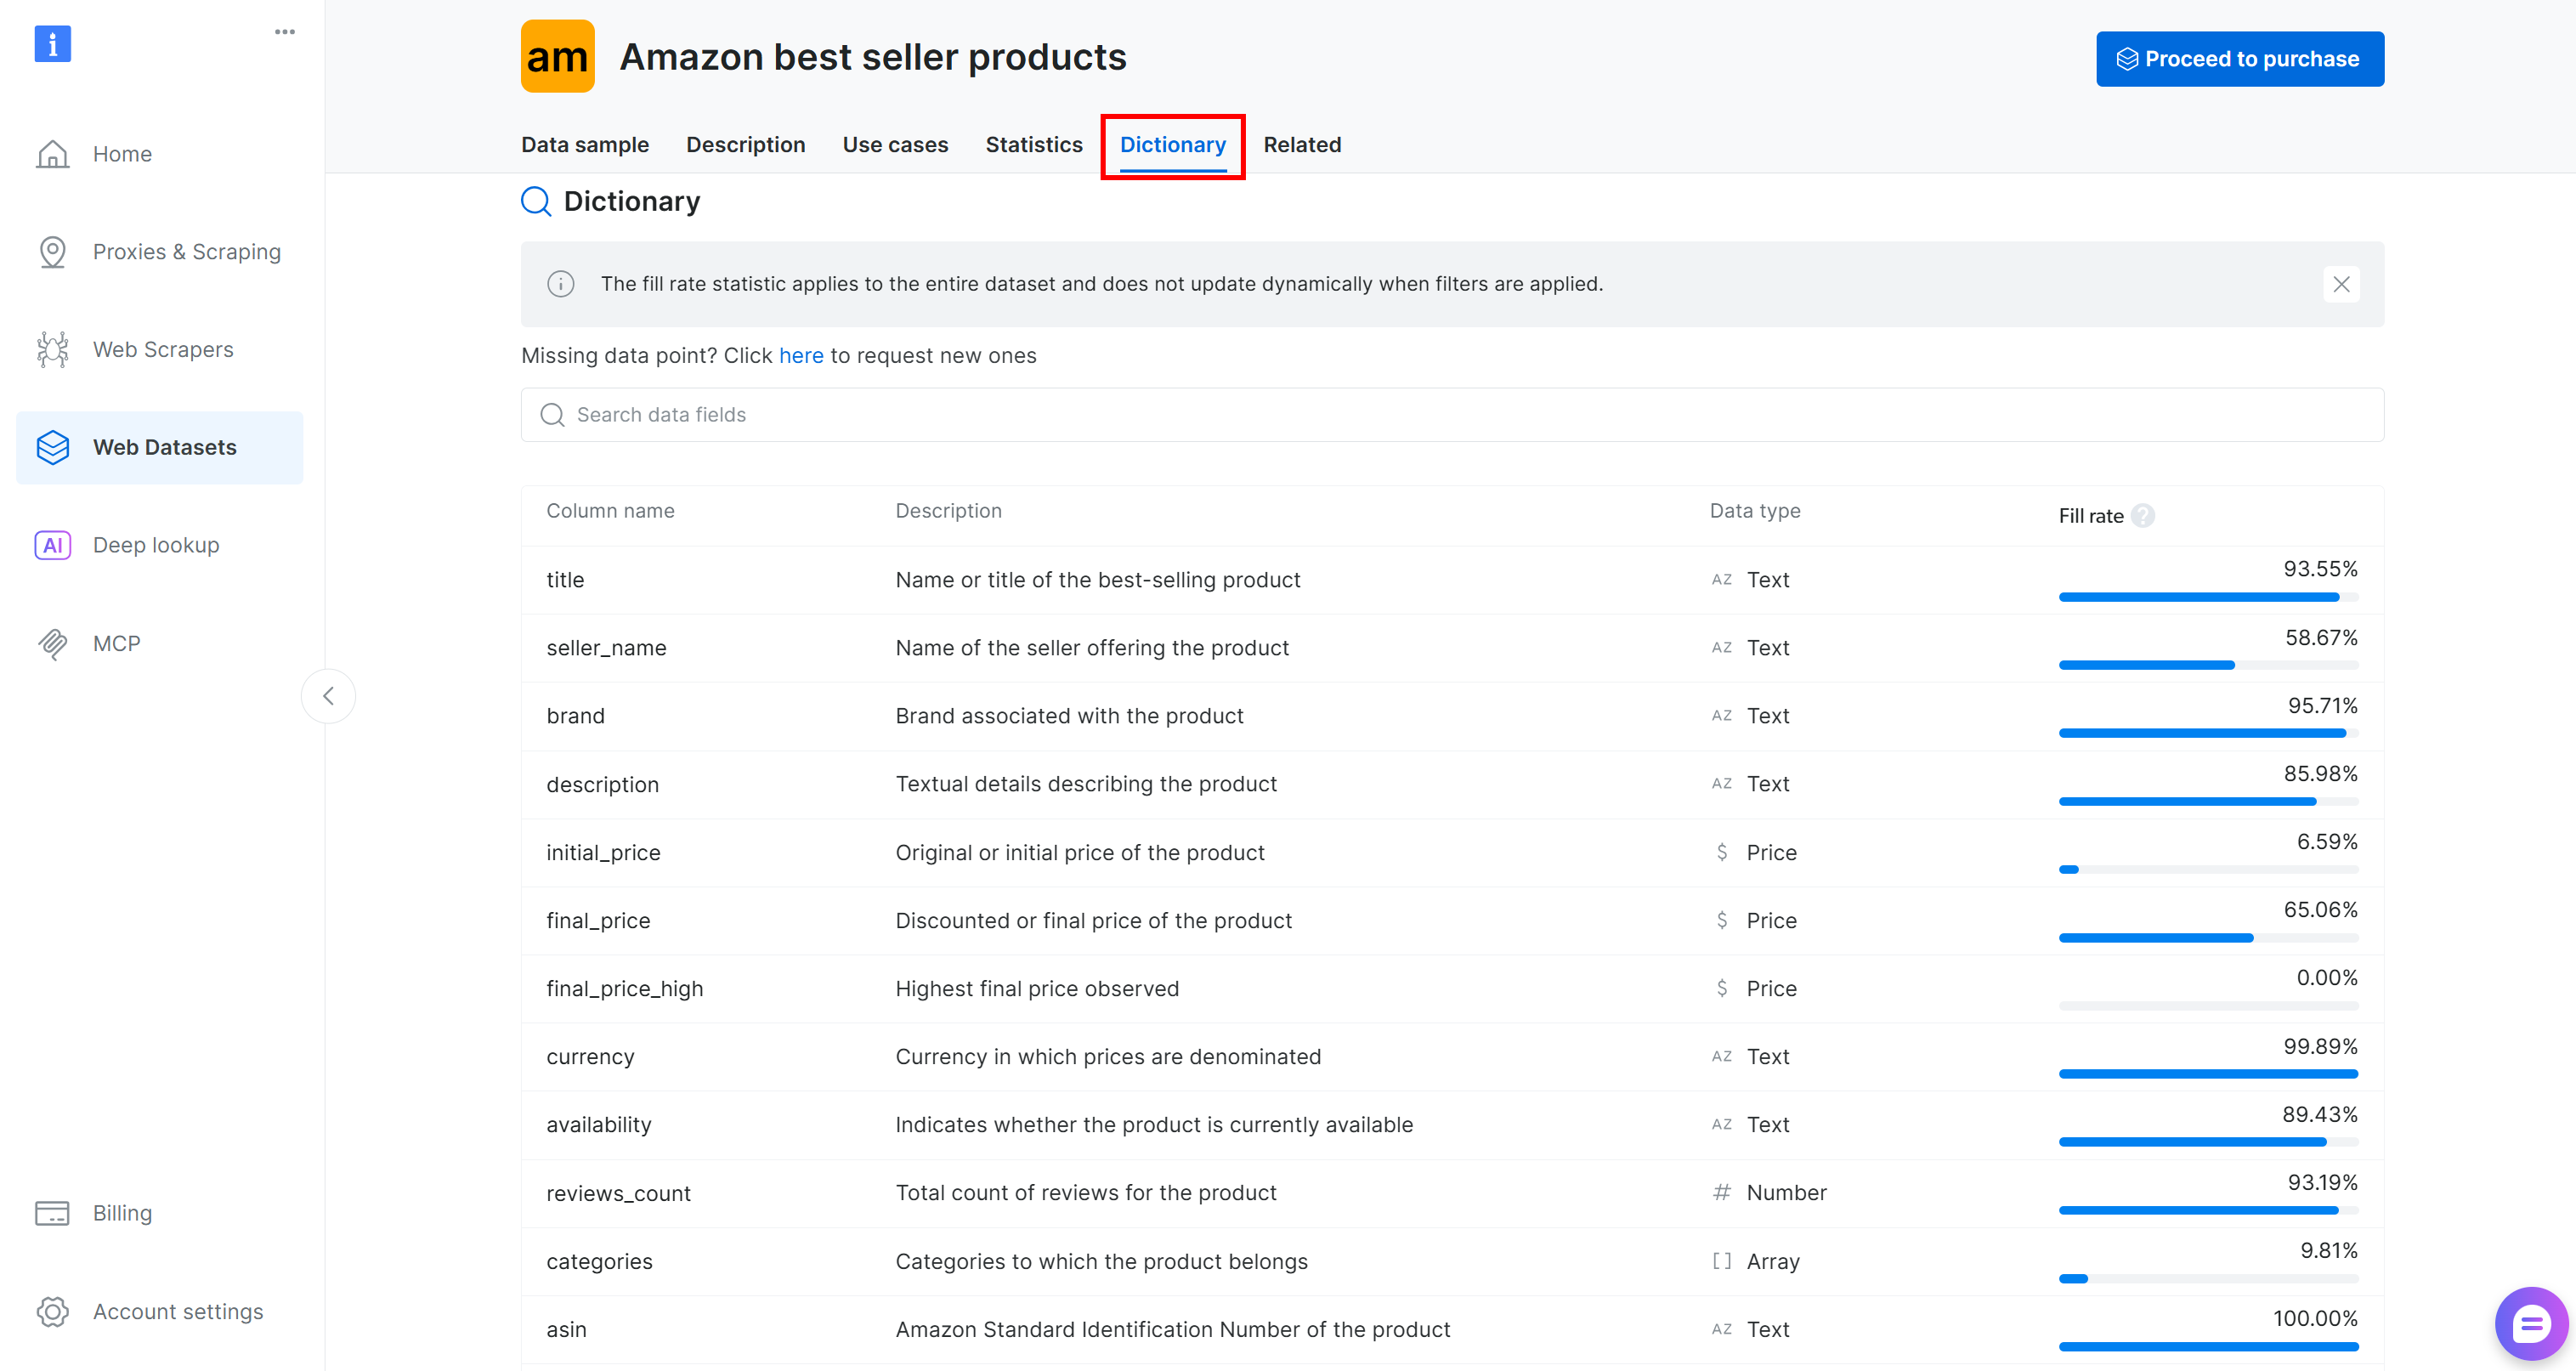
In this case, the columns of interest are:
brand(text): Brand associated with the product.final_price(price): Discounted or final price of the product.reviews_count(number): Total number of reviews.rating(number): Average product rating.
Now, load the JSON file:
with open("products.json", "r", encoding="utf-8") as f:
    data = json.load(f)
Then convert it into a pandas DataFrame:
df = pd.DataFrame(data)If you inspect the final_price column, you will notice that sometimes it contains only numeric values (e.g., 1500), while other times it includes formatted strings (e.g., $1,500).
For consistent processing, convert all prices to numeric format and drop rows where final_price is null:
df["final_price"] = pd.to_numeric(
    df["final_price"].astype(str).str.replace(r"[$,]", "", regex=True),
    errors="coerce"
)
df = df.dropna(subset=["final_price"])
Finally, register the dataset in MLflow:
# Define feature columns and target column
FEATURES = ["rating", "reviews_count", "brand"]
TARGET = "final_price"

# Explicitly define the dataset source
dataset_source = CodeDatasetSource(tags="v1")

# Register dataset in MLflow with some metadata
mlflow_dataset = mlflow.data.from_pandas(
    df[FEATURES + [TARGET]],
    source=dataset_source,
    name="brightdata_products",
    targets=TARGET
)
This code defines the input features (rating, reviews_count, brand) and the target variable (final_price) for your ML pipeline. It then creates a CodeDatasetSource object and registers the selected DataFrame in MLflow with metadata to ensure experiment tracking and reproducibility.
Amazing! You are now ready to use this data in your model training pipeline.
Step #6: Define the Predictive Model Pipeline
Prepare your data for ML model training using the following logic:
# Separate features and target
X = df[FEATURES]
y = df[TARGET]

# Preprocessing pipeline:
# - Median imputation for numeric columns
# - Constant fill + one-hot encoding for categorical column
preprocessor = ColumnTransformer(
    transformers=[
        ("num", SimpleImputer(strategy="median"), ["rating", "reviews_count"]),
        ("cat", Pipeline([
            ("imputer", SimpleImputer(strategy="constant", fill_value="unknown")),
            ("onehot", OneHotEncoder(handle_unknown="ignore"))
        ]), ["brand"]),
    ]
)

# Full ML pipeline: preprocessing + RandomForest model
pipeline = Pipeline(steps=[
    ("preprocessor", preprocessor),
    ("model", RandomForestRegressor(n_estimators=200, max_depth=None, random_state=42))
])

# Split the dataset into training and testing sets
X_train, X_test, y_train, y_test = train_test_split(
    X, y, test_size=0.2, random_state=42
)
This snippet prepares the data and builds a complete ML pipeline by:
- Separating input features (
rating,reviews_count,brand) from the target (final_price). - Handling missing values with median imputation for numeric features and constant fill for categorical ones, then one-hot encodes the
brandtext field into a numeric format. These precautions ensure that the model receives clean, numerical input. - Combining preprocessing with a Random Forest model and splitting data into training and testing sets for evaluation.
Sweet! Time to run your MLflow experiment on the Bright Data–scraped dataset.
Step #7: Run the MLflow Experiment
You now have all the building blocks to run your MLflow experiment. Execute it with:
# Start the MLflow run and enable system metrics tracking
with mlflow.start_run(log_system_metrics=True) as run:
    # Log dataset as an input to the run
    mlflow.log_input(mlflow_dataset, context="training")

    # Train the model pipeline
    pipeline.fit(X_train, y_train)

    # Generate the predictions on the test set
    predictions = pipeline.predict(X_test)

    # Log the evaluation metrics (RMSE and R2)
    mlflow.log_metric("val_rmse", root_mean_squared_error(y_test, predictions))
    mlflow.log_metric("r2_score", r2_score(y_test, predictions))

    # Log the output dataset CSV to a local file and then as an artifact in MLflow
    csv_path = "cleaned_dataset.csv"
    df.to_csv(csv_path, index=False, encoding="utf-8-sig", errors="replace")
    mlflow.log_artifact(csv_path)

    # Log the trained model with signature and example input
    mlflow.sklearn.log_model(
        sk_model=pipeline,
        name="model",
        signature=mlflow.models.infer_signature(X_train, predictions),
        input_example=X_train.iloc[:3],
    )

print(f"Run complete. Check the 'System Metrics' tab in the MLflow UI for Run ID: {run.info.run_id}")
This is what the above snippet does:
- Start an MLflow run with system metrics tracking enabled.
- Registers
mlflow_datasetas an input to the experiment for traceability and reproducibility. - Train the model pipeline by fitting the full ML pipeline (preprocessing + Random Forest) on the training data.
- Generate predictions by utilizing the trained model to predict target values on the test set.
- Records RMSE and R² in MLflow to evaluate model performance.
- Log the cleaned dataset as an artifact, so you can explore it in MLflow for reference.
- Registers the trained pipeline in MLflow, including its input signature and an example input for reproducibility.
Cool! All that is left is to explore the final code and run your MLflow experiment.
Step #8: Put It All Together and Run the Experiment
Your experiment.py file should contain:
# pip install mlflow pandas scikit-learn psutil nvidia-ml-py

import json
import mlflow
import pandas as pd
import mlflow.sklearn
from mlflow.data.code_dataset_source import CodeDatasetSource
from sklearn.model_selection import train_test_split
from sklearn.preprocessing import OneHotEncoder
from sklearn.compose import ColumnTransformer
from sklearn.pipeline import Pipeline
from sklearn.ensemble import RandomForestRegressor
from sklearn.metrics import root_mean_squared_error, r2_score
from sklearn.impute import SimpleImputer


# Enable automatic system metrics logging (CPU, memory, etc.)
mlflow.enable_system_metrics_logging()

# Automatically log events for sklearn
mlflow.sklearn.autolog()

# Configure how frequently system metrics are sampled and logged (1 second)
mlflow.set_system_metrics_sampling_interval(1)
mlflow.set_system_metrics_samples_before_logging(1)

# Load scraped product data from the input Bright Data dataset file
# (download from: /cp/datasets/browse/gd_l1vijixj9g2vp7563)
with open("products.json", "r", encoding="utf-8") as f:
    data = json.load(f)

# Convert JSON to a pandas DataFrame
df = pd.DataFrame(data)

# Clean the target "final_price" column:
# - Remove dollar signs and commas
# - Convert to numeric
# - Invalid values become NaN
df["final_price"] = pd.to_numeric(
    df["final_price"].astype(str).str.replace(r"[$,]", "", regex=True),
    errors="coerce"
)

# Drop rows where the target value is missing
df = df.dropna(subset=["final_price"])

# Define feature columns and target column
FEATURES = ["rating", "reviews_count", "brand"]
TARGET = "final_price"

# Explicitly define the dataset source
dataset_source = CodeDatasetSource(tags="v1")

# Register dataset in MLflow with some metadata
mlflow_dataset = mlflow.data.from_pandas(
    df[FEATURES + [TARGET]],
    source=dataset_source,
    name="brightdata_products",
    targets=TARGET
)

# Separate features and target
X = df[FEATURES]
y = df[TARGET]

# Preprocessing pipeline:
# - Median imputation for numeric columns
# - Constant fill + one-hot encoding for categorical column
preprocessor = ColumnTransformer(
    transformers=[
        ("num", SimpleImputer(strategy="median"), ["rating", "reviews_count"]),
        ("cat", Pipeline([
            ("imputer", SimpleImputer(strategy="constant", fill_value="unknown")),
            ("onehot", OneHotEncoder(handle_unknown="ignore"))
        ]), ["brand"]),
    ]
)

# Full ML pipeline: preprocessing + RandomForest model
pipeline = Pipeline(steps=[
    ("preprocessor", preprocessor),
    ("model", RandomForestRegressor(n_estimators=200, max_depth=None, random_state=42))
])

# Split the dataset into training and testing sets
X_train, X_test, y_train, y_test = train_test_split(
    X, y, test_size=0.2, random_state=42
)

# Set the MLflow experiment
mlflow.set_experiment("brightdata_product_price_prediction")

# Start the MLflow run and enable system metrics tracking
with mlflow.start_run(log_system_metrics=True) as run:
    # Log dataset as an input to the run
    mlflow.log_input(mlflow_dataset, context="training")

    # Train the model pipeline
    pipeline.fit(X_train, y_train)

    # Generate the predictions on the test set
    predictions = pipeline.predict(X_test)

    # Log the evaluation metrics (RMSE and R2)
    mlflow.log_metric("val_rmse", root_mean_squared_error(y_test, predictions))
    mlflow.log_metric("r2_score", r2_score(y_test, predictions))

    # Log the output dataset CSV to a local file and then as an artifact in MLflow
    csv_path = "cleaned_dataset.csv"
    df.to_csv(csv_path, index=False, encoding="utf-8-sig", errors="replace")
    mlflow.log_artifact(csv_path)

    # Log the trained model with signature and example input
    mlflow.sklearn.log_model(
        sk_model=pipeline,
        name="model",
        signature=mlflow.models.infer_signature(X_train, predictions),
        input_example=X_train.iloc[:3],
    )

print(f"Run complete. Check the 'System Metrics' tab in the MLflow UI for Run ID: {run.info.run_id}")
With your Python environment activated, run your MLflow experiment with:
python experiment.pyThe execution should take a few seconds, so be patient.
Mission complete! You just implemented an MLflow experiment tracking pipeline with a scraped dataset from Bright Data.
Step #9: Explore the MLflow Tracking Results
Visit the MLflow UI at http://127.0.0.1:5000/. You should see a brightdata_product_price_prediction experiment entry (which is the name given to the MLflow experiment in the code). Click on it: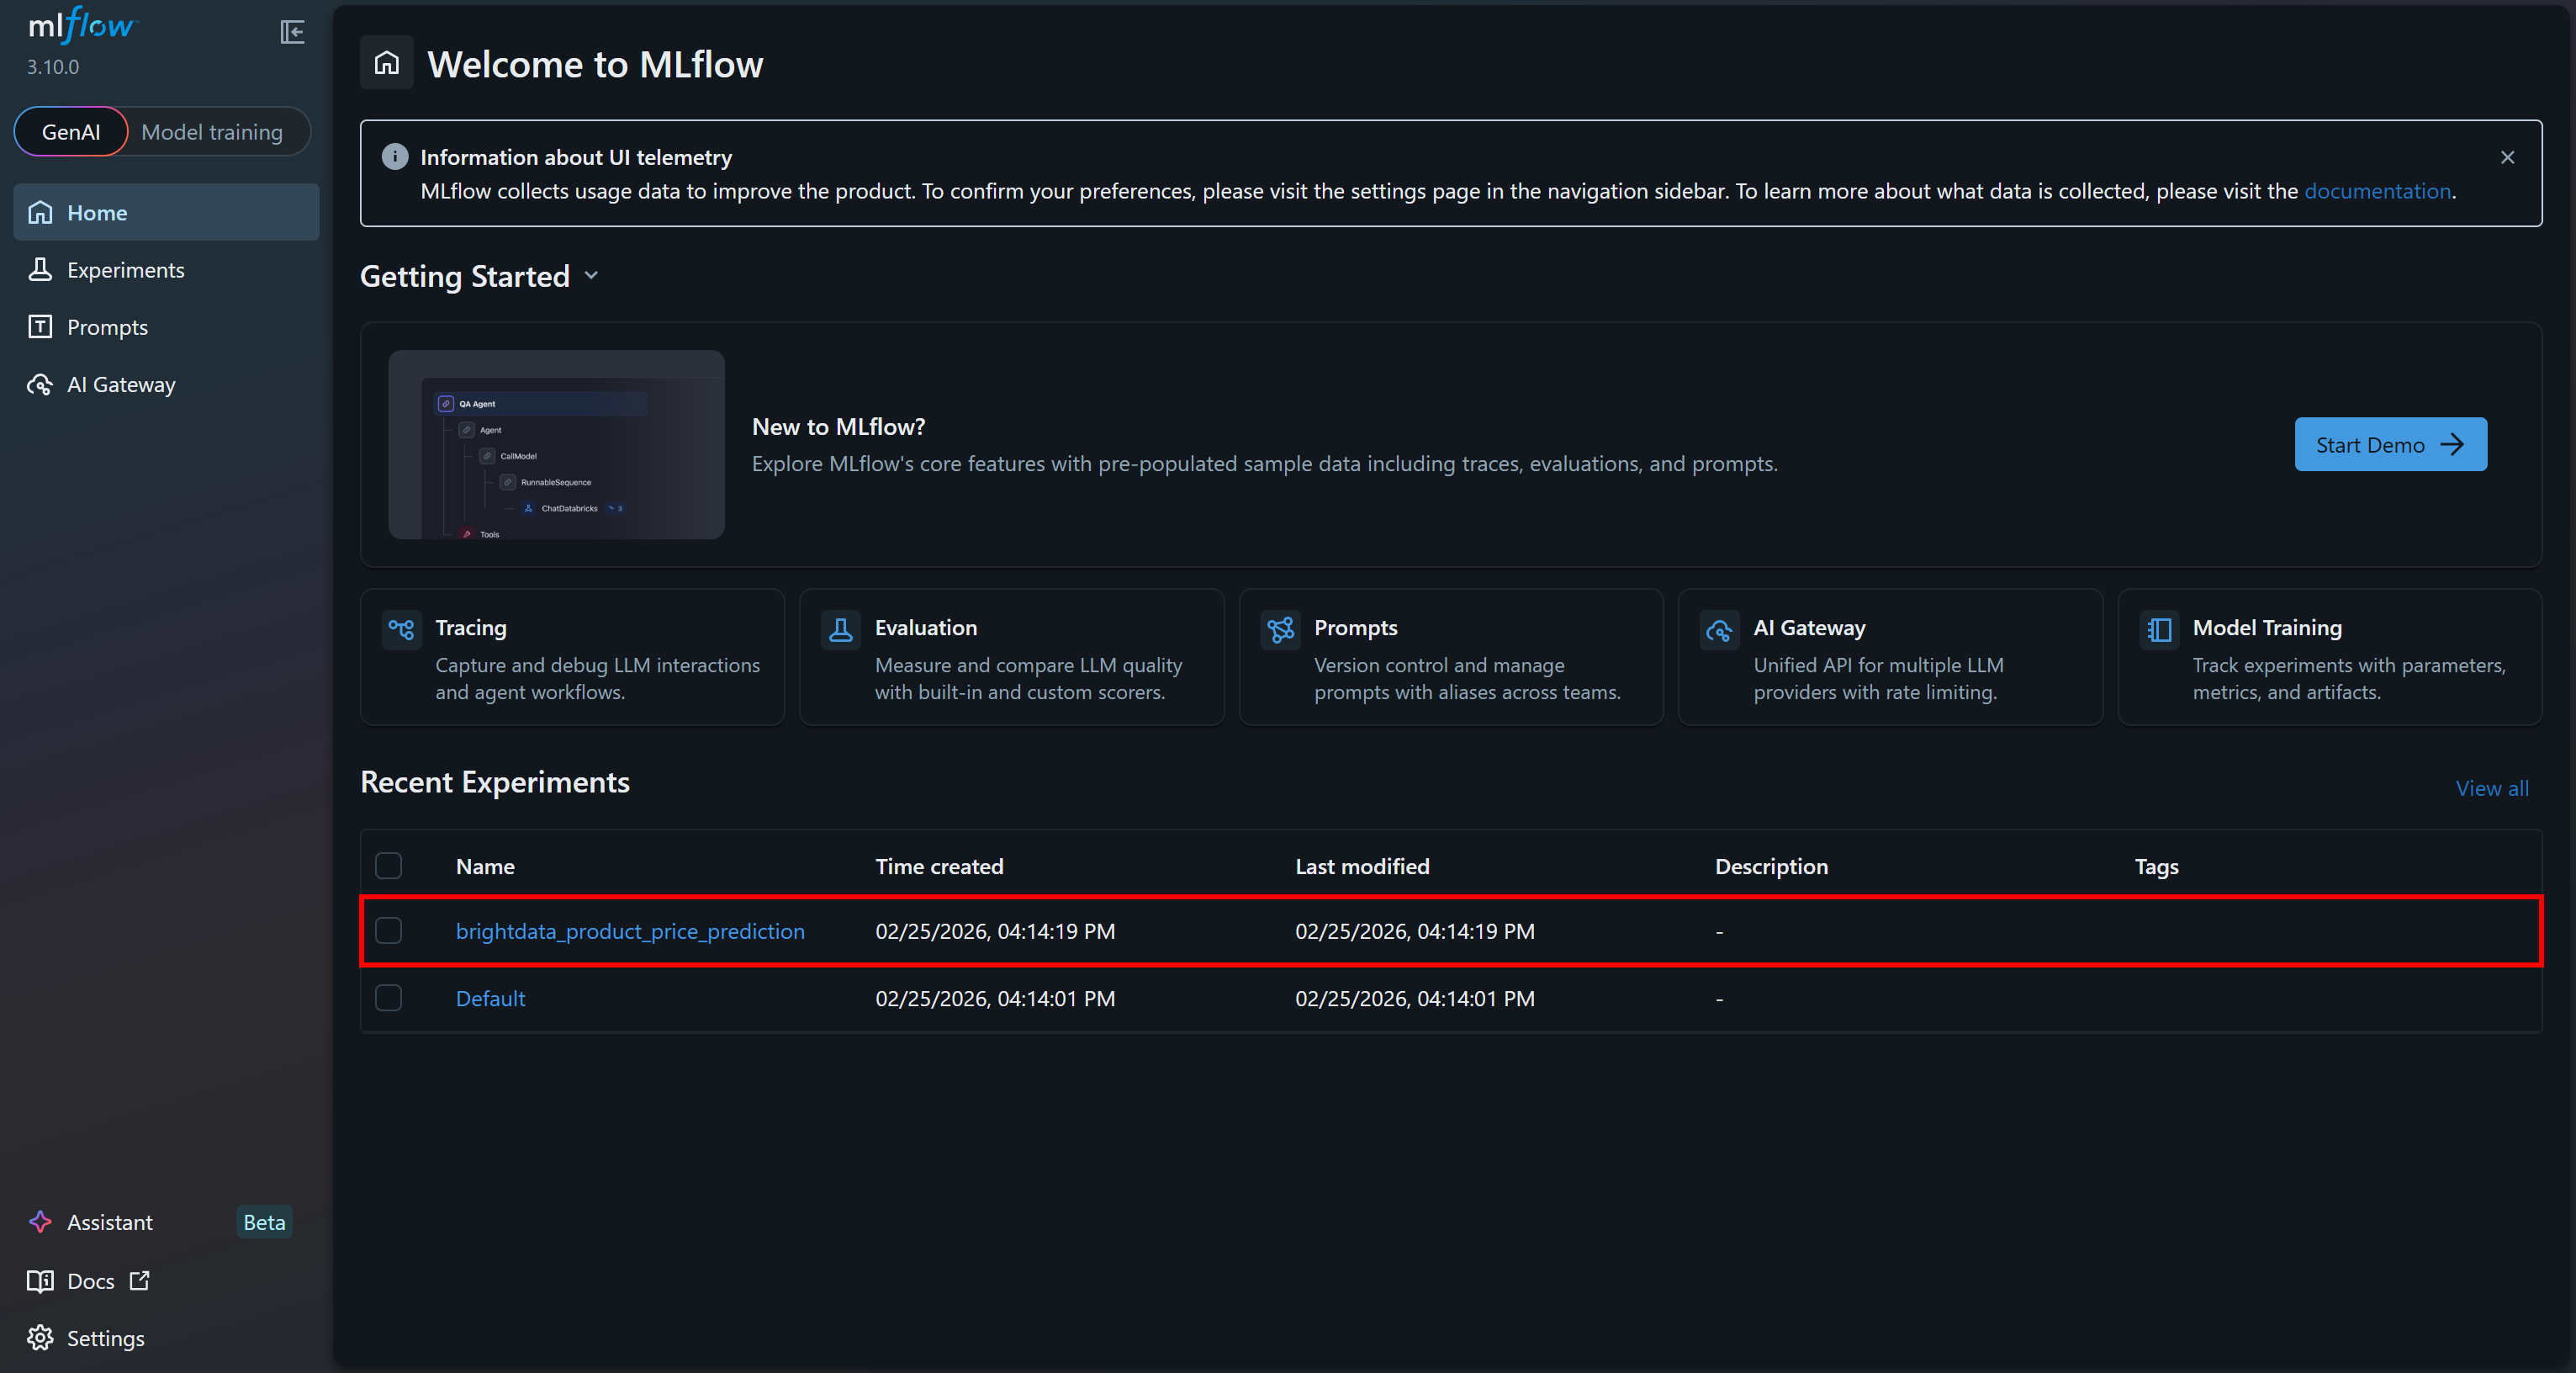
Move to the “Training runs” section for more details: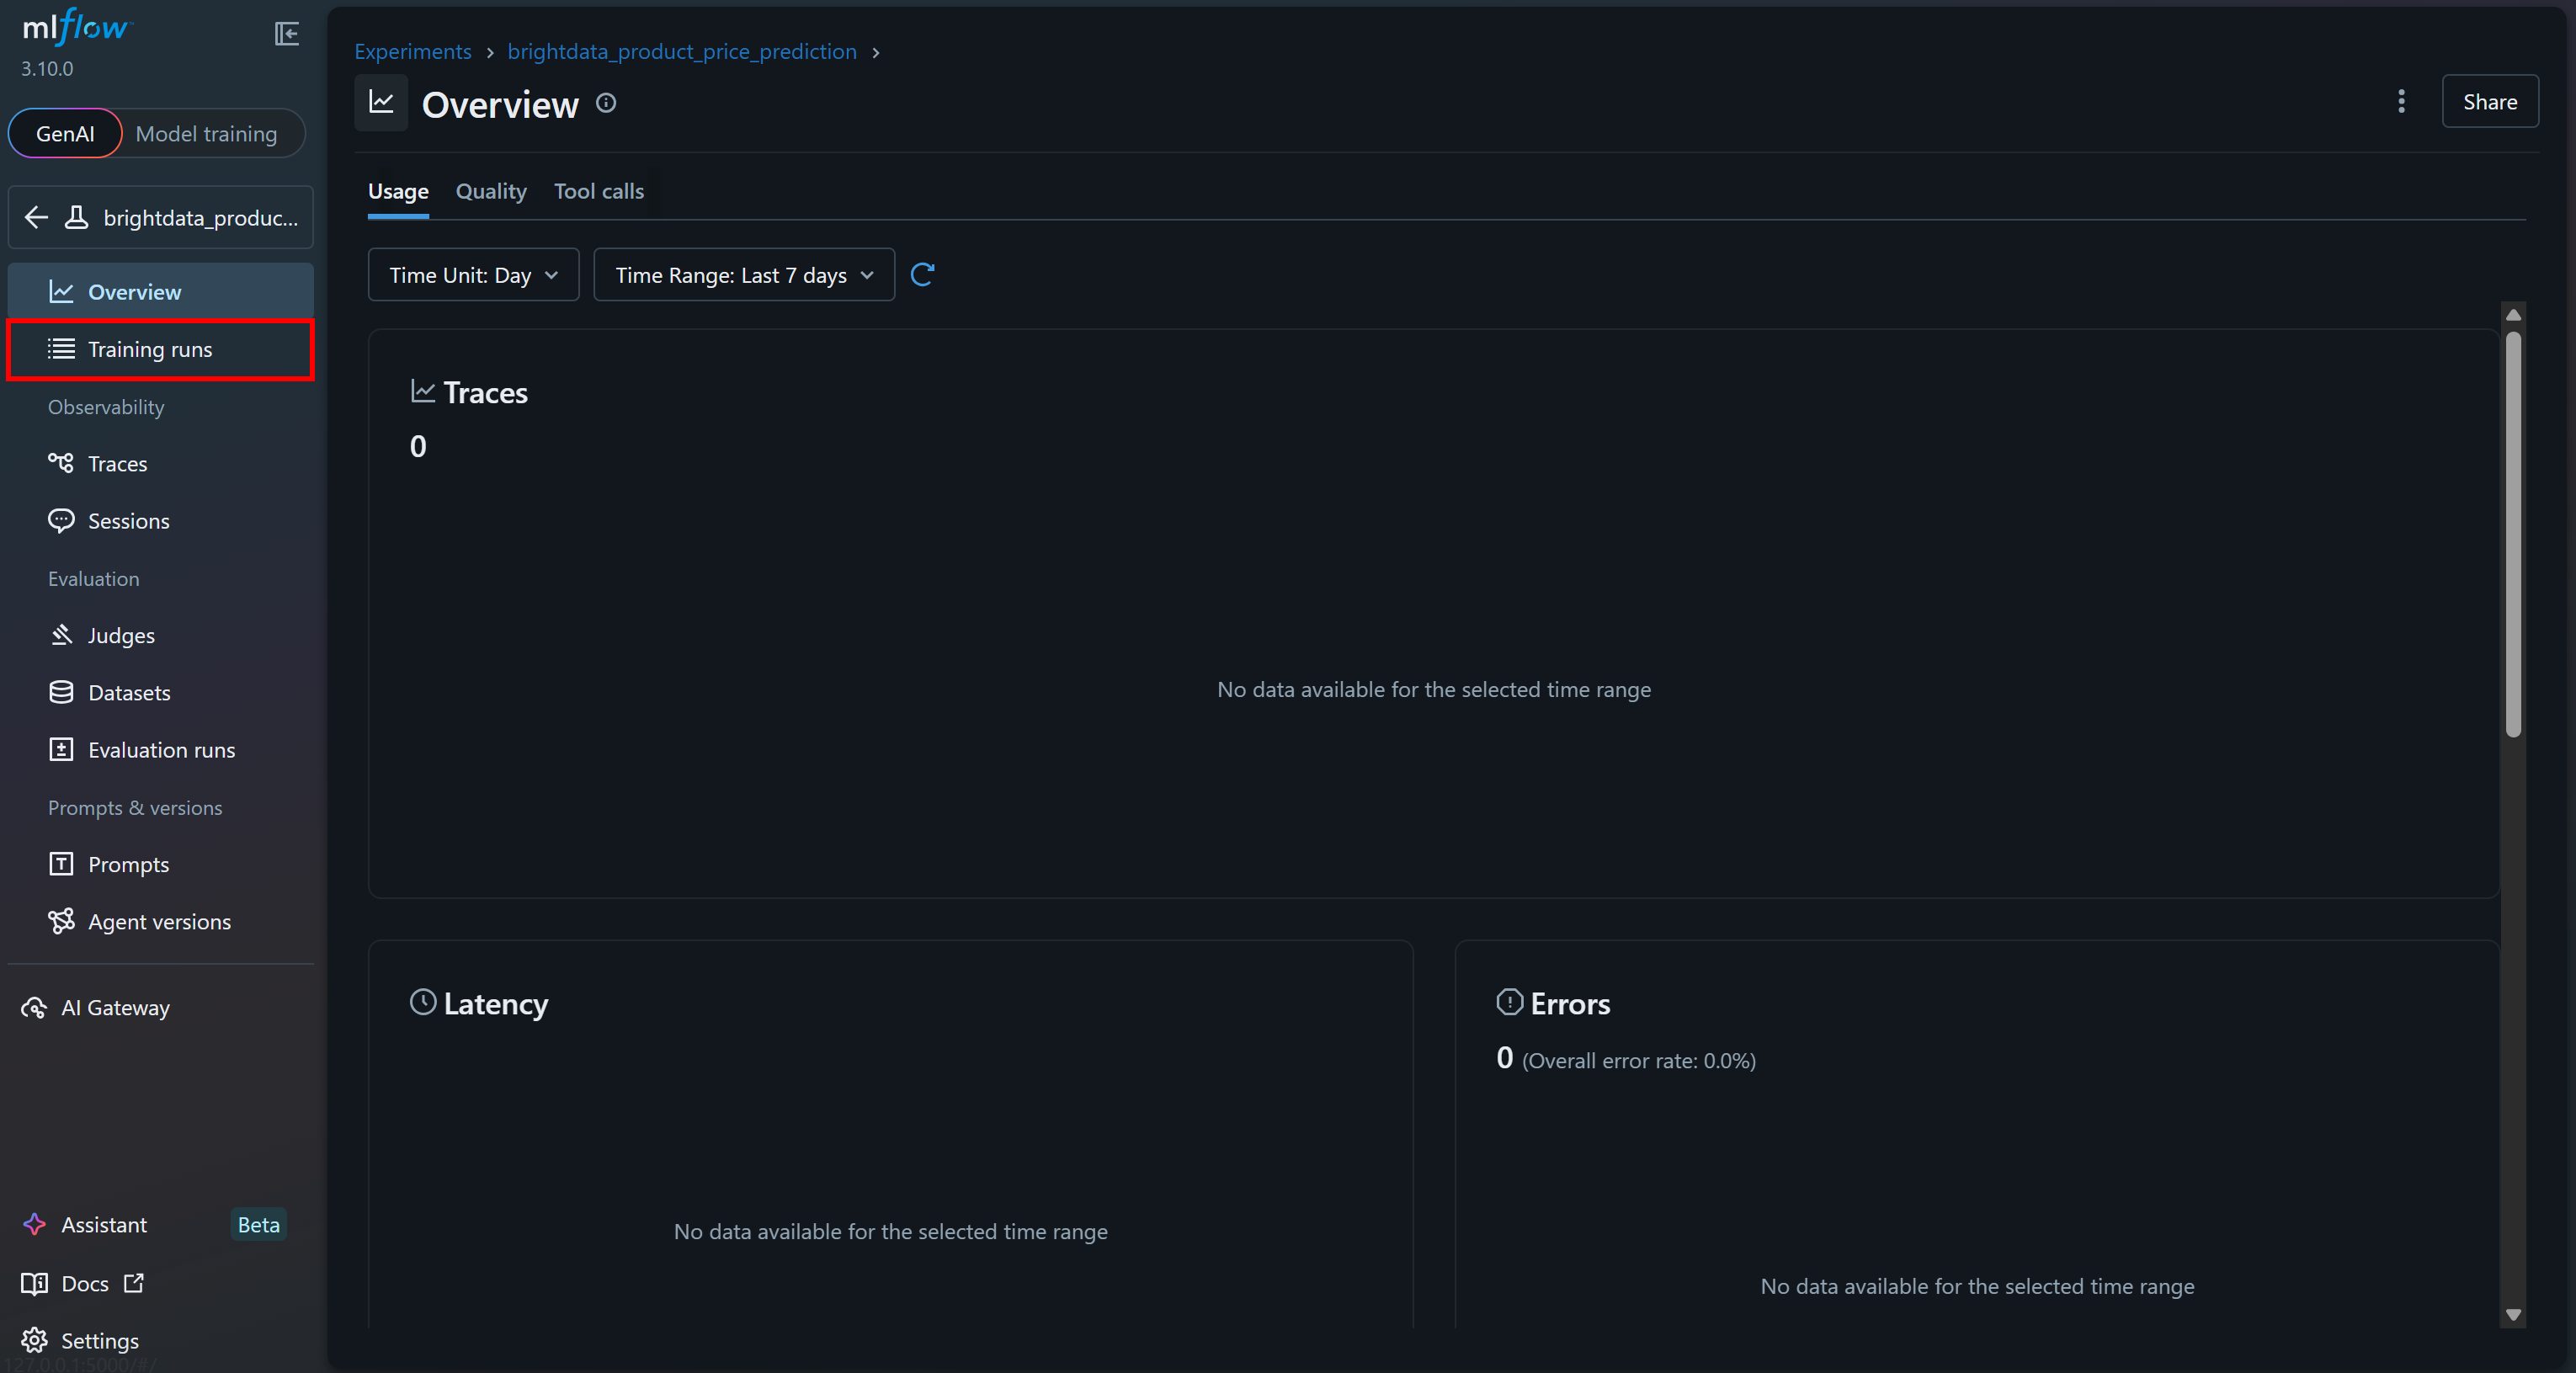
You should see the last run you just executed: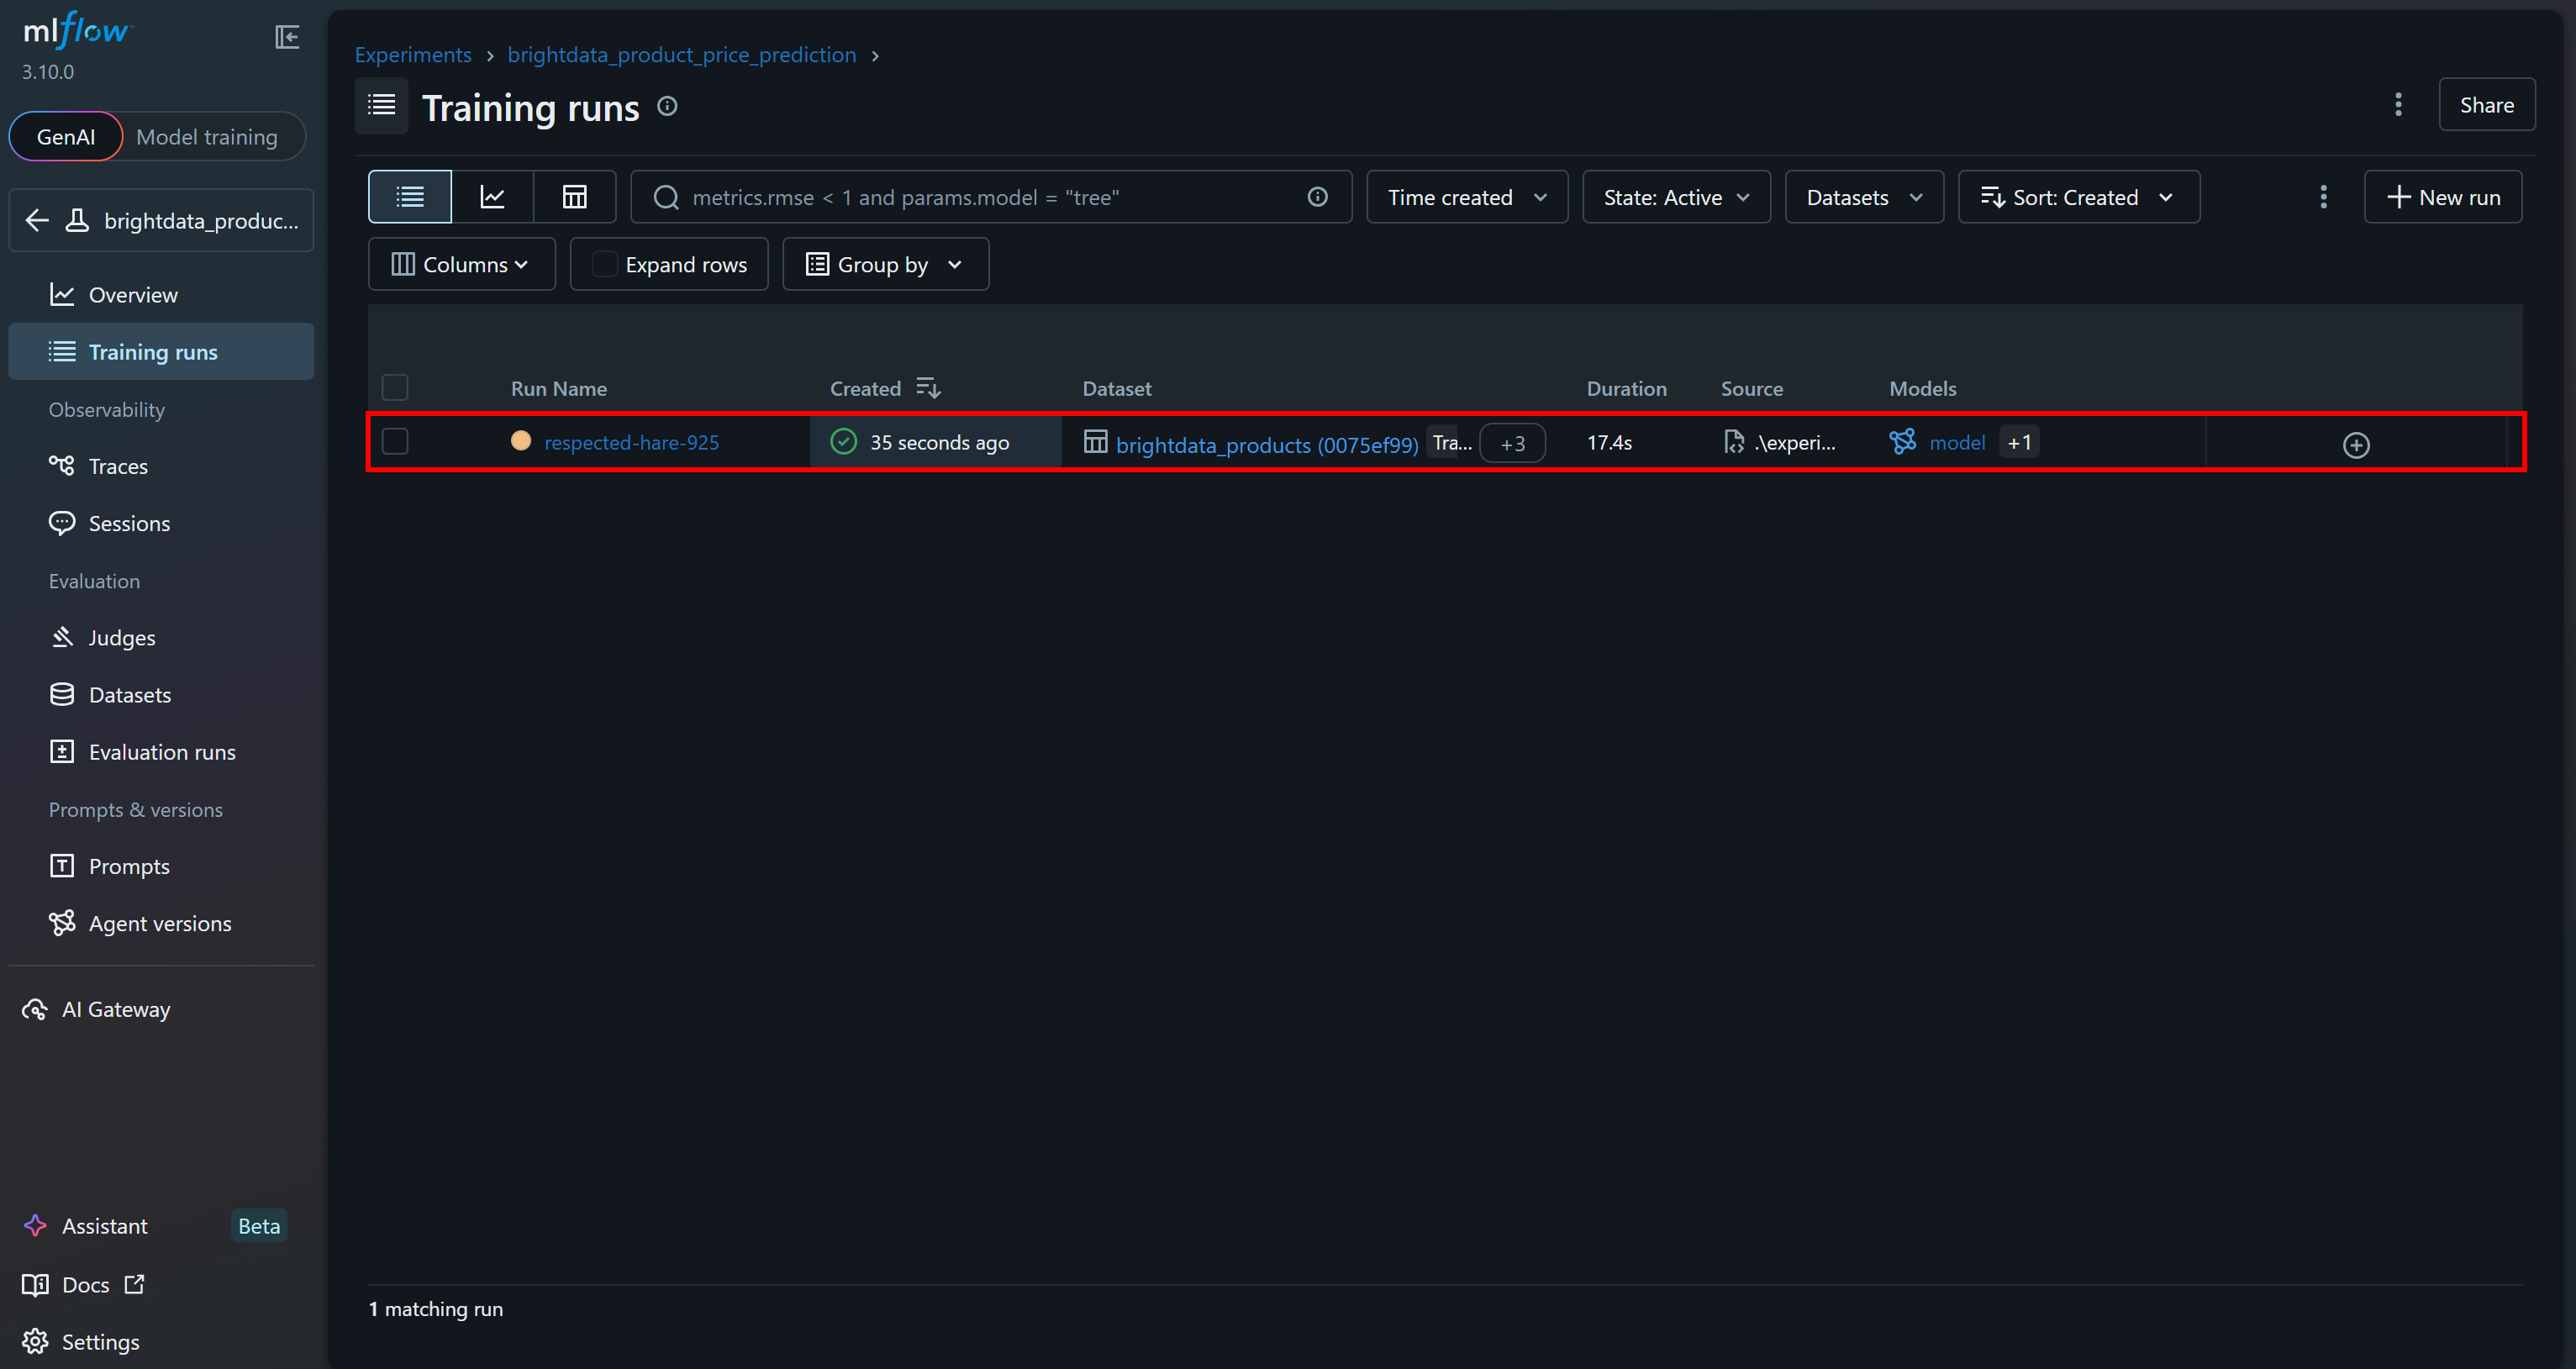
Click on it to immediately access over 15 metrics: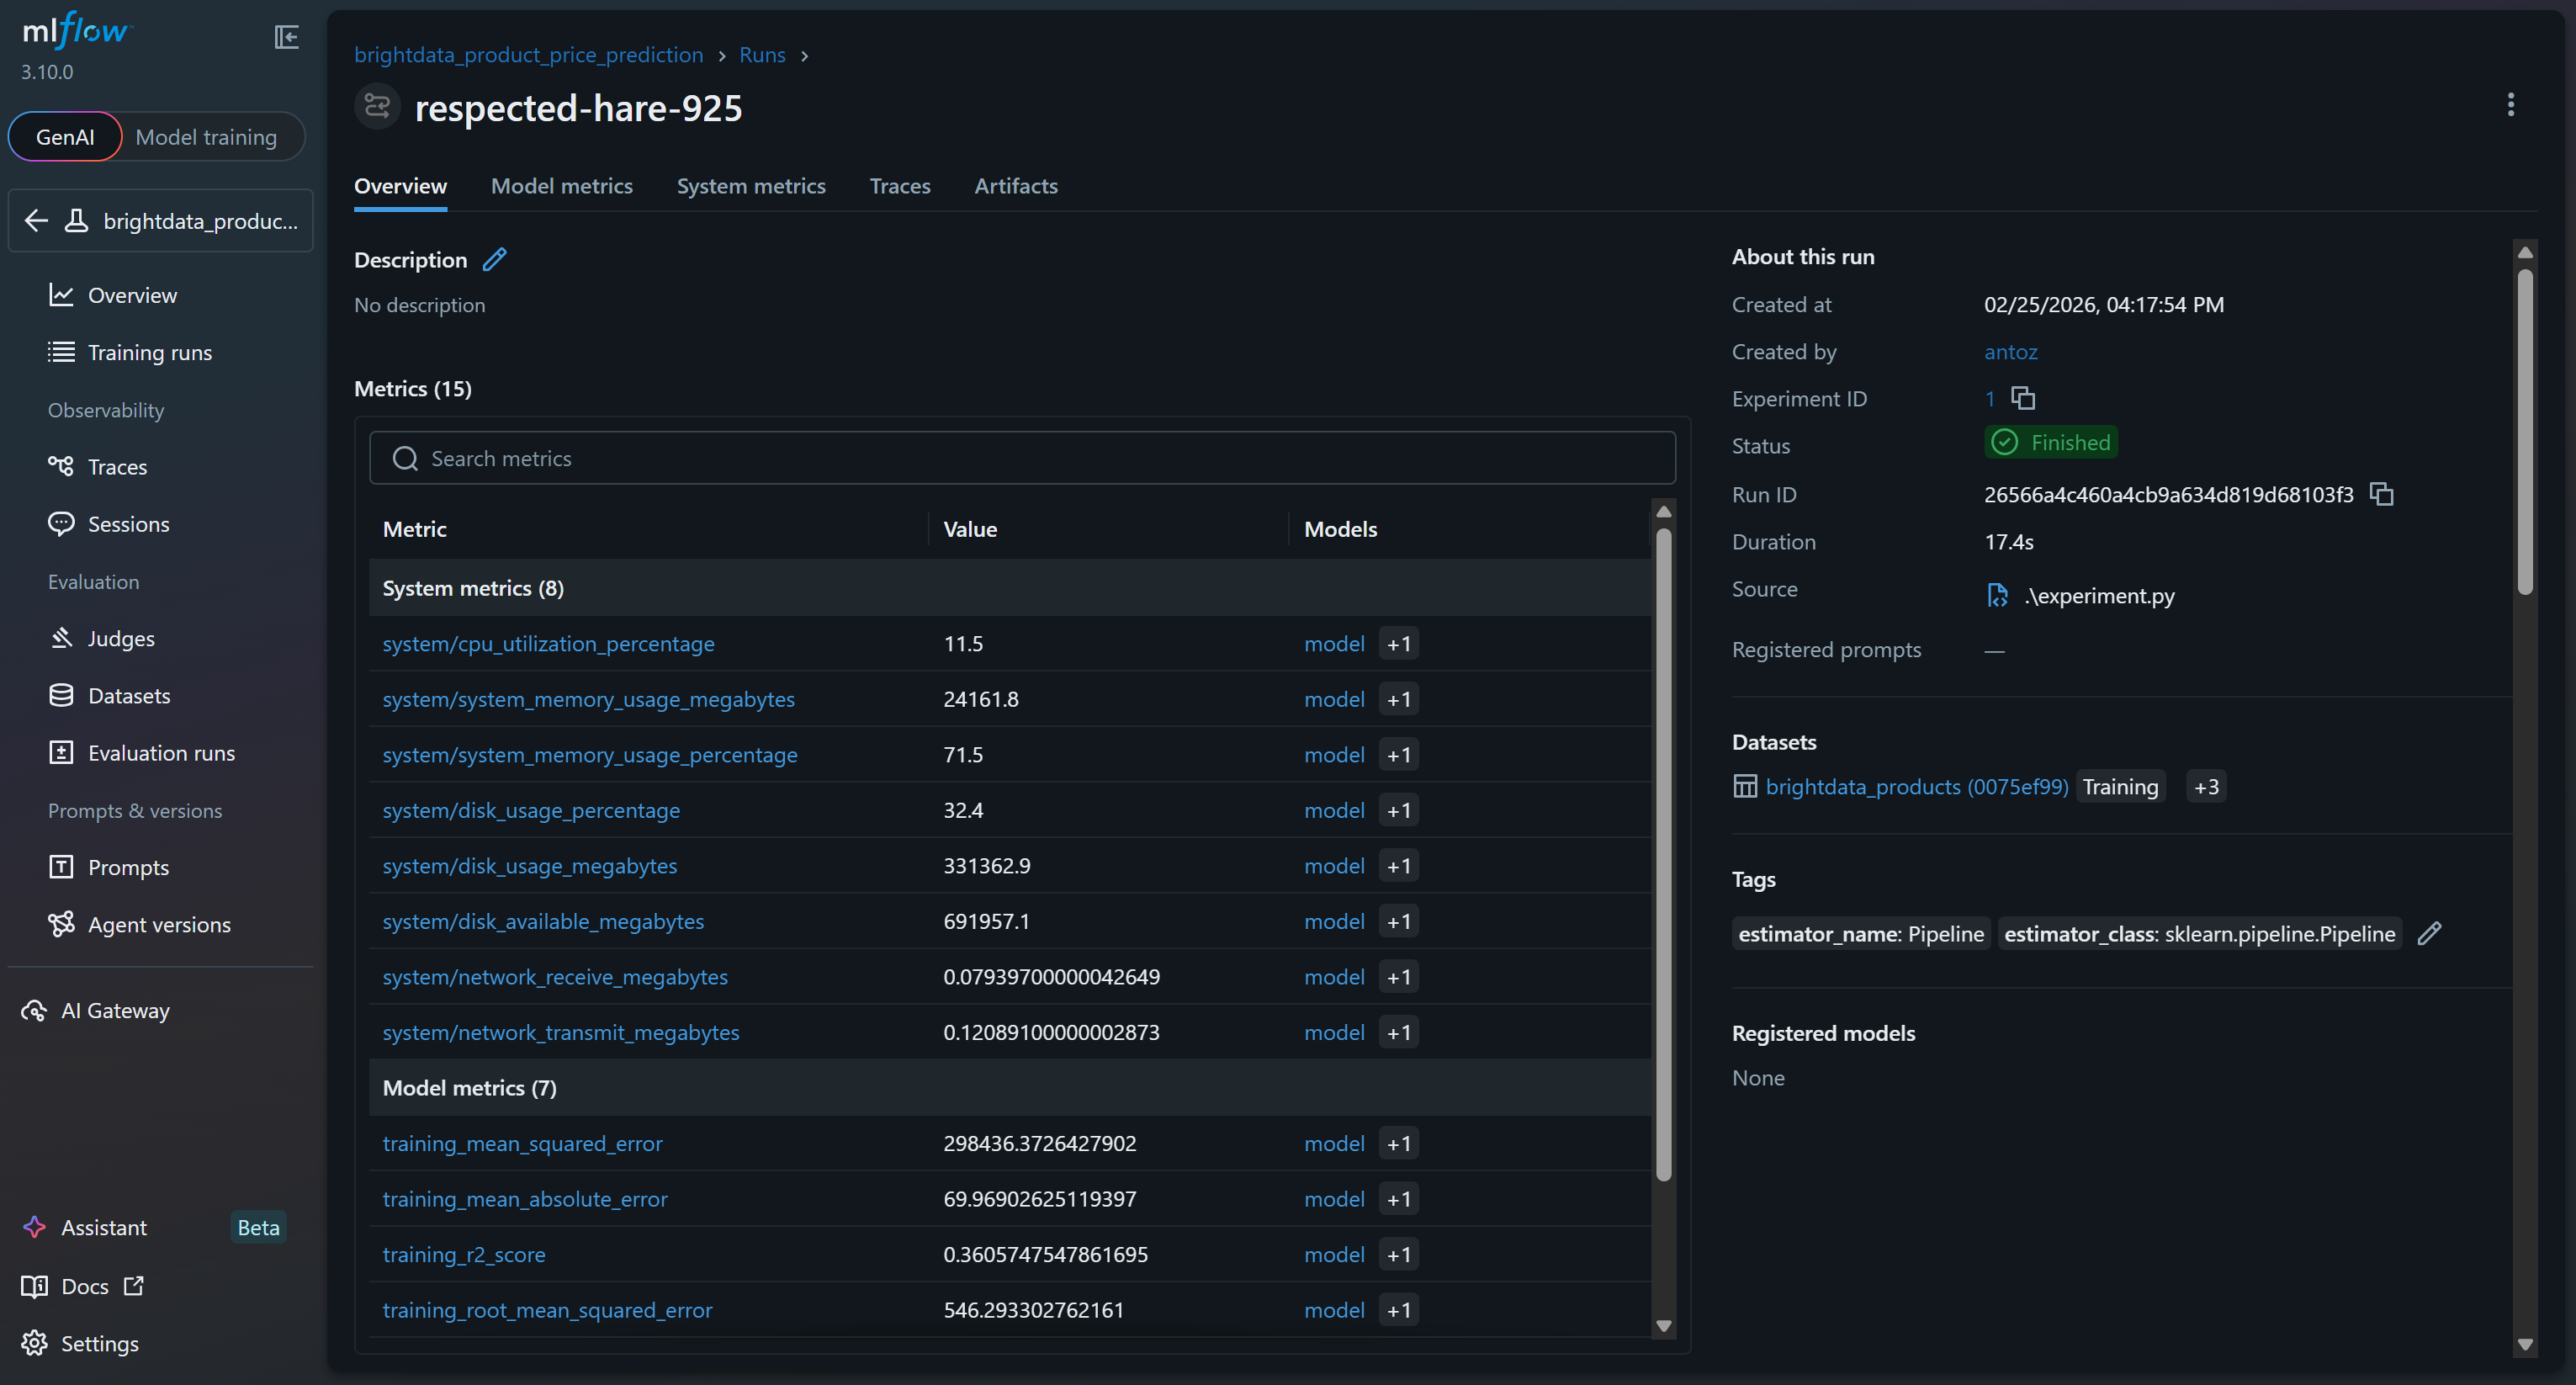
These include system and model metrics collected automatically by MLflow’s tracing features, as well as model metrics logged during your run (e.g., val_rmse, r2_score).
To explore the model metrics, access the corresponding tab: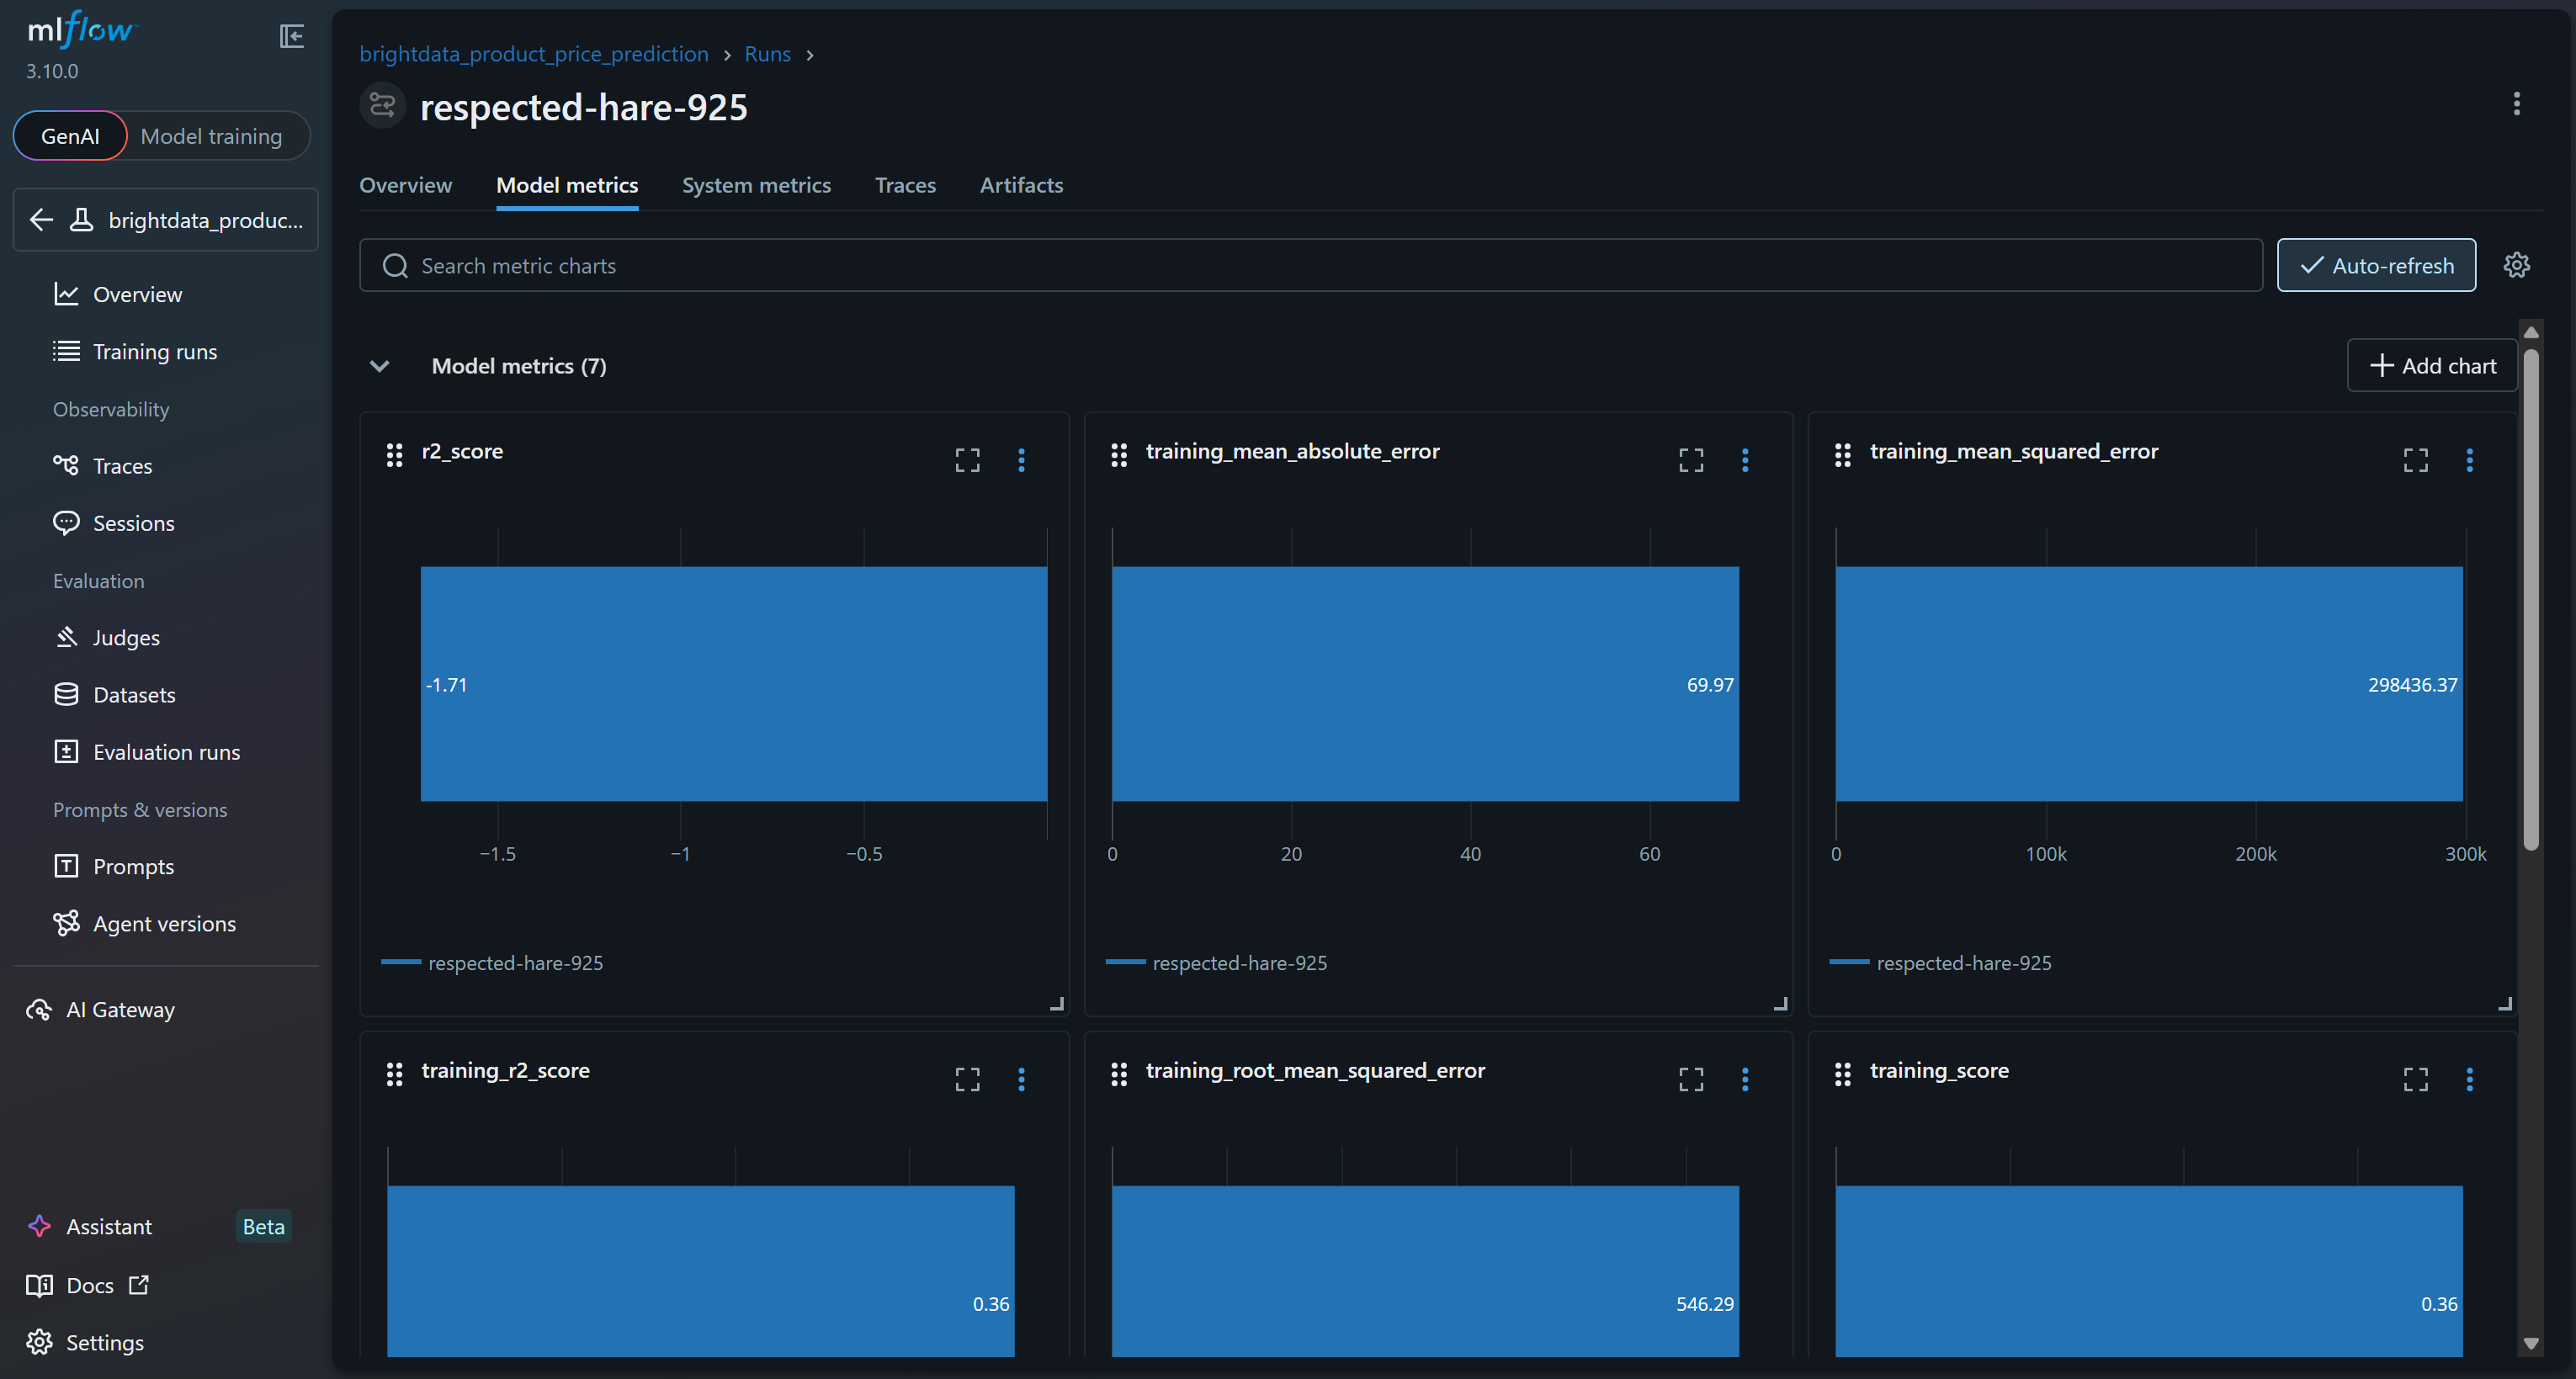
Or review system metrics charts in the “System metrics” tab: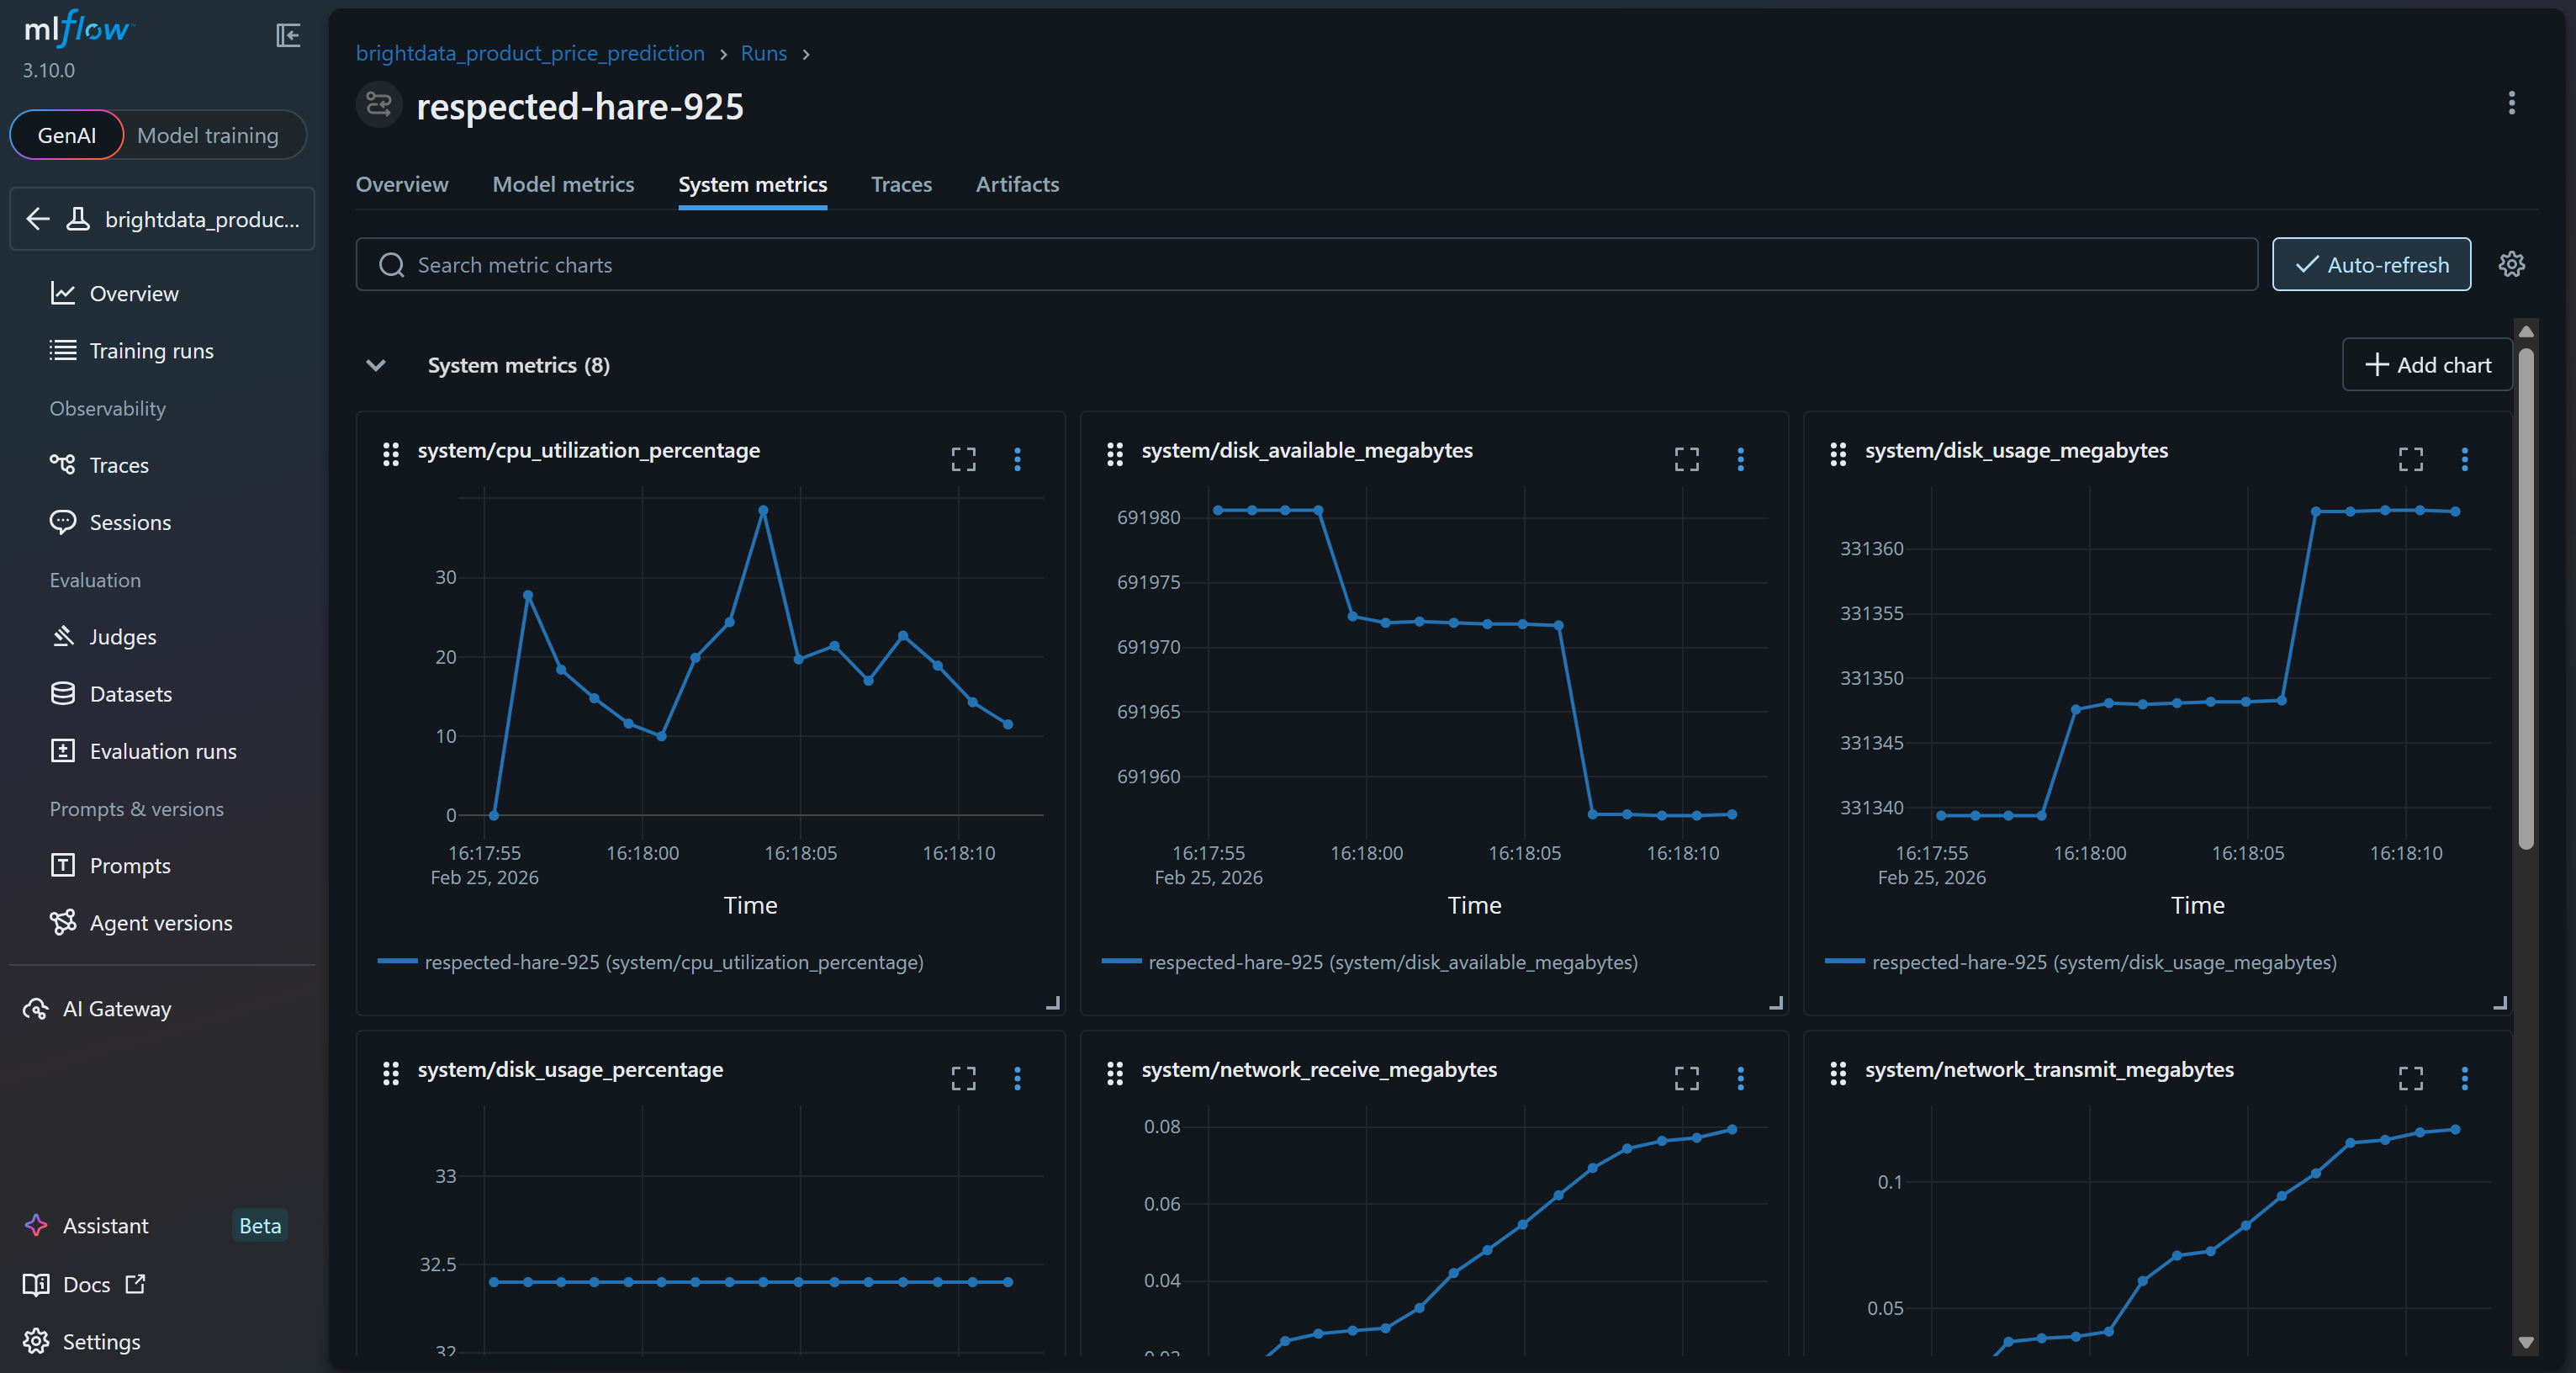
Also, the “Artifacts” section shows output files (such as the cleaned_dataset.csv file, as logged in your code):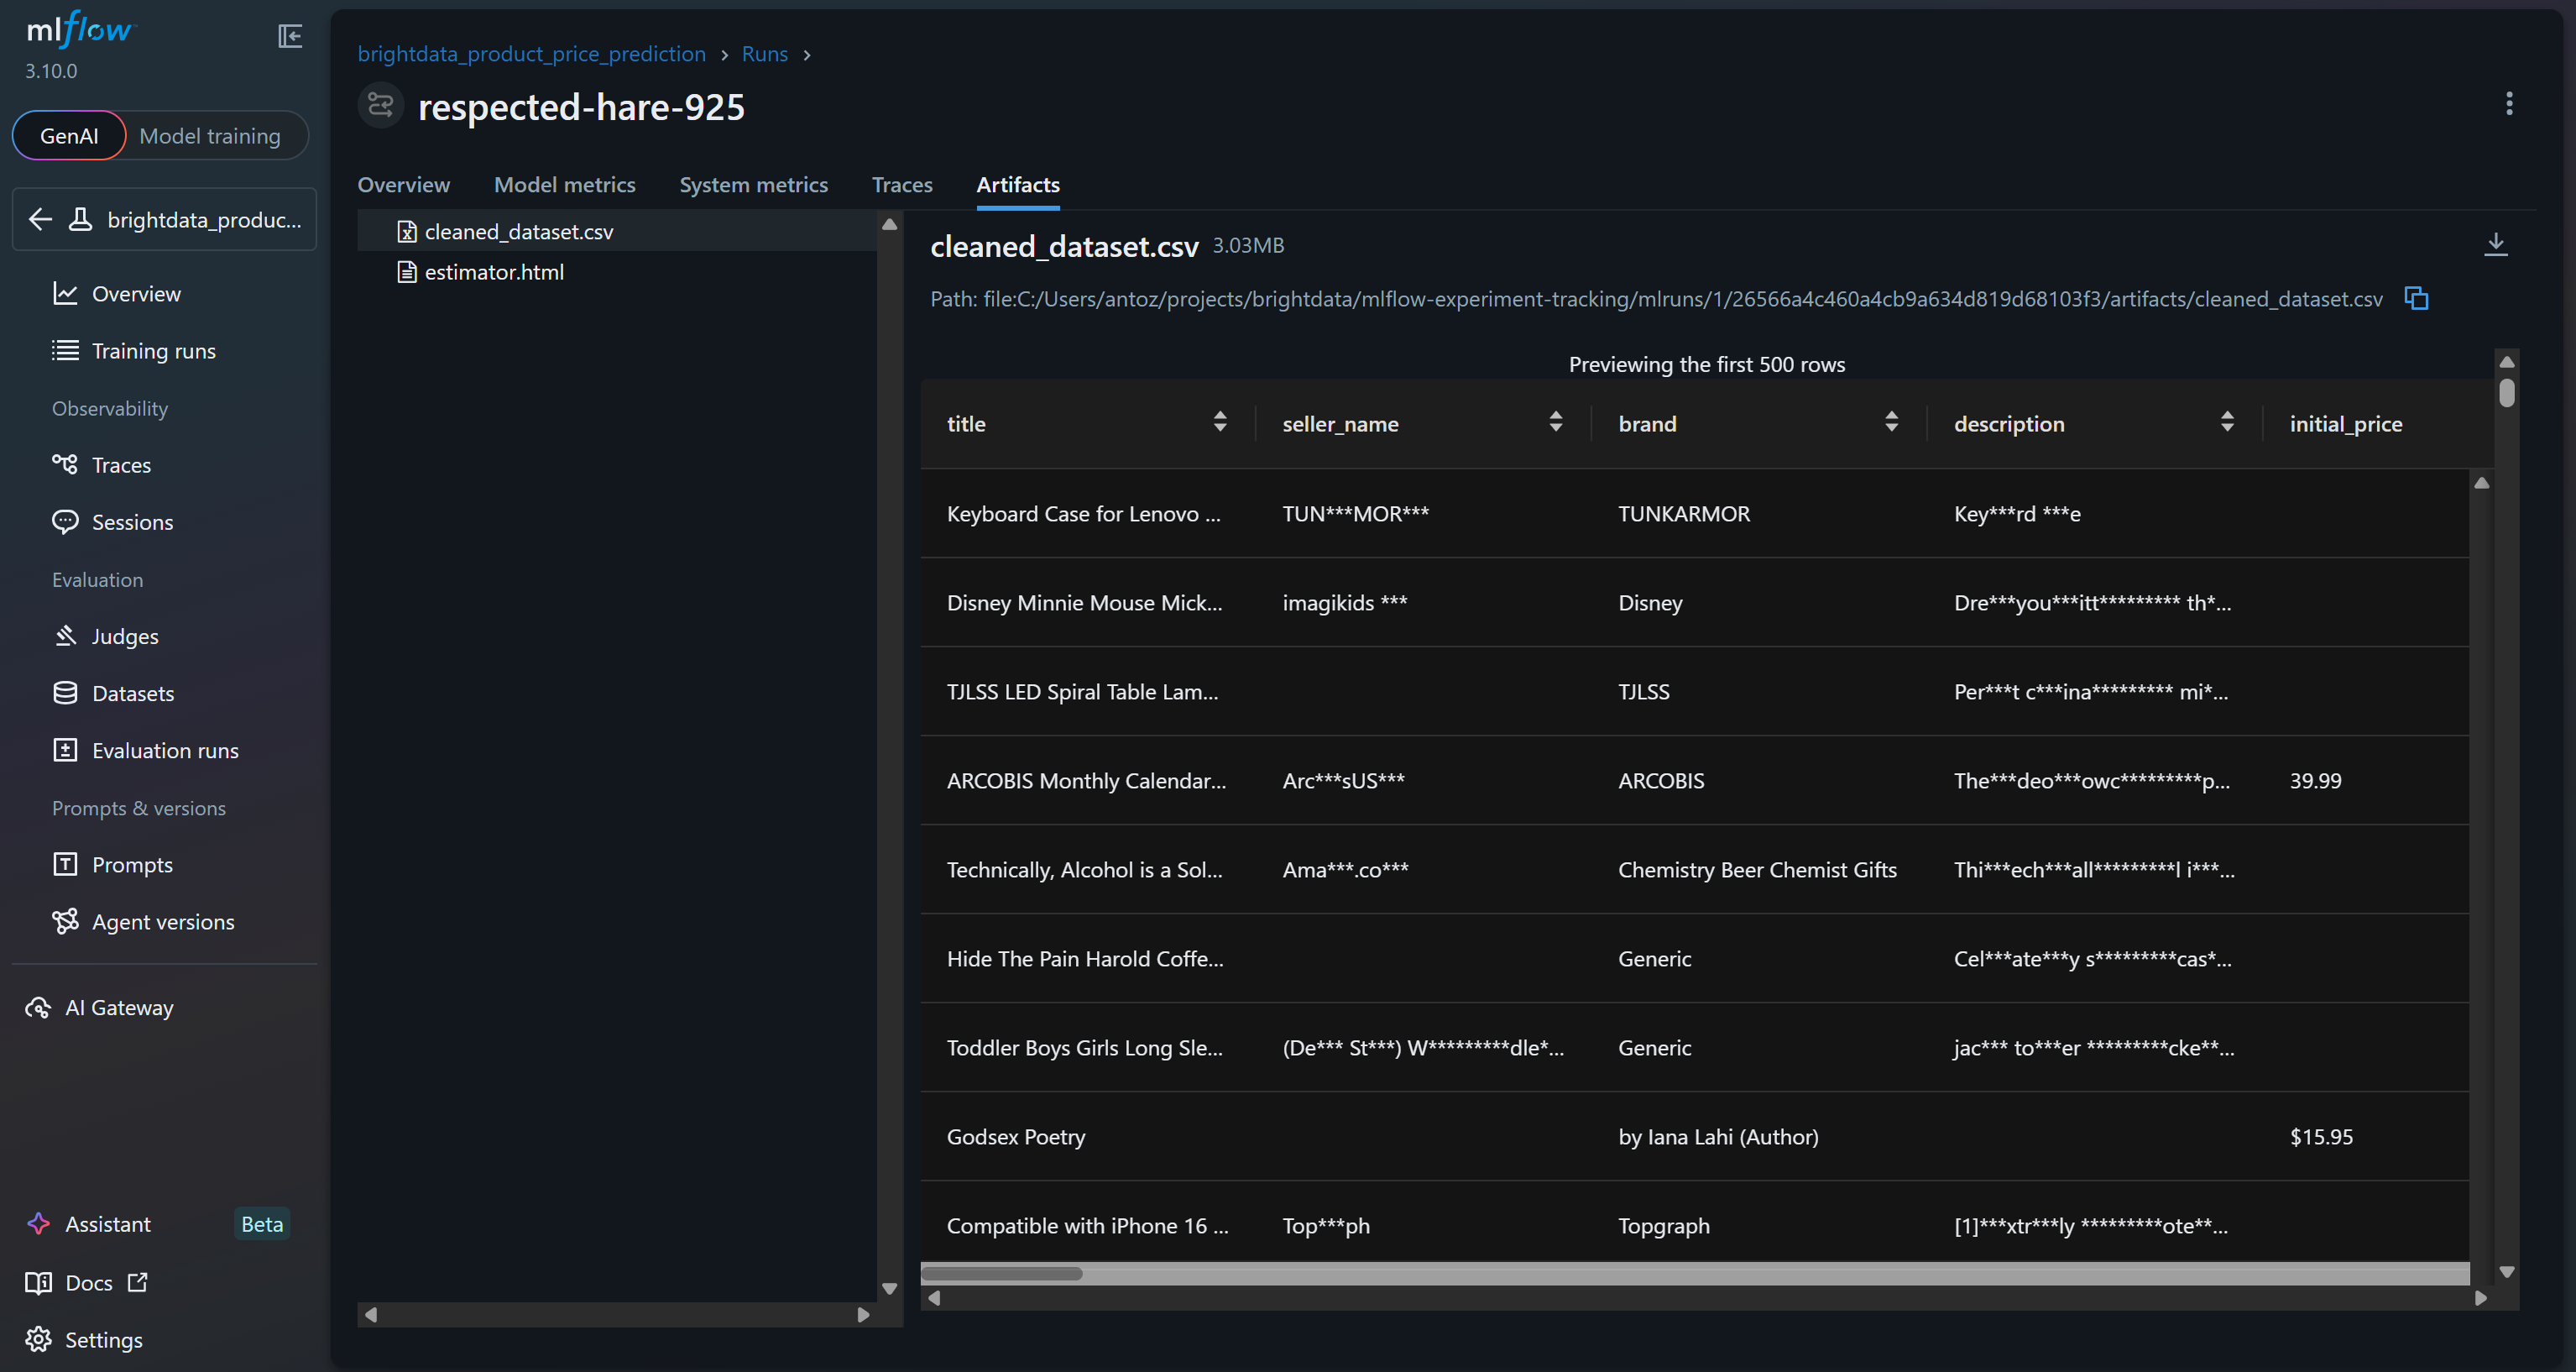
These are just some of the metrics and outputs you can track thanks to an MLflow experiment built around a Bright Data scraped dataset!
Step #10: Comment on the Results
To verify that the model training process worked, focus on the model metrics: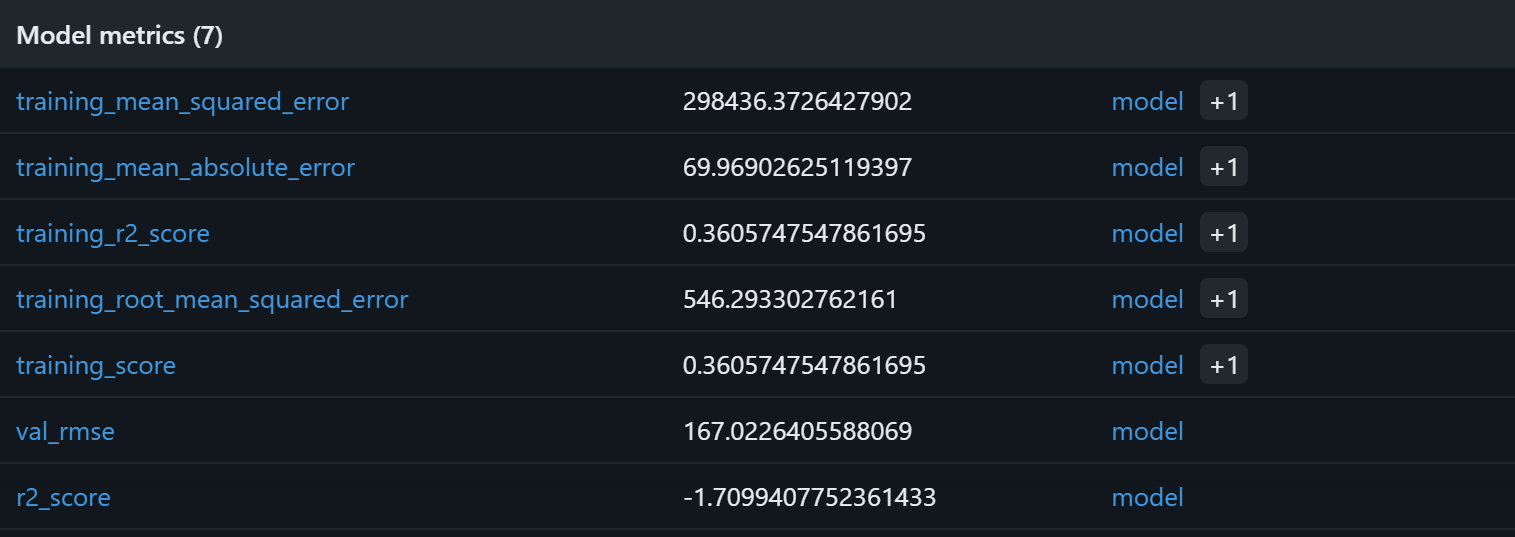
Based on these model metrics, the current pipeline is likely to produce meaningless predictions on the validation set. The training R² of 0.36 indicates that the model explains roughly 36% of the variance in the training data, which is modest. The training RMSE (546) and MAE (~70) suggest that errors are quite high relative to typical product prices, possibly due to noisy data or weak correlations between the features and the target.
More concerning is the validation performance: the R² is negative (-1.71), and the validation RMSE (167) remains significant. A negative R² implies that the model performs worse than simply predicting the mean price for all samples. That signals how the assumed relationship between rating, reviews_count, brand, and final_price may not be strong or sufficiently linear for a Random Forest to capture effectively!
Potential improvements include expanding the feature set, performing feature engineering (e.g., log-transforming review counts, encoding brand popularity), trying alternative models like gradient boosting or XGBoost, and increasing dataset size beyond the 1,000-sample subset. With a larger Bright Data dataset, you would have more data and variety, enabling deeper and more relevant experiments.
In short, the current pipeline works technically but fails to adequately capture underlying price patterns. Thanks to MLflow experiment tracking, you could identify that the assumptions underlying this machine learning pipeline are probably flawed.
Next Steps
If you want to use MLflow to trace AI pipelines with Bright Data datasets for fine-tuning or RAG, remember that MLflow tracing is fully OpenTelemetry-compatible. Specifically, MLflow provides an LLM observability solution that captures inputs, outputs, and metadata for every intermediate step of a request.
When integrating with OpenAI, you can enable it easily with:
import mlflow

mlflow.openai.autolog()
For more details, refer to the official MLflow documentation.
Conclusion
In this tutorial, you saw what MLflow brings to the table for building and tracking machine learning and AI pipelines. You also understood why scraped datasets are excellent sources for training or fine-tuning models.
As demonstrated, Bright Data offers a rich dataset marketplace covering hundreds of domains and billions of web data records. These datasets are continuously updated via web scraping to support machine learning and AI workflows. In detail, they are perfectly compatible with MLflow tracking, as shown here.
Create a free Bright Data account and start exploring our web data solutions today!

Technical Writer
Antonello Zanini is a technical writer, editor, and software engineer with 5M+ views. Expert in technical content strategy, web development, and project management.


