

In this article, you will learn:
- What Microsoft Copilot Studio is and what makes it special.
- Why you should consider integrating Bright Data’s SERP API into an AI agent built within it.
- How to implement an AI agent connected to the SERP API within Copilot Studio in a real-world scenario.
Let’s dive in!
What Is Microsoft Copilot Studio?
Copilot Studio is a low-code platform developed by Microsoft that allows you to build, test, and publish custom AI agents. You can also use it to customize Microsoft 365 Copilot, the generative AI chatbot designed to boost productivity.
Copilot Studio is part of the Microsoft Power Platform and is built to be accessible for users with different technical skill levels. In particular, it equips you with the tools to visually create AI agents to automate tasks, deliver information, and connect to other business systems and communication channels.
Note: If you were looking to build an AI agent in Azure, check out our dedicated guide on integrating the Bright Data SERP API within Azure AI Foundry.
Why Integrate Bright Data’s SERP API into a Microsoft Copilot Studio AI Agent
Copilot Studio supports multiple large language models, which act as the engine/brain behind any AI agent. However, regardless of the LLM you end up choosing, their knowledge remains static. For instance, an LLM has no awareness of recent events, such as today’s headlines or last night’s sports results. That leads to outdated or even “hallucinated” responses.
To address that limitation, you need to ground your LLM with real-time data from the web. This technique is widely used in RAG (Retrieval-Augmented Generation) workflows, where external information is retrieved and provided to the LLM before it generates an answer, ensuring that responses are accurate and up to date.
Copilot Studio makes that possible by allowing integration with third-party data sources for live web search, such as Bright Data’s SERP API.
The SERP API lets you programmatically perform search queries across search engines and retrieve full SERPs (Search Engine Result Pages). This gives your AI agents a steady flow of up-to-date, verifiable, and context-rich data from search engines.
How to Build an AI Agent in Microsoft Copilot Studio with Access to a SERP API Tool
In this step-by-step section, you will learn how to integrate a Bright Data SERP API tool into an AI agent in Copilot Studio.
Among the many possible use cases, this chapter walks you through creating a content association analysis agent. Such an agent is conceived to discover semantic associations and contextual topics that top-ranking pages connect to a given keyword.
The information produced by the agent is invaluable for understanding a topic more deeply, optimizing content for SEO, and improving your overall content strategy.
Note: This is just an example, as you can achieve many other use cases with the SERP API integration.
Follow the steps below!
Prerequisites
To follow along with this tutorial, you must have:
- A Microsoft Copilot Studio account.
- A Microsoft Power Apps account.
- A Bright Data account with an API key ready.
To create a Microsoft Copilot Studio account, you have to meet a few extra prerequisites.
If you see the error “Microsoft Copilot Studio isn’t currently available for your work or school account” when signing up, try activating a Microsoft 365 Business Standard free trial. This will give you an account in the format <username>@<company>.onmicrosoft.com, which you can then use to subscribe to Copilot Studio.
Alternatively, follow the instructions from the official Microsoft forum for additional setup guidance.
Do not worry about setting up your Bright Data account just yet, as you will be guided through the process later in this article.
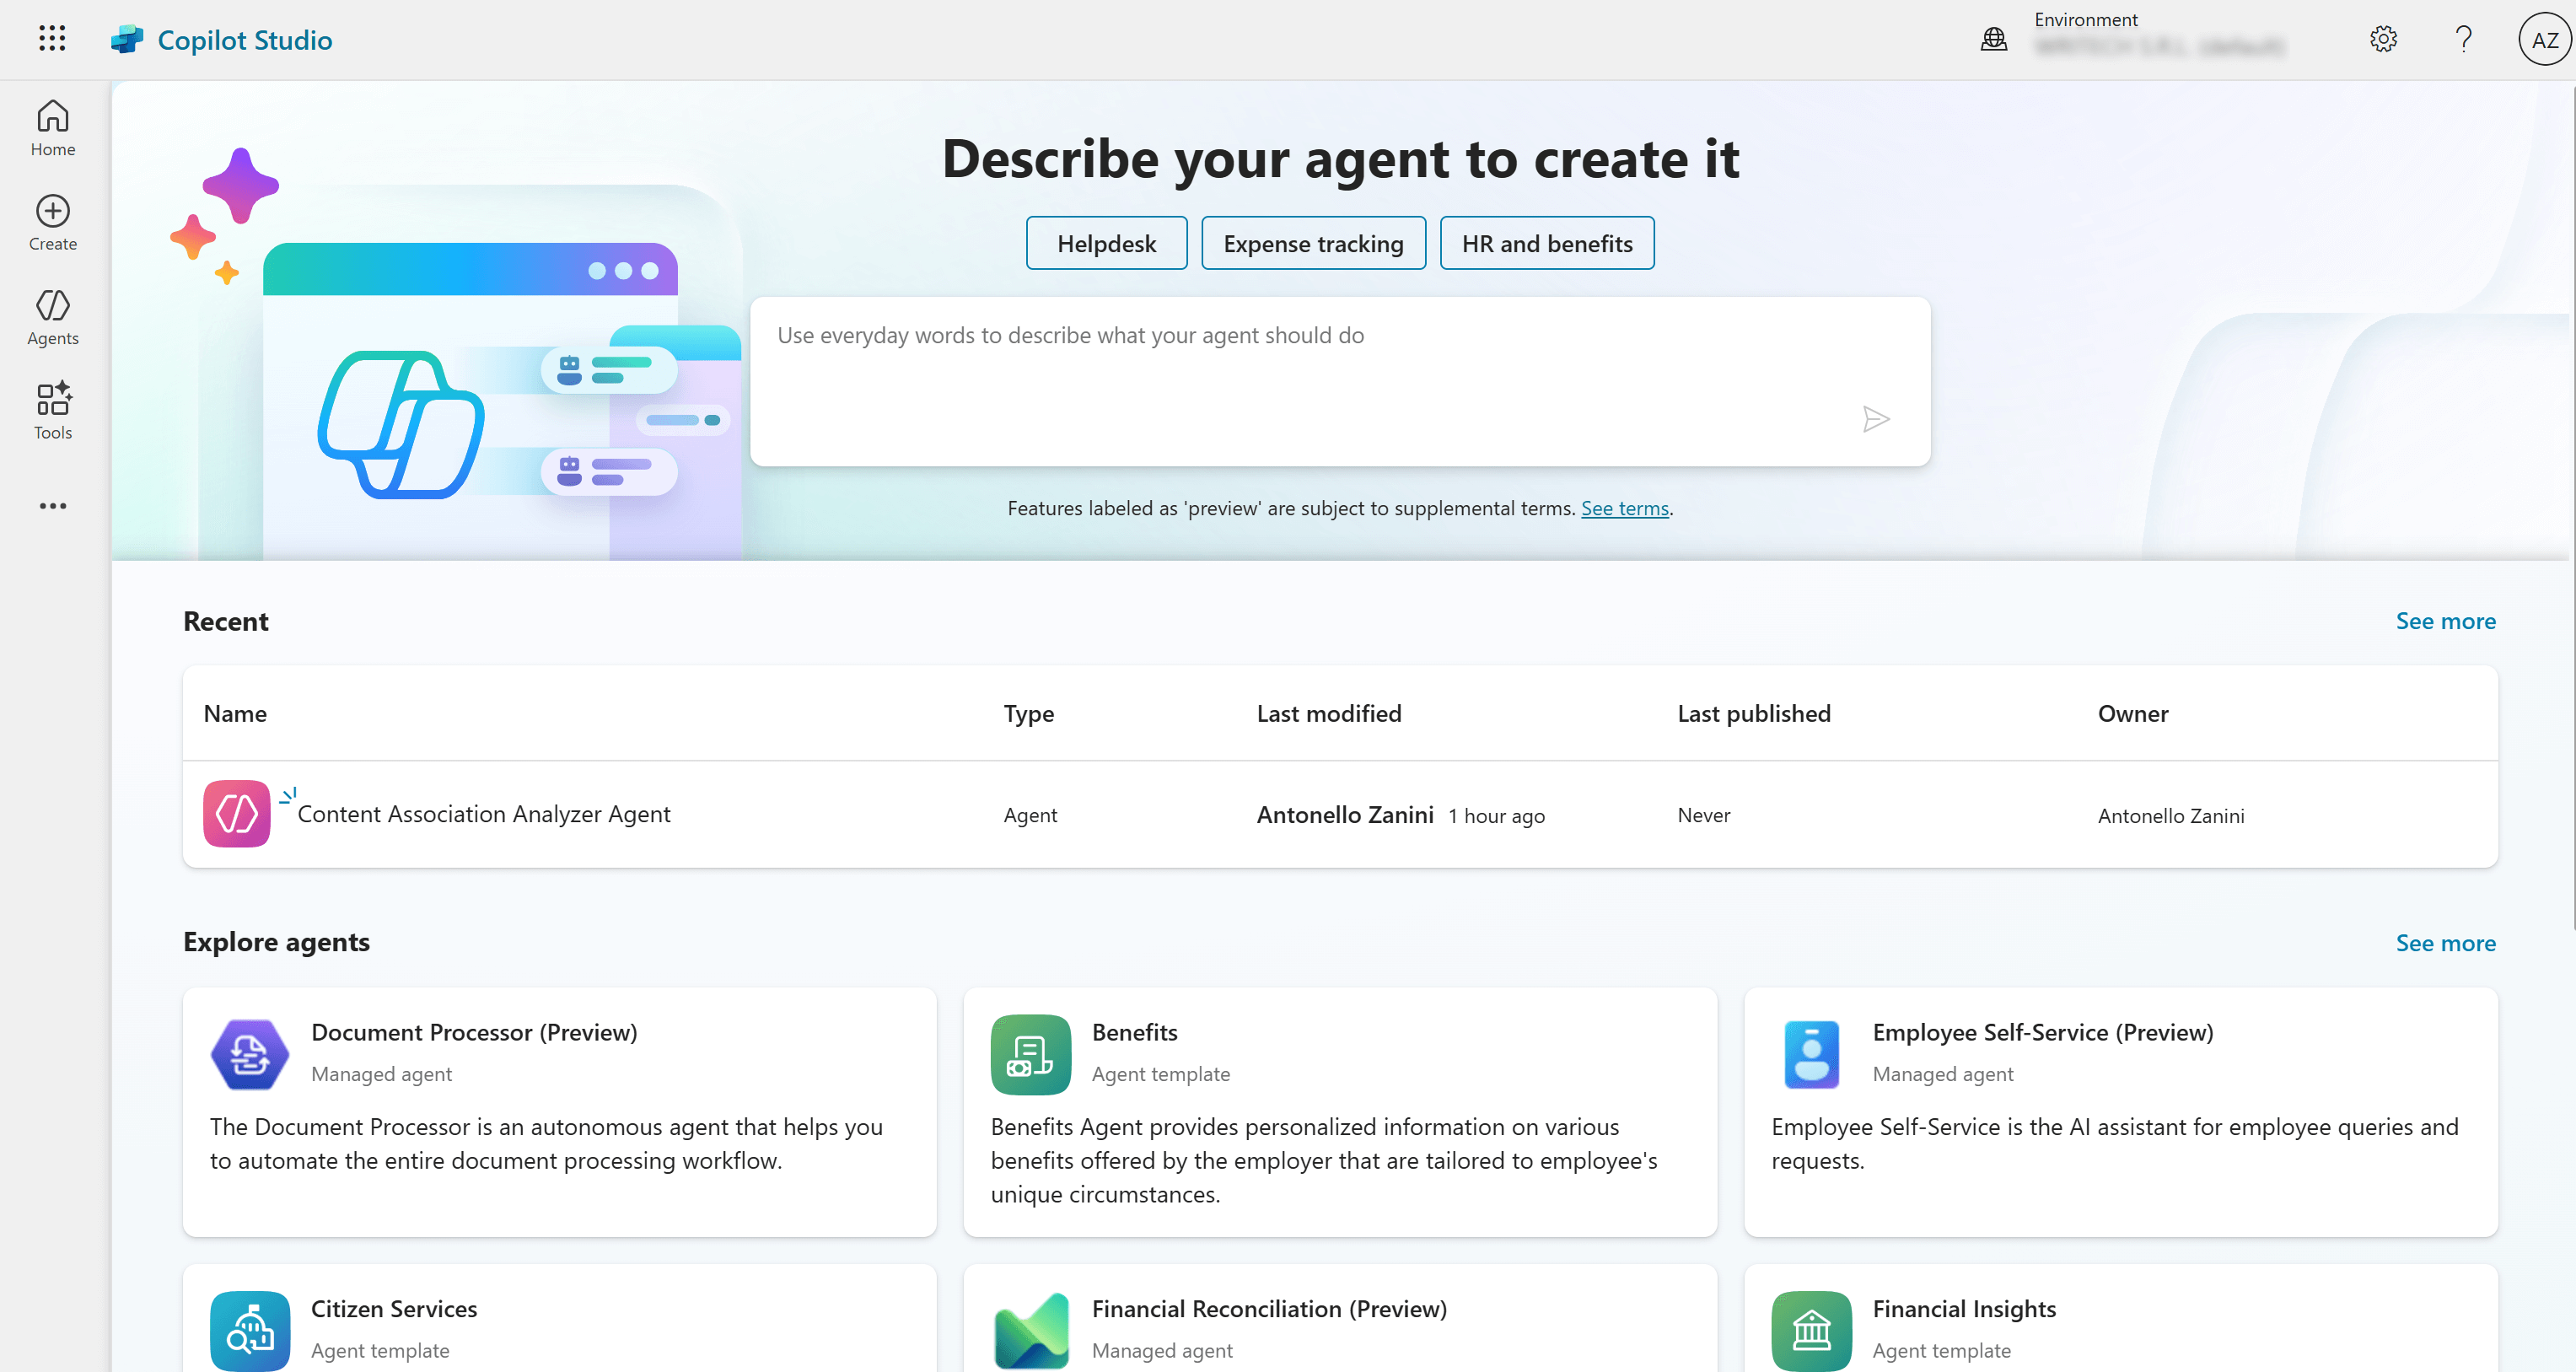
Step #1: Create a New AI Agent in Copilot Studio
To create an AI agent in Copilot Studio, start by logging in. You will reach the main dashboard:
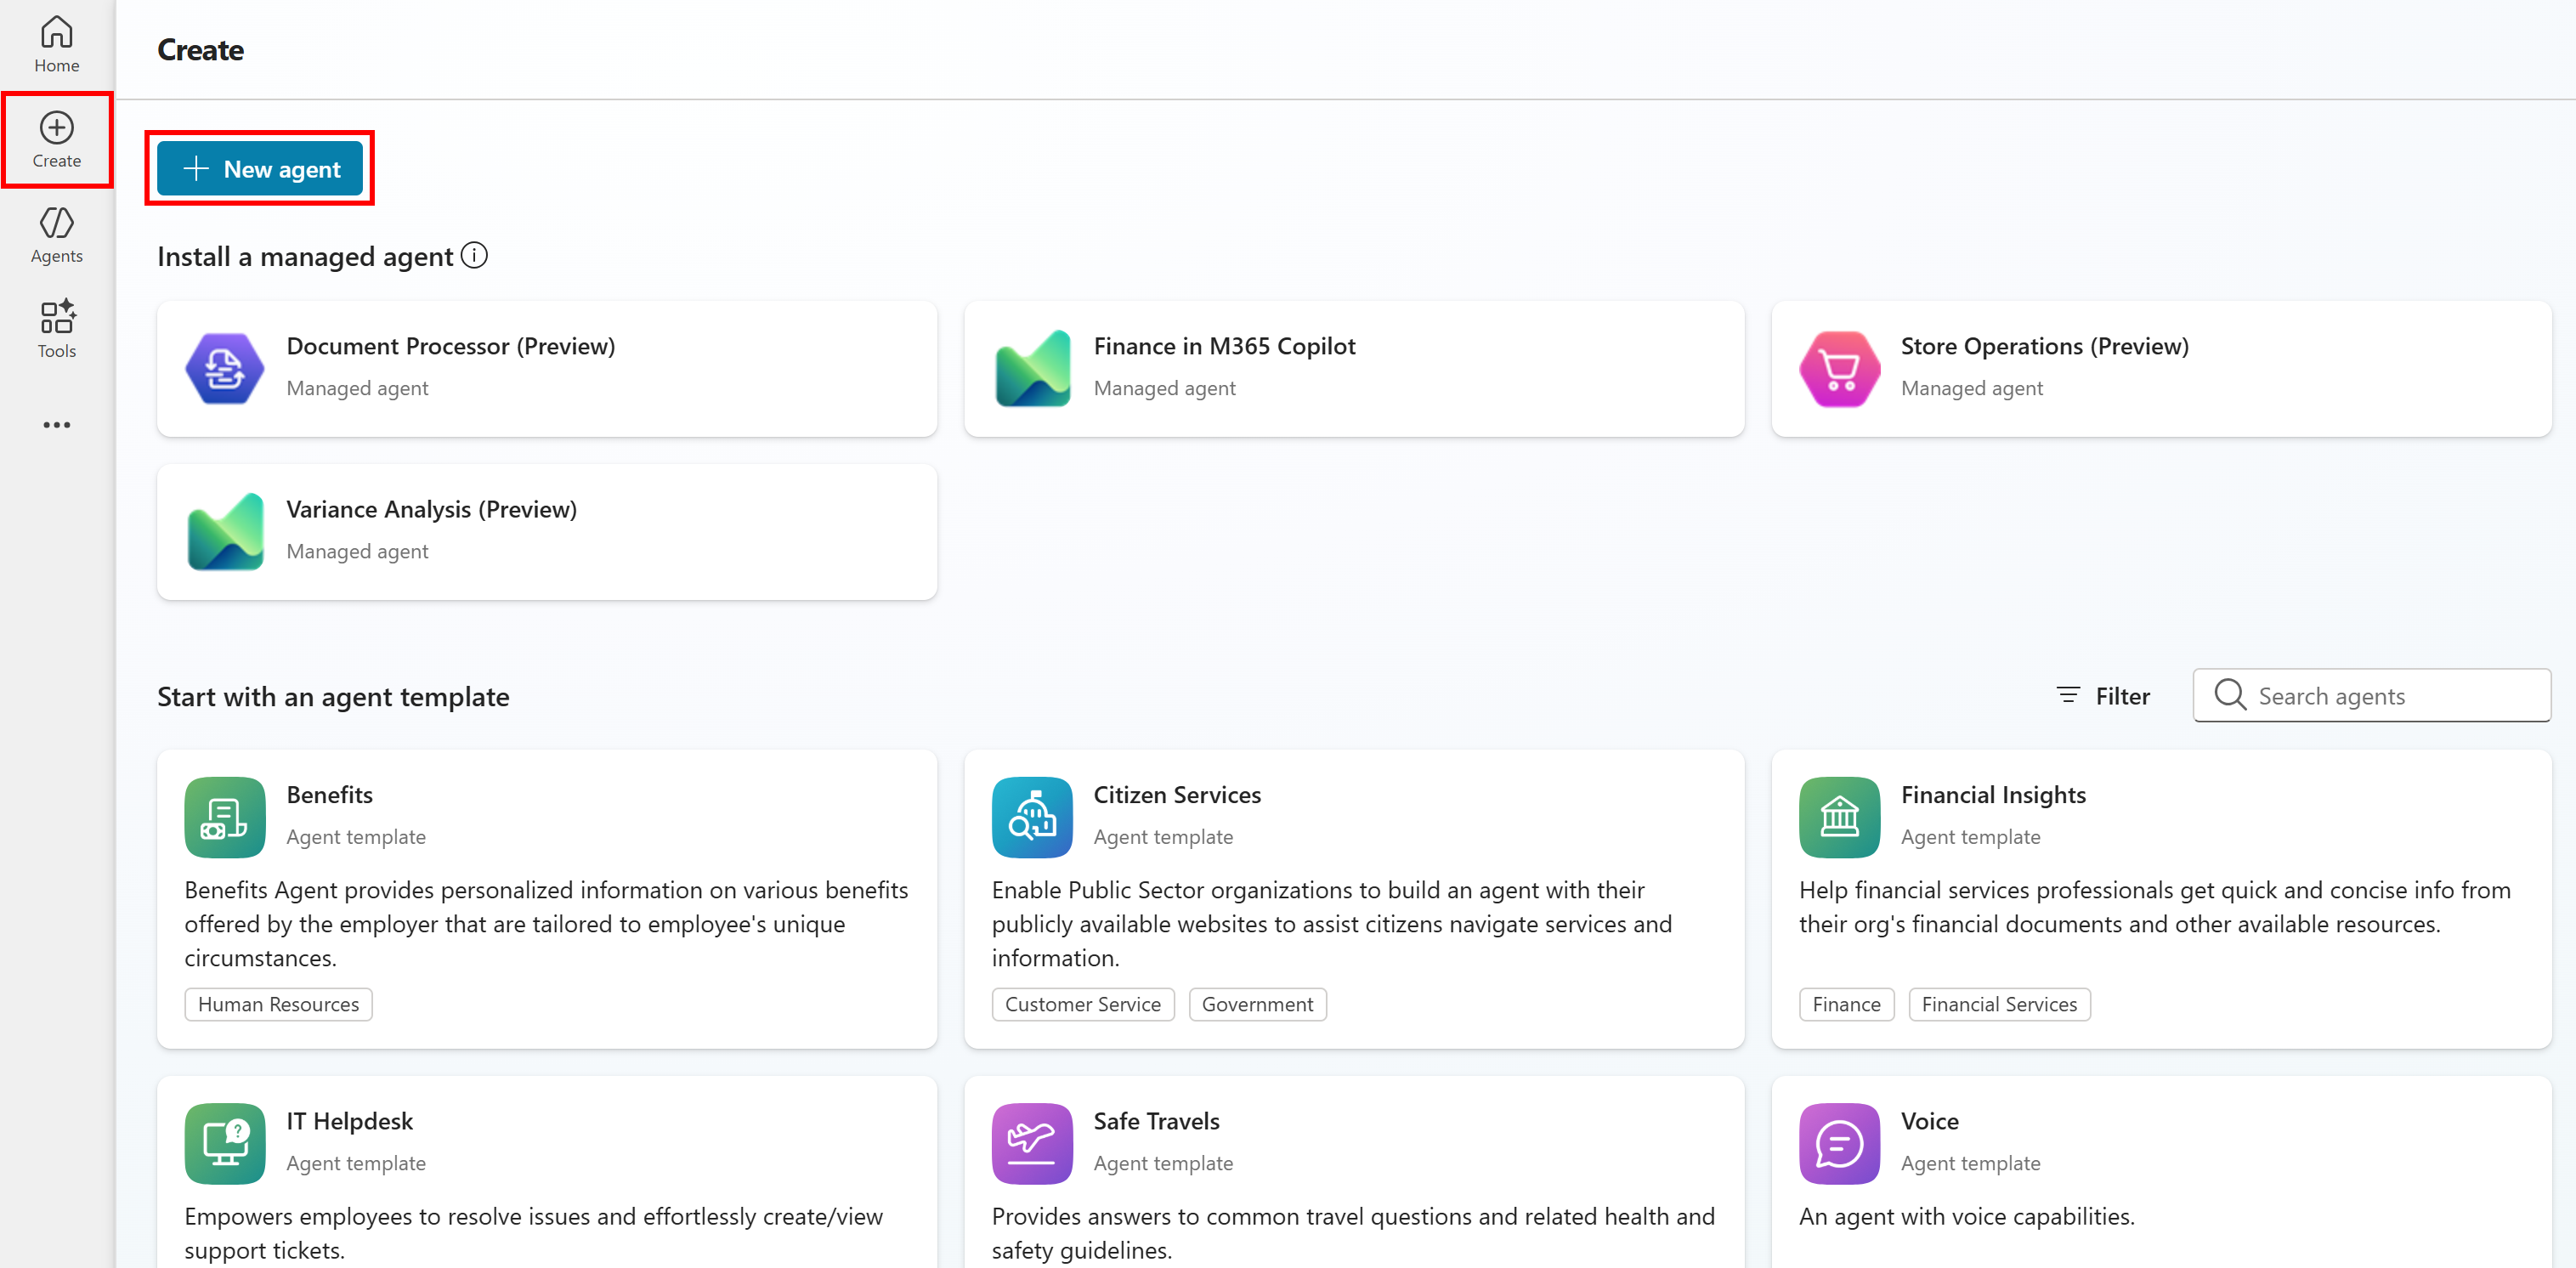
On the left menu, click the “Create” button, and then select the “New Agent” button:
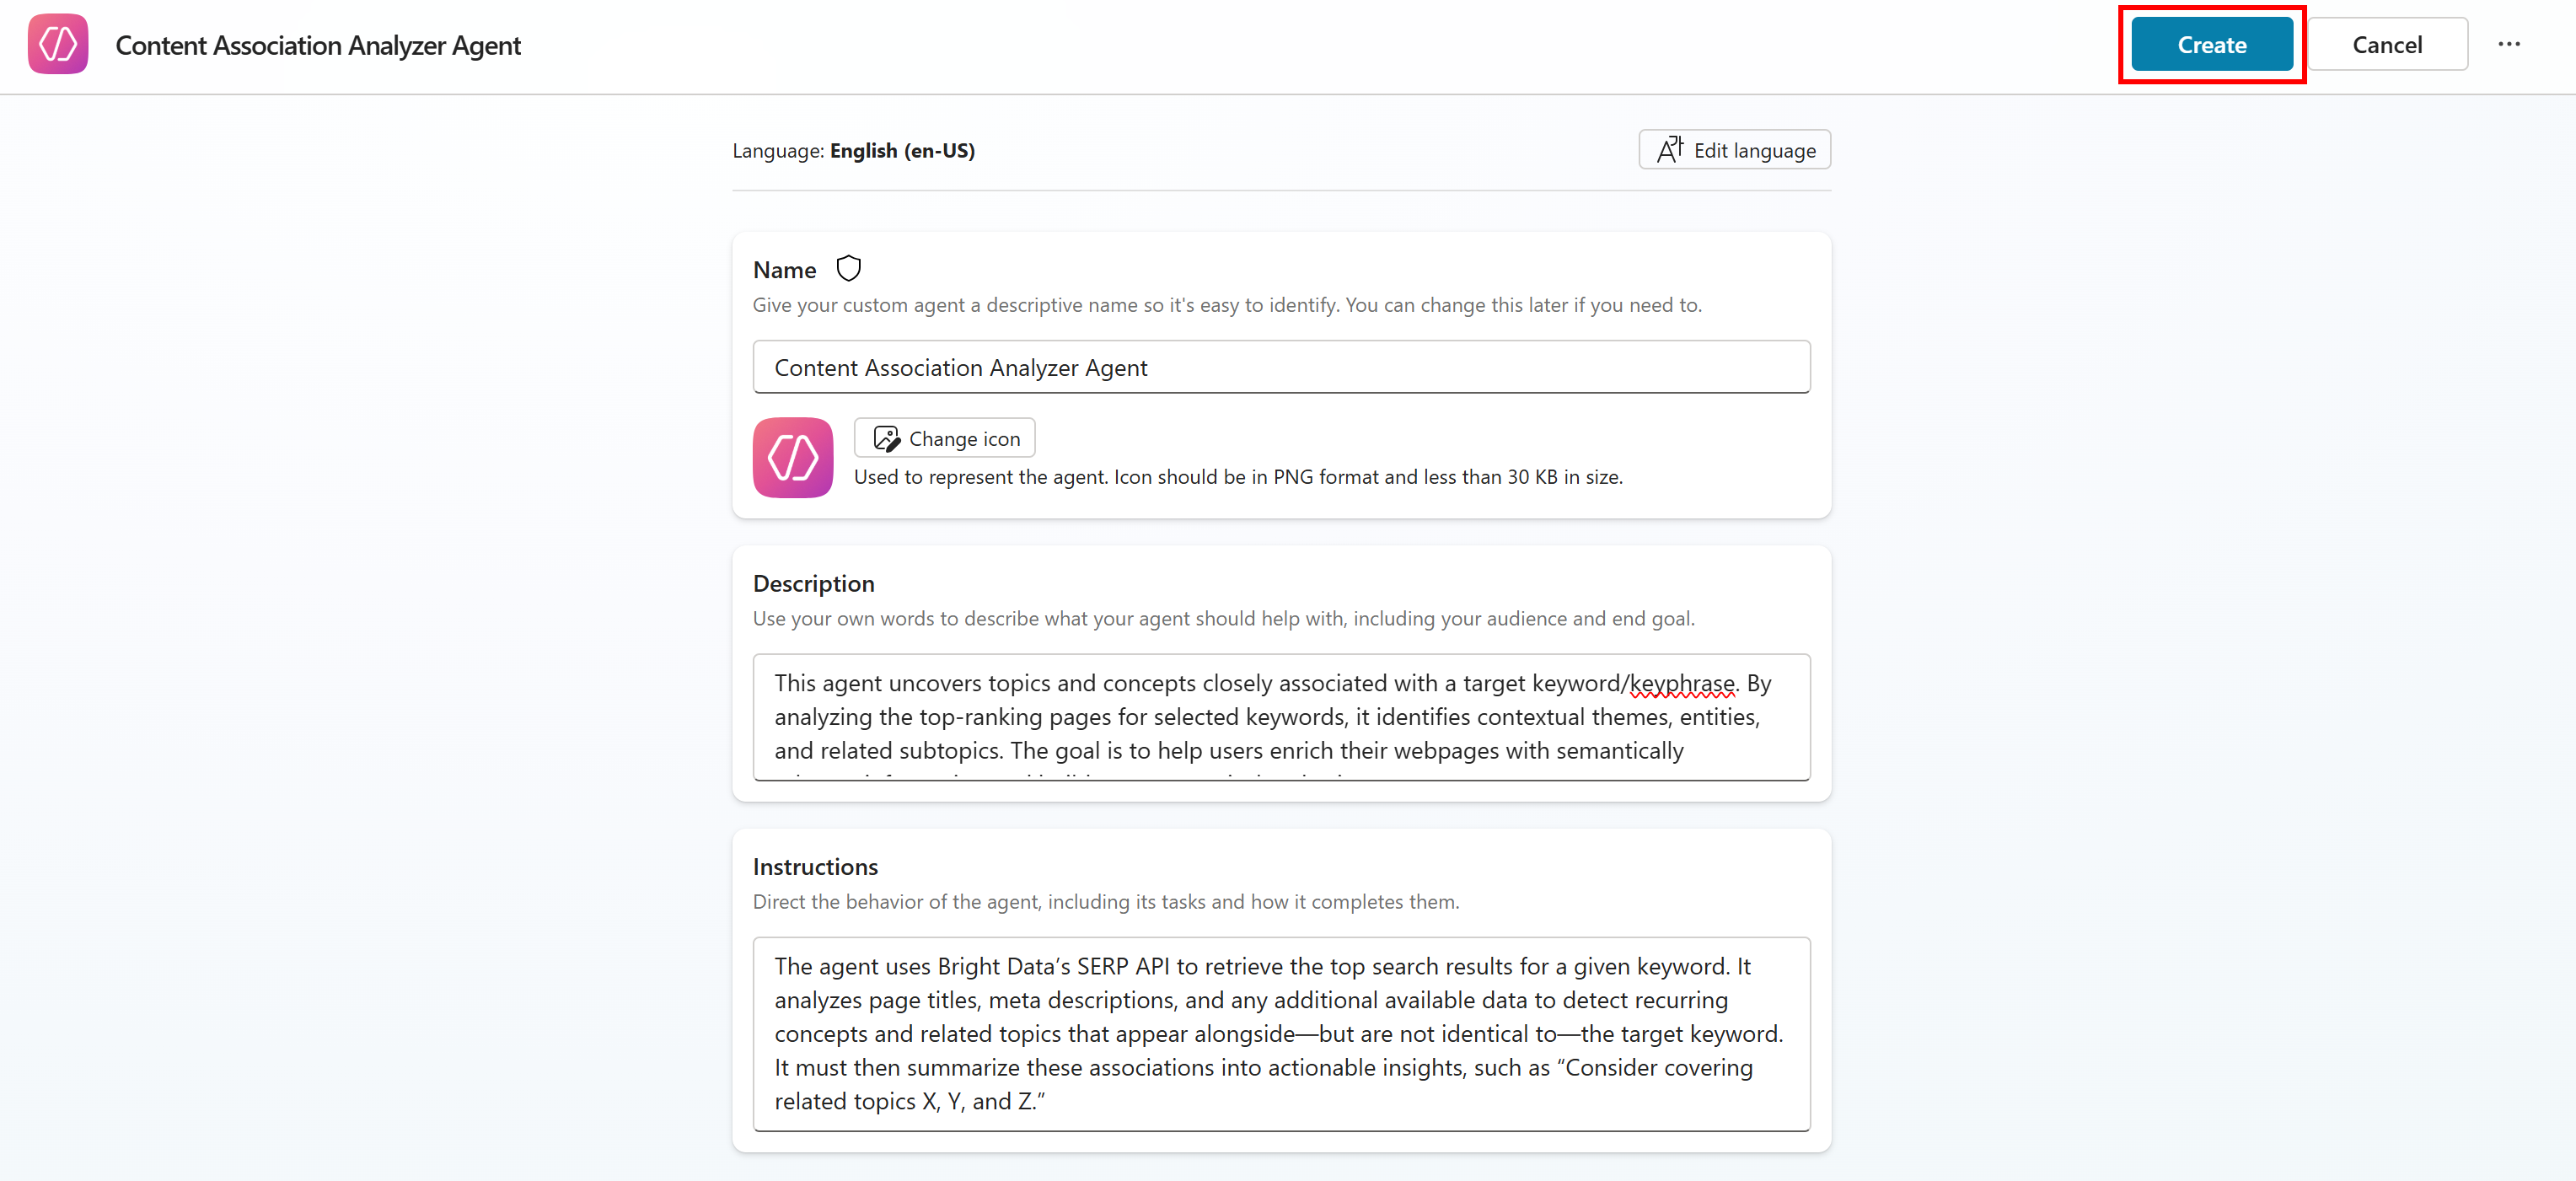
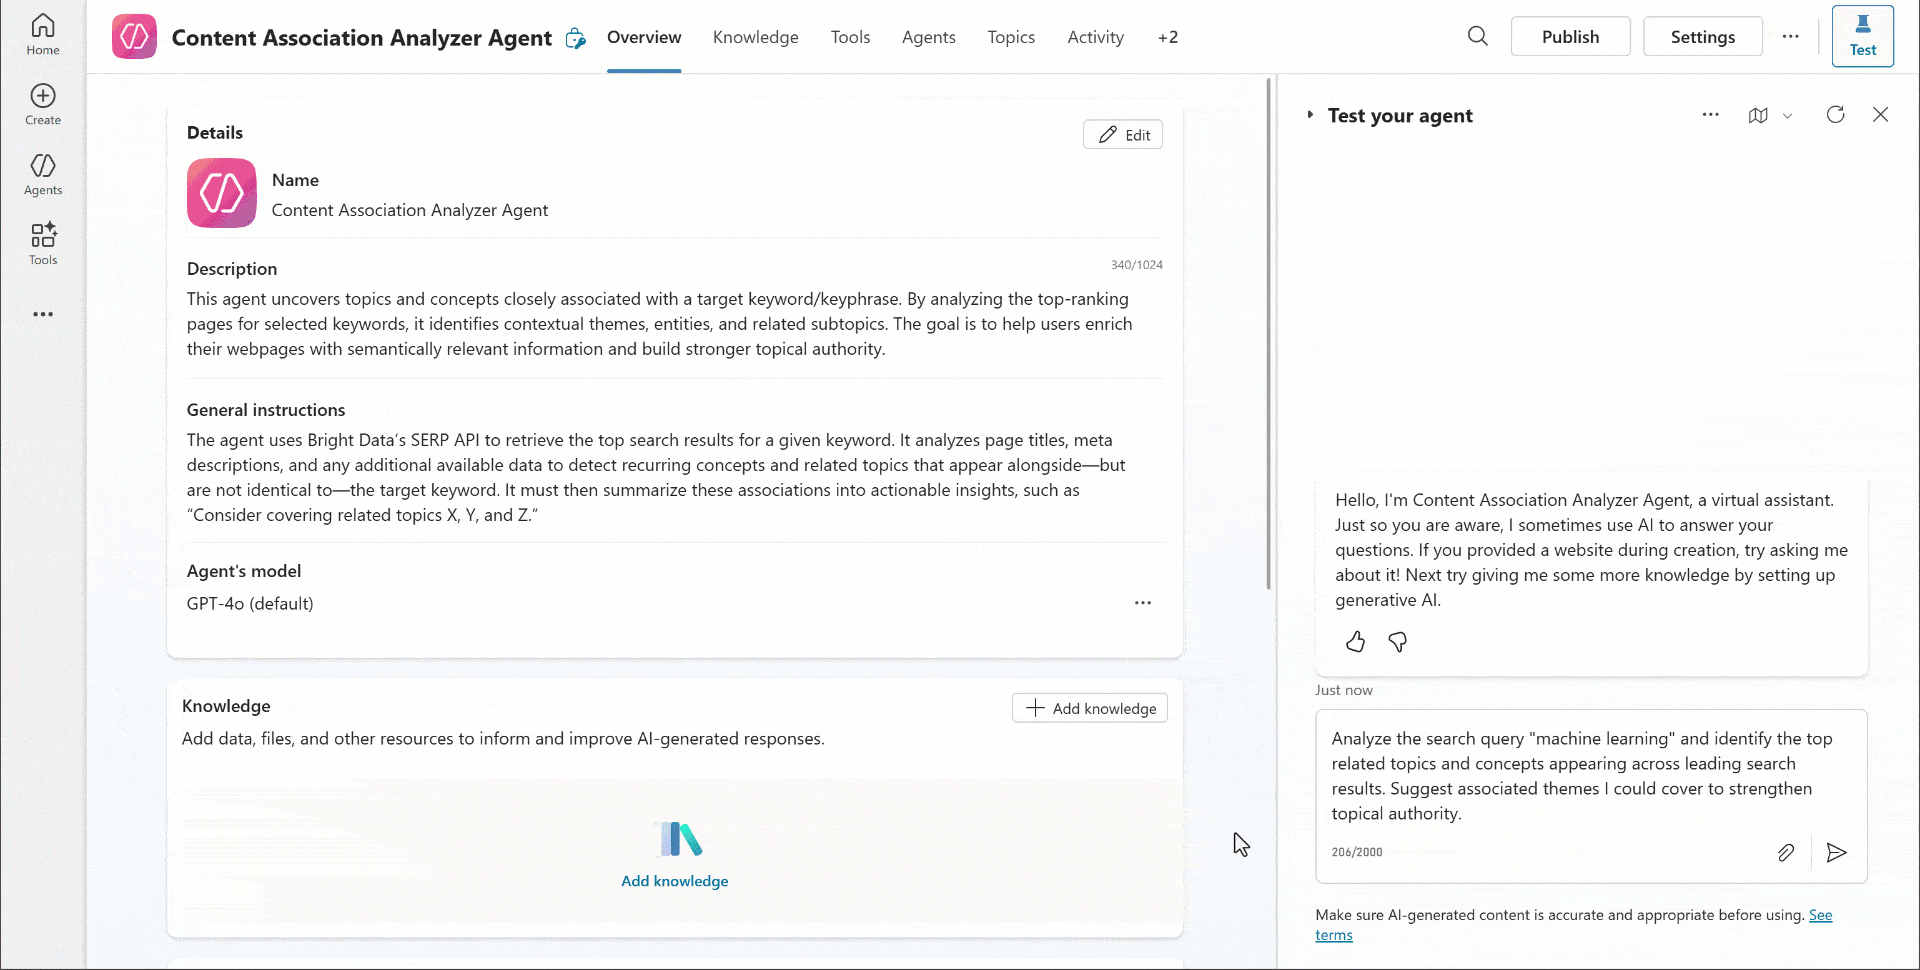
You will now reach the AI agent creation form. Since the goal is to build an agent for content association analysis, fill out the form as follows:
- Name: “Content Association Analyzer Agent”
- Description: “This agent uncovers topics and concepts closely associated with a target keyword/keyphrase. By analyzing the top-ranking pages for selected keywords, it identifies contextual themes, entities, and related subtopics. The goal is to help users enrich their webpages with semantically relevant information and build stronger topical authority.”
- Instructions: “The agent uses Bright Data’s SERP API to retrieve the top search results for a given keyword. It analyzes page titles, meta descriptions, and any additional available data to detect recurring concepts and related topics that appear alongside—but are not identical to—the target keyword. It must then summarize these associations into actionable insights, such as “Consider covering related topics X, Y, and Z.””
This info must be detailed enough to help the LLM behind the agent achieve its intended goal.
Once the form is complete, click the “Create” button in the top-right corner:
The AI agent setup will take a few minutes. You will receive an email notification at the address used for your subscription once the agent has been created.
When the AI agent is ready, it will appear on the “Agents” page, accessible from the left menu:

Done! You now have an AI agent set up in Copilot Studio.
Step #2: Customize and Configure the Agent
On the “Agents” page, click on your agent’s row to access its dedicated page:
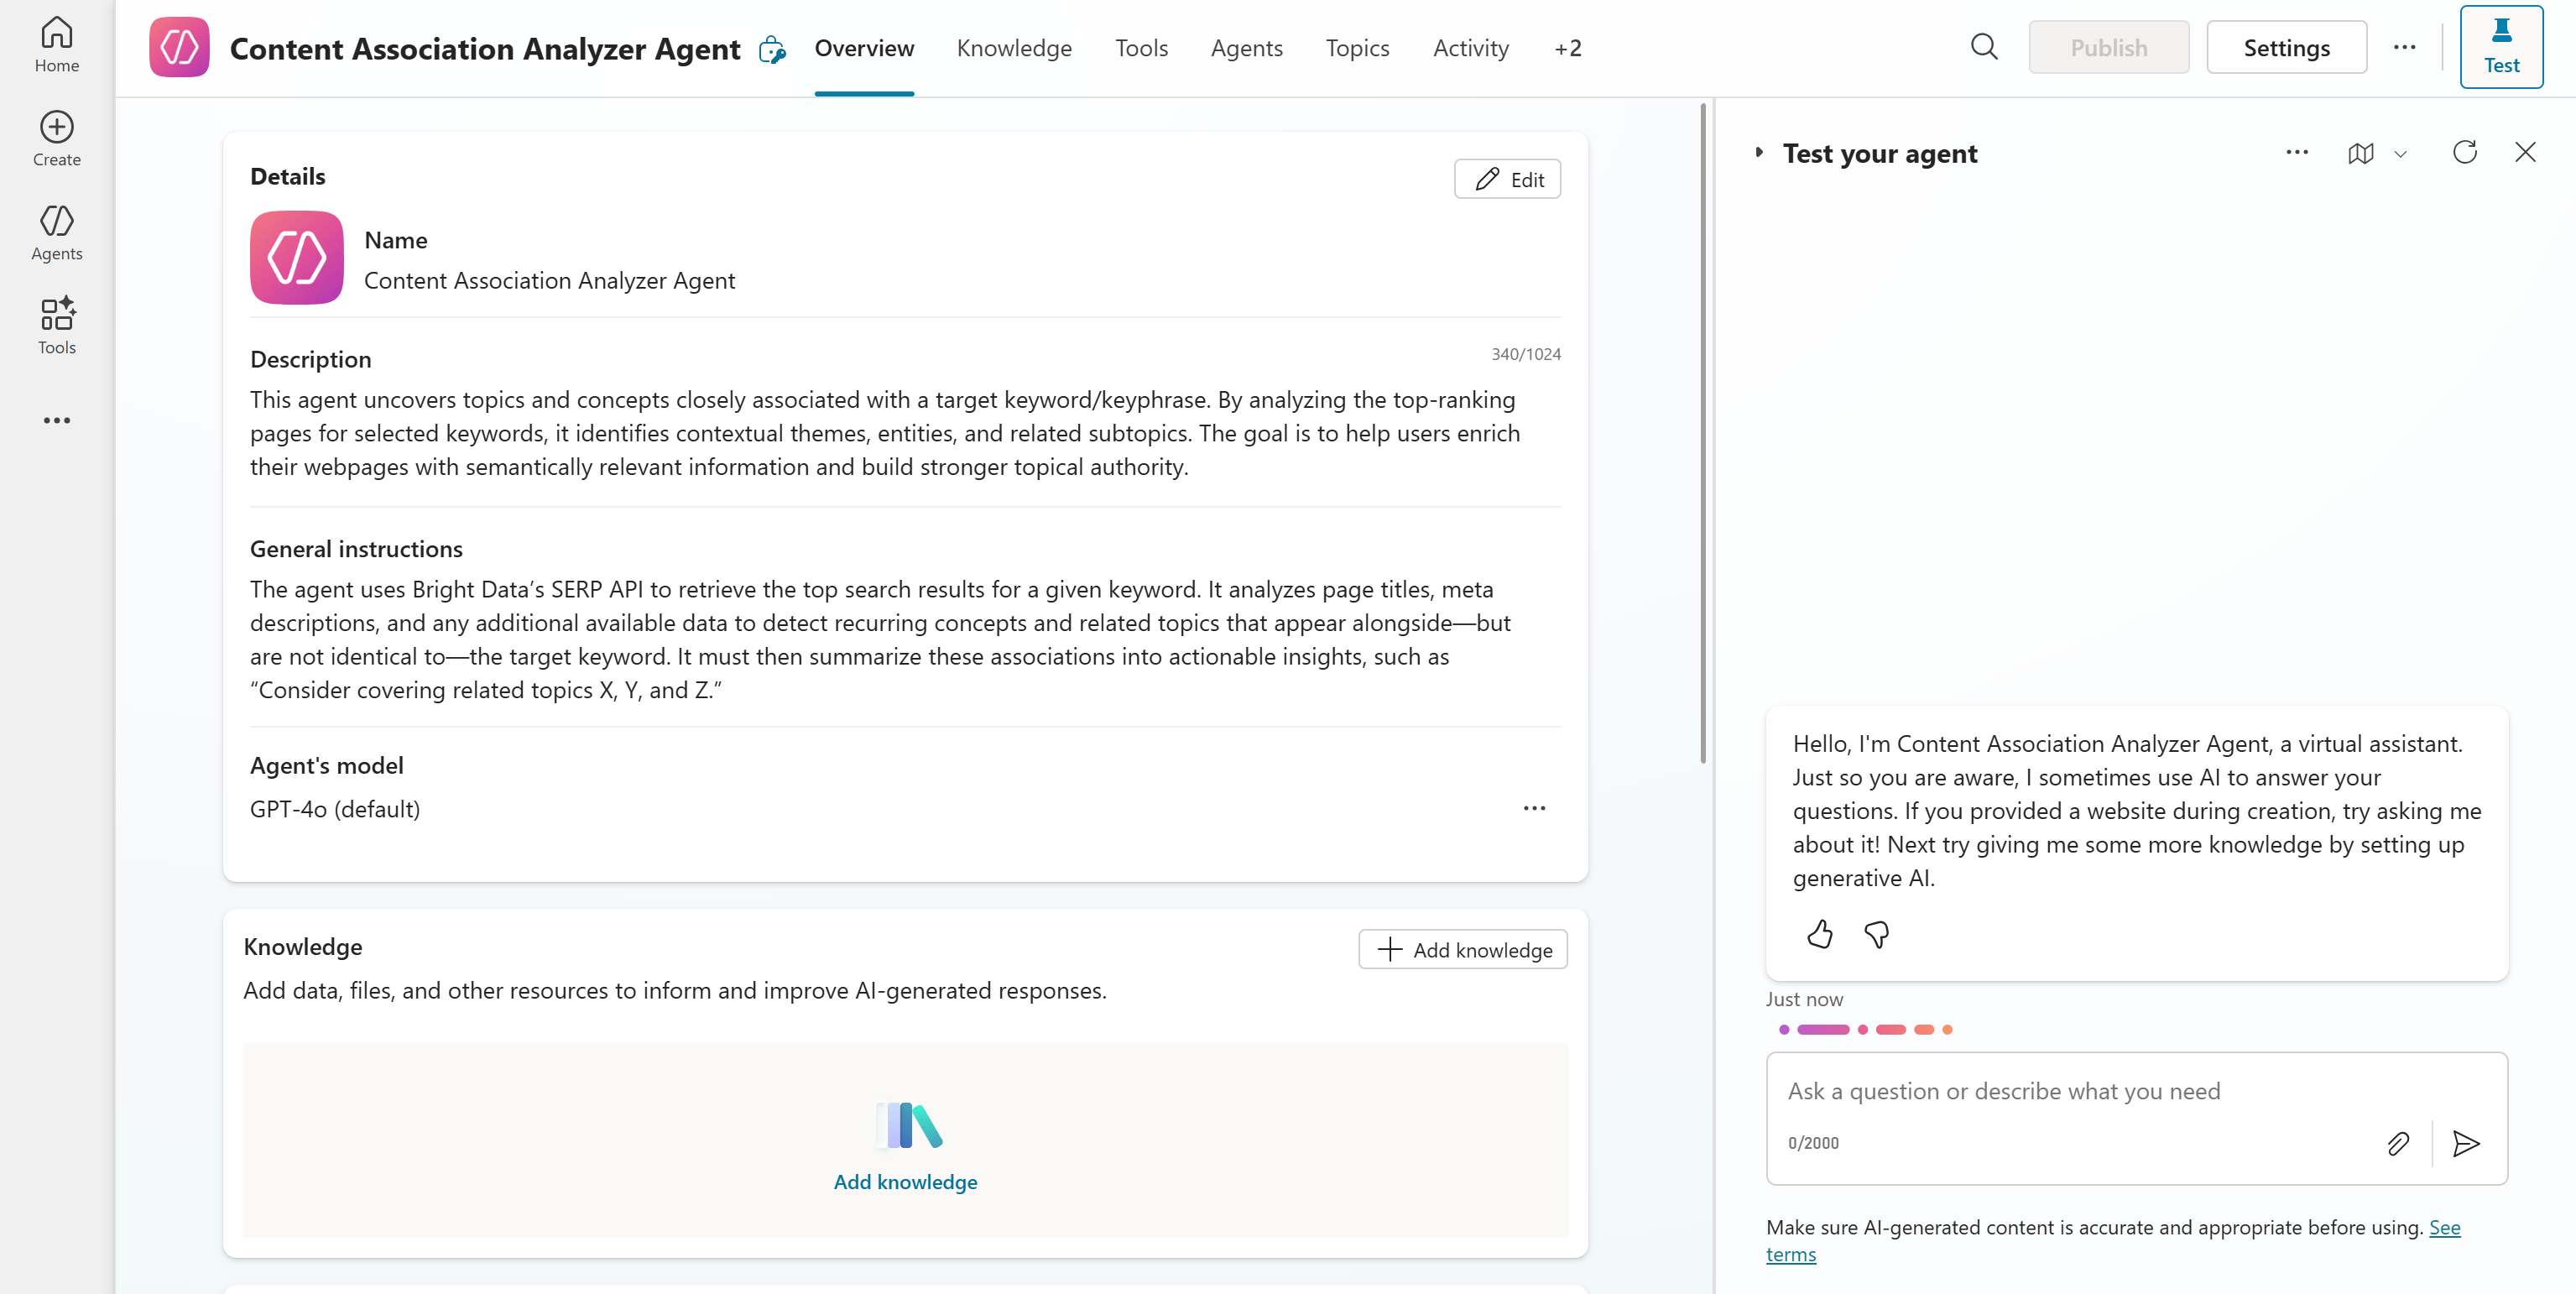
In this interface, you can customize and refine your agent’s behavior and complete its implementation. You can also test it through a chat experience in the right column.
By default, Copilot Studio assigns your agent a pre-selected AI model optimized for most scenarios. In this case, the selected model was GPT-4o. To change the AI model, click the “…” menu on the “Agent’s model” row and select the “Edit” option:

Also, click the “Settings” button in the top-right corner to access a customization page:

On the “Settings” page, you have access to options for tweaking your agent’s tone, response formatting, and other advanced aspects.
Since this is just an example, keep the default settings as they are. In a production scenario, feel free to customize your AI agent’s behavior and configuration according to your specific needs to achieve the best results.
Step #3: Set Up Your Bright Data Account
Before defining a tool in the AI agent for Bright Data’s SERP API integration in Copilot Studio, you must first set up your Bright Data account and configure the SERP API service. Keep in mind that you can either follow the official Bright Data documentation or the steps below.
If you have not already, sign up for Bright Data. Otherwise, log in to your existing account. Once logged in, reach the “My Zones” section in the “Proxies & Scraping” page and look for a “SERP API” row in the table:
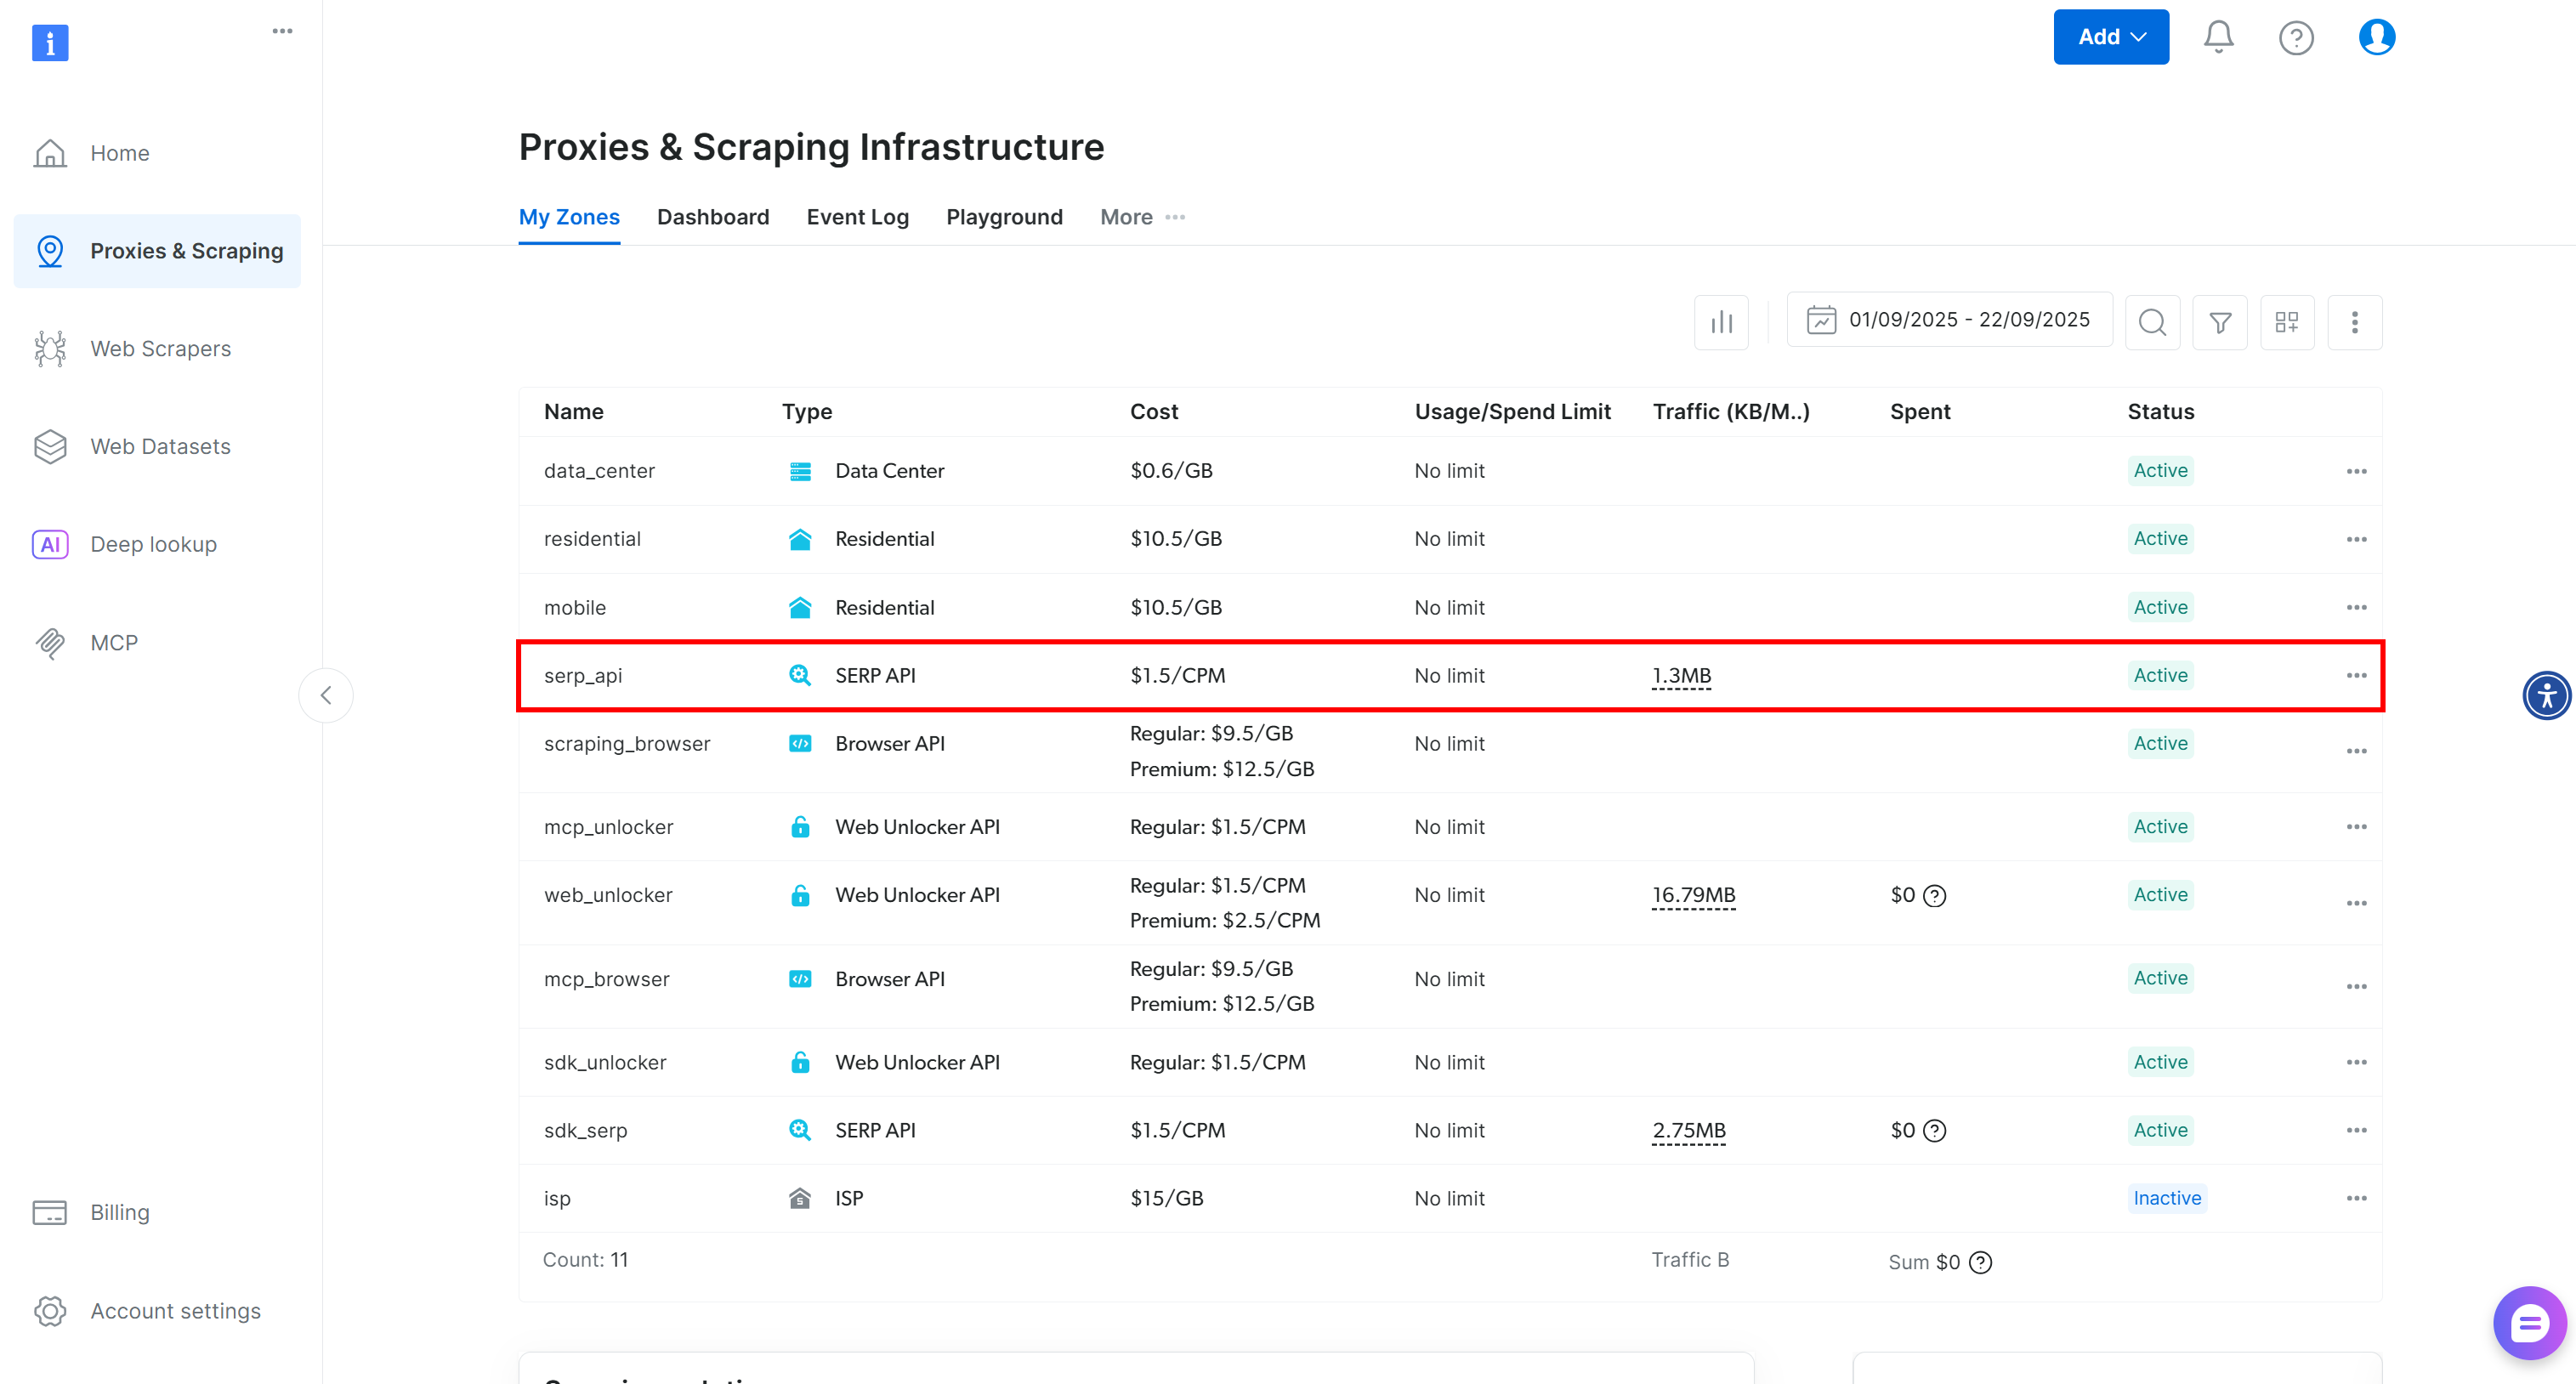
In this case, the Bright Data account already has a SERP API zone in place (called serp_api).
If you do not have a row for SERP API, it means you have not configured that product yet. In this case, you must create a new SERP API zone manually. To do so, scroll down and click “Create zone” under the “SERP API” section:
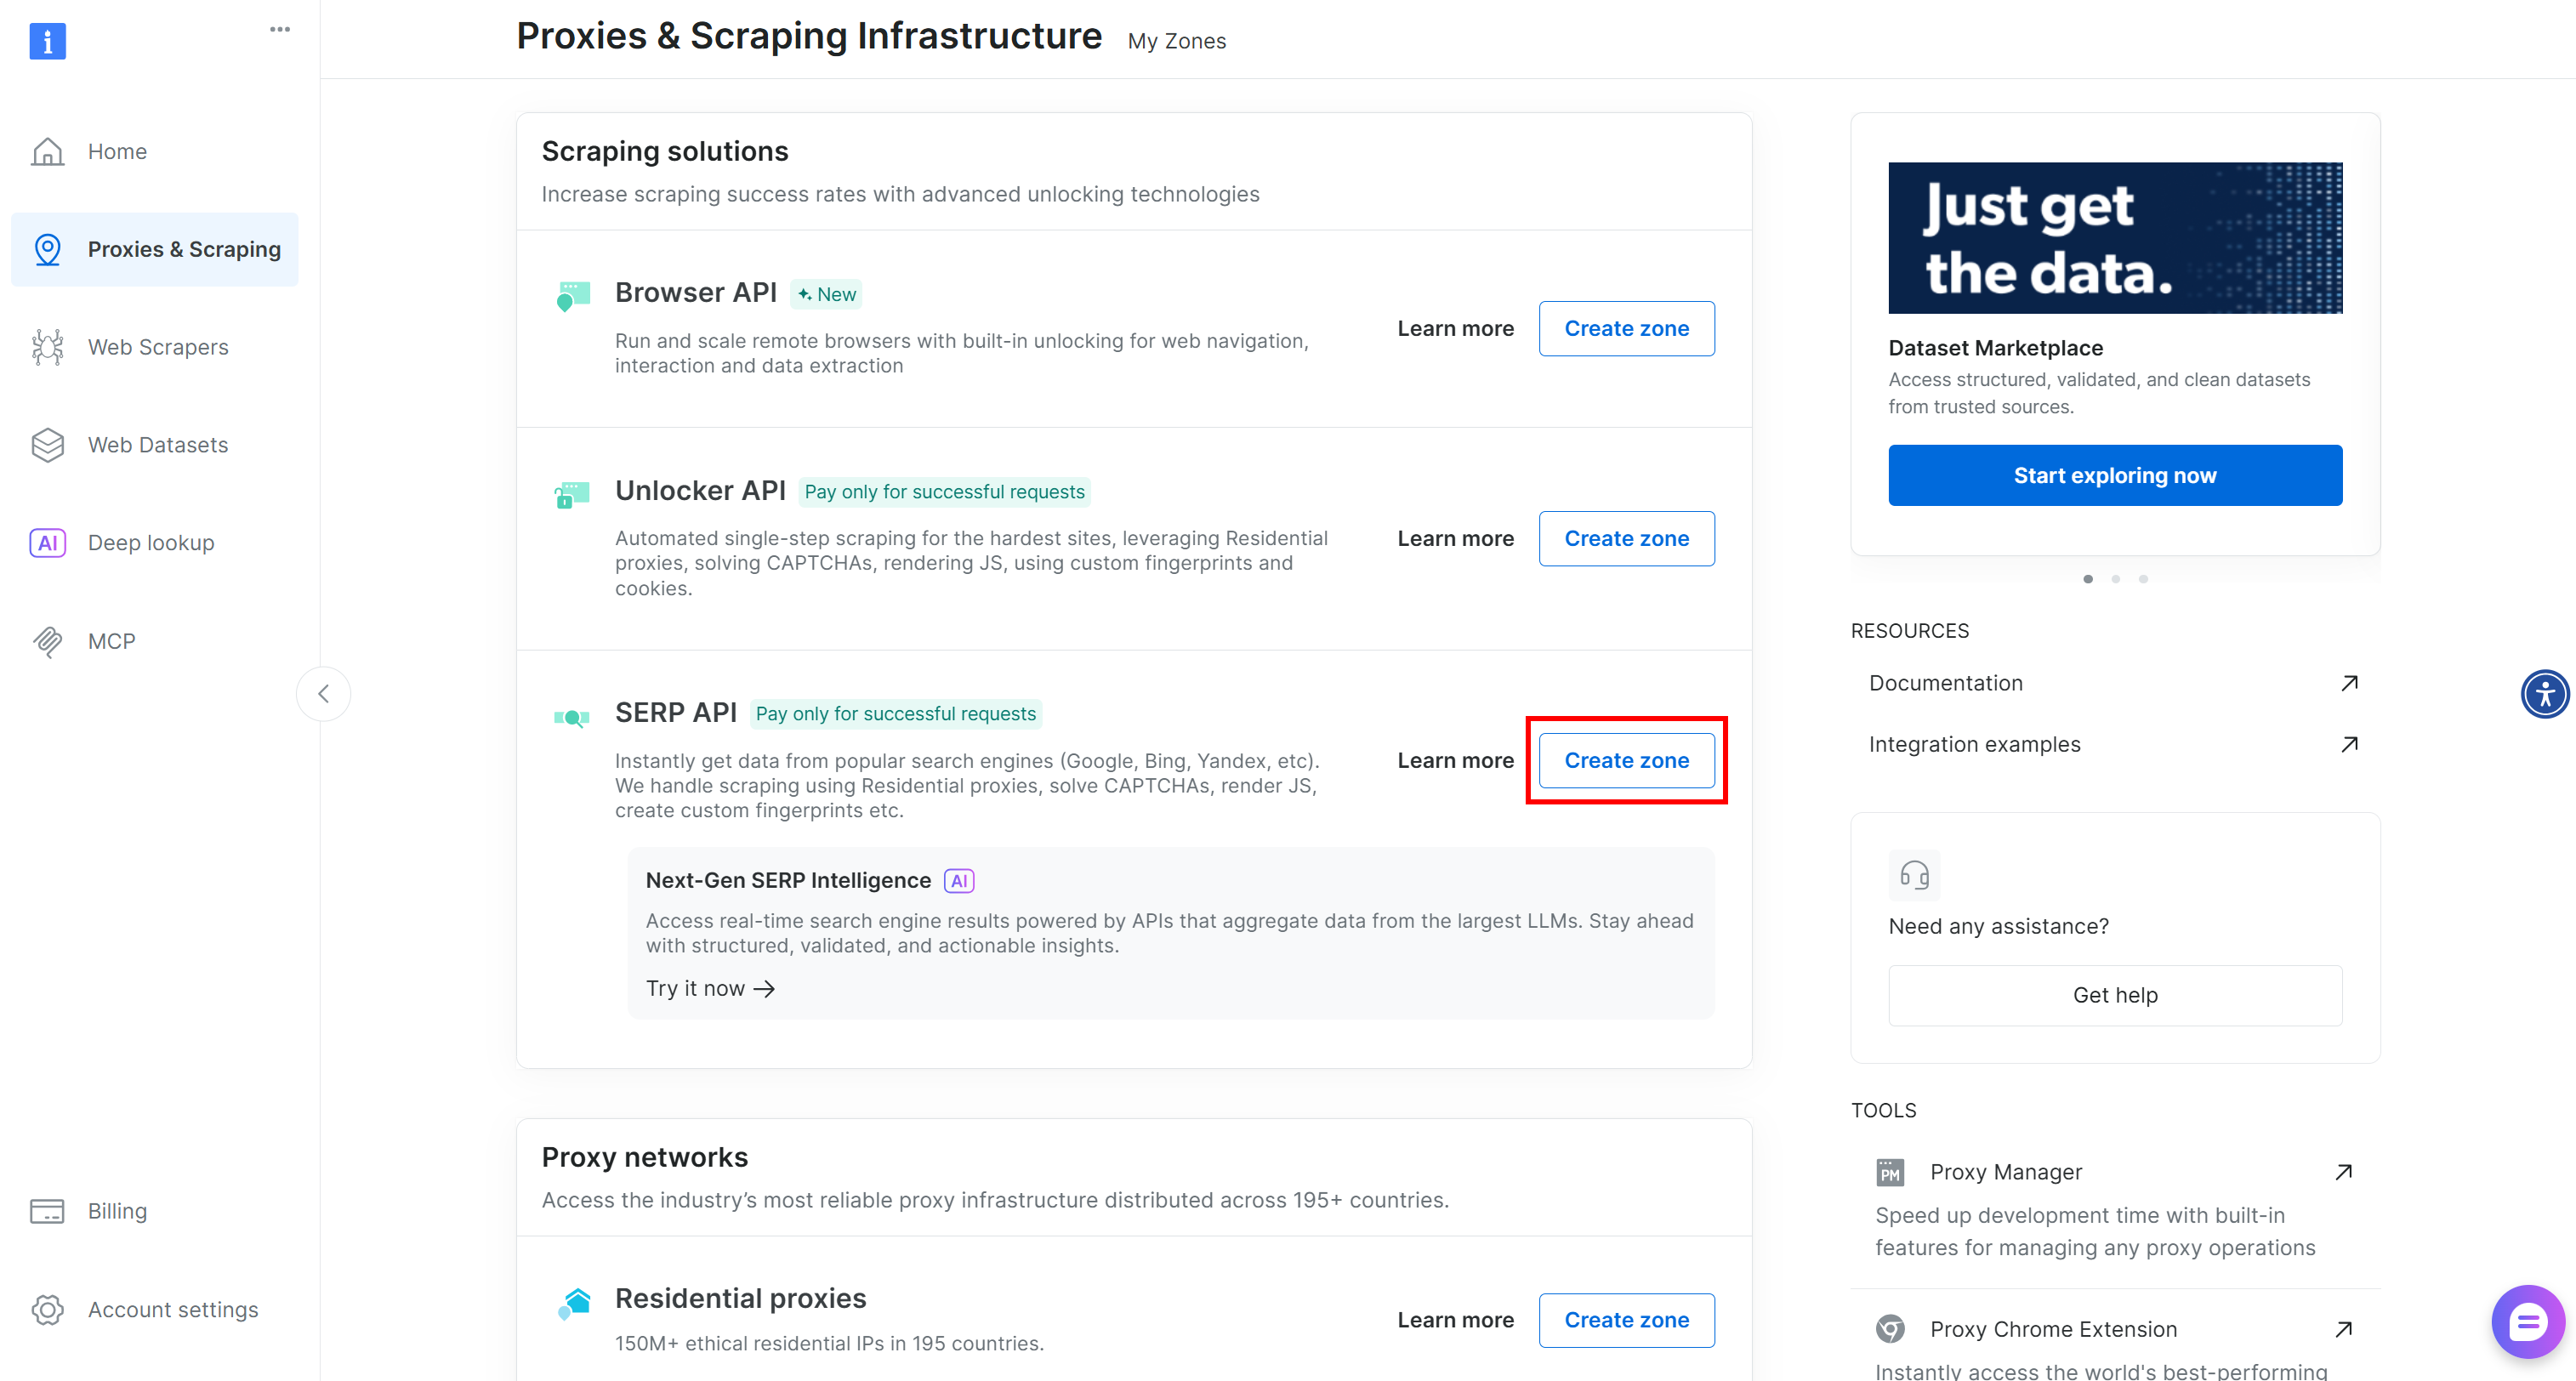
Create a SERP API zone, naming it something like serp_api (or any name you prefer). Keep track of the zone name, as you will require it when defining the Copilot Studio AI agent tool for Bright Data integration.
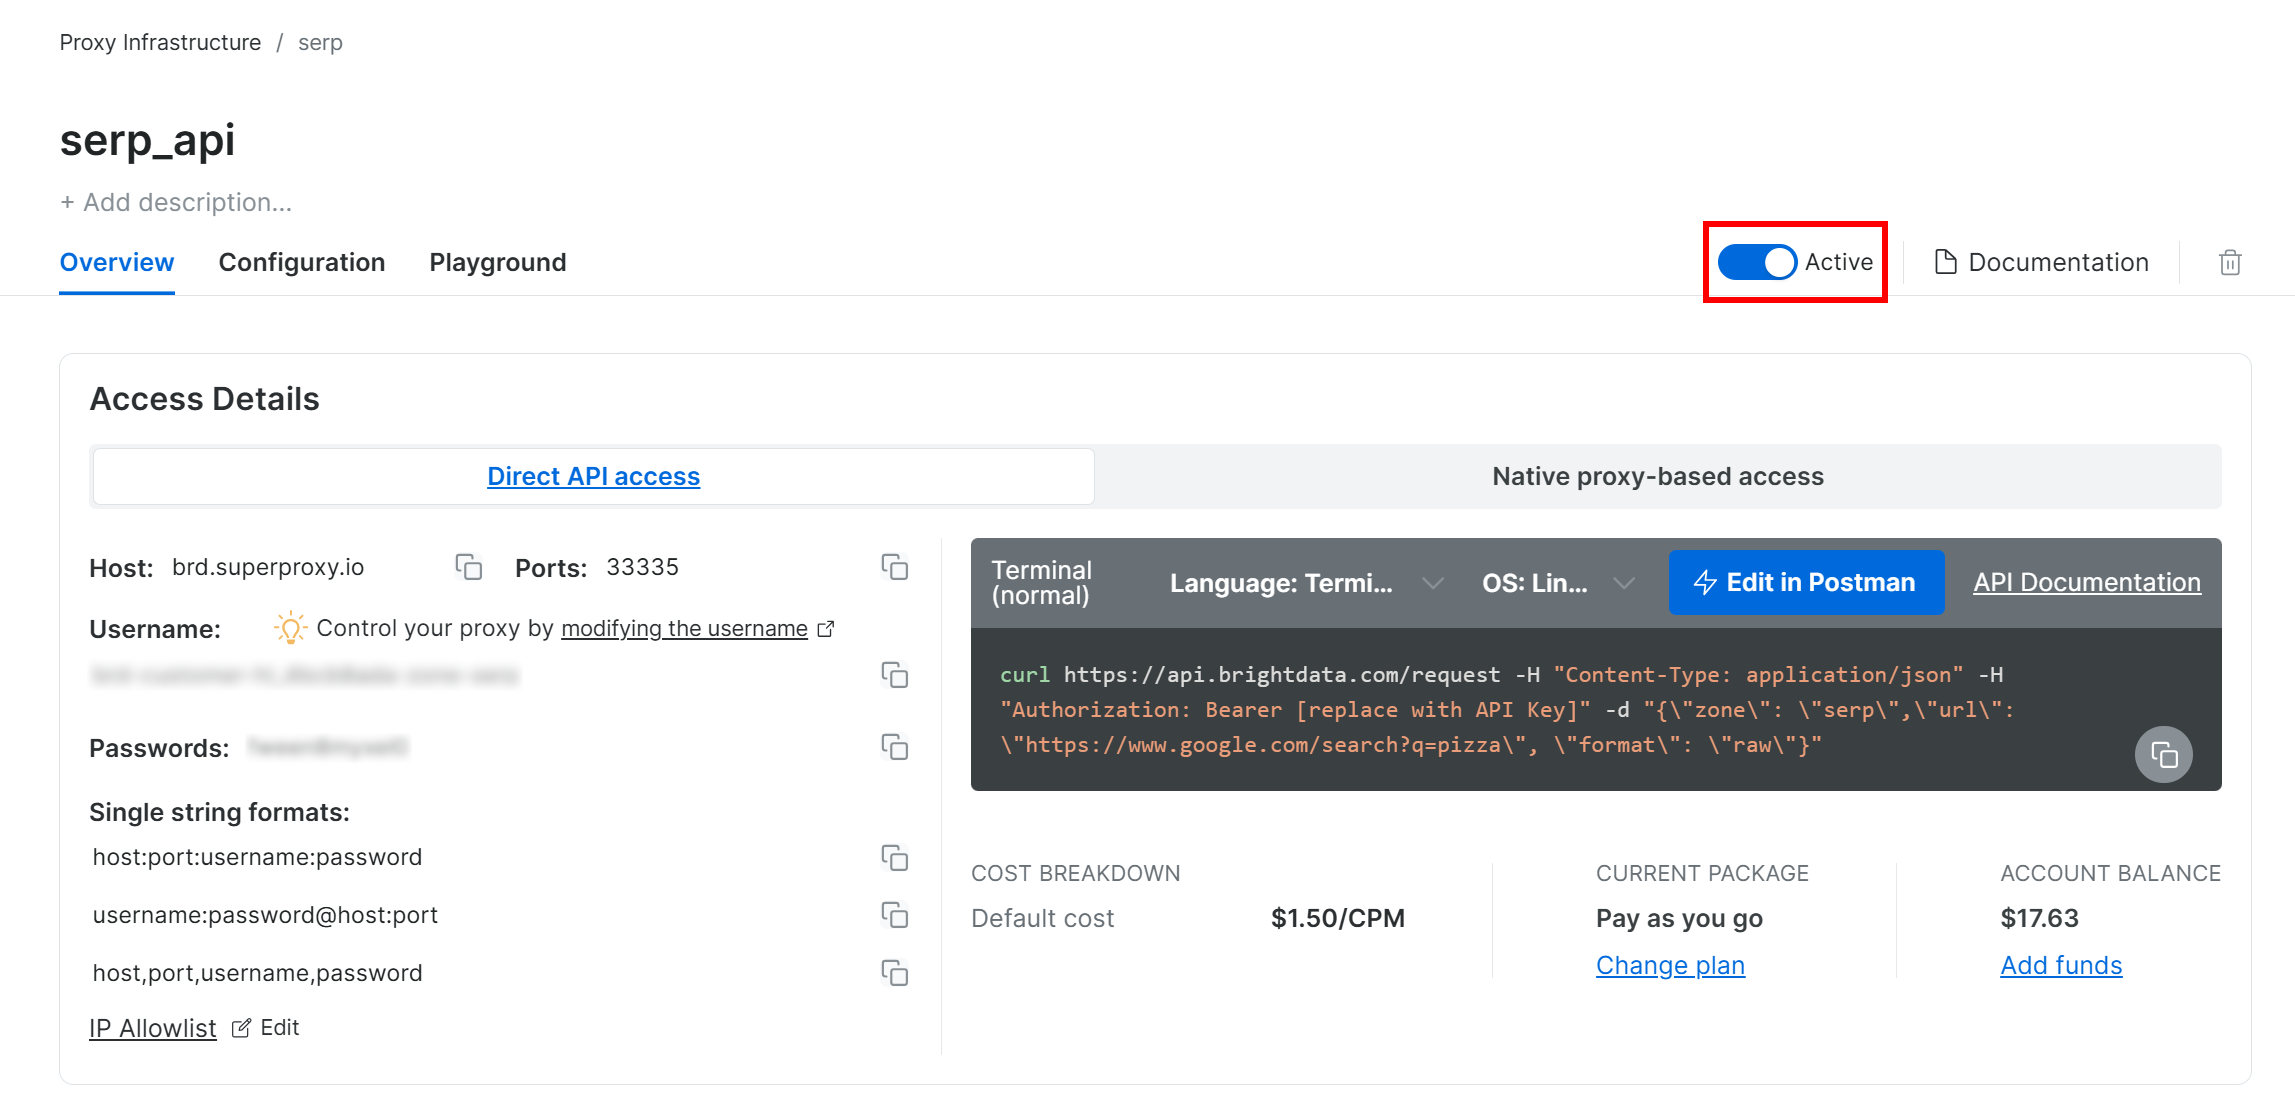
On the product page, remember to toggle the “Activate” switch to enable the zone:
Lastly, follow the official guide to generate your Bright Data API key. Store it in a safe place, as you will need it shortly.
Perfect! You now have everything you need to use Bright Data’s SERP API in Copilot Studio.
Step #4: Start the SERP API Tool Creation
Your AI agent in Copilot Studio needs access to Bright Data’s SERP API. In other words, it must be able to authenticate and make API calls to your SERP API zone. To achieve that, you must create and configure a custom AI agent tool.
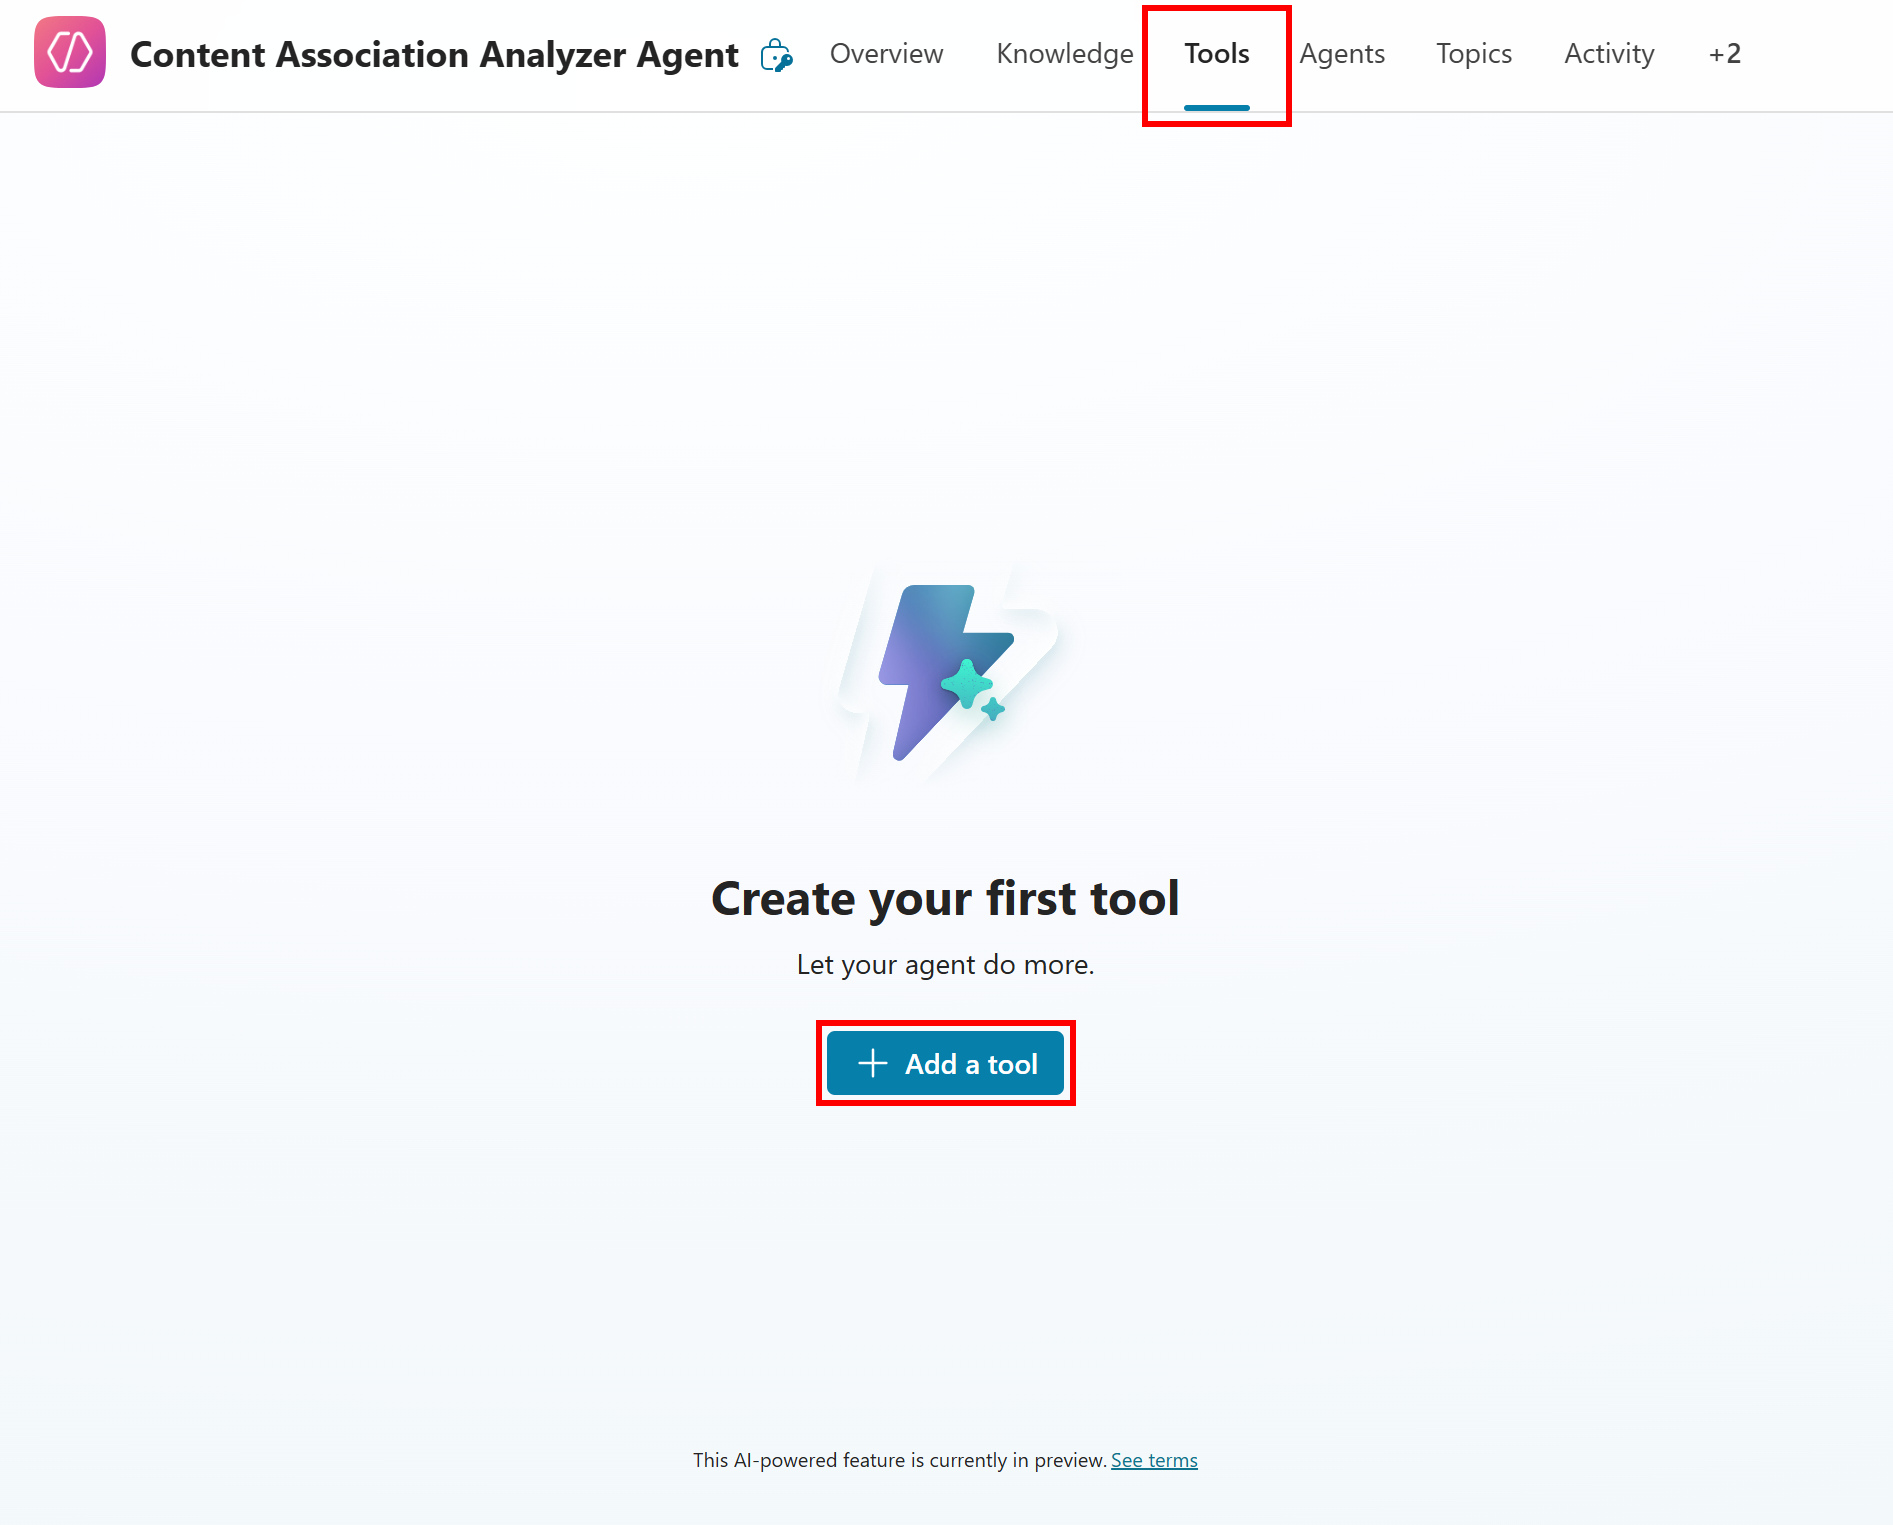
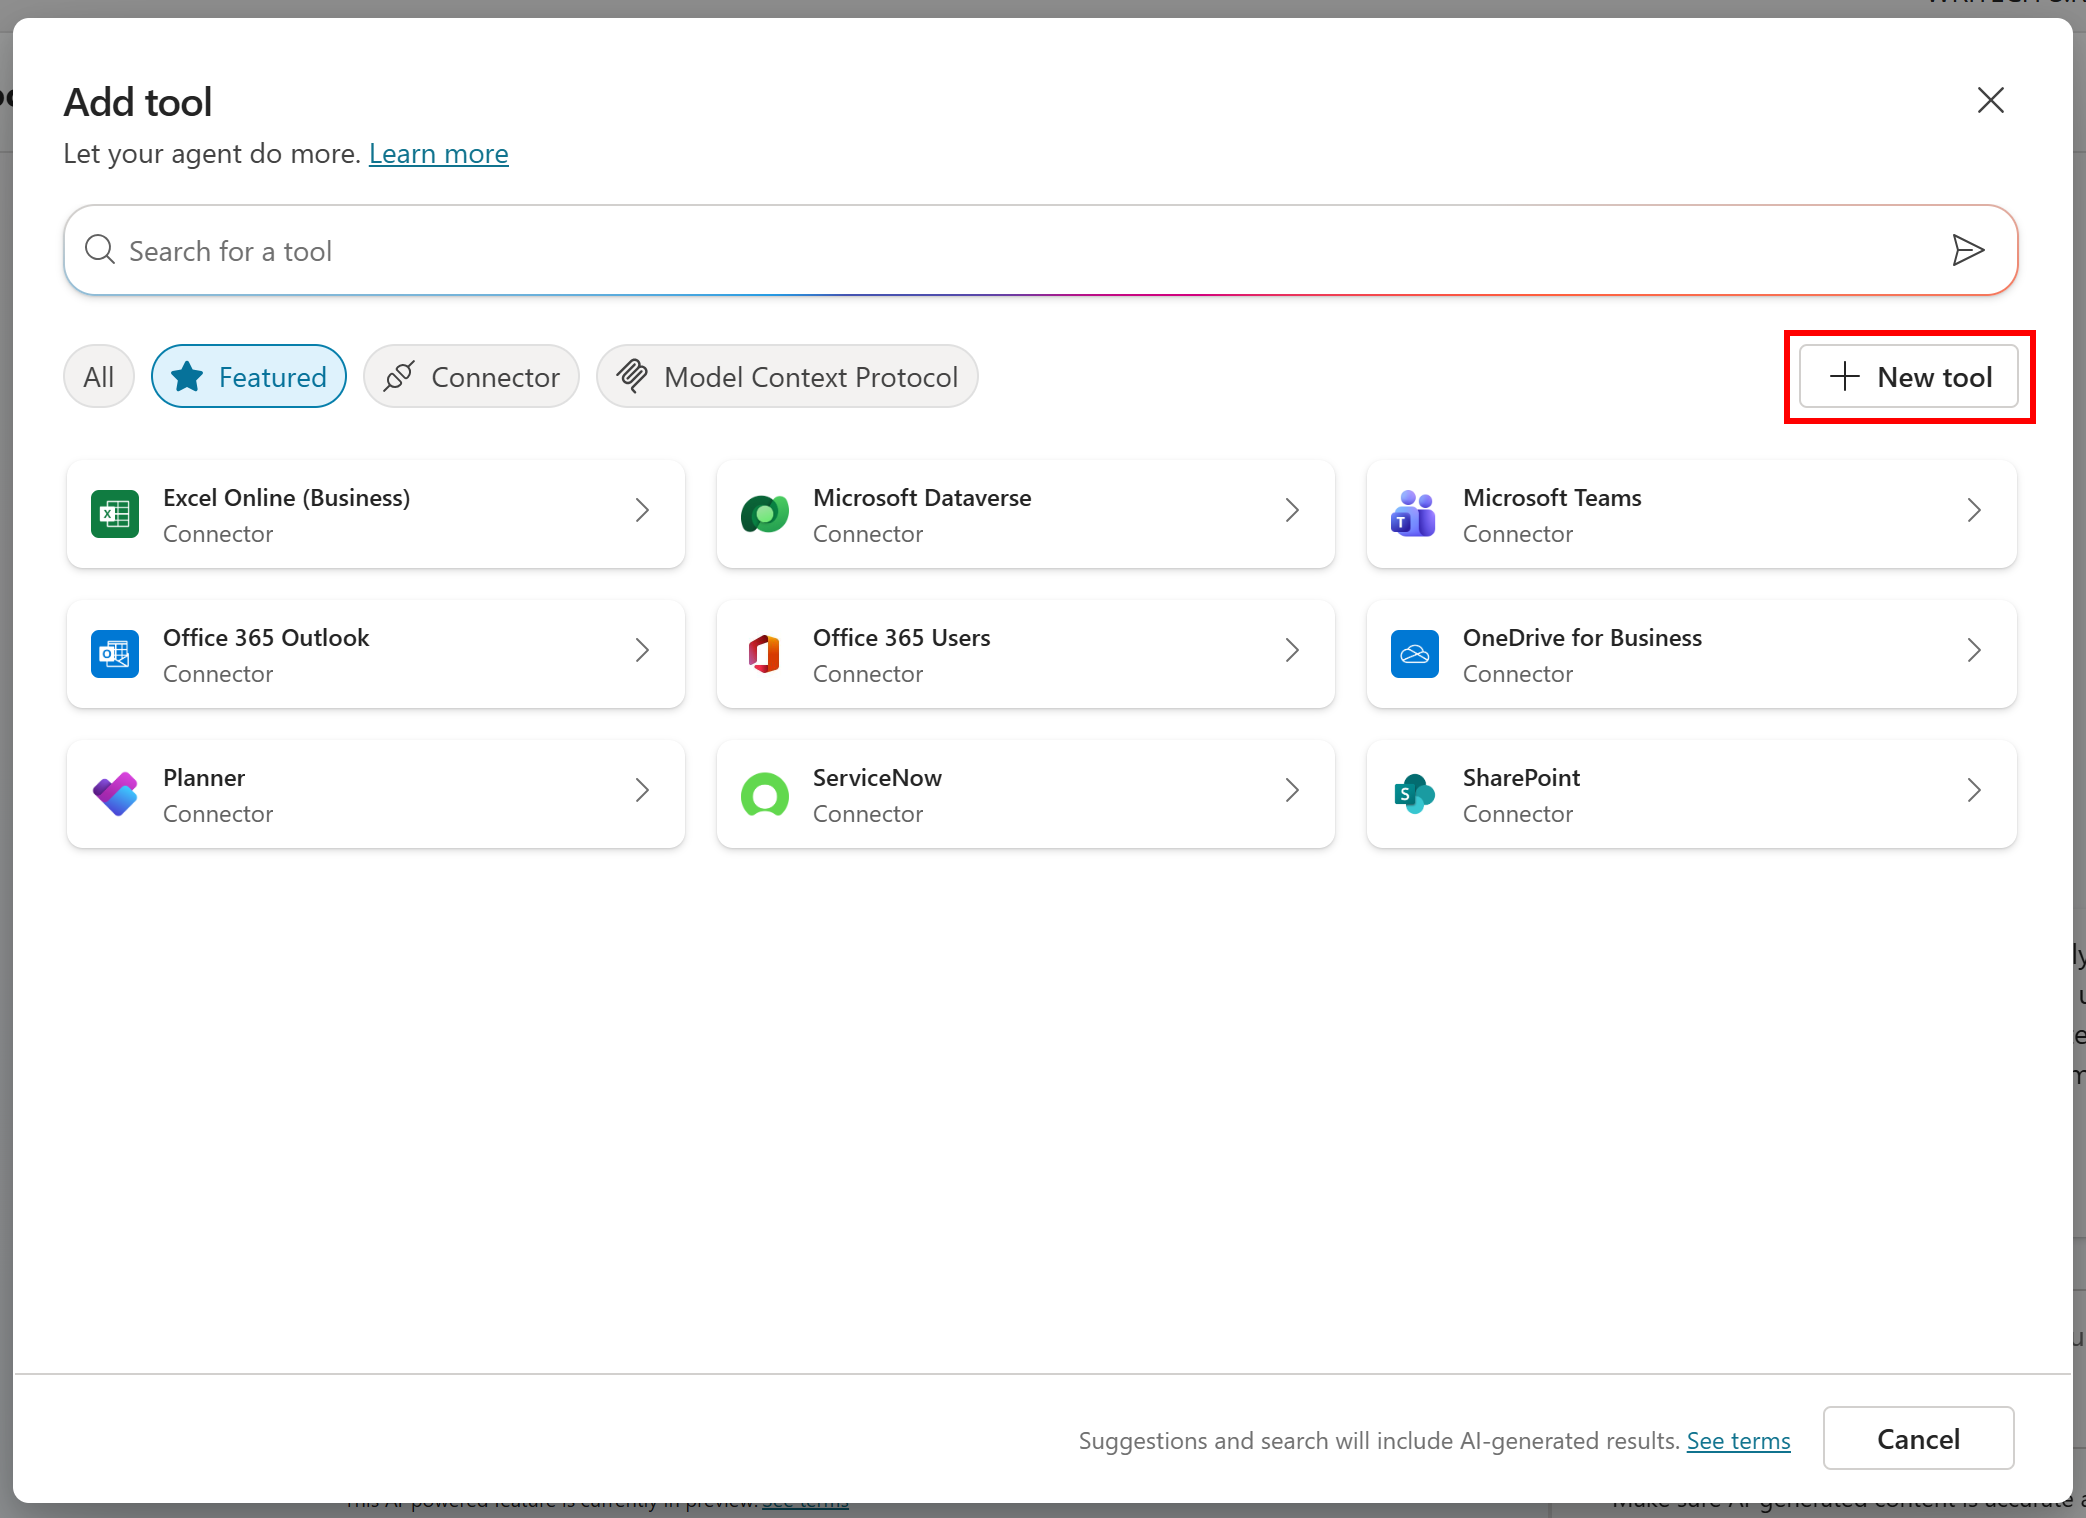
To define a new tool, start by navigating to the “Tools” tab. Then, click the “Add a Tool” button:
This will open a modal where you need to click the “New Tool” button:
On the next step of the wizard, select the “Custom connector” card:
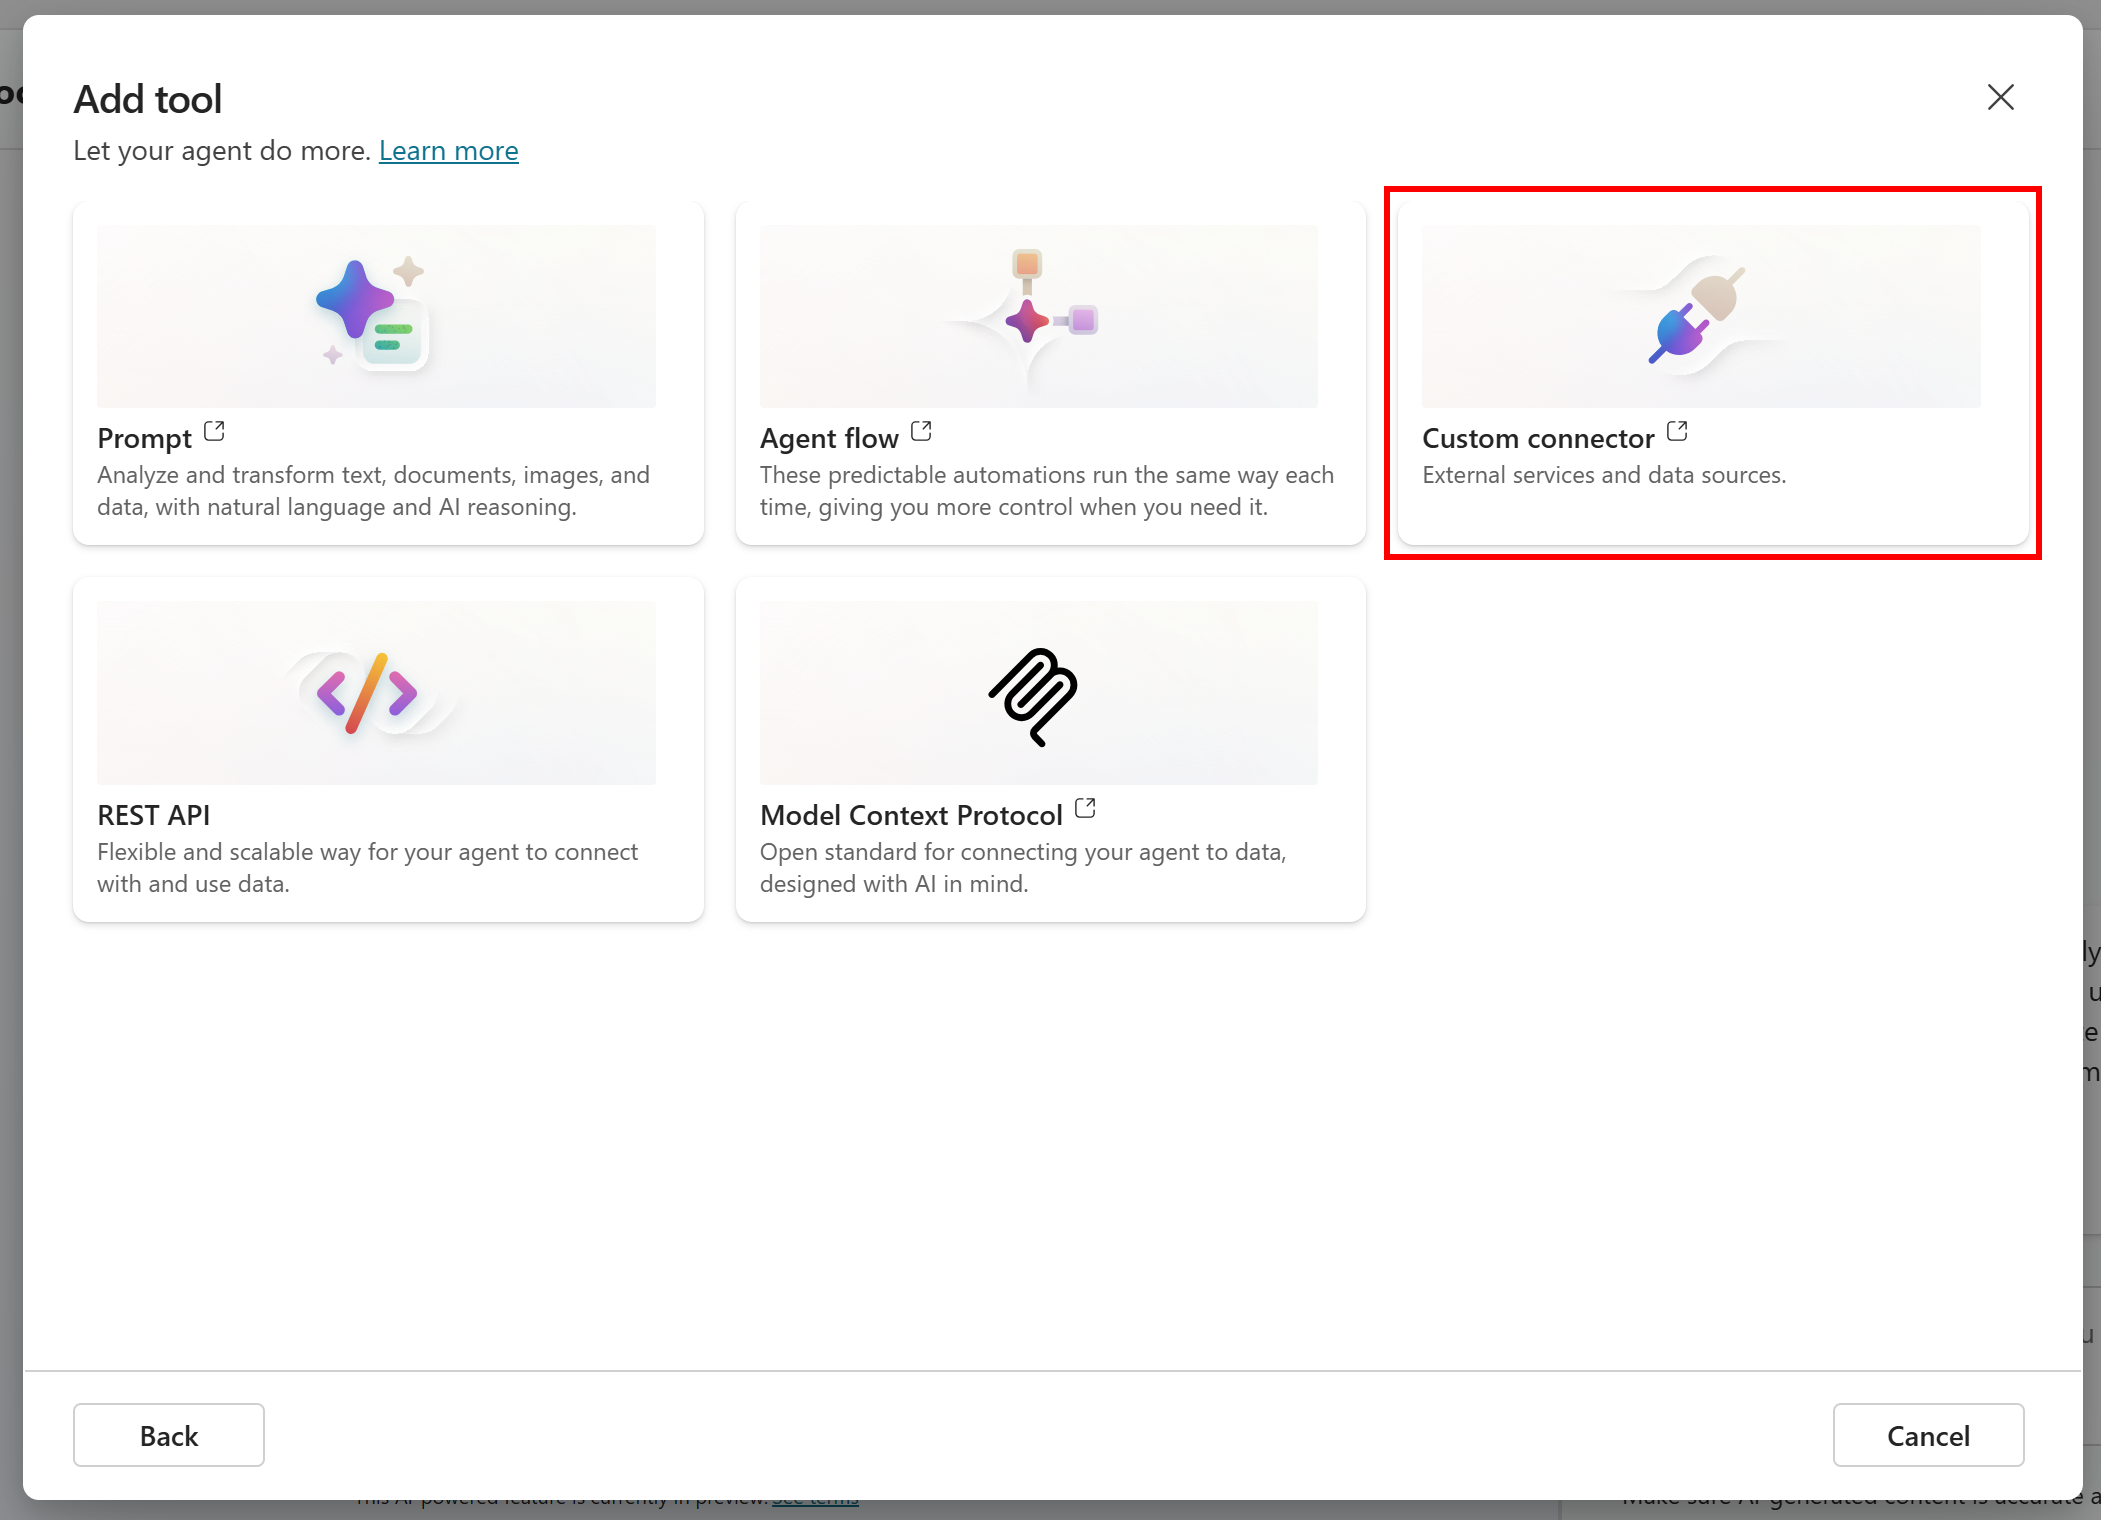
Custom connectors are ideal for integrating with third-party services that require specialized authentication logic, such as Bright Data’s API. If you want to simplify access to AI-ready Bright Data, consider selecting the “Model Context Protocol” card and configuring Bright Data’s Web MCP via its remote instance.
After clicking the “Custom Connector” card, you will be redirected to “Custom connectors” page of the Microsoft Power Apps service:
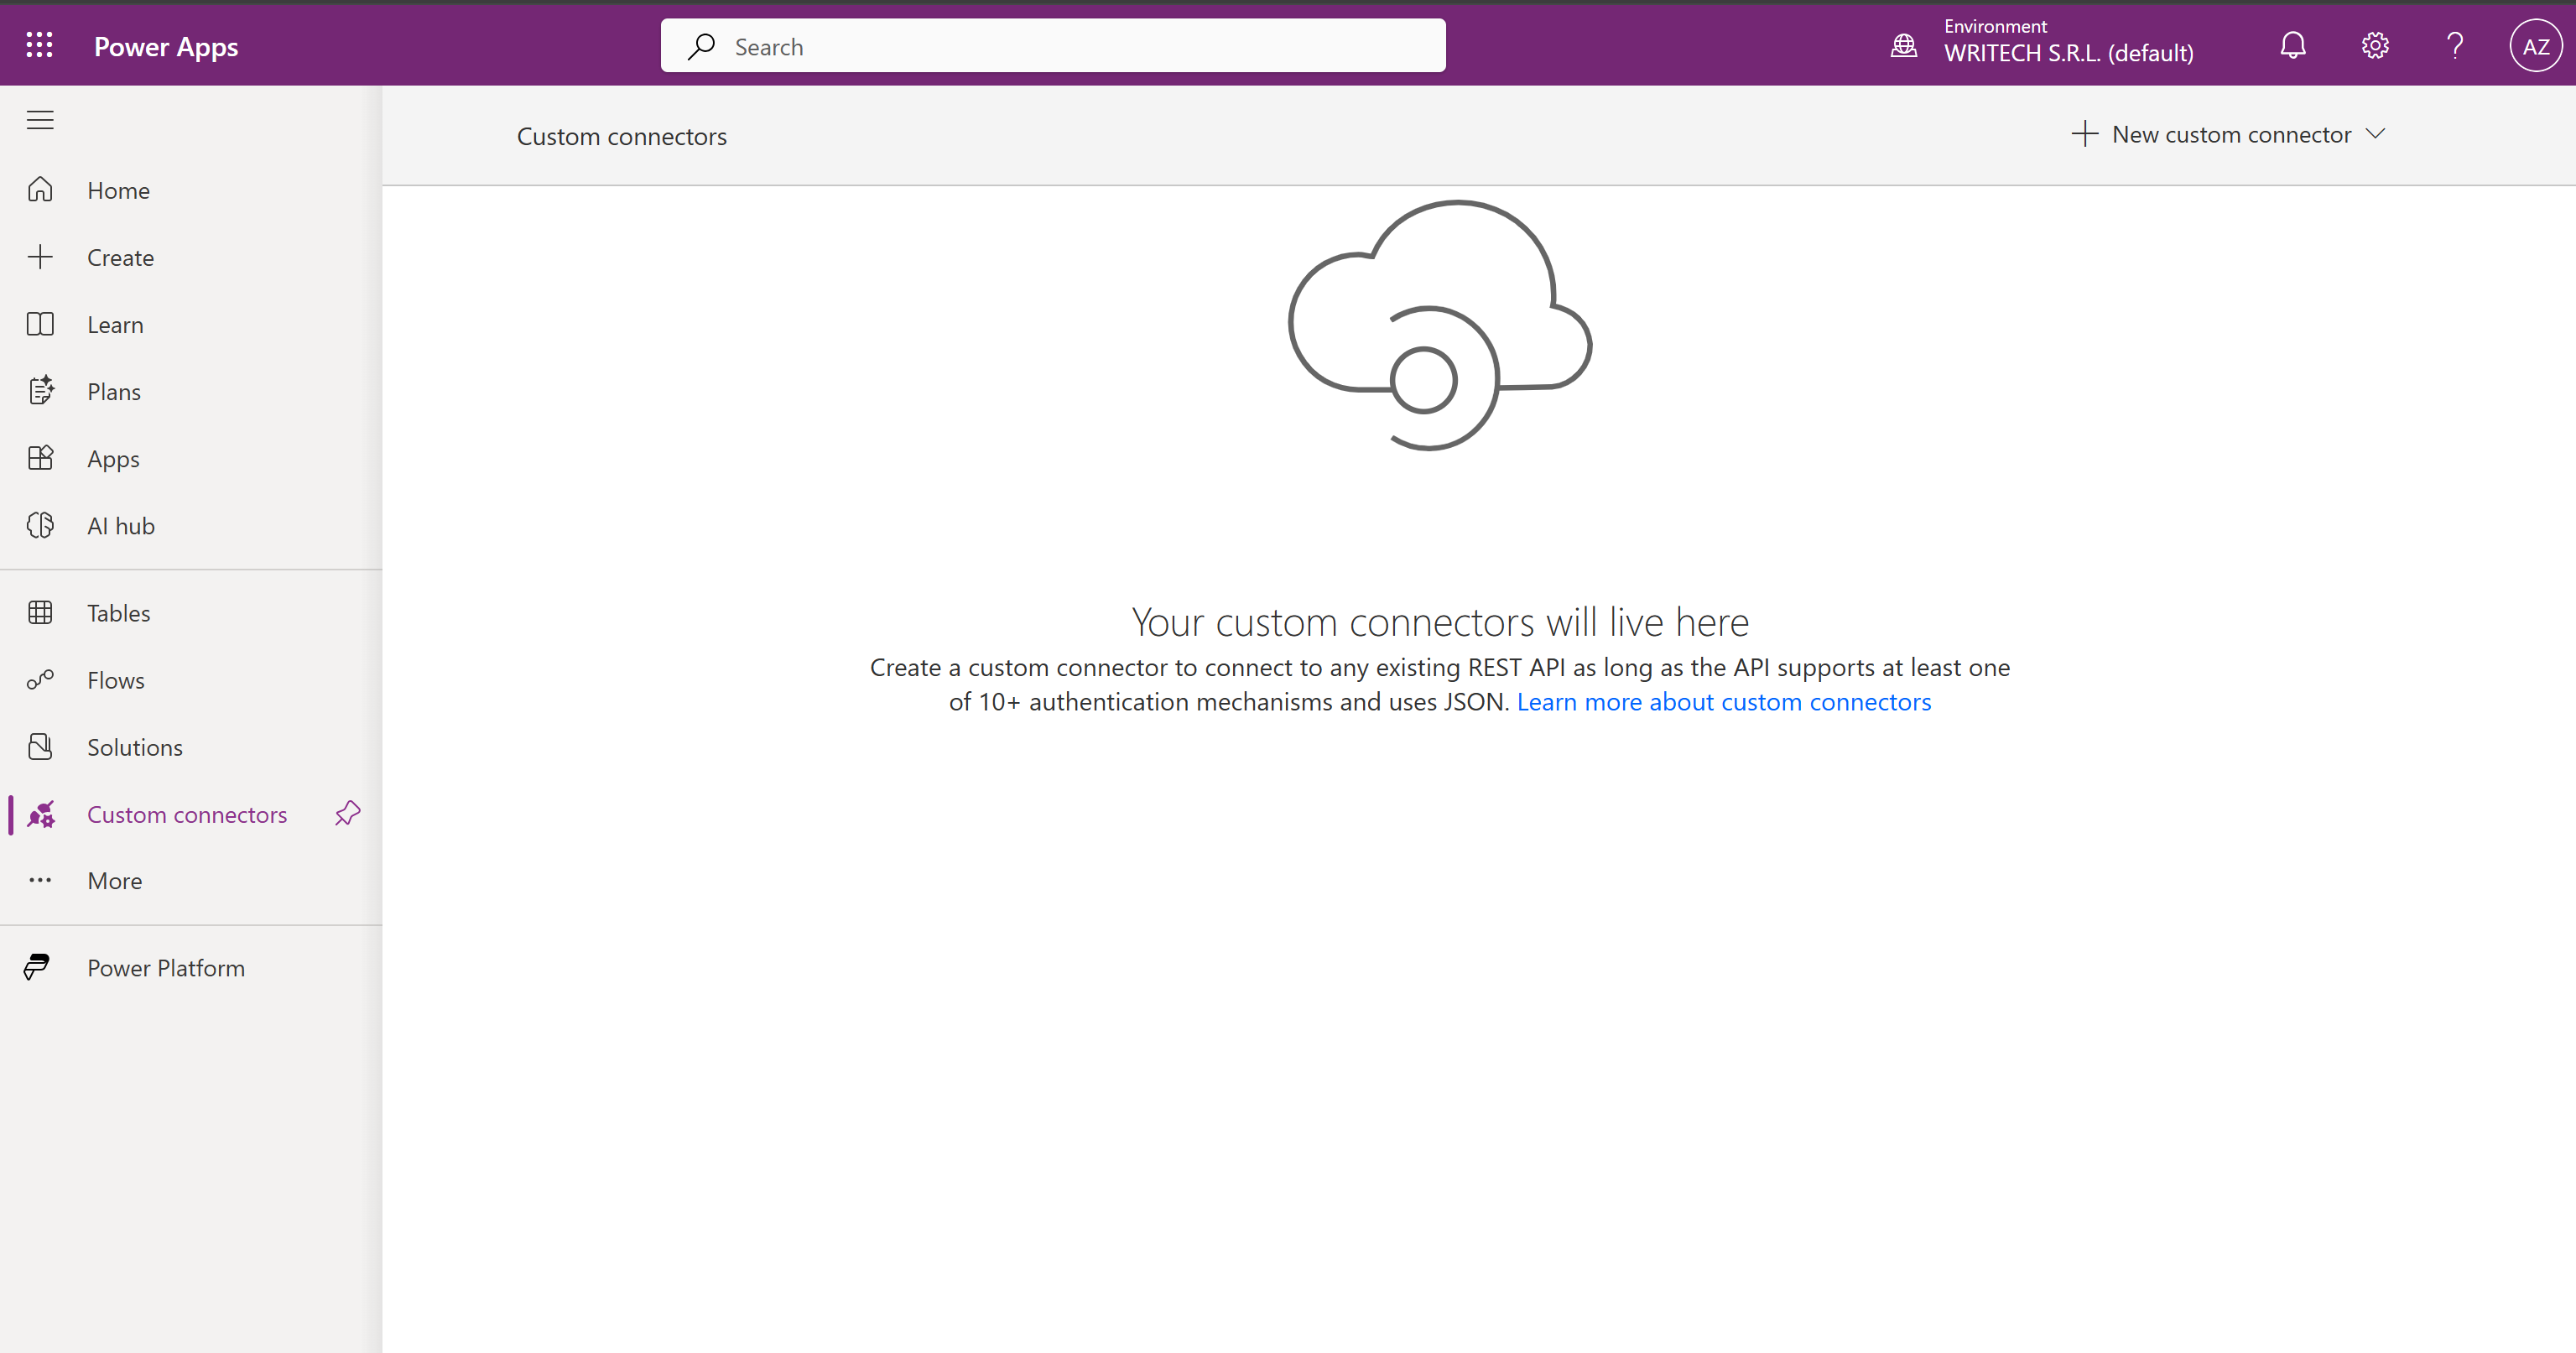
This is where you will define the connection to Bright Data’s SERP API, which will be used as a tool by your agent. The first part of the SERP API tool definition process is complete!
Step #5: Define the SERP API Connection
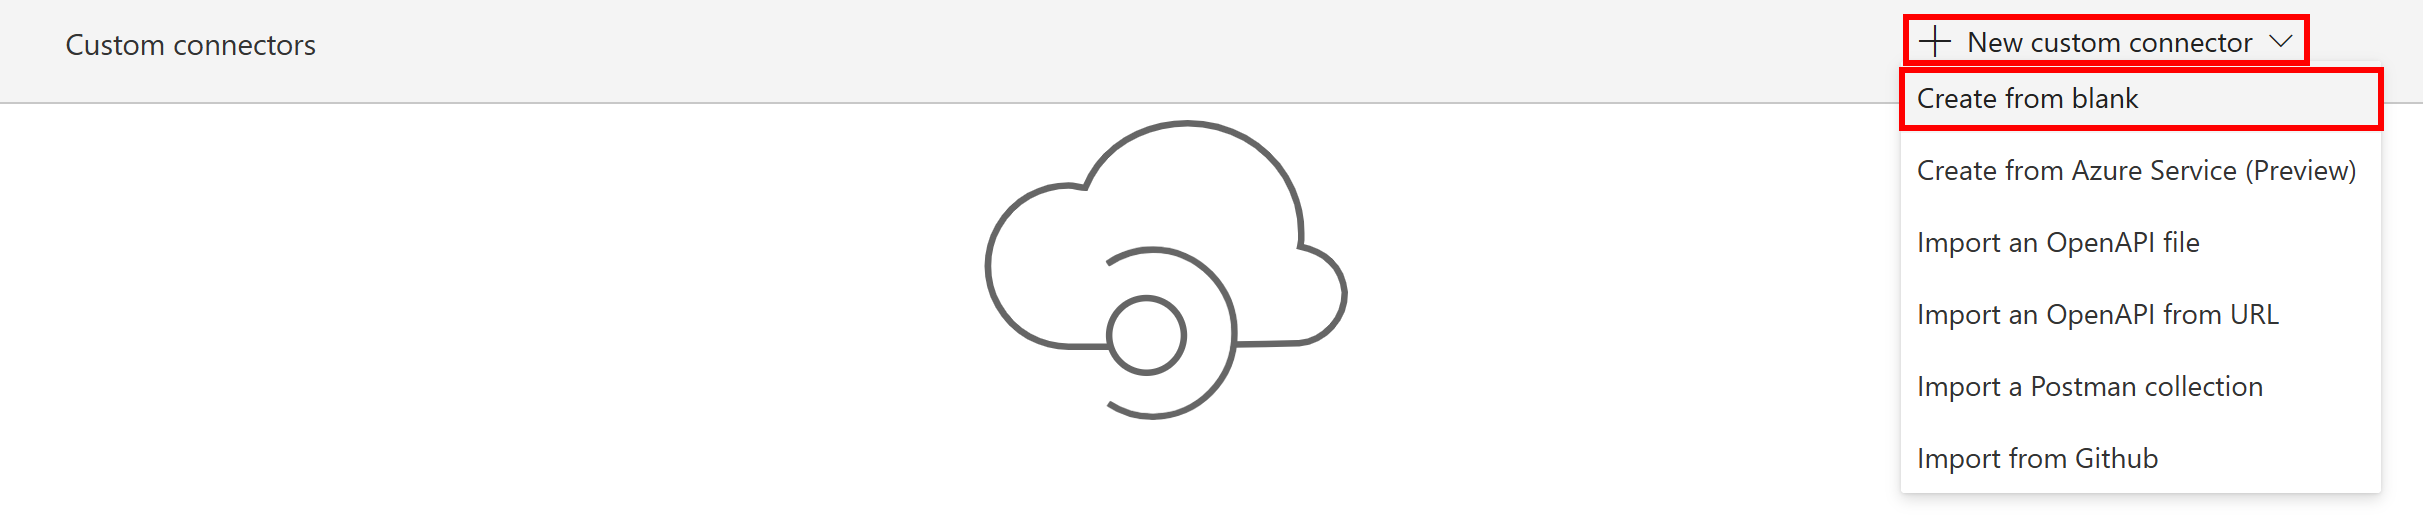
On the “Custom connectors” page of the Microsoft Power Apps service, click the “New custom connector” dropdown and select “Create from blank”:
In the modal that appears, give your connector a name (e.g., “Bright Data SERP API”) and then click the “Continue” button.
You will reach the Connector editor wizard. To simplify the definition, we will use a Swagger specification. Thus, toggle the “Swagger editor” option:

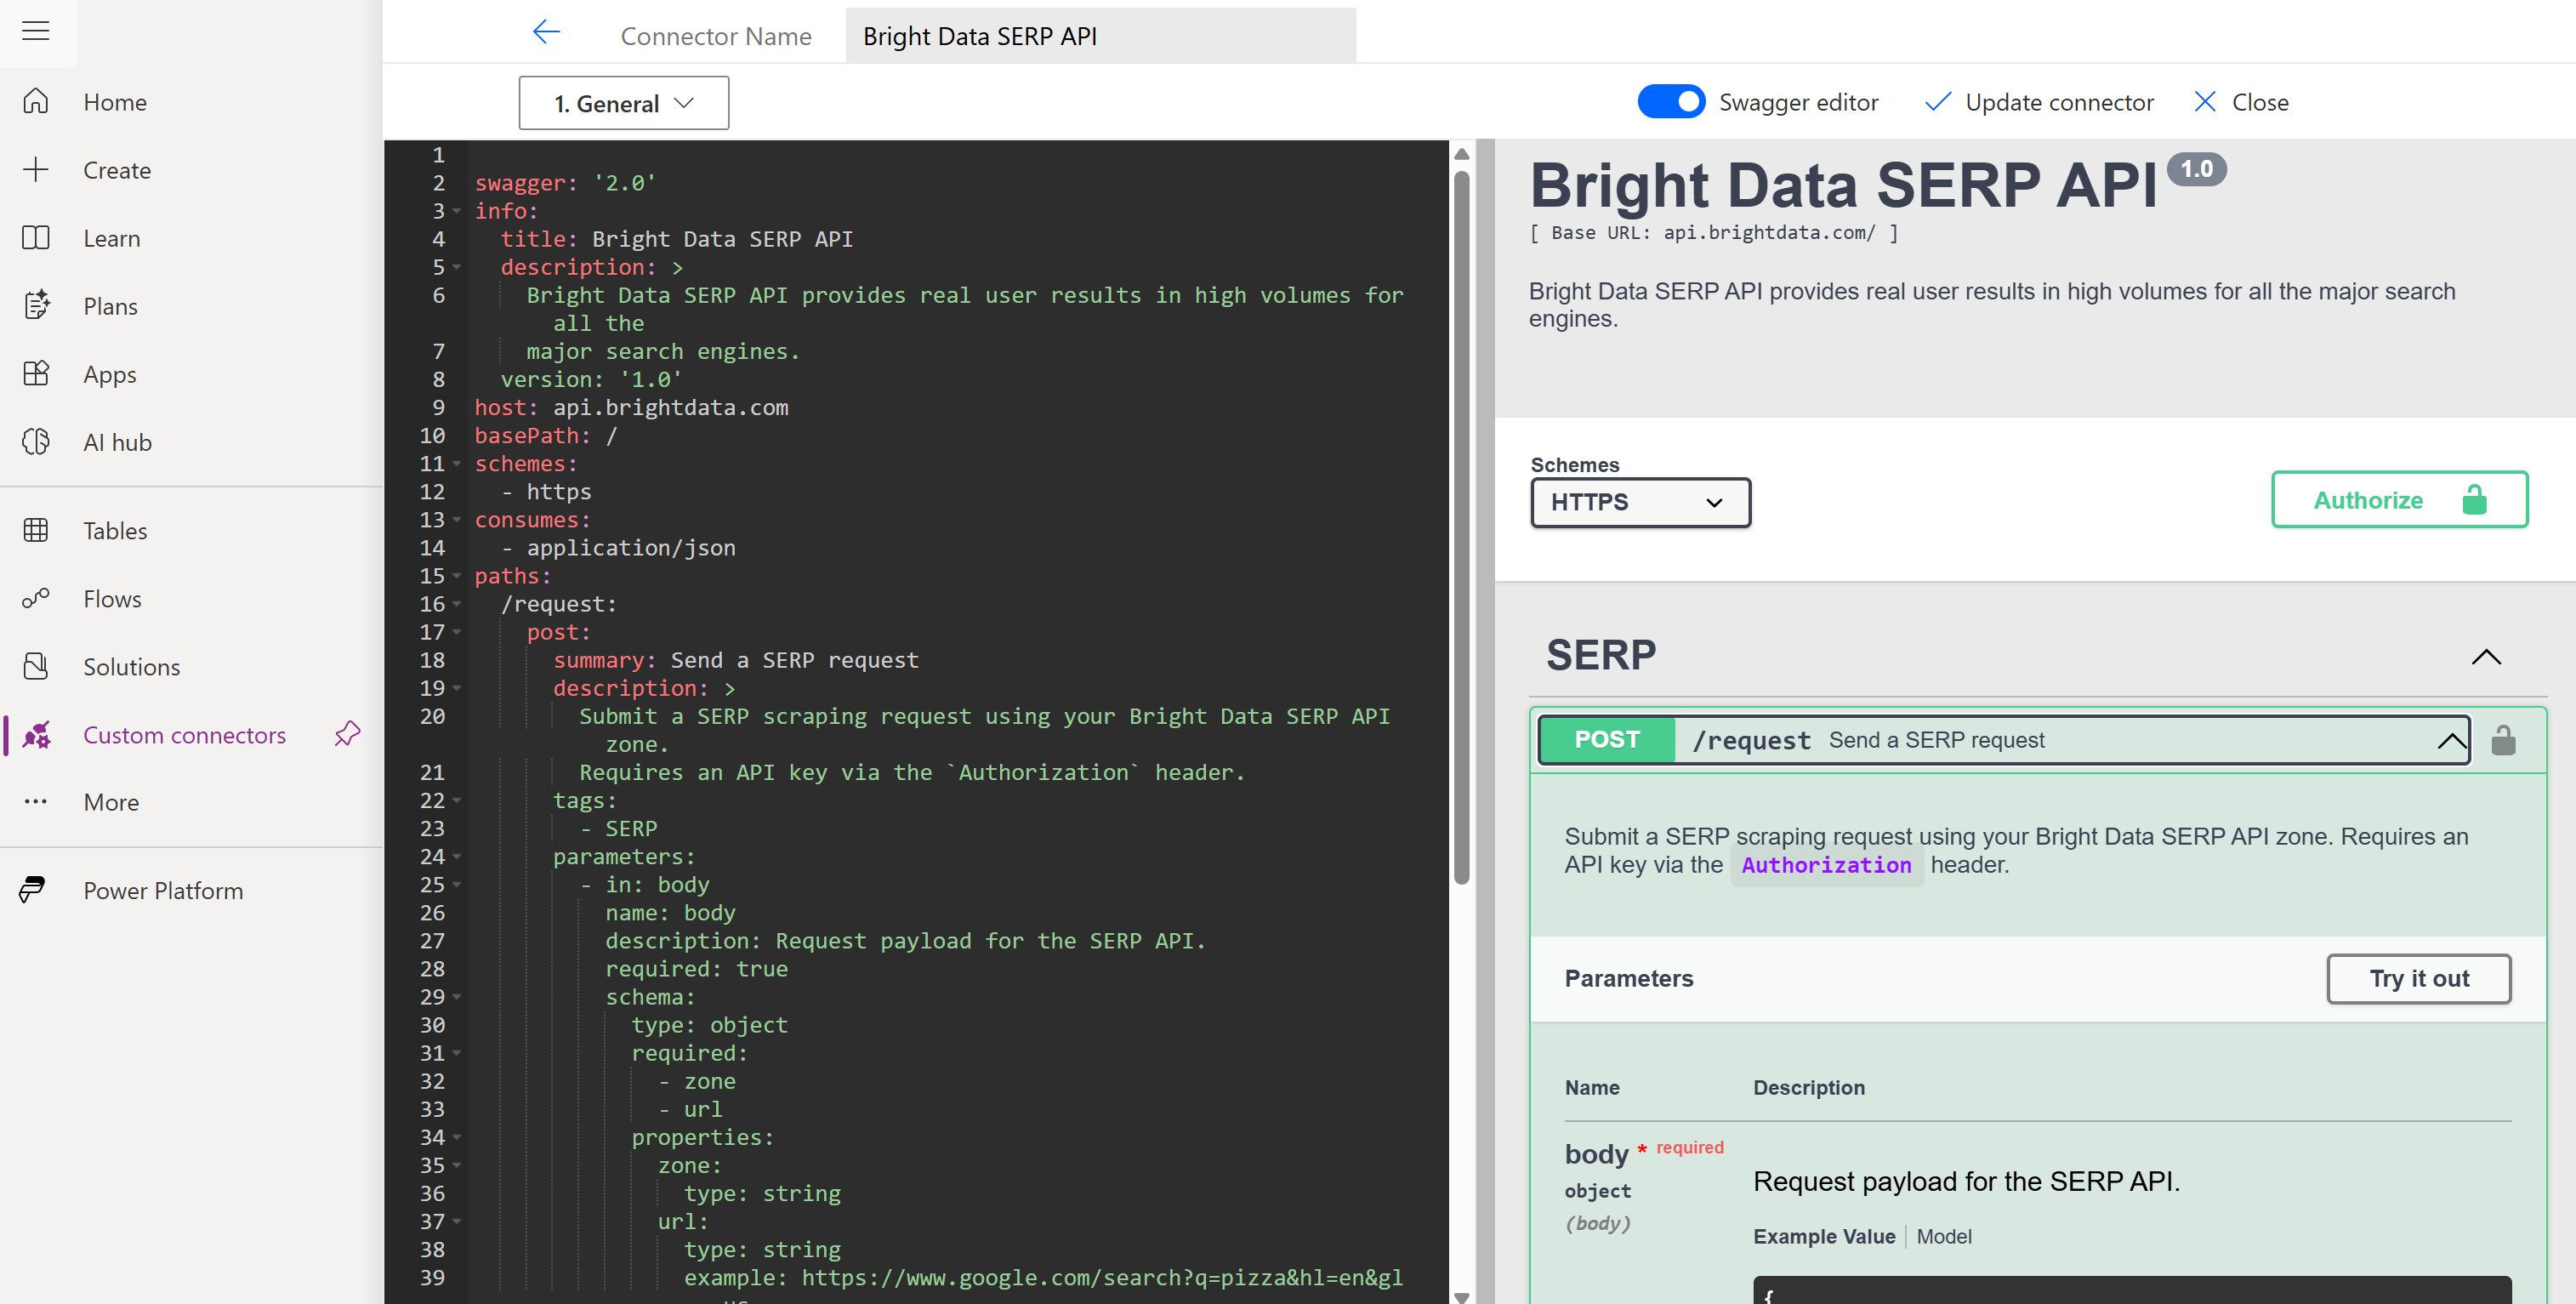
In the Swagger editor textarea, paste the following OpenAPI 2.0 definition:
swagger: '2.0'
info:
  title: Bright Data SERP API
  description: >
    Bright Data SERP API provides real user results in high volumes for all the
    major search engines.
  version: '1.0'
host: api.brightdata.com
basePath: /
schemes:
  - https
consumes:
  - application/json
paths:
  /request:
    post:
      summary: Send a SERP request
      description: >
        Submit a SERP scraping request using your Bright Data SERP API zone.
        Requires an API key via the `Authorization` header.
      tags:
        - SERP
      parameters:
        - in: body
          name: body
          description: Request payload for the SERP API.
          required: true
          schema:
            type: object
            required:
              - zone
              - url
            properties:
              zone:
                type: string
              url:
                type: string
              format:
                type: string
                default: raw
              data_format:
                type: string
                default: markdown
      responses:
        '200':
          description: Successful response
        '400':
          description: Invalid request
        '401':
          description: Unauthorized - invalid API key
        '500':
          description: Internal server error
      operationId: serp-api-call
securityDefinitions:
  api_key:
    type: apiKey
    in: header
    name: Authorization
security:
  - api_key: []
The above code in YAML is an OpenAPI 2.0 specification to define a Bright Data SERP API connector. What matters here are these two aspects:
- The definition, in the API body, of the
zone(which represents the name of your SERP API zone),url(which represents the search engine page URL),format(which defines how the API should produce the output data), anddata_format(which determines how the API will respond, whether with the HTML of the page, a parsed JSON version, a Markdown version, etc.) paramters. - The
api_keysection insecurityDefinitionsspecifies that the API connection is authenticated via a user-provided key added to theAuthorizationheader (this is how you authenticate the SERP API using your Bright Data API key).
For all the above details, including the meaning of each parameter and argument, refer to the official documentation. What you need to know is that the above Swagger configuration specifies a Bright Data SERP API call that returns data in Markdown format (a format optimized for AI ingestion).
On the connector definition page, you will see:
Press “Create connector” to save your connection:

Next, move to the “5. Test” step of the wizard. In the “Test operation” section, click “Create Connection” button in the “Connections” card:

You will be prompted for your Bright Data API key. Enter it in this format:
Bearer <YOUR_BRIGHT_DATA_API_KEY>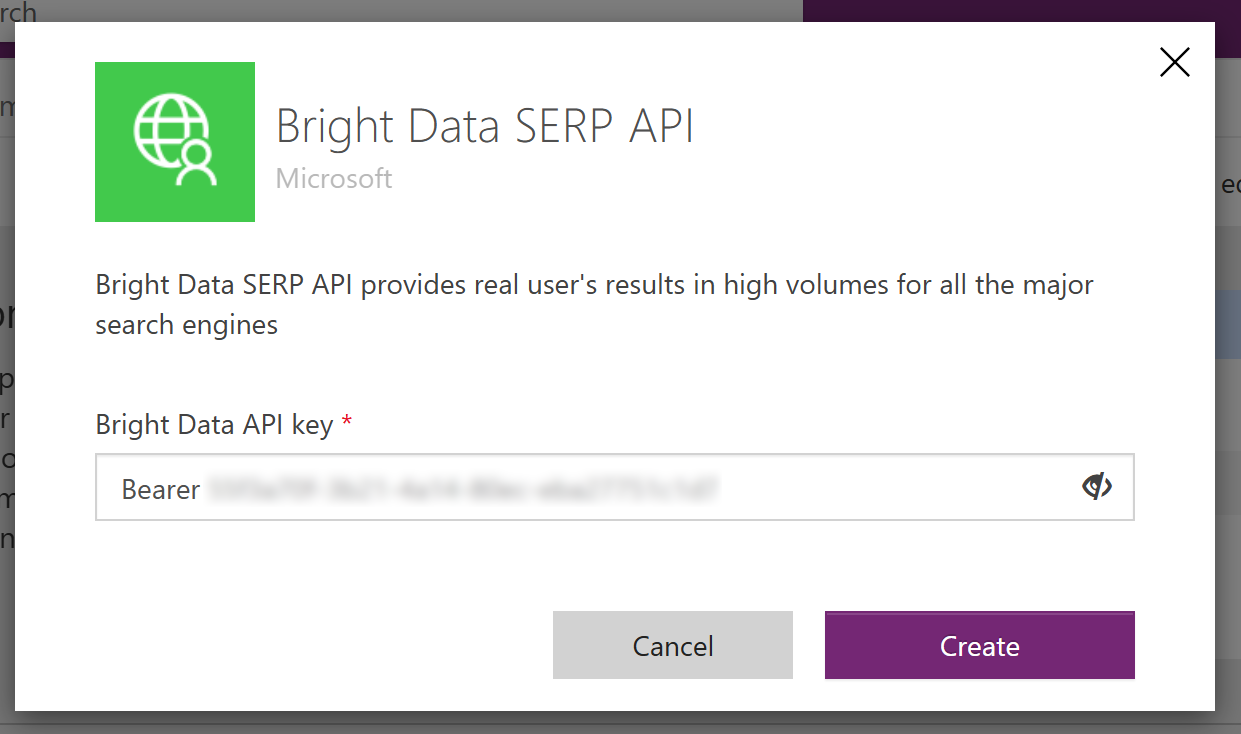
Then, press the “Create” button to continue.
Important: The “Bearer” prefix is required to populate the Authorization header correctly.
Now, on the “5. Test” page, fill out the “serp-api-call” section with your zone name (e.g., serp_api) and a test URL (e.g., https://www.google.com/search?q=pizza). Click “Test Operation” to test your SERP API integration. If everything goes as expected, you should receive a 200 OK HTTP response:
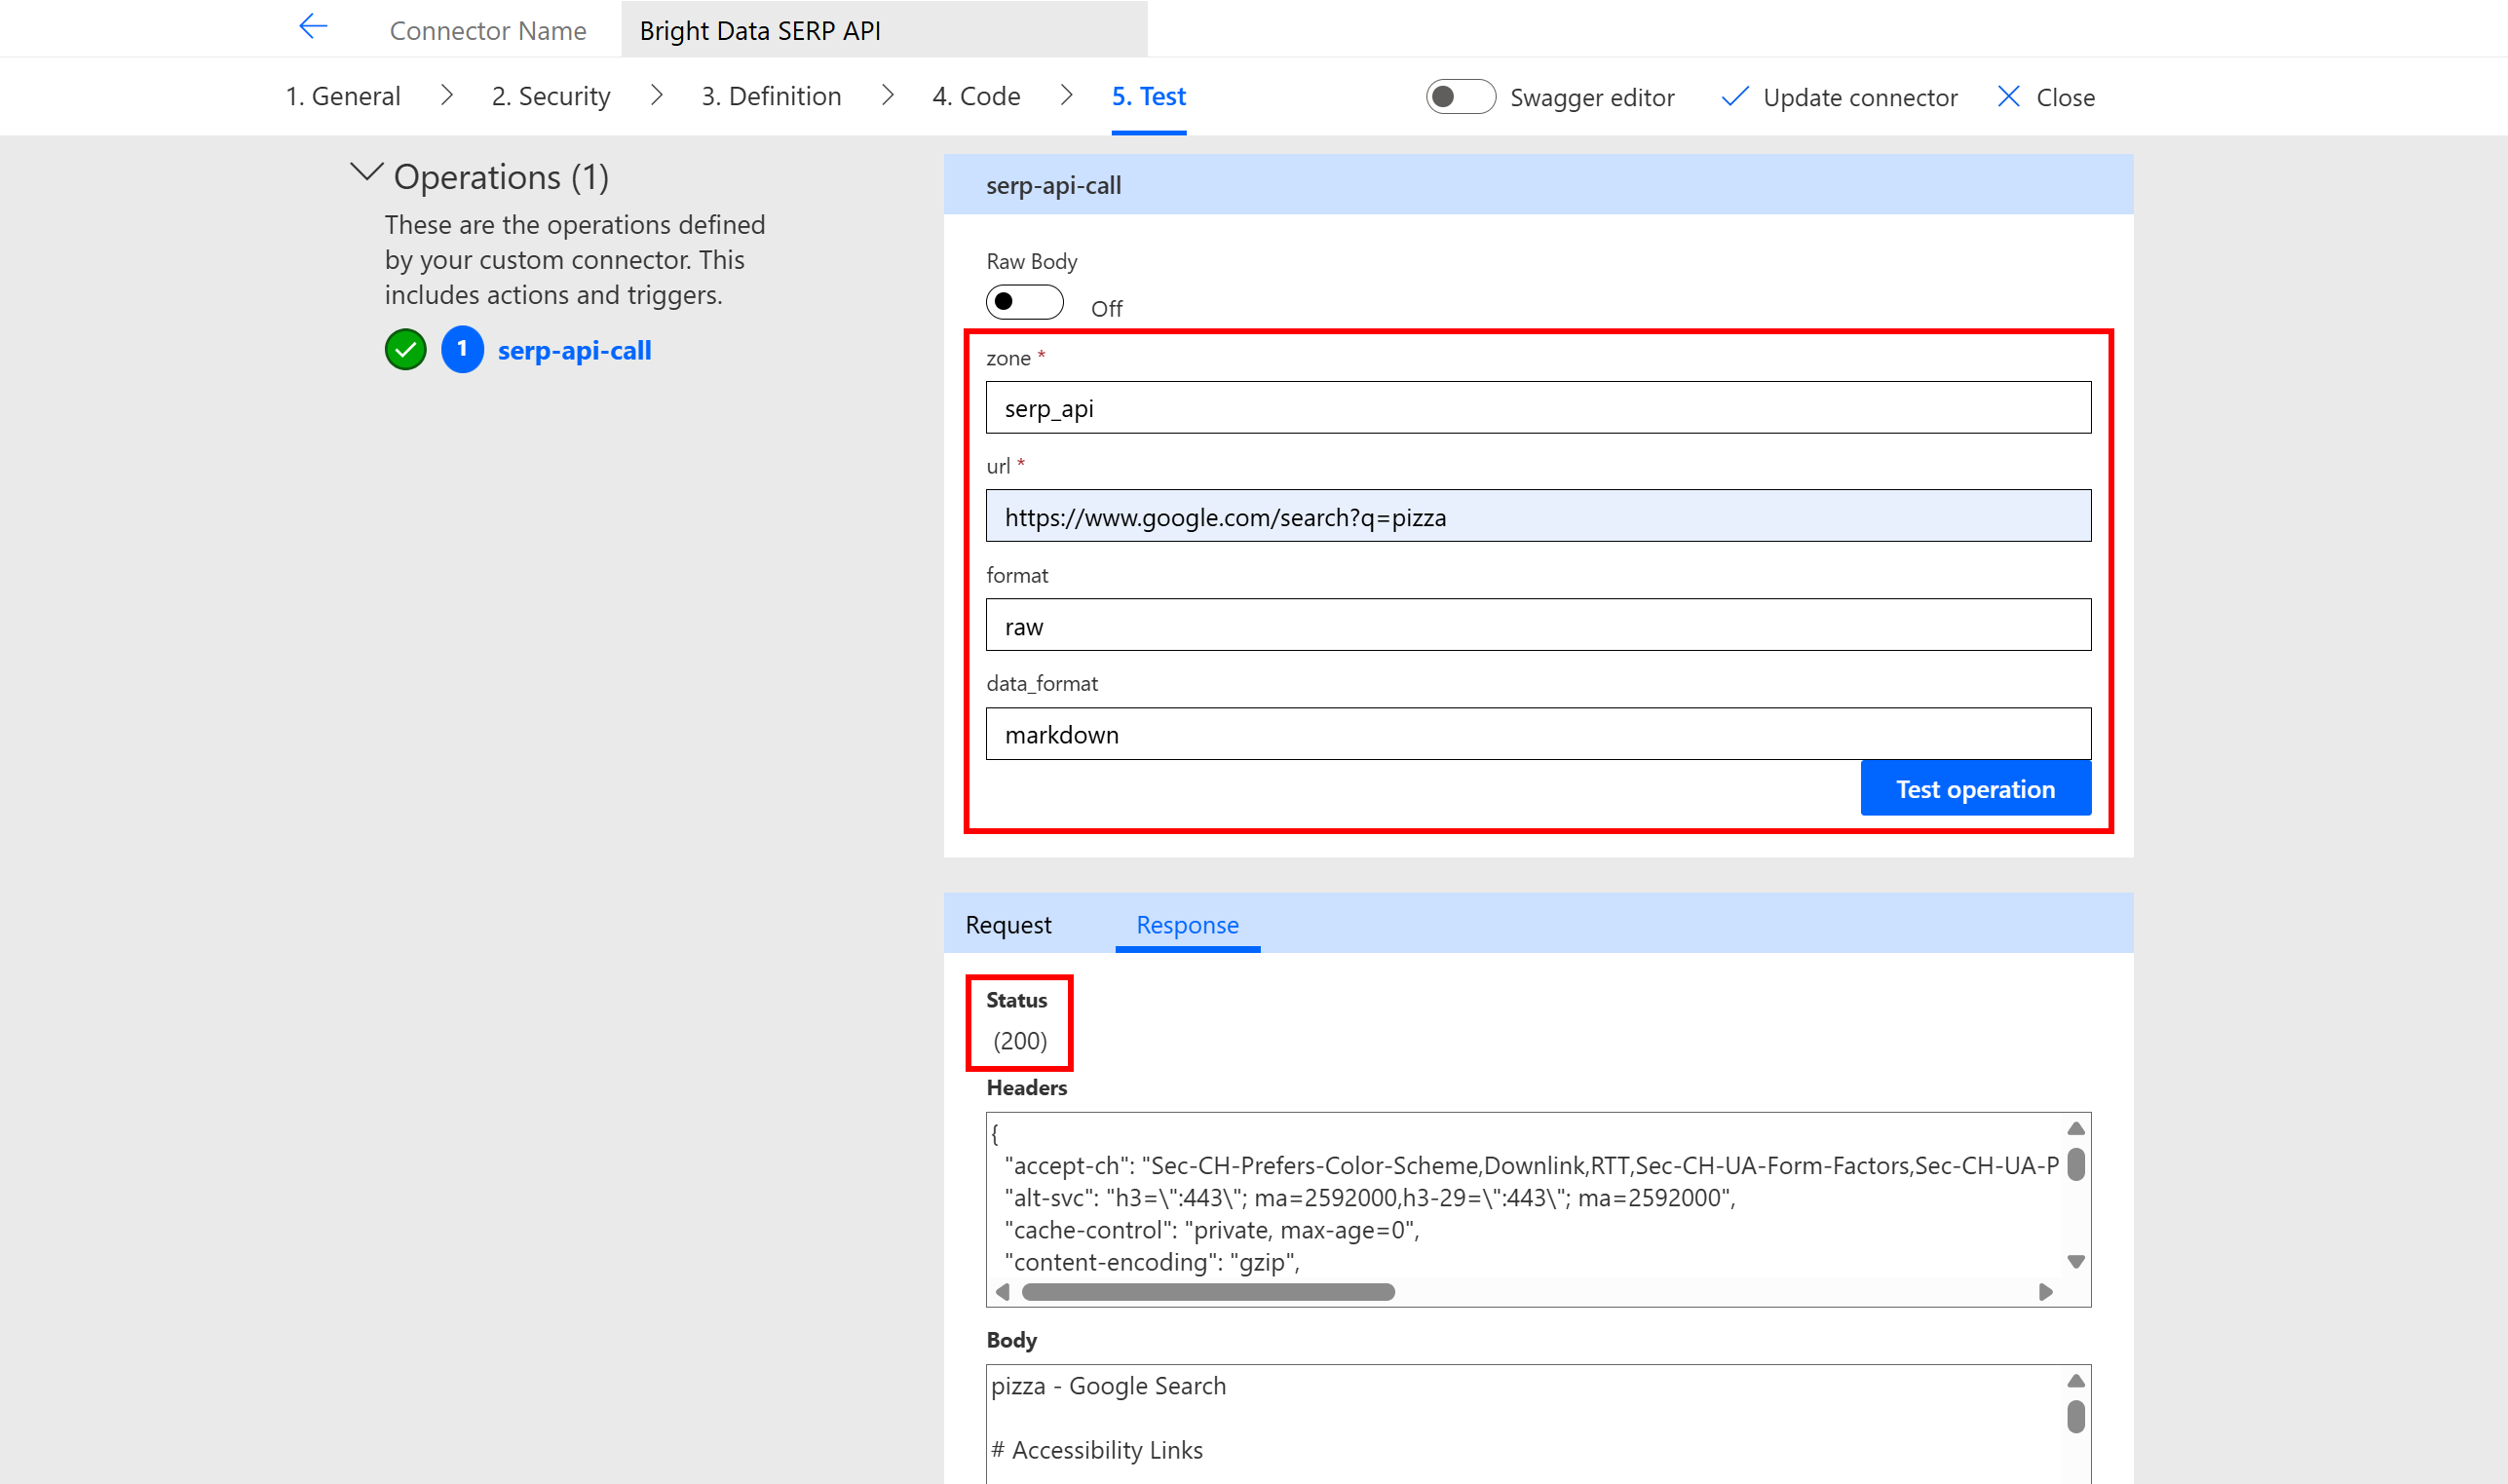
The 200 response confirms that the connector can successfully call the SERP API. In the response body, you will see the Markdown version of the Google SERP for the “pizza” search query (which was specified in the “url” field in the “serp-api-call” form).
Amazing! You now have a Bright Data SERP API connector ready to be used as a tool in your AI agent within Copilot Studio.
Step #6: Integrate the SERP API Tool into Your AI Agent
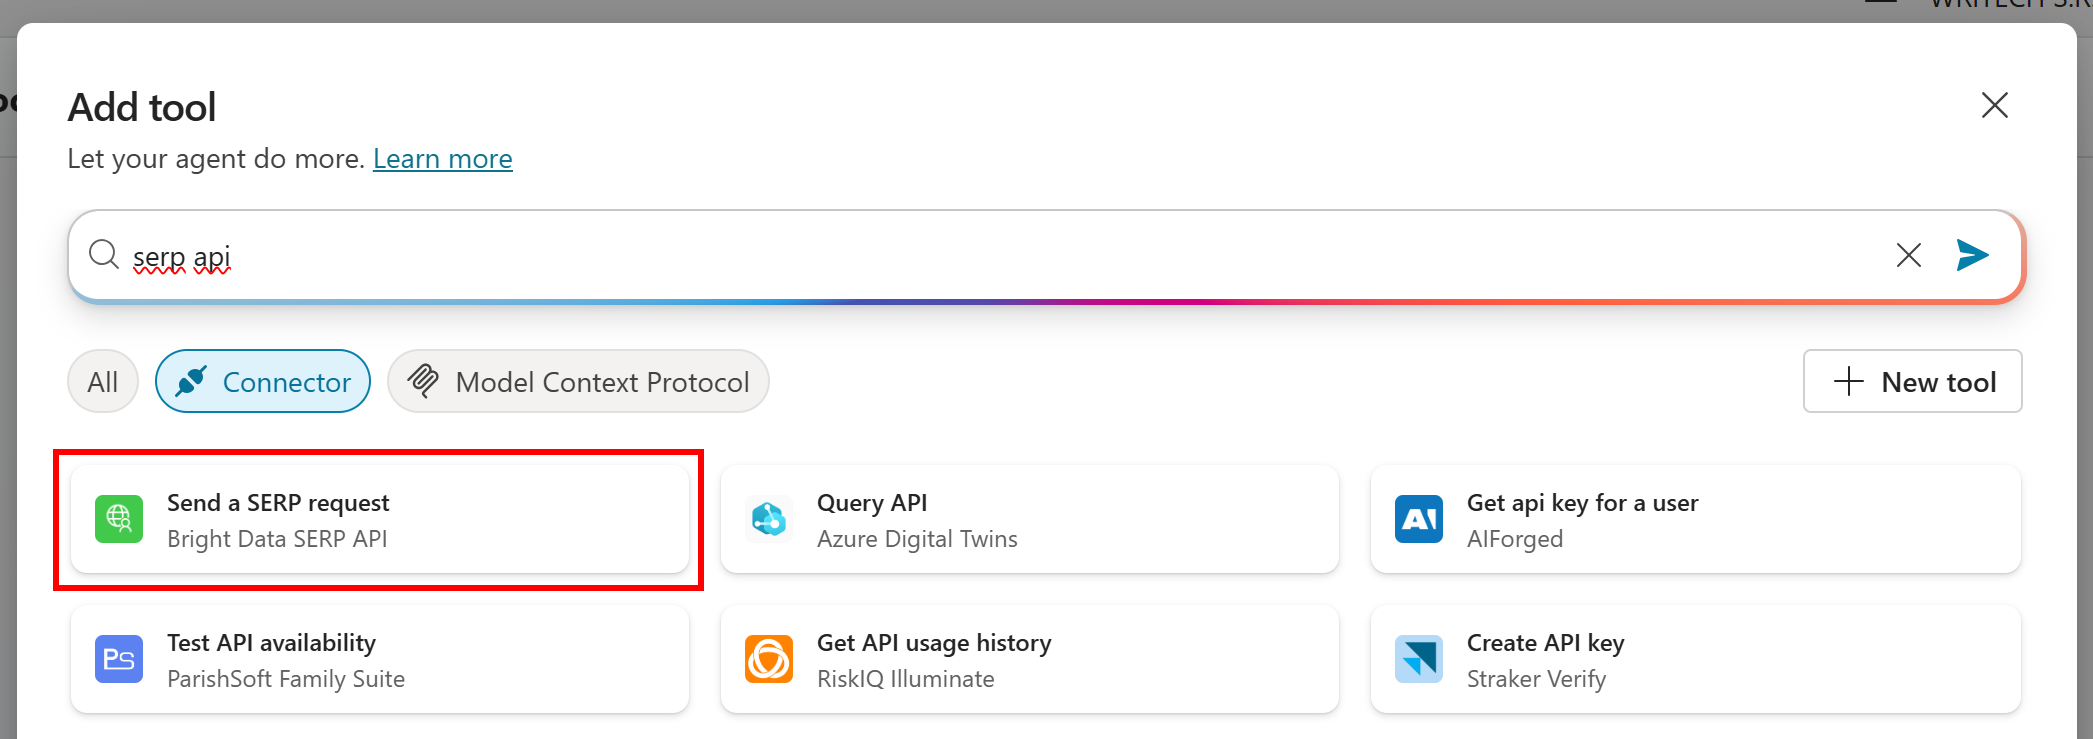
Now that the SERP API connector is ready, go back to your Copilot Studio AI agent dashboard. Navigate to the “Add tool” section as explained in Step #4.
Select the “Connector” label and filter the results by searching for “serp api.” You should see the “Send a SERP request — Bright Data SERP API” connector you created earlier:
Click the connector card and then press “Add and configure”:

The tool addition may take a few moments, so be patient. Once ready, in the connector configuration page, configure the inputs as follows:
zone: Specify your Bright Data SERP API zone name as defined in Step #3 (in this example,serp_api) using a custom value.url: Add a description like “URL of the search engine results page to query (e.g., https://www.google.com/search?q=).” This is important because it instructs the AI on how to fill this field (which will then be passed to the SERP API to retrieve fresh search results).
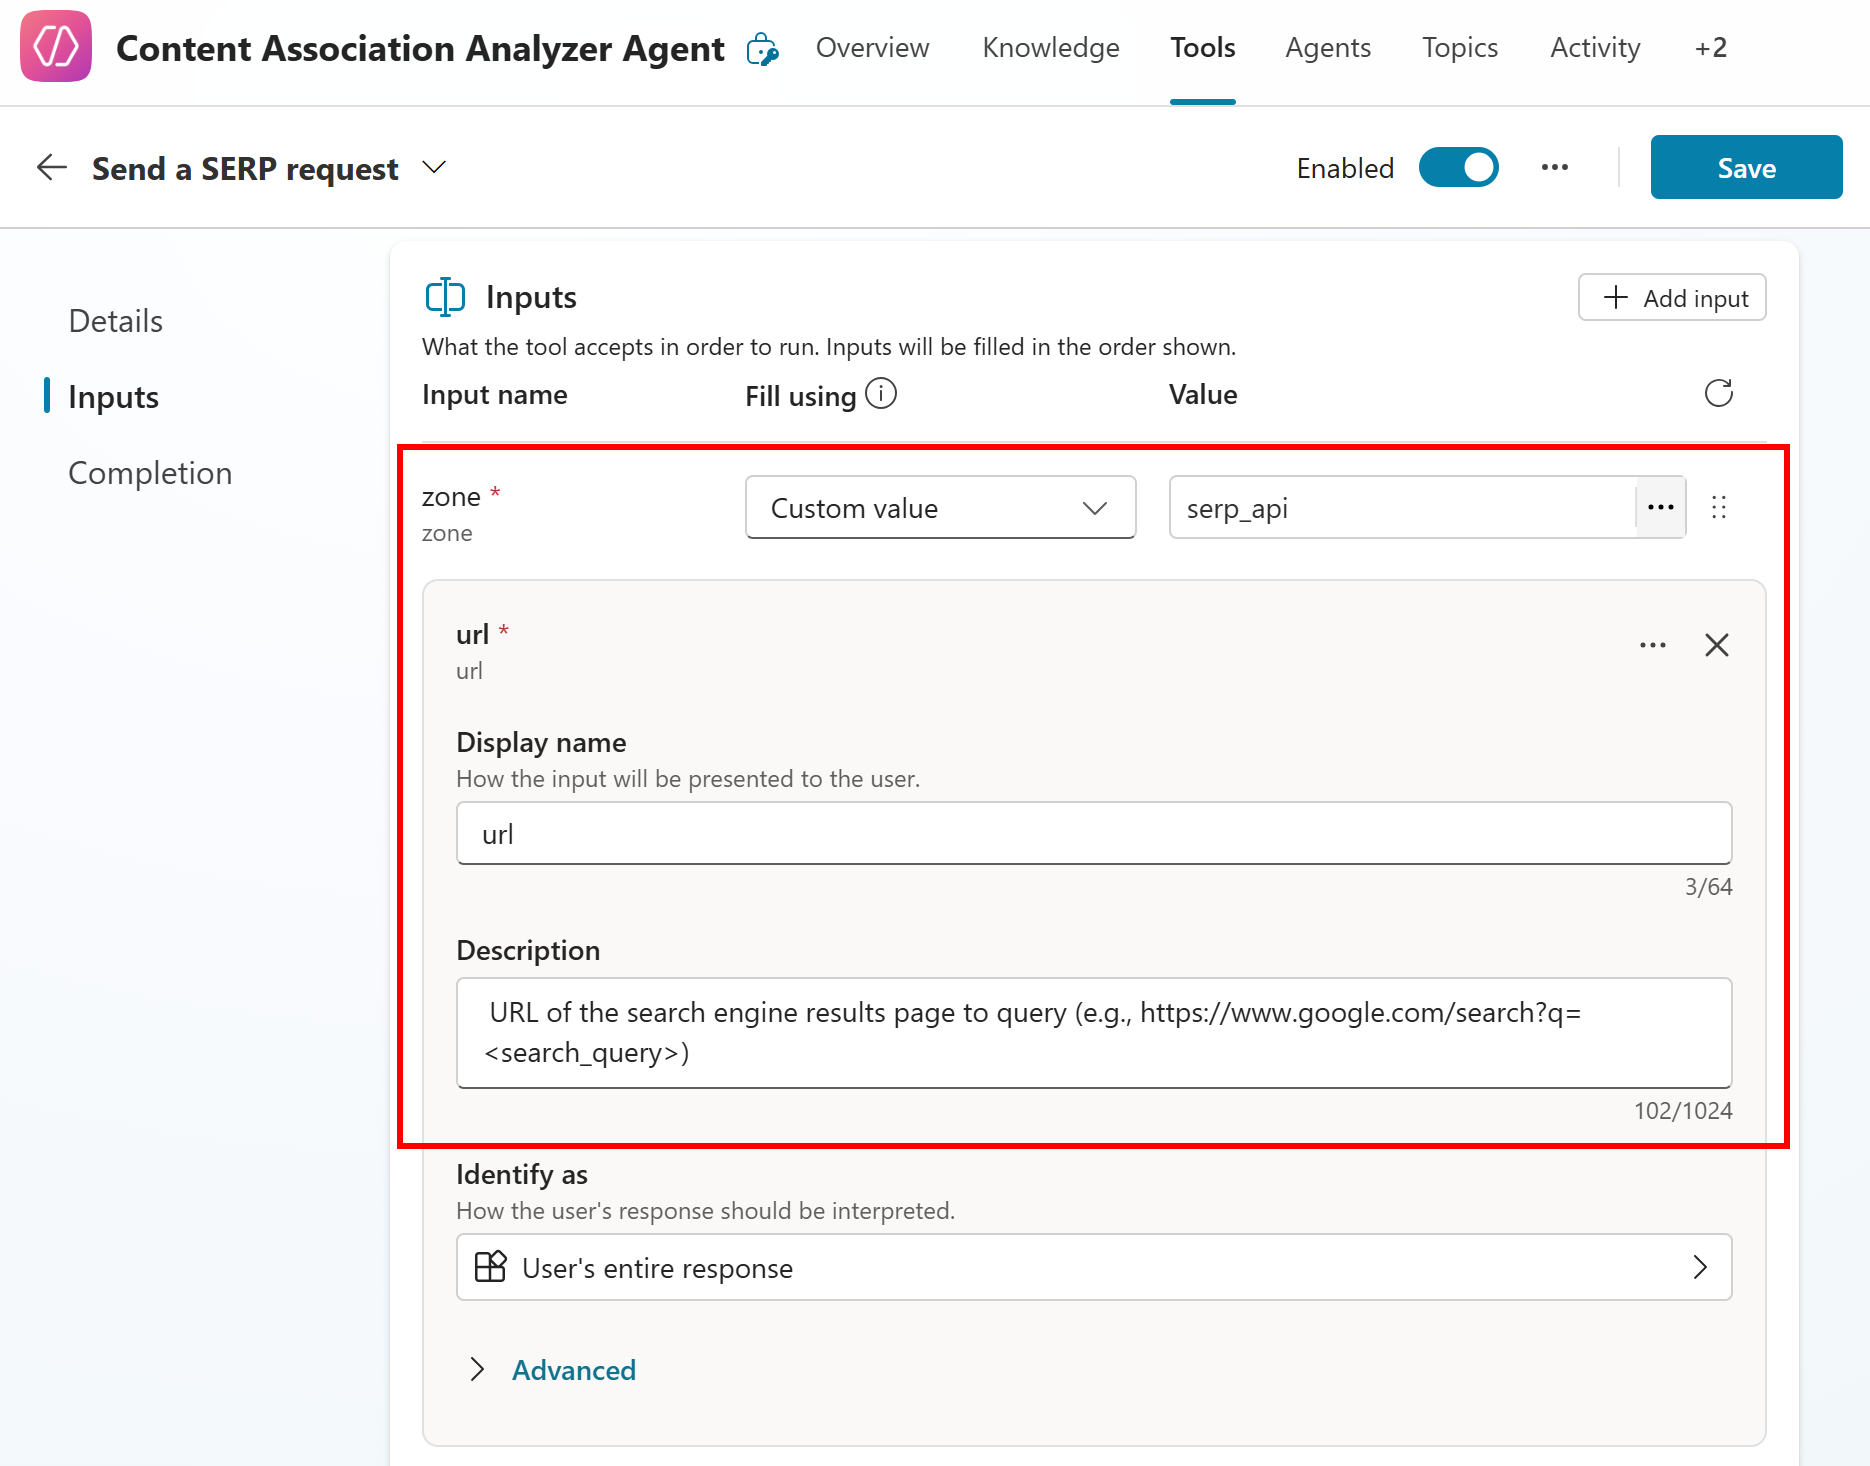
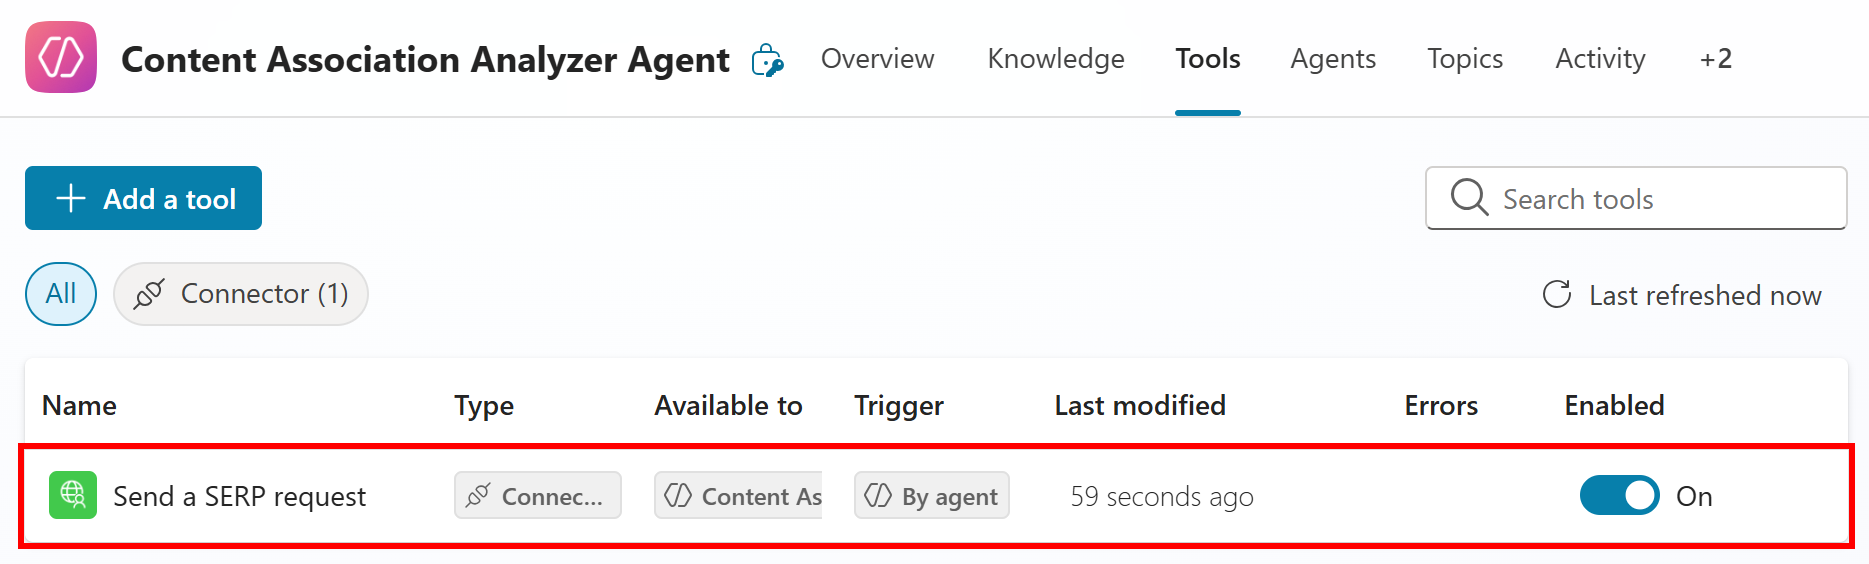
Press “Save” in the top-right corner, and you should see a “Send a SERP request” connector enabled in your agent:
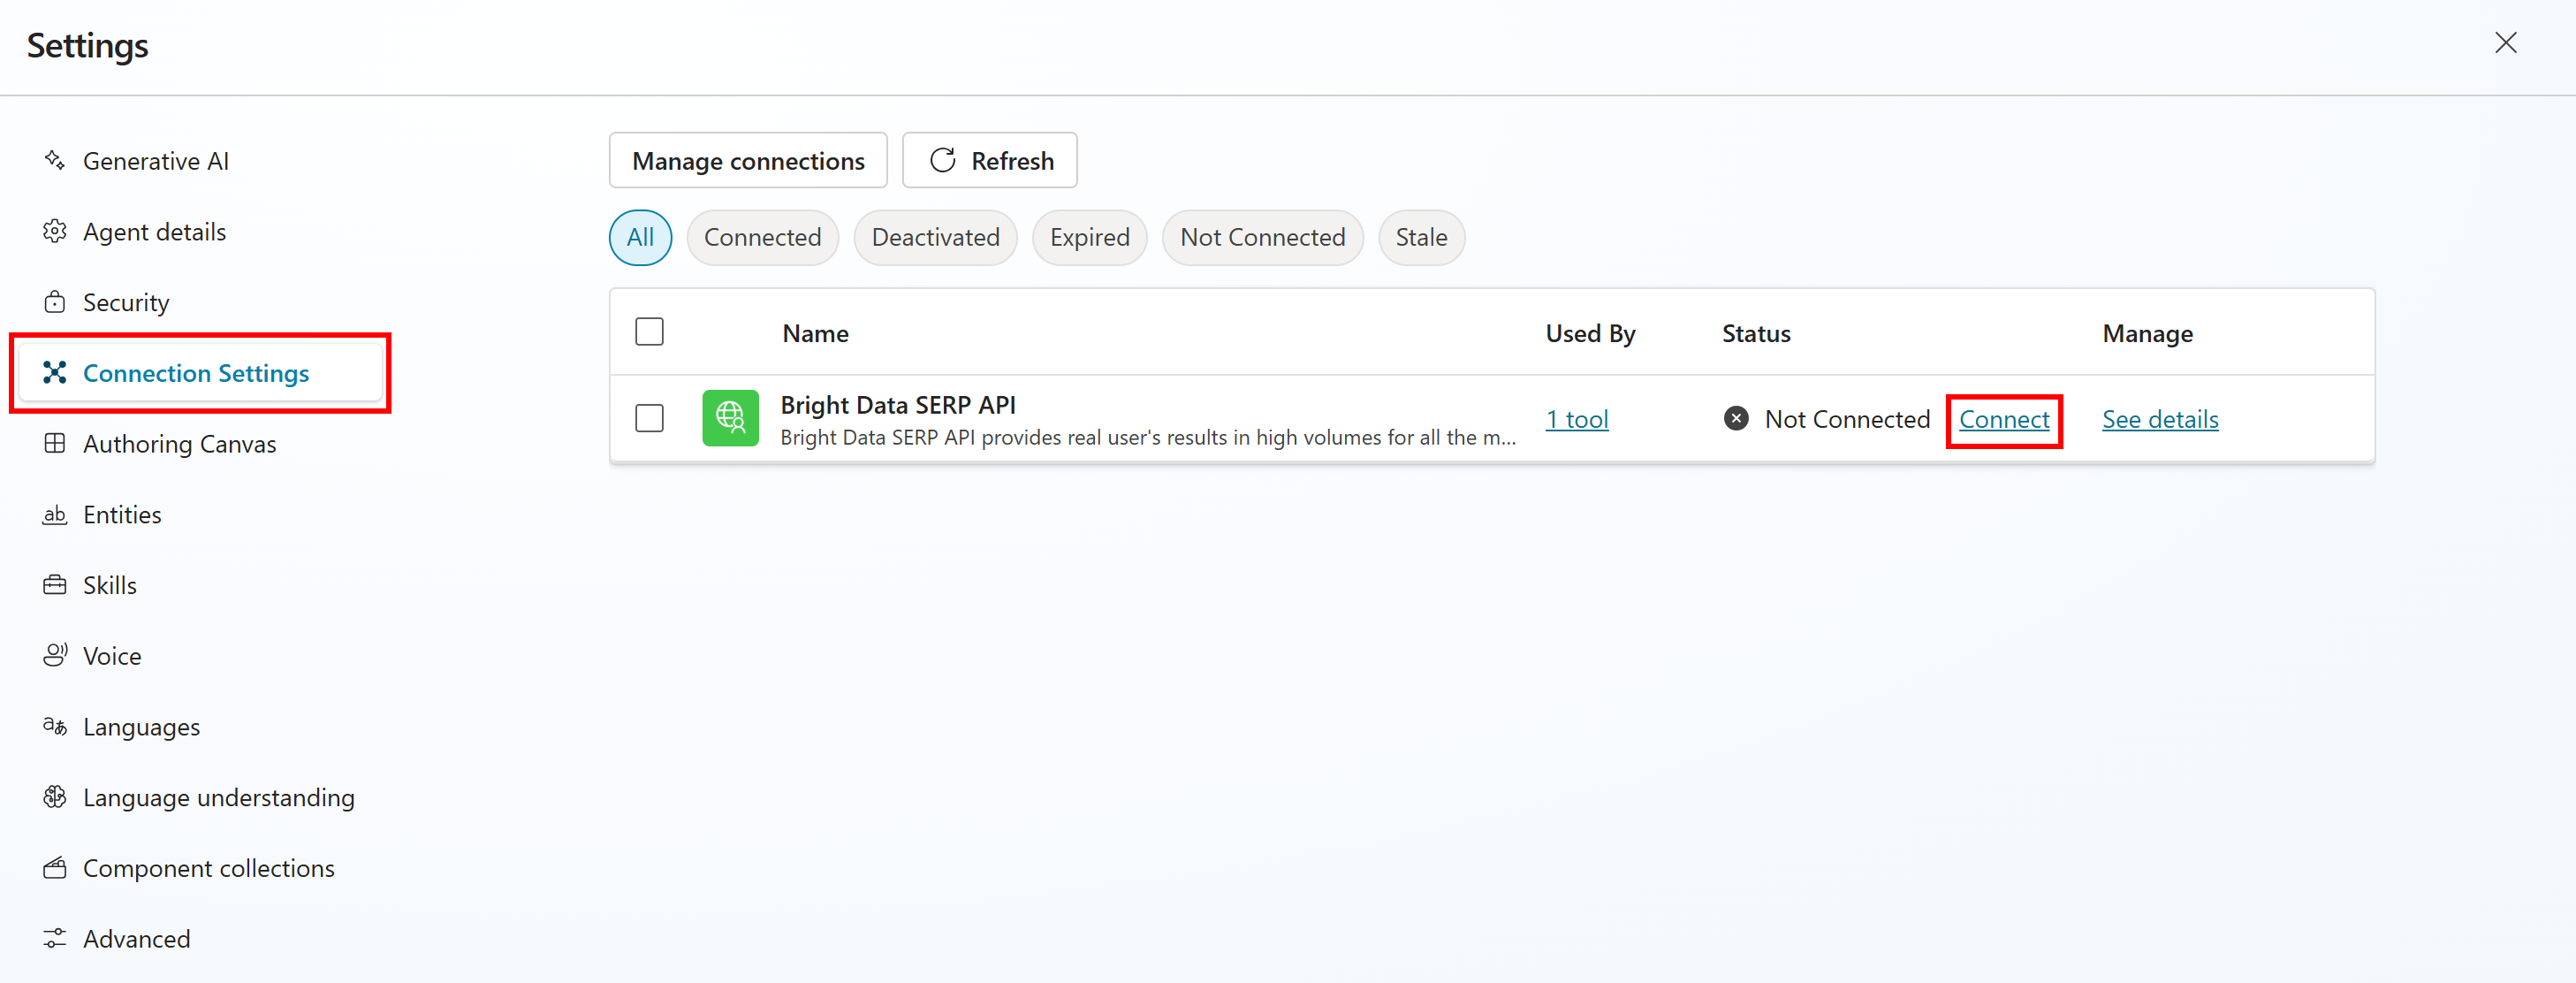
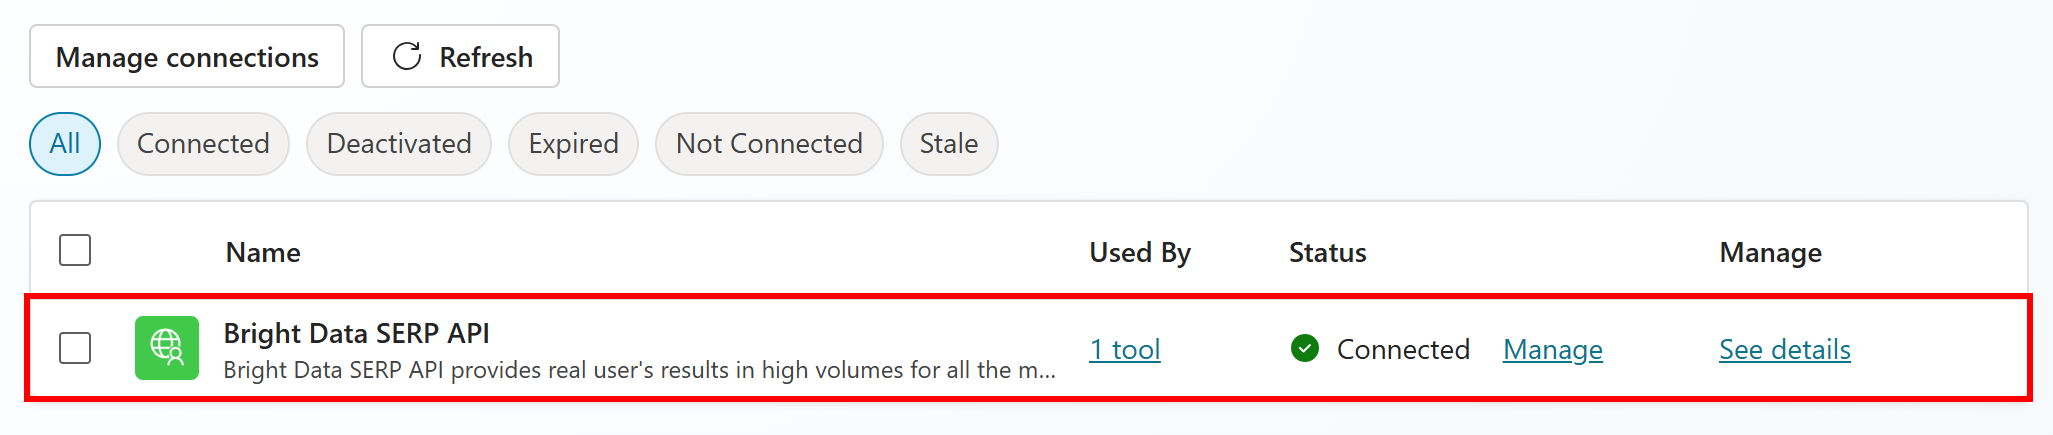
You have now connected your agent to the “Bright Data SERP API” connector defined earlier. To finalize this integration, click the “Settings” button on the “Overview” tab and reach the “Connection Settings” page. On the “Bright Data SERP API” row, press the “Connect” link:
Confirm by pressing “Submit”, and you will now see the Bright Data SERP API marked as connected:
Here we go! The SERP API is finally integrated and available as a tool in your Copilot Studio AI agent.
Step #7: Test Your AI Agent
To verify that your AI agent works correctly, you must test it with the right prompt, like the one below:
Analyze the search query "machine learning" and identify the top related topics and concepts appearing across leading search results. Suggest associated themes I could cover to strengthen topical authority.This should be enough to trigger the SERP API tool and let the agent process and analyze the results to carry out the content association analysis task.
Launch it in the “Test your agent” section of your dashboard, and you should see a behavior similar to this:
This is what the agent does:
- Defines a plan to carry out the task described in the prompt.
- Performs a SERP API request for the “machine learning” search query.
- Receives the SERP data in Markdown format and processes it using deep reasoning.
- Returns actionable recommendations for content optimization.
At the end of the execution, your AI agent dashboard in Copilot Studio should look like this:
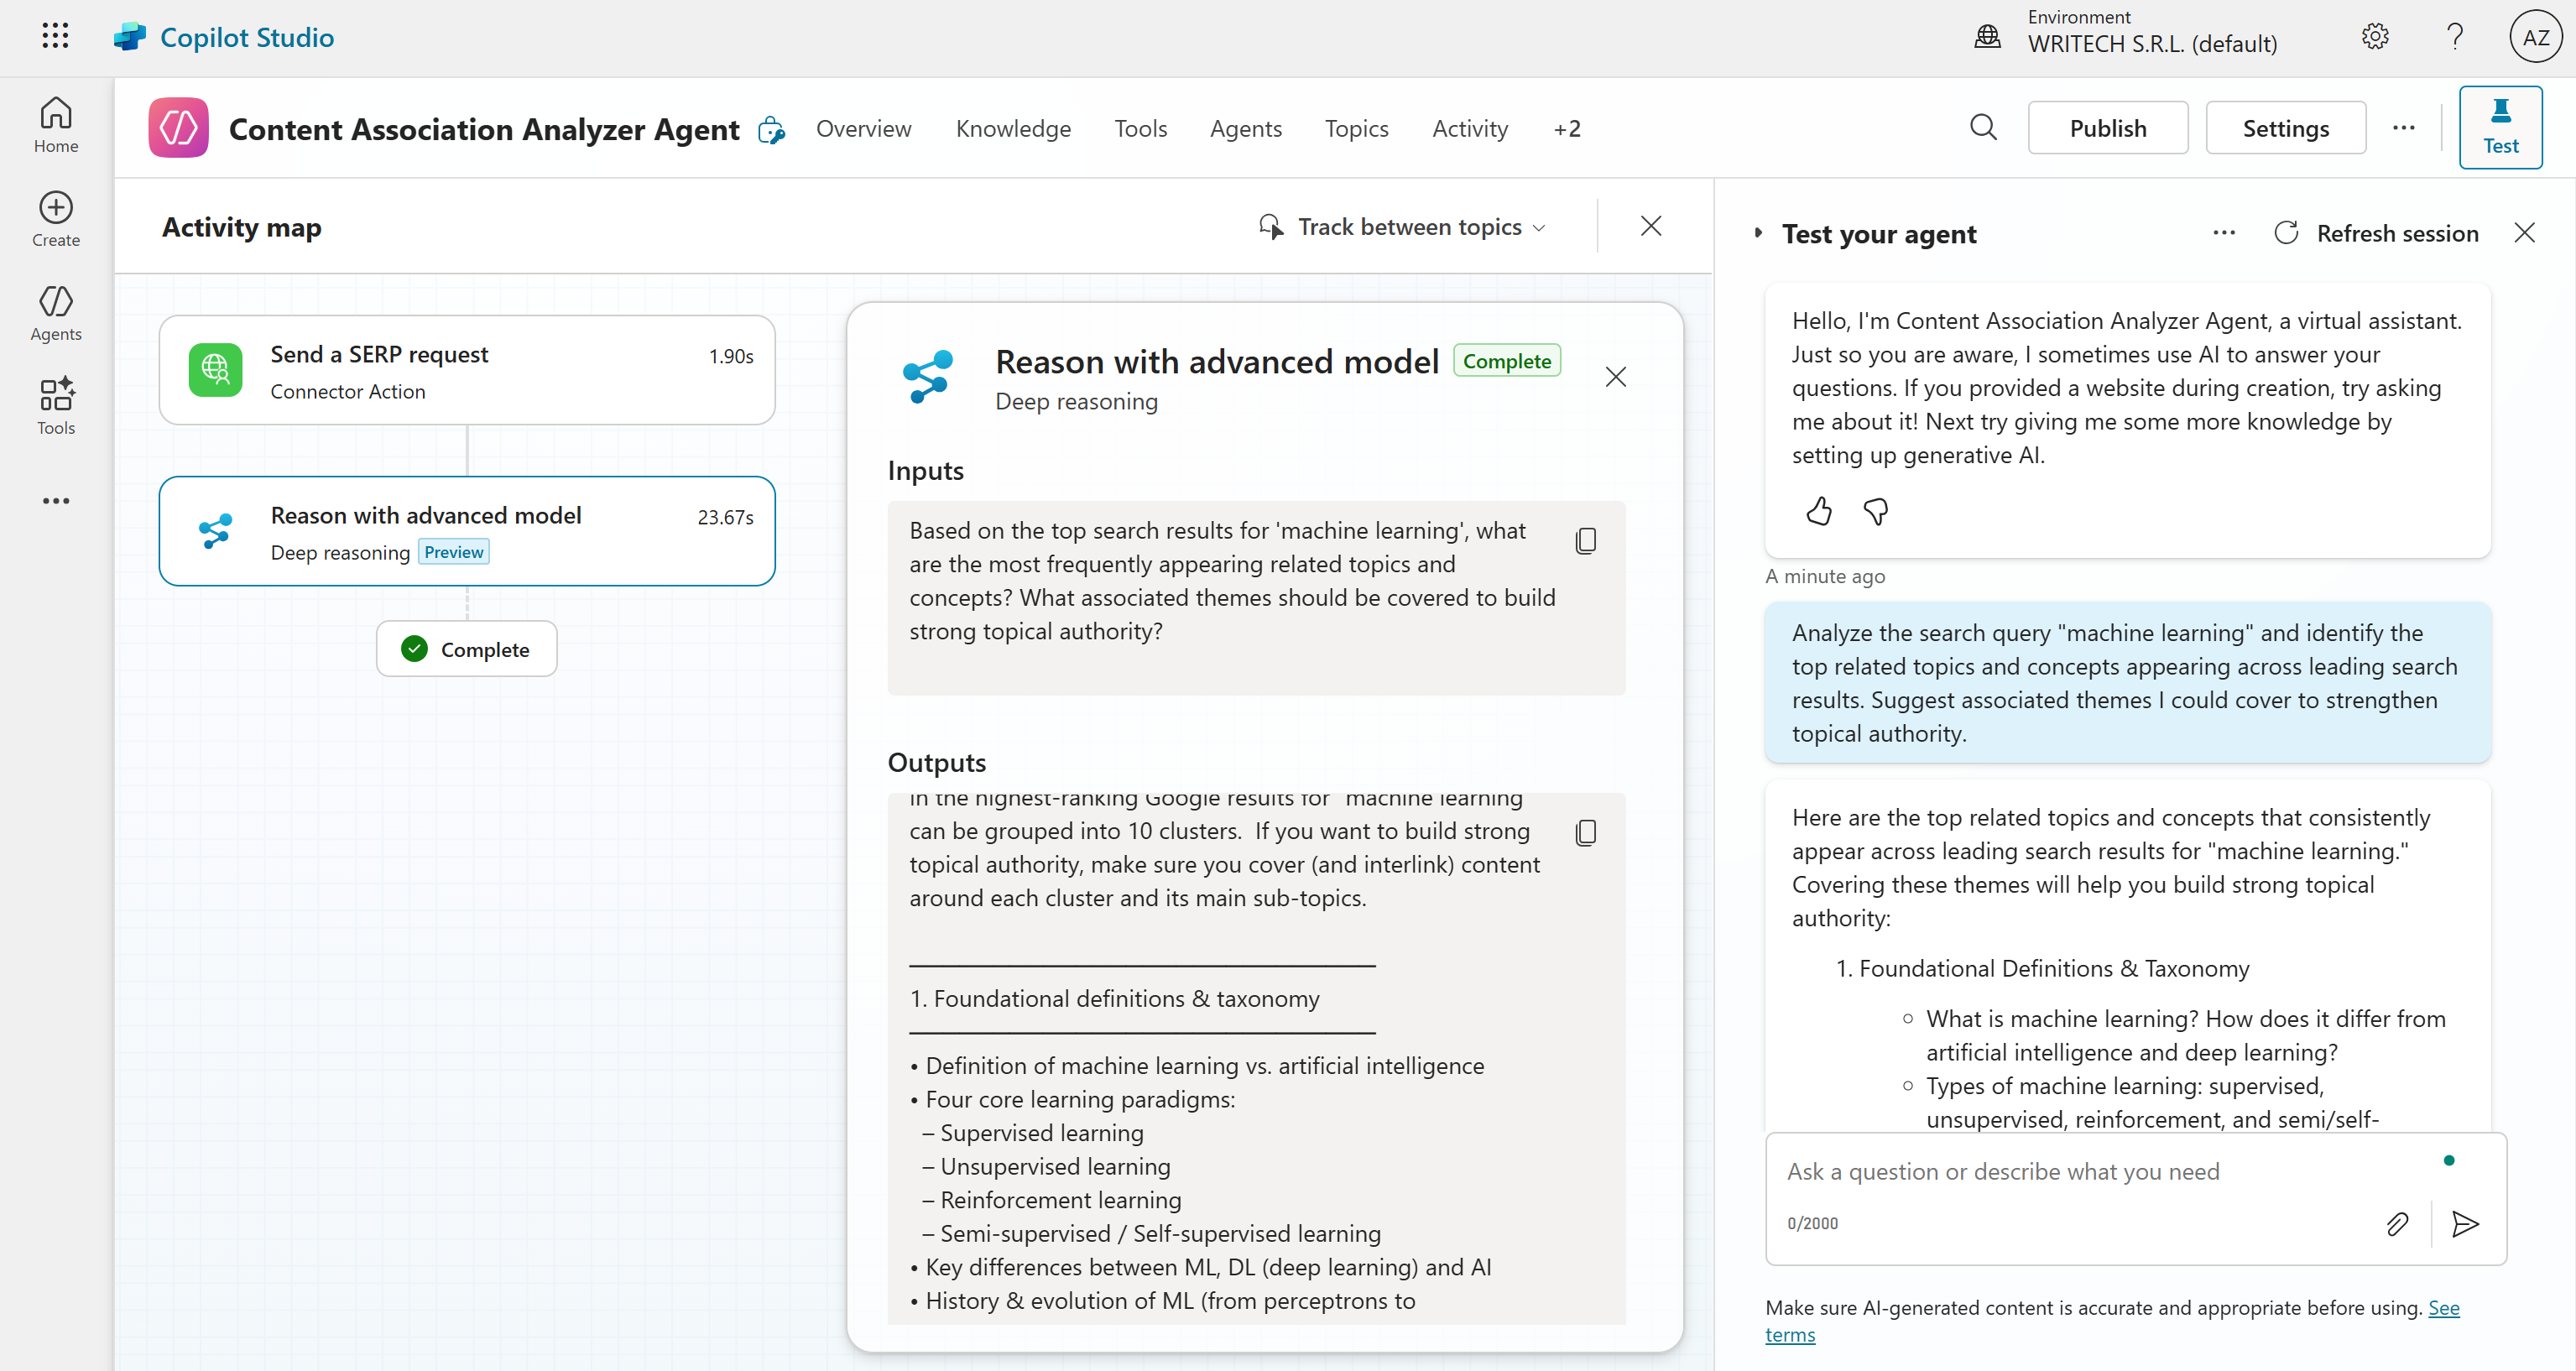
As you can tell, the left panel shows the visual flow representing each step taken by the agent to reach the final goal.
To confirm that the SERP API request was executed successfully, click on the “Send a SERP request” node. You will see that the request was made correctly, and the API returned the Markdown version of the Google SERP for “machine learning”:
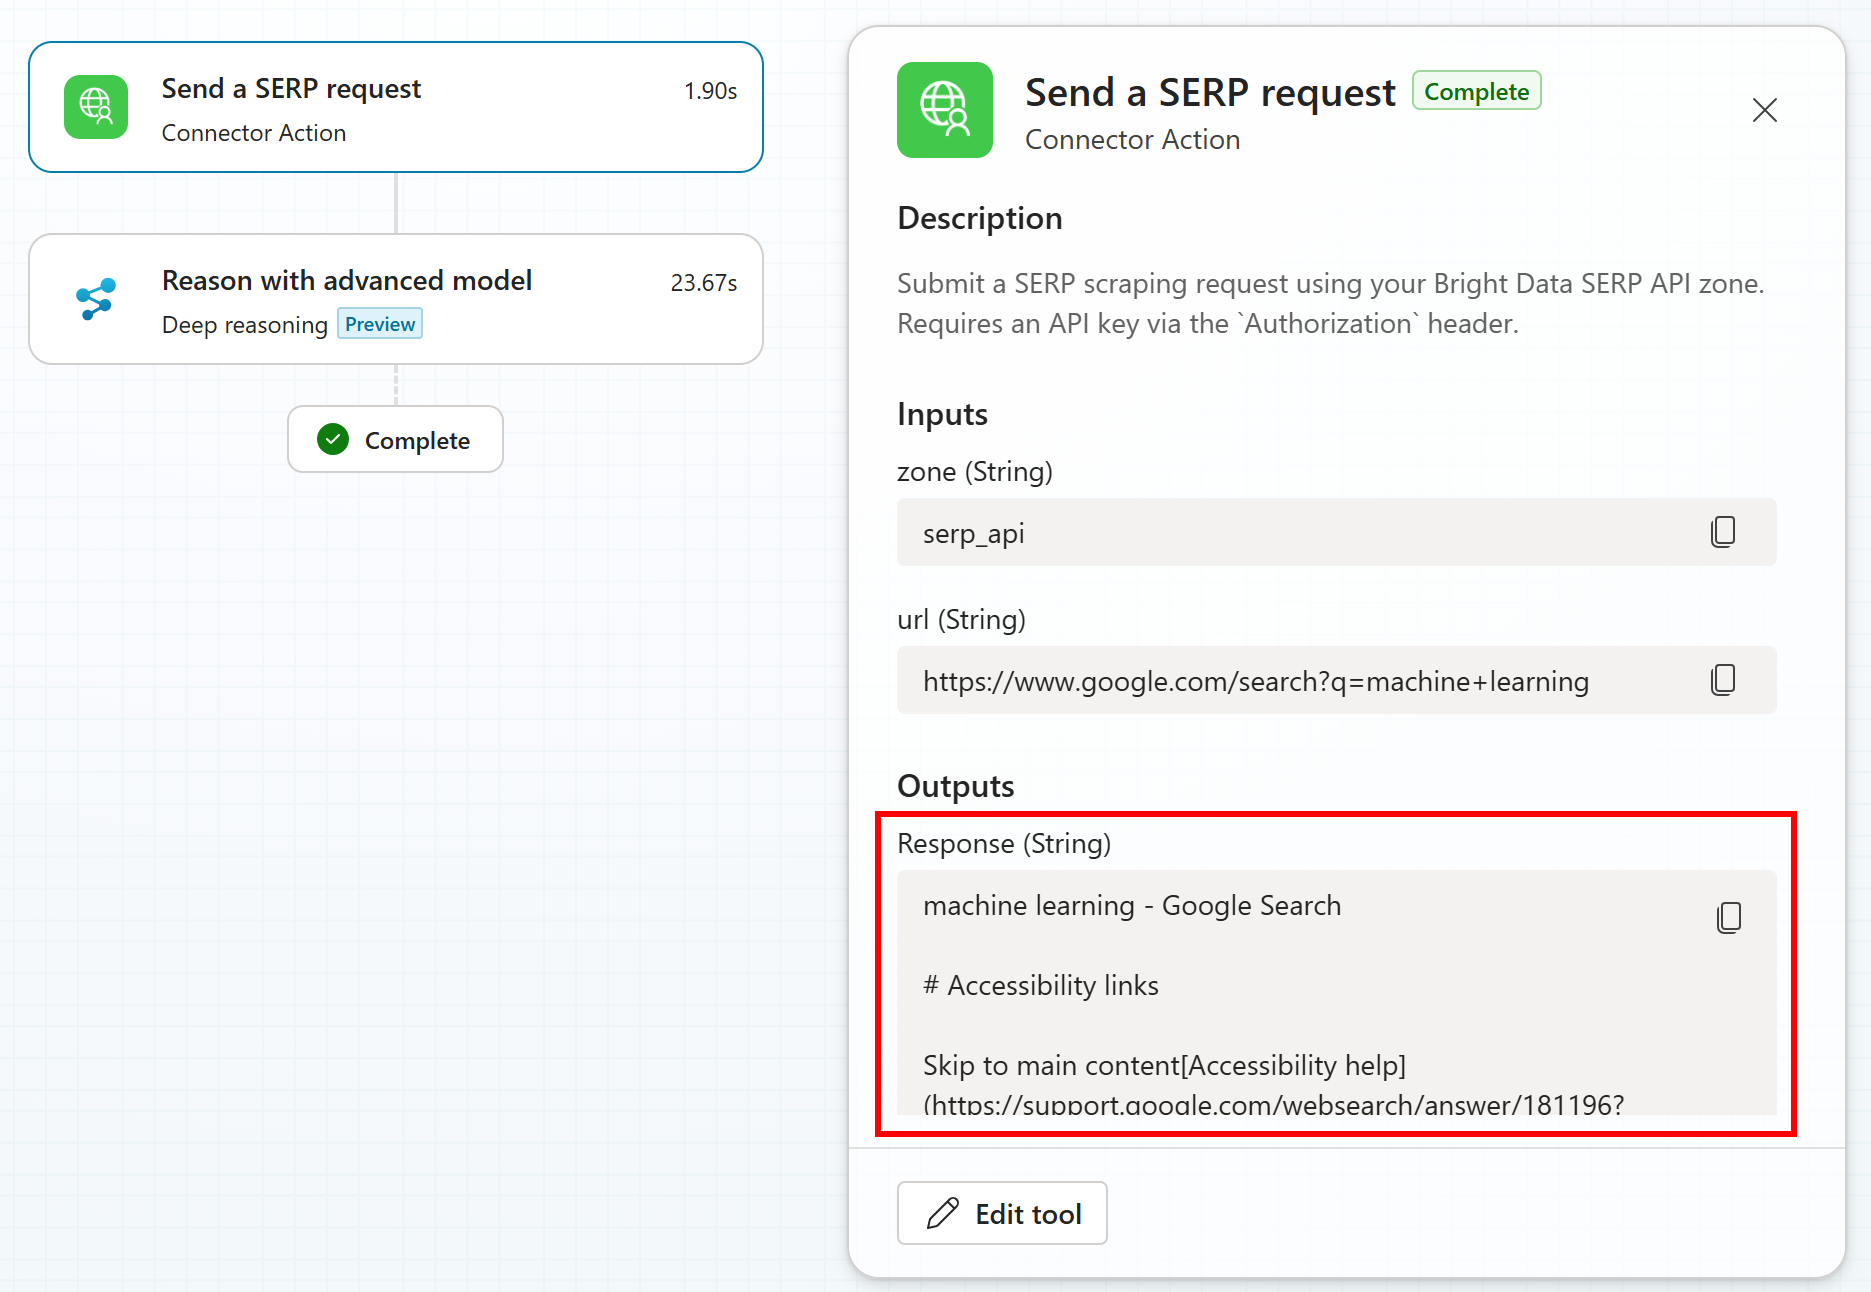
Specifically, below is the final result produced by the agent:
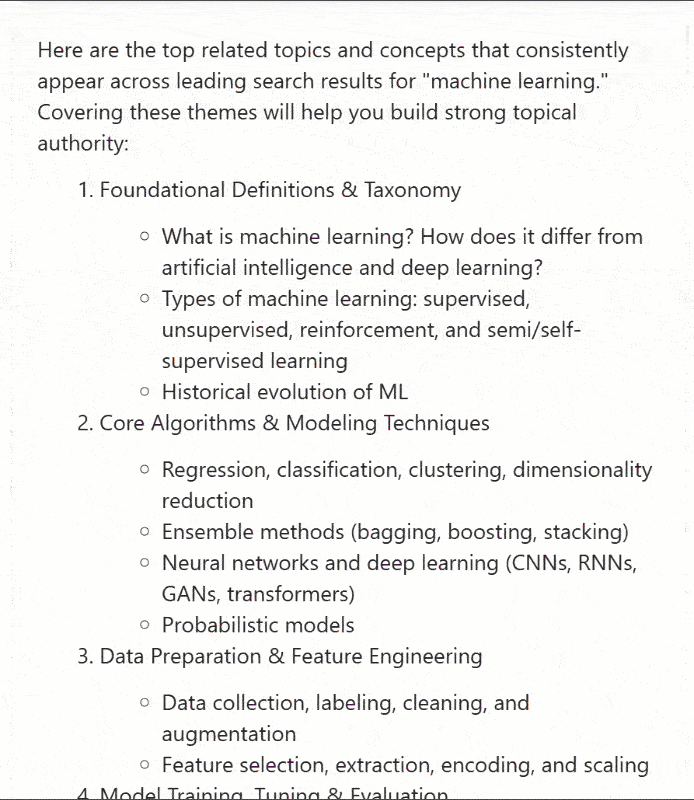
This output contains valuable content insights for SEO optimization. Getting those insights would not be possible without the search data retrieved through Bright Data’s SERP API.
If you have ever tried scraping Google results, you know how challenging it can be due to JavaScript rendering (which even led to an SEO data crisis) and advanced anti-bot protections. Even after successful scraping, you would still need to clean and optimize the content for AI ingestion. Bright Data’s SERP API handles all of this automatically while providing infinite scalability, allowing you to publish your AI agent and scale it indefinitely.
Now, experiment with different agent descriptions and prompts to explore other scenarios, such as agentic RAG workflows, fact-checking, news summarization, or any use case that requires fresh web search data.
Et voilà! You just understood how to integrate Bright Data’s SERP API into an AI agent in Microsoft Copilot Studio.
Conclusion
In this blog post, you saw how to use Bright Data’s SERP API for a content association analysis workflow.
Thanks to that, you were able to build an AI agent in Copilot Studio that can fetch SERP data from Google and analyze it to discover semantically accurate topics related to an input keyword. This is extremely useful for SEO optimization and many other use cases!
To build even richer and more complex AI agents and workflows, explore the full range of services offered by Bright Data’s infrastructure for AI.
Create a Bright Data account for free and get access to our AI-ready web data solutions!

Technical Writer
Antonello Zanini is a technical writer, editor, and software engineer with 5M+ views. Expert in technical content strategy, web development, and project management.


