

Python is one of the most popular languages when it comes to web scraping. What is the biggest source of information on the Internet? Google! That is why scraping Google with Python is so popular. The idea is to automatically retrieve SERP data and use it for marketing, competitor monitoring, and more.
Follow this guided tutorial and learn how to do Google scraping in Python with Selenium. Let’s dive in!
What Data To Scrape From Google?
Google is one of the largest sources of public data on the Internet. There is tons of interesting information that you can retrieve from it, from Google Maps reviews to “People also ask” answers:

However, what users and companies are usually interested in is SERP data. A SERP, short for “Search Engine Results Page,” is the page returned by search engines such as Google in response to a user query. Typically, it includes a list of cards with links and text descriptions to web pages proposed by the search engine.
Here is what a SERP page looks like:

SERP data is crucial for businesses to understand their online visibility and study the competition. It provides insights into user preferences, keyword performance, and competitor strategies. By analyzing SERP data, businesses can optimize their content, improve SEO rankings, and tailor marketing strategies to better meet user needs.
So, now you know that SERP data is undoubtedly very valuable. All that remains is to figure out how to choose the right tool to retrieve it. Python is one of the best programming languages for web scraping and is perfectly suited for this purpose. But before diving into manual scraping, let’s explore the best and fastest option for scraping Google search results: Bright Data’s SERP API.
Introducing Bright Data’s SERP API
Before diving into the manual scraping guide, consider leveraging Bright Data’s SERP API for efficient and seamless data collection. The SERP API provides real-time access to search engine results from all major search engines, including Google, Bing, DuckDuckGo, Yandex, Baidu, Yahoo, and Naver. This powerful tool is built on Bright Data’s industry-leading proxy services and advanced anti-bot solutions, ensuring reliable and accurate data retrieval without the usual challenges associated with web scraping.
Why Choose Bright Data’s SERP API Over Manual Scraping?
- Real-Time Results and High Accuracy: The SERP API delivers real-time search engine results, ensuring you get accurate and up-to-date data. With location accuracy down to the city level, you see exactly what a real user would see anywhere in the world.
- Advanced Anti-Bot Solutions: Forget about getting blocked or dealing with CAPTCHA challenges. The SERP API includes automated CAPTCHA solving, browser fingerprinting, and full proxy management to ensure smooth and uninterrupted data collection.
- Customizable and Scalable: The API supports a variety of tailored search parameters, allowing you to customize your queries to match specific needs. It’s built for volume, handling growing traffic and peak periods with ease.
- Ease of Use: With simple API calls, you can retrieve structured SERP data in JSON or HTML format, making it easy to integrate into your existing systems and workflows. The response time is exceptional, typically under 5 seconds.
- Cost-Effective: Save on operational costs by using the SERP API. You only pay for successful requests, and there’s no need to invest in maintaining scraping infrastructure or dealing with server issues.
Start your free trial today and experience the efficiency and reliability of Bright Data’s SERP API!
Build a Google SERP Scraper in Python
Follow this step-by-step tutorial and see how to build a Google SERP scraping script in Python.
Step 1: Project setup
To follow this guide, you need Python 3 installed on your machine. If you have to install it, download the installer, launch it, and follow the wizard.
You now have everything you need to scrape Google in Python!
Use the commands below to create a Python project with a virtual environment:
mkdir google-scraper

cd google-scraper

python -m venv env
google-scraper will be the root directory of your project.
Load the project folder in your favorite Python IDE. PyCharm Community Edition or Visual Studio Code with the Python extension are both great options.
In Linux or macOS, activate the virtual environment with the following command:
./env/bin/activateOn Windows run instead:
env/Scripts/activateNote that some IDEs recognize the virtual environment for you, so you do need to activate it manually.
Add a scraper.py file in your project’s folder and initialize it as below:
print("Hello, World!")This is just a simple script that prints the “Hello, World!” message, but it will soon contain the Google scraping logic.
Verify that your script works as desired by launching it via the run button in your IDE or with this command:
python scraper.pyThe script should print:
Hello, World!Well done! You now have a Python environment for SERP scraping.
Before jumping into scraping Google with Python, consider taking a look at our guide on web scraping with Python.
Step 2: Install the scraping libraries
It is time to install the appropriate Python scraping library for scraping data from Google. There are a few options available, and choosing the best approaches requires an analysis of the target site. At the same time, it is Google we are talking about, and we all know how Google works.
Forging a Google search URL that does not raise the sights of its anti-bot technologies is complex. We all know that Google requires user interaction. That is why the easiest and most effective way to interact with the search engine is through a browser, simulating what a real user would do.
In other words, you will need a headless browser tool to render web pages in a controllable browser. Selenium will be perfect!
In an activated Python virtual environment, execute the command below to install the selenium package:
pip install seleniumThe setup process may take some time, so be patient.
Awesome! You just added selenium to your project’s dependencies.
Step 3: Set up Selenium
Import Selenium by adding the following lines to scraper.py:
from selenium import webdriver

from selenium.webdriver.chrome.service import Service

from selenium.webdriver.chrome.options import Options
Initialize a a Chrome WebDriver instance to control a Chrome window in headless mode as below:
# options to launch Chrome in headless mode

options = Options()

options.add_argument('--headless') # comment it while developing locally

# initialize a web driver instance with the

# specified options

driver = webdriver.Chrome(

service=Service(),

options=options

)Note: The --headless flag makes sure that Chrome will be launched with no GUI. If you want to see the operations performed by your script on the Google page, comment out that option. In general, disable the --headless flag while developing locally but leave it in production. That is because running Chrome with the GUI takes a lot of resources.
As the last line of your script, do not forget to close the web driver instance:
driver.quit()Your scraper.py file should now contain:
from selenium import webdriver

from selenium.webdriver.chrome.service import Service

from selenium.webdriver.chrome.options import Options

# options to launch Chrome in headless mode

options = Options()

options.add_argument('--headless') # comment it while developing locally

# initialize a web driver instance with the

# specified options

driver = webdriver.Chrome(

service=Service(),

options=options

)

# scraping logic...

# close the browser and free up its resources

driver.quit()
Wonderful! You have everything it takes to scrape dynamic websites.
Step 4: Visit Google
The first step in scraping Google with Python is to connect to the target site. Use the get() function from the driver object to instruct Chrome to visit the Google home page:
driver.get("https://google.com/")This is what your Python SERP scraping script should look like so far:
from selenium import webdriver

from selenium.webdriver.chrome.service import Service

from selenium.webdriver.chrome.options import Options

# options to launch Chrome in headless mode

options = Options()

options.add_argument('--headless') # comment it while developing locally

# initialize a web driver instance with the

# specified options

driver = webdriver.Chrome(

service=Service(),

options=options

)

# connect to the target site

driver.get("https://google.com/")

# scraping logic...

# close the browser and free up its resources

driver.quit()
Launch the script in headed mode and you will see the following browser window for a split second before the quit() instruction terminates it:

If you are a user located in the EU (European Union) the Google home page will also contain the GDPR popup below:

In both cases, the “Chrome is being controlled by automated test software.” message informs you that Selenium is controlling Chrome as you want.
Great! Selenium opens the Google page as desired.
Note: If Google showed the cookie policy dialog for GDPR reasons, follow the next step. Otherwise, you can skip to step 6.
Step 5: Deal with the GDPR cookie dialog
The following Google GDPR cookie dialog will or will not appear depending on the location of your IP. Integrate a proxy server into Selenium to choose an exit IP of the country you prefer and avoid this issue.
Inspect the HTML element of the cookie dialog with the DevTools:

Expand the code and you will notice that you can select this HTML element with the CSS selector below:
[role='dialog']If you inspect the “Accept all” button, you will notice that there is no simple CSS selection strategy to select it:

In detail, the CSS classes in the HTML code seem to be randomly generated. To select the button, get all buttons in the cookie dialog element and find the one with the “Accept all” text. The CSS selector to get all the buttons inside the cookie dialog is:
[role='dialog'] buttonApply a CSS selector on the DOM by passing it to the find_elements() Selenium method. This selects HTML elements on the page based on the specified strategy, which is a CSS selector in this case:
buttons = driver.find_elements(By.CSS_SELECTOR, "[role='dialog'] button")To work properly, the above line requires the following import:
from selenium.webdriver.common.by import ByUse next() to find the “Accept all” button. Next, click it:
accept_all_button = next((b for b in buttons if "Accept all" in b.get_attribute("innerText")), None)

# click the "Accept all" button, if present

if accept_all_button is not None:

accept_all_button.click()
This instruction will locate the <button> element in the dialog whose text contains the “Accept all” string. If present, it will then click it by calling the Selenium click() method.
Fantastic! You are ready to simulate a Google search in Python to collect some SERP data.
Step 6: Simulate a Google search
Open Google in your browser and inspect the search form in the DevTools:

The CSS classes appear to be randomly generated, but you can select the form by targeting its action attribute with this CSS selector:
form[action='/search']Apply it in Selenium to retrieve the form element via the find_element() method:
search_form = driver.find_element(By.CSS_SELECTOR, "form[action='/search']")If you skipped step 5, you will need to add the following import:
from selenium.webdriver.common.by import ByExpand the HTML code of the form and focus on the search text area:

Again, the CSS class is randomly generated but you can select it by targeting its aria-label value:
textarea[aria-label='Search']Thus, locate the textarea inside the form and use the send_keys() button to type in the Google search query:
search_form_textarea= search_form.find_element(By.CSS_SELECTOR, "textarea[aria-label='Search']")

google_search_query = "bright data"

search_form_textarea.send_keys(google_search_query)
In this case, the Google query will be “bright data.” Keep in mind that any other query will do.
Now, call the submit() on the form element to submit the form and simulate a Google search:
search_form.submit()Google will perform the search based on the specified query and redirect you to the desired SERP page:

The lines to simulate a Google search in Python with Selenium are:
# select the Google search form

search_form = driver.find_element(By.CSS_SELECTOR, "form[action='/search']")

# select the textarea inside the form

search_form_textarea = search_form.find_element(By.CSS_SELECTOR, "textarea[aria-label='Search']")

# fill out the text area with a given query

google_search_query = "bright data"

search_form_textarea.send_keys(google_search_query)

# submit the form and perform the Google search

search_form.submit()
Here we go! Get ready to retrieve SERP data by scraping Google in Python.
Step 7: Select the search result elements
Inspect the right-hand column in the result section:

As you can see, this is a <div> element you can select with the CSS selector below:
#searchDo not forget that Google pages are dynamic. As a result, you should wait for this element to be present on the page before interacting with it. Achieve that with the following line:
search_div = WebDriverWait(driver, 10).until(EC.presence_of_element_located((By.CSS_SELECTOR, '#search')))WebDriverWait is a special class offered by Selenium to implement explicit waits. In particular, it enables you to wait for a specific event to occur on the page.
In this case, the script will wait up to 10 seconds for the #search HTML node to be present on the node. This way, you can ensure that the Google SERP has loaded as desired.
WebDriverWait requires some extra imports, so add them to scraper.py:
from selenium.webdriver.support.wait import WebDriverWait
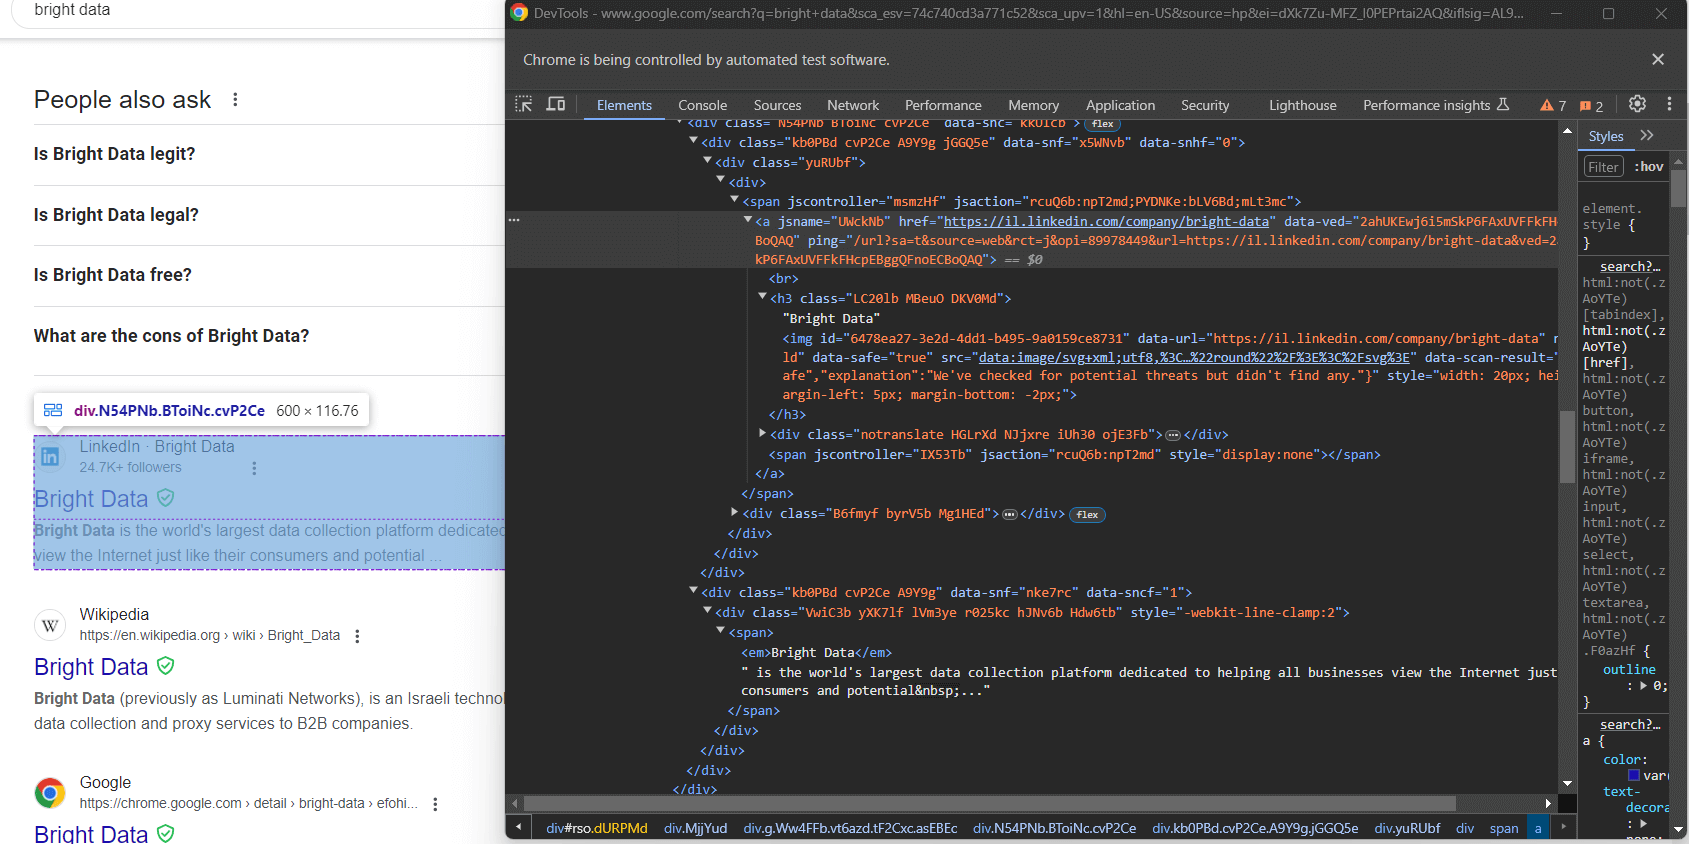
from selenium.webdriver.support import expected_conditions as ECNow, inspect the Google search elements:

Again, selecting them via CSS classes is not a good approach. Instead, focus on their unusual HTML attributes. A proper CSS selector to get the Google search elements is:
div[jscontroller][lang][jsaction][data-hveid][data-ved]This identifies all <div> that have the jscontroller, lang, jsaction, data-hveid, and data-ved attributes.
Pass it to find_elements() to select all Google search elements in Python via Selenium:
google_search_elements = search_div.find_elements(By.CSS_SELECTOR, "div[jscontroller][lang][jsaction][data-hveid][data-ved]")The entire logic will be:
# wait up to 10 seconds for the search div to be on the page

# and select it

search_div = WebDriverWait(driver, 10).until(EC.presence_of_element_located((By.CSS_SELECTOR, '#search')))

# select the Google search elements in the SERP

google_search_elements = search_div.find_elements(By.CSS_SELECTOR, "div[jscontroller][lang][jsaction][data-hveid][data-ved]")
Terrific! You are just one step away from scraping SERP data in Python.
Step 8: Extract the SERP data
Not all Google SERPs are created equal. In some cases, the first search result on the page has a different HTML code than the other search elements:

For example, in this case, the first search result element can be retrieved with this CSS selector:
div.g[data-hveid]Aside from that, what a Google search element contains is pretty much the same. This includes:
- The page title in an
<h3>node. - A URL to the specific page in an
<a>element that is the parent of the<h3>above. - A description in the
[data-sncf='1'] <div>.
Since a single SERP contains several search results, initialize an array where to store your scraped data:
serp_elements = []You will also need a rank integer to keep track of their ranking on the page:
rank = 1Define a function to scrape Google search elements in Python as follows:
def scrape_search_element(search_element, rank):

# select the elements of interest inside the

# search element, ignoring the missing ones, and apply

# the data extraction logic

try:

title_h3 = search_element.find_element(By.CSS_SELECTOR, "h3")

title = title_h3.get_attribute("innerText")

except NoSuchElementException:

title = None

try:

# get the "a" element that has an "h3" child

url_a = search_element.find_element(By.CSS_SELECTOR, "a:has(> h3)")

url = url_a.get_attribute("href")

except NoSuchElementException:

url = None

try:

description_div = search_element.find_element(By.CSS_SELECTOR, "[data-sncf='1']")

description = description_div.get_attribute("innerText")

except NoSuchElementException:

description = None

# return a new SERP data element

return {

'rank': rank,

'url': url,

'title': title,

'description': description

}
Google tends to change its SERP pages a lot. Nodes inside the search elements may disappear and you should protect against with try ... catch statements. In detail, when an element is not on the DOM, find_element() raises a NoSuchElementException exception.
Import the exception:
from selenium.common import NoSuchElementExceptionNote the use of the has() CSS operator to select a node with a specific child. Find out more about it on the official documentation.
Now, pass the first search element and the remaining ones to the scrape_search_element() function. Then, add the returned objects to the serp_elements array:
# scrape data from the first element on the SERP

# (if present)

try:

first_search_element = driver.find_element(By.CSS_SELECTOR, "div.g[data-hveid]")

serp_elements.append(scrape_search_element(first_search_element, rank))

rank += 1

except NoSuchElementException:

pass

# scrape data from all search elements on the SERP

for google_search_element in google_search_elements:

serp_elements.append(scrape_search_element(google_search_element, rank))

rank += 1
At the end of these instructions, serp_elements will store all SERP data of interest. Verify that by printing it in the terminal:
print(serp_elements)That will produce something like:
[

{'rank': 1, 'url': 'https://brightdata.com/', 'title': 'Bright Data - All in One Platform for Proxies and Web Data', 'description': None},

{'rank': 2, 'url': 'https://il.linkedin.com/company/bright-data', 'title': 'Bright Data', 'description': "Bright Data is the world's largest data collection platform dedicated to helping all businesses view the Internet just like their consumers and potential..."},

# omitted for brevity...

{'rank': 6, 'url': 'https://aws.amazon.com/marketplace/seller-profile?id=bf9b4324-6ee3-4eb3-9ca4-083e558d04c4', 'title': 'Bright Data - AWS Marketplace', 'description': 'Bright Data is a leading data collection platform, which enables our customers to collect structured and unstructured data sets from millions of websites...'},

{'rank': 7, 'url': 'https://techcrunch.com/2024/02/26/meta-drops-lawsuit-against-web-scraping-firm-bright-data-that-sold-millions-of-instagram-records/', 'title': 'Meta drops lawsuit against web-scraping firm Bright Data ...', 'description': 'Feb 26, 2024 — Meta has dropped its lawsuit against Israeli web-scraping company Bright Data, after losing a key claim in its case a few weeks ago.'}

]
Incredible! It only remains to export the scraped data to CSV.
Step 9: Export the scraped data to CSV
Now that you know how to scrape Google with Python, see how to export the retrieved data to a CSV file.
First, import the csv package from the Python standard library:
import csvNext, use the csv package to populate the output serp_data.csv file with your SERP data:
header = ["rank", "url", "title", "description"]

with open("serp_data.csv", 'w', newline='', encoding='utf-8') as csvfile:

writer = csv.DictWriter(csvfile, fieldnames=header)

writer.writeheader()

writer.writerows(serp_elements)
Et voilà! Your Google Python scraping script is ready.
Step 10: Put it all together
This is the final code of your scraper.py script:
from selenium import webdriver

from selenium.webdriver.chrome.service import Service

from selenium.webdriver.chrome.options import Options

from selenium.webdriver.common.by import By

from selenium.webdriver.support.wait import WebDriverWait

from selenium.webdriver.support import expected_conditions as EC

from selenium.common import NoSuchElementException

import csv

def scrape_search_element(search_element, rank):

# select the elements of interest inside the

# search element, ignoring the missing ones, and apply

# the data extraction logic

try:

title_h3 = search_element.find_element(By.CSS_SELECTOR, "h3")

title = title_h3.get_attribute("innerText")

except NoSuchElementException:

title = None

try:

# get the "a" element that has an "h3" child

url_a = search_element.find_element(By.CSS_SELECTOR, "a:has(> h3)")

url = url_a.get_attribute("href")

except NoSuchElementException:

url = None

try:

description_div = search_element.find_element(By.CSS_SELECTOR, "[data-sncf='1']")

description = description_div.get_attribute("innerText")

except NoSuchElementException:

description = None

# return a new SERP data element

return {

'rank': rank,

'url': url,

'title': title,

'description': description

}

# options to launch Chrome in headless mode

options = Options()

options.add_argument('--headless') # comment it while developing locally

# initialize a web driver instance with the

# specified options

driver = webdriver.Chrome(

service=Service(),

options=options

)

# connect to the target site

driver.get("https://google.com/?hl=en-US")

# select the buttons in the cookie dialog

buttons = driver.find_elements(By.CSS_SELECTOR, "[role='dialog'] button")

accept_all_button = next((b for b in buttons if "Accept all" in b.get_attribute("innerText")), None)

# click the "Accept all" button, if present

if accept_all_button is not None:

accept_all_button.click()

# select the Google search form

search_form = driver.find_element(By.CSS_SELECTOR, "form[action='/search']")

# select the textarea inside the form

search_form_textarea = search_form.find_element(By.CSS_SELECTOR, "textarea[aria-label='Search']")

# fill out the text area with a given query

google_search_query = "bright data"

search_form_textarea.send_keys(google_search_query)

# submit the form and perform the Google search

search_form.submit()

# wait up to 10 seconds for the search div to be on the page

# and select it

search_div = WebDriverWait(driver, 10).until(EC.presence_of_element_located((By.CSS_SELECTOR, '#search')))

# select the Google search elements in the SERP

google_search_elements = search_div.find_elements(By.CSS_SELECTOR, "div[jscontroller][lang][jsaction][data-hveid][data-ved]")

# where to store the scraped data

serp_elements = []

# to keep track of the current ranking

rank = 1

# scrape data from the first element on the SERP

# (if present)

try:

first_search_element = driver.find_element(By.CSS_SELECTOR, "div.g[data-hveid]")

serp_elements.append(scrape_search_element(first_search_element, rank))

rank += 1

except NoSuchElementException:

pass

# scrape data from all search elements on the SERP

for google_search_element in google_search_elements:

serp_elements.append(scrape_search_element(google_search_element, rank))

rank += 1

# export the scraped data to CSV

header = ["rank", "url", "title", "description"]

with open("serp_data.csv", 'w', newline='', encoding='utf-8') as csvfile:

writer = csv.DictWriter(csvfile, fieldnames=header)

writer.writeheader()

writer.writerows(serp_elements)

# close the browser and free up its resources

driver.quit()
Wow! In just over 100 lines of code, you can build a Google SERP scraper in Python.
Verify that it produces the expected results by running it in your IDE or by using this command:
python scraper.pyWait for the scraper execution to end, and a serp_results.csv file will appear in the root folder of the project. Open it, and you will see:

Congrats! You just performed Google scraping in Python.
Conclusion
In this tutorial, you saw what data can be collected from Google and why SERP data is the most interesting. In particular, you learned how to use browser automation to build a SERP scraper in Python using Selenium.
That works on simple examples, but there are three main challenges in scraping Google with Python:
- Google keeps changing the page structure of SERPs.
- Google has some of the most advanced anti-bot solutions on the market.
- Building an effective scraping process that can retrieve tons of SERP data in parallel is complex and costs a lot of money.
Forget about those challenges with Bright Data’s SERP API. This next-generation API provides a set of endpoints that expose real-time SERP data from all major search engines. SERP API is based on top-notch Bright Data’s proxy services and anti-bot bypass solutions, targeting several search engines with no effort.
Make a simple API call and get your SERP data in JSON or HTML format thanks to SERP API, start your free trial today!

Technical Writer
Antonello Zanini is a technical writer, editor, and software engineer with 5M+ views. Expert in technical content strategy, web development, and project management.


