
In this tutorial, you will learn:
- What Haystack is and why integrating Bright Data takes its AI pipelines and agents to the next level.
- How to get started.
- How to integrate Haystack with Bright Data using custom tools.
- How to connect Haystack to 60+ tools available via Web MCP.
Let’s dive in!
Haystack: What It Is and the Need for Web Data Retrieval Tools
Haystack is an open-source AI framework for building production-ready applications with LLMs. It enables you to create RAG systems, AI agents, and advanced data pipelines by connecting components like models, vector databases, and tools into modular workflows.
Haystack provides the flexibility, customization, and scalability needed to take AI projects from concept to deployment. All that in an open-source library with over 23k GitHub stars.
However, no matter how sophisticated your Haystack application is, it still faces the core limitations of LLMs: outdated knowledge from static training data and the lack of live web access!
The solution is integration with a web data provider for AI like Bright Data, which offers tools for web scraping, search, browser automation, and much more—unlocking the full potential of your AI system!
Prerequisites
To follow this tutorial, you need:
- Python 3.9+ installed locally.
- A Bright Data account with an API key configured.
- An OpenAI API key (or an API key from any other LLM supported by Haystack).
If you have not done so yet, follow the official guide to set up your account and generate a Bright Data API key. Store it in a safe place, as you will need it shortly.
Having some knowledge of Bright Data’s products and services will also be helpful, as well as a basic understanding of how tools and MCP integration work in Haystack.
For simplicity, we will assume you already have a Python project with a virtual environment set up. Install Haystack with the following command:
pip install haystack-aiYou now have everything you need to get started with Bright Data integration in Haystack. Here, we will explore two approaches:
- Define custom tools using the
@toolannotation. - Load an
MCPToolfrom the Bright Data Web MCP server.
Defining Custom Bright Data–Powered Tools in Haystack
One way to access Bright Data’s capabilities in Haystack is by defining custom tools. These tools integrate with Bright Data products via API in custom functions.
To simplify this process, we will rely on the Bright Data Python SDK, which provides a Python API to easily call:
- Web Unlocker API: Scrape any website with a single request and receive clean HTML or JSON, while all proxy, unblocking, header, and CAPTCHA handling is automated.
- SERP API: Collect search engine results from Google, Bing, and many others at scale without worrying about blocks.
- Web Scraping APIs: Retrieve structured, parsed data from popular sites like Amazon, Instagram, LinkedIn, Yahoo Finance, and more.
- And other Bright Data solutions…
We will transform the main SDK methods into Haystack-ready tools, allowing any AI agent or pipeline to benefit from Bright Data–powered web data retrieval!
Step #1: Install and Set Up the Bright Data Python SDK
Start by installing the Bright Data Python SDK through the brightdata-sdk PyPI package:
pip install brightdata-sdkImport the library and initialize a BrightDataClient instance:
import os
from brightdata import BrightDataClient

os.environ["BRIGHTDATA_API_TOKEN"] = "<YOUR_BRIGHT_DATA_API_KEY>" # Replace it with your Bright Data API key

# Initialize the Bright Data Python SDK client
client = BrightDataClient(
    token=BRIGHT_DATA_API_KEY,
)
Replace the <YOUR_BRIGHT_DATA_API_KEY> placeholder with the API key you generated in the “Prerequisites” section.
For production-ready code, avoid hard-coding your API key in the script. The Bright Data Python SDK expects it from the BRIGHTDATA_API_TOKEN environment variable, so set your environment variable to your Bright Data API key globally, or load it from a .env file using the python-dotenv package.
BrightDataClient will automatically set up default Web Unlocker and SERP API zones in your Bright Data account: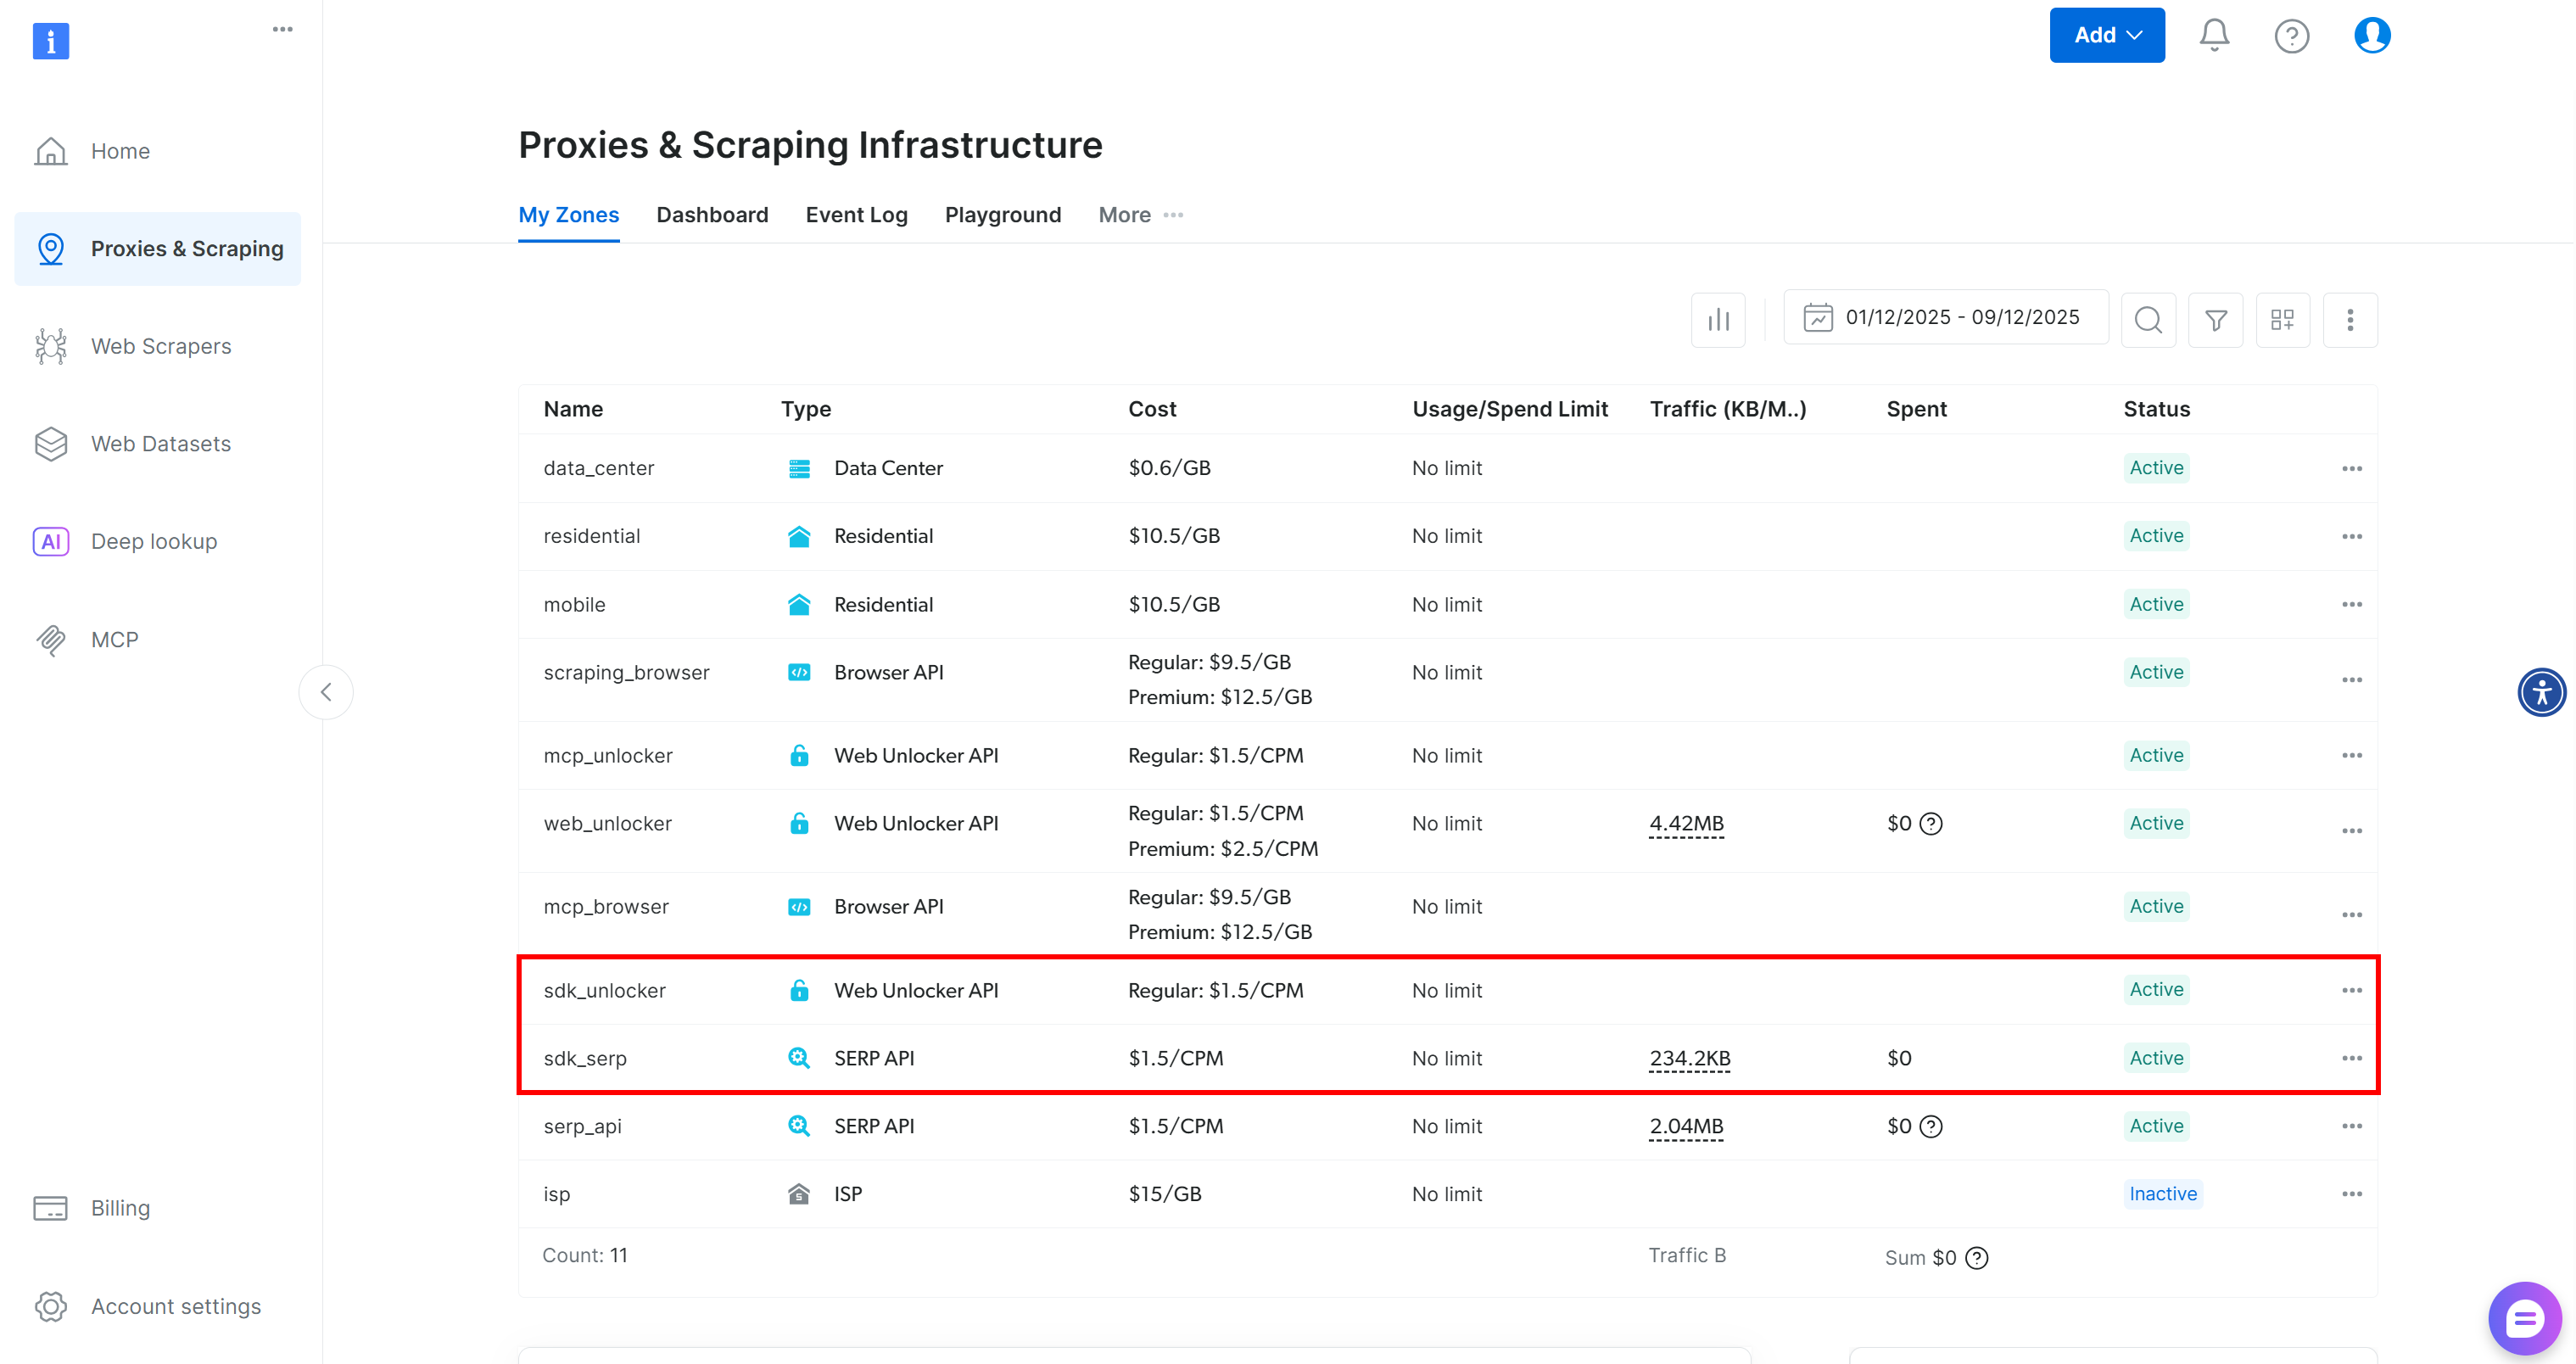
These two zones are required by the SDK to expose its 60+ tools.
If you already have custom zones in place, specify them as explained in the docs:
client = BrightDataClient(
    serp_zone="serp_api",              # Replace with the name of your SERP API zone
    web_unlocker_zone="web_unlocker",  # Replace with the name of your Web Unlocker API zone
)
Fantastic! You are now ready to turn Bright Data Python SDK methods into Haystack tools.
Step #2: Turn the SDK Functions into Tools
This guided section will show you how to convert the SERP API and Web Unlocker methods from the Bright Data Python SDK into Haystack tools. After learning this, you will be able to easily transform any other SDK method or direct API call into a Haystack tool.
Begin by transforming the SERP API method to run as an AI-ready tool with:
from brightdata import SearchResult
from typing import Union, List
import json
from haystack.tools import Tool

parameters = {
    "type": "object",
    "properties": {
        "query": {
            "type": ["string", "array"],
            "items": {"type": "string"},
            "description": "The search query or a list of queries to run on Google."
        },
        "kwargs": {
            "type": "object",
            "description": "Additional optional parameters for the search (e.g., location, language, device, num_results)."
        }
    },
    "required": ["query"]
}

def serp_api_output_handler(results: Union[SearchResult, List[SearchResult]]) -> str:
    if isinstance(results, list):
        # Handle a list of SearchResult instances
        output = [result.data for result in results]
    else:
        # Handle a single SearchResult
        output = results.data

    return json.dumps(output)

serp_api_tool = Tool(
    name="serp_api_tool",
    description="Calls the Bright Data SERP API to perform web searches and retrieve SERP data from Google.",
    parameters=parameters,
    function=client.search.google,
    outputs_to_string={ "handler": serp_api_output_handler },
    outputs_to_state= {
            "documents": {"handler": serp_api_output_handler }
        }
)
The above snippet defines a Haystack Tool for the Bright Data SERP API. Constructing the tool requires a name, a description, a JSON schema matching the input parameters, and the function to convert into a tool.
Now, client.search.google() returns a special object. Thus, you require a custom output handler to transform the function’s output into a string. This handler converts the results to JSON and maps them to both a string output and the agent state.
The Tool you just defined can now be used by AI agents or pipelines to run Google searches and retrieve structured SERP data.
Similarly, create a tool for calling the Web Unlocker method:
parameters = {
    "type": "object",
    "properties": {
        "url": {
            "type": ["string", "array"],
            "items": {"type": "string"},
            "description": "The URL or list of URLs to scrape."
        },
        "country": {
            "type": "string",
            "description": "Optional country code to localize the scraping."
        },
    },
    "required": ["url"]
}

def web_unlocker_output_handler(results: Union[ScrapeResult, List[ScrapeResult]]) -> str:
    if isinstance(results, list):
        # Handle a list of ScrapeResult instances
        output = [result.data for result in results]
    else:
        # Handle a single ScrapeResult
        output = results.data

    return json.dumps(output)

web_unlocker_tool = Tool(
    name="web_unlocker_tool",
    description="Calls the Bright Data Web Unlocker API to scrape web pages and retrieve their content.",
    parameters=parameters,
    function=client.scrape.generic.url,
    outputs_to_string={"handler": web_unlocker_output_handler},
    outputs_to_state={"scraped_data": {"handler": web_unlocker_output_handler}}
)
This new Tool allows AI agents to scrape web pages and access their content, even if they are protected by anti-scraping or anti-bot solutions.
Awesome! You now have two Bright Data Haystack tools available.
Step #3: Pass the Tools to a Haystack AI Agent
The above tools can be called directly, passed to chat generators, used in Haystack pipelines, or integrated into AI agents. We will show the AI agent approach, but you can easily test the other three methods by following the documentation.
First, a Haystack AI agent requires an LLM engine. In this example, we will use an OpenAI model, but any other supported LLM is fine:
from haystack.components.generators.chat import OpenAIChatGenerator

os.environ["OPENAI_API_KEY"] = "<YOUR_OPENAI_API_KEY>" # Replace with your OpenAI API key


# Initialize the LLM engine
chat_generator = OpenAIChatGenerator(
    model="gpt-5-mini"
)
As emphasized before, load the OpenAI API key from the environment in a production script. Here, we configured the gpt-5-mini model, but any OpenAI model that supports tool calling will work. Other supported generators are also compatible.
Next, use the LLM engine together with the tools to create a Haystack AI agent:
from haystack.components.agents import Agent

agent = Agent(
    chat_generator=chat_generator,
    tools=[serp_api_tool, web_unlocker_tool], # The Bright Data tools
)
Note how the two Bright Data tools are passed to the agent’s tools input. That enables the AI agent, fueled by OpenAI GPT-5 Mini, to call the custom Bright Data tools. Mission complete!
Step #4: Run the AI Agent
To test the Haystack + Bright Data integration, consider a task that involves web search and scraping. For example, use this prompt:
Identify the top 3 latest stock market news about the Google company on different topics, access the articles, and provide a brief summary for each. This gives a quick heads-up for anyone interested in investing in Google.
Use the snippet below to execute that prompt in your Bright Data-powered Haystack agent:
from haystack.dataclasses import ChatMessage

agent.warm_up()
prompt = """
Identify the top 3 latest stock market news about the Google company on different topics, access the articles, and provide a brief summary for each.
"""
chat_message = ChatMessage.from_user(prompt)

response = agent.run(messages=[chat_message])
Then, print the response produced by the AI agent, along with details on tool usage, using:
for msg in response["messages"]:
    role = msg._role.value

    if role == "tool":
        # Log tool outputs
        for content in msg._content:
            print("=== Tool Output ===")
            print(json.dumps(content.result, indent=2))
    elif role == "assistant":
        # Log assistant final messages
        for content in msg._content:
            if hasattr(content, "text"):
                print("=== Assistant Response ===")
                print(content.text)
Perfect! It only remains to see the complete code and execute it to verify that it works.
Step #5: Complete Code
The final code for your Haystack AI agent connected to Bright Data tools is:
# pip install haystack-ai brightdata-sdk

import os
from brightdata import BrightDataClient, SearchResult, ScrapeResult
from typing import Union, List
import json
from haystack.tools import Tool
from haystack.components.generators.chat import OpenAIChatGenerator
from haystack.components.agents import Agent
from haystack.dataclasses import ChatMessage

# Set the required environment variables
os.environ["BRIGHTDATA_API_TOKEN"] = "<YOUR_BRIGHT_DATA_API_KEY>" # Replace it with your Bright Data API key
os.environ["OPENAI_API_KEY"] = "<YOUR_OPENAI_API_KEY>" # Replace it with your OpenAI API key

# Initialize the Bright Data Python SDK client
client = BrightDataClient(
    serp_zone="serp_api",              # Replace with the name of your SERP API zone
    web_unlocker_zone="web_unlocker",  # Replace with the name of your Web Unlocker API zone
)

# Turn client.search.google() from Bright Data Python SDK into a Haystack tool
parameters = {
    "type": "object",
    "properties": {
        "query": {
            "type": ["string", "array"],
            "items": {"type": "string"},
            "description": "The search query or a list of queries to run on Google."
        },
        "kwargs": {
            "type": "object",
            "description": "Additional optional parameters for the search (e.g., location, language, device, num_results)."
        }
    },
    "required": ["query"]
}

def serp_api_output_handler(results: Union[SearchResult, List[SearchResult]]) -> str:
    if isinstance(results, list):
        # Handle a list of SearchResult instances
        output = [result.data for result in results]
    else:
        # Handle a single SearchResult
        output = results.data

    return json.dumps(output)

serp_api_tool = Tool(
    name="serp_api_tool",
    description="Calls the Bright Data SERP API to perform web searches and retrieve SERP data from Google.",
    parameters=parameters,
    function=client.search.google,
    outputs_to_string={ "handler": serp_api_output_handler },
    outputs_to_state= {
            "documents": {"handler": serp_api_output_handler }
        }
)

# Turn client.scrape.generic.url() from Bright Data Python SDK into a Haystack tool
parameters = {
    "type": "object",
    "properties": {
        "url": {
            "type": ["string", "array"],
            "items": {"type": "string"},
            "description": "The URL or list of URLs to scrape."
        },
        "country": {
            "type": "string",
            "description": "Optional country code to localize the scraping."
        },
    },
    "required": ["url"]
}

def web_unlocker_output_handler(results: Union[ScrapeResult, List[ScrapeResult]]) -> str:
    if isinstance(results, list):
        # Handle a list of ScrapeResult instances
        output = [result.data for result in results]
    else:
        # Handle a single ScrapeResult
        output = results.data

    return json.dumps(output)

web_unlocker_tool = Tool(
    name="web_unlocker_tool",
    description="Calls the Bright Data Web Unlocker API to scrape web pages and retrieve their content.",
    parameters=parameters,
    function=client.scrape.generic.url,
    outputs_to_string={"handler": web_unlocker_output_handler},
    outputs_to_state={"scraped_data": {"handler": web_unlocker_output_handler}}
)

# Initialize the LLM engine
chat_generator = OpenAIChatGenerator(
    model="gpt-5-mini"
)

# Initialize a Haystack AI agent
agent = Agent(
    chat_generator=chat_generator,
    tools=[serp_api_tool, web_unlocker_tool], # The Bright Data tools
)

## Run the agent
agent.warm_up()
prompt = """
Identify the top 3 latest stock market news about the Google company on different topics, access the articles, and provide a brief summary for each.
"""
chat_message = ChatMessage.from_user(prompt)

response = agent.run(messages=[chat_message])

## Print the output in structured format, with info on tool usage
for msg in response["messages"]:
    role = msg._role.value

    if role == "tool":
        # Log tool outputs
        for content in msg._content:
            print("=== Tool Output ===")
            print(json.dumps(content.result, indent=2))
    elif role == "assistant":
        # Log assistant final messages
        for content in msg._content:
            if hasattr(content, "text"):
                print("=== Assistant Response ===")
                print(content.text)
Et voilà! In just around 130 lines of code, you just built an AI agent that can search and scrape the web, accomplishing a wide range of tasks and covering multiple use cases.
Step #6: Test the Integration
Launch your script, and you should see a result like this: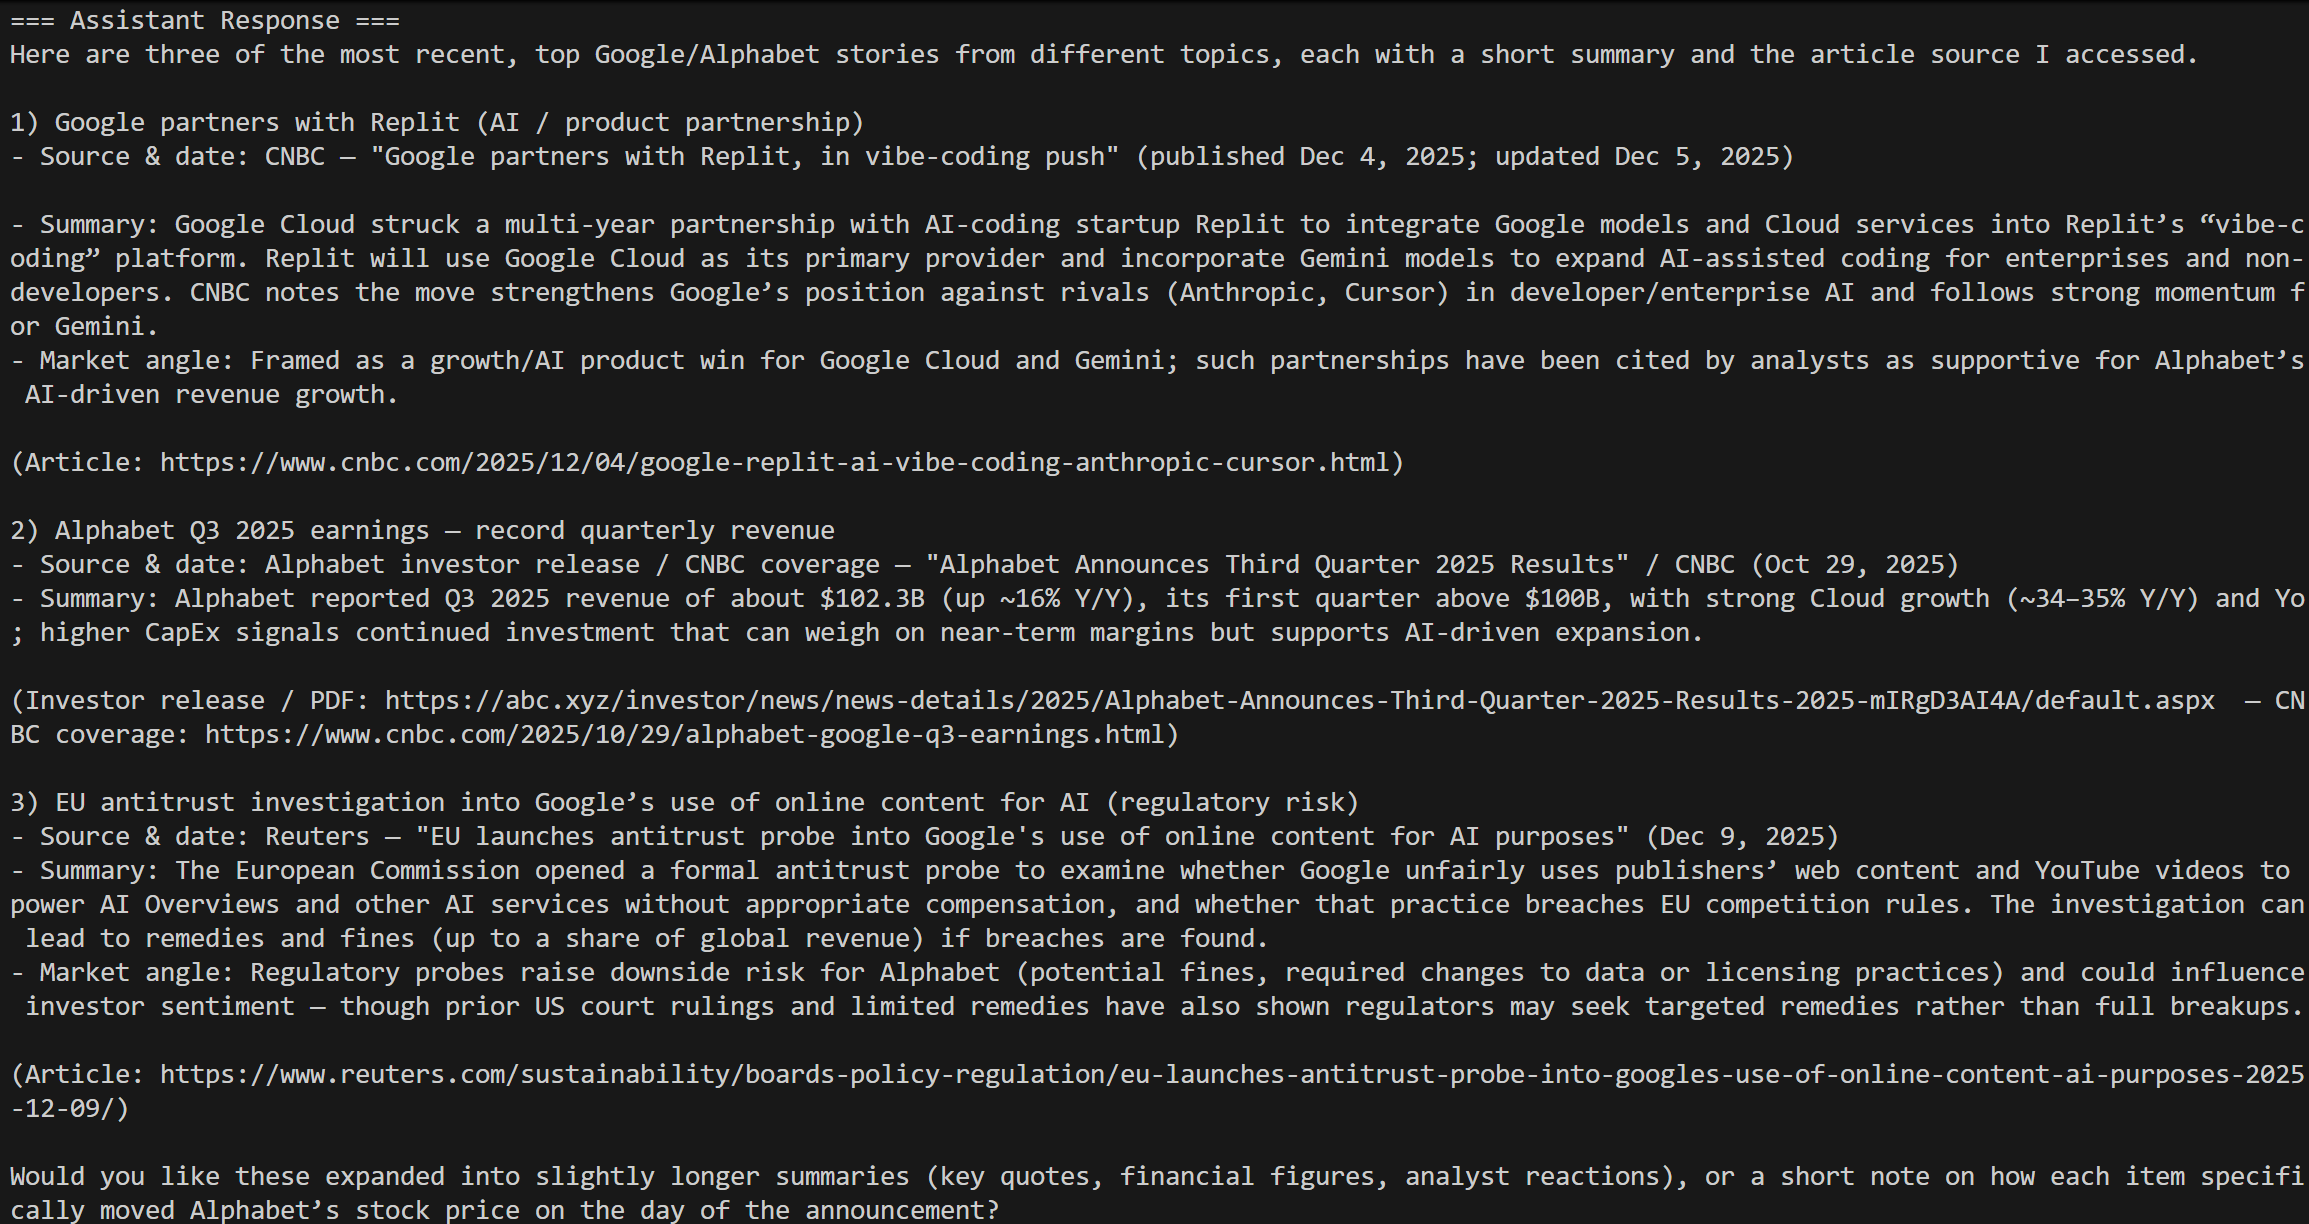
That corresponds to the results for today’s “Google stock market news” query, precisely as expected!
Note that a standard AI agent cannot accomplish that on its own. Vanilla LLMs do not have direct access to the live web and search engines without external tools. Even built-in grounding tools are usually limited, slow, and cannot scale to access any website like Bright Data can.
The logs include all details of the SERP API calls:
You will also see the Web Unlocker calls for the selected news articles from the Google search results: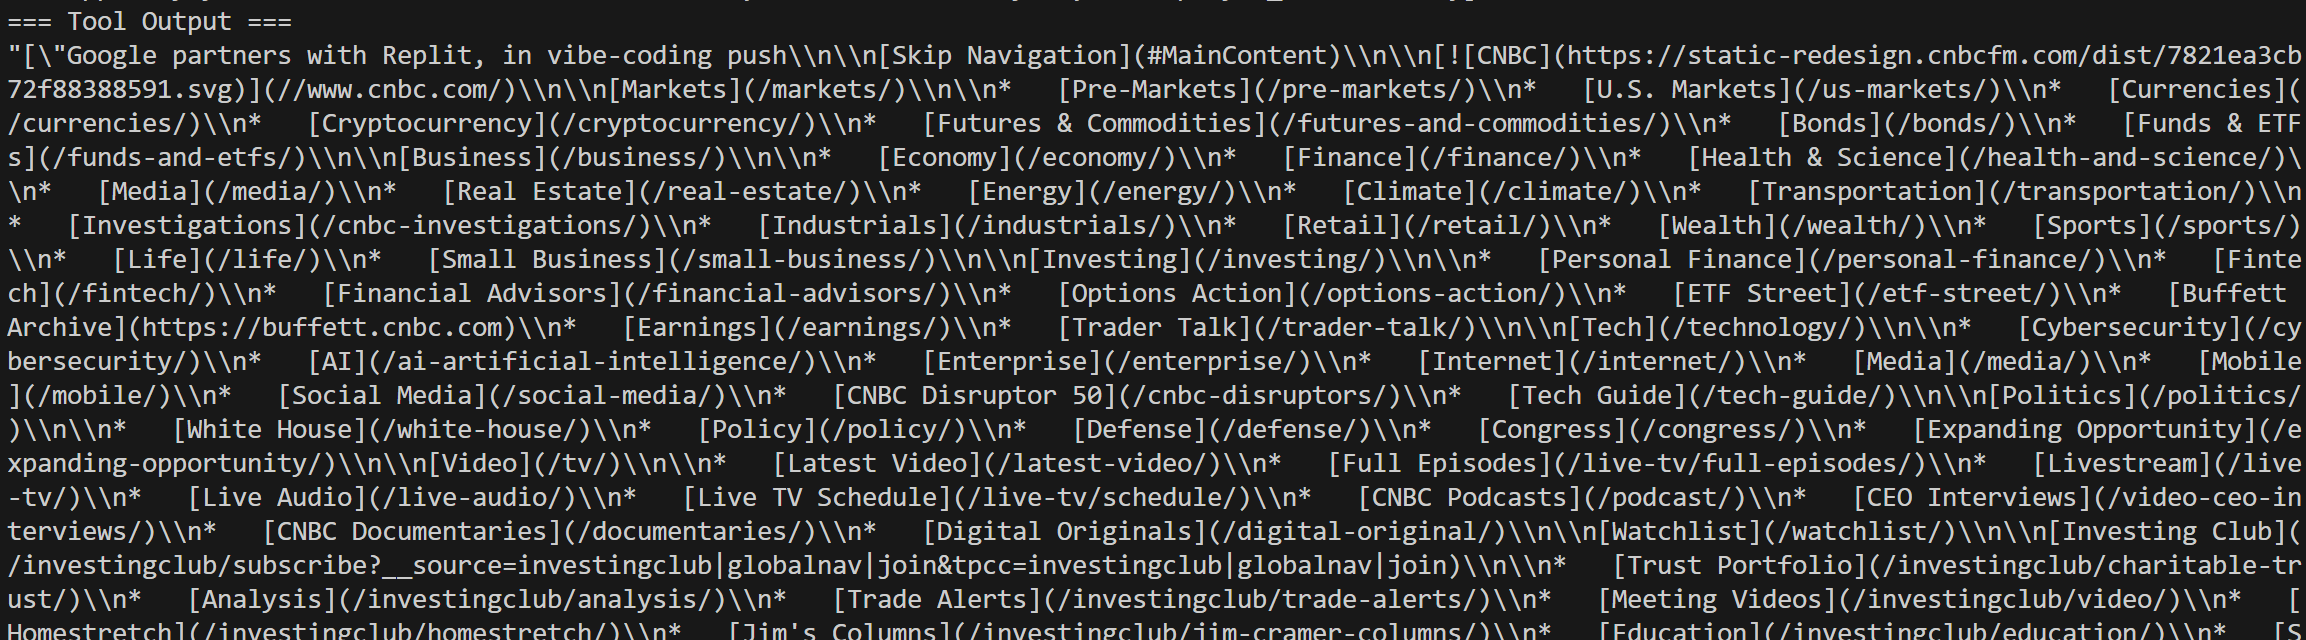
Et voilà! You now have a Haystack AI agent fully integrated with Bright Data tools.
Bright Data Web MCP Integration in Haystack
Another way to connect Haystack to Bright Data is through Web MCP. This MCP server exposes many of Bright Data’s most powerful capabilities as a large collection of AI-ready tools.
Web MCP includes 60+ tools built on top of Bright Data’s web automation and data-collection infrastructure. Even on its free tier, you get access to two highly useful tools:
| Tool | Description |
|---|---|
search_engine |
Fetch Google, Bing, or Yandex results in JSON or Markdown format. |
scrape_as_markdown |
Scrape any webpage into clean Markdown while bypassing anti-bot measures. |
Then, with the premium tier (Pro mode) enabled, Web MCP unlocks structured data extraction for major platforms, such Amazon, Zillow, LinkedIn, YouTube, TikTok, Google Maps, and many others. Plus, it comes with tools for automated browser actions.
Let’s walk through how to utilize Bright Data’s Web MCP inside Haystack!
Prerequisites
The open-source Web MCP package is built on Node.js. This means that if you want to run Web MCP locally and connect your Haystack AI agent to it, you will need Node.js installed on your machine.
Alternatively, you can connect to the remote Web MCP instance, which requires no local setup at all.
Step #1: Install the MCP–Haystack Integration
In your Python project, run the following command to install the MCP–Haystack integration:
pip install mcp-haystackThis package is required to access the classes that let you connect to a local or remote MCP server.
Step #2: Test Web MCP Locally
Before connecting Haystack to Bright Data’s Web MCP, ensure that your local machine can run the MCP server locally.
Note: Web MCP is also available as a remote server (via SSE and Streamable HTTP). This option is better suited for enterprise-grade scenarios.
Start by creating a Bright Data account. If you already have one, just log in. For a quick setup, follow the instructions in the “MCP” section of your dashboard: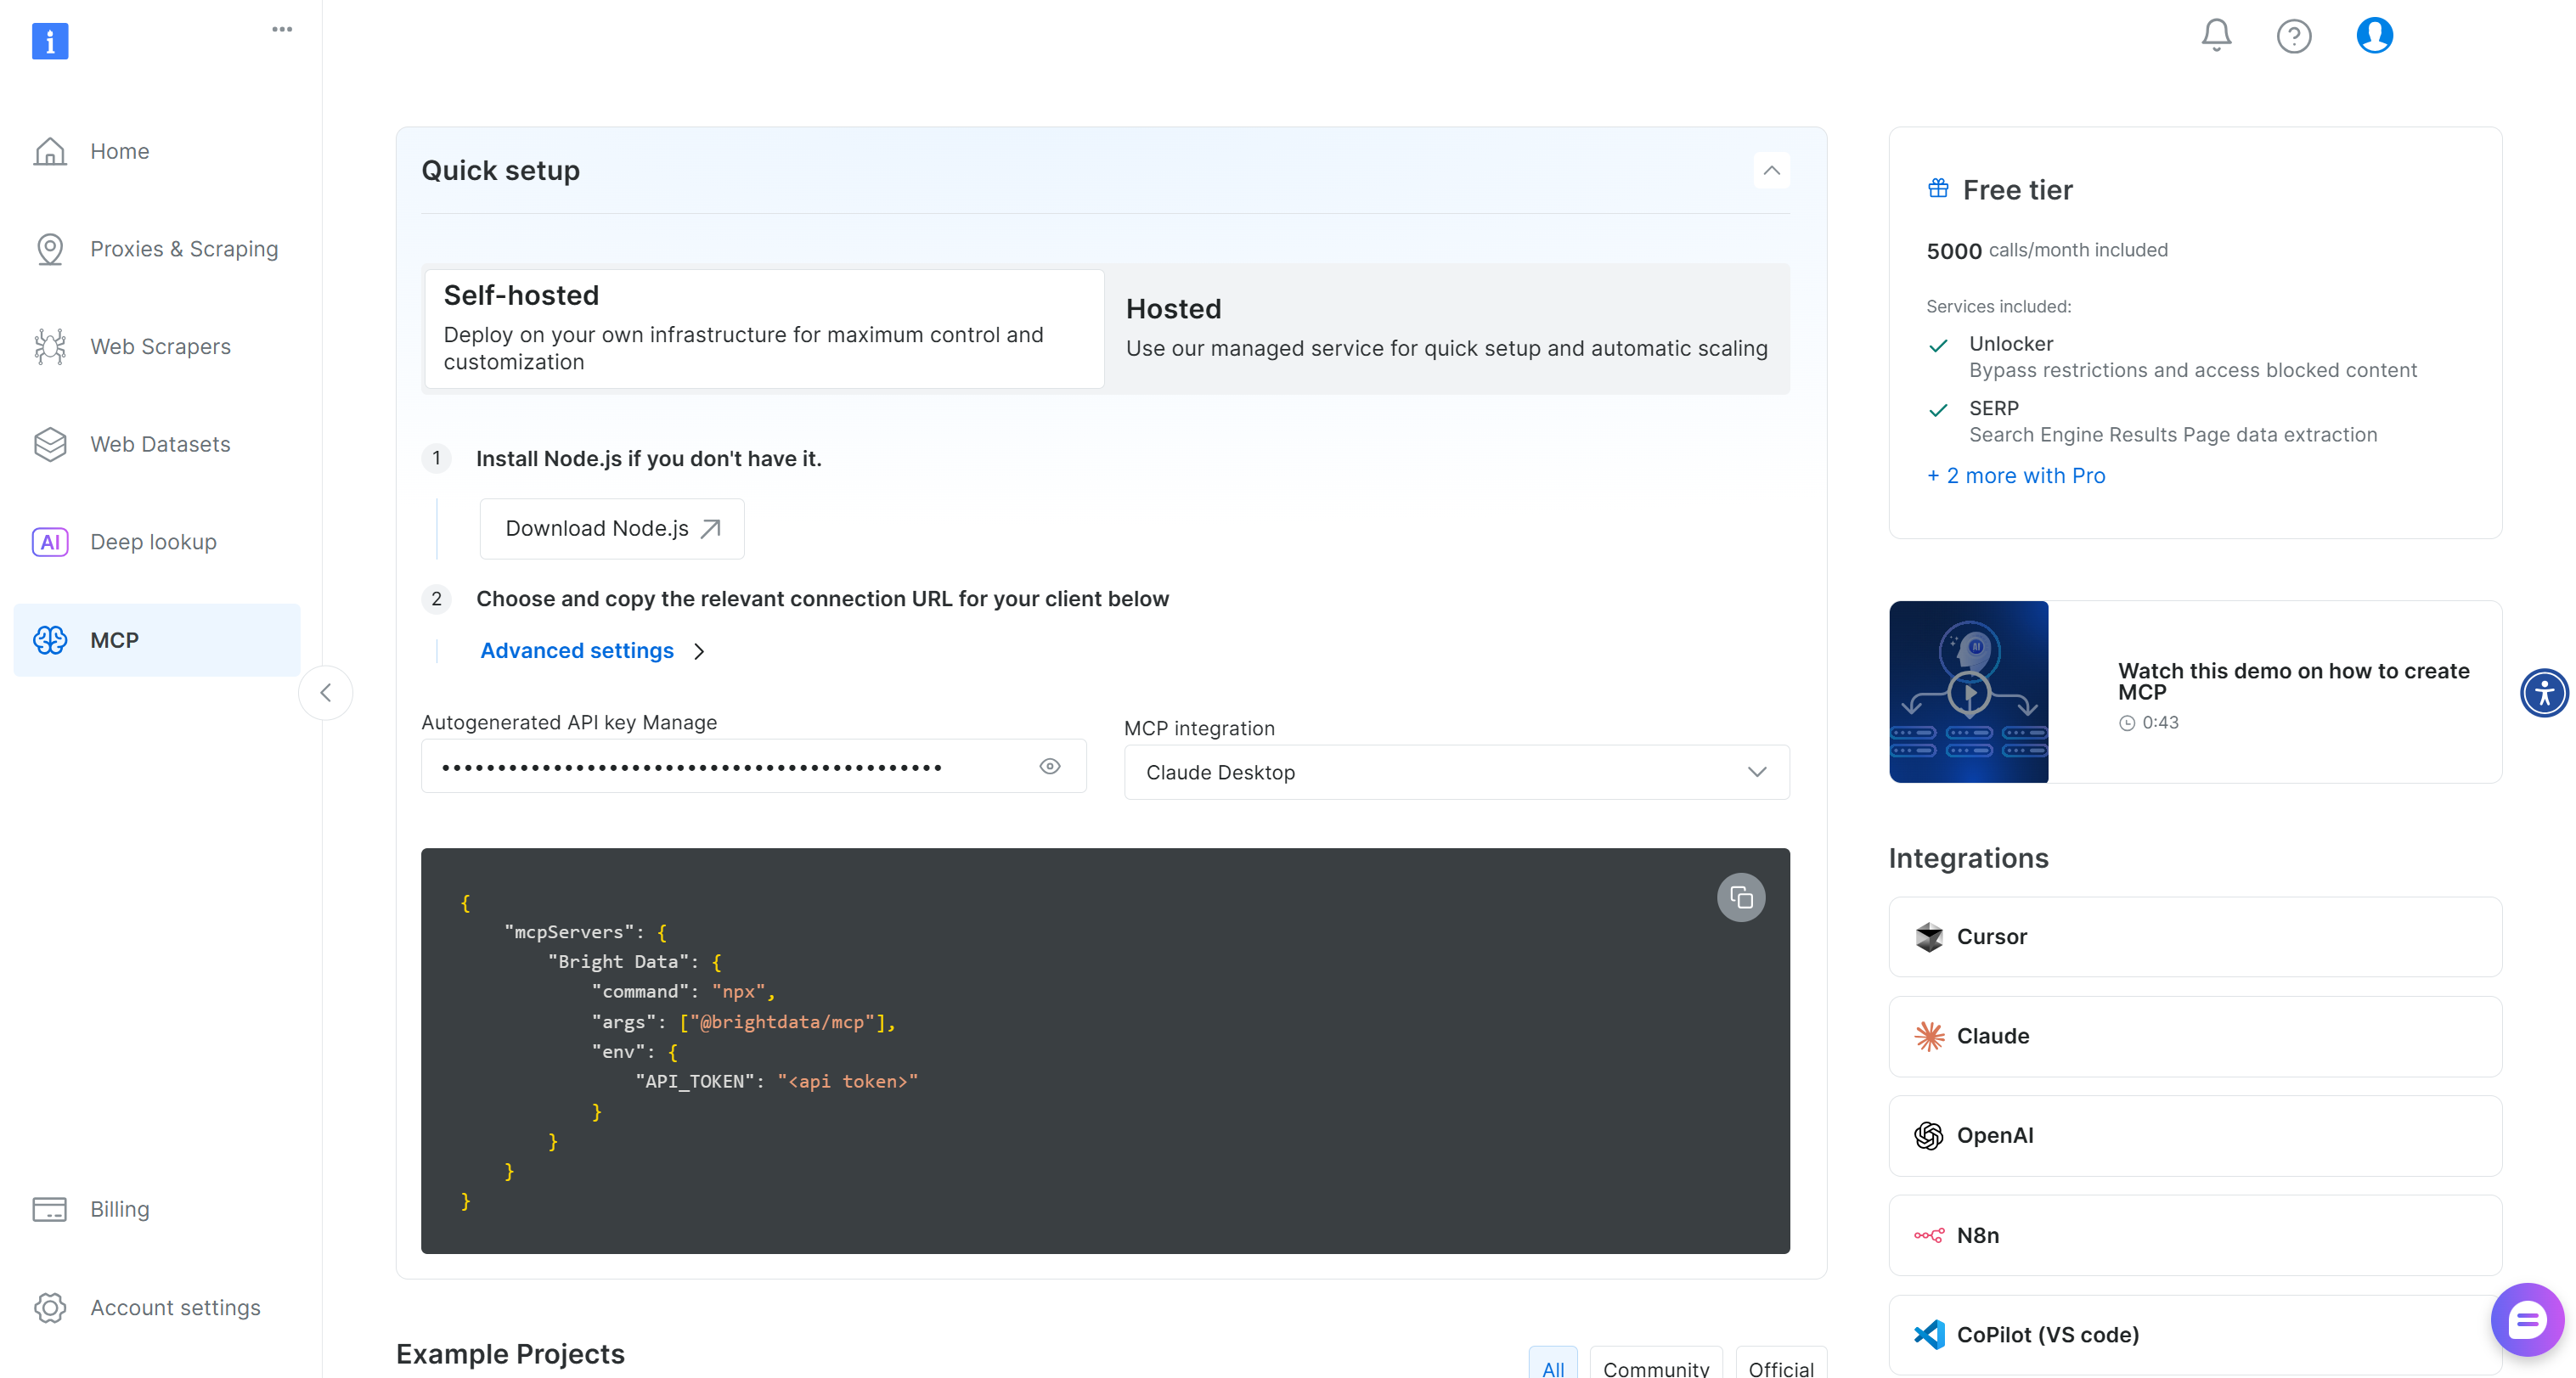
Otherwise, for additional guidance, refer to the instructions below.
First, generate your Bright Data API key. Store it in a safe place, as you will need it shortly to authenticate your local Web MCP instance.
Then, install the Web MCP globally on your machine via the @brightdata/mcp package:
npm install -g @brightdata/mcpVerify that the MCP server works by executing:
API_TOKEN="<YOUR_BRIGHT_DATA_API>" npx -y @brightdata/mcpOr, equivalently, in PowerShell:
$Env:API_TOKEN="<YOUR_BRIGHT_DATA_API>"; npx -y @brightdata/mcpReplace the <YOUR_BRIGHT_DATA_API> placeholder with your Bright Data API key. The two (equivalent) commands set the required API_TOKEN environment variable and launch the Web MCP server.
If successful, you should see logs similar to these:
On the first launch, Web MCP creates two zones in your Bright Data account:
mcp_unlocker: A zone for Web Unlocker.mcp_browser: A zone for Browser API.
Those two services are required by the Web MCP to power its 60+ tools.
To verify that the zones were created, reach the “Proxies & Scraping Infrastructure” page in your dashboard. You should notice both zones listed in the table:
Now, keep in mind that the Web MCP free tier only gives you access to the search_engine and scrape_as_markdown tools.
To unlock all tools, enable Pro mode by setting the PRO_MODE="true" environment variable:
API_TOKEN="<YOUR_BRIGHT_DATA_API>" PRO_MODE="true" npx -y @brightdata/mcpOr, on Windows:
$Env:API_TOKEN="<YOUR_BRIGHT_DATA_API>"; $Env:PRO_MODE="true"; npx -y @brightdata/mcpPro mode unlocks all 60+ tools, but it is not included in the free tier and may incur additional charges.
Well done! You have now confirmed that the Web MCP server runs correctly on your machine. Kill the process, as you will configure Haystack to launch the server locally and connect to it.
Step #3: Connect to Web MCP in Haystack
Use the following lines of code to connect to Web MCP:
from haystack_integrations.tools.mcp import StdioServerInfo, MCPToolset

BRIGHT_DATA_API_KEY = "<YOUR_BRIGHT_DATA_API_KEY>" # Replace it with your Bright Data API key

# Configuration to connect to the Web MCP server via STDIO
web_mcp_server_info = StdioServerInfo(
    command="npx",
    args=["-y", "@brightdata/mcp"],
    env={
        "API_TOKEN": BRIGHT_DATA_API_KEY,
        "PRO_MODE": "true"  # Enable Pro tools (optional)
    }
)
The StdioServerInfo object above mirrors the npx command you tested earlier, but wraps it in a form that Haystack can use. It also includes the environment variables needed to configure the Web MCP server:
API_TOKEN: Required. Set this to the Bright Data API key you generated earlier.PRO_MODE: Optional. Remove it if you want to stay on the free tier and access only thesearch_engineandscrape_as_markdowntools.
Next, access all tools exposed by Web MCP with:
web_mcp_toolset = MCPToolset(
    server_info=web_mcp_server_info,
    invocation_timeout=180 # 3 minutes
)
Verify that the integration works by loading all tools and printing their information:
web_mcp_toolset.warm_up()
for tool in web_mcp_toolset.tools:
  print(f"Name: {tool.name}")
  print(f"Description: {tool.name}\n")
If you are using Pro mode, you should see all 60+ tools available: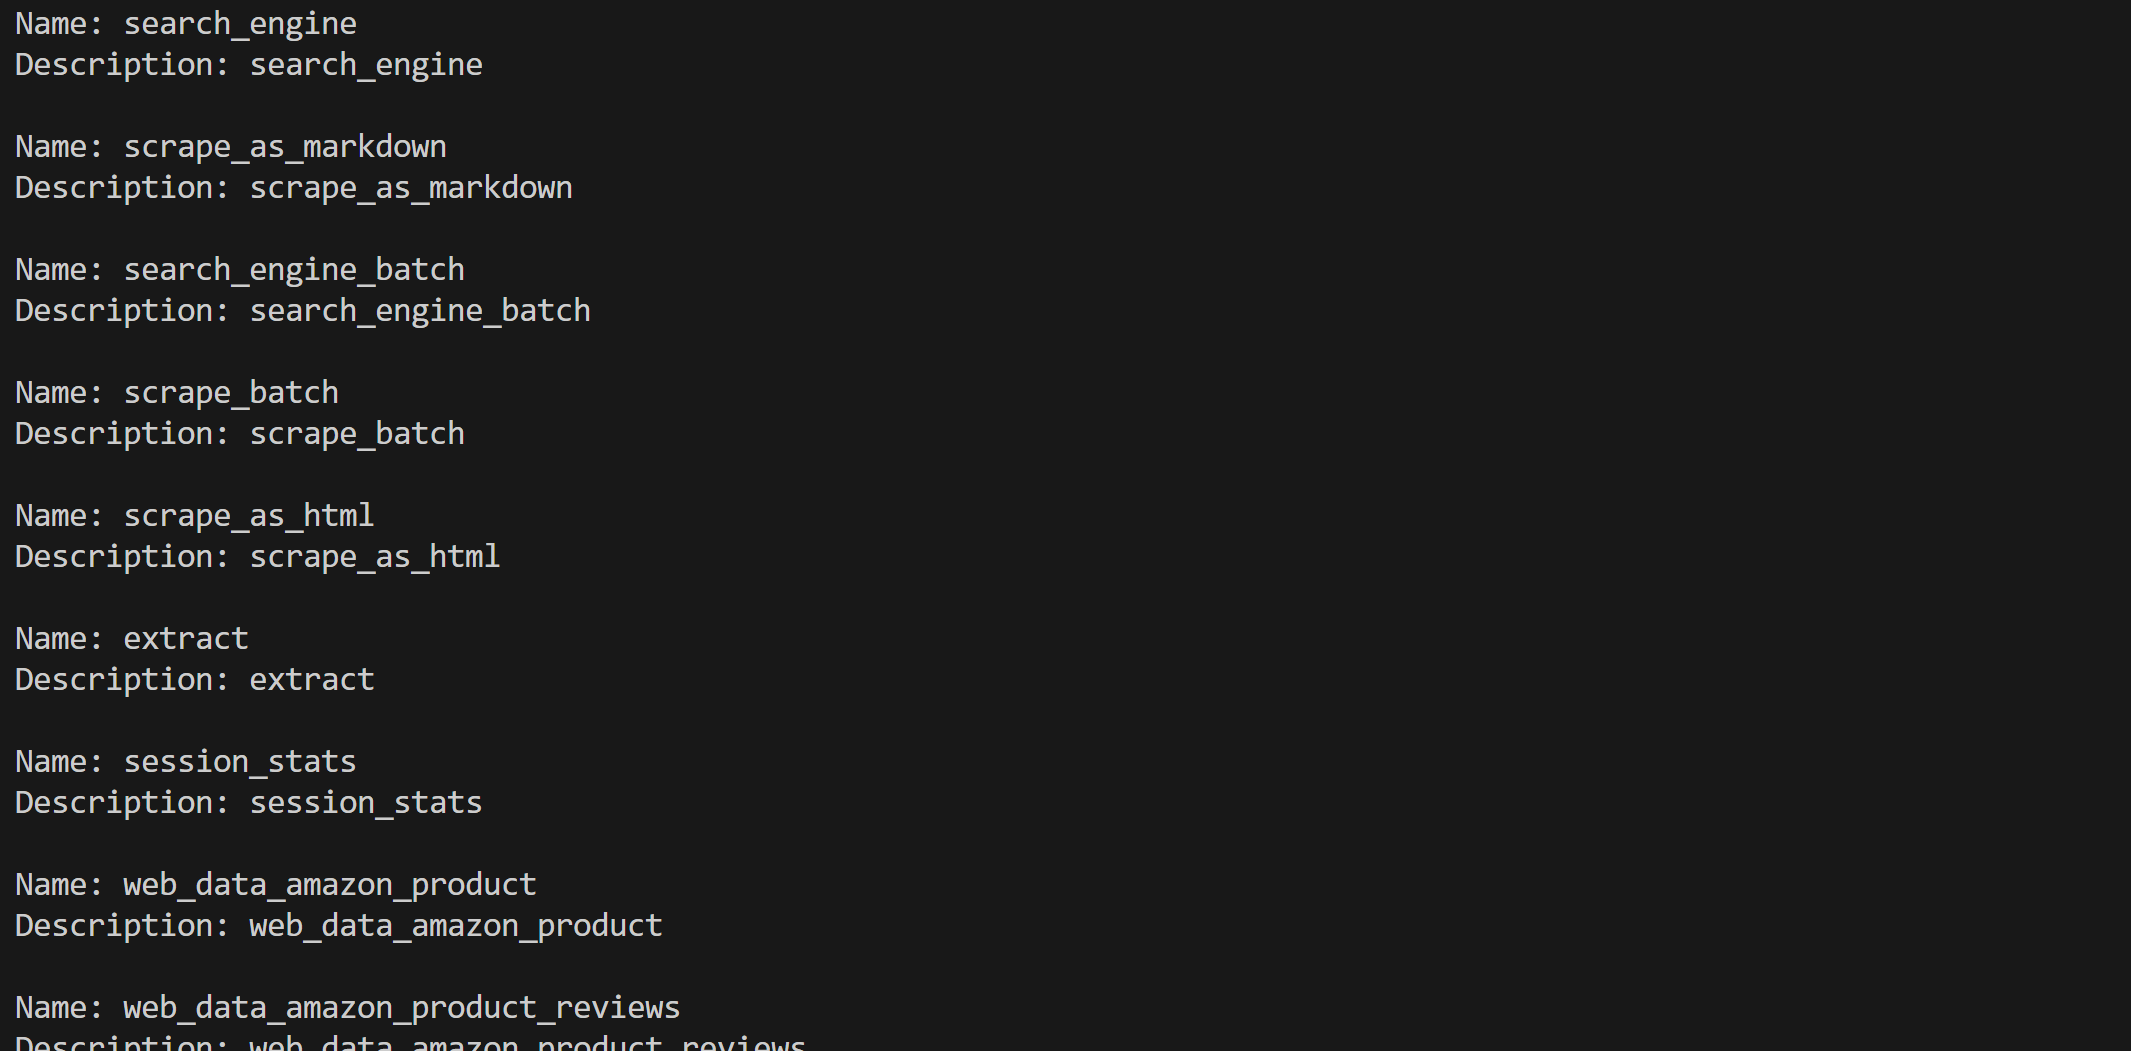
Here we go! The Bright Data Web MCP integration in Haystack works perfectly.
Step #4: Test the Integration
With all tools set up, use them in an AI agent (as demonstrated earlier) or a Haystack pipeline. For example, suppose you want an AI agent to handle this prompt:
Return a Markdown report with useful insights from the following Crunchbase company URL:
"https://www.crunchbase.com/organization/apple"
This is an example of a task that requires Web MCP tools.
Execute it in an agent with:
agent = Agent(
    chat_generator=chat_generator,
    tools=web_mcp_toolset, # The Bright Data Web MCP tools
)

## Run the agent
agent.warm_up()
prompt = """
Return a Markdown report with useful insights from the following Crunchbase company URL:
"https://www.crunchbase.com/organization/apple"
"""
chat_message = ChatMessage.from_user(prompt)

response = agent.run(messages=[chat_message])
The result would be: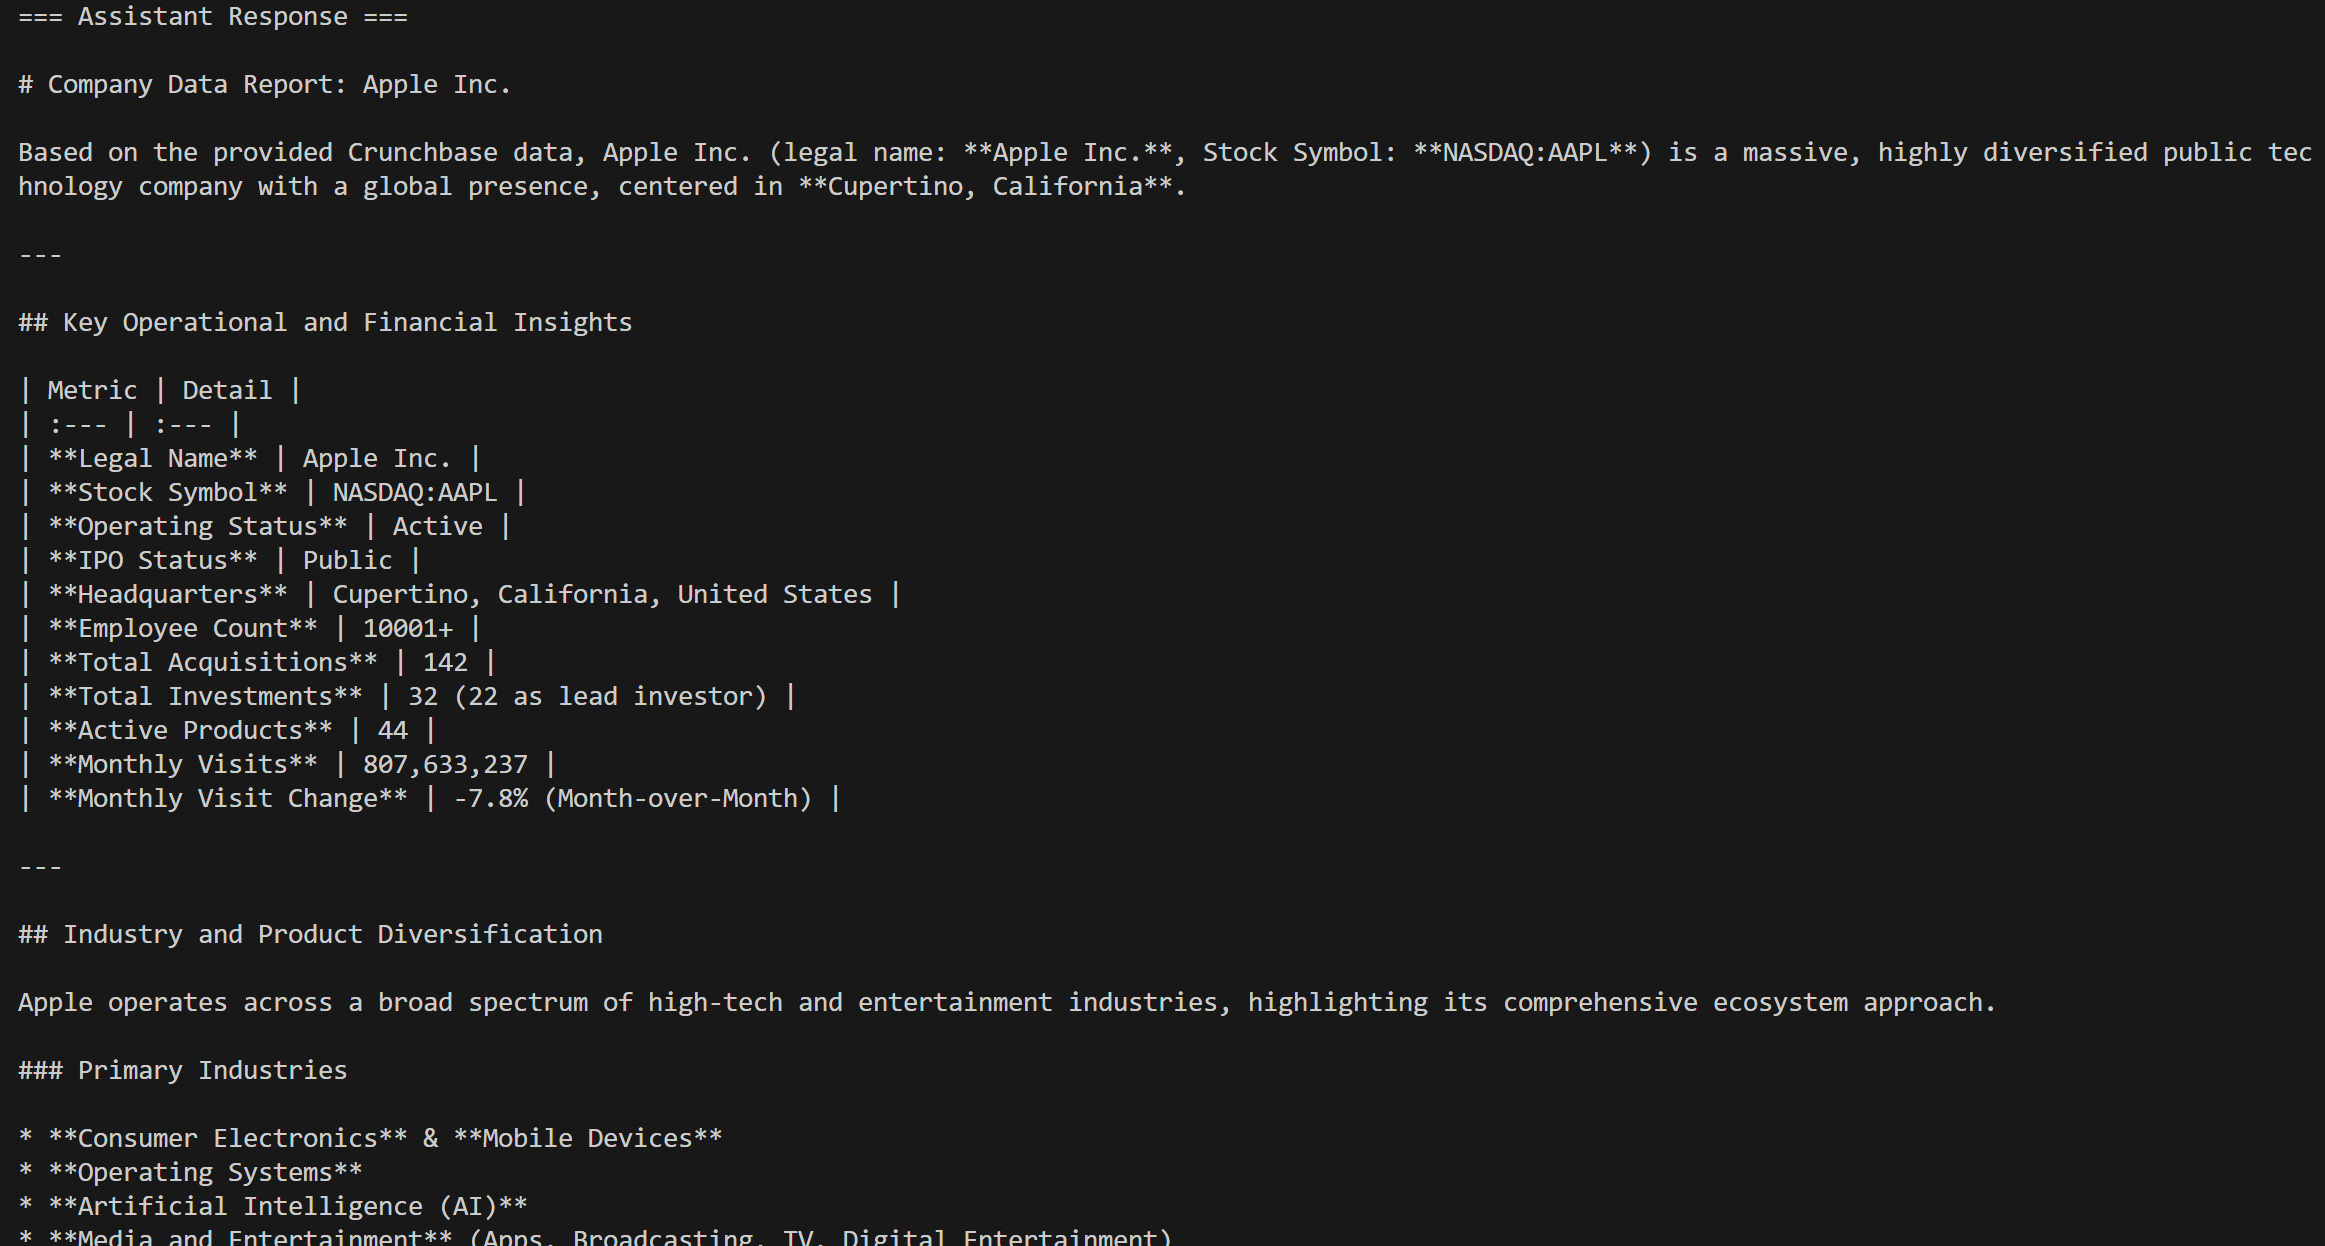
The tool that gets called will be the web_data_crunchbase_company Pro tool:
Under the hood, that tool relies on the Bright Data Crunchbase Scraper to extract structured information from the specified Crunchbase page.
Crunchbase scraping is definitely something a regular LLM cannot handle on its own! This proves the power of the Web MCP integration in Haystack, which supports a long list of use cases.
Step #5: Complete Code
The complete code for connecting Bright Data Web MCP in Haystack is:
# pip install haystack-ai mcp-haystack

from haystack_integrations.tools.mcp import StdioServerInfo, MCPToolset
import os
from haystack.components.generators.chat import OpenAIChatGenerator
from haystack.components.agents import Agent
from haystack.dataclasses import ChatMessage
import json

os.environ["OPENAI_API_KEY"] = "<YOUR_OPENAI_API_KEY>" # Replace it with your Bright Data API key

BRIGHT_DATA_API_KEY = "<YOUR_BRIGHT_DATA_API_KEY>" # Replace it with your Bright Data API key

# Configuration to connect to the Web MCP server via STDIO
web_mcp_server_info = StdioServerInfo(
    command="npx",
    args=["-y", "@brightdata/mcp"],
    env={
        "API_TOKEN": BRIGHT_DATA_API_KEY,
        "PRO_MODE": "true"  # Enable Pro tools (optional)
    }
)

# Load the available MCP tools exposed by the Web MCP server
web_mcp_toolset = MCPToolset(
    server_info=web_mcp_server_info,
    invocation_timeout=180, # 3 minutes
    tool_names=["web_data_crunchbase_company"]
)

# Initialize the LLM engine
chat_generator = OpenAIChatGenerator(
    model="gpt-5-mini"
)

# Initialize a Haystack AI agent
agent = Agent(
    chat_generator=chat_generator,
    tools=web_mcp_toolset, # The Bright Data Web MCP tools
)

## Run the agent
agent.warm_up()
prompt = """
Return a Markdown report with useful insights from the following Crunchbase company URL:
"https://www.crunchbase.com/organization/apple"
"""
chat_message = ChatMessage.from_user(prompt)

response = agent.run(messages=[chat_message])

## Print the output in structured format, with info on tool usage
for msg in response["messages"]:
    role = msg._role.value

    if role == "tool":
        # Log tool outputs
        for content in msg._content:
            print("=== Tool Output ===")
            print(json.dumps(content.result, indent=2))
    elif role == "assistant":
        # Log assistant final messages
        for content in msg._content:
            if hasattr(content, "text"):
                print("=== Assistant Response ===")
                print(content.text)
Conclusion
In this guide, you learned how to leverage Bright Data integration in Haystack, whether through custom tools or via MCP.
This setup empowers AI models in Haystack agents and pipelines to perform web searches, extract structured data, access live web data feeds, and automate web interactions. All of this is made possible by the full suite of services in Bright Data’s ecosystem for AI.
Create a Bright Data account for free and start exploring our powerful AI-ready web data tools!

Technical Writer
Antonello Zanini is a technical writer, editor, and software engineer with 5M+ views. Expert in technical content strategy, web development, and project management.


