
In this article, you will learn:
- What goose is and what makes it unique.
- Why integrating Bright Data’s Web MCP into goose can make its AI agent much more powerful.
- How to connect Web MCP to goose Desktop.
- How to integrate Bright Data’s Web MCP into goose CLI.
Let’s dive in!
What Is goose?
goose is an open-source, extensible AI agent built to automate complex software development tasks from start to finish.
Unlike traditional code assistants, goose does not just suggest snippets. Instead, it can build full projects, write and execute code, debug failures, orchestrate workflows, and interact with external APIs autonomously.
What makes goose special is that it works with most LLMs, works with multi-model configurations for performance and cost optimization, and supports skills and integrations with MCP servers. Its goal is to enhance your productivity whether you are prototyping, refining code, or managing intricate engineering pipelines.
The solutuion is available as both a desktop application and a CLI tool. At the time of writing, it boasts 25.8k stars on Github:
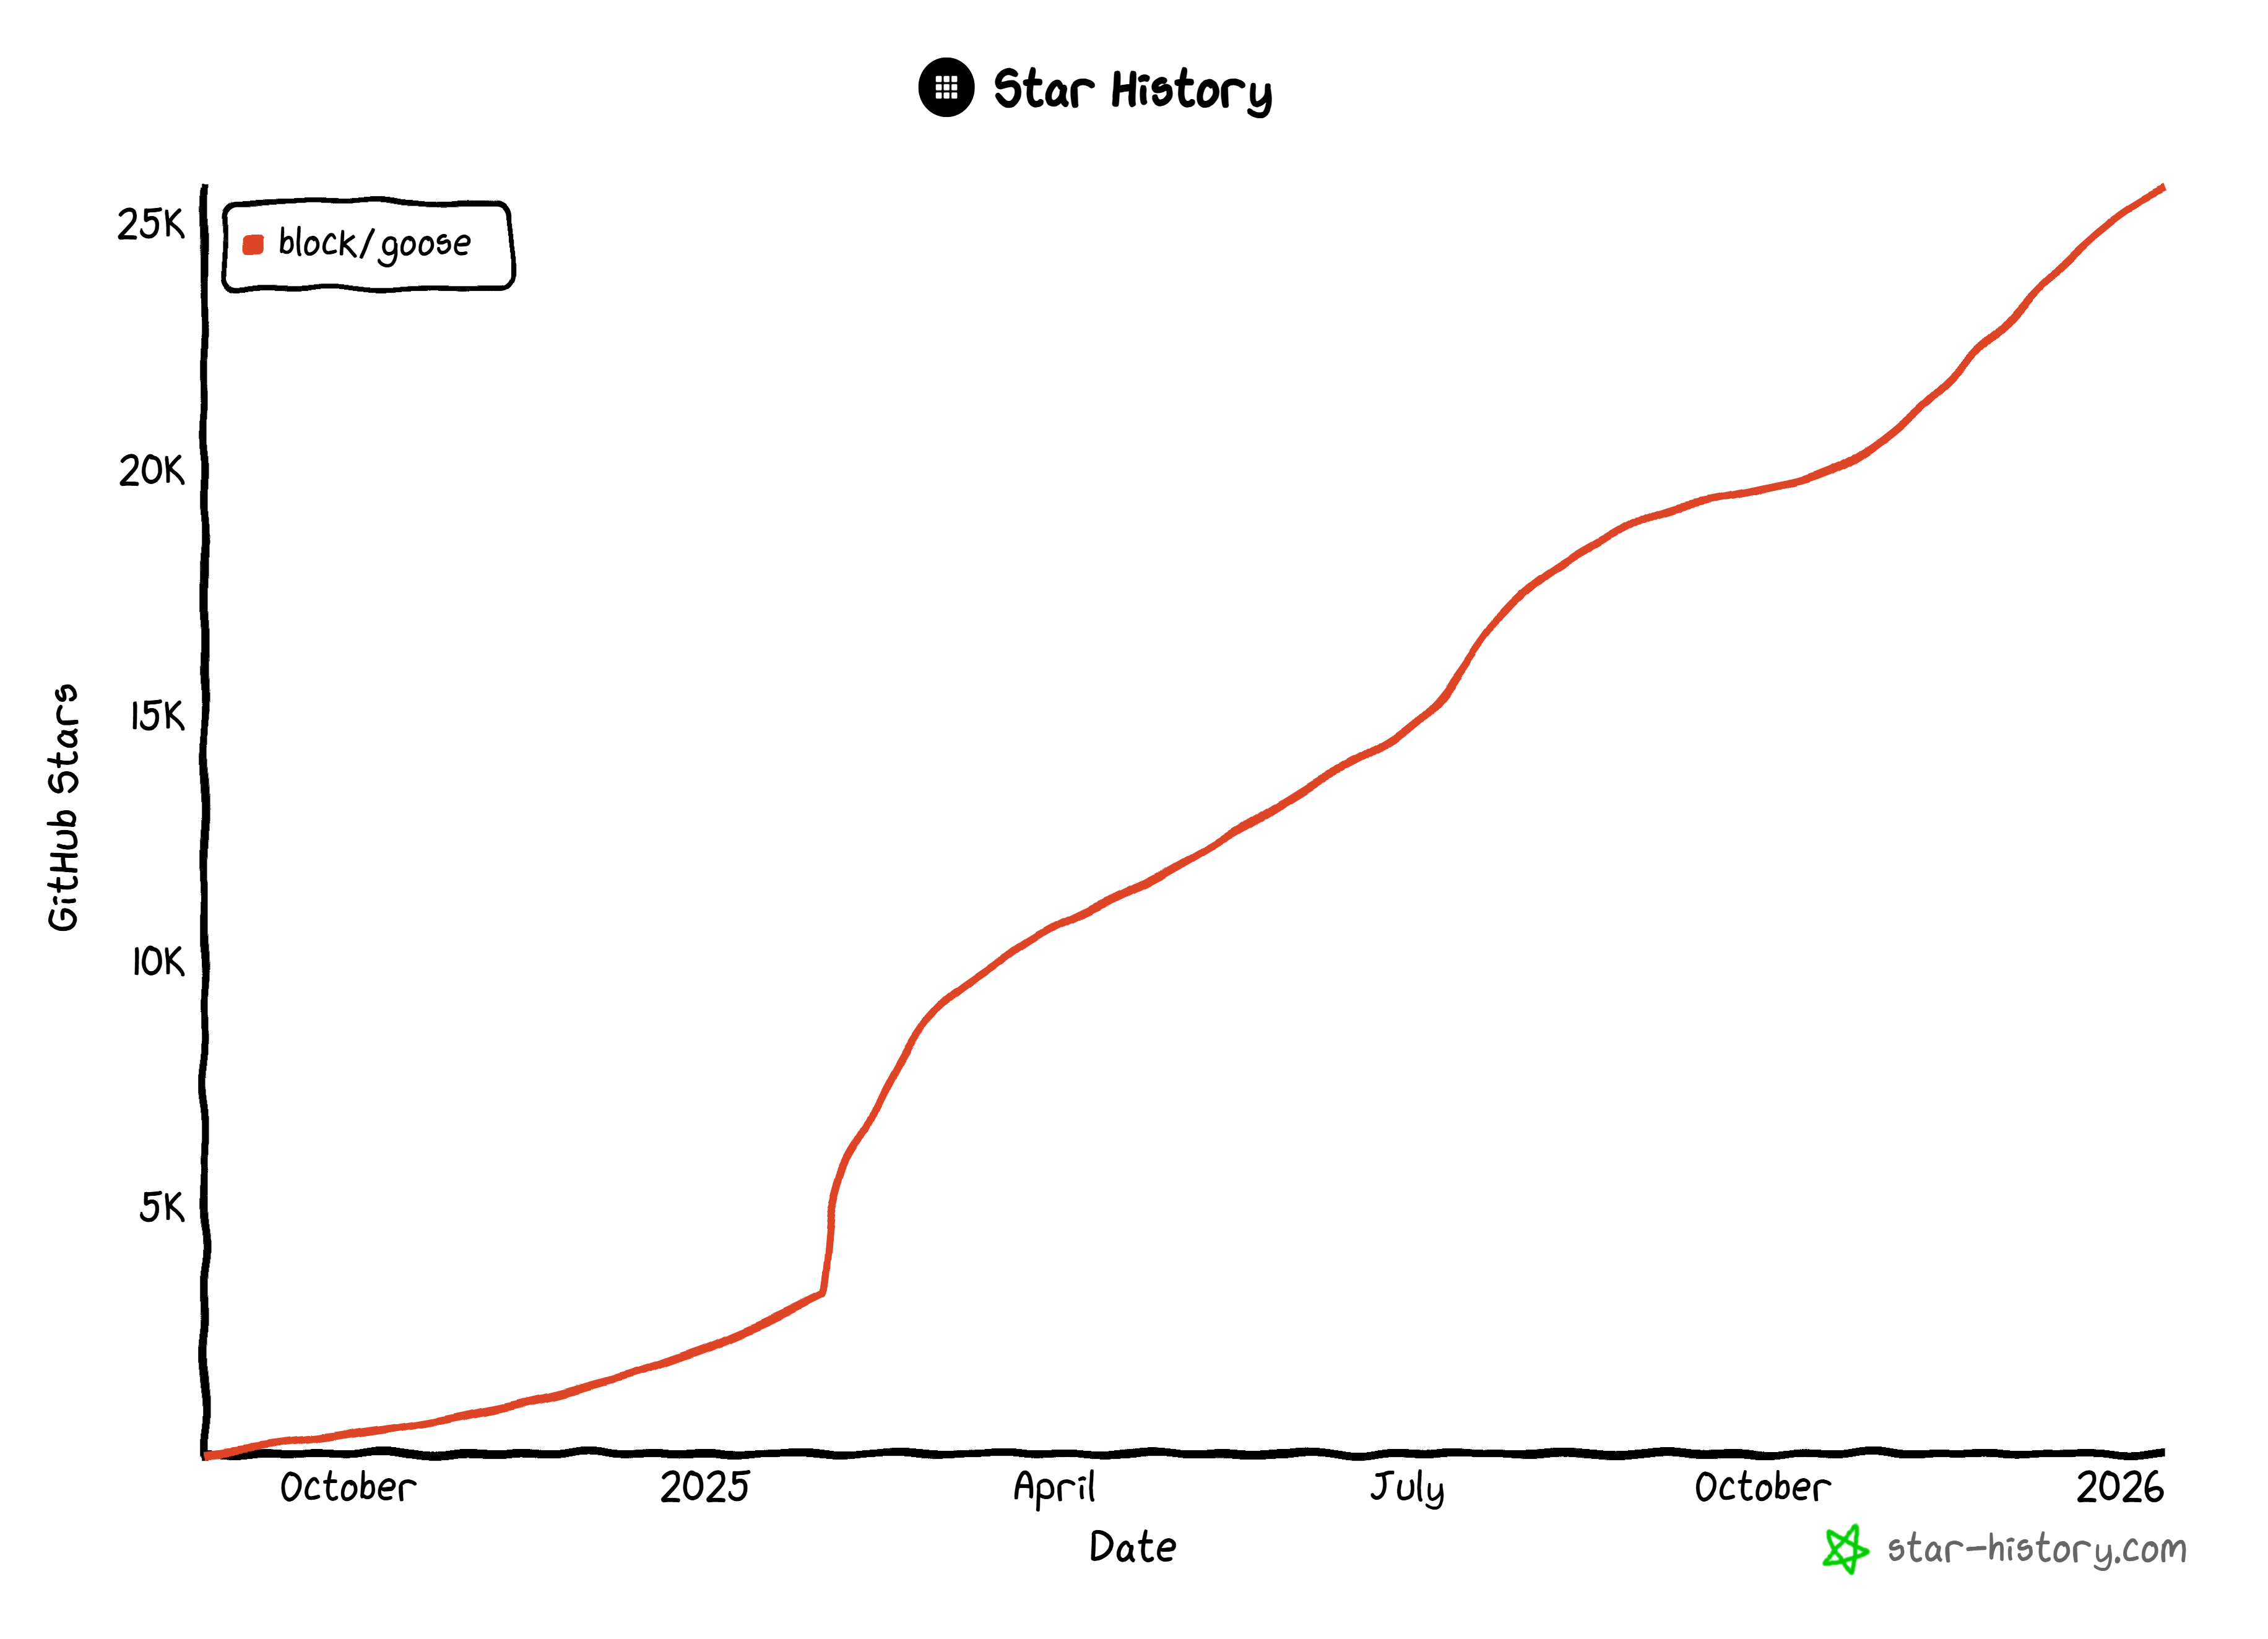
The steady growth in GitHub stars is a sign of strong community appreciation and widespread adoption.
Why Extend goose AI Agents with Web-Ready Capabilities
No matter how advanced the LLM integrated into goose is, it still shares a key limitation with all language models: static knowledge.
An LLM can only generate answers based on the data it was trained on. The issue is that LLM training data represents a static snapshot of the past. In the fast-moving tech landscape, that information can quickly become outdated. As a result, AI models may suggest obsolete development practices.
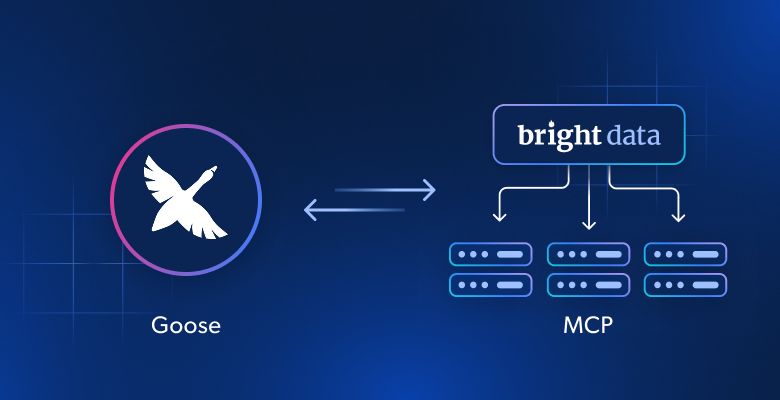
goose overcomes that limitation by supporting connections to third-party providers via extensions. Those extensions can be used to access external data and resources, add new features, and more. One of the easiest way to define a goose extension is via MCP.
For example, by integrating goose with Bright Data’s Web MCP, the underlying AI agent gains real-time access to up-to-date tutorials, documentation, and guides. This is possible because Web MCP provides more than 60 AI-ready tools for automated web data collection, structured data extraction, and web interactions.
Even on the free tier, you get access to these two powerful tools (and their batch version):
| Tool | Description |
|---|---|
search_engine |
Retrieve Google, Bing, or Yandex results in JSON or Markdown format. |
scrape_as_markdown |
Scrape any webpage into clean Markdown, bypassing anti-bot measures. |
But Web MCP truly shines in [Pro mode](https://github.com/brightdata/brightdata-mcp?tab=readme-ov-file#-pricing, modes), which provides premium tools for structured data extraction from platforms like Amazon, LinkedIn, YouTube, TikTok, Zillow, Google Maps, as well as for automated browser actions.
The Bright Data Web MCP + goose integration allows the AI agent to:
- Search the web for accurate information.
- Fetch fresh tutorials or documentation pages and learn from them.
- Scrape real websites on the fly for testing, mocking, or analysis.
- Do much more…
Integrating goose Desktop with Bright Data’s Web MCP
In this guided section, you will learn how to take advantage of Web MCP capabilities in a goose-powered AI agent. This setup delivers an enhanced, web-data-ready AI experience, regardless of which AI provider you configure.
Follow the instructions below!
Prerequisites
To follow along with this tutorial section, verify you have:
- Node.js installed on your machine (the latest LTS version is recommended) to run the Web MCP server locally.
- An API key from one of the many AI providers supported by goose (in this case, we will use OpenAI).
- A Bright Data account with an API key set up.
Some familiarity with how the MCP protocol works and with the tools exposed by the Web MCP server will also be helpful.
Note: Make sure Node.js is installed via the official installer and in the default system path (not via nvm or similar solutions). Otherwise, when connecting to a custom MCP server in goose, the application may fail with an error like:
Failed to add extension: process quit before initialization: stderr =Do not worry about setting up the Bright Data account just yet, as we will cover that in a dedicated step later on.
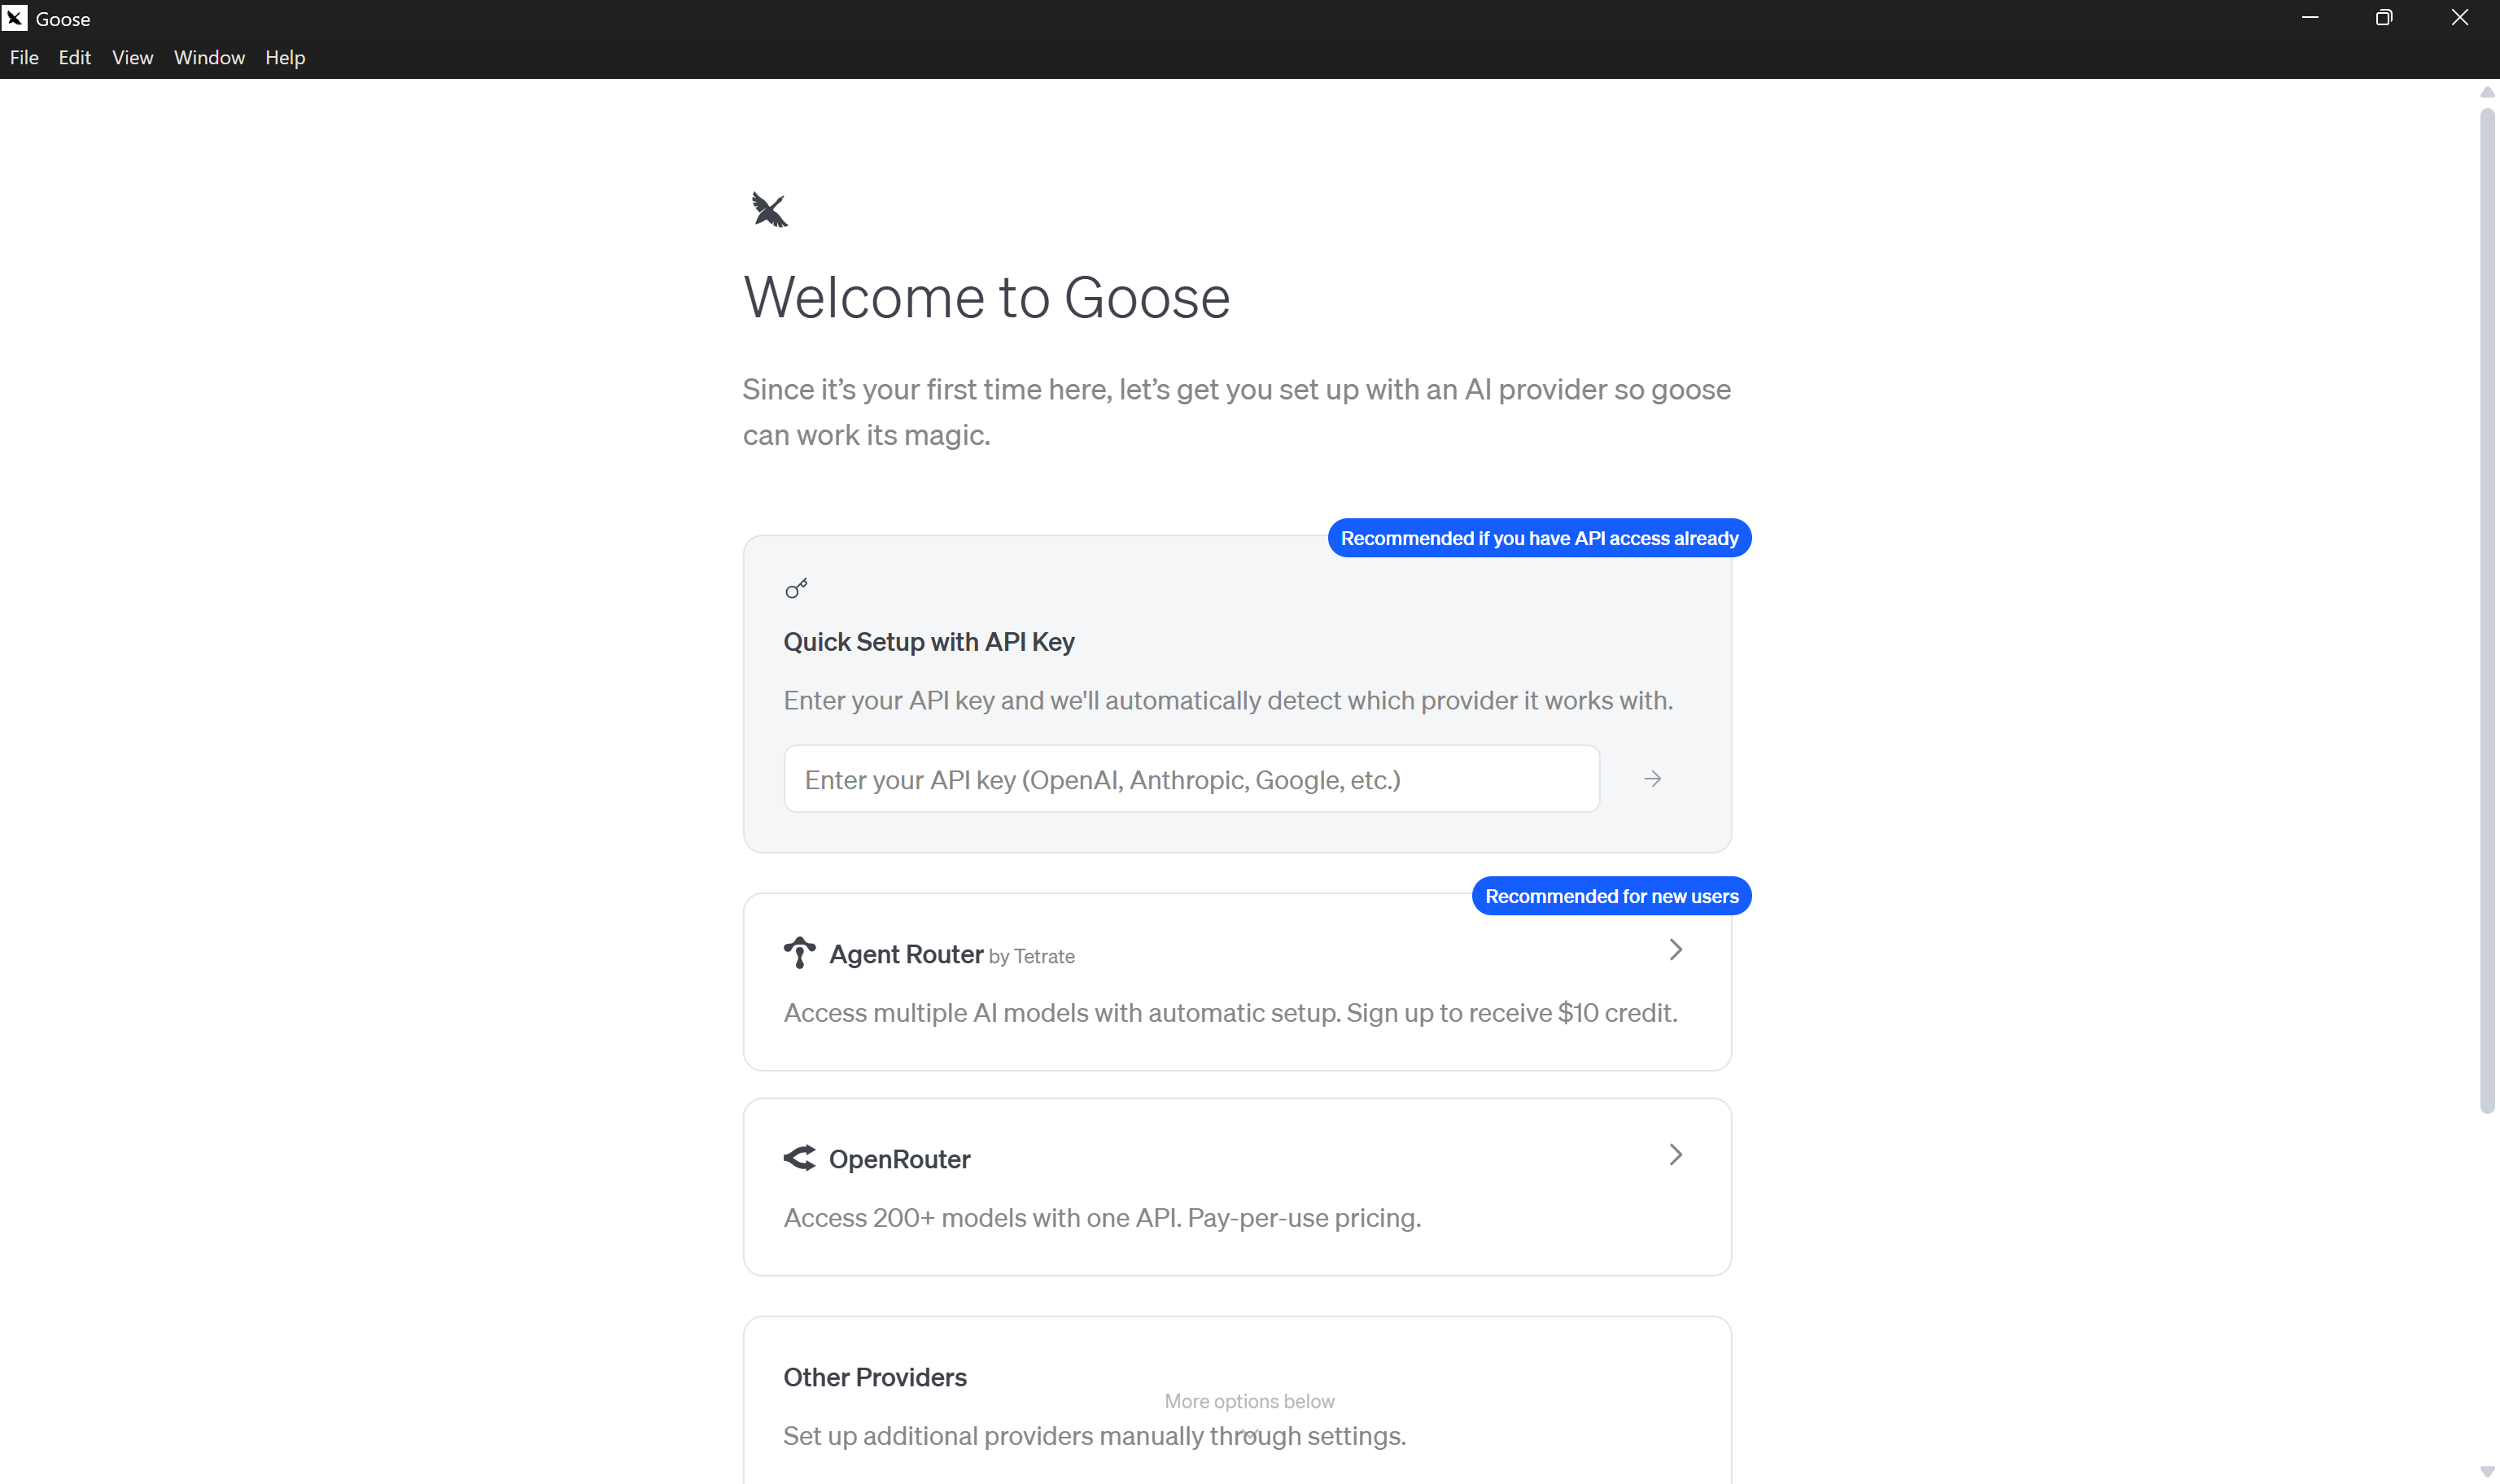
Step #1: Install and Configure goose Desktop
Start by downloading the correct goose Desktop installer for your operating system. Open it, and launch the application. This is what you should see:
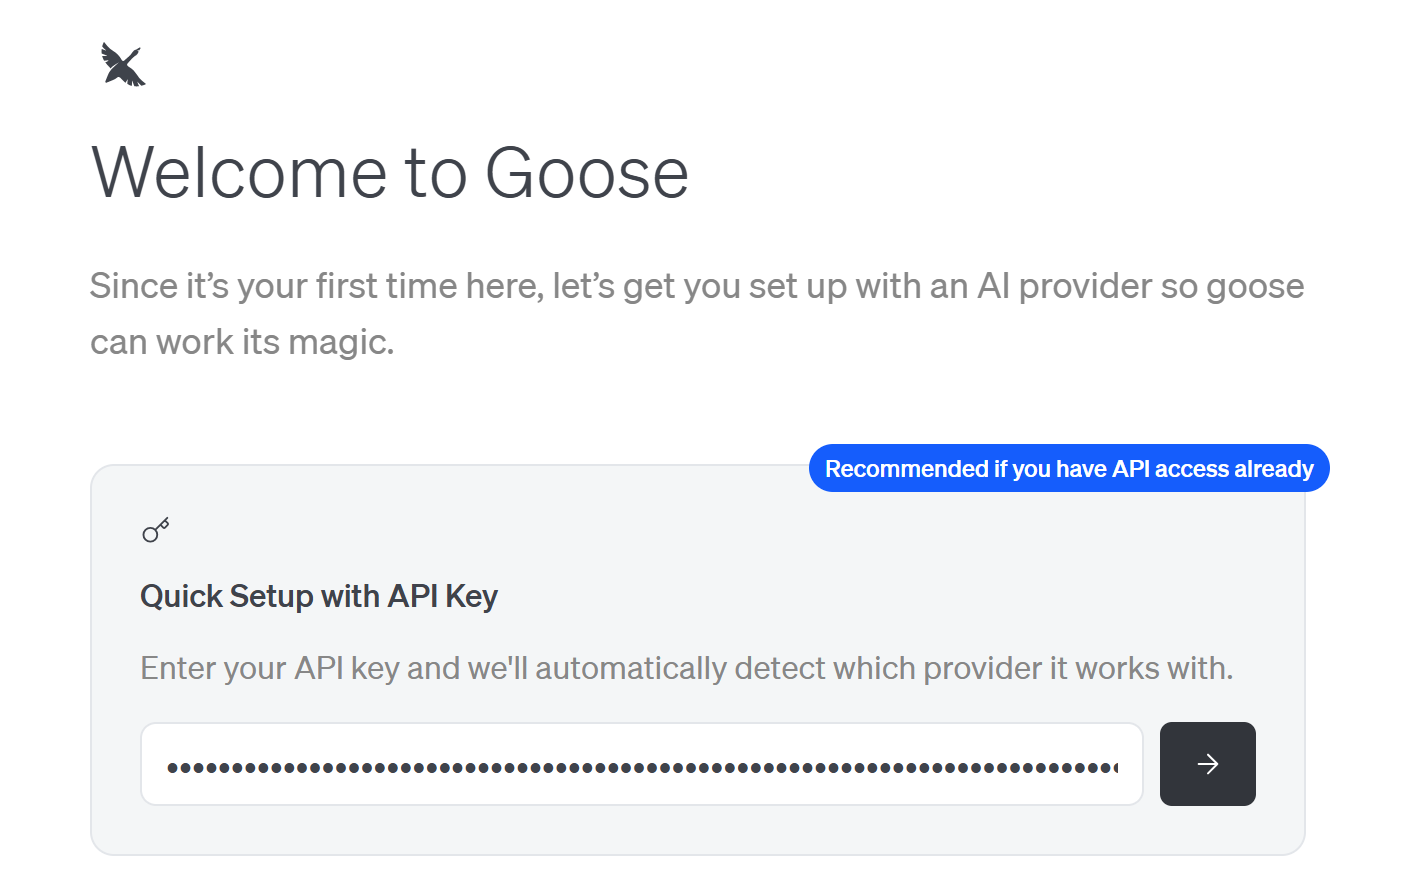
In the “Quick Setup with API” key section, paste the API key of your preferred AI provider. In this case, we are going to use an OpenAI API key:
Press the right arrow (“→”) button, and the “Choose Model” modal will appear:

Here, you need to choose the model provider and a specific model. Since we configured an OpenAI API key, the provider will automatically be set to “OpenAI.” Then, select a model such as “gpt-5-mini.”
Confirm by clicking the “Select model” button, and you should land on the goose home screen:
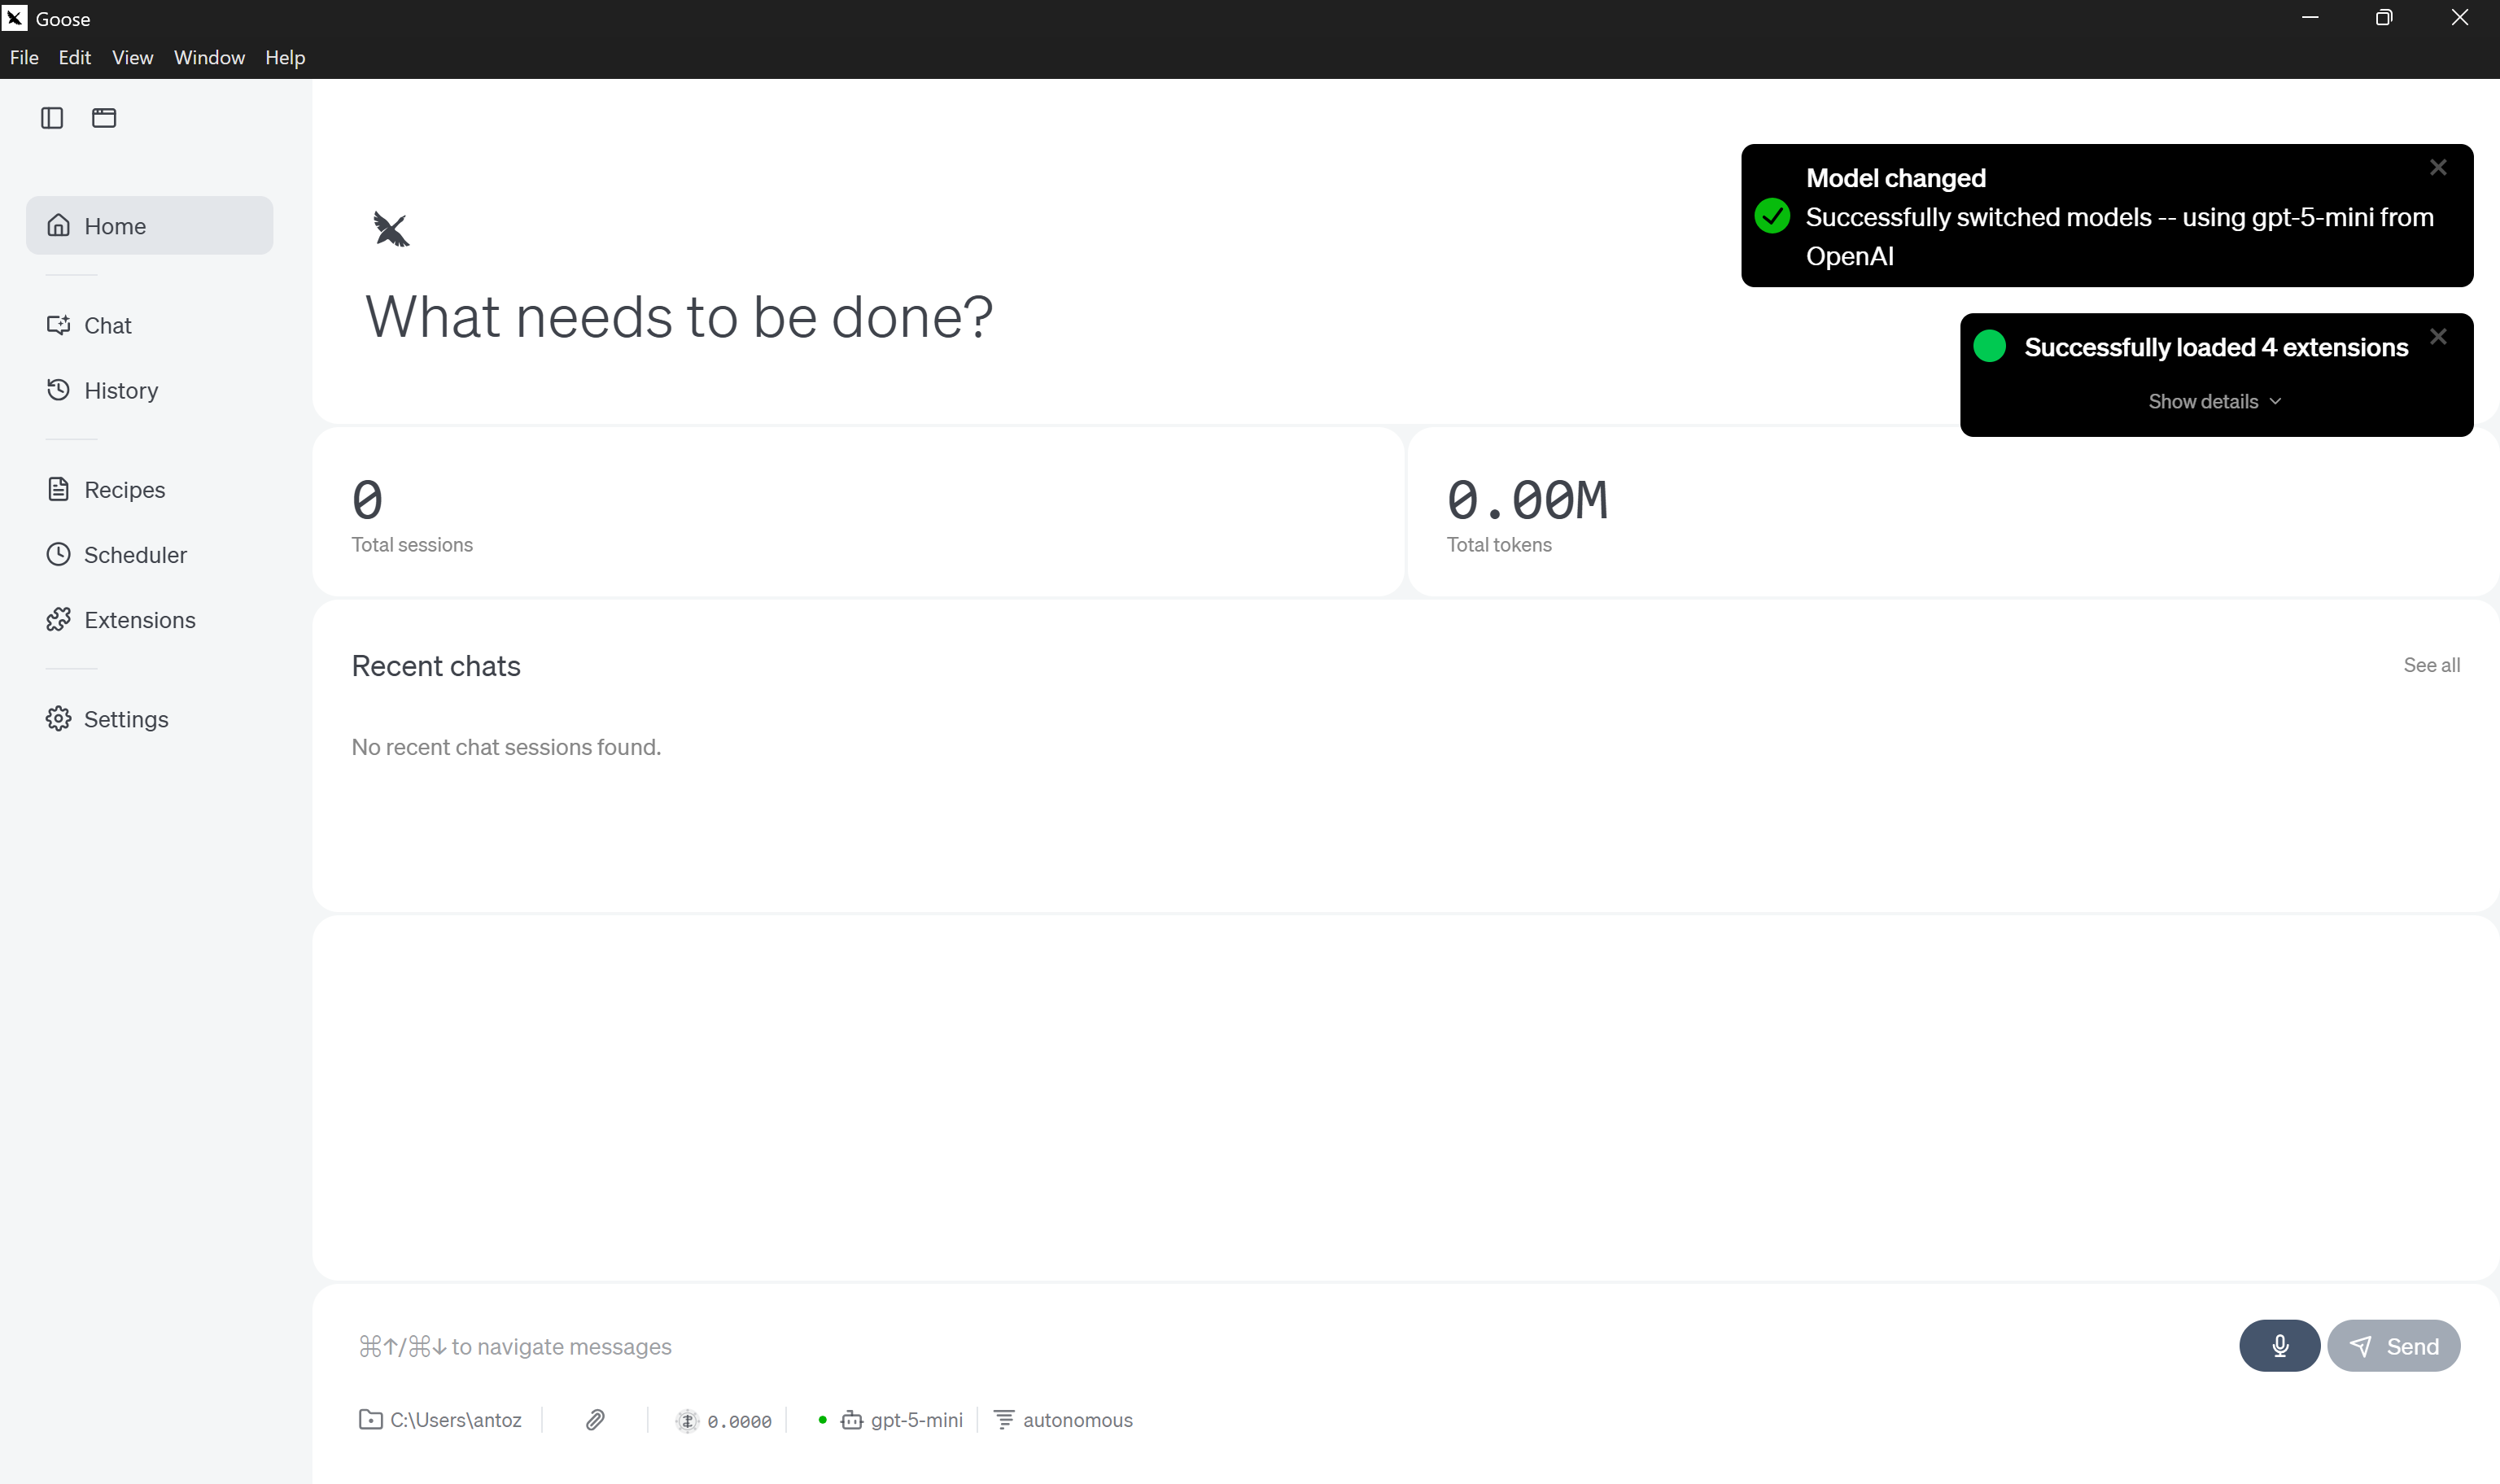
Notice the model change notificationm confirming that the model was updated successfully.
Note: To avoid security issues on Windows, make sure to run the following command on the downloaded goose folder to unblock all files:
Get-ChildItem -Path "<YOUR_GOOSE_PATH>" -Recurse | Unblock-FileFor example, <YOUR_GOOSE_PATH> could be C:\Users\<YOUR_USERNAME>\Downloads\goose-win32-x64. Then, restart the application.
Well done! You now have a fully configured goose application ready to use.
Step #2: Get Started with Bright Data Web MCP
Before connecting goose Desktop to Bright Data’s Web MCP, check that your local machine can run the MCP server.
First, you require a Bright Data account. If you already have one, just log in. For a quick setup, follow the instructions in the “MCP” section of your dashboard:
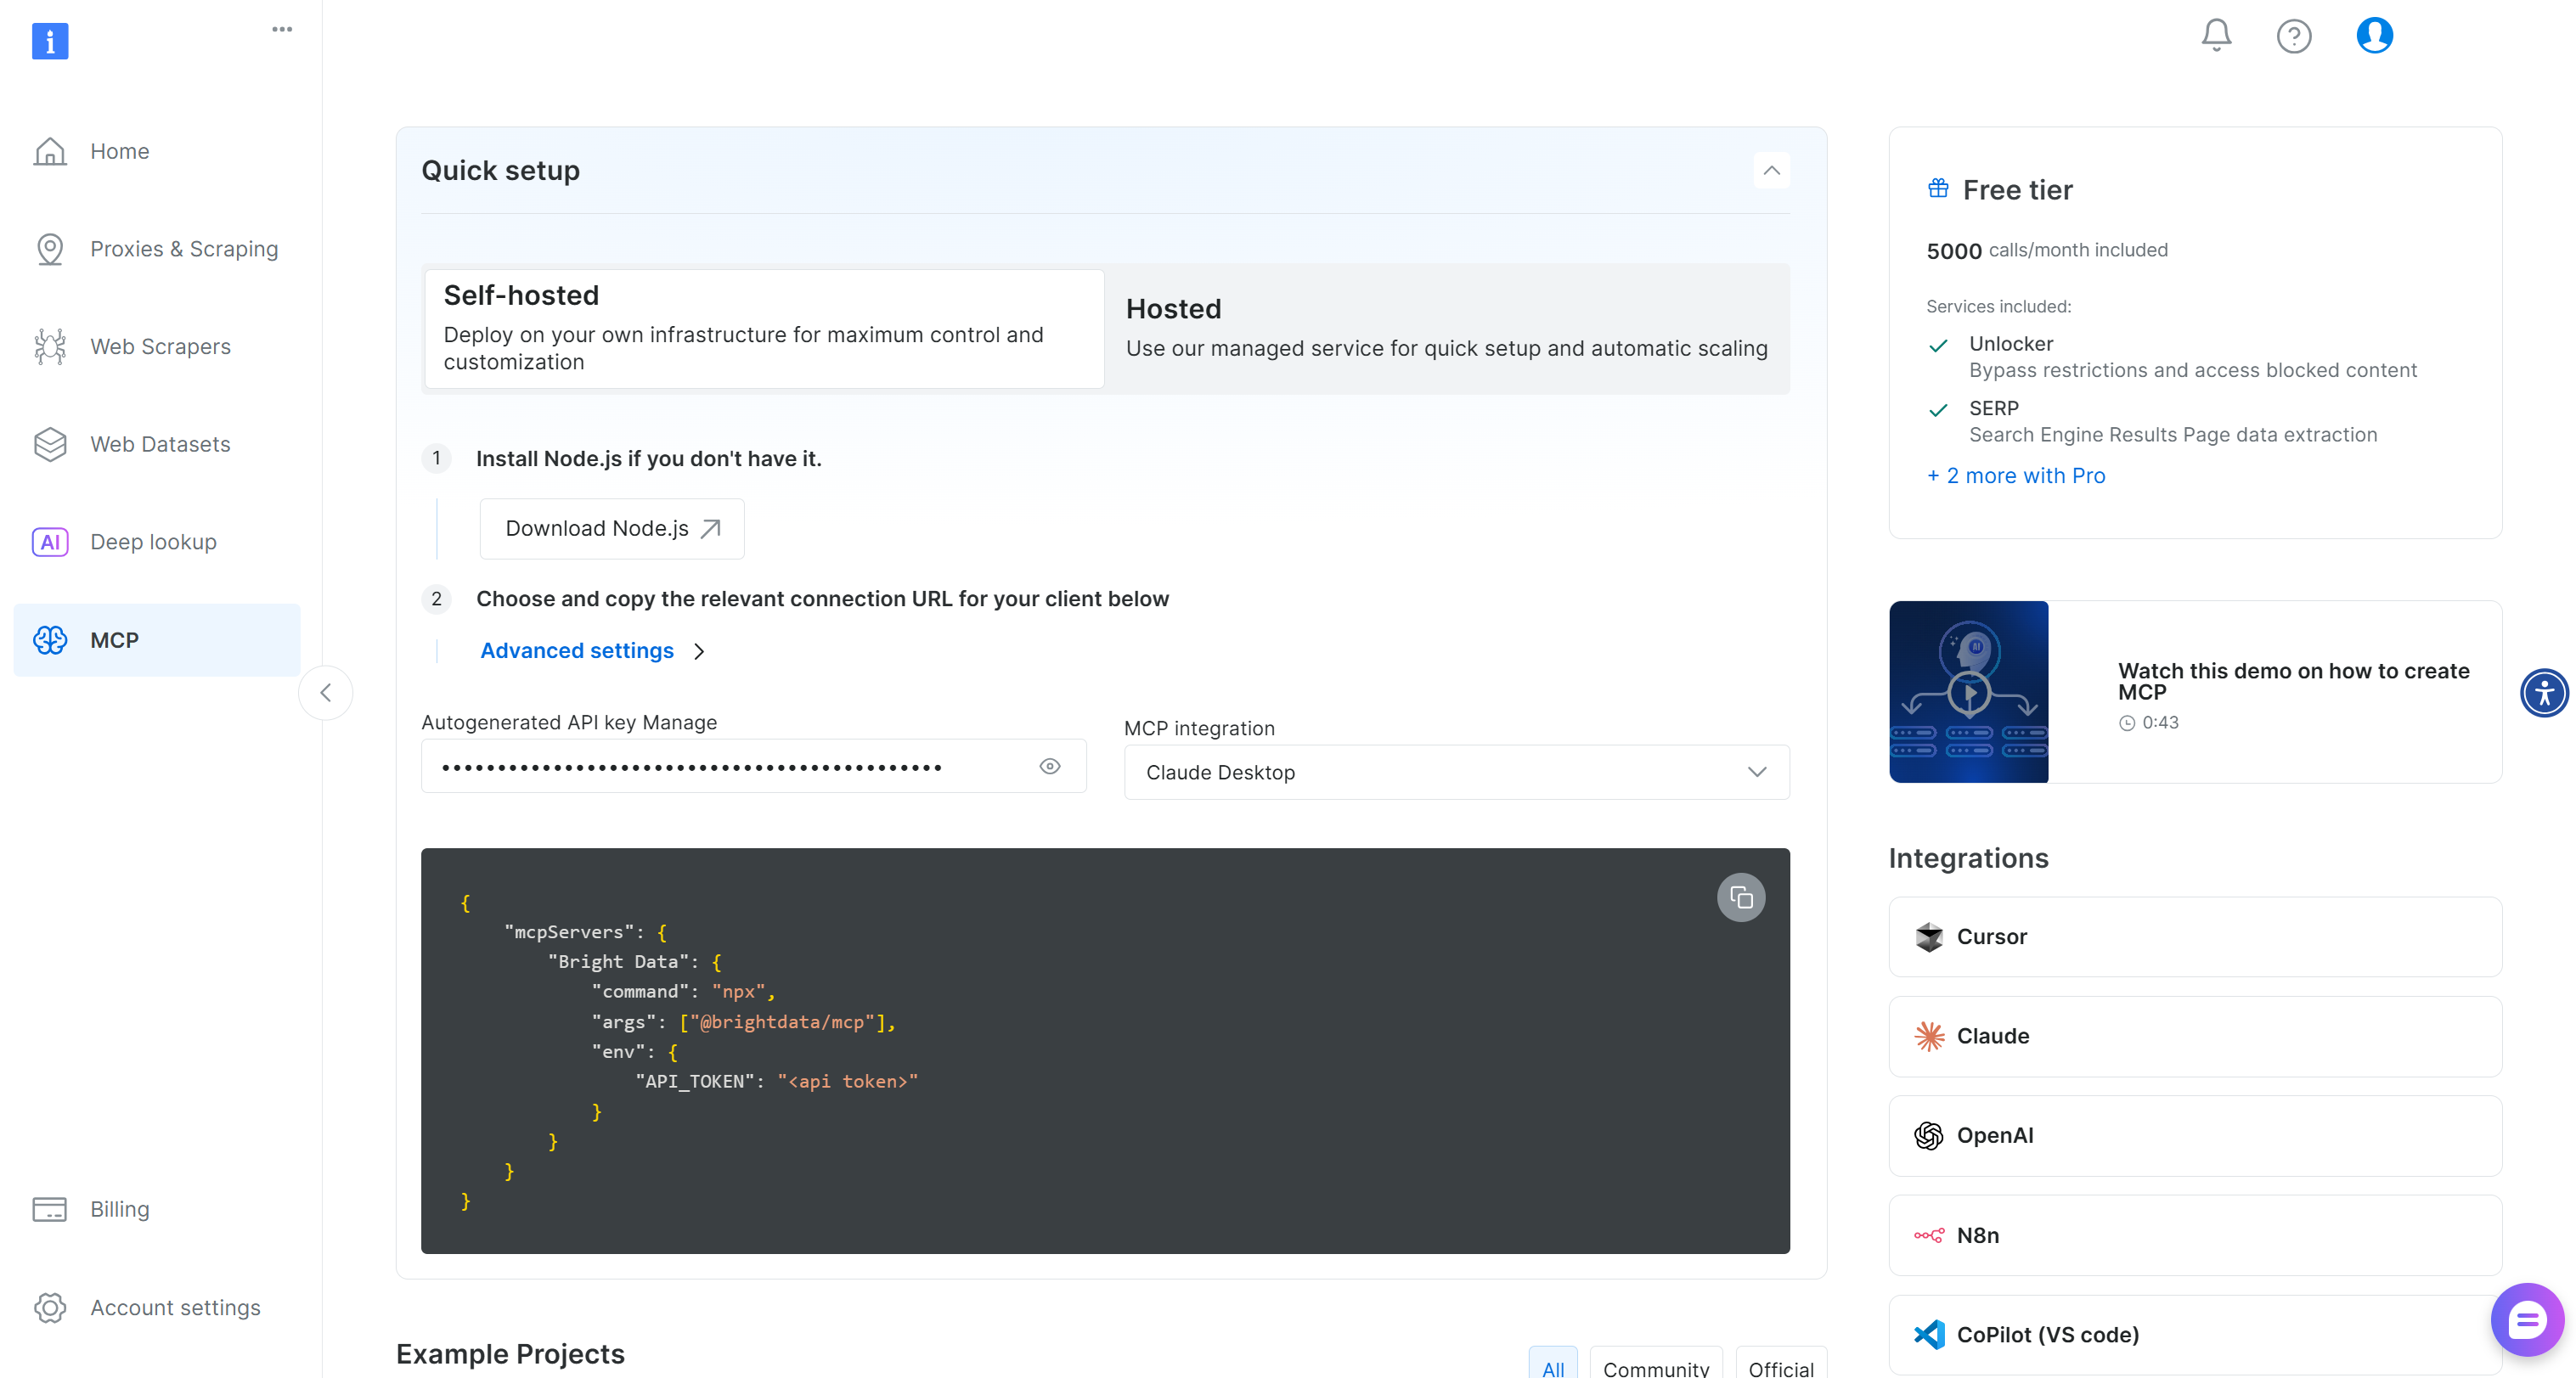
For additional guidance, refer to the instructions below.
Begin by generating your Bright Data API key. Store it in a safe place, as you will use it shortly to authenticate your local Web MCP instance with your Bright Data account.
Then, install the Web MCP globally on your machine via the @brightdata/mcp package:
npm install -g @brightdata/mcpVerify that the MCP server runs locally by executing:
API_TOKEN="<YOUR_BRIGHT_DATA_API>" npx -y @brightdata/mcpOr, equivalently, in PowerShell:
$Env:API_TOKEN="<YOUR_BRIGHT_DATA_API>"; npx -y @brightdata/mcpReplace the <YOUR_BRIGHT_DATA_API> placeholder with your Bright Data API token. The two (equivalent) commands set the API_TOKEN environment variable (which is required) and launch the Web MCP server locally.
If successful, you should see output similar to this:

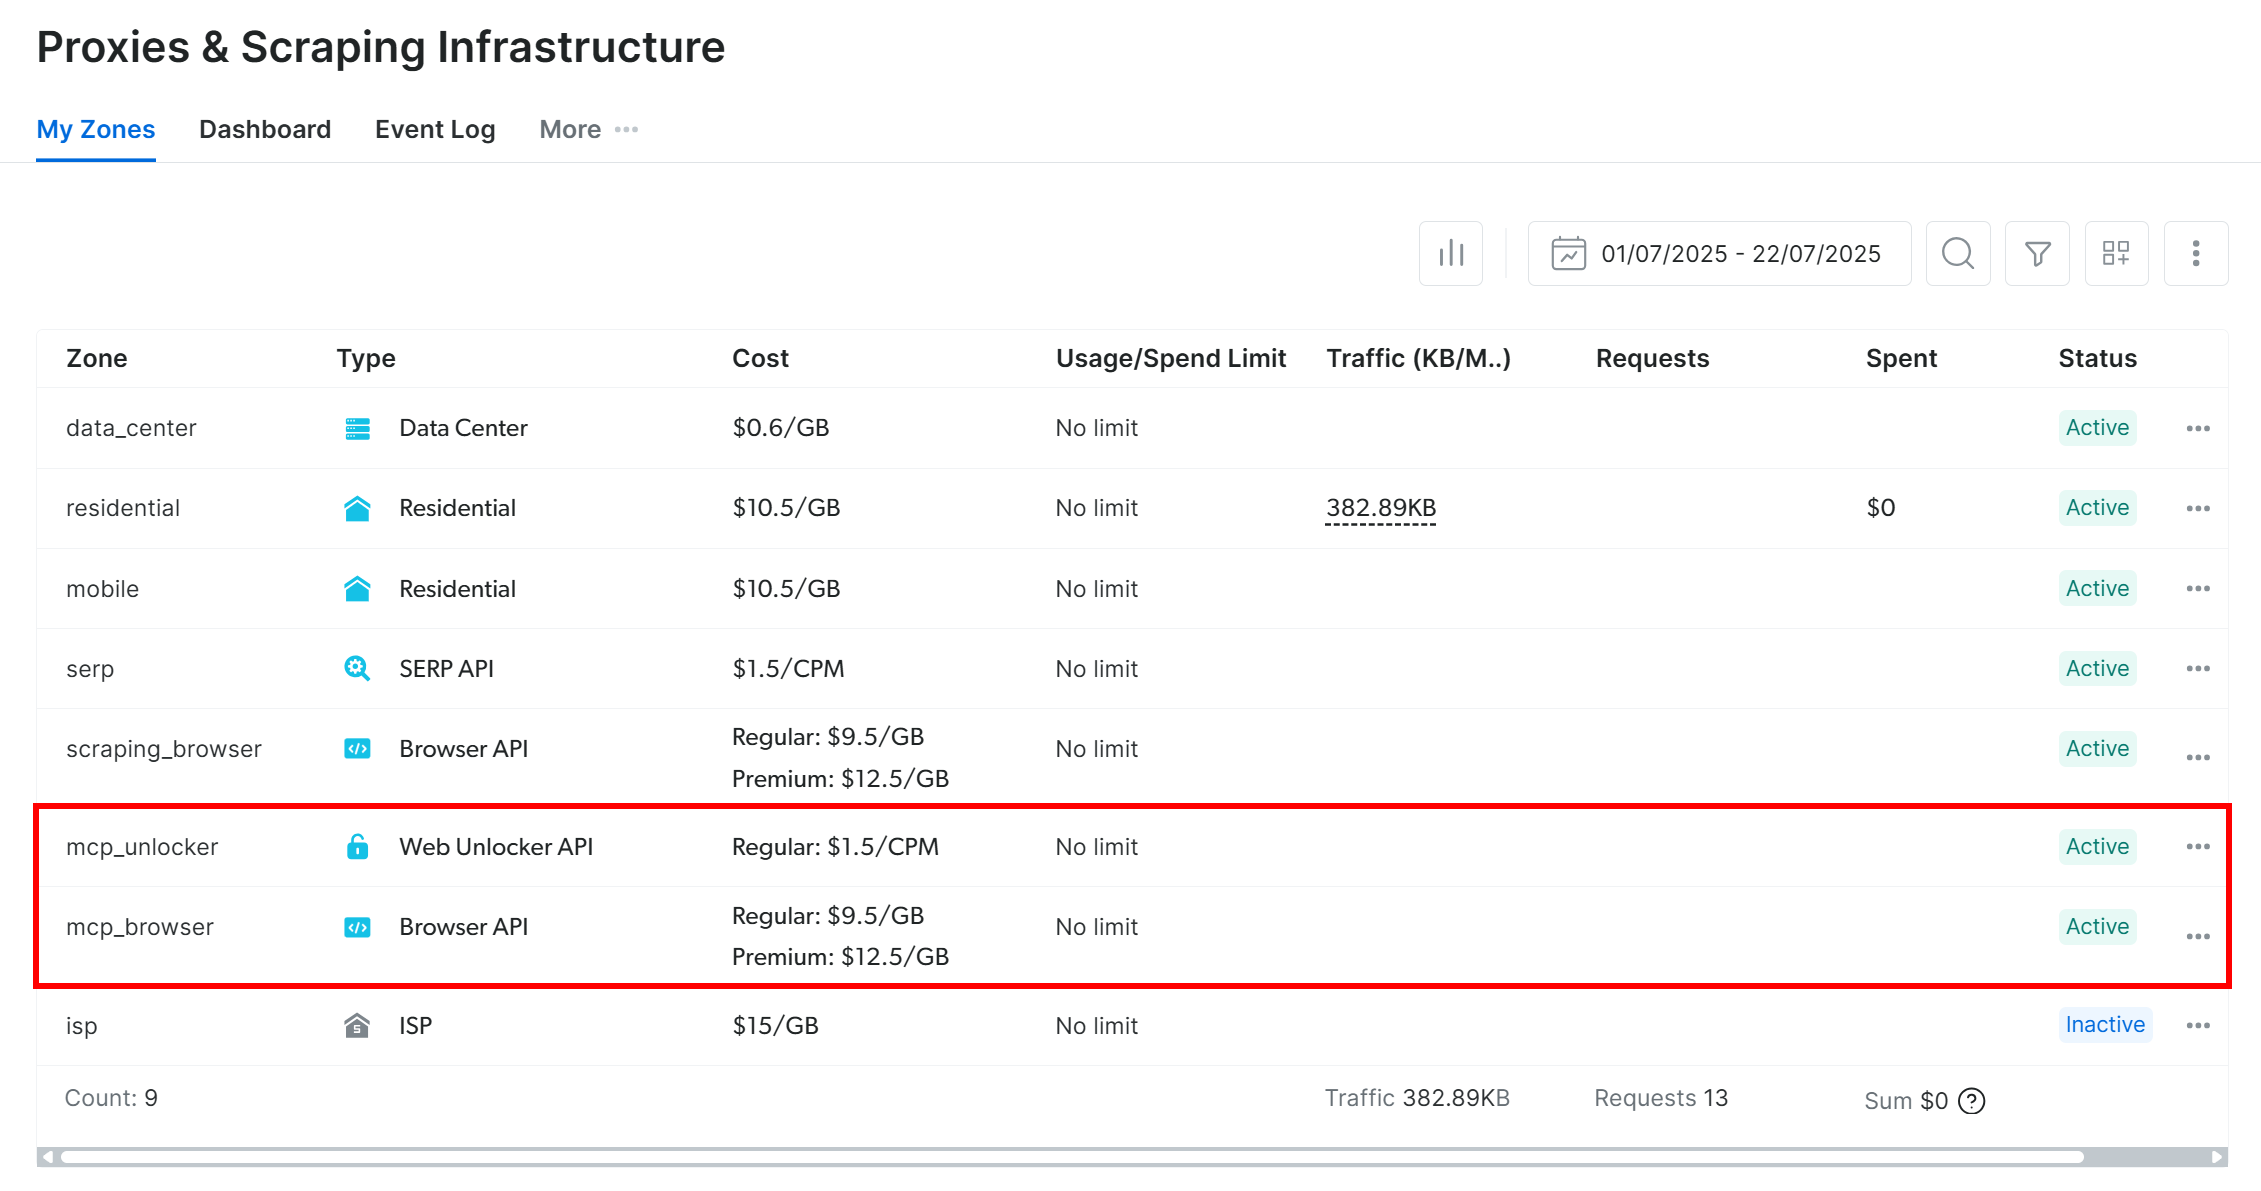
By default, on the first launch, Web MCP creates two zones in your Bright Data account:
mcp_unlocker: A zone for Web Unlocker.mcp_browser: A zone for Browser API.
Those two zones power the 60+ tools available in Web MCP.
To verify that the zones were created, go to the “Proxies & Scraping Infrastructure” page in your Bright Data dashboard. You should see both zones listed in the table:
Now, remember that on the Web MCP free tier, only the search_engine and scrape_as_markdown tools (and their batch versions) are available.
To unlock all tools, enable Pro mode by setting the PRO_MODE="true" environment variable:
API_TOKEN="<YOUR_BRIGHT_DATA_API>" PRO_MODE="true" npx -y @brightdata/mcpOr, on Windows:
$Env:API_TOKEN="<YOUR_BRIGHT_DATA_API>"; $Env:PRO_MODE="true"; npx -y @brightdata/mcpPro mode unlocks all 60+ tools, but it is not included in the free tier and [incurs additional charges](https://github.com/brightdata/brightdata-mcp?tab=readme-ov-file#-pricing, modes).
Cool! You have now verified that the Web MCP server works on your machine. Kill the process, as you will next configure goose to start the server locally and connect to it.
Step #3: Configure the Web MCP as a goose Extension
The official way to connect to an external MCP server in goose Desktop is by adding it as a custom extension.
To do this, click “Extensions” in the left-hand menu:
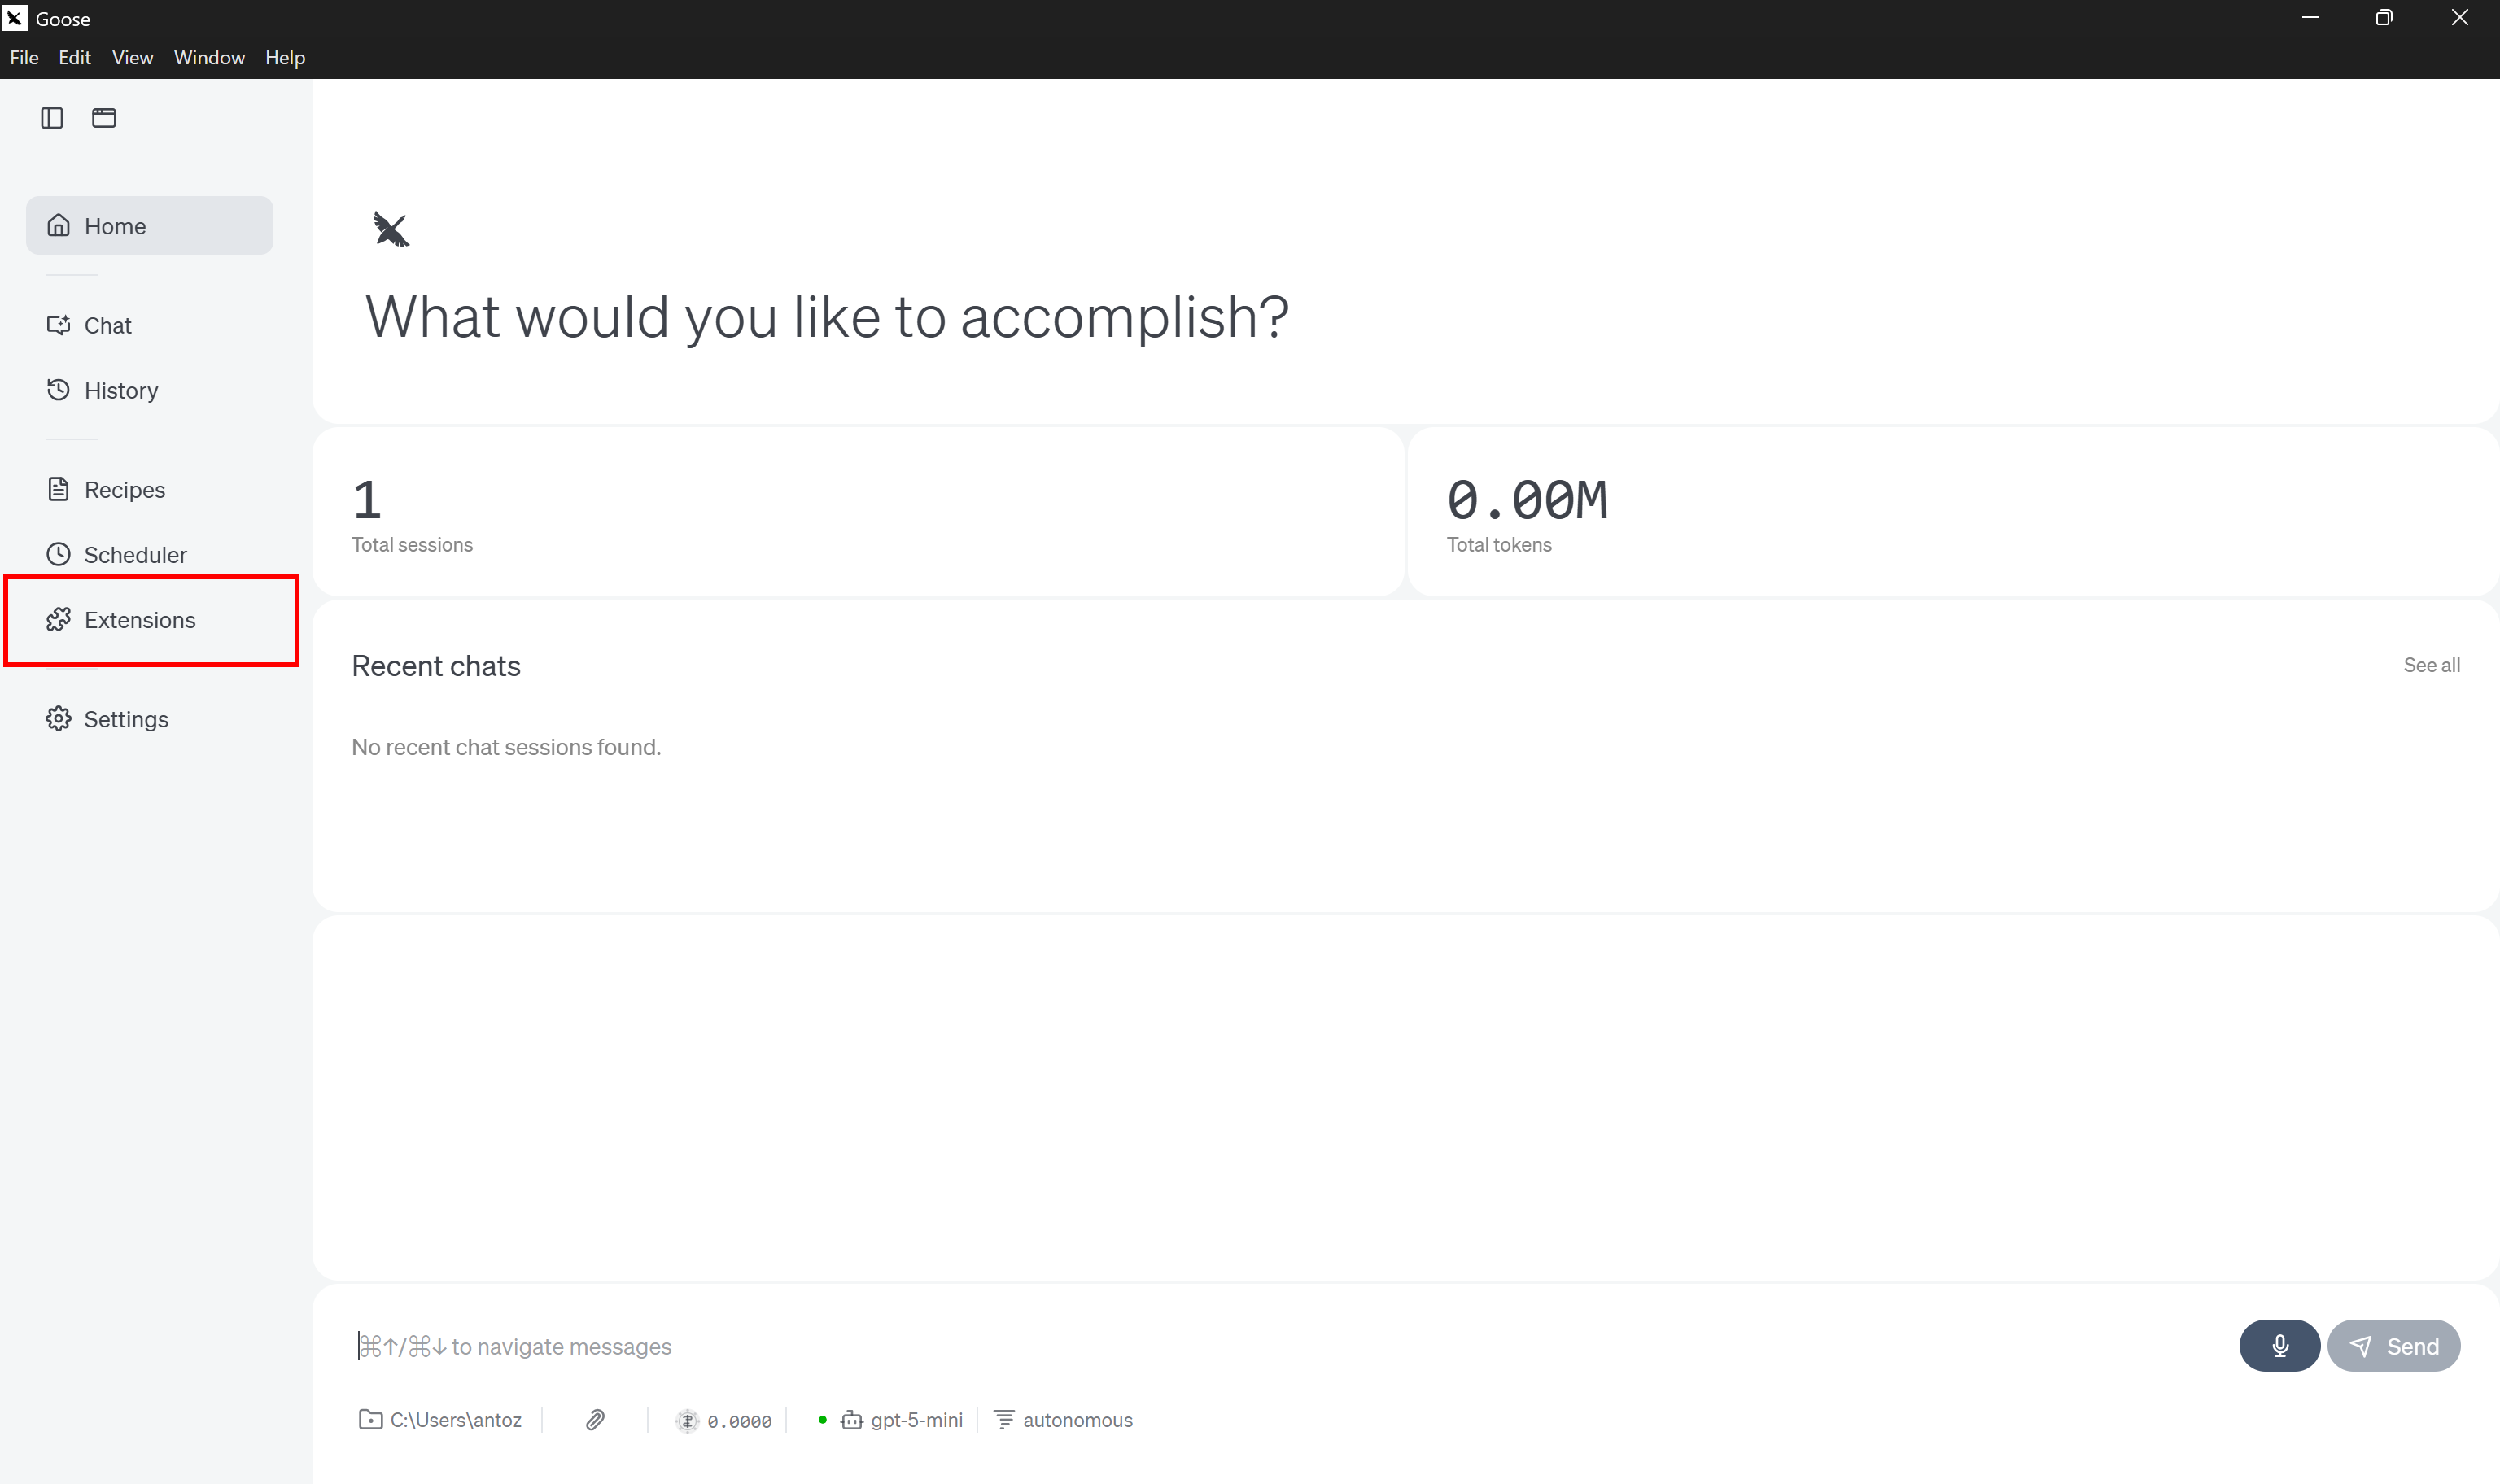
Next, choose the “Add custom extension” button:

Fill in the “Add custom extension modal” as shown below:
- Extension Name: “Bright Data”
- Description: “Empower your AI models and agents with real-time, reliable access to public web data.”
- Command:
npx -y @brightdata/mcp - Timeout:
300. - Environment Variables:
– API_TOKEN: <YOUR_BRIGHT_DATA_API_KEY> (replace it with your actual Bright Data API key value)
– PRO_MODE: true (optional; set this only if you want to enable Pro Mode)
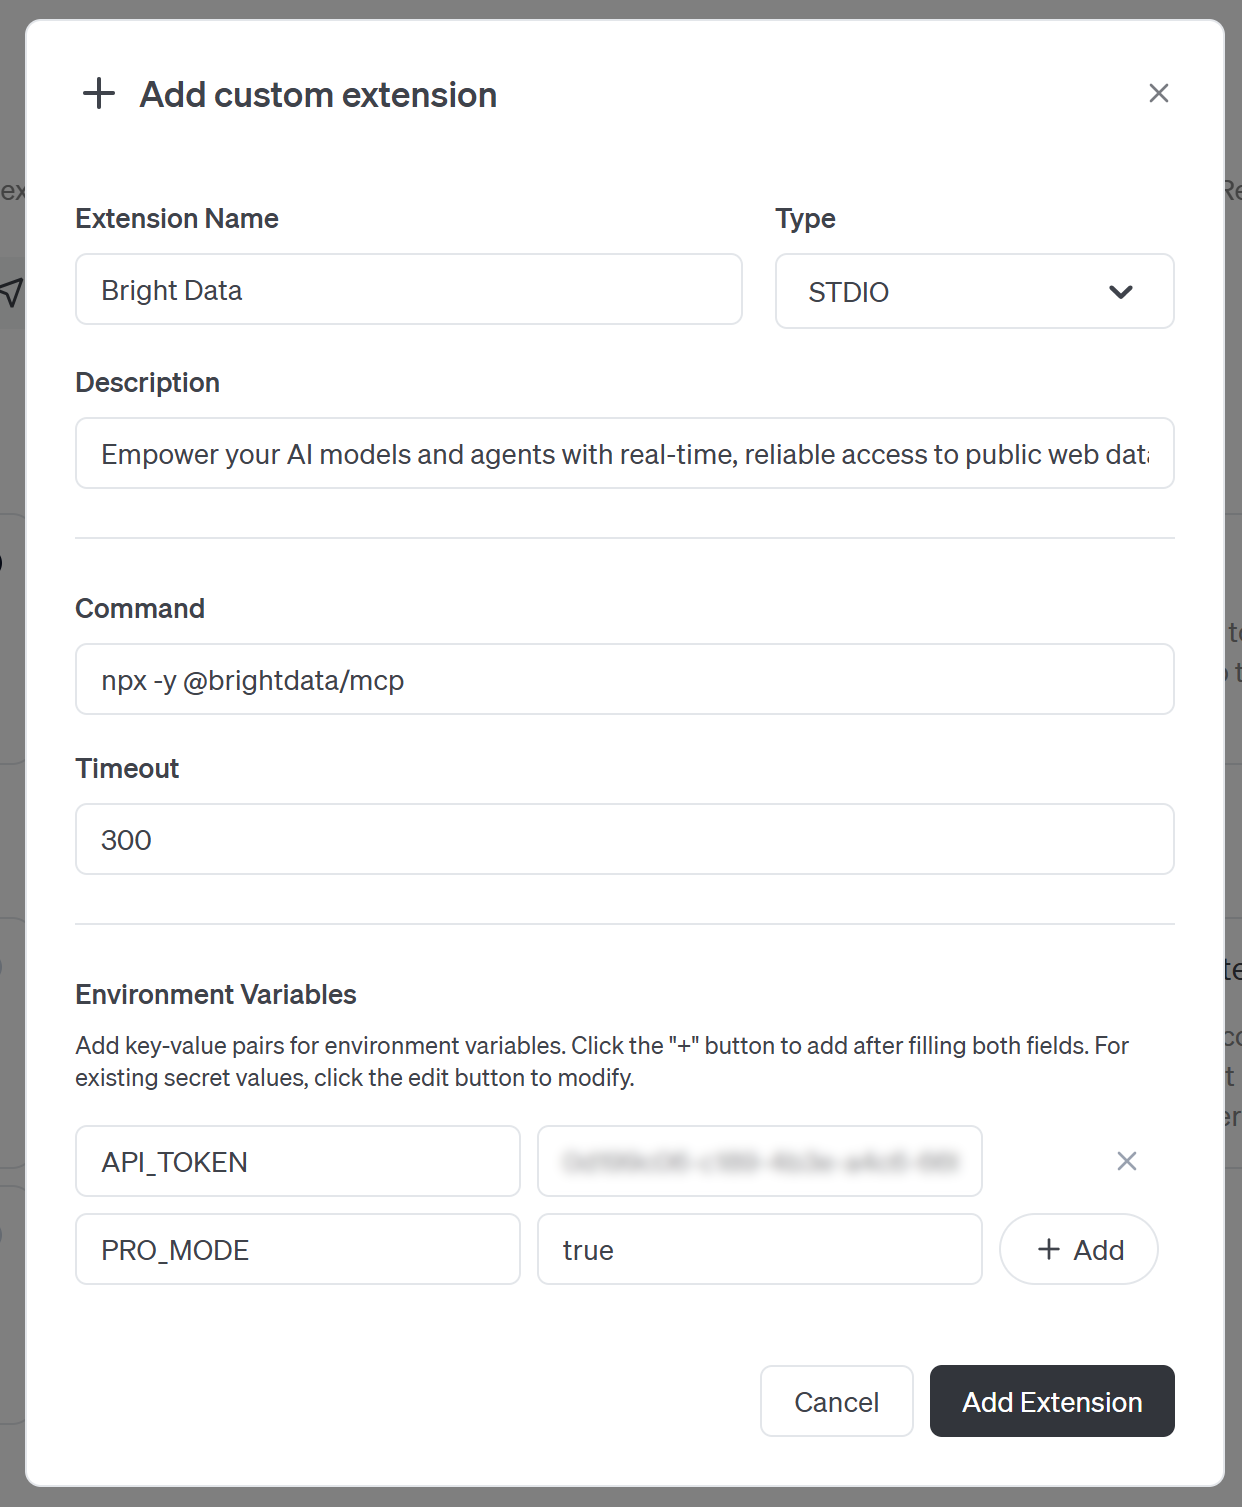
Next, press the “Add Extension” button to continue.
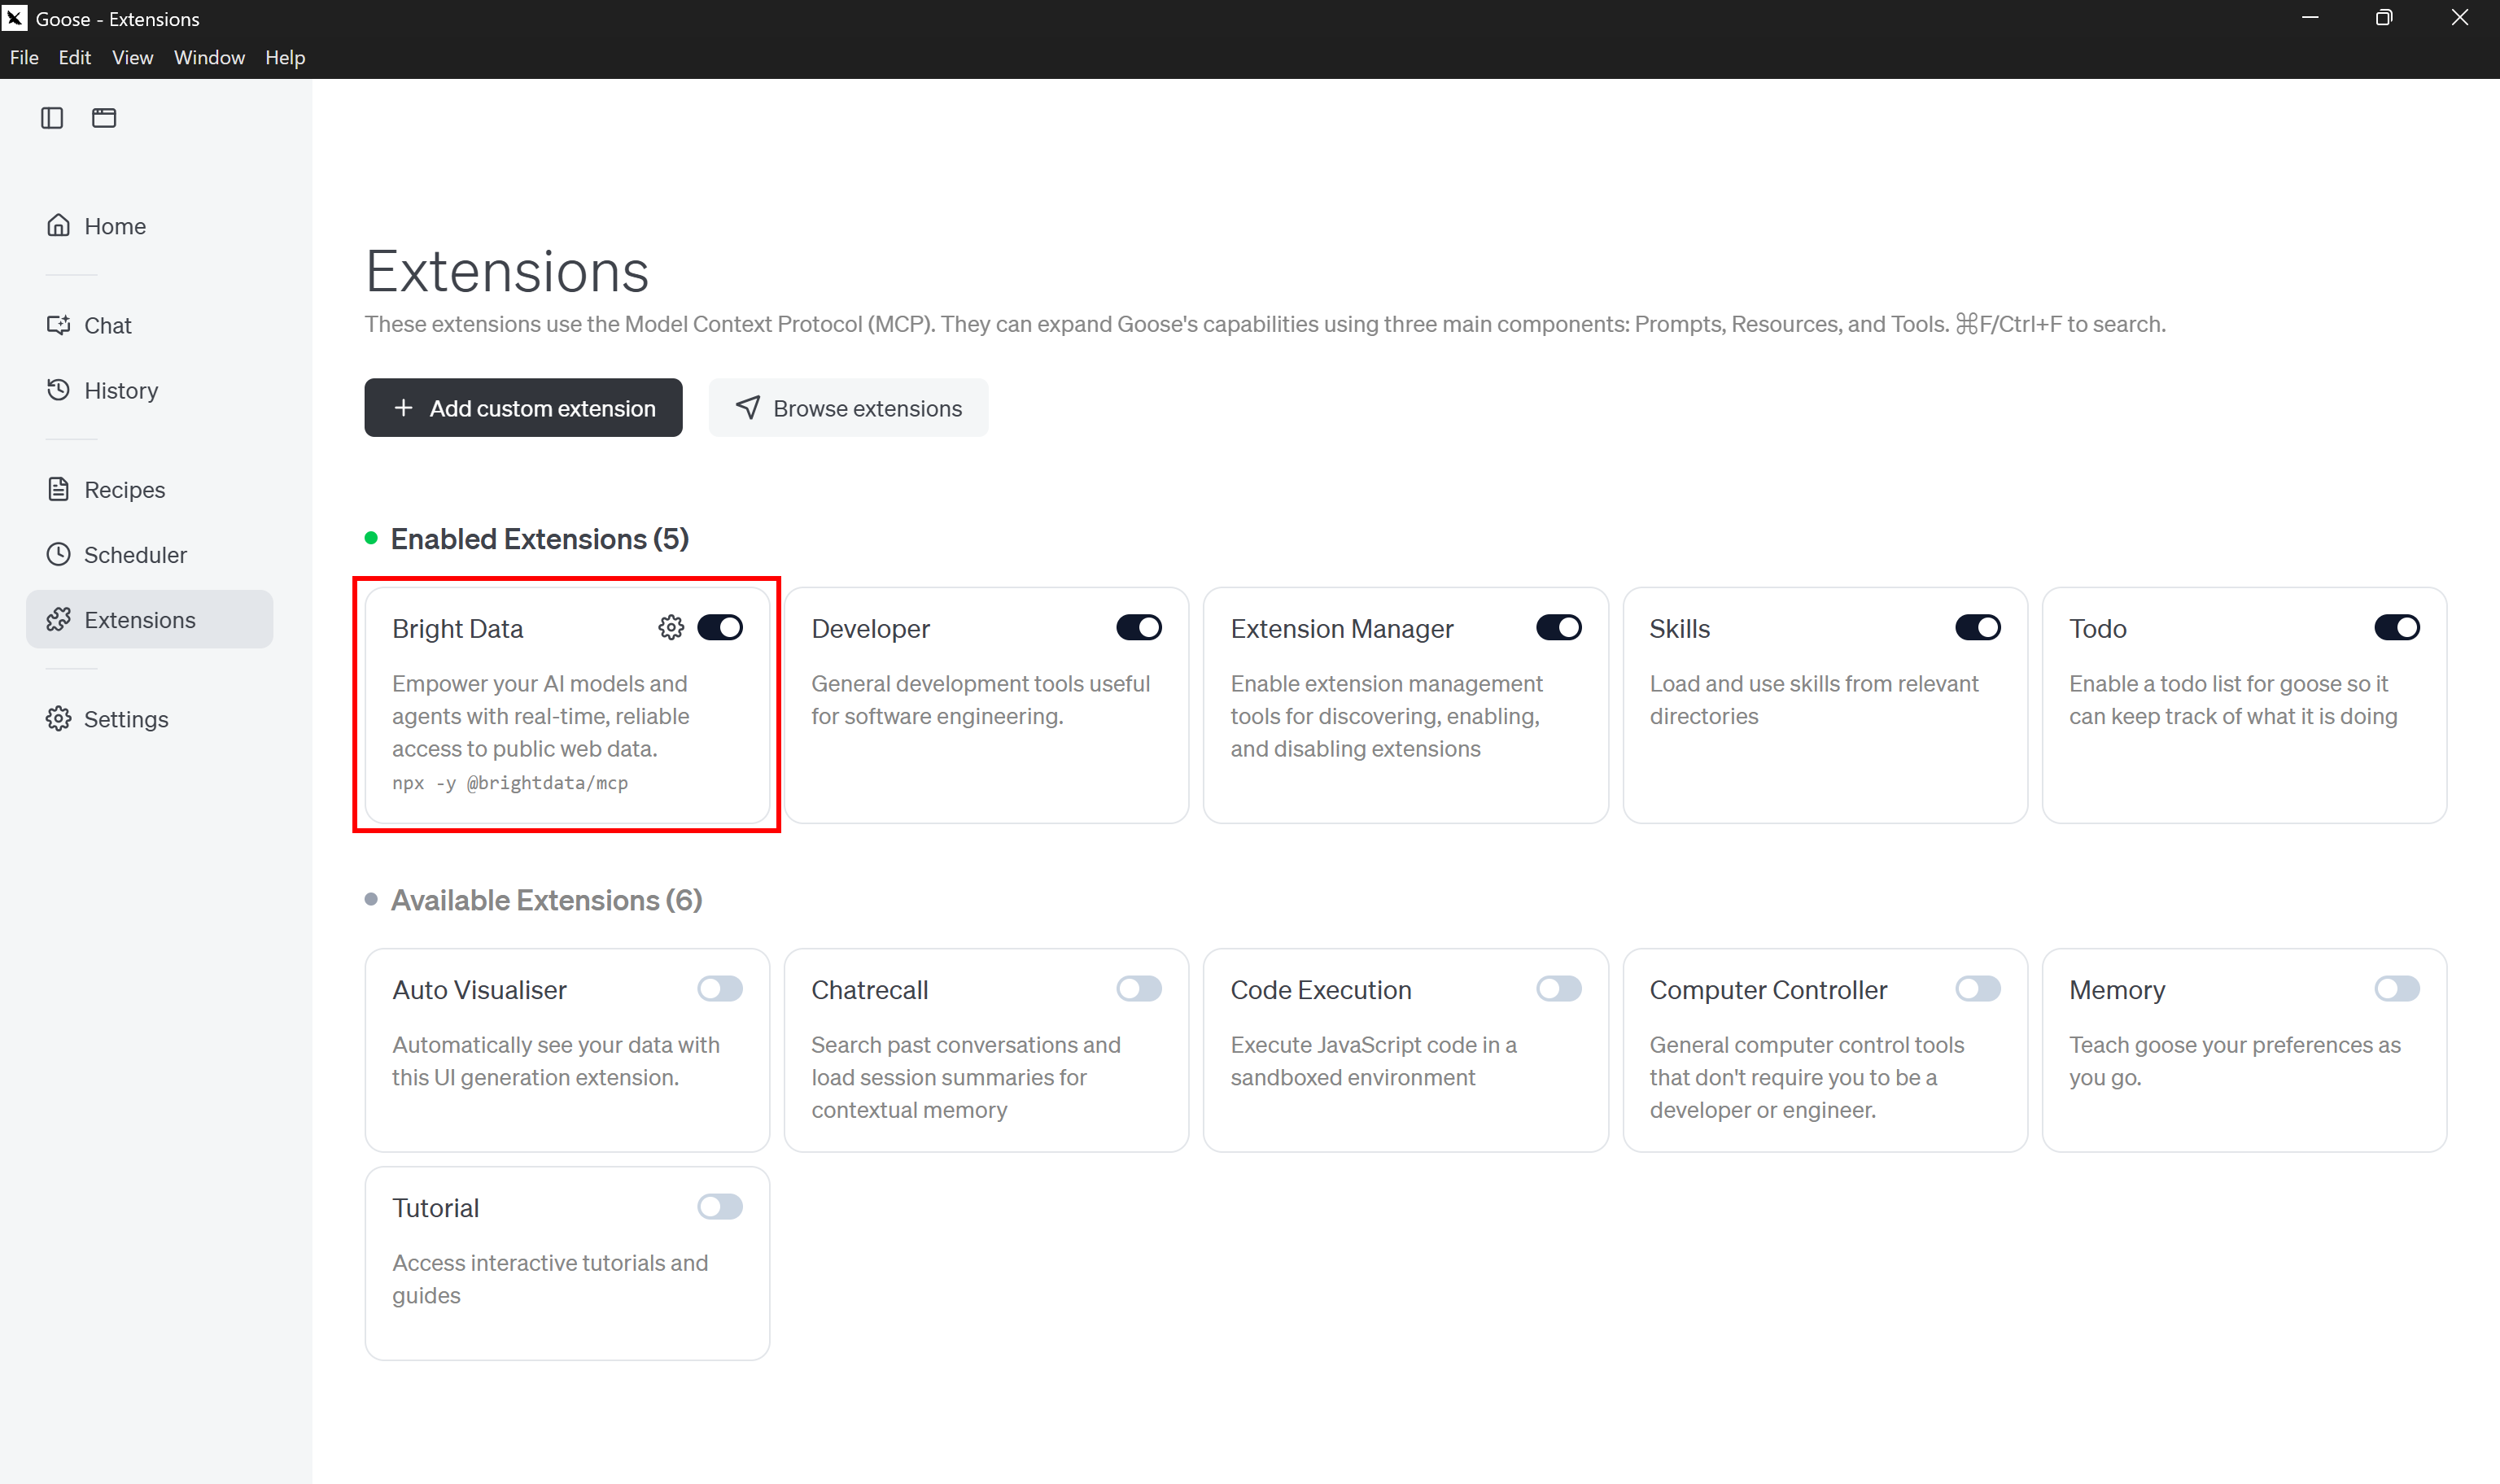
The “Bright Data” extension will be added and enabled by default. If it is not started, toggle the extension to enable it yourself.
This approach essentially tells goose to run the same command we used earlier to start the Web MCP server locally. goose executes that command for you and automatically connects to the local server, giving the agent access to its tools.
Note: Similarly, instead of running the server locally, you can also connect to the remote Bright Data Web MCP via Streamable HTTP. This option is better suited for enterprise-grade use cases.
Fantastic! goose will now be able to connect to Bright Data’s Web MCP.
Step #4: Verify the Web MCP Connection
As of this writing, goose does not provide a direct way to list connected tools. That said, there is a simple trick you can use to verify that everything is working.
Go to the goose home page and click the “autonomous” label in the chat section at the bottom:
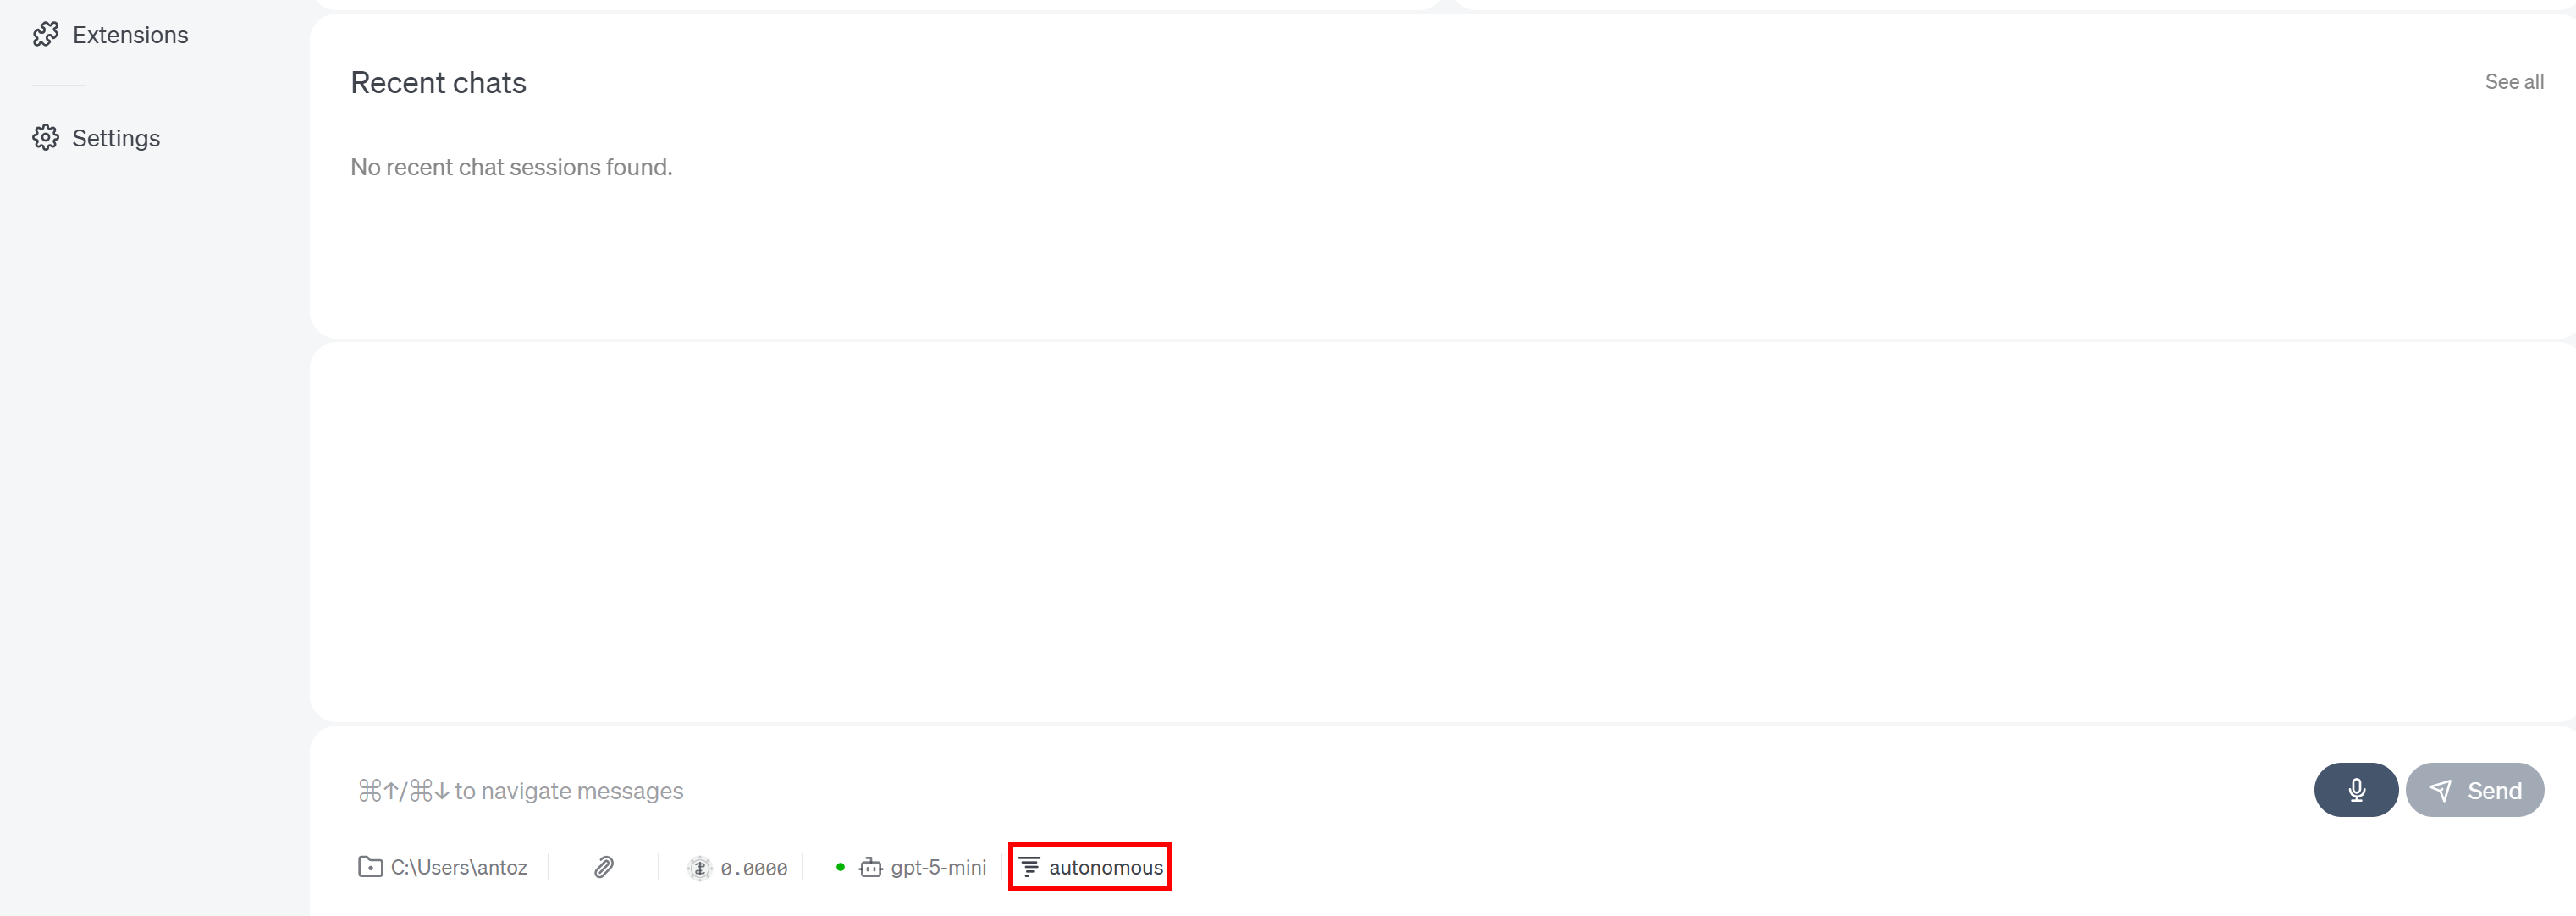
This setting controls how the AI agent behaves when using tools exposed by extensions. By default, it is set to “Autonomous,” meaning goose can use extensions, modify files, and delete files without asking for approval.
Press the gear icon in the “Manual” entry:
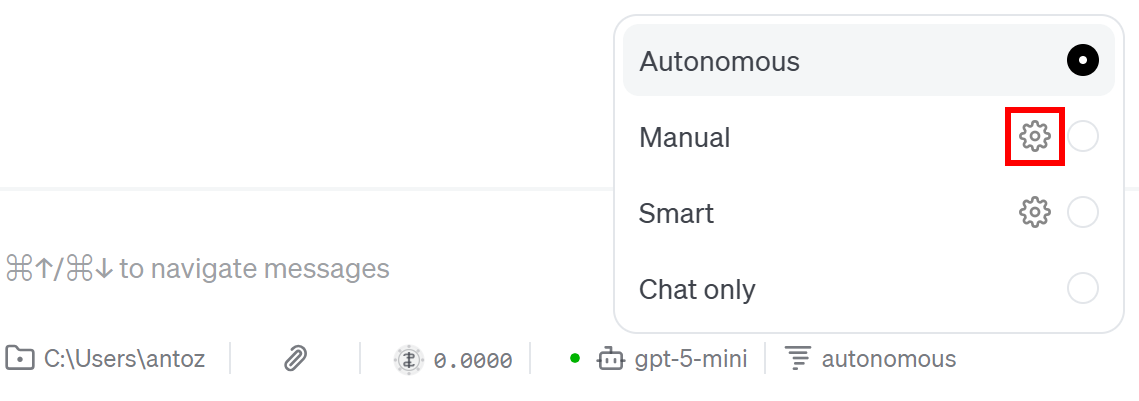
You will see the list of enabled extensions in the “Permission Rules” modal. Select the “bright-data” one:
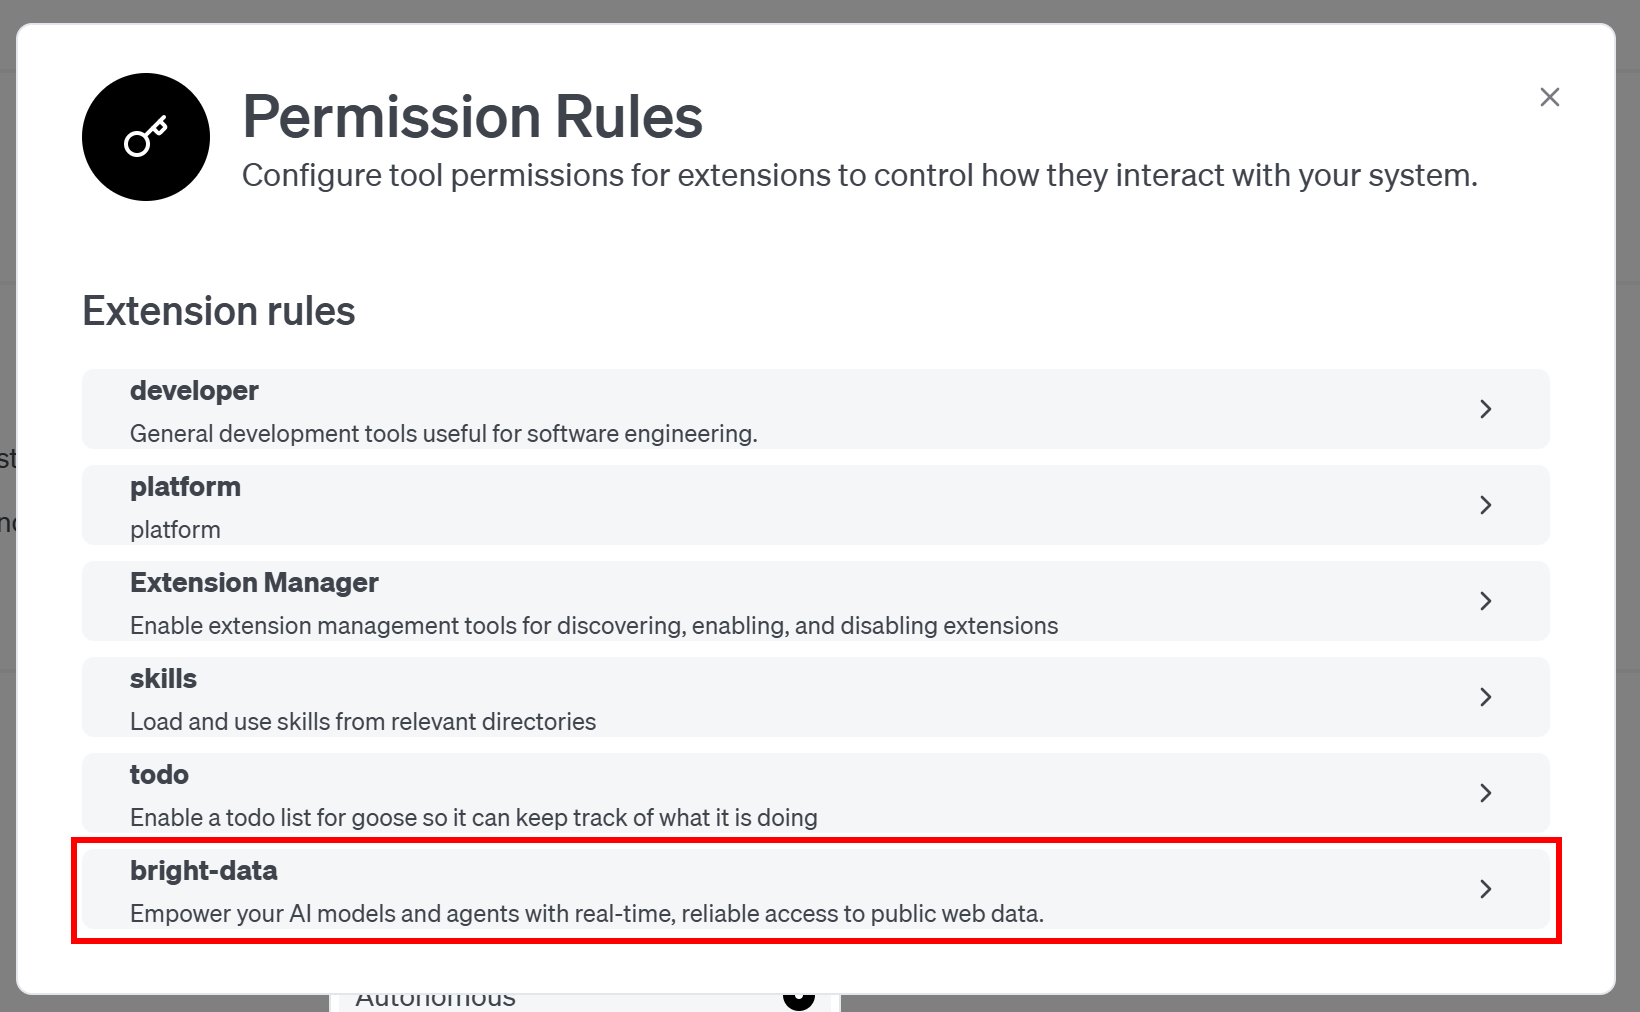
At this point, goose will list all the tools exposed by the Web MCP server (allowing you to configure permissions for each tool individually):
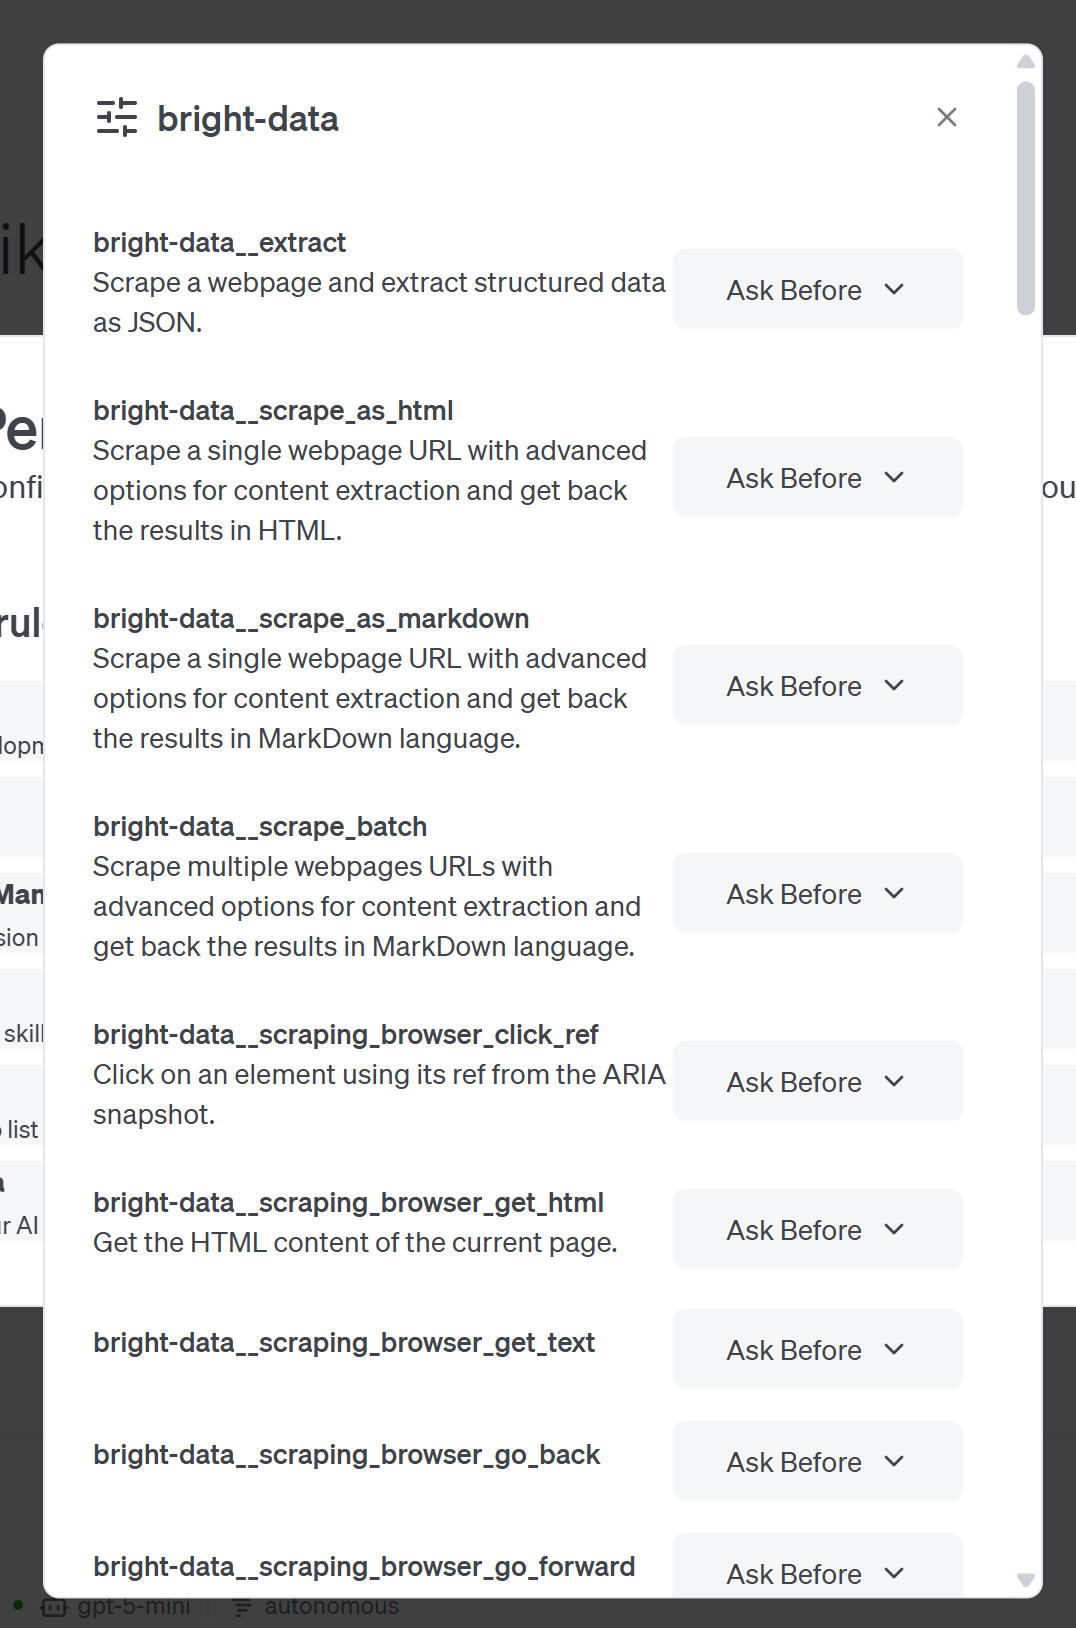
In this example, the list includes 60+ tools because the Web MCP server was configured in Pro mode. If you are running it in regular mode, only the four free tools (search_engine and scrape_as_markdown, plus their batch versions) will be available.
From here, you can either granularly configure permissions for the tools you plan to use or continue in Autonomous mode.
Terrific! goose successfully connected to the Bright Data Web MCP.
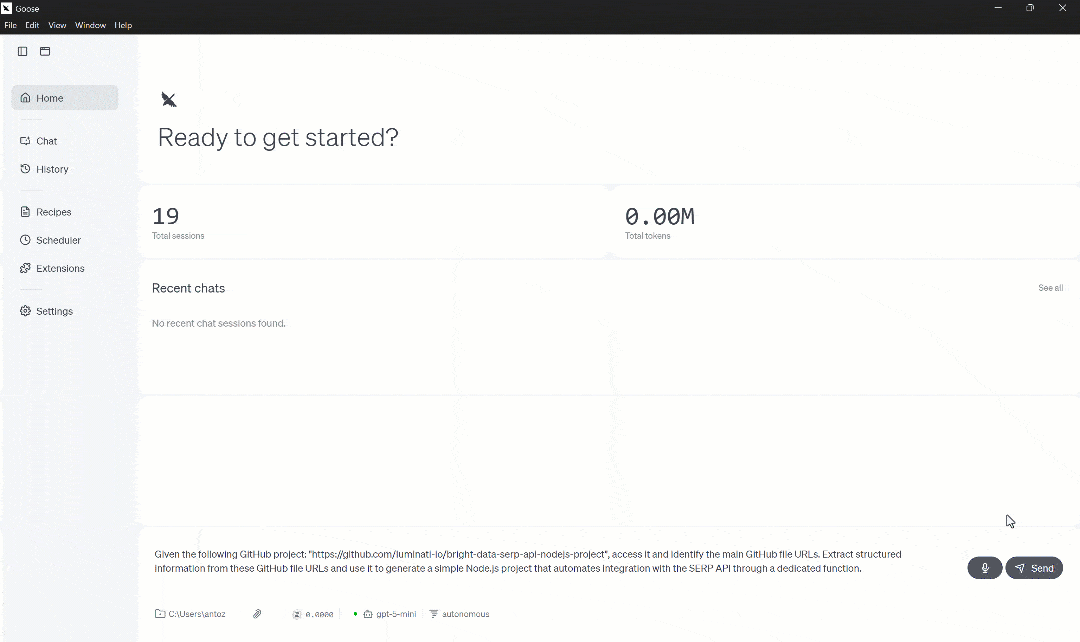
Step #5: Test the Integration
To verify that the integration works, imagine you want to create a real-world project that requires fresh documentation information. That is something an LLM alone would not have.
For higher accuracy, you can instruct the AI agent to access the GitHub page of a similar project, explore its files, learn from them, and produce the required result. For instance, test a prompt like this to get started with Bright Data’s SERP API integration in Node.js:
Given the following GitHub project: "https://github.com/luminati-io/bright-data-serp-api-nodejs-project", access it and identify the main GitHub file URLs. Extract structured information from these GitHub file URLs and use it to generate a simple Node.js project that automates integration with the SERP API through a dedicated function.Normally, an LLM might not know all the details and could hallucinate. Instead, by relying on official GitHub information, the output becomes much more accurate.
Specifically, the AI agent should use Web MCP tools to read information from the target project and then use specialized GitHub tools to extract structured data from the repository files.
Launch the prompt in goose:
As you can see, the agent calls the “Scrape As Markdown” tool to first read the official repository page and return it in LLM-ready Markdown format (which is the ideal format for ingestion in AI agents).
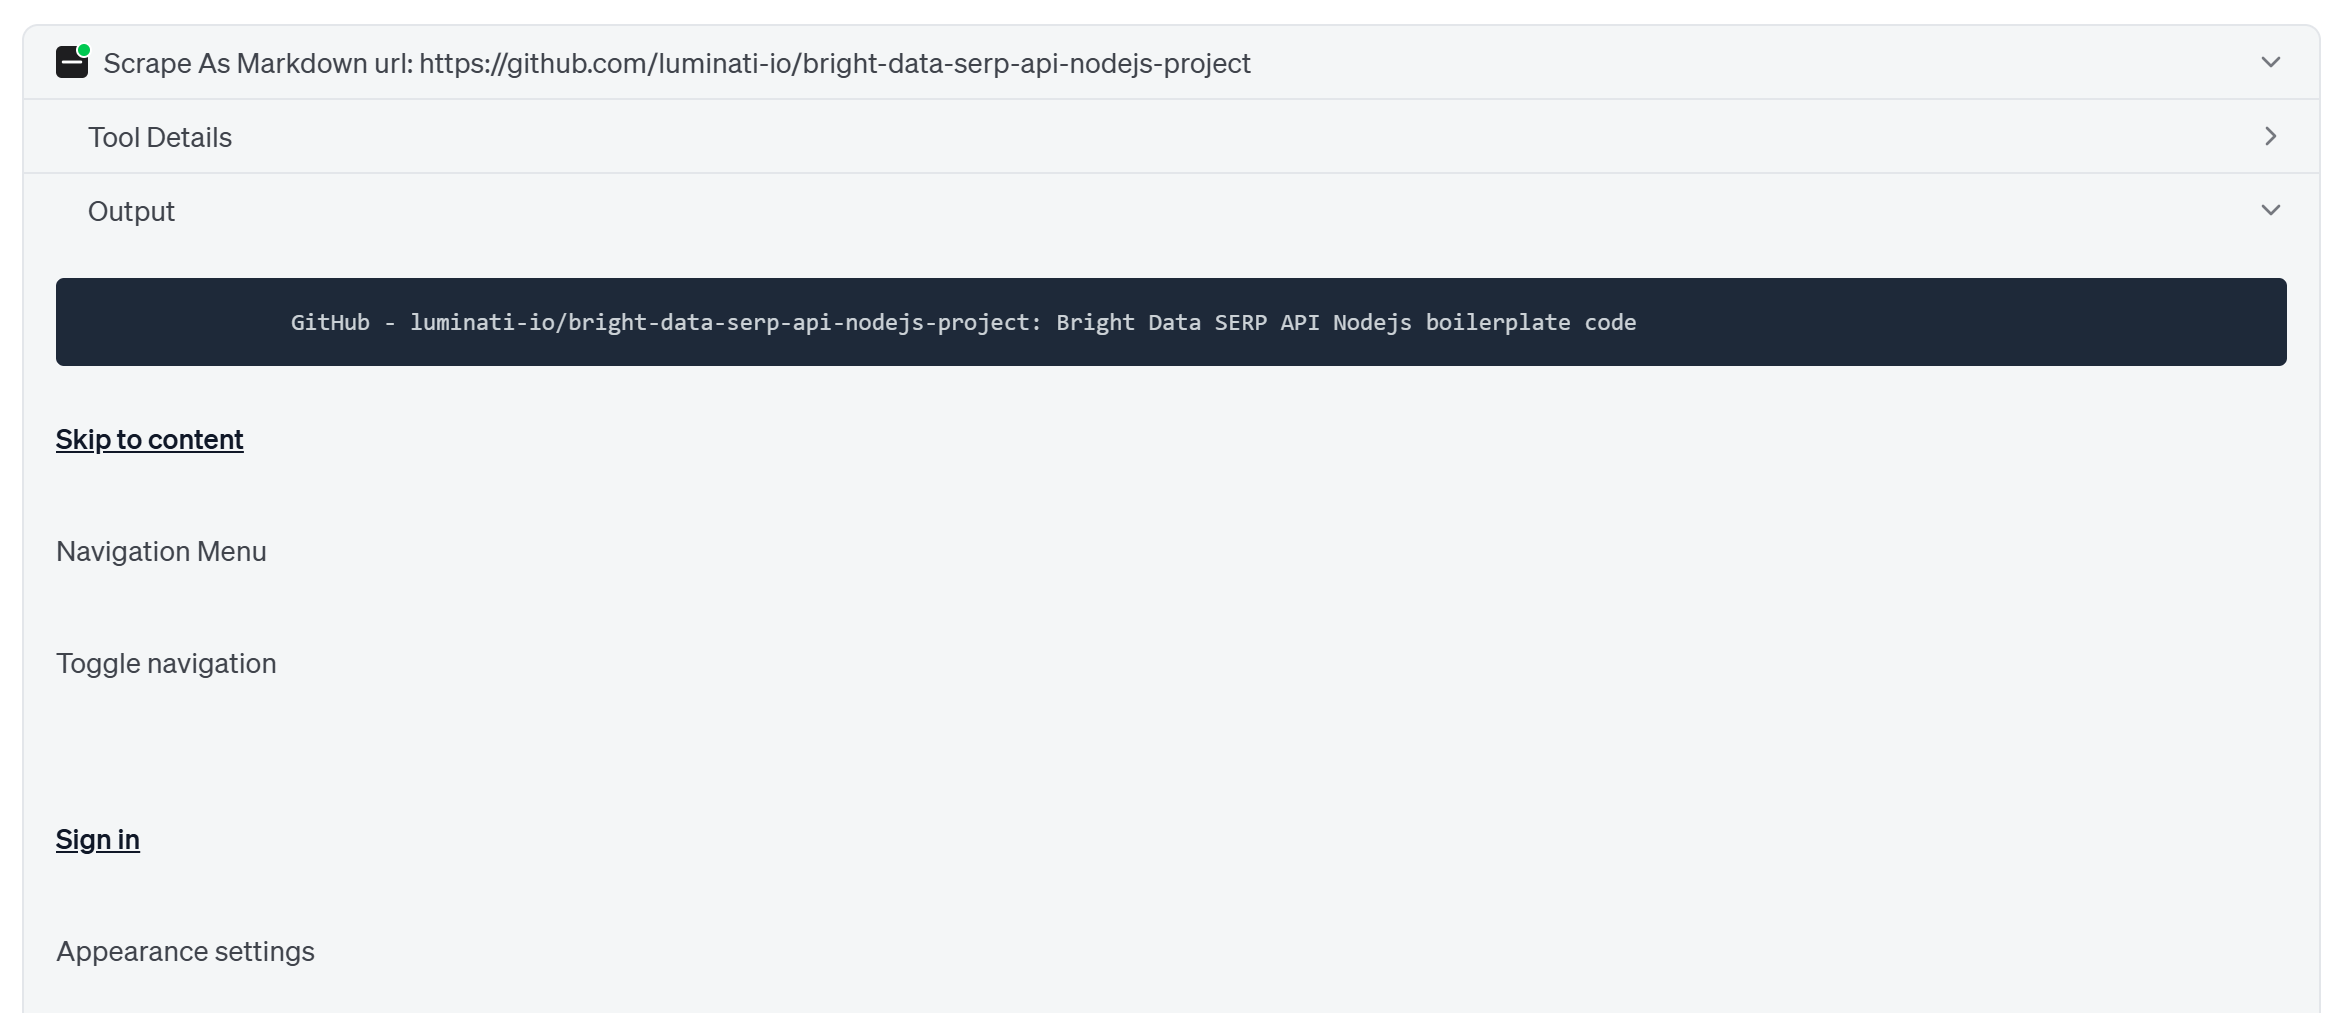
From there, it discovers the links to the most important files and accesses them via the premium “Web Data GitHub Repository File” tool in Web MCP. This tool scrapes structured JSON data from the given GitHub URLs:
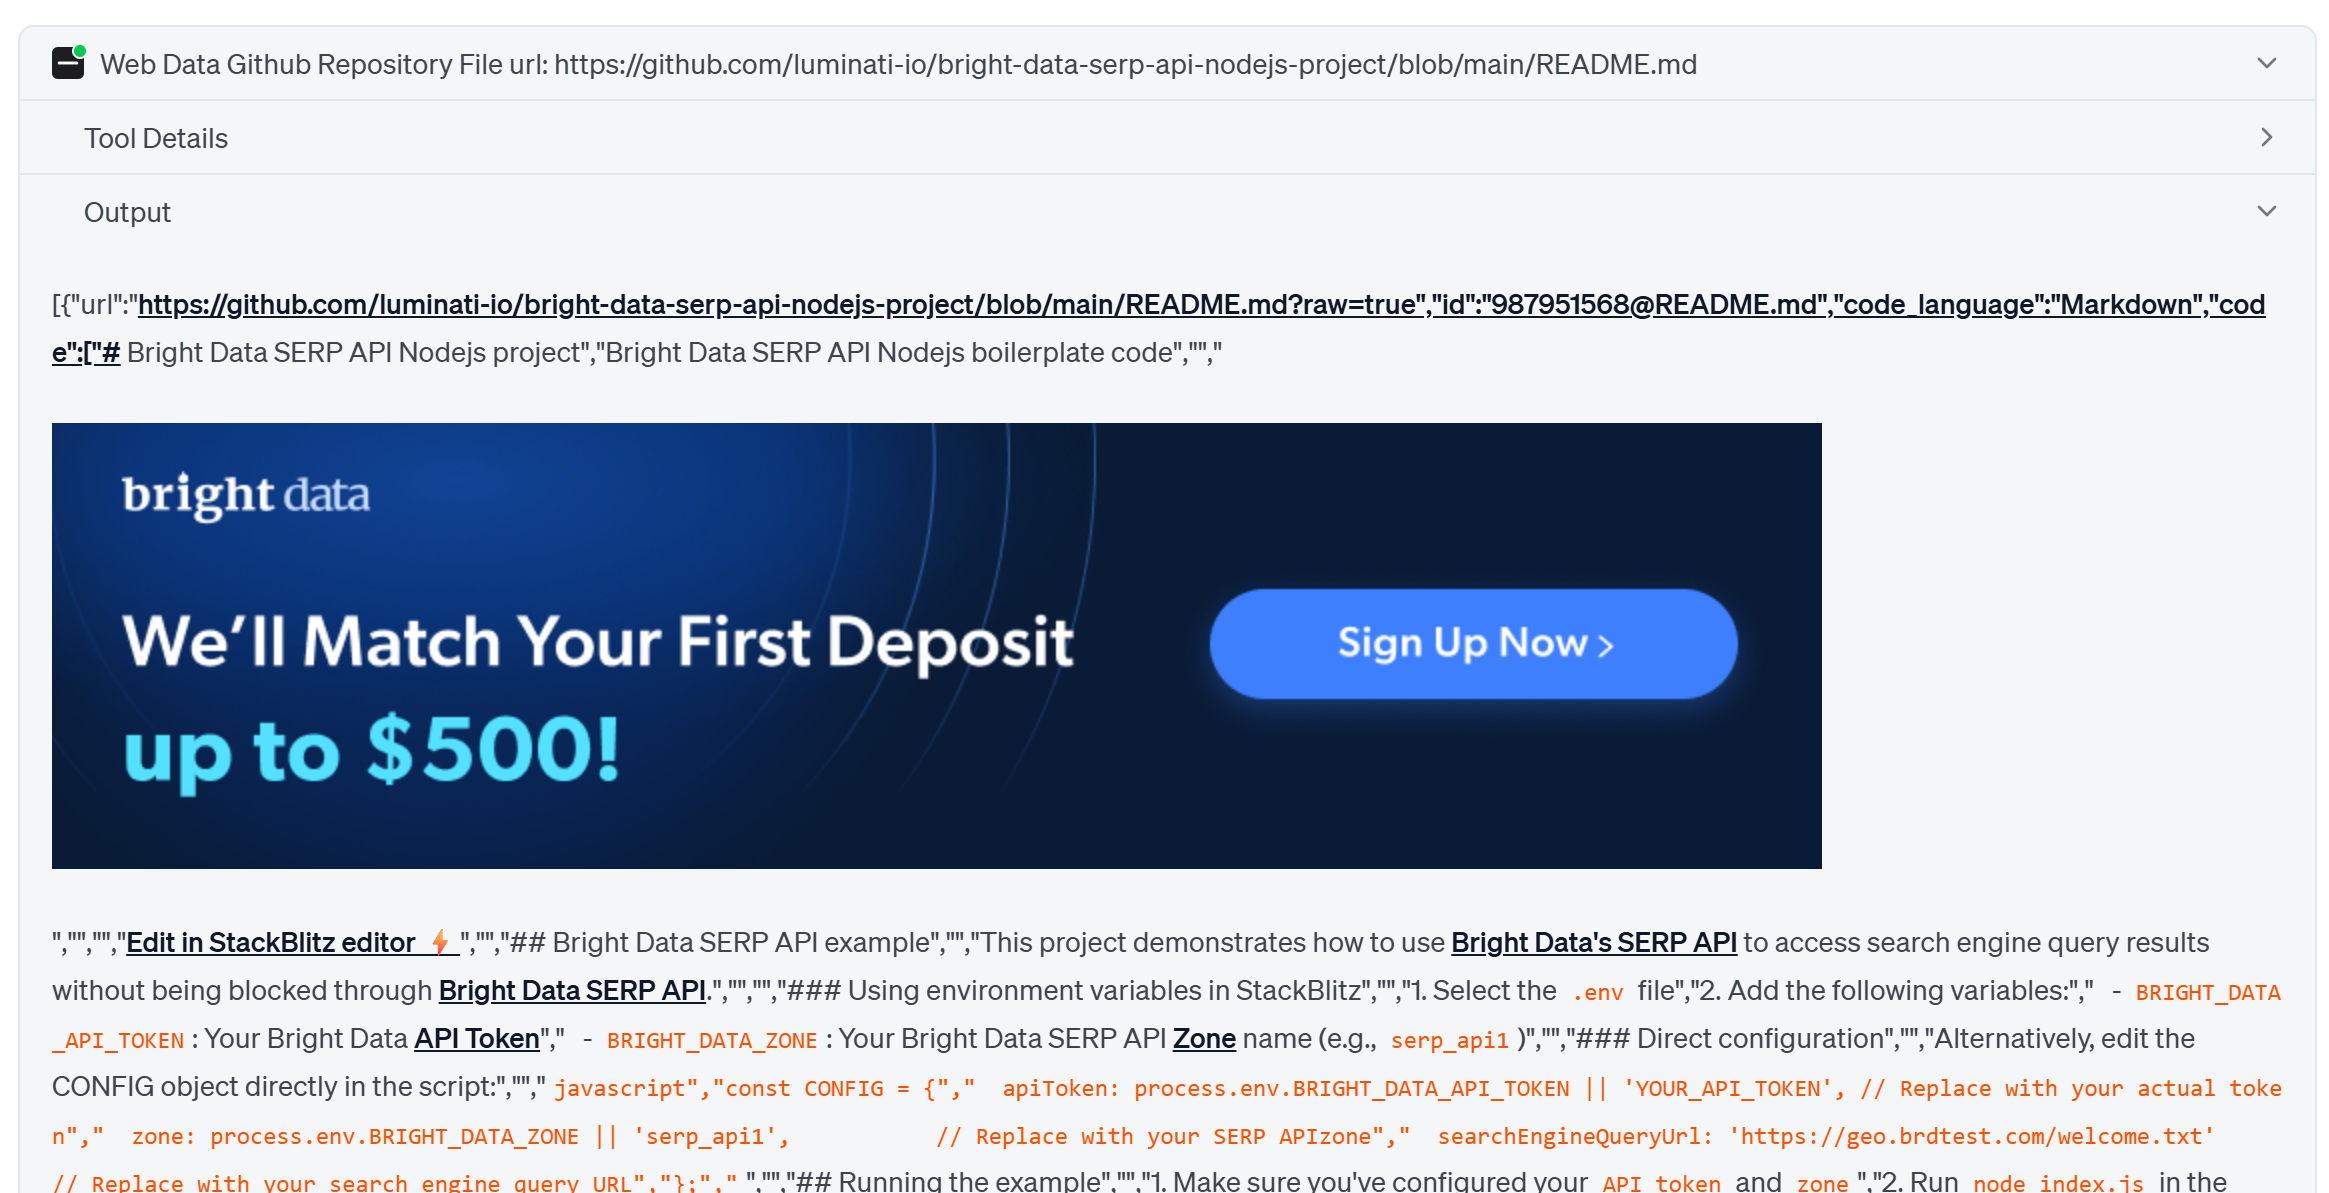
Finally, the agent learns from the retrieved data and produces very detailed, contextual instructions to set up the desired project, including well-commented code.
Et voilà! Your goose AI agent is now more powerful than ever, with access to all the tools it needs for high-quality results, thanks to the Bright Data Web MCP connection.
Connecting Bright Data Web MCP in goose CLI: Step-by-Step Tutorial
This guided section will walk you through the process of integrating Bright Data Web MCP into goose via its CLI.
Step #1: Install and Configure the goose CLI
Start by following the official instructions to install the goose CLI for your operating system. During installation, the goose configure command is automatically executed:
This interface allows you to configure your goose setup.
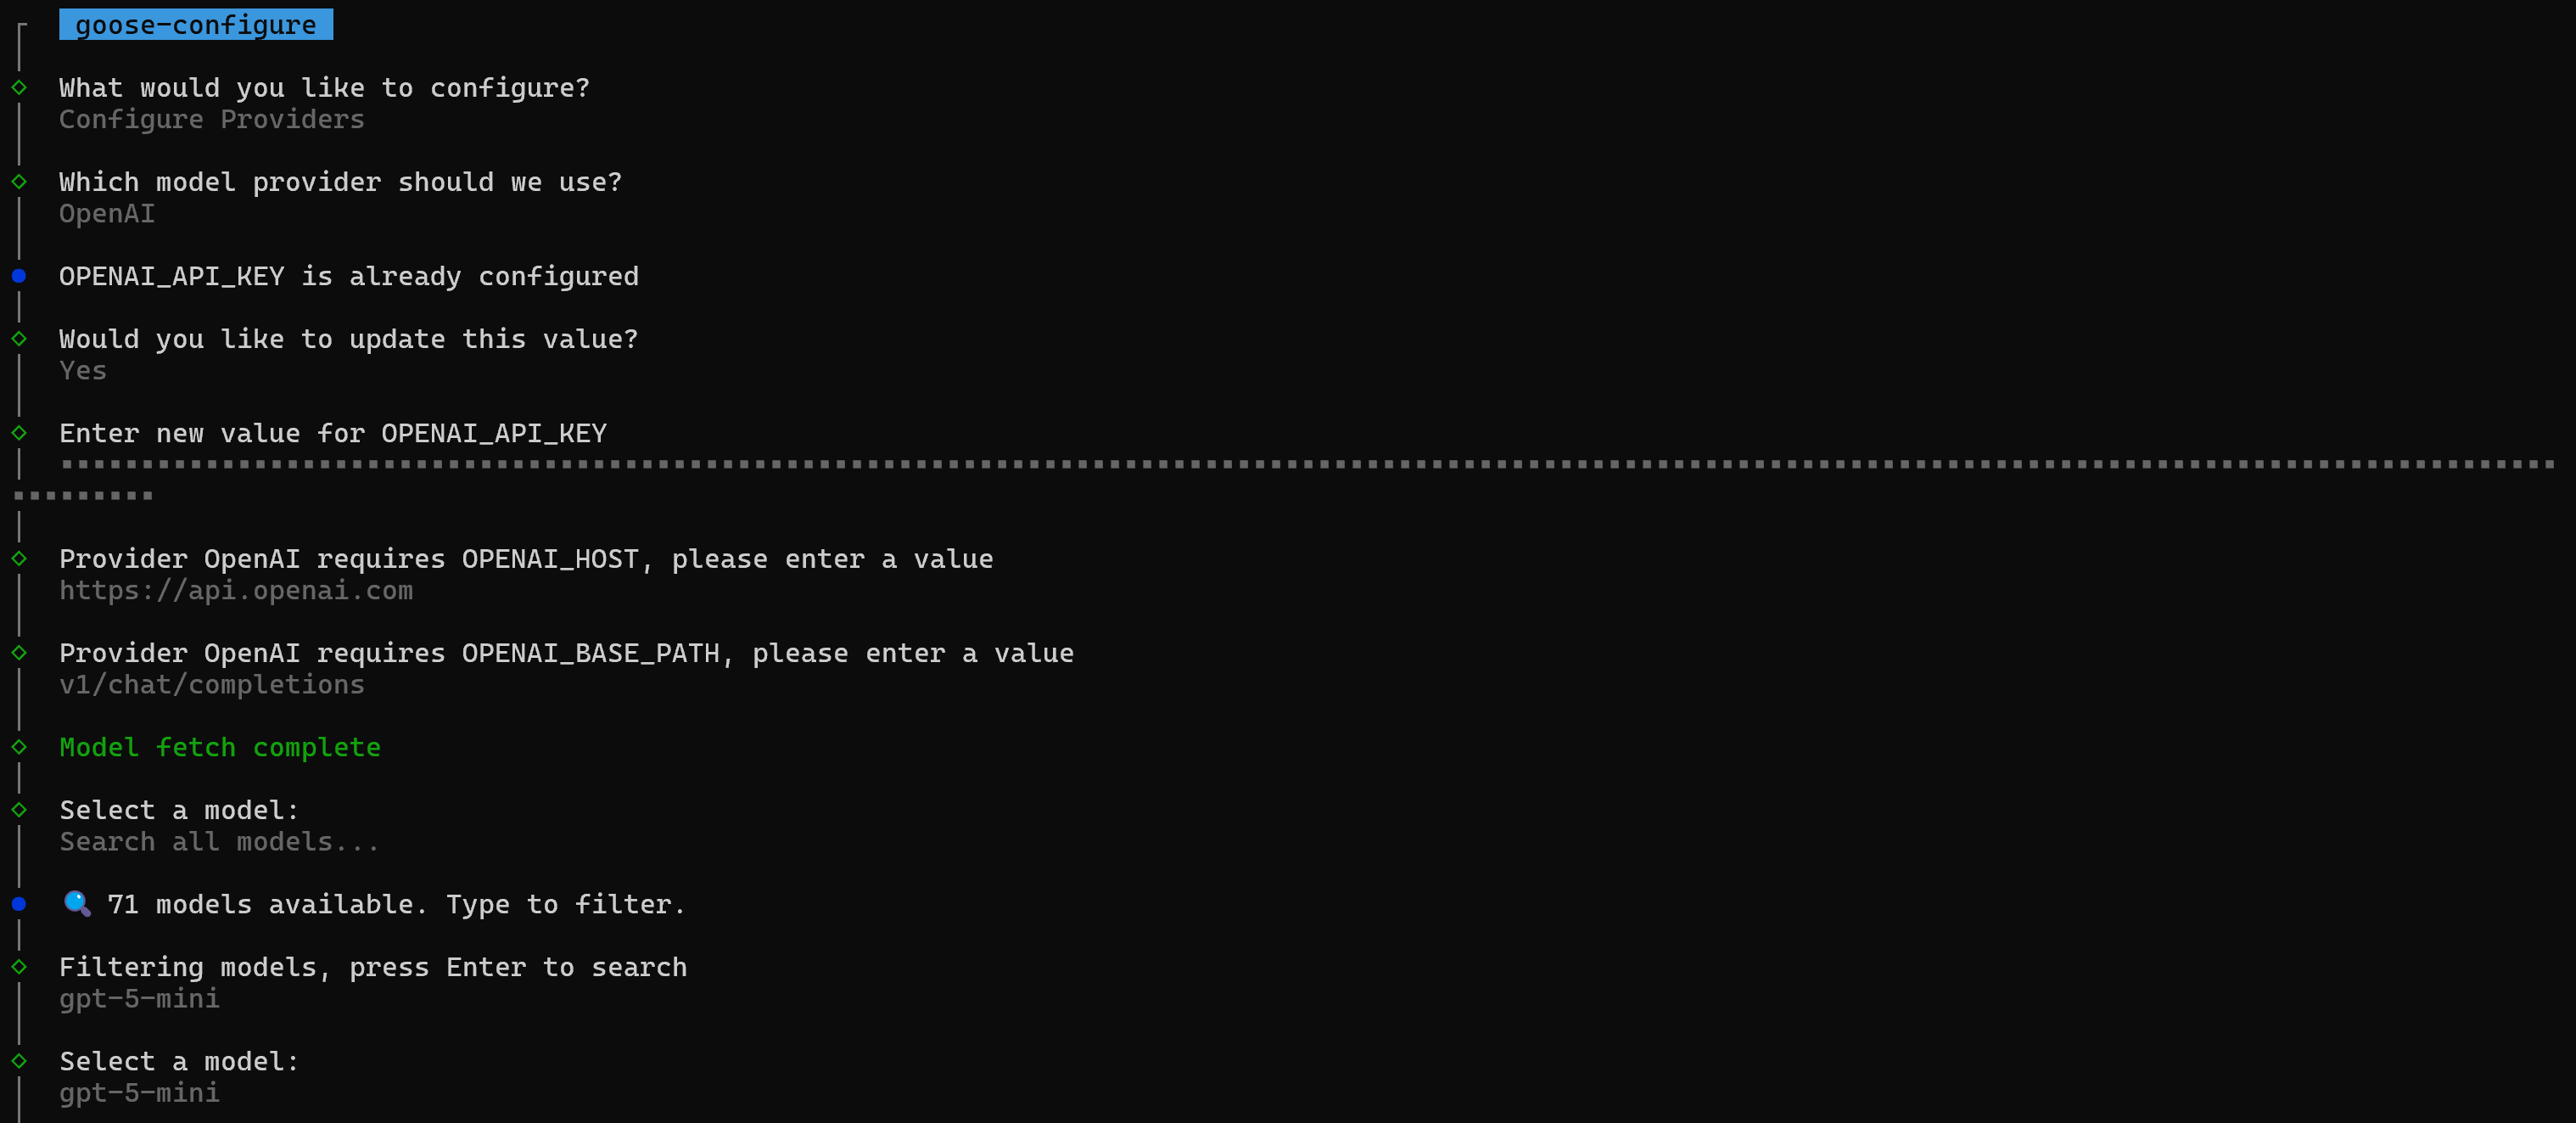
Now, press Enter on the “Configure Providers” option and follow the instructions to set up your AI provider API key and select the model you want to use (in this case, gpt-5-mini):
At the end of the process, on Windows, you should see an output similar to this:
C:\Users\<YOUR_USERNAME>\AppData\Roaming\Block\goose\config\config.yaml
goose CLI installation completed successfully!
goose is installed at: C:\Users\<YOUR_USERNAME>\.local\bin\goose.exe
This confirms that the goose main configuration file has been correctly updated with the required information. In the future, you can either rerun the goose configure command for a guided setup or edit the configuration file directly.
The goose configuration file is located at:
- macOS/Linux:
~/.config/goose/config.yaml - Windows:
%APPDATA%\Block\goose\config\config.yaml
Great! You now have a working goose CLI installation.
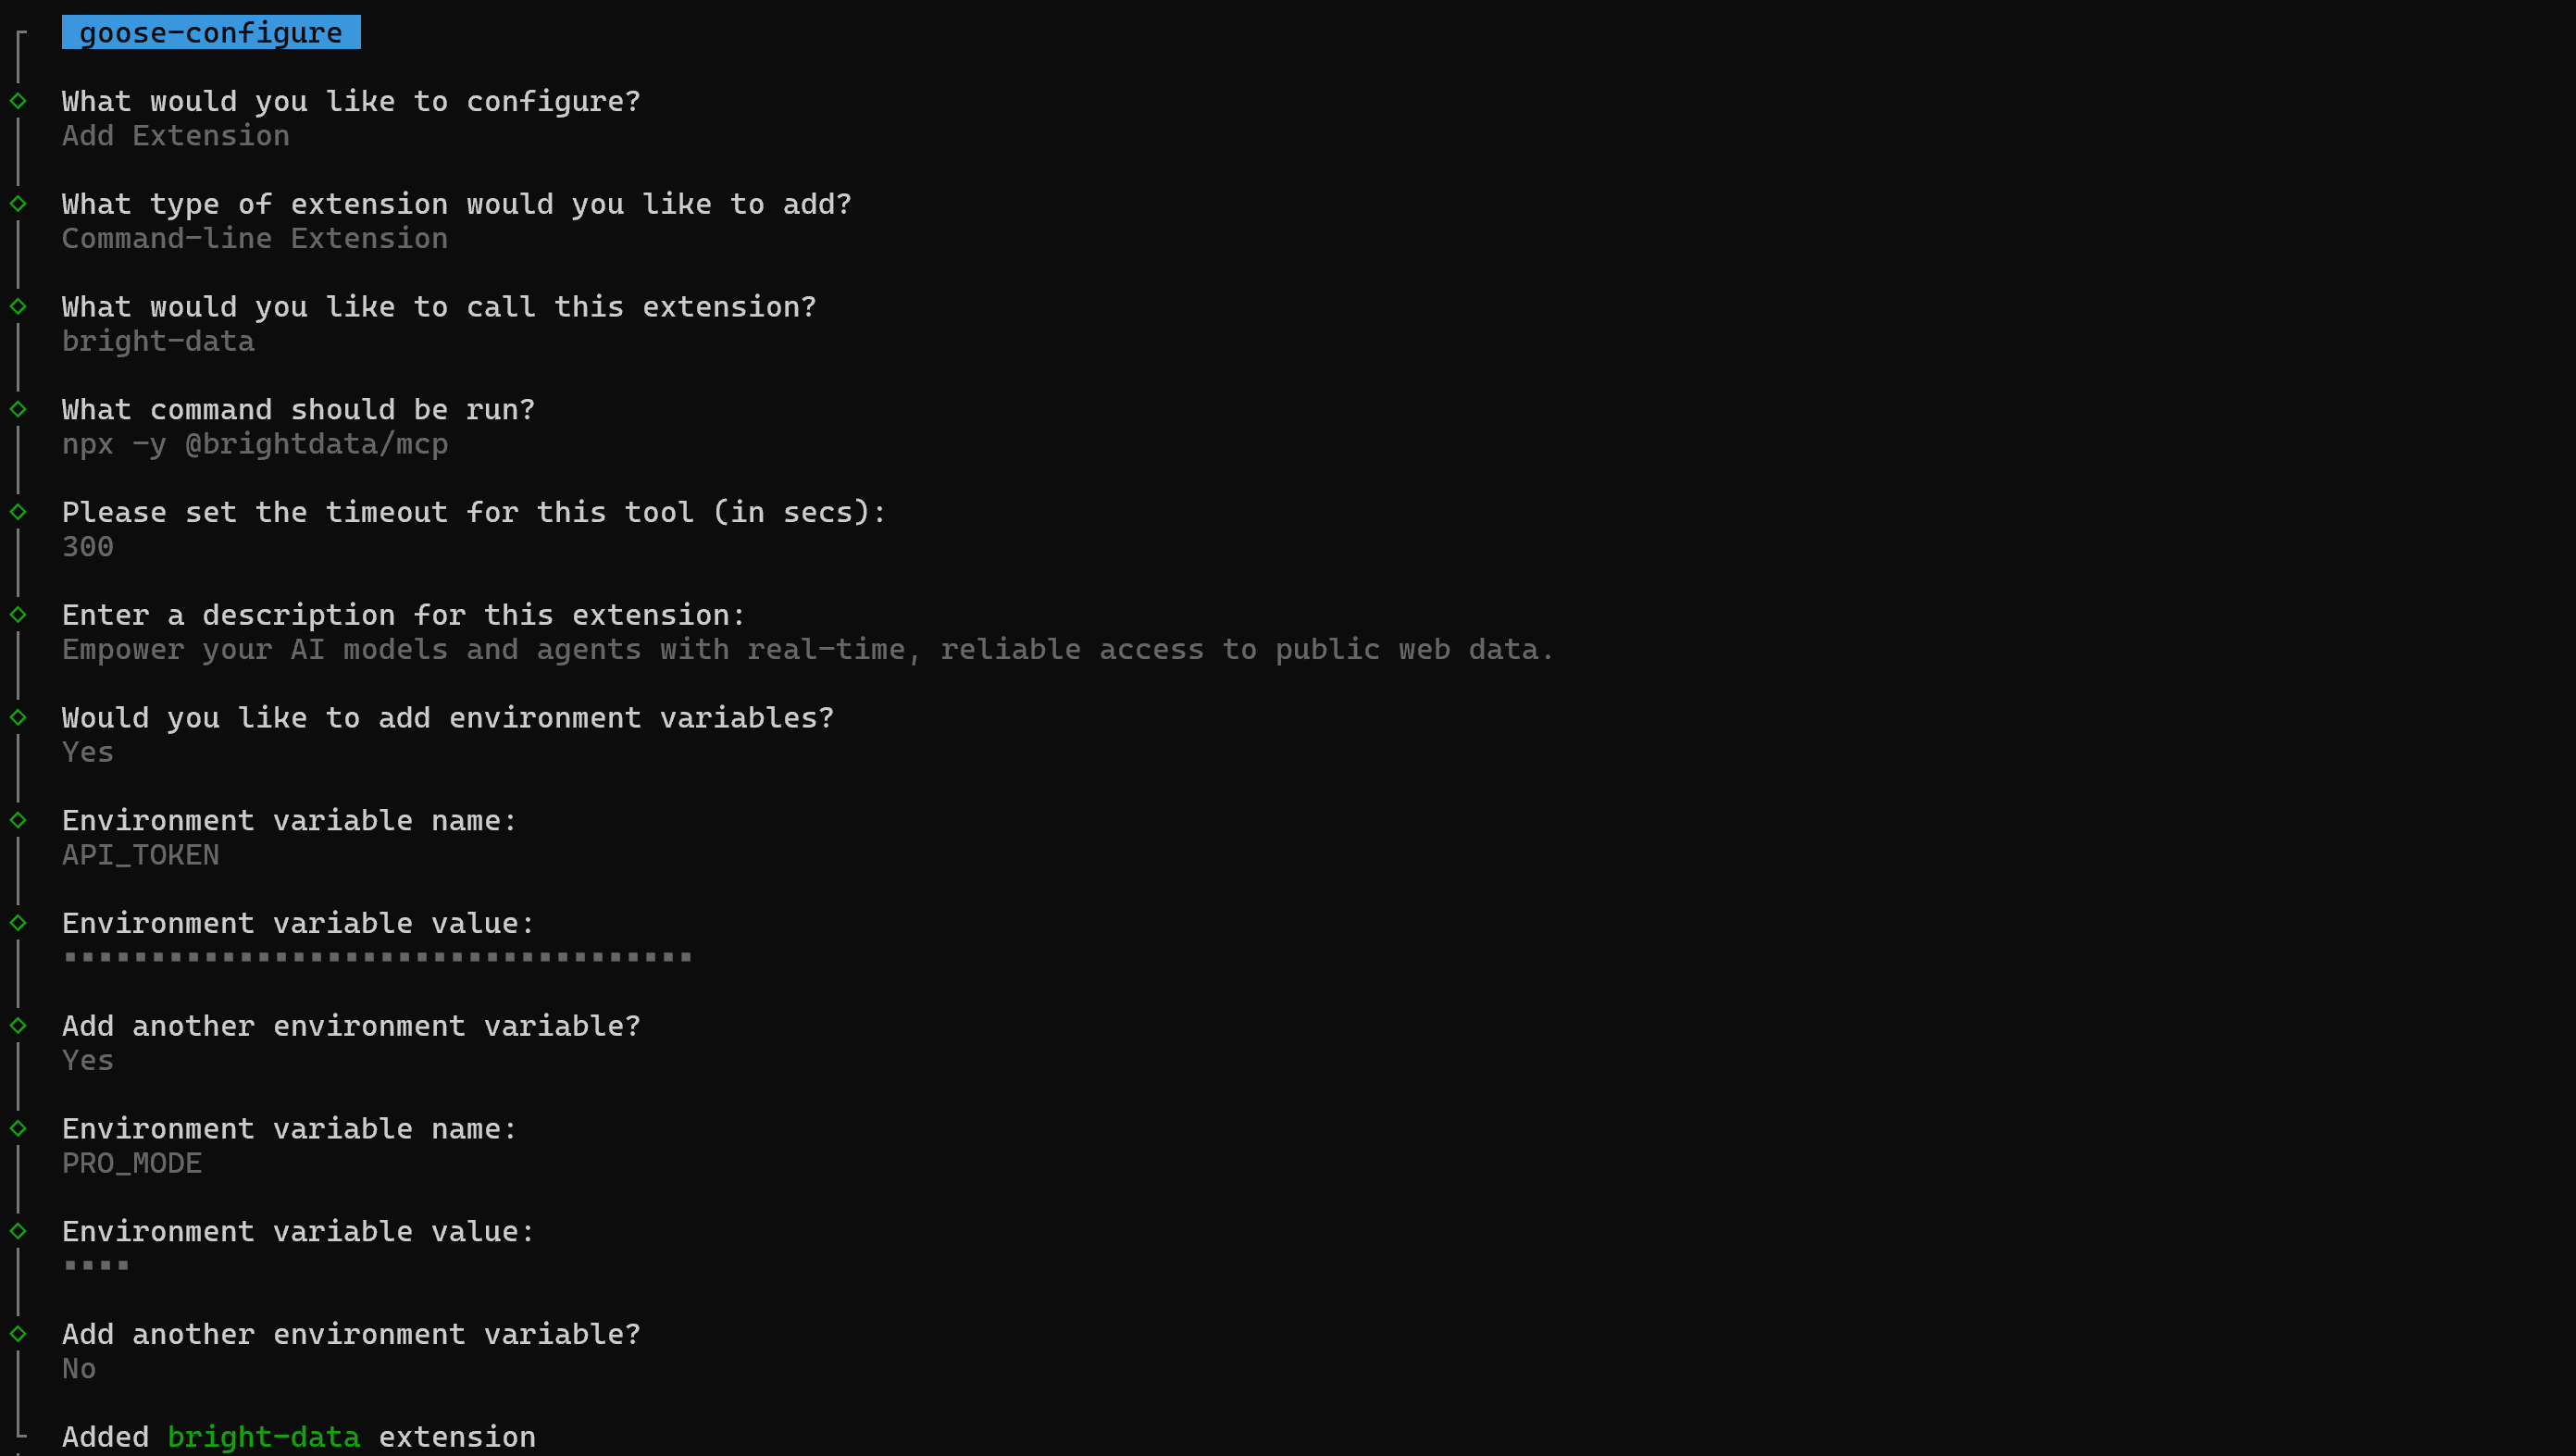
Step #2: Configure the Bright Data Extension
Run goose configure again, but this time select the “Add Extension” option:
Again, remember that defining a custom extension is the officially supported way to integrate a custom MCP server in goose. Answer the questions with this info:
- Extension name: “bright-data”
- Description: “Empower your AI models and agents with real-time, reliable access to public web data.”
- Command:
npx -y @brightdata/mcp - Timeout:
300. - Environment variables:
– API_TOKEN: <YOUR_BRIGHT_DATA_API_KEY> (replace it with your actual Bright Data API key value)
– PRO_MODE: true (optional; set this only if you want to enable Pro Mode)
If you open the goose configuration file, you will see the newly added extension:
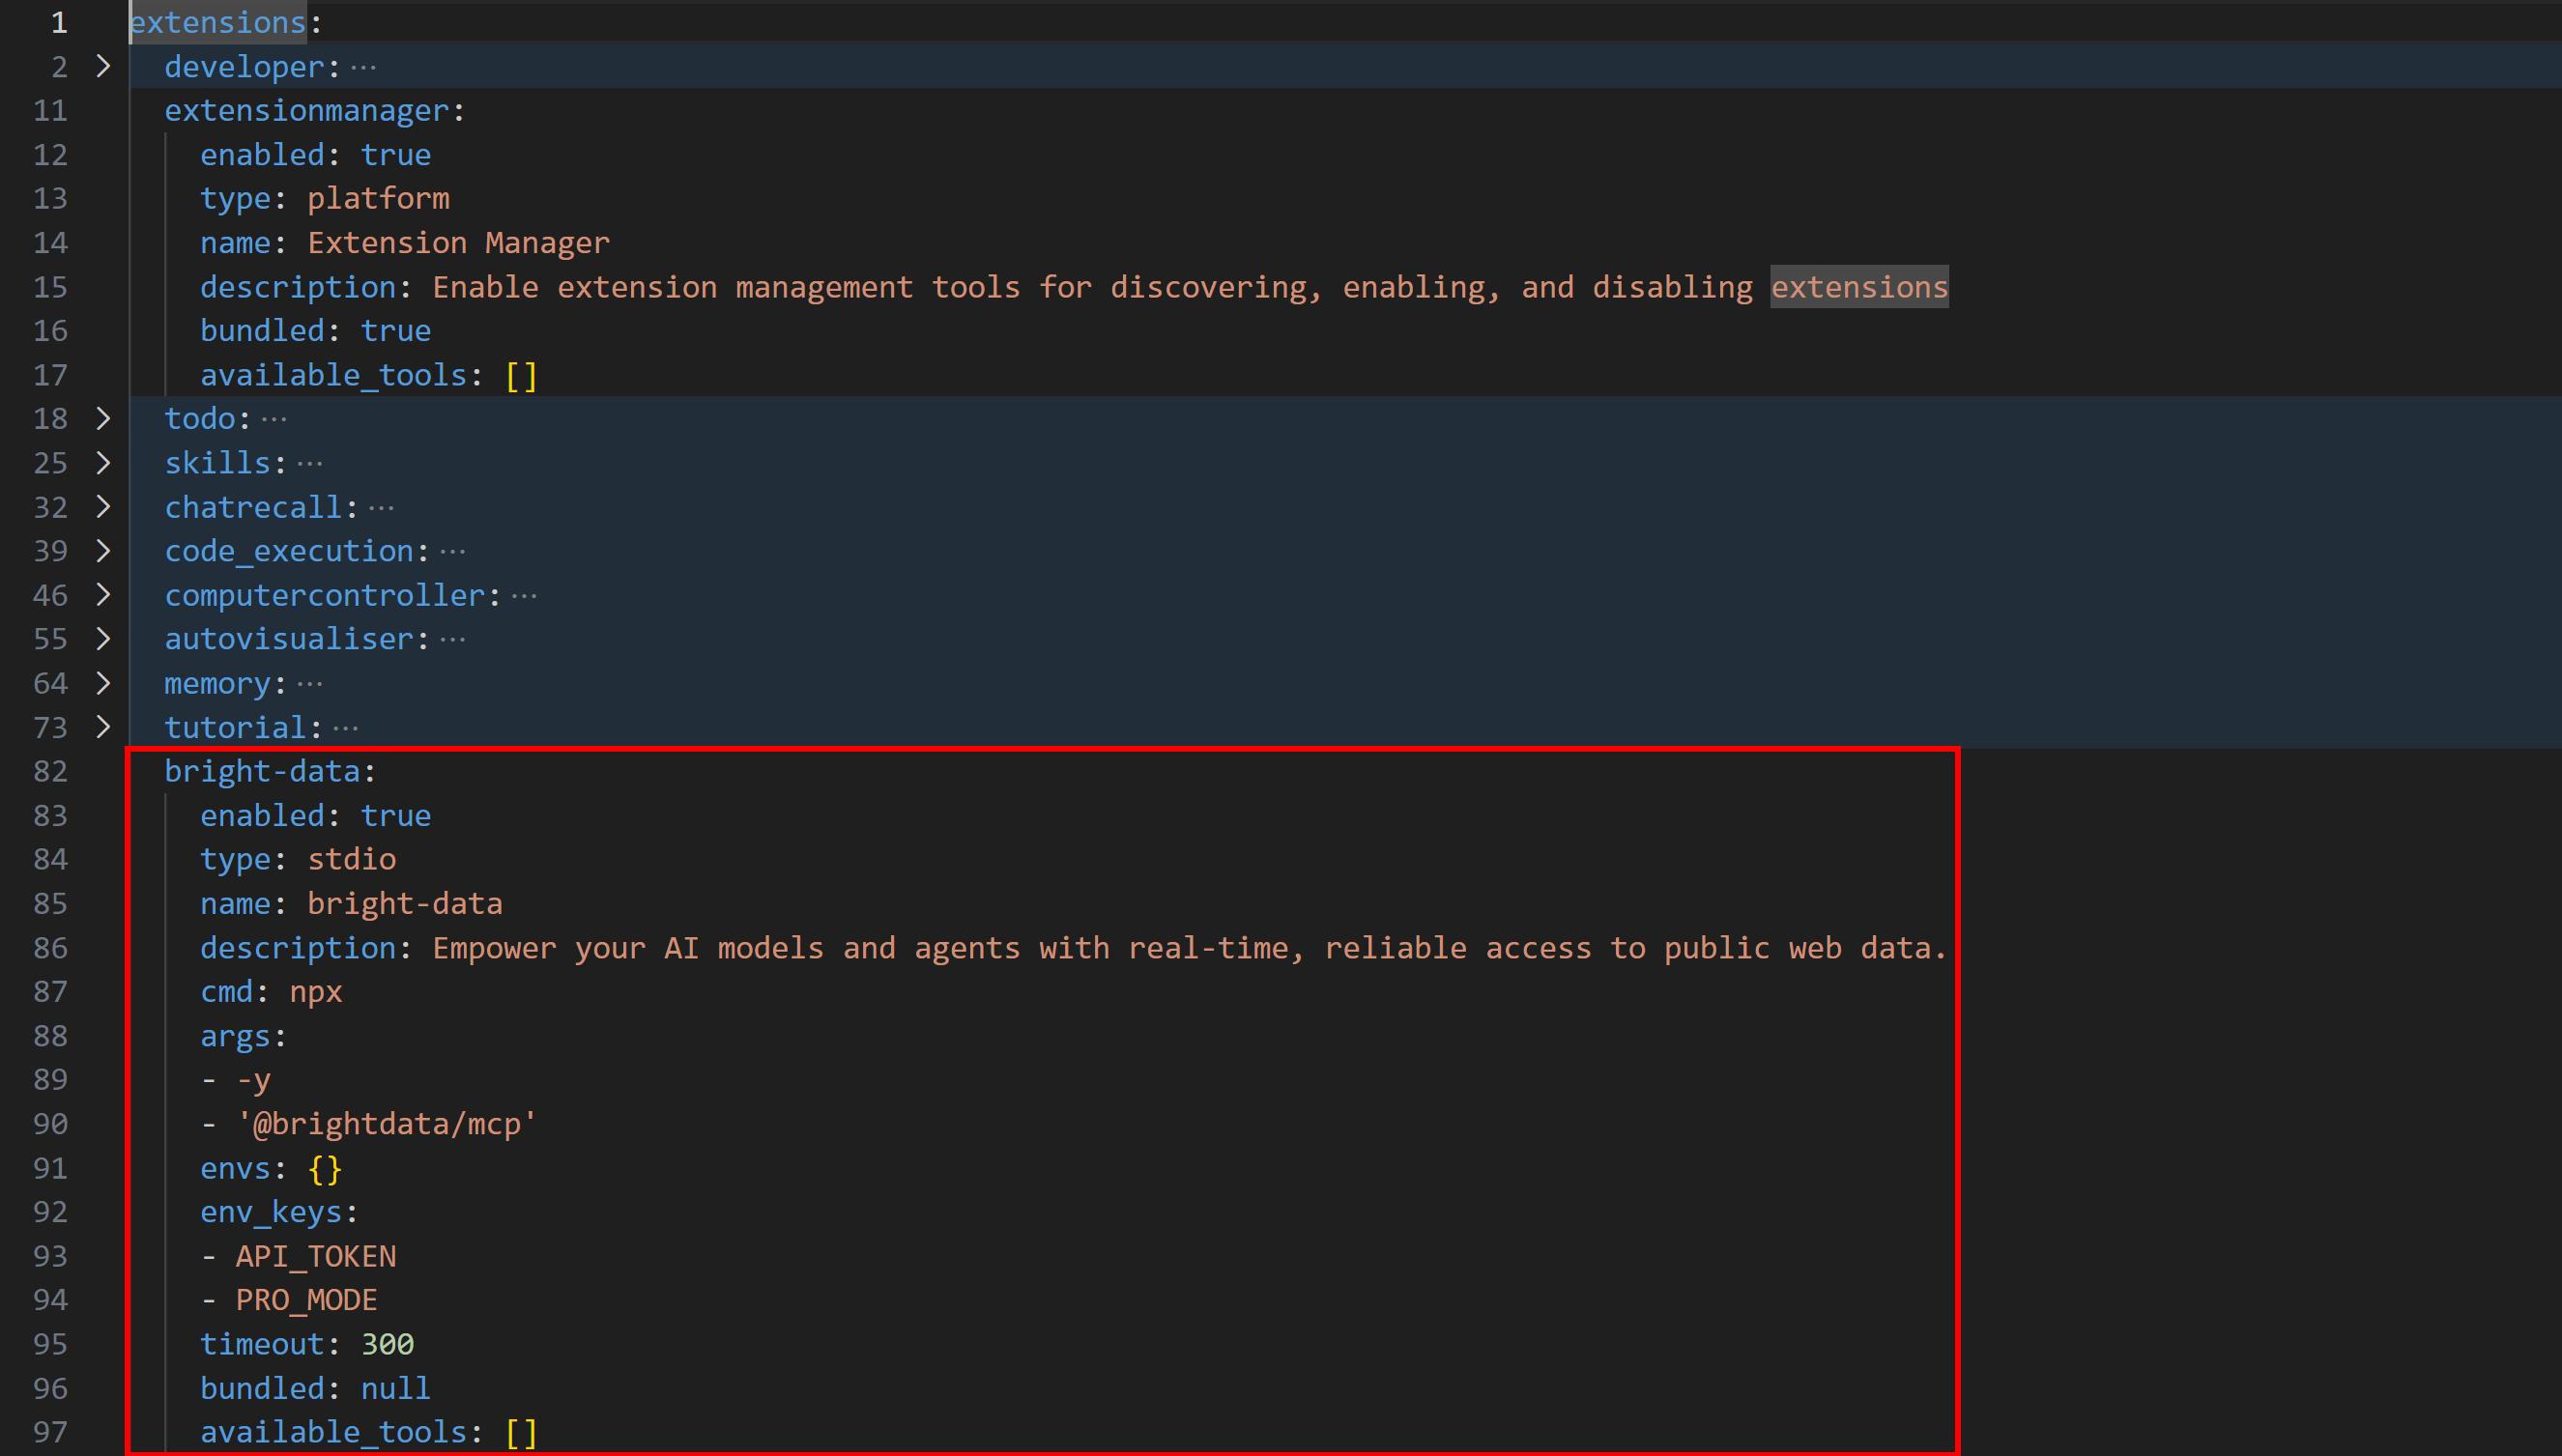
Note that the extension should be added and enabled by default. If it is not, launch goose configure and select “Toggle Extensions” and enable it manually.
Perfect! Bright Data MCP is now fully integrated into goose CLI.
Step #3: Test the Integration
To verify that the integration works, launch goose CLI with:
goose sessionThis will start a goose session where you can chat with the underlying AI agent connected to the configured extension. Try a simple prompt like this:
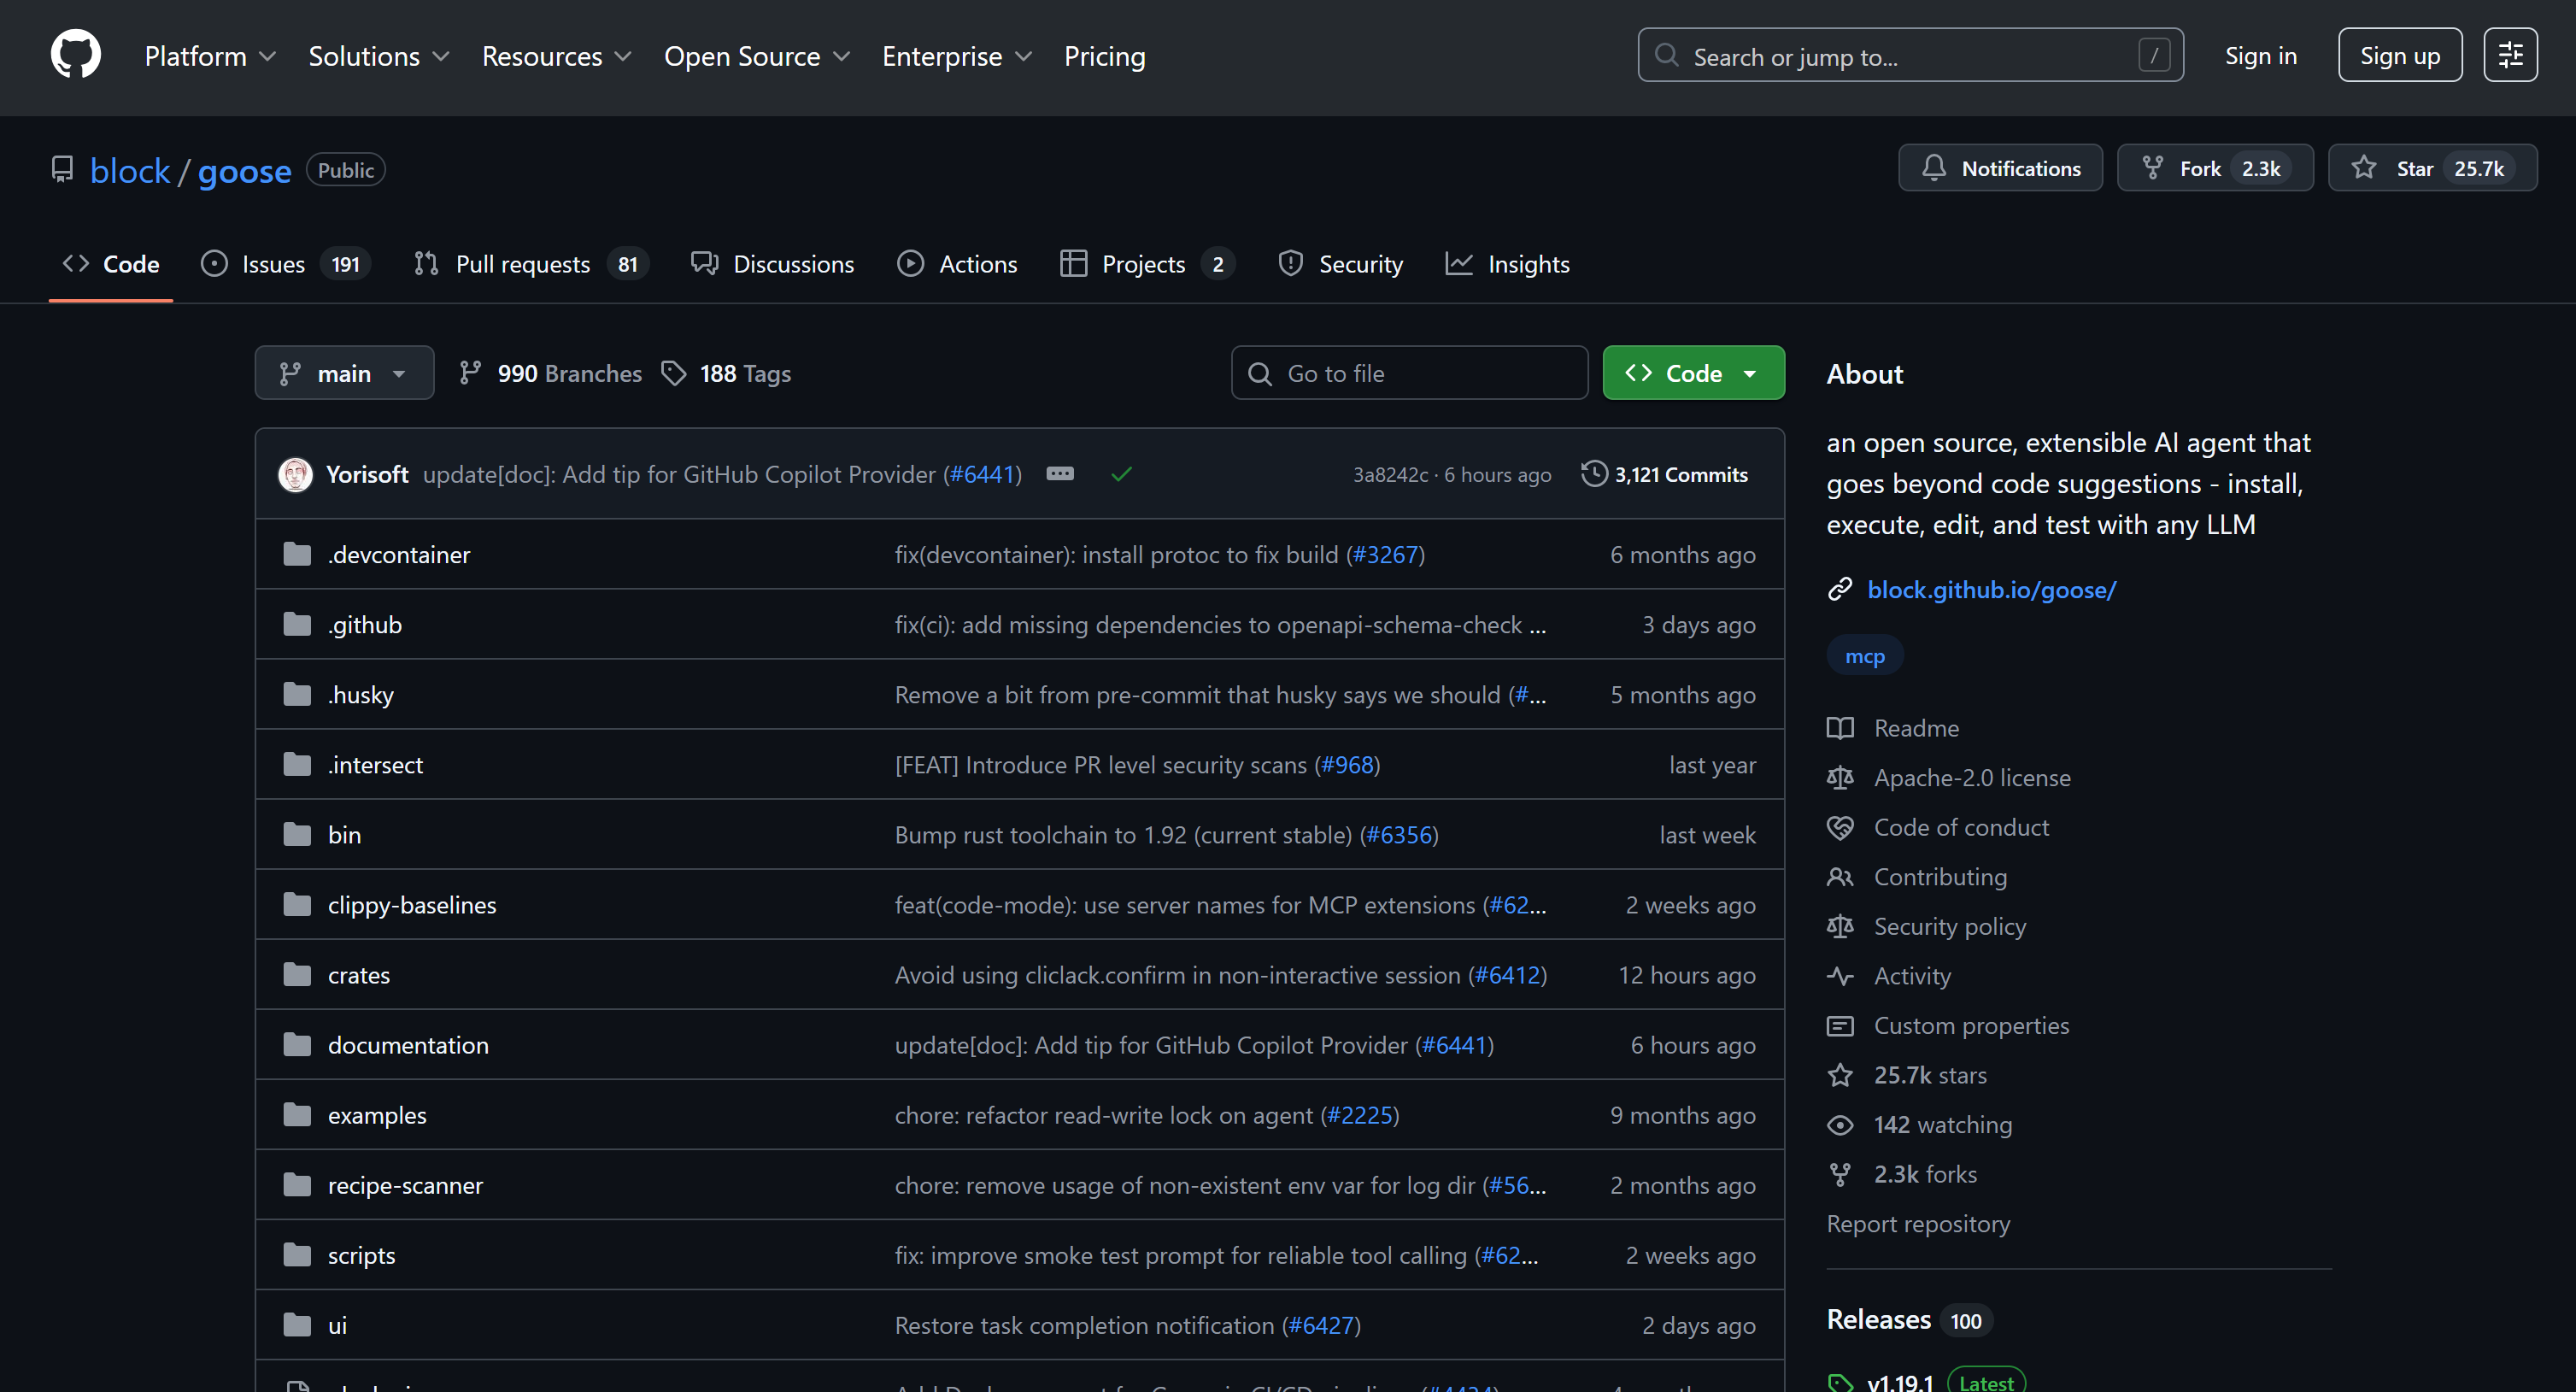
Retrieve and present the main stats from the "https://github.com/block/goose" repository That is something that vanilla AI models cannot handle on their own, as it requires visiting an external page. With the Bright Data Web MCP tools connected, such a task can be accomplished easily.
The output will look something like:
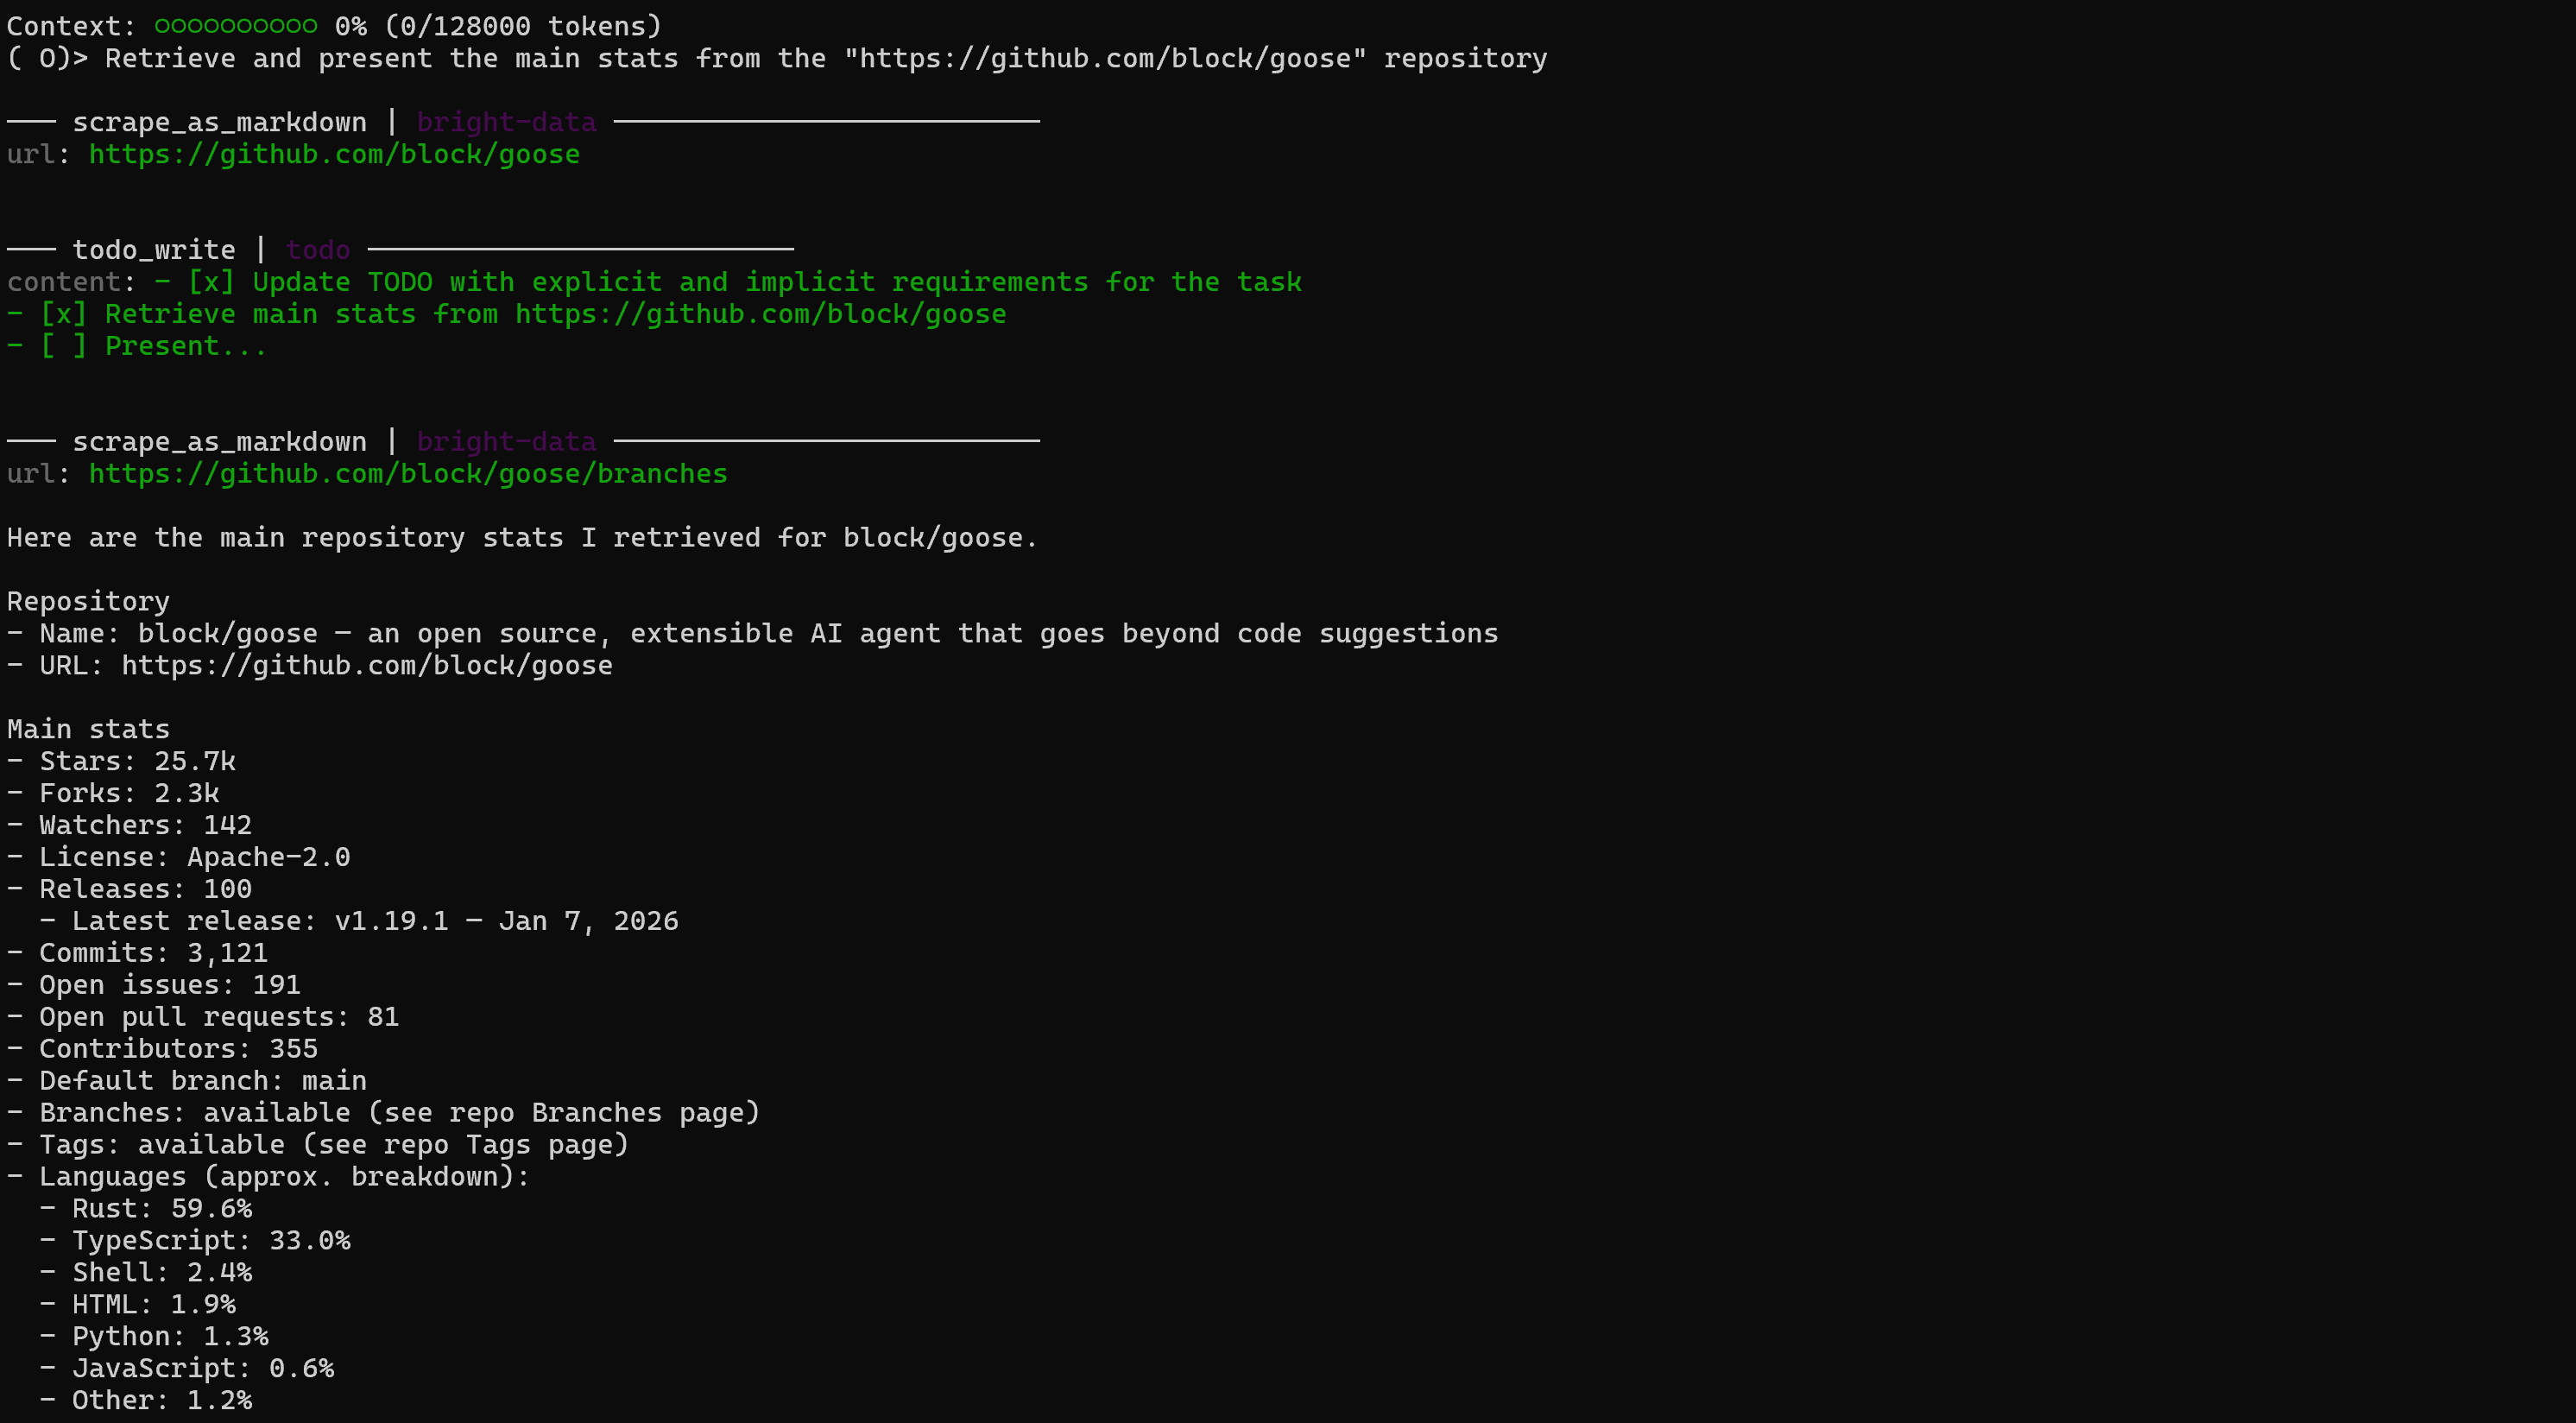
Notice how the AI agent utilized the scrape_as_markdown tool to retrieve information from the live URL and its repository pages. The response matches exactly the information available on the target GitHub page:
Mission complete! You now have a goose-powered CLI AI agent extended with Bright Data Web MCP capabilities for web exploration, interaction, and data retrieval.
Conclusion
In this blog post, you learned how to leverage MCP integration in goose, whether through its Desktop or CLI application. In particular, you saw how to extend the goose AI agent via an extension that connects to Bright Data’s Web MCP.
This setup equips the goose AI agent with powerful capabilities like web search, structured data extraction, live web data retrieval, and automated web interactions. To build even more advanced workflows, explore the full range of services available in Bright Data’s ecosystem for AI.
Sign up for a Bright Data account today and start experimenting with our AI-ready web data tools!

Technical Writer
Antonello Zanini is a technical writer, editor, and software engineer with 5M+ views. Expert in technical content strategy, web development, and project management.


