
In this article, you will see:
- What the Google Gen AI SDK is and the core features it offers.
- Why extending it via MCP is a winning option.
- How to use the Google Gen AI SDK with Bright Data Web MCP to build a sentiment analysis AI workflow example.
Let’s dive in!
What Is Google Gen AI SDK?
The Google Gen AI SDK is a set of software development kits that helps you integrate Google’s generative AI models, such as Gemini, into AI applications. These open-source SDKs are available in multiple programming languages.
Simply put, it provides a unified interface for interacting with these models through both the Gemini Developer API and the Gemini API on Vertex AI. In particular, the key features of the Google Gen AI SDK are:
- Multilingual support: The SDK is available in Python, Node.js, Java, and Go, allowing you to choose your preferred language when building AI-powered features.
- Access to Gemini models: Provides access to Google’s advanced generative AI models, such as Gemini 2.5 LLMs.
- Unified API access: Exposes a consistent interface to both the Gemini Developer API for rapid prototyping and the Gemini API on Vertex AI for production-ready applications.
- Function calling capabilities: Supports interaction with external tools and services, including via MCP.
Why Integrate Google Gen AI SDK with an MCP Server for Web Access
No matter which Google Generative AI model you configure in the Google Gen AI SDK, they all share the same limitation: their knowledge is static!
LLMs are trained on data that represents a snapshot in time, which can quickly become outdated. This is one of the main limitations of LLMs, along with their lack of ability to interact directly with live websites.
In most cases, you want your AI workflows and applications to have access to fresh, high-quality data. Ideally, since AI is all about automation, the workflow should be able to retrieve this data for you. This is exactly what you get when you integrate the Google Gen AI SDK with Bright Data’s Web MCP.
The Web MCP provides access to 60+ AI-ready tools, all powered by Bright Data’s AI infrastructure for web interaction and data gathering. Even for free, you can give your AI access to two of these tools:
| Tool | Description |
|---|---|
scrape_as_markdown |
Scrape content from a single webpage with advanced extraction options, returning the data in Markdown. Can bypass bot detection and CAPTCHA. |
search_engine |
Extract search results from Google, Bing, or Yandex. Returns SERP data in JSON or Markdown format. |
Beyond these, there are around 60 specialized tools for web interaction and structured data collection across domains like Amazon, LinkedIn, Yahoo Finance, TikTok, and more.
In short, integrating the Google Gen AI SDK with Web MCP effectively gives your AI workflow access to the web. This helps it to generate insights from the freshest data while leveraging the power of Google’s generative models.
How to Create a Sentiment Analysis AI Workflow Using Google Gen AI SDK and Bright Data’s Web MCP
In this guided section, you will learn how to connect Bright Data’s Web MCP in a Google Gen AI SDK workflow written in Python. Specifically, you will use this integration to build a sentiment analysis AI workflow that:
- Utilizes Bright Data Web MCP tools to scrape a CNN news article.
- Lets a Gemini model process the content for summarization and sentiment analysis.
- Returns the results to you.
Note: This is just an example. By changing the prompt, you can cover many other scenarios. Also, you can easily adapt the following Python script to any other supported programming language.
Let’s get started!
Prerequisites
Before starting this tutorial, make sure you have:
- Python 3.9+ installed locally.
- Node.js installed locally (we recommend the latest LTS version).
- A Gemini API key.
- A Bright Data account with a configured API key.
Do not worry about setting up the Bright Data account, as you will be guided through that process in a later step.
Step #1: Create Your Python Project
Open a terminal and create a new directory for your Google Gen AI project:
mkdir google-genai-mcp-workflowThe google-genai-mcp-workflow/ folder will contain the Python code for your Google Gen AI workflow. That will connect to Bright Data Web MCP for web data scraping.
Next, navigate into the project directory and create a virtual environment inside it:
cd google-genai-mcp-agent
python -m venv .venv
Now, load the project in your favorite Python IDE. We recommend Visual Studio Code with the Python extension or PyCharm Community Edition.
In the project folder, create a new file named workflow.py. Your directory structure should look like this:
google-genai-mcp-workflow/
├── .venv/
└── workflow.py
Activate the virtual environment in your terminal. In Linux or macOS, execute:
source .venv/bin/activateEquivalently, on Windows, run this command:
.venv/Scripts/activateOnce the environment is active, install the required dependencies:
pip install google-genai mcp python-dotenvThis will install:
google-genai: Google Gen AI Python SDK for integrating Google’s generative models into Python applications.mcp: Python implementation of the MCP (Model Context Protocol).python-dotenv: Loads environment variable values from a.envfile.
You are all set! You now have a Python development environment ready to build an AI workflow with Bright Data Web MCP integration.
Step #2: Set Up Environment Variable Reading
Your AI workflow will connect to third-party components such as Gemini AI models and the Bright Data Web MCP server. To keep these integrations secure, you should avoid hardcoding API keys directly into your Python code. Instead, store them as environment variables.
To simplify loading environment variables, rely on the python-dotenv library. Import it and call load_dotenv() at the top of your workflow.py file:
import os
from dotenv import load_dotenv

load_dotenv()
The load_dotenv() function allows your script to read variables from a local .env file. Thus, create this .env file in the root of your project directory:
google-genai-mcp-workflow/
├── venv/
├── .env         # <-----------
└── workflow.py
Great! You are now set up to securely manage your API keys and other secrets using environment variables.
Step #3: Test the Bright Data Web MCP
Before configuring the connection to Bright Data’s Web MCP in your script, first ensure your machine can run the MCP server.
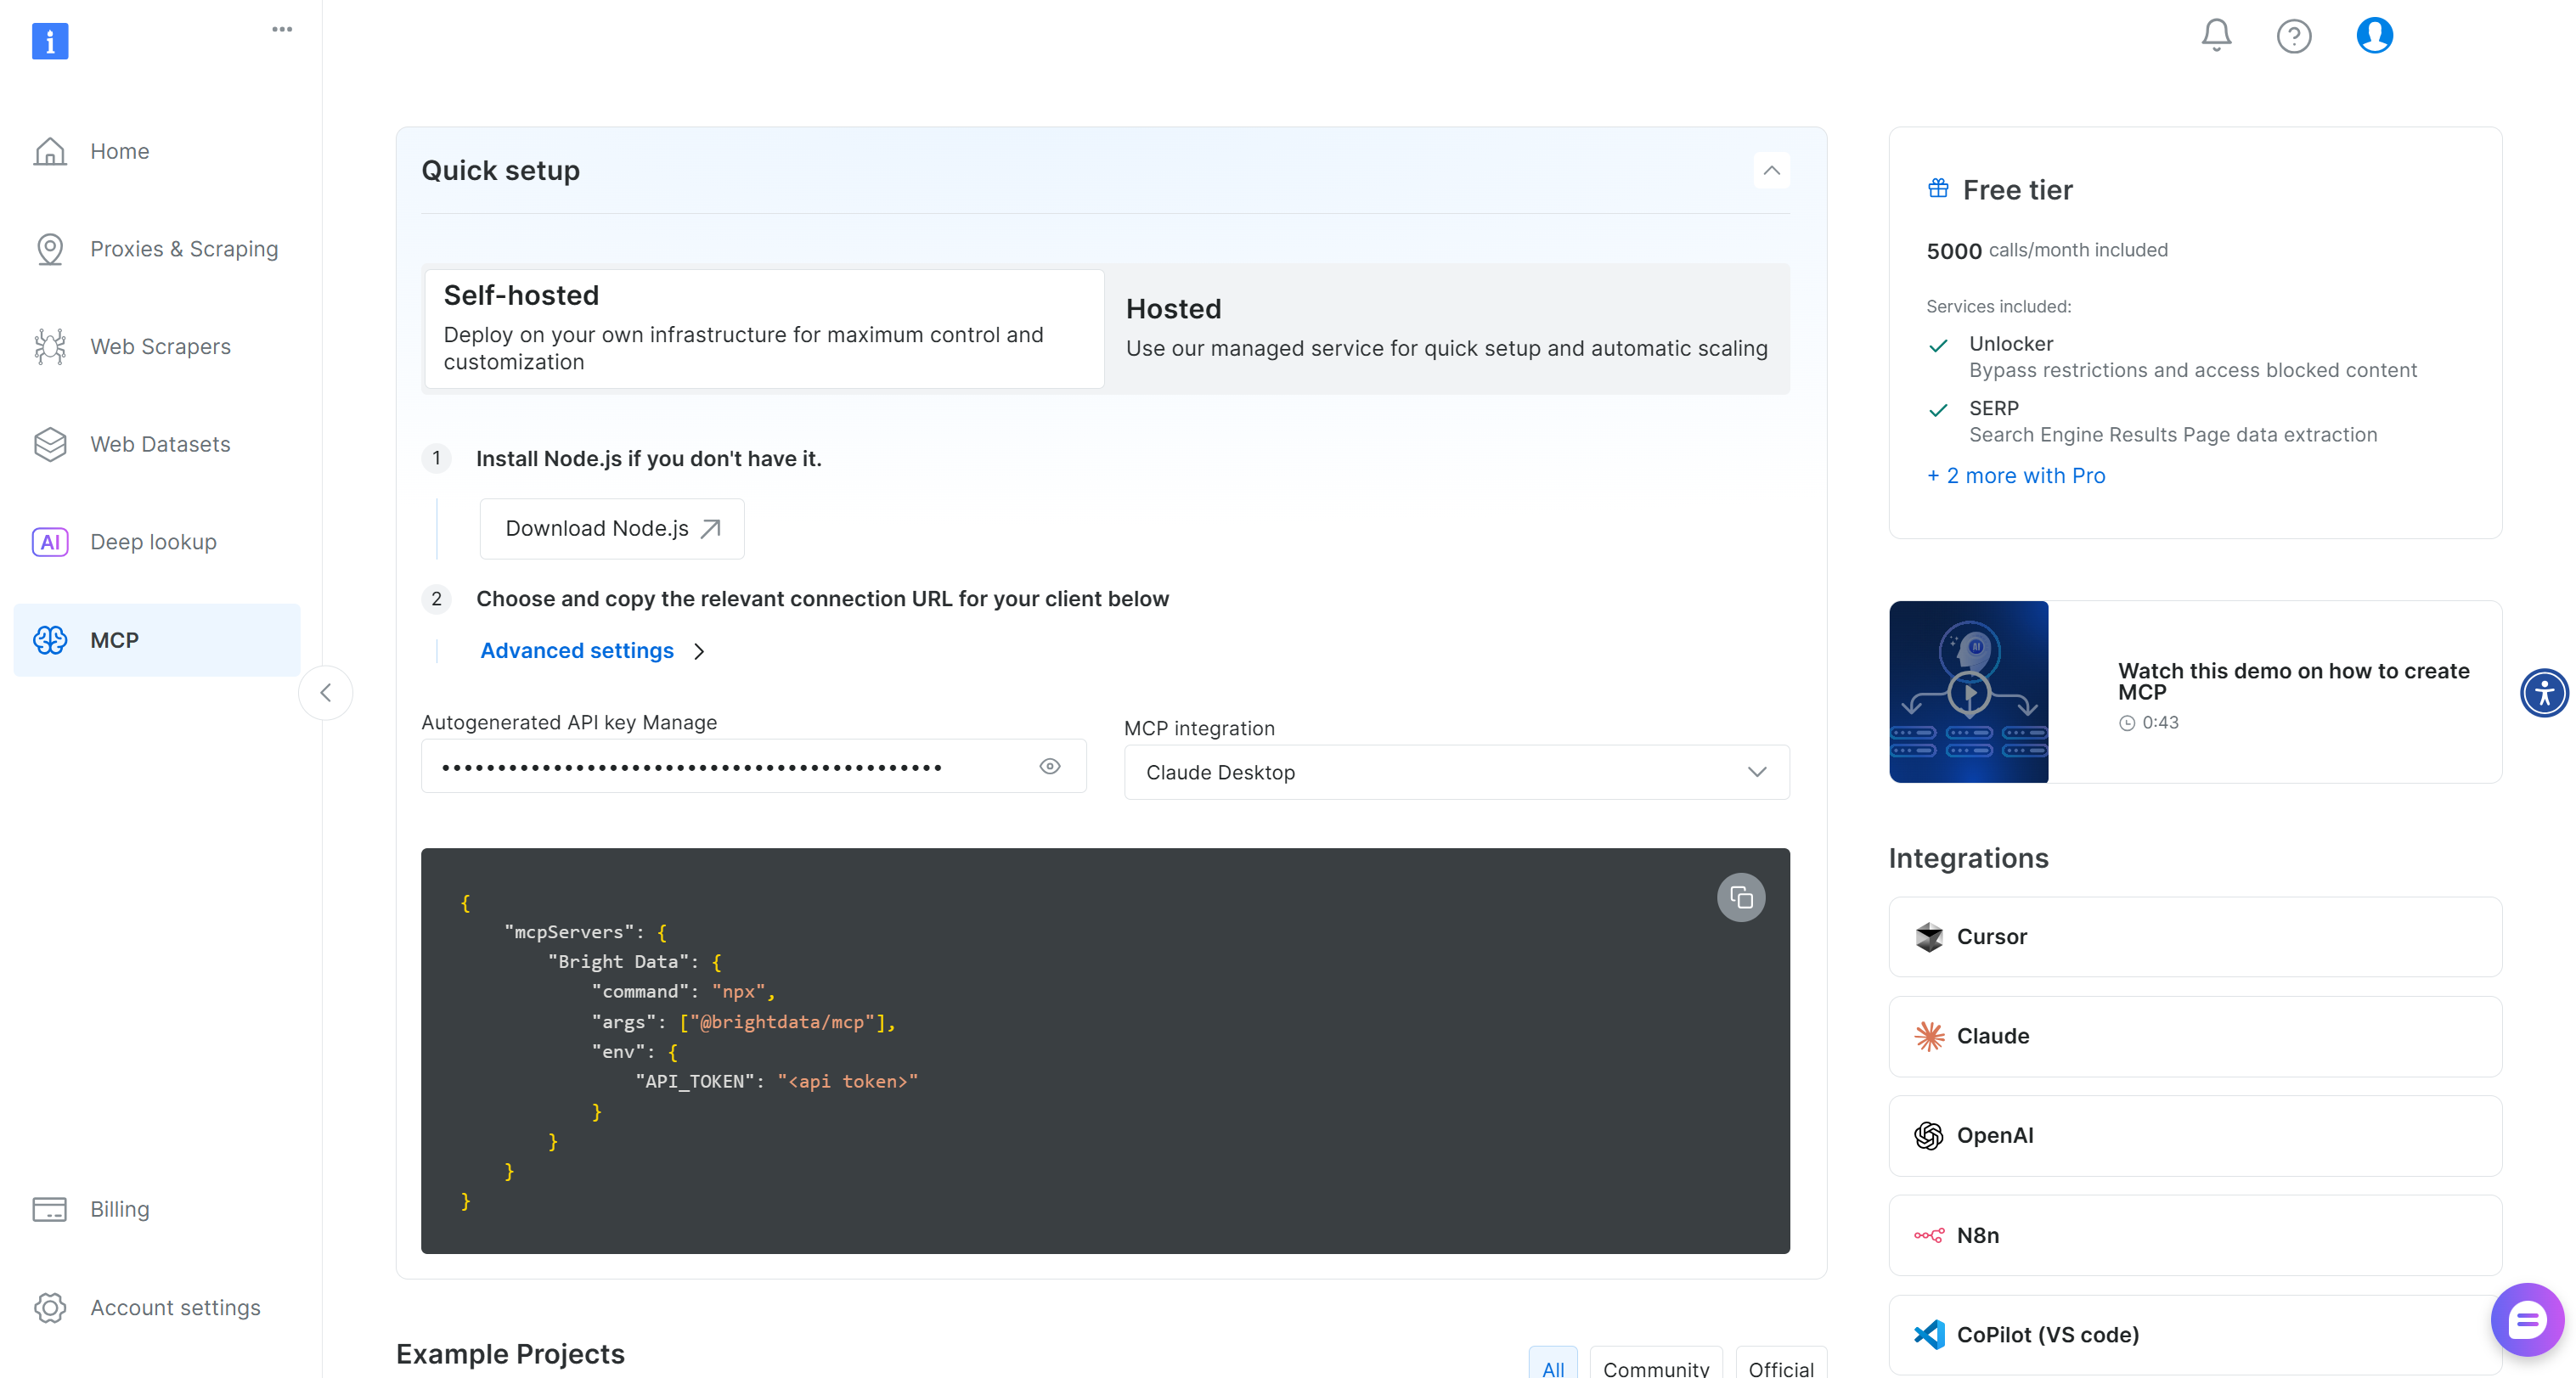
If you do not already have a Bright Data account, create one. If you do, simply log in. For a quick setup, reach the “MCP” section in the dashboard and follow the instructions:
Otherwise, follow these steps.
First, generate a Bright Data API key and store it in a safe place. In this guide, we assume the API key has Admin permissions, which simplifies the Web MCP integration process.
Run the command below to install the Web MCP globally:
npm install -g @brightdata/mcpThen, verify that the local MCP server works by running:
API_TOKEN="<YOUR_BRIGHT_DATA_API>" npx -y @brightdata/mcpOr, on Windows:
$Env:API_TOKEN="<YOUR_BRIGHT_DATA_API>"; npx -y @brightdata/mcpReplace <YOUR_BRIGHT_DATA_API> with your actual Bright Data API token. The command sets the required API_TOKEN environment variable and starts the Web MCP using the @brightdata/mcp package.
If successful, you should see logs similar to the following:

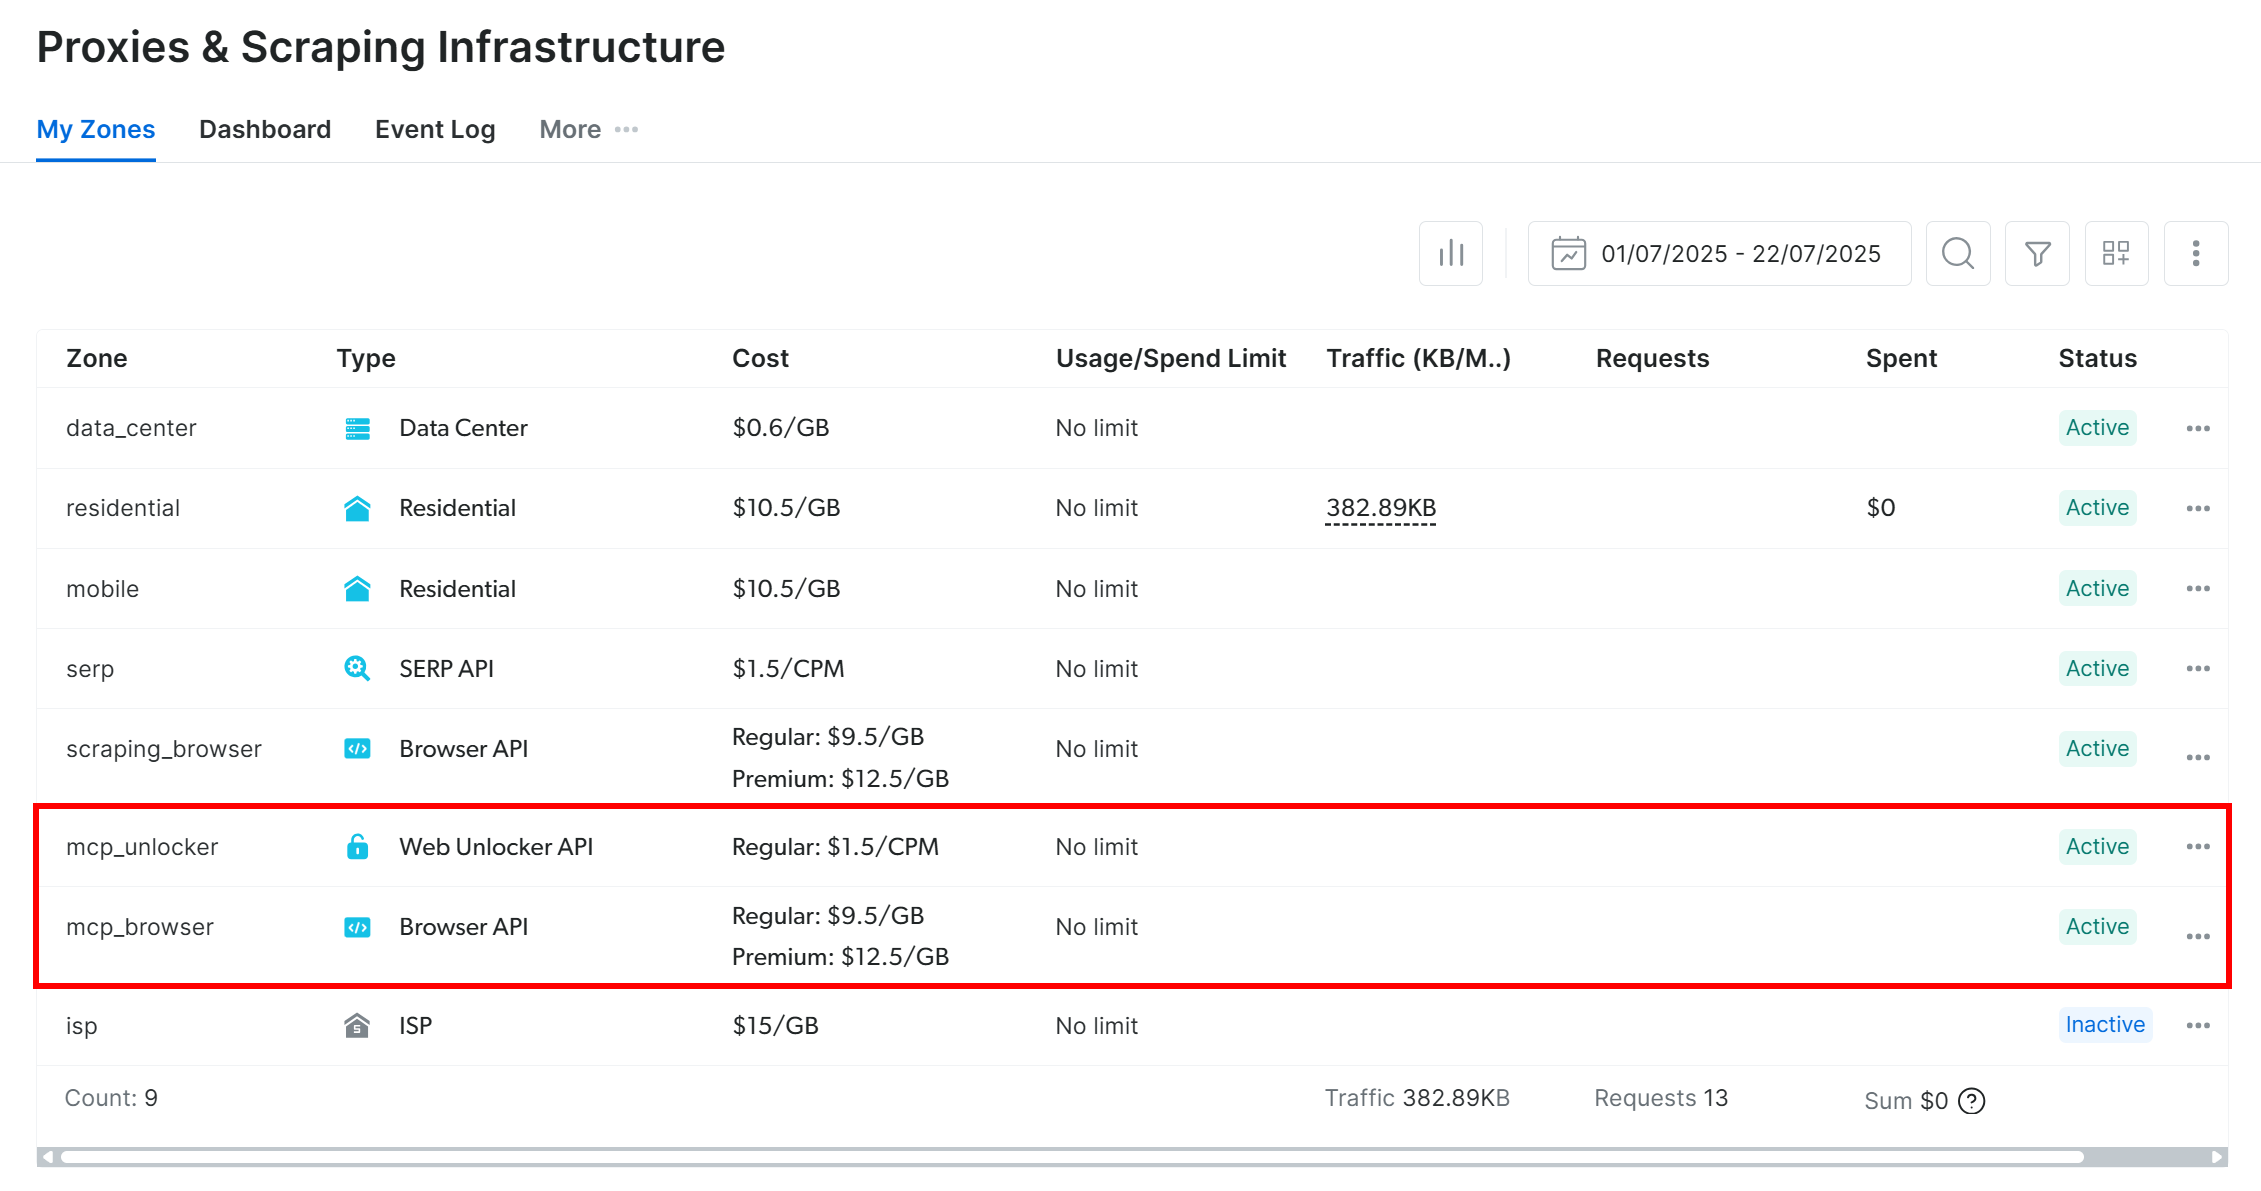
On the first launch, the package creates two default zones in your Bright Data account:
mcp_unlocker: A zone for Web Unlocker.mcp_browser: A zone for Browser API.
These zones are required for the Web MCP to power all its 60+ tools.
To confirm the zones were created, log in to your Bright Data dashboard. Go to the “Proxies & Scraping Infrastructure” page, and check that the two zones appear in the table:
Note: If your API token does not have Admin permissions, these zones will not be created automatically. In that case, you must add them manually in the dashboard and configure their names via environment variables (see the GitHub page for details).
By default, the MCP server only exposes the search_engine and scrape_as_markdown tools (and their batch versions). These can be used for free thanks to the Web MCP free tier.
Extra: To unlock advanced tools—such as browser automation and structured data feeds—enable Pro mode by setting the PRO_MODE="true" environment variable before launching the MCP server:
API_TOKEN="<YOUR_BRIGHT_DATA_API>" PRO_MODE="true" npx -y @brightdata/mcpOr, on Windows:
$Env:API_TOKEN="<YOUR_BRIGHT_DATA_API>"; $Env:PRO_MODE="true"; npx -y @brightdata/mcpPro mode unlocks all 60+ tools, but it is not included in the free tier and may incur additional charges.
Perfect! You have confirmed that the Web MCP server works on your machine. You can now stop the server, as you will configure your Google Gen AI script to launch and connect to it automatically.
Step #4: Define the MCP Connection Configs
In workflow.py, represent the Web MCP connection logic using this configuration:
from mcp import StdioServerParameters

# Read the Bright Data API key from the env
BRIGHT_DATA_API_KEY = os.getenv("BRIGHT_DATA_API_KEY")
# Configuration to connect to the Bright Data Web MCP via stdio connection
server_params = StdioServerParameters(
    command="npx",
    args=["-y", "@brightdata/mcp"],
    env={
        "API_TOKEN": BRIGHT_DATA_API_KEY,
        # "PRO_MODE": "true" (optional, to enable access to all 60+ tools)
    },
)
This configuration will result in the same npx command seen earlier—with the correct environment variables—to launch the Web MCP server locally and connect to it via stdio.
Note: The PRO_MODE environment variable is optional. Enable it only if you want access to all 60+ tools. Otherwise, you can stick to the search_engine and scrape_as_markdown tools (and their batch versions) available in the free tier.
Next, add your Bright Data API key to the .env file:
BRIGHT_DATA_API_KEY="<YOUR_BRIGHT_DATA_API_KEY>"Make sure to replace the <YOUR_BRIGHT_DATA_API_KEY> placeholder with the actual API key you generated and tested in the previous steps.
Fantastic! Your AI workflow can use that config to connect to the local Bright Data Web MCP server via the mcp package.
Step #5: Create the Google Gen AI SDK Client + MCP Session
Start by adding your Gemini API key to the .env file:
GEMINI_API_KEY="<YOUR_GEMINI_API_KEY>"Replace the <YOUR_GEMINI_API_KEY> placeholder with your actual Gemini API key.
Next, initialize a Google Gen AI SDK client and set up a session with MCP integration:
import asyncio
from mcp import ClientSession
from google import genai
from mcp.client.stdio import stdio_client

# Initialize the Google Gen AI SDK client
client = genai.Client()

async def run():
    # Initialize an MCP client context
    async with stdio_client(server_params) as (read, write):
        async with ClientSession(read, write) as session:
            # Initialize the AI SDK client session, with MCP integration
            await session.initialize()

            # Google Gen AI SDK with MCP integration...

# Start the asyncio event loop and run the main function
asyncio.run(run())
The session starts via stdio_client(). The resulting read and write objects are then passed to ClientSession, establishing the MCP connection. This session will soon be passed to the Google Gen AI SDK instance for MCP integration in Gemini.
Note: This setup requires asyncio because it involves asynchronous operations.
Well done! You can now send requests to a Gemini model via the client, with the ability to call MCP tools as needed—just as you are about to see.
Step #6: Verify MCP Tool Integration
Verify that the tools exposed by the Bright Data Web MCP local server are correctly available. To do so, list all available tools with:
tools = await session.list_tools()Then, print them:
print(tools)If you execute your script (not in Pro mode), you should get:
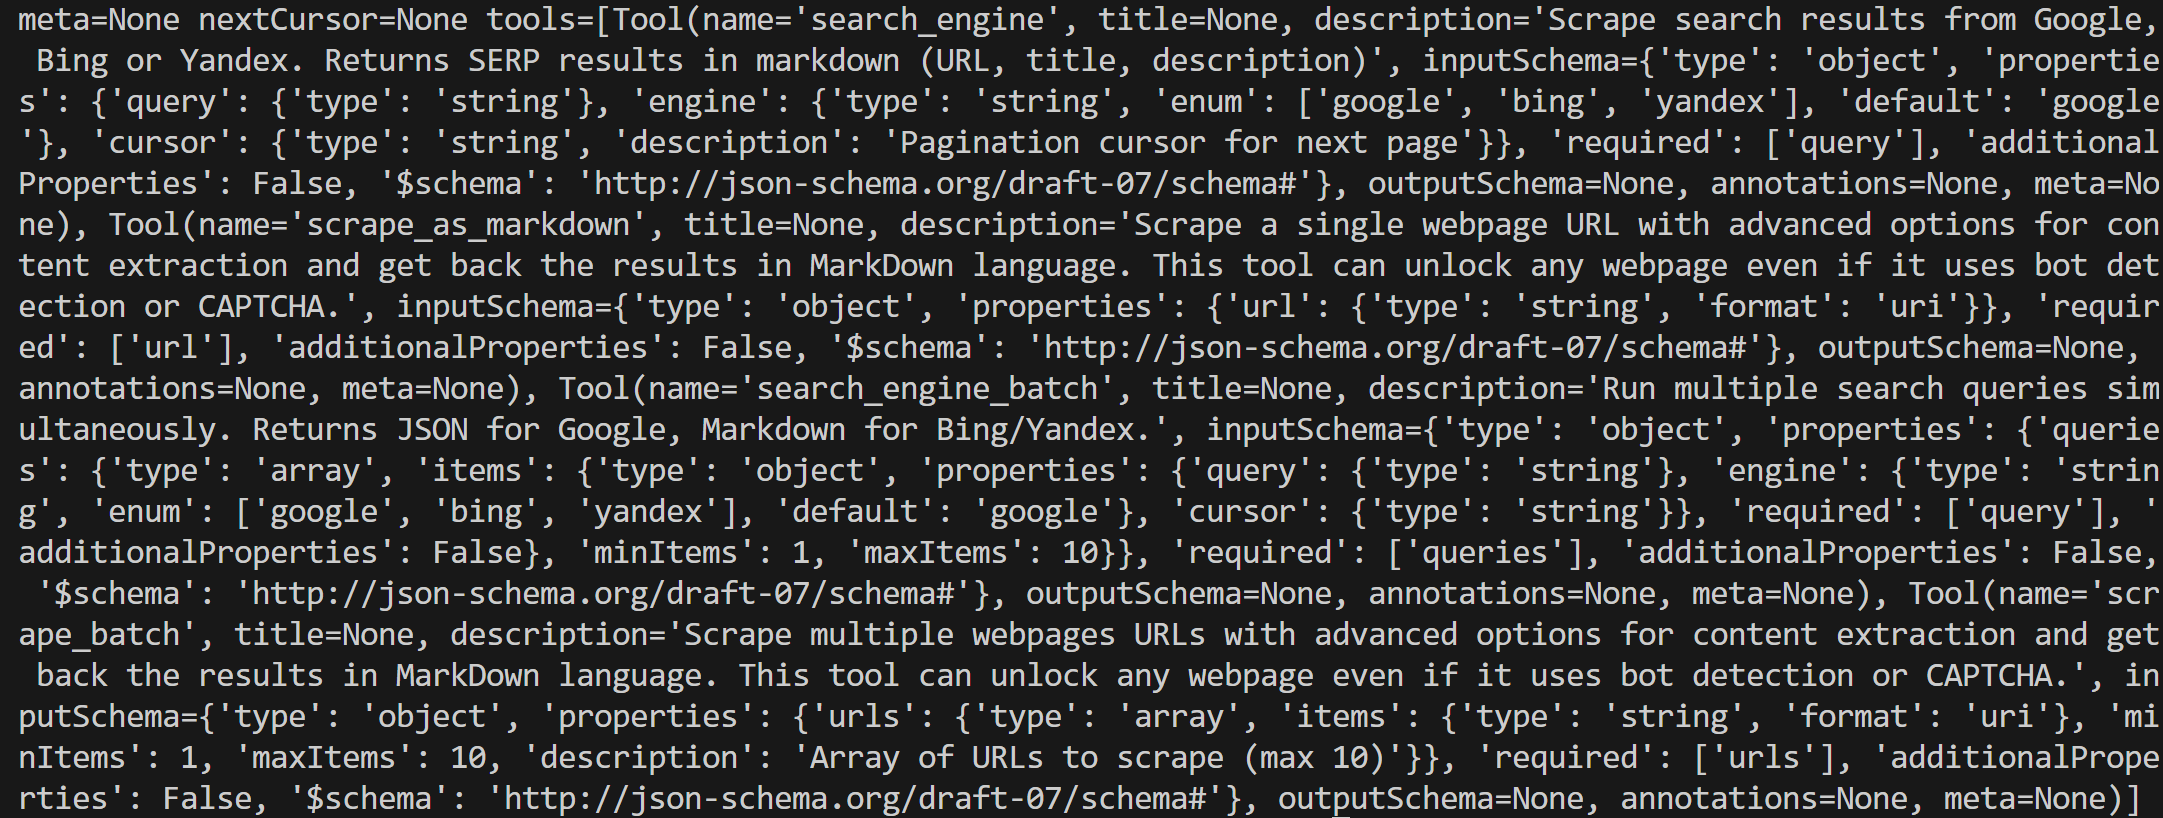
The above output is a bit messy, but if you take a look at it carefully, you will see that it lists:
search_engine: Scrape search results from Google, Bing, or Yandex. Returns SERP results in Markdown format (URL, title, description).scrape_as_markdown: Scrape a single webpage with advanced options and return the content in Markdown. Works even with bot detection or CAPTCHA.search_engine_batch: Run multiple search queries simultaneously. Returns JSON for Google, Markdown for Bing/Yandex.scrape_batch: Scrape multiple webpages at once, with advanced options, and return results in Markdown. Supports up to 10 URLs per batch.
These are exactly the tools exposed by the Web MCP in its free tier, which confirms that your integration is working perfectly!
Step #7: Execute the Task
You now have all the pieces to run a task in your Google Gen AI SDK workflow, which can connect to Bright Data’s Web MCP.
Create a prompt that refers to a specific news article (in this example, from CNN). Ask a Gemini model (e.g., gemini-2.5-flash) to scrape the article’s content, then return a summary and a sentiment analysis comment:
prompt = """
Scrape the content from the following news article as Markdown:
https://www.cnn.com/2026/09/15/tech/meta-future-ai-smart-glasses

Then, analyze it and provide:
1. A short summary of around 50 words.
2. A sentiment analysis comment indicating whether the article is positive, negative, or neutral.
"""
Pass the prompt to the client.aio.models.generate_content() method to interrogate the configured Gemini model via the Google Gen AI SDK:
# Send the prompt to the Gemini model
response = await client.aio.models.generate_content(
    model="gemini-2.5-flash",
    contents=prompt,
    config=genai.types.GenerateContentConfig(
        temperature=0, # For more repeatable results
        tools=[session], # To allow the automatic calling of the configured MCP tools
    ),
)
# Print the response from the AI
print(response.text)
By passing the MCP session initialized earlier to the tools parameter, the Gemini model will be able to call the Web MCP tools automatically. In detail, to scrape the content of the article, it should use scrape_as_markdown.
Important: The gemini-2.5-flash model has generous limits, and the Bright Data Web MCP has been configured to operate under the free tier. This means you will not incur any charges, as the workflow works completely for free.
Cool! It only remains to test your sentiment analysis AI workflow.
Step #8: Put It All Together
The final code of workflow.py is:
import asyncio
import os
from dotenv import load_dotenv
from mcp.client.stdio import stdio_client
from mcp import ClientSession, StdioServerParameters
from google import genai

# Load environment variables from the .env file
load_dotenv()

# Read the Bright Data API key from the env
BRIGHT_DATA_API_KEY = os.getenv("BRIGHT_DATA_API_KEY")
# Configuration to connect to the Bright Data Web MCP via stdio connection
server_params = StdioServerParameters(
    command="npx",
    args=["-y", "@brightdata/mcp"],
    env={
        "API_TOKEN": BRIGHT_DATA_API_KEY,
        # "PRO_MODE": "true" (optional, to enable access to all 60+ tools)
    },
)

# Initialize the Google Gen AI SDK client
client = genai.Client()

async def run():
    # Initialize an MCP client context
    async with stdio_client(server_params) as (read, write):
        async with ClientSession(read, write) as session:
            # Initialize the AI SDK client session, with MCP integration
            await session.initialize()

            # Prompt to get sentiment analysis from a news article
            prompt = """
            Scrape the content from the following news article as Markdown:
            https://www.cnn.com/2026/09/15/tech/meta-future-ai-smart-glasses

            Then, analyze it and provide:
            1. A short summary of around 50 words.
            2. A sentiment analysis comment indicating whether the article is positive, negative, or neutral.
            """

            # Send the prompt to the Gemini model
            response = await client.aio.models.generate_content(
                model="gemini-2.5-flash",
                contents=prompt,
                config=genai.types.GenerateContentConfig(
                    temperature=0, # For more repeatable results
                    tools=[session], # To allow the automatic calling of the configured MCP tools
                ),
            )
            # Print the response from the AI
            print(response.text)

# Start the asyncio event loop and run the main function
asyncio.run(run())
Wow! In around 50 lines of code, you just built an AI workflow for sentiment analysis. This would not have been possible without the Bright Data Web MCP and Google Gen AI SDK.
Verify that the script works with:
python workflow.pyThe script execution may take a while, as scraping a site on demand and analyzing it with AI takes some time.
The output should be something like:
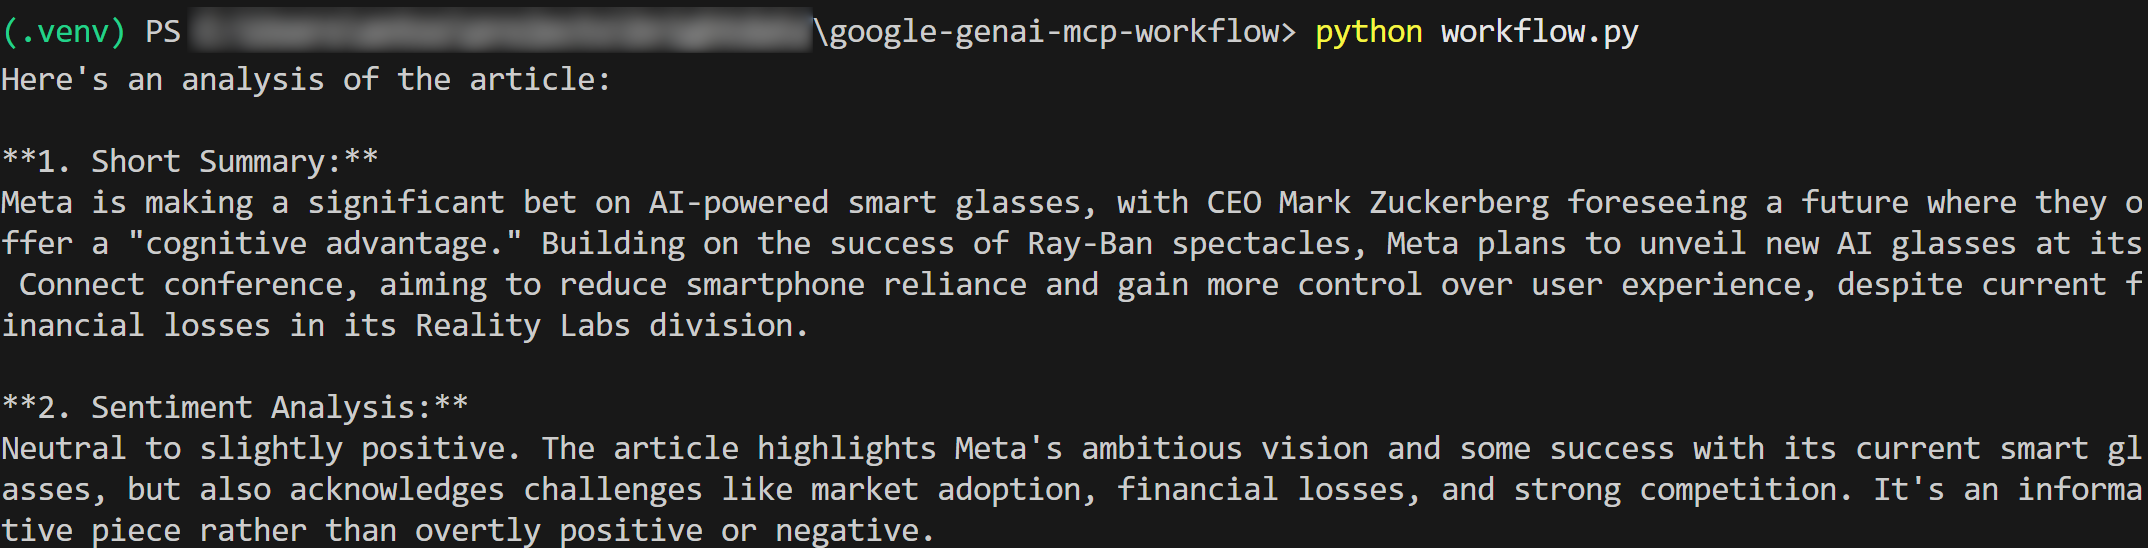
As you can verify on the original CNN news article, the summary and sentiment analysis results are accurate.
Notice that news scraping is not easy, especially on popular sites like CNN, which are usually protected by anti-bot systems. That is where the Bright Data Web MCP server comes into play, providing a complete toolkit of AI-ready solutions for web data retrieval, interaction, and search.
This was just one example, but with the wide range of Bright Data tools available in the Gen AI SDK, you can build workflows covering several real-world use cases simply by adjusting the prompt.
Et voilà! You just experienced the power of Bright Data Web MCP integration within a Google Gen AI workflow.
Conclusion
In this blog post, you saw how to connect the Google Gen AI SDK to Bright Data’s Web MCP (which now includes a free tier!). The result is an enhanced AI workflow with access to multiple tools for web data extraction and interaction.
To build more complex AI agents, explore the full range of products and services available in Bright Data’s AI infrastructure. These solutions support a wide variety of AI workflows and agentic scenarios.
Create a free Bright Data account today and start experimenting with our AI-ready web data tools!

Technical Writer
Antonello Zanini is a technical writer, editor, and software engineer with 5M+ views. Expert in technical content strategy, web development, and project management.


