
In this guide, you will learn:
- What GitHub Copilot CLI is and what it offers.
- Why extending it with web access takes it to the next level.
- How Bright Data enables GitHub Copilot CLI integration for web scraping, search, discovery, and browser automation.
- How to connect Bright Data to GitHub Copilot CLI using MCP.
- How to equip Copilot CLI with Bright Data knowledge using Agent Skills.
- What the GitHub Copilot CLI + Bright Data integration enables, with a complete example.
Let’s dive in!
What Is GitHub Copilot CLI?
GitHub Copilot CLI is an open-source, AI-powered coding agent that brings Copilot directly into your terminal, enabling natural language-driven coding, debugging, and GitHub interactions without leaving the command line.
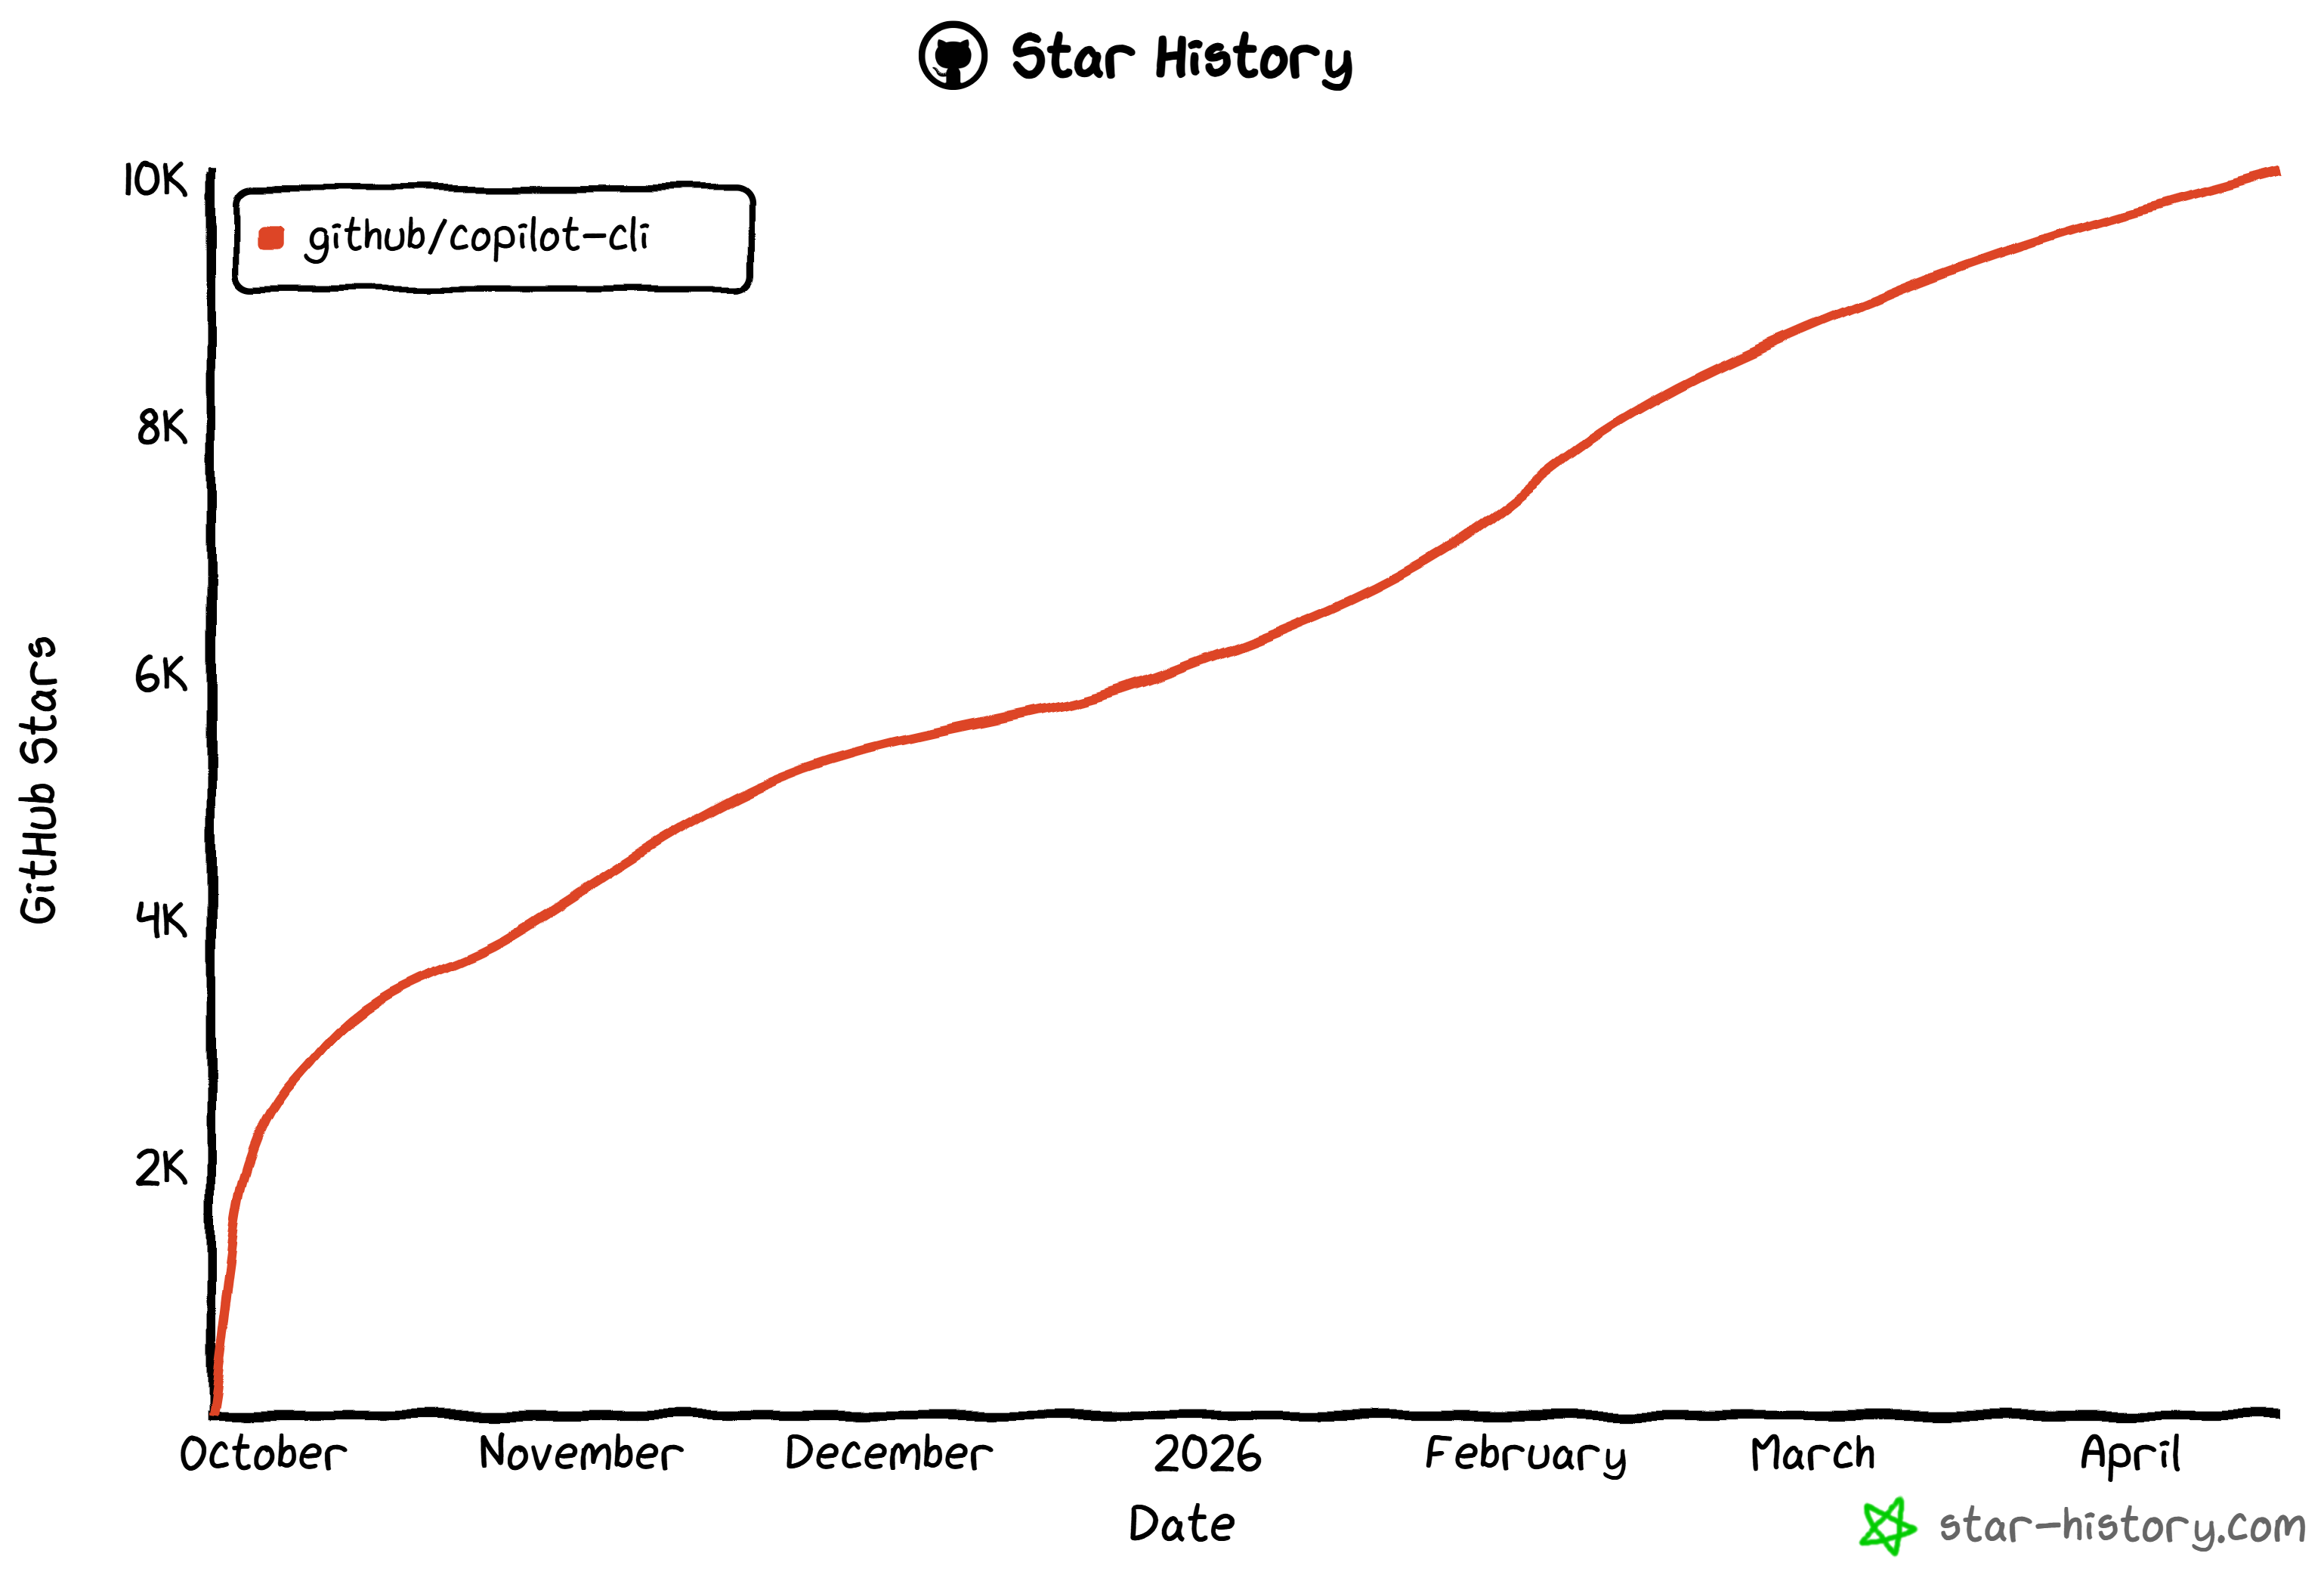
It boasts over 10k stars on GitHub, reflecting strong trust and support from the global developer community. Note that the project is built and maintained by the GitHub team.
The main features of the GitHub Copilot CLI are:
- Natural language programming: Lets you describe tasks in plain English to generate, modify, or debug code directly in the CLI.
- GitHub integration: Works with repositories, issues, and pull requests using authenticated GitHub context.
- Agentic execution model: Can plan and execute multi-step coding tasks autonomously while keeping user control.
- Interactive + programmatic modes: Supports conversational sessions or single-command automation via CLI flags.
- MCP extensibility: Integrates with Model Context Protocol servers to expand capabilities with external tools and data sources.
- Custom agents support: Enables specialized AI behaviors tailored to different workflows or engineering standards.
- Safety and approvals system: Requires explicit permission before executing or modifying files or running shell commands.
- Model flexibility: Allows switching between different AI models or connecting external providers (OpenAI-compatible, Azure, Anthropic, local models).
- LSP (Language Server Protocol) support: Enhances code intelligence with features like diagnostics, hover info, and go-to-definition via external LSP servers.
For more details, check out the docs.
Why Extend GitHub Copilot with Dynamic Web Data Fetching and Discovery
No matter how good the LLM configured in GitHub Copilot CLI is, it faces a universal constraint: information stagnation. Because large language models generate output based on their training data, they essentially operate within a static snapshot of the past.
In a fast-moving technical landscape, this lag is a significant bottleneck. An offline CLI agent might suggest deprecated library syntax or fail to account for recent security patches. To overcome these hurdles, your AI tools require real-time web integration. This is where Bright Data comes in!
Bright Data’s AI-ready infrastructure allows your GitHub Copilot CLI agent to move beyond its training data and autonomously:
- Execute live searches: Query Google or other search engines to find the latest documentation, ensuring commands are compatible with the most recent software versions.
- Verify accuracy: Cross-reference solutions against Stack Overflow threads or GitHub Issues to self-correct when encountering hallucinated or outdated code.
- Ingest structured data: Scrape live web content to populate local databases or generate accurate mock data for testing.
- Enrich documentation: Suggest valid, high-authority links for
README.mdfiles or internal wikis. - And much more..
What distinguishes Bright Data is its massive global network of over 400 million residential IPs across 195 countries. This foundation provides unlimited scalability, a 99.99% uptime, and a 99.95% success rate. The result is a production-ready, reliable, and robust AI-powered development environment.
How to Extend GitHub Copilot CLI with Web Scraping and Search Capabilities
Bright Data supports GitHub Copilot CLI through two complementary integrations:
- Bright Data Web MCP: The official MCP server exposing 70+ tools for interacting with Bright Data’s API-based products and services.
- Bright Data skills: A set of Agent Skills that teach Copilot how to properly employ Bright Data’s tools for search, scraping, and data extraction.
Important: These two approaches are not alternatives, but synergic. In detail, the Bright Data skills provide a specific skill to help AI coding agents get the most out of the Web MCP tools.
Bright Data Web MCP
The Bright Data Web MCP exposes 70+ tools for automated web data collection, structured extraction, and browser interactions.
Even on the free tier, you get access to core tools such as:
| Tool | Description |
|---|---|
search_engine |
Retrieve Google, Bing, or Yandex results in JSON or Markdown format |
scrape_as_markdown |
Convert any webpage into clean Markdown while bypassing bot protection |
discover |
Perform AI-powered web search with ranked, relevant results |
You also get batch versions of both search_engine and scrape_as_markdown.
Still, [Pro mode](https://github.com/brightdata/brightdata-mcp?tab=readme-ov-file#-pricing, modes) truly unlocks the full potential of Web MCP. This includes advanced tools for structured extraction from platforms like GitHub, NPM, Amazon, LinkedIn, Yahoo Finance, YouTube, TikTok, Zillow, Google Maps, and many others. Plus, you gain browser automation capabilities.
Bright Data Skills
The Bright Data skills include:
| Skill | Description |
|---|---|
search |
Structured Google search with pagination and clean JSON output |
scrape |
Scrape any webpage as Markdown with bot bypass, CAPTCHA handling, and JS rendering |
data-feeds |
Prebuilt structured datasets from 40+ platforms (Amazon, LinkedIn, TikTok, YouTube, eBay, Walmart, etc.) |
bright-data-mcp |
Orchestrates MCP tools for search, scraping, extraction, and automation |
brightdata-cli |
CLI usage for scraping, search, proxies, extraction, and monitoring |
scraper-builder |
Guides creation of production-ready scrapers from analysis to implementation |
competitive-intel |
Real-time competitive intelligence (pricing, reviews, hiring, SEO signals) |
design-mirror |
Replicates UI patterns, tokens, and design systems |
bright-data-best-practices |
Best practices for Web Unlocker, SERP API, Scraper API, and Browser API |
python-sdk-best-practices |
Usage guide for the Bright Data SDK (sync/async, datasets, errors, etc.) |
Common Steps
In the next two chapters, you will see how to integrate Bright Data into GitHub Copilot CLI using MCP and Agent Skills, respectively. For now, let’s focus on a few common preliminary steps you need to complete before getting started.
Prerequisites
To follow this tutorial, make sure you have:
- Node.js 22+ installed locally.
- A GitHub account, ideally with a Copilot plan already set up (the Free plan works as well).
- A Bright Data account with an API key configured.
To generate a Bright Data API key, follow the official guide.
Step #1: Install GitHub Copilot CLI
Run the following command to install the GitHub Copilot CLI through the @github/copilot npm package:
npm install -g @github/copilotNote: You can also install GitHub Copilot CLI via Homebrew and WinGet, as explained in the docs.
Once the installation is complete, you can run the Copilot CLI with:
copilotThis is it! GitHub Copilot CLI is now successfully installed on your system.
Step #2: Complete the Setup
Create a folder for your project (or navigate to an existing one) from the terminal. In this example, we will use a directory called github-copilot-cli-bright-data-example:
mkdir github-copilot-cli-bright-data-example
cd github-copilot-cli-bright-data-example
Inside your project folder, start GitHub Copilot CLI:
copilotThe first time you run the tool, you should see something like this:
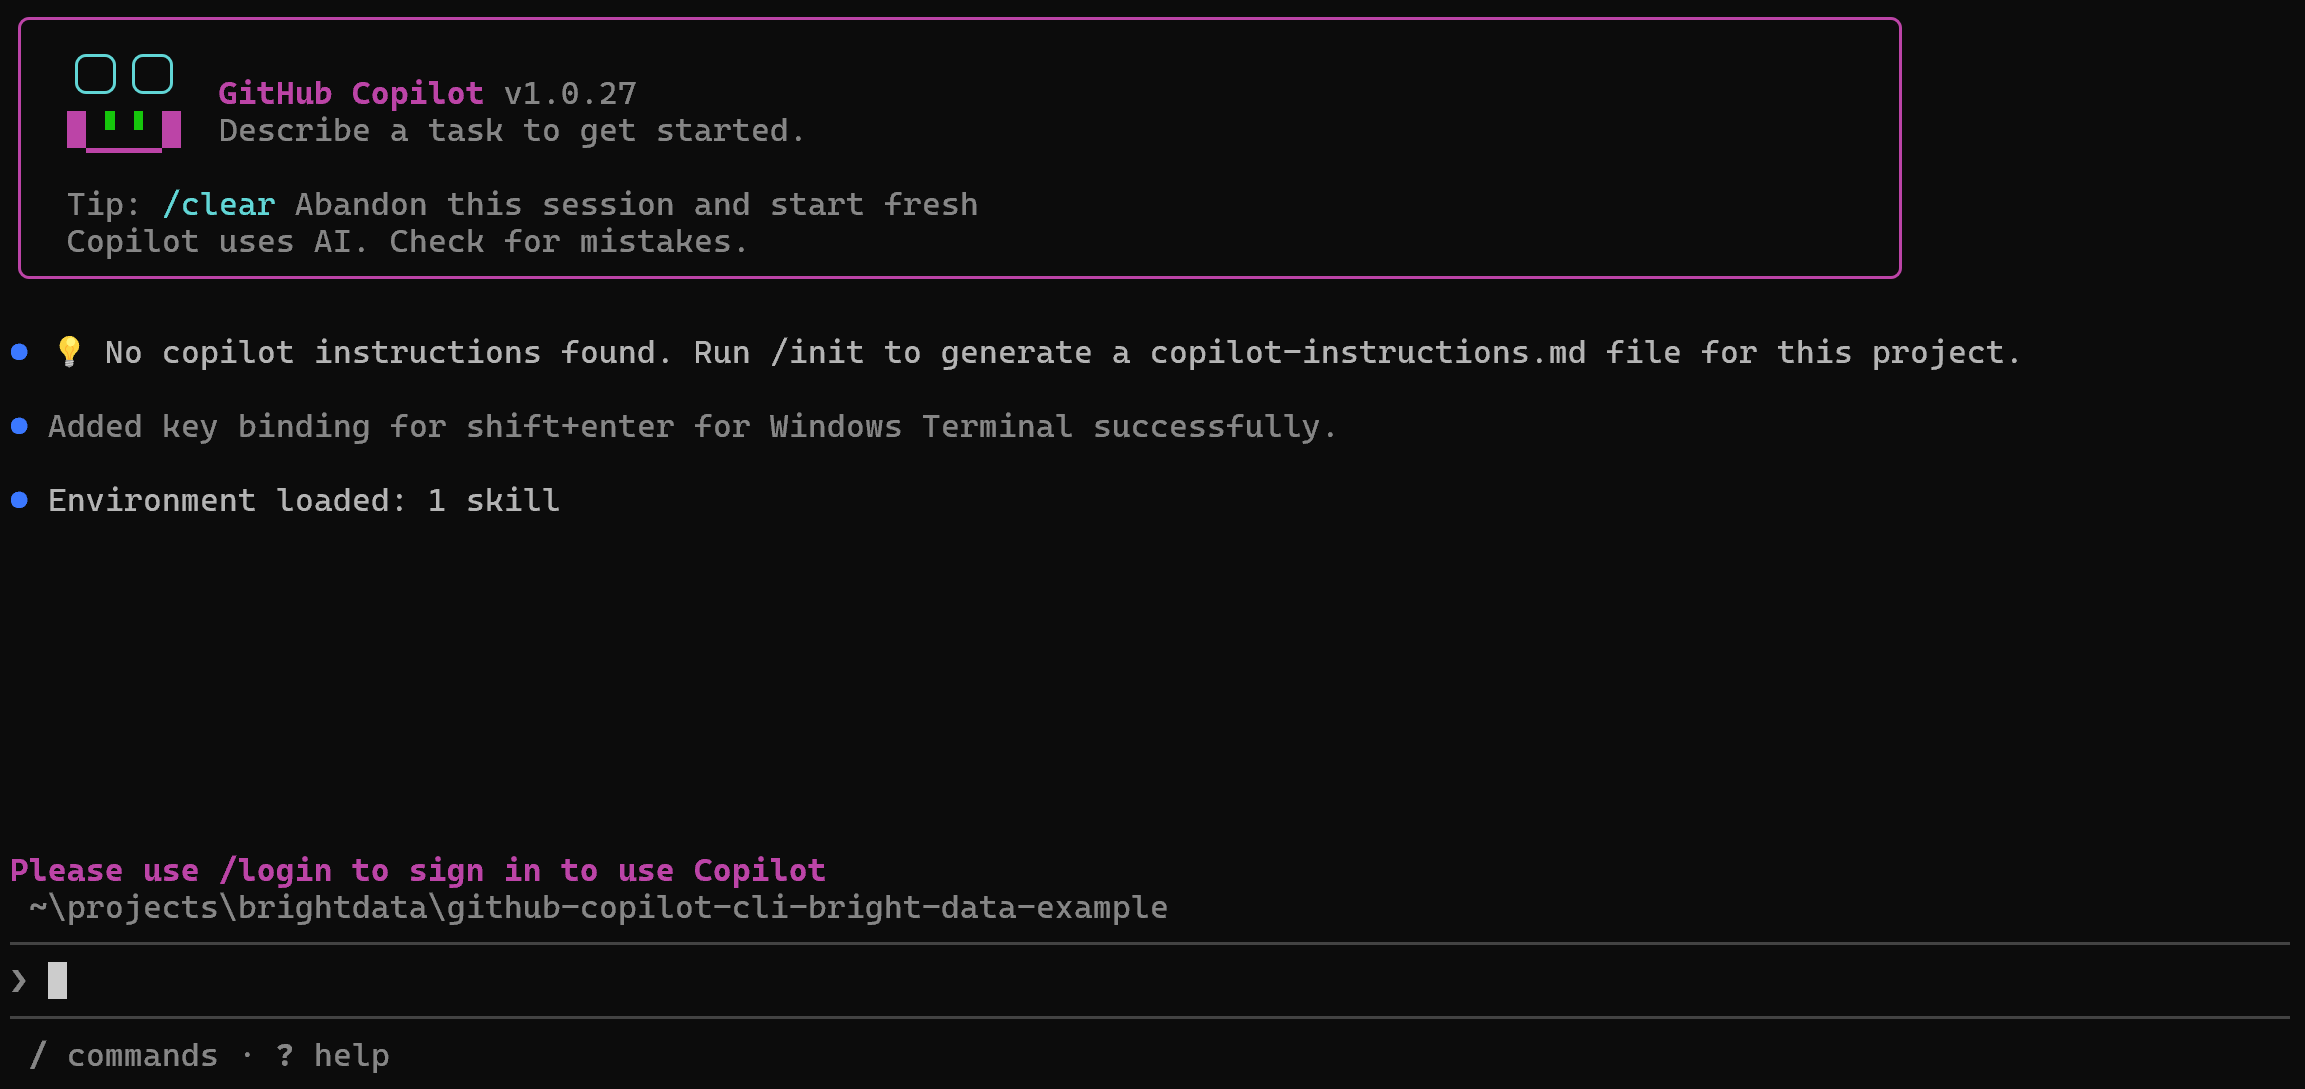
To complete the quickstart, run:
/loginThis will connect your local GitHub Copilot CLI to your GitHub account. Start by selecting the GitHub account you want to log into:

A GitHub page will open in your browser, where you’ll be prompted to enter a code to authorize your device. Then, you will be asked to connect Copilot CLI to your GitHub account and grant the required permissions:
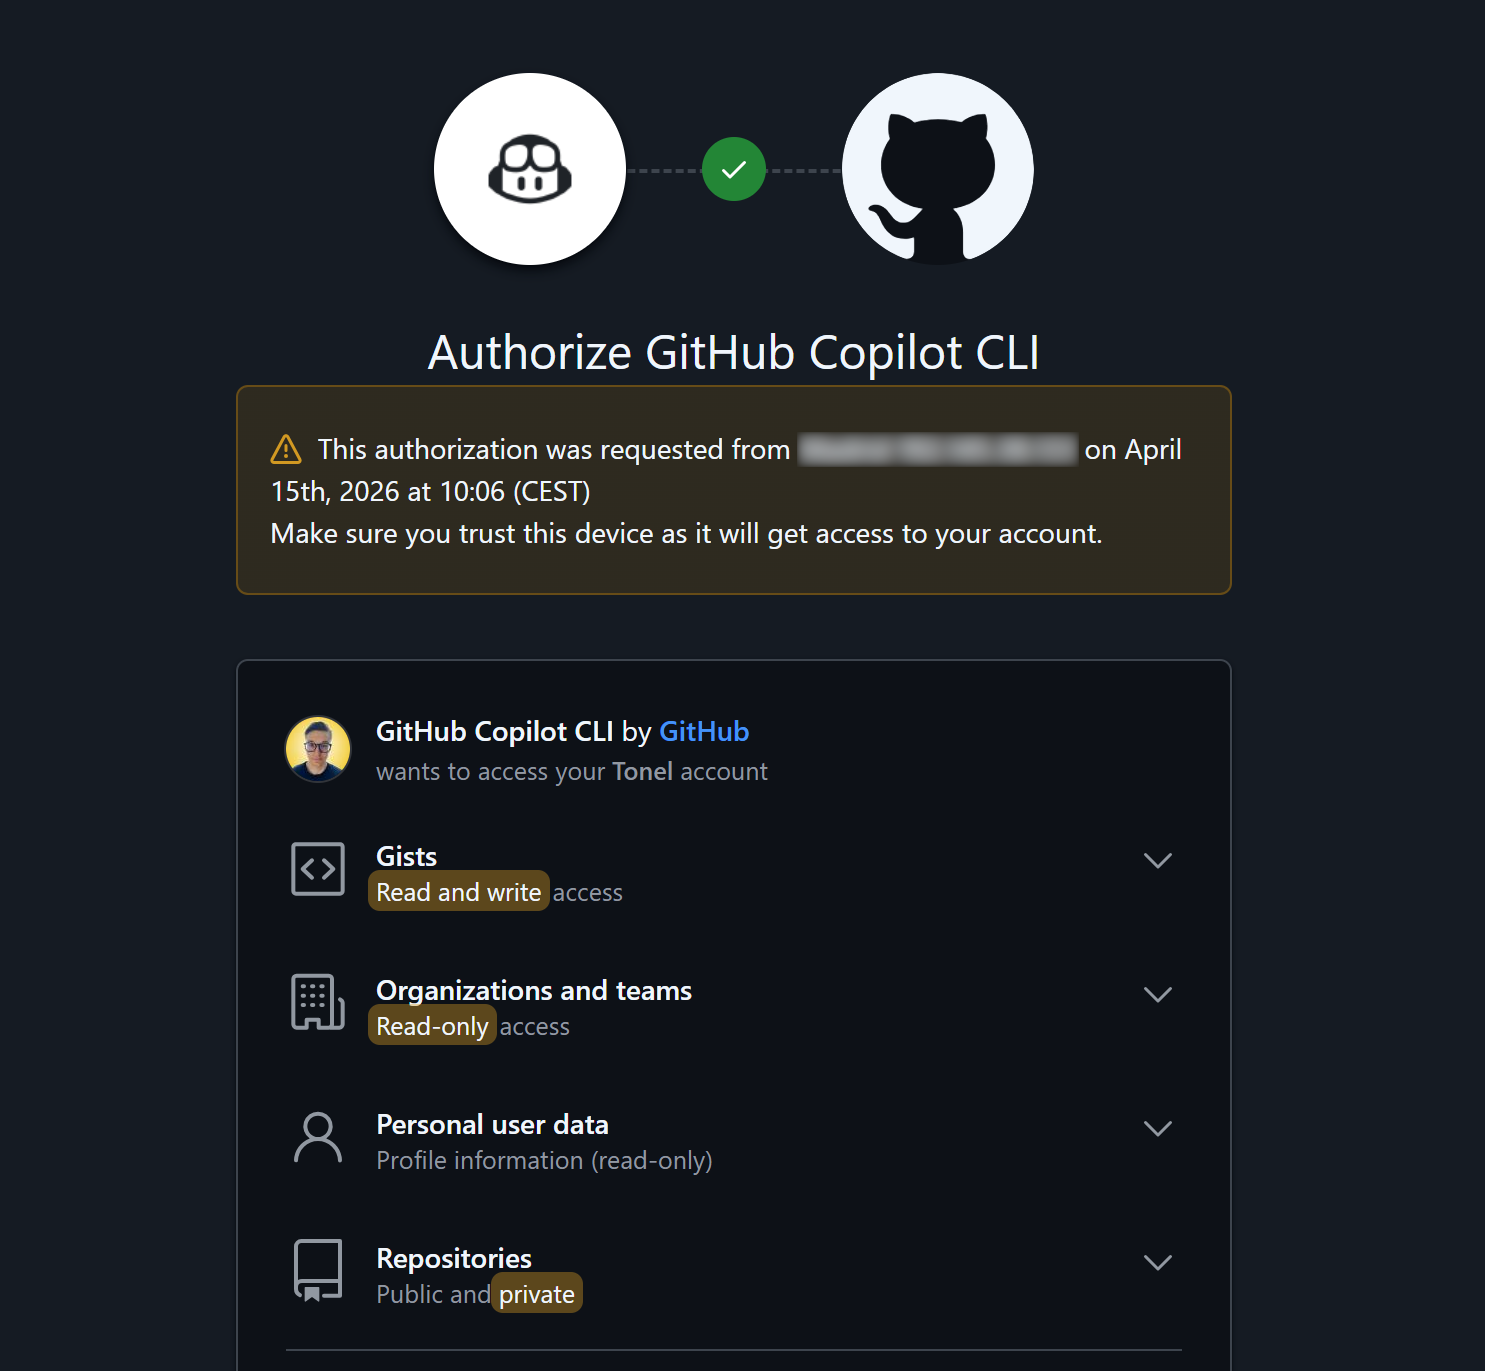
Review the permissions and press “Authorize github” to confirm.
If you already have a Copilot plan, you are good to go. Otherwise, you will be prompted to start a Copilot Free plan:

Accept it, and you should now see:
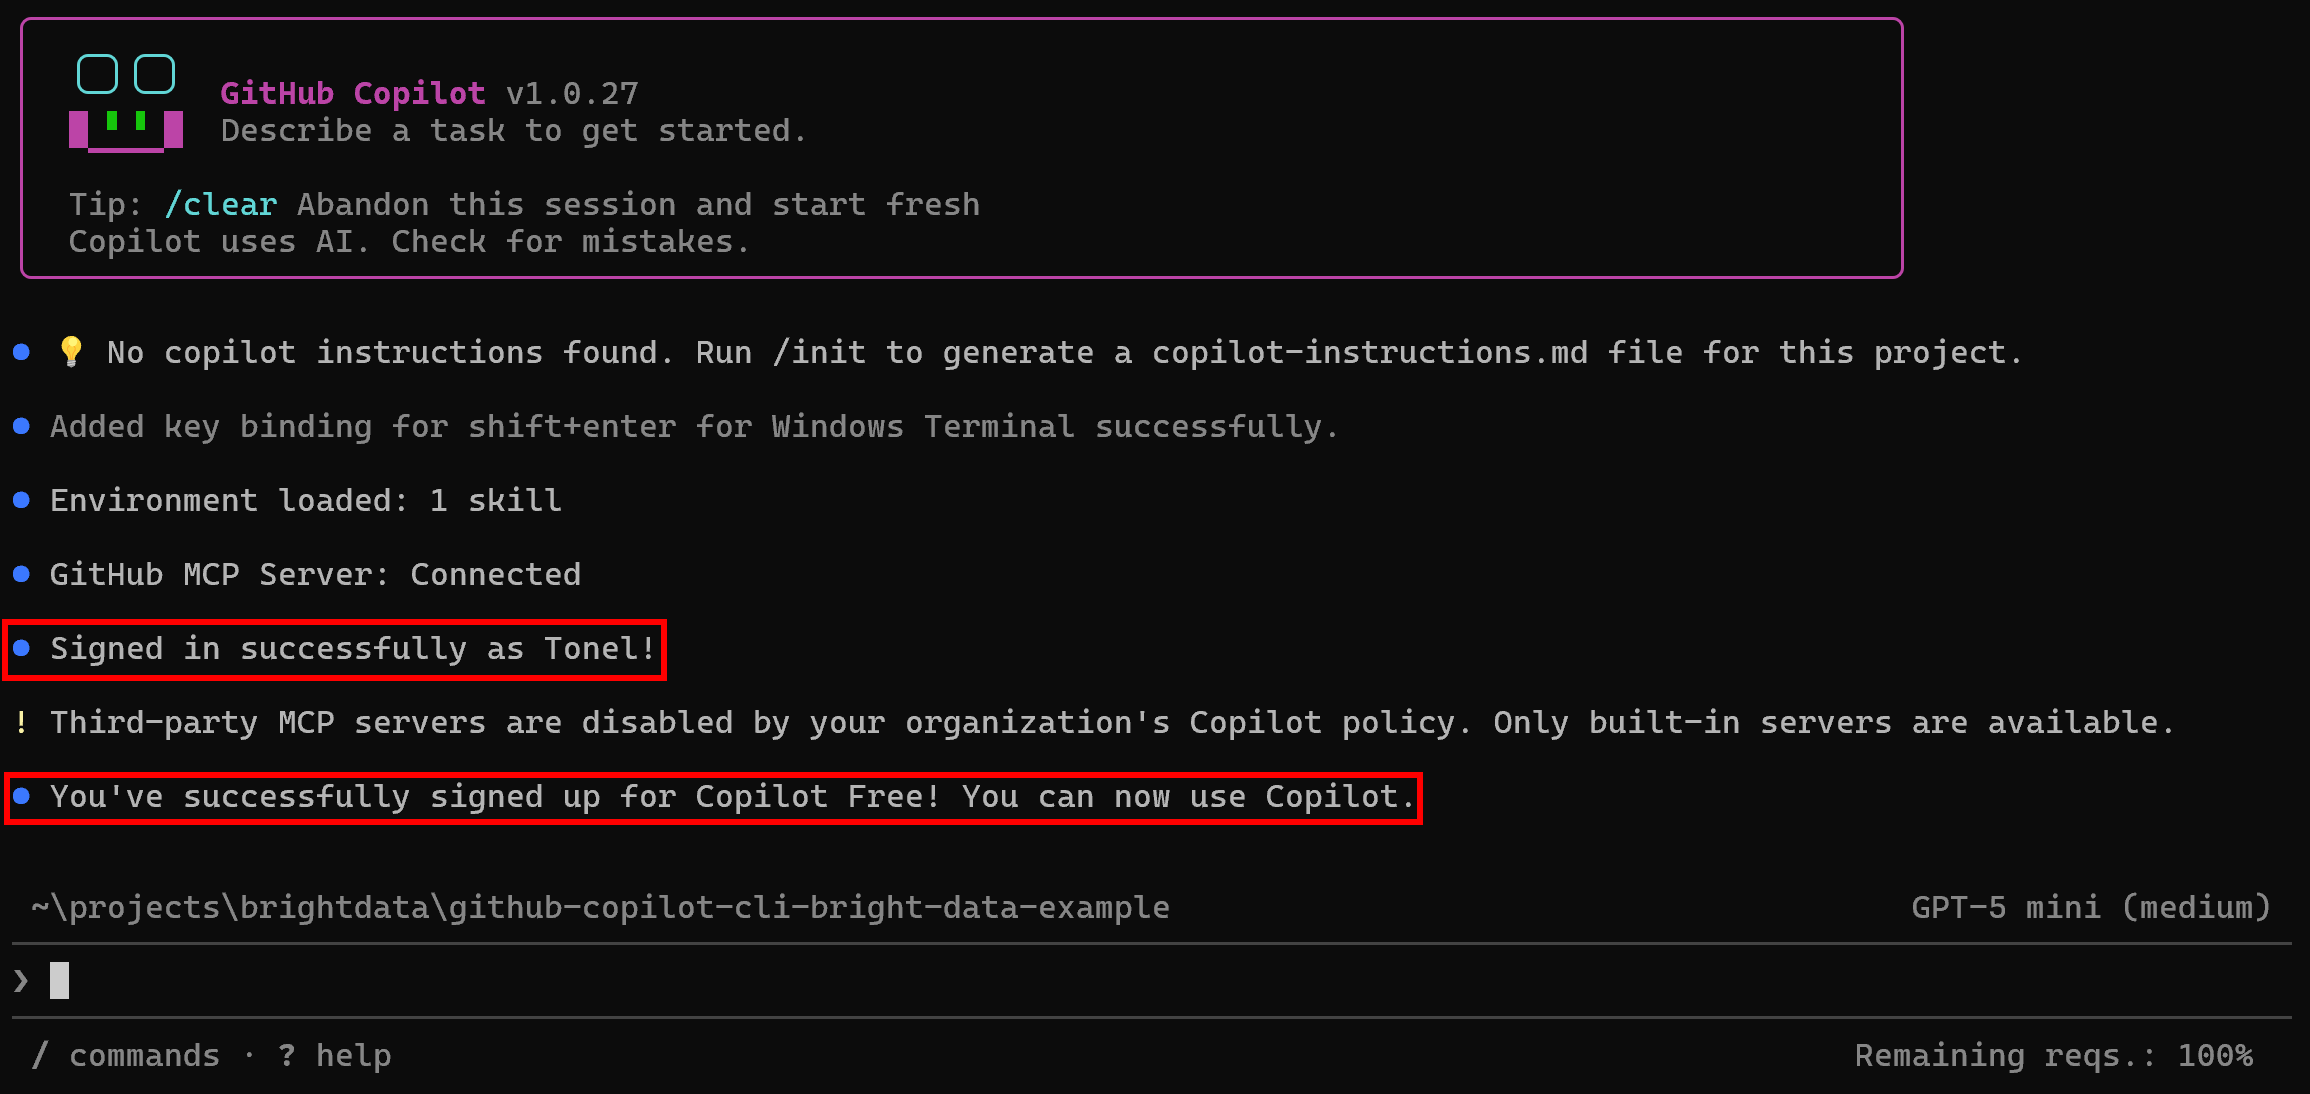
At this point, a success message will confirm that you are logged in and that your Copilot plan is active.
Well done! You have successfully set up GitHub Copilot CLI.
Connect Bright Data to GitHub Copilot CLI Through the Web MCP
In this section, you will see how to configure a local instance of the Bright Data Web MCP in the GitHub Copilot CLI.
Prerequisites
To follow along more easily, it is recommended that you have:
- A basic understanding of how MCP works.
- Familiarity with the tools exposed by the Bright Data Web MCP.
Also, keep in mind that the prerequisites listed in the “Common Steps” chapter apply here as well.
Step #1: Set Up Bright Data’s Web MCP
Before adding Bright Data’s Web MCP to your Copilot CLI project, you should first verify that the MCP server runs correctly on your machine. Skip this step if you plan to configure a remote connection to Bright Data Web MCP.
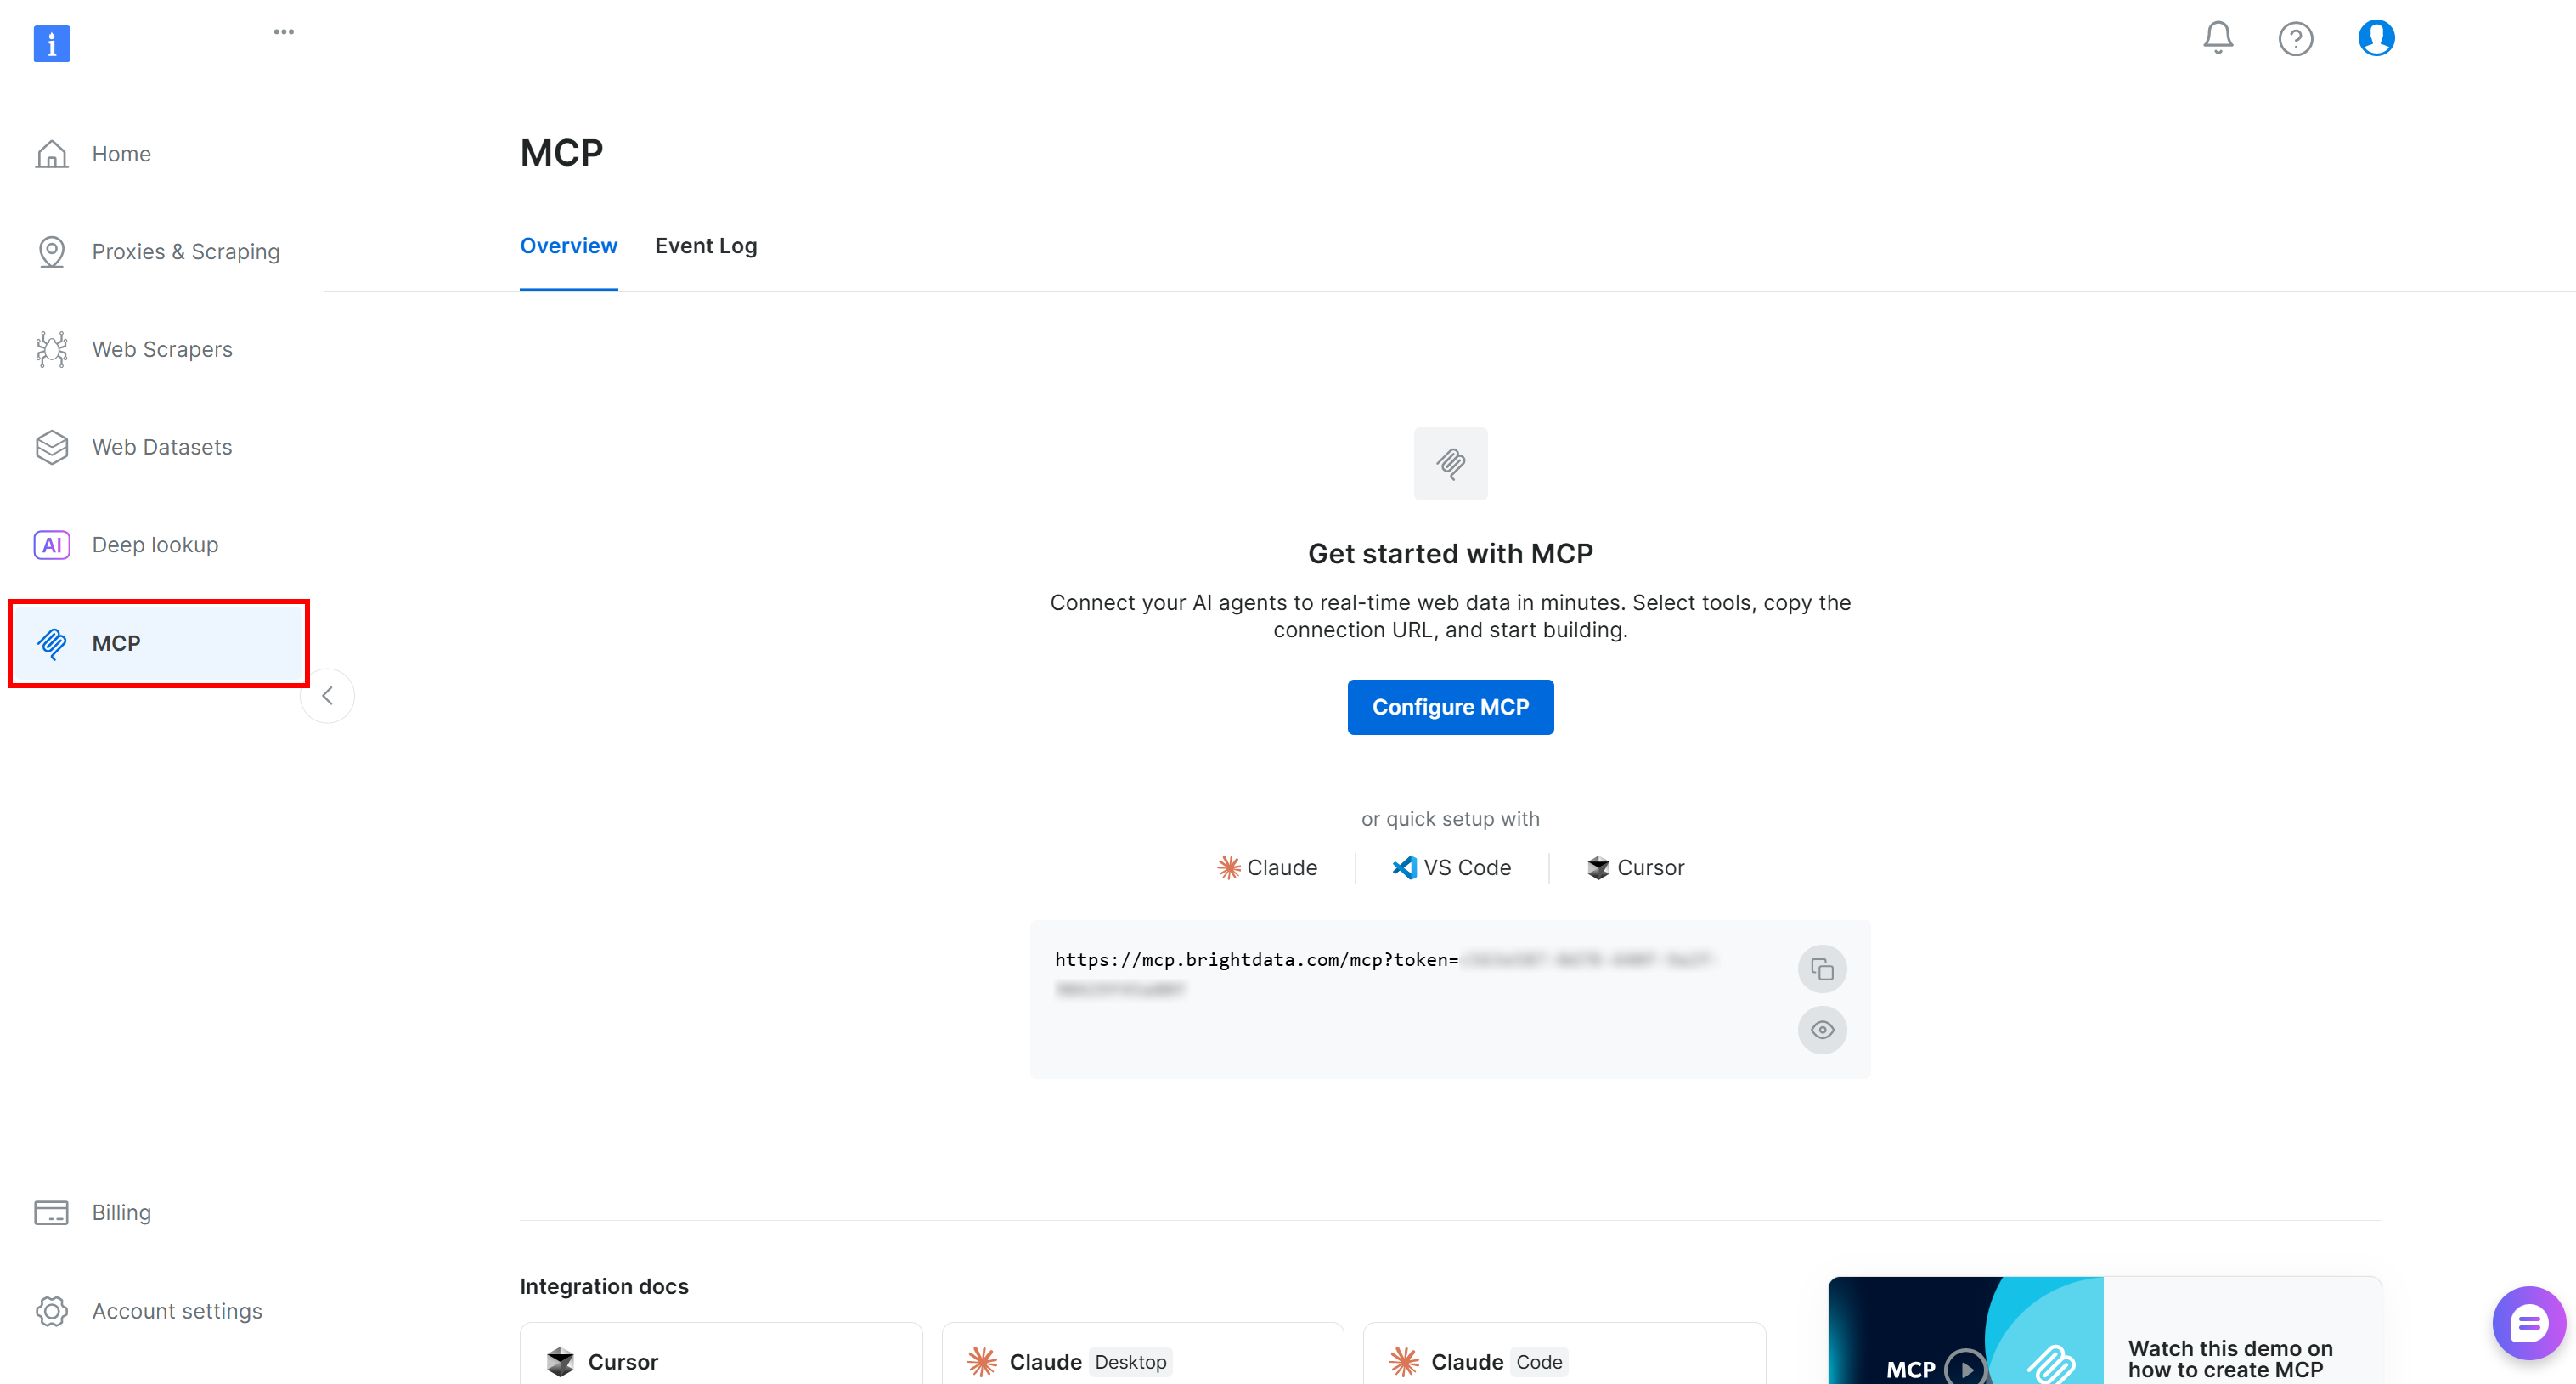
Begin by logging in to your Bright Data account. For a quick setup, follow the wizard in the “MCP” section of the control panel:
Otherwise, follow the steps below.
First, install the Web MCP globally by adding the @brightdata/mcp package:
npm install -g @brightdata/mcpThen, check that the MCP server starts locally with:
API_TOKEN="<YOUR_BRIGHT_DATA_API>" npx -y @brightdata/mcpOr, equivalently, in PowerShell:
$Env:API_TOKEN="<YOUR_BRIGHT_DATA_API>"; npx -y @brightdata/mcpReplace the <YOUR_BRIGHT_DATA_API> placeholder with your actual Bright Data API key. This command sets the required API_TOKEN environment variable and launches the Web MCP server locally.
If everything works correctly, you should see output similar to:

On the first run, the @brightdata/mcp package automatically creates two zones in your Bright Data account:
mcp_unlocker: A zone for Web Unlocker.mcp_browser: A zone for Browser API.
These zones power the 60+ tools available in Web MCP. You can also configure custom zones if needed, as described in the documentation.
To confirm that the default zones were created, navigate to the “Proxies & Scraping Infrastructure” page in the Bright Data control panel. You should see both zones listed:

On the Web MCP free tier, only a limited set of tools is available: search_engine, scrape_as_markdown (and their batch versions), along with the discover tool.
To unlock all 60+ tools, enable Pro mode by setting the PRO_MODE="true" environment variable:
API_TOKEN="<YOUR_BRIGHT_DATA_API>" PRO_MODE="true" npx -y @brightdata/mcpOr, on Windows:
$Env:API_TOKEN="<YOUR_BRIGHT_DATA_API>"; $Env:PRO_MODE="true"; npx -y @brightdata/mcpNote: Pro mode is not included in the free tier and [incurs additional charges](https://github.com/brightdata/brightdata-mcp?tab=readme-ov-file#-pricing, modes).
Nice work! You just made sure that the Bright Data Web MCP runs on your machine. Next, you will configure GitHub Copilot CLI to start the server automatically and connect to it.
Step #2: Add the Web MCP
To add an MCP server connection to GitHub Copilot CLI, fire this command:
/mcp addYou will be prompted to enter the required connection details. Use Tab to navigate between fields and fill in the information as follows:
- MCP name:
bright-data-web-mcp(Note: the name cannot contain spaces) - Command:
npx @brightdata/mcp - Environment variables:
{"API_TOKEN":"<YOUR_BRIGHT_DATA_API_KEY>", "PRO_MODE":"true"}(must be provided as a JSON key-value object) - Tools:
*(to enable all tools)
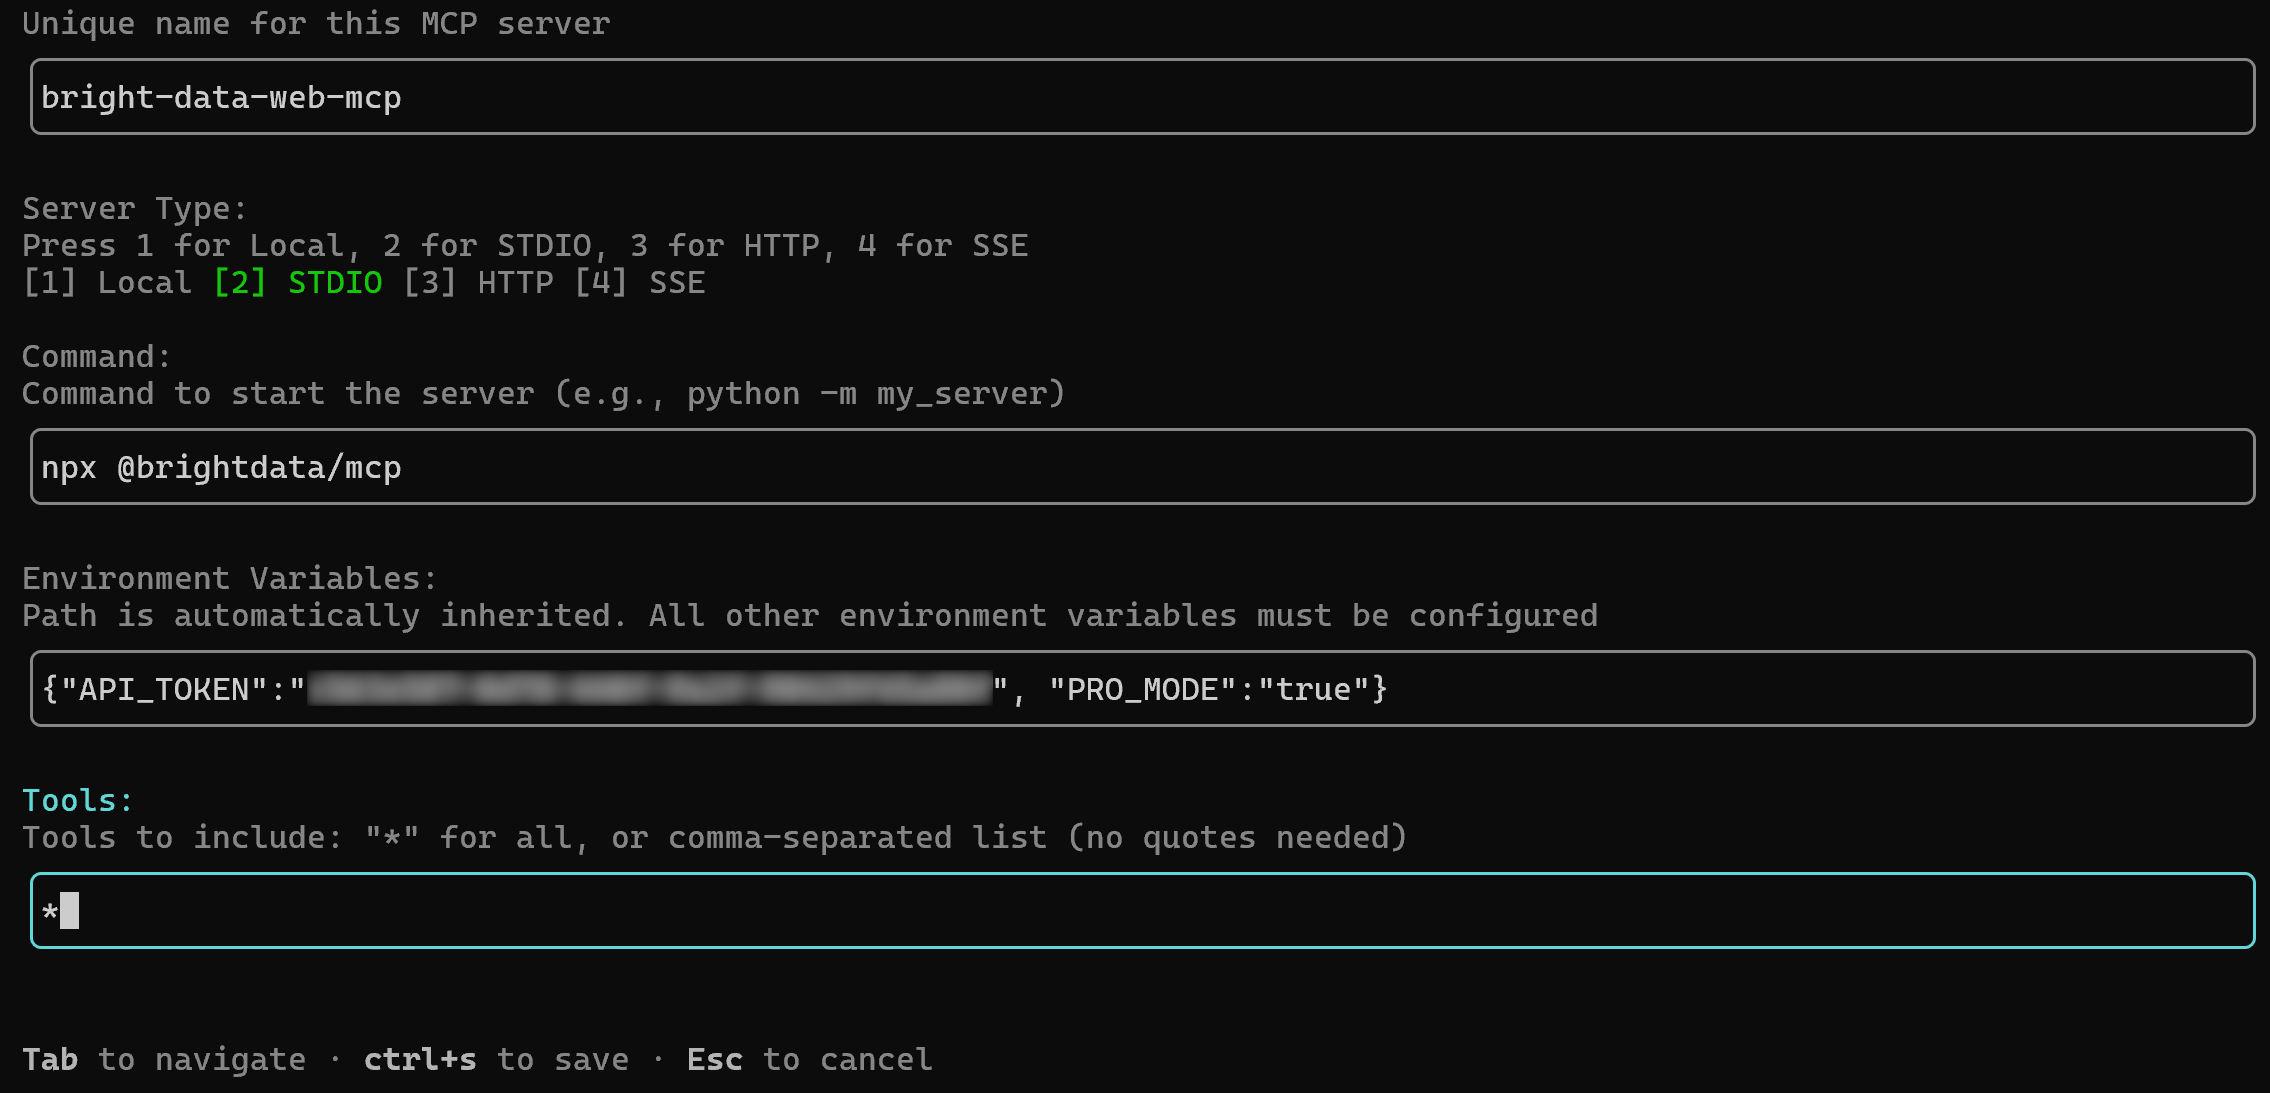
Once finished, press Ctrl+S to save.
The configuration above mirrors the npx command you tested earlier, using environment variables for credentials and setup:
API_TOKEN: Required. Set it to your Bright Data API key.PRO_MODE: Optional. Remove it (or set it to"false") if you do not want to activate Pro mode.
Now GitHub Copilot CLI will start the MCP server using the specified npx command and connect to it automatically. You should see two confirmation messages:

Note that you will see at least two servers mentioned. (One is the built-in github-mcp-server, and the other is the newly configured Bright Data Web MCP.)
The MCP server configuration is stored in the global ~/.copilot/mcp-config.json configuration file.
Alternative approach: Edit ~/.copilot/mcp-config.json file file directly so it includes:
{
  "mcpServers": {
    "bright-data-web-mcp": {
      "type": "stdio",
      "command": "npx",
      "tools": [
        "*"
      ],
      "args": [
        "@brightdata/mcp"
      ],
      "env": {
        "API_TOKEN": "<YOUR_BRIGHT_DATA_API_KEY>",
        "PRO_MODE": "true"
      }
    }
  }
}
After saving the file, execute the following command inside your GitHub Copilot CLI sessions:
/mcp reloadEither way, your GitHub Copilot CLI setup should now be connected to a local instance of the Bright Data Web MCP. Cool!
Step #3: Verify the Connection Works
Right after running the /mcp add command and seeing the success message, you should reach this view:
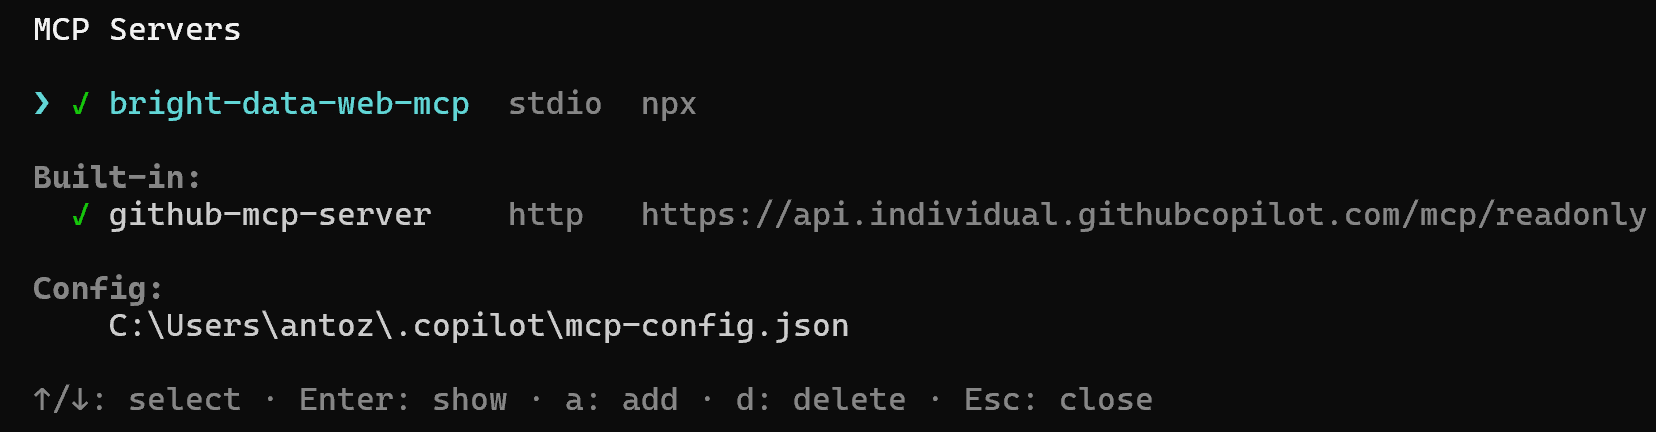
Note: That view corresponds to the output of the /mcp show command. So, if it does not show up, access it via the command.
Select the bright-data-web-mcp option and press Enter. You will then receive a list of all available tools. In Pro mode, that will include 70+ tools:
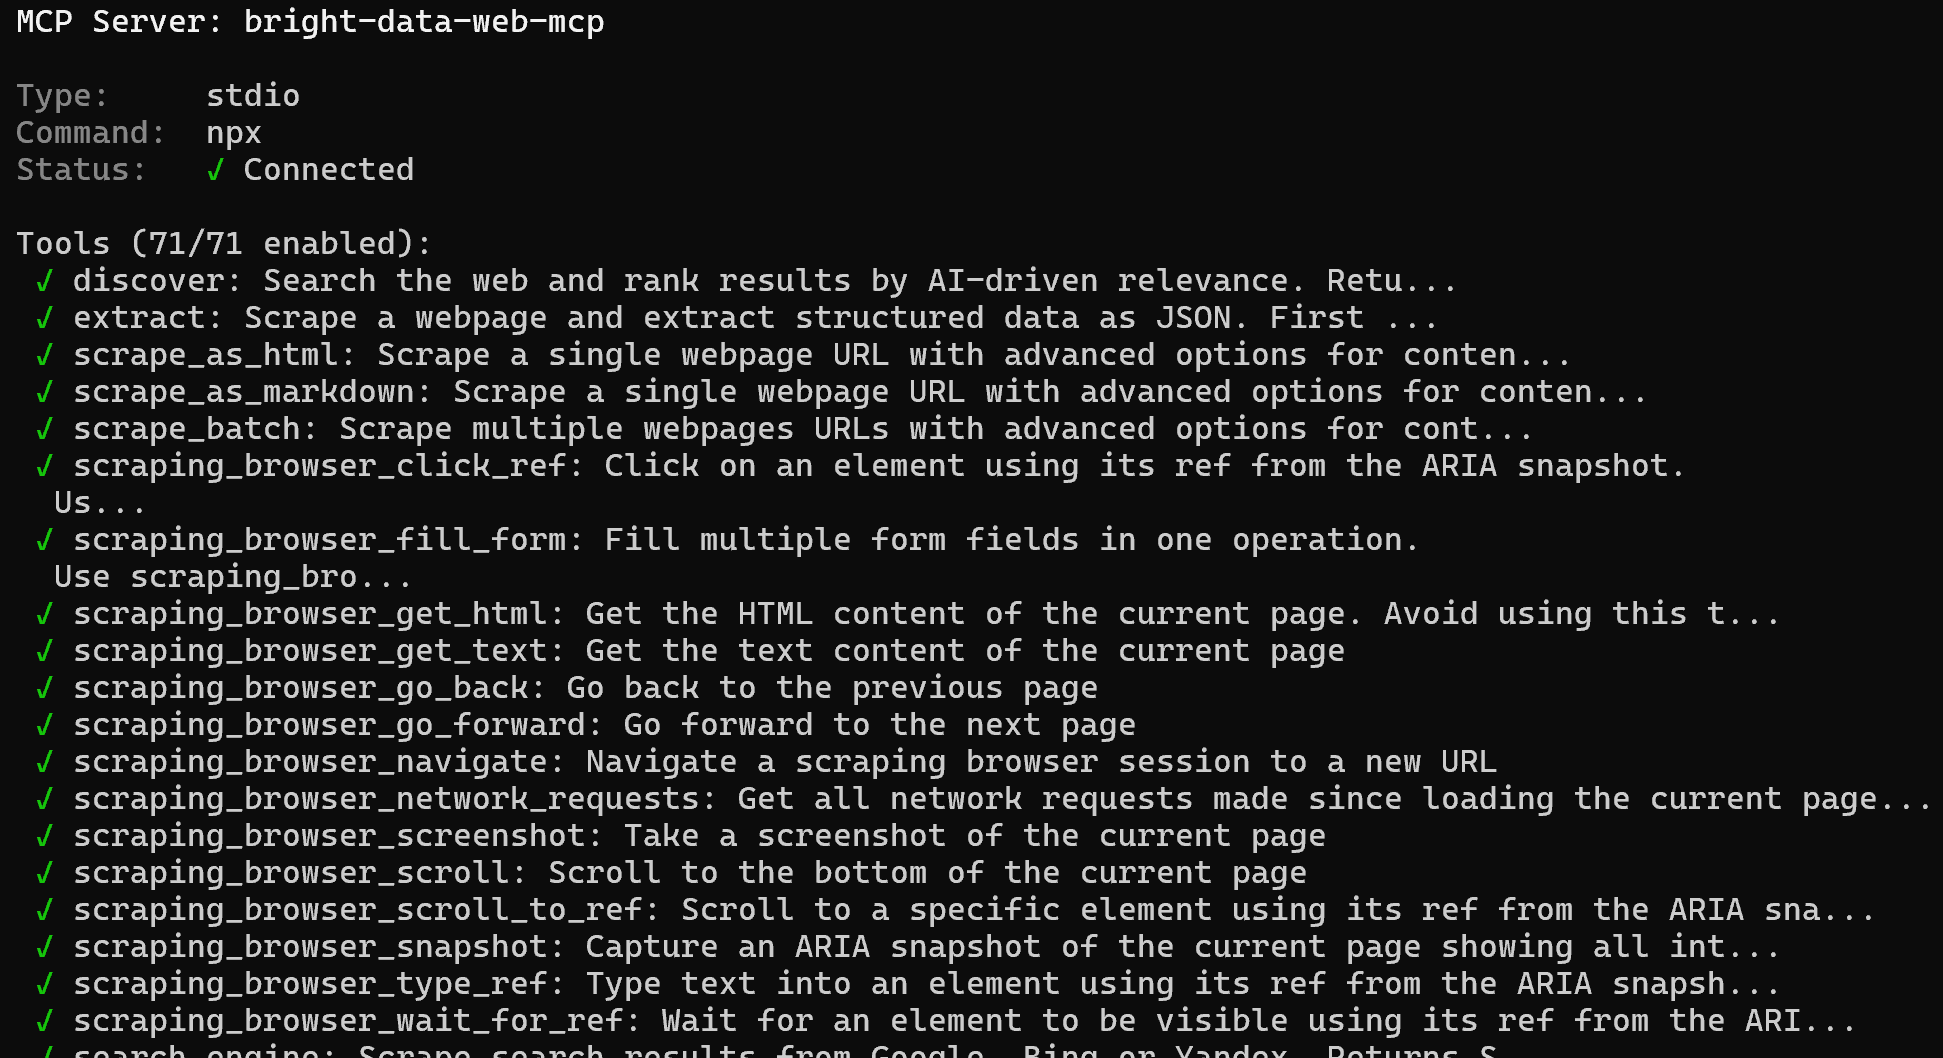
Congrats! This confirms that the Bright Data Web MCP is correctly exposing tools to GitHub Copilot CLI. Later in this blog post, you will experience the Web MCP in action together with the Bright Data skills.
Add the Bright Data Skills to GitHub Copilot CLI
In this chapter, you will be guided through how to add the Bright Data skills to your GitHub Copilot CLI project. That will be achieved using the guided workflow provided by Vercel’s skills tool.
Quick manual setup: If you prefer a manual setup, clone the Bright Data Skills repository. Next, just copy the contents of the skills/skills/ folder into the ~/.copilot/skills (or ~/.agents/skills/skills/) directory of your project:
git clone https://github.com/brightdata/skills
cp -r skills/skills/* ~/.copilot/skills/
However, the guided approach below is simpler and more reliable, so let’s go through it!
Prerequisites
To complete this section, make sure you have:
- A Unix-based operating system, such as Linux, macOS, or WSL on Windows. (Note: As of this writing, this is still a requirement, but Windows support for the Bright Data skills is coming soon.)
- A basic understanding of the Agent Skills standard.
- Familiarity with Vercel’s
skillsCLI tool for managing AI agent skills. - Basic knowledge of the Bright Data skills.
In addition to the prerequisites from the “Common Steps” chapter, you will also need:
- A Web Unlocker API zone set up in your Bright Data account.
- The
jqpackage installed locally.
To install jq (a lightweight JSON processor similar to sed) on Debian-based operating systems, run:
sudo apt-get install curl jqEquivalently, on macOS, execute:
brew install curl jqNow, for a quick setup of the Web Unlocker API zone, refer to the “Create Your First Unlocker API” guide. Alternatively, continue with the step below.
Step #1: Add a Web Unlocker API Zone
Log in to your Bright Data account and go to the “Proxies & Scraping Infrastructure” page. Then check the “My Zones” table:
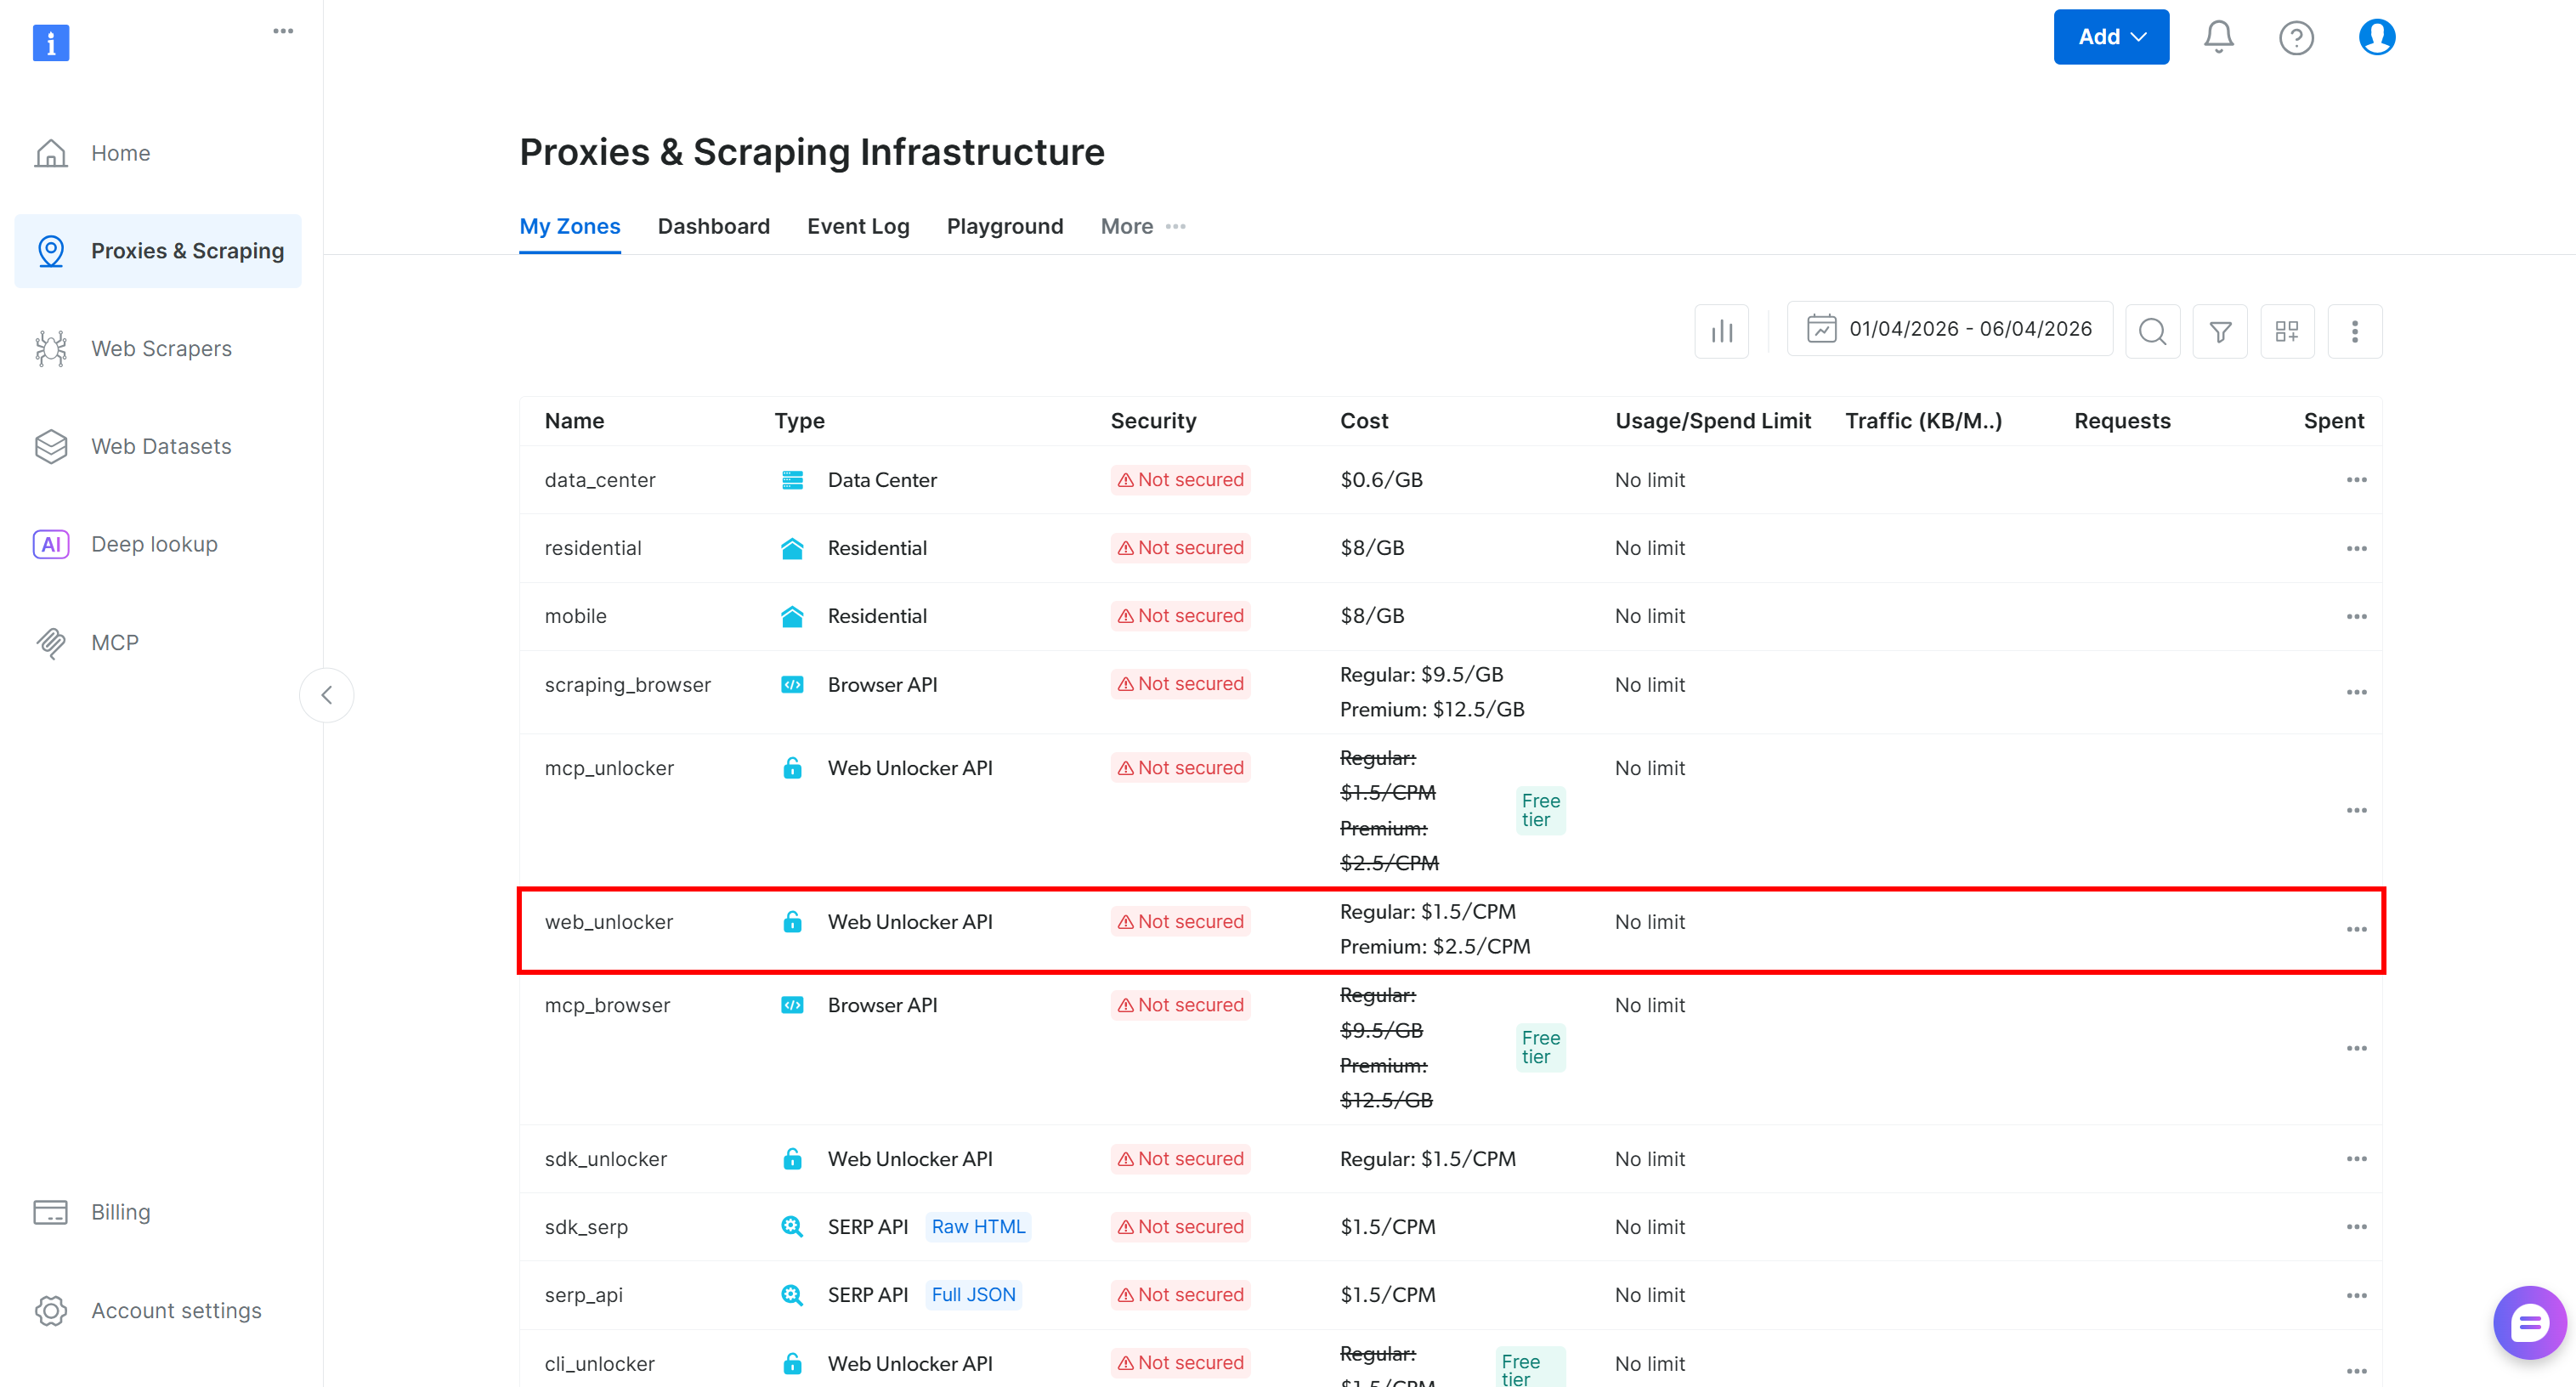
If a Web Unlocker zone (for example, web_unlocker) already exists, you can skip this step.
If not, create one by scrolling to the “Unblocker API” card and clicking “Create zone”:
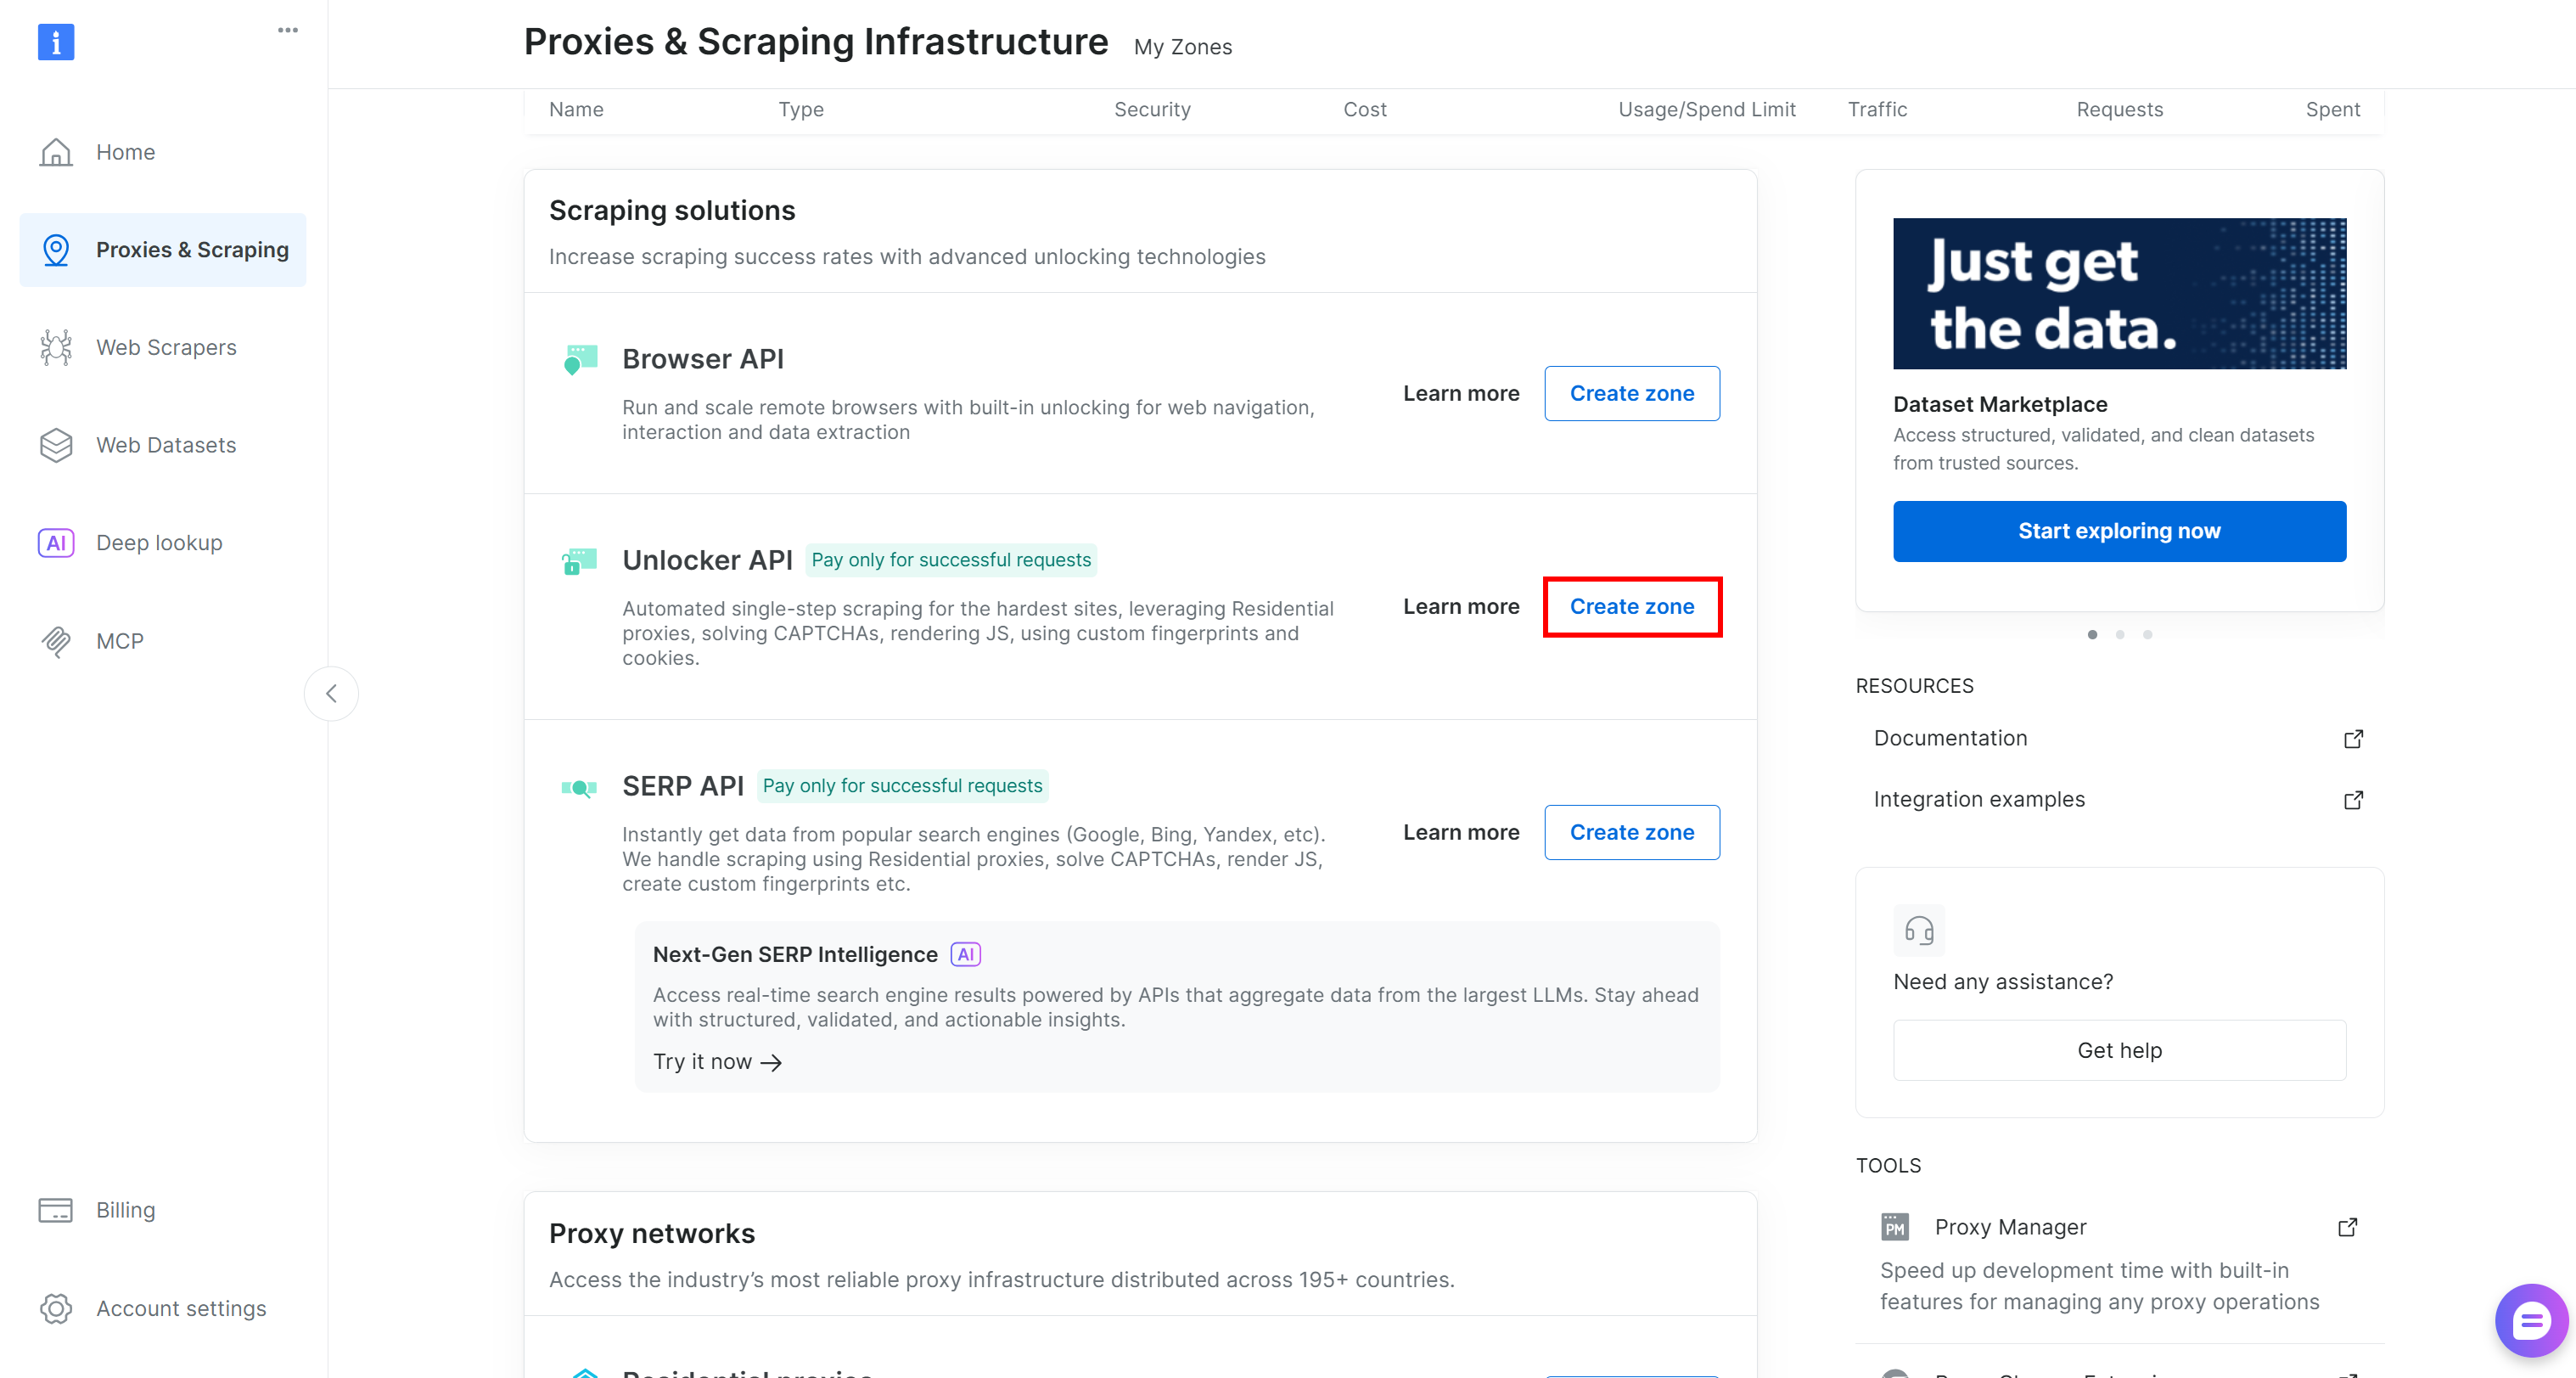
Choose a clear name for your zone and complete the setup wizard until the zone becomes active. Great!
Step #2: Complete the Setup
The Bright Data skills require these two environment variables to work:
BRIGHTDATA_API_KEY: Used to authenticate requests to Bright Data APIs.BRIGHTDATA_UNLOCKER_ZONE: Specifies your Web Unlocker API zone, enabling web scraping and search capabilities (as it can also act as a SERP API).
Set the required envs in your terminal as follows:
export BRIGHTDATA_API_KEY="<YOUR_BRIGHT_DATA_API_KEY>"
export BRIGHTDATA_UNLOCKER_ZONE="<YOUR_BRIGHT_DATA_WEB_UNLOCKER_API_ZONE_NAME>"
Replace the placeholders with your actual values. Once set, you are ready to use the Bright Data skills!
Step #3: Install the Bright Data Skills
To install the Bright Data skills in GitHub Copilot CLI, run the following command:
npx skills add brightdata/skills -a github-copilotThis command installs the skills package and starts the setup process, which will:
- Download the Bright Data skills from the official Agent Skills Directory.
- Configure them for use in GitHub Copilot CLI.
You will first see a screen where you can choose which skills to install:
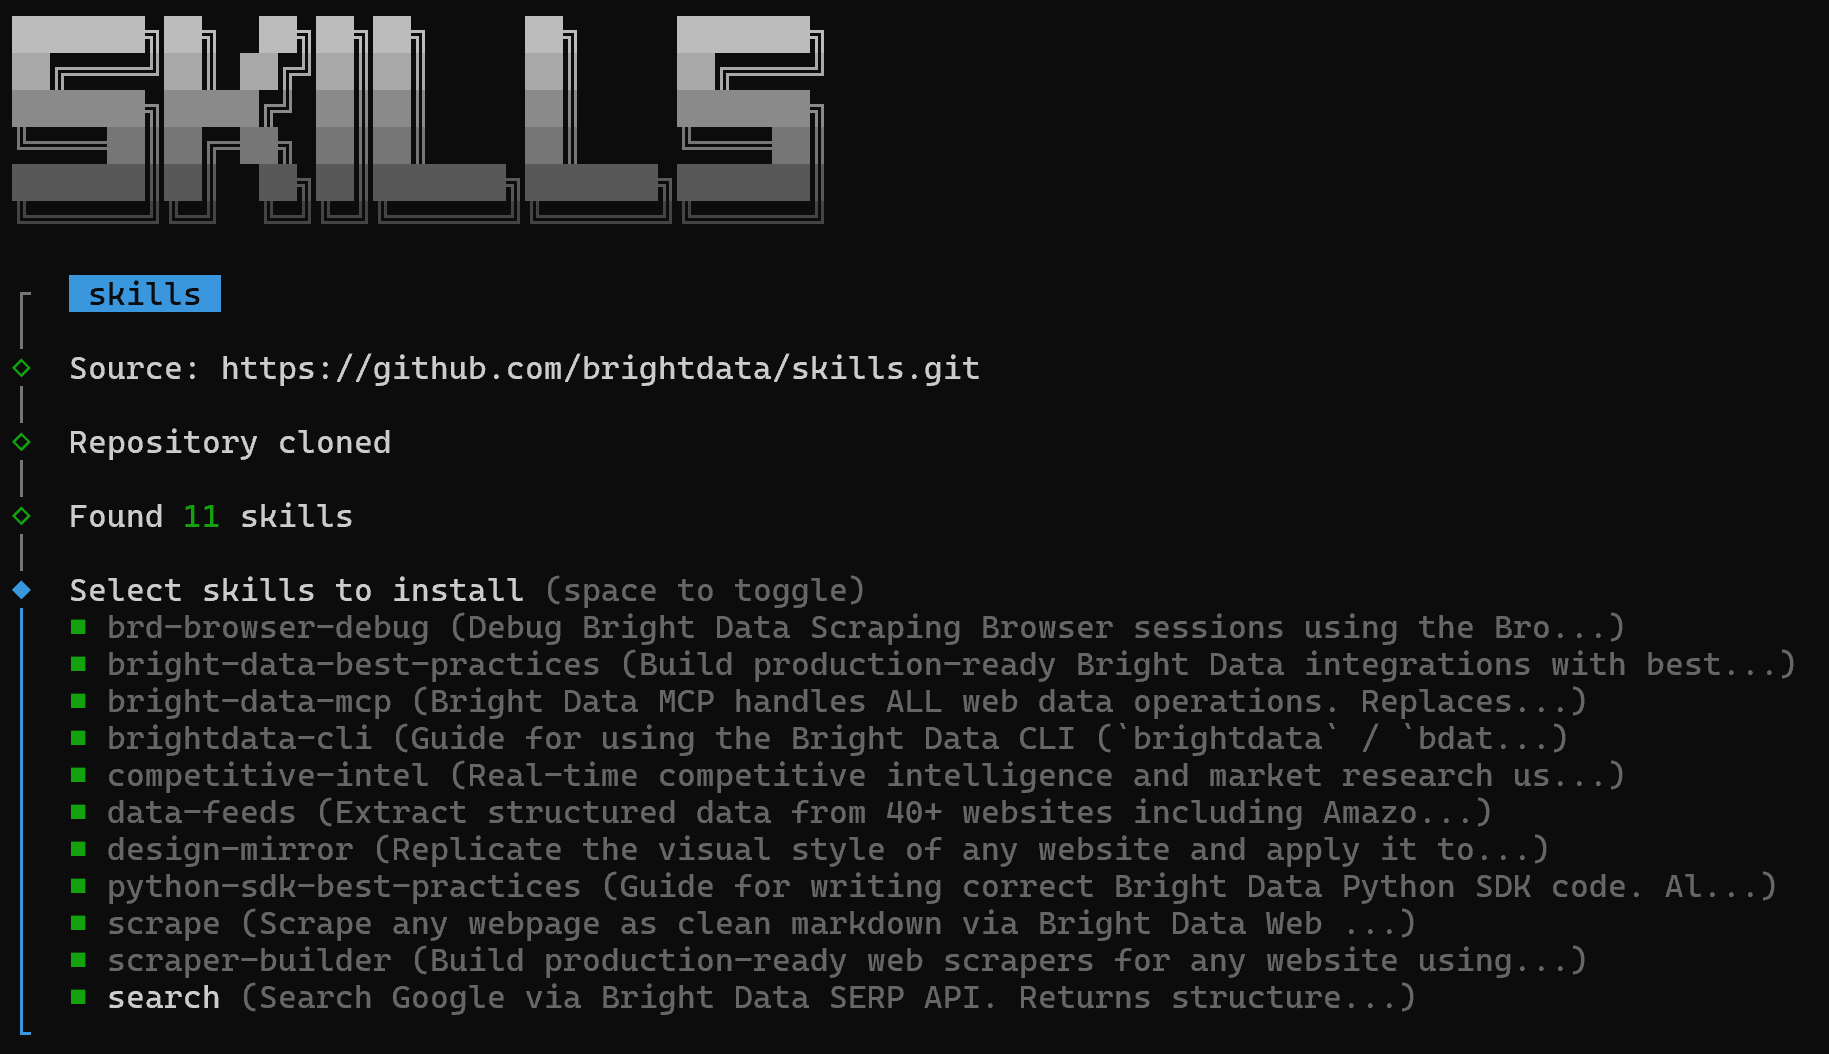
To install all of them, use the spacebar to select each skill, then press Enter.
Next, you will be prompted to select the installation scope. Since the Web MCP integration was configured globally, it makes sense to install the Bright Data skills globally as well. Thus, select the “Global” option:

You will then see the “Installation Summary” and “Security Risk Assessment” sections. Review both carefully and press Enter to confirm. Finally, you will receive a confirmation message like this:
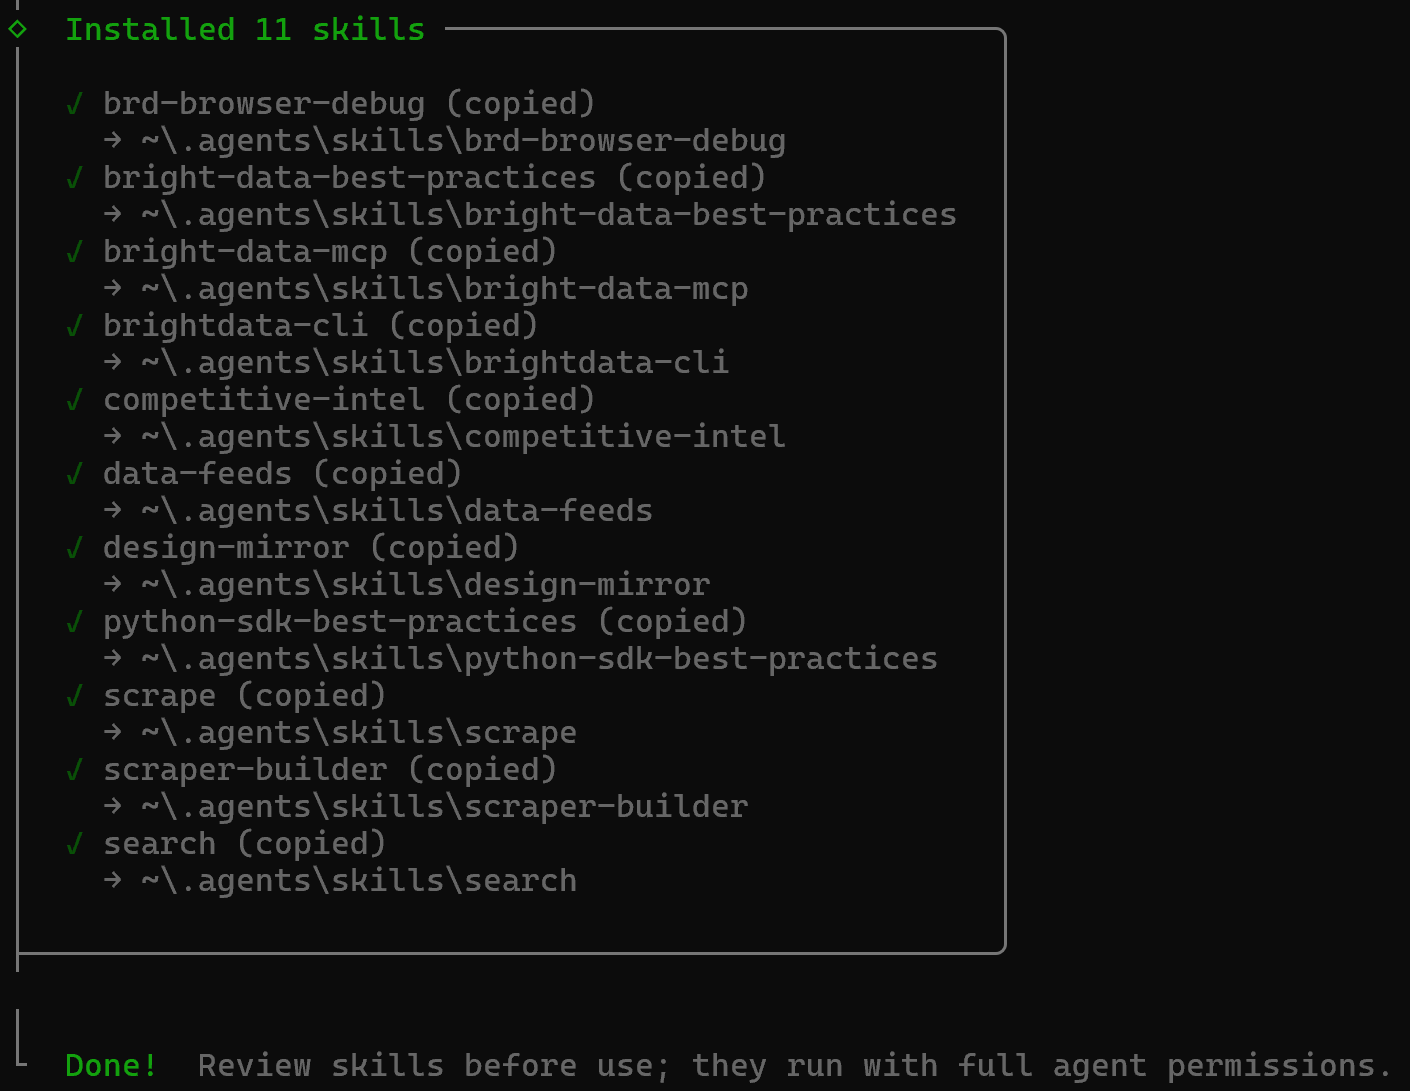
The Bright Data Skills will be copied into the ~/.agents/skills directory (or ~/.copilot/skills, or ~/.claude/skills).
Excellent! The Bright Data skills are now installed and available in Copilot CLI.
Step #4: Verify That the Skills Are Available
In your GitHub Copilot CLI session, reload all skills with:
/skills reloadThis is the result you should see:

Note that the total number of skills is 12 (11 Bright Data skills + the built-in customize-cloud-agent skill).
Next, list all available skills with:
/skills listThe output will look like this:
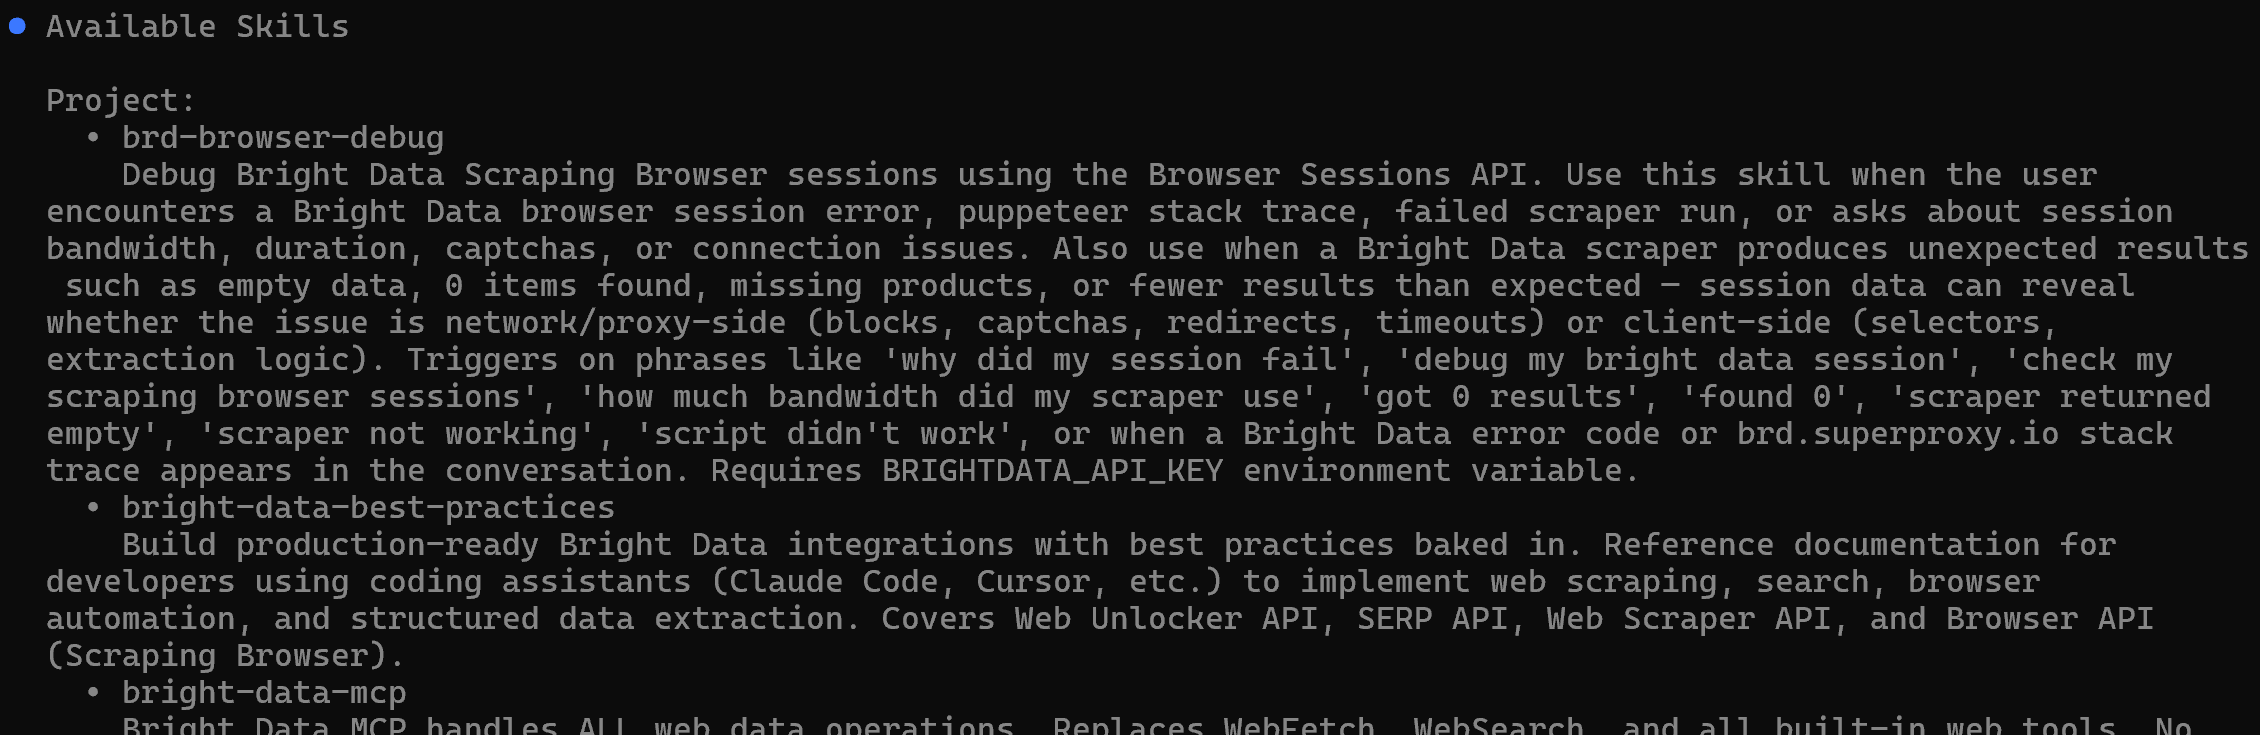
The listed skills match the Bright Data skill names, confirming they have been installed correctly.
Mission accomplished! In the next chapter, you will experience how to fully leverage the Bright Data Web MCP and Agent Skills setup in GitHub Copilot CLI.
GitHub Copilot CLI + Bright Data: Next-Level AI Coding Assistance
Now that you have integrated Bright Data into Copilot CLI via both MCP and skills, it is time to explore what this setup enables. We will walk through a practical, real-world example,though many other use cases are possible.
Imagine you want to learn how to get the most out of GitHub Copilot CLI (prompting techniques, best practices, etc.), along with resources on how to extend it (via agents, skills, and more). Instead of manually searching and reviewing dozens of sources, simply ask your coding assistant to generate a Markdown report with:
Search online for the best GitHub Copilot repositories and official GitHub Copilot CLI best practices. Scrape the top pages and generate a `.md` file containing the main instructions on how to get the most out of GitHub Copilot CLI, along with useful resources for extensions (agents, skills, etc.). Include contextual links discovered from the scraped pages.Clearly, a standard AI coding agent would struggle with this task, as it requires tools for web search, discovery, and scraping capabilities.
Run the prompt, and you will get something like this:

Below is what the GitHub Copilot CLI agent actually did:
- Called the
discovertool to run multiple queries and retrieve ranked, relevant pages for best practices and repositories (via Bright Data’s Web Discovery API). - Selected the most relevant URLs to prioritize authoritative, high-signal sources.
- Used
scrape_batch(powered by Web Unlocker API) to extract content from multiple pages efficiently in a single request. - Processed the scraped output locally to identify key sections without additional network calls.
- Applied targeted searches (e.g.,
grep) to isolate relevant best practices and refine which pages to analyze further. - Used the
scrape_as_markdowntool to convert selected pages into clean, structured Markdown. - Aggregated insights and contextual links into a structured dataset for documentation.
- Generated a final
.mdfile with best practices, resources, and links.
Note: Copilot CLI automatically selected the most appropriate Bright Data tools for each step. This is enabled by Bright Data skills, which guide the agent’s decision-making.
The generated output is the GITHUB_COPILOT_CLI_BEST_PRACTICES.md file below:
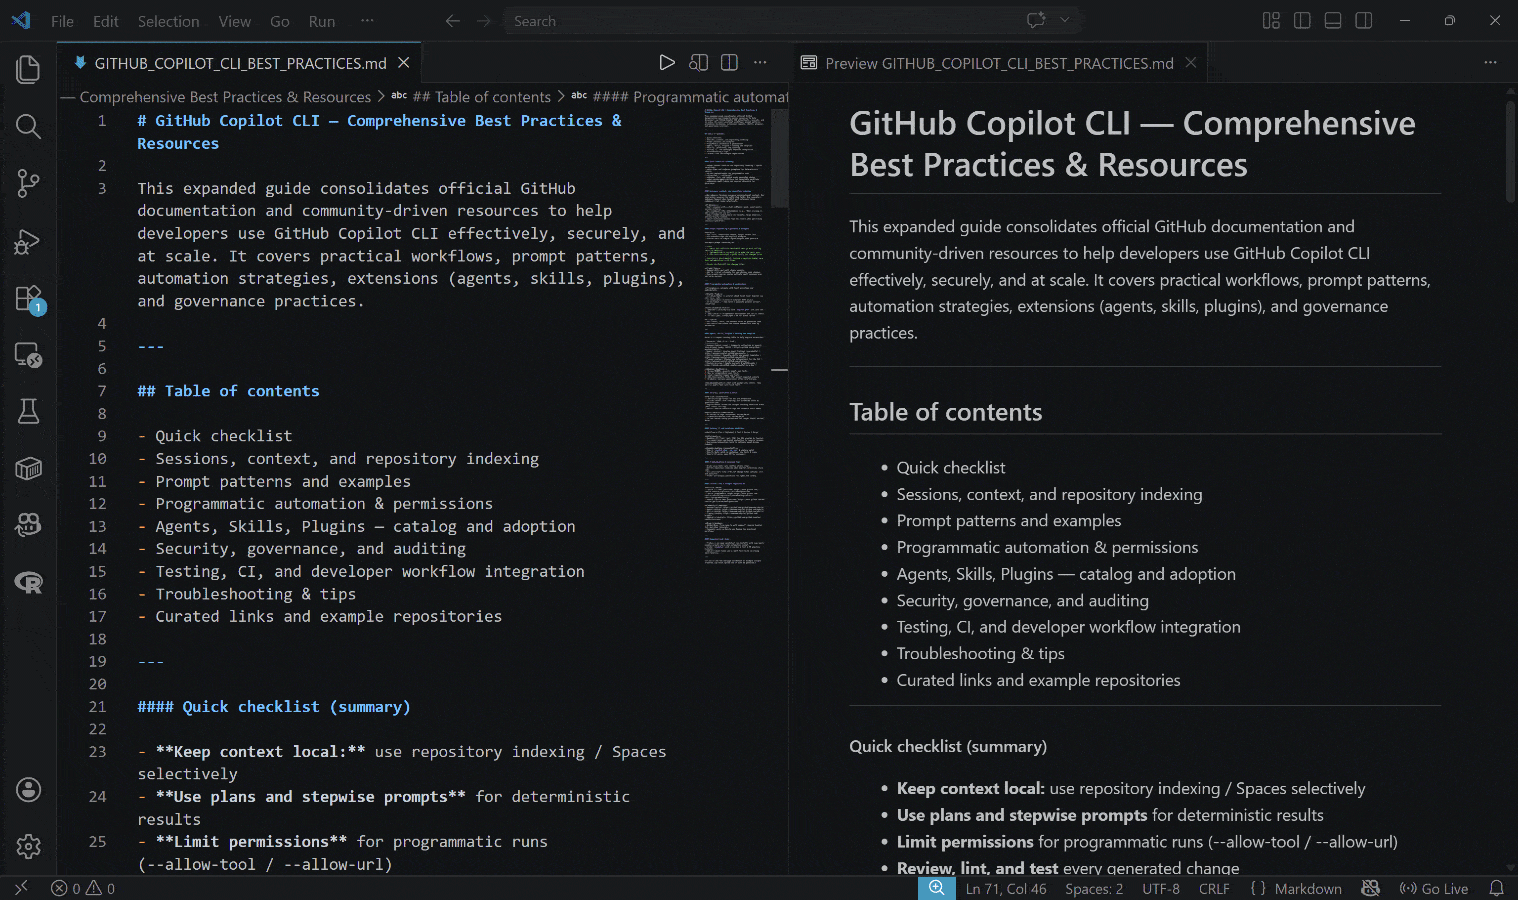
Notice how the result includes real, up-to-date, contextual information,backed by actual links and practical examples.
Et voilà! This simple example highlights the power of integrating Bright Data with GitHub Copilot CLI. Now you can experiment with other prompts, letting your coding agent actively interact with the web for more accurate results.
Conclusion
In this article, you understood what GitHub Copilot CLI is and what it brings to the table. Specifically, you saw why and how to extend it by connecting it to Bright Data via Web MCP and the official skills.
This integration takes the Copilot CLI coding experience to a whole new level. That is because the underlying AI coding agent gains powerful new capabilities such as web search, web discovery, structured data extraction, and automated web interactions.
For even more advanced workflows, take a look at the full range of AI-ready services in Bright Data’s ecosystem.
Create a Bright Data account for free today and get your hands on our web data tools!

Technical Writer
Antonello Zanini is a technical writer, editor, and software engineer with 5M+ views. Expert in technical content strategy, web development, and project management.


