

In this guide on fine-tuning GPT-OSS with web data, you’ll learn:
- What Unsloth is and why it speeds up fine-tuning
- How to collect quality training data using Bright Data’s scraping APIs
- How to set up your environment for efficient fine-tuning
- How to fine-tune GPT-OSS with a complete step-by-step tutorial
Let’s get started!
What Is Unsloth and Why Use It for Fine-Tuning?
Unsloth is a lightweight library that makes LLM fine-tuning significantly faster while being fully compatible with the Hugging Face ecosystem (Hub, transformers, PEFT, TRL). The library supports most NVIDIA GPUs, from GTX 1070 all the way up to H100s, and works seamlessly with the entire trainer suite from the TRL library.
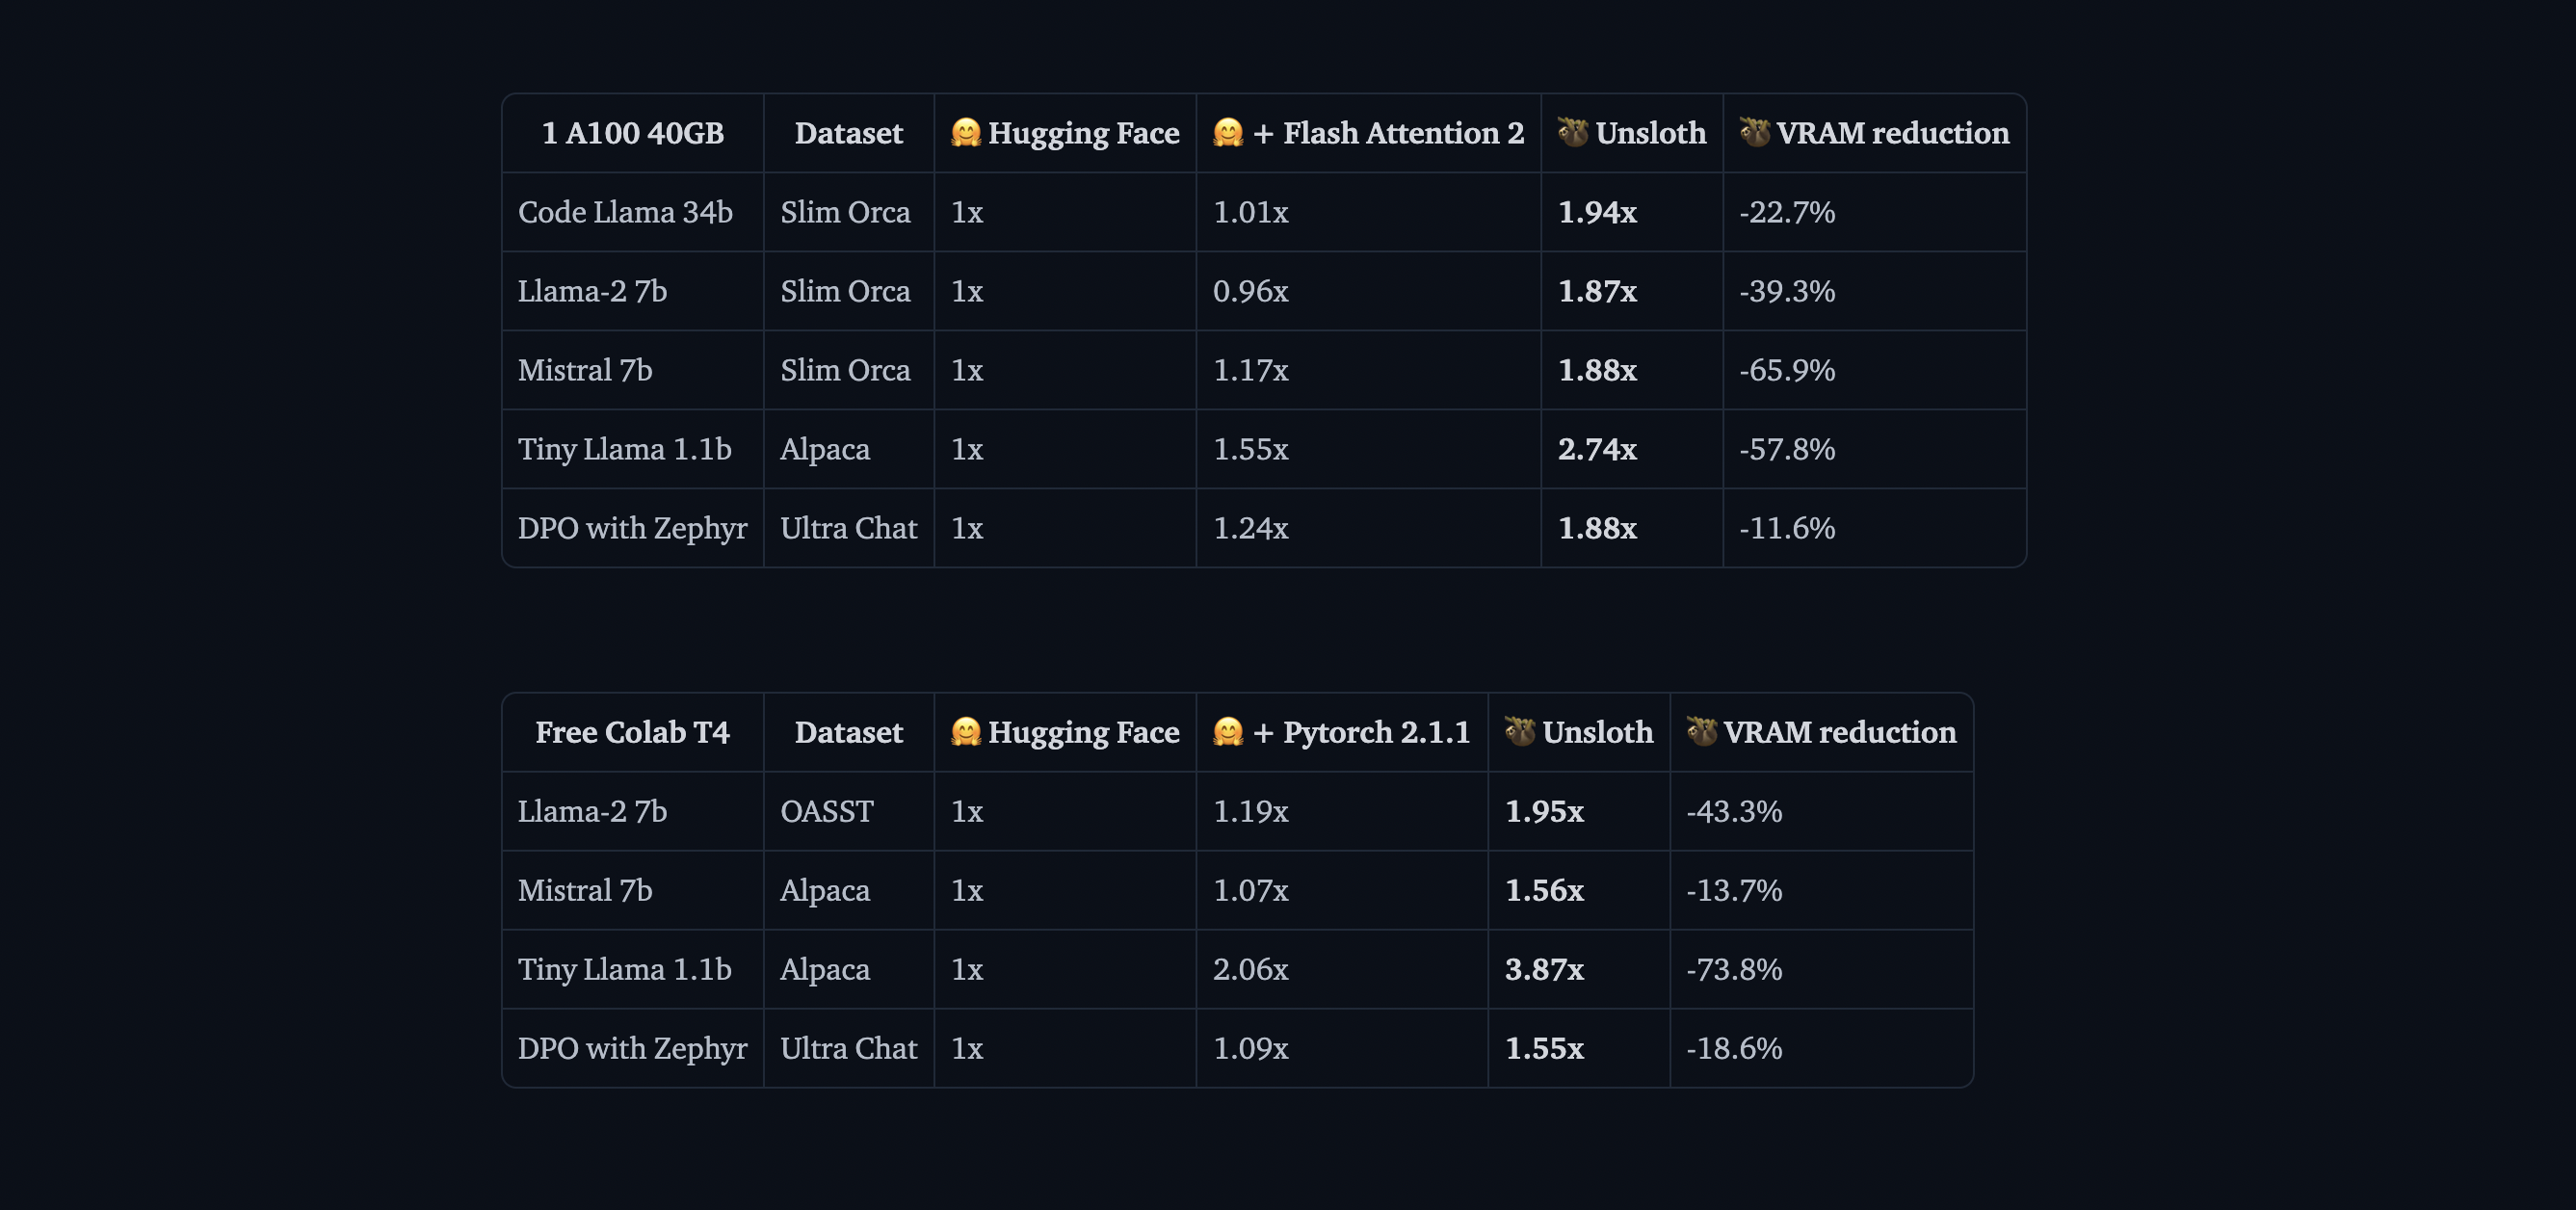
The performance improvements Unsloth delivers are impressive. In benchmarks, it achieves 2x faster training speeds compared to standard transformers implementations, while using 40% less memory. This means you can train larger models or use bigger batch sizes on the same hardware. Perhaps most importantly, it has 0% accuracy degradation, so you get all these benefits without sacrificing model quality.
Understanding GPT-OSS Models
OpenAI’s release of GPT-OSS marks a significant shift in their approach to AI development. For the first time, we have access to genuine GPT models without API limitations, usage-based billing, or rate limits.
GPT-OSS comes in two main variants:
- GPT-OSS-120B: This larger model matches GPT-4’s quality but requires at least 80GB of GPU memory
- GPT-OSS-20B: Comparable to GPT-3.5’s performance, this model runs efficiently on 16GB GPUs (perfect for our tutorial)
One unique feature that sets GPT-OSS apart from other open models is its reasoning effort control. You can adjust how deeply the model thinks through problems by setting the reasoning level to “low”, “medium”, or “high”. This lets you balance between speed and accuracy depending on your specific use case.
Why Quality Data Matters for Fine-Tuning
Fine-tuning is only as good as the data you feed it. We could have the most sophisticated training setup, but if our data is noisy, inconsistent, or poorly formatted, your model will learn those same problems. That’s why we will be using Bright Data’s Web Scraper APIs for clean, well formatted and accurate data.
Bright Data handles the complex parts of web scraping that often trip up custom solutions. It manages IP rotation to avoid rate limiting, solve CAPTCHAs automatically, handle dynamic JavaScript-rendered content, and maintain consistent data quality across millions of requests.
For our tutorial, we’ll use Bright Data’s API to collect Python documentation, which we’ll then transform into training data for our model.
Prerequisites and Environment Setup
Before we begin, let’s ensure you have everything needed for successful fine-tuning. We’ll use Google Colab because it provides free GPU access, but the same process works on any machine with at least 16GB of VRAM.
Hardware Requirements
For this tutorial, you’ll need:
- A GPU with at least 16GB VRAM (T4, V100, or better)
- 25GB of free disk space for model weights and checkpoints
- Stable internet connection for downloading models and dependencies
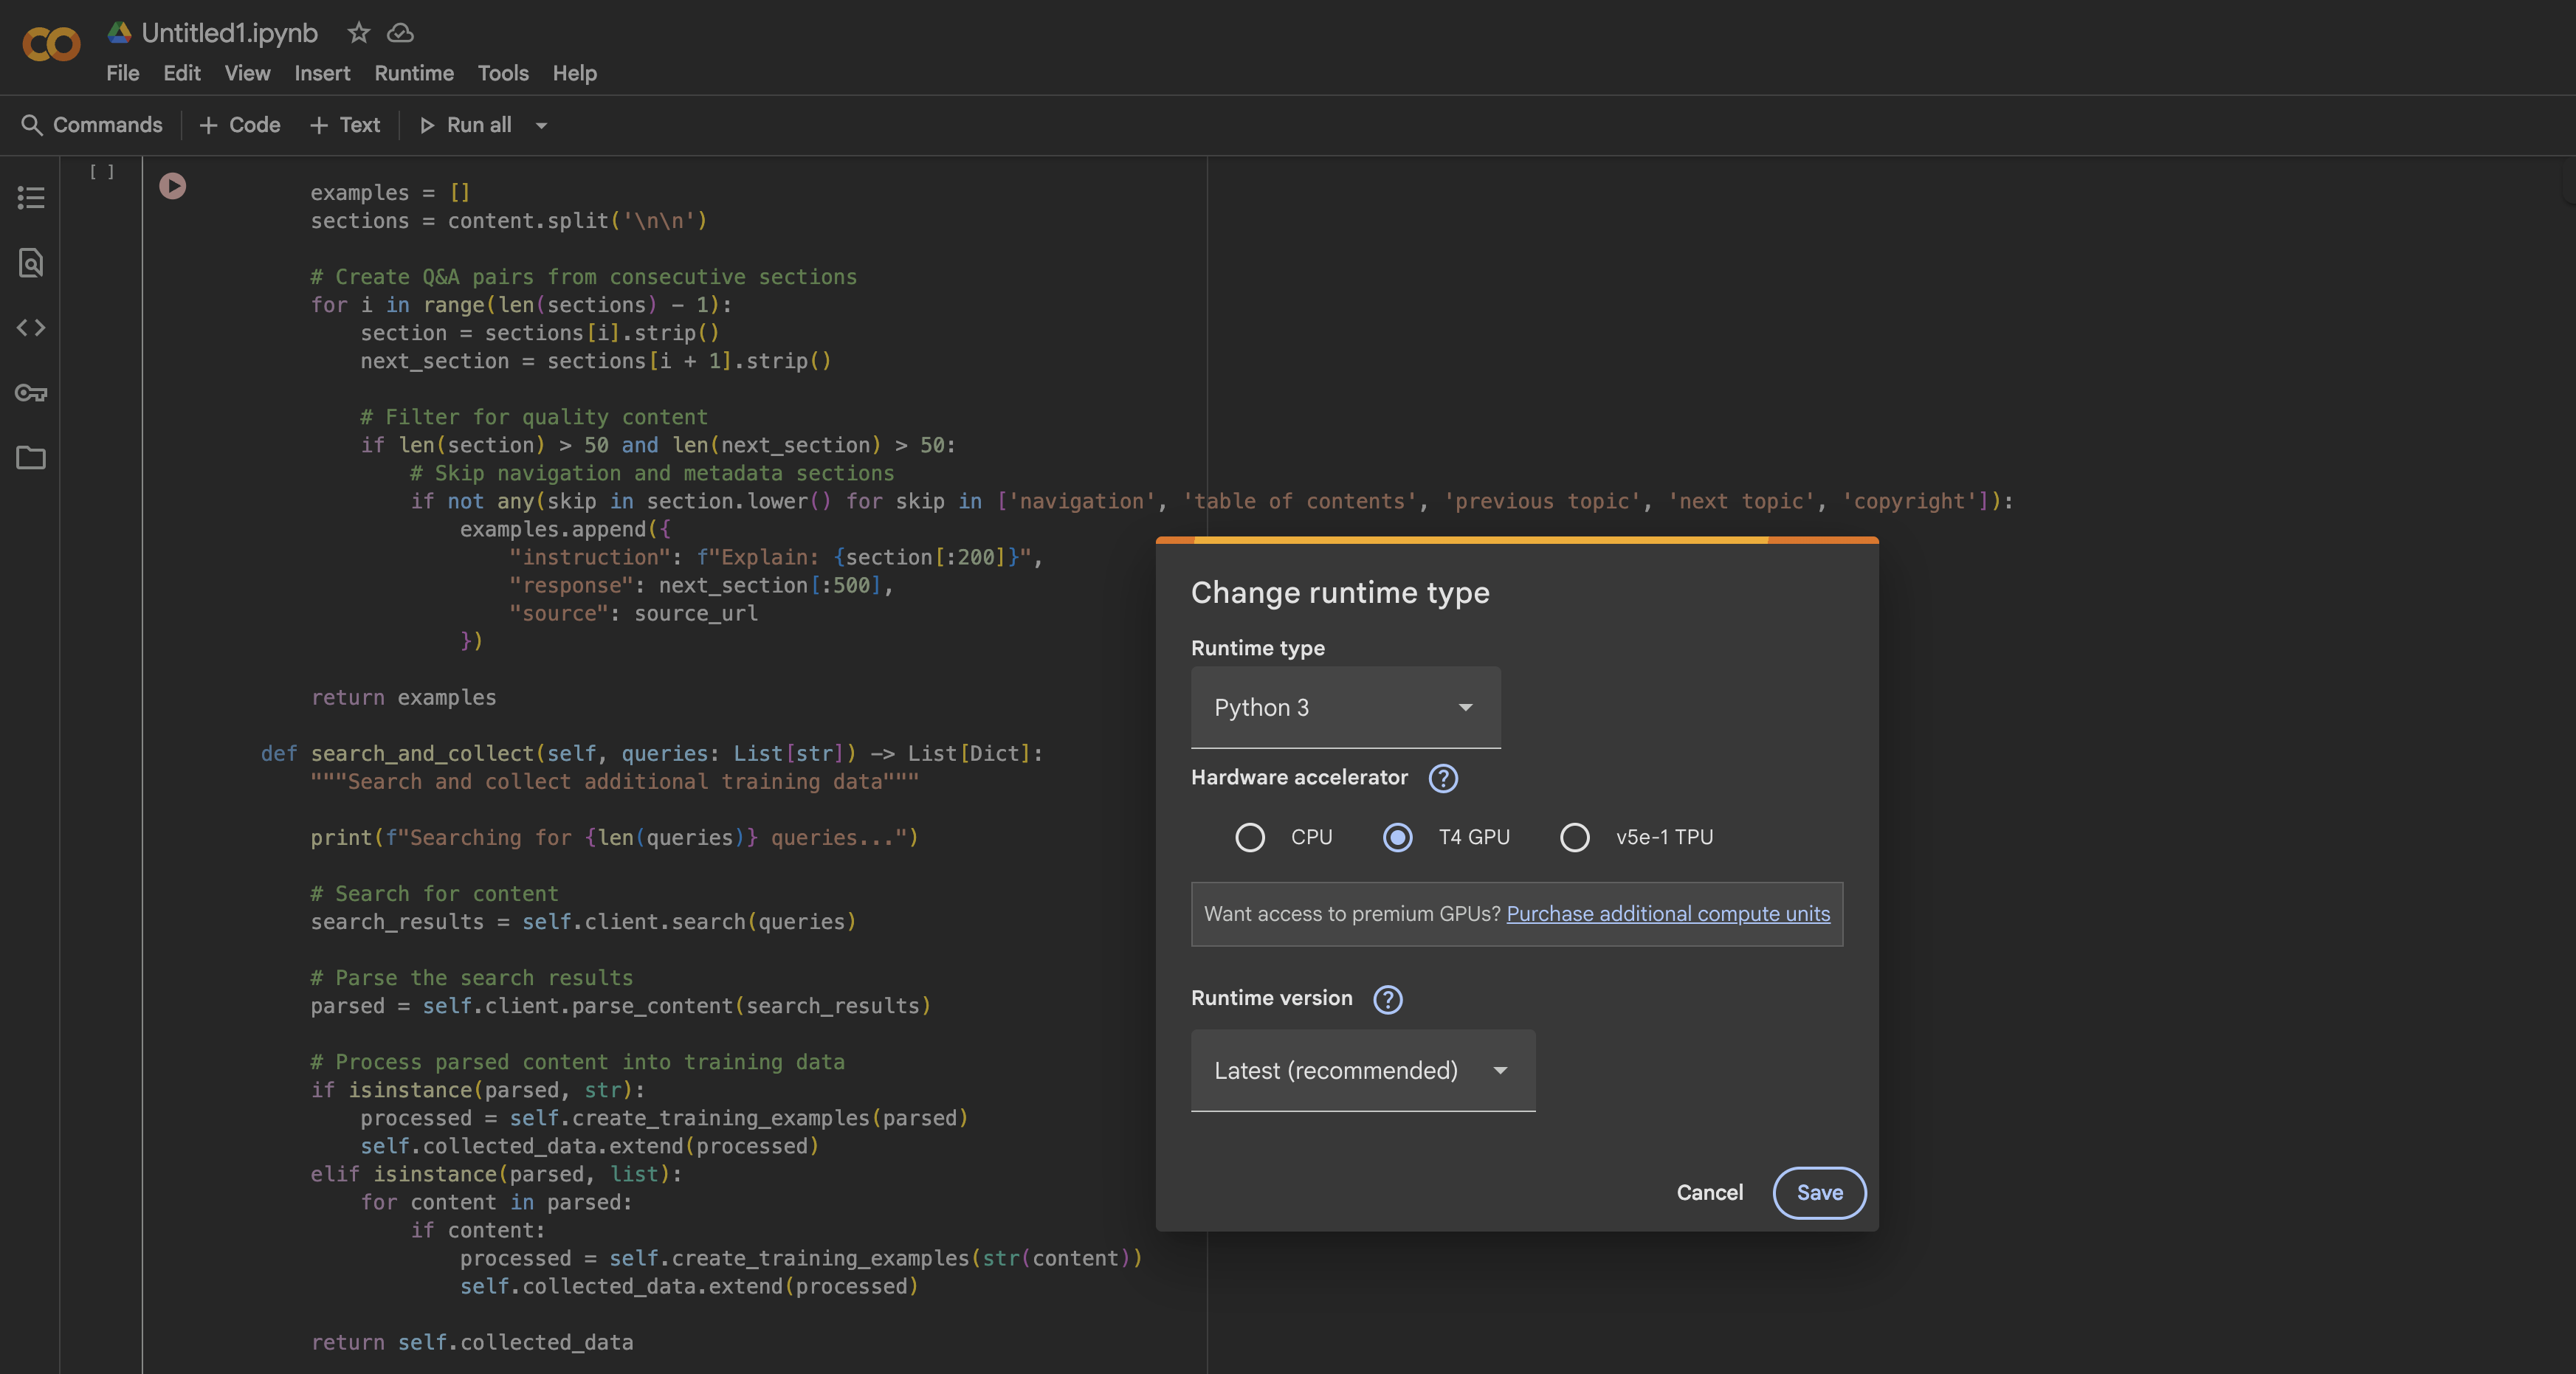
In Google Colab, you can access a T4 GPU for free by:
- Opening a new notebook
- Going to Runtime → Change runtime type
- Selecting GPU as your hardware accelerator
- Clicking Save to apply the changes
Installing Unsloth and Dependencies
Once your GPU runtime is ready, we’ll install Unsloth and all necessary dependencies. The installation process is optimized to avoid conflicts between different package versions:
%%capture
# Install Unsloth and core dependencies
!pip install --upgrade -qqq uv
try: import numpy; get_numpy = f"numpy=={numpy.__version__}"
except: get_numpy = "numpy"
!uv pip install -qqq \
    "torch>=2.8.0" "triton>=3.4.0" {get_numpy} torchvision bitsandbytes "transformers>=4.55.3" \
    "unsloth_zoo[base] @ git+https://github.com/unslothai/unsloth-zoo" \
    "unsloth[base] @ git+https://github.com/unslothai/unsloth" \
    git+https://github.com/triton-lang/triton.git@05b2c186c1b6c9a08375389d5efe9cb4c401c075#subdirectory=python/triton_kernels
!uv pip install --upgrade --no-deps transformers==4.56.2 tokenizers
!uv pip install --no-deps trl==0.22.2
!pip install -q brightdata-sdk
This installation script handles several important details. First, it uses uv for faster package resolution. It also pins specific versions to avoid compatibility issues, installs Unsloth’s custom Triton kernels for optimal performance, and includes the Bright Data SDK for our data collection step.
Verifying Your GPU Setup
After installation, let’s verify that your GPU is properly detected and has sufficient memory:
import torch

# Get GPU information
gpu_stats = torch.cuda.get_device_properties(0)
max_memory = round(gpu_stats.total_memory / 1024 / 1024 / 1024, 3)

print(f"GPU = {gpu_stats.name}")
print(f"Max memory = {max_memory} GB")
print(f"CUDA version = {torch.version.cuda}")
print(f"PyTorch version = {torch.__version__}")

# Verify minimum requirements
if max_memory < 15:
    print("⚠️ Warning: Your GPU might not have enough memory for GPT-OSS-20B")
else:
    print("✅ Your GPU has sufficient memory for fine-tuning")
You should see at least 15GB of available GPU memory. The T4 GPU in free Colab provides 16GB, which is perfect for our needs with Unsloth’s optimizations.
Loading GPT-OSS with Unsloth
Now we’ll load the GPT-OSS model using Unsloth’s optimized loader. The process is remarkably straightforward compared to standard transformers, as Unsloth handles all the optimization details automatically.
Loading the Base Model
from unsloth import FastLanguageModel
import torch

# Configuration
max_seq_length = 1024  # Adjust based on your data
dtype = None  # Auto-detect best dtype for your GPU

# Unsloth provides pre-quantized models for faster loading
fourbit_models = [
    "unsloth/gpt-oss-20b-unsloth-bnb-4bit",  # BitsAndBytes 4bit
    "unsloth/gpt-oss-120b-unsloth-bnb-4bit",
    "unsloth/gpt-oss-20b",  # MXFP4 format
    "unsloth/gpt-oss-120b",
]

# Load the model
model, tokenizer = FastLanguageModel.from_pretrained(
    model_name = "unsloth/gpt-oss-20b",
    dtype = dtype,
    max_seq_length = max_seq_length,
    load_in_4bit = True,  # Essential for fitting in 16GB
    full_finetuning = False,  # Use LoRA for efficiency
)

print(f"✅ Model loaded successfully!")
print(f"Model size: {model.num_parameters():,} parameters")
print(f"Using device: {model.device}")
The FastLanguageModel.from_pretrained() method does several things behind the scenes. It automatically detects your GPU capabilities and optimizes accordingly, applies 4-bit quantization to reduce memory usage by 75%, sets up the model for LoRA training instead of full fine-tuning, and configures memory-efficient attention mechanisms.
Configuring LoRA Adapters
LoRA (Low-Rank Adaptation) is what makes fine-tuning feasible on consumer hardware. Instead of updating all model parameters, we only train small adapter matrices that get inserted into key layers:
model = FastLanguageModel.get_peft_model(
    model,
    r = 8,  # LoRA rank - higher = more capacity but slower
    target_modules = ["q_proj", "k_proj", "v_proj", "o_proj",
                      "gate_proj", "up_proj", "down_proj"],
    lora_alpha = 16,  # LoRA scaling factor
    lora_dropout = 0,  # Dropout disabled for faster training
    bias = "none",  # Don't train bias terms
    use_gradient_checkpointing = "unsloth",  # Critical for memory savings
    random_state = 3407,
    use_rslora = False,  # Standard LoRA works best for most cases
    loftq_config = None,
)

# Display training statistics
trainable_params = sum(p.numel() for p in model.parameters() if p.requires_grad)
all_params = sum(p.numel() for p in model.parameters())
trainable_percent = 100 * trainable_params / all_params

print(f"Training {trainable_params:,} parameters out of {all_params:,}")
print(f"That's only {trainable_percent:.2f}% of all parameters!")
print(f"Memory saved: ~{(1 - trainable_percent/100) * 40:.1f}GB")
This configuration strikes a balance between training efficiency and model capacity. With r=8, we’re training less than 1% of the total parameters while still achieving excellent fine-tuning results. The gradient checkpointing alone saves about 30% memory, which can be the difference between fitting your model in memory or getting OOM(Out of Memory) errors.
Testing GPT-OSS Reasoning Effort Control
Before we start fine-tuning, let’s explore GPT-OSS’s unique reasoning effort feature. This allows you to control how much “thinking” the model does before responding:
from transformers import TextStreamer

# Test problem requiring mathematical reasoning
messages = [
    {"role": "user", "content": "Solve x^5 + 3x^4 - 10 = 3. Explain your approach."},
]

# Test with LOW reasoning effort
print("="*60)
print("LOW REASONING (Fast but less thorough)")
print("="*60)

inputs = tokenizer.apply_chat_template(
    messages,
    add_generation_prompt = True,
    return_tensors = "pt",
    return_dict = True,
    reasoning_effort = "low",
).to("cuda")

text_streamer = TextStreamer(tokenizer, skip_prompt=True, skip_special_tokens=True)
_ = model.generate(**inputs, max_new_tokens = 128, streamer = text_streamer)

# Test with HIGH reasoning effort
print("\n" + "="*60)
print("HIGH REASONING (Slower but more accurate)")
print("="*60)

inputs = tokenizer.apply_chat_template(
    messages,
    add_generation_prompt = True,
    return_tensors = "pt",
    return_dict = True,
    reasoning_effort = "high",
).to("cuda")

_ = model.generate(**inputs, max_new_tokens = 512, streamer = text_streamer)
When we run this code, we will see that with “low” reasoning, the model gives a quick approximate answer, while “high” reasoning produces a more detailed solution with step-by-step working. This feature is invaluable for balancing speed and accuracy in production deployments.
Collecting Training Data with Bright Data
Now we’ll collect high-quality training data using Bright Data’s Web Scraper API. This approach is much more reliable than building your own scraper, as Bright Data handles all the complex infrastructure needed for large-scale web scraping.
Setting Up the Data Collector
from brightdata import bdclient
from typing import List, Dict
import re
import json

class DataCollector:
    def __init__(self, api_token: str):
        """
        Initialize Bright Data client for web scraping.

        Args:
            api_token: Your Bright Data API token
        """
        self.client = bdclient(api_token=api_token)
        self.collected_data = []
        print("✅ Bright Data client initialized")

    def collect_documentation(self, urls: List[str]) -> List[Dict]:
        """
        Scrape documentation pages and convert to training data.

        This method handles both batch and individual URL scraping,
        automatically falling back to individual requests if batch fails.
        """
        print(f"Starting to scrape {len(urls)} URLs...")

        try:
            # Attempt batch scraping for efficiency
            results = self.client.scrape(urls, data_format="markdown")

            if isinstance(results, str):
                # Single result returned
                print("Processing single result...")
                training_data = self.process_single_result(results)

            elif isinstance(results, list):
                # Multiple results returned
                print(f"Processing {len(results)} results...")
                training_data = []
                for i, content in enumerate(results, 1):
                    if content:
                        print(f"  Processing result {i}/{len(results)}")
                        examples = self.process_single_result(content)
                        training_data.extend(examples)
            else:
                print(f"Unexpected result type: {type(results)}")
                training_data = []

        except Exception as e:
            print(f"Batch scraping failed: {e}")
            print("Falling back to individual URL scraping...")

            # Fallback: scrape URLs one by one
            training_data = []
            for url in urls:
                try:
                    print(f"  Scraping: {url}")
                    content = self.client.scrape(url, data_format="markdown")
                    if content:
                        examples = self.process_single_result(content)
                        training_data.extend(examples)
                        print(f"    ✓ Extracted {len(examples)} examples")
                except Exception as url_error:
                    print(f"    ✗ Failed: {url_error}")

        self.collected_data = training_data
        print(f"\n✅ Collection complete: {len(self.collected_data)} training examples")
        return self.collected_data
What this code does:
- Intelligent Fallback Strategy: The collector tries batch scraping first for efficiency. If that fails (due to network issues or API limits), it automatically falls back to individual URL scraping.
- Progress Tracking: Real-time updates show us exactly what’s happening during the scraping process, making debugging easier.
- Error Resilience: Each URL is wrapped in its own try-catch block, so one failed URL won’t stop the entire collection process.
- Markdown Format: We request data in Markdown format because it’s cleaner than HTML and easier to process into training data.
The Bright Data client handles several complex tasks for us:
- Rotating IP addresses to avoid rate limiting
- Solving CAPTCHAs automatically
- Rendering JavaScript-heavy pages
- Retrying failed requests with exponential backoff
Processing Scraped Content into Training Data
The key to good fine-tuning is clean, well-formatted data. Here’s how we process raw scraped content into question-answer pairs:
    def process_single_result(self, content: str) -> List[Dict]:
        """
        Process scraped content into clean Q&A training pairs.

        This method performs aggressive cleaning to remove all
        formatting artifacts and create natural-sounding examples.
        """
        examples = []

        # Step 1: Remove all HTML and Markdown formatting
        content = re.sub(r'<[^>]+>', '', content)  # HTML tags
        content = re.sub(r'!\[.*?\]\(.*?\)', '', content)  # Images
        content = re.sub(r'\[([^\]]+)\]\([^\)]+\)', r'\1', content)  # Links
        content = re.sub(r'```[^`]*```', '', content)  # Code blocks
        content = re.sub(r'`[^`]+`', '', content)  # Inline code
        content = re.sub(r'[#*_~>`|-]+', ' ', content)  # Markdown symbols
        content = re.sub(r'\\(.)', r'\1', content)  # Escape sequences
        content = re.sub(r'https?://[^\s]+', '', content)  # URLs
        content = re.sub(r'\S+\.\w+', '', content)  # File paths
        content = re.sub(r'\s+', ' ', content)  # Normalize whitespace

        # Step 2: Split into sentences
        sentences = re.split(r'(?<=[.!?])\s+', content)

        # Step 3: Filter out navigation and boilerplate content
        clean_sentences = []
        skip_patterns = ['navigation', 'copyright', 'index',
                        'table of contents', 'previous', 'next',
                        'click here', 'download', 'share']

        for sent in sentences:
            sent = sent.strip()
            # Keep only substantial sentences
            if (len(sent) > 30 and
                not any(skip in sent.lower() for skip in skip_patterns)):
                clean_sentences.append(sent)

        # Step 4: Create Q&A pairs from consecutive sentences
        for i in range(0, len(clean_sentences) - 1):
            instruction = clean_sentences[i][:200].strip()
            response = clean_sentences[i + 1][:300].strip()

            # Ensure both parts are substantial
            if len(instruction) > 20 and len(response) > 30:
                examples.append({
                    "instruction": instruction,
                    "response": response
                })

        return examples
How the processing works:
The process_single_result method transforms raw web content into clean training data through four critical steps:
- Step 1 – Aggressive Cleaning: We remove all formatting artifacts that could confuse the model:
- HTML tags that might have survived the Markdown conversion
- Image references and links that add no value to text understanding
- Code blocks and inline code (we want prose, not code samples)
- Special characters and escape sequences that create noise
- Step 2 – Sentence Segmentation: We split the content into individual sentences using punctuation markers. This gives us logical units of text to work with.
- Step 3 – Quality Filtering: We remove:
- Short sentences (under 30 characters) that lack substance
- Navigation elements like “click here” or “next page”
- Boilerplate content like copyright notices
- Any sentence containing common web navigation patterns
- Step 4 – Pair Creation: We create training pairs by treating consecutive sentences as question-answer pairs. This works because documentation often follows a pattern of stating a concept then explaining it.
The result is clean, contextual training data that teaches the model natural flow and response patterns.
Collecting and Validating the Data
Now let’s put it all together and collect our training data:
# Initialize the collector with your API token
# Get your token from: /cp/api_tokens
BRIGHTDATA_API_TOKEN = "your_brightdata_api_token_here"

collector = DataCollector(api_token=BRIGHTDATA_API_TOKEN)

# URLs to scrape - Python documentation makes excellent training data
urls = [
    "https://docs.python.org/3/tutorial/introduction.html",
    "https://docs.python.org/3/tutorial/controlflow.html",
    "https://docs.python.org/3/tutorial/datastructures.html",
    "https://docs.python.org/3/tutorial/modules.html",
    "https://docs.python.org/3/tutorial/classes.html",
]

print("="*60)
print("STARTING DATA COLLECTION")
print("="*60)

training_data = collector.collect_documentation(urls)

# Validate that we got data
if len(training_data) == 0:
    print("⚠️ ERROR: No training data collected!")
    print("\nTroubleshooting steps:")
    print("1. Verify your Bright Data API token is correct")
    print("2. Check that your account has sufficient credits")
    print("3. Try with a single URL first to test connectivity")
    raise ValueError("No training data collected")
Understanding the data collection setup:
- API Token: You’ll need to sign up for a Bright Data account to get your API token. It offers a free trial with credits to get you started.
- URL Selection: We’re using Python documentation because:
- It’s well-structured and consistent
- It contains technical content perfect for training a coding assistant
- The explanatory style translates well to Q&A format
- It’s publicly available and ethically sourced
- Error Handling: The validation check ensures you don’t proceed with an empty dataset, which would cause training to fail later. The troubleshooting steps help diagnose common issues.
Final Data Validation and Cleaning
Before using the data for training, we perform one final cleanup pass:
# Final validation and cleaning
def final_validation(examples: List[Dict]) -> List[Dict]:
    """
    Perform final validation and deduplication of training examples.
    """
    clean_data = []
    seen_instructions = set()

    for ex in examples:
        instruction = ex.get('instruction', '').strip()
        response = ex.get('response', '').strip()

        # Final cleaning pass
        instruction = re.sub(r'[^a-zA-Z0-9\s\.\,\?\!]', '', instruction)
        response = re.sub(r'[^a-zA-Z0-9\s\.\,\?\!]', '', response)

        # Remove duplicates and ensure quality
        if (len(instruction) > 10 and
            len(response) > 20 and
            instruction not in seen_instructions):

            seen_instructions.add(instruction)
            clean_data.append({
                "instruction": instruction,
                "response": response
            })

    return clean_data

training_data = final_validation(training_data)

print(f"\n✅ Final dataset: {len(training_data)} unique examples")
print("\nSample training examples:")
print("="*60)

for i, example in enumerate(training_data[:3], 1):
    print(f"\nExample {i}:")
    print(f"Q: {example['instruction']}")
    print(f"A: {example['response']}")
What the validation accomplishes:
- Deduplication: The
seen_instructionsset ensures we don’t have duplicate questions, which could lead to overfitting during training. - Final Character Cleaning: We remove any remaining special characters except basic punctuation, ensuring the text is clean and consistent.
- Length Validation: We enforce minimum lengths to ensure examples have substance:
- Instructions must be at least 10 characters
- Responses must be at least 20 characters
- Quality Assurance: By printing sample examples, you can visually verify the data quality before proceeding with training.
The final output should show clean, readable Q&A pairs that make sense as training data. If the examples look nonsensical or poorly formatted, you may need to adjust the processing parameters or choose different source URLs.
Pro tip: For production use cases, consider using Bright Data’s marketplace for pre-collected datasets. It offers curated datasets for various domains that can save you significant time and ensure consistent quality.
Formatting Data for GPT-OSS Training
GPT-OSS expects data in a specific chat format. We’ll use Unsloth’s utilities to ensure our data is properly formatted for optimal training results:
from unsloth.chat_templates import standardize_sharegpt
from datasets import Dataset

def prepare_dataset(raw_data: List[Dict]):
    """
    Convert raw Q&A pairs to properly formatted training dataset.

    This function handles:
    1. Converting to message format
    2. Applying GPT-OSS chat template
    3. Fixing any formatting issues
    """

    print("Preparing dataset for training...")

    # Step 1: Convert to chat message format
    formatted_data = []
    for item in raw_data:
        formatted_data.append({
            "messages": [
                {"role": "user", "content": item["instruction"]},
                {"role": "assistant", "content": item["response"]}
            ]
        })

    # Step 2: Create HuggingFace dataset
    dataset = Dataset.from_list(formatted_data)
    print(f"Created dataset with {len(dataset)} examples")

    # Step 3: Standardize to ShareGPT format
    dataset = standardize_sharegpt(dataset)
What’s happening in this first part:
- Message Format Conversion: We transform our simple Q&A pairs into a conversation format that GPT models expect. Each training example becomes a two-turn conversation with a user question and assistant response.
- Dataset Creation: HuggingFace’s Dataset class provides efficient data handling, including:
- Memory-mapped access for large datasets
- Built-in batching and shuffling
- Compatibility with the entire HuggingFace ecosystem
- ShareGPT Standardization: The
standardize_sharegptfunction ensures our data matches the ShareGPT format, which has become the de facto standard for chat model training. This handles edge cases and ensures consistency.
Applying the Chat Template
Now we apply GPT-OSS’s specific formatting requirements:
    # Step 4: Apply GPT-OSS specific chat template
    def formatting_prompts_func(examples):
        """Apply the GPT-OSS chat template to each example."""
        convos = examples["messages"]
        texts = []

        for convo in convos:
            # Apply template without generation prompt (we're training)
            text = tokenizer.apply_chat_template(
                convo,
                tokenize = False,
                add_generation_prompt = False
            )
            texts.append(text)

        return {"text": texts}

    dataset = dataset.map(
        formatting_prompts_func,
        batched = True,
        desc = "Applying chat template"
    )
Understanding the template application:
- Chat Template Purpose: Each model family has its own special tokens and formatting. GPT-OSS uses tags like
<|start|>,<|message|>, and<|channel|>to delineate different parts of the conversation. - No Generation Prompt: We set
add_generation_prompt = Falsebecause we’re training, not generating. During training, we want the model to see complete conversations, not prompts waiting for completion. - Batched Processing: The
batched = Trueparameter processes multiple examples at once, significantly speeding up the formatting process for large datasets. - Text Output: We keep the output as text (not tokenized) at this stage because the trainer will handle tokenization with its own settings.
Verifying and Fixing Format Issues
GPT-OSS has a specific requirement for the channel tag that we need to verify:
    # Step 5: Verify and fix channel tag if needed
    sample_text = dataset[0]['text']
    print("\nChecking format...")
    print(f"Sample (first 200 chars): {sample_text[:200]}")

    if "<|channel|>" not in sample_text:
        print("⚠️ Missing channel tag, fixing format...")

        def fix_formatting(examples):
            """Add the channel tag for GPT-OSS compatibility."""
            fixed_texts = []
            for text in examples["text"]:
                # GPT-OSS expects channel tag between role and message
                text = text.replace(
                    "<|start|>assistant<|message|>",
                    "<|start|>assistant<|channel|>final<|message|>"
                )
                fixed_texts.append(text)
            return {"text": fixed_texts}

        dataset = dataset.map(
            fix_formatting,
            batched = True,
            desc = "Adding channel tags"
        )
        print("✅ Format fixed")

    print(f"\n✅ Dataset ready: {len(dataset)} formatted examples")
    return dataset

# Prepare the dataset
dataset = prepare_dataset(training_data)
Why the channel tag matters:
- Channel Tag Function: The
<|channel|>finaltag tells GPT-OSS that this is the final response, not an intermediate reasoning step. This is part of GPT-OSS’s unique reasoning effort control system. - Format Verification: We check if the tag exists and add it if missing. This prevents training failures due to format mismatches.
- Automatic Fixing: The replacement operation ensures compatibility without requiring manual intervention. This is especially important when using different tokenizer versions that might have different default behaviors.
Dataset Statistics and Validation
Finally, let’s verify our prepared dataset:
# Display statistics
print("\nDataset Statistics:")
print(f"Number of examples: {len(dataset)}")
print(f"Average text length: {sum(len(x['text']) for x in dataset) / len(dataset):.0f} chars")

# Show a complete formatted example
print("\nFormatted example:")
print("="*60)
print(dataset[0]['text'][:500])
print("="*60)

# Verify all examples have the correct format
format_checks = {
    "has_user_tag": all("<|start|>user" in ex['text'] for ex in dataset),
    "has_assistant_tag": all("<|start|>assistant" in ex['text'] for ex in dataset),
    "has_channel_tag": all("<|channel|>" in ex['text'] for ex in dataset),
    "has_message_tags": all("<|message|>" in ex['text'] for ex in dataset),
}

print("\nFormat validation:")
for check, passed in format_checks.items():
    status = "✅" if passed else "❌"
    print(f"{status} {check}: {passed}")
What to look for in the validation:
- Length Statistics: Average text length helps you set appropriate sequence lengths for training. If it’s too long, you might need to truncate or use a larger max_seq_length.
- Format Completeness: All four checks should pass:
- User tags indicate where user input begins
- Assistant tags mark model responses
- Channel tags specify the response type
- Message tags contain the actual content
- Visual Inspection: The printed example lets you see exactly what the model will train on. It should look like:
  <|start|>user<|message|>Your question here<|end|>
  <|start|>assistant<|channel|>final<|message|>The response here<|end|>
If any validation fails, the training may not work correctly or the model might learn incorrect patterns. The automatic fixing should handle most issues, but manual inspection helps catch edge cases.
Configuring Training with Unsloth and TRL
Now we’ll set up the training configuration. Unsloth integrates seamlessly with Hugging Face’s TRL library, giving us the best of both worlds: Unsloth’s speed optimizations and TRL’s proven training algorithms.
from trl import SFTConfig, SFTTrainer
from unsloth.chat_templates import train_on_responses_only

# Create the training configuration
training_config = SFTConfig(
    # Basic settings
    per_device_train_batch_size = 2,  # Adjust based on your GPU memory
    gradient_accumulation_steps = 4,   # Effective batch size = 2 * 4 = 8
    warmup_steps = 5,
    max_steps = 60,  # For quick testing; increase for production

    # Learning rate settings
    learning_rate = 2e-4,
    lr_scheduler_type = "linear",

    # Optimization settings
    optim = "adamw_8bit",  # 8-bit optimizer saves memory
    weight_decay = 0.01,

    # Logging and saving
    logging_steps = 1,
    save_steps = 20,
    output_dir = "outputs",

    # Advanced settings
    seed = 3407,  # For reproducibility
    fp16 = True,  # Mixed precision training
    report_to = "none",  # Set to "wandb" for experiment tracking
)

print("Training configuration:")
print(f"  Effective batch size: {training_config.per_device_train_batch_size * training_config.gradient_accumulation_steps}")
print(f"  Total training steps: {training_config.max_steps}")
print(f"  Learning rate: {training_config.learning_rate}")
Setting Up the Trainer
The SFTTrainer (Supervised Fine-Tuning Trainer) handles all the complexity of training:
# Initialize the trainer
trainer = SFTTrainer(
    model = model,
    tokenizer = tokenizer,
    train_dataset = dataset,
    args = training_config,
)

print("✅ Trainer initialized")

# Configure to only train on assistant responses
# This is crucial - we don't want the model learning to generate user questions
gpt_oss_kwargs = dict(
    instruction_part = "<|start|>user<|message|>",
    response_part = "<|start|>assistant<|channel|>final<|message|>"
)

trainer = train_on_responses_only(
    trainer,
    **gpt_oss_kwargs,
)

print("✅ Configured for response-only training")
Understanding the trainer setup:
- SFTTrainer Integration: The trainer combines several components:
- Your LoRA-configured model
- The tokenizer for processing text
- Your prepared dataset
- Training configuration parameters
- Response-Only Training: This is critical for chat models. By using
train_on_responses_only, we ensure:- The model only calculates loss on assistant responses
- It doesn’t learn to generate user questions
- Training is more efficient (fewer tokens to optimize)
- The model maintains its ability to understand diverse user inputs
- GPT-OSS Specific Tags: The instruction and response parts must match exactly what your formatted data contains. These tags tell the trainer where to split between what to ignore (user input) and what to train on (assistant response).
Verifying the Training Mask
It’s important to verify that we’re only training on the assistant’s responses, not the user’s questions:
# Verify the training mask is correct
print("\nVerifying training mask...")
sample = trainer.train_dataset[0]

# Decode the labels to see what we're training on
# -100 indicates tokens we're not training on (masked)
visible_tokens = []
for token_id, label_id in zip(sample["input_ids"], sample["labels"]):
    if label_id != -100:
        visible_tokens.append(token_id)

if visible_tokens:
    decoded = tokenizer.decode(visible_tokens)
    print(f"Training on: {decoded[:200]}...")
    print("✅ Mask verified - only training on responses")
else:
    print("⚠️ Warning: No visible training tokens detected")
What the mask verification tells you:
- The -100 Label: In PyTorch, -100 is a special value that tells the loss function to ignore these tokens. This is how we implement response-only training:
- User input tokens are labeled as -100 (ignored)
- Assistant response tokens keep their actual token IDs (trained)
- Visible Tokens Check: By extracting only the non-masked tokens, we can see exactly what the model will learn from. You should see only the assistant’s response text, not the user’s question.
- Why This Matters: Without proper masking:
- The model might learn to generate user questions instead of answers
- Training would be less efficient (optimizing unnecessary tokens)
- The model could develop unwanted behaviors like echoing user input
- Debugging Tips: If you see user input in the decoded text, check:
- Your
instruction_partandresponse_partstrings match exactly - The dataset formatting includes all required tags
- The tokenizer is applying the chat template correctly
- Your
Starting the Training Process
With everything configured, we’re ready to begin training. Let’s monitor GPU memory usage and track the training progress:
import time
import torch

# Clear GPU cache before training
torch.cuda.empty_cache()

# Record initial GPU state
start_gpu_memory = torch.cuda.max_memory_reserved() / 1024**3
start_time = time.time()

print("="*60)
print("STARTING TRAINING")
print("="*60)
print(f"Initial GPU memory reserved: {start_gpu_memory:.2f} GB")
print(f"Training for {training_config.max_steps} steps...")
print("\nTraining progress:")

# Start training
trainer_stats = trainer.train()

# Calculate training statistics
training_time = time.time() - start_time
final_gpu_memory = torch.cuda.max_memory_reserved() / 1024**3
memory_used = final_gpu_memory - start_gpu_memory

print("\n" + "="*60)
print("TRAINING COMPLETE")
print("="*60)
print(f"Time taken: {training_time/60:.1f} minutes")
print(f"Final loss: {trainer_stats.metrics['train_loss']:.4f}")
print(f"GPU memory used for training: {memory_used:.2f} GB")
print(f"Peak GPU memory: {final_gpu_memory:.2f} GB")
print(f"Training speed: {trainer_stats.metrics.get('train_steps_per_second', 0):.2f} steps/second")
Understanding the training metrics:
- GPU Memory Management:
- Clearing the cache before training frees up any unused memory
- Monitoring memory usage helps you optimize batch sizes for future runs
- The difference between start and end shows actual training overhead
- Peak memory tells you how close you are to OOM errors
- Training Progress Indicators:
- Loss: Should decrease over time. If it plateaus early, your learning rate might be too low
- Steps/second: Helps you estimate training time for larger datasets
- Time taken: On a T4 GPU, expect about 10-15 minutes for 60 steps
- What to Watch For During Training:
- Loss steadily decreasing (good)
- Loss jumping erratically (learning rate too high)
- Loss not changing (learning rate too low or data issues)
- Memory errors (reduce batch size or sequence length)
- Performance Expectations:
- T4 GPU: 0.5-1.0 steps/second
- V100: 1.5-2.5 steps/second
- A100: 3-5 steps/second
The training should complete without errors, and you should see the loss decrease from around 2-3 initially to below 1.0 by the end.
Testing Your Fine-Tuned Model
Now comes the exciting part, testing whether our fine-tuning actually worked! We’ll create a comprehensive testing function and evaluate the model on various Python-related questions:
from transformers import TextStreamer

def test_model(prompt: str, reasoning_effort: str = "medium", max_length: int = 256):
    """
    Test the fine-tuned model with a given prompt.

    Args:
        prompt: The question or instruction
        reasoning_effort: "low", "medium", or "high"
        max_length: Maximum tokens to generate

    Returns:
        The generated response
    """

    # Create the message format
    messages = [
        {"role": "system", "content": "You are a Python expert assistant."},
        {"role": "user", "content": prompt}
    ]

    # Apply chat template
    inputs = tokenizer.apply_chat_template(
        messages,
        add_generation_prompt = True,
        return_tensors = "pt",
        return_dict = True,
        reasoning_effort = reasoning_effort,
    ).to("cuda")

    # Set up streaming for real-time output
    streamer = TextStreamer(
        tokenizer,
        skip_prompt=True,
        skip_special_tokens=True
    )

    # Generate response
    outputs = model.generate(
        **inputs,
        max_new_tokens = max_length,
        streamer = streamer,
        temperature = 0.7,
        top_p = 0.9,
        do_sample = True,
    )

    # Decode and return the response
    response = tokenizer.decode(outputs[0], skip_special_tokens=True)
    return response

# Test on various Python topics
test_questions = [
    "What is a Python generator and when should I use one?",
    "How do I read a CSV file in Python?",
    "Explain async/await in Python with a simple example",
    "What's the difference between a list and a tuple in Python?",
    "How do I handle exceptions properly in Python?",
]

print("="*60)
print("TESTING FINE-TUNED MODEL")
print("="*60)

for i, question in enumerate(test_questions, 1):
    print(f"\n{'='*60}")
    print(f"Question {i}: {question}")
    print(f"{'='*60}")
    print("Response:")
    _ = test_model(question, reasoning_effort="medium")
    print()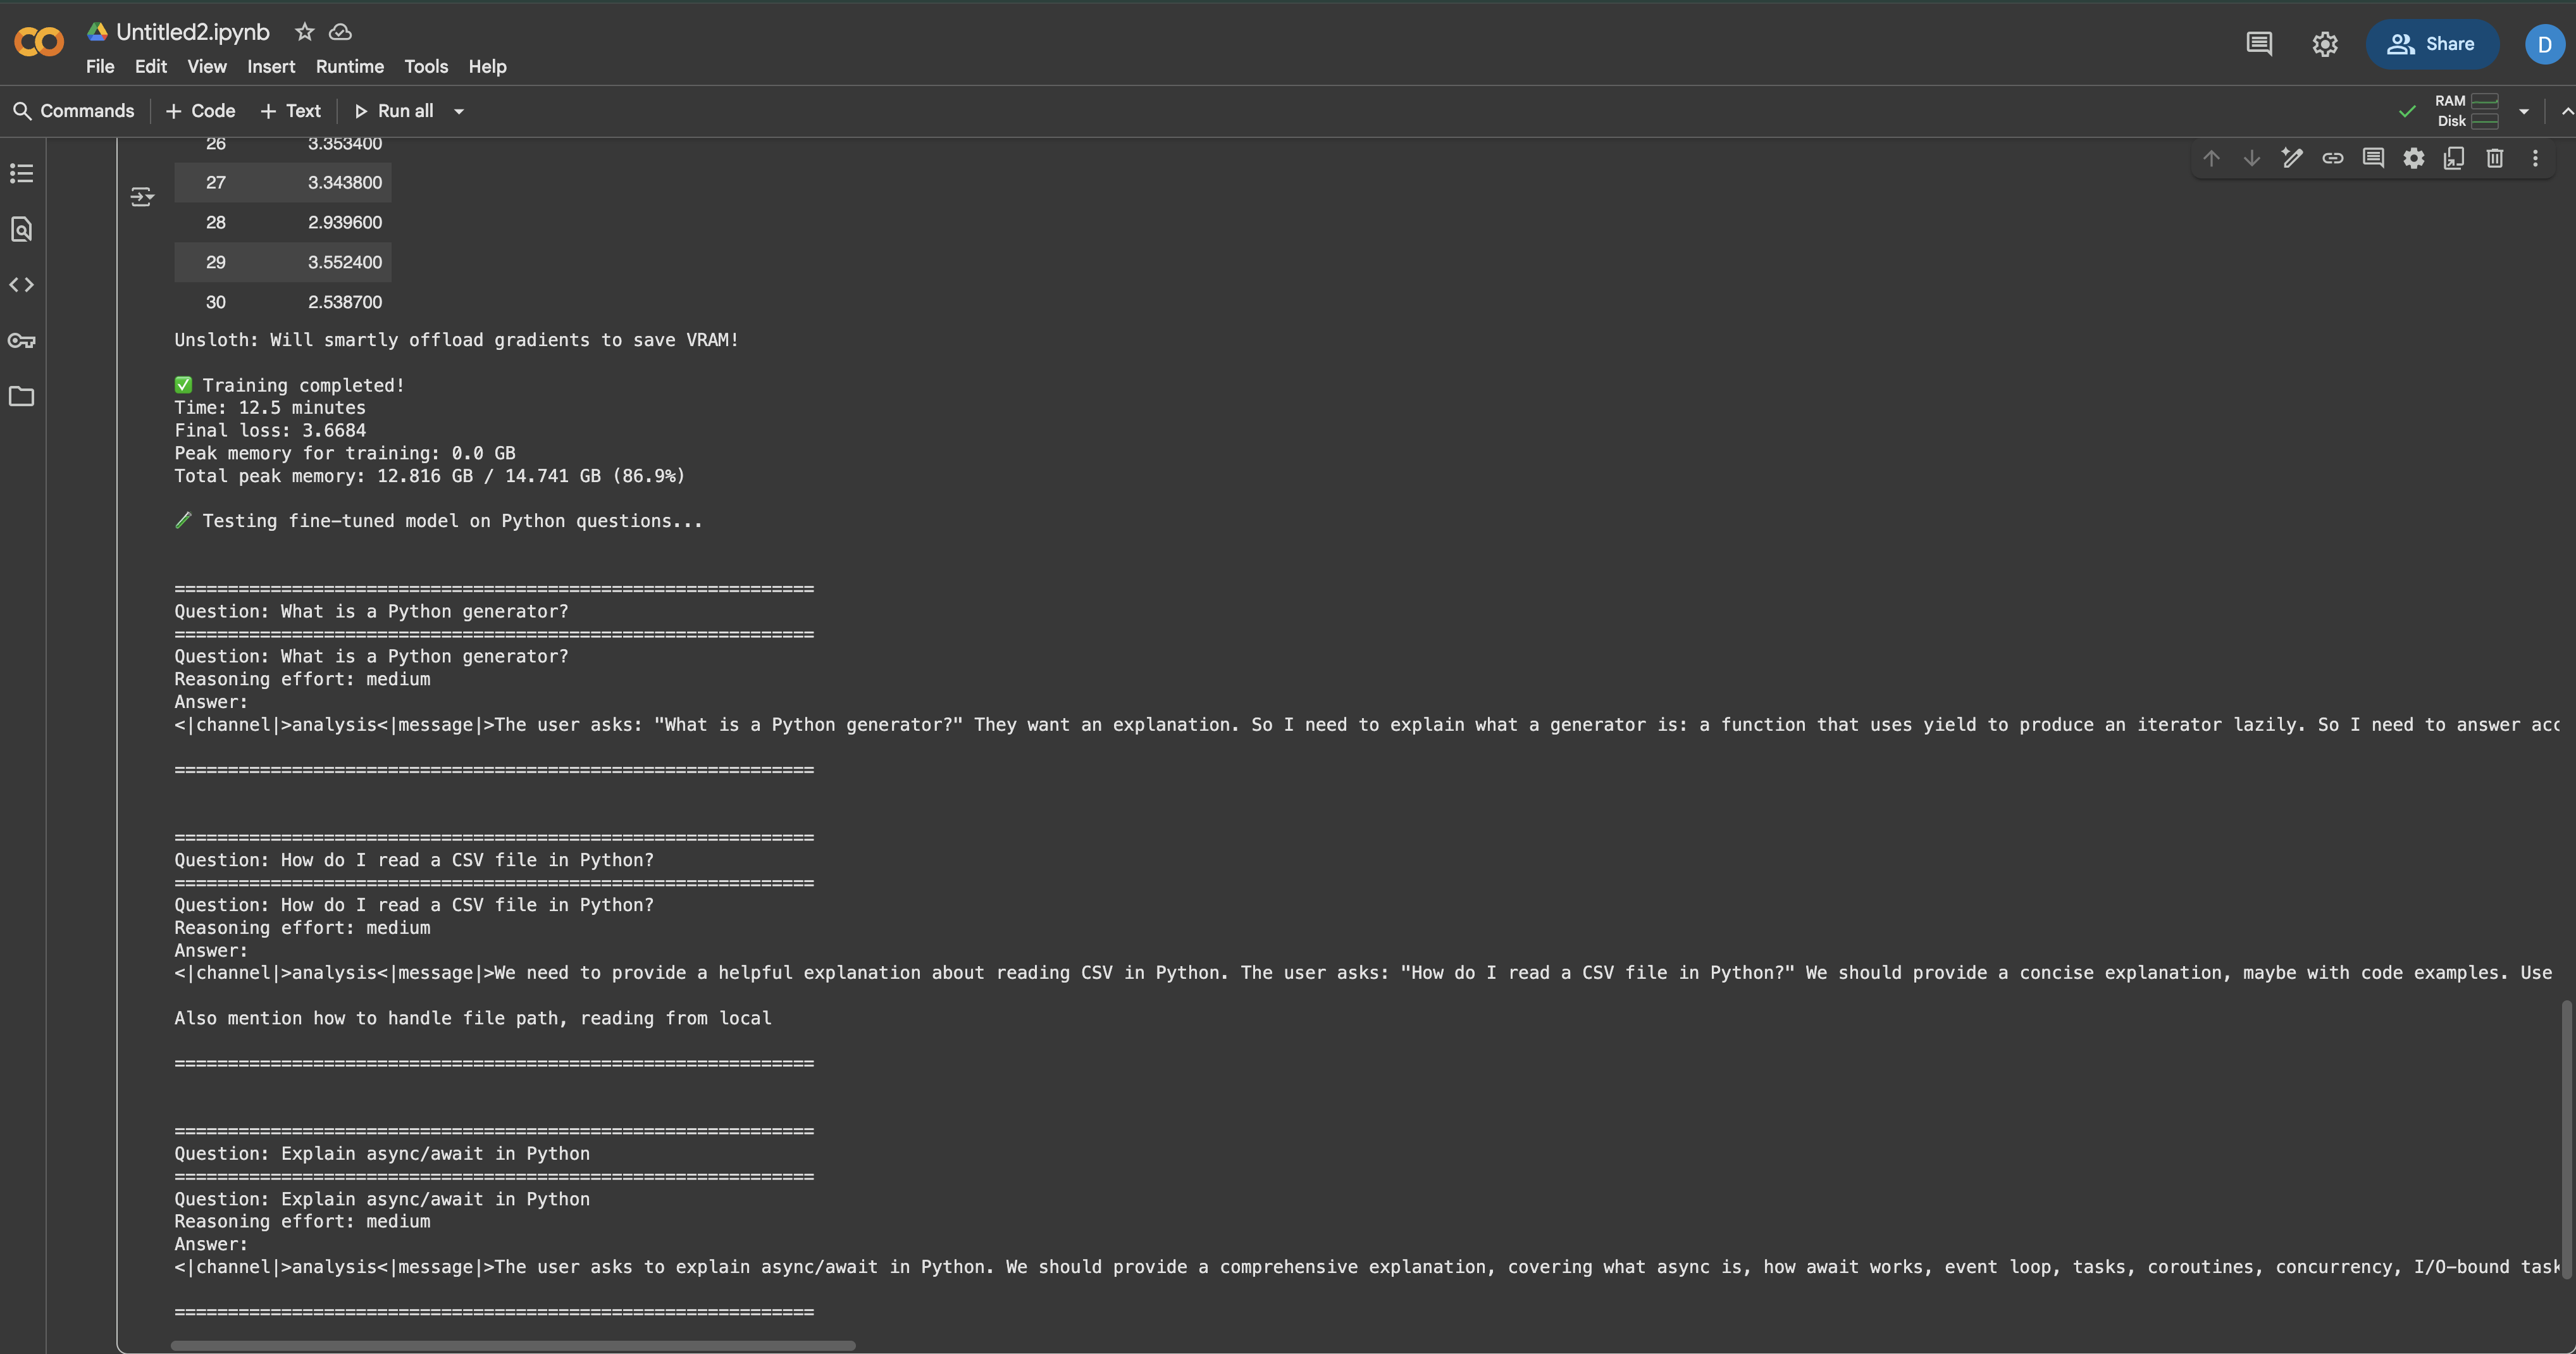
You should notice that the model now provides more detailed, Python-specific answers compared to before fine-tuning. The responses should reflect the documentation style and technical depth of your training data.
Testing Different Reasoning Levels
Let’s also test how reasoning effort affects the responses:
complex_question = "Write a Python function that finds all prime numbers up to n using the Sieve of Eratosthenes"

print("="*60)
print("TESTING REASONING EFFORT LEVELS")
print("="*60)

for effort in ["low", "medium", "high"]:
    print(f"\n{'='*40}")
    print(f"Reasoning Effort: {effort.upper()}")
    print(f"{'='*40}")
    _ = test_model(complex_question, reasoning_effort=effort, max_length=300)
    print()
When you run the code, you’ll see that “low” gives a basic implementation, “medium” provides a good balance of explanation and code, while “high” includes detailed explanations and optimizations.
Saving and Deploying Your Model
After successful fine-tuning, you’ll want to save your model for future use. We have several options depending on your deployment needs:
Saving Locally
import os

# Create directory for saving
save_dir = "gpt-oss-python-expert"
os.makedirs(save_dir, exist_ok=True)

print("Saving model locally...")

# Option 1: Save LoRA adapters only (small, ~200MB)
lora_save_dir = f"{save_dir}-lora"
model.save_pretrained(lora_save_dir)
tokenizer.save_pretrained(lora_save_dir)
print(f"✅ LoRA adapters saved to {lora_save_dir}")

# Check the size
lora_size = sum(
    os.path.getsize(os.path.join(lora_save_dir, f))
    for f in os.listdir(lora_save_dir)
) / (1024**2)
print(f"   Size: {lora_size:.1f} MB")

# Option 2: Save merged model (full size, ~20GB)
merged_save_dir = f"{save_dir}-merged"
model.save_pretrained_merged(
    merged_save_dir,
    tokenizer,
    save_method = "merged_16bit"  # Options: "merged_16bit", "mxfp4"
)
print(f"✅ Merged model saved to {merged_save_dir}")
Pushing to Hugging Face Hub
For easy sharing and deployment, push your model to Hugging Face:
from huggingface_hub import login

# Login to Hugging Face (you'll need your token)
# Get token from: https://huggingface.co/settings/tokens
login(token="hf_...")  # Replace with your token

# Push LoRA adapters (recommended for sharing)
model_name = "your-username/gpt-oss-python-expert-lora"
print(f"Pushing LoRA adapters to {model_name}...")

model.push_to_hub(
    model_name,
    use_auth_token=True,
    commit_message="Fine-tuned GPT-OSS on Python documentation"
)

tokenizer.push_to_hub(
    model_name,
    use_auth_token=True
)

print(f"✅ Model available at: https://huggingface.co/{model_name}")

# Optionally push the merged model (takes longer)
if False:  # Set to True if you want to push the full model
    merged_model_name = "your-username/gpt-oss-python-expert"
    model.push_to_hub_merged(
        merged_model_name,
        tokenizer,
        save_method = "mxfp4",  # 4-bit for smaller size
        use_auth_token=True
    )
Loading Your Fine-Tuned Model
Here’s how to load your model later for inference:
from unsloth import FastLanguageModel

# Load from local directory
model, tokenizer = FastLanguageModel.from_pretrained(
    model_name = "gpt-oss-python-expert-lora",
    max_seq_length = 1024,
    dtype = None,
    load_in_4bit = True,
)

# Or load from Hugging Face Hub
model, tokenizer = FastLanguageModel.from_pretrained(
    model_name = "your-username/gpt-oss-python-expert-lora",
    max_seq_length = 1024,
    dtype = None,
    load_in_4bit = True,
)

print("✅ Model loaded and ready for inference!")
Optimization Strategies for Better Results
Here are some of the strategies that I’ve found useful for optimizing model fine-tuning:
Memory Optimization Techniques
When working with limited GPU memory, these techniques can make the difference between success and OOM errors:
# 1. Gradient checkpointing - trades compute for memory
model.gradient_checkpointing_enable()

# 2. Reduce sequence length if your data allows
max_seq_length = 512  # Instead of 1024

# 3. Use smaller batch sizes with more accumulation
per_device_train_batch_size = 1
gradient_accumulation_steps = 16  # Still effective batch size of 16

# 4. Enable memory efficient attention (if supported)
model.config.use_flash_attention_2 = True

# 5. Clear cache regularly during training
import gc
gc.collect()
torch.cuda.empty_cache()
Training Best Practices
From experience, these practices lead to better fine-tuning results:
- Start Small: Test with 100 examples first. If that works, scale up gradually.
- Monitor Metrics: Watch for overfitting – if training loss drops but validation loss rises, stop early.
- Mix Your Data: Combine domain-specific data with general instruction data to prevent catastrophic forgetting.
- Learning Rate Schedule: Start with the default 2e-4, but don’t be afraid to experiment. I’ve seen good results with 5e-5 for smaller datasets.
- Checkpointing Strategy: Save every N steps so you can recover from the best checkpoint:
training_config = SFTConfig(
    save_steps = 50,
    save_total_limit = 3,  # Keep only 3 best checkpoints
    load_best_model_at_end = True,
    metric_for_best_model = "loss",
)
Speed Optimizations
To maximize training speed:
# Use PyTorch 2.0 compile for faster training
if hasattr(torch, 'compile'):
    model = torch.compile(model)
    print("✅ Model compiled for faster training")

# Enable TF32 on Ampere GPUs (A100, RTX 30xx)
torch.backends.cuda.matmul.allow_tf32 = True
torch.backends.cudnn.allow_tf32 = True

# Use larger batch sizes if memory allows
# Larger batches generally train faster
optimal_batch_size = find_optimal_batch_size(model, max_memory=0.9)
Deployment Options for Production
Once your model is fine-tuned, you have several deployment options:
Quick Local API with FastAPI
For rapid prototyping, create a simple API:
# save as: api.py
from fastapi import FastAPI, HTTPException
from pydantic import BaseModel
import uvicorn
from unsloth import FastLanguageModel

app = FastAPI()

# Load model once at startup
model, tokenizer = None, None

@app.on_event("startup")
async def load_model():
    global model, tokenizer
    model, tokenizer = FastLanguageModel.from_pretrained(
        "gpt-oss-python-expert-lora",
        max_seq_length = 1024,
        load_in_4bit = True,
    )

class GenerateRequest(BaseModel):
    prompt: str
    reasoning_effort: str = "medium"
    max_tokens: int = 256

@app.post("/generate")
async def generate(request: GenerateRequest):
    if not model:
        raise HTTPException(status_code=503, detail="Model not loaded")

    messages = [{"role": "user", "content": request.prompt}]
    inputs = tokenizer.apply_chat_template(
        messages,
        add_generation_prompt = True,
        return_tensors = "pt",
        reasoning_effort = request.reasoning_effort,
    ).to("cuda")

    outputs = model.generate(
        **inputs,
        max_new_tokens = request.max_tokens,
        temperature = 0.7,
    )

    response = tokenizer.decode(outputs[0], skip_special_tokens=True)
    return {"response": response}

# Run with: uvicorn api:app --host 0.0.0.0 --port 8000
Production Deployment with vLLM
For high-throughput production serving, vLLM provides excellent performance:
# Install vLLM
pip install vllm

# Serve your model
python -m vllm.entrypoints.openai.api_server \
    --model gpt-oss-python-expert-merged \
    --tensor-parallel-size 1 \
    --max-model-len 1024 \
    --dtype float16
Cloud Deployment Options
Each cloud platform has its advantages:
Hugging Face Inference Endpoints
- Easiest setup – just push and deploy
- Great for testing and small-scale production
- Automatic scaling available
- Perfect for serverless deployment
- Pay only for actual usage
- Great for bursty workloads
- Most cost-effective for 24/7 serving
- Full control over the environment
- Good for high-throughput applications
- Enterprise-grade with full AWS integration
- Advanced monitoring and logging
- Best for large-scale production deployments
Troubleshooting Common Issues
Even with Unsloth’s optimizations, you might encounter some issues. Here’s how to solve the most common ones:
CUDA Out of Memory Errors
This is the most common issue when fine-tuning large models:
# Solution 1: Reduce batch size
training_config = SFTConfig(
    per_device_train_batch_size = 1,  # Minimum batch size
    gradient_accumulation_steps = 8,   # Compensate with accumulation
)

# Solution 2: Reduce sequence length
max_seq_length = 512  # Instead of 1024

# Solution 3: Use more aggressive quantization
model = FastLanguageModel.from_pretrained(
    model_name = "unsloth/gpt-oss-20b",
    load_in_4bit = True,
    use_double_quant = True,  # Even more memory savings
)

# Solution 4: Enable all memory optimizations
use_gradient_checkpointing = "unsloth"
use_flash_attention = True
Slow Training Speed
If training is taking too long:
# Use Unsloth's full optimization suite
model = FastLanguageModel.get_peft_model(
    model,
    use_gradient_checkpointing = "unsloth",  # Critical
    lora_dropout = 0,  # 0 is faster than dropout
    bias = "none",  # "none" is faster than training biases
    use_rslora = False,  # Standard LoRA is faster
)

# Check you're using the right dtype
torch.set_float32_matmul_precision('medium')  # Or 'high'
Model Not Learning
If your loss isn’t decreasing:
- Check Data Format: Ensure your data matches GPT-OSS format exactly
- Verify Response Masking: Confirm you’re only training on responses
- Adjust Learning Rate: Try 5e-4 or 1e-4 instead of 2e-4
- Increase Data Quality: Remove low-quality examples
- Add More Data: 500+ examples typically work better than 100
Inconsistent Outputs
If the model generates inconsistent or poor quality outputs:
# Use lower temperature for more consistent outputs
outputs = model.generate(
    temperature = 0.3,  # Lower = more consistent
    top_p = 0.9,
    repetition_penalty = 1.1,  # Reduce repetition
)

# Fine-tune for more steps
max_steps = 200  # Instead of 60

# Use higher quality data filtering
min_response_length = 50  # Instead of 30
Conclusion
Conclusion
Fine-tuning GPT-OSS is faster and easier when you combine Unsloth’s speed with high-quality, structured training data provided by one of the top AI training data companies. Using Bright Data’s solutions for AI ensures you have access to the reliable data needed for effective fine-tuning, so you can build tailored AI models for any use case.
For further exploration into AI-driven data extraction strategies, consider these additional resources:

Technical Writer
Amitesh Anand is a developer advocate and technical writer sharing content on AI, software, and devtools, with 10k followers and 400k+ views.


