

This guide will explore how MCP revolutionizes web scraping workflows and walk through implementing Bright Data’s Web MCP server for web data extraction. You’ll learn to set up a system that allows LLMs to fetch live web data, even from heavily protected websites, through simple conversational prompts with your AI assistant.
The Bottleneck: Why LLMs Struggle with Real-World Interaction (and How MCP Fixes It)
Large language models are trained on static snapshots of the internet, so out of the box they can’t
- open live websites or databases
- run custom scripts
- bypass CAPTCHAs and other bot protections
- execute JavaScript to pull dynamic data
Try it yourself: ask Claude for the current price of a Best Buy item. Claude has a Web Search mode, but since it relies on Brave Search’s cached index, prices and stock levels are often outdated. Moreover, it can’t execute JavaScript or bypass Best Buy’s security challenge, making crucial details inaccessible.

Enter the Model Context Protocol (MCP)—an open JSON-RPC specification that enables LLMs to call external tools like scrapers, databases, and CI pipelines while maintaining sandbox security. Though initially proposed by Anthropic, it has evolved into a community-maintained standard.
When Claude connects to a Web MCP server, Best Buy data flows in real-time. Through a single MCP call, the server launches a headless browser, rotate through proxies, overcomes CAPTCHAs, and delivers clean JSON for the model to analyze.

Don’t worry about the wiring yet—we’ll walk through the setup step by step in the later sections.
Why MCP matters
- Open standard, no vendor lock-in. Any MCP-capable LLM client can talk to any MCP server through the same JSON-RPC contract.
- Pluggable transports and models. Switch from stdio to Streaming HTTP—or from Claude to Gemini—without touching your scraping or database logic.
- Real-time actions, not just chat. Servers expose live tools (scrapers, APIs, build hooks), so agents return fresh data and can actually get work done.
Think of MCP as the USB-C port for LLMs: plug in a scraper today, a database tomorrow, or an internal microservice next week—no bespoke integrations required.
What Is the Model Context Protocol (MCP)?
Model Context Protocol (MCP) is an open JSON-RPC 2.0 standard that lets large language models call external tools—run a scraper, query SQL, hit any REST API—through one unified interface.
MCP complements Retrieval-Augmented Generation (RAG): RAG pulls static documents from a vector store, while MCP can fetch live data or trigger real-time actions. In practice, you can combine both—retrieve docs and call tools when the model needs fresh input.
Core Components
- Host: The LLM application (Claude Desktop, Cursor, custom agent).
- MCP Client: A lightweight, stateful connector inside the host (one client ↔ one server).
- Server: Wraps an external system (scraper, SQL, Jira, Git…) and exposes tools, plus optional resources.
- Tool: A single callable function (
scrape_url,sql.query,jira.create_issue)that the model can invoke. - External Resource: The real website, database, or API the server/tool interacts with.
Request/Response Flow
- The LLM determines it needs external data or functionality.
- The MCP client selects the appropriate server and sends a JSON-RPC request.
- The server executes the action (e.g., scrape, search, commit) and streams results back to the client.
- The host feeds the response into the model’s context, giving the LLM fresh facts or confirmation that an action completed.

MCP for Web Scraping
Connecting a web scraper to the Model Context Protocol (MCP) instantly transforms raw HTML into LLM-ready context, eliminating one of the slowest and messiest steps in most LLM workflows.
The Problem
Traditional scrapers return unstructured HTML filled with ads, trackers, and layout junk. Cleaning it up—removing noise, isolating useful content, and converting it into a usable format—often takes more time than the scraping itself. This becomes even more painful when the data needs to be live.
What an MCP Server Does
An MCP-enabled scraper acts as a streamlined adapter between the LLM and the target website:
- Fetch the page using a basic
GET, a headless browser, or a proxy-based unlocker. - Transform the response—extract just the useful content and convert it into structured JSON, Markdown, or plain text.
- Annotate with metadata like URL, timestamp, HTTP status, geo-location, and CAPTCHA results to help the LLM assess source freshness and trustworthiness.
- Stream the cleaned result back in a standard MCP-compliant JSON-RPC response.
Because MCP defines a consistent interface, every LLM client—Claude Desktop, Cursor, or your own agent—receives structured, token-efficient outputs regardless of which site was scraped or how the server was implemented.
Bright Data MCP Server for Web Scraping
The Bright Data Web MCP server allows any MCP-compatible client, like Claude Desktop, Cursor IDE, Windsurf, or your custom agent, to fetch live web data through Bright Data’s full proxy and scraping stack.
If your agent needs reliable, real-time access to public websites, without managing headless browsers, proxy pools, or CAPTCHA solvers, this server provides a plug-and-play solution. A single MCP call gives you access to: Web Unlocker, SERP API, Web Scraper API, and Scraping Browser (or Browser API).
Key Capabilities
- Delivers AI-ready data: Automatically fetches and formats web content into clean, structured outputs (JSON, Markdown, plain text), reducing the need for manual pre-processing.
- Scales with your workload: Built on Bright Data’s resilient infrastructure to handle high request volumes without bottlenecks or downtime.
- Bypasses blocks and CAPTCHAs: Uses Web Unlocker and other advanced anti-bot mechanisms to access even the most protected sites.
- Supports global targeting: Tap into a proxy network spanning 195 countries for region-specific content and compliance.
- Easy to integrate: Requires minimal setup and works out of the box with any MCP-compatible client.
Prerequisites for Using the Bright Data MCP Server
- Bright Data account: Sign up at brightdata.com. New users get 5,000 monthly credits for free.
- API token: Go to your dashboard → Settings → API Tokens
- Web Unlocker zone: Create a zone in your Bright Data account (default:
mcp_unlocker). You can override this via theWEB_UNLOCKER_ZONEenvironment variable. - (Optional) Scraping Browser zone: Only required for full browser automation. Note the auth string in the format
brd-customer-ID-zone-ZONE_NAME:PASSWORD. - Node.js 18+: The server is published as
@brightdata/mcpon npm.
Bright Data MCP Setup in Claude Desktop
Follow these steps to integrate the Bright Data Web MCP server with Claude Desktop:
Step 1: Open Claude Desktop → Settings → Developer → Edit Config
Step 2: Update your claude_desktop_config.json to include the Bright Data Web MCP server configuration:
{
  "mcpServers": {
    "Bright Data": {
      "command": "npx",
      "args": ["@brightdata/mcp"],
      "env": {
        "API_TOKEN": "<your-brightdata-api-token>",
        "WEB_UNLOCKER_ZONE": "<optional—override default zone name 'mcp_unlocker'>",
        "BROWSER_AUTH": "<optional—enable full browser control via Scraping Browser>"
      }
    }
  }
}
Step 3: Save the config file and restart Claude Desktop.
You should now see Bright Data scraping tools available and ready to use:

Bright Data Web MCP Setup in Cursor IDE
Integrate the Bright Data Web MCP server into Cursor IDE in just a few steps:
Step 1: Open Cursor IDE
Step 2: Go to Settings ⚙️ → MCP section
Step 3: Click “Add a new global MCP Server”. This opens the mcp.json configuration file.
Step 4: Add the Bright Data Web MCP server config. You can reuse the same structure as used for Claude Desktop:
{
  "mcpServers": {
    "Bright Data": {
      "command": "npx",
      "args": ["@brightdata/mcp"],
      "env": {
        "API_TOKEN": "<your-brightdata-api-token>",
        "WEB_UNLOCKER_ZONE": "<optional—override default zone name 'mcp_unlocker'>",
        "BROWSER_AUTH": "<optional—enable full browser control via Scraping Browser>"
      }
    }
  }
}
Step 5: Save the file. Cursor will automatically detect the new server. You’ll see a green status indicator next to the server name once it connects successfully. If tools don’t appear immediately, try restarting Cursor IDE.

Bright Data MCP Setup in Windsurf
Connect Bright Data’s MCP server to Windsurf with these simple steps:
Step 1: Open Settings → Windsurf Settings
Step 2: Scroll to the Cascade section
Step 3: Click “Add custom server +”. This will open a JSON config file named mcp_config.json.
Step 4: Add the Bright Data Web MCP server configuration, following the same format used for Claude Desktop or Cursor IDE:
{
  "mcpServers": {
    "Bright Data": {
      "command": "npx",
      "args": ["@brightdata/mcp"],
      "env": {
        "API_TOKEN": "<your-brightdata-api-token>",
        "WEB_UNLOCKER_ZONE": "<optional—override default zone name 'mcp_unlocker'>",
        "BROWSER_AUTH": "<optional—enable full browser control via Scraping Browser>"
      }
    }
  }
}
Step 5: Save the file and restart Windsurf. You should now see Bright Data tools available in your MCP tool list.

Bright Data MCP in Action: Practical Examples
Once configured, your LLM client can leverage the full capabilities of the Bright Data Web MCP server. Each tool is designed for a specific use case. View the full tool catalog.
Note: These examples use Claude, but the same flow applies to any MCP-compatible client such as Windsurf or Cursor. Just open the chat window (Cmd + L) and paste your prompt to initiate a live tool call.
Example 1: Extract Zillow Property Listings
Zillow is notoriously difficult to scrape due to aggressive bot protection, but Bright Data’s MCP stack handles it seamlessly.
Prompt to LLM:
Extract key property data in JSON format from this Zillow URL:
https://www.zillow.com/apartments/arverne-ny/the-tides-at-arverne-by-the-sea/ChWHPZ/
What Happens Behind the Scenes:
- The LLM determines that external data is needed.
- It triggers the relevant Bright Data MCP tool (e.g.,
web_data_zillow_properties_listingor a fallback generic scraper). - The server uses Web Unlocker, and optionally the Scraping Browser, to bypass bot protection and render the page.
- Clean, structured JSON is returned.

Example 2: E-commerce Product Search (Amazon & Best Buy)
Amazon and Best Buy are high-value targets for product data, but they implement strong anti-scraping defenses.
Prompt to LLM:
I want to buy a DSLR camera, and my maximum budget is $1000 USD. Please visit amazon.com and bestbuy.com and find the top 3 DSLR cameras from each website that are priced under or up to $1000. For each camera, include the product name, price, and a direct link to the product page. Also, provide the latest 2 to 3 customer reviews for each camera.What Happens Behind the Scenes:
- The LLM detects that live product data is needed from two different eCommerce sites.
- It invokes the appropriate Bright Data Web MCP tools, typically
web_data_amazon_product_searchfor Amazon. - For Best Buy, which relies heavily on client-side JavaScript, the Scraping Browser is launched to render content, simulate interactions, and extract dynamic data.

Sample Output from the LLM:

Example 3: Fetching YouTube Channel Video Data
YouTube loads most of its content dynamically, making it a strong use case for headless browser automation.
Prompt to LLM:
Extract the first 5 videos from the YouTube channel page https://www.youtube.com/@BrightData/videos. For each video, include the title, upload date, and number of views.What Happens Behind the Scenes:
- The LLM detects the need for browser-based rendering due to dynamic content.
- If
BROWSER_AUTHis configured, the Bright Data Web MCP server launches a Scraping Browser session. - The remote browser navigates to the channel page, waits for the video feed to load, and extracts structured data.

Sample LLM Output:

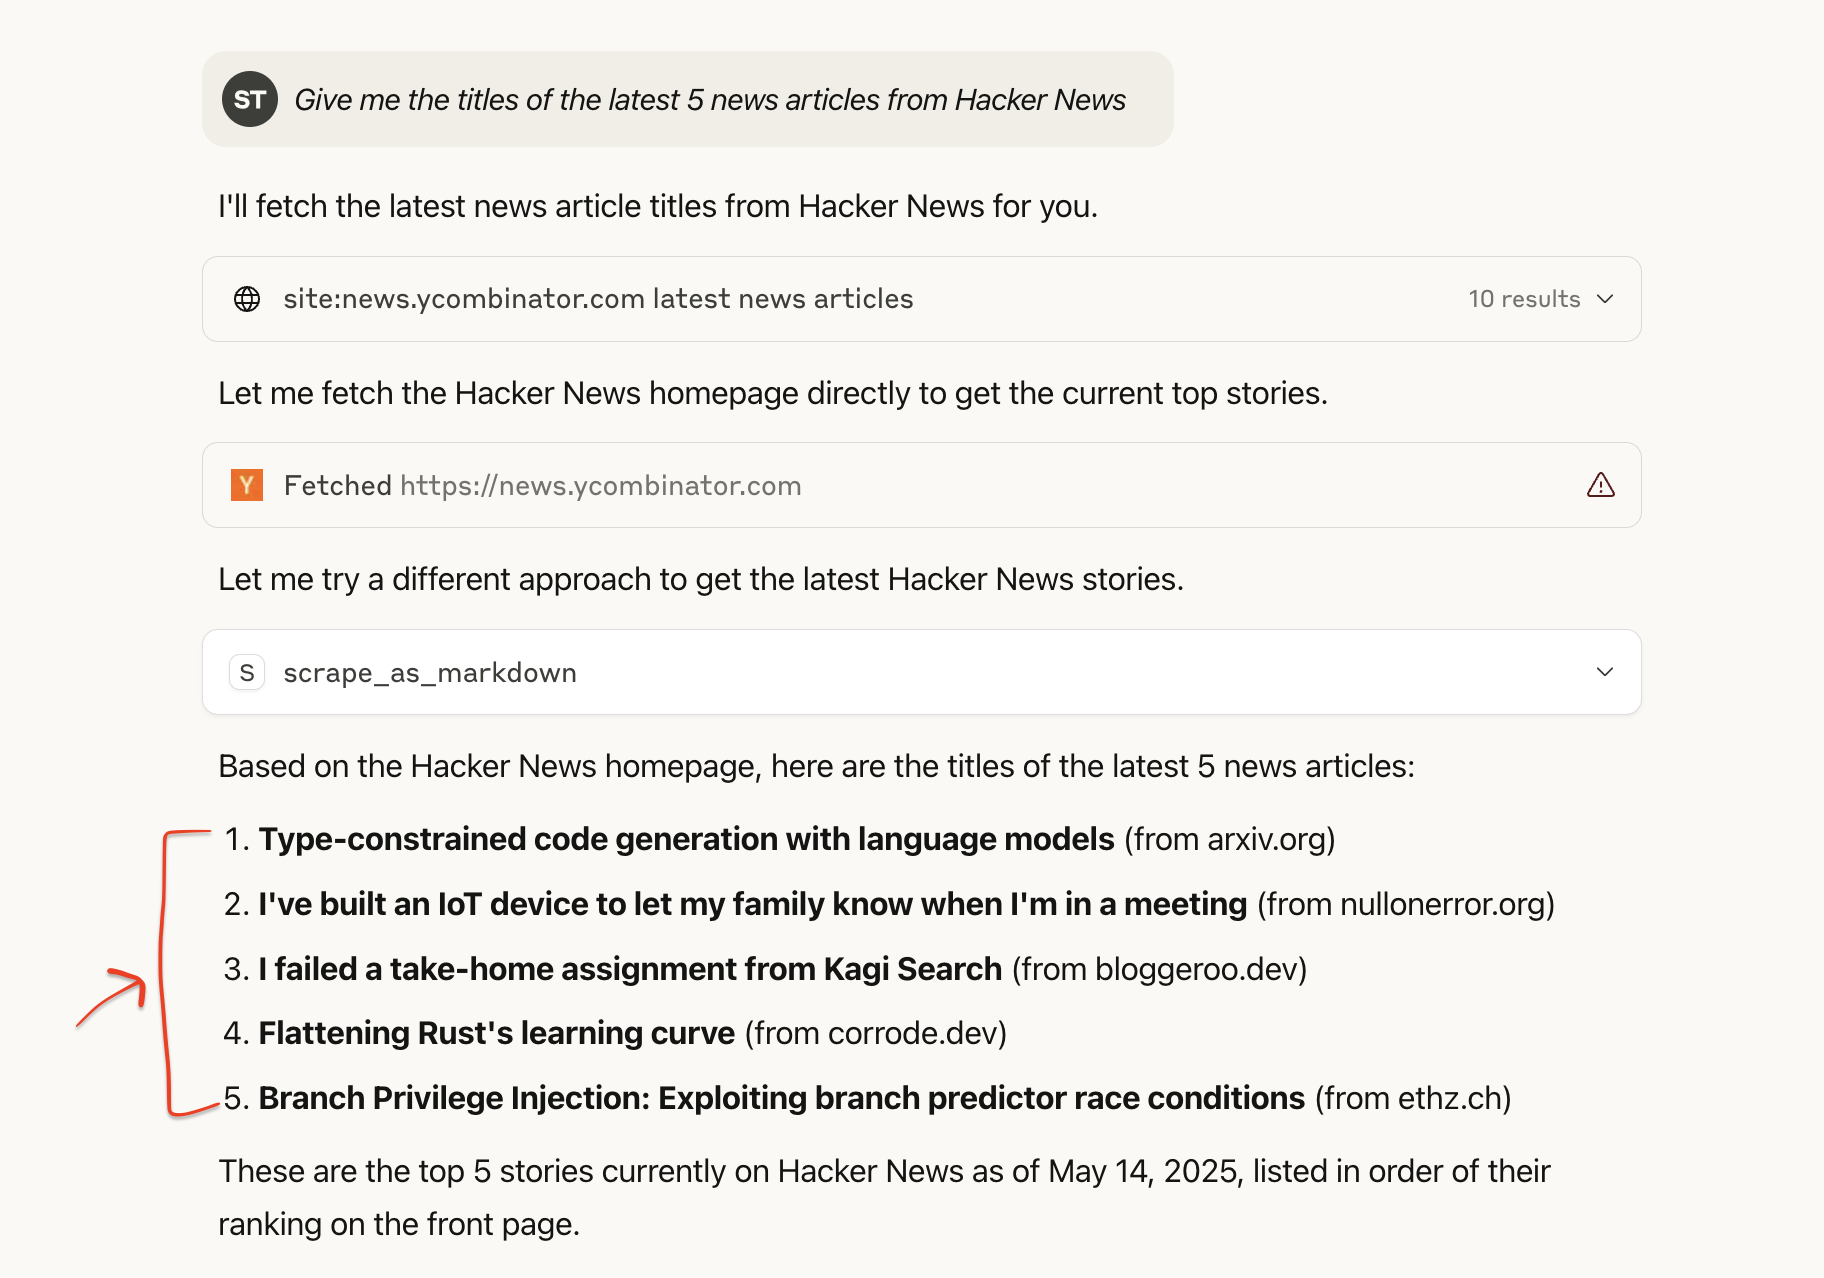
Example 4: Hacker News Headlines
A simpler case that shows how quickly an LLM can ingest and format structured text data.
Prompt to LLM:
Give me the titles of the latest 5 news articles from Hacker NewsBehind the Scenes:
- The LLM calls a generic scraping tool like
scrape_as_markdownvia Bright Data Web MCP. - The server fetches the Hacker News homepage, parses the top headlines, and returns them in clean Markdown format.
Sample LLM Output:
🔥 Great! These examples show the breadth of Bright Data’s Web MCP server, from extracting static HTML content to orchestrating browser sessions on JavaScript-rich sites protected by advanced anti-bot measures.
Alternative Installation via Smithery CLI
You can also run the Bright Data Web MCP server using Smithery CLI. Run the following command in your terminal:
npx -y @smithery/cli install @luminati-io/brightdata-mcp --client windsurfYou’ll Be Prompted to Provide:
- Smithery API Key – Create one here if you don’t have it already.
- Bright Data API Token
- (Optional) Web Unlocker Zone Name
- (Optional) Scraping Browser Auth String

Once you’re set up, open Windsurf and launch the chat window. Then, type any prompt.
Example prompt:
List the 3 biggest AI companies by valuation as of 2026.Live Response in Windsurf:

If you want to test Bright Data Web MCP without installing anything, use the Smithery Playground to try live scraping scenarios in your browser:

Conclusion
This guide has shown that the Model Context Protocol (MCP) extends traditional language models into agents that can interact with the live web in real time. Through Bright Data’s Web MCP server, a single API request can:
- Fetch fresh, geo-specific content from nearly any website.
- Bypass anti-bot mechanisms, including automated CAPTCHA solving.
- Control a full browser environment to handle dynamic, JavaScript-intensive pages.
To build a scalable, compliant data infrastructure optimized for AI-driven use cases, explore Bright Data’s AI-Ready Web Data Infrastructure—purpose-built for real-time search, extraction, and large-scale automation.
For more advanced agent workflows, learn how to integrate Google ADK with an MCP server.

Technical Writer
Satyam Tripathi helps SaaS and data startups turn complex tech into actionable content, boosting developer adoption and user understanding.


