
In this blog post, you will learn:
- What Airia is and what features it provides.
- How Airia agents become more powerful when connected to Bright Data Web MCP.
- How to build a web automation pipeline using Web MCP with the no-code Airia Agent Builder.
Let’s dive in!
What Is Airia?
Airia is an enterprise AI platform that helps organizations build, deploy, secure, and govern AI applications and agents from a single environment.
It combines AI orchestration, security, governance, and workflow automation. Airia’s end goal is to enable both technical and non-technical teams to create AI-powered solutions. Also, it helps companies scale AI workloads, discover and manage shadow AI, and deploy multi-model systems across their existing tech stack.
Main Features
The core capabilities supported by Airia are:
- Agent Builder: A web solution to create AI agents using no-code, low-code, or pro-code development options.
- AI orchestration: Design, deploy, and manage AI workflows and agents across the enterprise.
- Workflow automation: Automate complex business processes and repetitive tasks with AI.
- Enterprise integrations: Connect AI agents to thousands of data sources, SaaS platforms, databases, and internal systems.
- AI security: Protect sensitive data through encryption, access controls, and built-in security policies.
- AI governance: Monitor AI usage, enforce policies, maintain auditability, and support regulatory compliance.
- Governance dashboard: Gain visibility into AI activity, risks, and compliance status.
- Audit trail reporting: Track and review AI interactions and decisions across the organization.
- Risk classification: Classify AI models, agents, and data according to organizational risk levels.
- Analytics and insights: Monitor AI performance, usage, costs, and operational impact.
Why Extend Airia with Bright Data’s Web MCP
There is no doubt that Airia provides a robust environment for building, orchestrating, and governing AI agents. Still, many enterprise workflows depend on information that exists outside company boundaries.
Think of competitor intelligence, market research, lead generation, pricing monitoring, supplier analysis, compliance checks, and trend tracking. All these use cases require access to live web data.
This creates a challenge for AI agents. By default, LLMs cannot search the web, retrieve real-time information, or interact with modern websites. Even when enabling the built-in model search tools, these often have scalability issues and struggle to access many websites. After all, online platforms increasingly deploy sophisticated anti-bot protections.
As a result, agents end up lacking the external context required to make informed decisions and automate business processes end-to-end. The solution is to equip Airia agents with advanced web access capabilities by leveraging its MCP integration support.
Bright Data’s Web MCP for Enterprise Web Intelligence
Bright Data’s Web MCP gives Airia agents direct access to web search, source discovery, data extraction, and browser automation tools. Once connected, agents can autonomously search for information, scrape websites, collect structured data, and interact with web pages.
Web MCP exposes over 70 tools, which interact with Bright Data’s API-based products. It is available in [two different tiers](https://github.com/brightdata/brightdata-mcp?tab=readme-ov-file#-pricing, modes):
- Rapid mode: A free plan that includes up to 5,000 monthly requests and a core set of tools for web search, website discovery, and data extraction.
- Pro mode: A paid plan that unlocks the complete catalog of 70+ tools, including structured data collection from platforms such as Amazon, LinkedIn, Yahoo Finance, Crunchbase, YouTube, Zillow, Google Maps, and more than 40 additional sources. Also, it provides advanced browser automation features.
Some of the most relevant Bright Data Web MCP tools are:
| Tool | Description | Underlying Bright Data Product |
|---|---|---|
search_engine |
Performs web searches (on Google, Bing, Yandex, and others) and returns SERP results in JSON | SERP API |
scrape_as_markdown |
Retrieves webpage content and converts it into clean Markdown format, bypassing anti-bots | Unlocker API |
discover |
Finds and ranks relevant web pages using AI-powered relevance scoring | Discover API |
scraping_browser_navigate |
Launches a browser session and navigates to a target URL | Browser API |
scraping_browser_click_ref |
Click elements on a given page | Browser API |
scraping_browser_screenshot |
Captures screenshots of the current page, including full-page screenshots when needed | Browser API |
Important: Bright Data operates a global infrastructure including more than 400 million residential IPs distributed across 195 countries. This network powers all Bright Data services and enables enterprise-grade performance, high availability, unlimited concurrency, massive scalability, and 99.99% uptime.
How to Build a Web Automation Pipeline Using Web MCP in Airia Agent Builder
In this step-by-step section, you will learn how to integrate Bright Data’s Web MCP into an agent using the Airia Agent Builder.
Specifically, you will build a pricing competitor analysis agentic workflow that:
- Searches for a competitor’s pricing page online using their name.
- Scrapes and extracts pricing information from the competitor’s website.
- Retrieves pricing data from your own product’s pricing page.
- Compares both pricing structures, plans, and features.
- Generates a structured HTML report optimized for email delivery.
- Automatically sends the report via email.
Note: This is just one enterprise-ready example of what you can build with Bright Data Web MCP.
Follow the instructions below!
Prerequisites
Before going through the next steps, make sure you have:
- An Airia account (even on a free trial).
- A Bright Data account with an API key configured. Follow the official guide to generate a Bright Data API key.
- A Google account (for automated Gmail email sending).
Familiarity with how MCP works and the tools exposed by the Web MCP server will also be useful.
Step #1: Get a Bright Data Web MCP Remote Connection URL
Since Airia runs in the cloud, you need to connect it to the remote version of the Bright Data Web MCP server. Before creating your Airia agent, obtain the remote connection URL that Airia will use to access the remote Web MCP server.
Note: The Bright Data Web MCP remote server is built for enterprise scenarios. It supports unlimited concurrent connections and scalability, just like all other Bright Data services.
To get started, familiarize yourself with the standard Web MCP remote connection URL format:
https://mcp.brightdata.com/mcp?token=<YOUR_BRIGHT_DATA_API_KEY>&pro=1Replace the <YOUR_BRIGHT_DATA_API_KEY> placeholder with your actual Bright Data API key. The token parameter authenticates requests sent to the Web MCP server and links them to your Bright Data account.
In the above URL format, the &pro=1 parameter is optional:
- Without
&pro=1: You can access only the free tools, which include up to 5,000 requests per month in Rapid mode. - With
&pro=1: You gain access to the full catalog of 70+ tools and advanced capabilities. Standard Bright Data usage fees apply.
If you need more control, such as enabling only specific tools or tool groups, you can generate a customized MCP connection URL directly from the Bright Data dashboard.
Log in to your Bright Data account and navigate to the “AI Gateways > MCP” page. Then, follow the setup wizard to configure your MCP server. Here, you can generate a custom Web MCP connection URL:
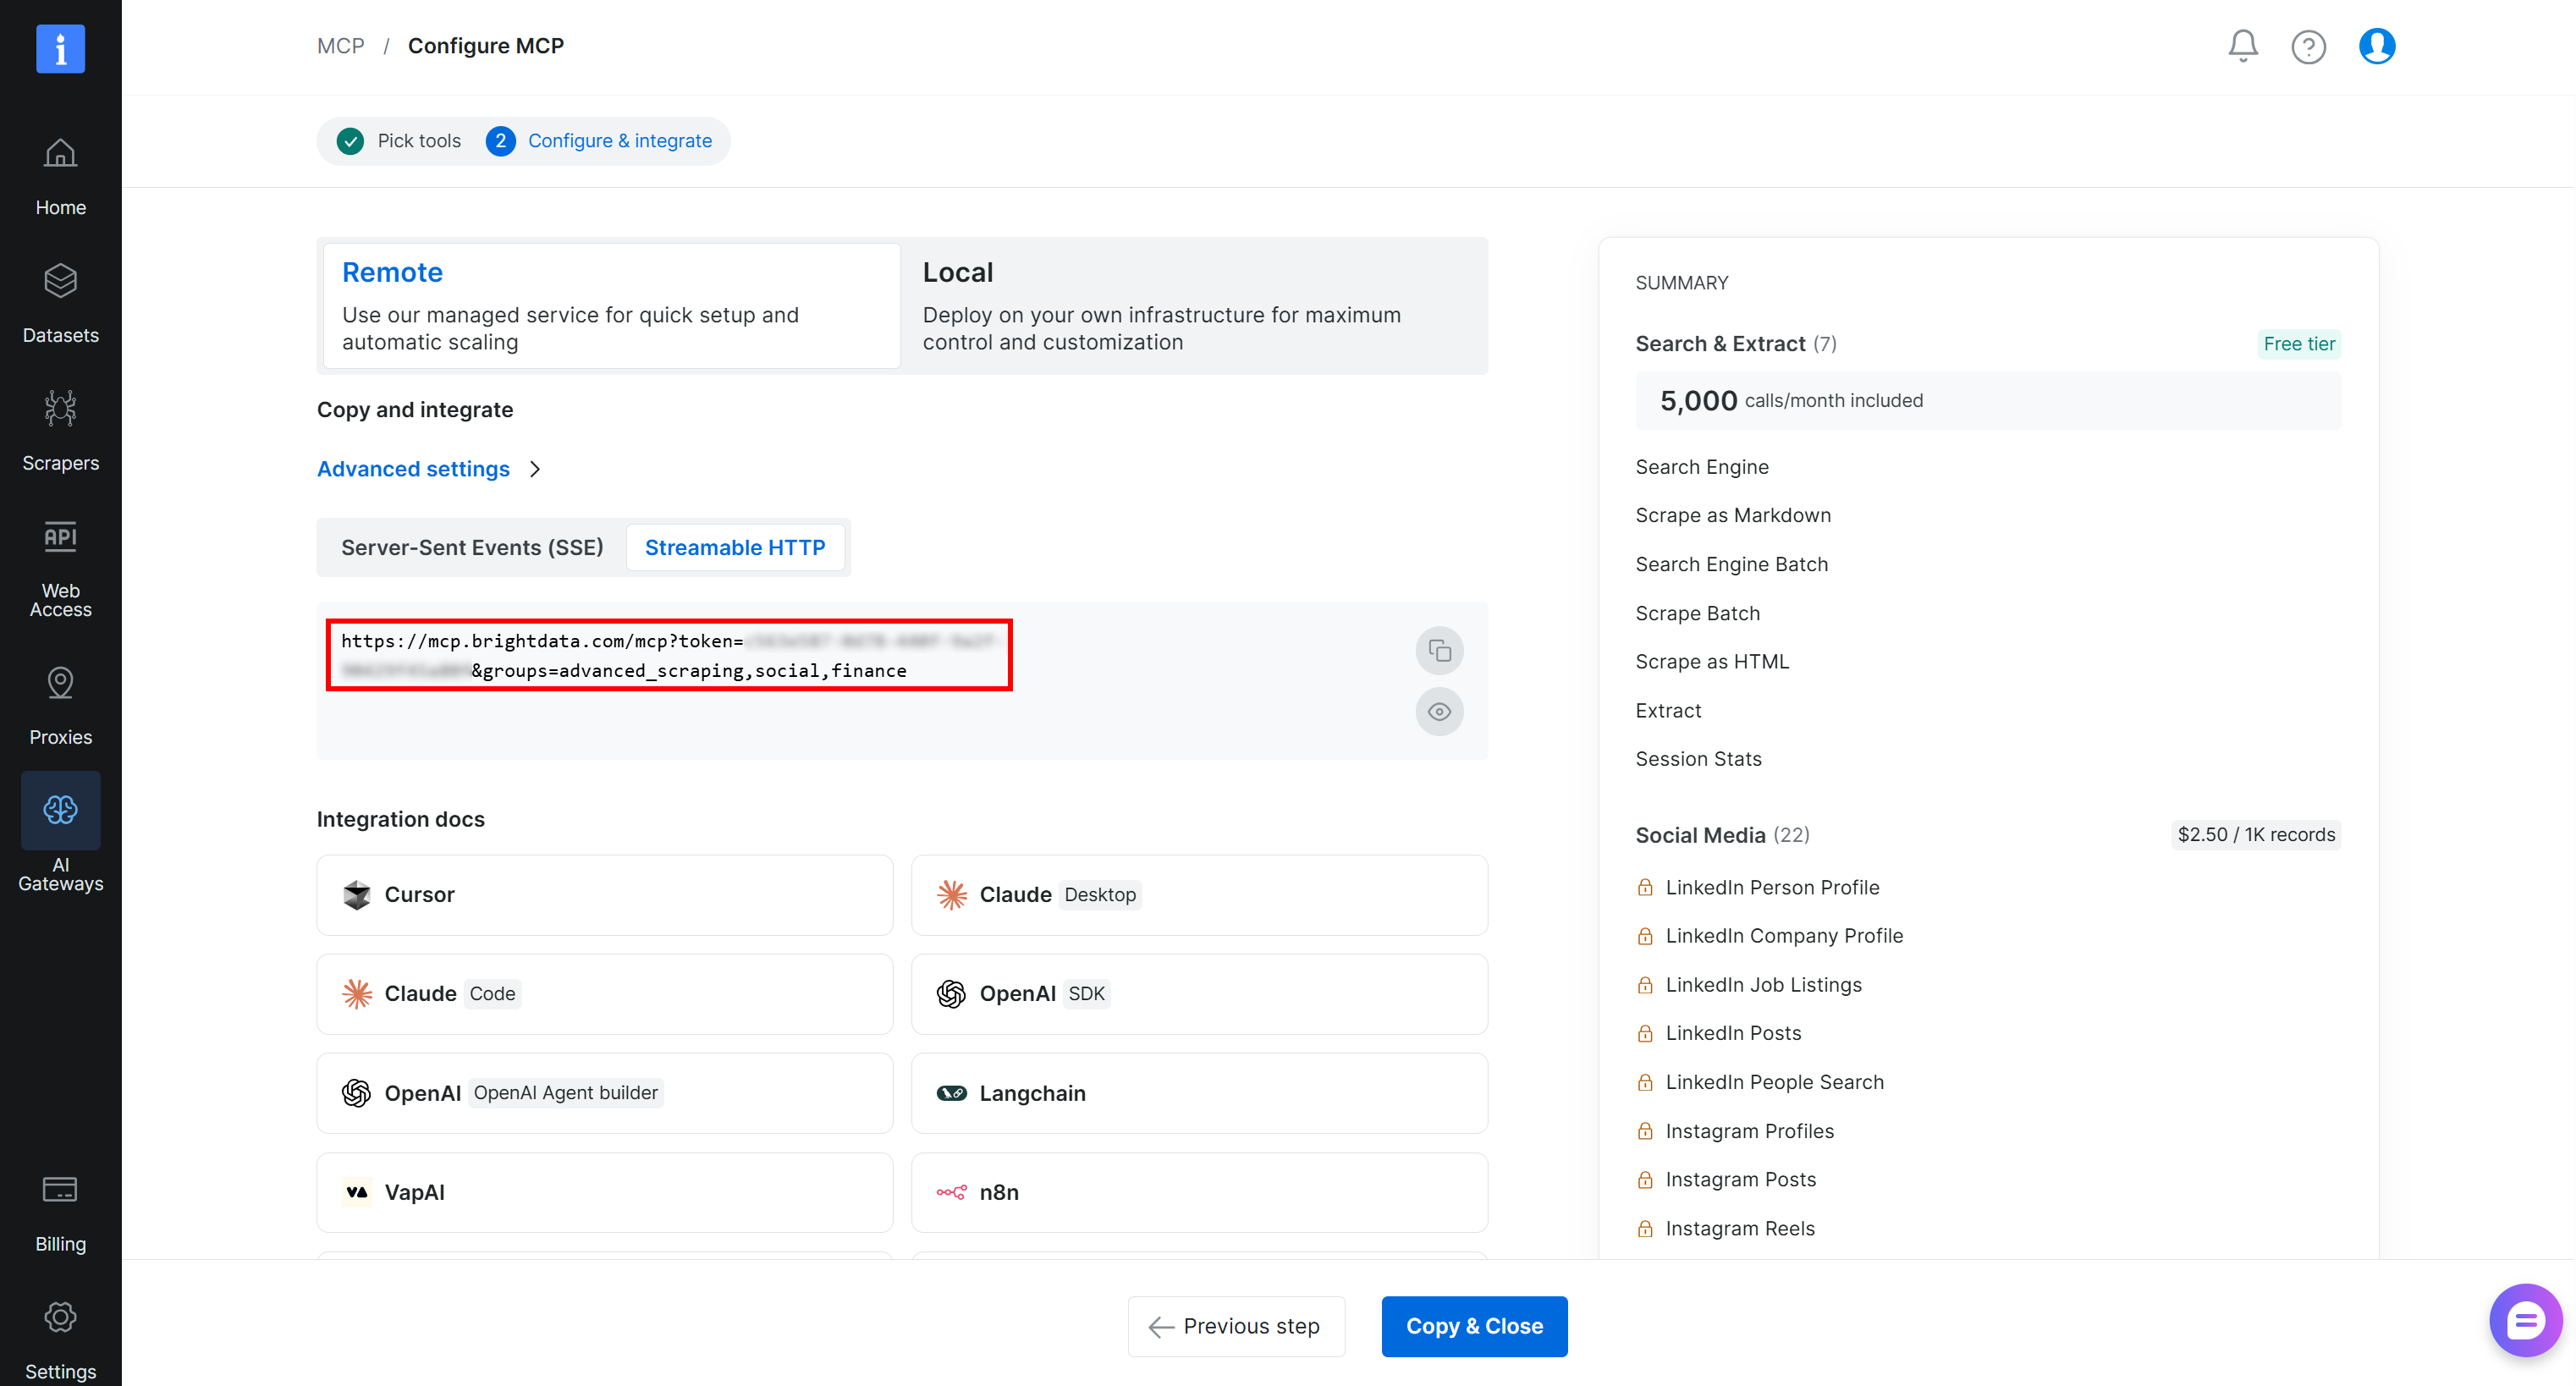
Copy the “Streamable HTTP” connection URL or populate the URL as described before. You will need it in the next step to connect Bright Data Web MCP to your Airia agent. Great!
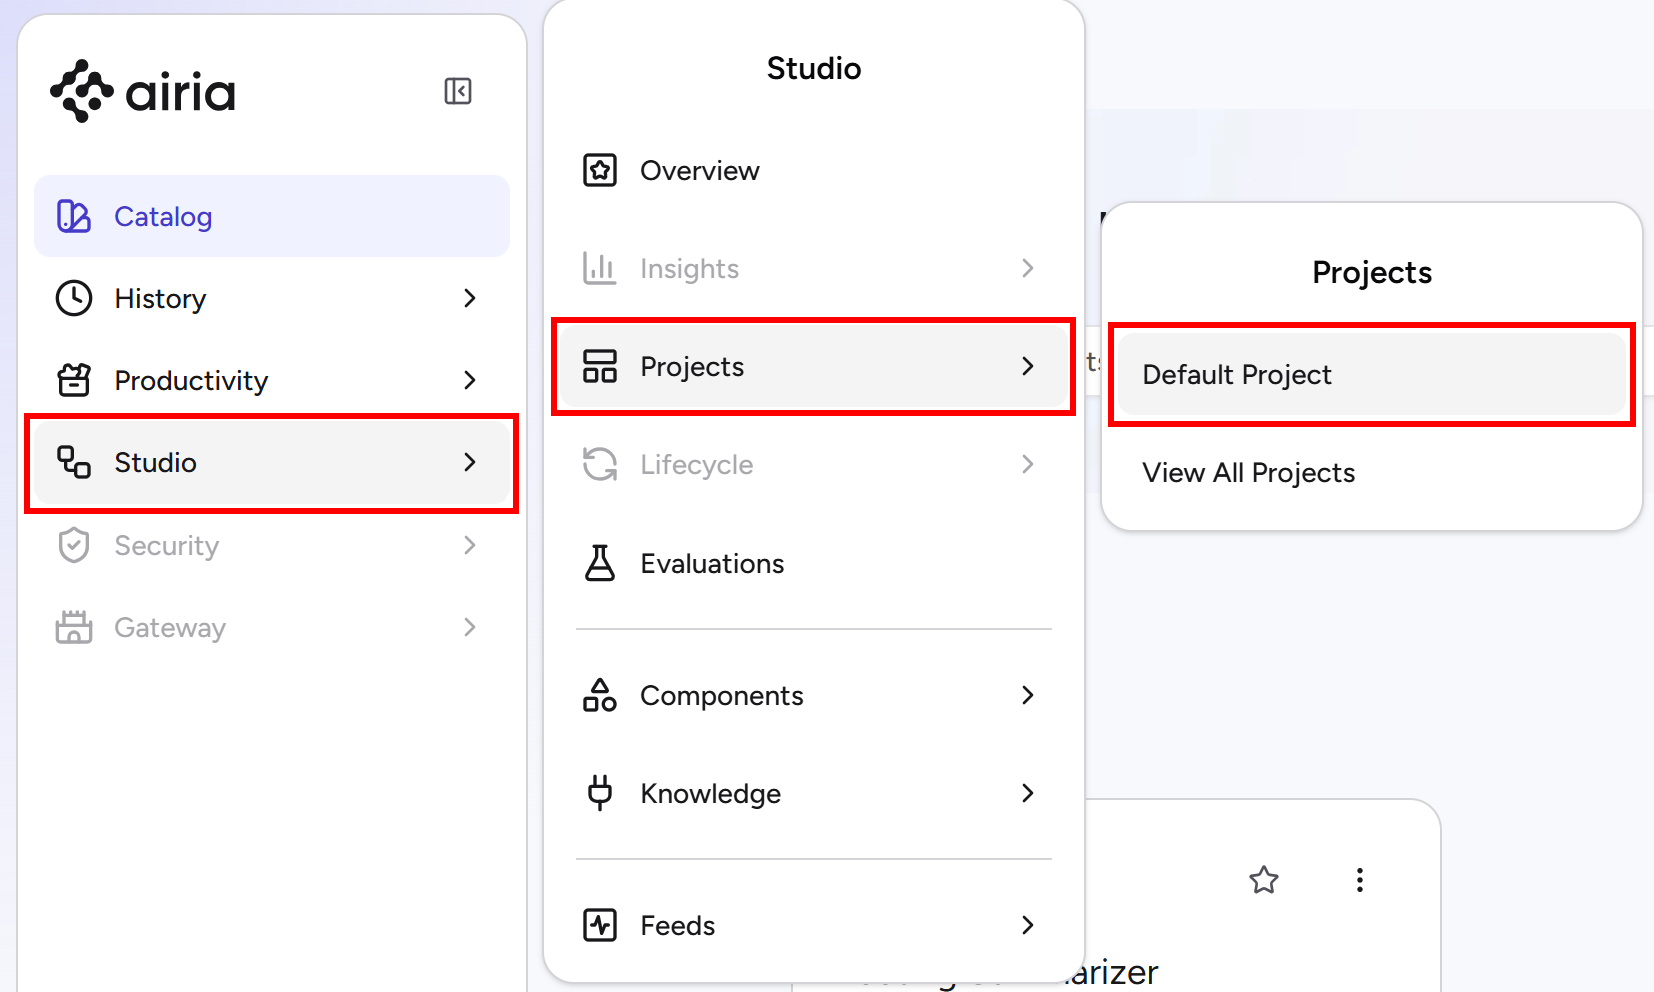
Step #2: Configure the Web MCP Connection in Airia
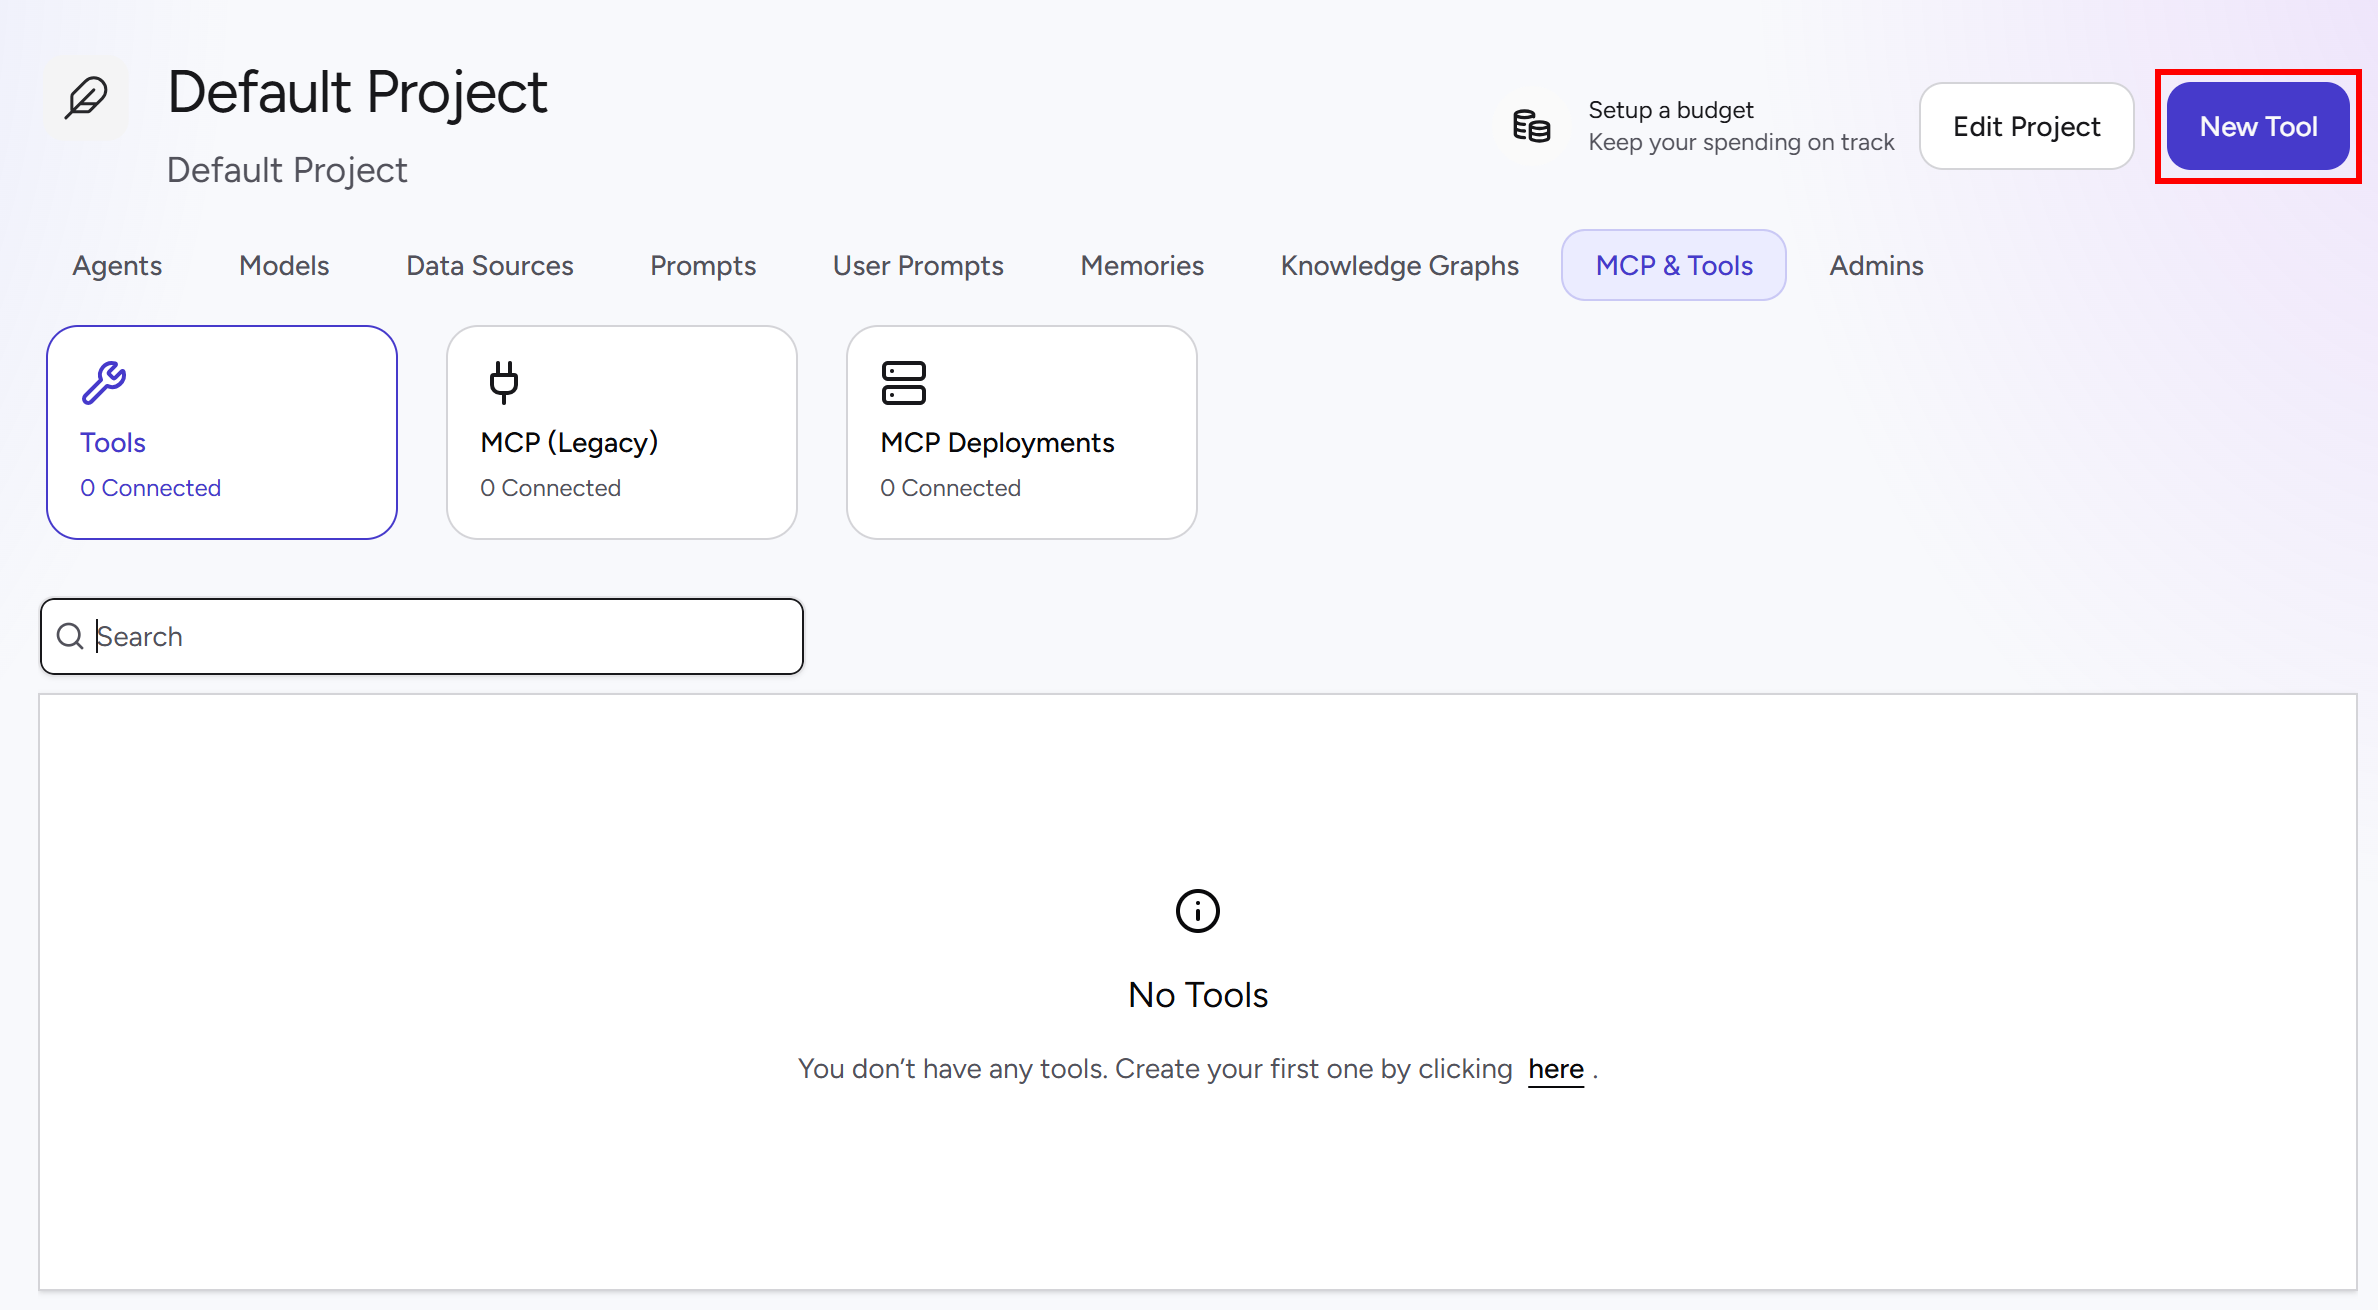
Start by logging in to Airia. From the left navigation menu, go to the “Studio > Projects > Default Project” page:
On the “Default Project” page, open the “MCP & Tools” tab and click the “New Tool” button:
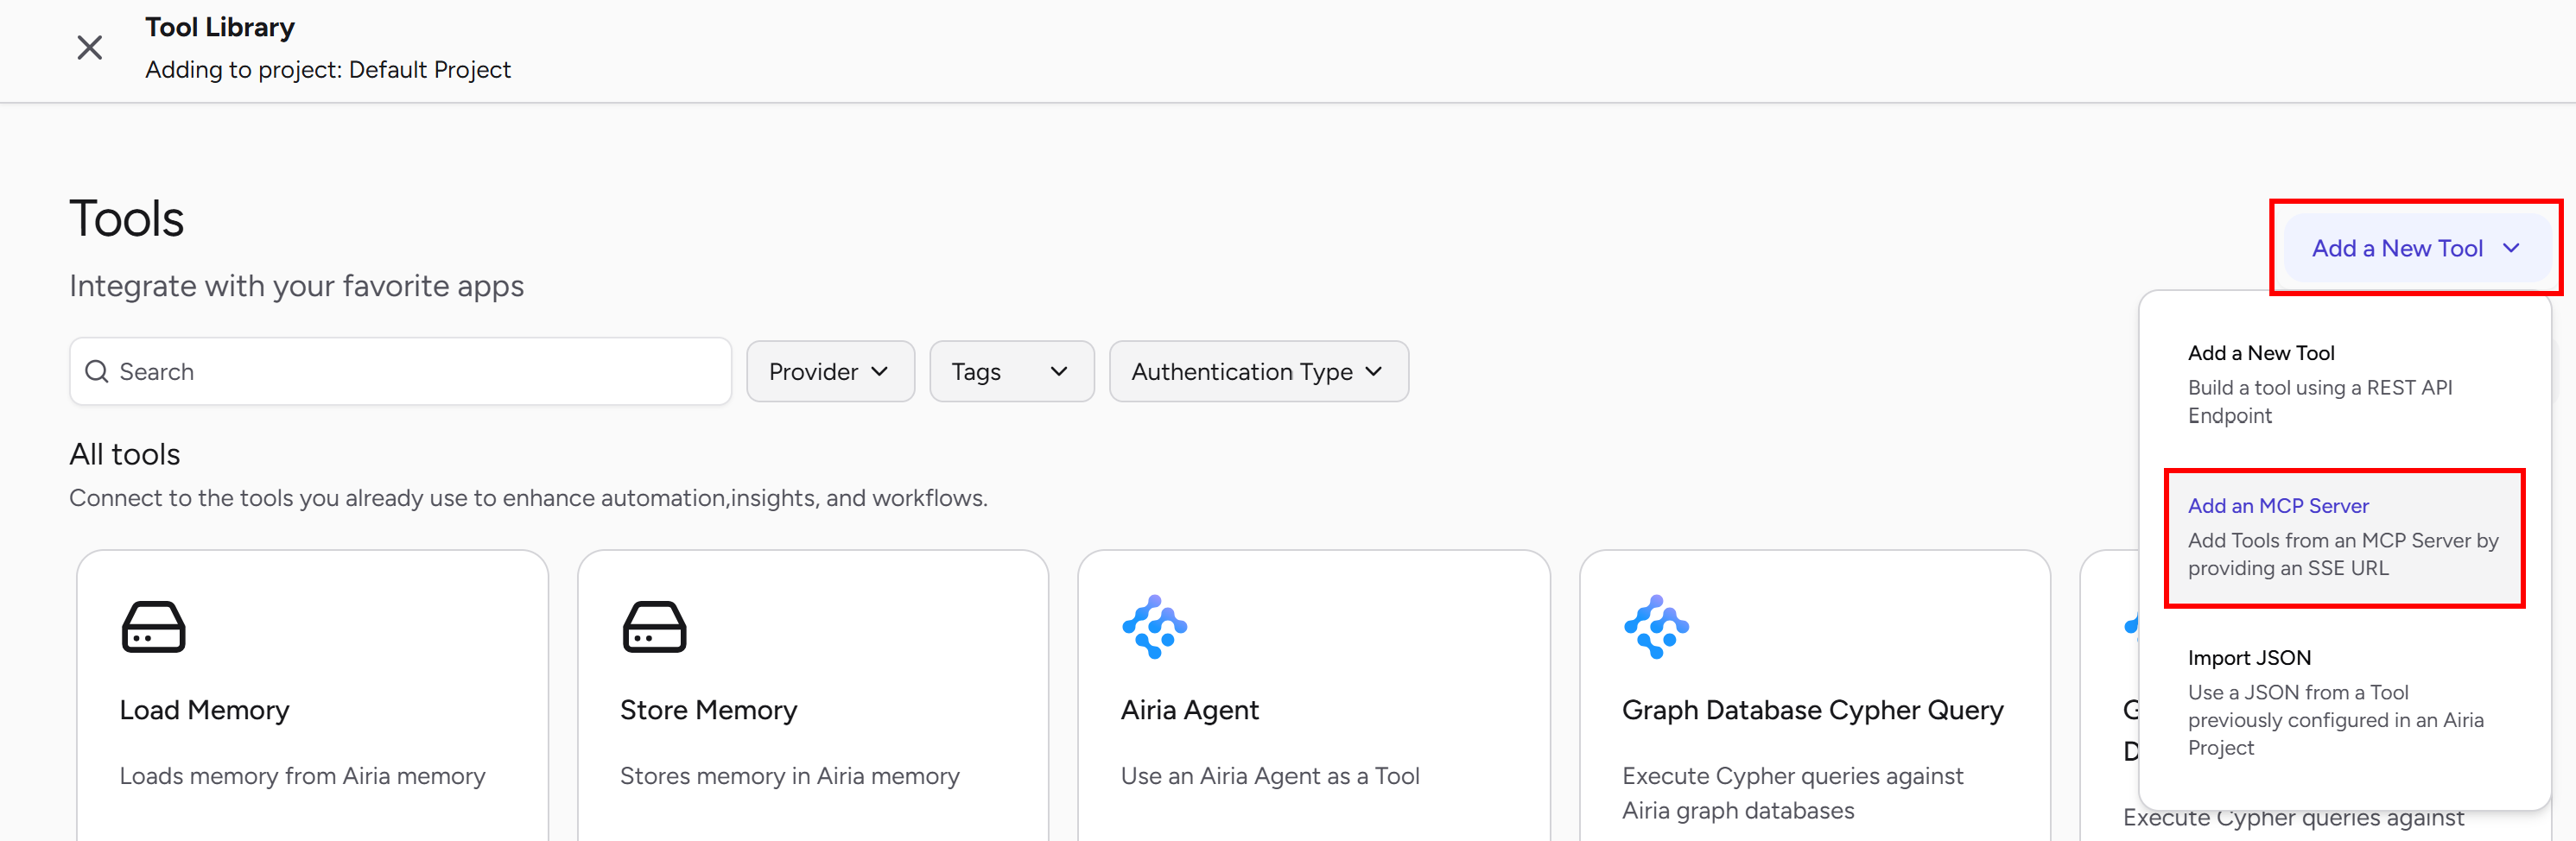
This will take you to the “Tools” page, where you can configure connections to MCP servers. Click the “Add a New Tool” dropdown and select “Add an MCP Server”:
In the “Connect to Custom MCP Server” dialog, provide a name for the connection (e.g., “Bright Data Web MCP”) and fill out the form as follows:
- URL: Paste your Web MCP connection URL.
- Credential type: Select “None” (Since authentication is handled through the Bright Data API key included in the URL’s
tokenparameter).
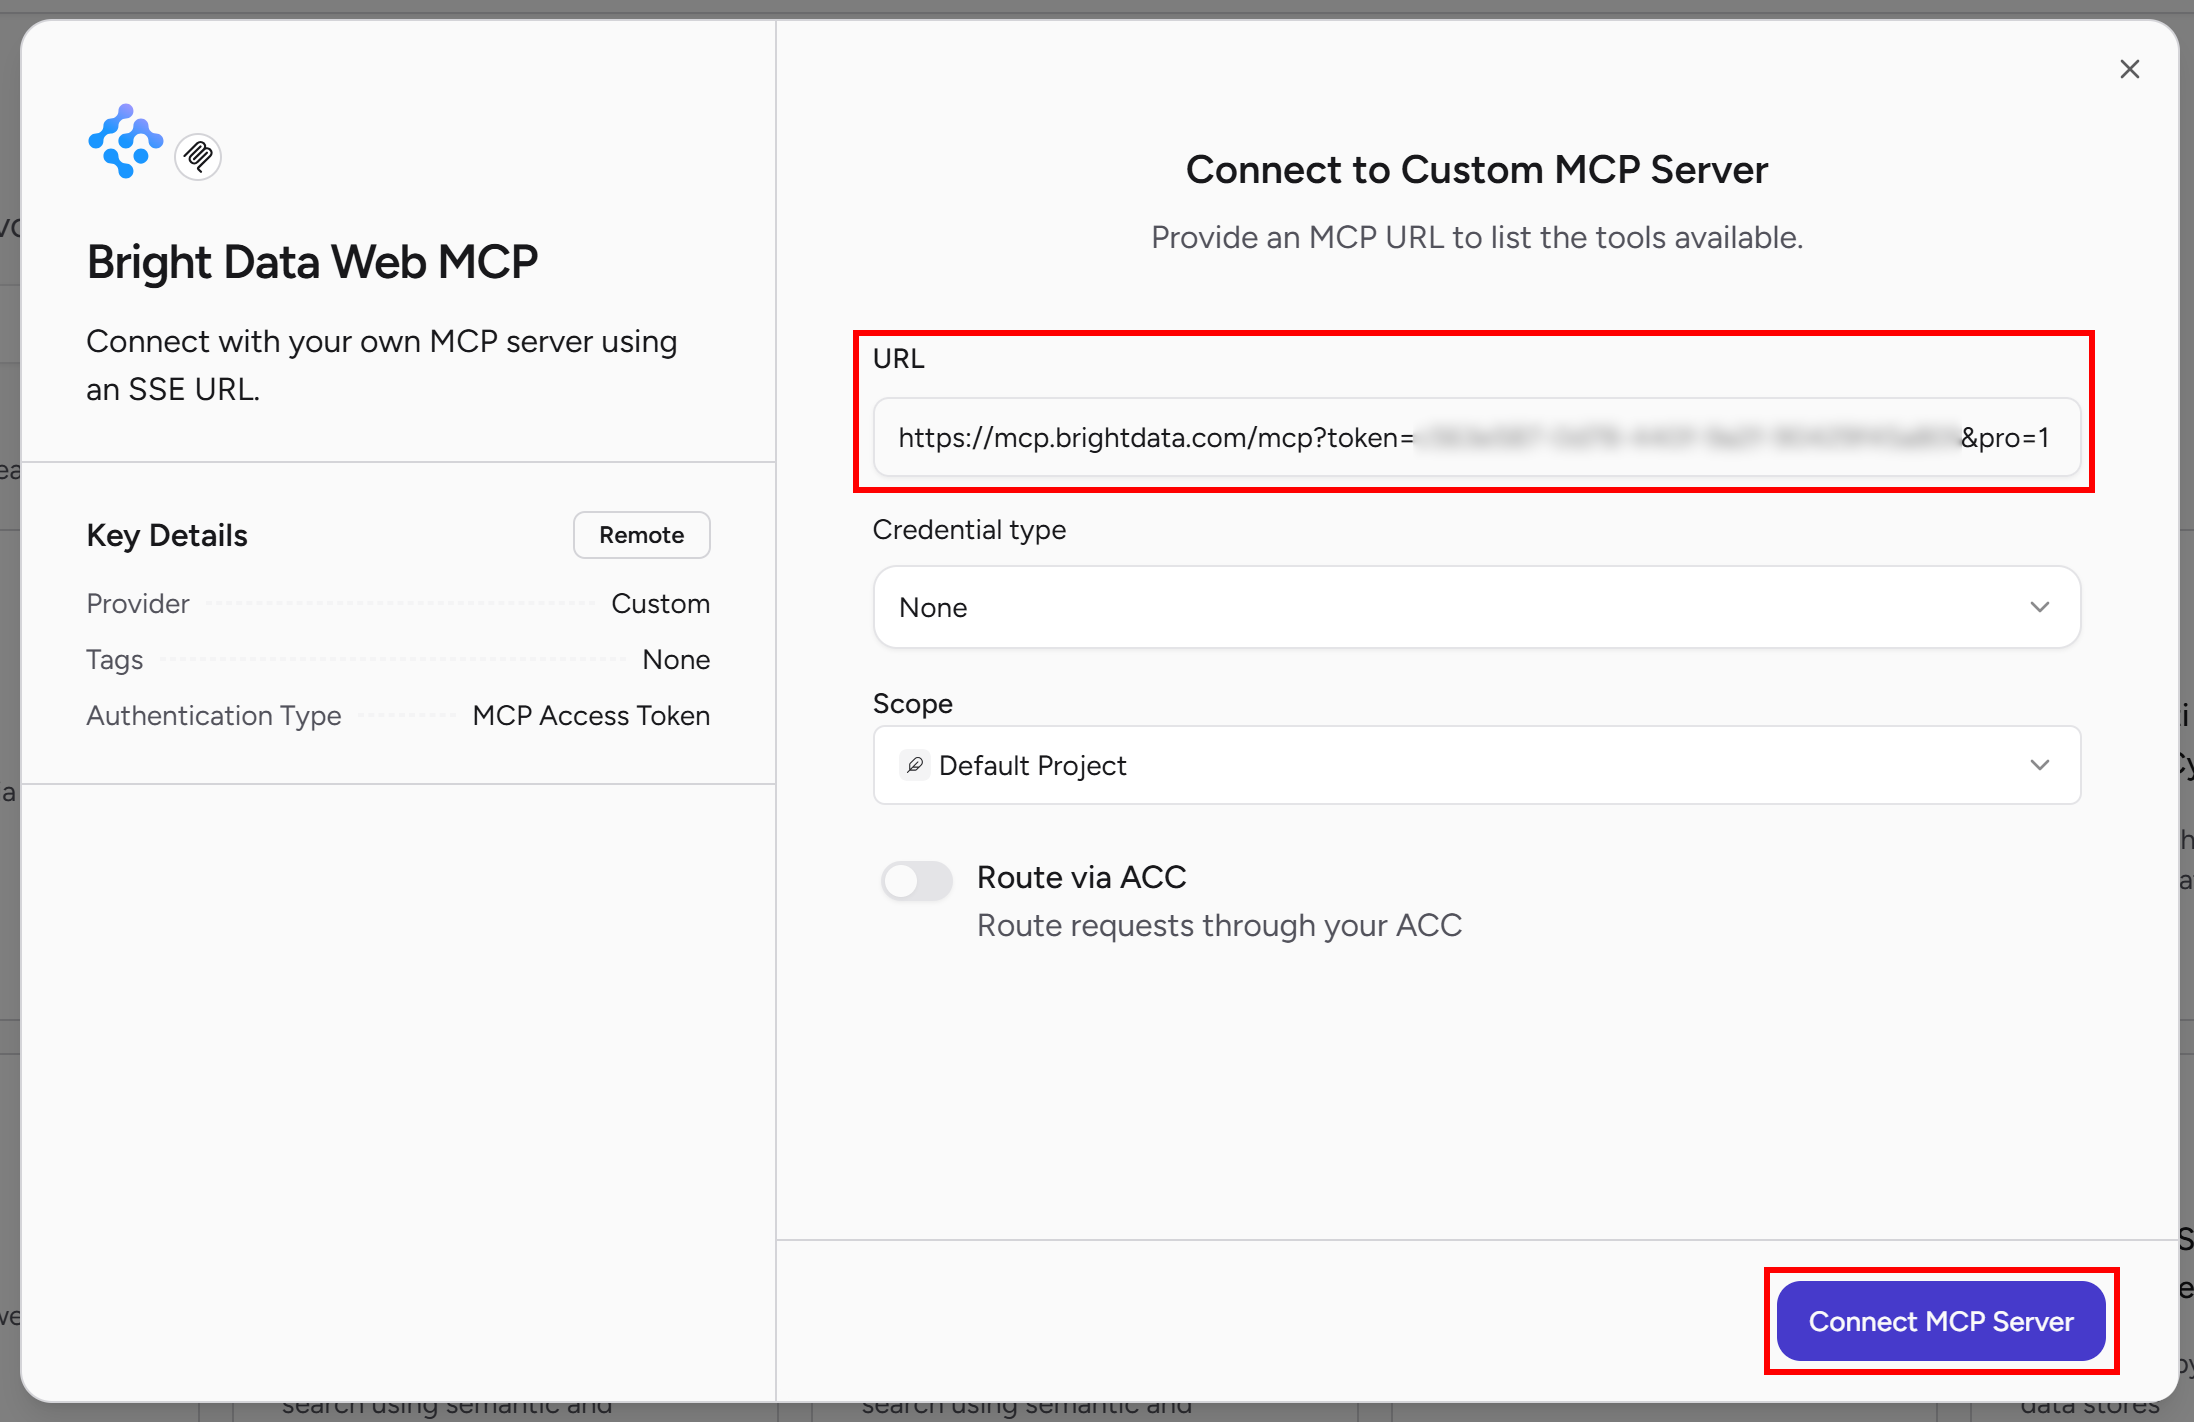
Click “Connect MCP Server” to create the connection. Once the setup is complete, you should see your new entry under the “MCP (Legacy)” section:
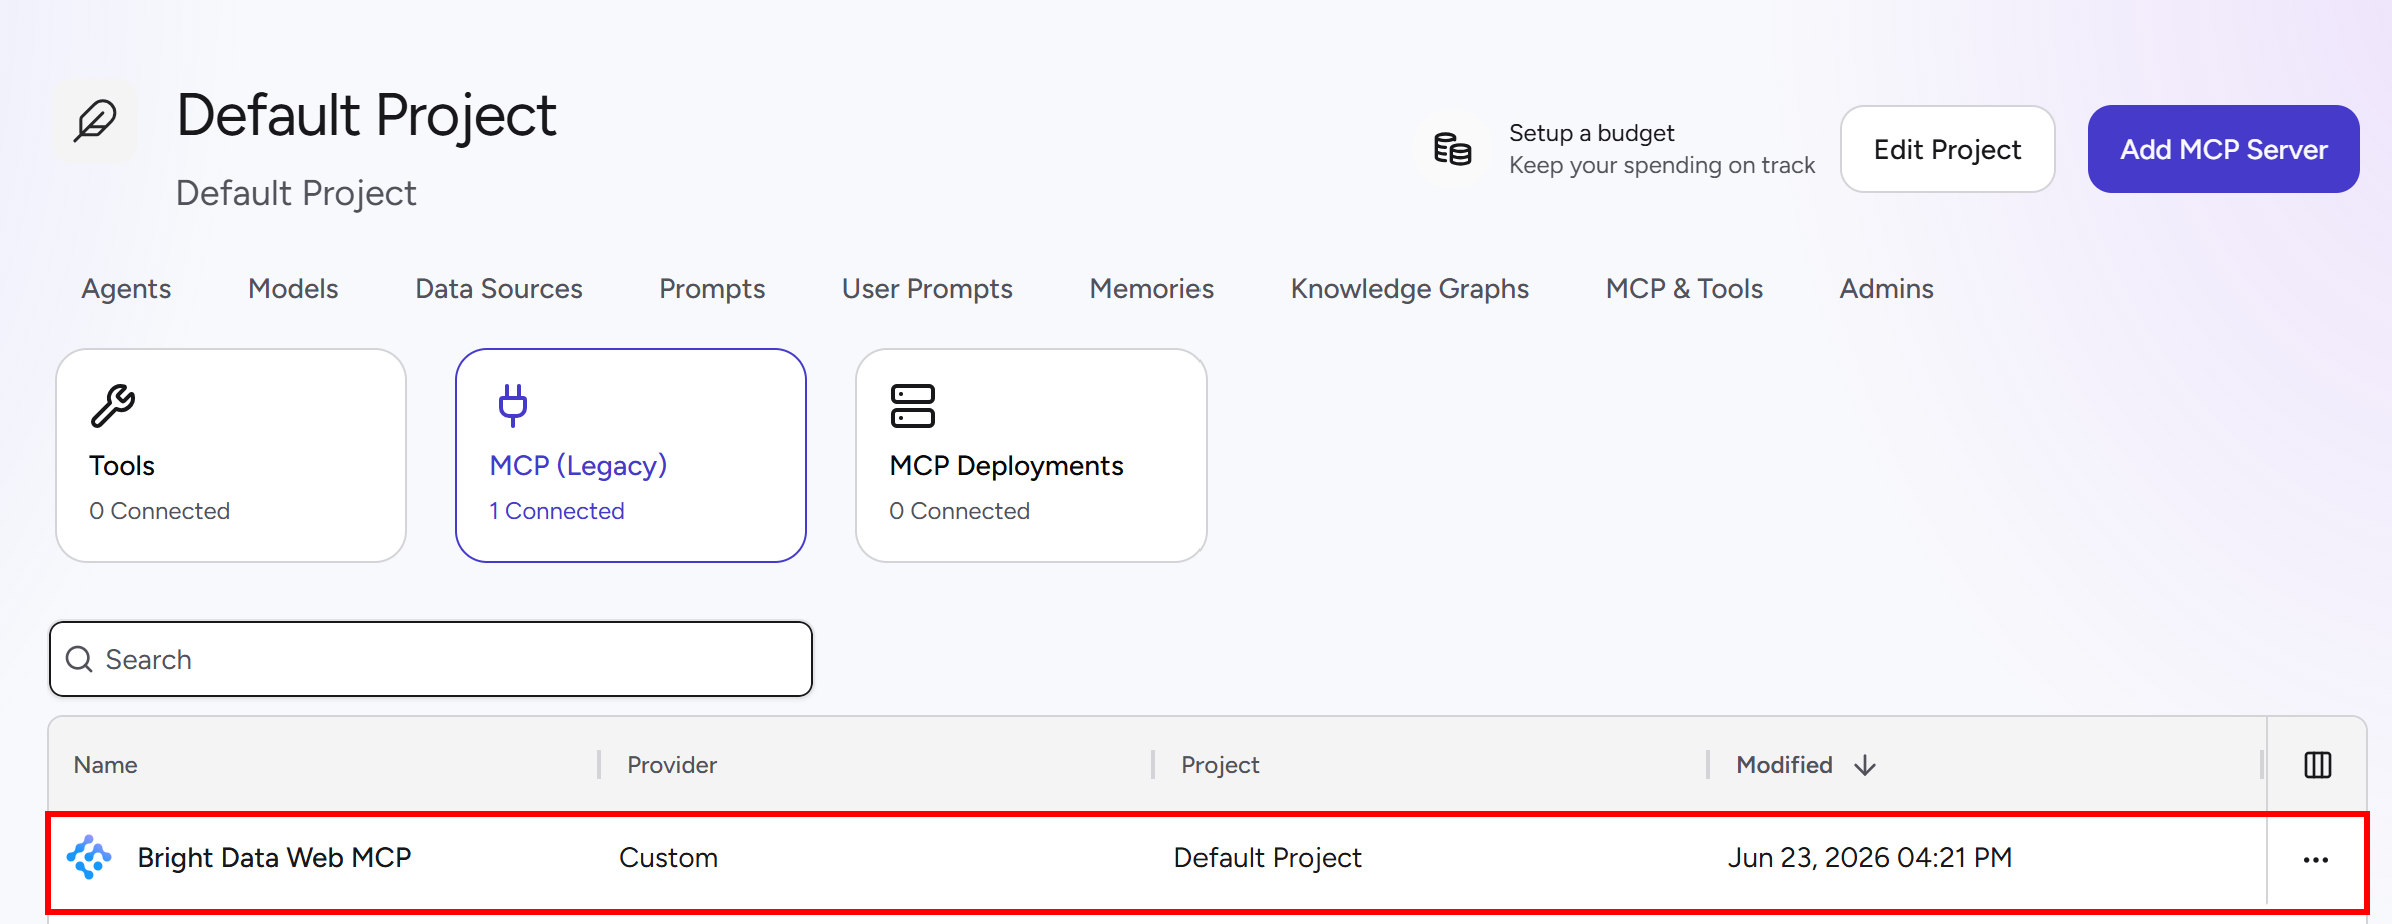
Wonderful! Bright Data Web MCP is now available to your Airia agents.
Step #3: Define Your Airia Agent
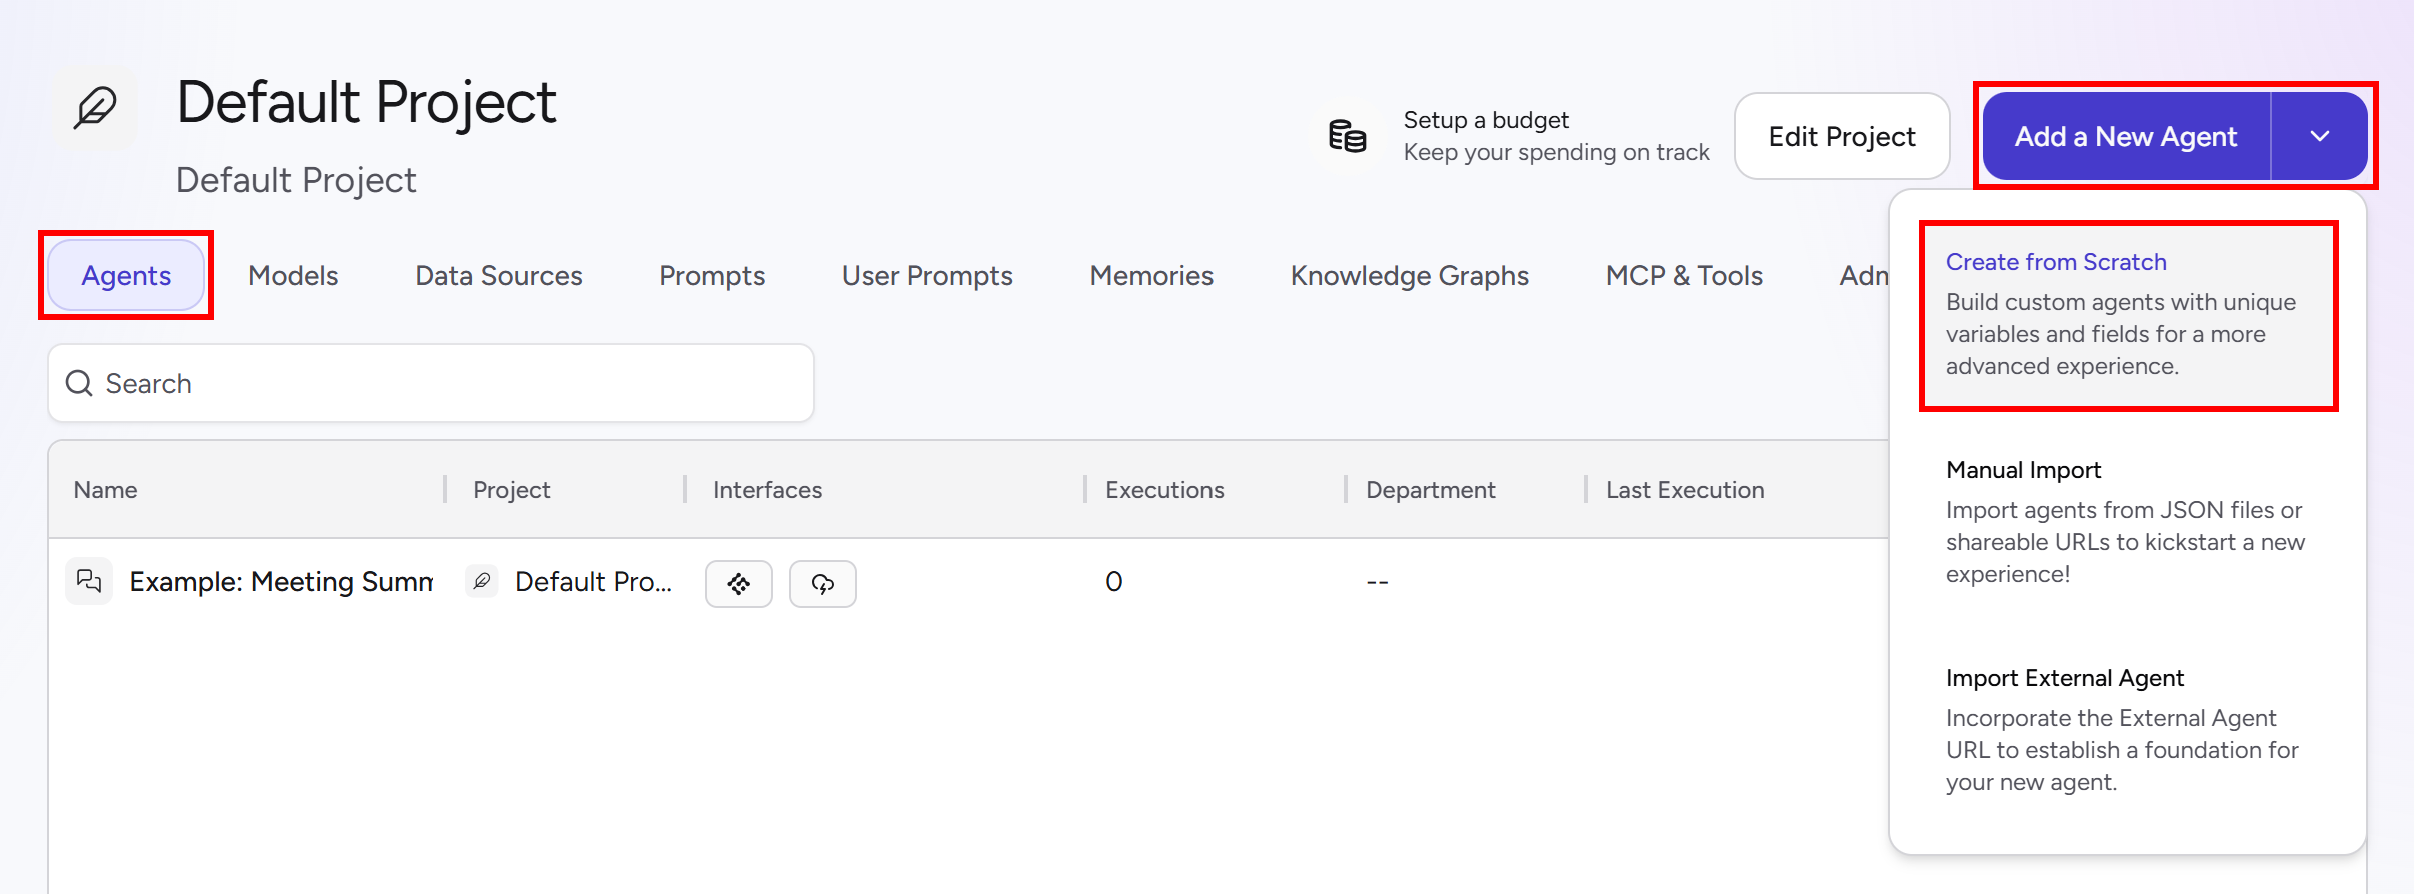
Return to the “Default Project” page, open the “Agents” tab, and click “Add a New Agent > Create from Scratch”:
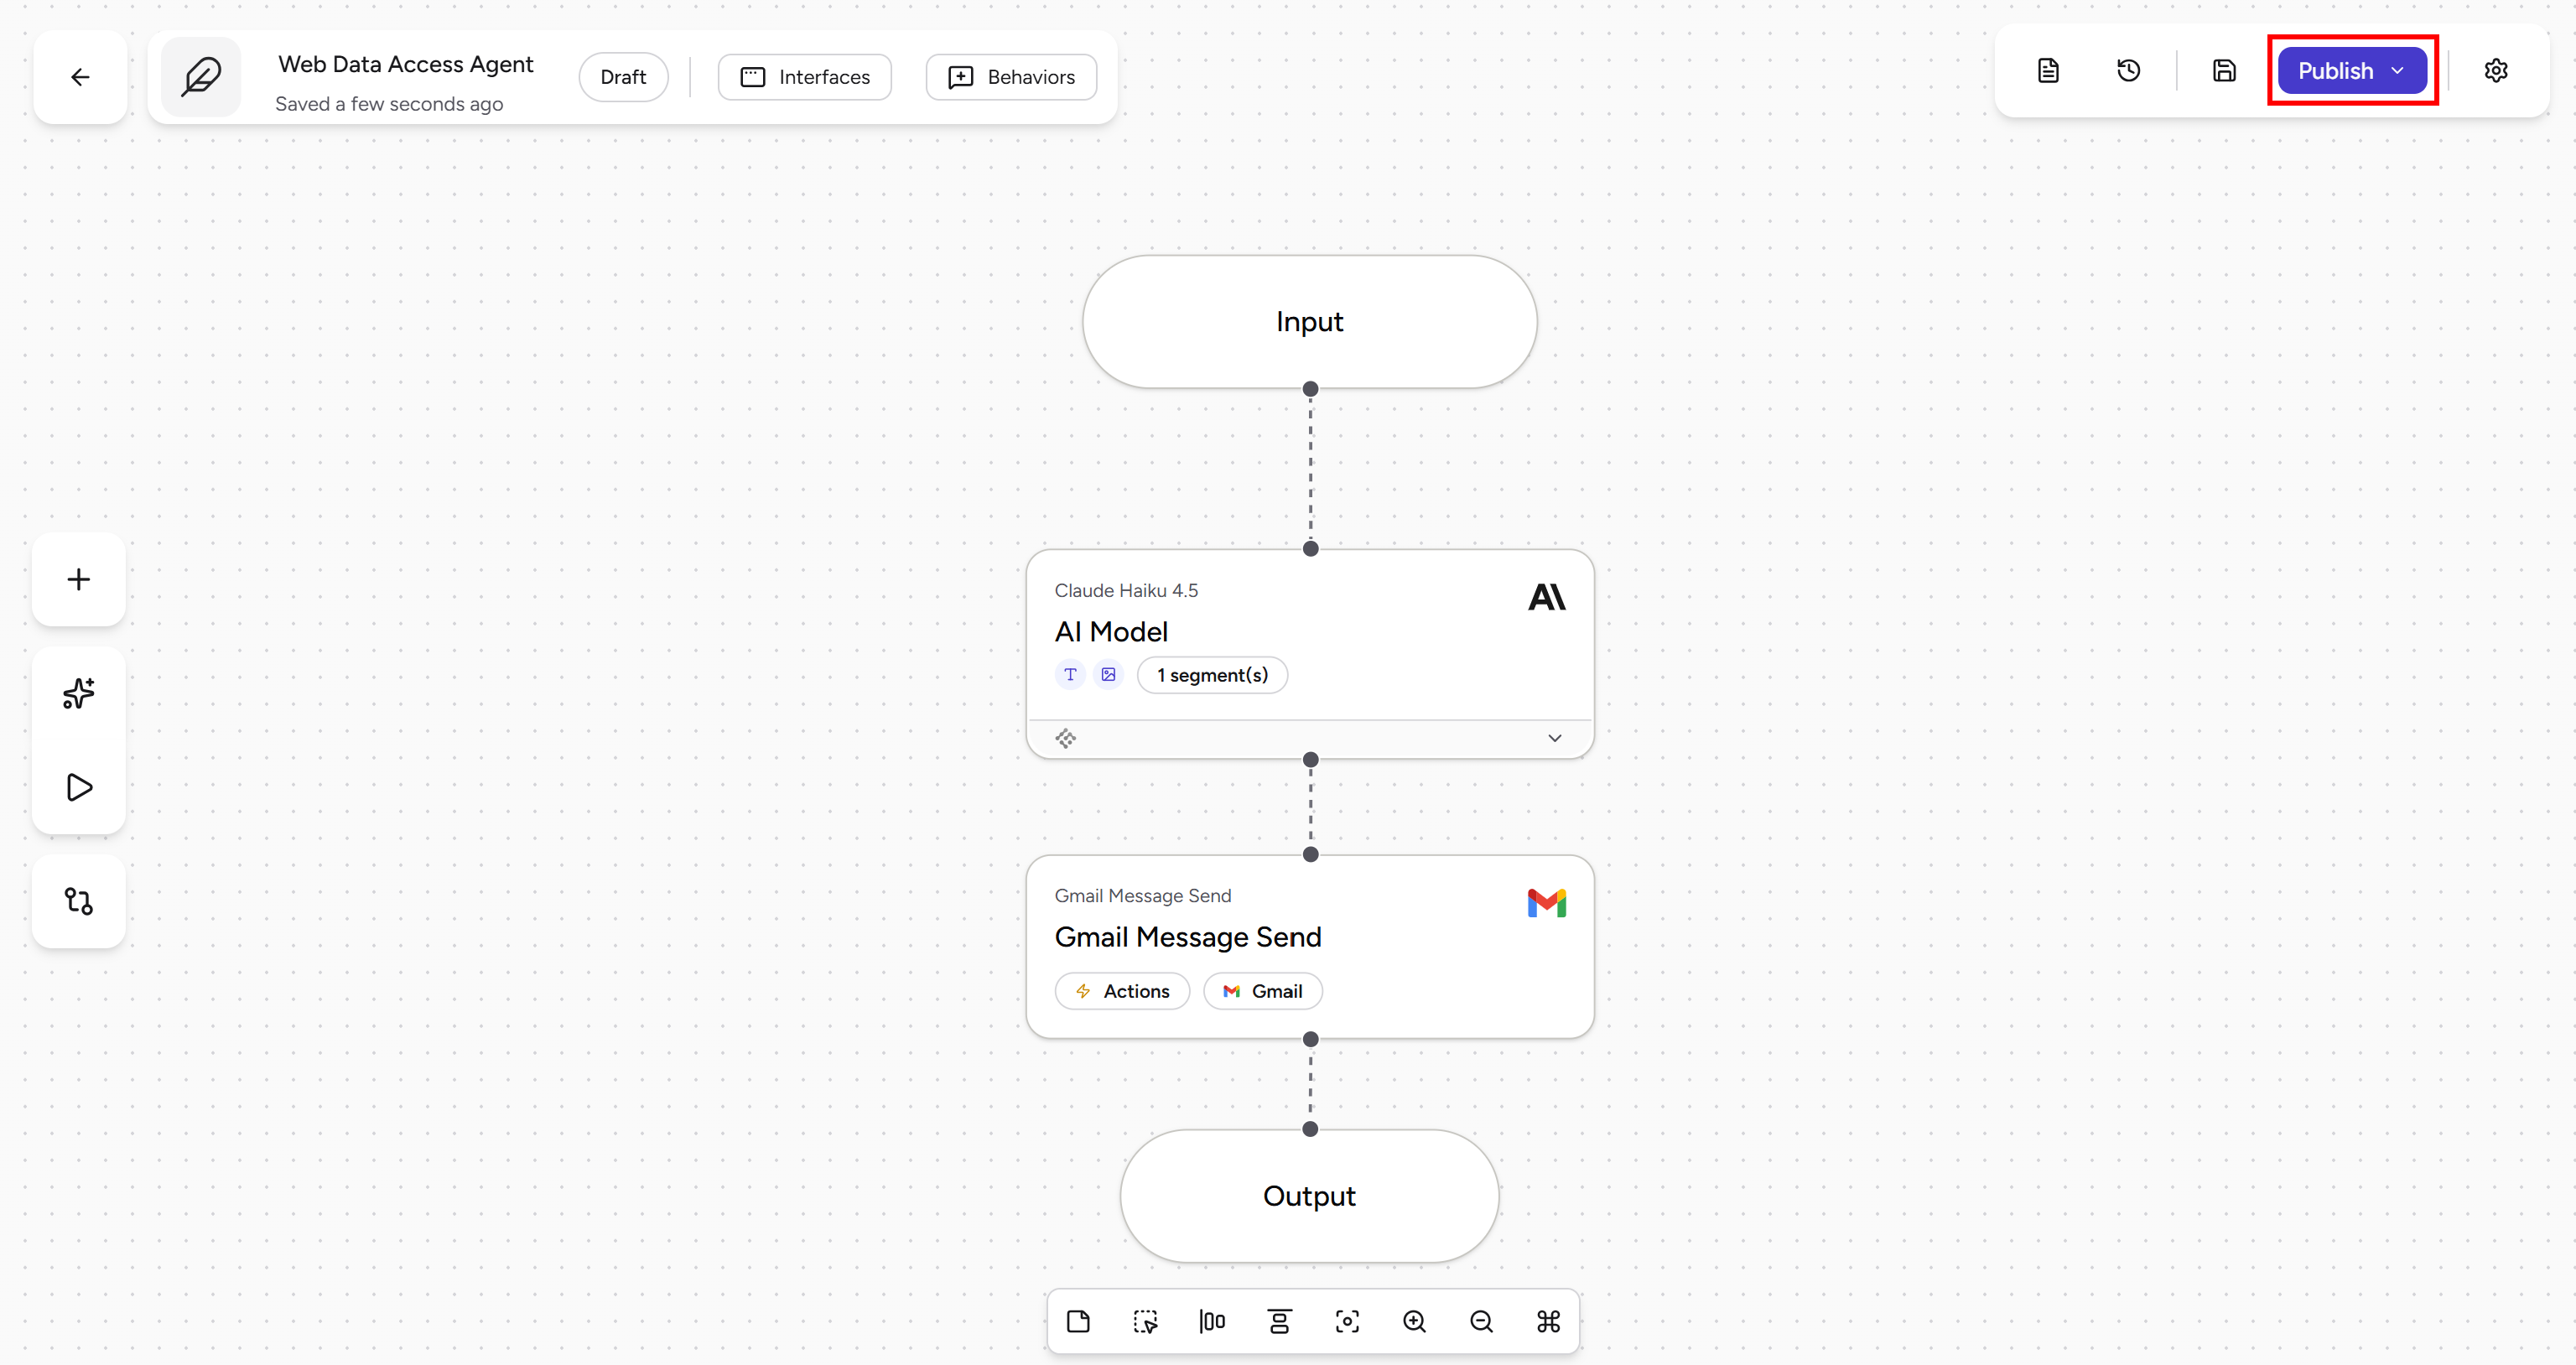
Give your agent a descriptive name, such as “Web Data Access Agent”. By default, the agent canvas contains three blocks:
- Input: Receives user input in the form of text or images.
- AI Model: Connects to an AI model (Claude Haiku 4.5 by default) that processes the input according to your instructions.
- Output: Returns the final response generated by the agent.
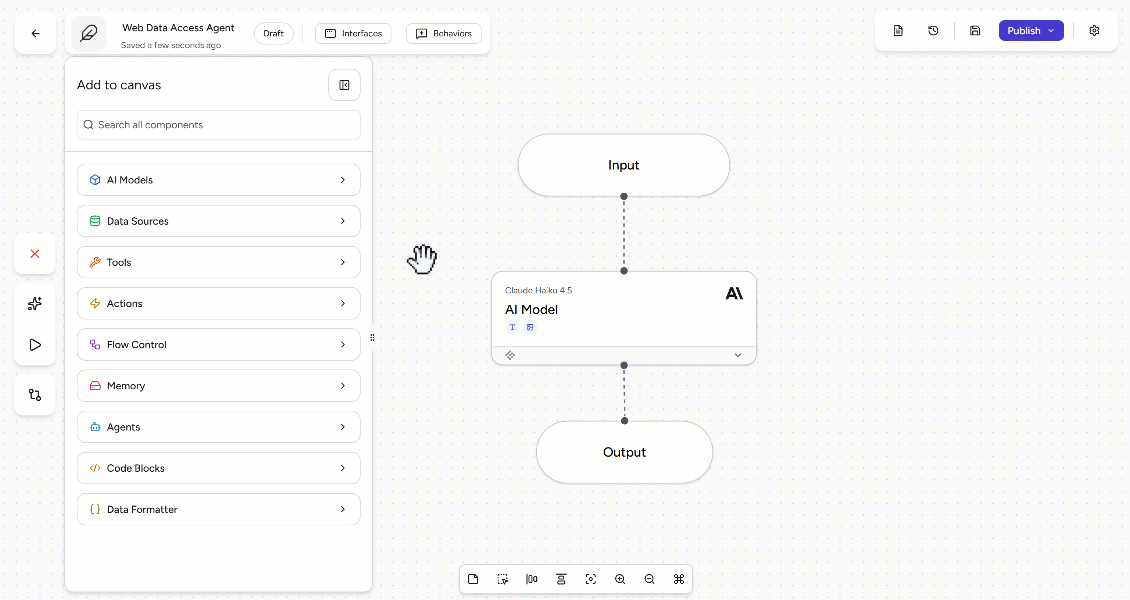
Next, add a Gmail action that the agent can use to send emails. Click “Add to Canvas” in the left sidebar, open the “Actions” category, and drag the “Gmail Message Send” block onto the canvas:
Position the “Gmail Message Send” block between “AI Model” and “Output”. Your agent workflow will be:
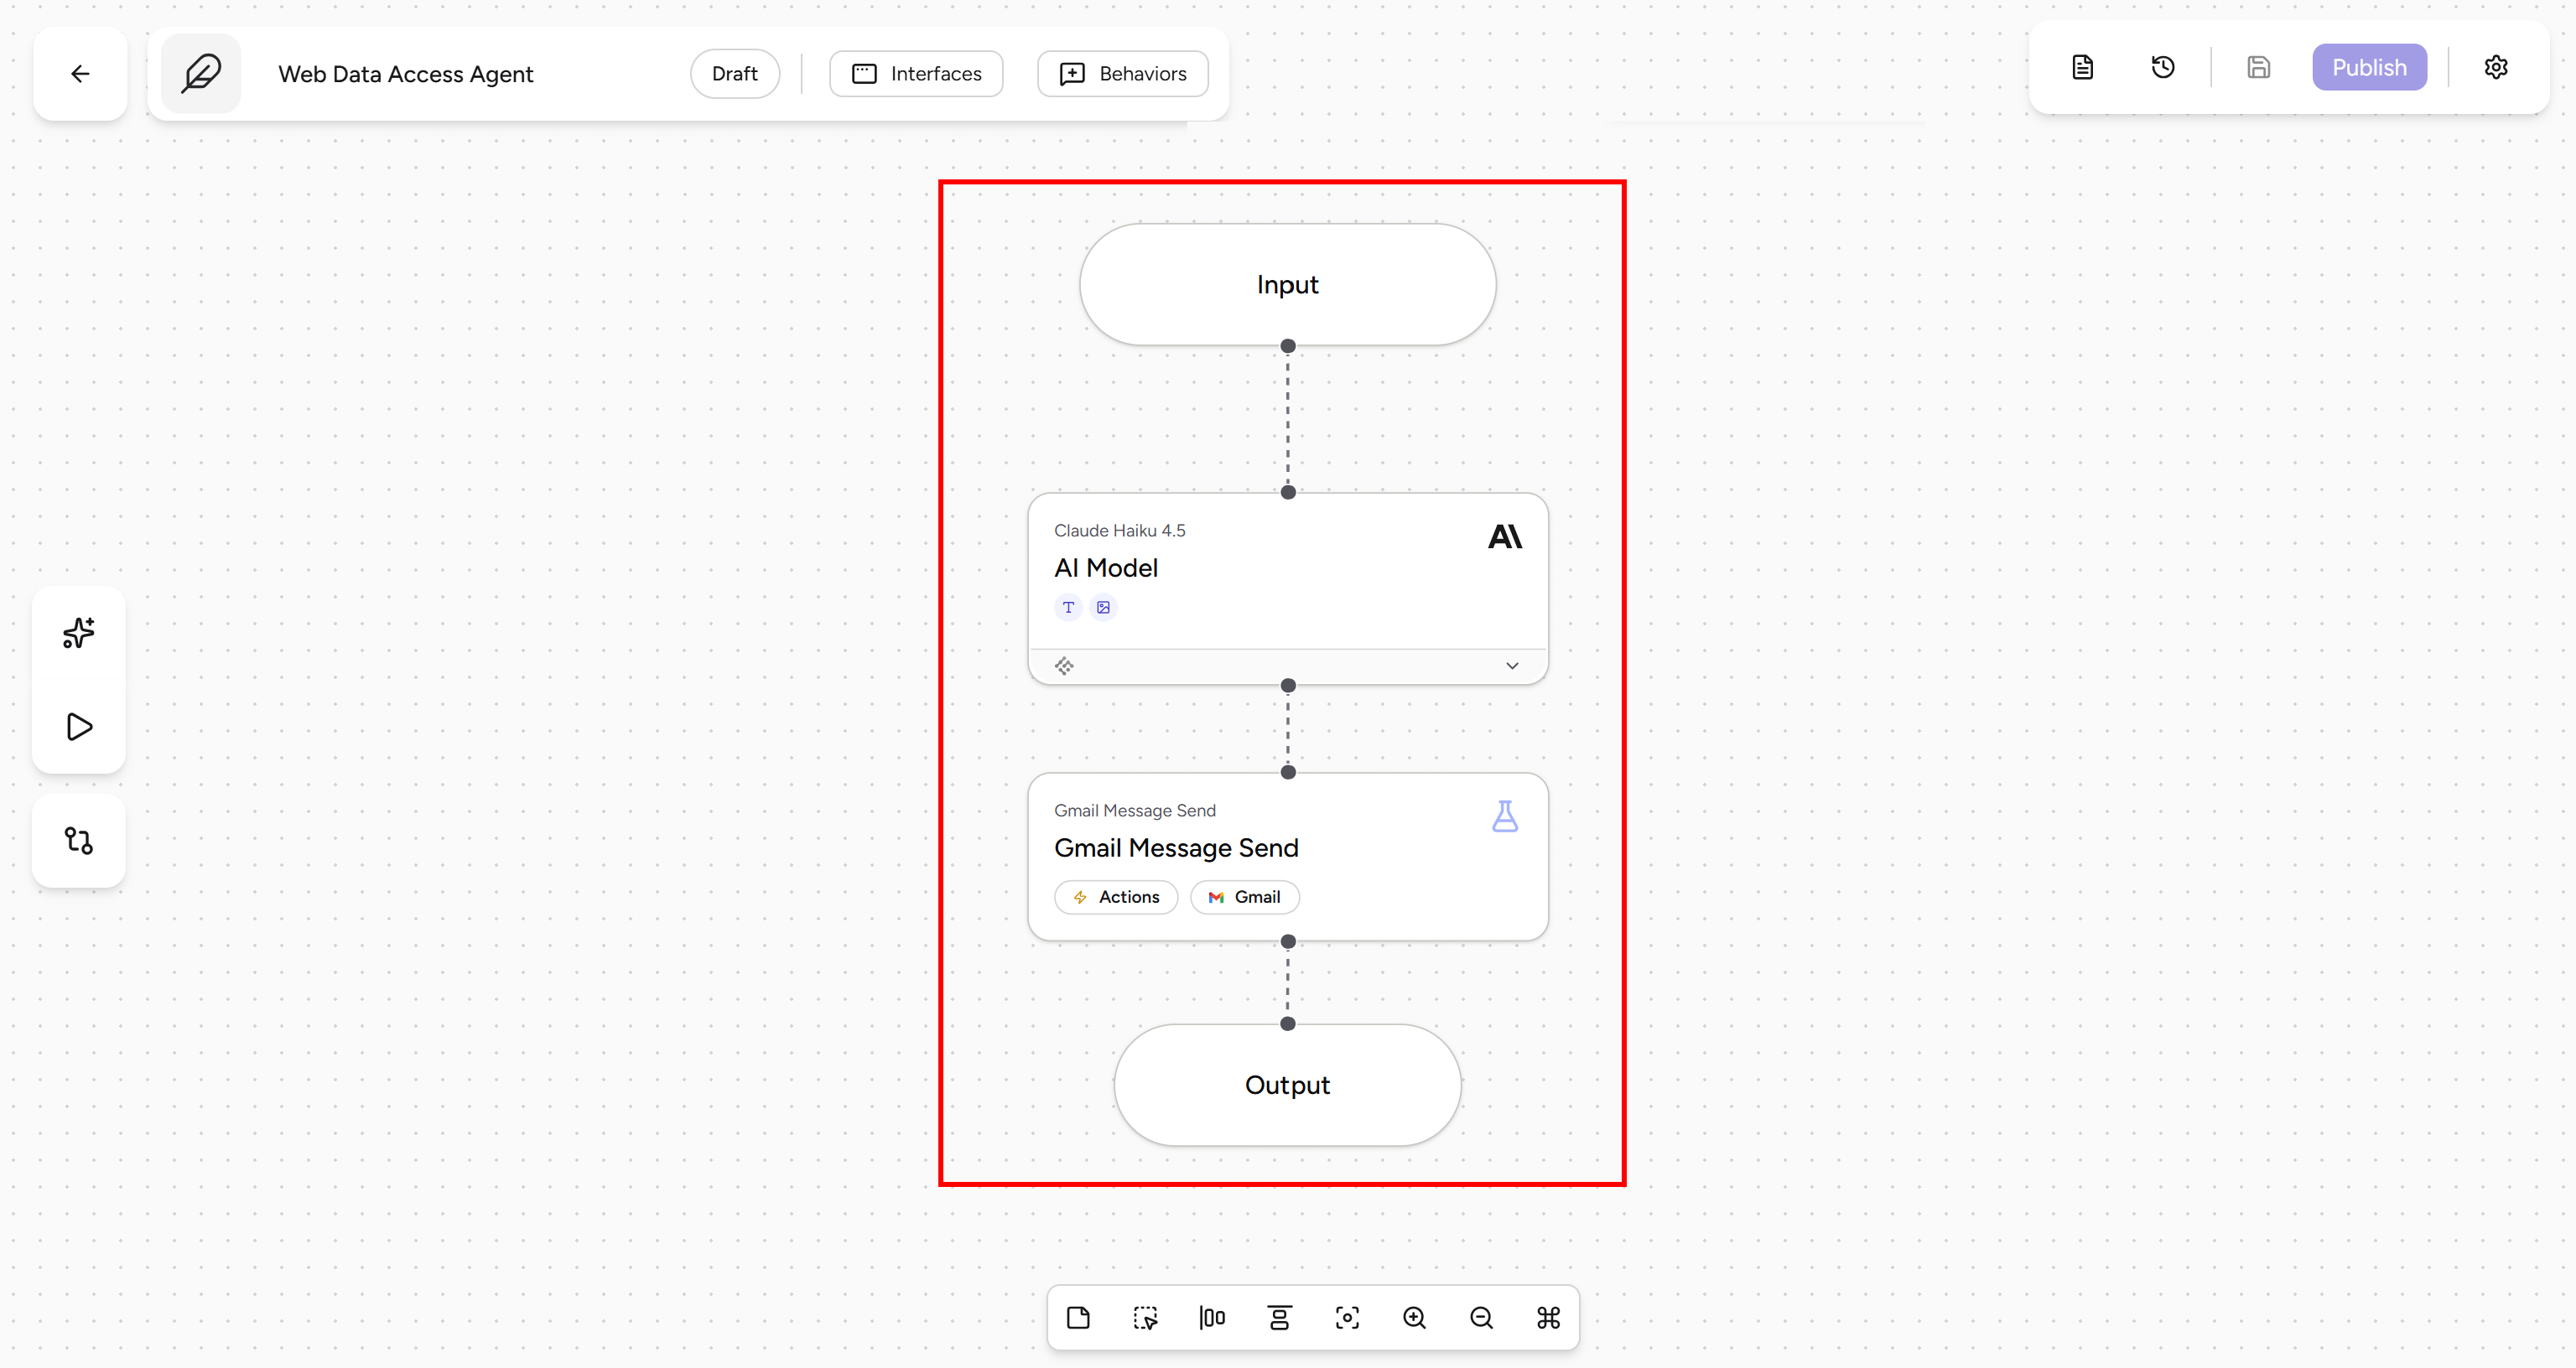
Perfect! The basic structure of your agent is now in place. In the next step, you will configure each block and define the agent’s behavior.
Step #4: Configure the Input Block
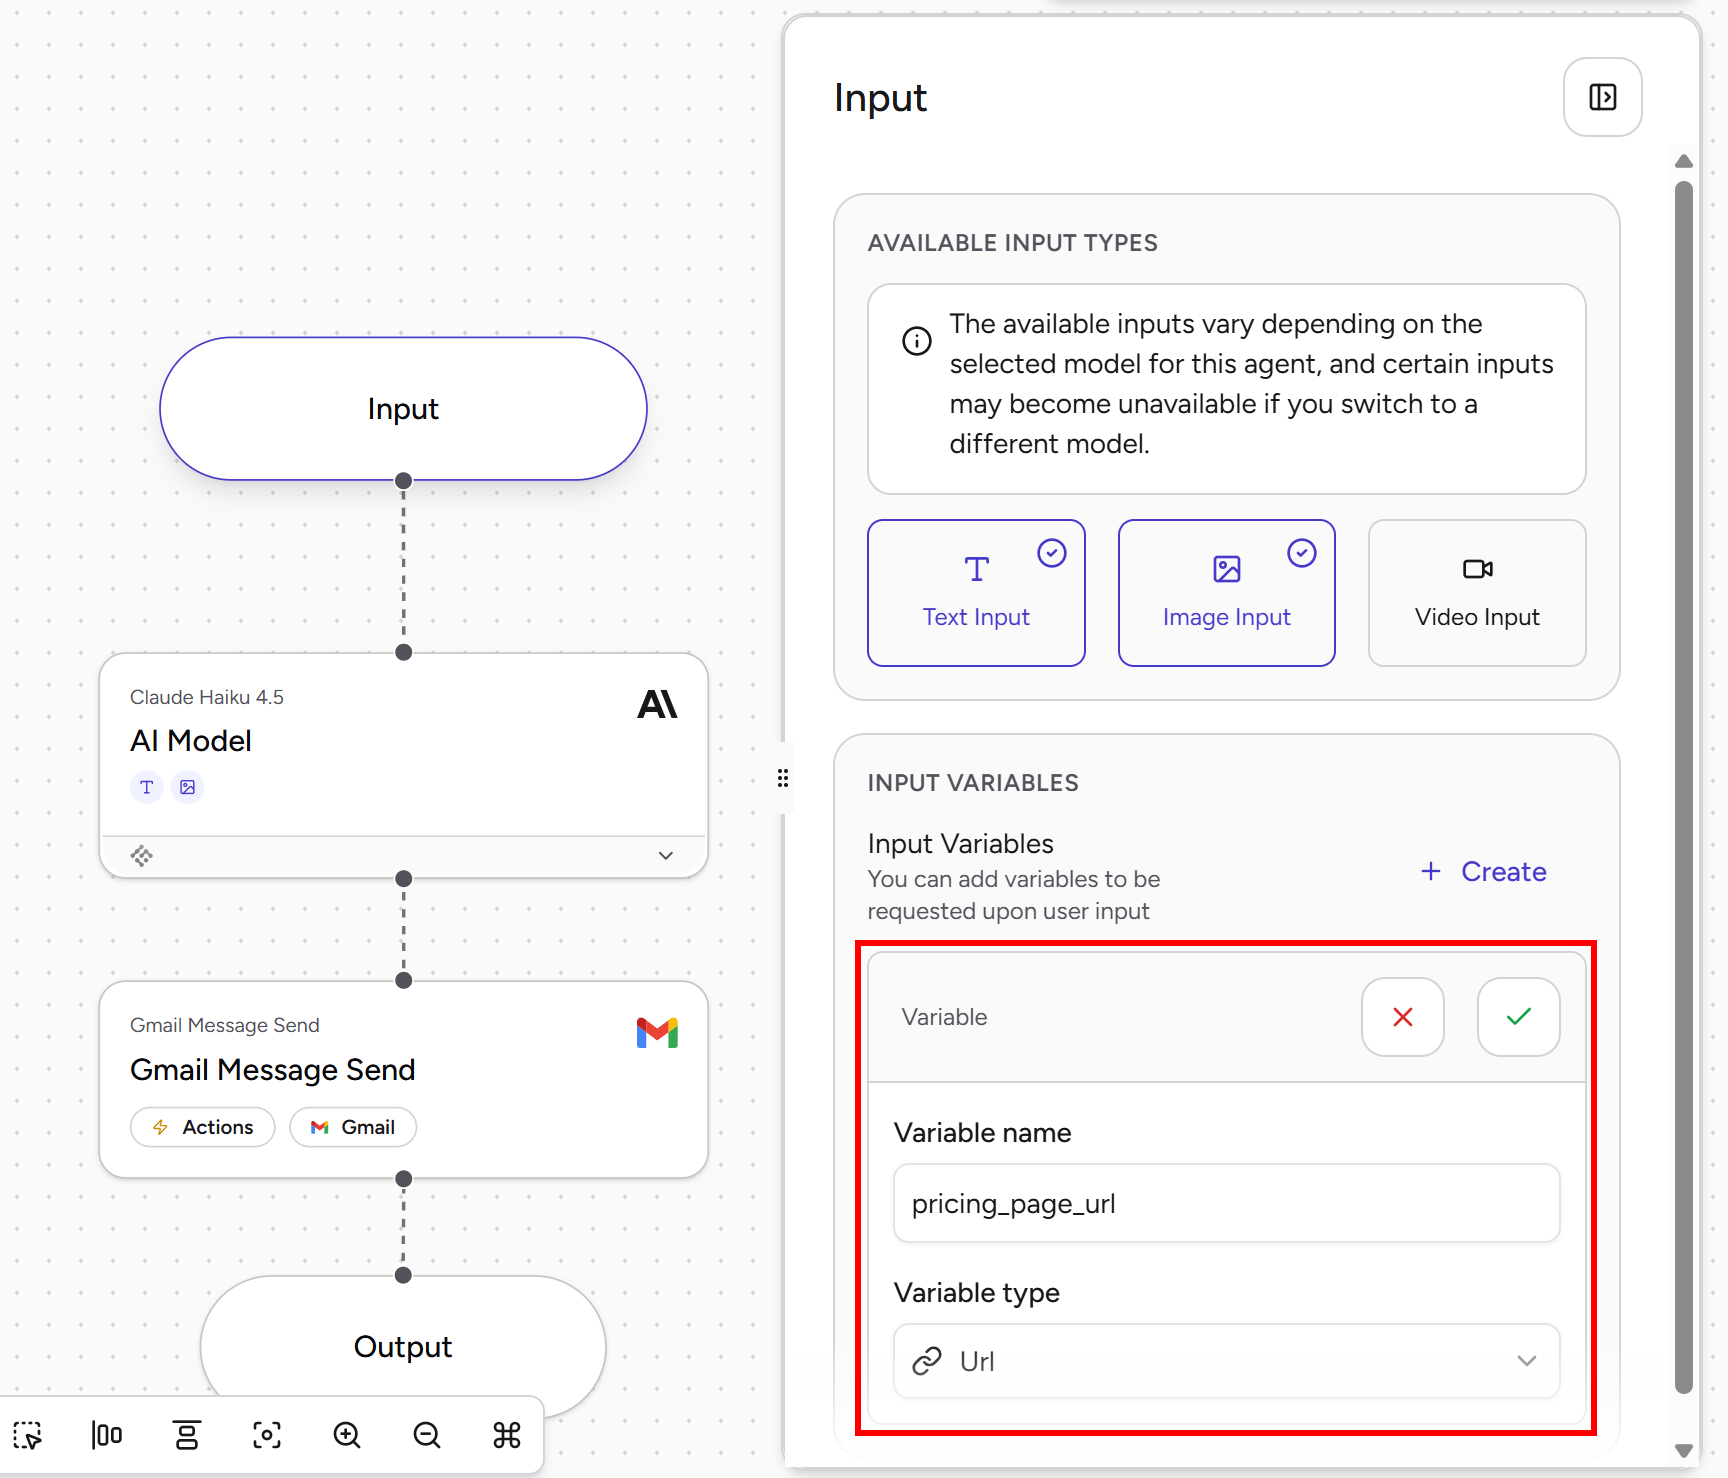
This agent requires two input variables:
pricing_page_url(URL): The URL of your company’s pricing page.competitor_name(Text): The name of the competitor whose pricing you want to monitor.
The pricing_page_url variable lets the agent directly retrieve pricing information from your website. The competitor_name variable enables the agent to search the web for the competitor’s pricing page and related information, then extract the relevant data. In both cases, these actions are supported by Bright Data’s Web MCP tools.
To define those variables, select the “Input” block. In the “INPUT VARIABLES” section, click “+ Create” and fill out the form by specifying a name and type for the variable. When finished, click the “✓” button to save it:
Repeat the same process for competitor_name. Once complete, you should see both input variables listed in the “Input” block:
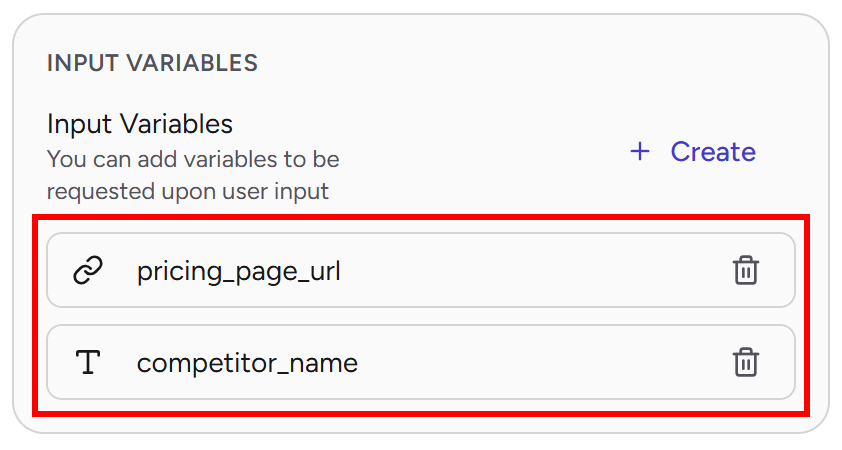
Excellent! The input layer for your automated competitor pricing analysis agent is now ready.
Step #5: Set Up the AI Model Block
Start by connecting the Bright Data Web MCP tools to the “AI Model” block.
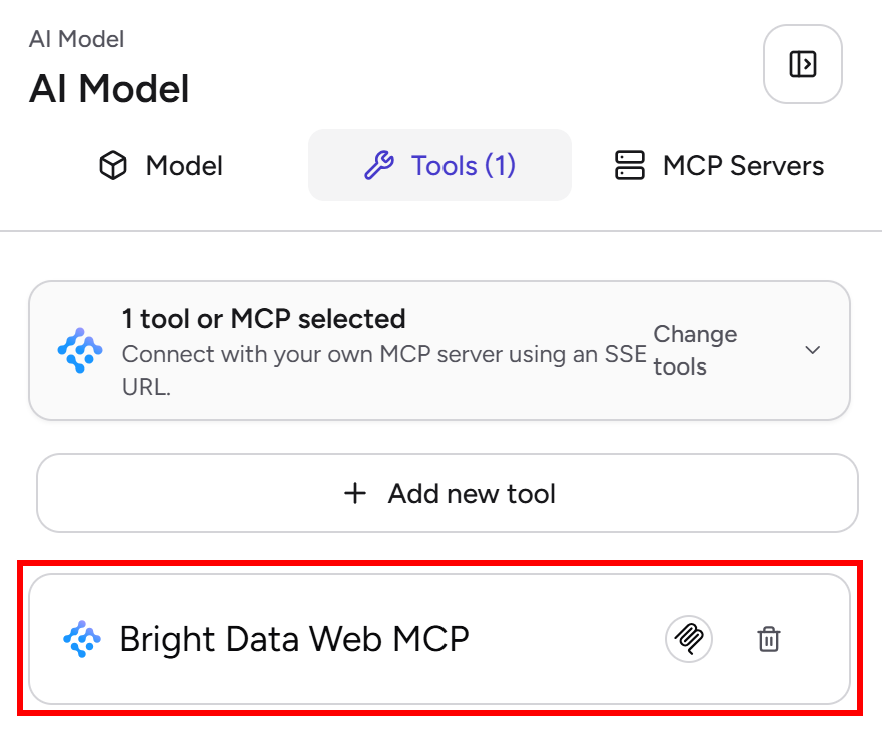
Select the “AI Model block” and open the “Tools” tab. In the “SELECT TOOLS or MCPs” field, choose the Bright Data Web MCP connection you configured earlier:
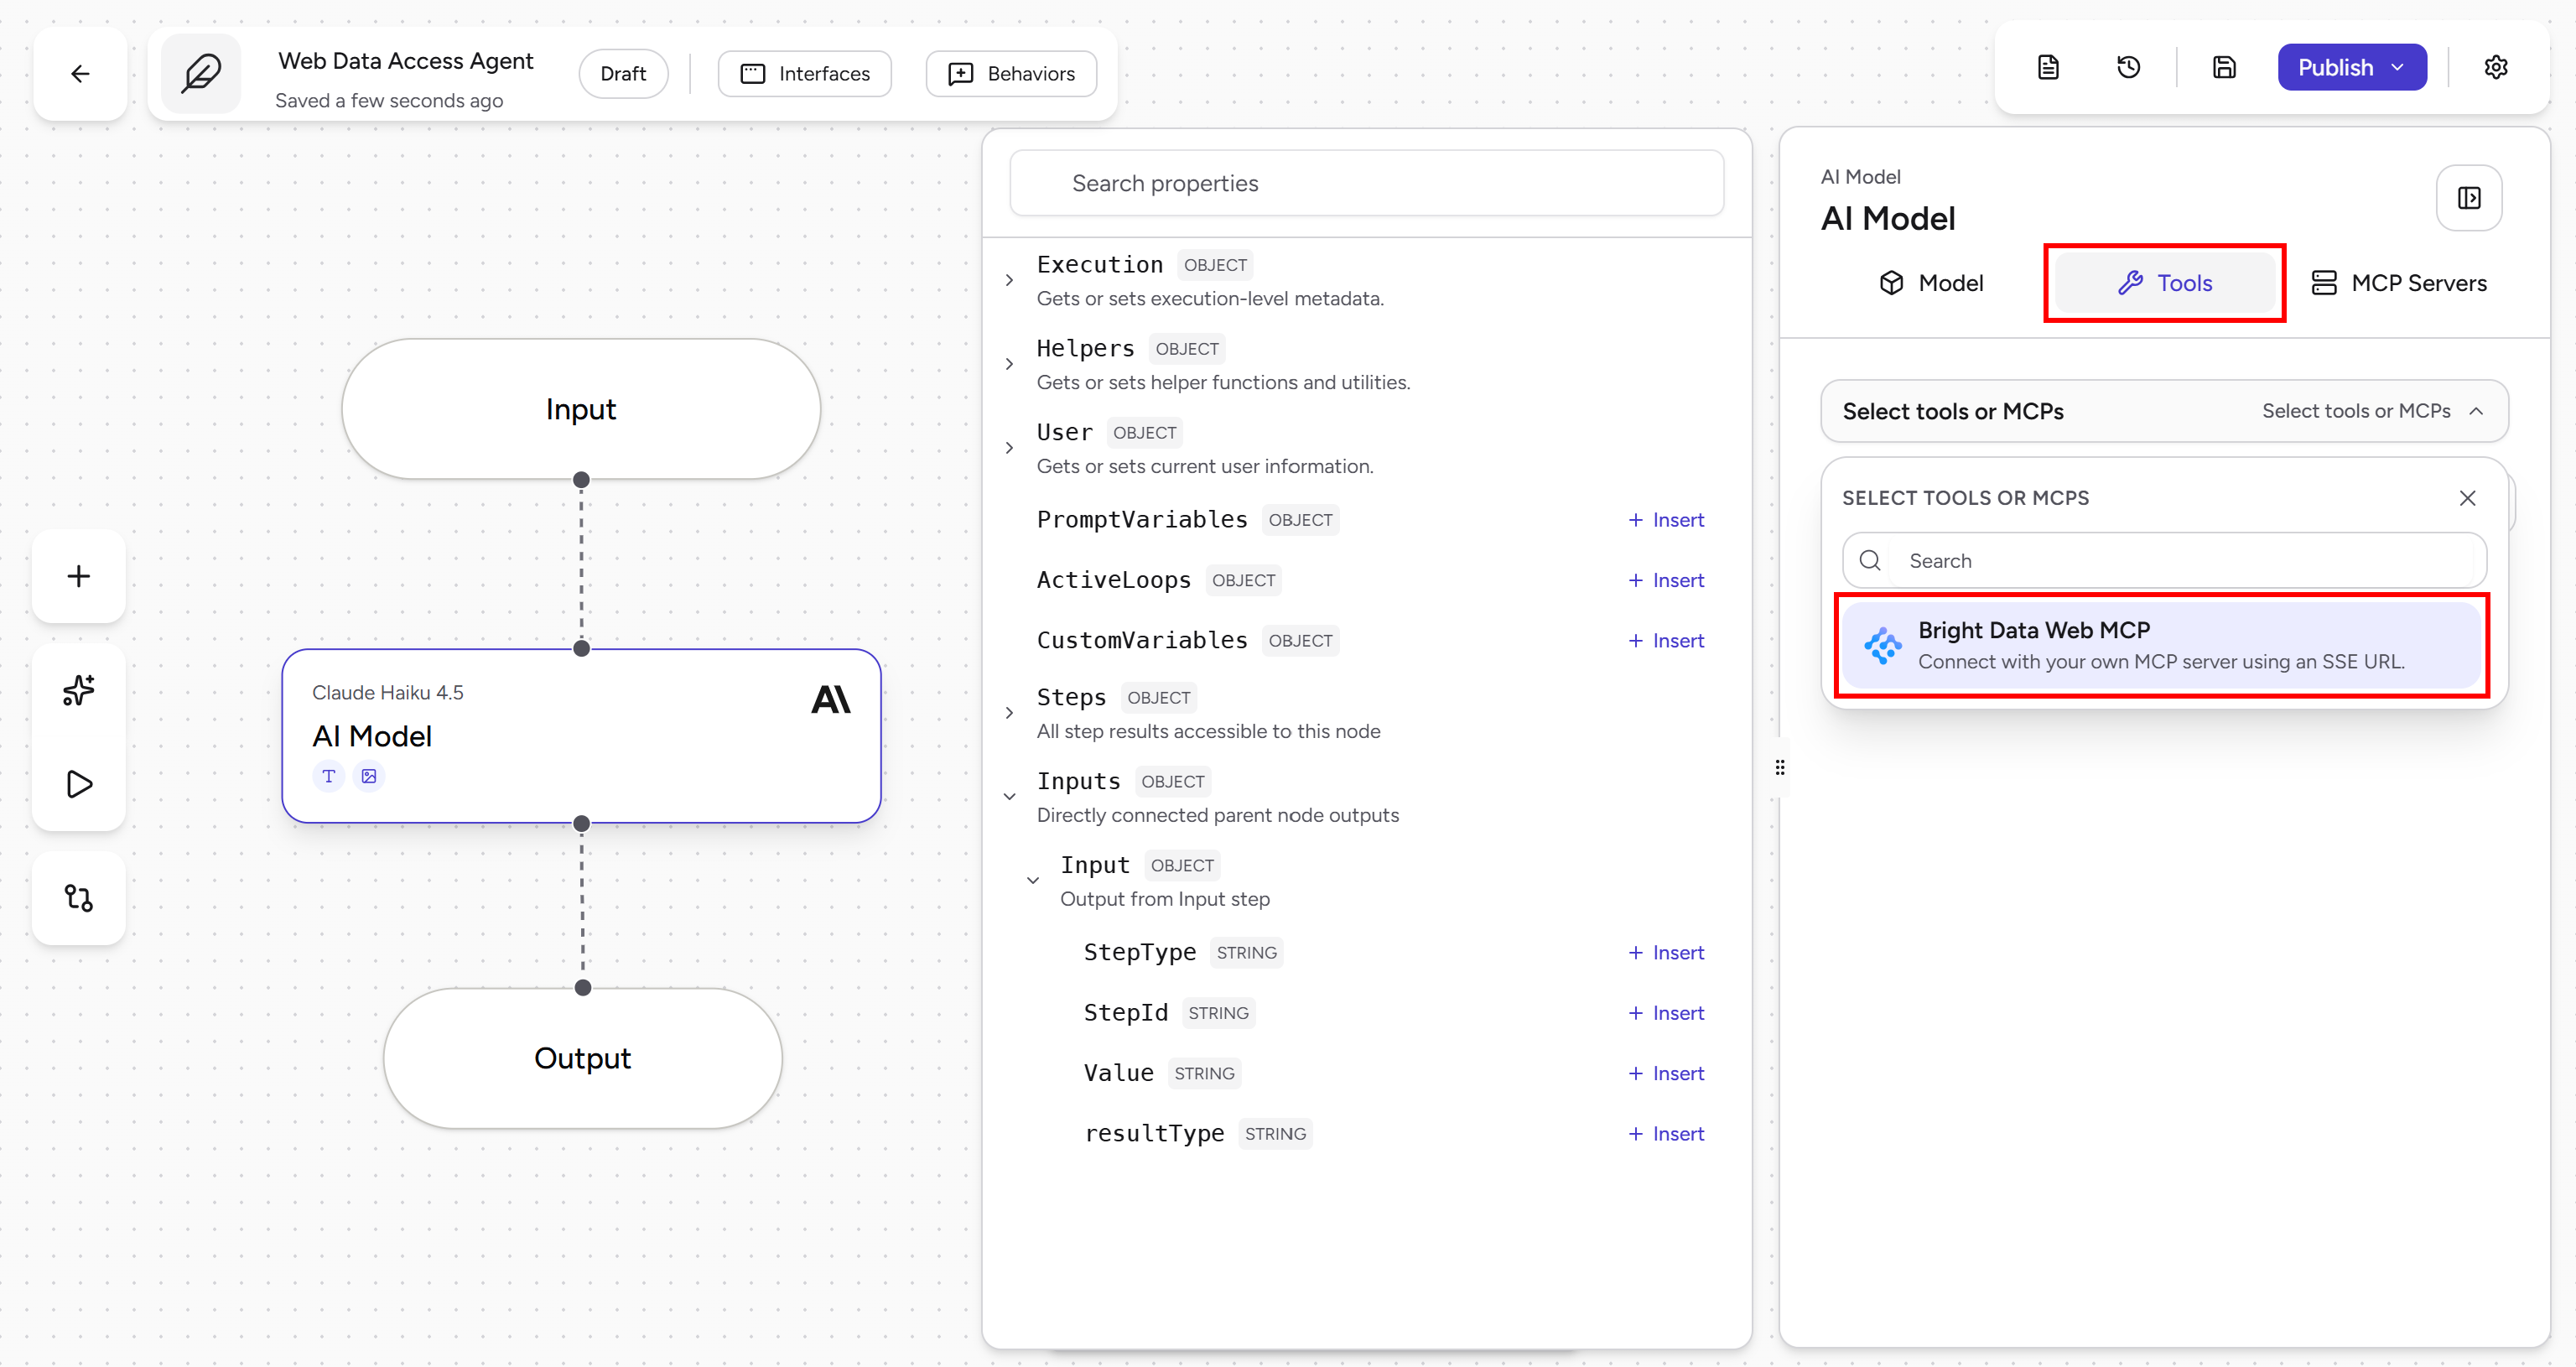
Once selected, the Web MCP tools will be available to the AI model:
Next, switch to the “Model” tab and define the agent’s instructions. To reference the input variables created earlier, click inside the “Instructions” editor and use the “Variables” panel on the left to insert the competitor_name and pricing_page_url variables:
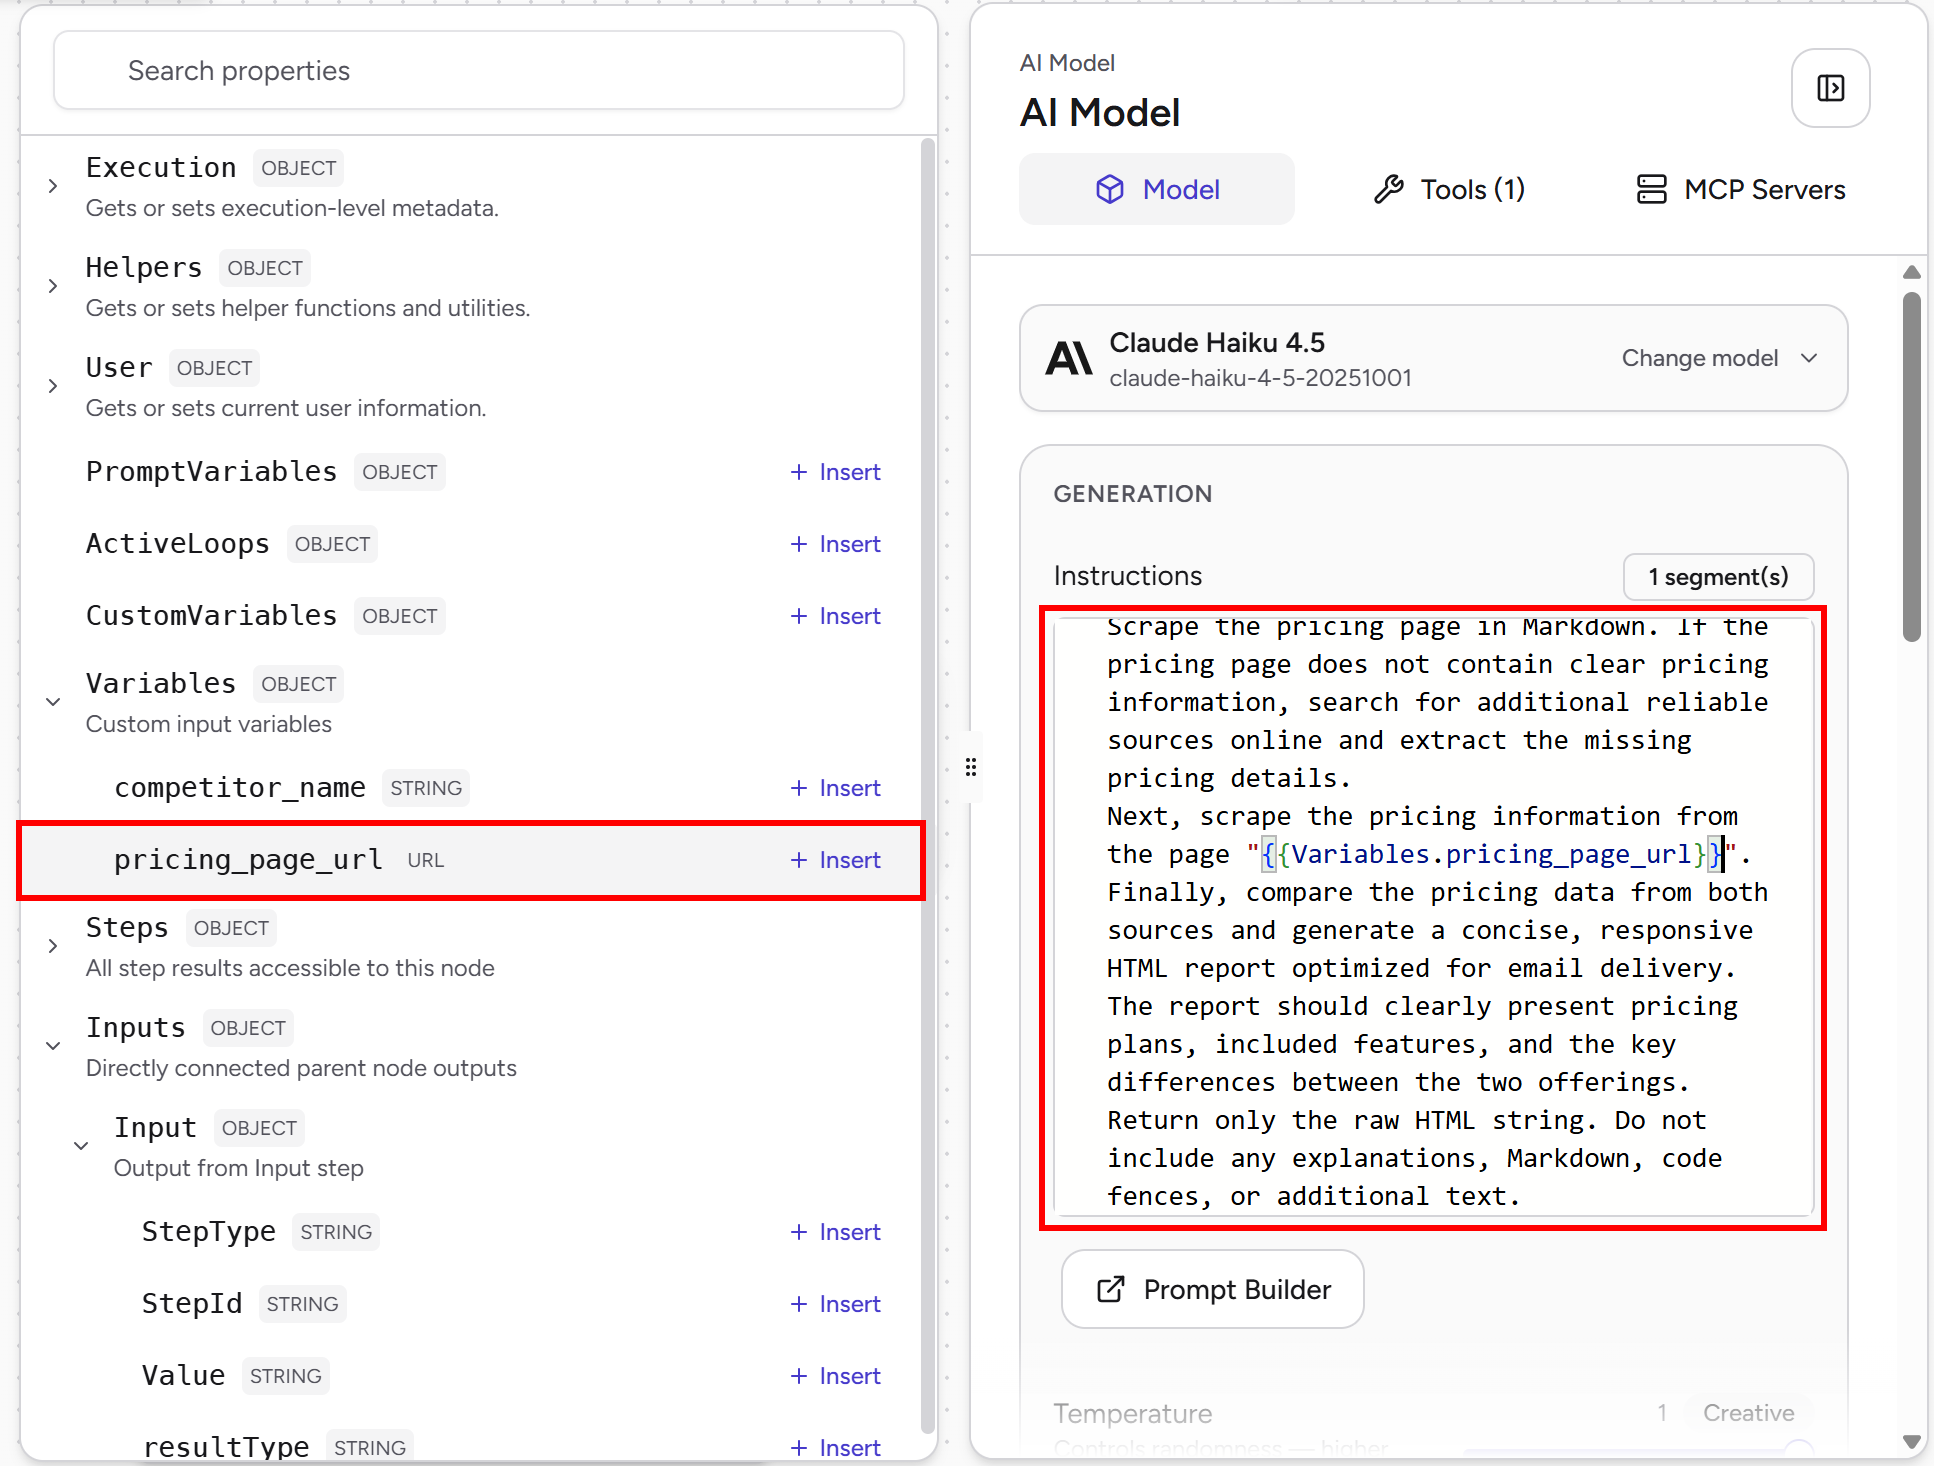
The final prompt will be:
Search online for the pricing page of the company "{{Variables.competitor_name}}".
Scrape the pricing page in Markdown. If the pricing page does not contain clear pricing information, search for additional reliable sources online and extract the missing pricing details.
Next, scrape the pricing information from the page "{{Variables.pricing_page_url}}".
Finally, compare the pricing data from both sources and generate a concise, responsive HTML report optimized for email delivery. The report should clearly present pricing plans, included features, and the key differences between the two offerings.
Return only the raw HTML string. Do not include any explanations, Markdown, code fences, or additional text.
This prompt instructs the agent to find and analyze both pricing pages, gather any missing pricing information from reliable online sources, compare the two offerings, and generate an email-ready HTML report summarizing plans, features, and pricing differences.
Well done! The “AI Model” block can now perform automated competitor pricing analysis powered by the Bright Data Web MCP.
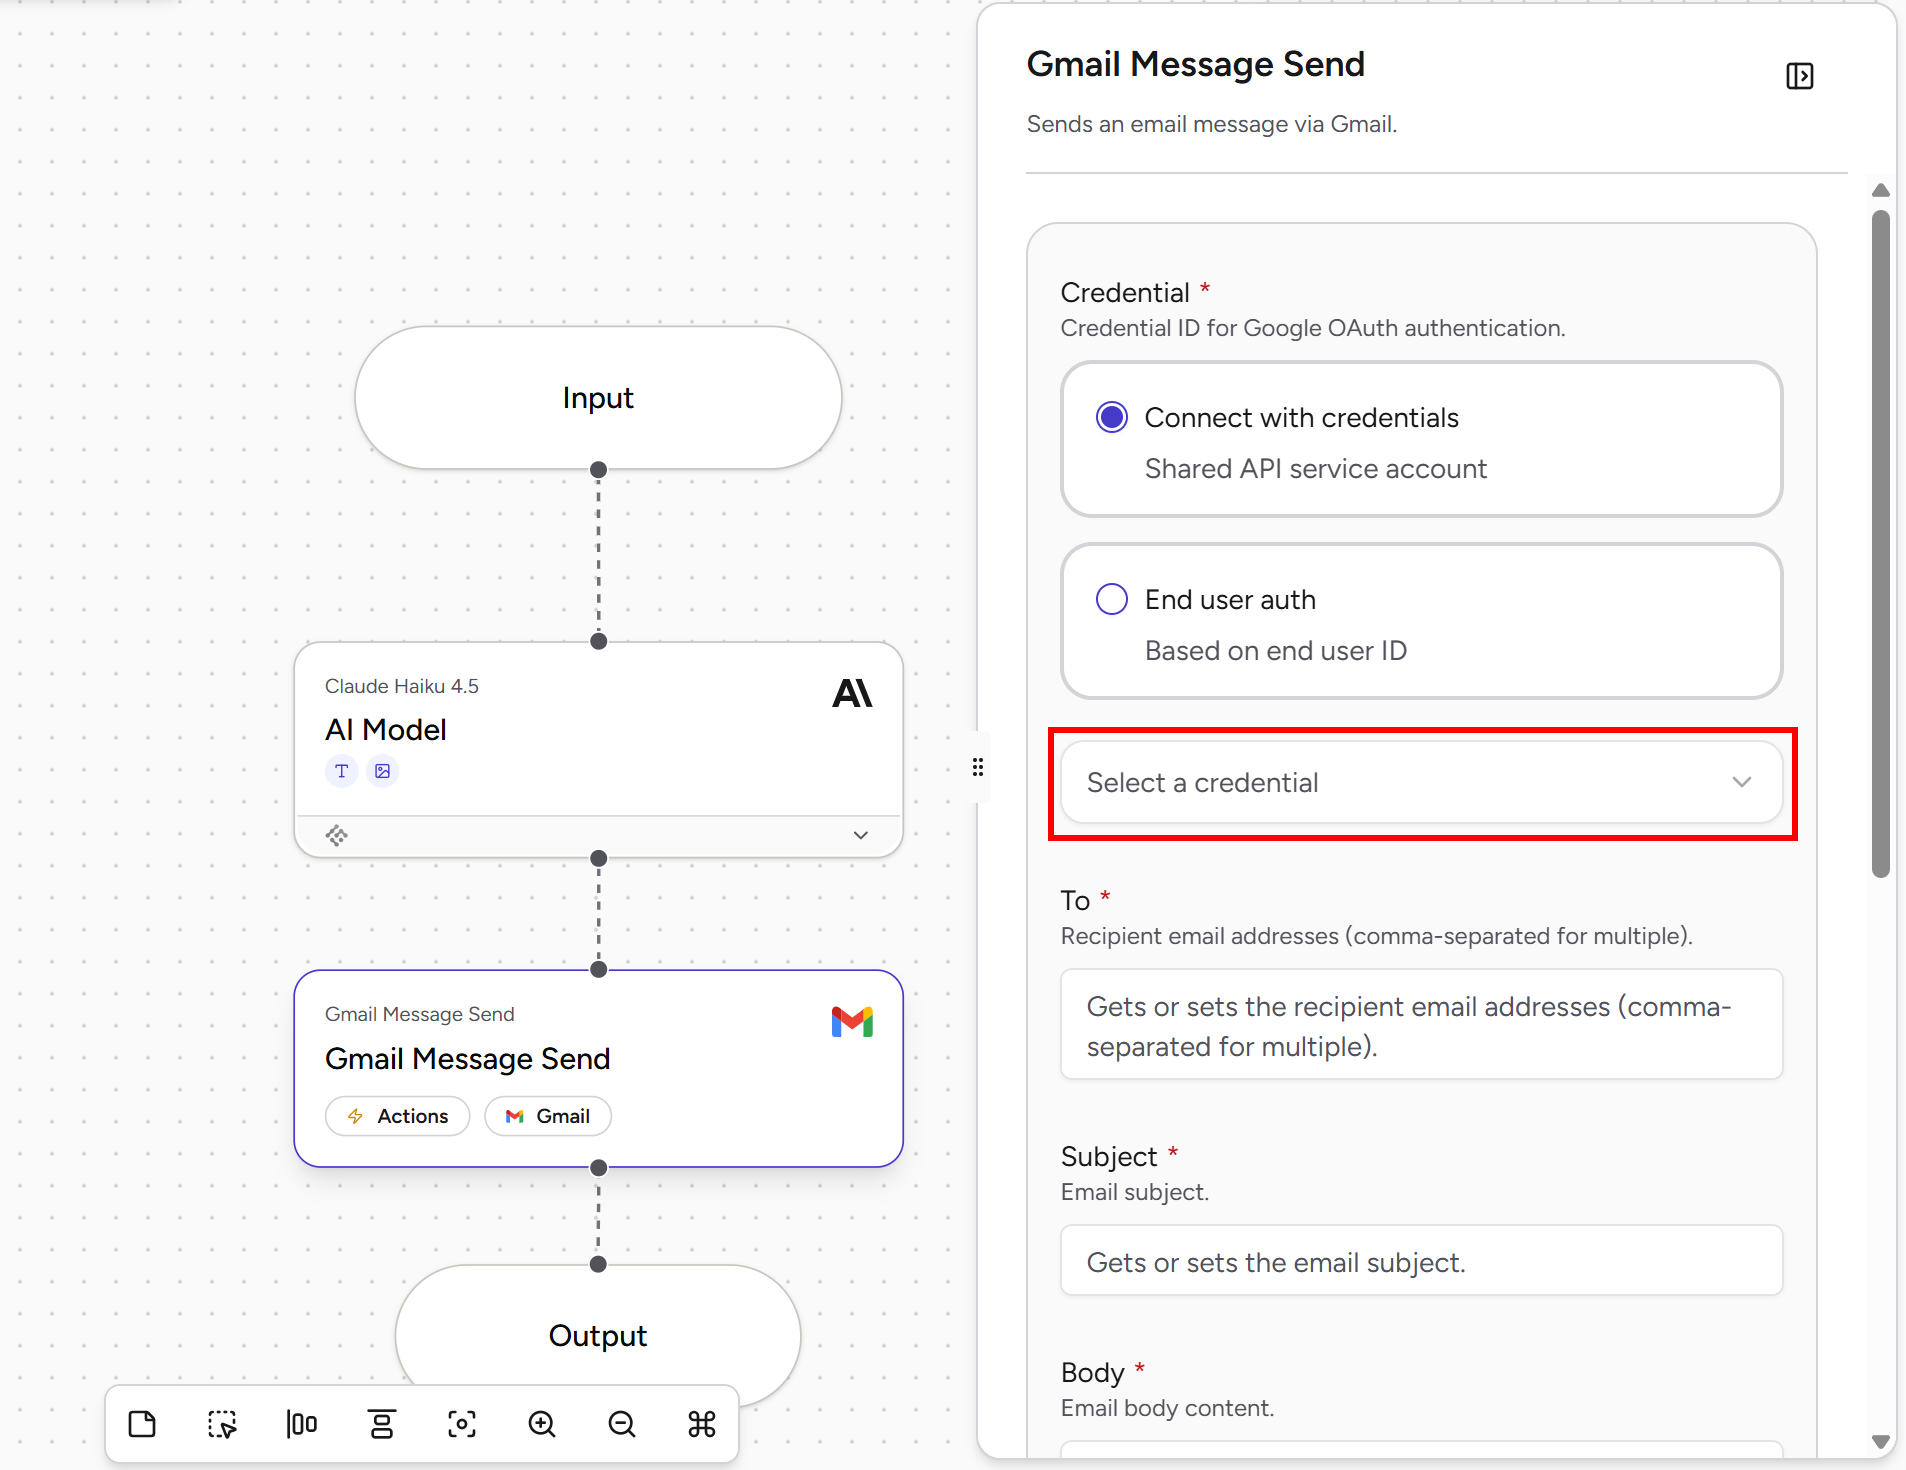
Step #6: Configure the Gmail Message Send Block
The final step is to set up the “Gmail Message Send” block. This allows the agent to automatically email the competitor pricing report generated at the end of the workflow.
Select the “Gmail Message Send” block. Then, open the “Select a credential” dropdown and choose “Create a new credential”:
Press “Sign in with Google” and grant the required permissions. In this case, the only permission needed is “Send Emails (Gmail)”:
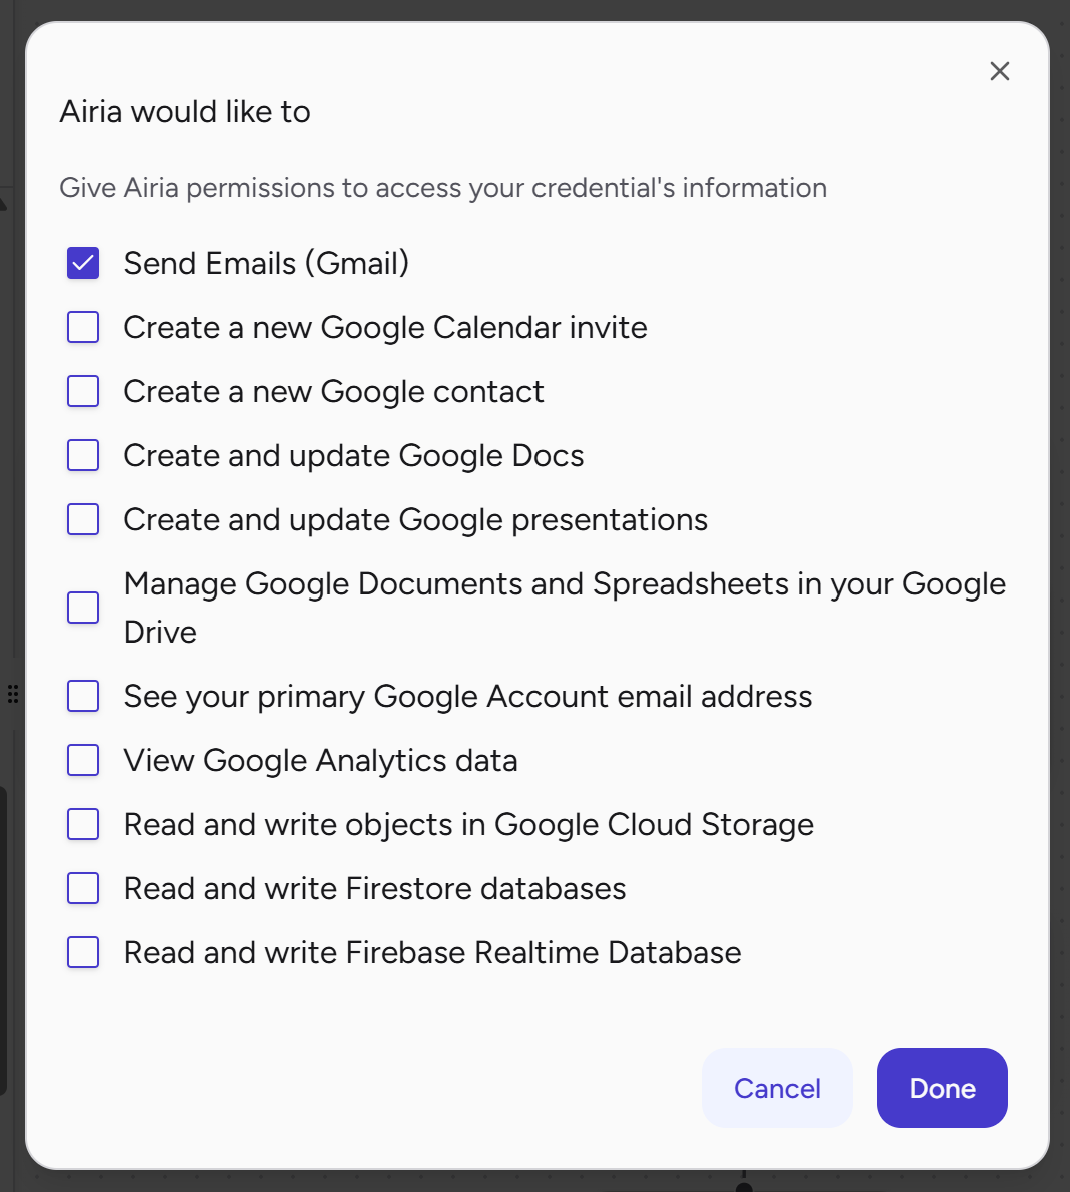
Complete the Gmail integration wizard to connect your Airia agent to your Google account.
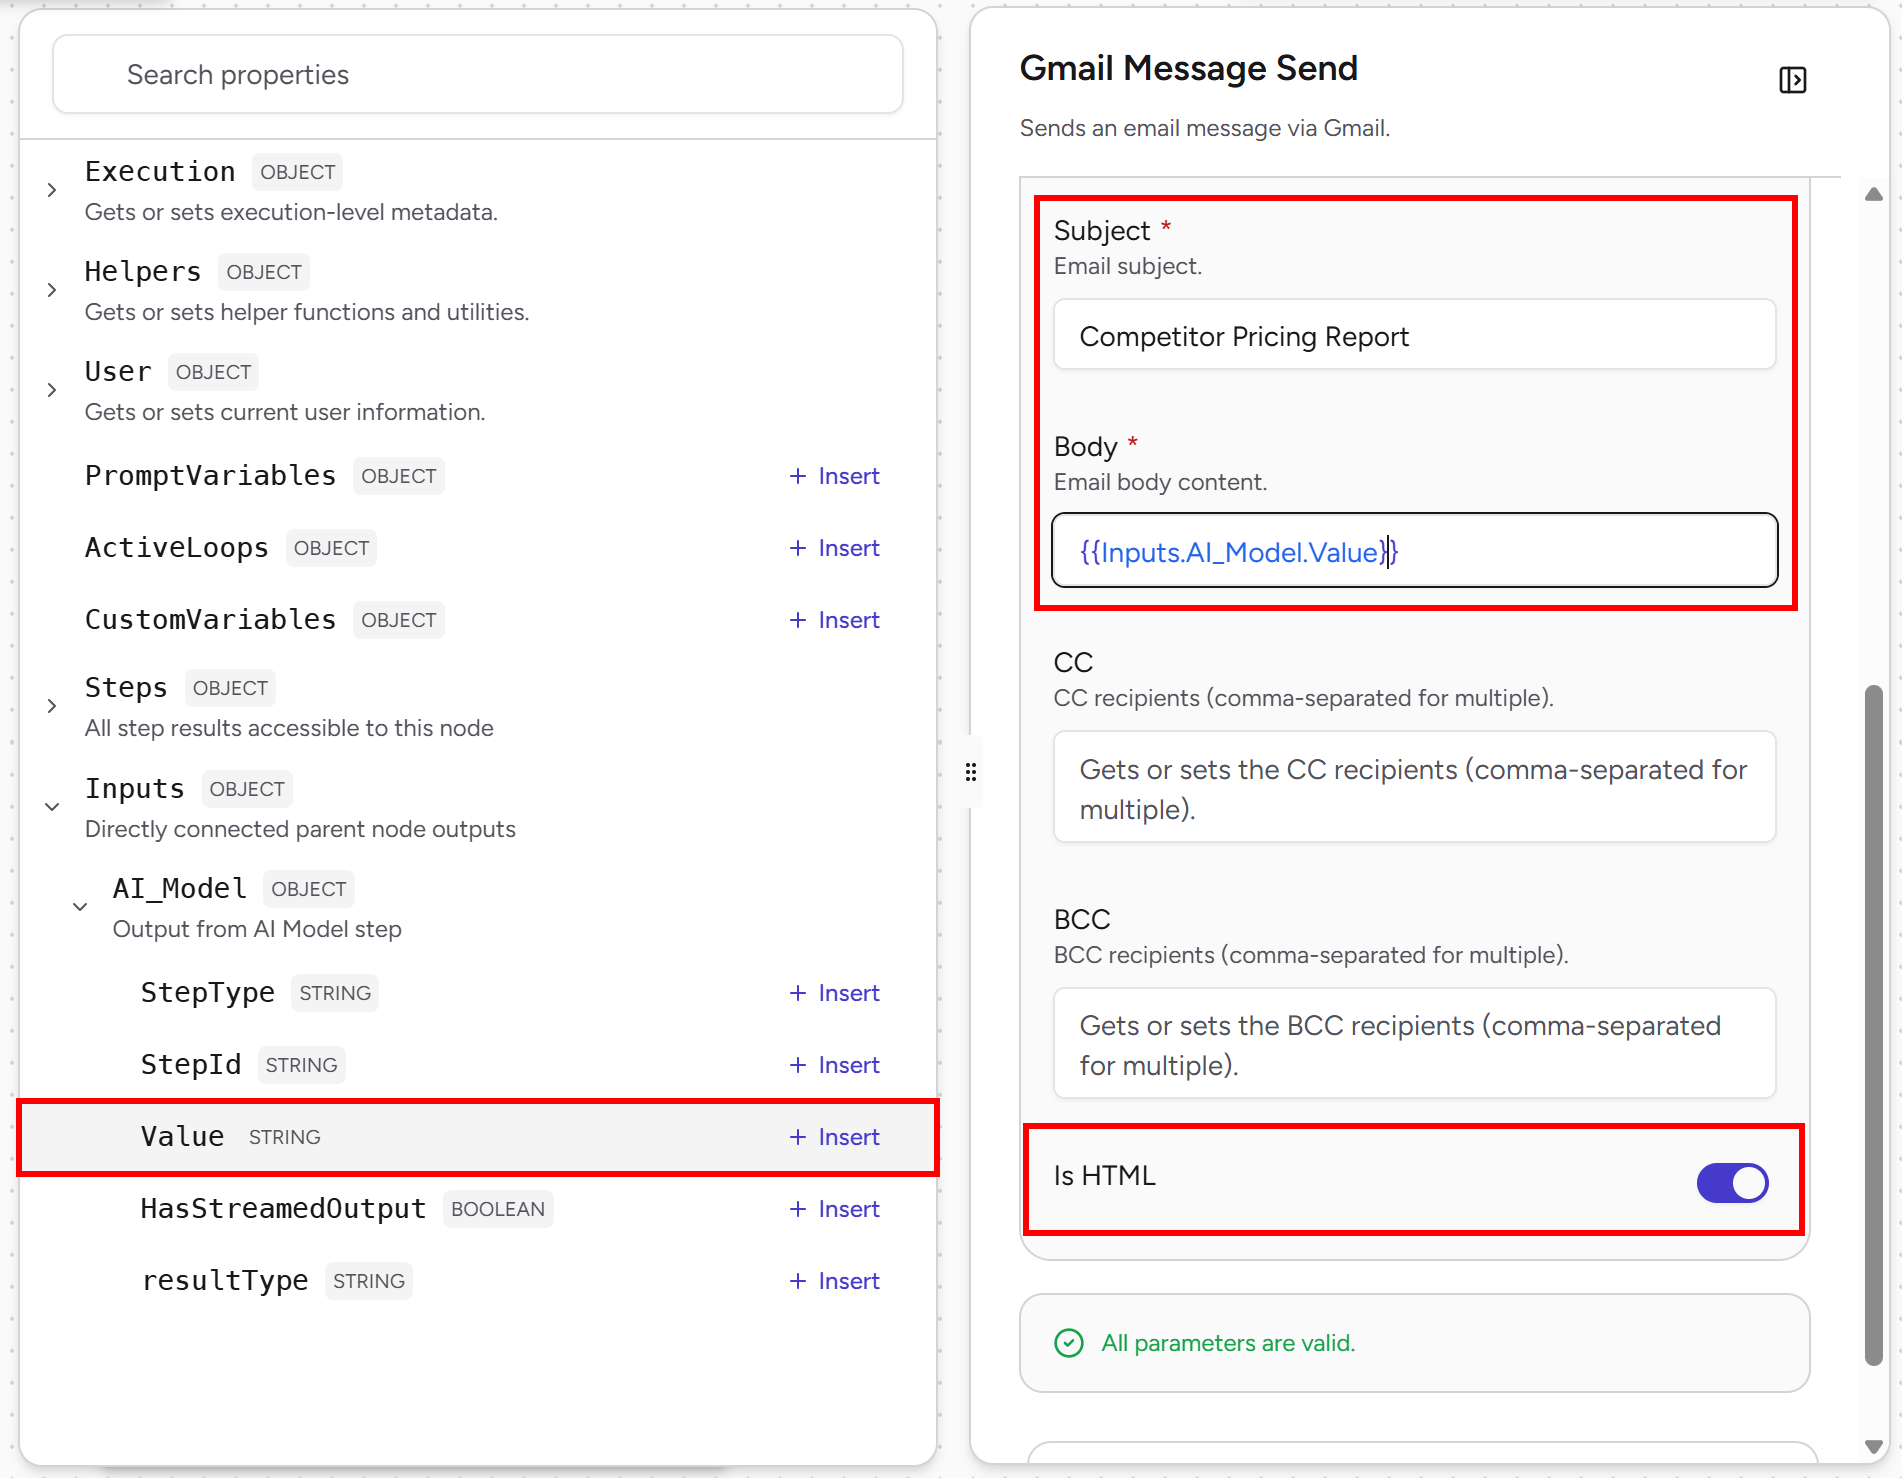
Once the connection is established, configure the “Gmail Message Send” block as follows:
- Subject:
Competitor Pricing Report - Body:
{{Inputs.AI_Model.Value}}(this way, the email body contains the HTML report generated by the “AI Model” block.) - Is HTML Enabled:
true(as AI was instructed to return HTML) - To: The email address where the competitor pricing analysis report will be sent.
Cool! Your Airia agent now has all the components needed to perform automated competitor pricing analysis, generate a comparison report, and deliver it directly by email.
Step #7: Launch the Agentic Workflow
Click the “Publish” button in the top-right corner to deploy your agent:
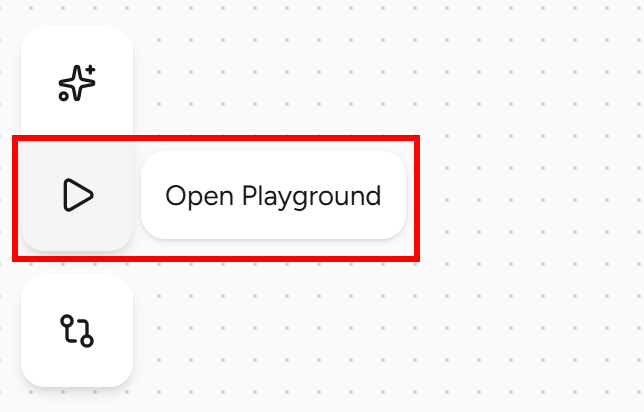
Then, click the “Open Playground” button on the left to start interacting with your agent:
For this example, assume you are the ClickUp company and want to receive periodic competitor pricing analysis for a company like Asana.
In the “Playground” area, open the “Variable Values” section. There, you will be able to fill in the input variables defined in Step #4. These values will be passed to the “AI Model” block and used to launch the agentic workflow. Fill in the input fields as follows:
pricing_page_url: https://clickup.com/pricingcompetitor_name: Asana
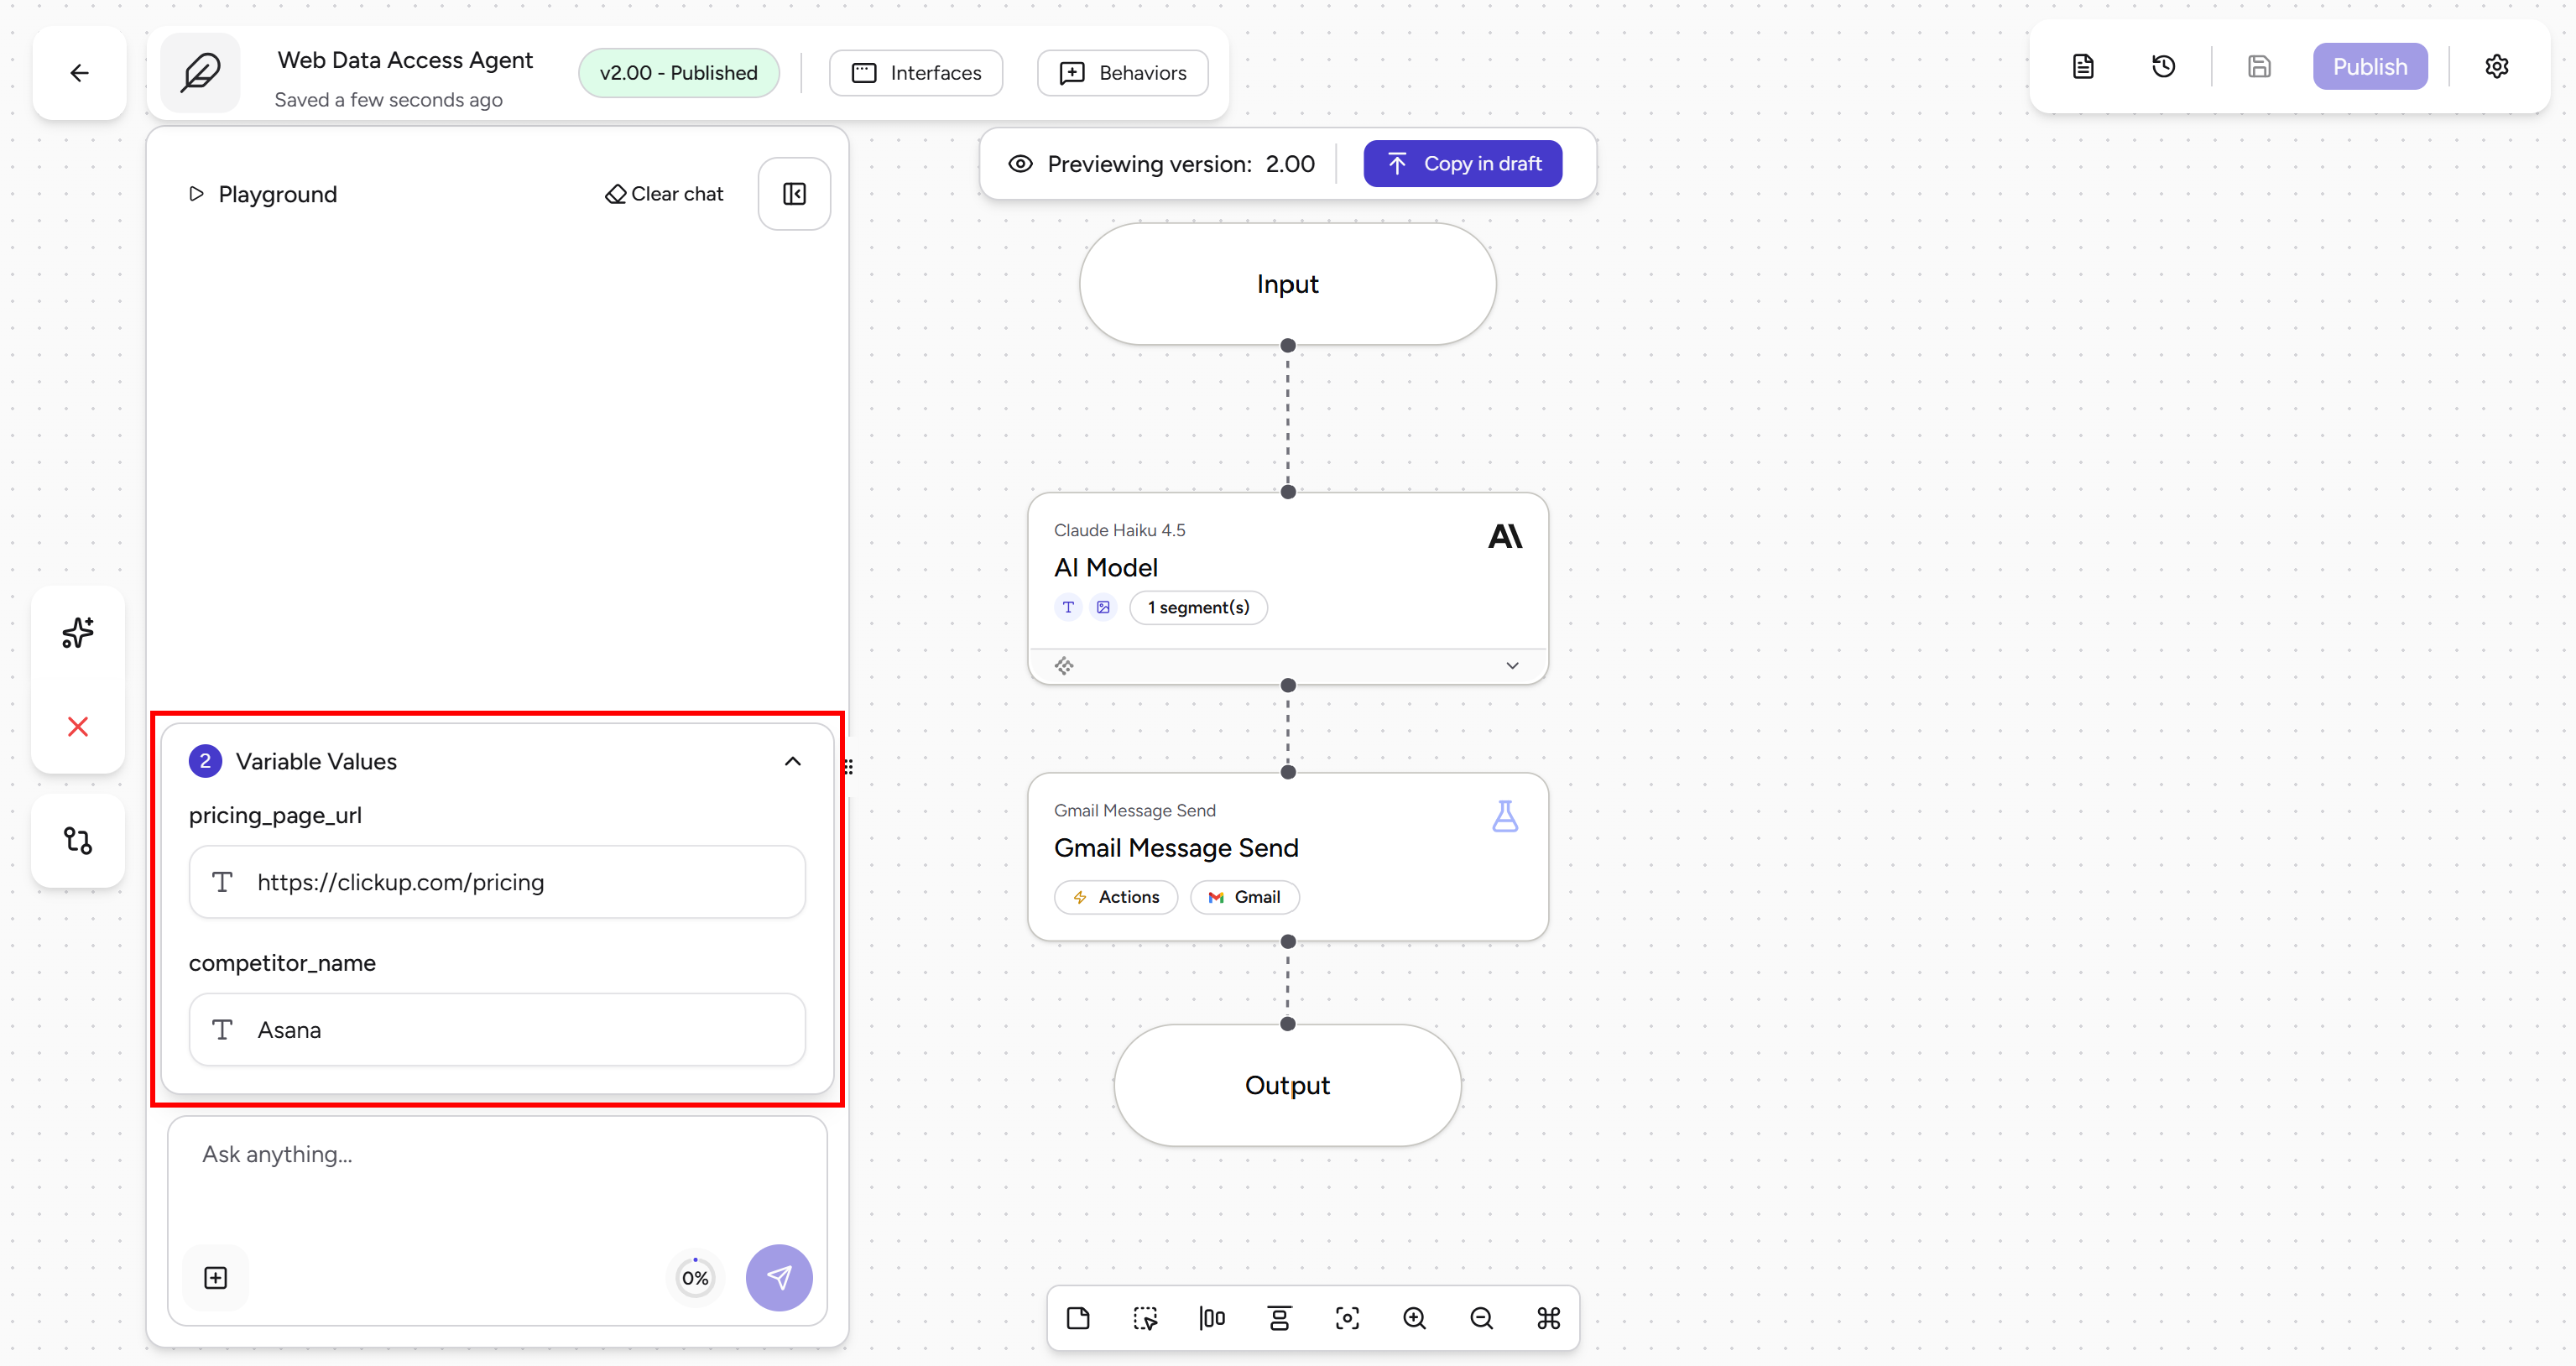
Start the workflow by entering a simple prompt such as “Perform the task”, then click the send button. This is what you should see:
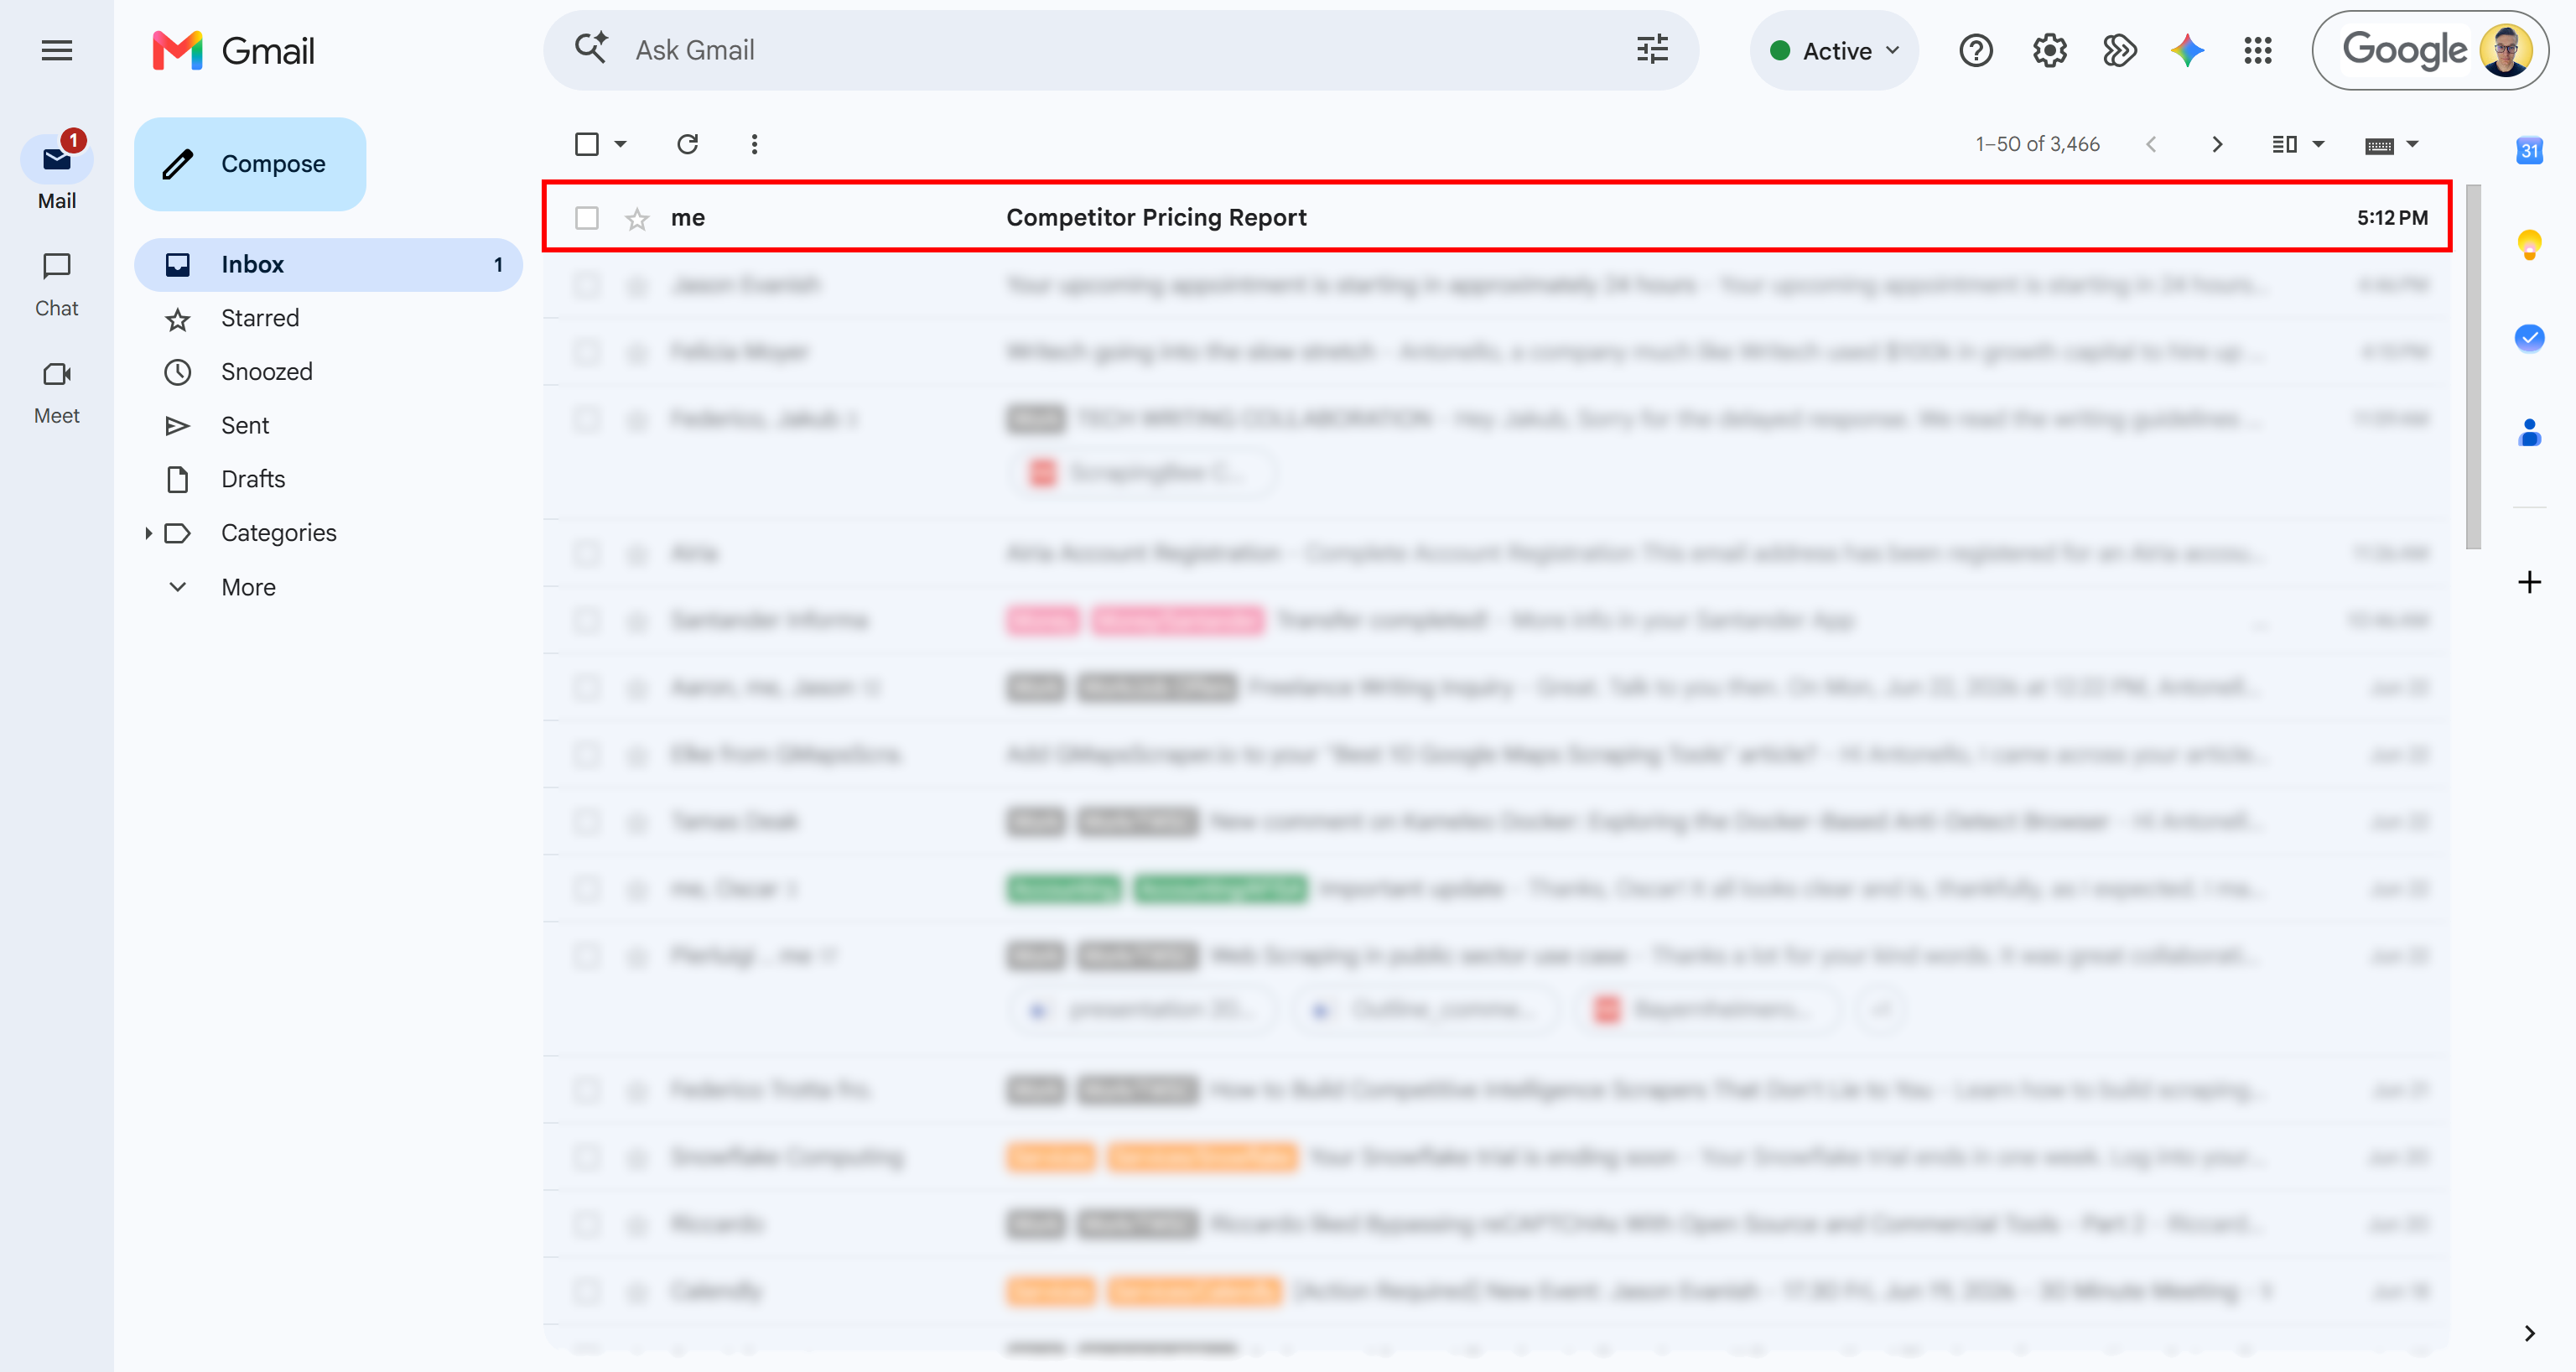
If everything is set up correctly, all blocks will turn green, and you will receive the email in the configured inbox. Here we go!
Step #8: Explore the Output
Check the email received in the destination inbox you configured earlier. You should notice a “Competitor Pricing Report” email:
That is the email sent by your Airia competitor analysis agent. Open it, and you will find a detailed, data-driven pricing comparison report:
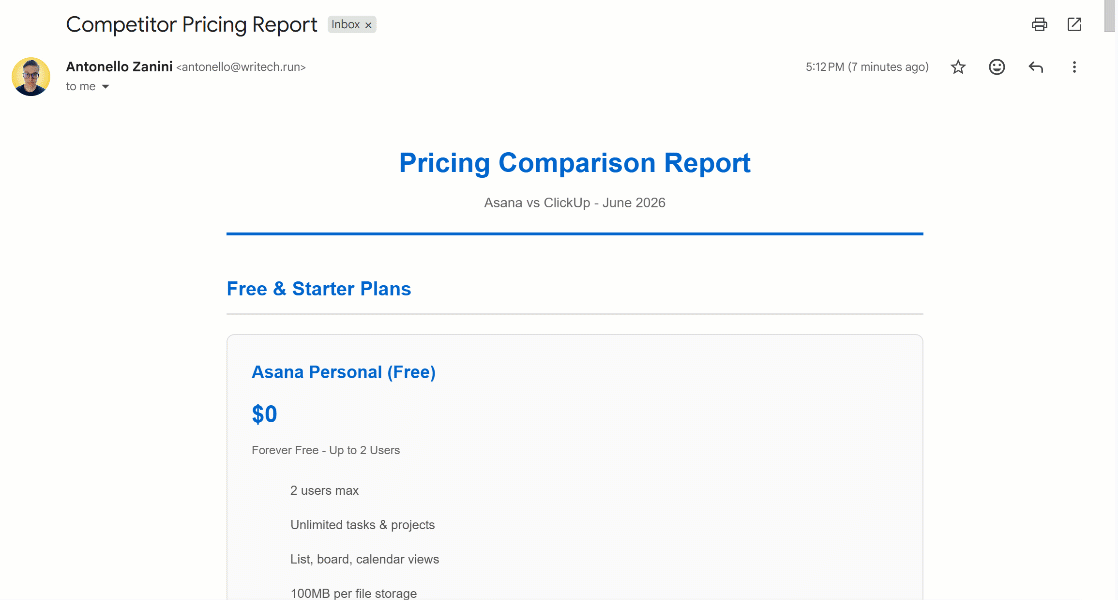
As expected, the output is formatted as an HTML report. The extracted information matches the pricing data from the target websites. Look at the ClickUp pricing page:

And the dynamically discovered Asana pricing page:
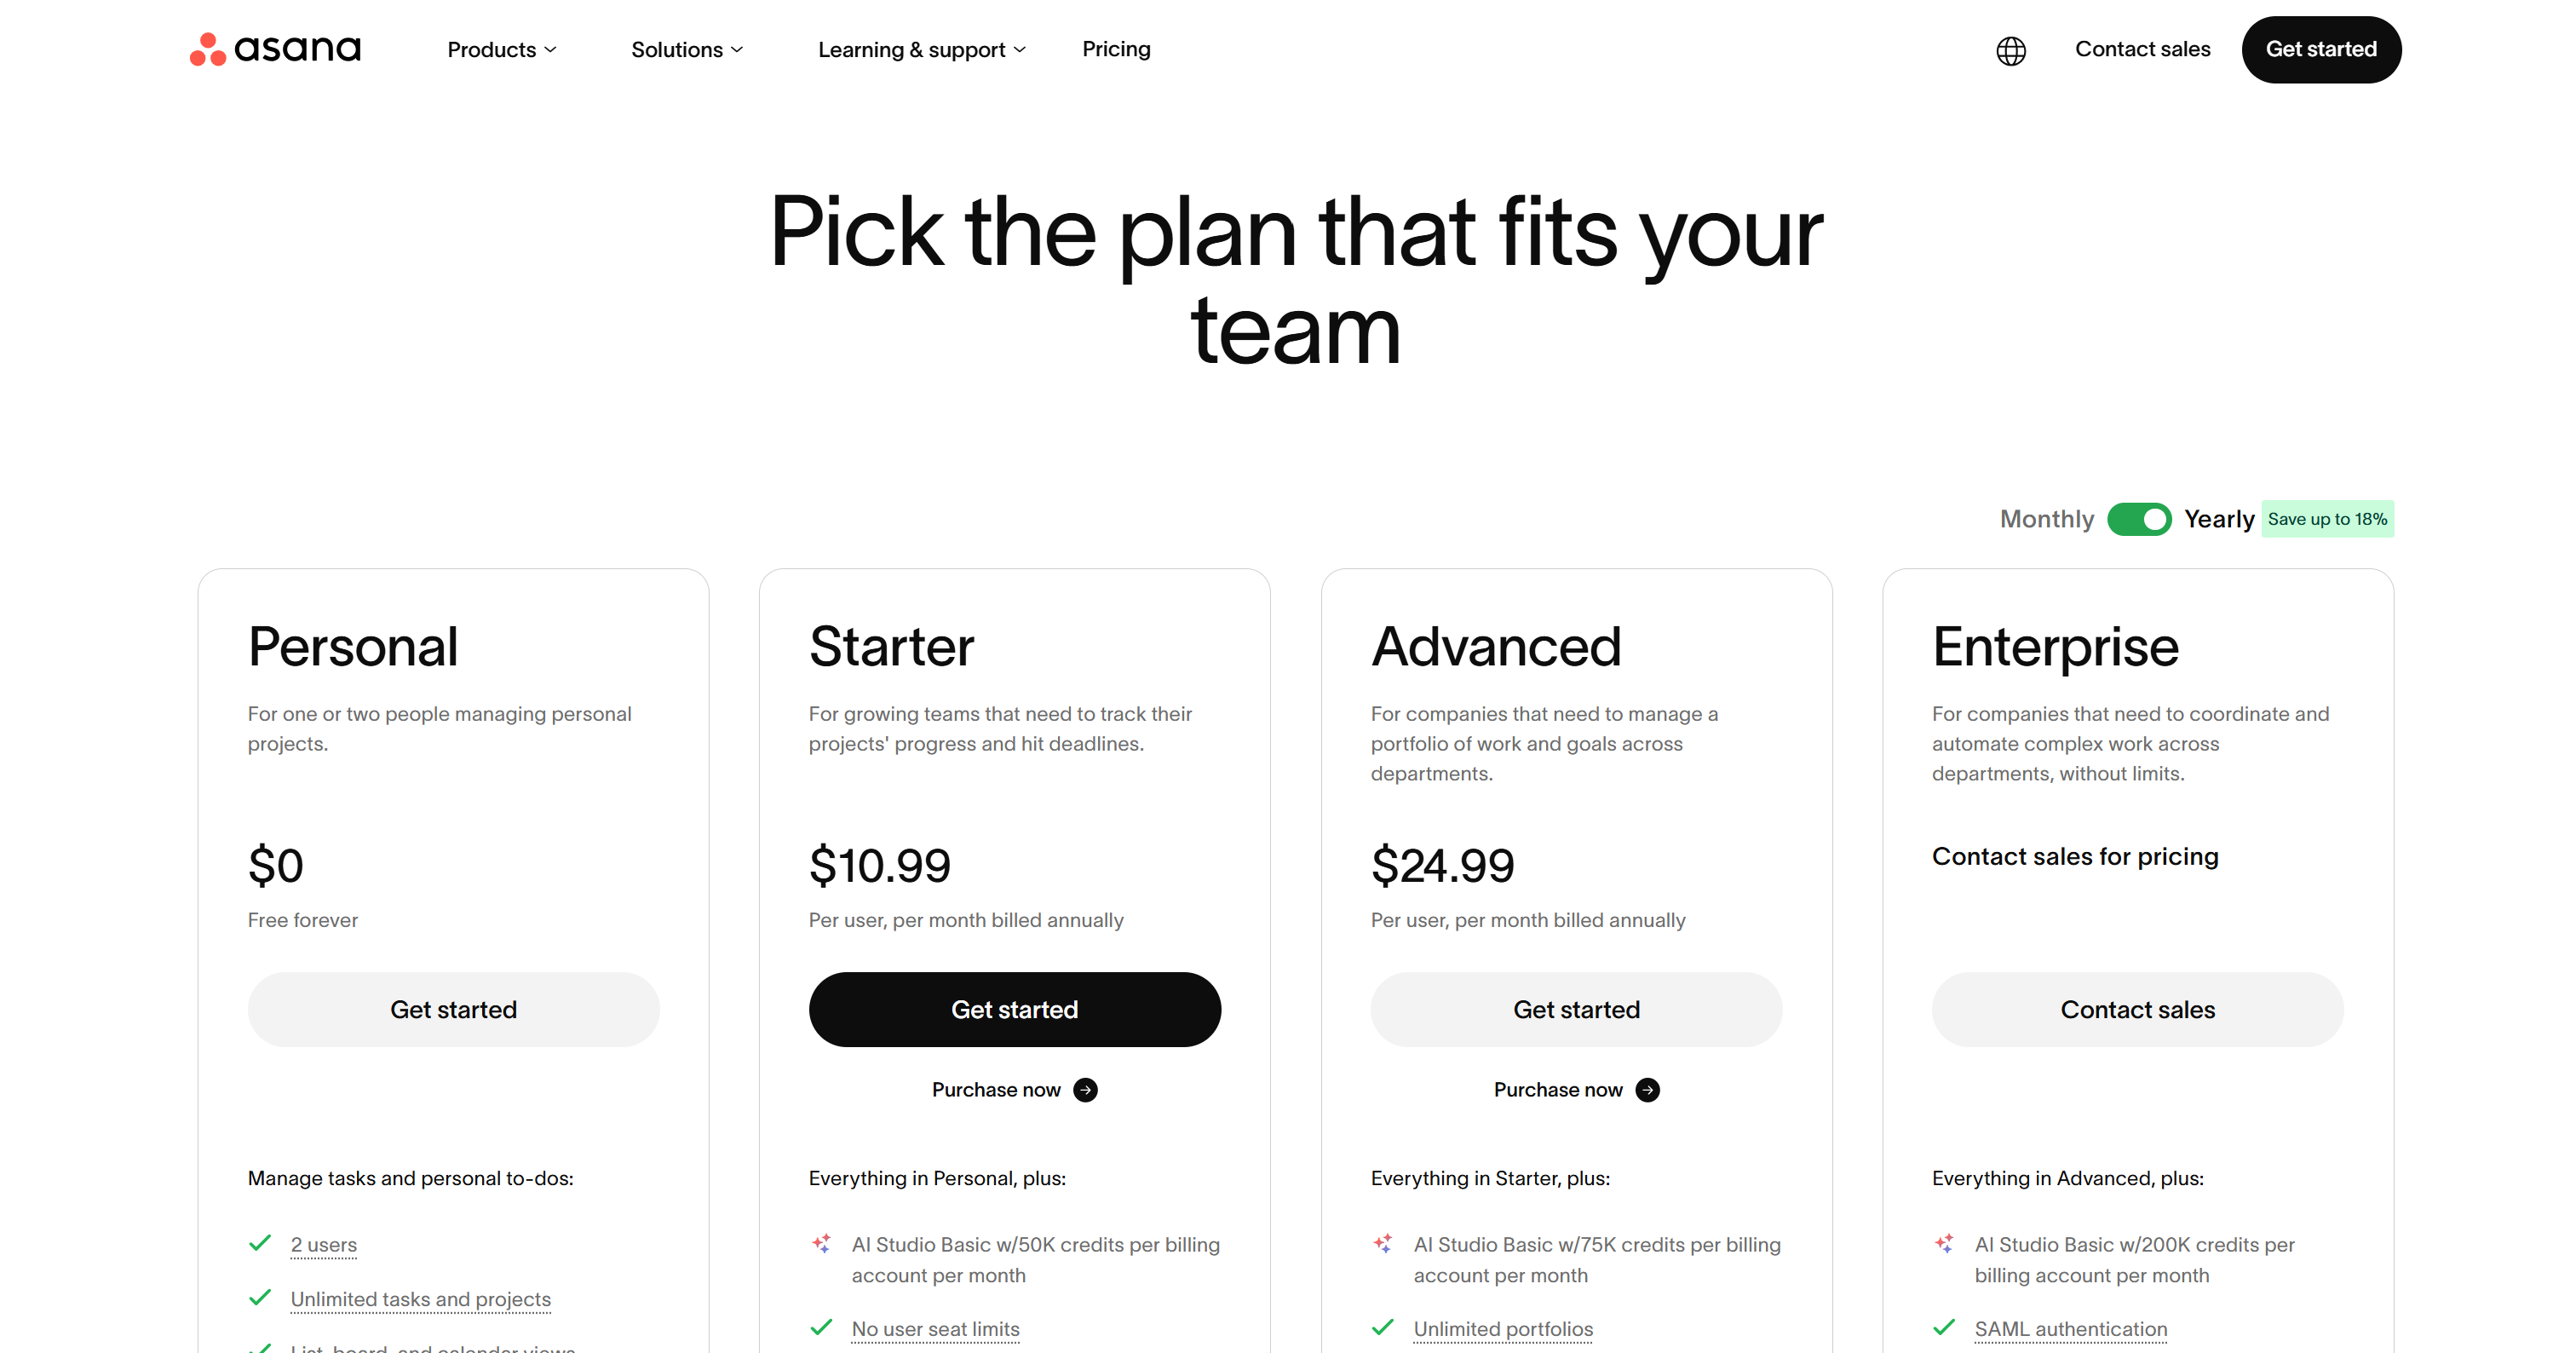
This confirms that the agent successfully retrieved the required pricing data.
Step #9: Understand How the Agent Works
To verify that the Airia agent correctly retrieved data using the Bright Data Web MCP, go back to the Airia agent page. Click the “See your previous Agent executions” button in the top-right corner and select the most recent execution:
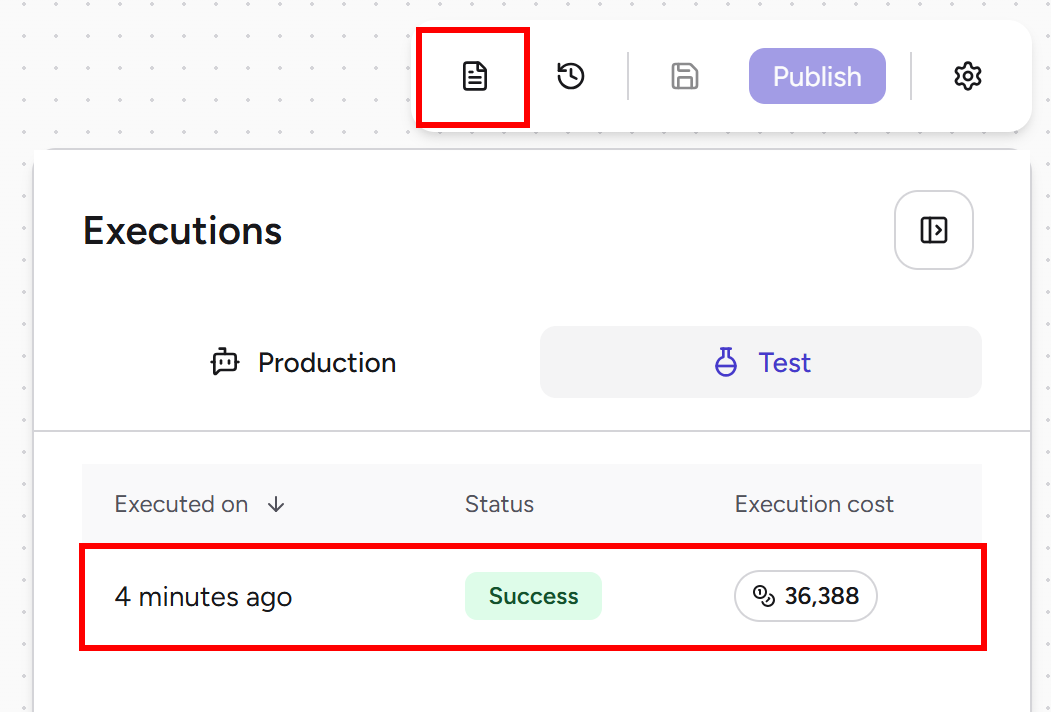
In the Steps section, you can see exactly what the agent did during execution:
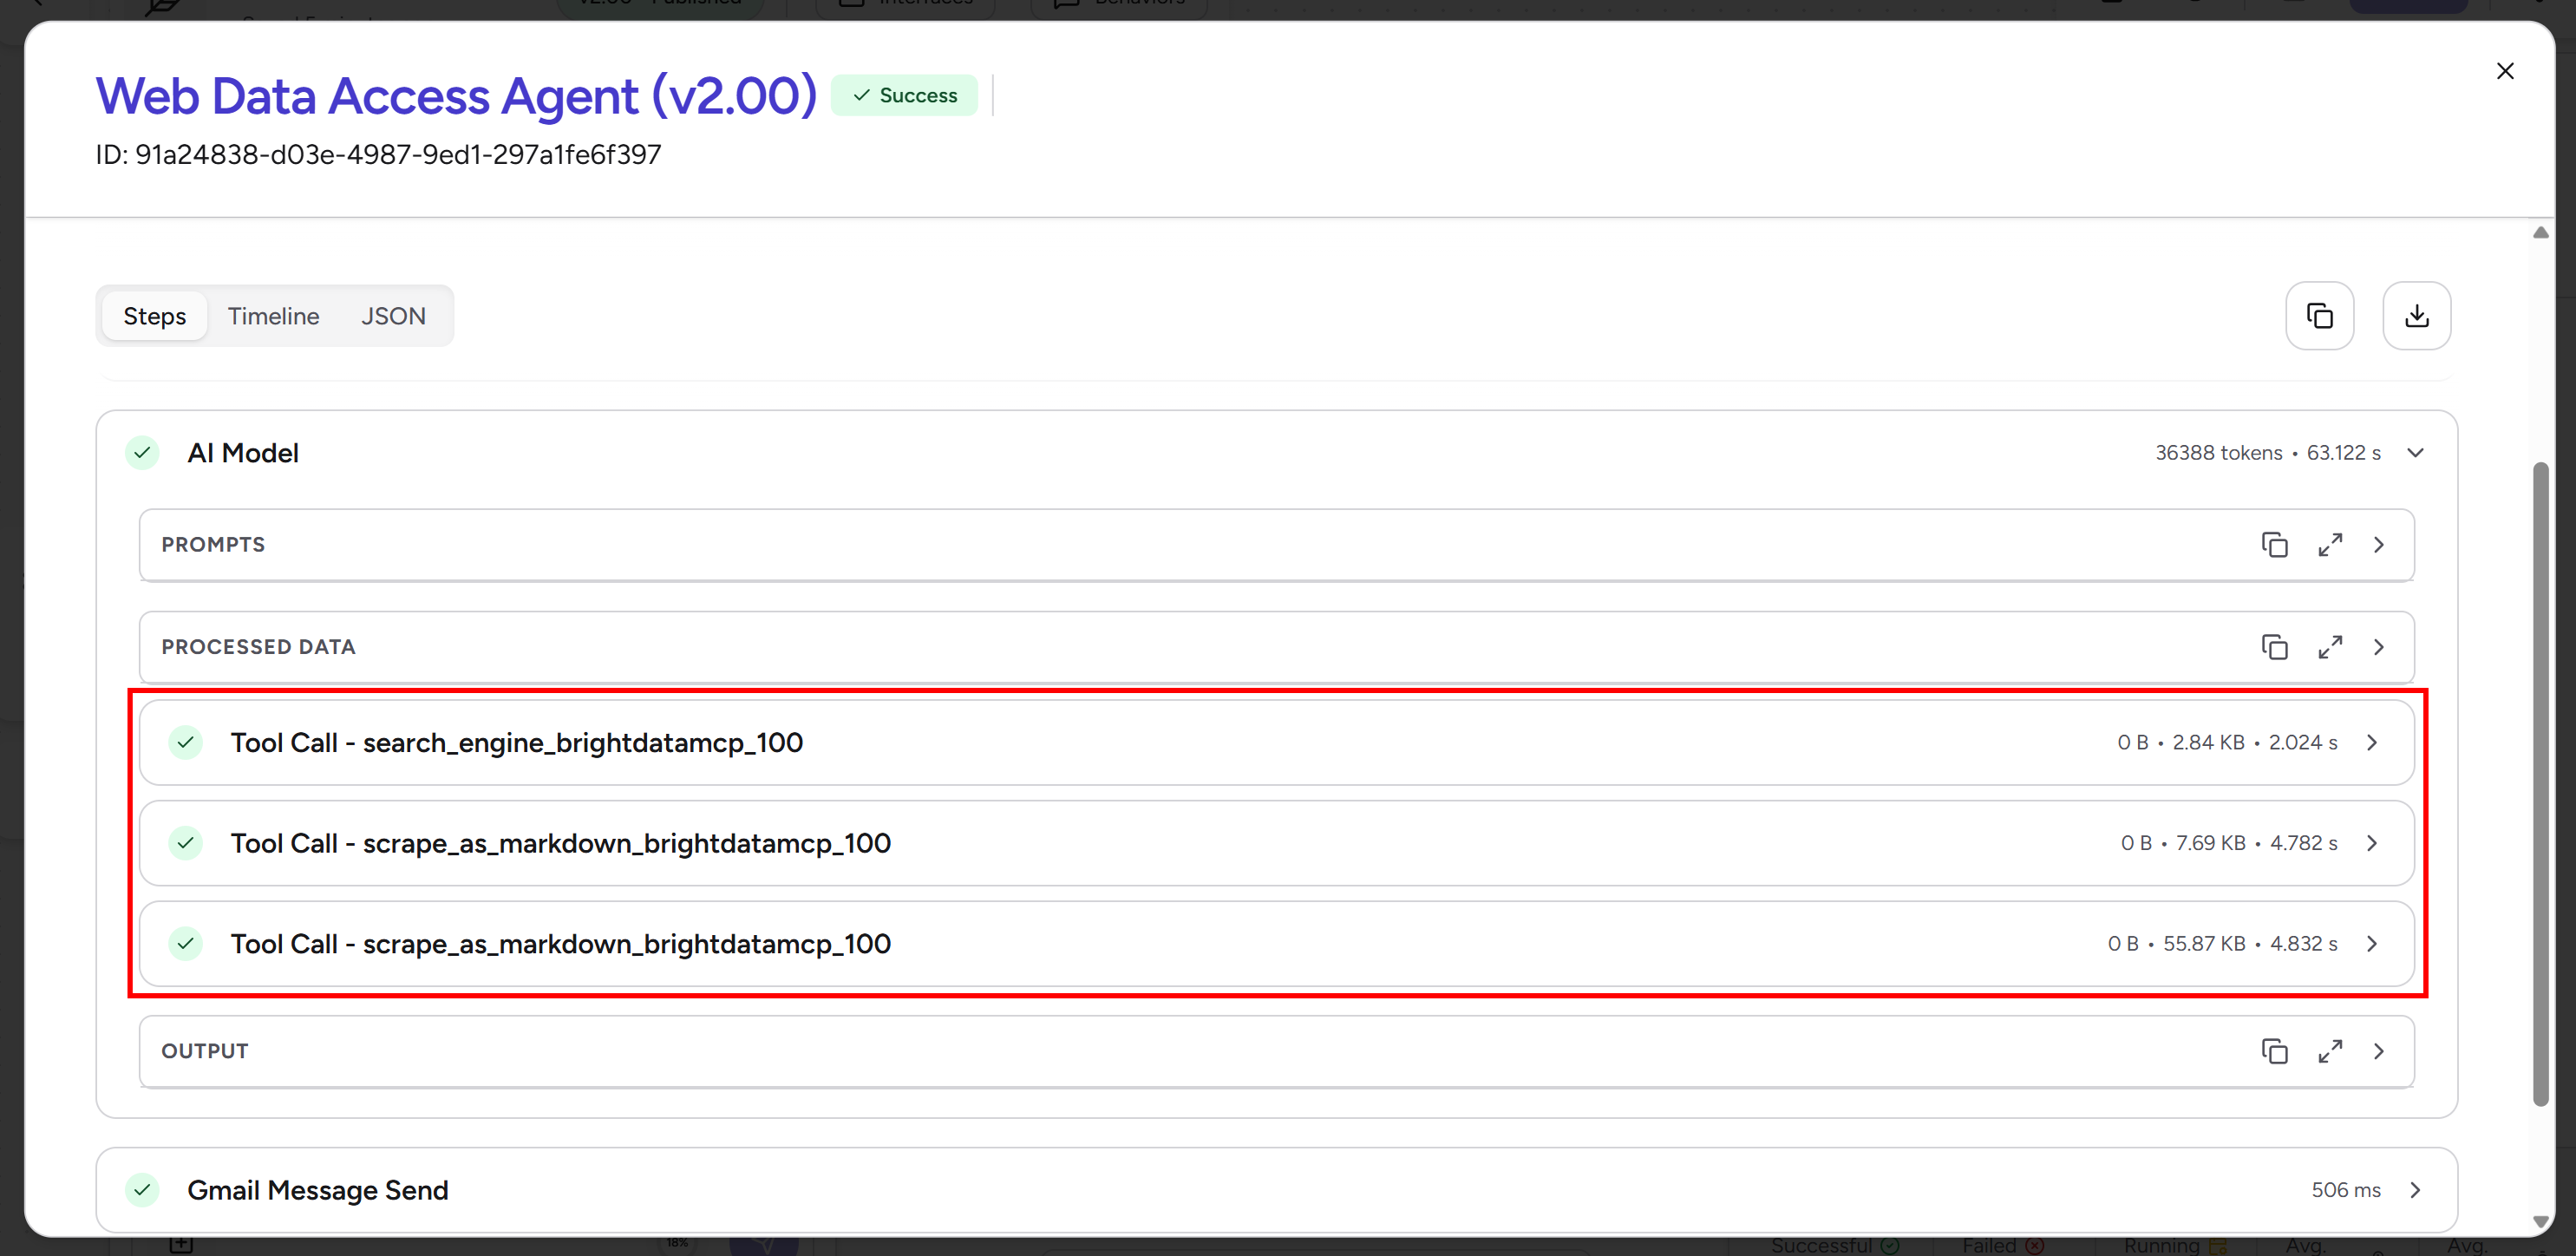
In detail, the agent:
- Read the input variables and passed them to the AI model.
- Used the
search_enginetool from Web MCP to retrieve Google SERP results (parsed as JSON) for the “Asana pricing” query. Behind the scenes, this calls Bright Data’s SERP API. - Analyzed the returned SERP JSON and identified the relevant Asana pricing page.
- Scraped the page using the
scrape_as_markdowntool, backed by Bright Data’s Web Unlocker API. Since the page already contained the required pricing data, no additional searches were needed. - Scraped the input ClickUp pricing page using the same
scrape_as_markdowntool. - Aggregated all extracted data into a structured HTML report.
- Sent the final report via email using the “Gmail Message Send” block.
This shows how the agent can autonomously search, extract, and structure web data to produce grounded and accurate results. A standard LLM alone would not be able to complete all these steps without external tools. This is the power of integrating Airia with Web MCP.
Et voilà! You’ve just seen how powerful an Airia agent becomes when combined with Bright Data’s Web MCP. This is a simple example, but the same setup can support many more complex, enterprise-grade use cases.
Conclusion
In this article, you learned what Airia is and what it offers. In particular, you saw how to connect it to Bright Data Web MCP to build AI workflows with direct access to the web through its no-code Agent Builder.
Web MCP gives Airia agents the tools for reliably searching, discovering, and scraping web data at scale. Agents also gain the ability to interact with web pages, allowing you to build full browser automation workflows.
If you encounter any issues with Bright Data integration in Airia, want to learn more, or need support, contact Bright Data’s 24/7 support team.
Create a free Bright Data account today and start building AI-ready web data solutions!

Technical Writer
Antonello Zanini is a technical writer, editor, and software engineer with 5M+ views. Expert in technical content strategy, web development, and project management.


