







In this tutorial, you will learn:
- What Octop is and what it offers as a multi-agent, multi-user AI assistant.
- Why giving Octop agents reliable, production-ready web access makes them more capable and useful.
- How Bright Data provides Octop with enterprise-ready web search, web scraping, and browser automation capabilities.
- How to extend Octop by teaching its agents to use the Bright Data CLI.
- How to connect Octop to the Bright Data MCP server.
Let’s dive in!
What Is Octop?
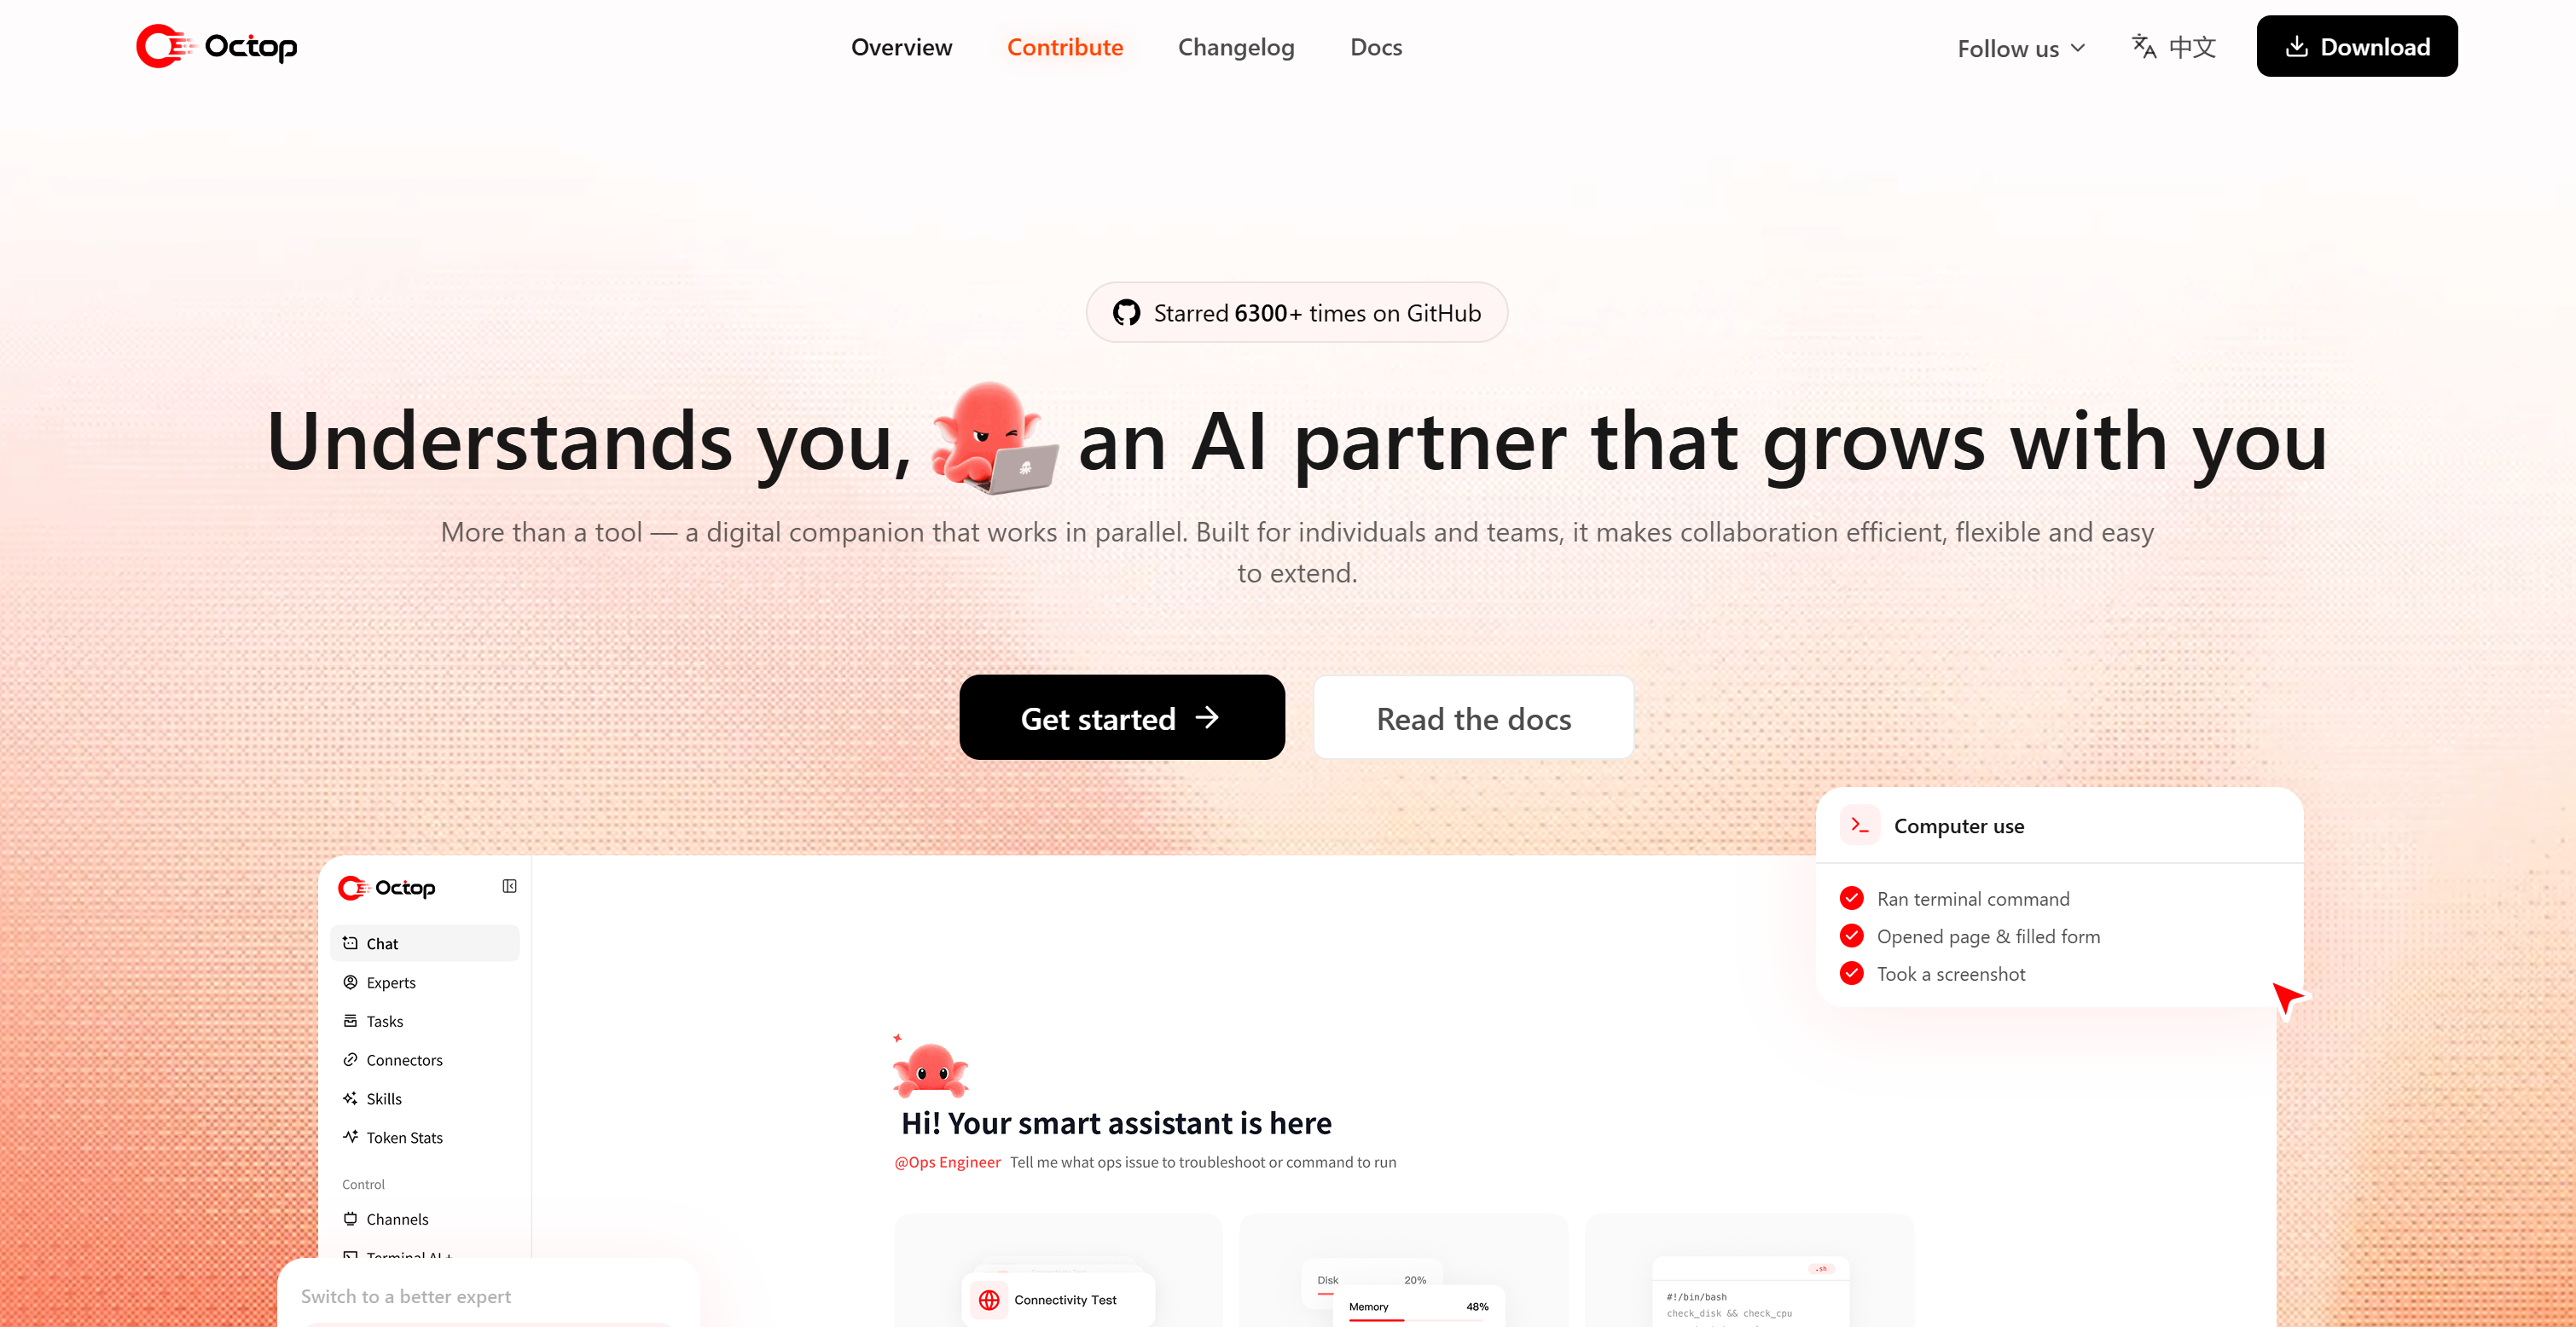
Octop is an open-source, self-hosted AI assistant developed by Tencent. It provides you with a multi-agent environment for automating tasks, interacting with web applications, managing knowledge, and coordinating specialized AI agents while keeping data on your own infrastructure.
The project is currently a trending repository on GitHub, with over 6.3K stars. The main features Octop supports include:
- AI-assisted terminal access for command execution and troubleshooting.
- Connections to messaging platforms, MCP servers, Tencent services, and other external tools.
- IDE and coding-agent integration through ACP (Agent Client Protocol).
- Knowledge bases using RAG to ground responses in private documents.
- Persistent agent memory that travels with each agent workspace.
- Scheduled automation through cron jobs and natural-language triggers.
- Multi-user support with isolated agents, workspaces, and permissions.
- Plugins and shared experts for extending and reusing agent capabilities.
Find out more in the official documentation.
Why Give Octop Production-Ready Web Search, Scraping, and Browser Capabilities
Octop provides an internal browser to allow agents to navigate websites and perform automation tasks. This built-in tool is primarily designed for general-purpose web interaction rather than production-scale data collection.
When agents need to access large numbers of pages, extract structured data, perform repeated searches, or work with websites protected by anti-bot systems, additional infrastructure is necessary.
Modern web applications are increasingly protected by mechanisms such as rate limits, CAPTCHAs, browser fingerprinting, and other anti-scraping techniques. These protections make reliable web access difficult, particularly when an AI assistant needs to perform web tasks at scale.
This is where Bright Data can complement Octop. By connecting Octop to Bright Data’s web data infrastructure, its agents gain access to production-ready capabilities for web search, scraping, structured data collection, and browser automation.
Bright Data’s infrastructure is built for large-scale web data workflows, with 400+ million residential IPs and support for high concurrency. It also provides 99.99% SLA-backed uptime and a reported 99.95% success rate, helping AI agents access web data more consistently.
How Bright Data Adds Web Data Capabilities to Octop
Bright Data can be used with Octop through:
- Bright Data CLI: Provides web data and browser capabilities through terminal commands.
- Bright Data MCP: Makes Bright Data’s web data tools available directly to Octop agents through the Model Context Protocol.
With these integrations, Octop agents can search for current information, retrieve web content, collect structured data, and automate browser interactions without getting blocked.
Bright Data CLI
The Bright Data CLI provides terminal-based access to Bright Data’s web data products. Its main commands are:
| Command | What it does | Bright Data product |
|---|---|---|
brightdata search <query> |
Runs searches across Google, Bing, or Yandex and returns structured results. | SERP API |
brightdata scrape <url> |
Retrieves webpage content while handling JavaScript rendering and common access restrictions. | Web Unlocker API |
brightdata browser open <url> |
Starts a persistent browser session and loads the specified webpage for further interaction. | Browser API |
brightdata browser snapshot |
Converts the current browser page into an accessibility tree that AI agents can inspect. | Browser API |
brightdata browser click / type / fill / scroll / etc. |
Lets agents interact with page elements by clicking, entering text, filling forms, scrolling, and performing other browser actions. | Browser API |
brightdata browser screenshot |
Captures the visible browser viewport or an entire webpage for visual inspection. | Browser API |
brightdata pipelines <type> |
Collects structured information from supported websites and platforms such as Amazon, LinkedIn, Instagram, and YouTube. | Web Scraping API |
Note: Bright Data CLI is supported by a recurring monthly free tier with up to 5,000 credits. Inspect the “Free Tier” documentation page for more details.
Bright Data MCP
Instead of requiring agents to work with individual CLI commands, the Bright Data MCP server exposes a broad collection of specialized tools that Octop can invoke as needed.
Key tools include:
- Web search: Retrieve current results from Google, Bing, and Yandex.
- Webpage extraction: Fetch webpages and return their content as clean Markdown.
- Domain-specific scraping: Use 60+ pre-built scrapers for popular websites and platforms.
- Web unlocking: Access websites protected by anti-bot systems, including CAPTCHAs and other access restrictions.
- Browser automation: Navigate websites and perform actions through a real browser environment.
- Structured data retrieval: Collect structured information from supported websites and platforms.
- Geo-targeting: Retrieve web content from specific geographic locations.
Note: Bright Data MCP is available with a free tier of up to 5,000 requests per month.
How to Let Octop AI Agents Call Bright Data CLI Commands
In this step-by-step section, you will learn how to configure Octop to use the Bright Data CLI.
Prerequisites
To follow this tutorial, make sure you have:
- Node.js installed locally.
- A Bright Data account.
- An API key from any LLM provider supported by Octop. Here, we will use OpenAI as an example and show how to configure Octop with an OpenAI API key.
A basic understanding of how AI agents can use the Bright Data CLI will also be useful.
Step #1: Install Octop
Run the following command to download and run the one-line installer for macOS or Linux:
curl -fsSL https://finnie-1258344699.cos.ap-guangzhou.myqcloud.com/octop/install.sh | bashAlternatively, on Windows (PowerShell), run:
irm https://finnie-1258344699.cos.ap-guangzhou.myqcloud.com/octop/install.ps1 | iexFor other installation options, including Python, CMD, Docker, and additional alternatives, refer to the official installation documentation.
These commands will download and install the Octop CLI in your environment. After the installation completes, you should see output similar to:

Note how this includes instructions for the next steps. Great! Time to configure Octop using the guided setup wizard.
Step #2: Set Up Octop
The installation script may recommend running:
octop initNote: This could result in an error. This happens because the installation script has already completed the initialization for you, so there is no need to worry.
Instead, start Octop by executing:
octop runYou should see a message in the terminal containing a one-time password and indicating that the Octop dashboard is available at http://127.0.0.1:8088:

Open the local URL in your browser. You will get the Octop initial setup wizard:
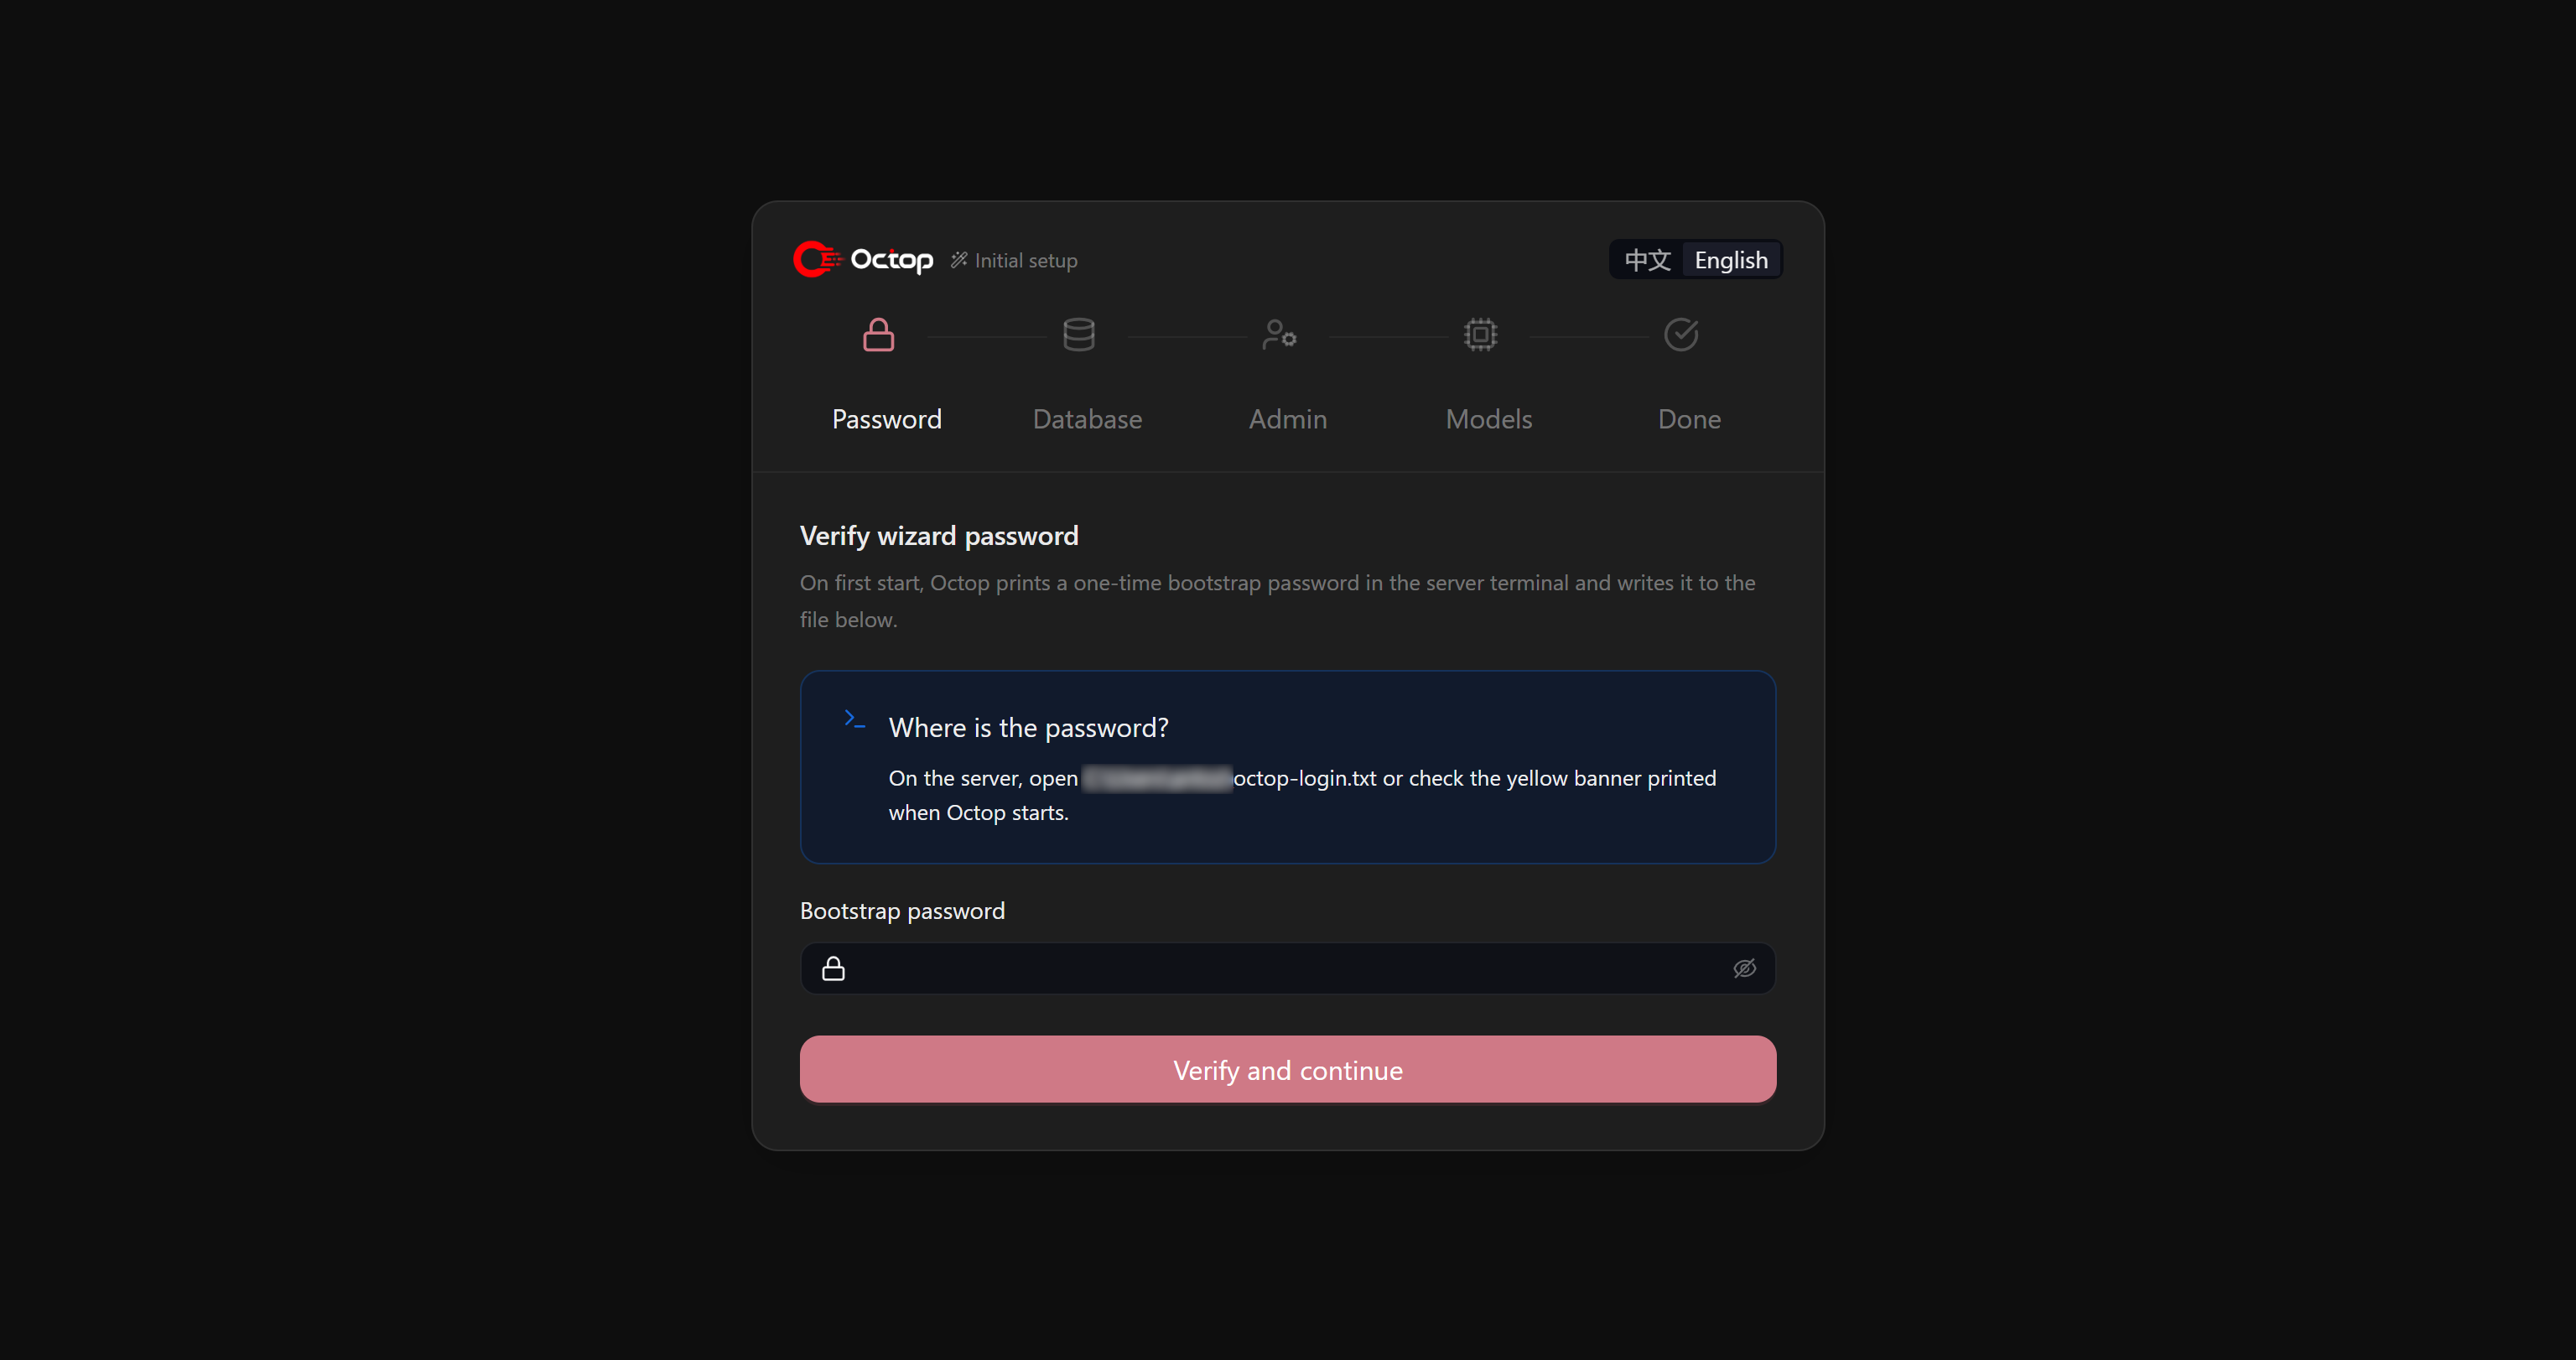
As the first step, enter the one-time password displayed in the terminal after running octop run.
Paste the password into the setup wizard and click “Verify and continue”.
Next, you will be asked to configure the database. By default, Octop uses a local SQLite database file. This is fine for the initial setup, so you can keep the default configuration and click “Save and continue”:
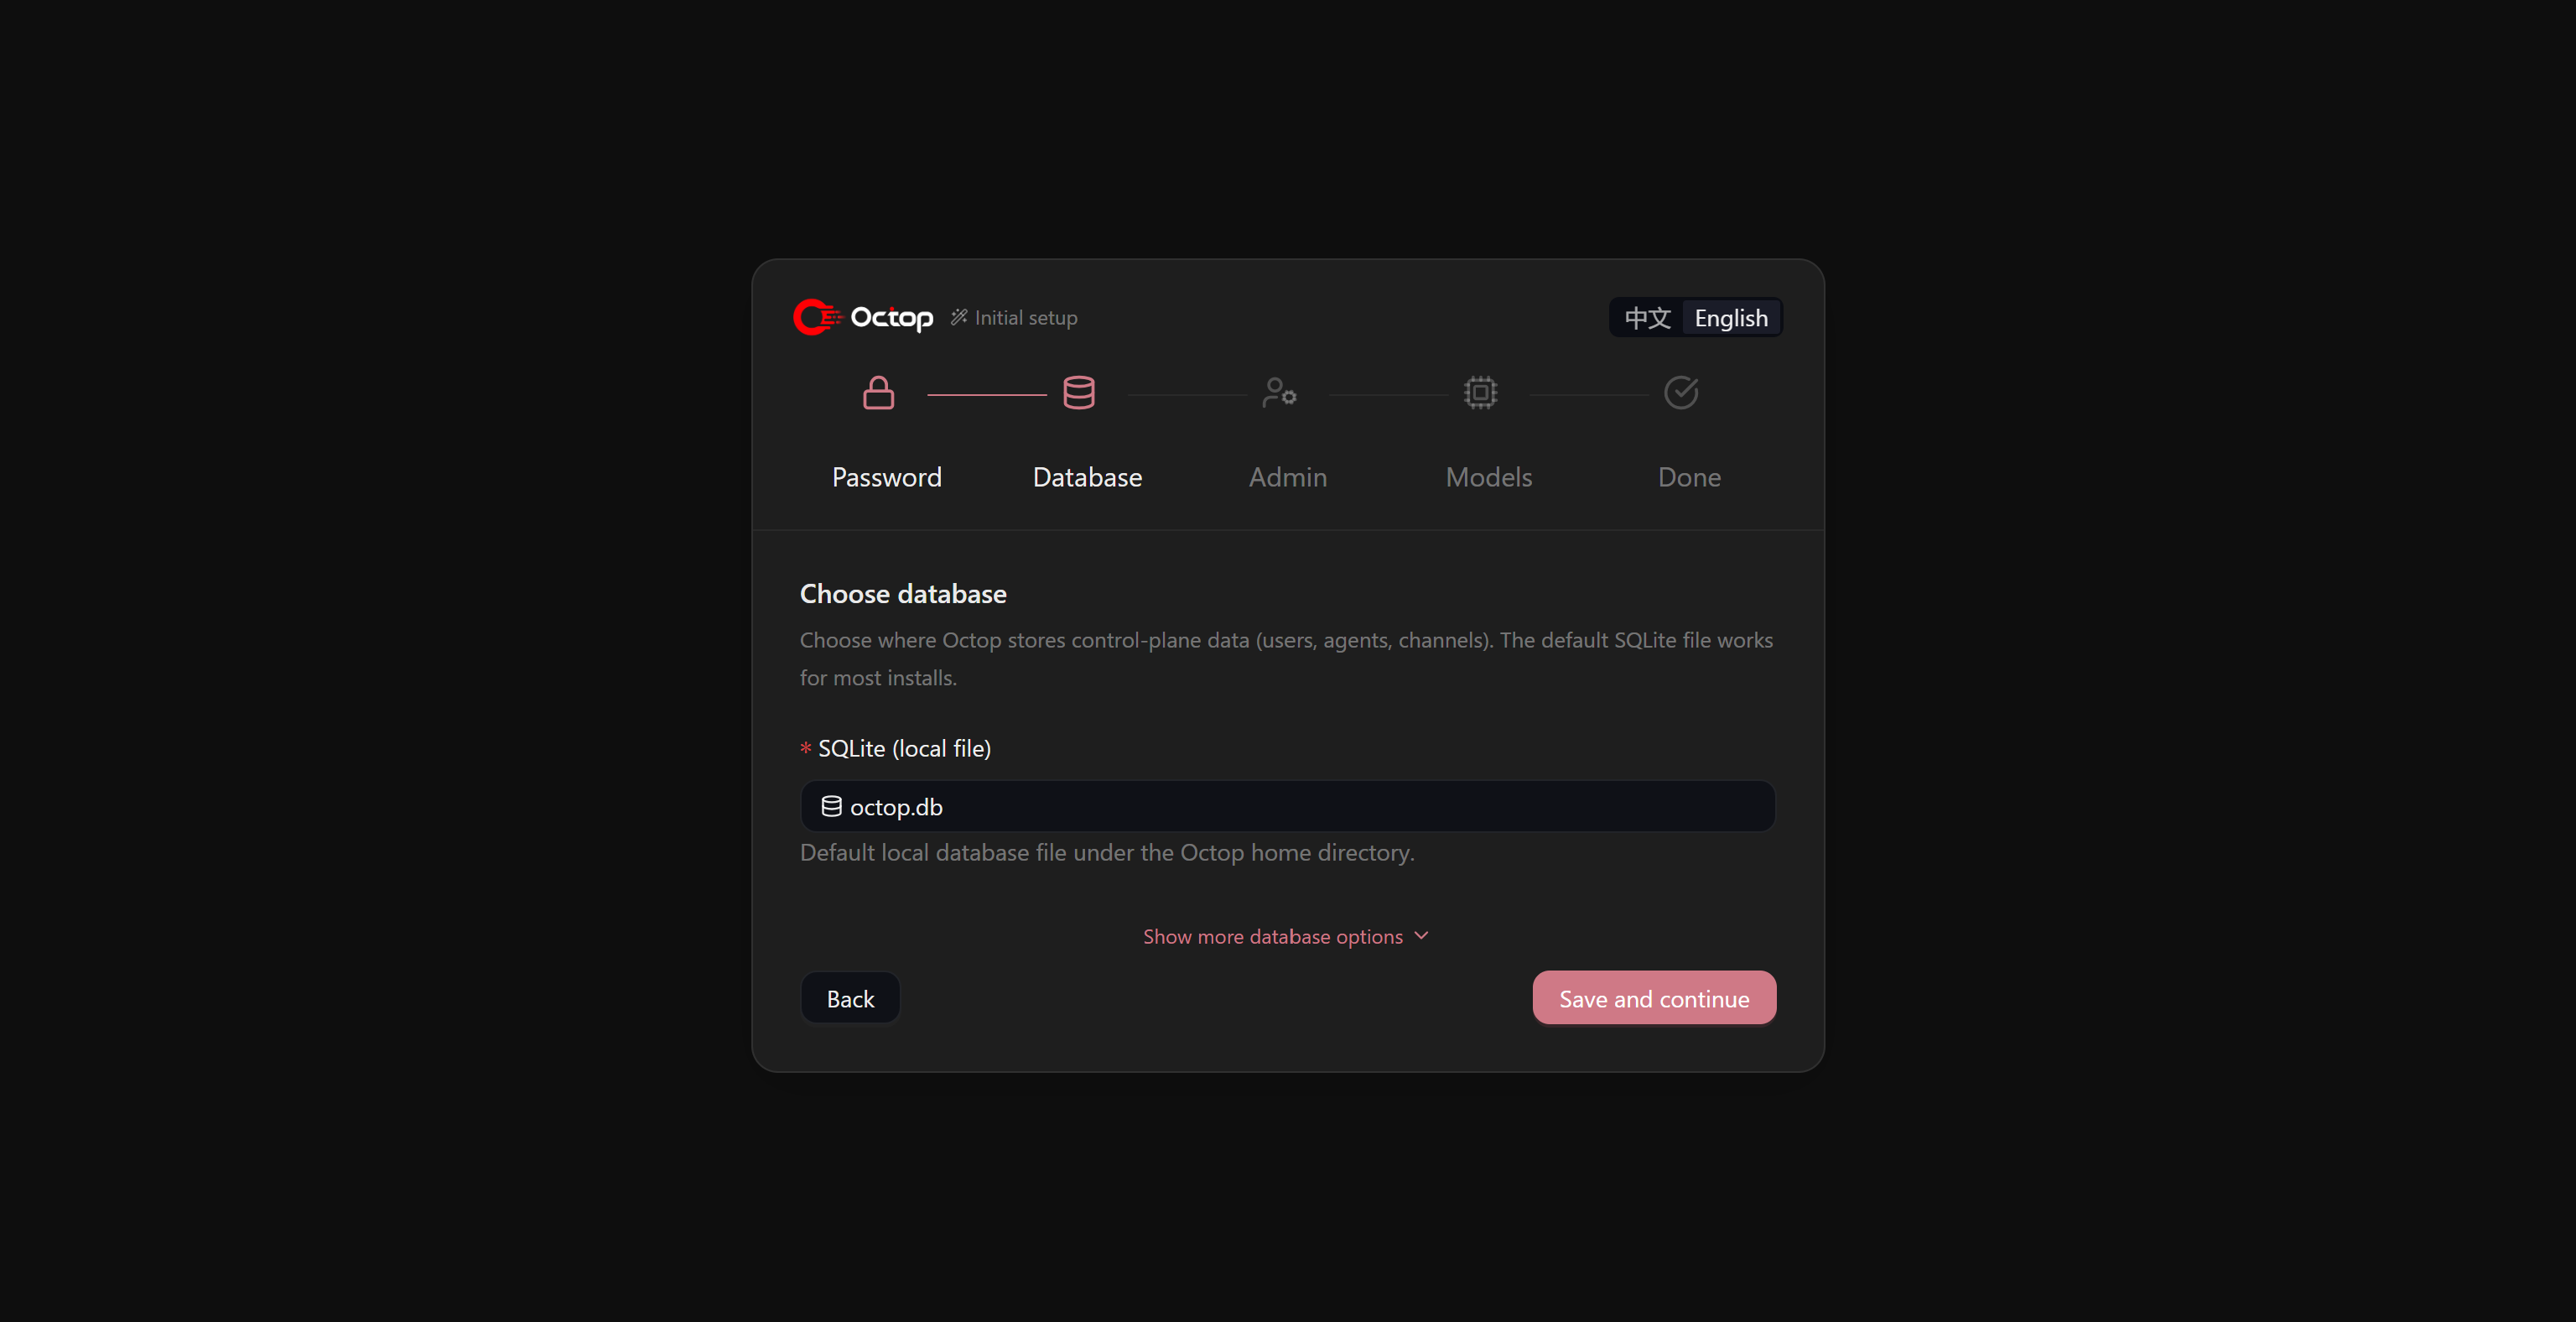
You will then be asked to create the admin credentials you will use to log in to Octop in the future.
Enter a username and password, then click “Create administrator and continue”:
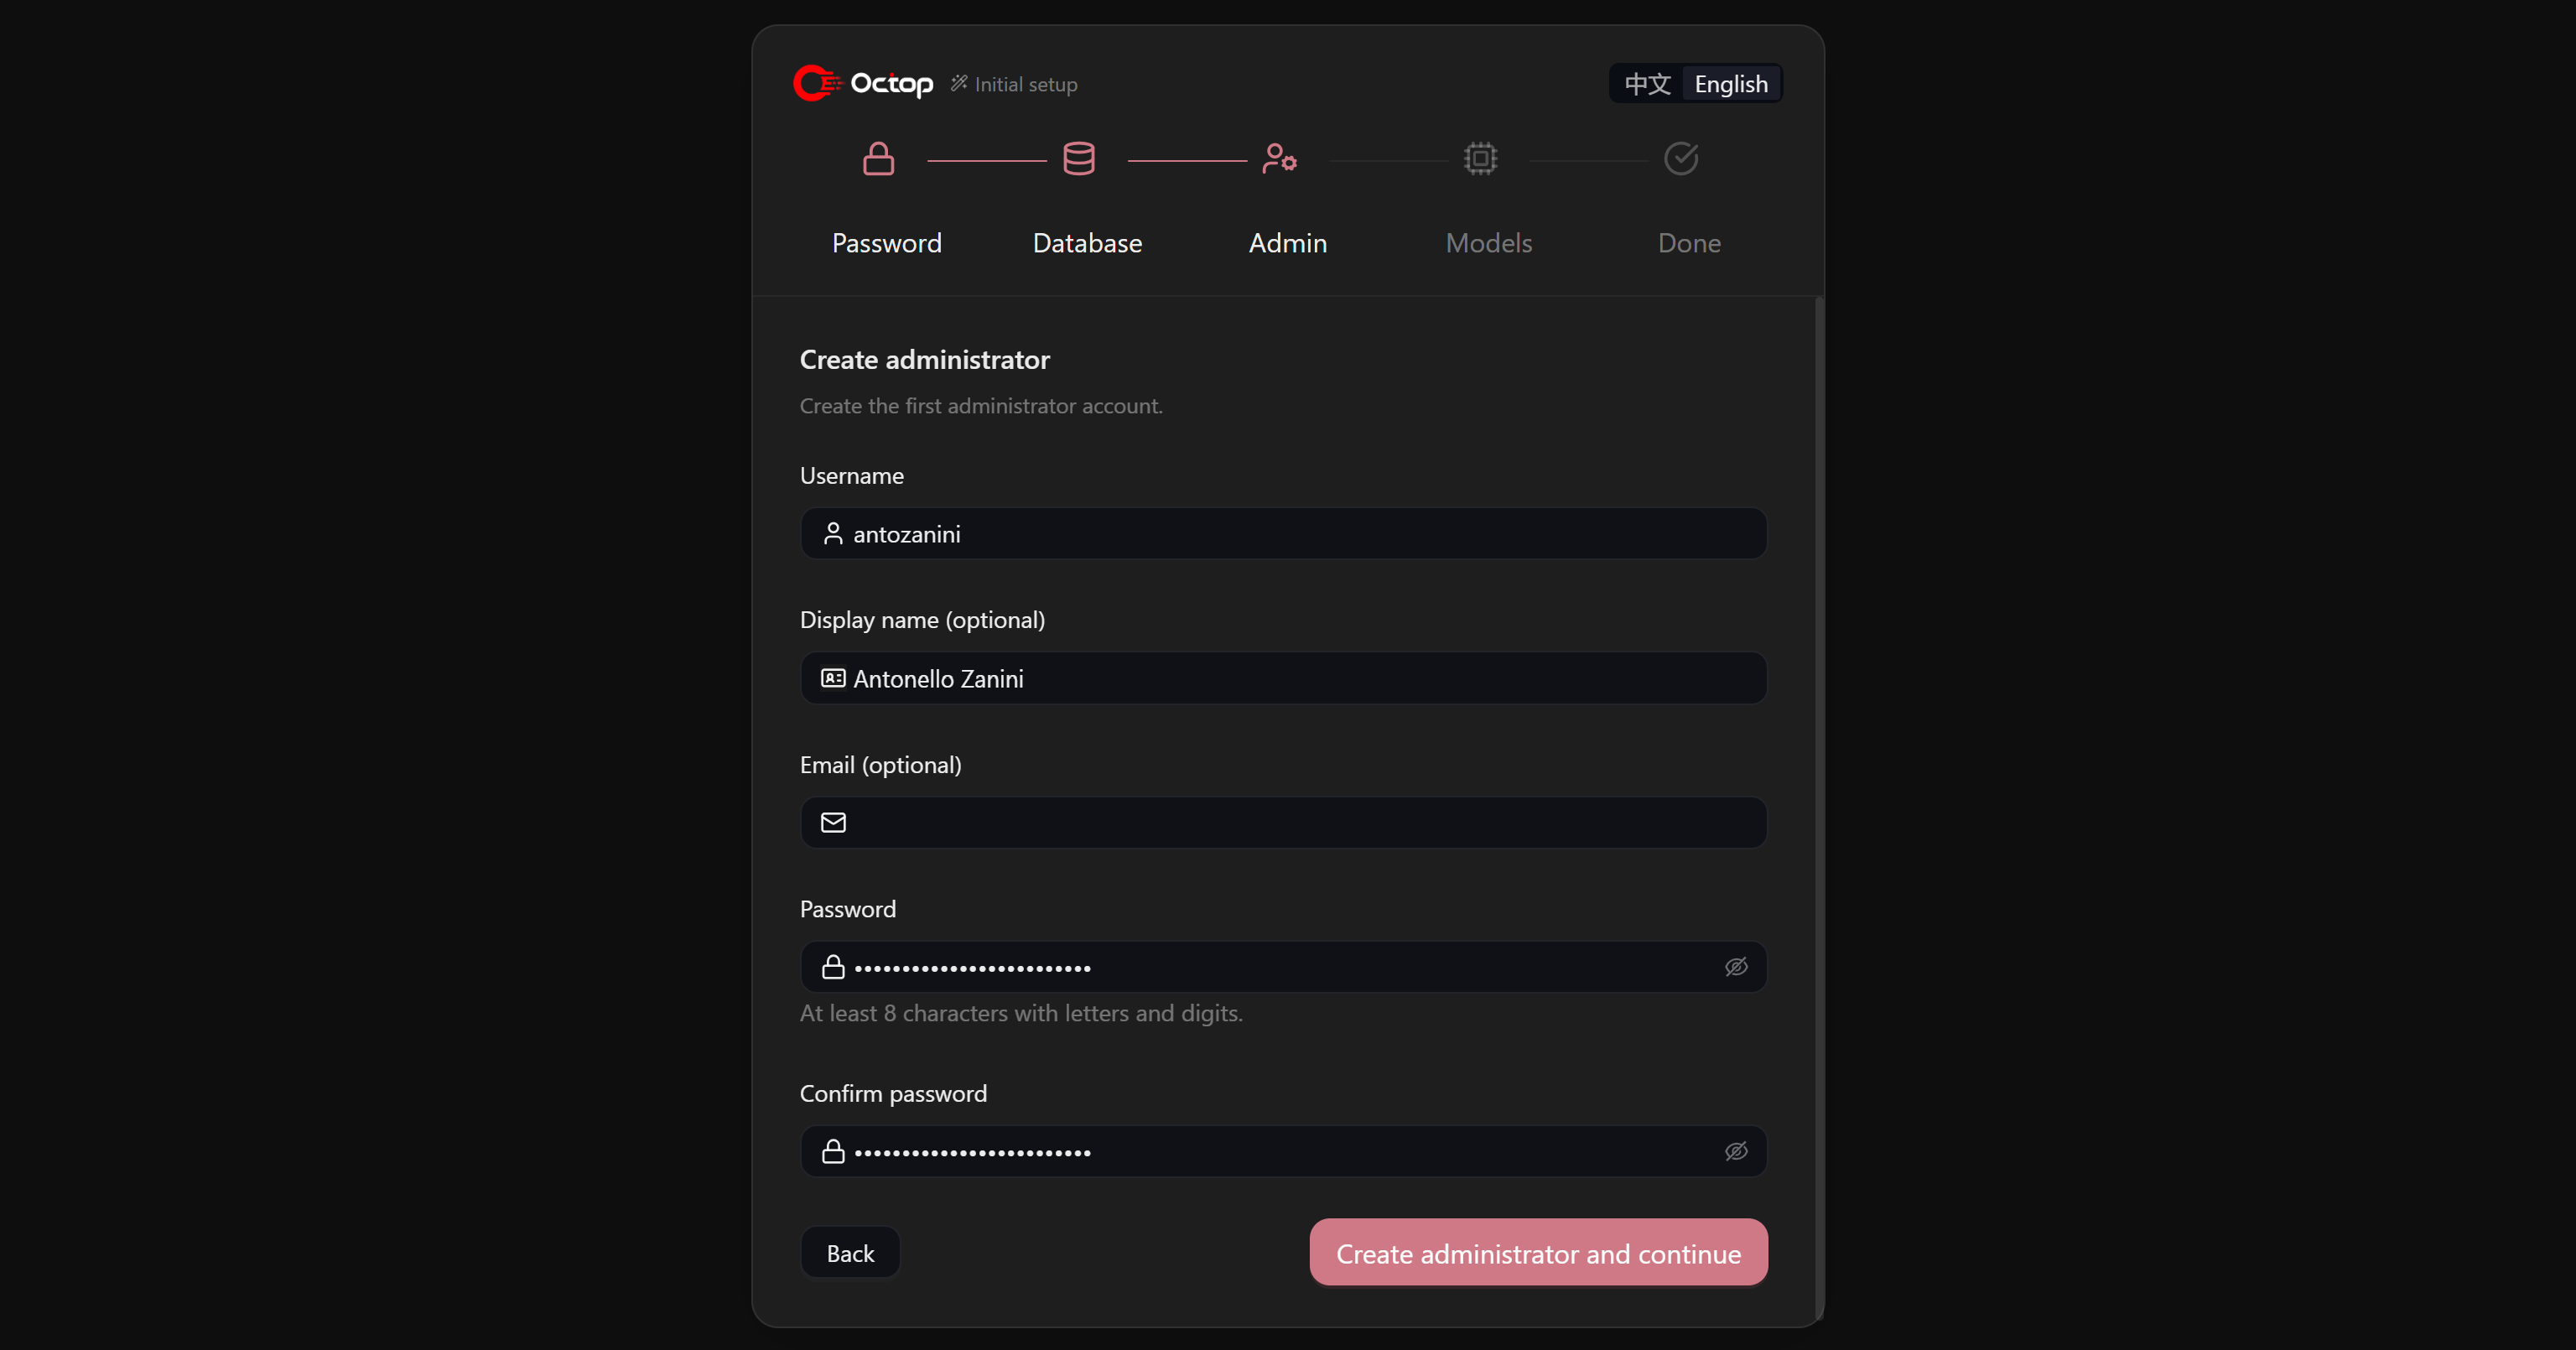
Important: Store these credentials, as you will need them to authenticate future Octop sessions.
Finally, select the AI provider that you want Octop to use. In this example, we will use OpenAI, so select the “OpenAI” card:
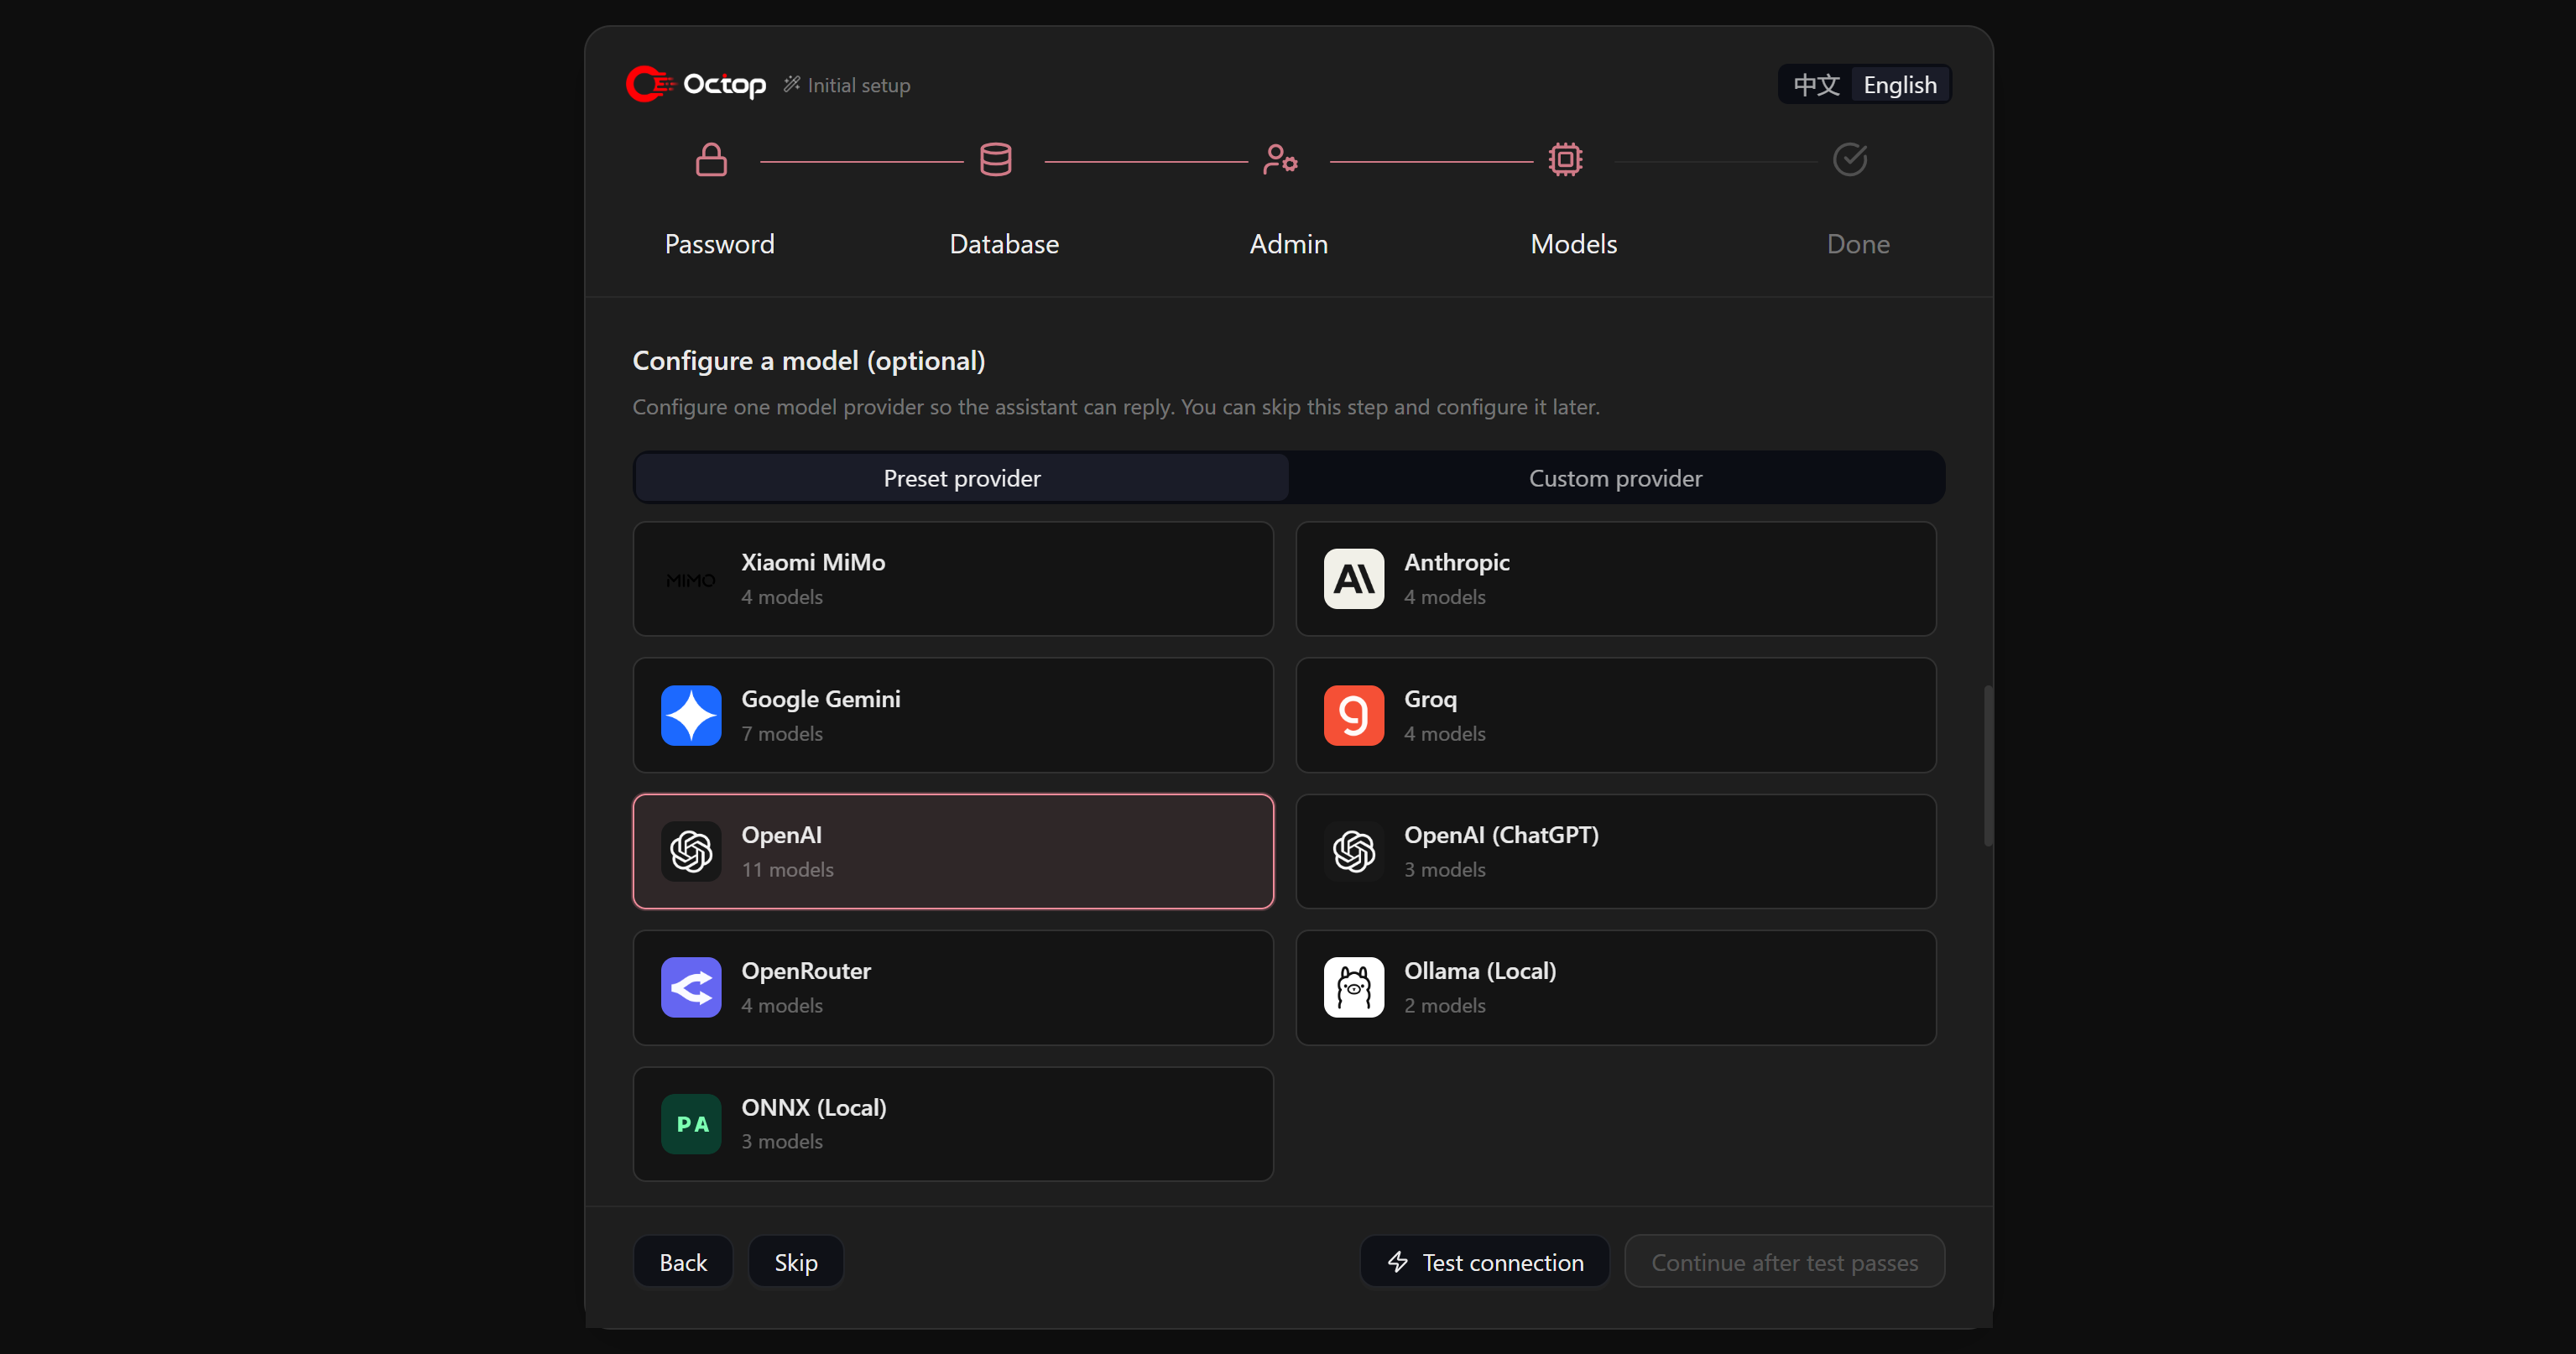
Enter your OpenAI API key in the “API Key” field and select the initial models you want Octop to use. Click “Test connection” to verify that Octop can connect to OpenAI. Once the test succeeds, click “Continue after test passes” to complete the setup.
Once the setup is complete, the Octop Web UI will start, and the first expert (called “Main – General Assistant”) will be initialized automatically:
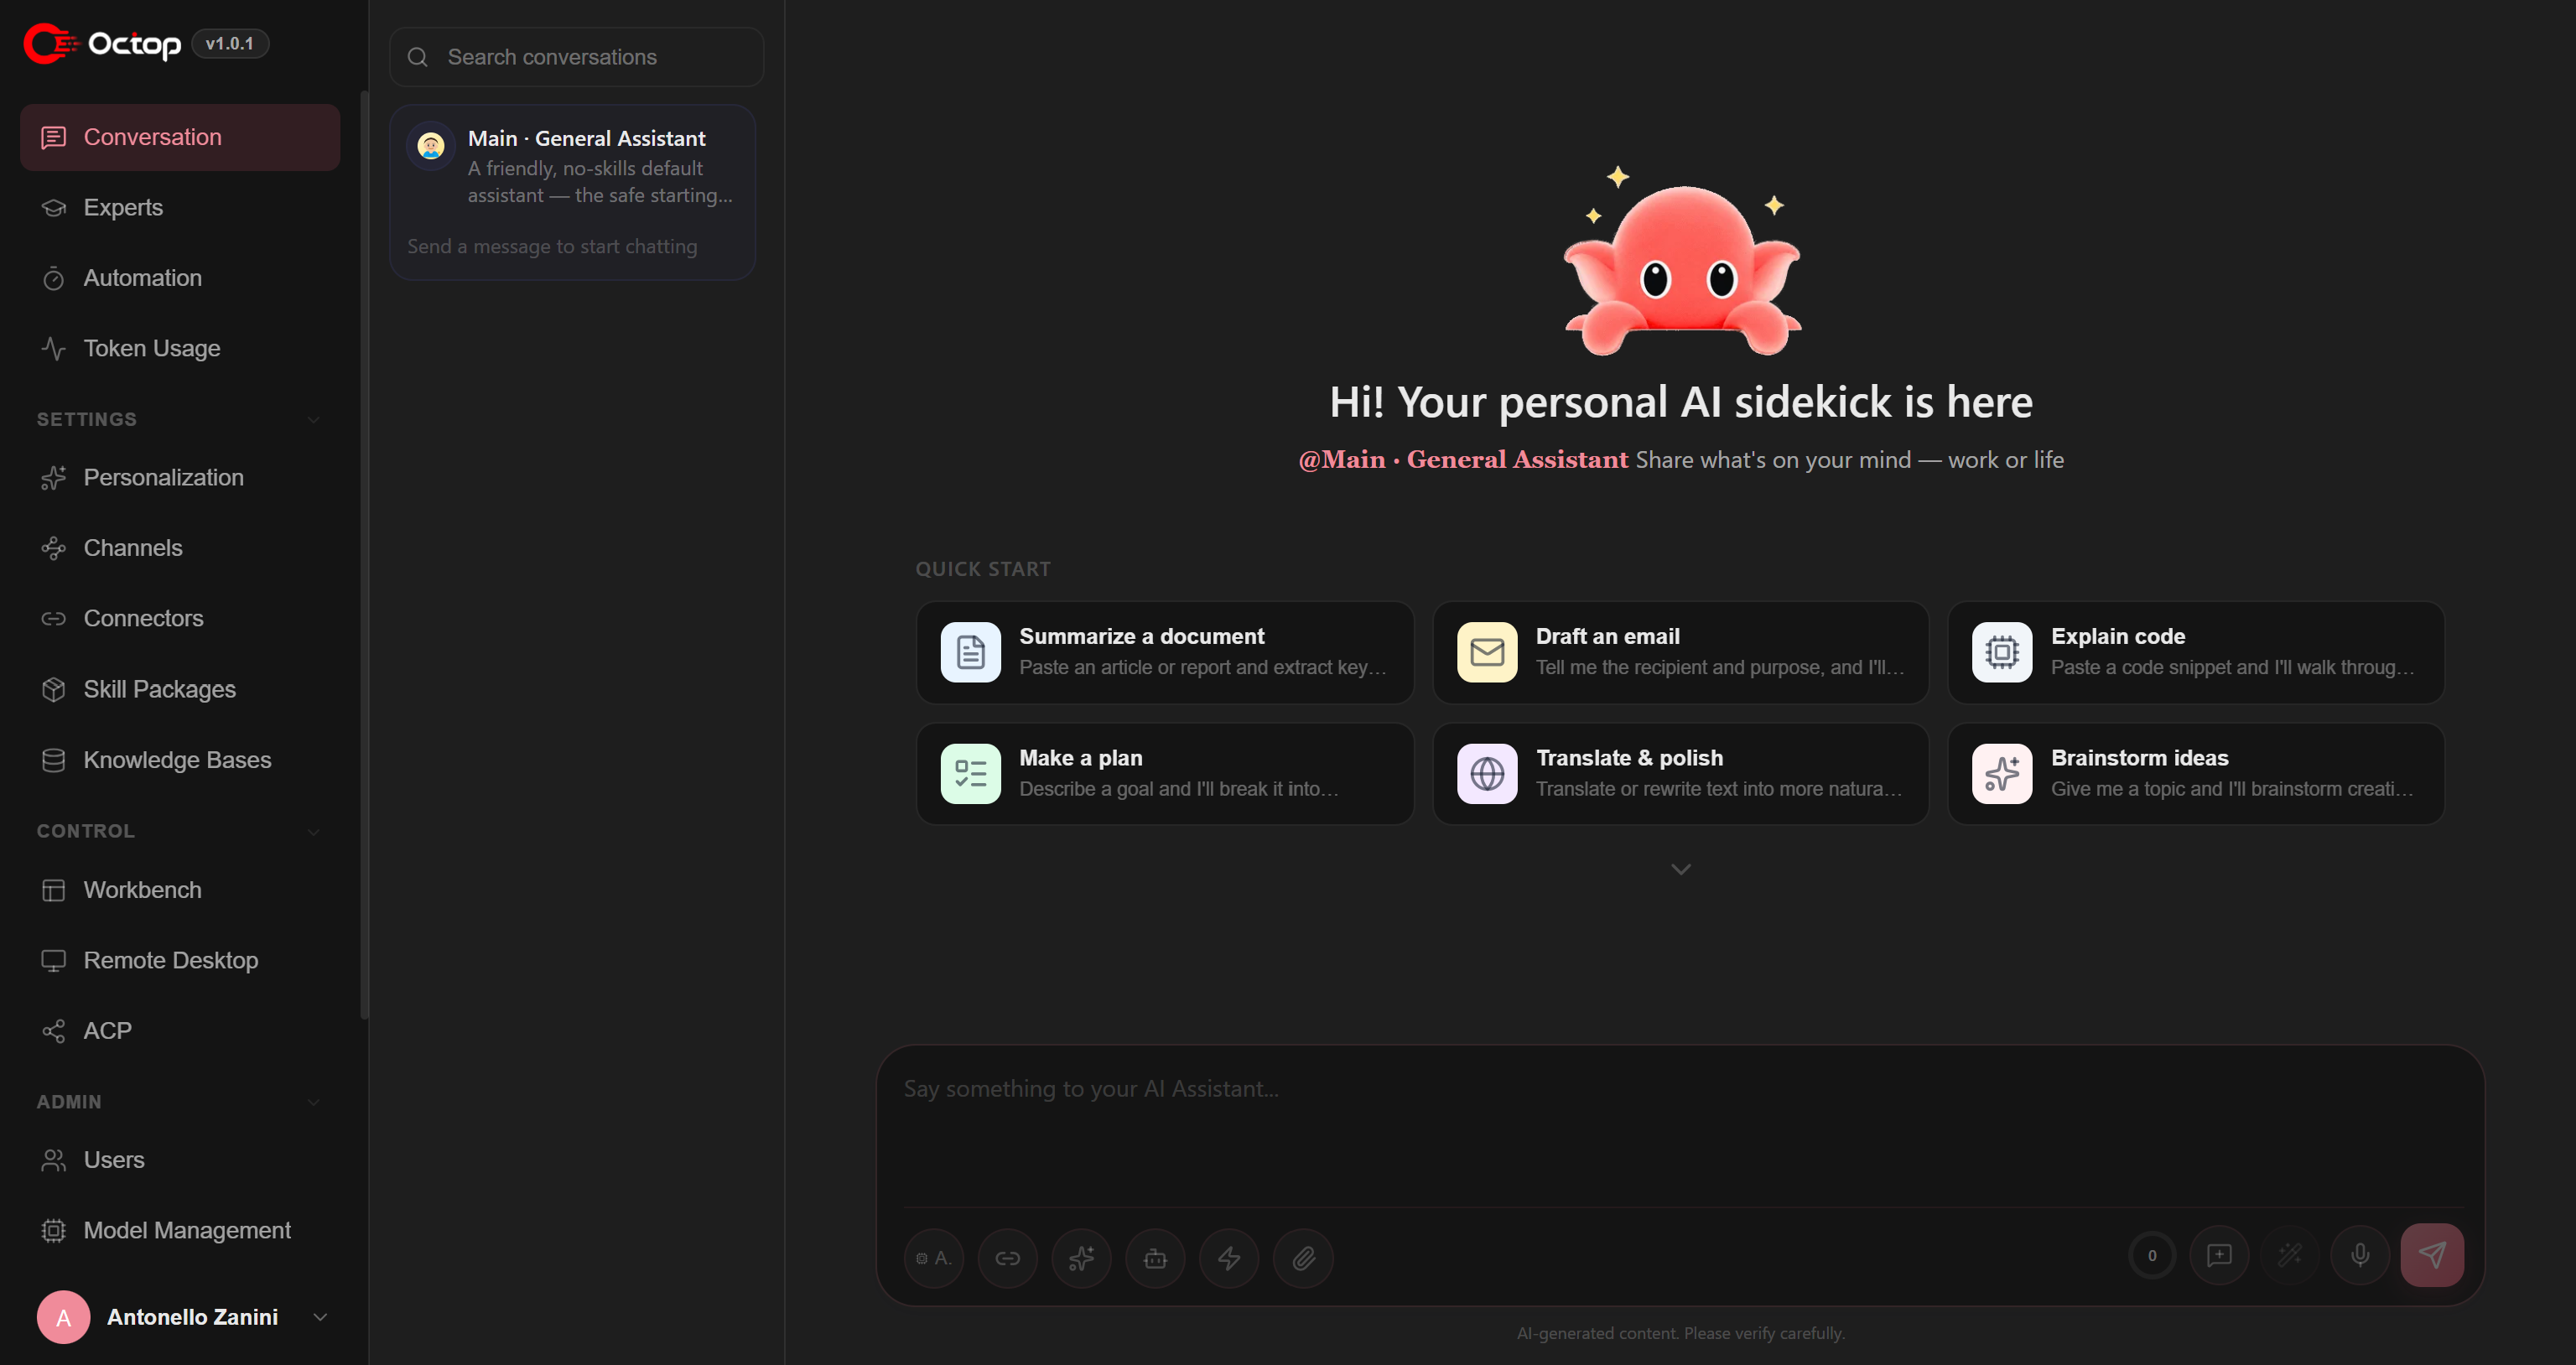
This is it! You now have a fully configured Octop environment up and running.
Step #3: Set Up the Bright Data CLI
For a guided setup, refer to the official documentation on installing and configuring the Bright Data CLI. For a more detailed introduction, read our blog post: Meet the Bright Data CLI: Extract Data and Interact with the Web from Your Terminal.
Alternatively, follow the steps below.
First, install the Bright Data CLI globally using the @brightdata/cli npm package:
npm install -g @brightdata/cliThis installs the brightdata command and its bdata alias, allowing you to use the CLI directly from your terminal.
To verify that the installation was successful, check the installed version:
bdata --versionThe output shows the installed version, for example 0.3.8.
Next, connect the Bright Data CLI to your Bright Data account with:
bdata loginThis opens your browser and starts a secure OAuth authentication flow. Once authentication is complete, the CLI automatically configures the required APIs and applies the necessary defaults.
Fantastic! The Bright Data CLI is now ready to be configured in Octop.
Step #4: Import the Bright Data CLI Skill
The easiest way to give Octop AI agents the context they need to use the Bright Data CLI is to install the brightdata-cli skill. This skill is part of the official set of Bright Data Agent Skills. In detail, it provides agents with the knowledge they need to install, configure, and use the Bright Data CLI.
Alternative approach: You can also manually instruct AI agents to use the Bright Data CLI by providing them with the relevant context, as explained in our “Using Bright Data CLI with Claude Code, Codex CLI, and Other Local AI Agents” guide.
To install the brightdata-cli skill in Octop, go to the “Personalization” page, open the “Installed Skills” tab, and click “Import Skill”:
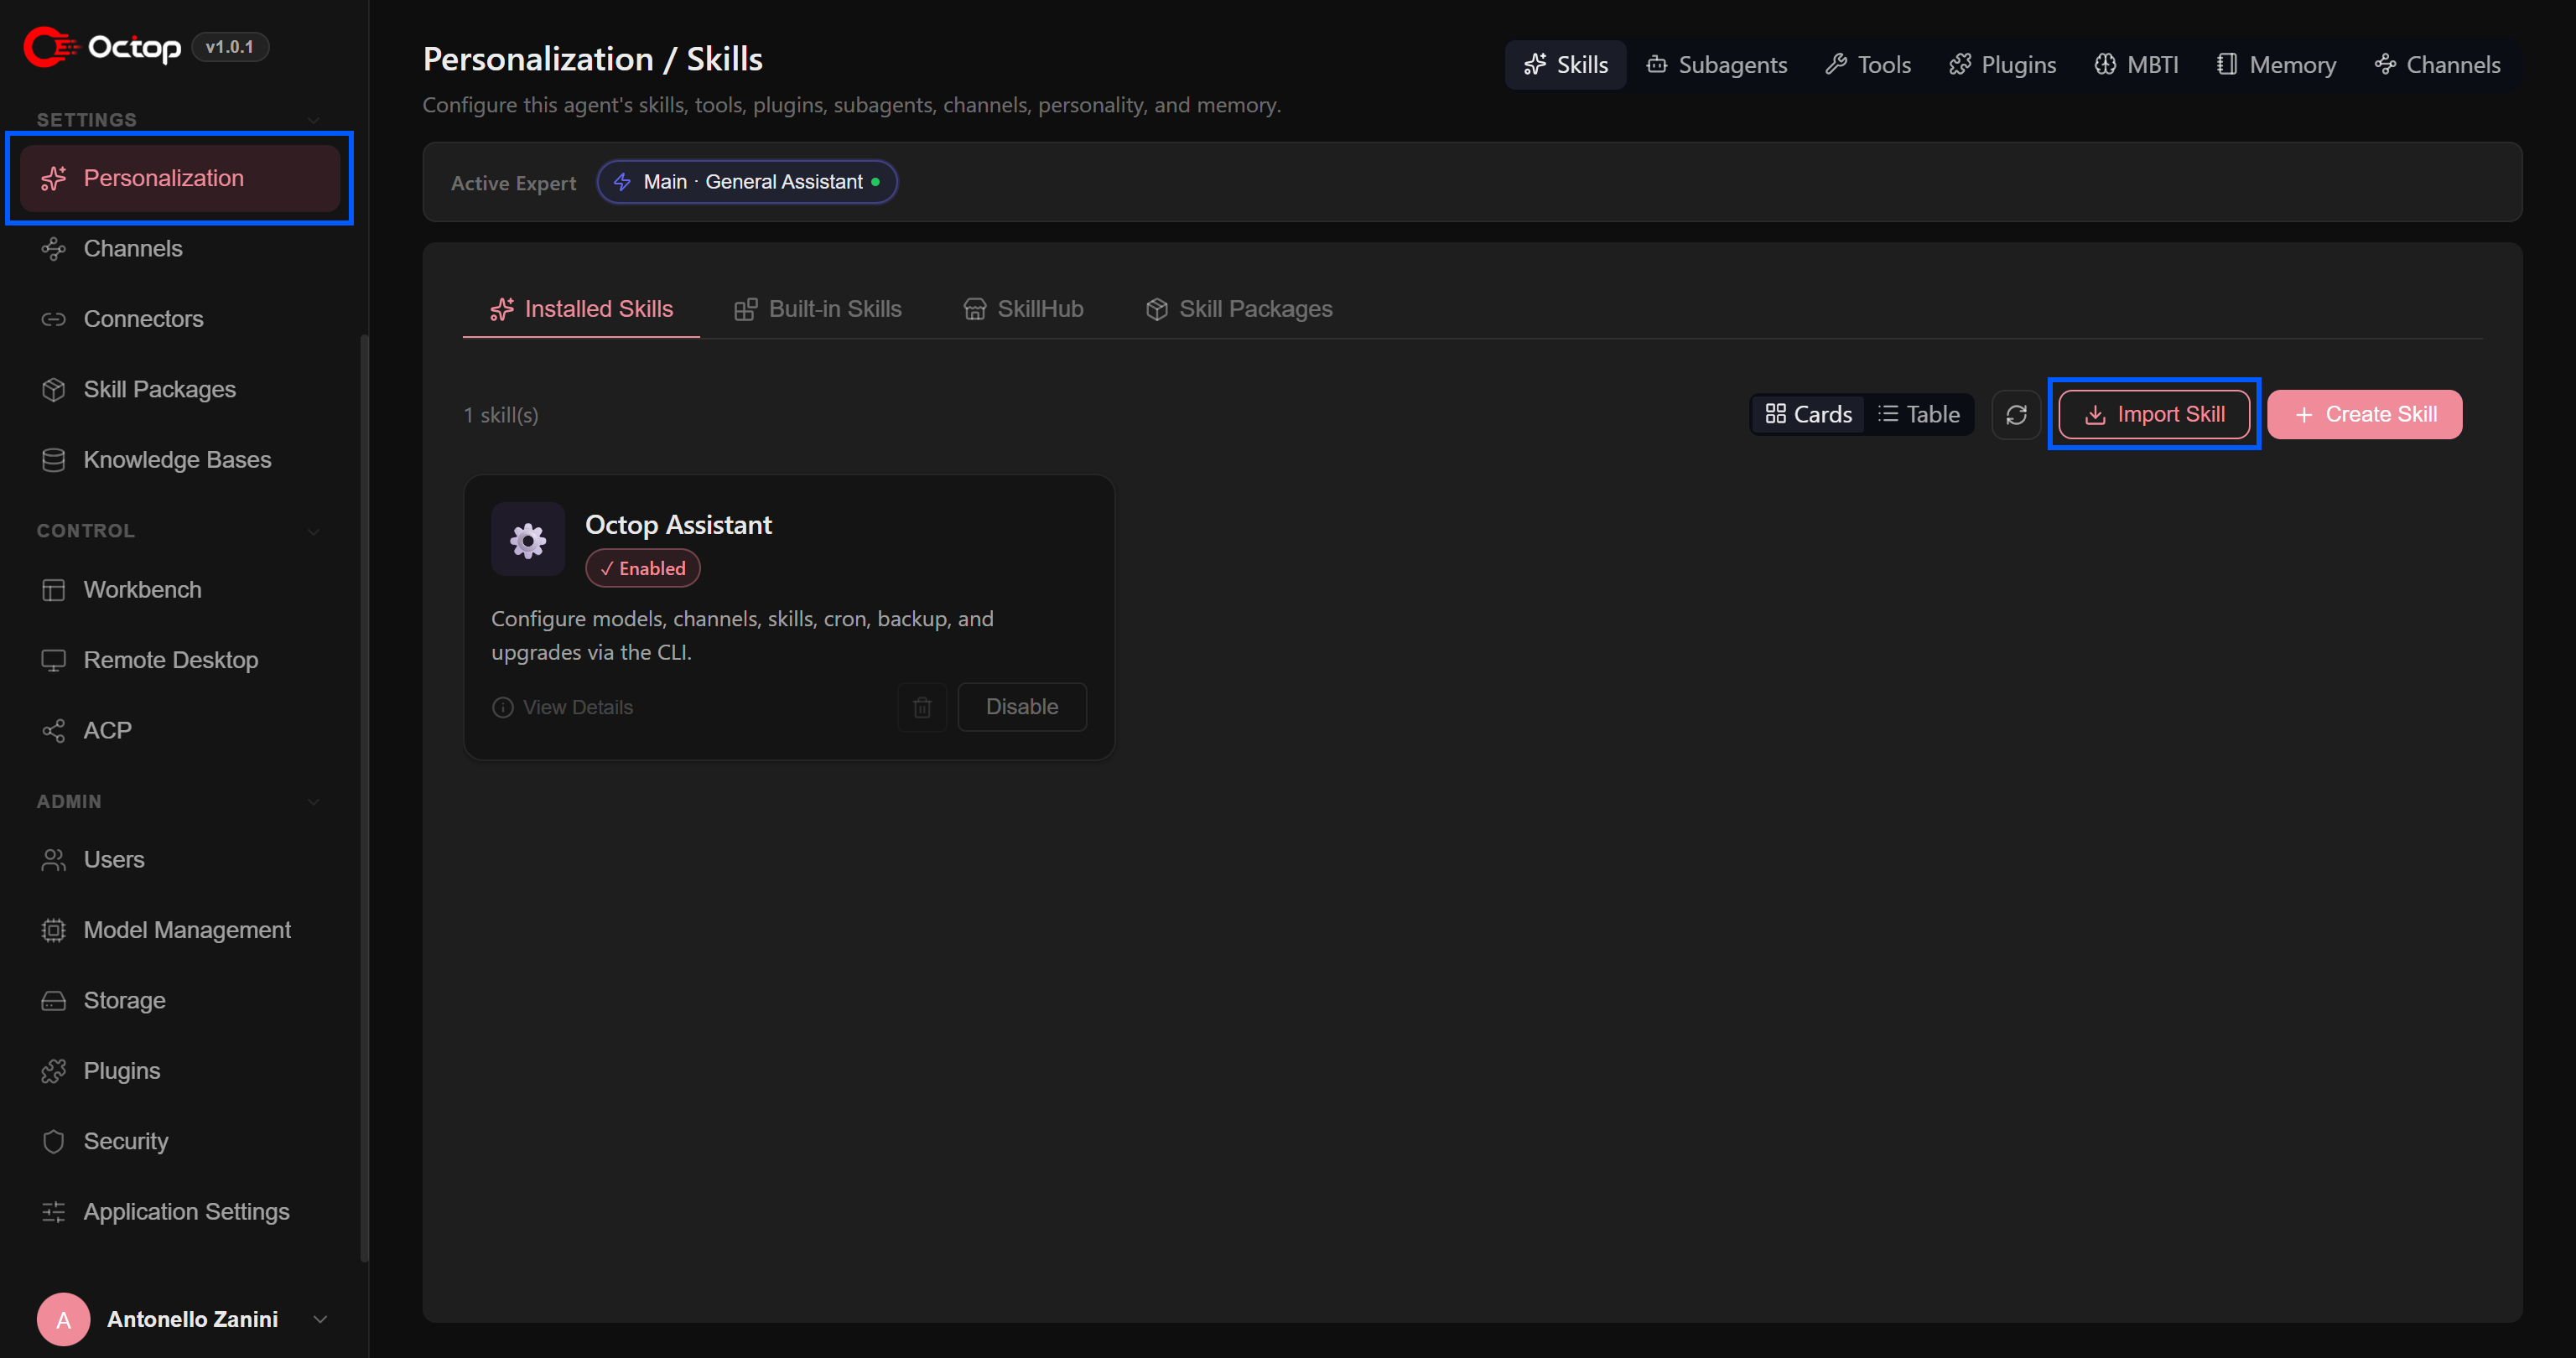
This will open the “Import Skill” modal. Here, you can import external skills from the Skills.sh repository or directly from GitHub.
The Bright Data Agent Skills are available on Skills.sh. So, to add the Bright Data CLI skill, paste its Skills.sh URL into the import field:
https://github.com/brightdata/skills/blob/main/skills/brightdata-cli/SKILL.md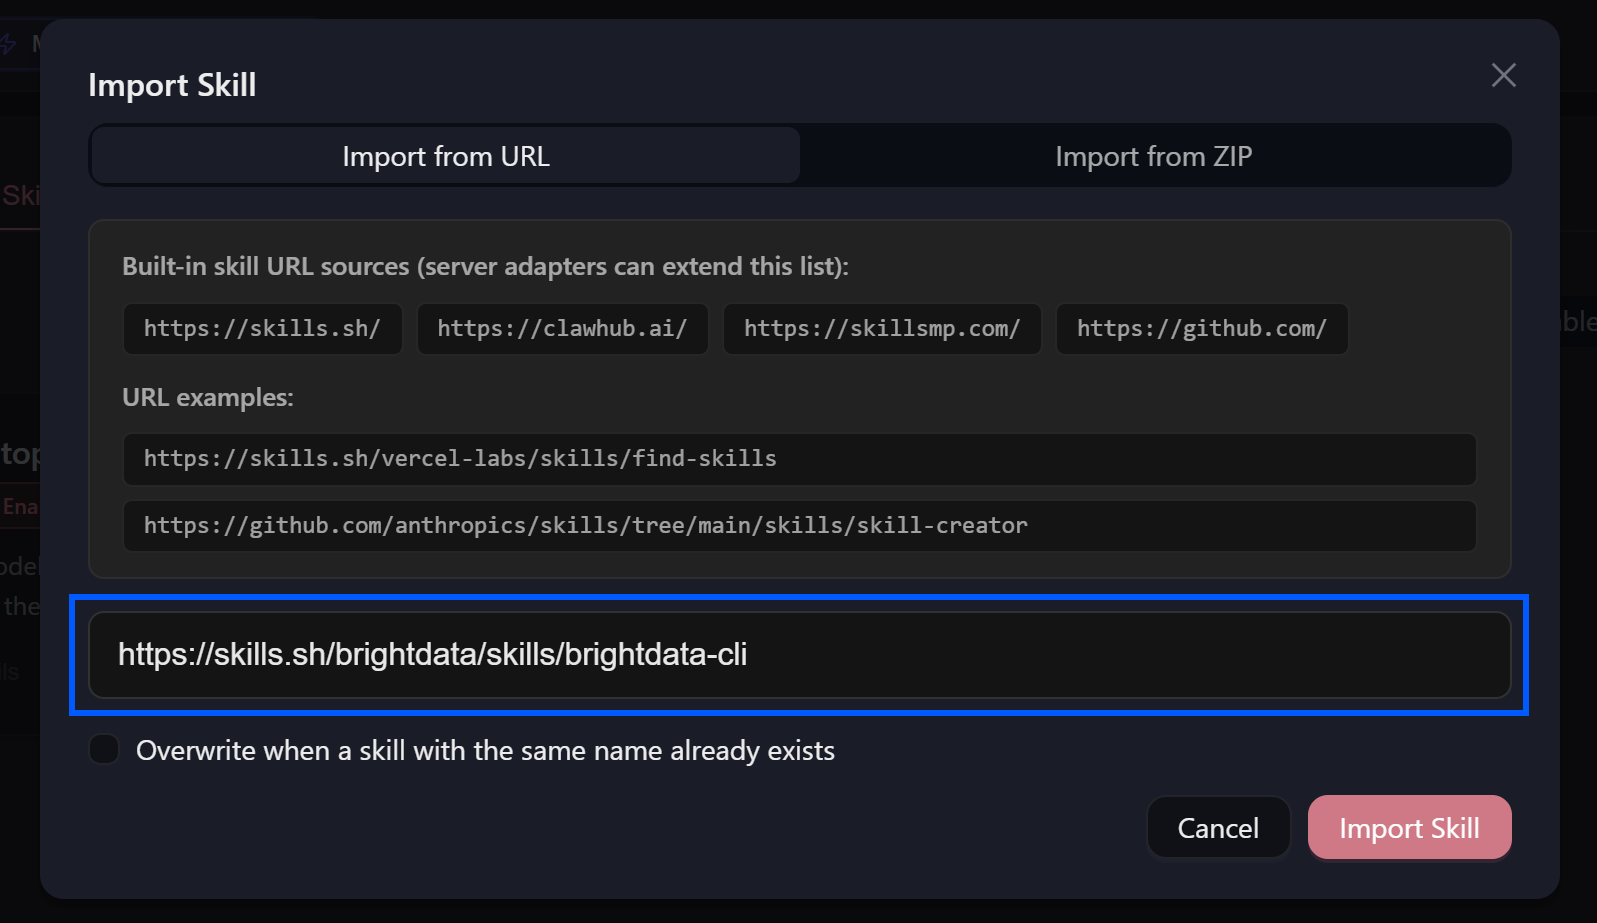
Click “Import Skill” to continue. The brightdata-cli skill will now be available in Octop:
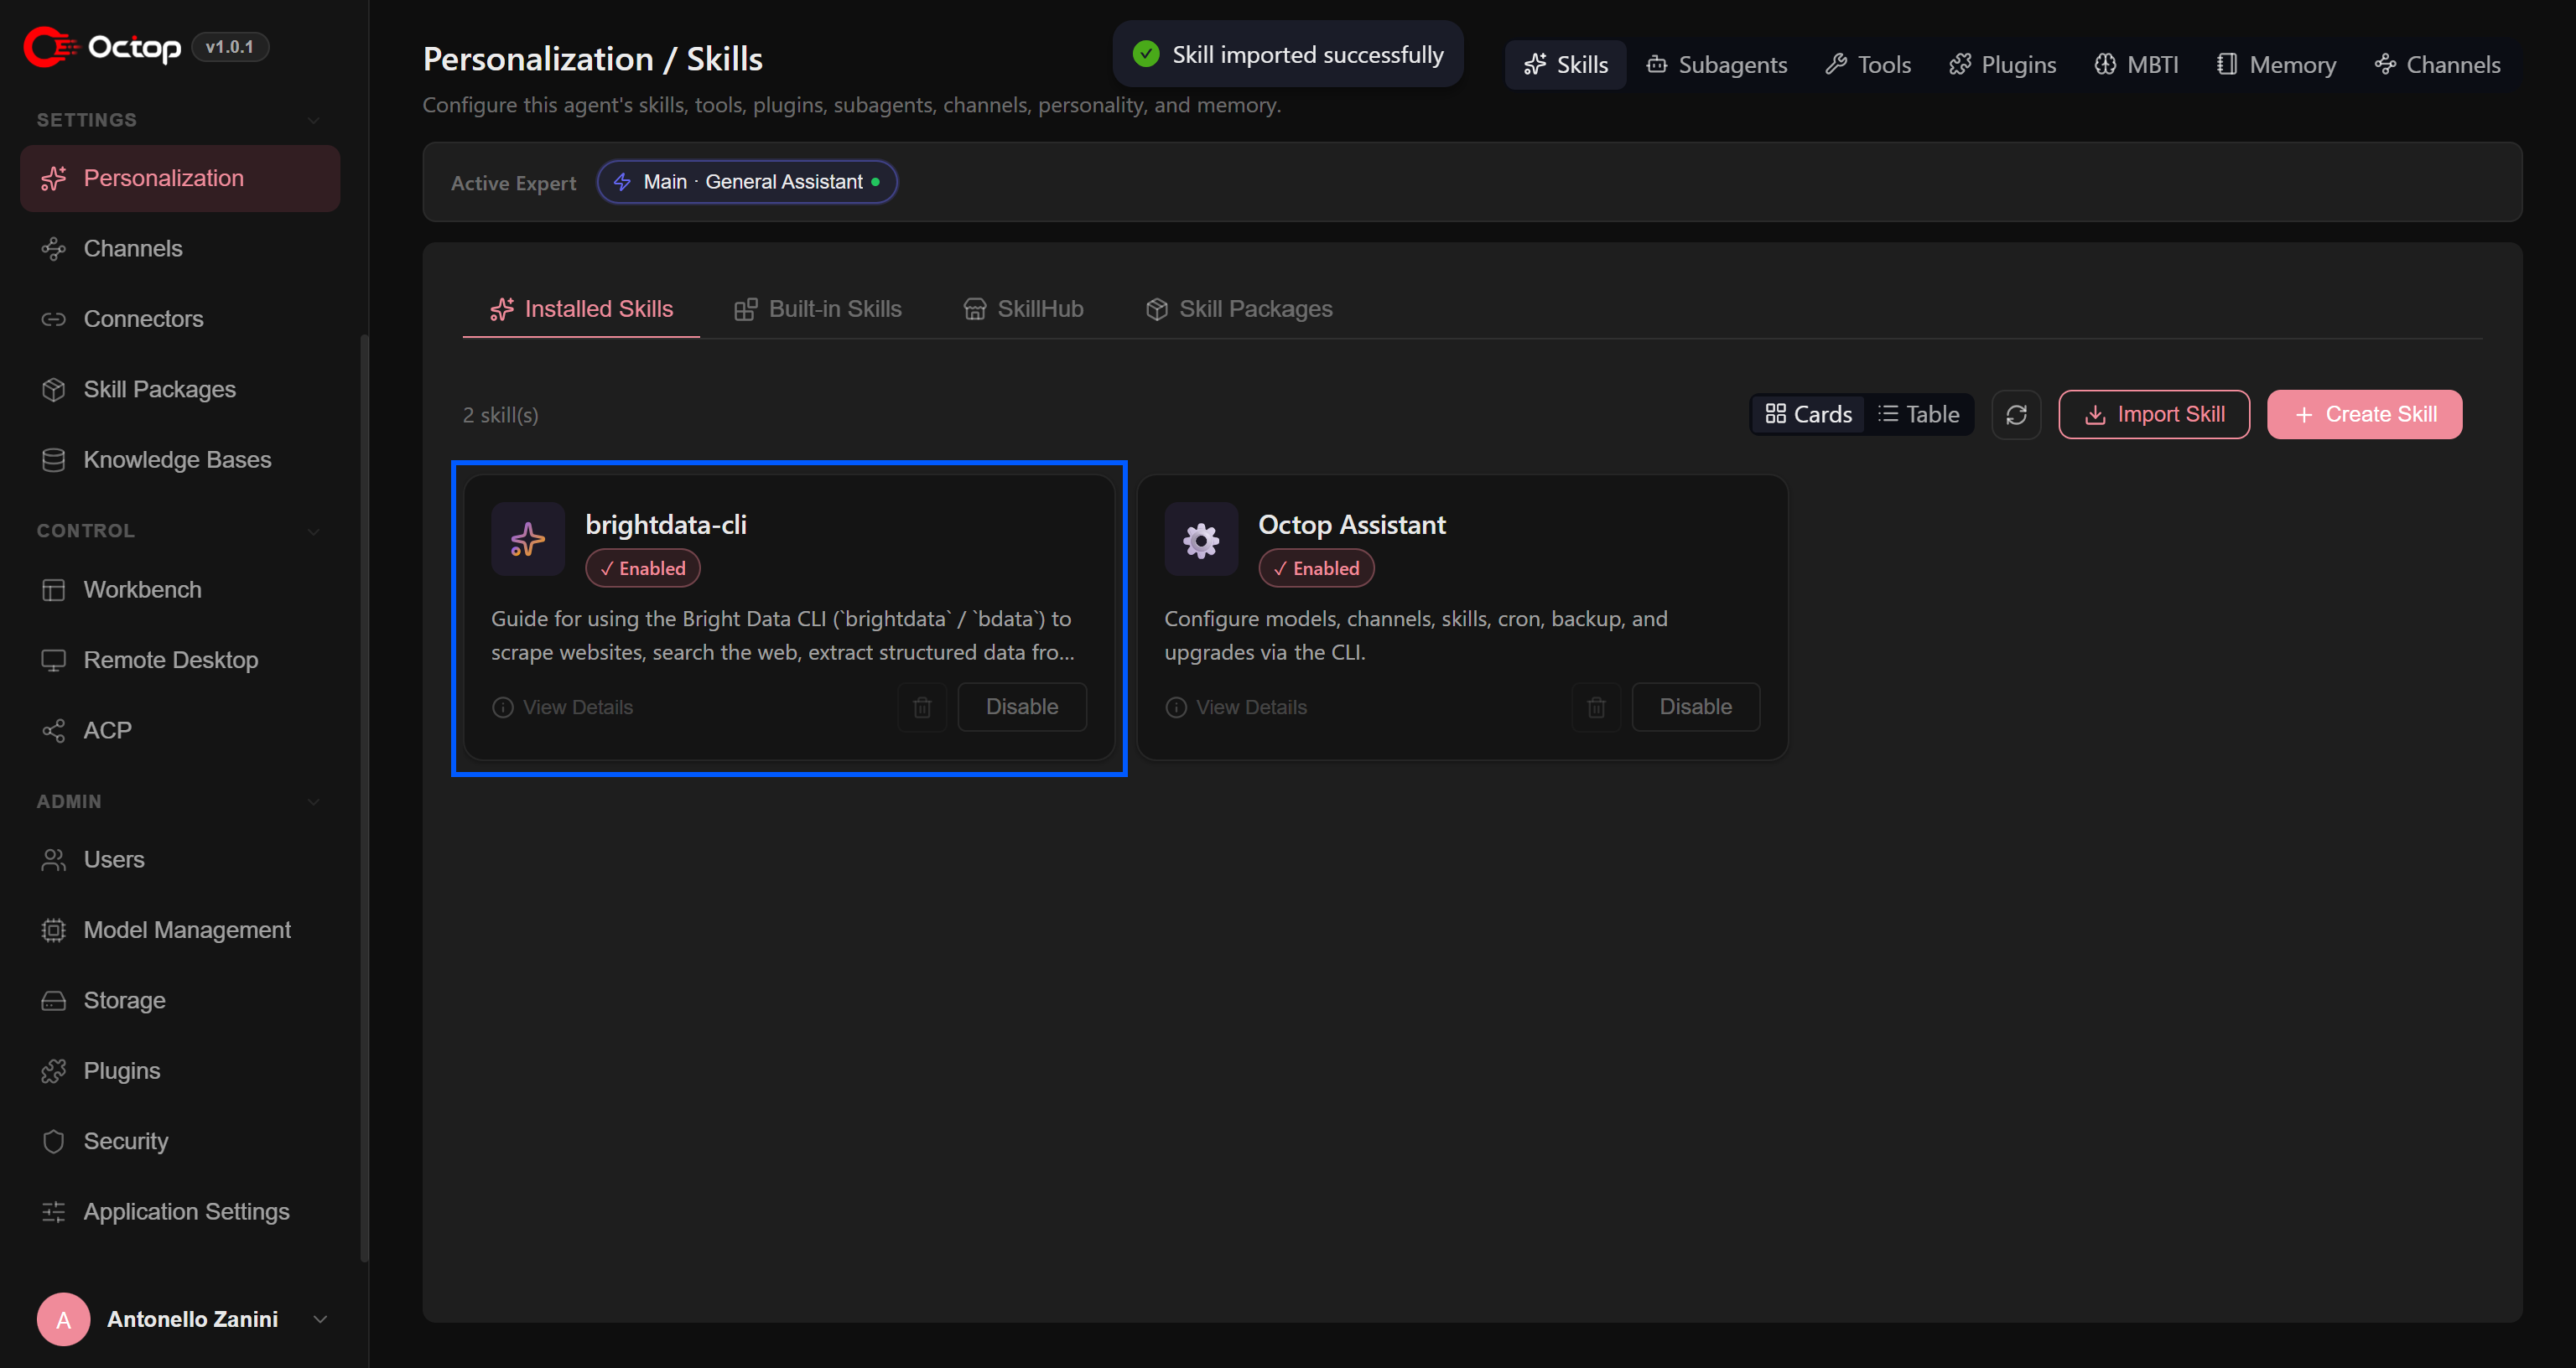
The skill will be enabled by default. This means Octop AI agents can automatically load the skill when they need to use the Bright Data CLI. Cool! Let’s verify that.
Step #5: Update the Agent Memory
Before you can see the Octop + Bright Data integration in action, there is one additional step you need to complete.
Octop AI agents do not know that the Bright Data CLI is already installed and available on your system. You therefore need to provide this context to the agent first.
Go to the “Conversation” section and start by telling the selected agent that it can now use the Bright Data CLI:
Try to run `bdata --version` to check that you have access to the Bright Data CLI. If so, remember that.You should receive output similar to:

This is important because it ensures that the agent understands not only that it has access to the brightdata-cli skill, but also that the Bright Data CLI is already installed and ready to use.
More specifically, Octop updates the agent’s memory by writing this information to the MEMORY.md file. As a result, future conversations with the agent can start with this context already available, so you do not have to explain it again. Perfect!
Step #6: Test the Integration
Verify that the agent can actually use the Bright Data CLI to perform tasks that require web access. Paste a prompt like the following:
Use the Bright Data CLI to search online for the NFL schedule for this week. Return a list of all games taking place during this week, along with information about the venue, kickoff time, and any other relevant game details.Note that this is just one example. Integrating Bright Data with Octop opens the door to many other use cases, including price monitoring, news summarization, SERP tracking, market research, and more.
Execute the prompt, and you should see output similar to this:
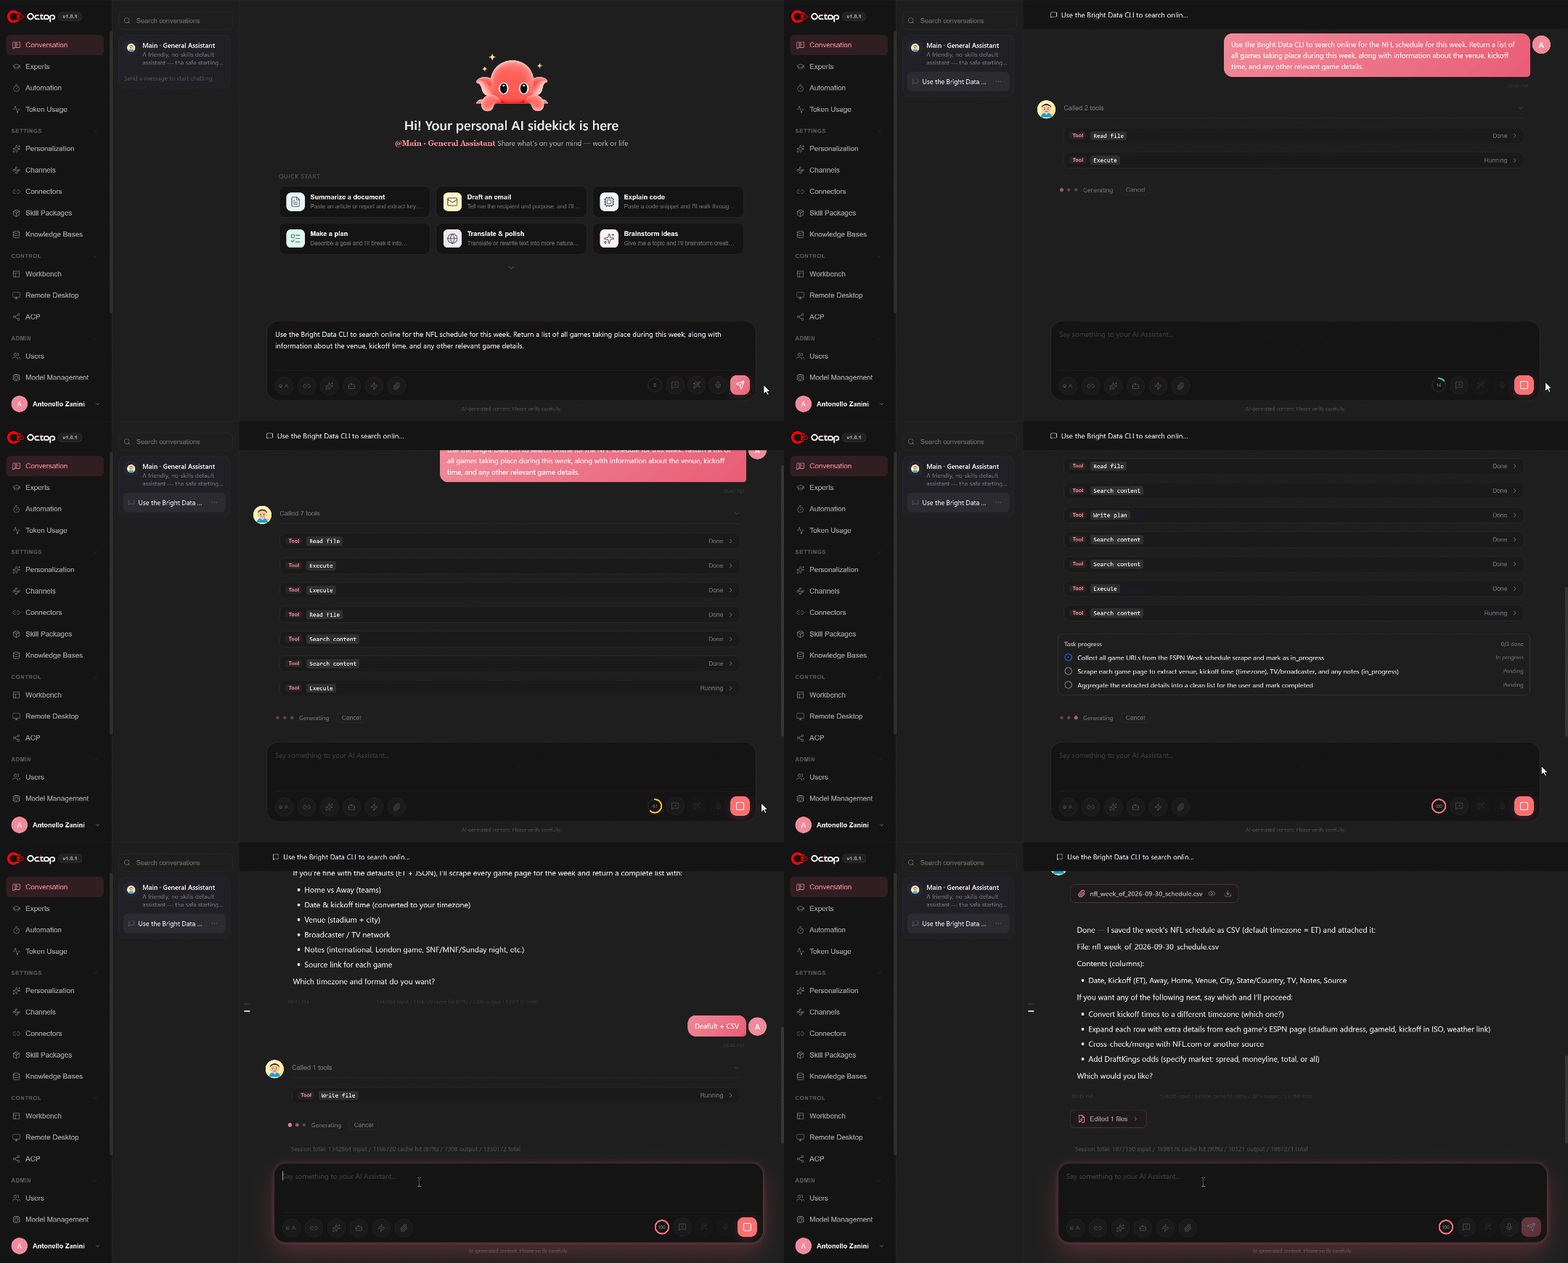
To complete the task, the Octop AI agent performs the following steps:
- Searches for the relevant web source by calling the
bdata searchcommand, powered by the Bright Data SERP API. - Analyzes the search results returned in JSON by the SERP API and identifies the most relevant link (in this case, the ESPN NFL schedule page).
- Scrapes the selected page using the
bdata scrapecommand, backed by the Bright Data Web Unlocker API. - Analyzes the AI-optimized Markdown page content returned by the scraper and identifies the relevant NFL games.
- Creates a scraping plan to retrieve the specific information needed for each NFL game.
- Executes the plan by making multiple
bdata scrapecalls to fetch the required game details. - Asks the user to specify the desired output format and data (here, we selected ET for dates and times and the results as a CSV file).
- Produces the final output file,
nfl_week_of_2026-09-30_schedule.csv, containing the requested data.
Impressive! Get ready to inspect the results in the output file.
Step #7: Analyze the Output
Open the nfl_week_of_2026-09-30_schedule.csv file generated by Octop:
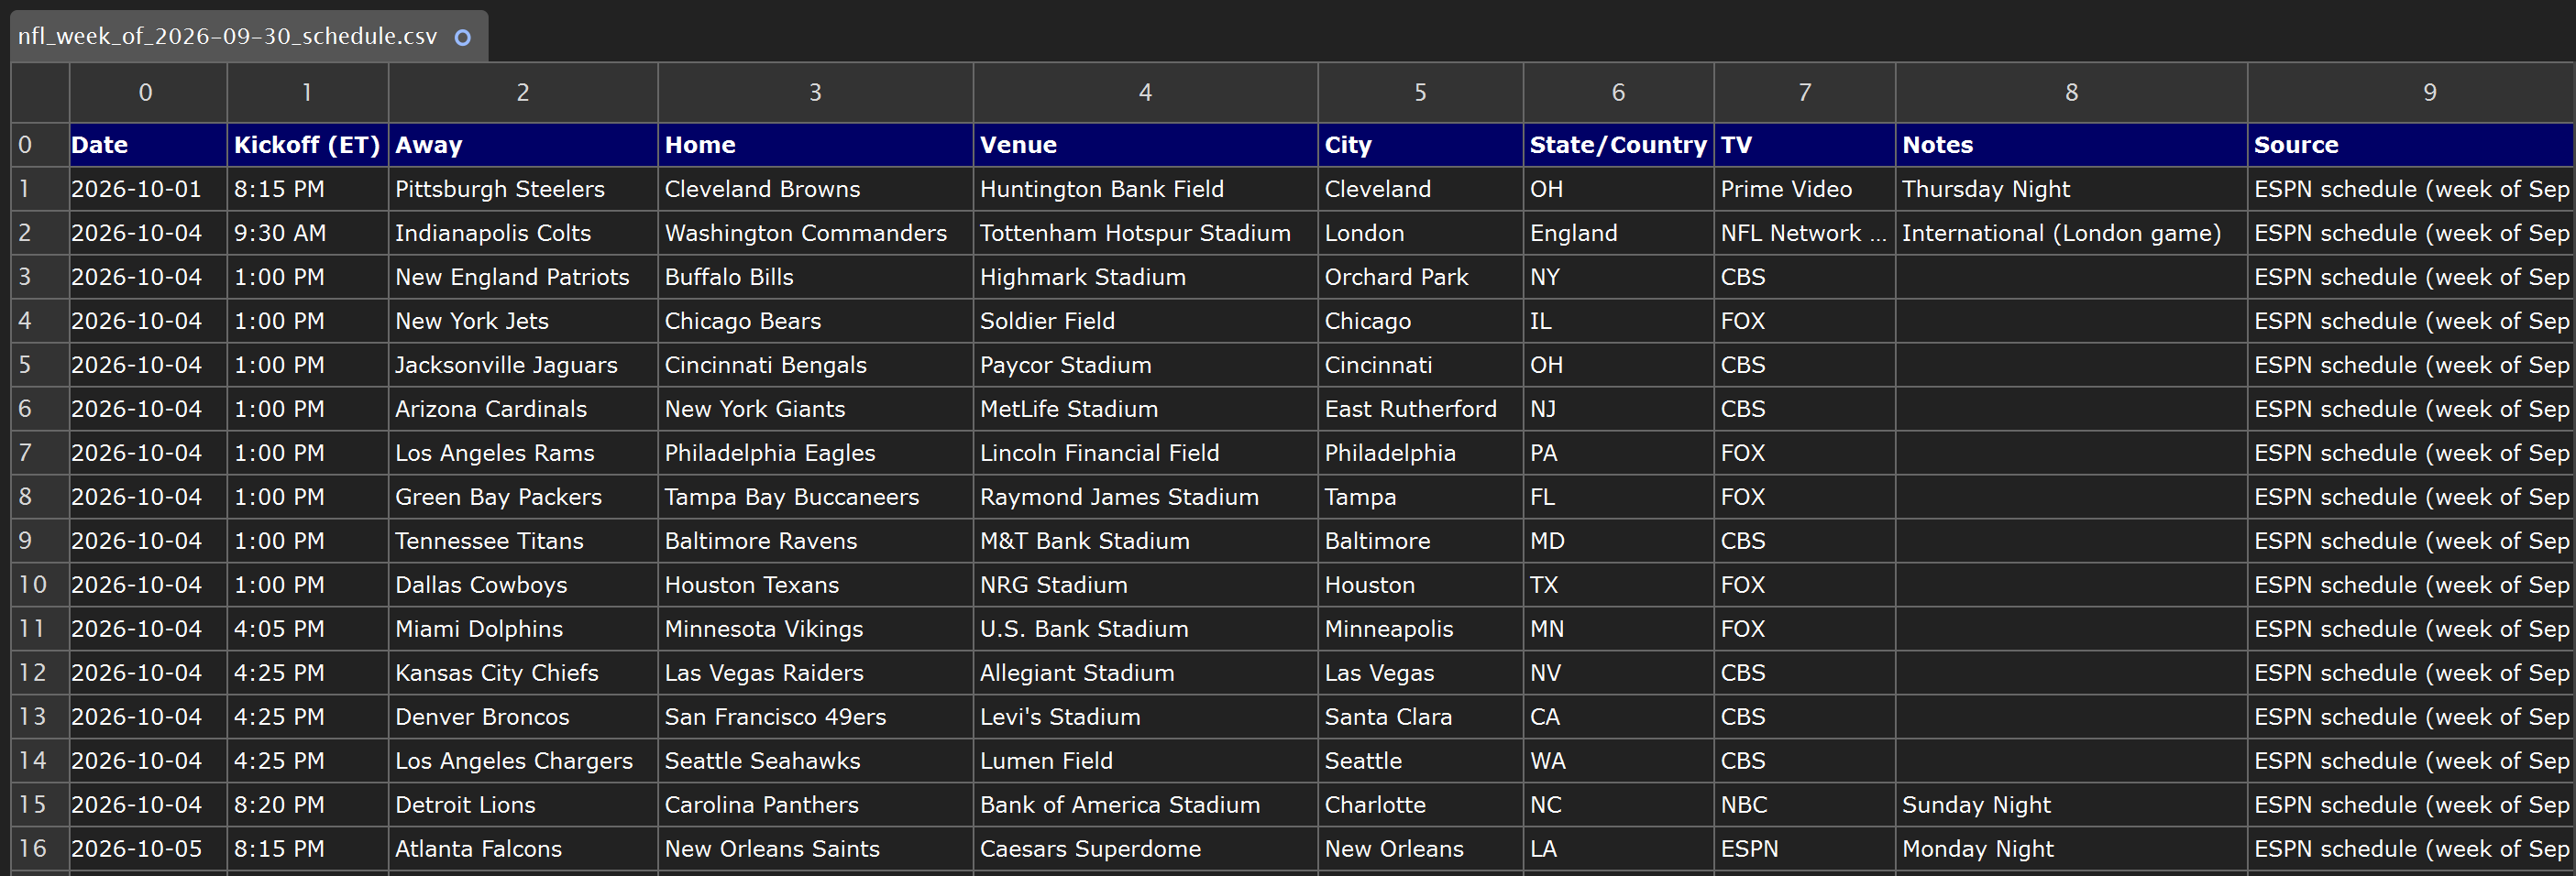
Note that the file contains all of the requested NFL games for the week the test ran:
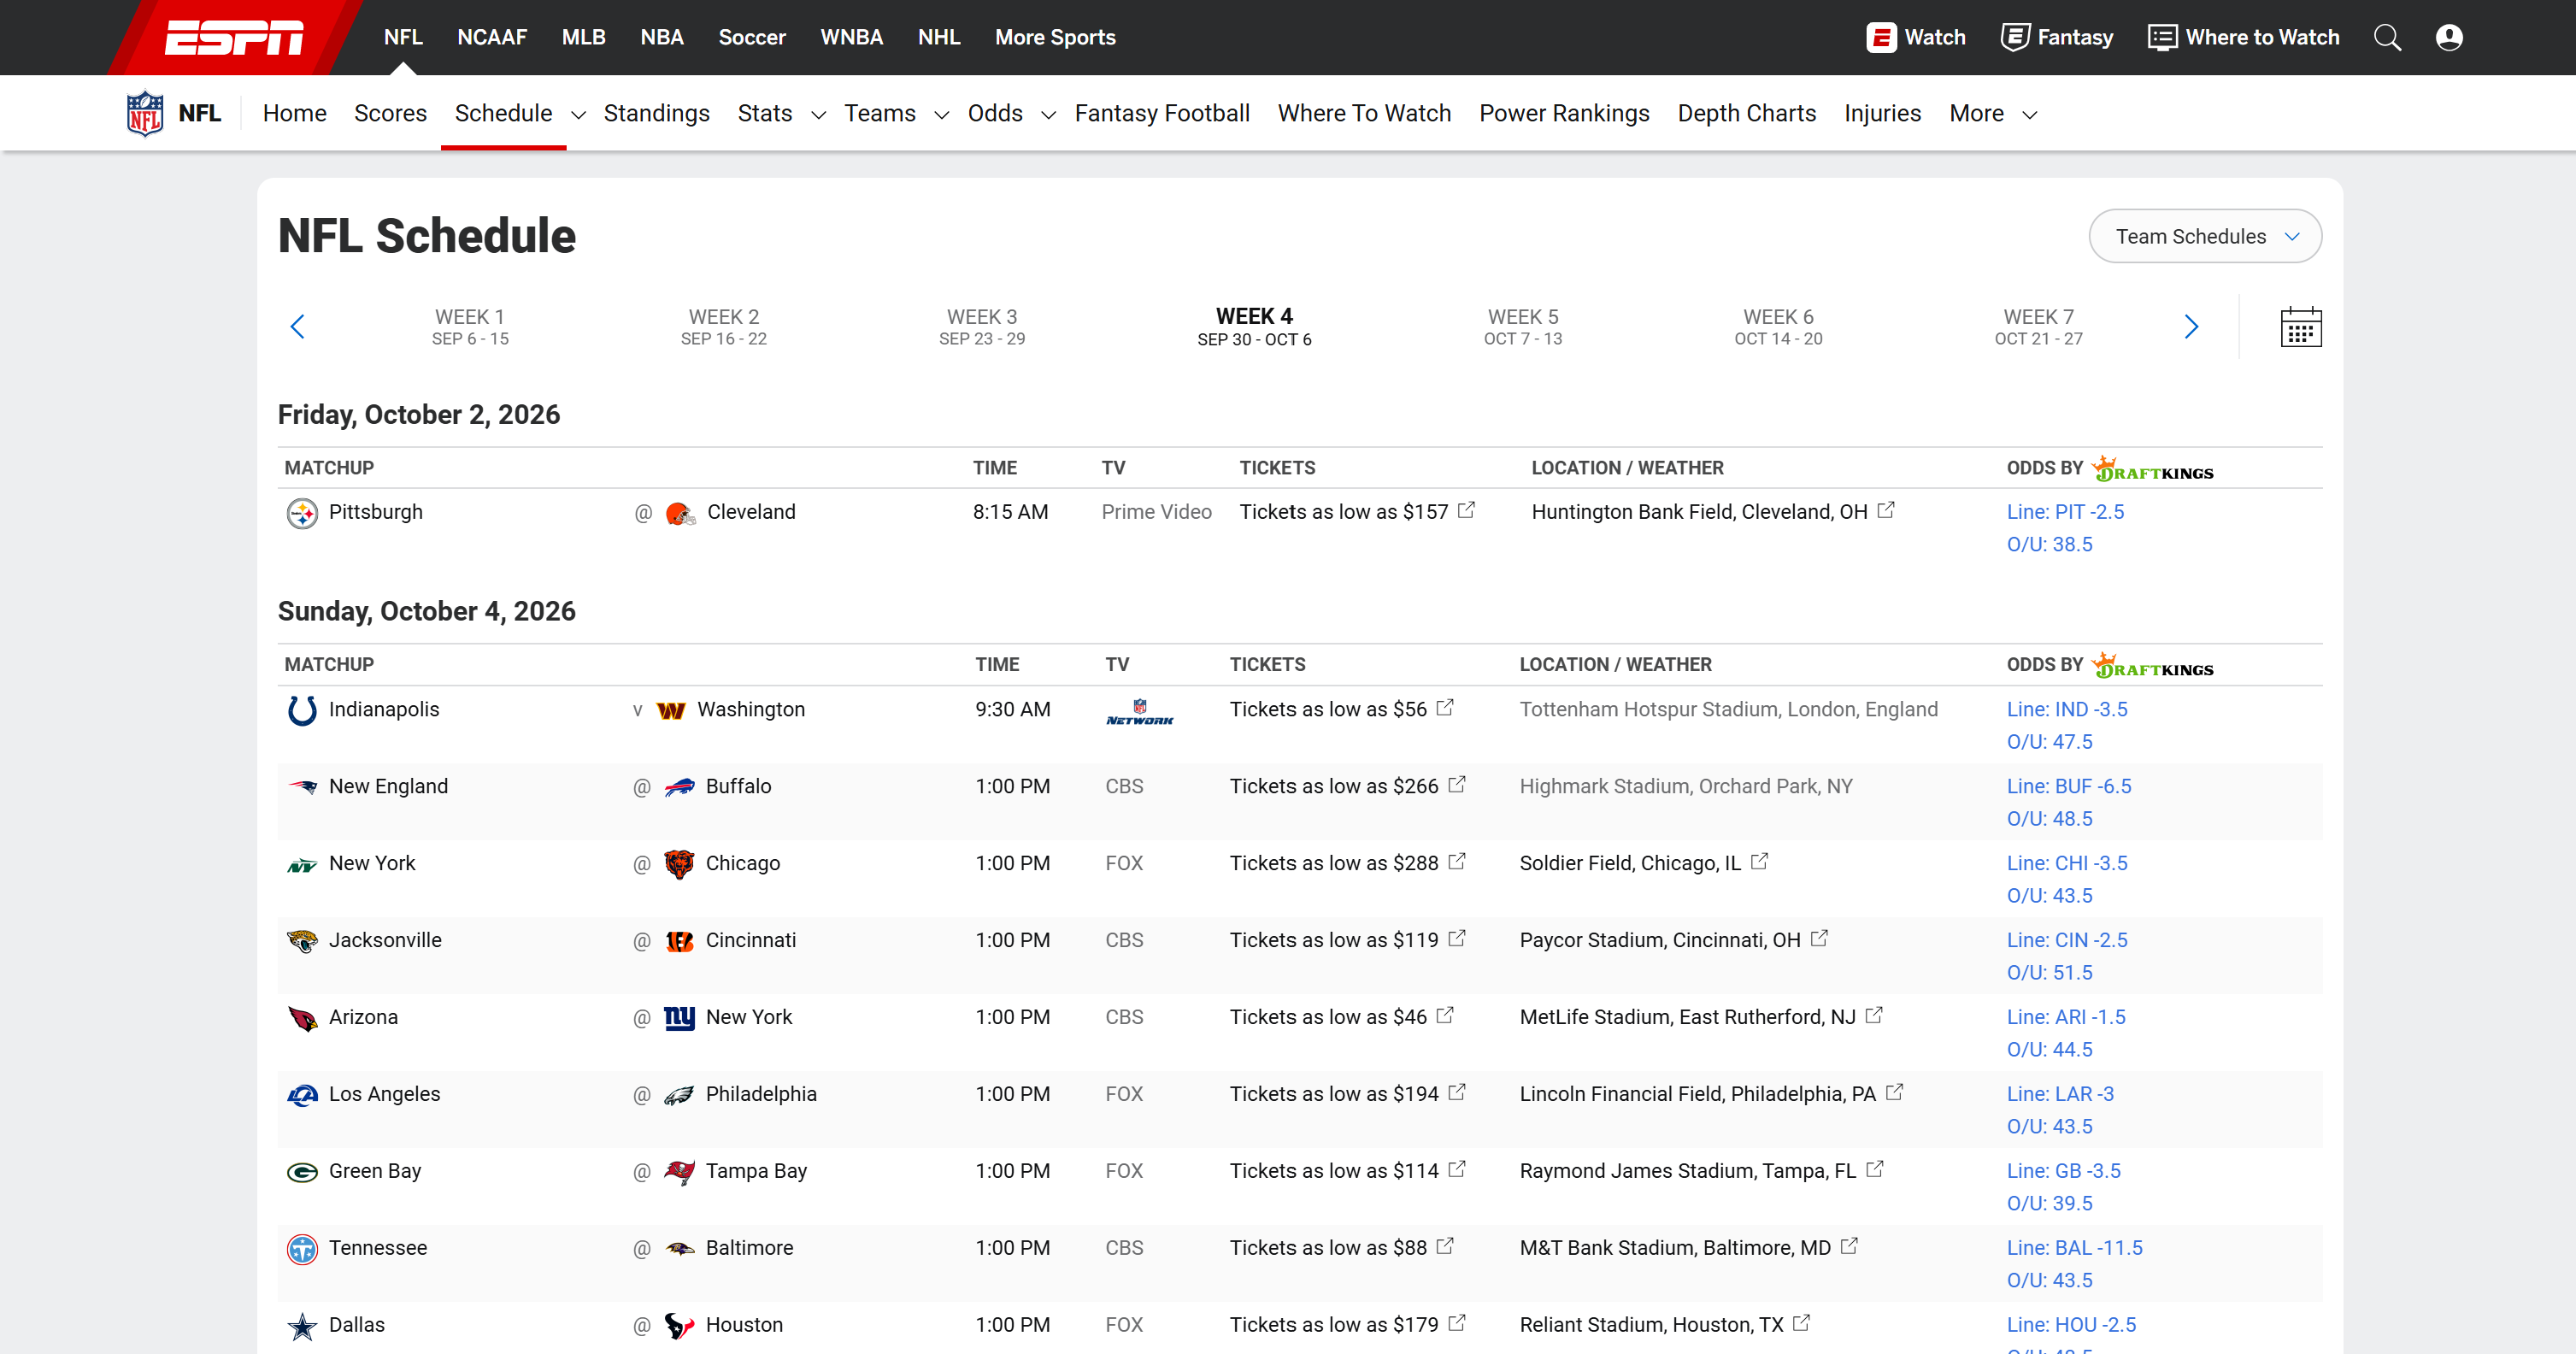
If you are wondering where this information came from, expand the “Tool Execute” instances. You will see that the Octop agent used the Bright Data CLI to retrieve the data:
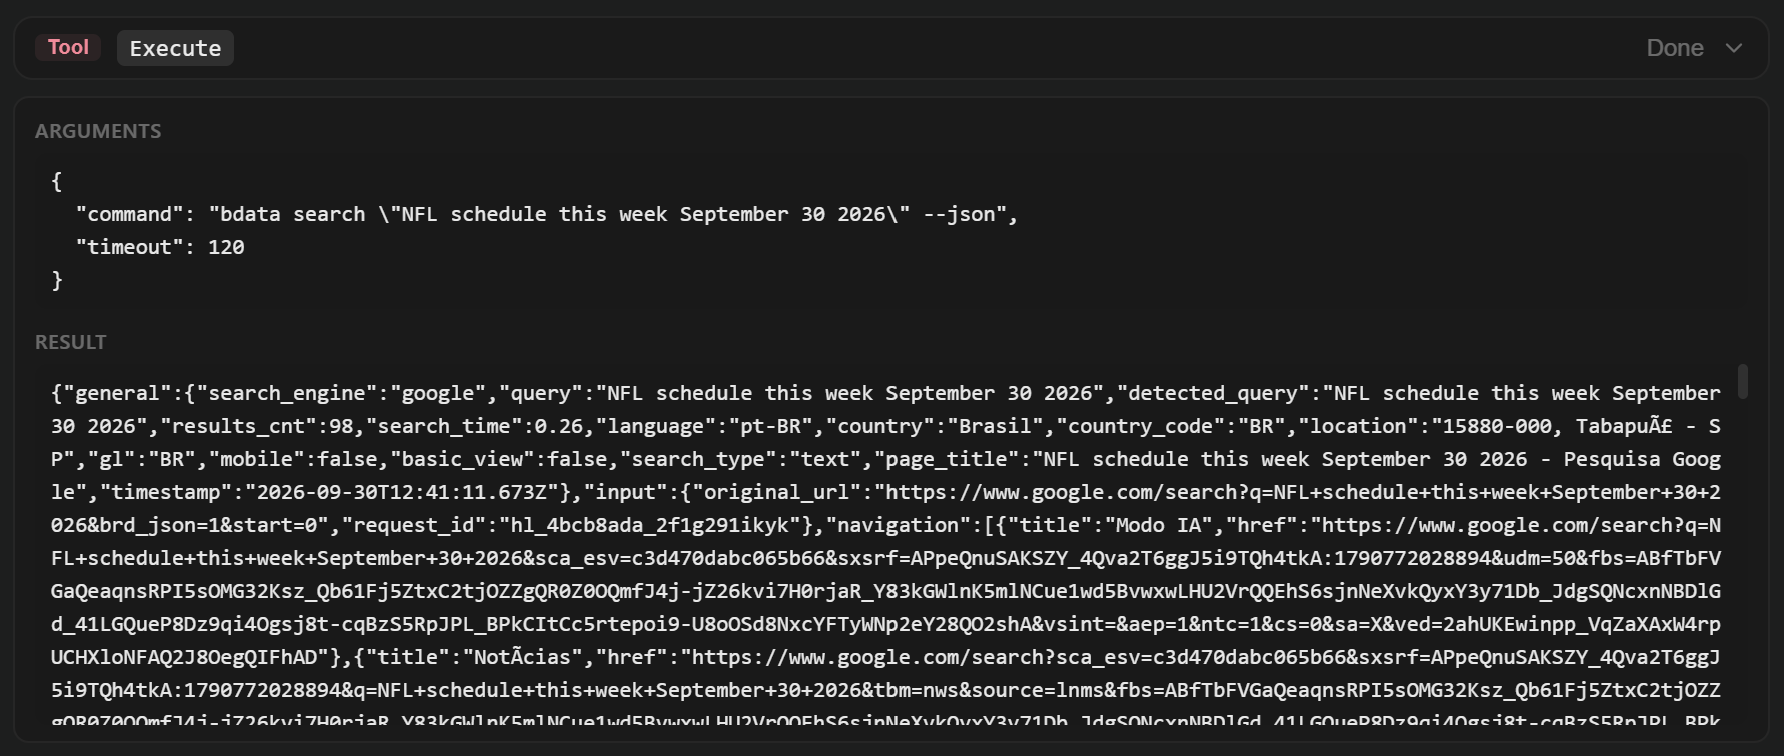
This simple example demonstrates the complete workflow. Thanks to using the Bright Data CLI, Octop agents can now discover relevant web pages, scrape them, analyze the returned content, and produce structured results. Mission complete!
Next Steps
The workflow shown here is just one example of what you can build with Octop and Bright Data. You can enhance this setup with features such as:
- Messaging integrations: Connect Octop to platforms like Telegram, Discord, or WeCom to interact with agents directly from your phone.
- Browser automation: Let agents use the Bright Data CLI to navigate websites, fill out forms, capture screenshots, and more.
- Knowledge bases: Combine web data with your private documents to give agents richer context and more grounded answers.
- Scheduled tasks: Use Octop’s cron capabilities to run recurring research, monitoring, and data collection tasks automatically.
Octop + Bright Data MCP: Alternative Integration
Here, you’ll learn how to connect Octop to the Bright Data MCP server, giving its agents access to 70+ tools for web search, scraping, and web exploration.
Step #1: Retrieve Your Bright Data MCP Connection URL
Octop supports connections to both STDIO and remote MCP servers. Bright Data MCP can run locally through @brightdata/mcp` or remotely using the Streamable HTTP (or SSE) server.
The remote option does not require installing any packages locally. To give your Octop agents access to the full Bright Data MCP toolset, use the following Streamable HTTP connection URL:
https://mcp.brightdata.com/mcp?token=<YOUR_BRIGHT_DATA_API_KEY>&pro=1The URL includes two query parameters:
token: Authenticates your requests and connects them to your Bright Data account. Replace<YOUR_BRIGHT_DATA_API_KEY>with your actual Bright Data API key.pro=1: Enables access to the full catalog of 70+ Bright Data MCP tools. Without this parameter, you can access only the free tools.
If you want more control over which tools to expose, you can create a custom MCP connection URL from the Bright Data dashboard. To get started, log in to your Bright Data account and go to the “AI Gateways > MCP” page. Follow the setup wizard to configure your MCP server and generate a custom connection URL.
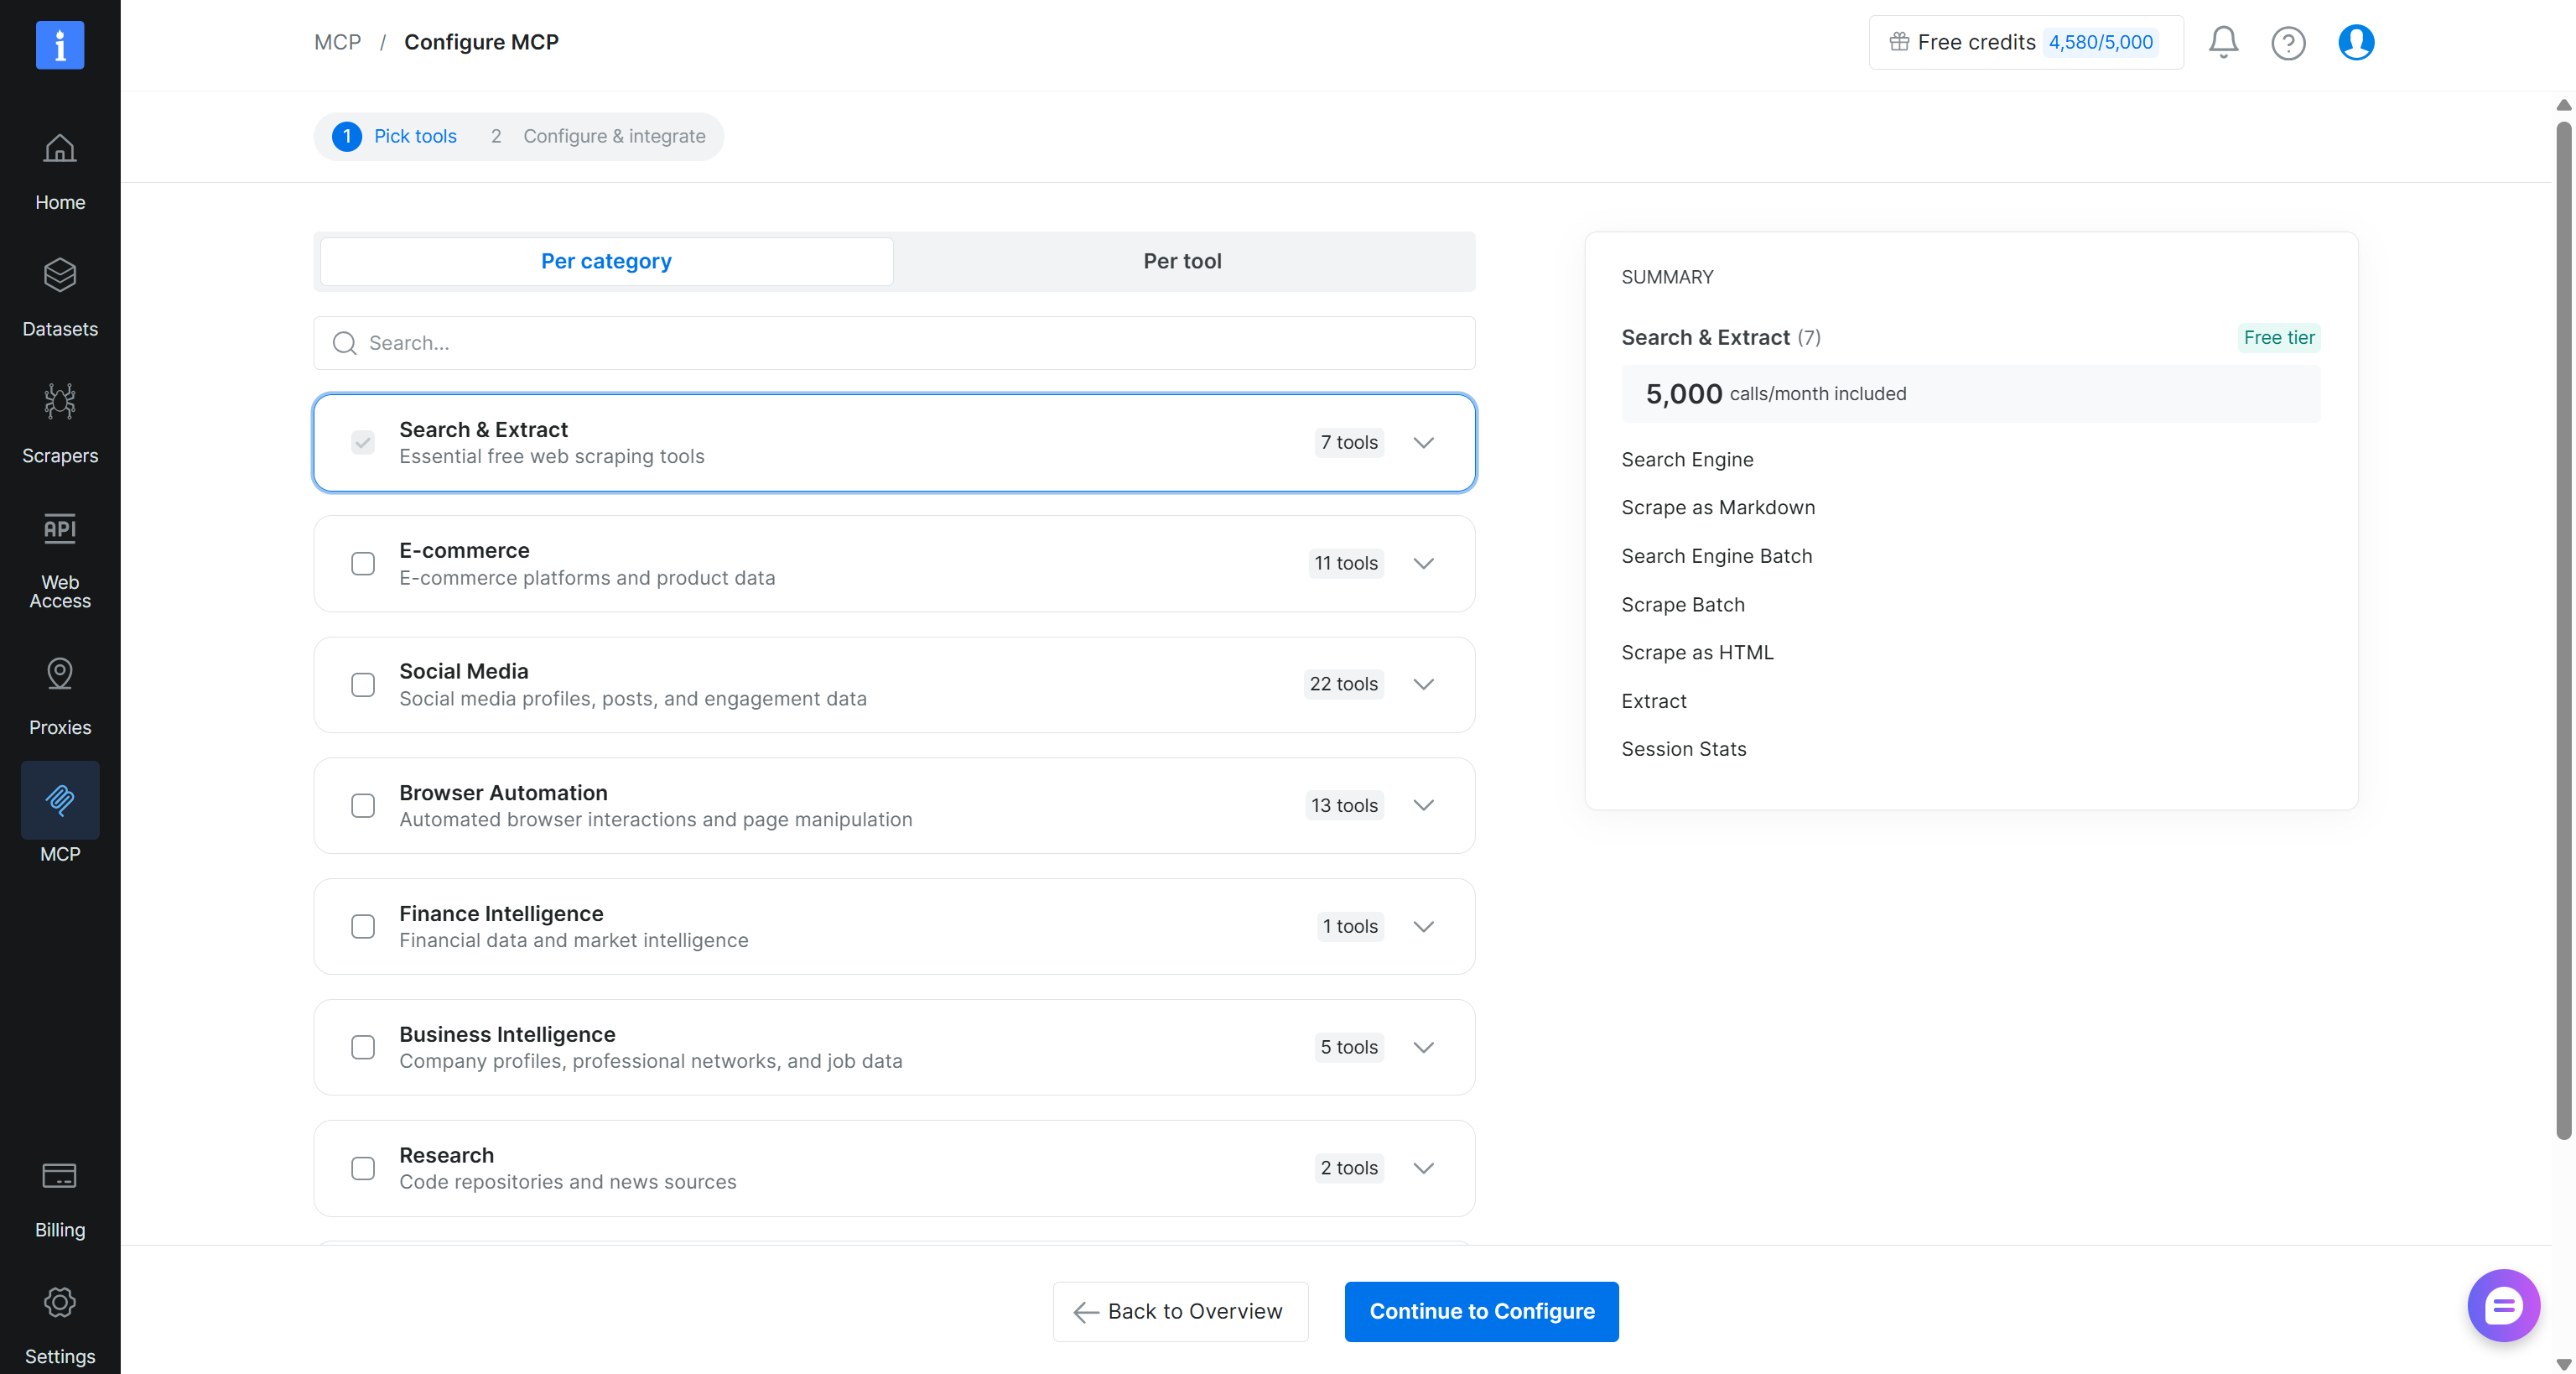
Once the setup is complete, copy the generated Bright Data MCP connection URL. Great!
Step #2: Connect Octop to the Bright Data MCP
In Octop, go to the “Connectors” page. Open the “Enabled connectors” tab and click “Add custom MCP”:
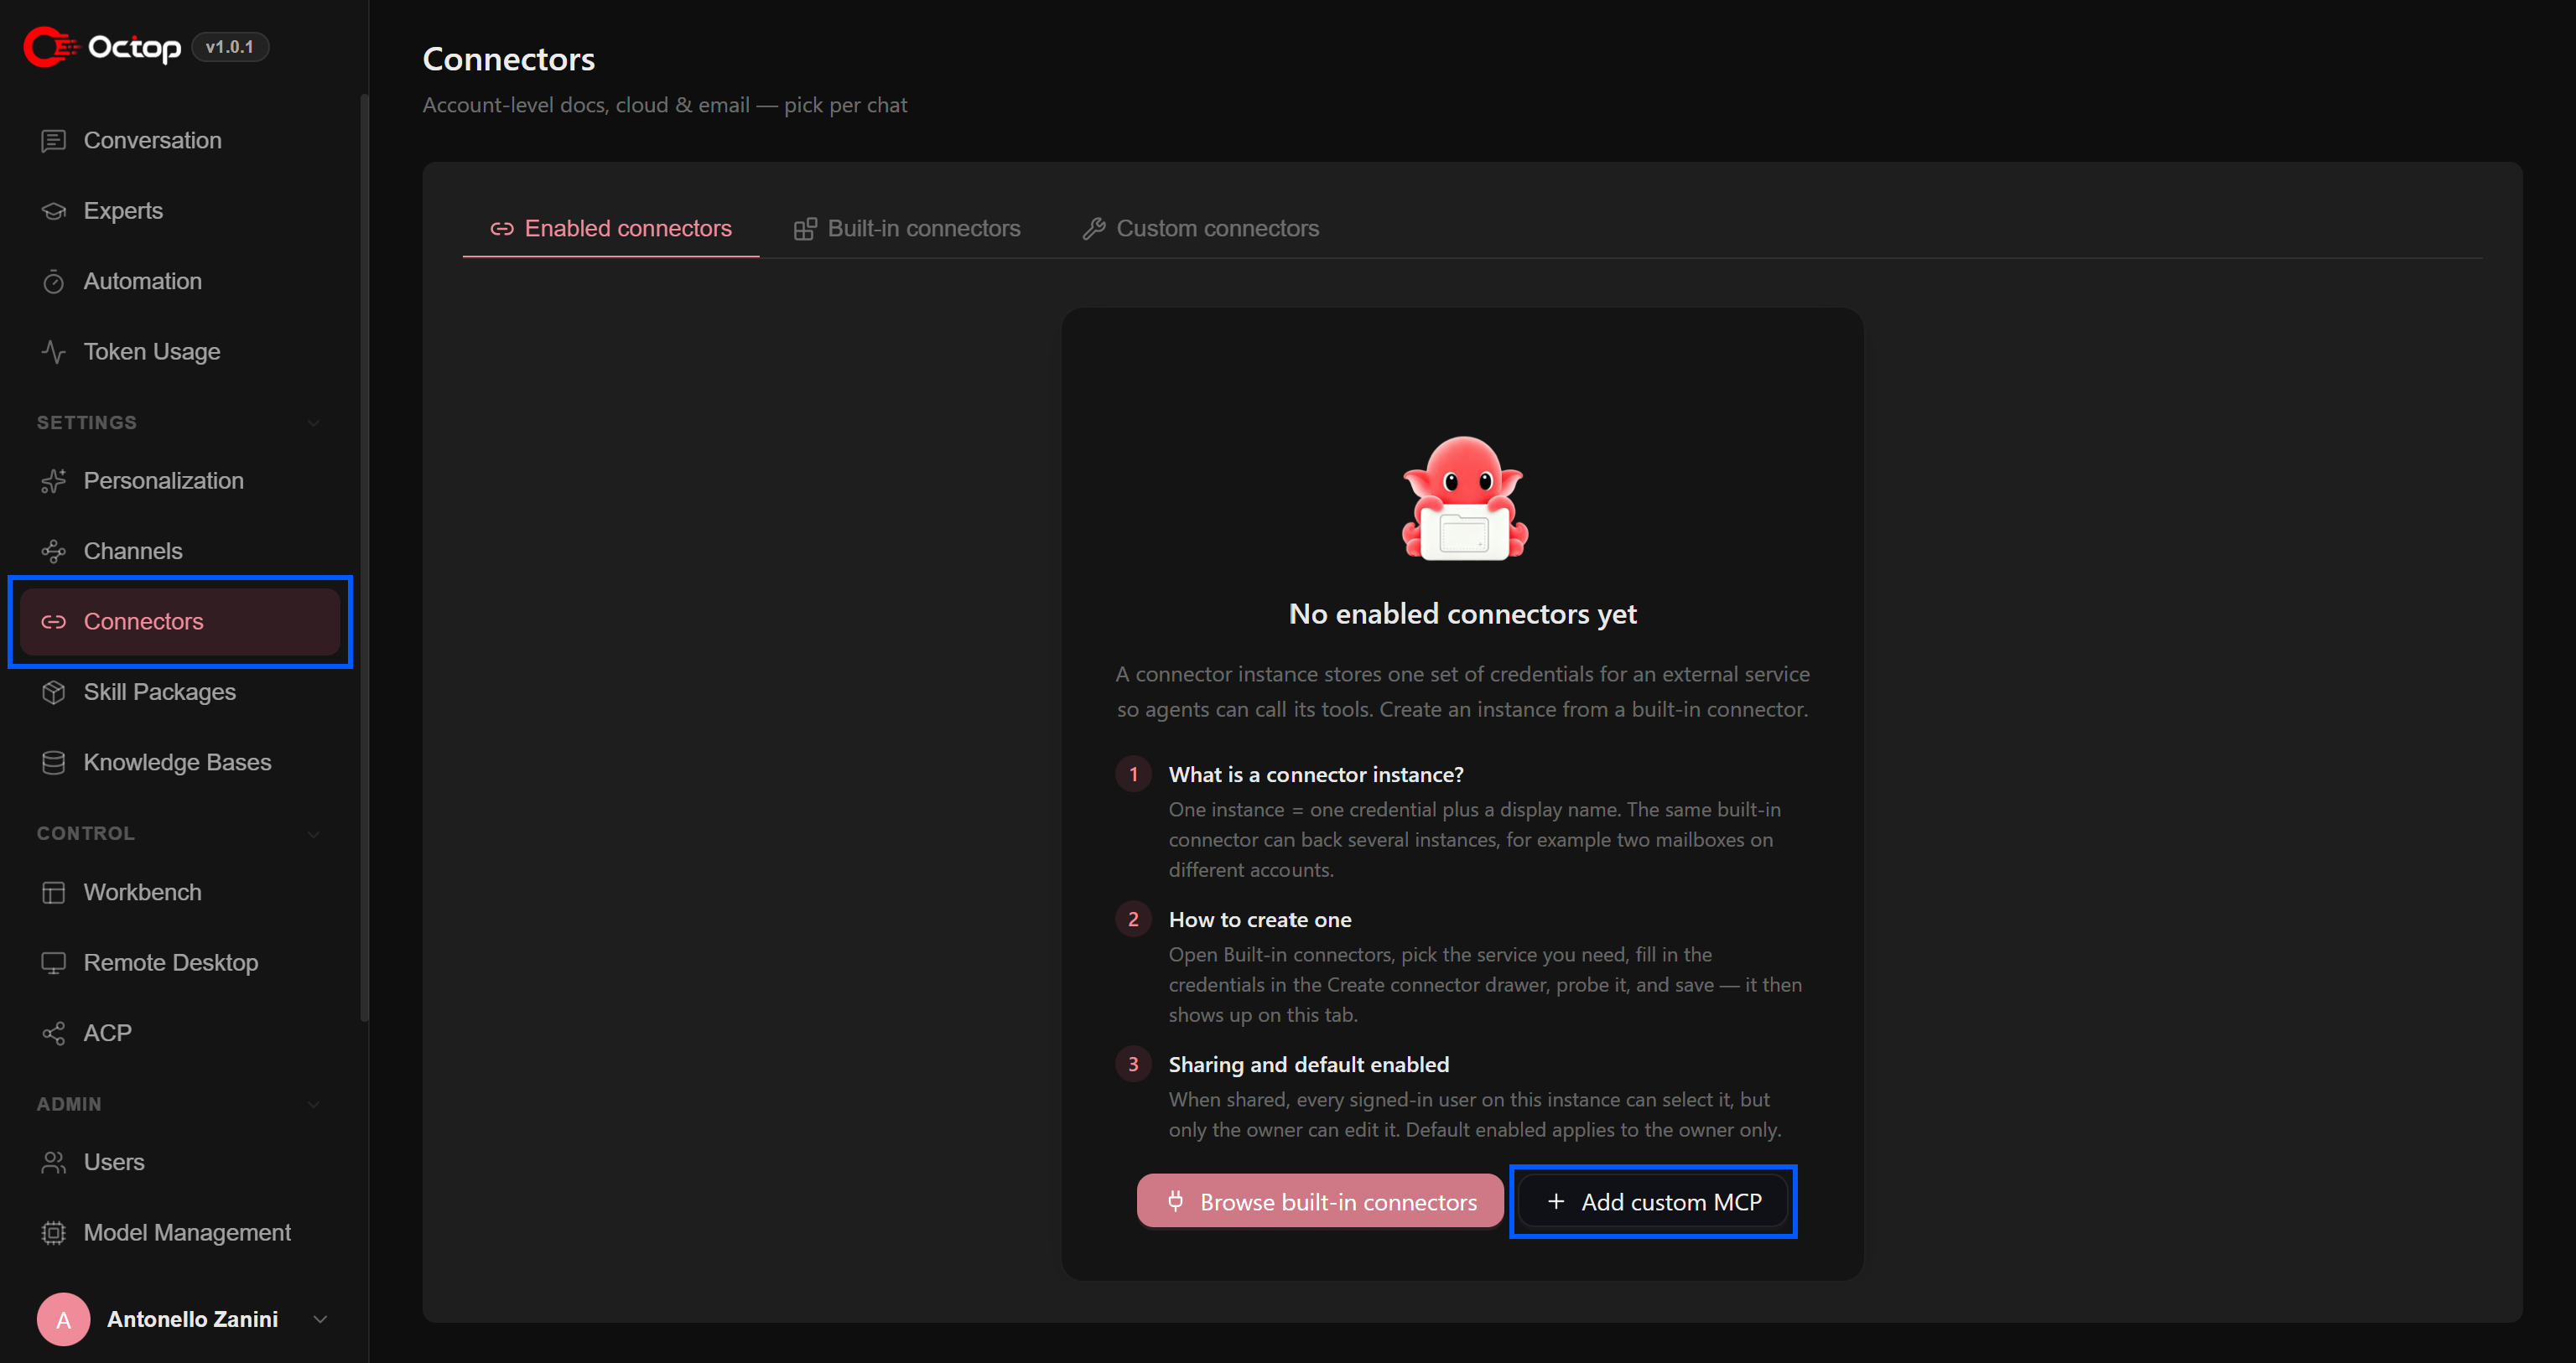
Select “Add HTTP server” and fill out the form as follows:
- Display name:
Bright Data MCP - Server ID:
bright-data-mcp - Transport:
streamable_http - URL: Your Bright Data MCP connection URL generated in the previous step
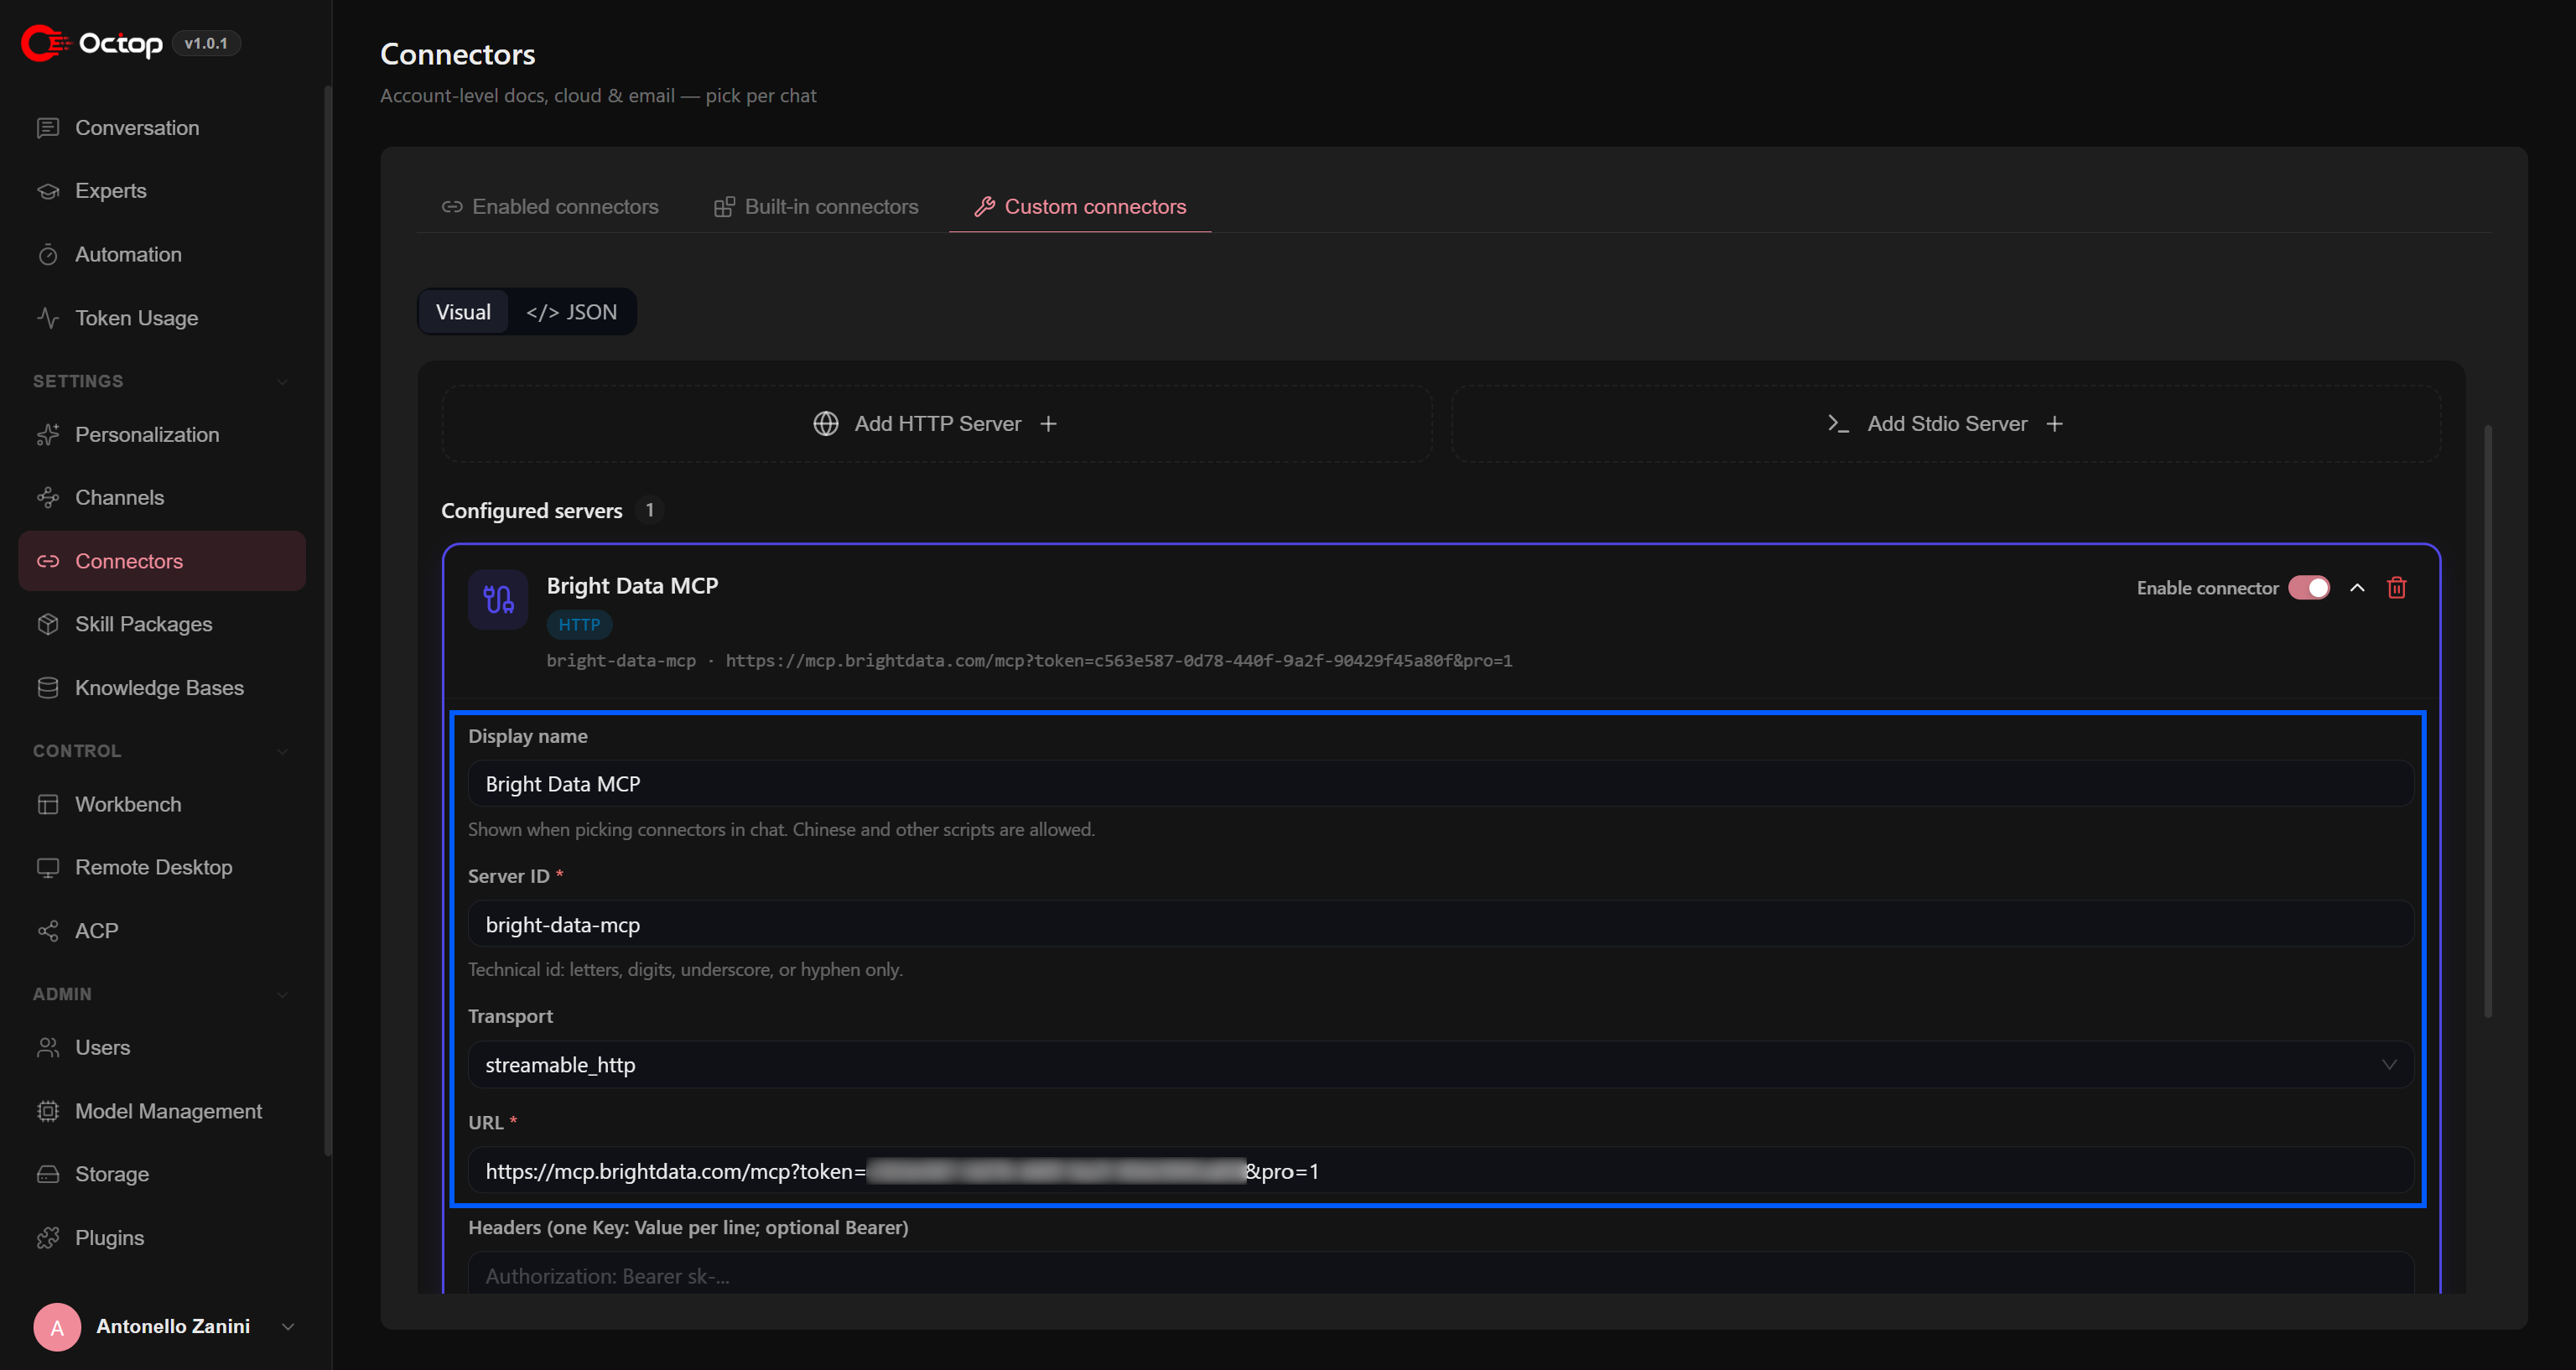
Click “Save” to complete the connection setup. Amazing!
Step #3: Verify the Connection
To verify that Octop can connect to the Bright Data MCP server and access its tools, click “Probe”. Octop should display the tools available through the configured MCP server:
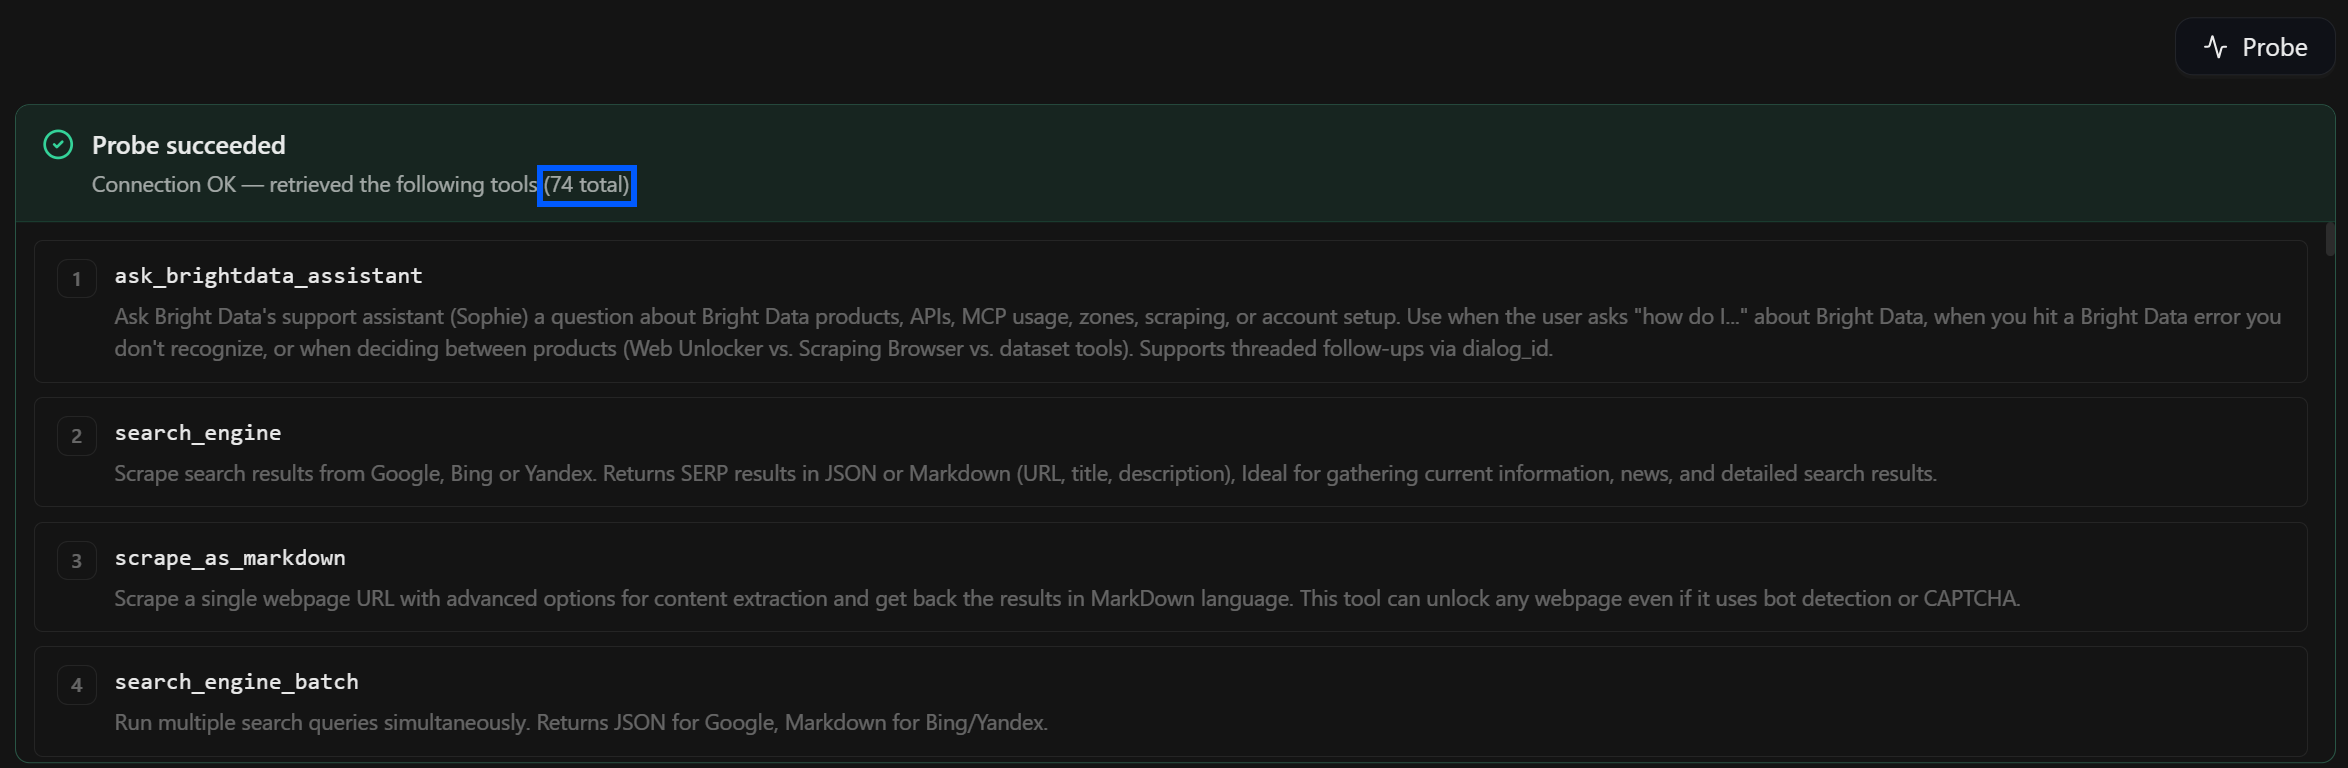
In this example, Octop loads 74 tools because the Bright Data MCP server is running in Pro mode.
Et voilà! From this point on, your Octop agents can use Bright Data MCP for production-ready web search, scraping, and exploration tasks, as demonstrated earlier.
Conclusion
In this article, you learned what Octop is and what it brings to the table as a self-hosted AI assistant. In particular, you saw how to connect it to the Bright Data CLI (through an official skill) and to Bright Data MCP.
Thanks to Bright Data, Octop agents can search, scrape, and interact with the web at scale, providing reliable access to fresh web data. For more advanced use cases, explore the full range of solutions available through the Bright Data AI ecosystem.
Create a Bright Data account for free today and start exploring our AI-ready web data and automation tools!



Technical Writer
 5.5 years experience
Antonello Zanini is a technical writer, editor, and software engineer with 5M+ views. Expert in technical content strategy, web development, and project management.