
In this guide, you will see :
- What the NVIDIA NeMo Framework offers, especially for building AI agents using the NVIDIA NeMo Agent Toolkit.
- How to integrate Bright Data into an NAT AI agent using custom tools via LangChain.
- How to connect an NVIDIA NeMo Agent Toolkit workflow to Bright Data Web MCP.
Let’s dive in!
An Introduction to the NVIDIA NeMo Framework
The NVIDIA NeMo framework is a comprehensive, cloud-native AI development platform engineered for building, customizing, and deploying generative AI models, including LLMs and multimodal models.
It offers end-to-end tools for the entire AI lifecycle—from training and fine-tuning to evaluation and deployment. NeMo also leverages large-scale distributed training and includes components for tasks such as data curation, model evaluation, and implementing safety guardrails.
It is supported by an open-source Python library with over 16k GitHub stars and dedicated Docker images.
NVIDIA NeMo Agent Toolkit
Part of the NVIDIA NeMo framework, the NVIDIA NeMo Agent Toolkit (abbreviated in “NAT”) is an open-source framework for building, optimizing, and managing complex AI agent systems.
It helps you connect diverse agents and tools into unified workflows with deep observability, profiling, and cost analysis, acting as a “conductor” for multi-agent operations and helping scale AI applications.
NAT emphasizes composability, treating agents and tools as modular function calls. It also provides features to identify bottlenecks, automate evaluations, and manage enterprise-grade agentic AI systems.
For more information, refer to:
- The NAT official documentation.
- The NAT GitHub page.
Bridging LLMs and Live Data with Bright Data Tools
The NVIDIA NeMo Agent Toolkit provides the flexibility, customization, observability, and scalability required to build and manage enterprise-grade AI projects. It gives organizations the ability to orchestrate complex AI workflows, connect multiple agents, and monitor performance and costs.
However, even the most sophisticated NAT applications face the inherent limitations of LLMs. These include outdated knowledge due to static training data and a lack of access to live web information.
The solution is to integrate your NVIDIA NeMo Agent Toolkit workflow with a web data provider for AI, such as Bright Data.
Bright Data offers tools for web scraping, search, browser automation, and more. Those solutions empower your AI system to retrieve real-time, actionable data and unlock its full potential for enterprise applications!
How to Connect Bright Data to an NVIDIA NeMo AI Agent
One way to leverage Bright Data’s capabilities in an NVIDIA NeMo AI Agent is by creating custom tools through the NeMo Agent Toolkit.
Those tools will connect to Bright Data products via custom functions powered by LangChain (or any other supported integration with AI agent building libraries).
Follow the instructions below!
Prerequisites
To follow along with this tutorial, you need:
- Python 3.11, 3.12, or 3.13 installed locally.
- A Bright Data account set up for integration with the official LangChain tools.
- An NVIDIA NIM account with an API key configured.
Do not worry about setting up the Bright Data and NVIDIA NIM accounts right now, as you will be guided through that in dedicated chapters.
Note: In case of issues during installation or while running the toolkit, make sure to be on one of the supported platforms.
Step #1: Retrieve Your NVIDIA NIM API Key
Most NVIDIA NeMo Agent workflows require an NVIDIA_API_KEY environment variable. That is required to authenticate the connection to the NVIDIA NIM LLMs behind the workflow.
To retrieve your API key, start by creating an NVIDIA NIM account (if you do not have one already). Log in and click your account image in the top-right corner. Select the “API Keys” option:
You will reach the API Keys page. Click the “Generate API Key” button to create a new key: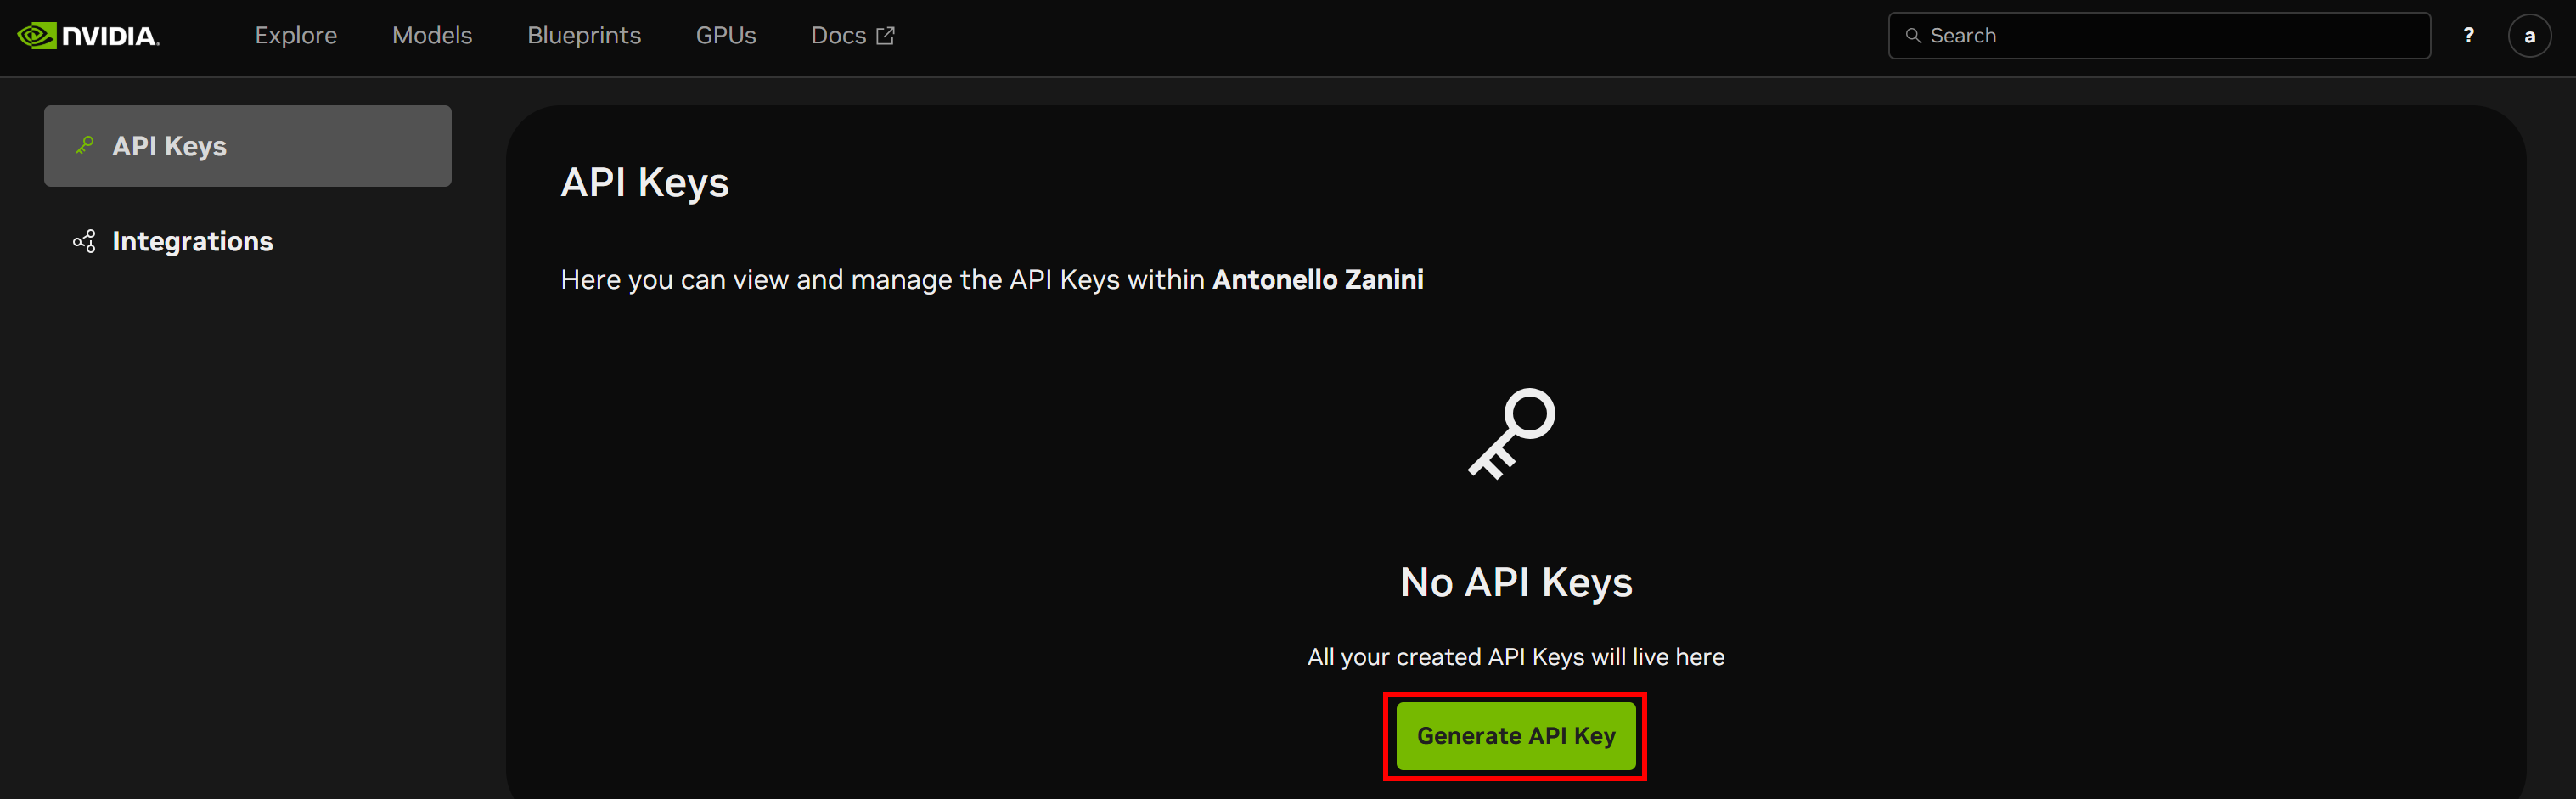
Give your API key a name and click “Generate Key”: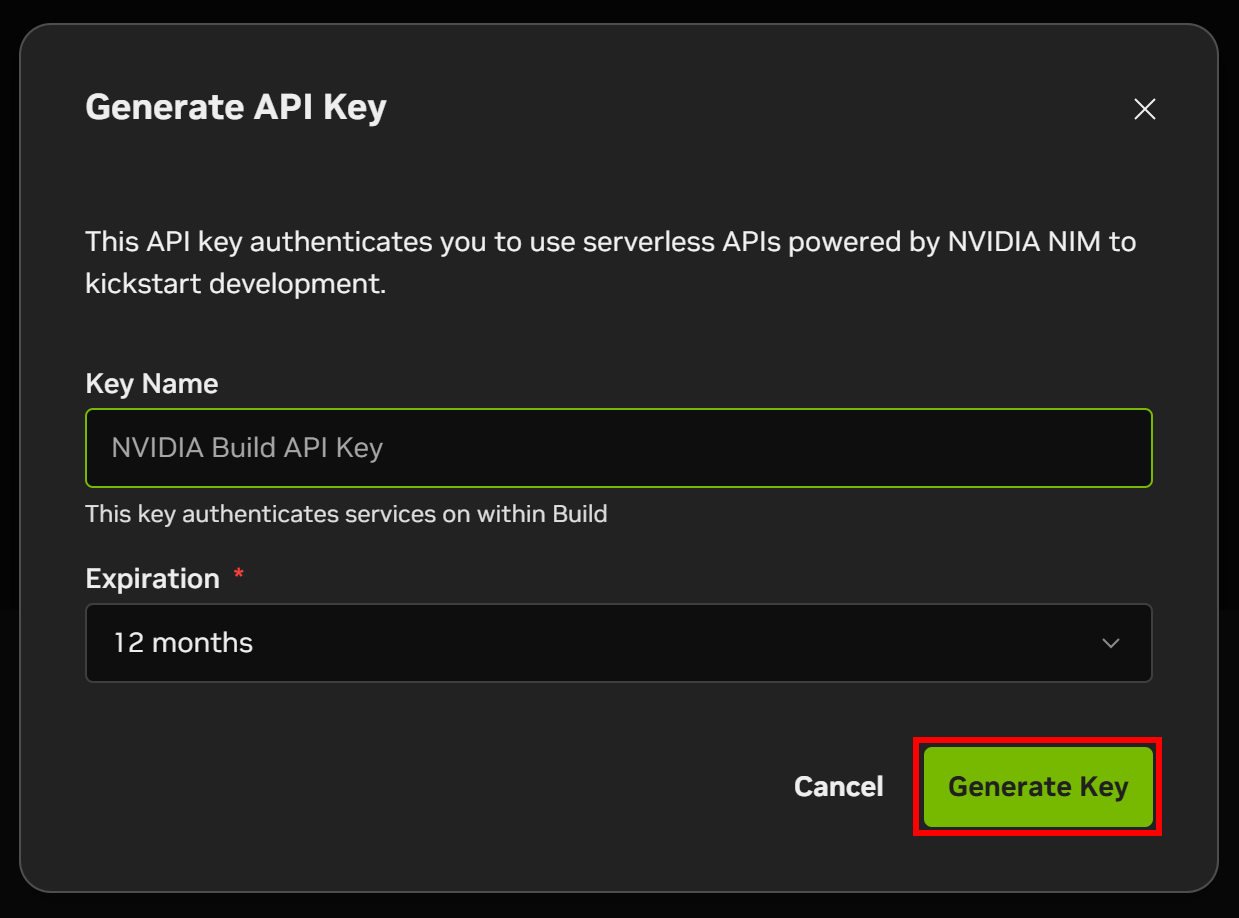
A modal will display your API key. Click the “Copy API Key” button and store the key in a safe place, as you will need it shortly.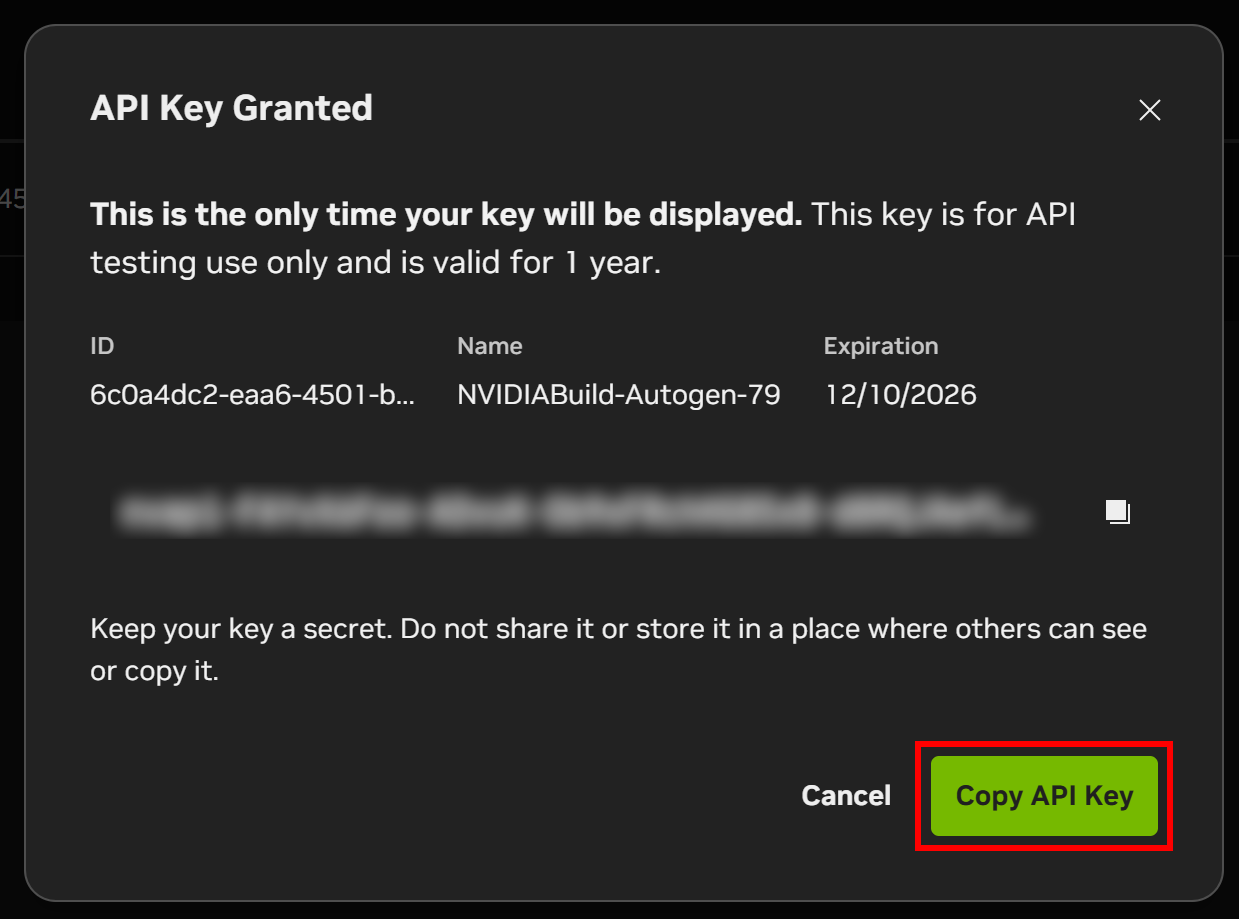
Well done! You are ready to install the NVIDIA NeMo Agent Toolkit and get started.
Step #2: Set Up an NVIDIA NeMo Project
To install the latest stable version of NeMo Agent Toolkit, run:
pip install nvidia-natNeMo Agent Toolkit has many optional dependencies that can be installed along with the core package. These optional dependencies are grouped by framework.
Once installed, you should have access to the nat command. Verify it works by running:
nat --versionYou should see output similar to:
nat, version 1.3.1Next, create a root folder for your NVIDIA NeMo application. For example, call it “bright_data_nvidia_nemo”:
mkdir bright_data_nvidia_nemoInside this folder, create a NeMo Agent workflow called “web_data_workflow” using:
nat workflow create --workflow-dir bright_data_nvidia_nemo web_data_workflow Note: If you encounter the error “A required privilege is not held by the client,” run the command as an administrator.
If successful, you should see logs like:
Installing workflow 'web_data_workflow'...
Workflow 'web_data_workflow' installed successfully.
Workflow 'web_data_workflow' created successfully in <your_path>
Your project folder bright_data_nvidia_nemo/web_data_workflow will now contain the following structure:
bright_data_nvidia_nemo/web_data_workflow/
├── configs -> src/web_data_workflow/configs
├── data -> src/text_file_ingest/data
├── pyproject.toml
└── src/
    ├── web_data_workflow.egg-info/
    └── web_data_workflow/
        ├── __init__.py
        ├── configs/
        │   └── config.yml
        ├── data/
        ├── __init__.py
        ├── register.py
        └── web_data_workflow.py
This is what each file and folder represents:
configs/→src/web_data_workflow/configs: Symlink for easy access to workflow configuration.data/→src/text_file_ingest/data: Symlink to store sample data or input files.pyproject.toml: Project metadata and dependencies file.src/: Source code directory.web_data_workflow.egg-info/: Metadata folder created by Python packaging tools.web_data_workflow/: Main workflow module.__init__.py: Initializes the module.configs/config.yml: Workflow configuration file where you define runtime behavior (LLM configuration, function/tool definitions, agent type and settings, workflow orchestration, etc.).
data/: Directory for storing workflow-specific data, sample inputs, or test files.register.py: Registration module to connect your custom functions with NAT.web_data_workflow.py: Sample file defining custom tools.
Open the project in your favorite Python IDE and spend some time getting familiar with the generated files.
You will see that the workflow definition is located in the file below:
bright_data_nvidia_nemo/web_data_workflow/web_data_workflow/configs/config.ymlOpen it, and you will notice the following YAML configuration:
functions:
  current_datetime:
    _type: current_datetime
  web_data_workflow:
    _type: web_data_workflow
    prefix: "Hello:"

llms:
  nim_llm:
    _type: nim
    model_name: meta/llama-3.1-70b-instruct
    temperature: 0.0

workflow:
  _type: react_agent
  llm_name: nim_llm
  tool_names: [current_datetime, web_data_workflow]
This defines a ReAct agent workflow powered by the meta/llama-3.1-70b-instruct model from NVIDIA NIM, with access to:
- The built-in
current_datetimetool. - The custom
web_data_workflowtool.
In particular, the web_data_workflow tool itself is defined in:
bright_data_nvidia_nemo/web_data_workflow/web_data_workflow/web_data_workflow.pyThat sample tool takes a text input and returns it prefixed with a predefined string (e.g., "Hello:").
Great! You now have a workflow ready with the NAT.
Step #3: Test the Current Workflow
Before customizing the generated workflow, it is a good idea to spend some time familiarizing yourself with it and understanding how it works. This will make it easier to adapt the workflow to integrate with Bright Data.
Start by navigating to the workflow folder in your terminal:
cd ./bright_data_nvidia_nemo/web_data_workflowBefore running the workflow, you must set the NVIDIA_API_KEY environment variable. On Linux/macOS, run:
export NVIDIA_API_KEY="<YOUR_NVIDIA_API_KEY>"Equivalently, on Windows PowerShell, execute:
$Env:NVIDIA_API_KEY="<YOUR_NVIDIA_API_KEY>"Replace the <YOUR_NVIDIA_API_KEY> placeholder with the NVIDIA NIM API key you retrieved earlier.
Now, test the workflow with the nat run command as follows:
nat run --config_file configs/config.yml --input "Hey! How's it going?"Thar loads the config.yml file (via the configs/ symlink) and sends the prompt "Hey! How's it going?".
You should see output like this: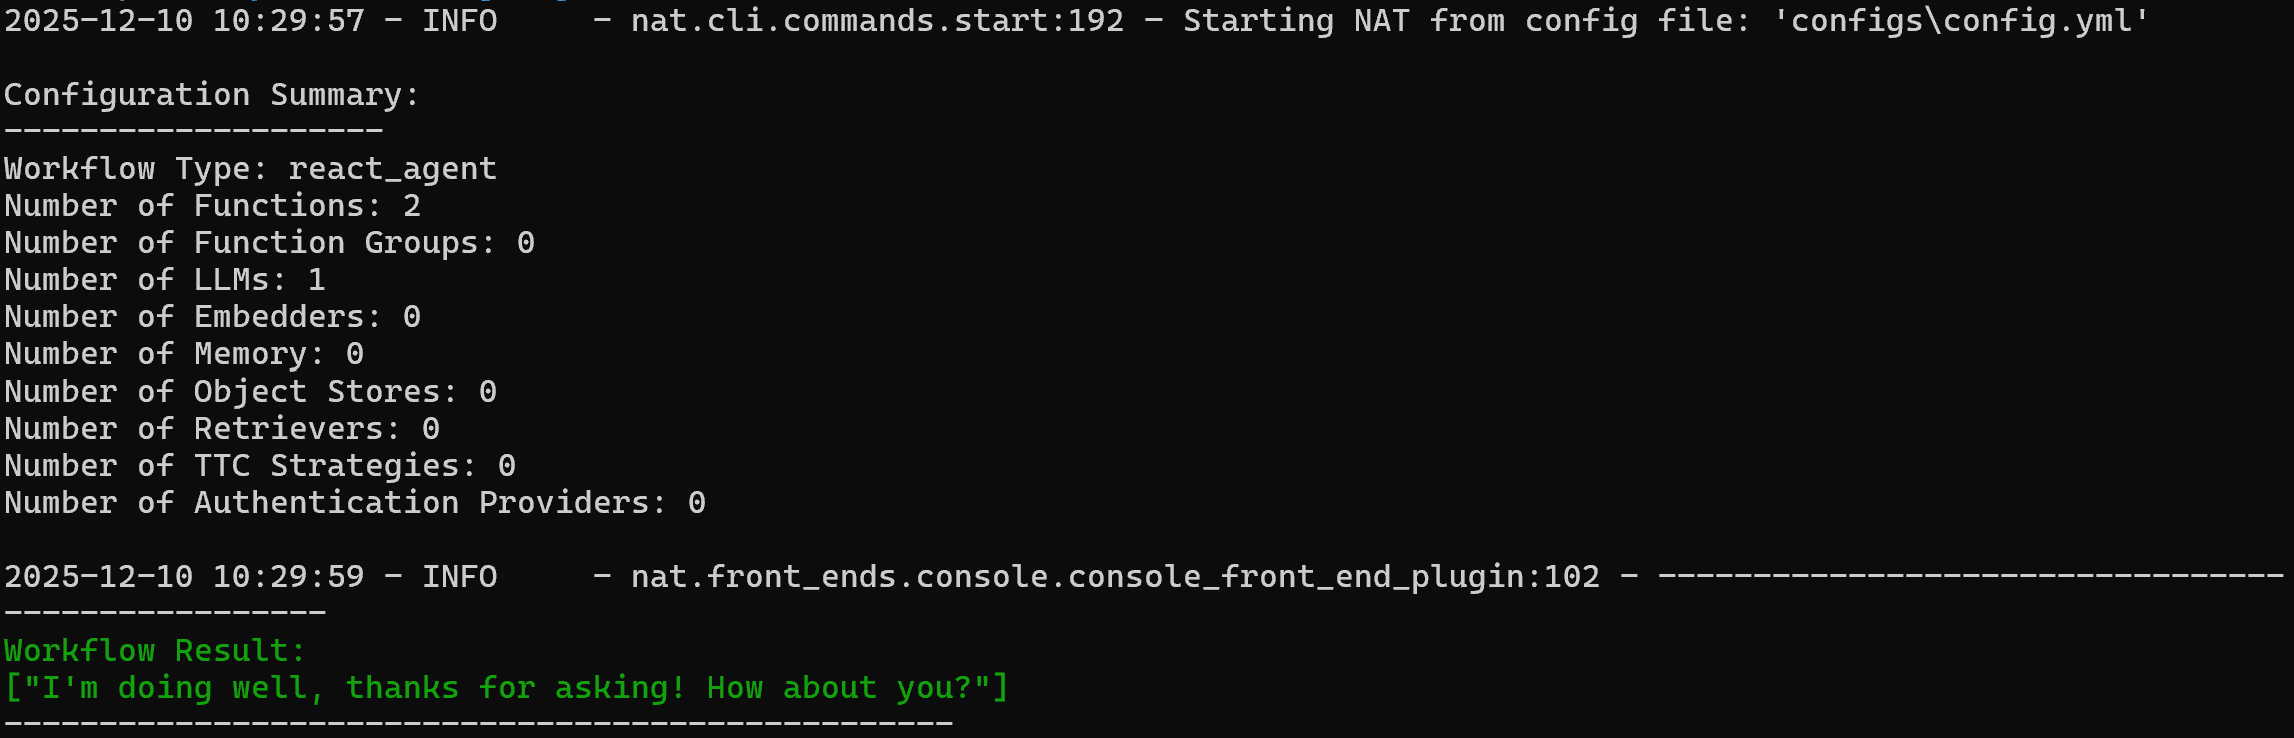
Note that the agent responded with:
I'm doing well, thanks for asking! How about you?To verify that the custom web_data_workflow tool works, try a prompt like:
nat run --config_file configs/config.yml --input "Use the web_data_workflow tool on 'World!'"Since the web_data_workflow tool is configured with a "Hello:" prefix, the expected output is:
Workflow Result:
['Hello: World!']
Notice how the result matches the expected behavior: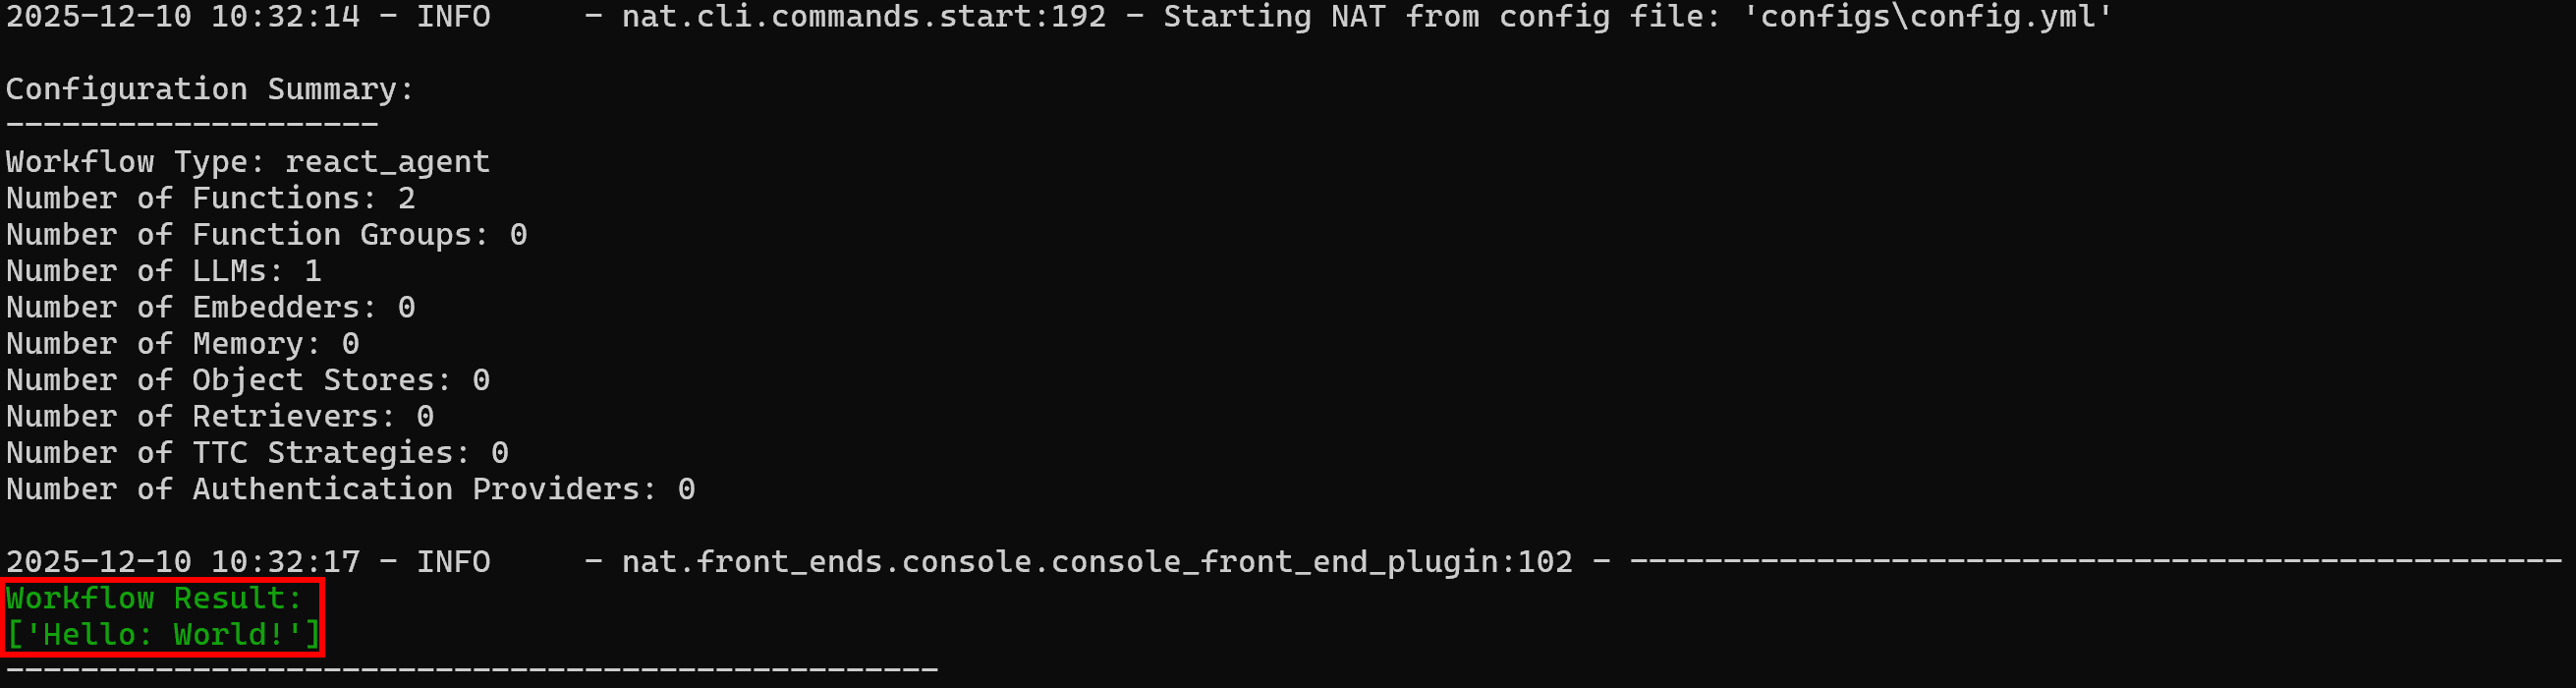
Amazing! Your NAT workflow is working perfectly. You are now ready to integrate it with Bright Data.
Step #4: Install the LangChain Bright Data Tools
One of the peculiar aspects of NVIDIA NeMo Agent Toolkit is that it works with other AI libraries, including LangChain, LlamaIndex, CrewAI, Agno, Microsoft Semantic Kernel, Google ADK, and many others.
To simplify integration with Bright Data, instead of reinventing the wheel, we will use the official Bright Data tools for LangChain.
For more guidance on these tools, refer to the official documentation or these blog posts:
Prepare to use LangChain within the NVIDIA NeMo Agent Toolkit by installing the following libraries:
pip install "nvidia-nat[langchain]" langchain-brightdataThe required packages are:
"nvidia-nat[langchain]": A subpackage for integrating LangChain (or LangGraph) with the NeMo Agent Toolkit.langchain-brightdata: Provides LangChain integrations for Bright Data’s suite of web data collection tools. It allows AI agents to collect search engine results, access geo-restricted or anti-bot protected websites, and extract structured data from popular platforms like Amazon, LinkedIn, and many others.
To avoid issues during deployment, ensure your project’s pyproject.toml file includes:
dependencies = [
  "nvidia-nat[langchain]~=1.3",
  "langchain-brightdata~=0.1.3",
]Note: Adjust the versions of these packages as needed for your project.
Wonderful! Your NVIDIA NeMo Agent workflow can now integrate with LangChain tools for simplified Bright Data connections.
Step #5: Prepare the Bright Data Integration
The LangChain Bright Data tools work by connecting to the Bright Data services configured in your account. The two tools showcased in this article are:
BrightDataSERP: Fetches search engine results to locate relevant regulatory web pages. It connects to Bright Data’s SERP API.BrightDataUnblocker: Accesses any public website, even if geo-restricted or protected by anti-bot measures. This helps the agent scrape content from individual web pages and learn from them. It connects to Bright Data’s Web Unblocker API.
To utilize those tools, you need a Bright Data account with both a SERP API zone and a Web Unblocker API zone configured. Let’s set them up!
If you do not have a Bright Data account yet, create a new one. Otherwise, log in and reach your dashboard. Next, navigate to the “Proxies & Scraping” page and check the “My Zones” table: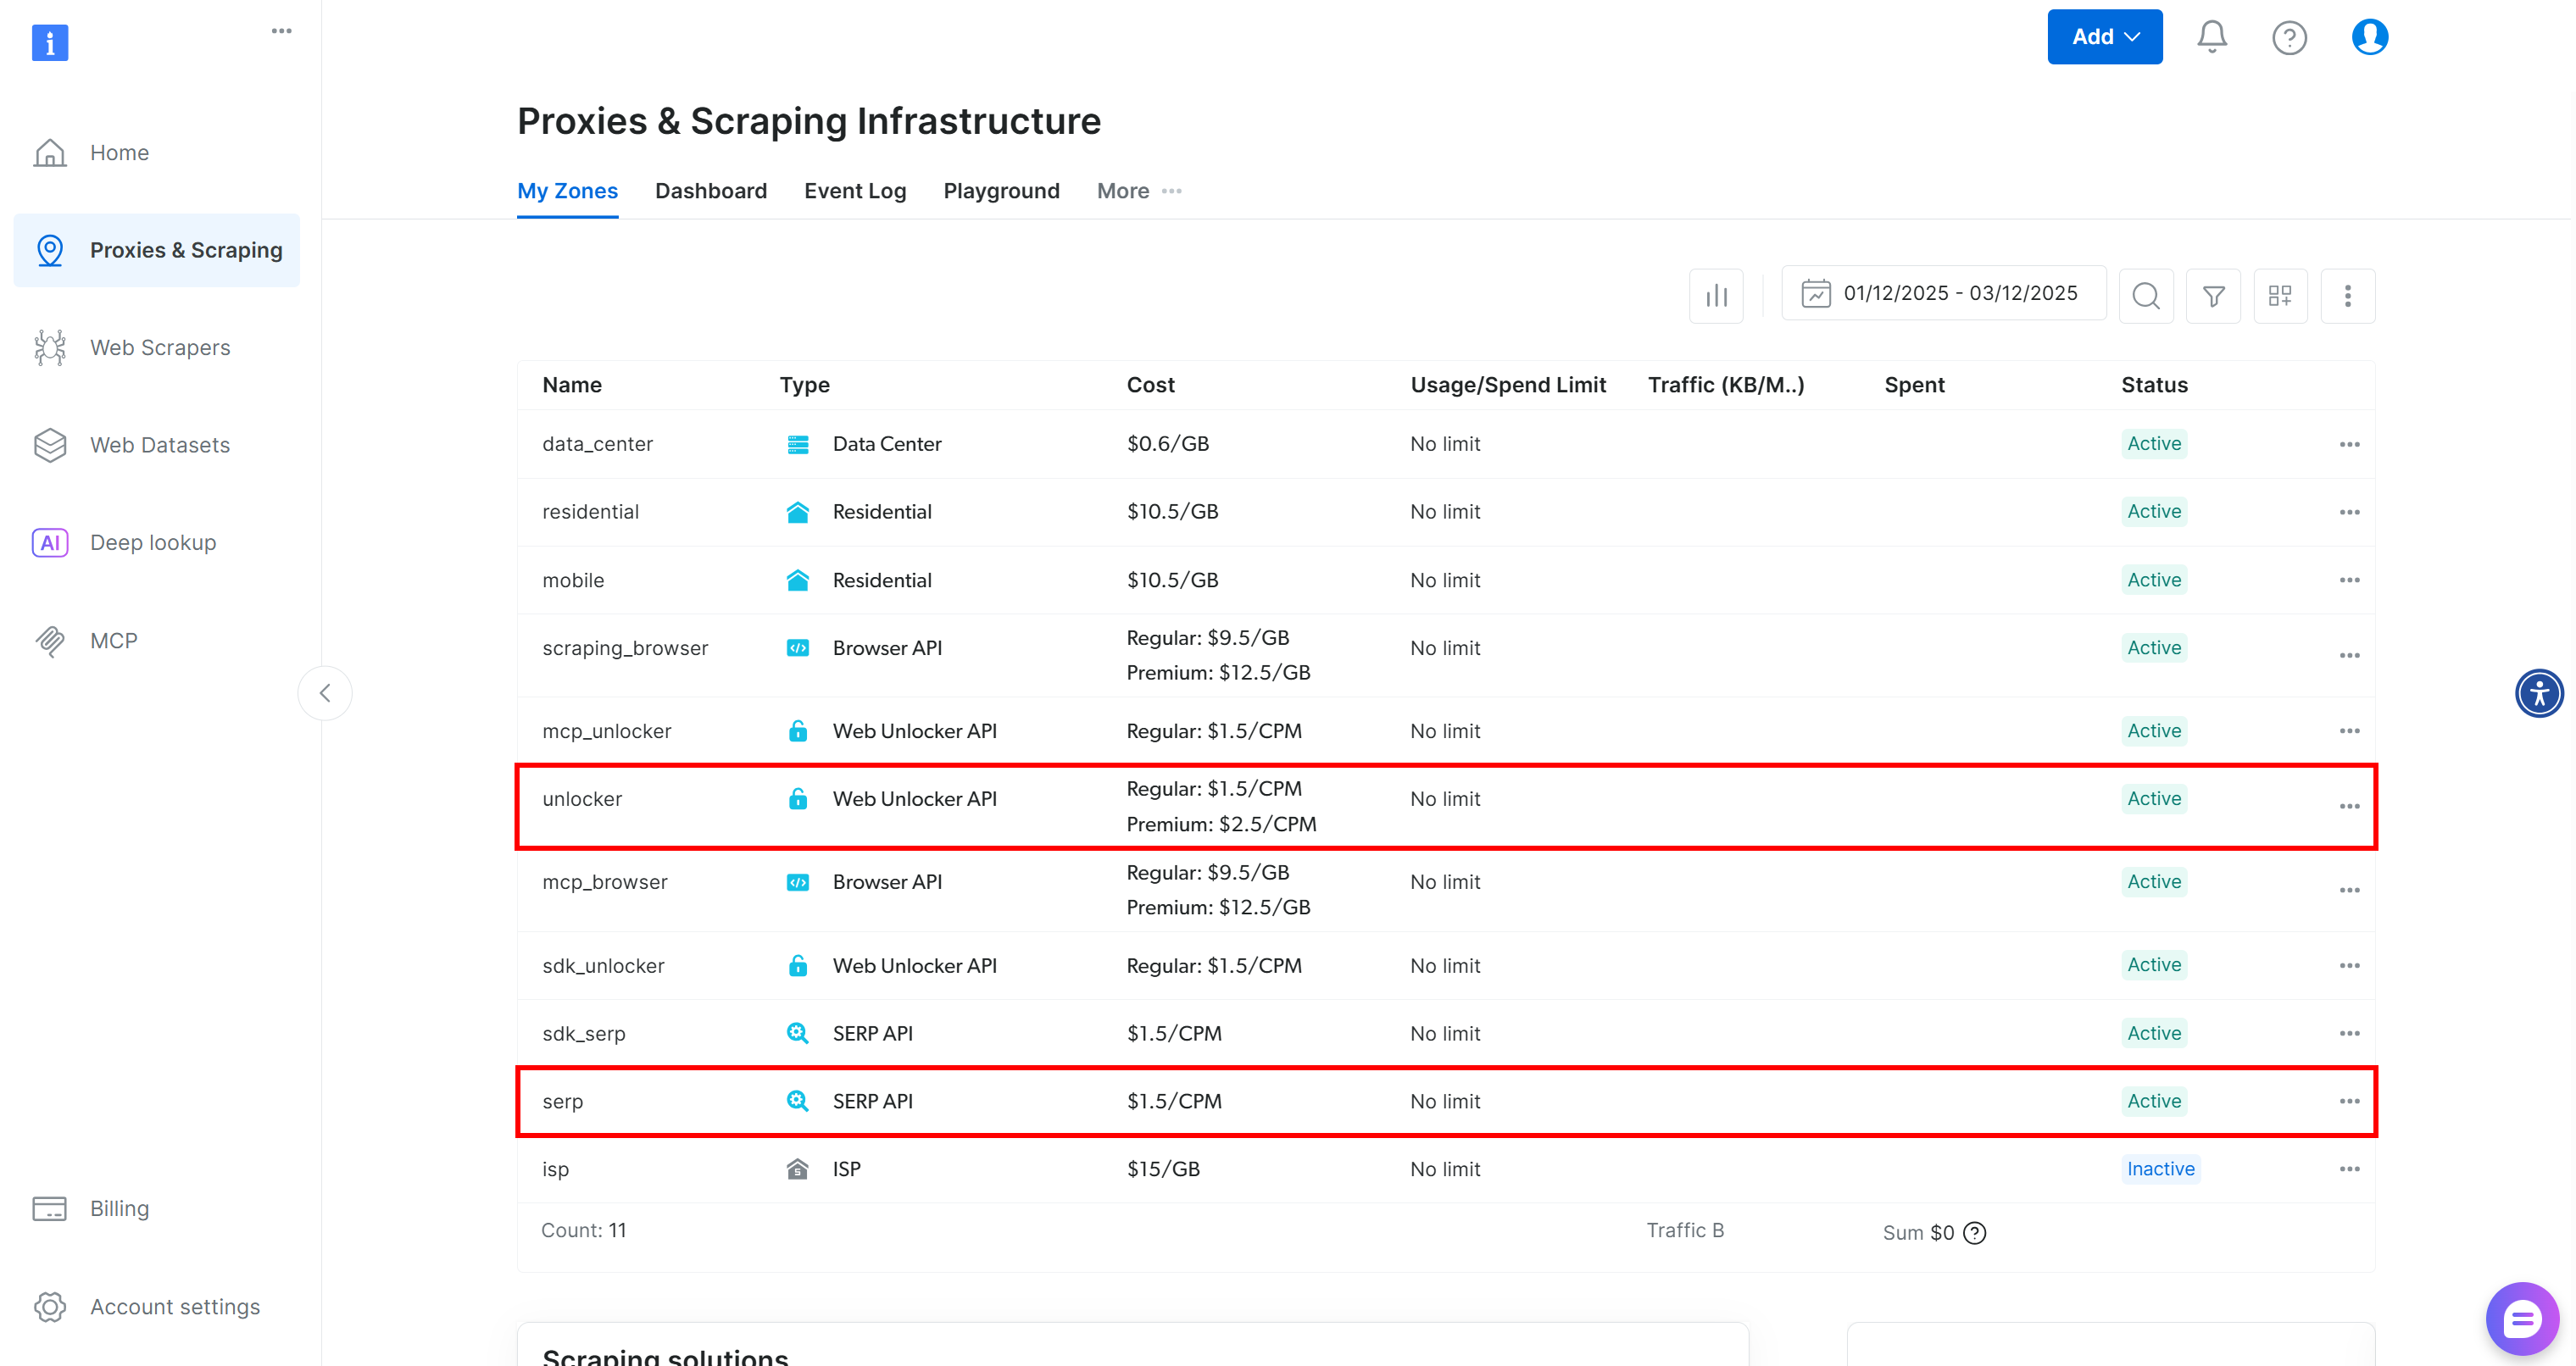
If the table already contains a Web Unblocker API zone called unlocker and a SERP API zone called serp, you are ready. That is because:
- The
BrightDataSERPLangChain tool automatically connects to a SERP API zone calledserp. - The
BrightDataUnblockerLangChain tool automatically connects to a Web Unblocker API zone calledweb_unlocker.
If these two zones are missing, you have to create them. Scroll down on the “Unblocker API” and “SERP API” cards, then click the “Create zone” buttons. Follow the wizard to add the two zones with the required names: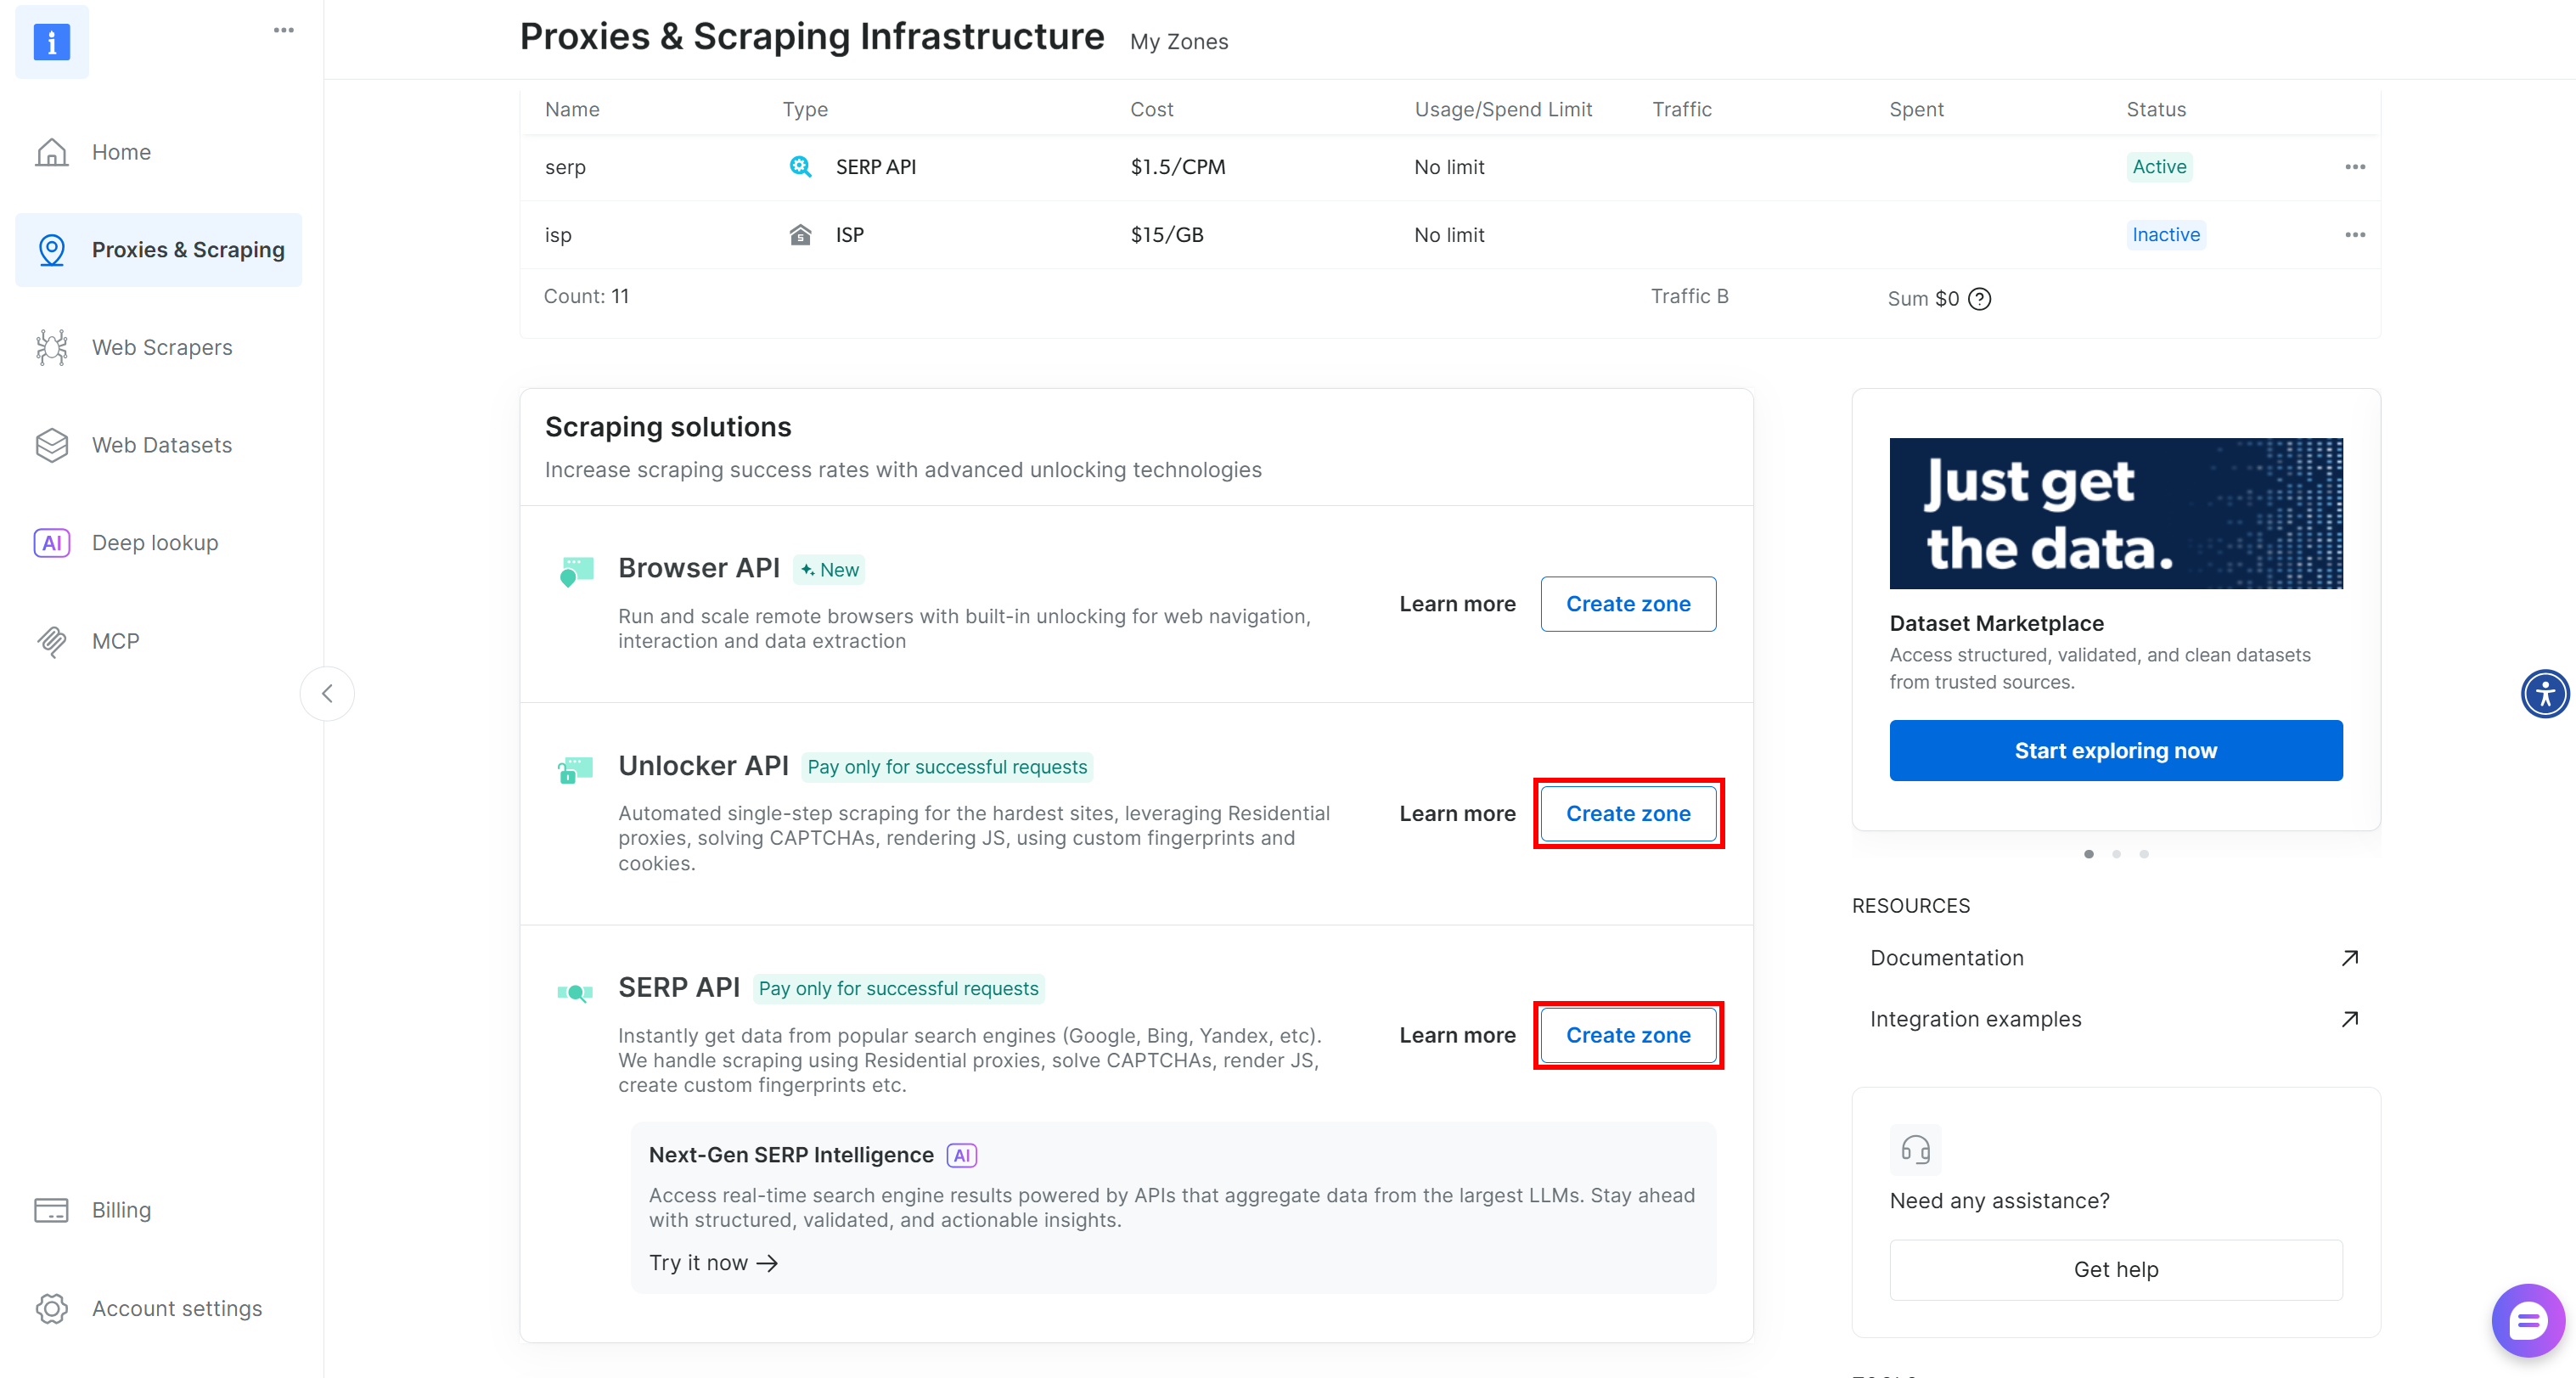
For step-by-step guidance, refer to these documentation pages:
Finally, you need to tell the LangChain Bright Data tools how to authenticate with your account. Generate your Bright Data API key and store it as an environment variable:
export BRIGHT_DATA_API_KEY="<YOUR_BRIGHT_DATA_API_KEY>"Or, in PowerShell:
$Env:BRIGHT_DATA_API_KEY="<YOUR_BRIGHT_DATA_API_KEY>"Terrific! You now have all the prerequisites to connect your NVIDIA NeMo agent to Bright Data via the LangChain tools.
Step #6: Define the Custom Bright Data Tools
Now you have all the building blocks to create new tools in your NVIDIA NeMo Agent Toolkit workflow. These tools will let the agent interact with Bright Data’s SERP API and Web Unblocker API, allowing it to search the web and scrape data from any public web page.
Start by adding a bright_data.py file to the src/ folder of your project: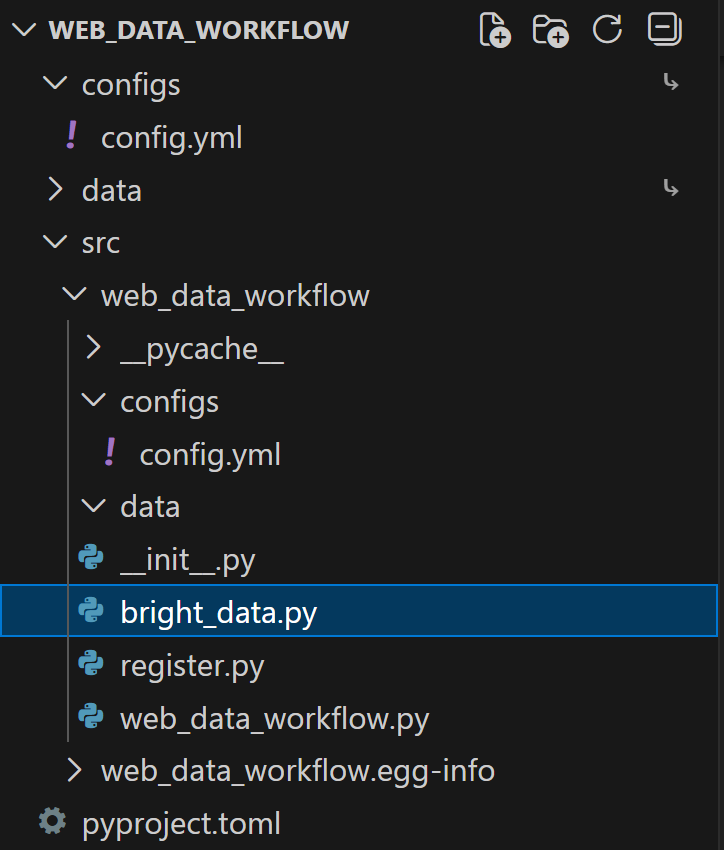
Define a custom tool for interacting with the SERP API as follows:
# bright_data_nvidia_nemo/web_data_workflow/src/web_data_workflow/bright_data.py

from pydantic import Field
from typing import Optional
from nat.builder.builder import Builder
from nat.builder.function_info import FunctionInfo
from nat.cli.register_workflow import register_function
from nat.data_models.function import FunctionBaseConfig
import json


class BrightDataSERPAPIToolConfig(FunctionBaseConfig, name="bright_data_serp_api"):
    """
    Configuration for Bright Data SERP API tool.
    Requires BRIGHT_DATA_API_KEY.
    """
    api_key: str = Field(
        default="",
        description="Your Bright Data API key used for SERP requests."
    )

    # Default SERP parameters (optional overrides)
    search_engine: str = Field(
        default="google",
        description="Search engine to query (default: google)."
    )
    country: str = Field(
        default="us",
        description="Two-letter country code for localized results (default: us)."
    )
    language: str = Field(
        default="en",
        description="Two-letter language code (default: en)."
    )
    search_type: Optional[str] = Field(
        default=None,
        description="Type of search: None, 'shop', 'isch', 'nws', 'jobs'."
    )
    device_type: Optional[str] = Field(
        default=None,
        description="Device type: None, 'mobile', 'ios', 'android'."
    )
    parse_results: Optional[bool] = Field(
        default=None,
        description="Whether to return structured JSON instead of raw HTML."
    )


@register_function(config_type=BrightDataSERPAPIToolConfig)
async def bright_data_serp_api_function(tool_config: BrightDataSERPAPIToolConfig, builder: Builder):
    import os
    from langchain_brightdata import BrightDataSERP

    # Set API key if missing
    if not os.environ.get("BRIGHT_DATA_API_KEY"):
        if tool_config.api_key:
            os.environ["BRIGHT_DATA_API_KEY"] = tool_config.api_key

    async def _bright_data_serp_api(
        query: str,
        search_engine: Optional[str] = None,
        country: Optional[str] = None,
        language: Optional[str] = None,
        search_type: Optional[str] = None,
        device_type: Optional[str] = None,
        parse_results: Optional[bool] = None,
    ) -> str:
        """
        Perform a real-time search query using Bright Data SERP API.

        Args:
            query (str): The search query text.
            search_engine (str, optional): Search engine to use (default: google).
            country (str, optional): Country code for localized results.
            language (str, optional): Language code for localized results.
            search_type (str, optional): Search type (e.g., None, 'isch', 'shop', 'nws').
            device_type (str, optional): Device type (e.g., None, 'mobile', 'ios').
            parse_results (bool, optional): Whether to return structured JSON.

        Returns:
            str: JSON-formatted search results.
        """

        serp_client = BrightDataSERP(
            bright_data_api_key=os.environ["BRIGHT_DATA_API_KEY"]
        )

        payload = {
            "query": query,
            "search_engine": search_engine or tool_config.search_engine,
            "country": country or tool_config.country,
            "language": language or tool_config.language,
            "search_type": search_type or tool_config.search_type,
            "device_type": device_type or tool_config.device_type,
            "parse_results": (
                parse_results
                if parse_results is not None
                else tool_config.parse_results
            ),
        }

        # Remove parameters explicitly set to None
        payload = {k: v for k, v in payload.items() if v is not None}

        results = serp_client.invoke(payload)
        return json.dumps(results)

    yield FunctionInfo.from_fn(
        _bright_data_serp_api,
        description=_bright_data_serp_api.__doc__,
    )
This snippet defines a custom NVIDIA NeMo Agent tool called bright_data_serp_api. First, you need to define a BrightDataSERPAPIToolConfig class, which specifies the required arguments and configurable parameters supported by the SERP API for Google (.e.g, the API key, search engine, country, language, device type, search type, whether results should be parsed into JSON, etc.)
Next, a custom bright_data_serp_api_function() is registered as a NeMo workflow function. The function checks that the Bright Data API key is set in the environment, and then defines an asynchronous _bright_data_serp_api() function.
_bright_data_serp_api() constructs a search request using LangChain’s BrightDataSERP client, invokes it, and returns the results in JSON format. Finally, it exposes the function to the NeMo Agent framework via FunctionInfo, which contains all the metadata required for the agent to call the function.
Note: Returning results as JSON provides a standardized string output. That is a helpful trick, considering that SERP API responses can vary (parsed JSON, raw HTML, etc.) depending on the configured arguments.
Similarly, you can define a bright_data_web_unlocker_api tool in the same file with:
class BrightDataWebUnlockerAPIToolConfig(FunctionBaseConfig, name="bright_data_web_unlocker_api"):
    """
    Configuration for Bright Data Web Unlocker Tool.

    Allows accessing geo-restricted or anti-bot-protected pages using
    Bright Data Web Unlocker.
    Requires BRIGHT_DATA_API_KEY.
    """

    api_key: str = Field(
        default="",
        description="Bright Data API key for the Web Unlocker."
    )

    country: str = Field(
        default="us",
        description="Two-letter country code simulated for the request (default: us)."
    )

    data_format: str = Field(
        default="html",
        description="Output content format: 'html', 'markdown', or 'screenshot'."
    )

    zone: str = Field(
        default="unblocker",
        description='Bright Data zone to use (default: "unblocker").'
    )


@register_function(config_type=BrightDataWebUnlockerAPIToolConfig)
async def bright_data_web_unlocker_api_function(tool_config: BrightDataWebUnlockerAPIToolConfig, builder: Builder):
    import os
    import json
    from typing import Optional
    from langchain_brightdata import BrightDataUnlocker

    # Set environment variable if needed
    if not os.environ.get("BRIGHT_DATA_API_KEY") and tool_config.api_key:
        os.environ["BRIGHT_DATA_API_KEY"] = tool_config.api_key

    async def _bright_data_web_unlocker_api(
        url: str,
        country: Optional[str] = None,
        data_format: Optional[str] = None,
    ) -> str:
        """
        Access a geo-restricted or anti-bot-protected URL using Bright Data Web Unlocker.

        Args:
            url (str): Target URL to fetch.
            country (str, optional): Override the simulated country.
            data_format (str, optional): Output content format ('html', 'markdown', 'screenshot').

        Returns:
            str: The fetched content from the target website.
        """

        unlocker = BrightDataUnlocker()

        result = unlocker.invoke({
            "url": url,
            "country": country or tool_config.country,
            "data_format": data_format or tool_config.data_format,
            "zone": tool_config.zone,
        })

        return json.dumps(result)

    yield FunctionInfo.from_fn(
        _bright_data_web_unlocker_api,
        description=_bright_data_web_unlocker_api.__doc__,
    )
Adjust the default argument values for both tools based on your needs.
Remember that BrightDataSERP and BrightDataUnlocker attempt to read the API key from the BRIGHT_DATA_API_KEY environment variable (which you set up earlier, so you are all set).
Next, import these two tools by adding the following line to register.py:
# bright_data_nvidia_nemo/web_data_workflow/src/web_data_workflow/register.py

# ...

from .bright_data import bright_data_serp_api_function, bright_data_web_unlocker_api_function
The two tools are not available for use in the config.yml file. The reason is that the auto-generated pyproject.toml file contains:
[project.entry-points.'nat.components']
web_data_workflow = "web_data_workflow.register"
This tells the nat command: “When loading the web_data_workflow workflow, look for components in the web_data_workflow.register module.”
Note: In the same way, you can create a tool for BrightDataWebScraperAPI to integrate with Bright Data’s Web Scraping APIs. This equips agent with the ability to retrieve structured data feeds from popular websites like Amazon, Instagram, LinkedIn, Yahoo Finance, and many others.
Here we go! It only remains to update the config.yml file accordingly to let the agent connect to these two new tools.
Step #7: Configure the Bright Data Tools
In config.yml, import the Bright Data tools and pass them to the agent with:
# bright_data_nvidia_nemo/web_data_workflow/src/web_data_workflow/configs/config.yml

functions:
  # Define and customize the custom Bright Data tools
  bright_data_serp_api:
    _type: bright_data_serp_api
  bright_data_web_unlocker_api:
    _type: bright_data_web_unlocker_api
    data_format: markdown

llms:
  nim_llm:
    _type: nim
    model_name: meta/llama-3.1-70b-instruct # Replace it with an enterprise-ready AI model
    temperature: 0.0

workflow:
  _type: react_agent
  llm_name: nim_llm
  tool_names: [bright_data_serp_api, bright_data_web_unlocker_api] # Configure the Bright Data tools
To use the tools defined earlier:
- Add them under the
functionssection of theconfig.ymlfile. Notice that you can customize them through the arguments exposed by theirFunctionBaseConfigclasses. For example, thebright_data_web_unlocker_apitool has been configured to return data in Markdown format, which is an excellent format for AI agents to process. - List the tools inside the
tool_namesfield in theworkflowblock so the agent can call them.
Fantastic! Your React Agent, powered by meta/llama-3.1-70b-instruct, now has access to both LangChain-based custom tools:
bright_data_serp_apibright_data_web_unlocker_api
Note: In this example, the LLM is configured as an NVIDIA NIM model. Consider switching to a more enterprise-oriented model depending on your deployment needs.
Step #8: Test the NVIDIA Nemo Agent Toolkit Workflow
To verify that your NVIDIA NeMo Agent Toolkit workflow can now interact with the Bright Data tools, you need a task that triggers both web search and web data extraction.
For example, imagine your company wants to monitor competitors’ new products and pricing to support business intelligence. If your competitor is Nike, you could write a prompt like:
Search the web to discover the latest Nike shoes. From the retrieved search results, select up to three of the most relevant web pages, giving priority to official Nike website pages. Access these pages and retrieve their content in Markdown format. For the discovered shoe model, provide the name, release status, price, key information, and a link to the official Nike page (if available).Make sure the NVIDIA_API_KEY and BRIGHT_DATA_API_KEY environment variables are defined, then run your agent with:
nat run --config_file configs/config.yml --input "Search the web to discover the latest Nike shoes. From the retrieved search results, select up to three of the most relevant web pages, giving priority to official Nike website pages. Access these pages and retrieve their content in Markdown format. For the discovered shoe models, provide the name, release status, price, key information, and a link to the official Nike page (if available)."The initial output will be something like: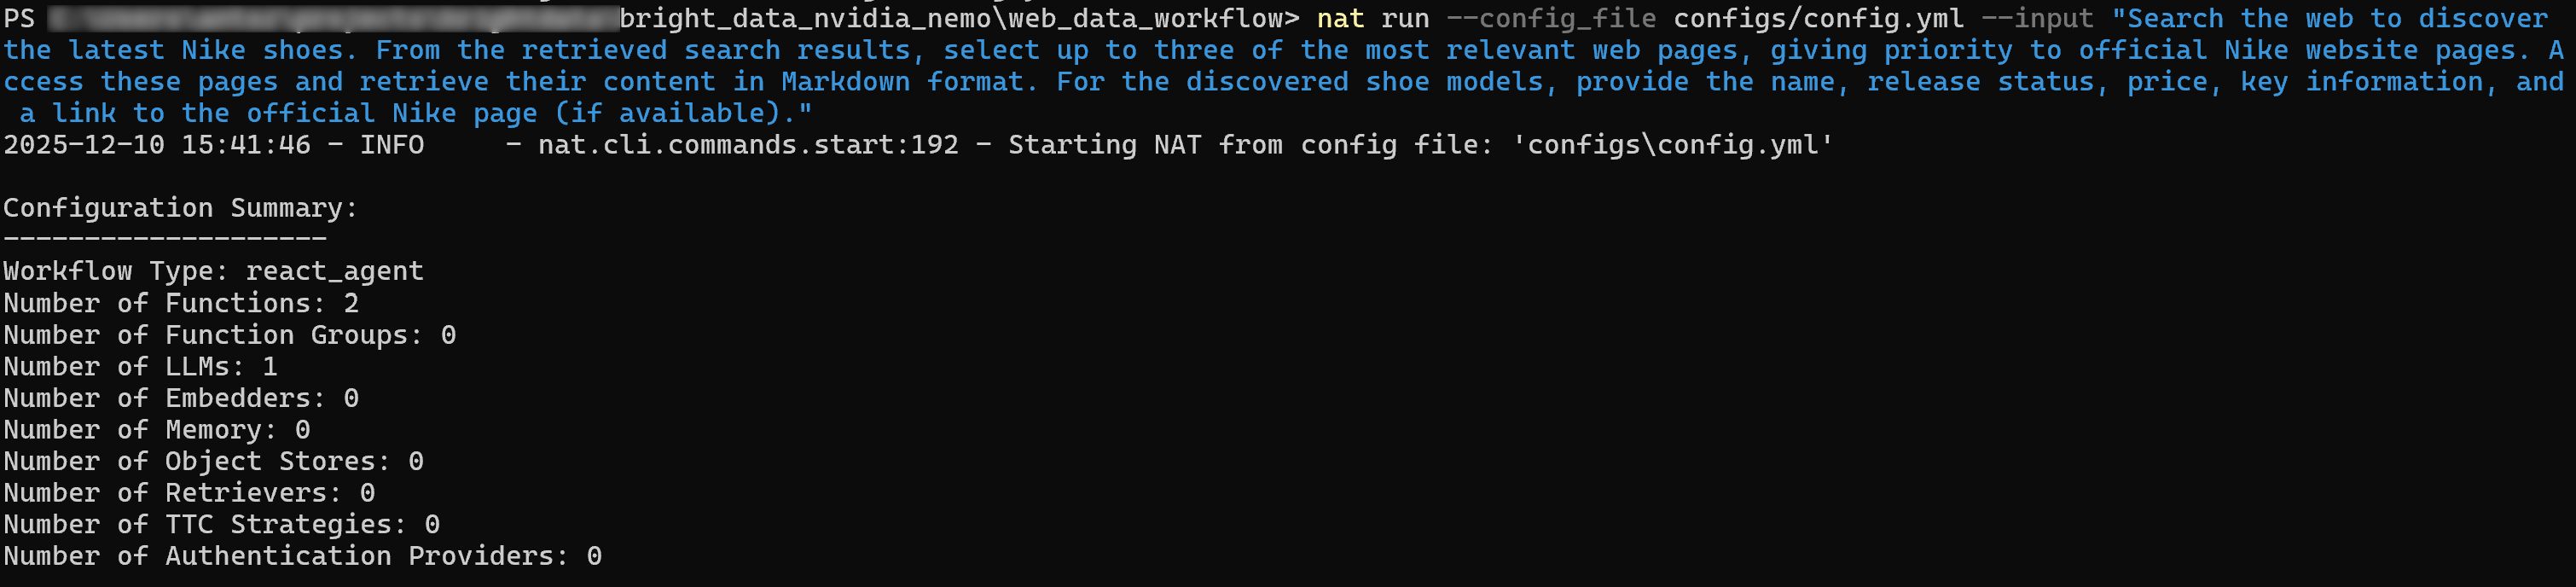
If you enable verbose mode (set verbose: true in the workflow block), you will see the agent performing the following steps:
- Call the SERP API with queries such as “latest Nike shoes” and “new Nike shoes.”
- Select the most relevant pages, prioritizing the official Nike “New Shoes” page.
- Use the Web Unlocker API tool to access the selected page and scrape its content in Markdown format.
- Process the scraped data and producing a structured list of results:
[Air Jordan 11 Retro "Gamma" - Men's Shoes](https://www.nike.com/t/air-jordan-11-retro-gamma-mens-shoes-DYkD1oXL/CT8012-047)
Release Status: Coming Soon
Colors: 1
Price: $235

[Air Jordan 11 Retro "Gamma" - Big Kids' Shoes](https://www.nike.com/t/air-jordan-11-retro-gamma-big-kids-shoes-LJyljnZt/378038-047)
Release Status: Coming Soon
Colors: 1
Price: $190

# Omitted for brevity...
These results match exactly what you would find on Nike’s “New Shoes” page:
Mission complete! The AI agent autonomously searched the web, selected the right pages, scraped them, and extracted structured product insights. None of this would be possible without the integration of the Bright Data tools within your NAT workflow!
Remember that agentic business intelligence is only one of the many use cases enabled by Bright Data solutions when combined with NVIDIA NeMo Agent Toolkit. Try adjusting the tool configuration, integrating additional tools, or changing the input prompt to explore more scenarios!
Connect NVIDIA NeMo Agent Toolkit with Bright Data via Web MCP
Another way to integrate the NVIDIA NeMo Agent Toolkit with Bright Data products is by connecting it to Web MCP. For more details, refer to the official documentation.
Web MCP provides access to 60+ tools built on top of Bright Data’s web automation and data-collection platform. Even on its free tier, you can already have access to two powerful tools:
| Tool | Description |
|---|---|
search_engine |
Fetch Google, Bing, or Yandex results in JSON or Markdown format. |
scrape_as_markdown |
Scrape any webpage into clean Markdown while bypassing anti-bot measures. |
But Web MCP truly shines with Pro mode. This premium tier isn’t free, but it unlocks structured data extraction for major platforms such as Amazon, Zillow, LinkedIn, YouTube, TikTok, Google Maps, and more—plus additional tools for automated browser actions.
Note: For project setup and prerequisites, refer to the previous chapter.
Now, let’s walk through how to use Bright Data’s Web MCP inside the NVIDIA NeMo Agent Toolkit!
Step #1: Install the NVIDIA NAT MCP Package
As mentioned earlier, the NVIDIA NeMo Agent Toolkit is modular. The core package provides the foundation, and additional capabilities are added through optional extensions.
For MCP support, the required package is nvidia-nat[mcp]. Install it with:
pip install nvidia-nat[mcp]Your NVIDIA NeMo Agent Toolkit agent can now connect to MCP servers. In particular, to ensure enterprise-grade performance and reliability, you will connect to Bright Data’s Web MCP using remote Streamable HTTP communication through the managed remote server.
Step #2: Configure the Remote Web MCP Connection
In your config.yml, configure the connection to Bright Data’s remote Web MCP server using the Streamable HTTP protocol:
# bright_data_nvidia_nemo/web_data_workflow/src/web_data_workflow/configs/config.yml

function_groups:
  bright_data_web_mcp:
    _type: mcp_client
    server:
      transport: streamable-http
url: "https://mcp.brightdata.com/mcp?token=<YOUR_BRIGHT_DATA_API_KEY>&pro=1"    tool_call_timeout: 600
    auth_flow_timeout: 300
    reconnect_enabled: true
    reconnect_max_attempts: 3

llms:
  nim_llm:
    _type: nim
    model_name: meta/llama-3.1-70b-instruct # Replace it with an enterprise-ready AI model
    temperature: 0.0

workflow:
  _type: react_agent
  llm_name: nim_llm
  tool_names: [bright_data_web_mcp]
This time, instead of defining tools under the functions block, you use function_groups. This configures the Web MCP connection and retrieves the entire set of MCP tools from the remote server. The group is then passed to the agent through the tool_names field, just like individual tools.
The Web MCP URL includes the &pro=1 query parameter. That enables Pro mode, which is optional but strongly recommended for enterprise use because it unlocks the full suite of structured data extraction tools—not just the basic ones.
Step #3: Verify the Web MCP Connection
Run your NVIDIA NeMo Agent with a new prompt. In the initial logs, you should see the agent loading all the tools exposed by Web MCP: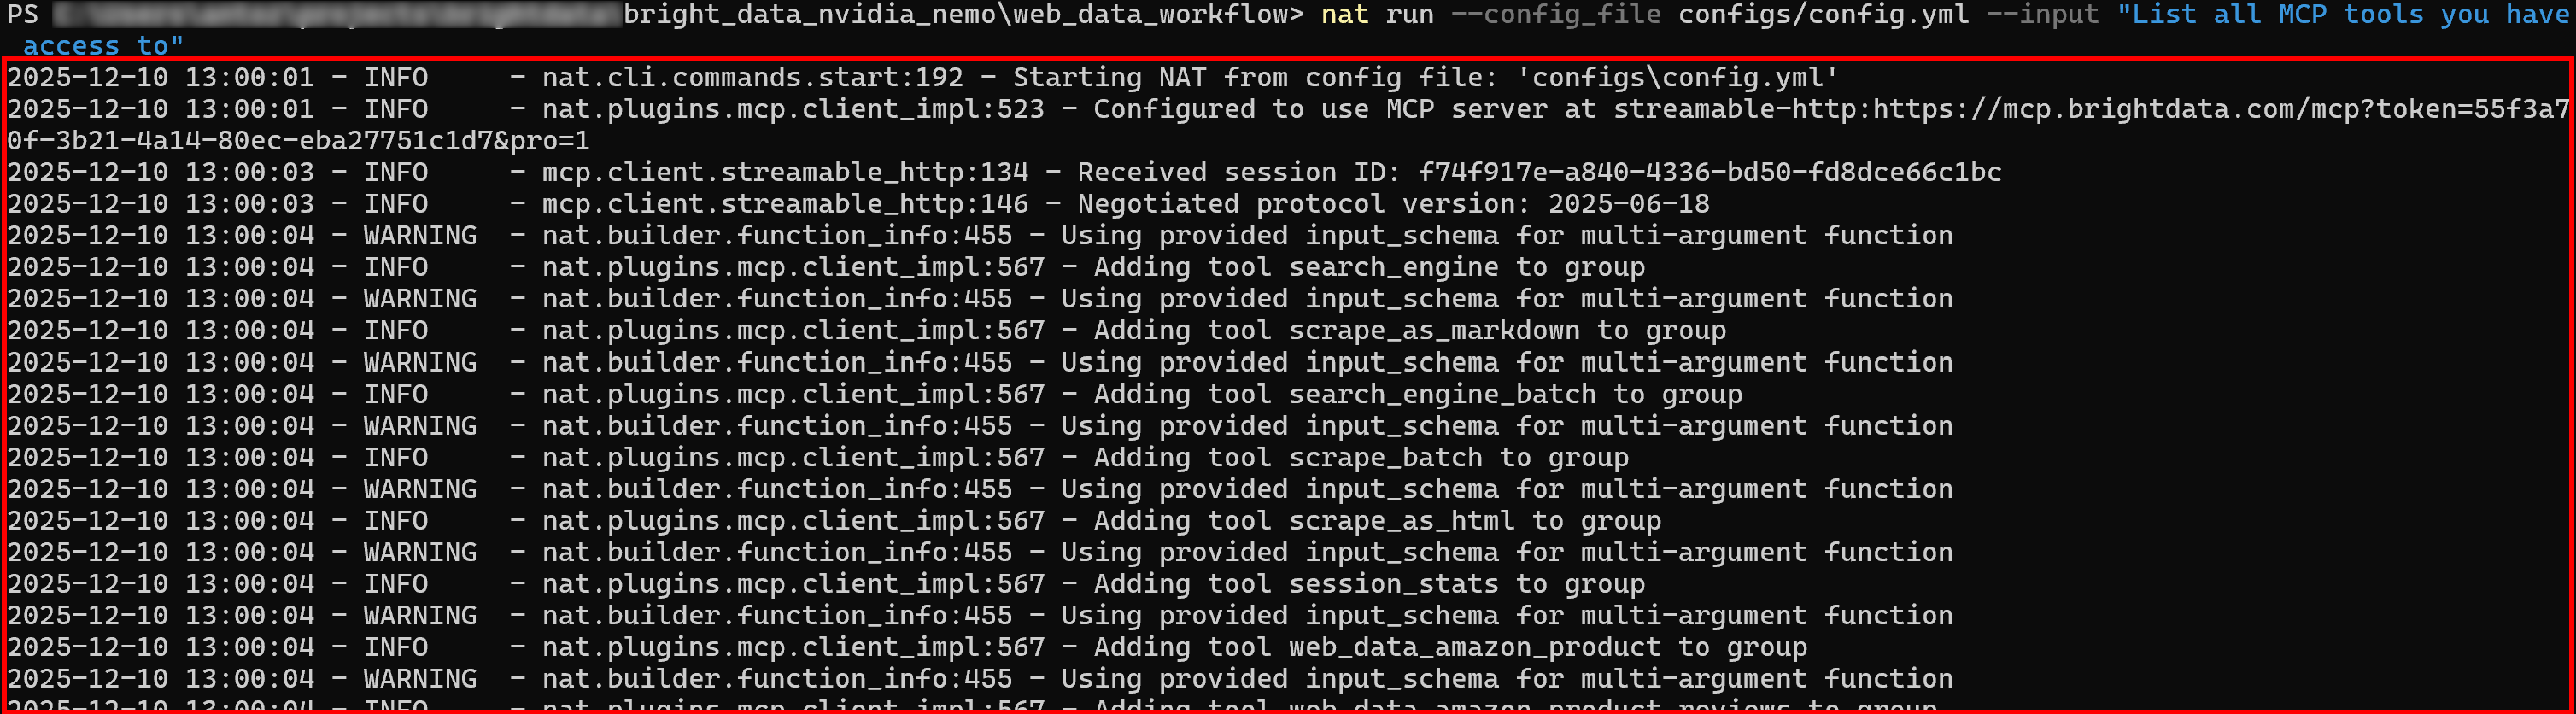
If Pro mode is enabled, all 60+ tools will be loaded initially.
Then, the configuration summary logs will show a single function group, as expected: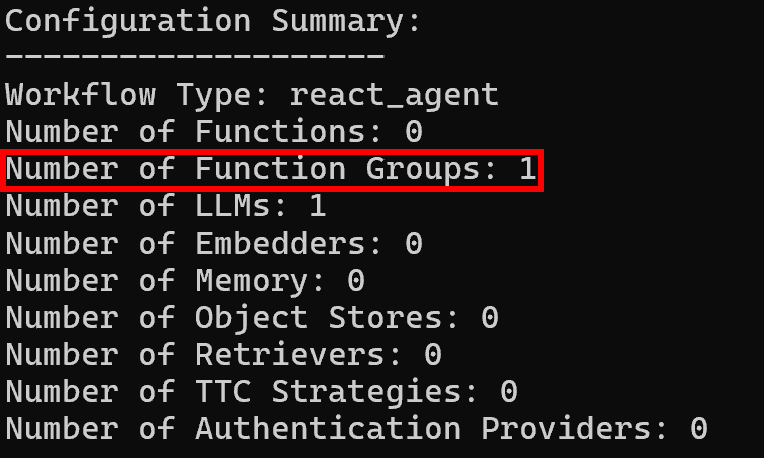
Et voilà! Your NVIDIA NeMo Agent Toolkit workflow now has full access to all the capabilities provided by Bright Data Web MCP.
Conclusion
In this blog post, you learned how to integrate Bright Data with the NVIDIA NeMo Agent Toolkit, either through custom tools powered by LangChain or via Web MCP.
Those setups open the door to real-time web searches, structured data extraction, live web feed access, and automated web interactions within NAT workflows. It leverages the full suite of Bright Data services for AI, unlocking the full potential of your AI agents!
Sign up for Bright Data today and start integrating our AI-ready web data tools!

Technical Writer
Antonello Zanini is a technical writer, editor, and software engineer with 5M+ views. Expert in technical content strategy, web development, and project management.


