







In this article, you will learn:
- What Aider is and what it brings to the table as an AI pair programming tool.
- Why it becomes even more powerful when paired with a production-ready web access solution like the Bright Data CLI.
- How to combine Aider and the Bright Data CLI in an AI-powered development workflow to achieve better results.
Let’s dive in!
What Is Aider?
Aider is an AI pair programming tool that runs in your terminal and helps you build or improve codebases using large language models. It supports multiple LLMs and works across new projects or existing repositories.
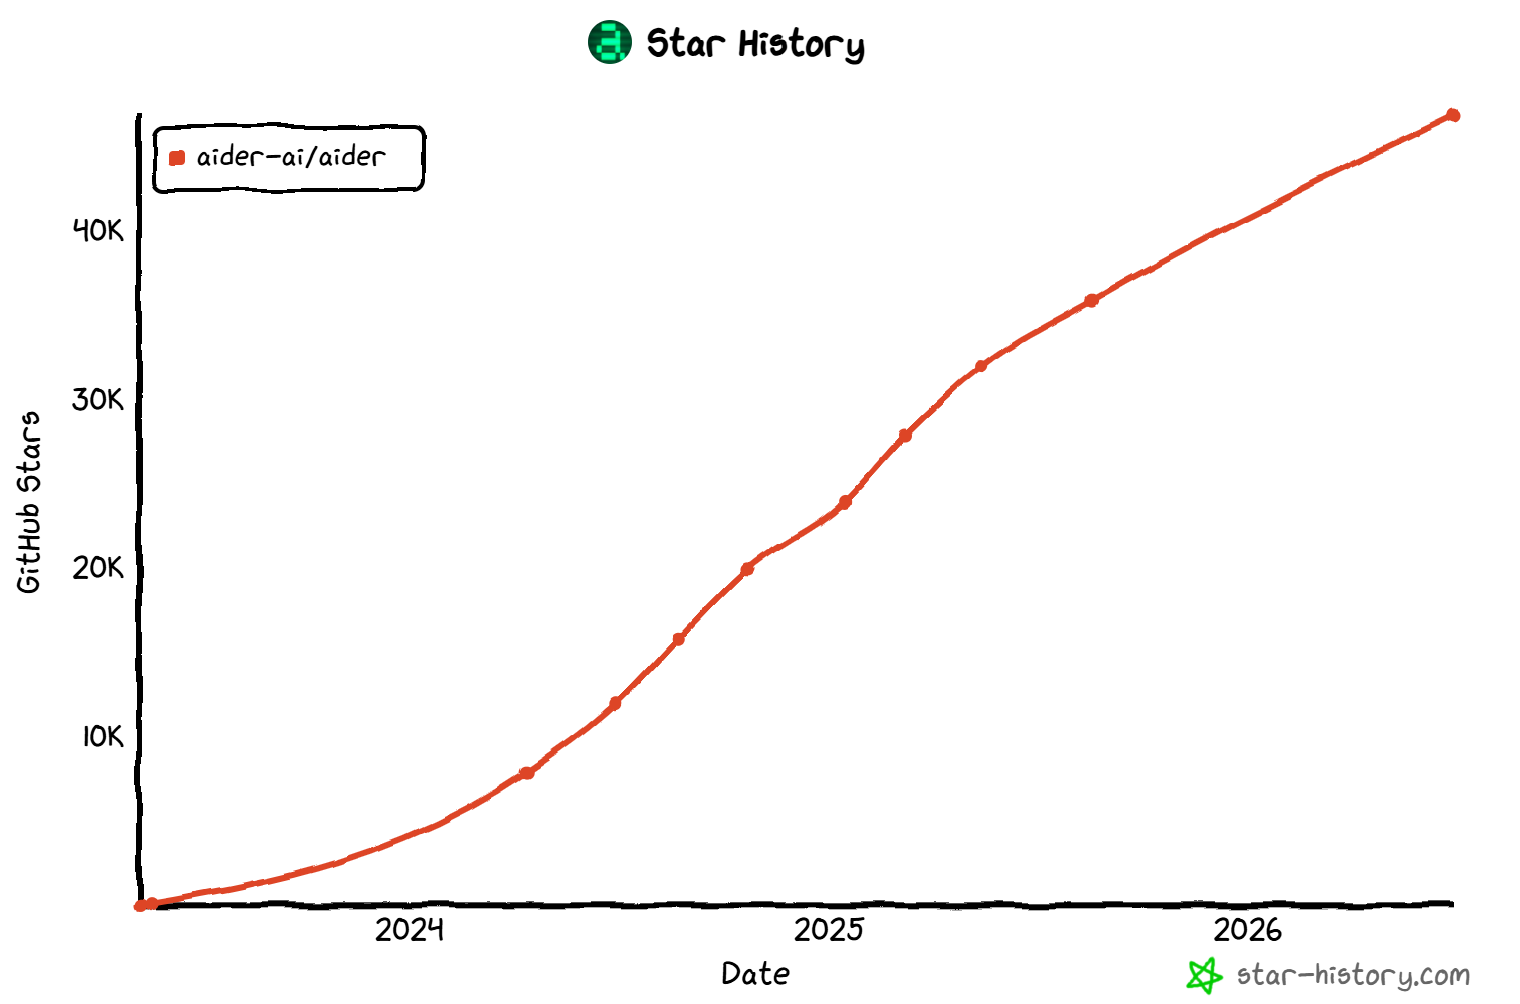
Developers use it for coding, debugging, refactoring, testing, and understanding code with AI assistance. The solution has gained significant traction in the community, reaching over 46k GitHub stars with more than 170 contributors.
Main Features
These are the main capabilities provided by Aider:
- Cloud and local LLM support: Connects to top models like Claude, GPT-5.4, DeepSeek, and also local models, giving flexibility across providers and setups.
- Codebase mapping: Builds a structured map of your entire repository to give the AI better context, especially useful for large or complex projects.
- Multi-language support: Works with 100+ programming languages, including Python, JavaScript, Rust, Go, PHP, and many others.
- Git integration: Automatically commits changes with meaningful messages, enabling easy diffs, rollbacks, and version tracking of AI-generated edits.
- IDE integration: Runs alongside your favorite editor, letting you request code changes directly from comments in your files.
- Images and web context: Allows you to attach screenshots, images, and web pages to provide richer context for coding tasks.
- Voice-to-code: Lets you speak feature requests, bug fixes, or test ideas, which Aider then translates into code changes.
- Linting and testing automation: Automatically runs linters and test suites after edits and can fix issues detected in your codebase.
- Copy/paste web chat support: Works with browser-based LLMs by simplifying the process of transferring code and changes between chat and editor.
- Interactive terminal workflow: Keeps the entire coding loop inside the terminal, making it fast and lightweight while still powerful for real development workflows.
Find out more in the official docs.
Why Aider Needs Reliable Web Scraping, Discovery, and Interaction Tools
No matter which of the many LLMs supported by Aider you choose to configure, they all share the same limitation: outdated knowledge. Large language models are inherently limited to the static datasets they were trained on, which represent only a snapshot of the past.
As a result, LLMs do not know about recent trends, newly discovered security vulnerabilities, or the latest framework updates. They may recommend outdated approaches, deprecated methods, or code that no longer follows current best practices. This can quickly become a problem when you rely on them for development tasks…
The obvious solution is to give the LLM access to external tools for web grounding. This is exactly why Aider provides the /web command. It lets the model scrape a web page (using Playwright behind the scenes), retrieve its content, and use that information as context.
Unfortunately, Aider’s built-in /web tool does not work reliably against bot-protected websites. Since more and more sites now use advanced anti-bot systems to block automated requests, this significantly limits the command’s usefulness.
For example, try scraping the Bright Data reviews page on G2 with the command below:
/web http://www.g2.com/products/bright-data/reviews
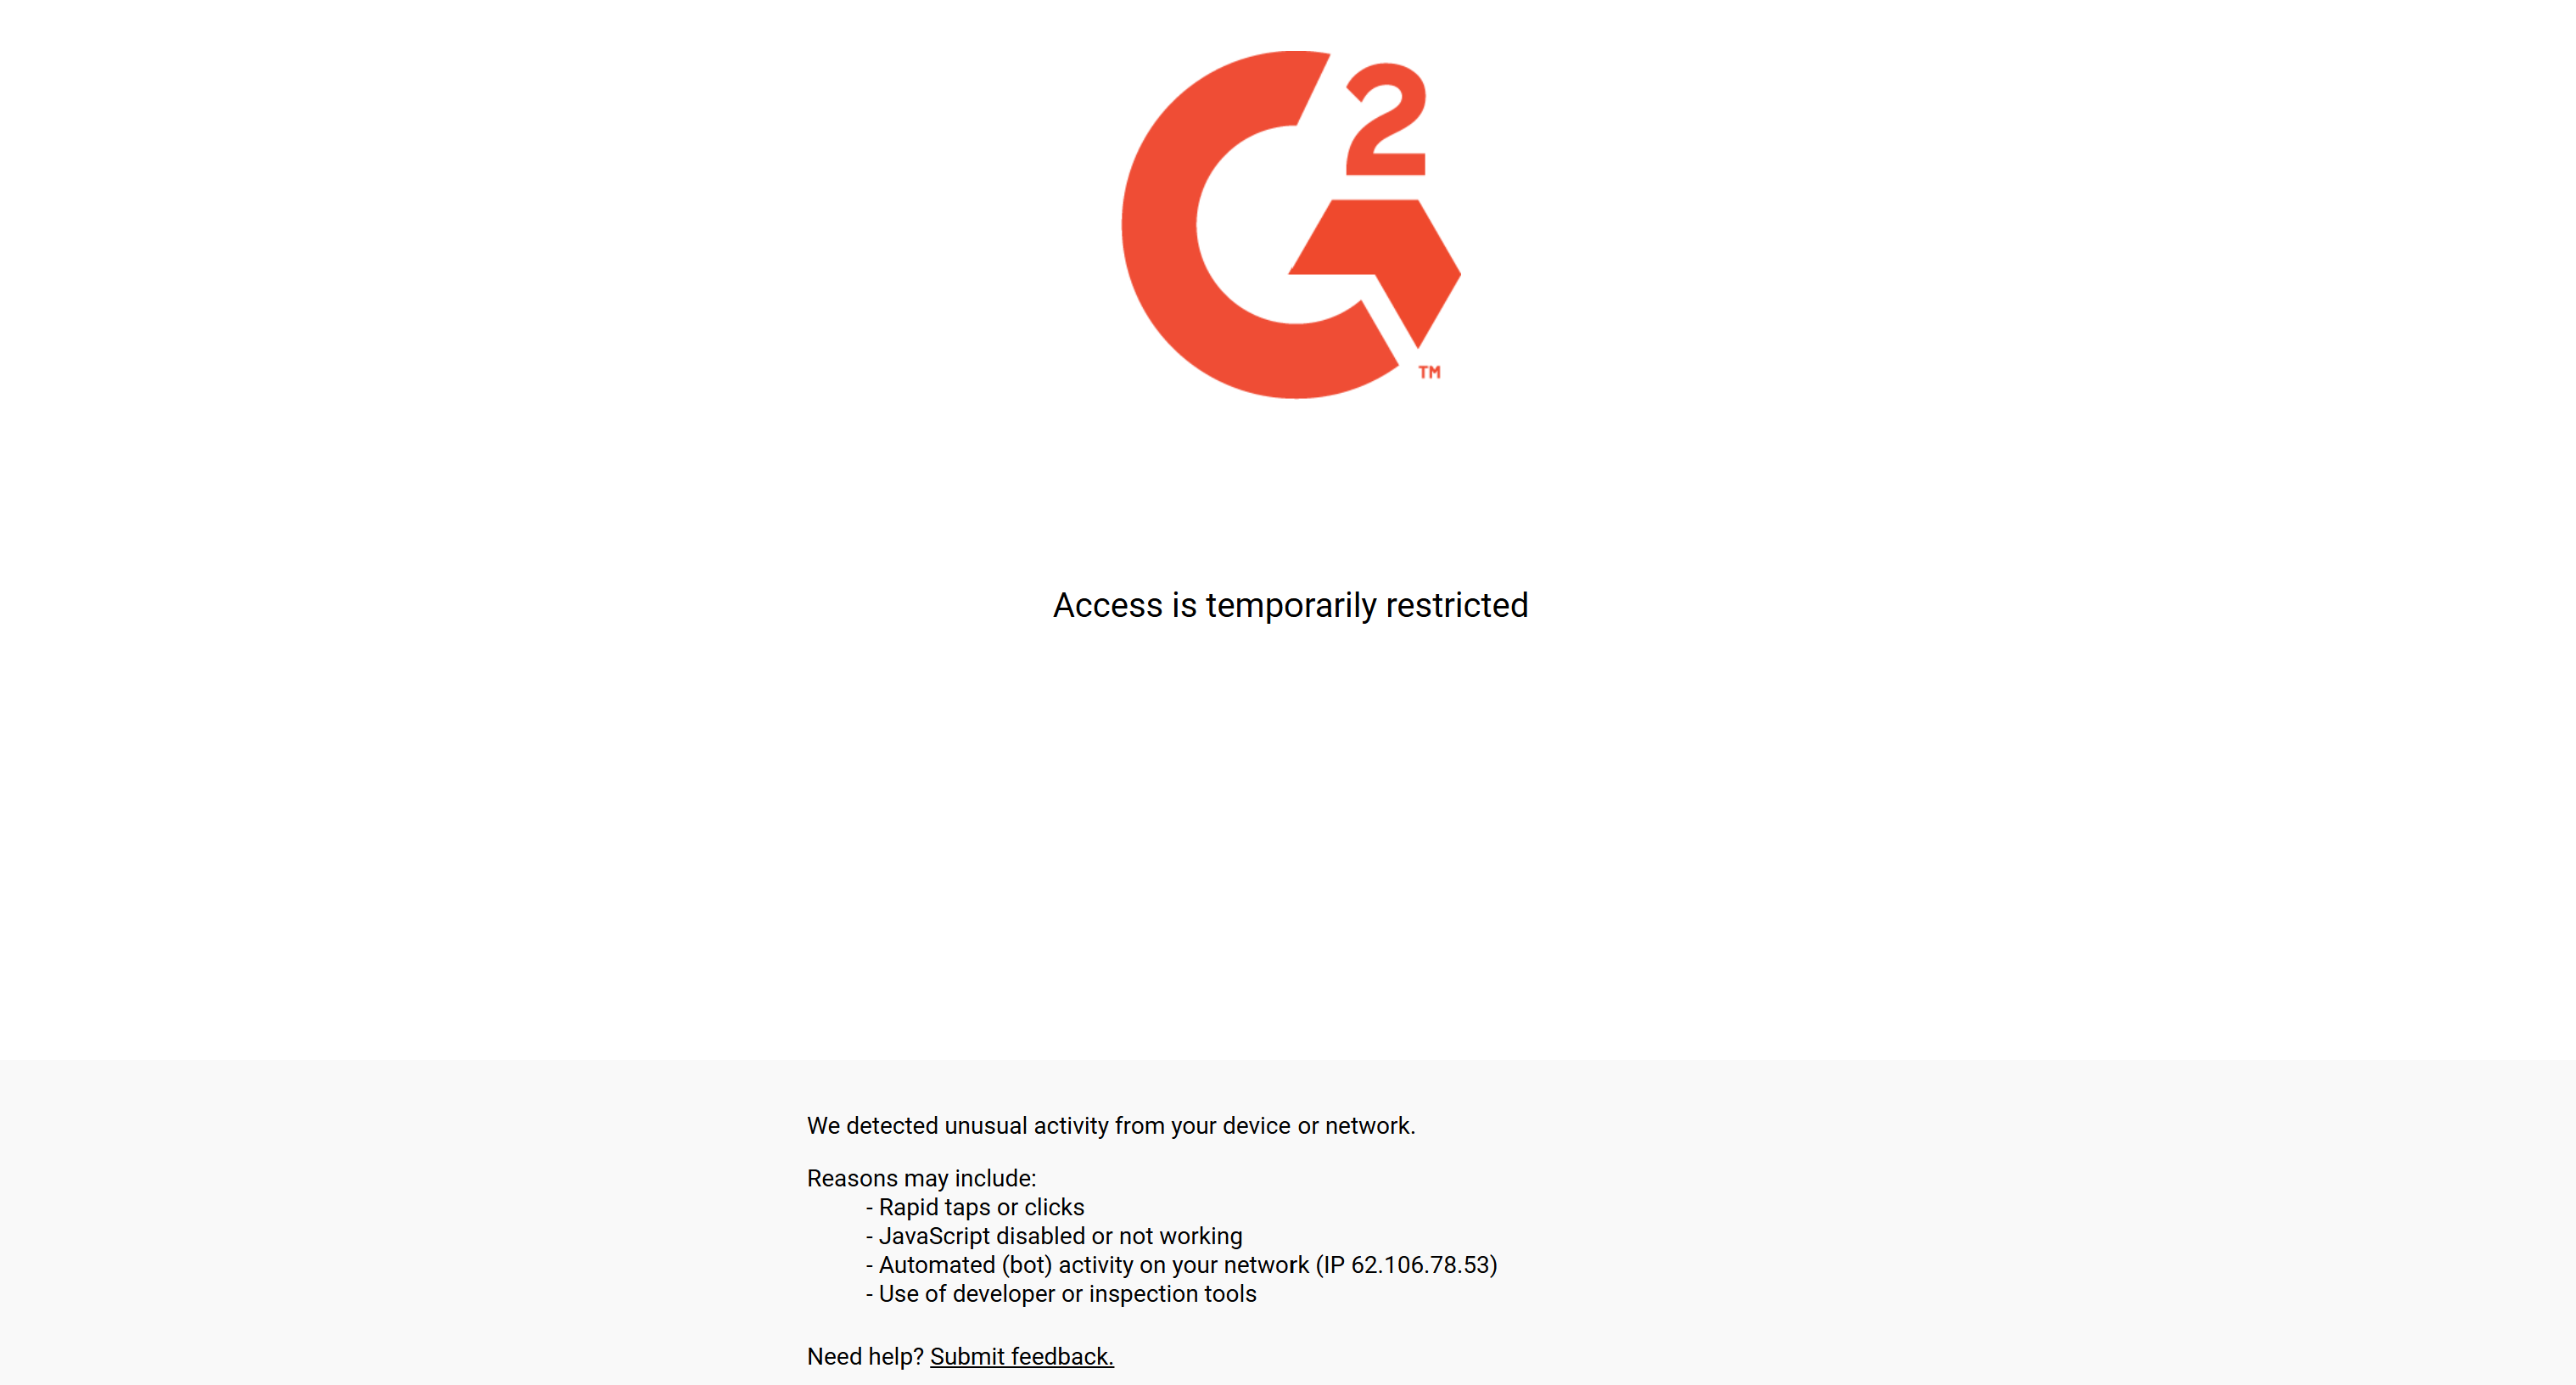
Instead of retrieving the page, Aider returns an error. This happens because G2 detects the automated Playwright browser session controlled by Aider and blocks the request. As a result, it will likely get this error page:
Bright Data CLI to the Rescue
The easiest way to let Aider interact with the web, from scraping to browser automation, is by connecting it to Bright Data’s ecosystem. You can achieve that through the Bright Data CLI, which wraps the full Bright Data web data services into a simple set of terminal commands.
The exposed CLI commands build on Bright Data’s advanced anti-bot technology and proxy network of 400+ million IPs across 195 countries. This enables access to any website with unlimited concurrency, without worrying about blocks (including CAPTCHAs), while achieving 99.99% uptime and a 99.95% success rate.
Some of the most relevant Bright Data CLI commands include:
| Command | Descriptions | Bright Data Product |
|---|---|---|
brightdata scrape |
Scrapes any URL while bypassing CAPTCHAs, JavaScript rendering, and anti-bot protections | Web Unlocker API |
brightdata search |
Performs searches on Google, Bing, Yandex (and others) and returns structured JSON results | SERP API |
brightdata pipelines |
Extracts structured data from 40+ major platforms like Amazon, LinkedIn, and TikTok | Web Scraping API |
brightdata browser |
Controls a real browser for navigation, clicks, typing, screenshots, and more | Browser API |
brightdata scraper create |
Creates a new scraper from a natural-language description using AI | Scraper Studio |
brightdata scraper run |
Executes a configured scraper on a target URL and returns extracted data | Scraper Studio |
brightdata scraper heal |
Uses AI to automatically fix broken scrapers with a human approval step | Scraper Studio (self-healing feature) |
brightdata scraper approve |
Approves or rejects proposed self-healing updates for a scraper | Scraper Studio (self-healing feature) |
For the full list of available CLI commands, refer to the official Bright Data GitHub repository.
Note: The Bright Data CLI includes a free plan with up to 5,000 requests per month on a recurring basis.
Test Bright Data’s CLI performance against Aider’s /web tool on the same G2 page. The result is the actual target webpage:
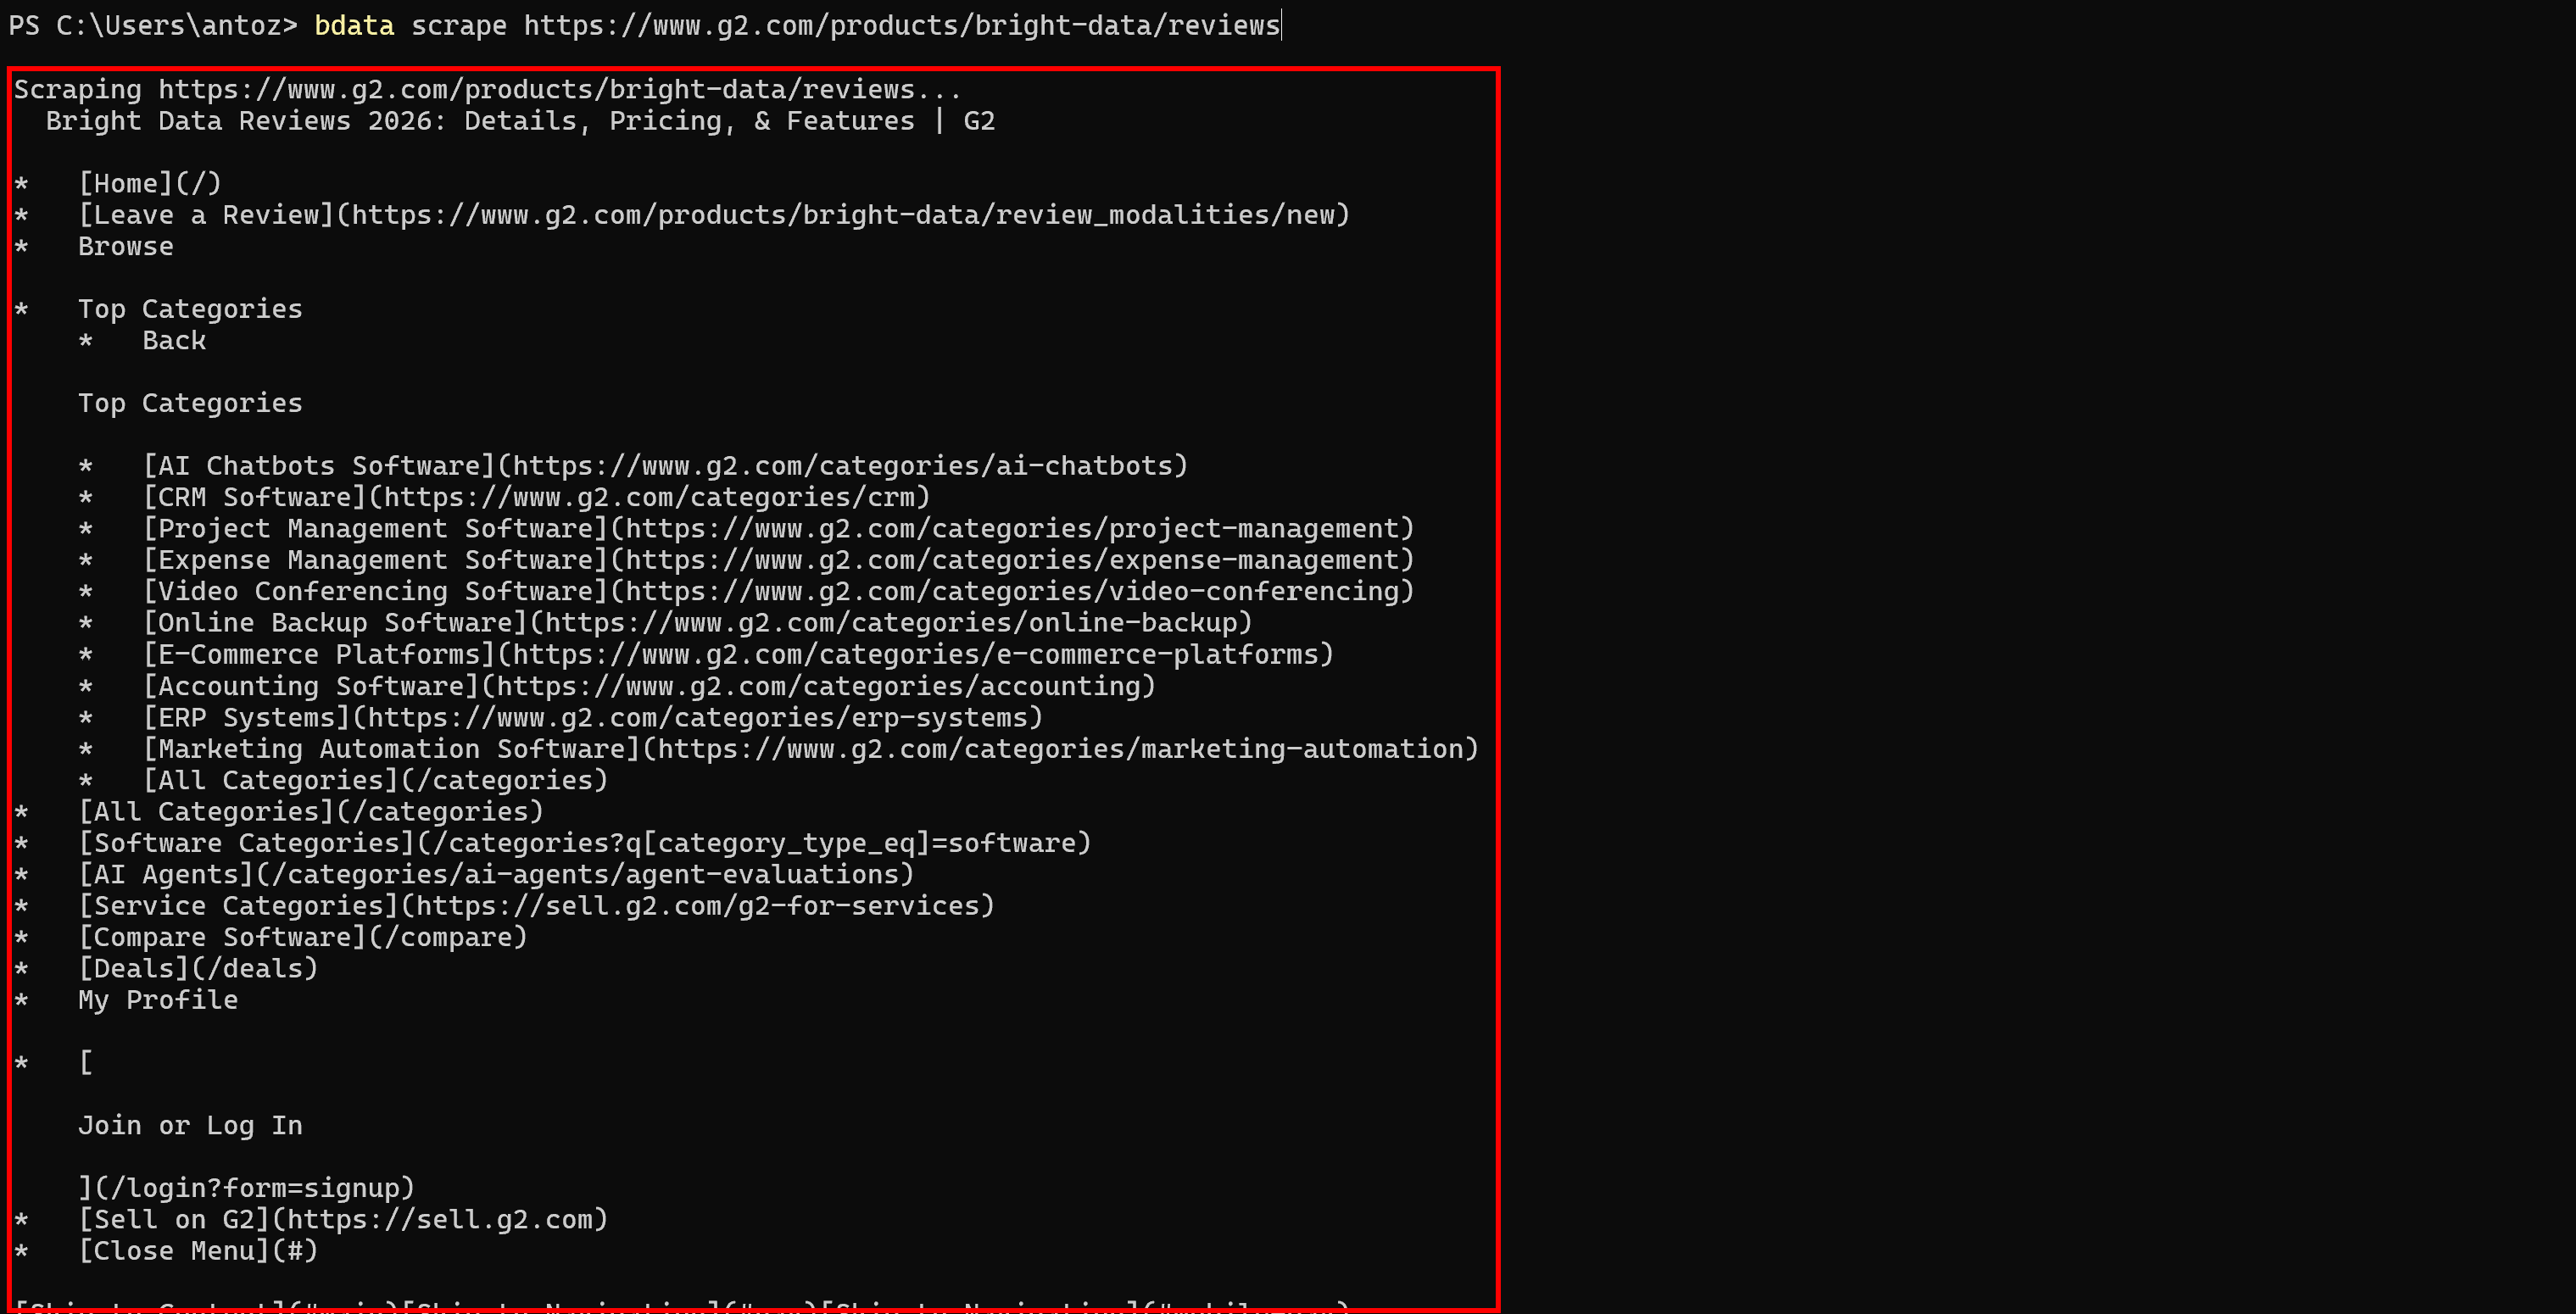
This proves that the Bright Data CLI was able to bypass G2’s anti-bot protections. Additionally, the result is returned in an AI-optimized Markdown format, making it easy for LLMs to ingest and process. Much better, isn’t it?
How to Use the Bright Data CLI for Web Scraping, Grounding, and More in Aider
In this section, you will learn how to extend Aider with the web capabilities provided by the Bright Data CLI.
Follow the instructions below!
Prerequisites
To follow along with this section, make sure you have:
- Python 3.8+ installed locally.
- Node.js 20+ installed locally.
- A Bright Data account.
- An API key from one of the LLM providers supported by Aider (in this tutorial, we will rely on an OpenAI API key).
Step #1: Get Started with Aider
Launch the following command to install the Aider installation package from PyPI (aider-install):
python -m pip install aider-installThen run it to install Aider:
aider-installNext, move into your project folder:
cd your-project-folder/Start Aider with:
aiderThe first time you launch it, you will be asked a few questions. If a Git repository is missing, Aider can initialize one for you. A .gitignore file with the required Aider entries will also be created.

Next, choose whether to log in via OpenRouter (the default option) or not.

If you go through this option, you will need to connect Aider to your OpenRouter account. After doing so, the default model will be openrouter/deepseek/deepseek-r1. Otherwise, you will be guided on how to configure other models (e.g., OpenAI models) in the next step.
The following files will be added to your project directory:
your-project-folder/
├── ...
├── .aider.chat.history.md
├── .gitignore
└── .aider.tags.cache.v4/
And this is what you will see:

Notice how minimal the Aider TUI is. After the “>” character, you can write your request to the configured model or use specific Aider commands. Well done!
Step #2: Configure the LLM Model
To use Aider with OpenAI models, start by setting your OpenAI API key as an environment variable. On Linux or macOS, run:
export OPENAI_API_KEY=<YOUR_OPENAI_API_KEY>On Windows, run:
setx OPENAI_API_KEY <YOUR_OPENAI_API_KEY>After the setx command, close all open terminal windows and open a new one before continuing. This ensures the new environment variable is available.
Next, launch Aider with the model you want to use:
aider, model <MODEL_NAME>For example, to start Aider with GPT-5.4 Mini, run:
aider, model gpt-5.4-miniThis is what you should see:

Great! Aider is now connected to your chosen OpenAI model and ready to help with your development tasks. If you want to use a different LLM provider, follow Aider’s documentation to configure the corresponding API key and model.
Step #3: Set Up the Bright Data CLI
Start by adding the Bright Data CLI globally on your machine with:
npm install -g @brightdata/cliThis installs the @brightdata/cli npm package, which adds the brightdata command (along with its shorter bdata alias) to your system.
Verify that the installation completed successfully by running:
bdata, versionYou should see output similar to:
0.3.2Next, connect the CLI to your Bright Data account by running:
brightdata loginThis command opens your browser and starts a secure OAuth authentication flow. Once you sign in, the CLI automatically:
- Validates and stores your API key locally.
- Creates the required Bright Data APIs in your control panel (
cli_unlockerandcli_browser) if they do not already exist. - Configures the default settings so you can start using the CLI immediately.
For additional details, see the official Bright Data CLI installation guide. Alternatively, follow our step-by-step tutorial on getting started with the Bright Data CLI.
To verify that everything works correctly, run a test command like:
bdata scrape https://example.comThe command should scrape https://example.com and return the page as Markdown:

To learn more about the available commands, their arguments, and how they work, check out the official documentation or the project’s GitHub repository.
Excellent! Your local machine now exposes enterprise-grade web scraping, browser automation, search, and web interaction capabilities through the Bright Data CLI. In the next step, you will connect these capabilities to Aider.
Step #4: Test the Aider + Bright Data CLI Setup
Aider can interact with your terminal through the /run command. This allows it to execute CLI commands (and local code) and automatically add their output to the chat. Now, let’s verify that the Aider + Bright Data CLI integration works with a simple example.
Suppose you want to build a website similar to aider.chat. The idea is to:
- Capture a screenshot of the website with the Bright Data CLI.
- Ask the LLM to analyze the screenshot and scaffold a similar Next.js application.
Start by running the following command in Aider:
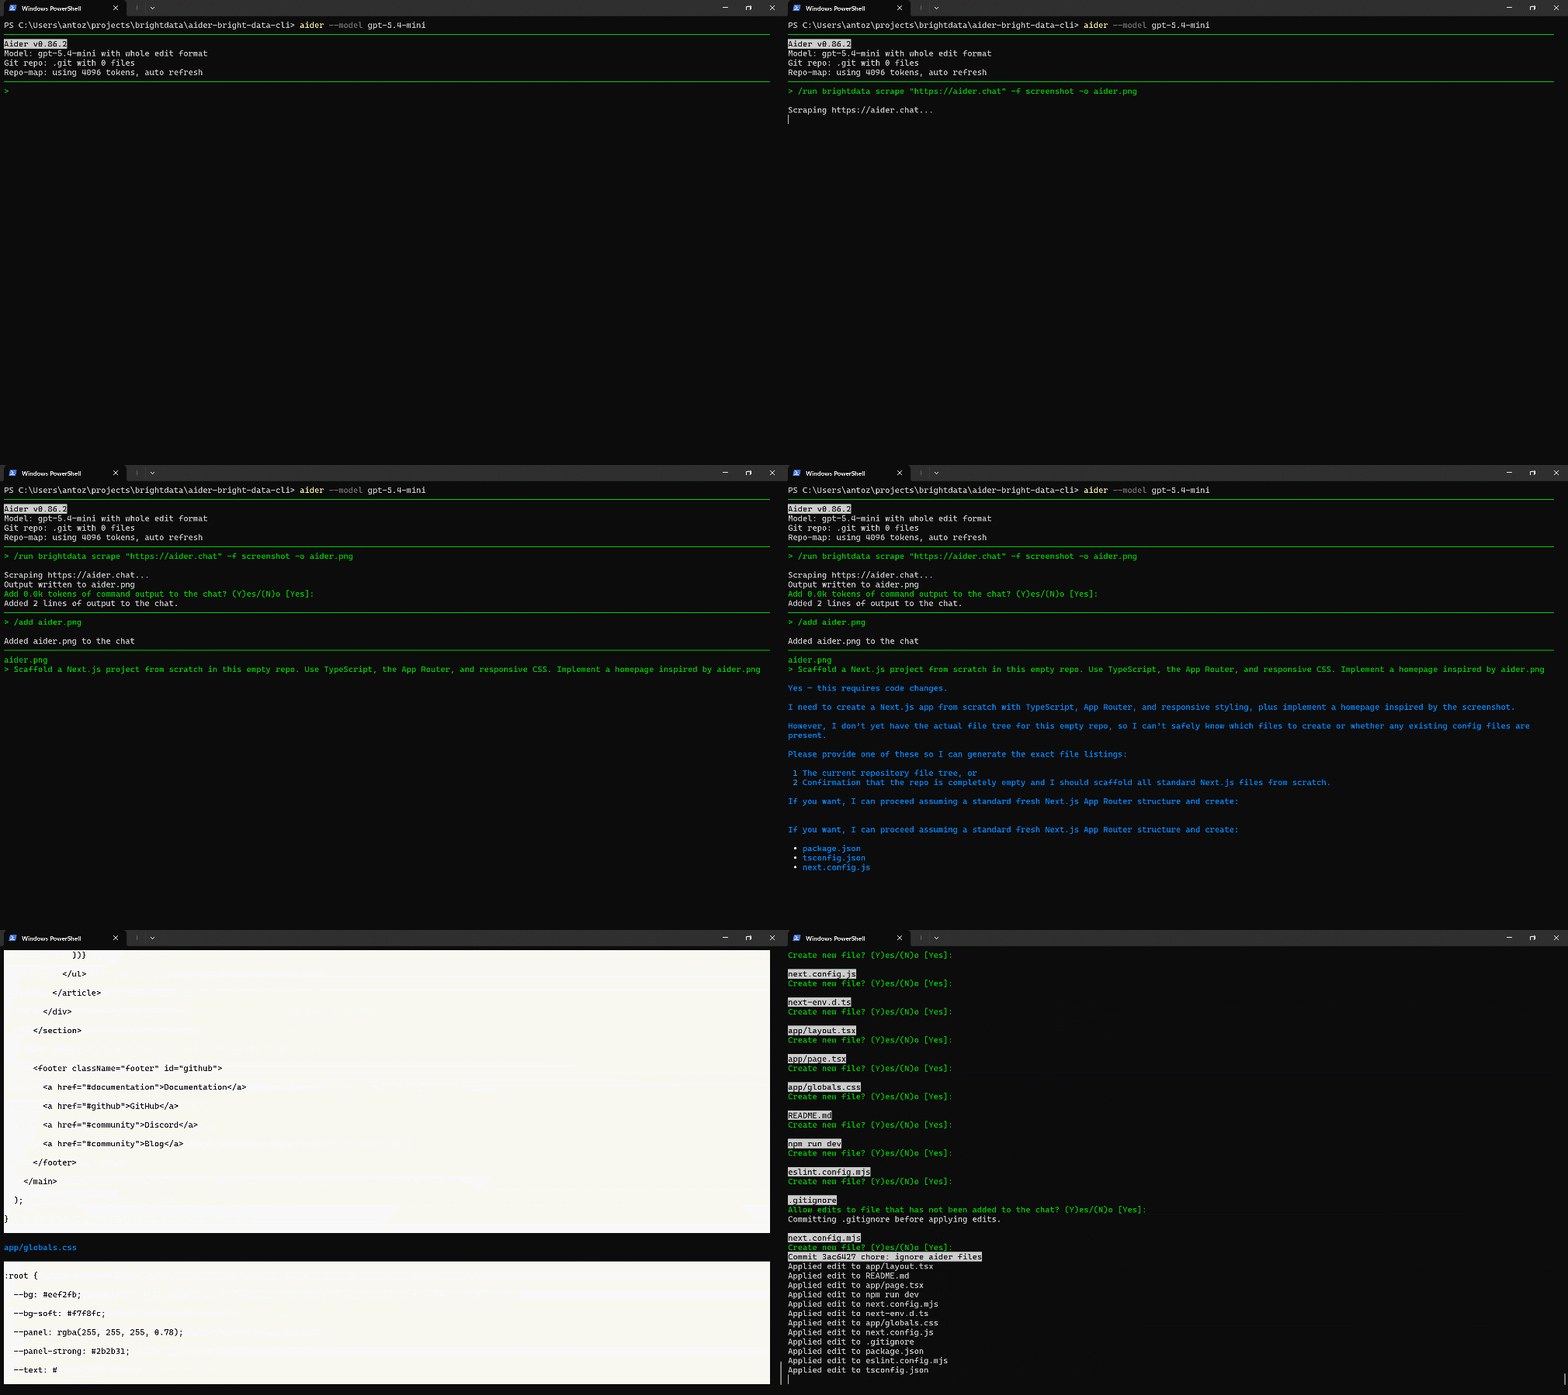
/run bdata scrape "https://aider.chat" -f screenshot -o aider.pngThis instructs Aider to use the Bright Data CLI to visit the aider.chat website, take a screenshot, and save it as aider.png. Behind the scenes, it uses the Bright Data Web Unlocker API, which can reliably access and capture even bot-protected websites.
Since the screenshot is not automatically loaded to Aider’s chat, add it with:
/add aider.pngNow that the model can access the image, ask it to generate the Next.js project:
Scaffold a Next.js project from scratch in this empty repo. Use TypeScript, the App Router, and responsive CSS. Implement a homepage inspired by aider.png.Aider may ask for confirmation before creating the project. Reply with something like:
The repo is empty. Create the full set of required files.Aider will start generating the application and ask for permission before writing these files:
app/layout.tsxREADME.mdapp/page.tsxnpm run devnext.config.mjsnext-env.d.tsapp/globals.cssnext.config.jspackage.jsoneslint.config.mjstsconfig.json
Mission accomplished! You now have a complete Next.js application inspired by the original aider.chat homepage.
The GIF below shows the entire workflow:
Step #5: Explore the Output
Your project folder should now contain a complete Next.js application:
your-project-folder/
├── ...
├── app/
│   ├── globals.css
│   ├── layout.tsx
│   └── page.tsx
├── eslint.config.mjs
├── next-env.d.ts
├── next.config.js
├── next.config.mjs
├── package.json
├── README.md
└── tsconfig.json
To test the produced application, begin by installing the project’s dependencies:
npm installThen start the development server:
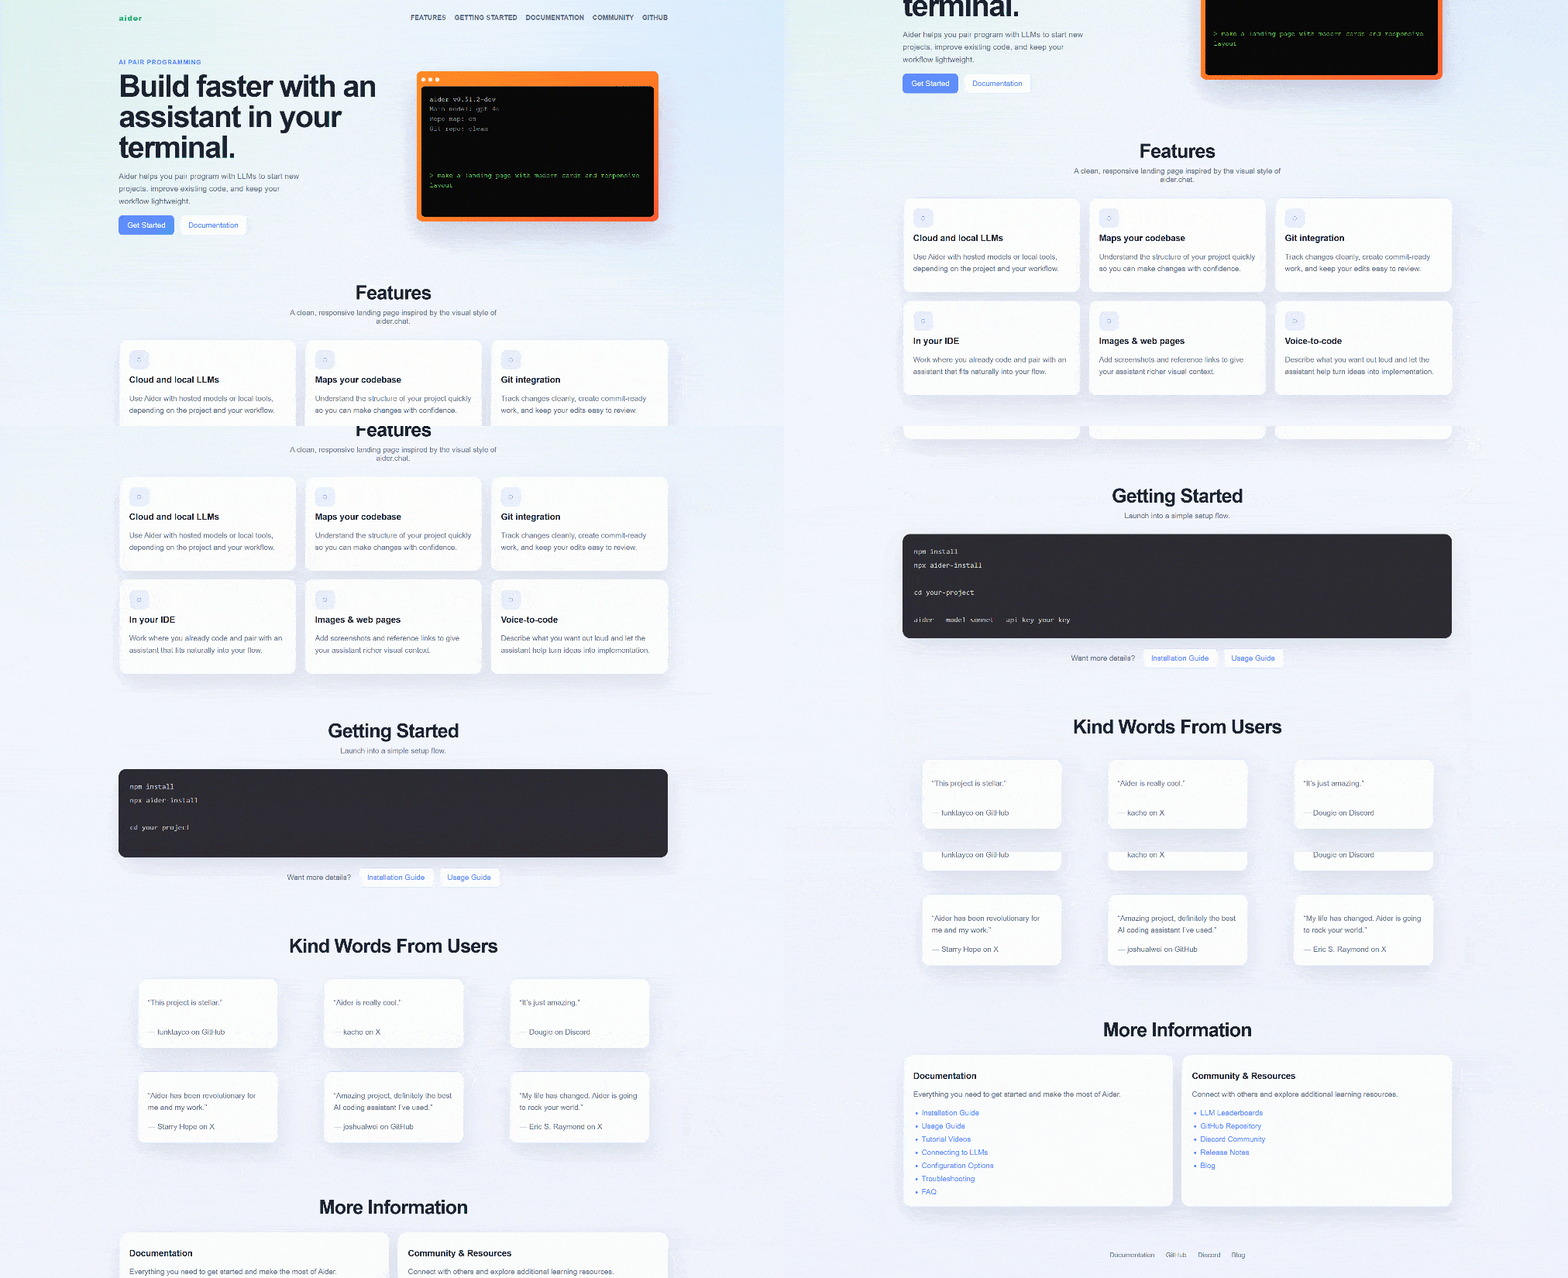
npm run devOpen http://localhost in your browser. You should see a website similar to the following:
For comparison, this is the original aider.chat homepage that the model used as inspiration:
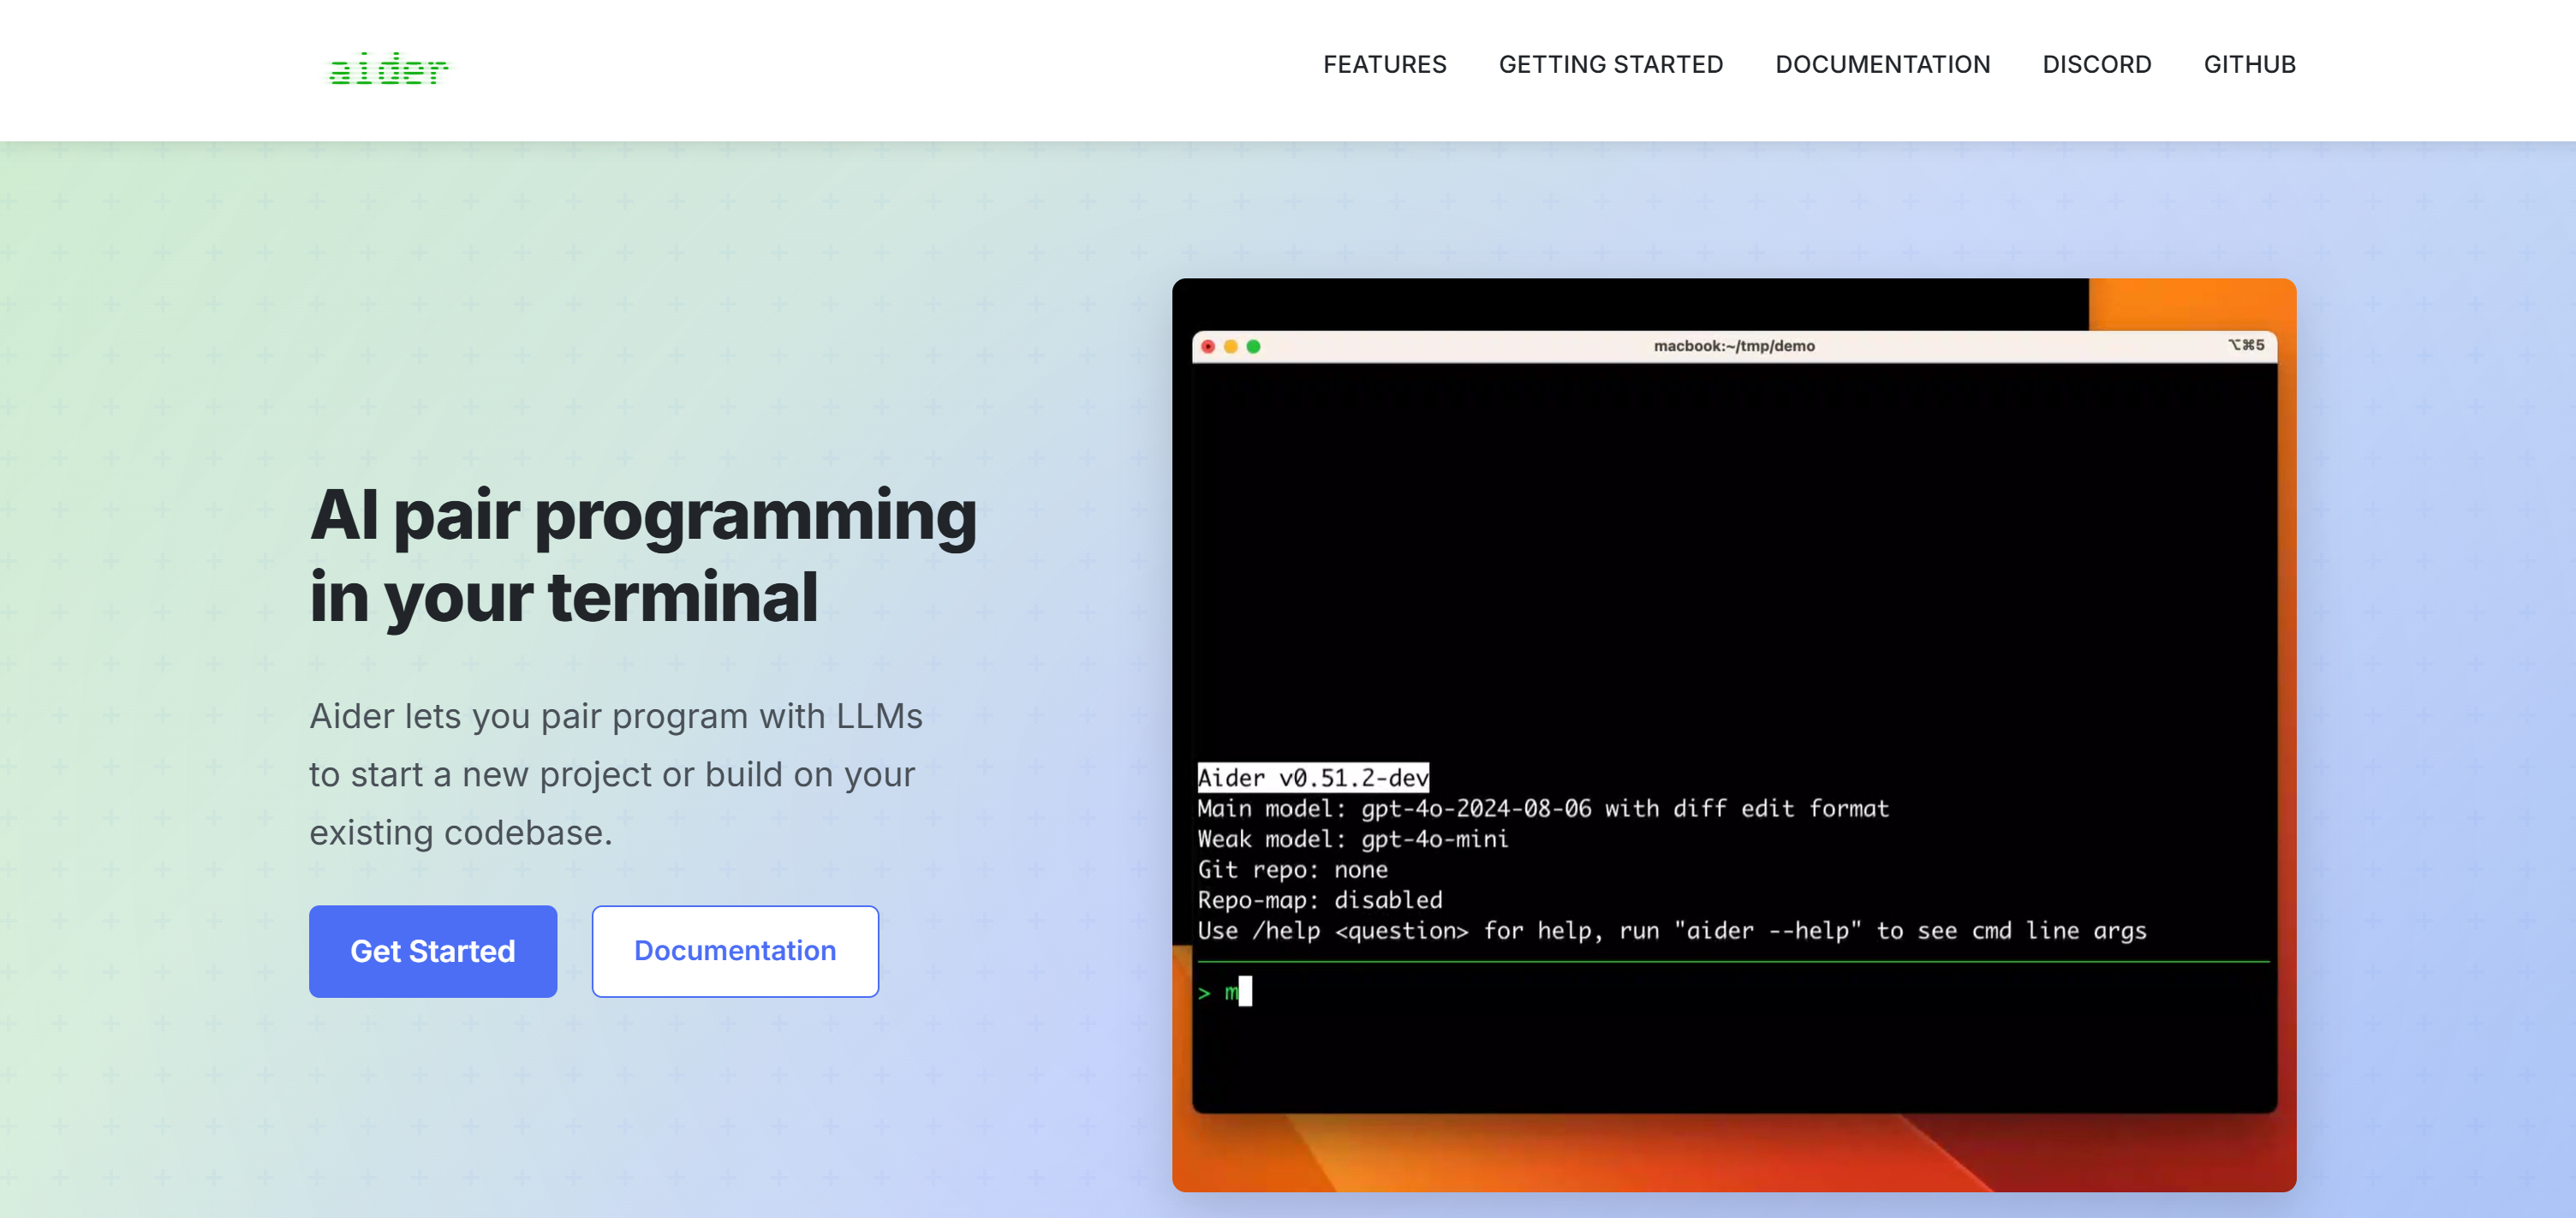
The generated application successfully reproduces the overall layout, structure, and visual style of the original website.
Important: The workflow was only possible thanks to Bright Data’s ability to capture screenshots of any web page, including those protected by anti-bots.
Note that this was only a simple example. You can use the same Bright Data CLI + Aider setup for many other tasks, including:
- Analyzing competitors’ websites.
- Grounding the LLM with up-to-date documentation before implementing new features.
- Scraping product pages, reviews, or documentation for grounding and analysis.
- Performing SEO audits and asking the LLM to implement recommended improvements.
- Researching APIs, libraries, and frameworks on the web before generating code.
- Extracting structured data from websites and using it to build dashboards or internal tools.
- Interacting with JavaScript-heavy or bot-protected websites that standard browser automation tools cannot reliably access via the Browser API CLI commands.
Et voilà! You have learned how to combine the Bright Data CLI with Aider to give your AI pair programmer enterprise-grade web capabilities. Aider can now scrape websites, search the web, interact with modern web applications, and ground its responses with fresh, real-world info.
Conclusion
In this blog post, you understood what Aider is and why giving it access to the web makes it a more reliable and accurate. In particular, you saw how the Bright Data CLI extends it with production-ready tools for web scraping, search, discovery, and browser automation.
Through a hands-on example, you learned how to expose those CLI tools to Aider. This way, it can retrieve up-to-date information from the web. Install the Bright Data CLI and get started with its free plan, which includes up to 5,000 requests per month.
Sign up for Bright Data and start exploring its AI-ready web access and data collection tools!



Technical Writer
 5.5 years experience
Antonello Zanini is a technical writer, editor, and software engineer with 5M+ views. Expert in technical content strategy, web development, and project management.