









In this tutorial, you will learn:
- How to set up Snowflake to receive data from Bright Data’s delivery infrastructure.
- Configure the Goodreads Books dataset to deliver directly into a Snowflake internal stage.
- Trigger a snapshot and load it into a queryable table, then run SQL against 6+ million book records.
Let’s dive in!
Presenting the Snowflake Ingestion Workflow
At a high level, the pipeline has three phases, each covered in its own section:
- Snowflake setup: Create the database, stage, role, and service user that Bright Data will authenticate against. This is the most SQL-heavy part, but each command is given in full and runs in order.
- Bright Data configuration: Pick a dataset from the marketplace, connect it to your Snowflake environment, and trigger a snapshot. Bright Data pushes the files directly into your internal stage.
- Load and query: A single
COPY INTOcommand moves the staged files into a structured table. The rest is standard SQL.
The output is a fully queryable Snowflake table populated with structured web data, refreshed on whatever schedule your use case requires. No CSV exports, no custom ETL glue code.
Learn more about each phase and how to implement them!
1. Snowflake Setup
Bright Data delivers files by authenticating directly into your Snowflake account. This requires a dedicated internal stage (a landing zone for incoming files), a service role with write access to that stage, and a service user assigned to that role.
Using dedicated objects for this purpose keeps ingestion separate from your analytical workloads and makes it easier to audit, revoke, or rotate credentials later.
2. Bright Data Dataset Configuration and Snapshot Delivery
Bright Data’s Dataset Marketplace contains pre-built, validated datasets covering Amazon, LinkedIn, Crunchbase, Glassdoor, hotel listings, real estate, job postings, and more. Each dataset ships with a full field reference so you can design your Snowflake schema before the first byte arrives.
Direct Snowflake delivery is available for the Datasets product. If you are using the Web Scraper APIs instead, deliver files to an S3 bucket and load from an external stage.
Once you configure Snowflake as the delivery destination, Bright Data handles the transfer. It authenticates using the service user you created, stages the files into your internal stage, and logs the delivery in the control panel. You can trigger snapshots on demand, on a schedule, or via the Marketplace Dataset API.
3. Load and Query
With files in the stage, a single COPY INTO command loads them into your table. From there, you query using standard SQL with no special syntax and no new tooling.
Setting Up Snowflake to Receive Bright Data
Let’s start building the pipeline by preparing the Snowflake side. All commands in this section run inside Snowsight’s SQL worksheet or via SnowSQL. Run this first to ensure you have the privileges needed to create databases, roles, and users:
USE ROLE ACCOUNTADMIN;Prerequisites
To follow along with this section, you should have:
- A Snowflake account with
ACCOUNTADMINorSYSADMINprivileges. - Basic familiarity with the Snowflake UI (Snowsight).
Step #1: Create a Database and Schema
In Snowflake, a database is the top-level container for all your data objects. A schema sits inside a database and groups related tables, stages, and other objects together. Creating a dedicated database and schema for Bright Data keeps its objects separate from your existing data and makes permissions easier to manage.
CREATE DATABASE IF NOT EXISTS bright_data_db;
CREATE SCHEMA IF NOT EXISTS bright_data_db.web_data;
You can use an existing database if you prefer. Substitute its name wherever bright_data_db appears in the commands that follow.
Step #2: Create a Dedicated Warehouse
In Snowflake, a warehouse is the compute cluster that executes SQL statements, including COPY INTO. It is separate from storage, which means you only pay for compute while it is actively running. A dedicated warehouse for Bright Data ingestion keeps those compute costs visible and prevents ingestion workloads from competing with your analytical queries for resources.
CREATE WAREHOUSE IF NOT EXISTS bright_data_wh
  WAREHOUSE_SIZE = 'XSMALL'
  AUTO_SUSPEND = 60
  AUTO_RESUME = TRUE;
AUTO_SUSPEND = 60 shuts the warehouse down after 60 seconds of inactivity so it does not run idle between deliveries. AUTO_RESUME = TRUE brings it back up automatically when the next COPY INTO runs. XSmall handles most Bright Data deliveries comfortably. Resize if volumes grow.
Step #3: Create an Internal Named Stage
In Snowflake, a stage is a named location where files sit before being loaded into a table. An internal named stage lives inside Snowflake itself. No S3 bucket or external cloud storage required.
This stage is the bridge between Bright Data and your table. Rather than loading data directly into a table row by row, Bright Data deposits structured files (Parquet or JSON) into the stage first. Snowflake then reads those files in bulk via COPY INTO, which is significantly faster and more cost-efficient than row-level inserts. It also gives you a checkpoint: you can inspect the files in the stage, verify they look correct, and choose when to trigger the load.
CREATE STAGE IF NOT EXISTS bright_data_db.web_data.bright_data_stage
  COMMENT = 'Landing zone for Bright Data dataset deliveries';
Step #4: Create a Role and Grant It the Right Permissions
In Snowflake, a role is a collection of privileges that can be assigned to users. Rather than granting permissions directly to a user, you grant them to a role and assign that role to the user. This makes it easy to revoke or modify access later without touching the user account itself.
This role gives Bright Data exactly the access it needs and nothing more.
CREATE ROLE IF NOT EXISTS bright_data_loader;

-- Allow the role to use the database and schema
GRANT USAGE ON DATABASE bright_data_db TO ROLE bright_data_loader;
GRANT USAGE ON SCHEMA bright_data_db.web_data TO ROLE bright_data_loader;

-- Allow the role to use and operate the warehouse
GRANT USAGE ON WAREHOUSE bright_data_wh TO ROLE bright_data_loader;
GRANT OPERATE ON WAREHOUSE bright_data_wh TO ROLE bright_data_loader;

-- Allow the role to write files into the stage
-- READ must be granted alongside WRITE; Snowflake requires it for COPY INTO ... FROM @stage
GRANT READ ON STAGE bright_data_db.web_data.bright_data_stage
  TO ROLE bright_data_loader;
GRANT WRITE ON STAGE bright_data_db.web_data.bright_data_stage
  TO ROLE bright_data_loader;
Here is what each grant does and why it is required:
- USAGE on database and schema: Allows the role to see and navigate to the objects inside them. Without this, Snowflake will return an “object does not exist” error even if the role has privileges on the stage directly.
- USAGE on warehouse: Allows the role to execute SQL statements against the warehouse. This is what lets
COPY INTOactually run. - OPERATE on warehouse: Allows the role to resume the warehouse if it has been suspended. Without this, an auto-suspended warehouse will not come back up when Bright Data triggers a load.
- READ on stage: Required for
COPY INTOto read the files out of the stage and into the table. - WRITE on stage: Required for Bright Data to deposit files into the stage in the first place.
Step #5: Create the Bright Data Service User
A service user is a Snowflake account created for a system or application rather than a person. Using a dedicated service user means Bright Data’s access is isolated from any human user accounts, and you can rotate or revoke its credentials without affecting anyone else.
CREATE USER IF NOT EXISTS brightdata_svc
  PASSWORD = 'YourStrongPasswordHere'
  LOGIN_NAME = 'brightdata_svc'
  DEFAULT_ROLE = bright_data_loader
  DEFAULT_WAREHOUSE = bright_data_wh
  DEFAULT_NAMESPACE = bright_data_db.web_data
  MUST_CHANGE_PASSWORD = FALSE
  DISABLED = FALSE
  COMMENT = 'Service user for Bright Data dataset delivery';

GRANT ROLE bright_data_loader TO USER brightdata_svc;
MUST_CHANGE_PASSWORD = FALSE prevents Snowflake from prompting for a password reset on first login, which would break an automated connection. DEFAULT_ROLE, DEFAULT_WAREHOUSE, and DEFAULT_NAMESPACE ensure the service user always connects with the right context regardless of how the session is initiated. The final line assigns the bright_data_loader role to this user, giving it exactly the privileges defined in Step #4.
Store the username and password securely. You will paste them into the Bright Data control panel in the next section.
Step #6: Allowlist Bright Data’s IPs (if you use a Network Policy)
If your Snowflake account enforces a Network Policy, Bright Data’s delivery servers need to be added to the allowed list. The IPs below were current at the time of writing. Verify the latest ranges with Bright Data support or their documentation before applying, as static IPs can change:
ALTER NETWORK POLICY your_policy_name
  SET ALLOWED_IP_LIST = (
    -- paste your existing allowed IPs here,
    '35.169.71.210',
    '34.233.211.38',
    '44.194.183.74',
    '54.243.177.151'
  );
If your account has no active Network Policy, skip this step.
Step #7: Create the Target Table
This tutorial uses Goodreads book data as the example. The schema below maps directly to the field names Bright Data’s Goodreads Books dataset delivers in JSON:
CREATE TABLE IF NOT EXISTS bright_data_db.web_data.goodreads_books (
  id               VARCHAR,        -- Goodreads book ID
  name             VARCHAR,        -- book title
  url              VARCHAR,
  author           VARIANT,        -- array: [{name, num_books, num_followers}]
  star_rating      FLOAT,          -- average rating 1-5
  num_ratings      INT,            -- total number of ratings
  num_reviews      VARCHAR,        -- total reviews (may be formatted, e.g. "1,234")
  summary          VARCHAR,        -- book description/blurb
  genres           VARIANT,        -- array of genre strings
  first_published  VARCHAR,        -- publication date as text
  about_author     VARIANT,        -- object: {name, num_books, num_followers}
  community_reviews VARIANT        -- object: {5_stars, 4_stars, ...} with counts and percentages
);
VARIANT is Snowflake’s semi-structured type. It stores arrays and nested objects as-is and lets you query into them using dot notation and bracket syntax (author[0]:name, community_reviews['5_stars']:reviews_num). This avoids flattening complex nested fields at load time. You can do that later with a view or a LATERAL FLATTEN once you know which sub-fields you need.
A few field decisions worth understanding:
authoras VARIANT: Each book can have multiple authors. The field arrives as an array of objects. Storing it as VARIANT preserves all author data without requiring a separate join table.genresas VARIANT: Genre is also an array. A book can belong to multiple genres. Flatten it withLATERAL FLATTEN(INPUT => genres)when you need to query by genre.num_reviewsas VARCHAR: Bright Data’s data dictionary marks this field as Text rather than Number, meaning it may arrive formatted (e.g."1,234"rather than1234). Cast it at query time withTO_NUMBER(REPLACE(num_reviews, ',', ''))if you need to aggregate on it.community_reviewsas VARIANT: Contains a breakdown of ratings by star level, each with a count and a percentage. Store as VARIANT and query specific star levels as needed.
Note: If you pick a different dataset from the marketplace (LinkedIn companies, job postings, Amazon products, and so on), adjust the schema to match its field list. Bright Data provides a full field reference for every dataset on its dataset page in the control panel.
Excellent! Your Snowflake environment is now ready to receive data from Bright Data.
Configuring Bright Data to Deliver to Snowflake
With the Snowflake side in place, let’s configure Bright Data to push data into it.
Prerequisites
To follow along with this section, you should have:
- A Bright Data account with an active subscription or trial.
- The Snowflake connection details from the previous section: account identifier, username, password, database, schema, stage, and warehouse names.
Step #1: Pick a Dataset
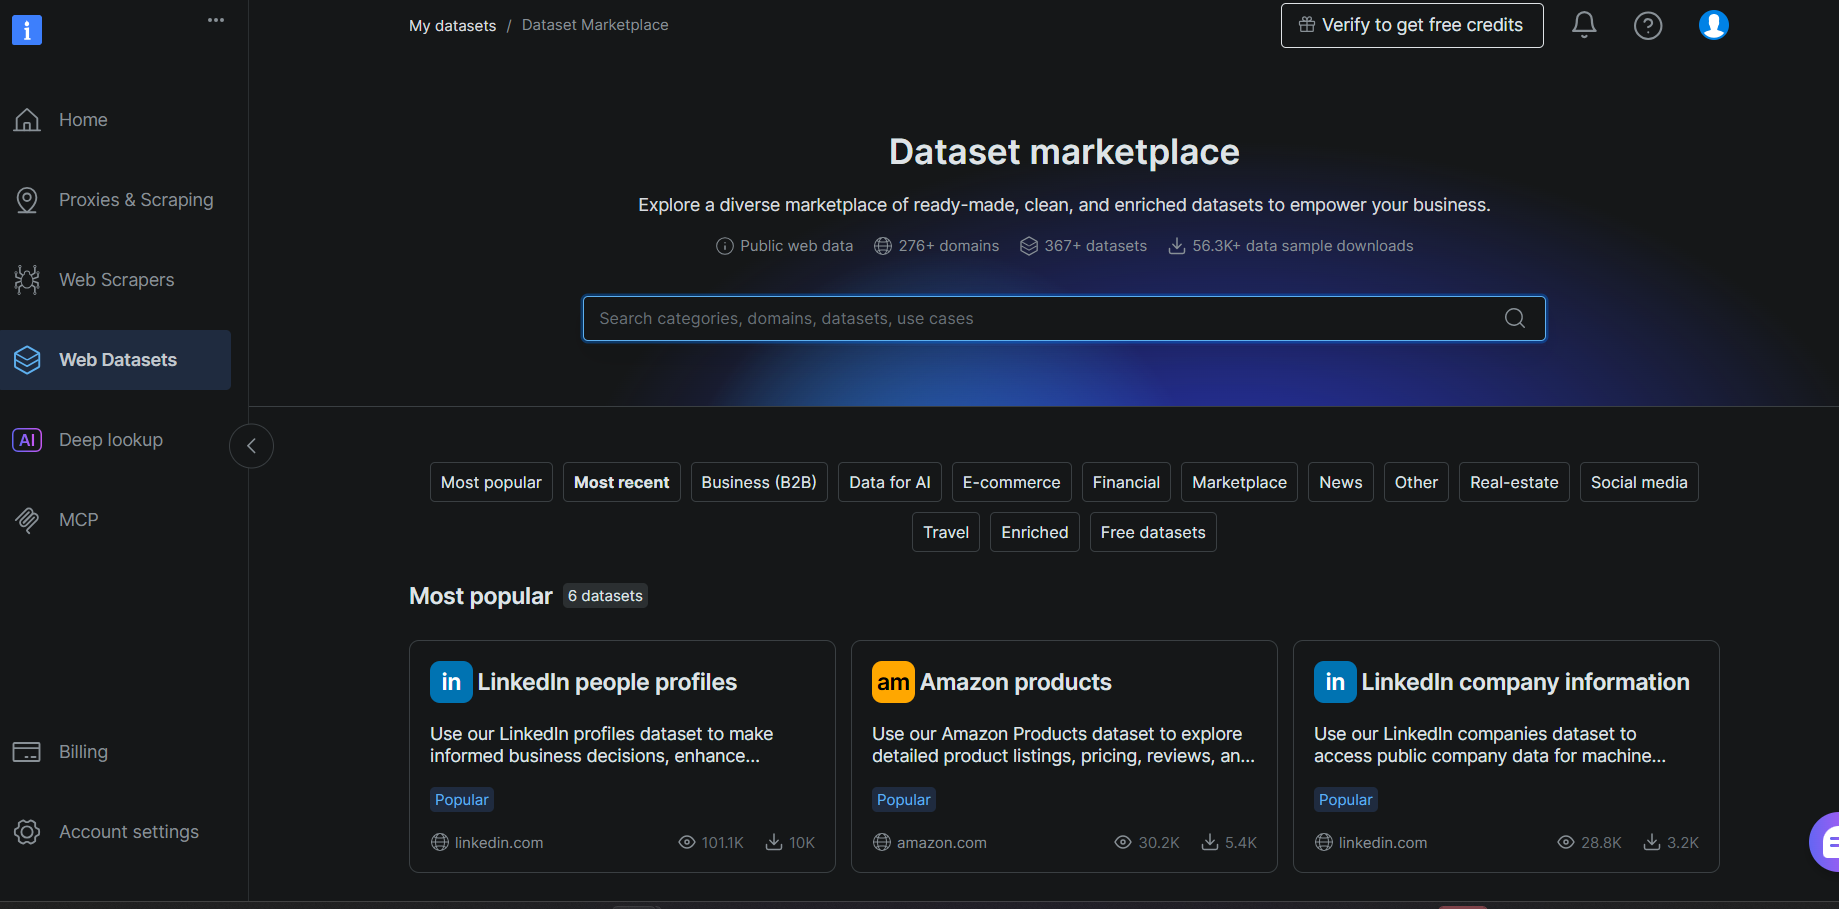
Log into your Bright Data account and navigate to Web Datasets > Dataset Marketplace. Search for Goodreads and select the Goodreads Books dataset from the results.
On the dataset page, review the field list in the left panel. Notice how every field maps directly to a column in the table you created in Step #7. This confirms your schema is correct before a single row arrives.
Step #2: Configure Snowflake as the Delivery Destination
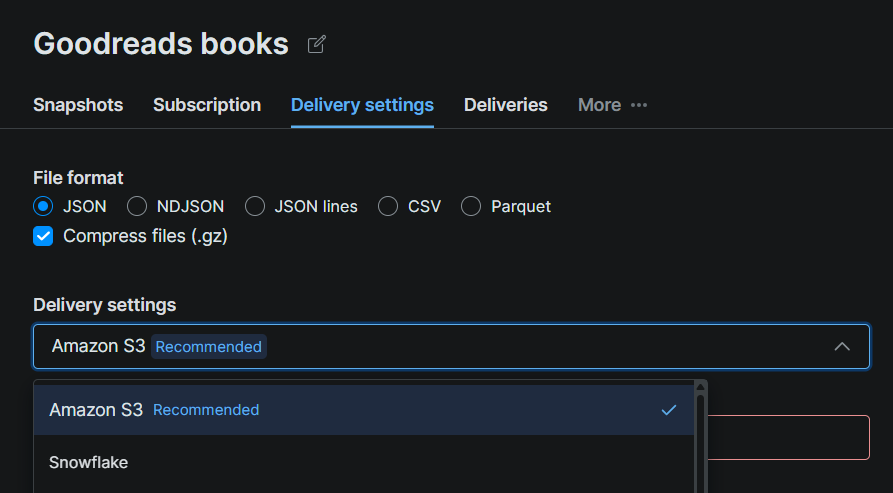
Click the Delivery Settings tab on the dataset page and select Snowflake as the destination. Fill in the connection form with the details from your Snowflake setup:
| Field | Value |
|---|---|
| Account identifier | Your Snowflake account URL (e.g. xy12345.us-east-1) |
| Database | bright_data_db |
| Schema | web_data |
| Stage | bright_data_stage |
| Warehouse | bright_data_wh |
| Role | bright_data_loader |
| User | brightdata_svc |
| Password | The password you set in Step #5 |
The three fields below the connection form are optional and can be left at their defaults for this tutorial:
- Dataset file name: A custom prefix for the files Bright Data stages. Leave blank to use the default naming.
- Batch size (number of records): How many records Bright Data packs into each staged file. The default is suitable for most workloads.
- Group batches into one file (.tar): Combines all batches into a single archive before staging. Leave unchecked unless your pipeline specifically requires a single file per delivery.
Click Test Snowflake. A green confirmation means Bright Data can authenticate and write to your stage. Once the test passes, click Save.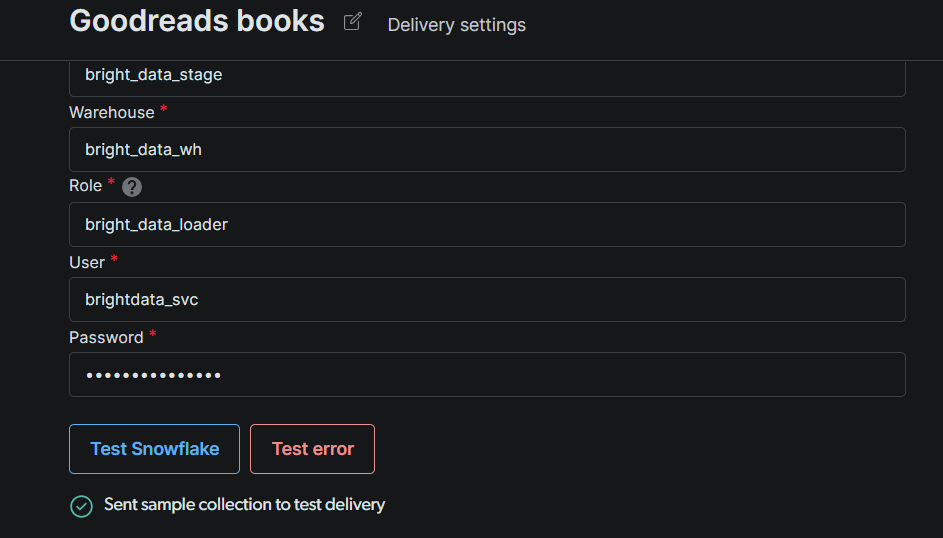
Note: If the test fails, check three things in order: (1) the account identifier format (Snowflake expects orgname-accountname or the legacy accountid.region.cloud format); (2) whether the service user has all the grants from Step #4, including the Role assignment; (3) whether Bright Data’s IPs are allowlisted if your account has a Network Policy active.
Step #3: Request a Snapshot
On the dataset page, click the Deliveries tab. Then click Add delivery + in the top right corner. This opens a delivery configuration panel where you select your destination (Snowflake), choose a snapshot or date range to deliver, and confirm.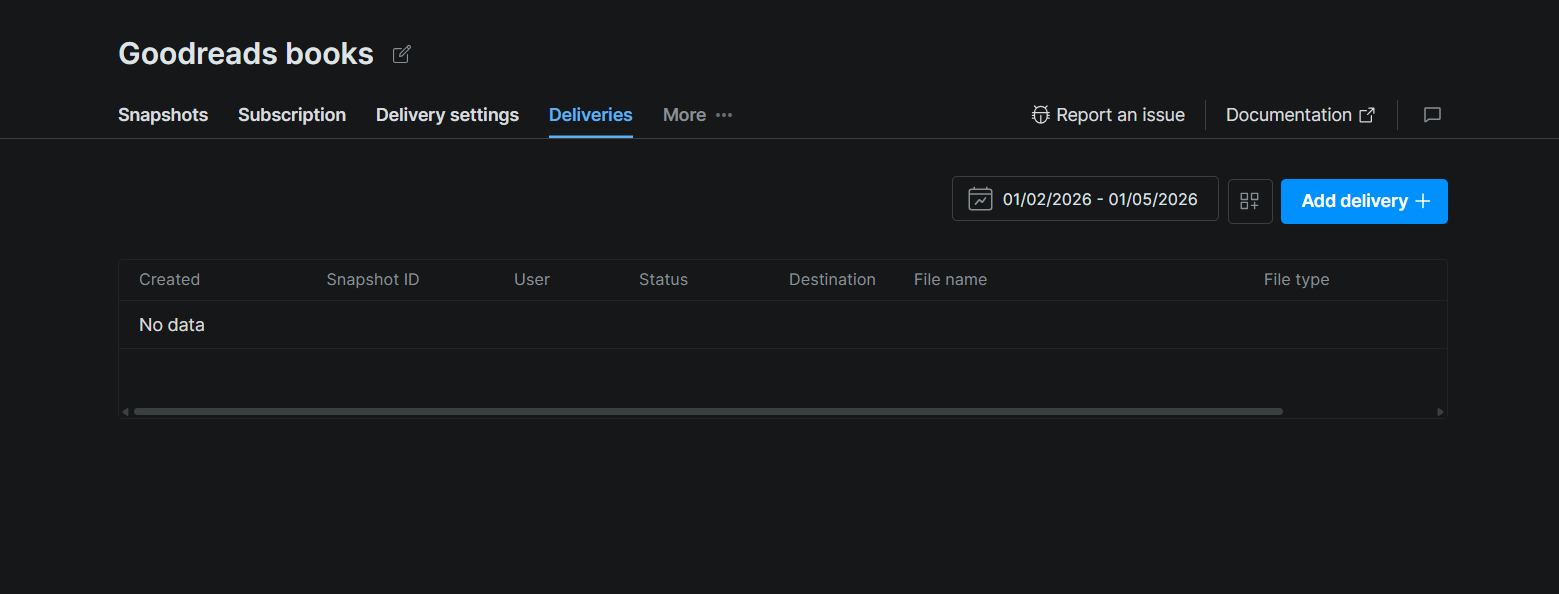
Once submitted, the delivery appears in the table with columns for Snapshot ID, Status, Destination, File name, and File type. Status will move from pending to complete when Bright Data has finished pushing the files to your stage.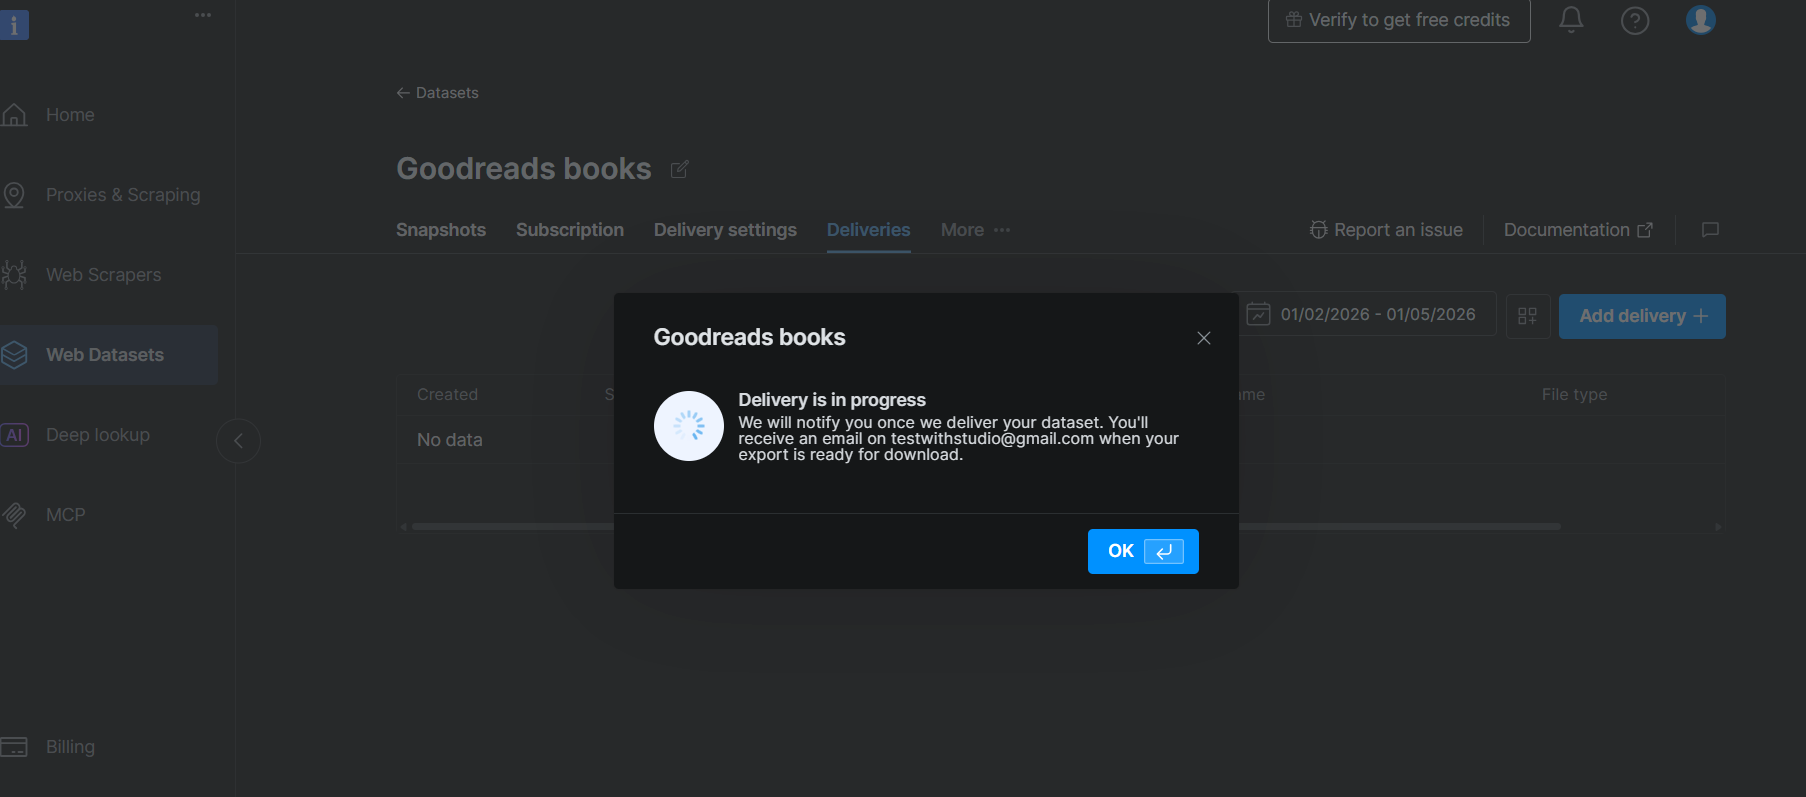
To trigger deliveries programmatically, the Marketplace Dataset API uses a two-step flow: first call the Filter API to create a filtered snapshot, then call Deliver Snapshot to push it to your Snowflake stage.
Step 1: Create a filtered snapshot:
curl --request POST \
  --url "https://api.brightdata.com/datasets/filter" \
  --header "Authorization: Bearer YOUR_API_TOKEN" \
  --header "Content-Type: application/json" \
  --data '{
    "dataset_id": "YOUR_DATASET_ID",
    "filter": {
      "operator": "and",
      "filters": [
        {"name": "star_rating", "operator": ">", "value": "4"},
        {"name": "num_ratings", "operator": ">", "value": "1000"}
      ]
    }
  }'
The response contains a snapshot_id. Pass that to the next call.
Step 2: Deliver the snapshot to your Snowflake stage:
curl --request POST \
  --url "https://api.brightdata.com/datasets/snapshots/YOUR_SNAPSHOT_ID/deliver" \
  --header "Authorization: Bearer YOUR_API_TOKEN" \
  --header "Content-Type: application/json" \
  --data '{
    "destination": "snowflake"
  }'
Bright Data will use the format configured for your dataset by default. If you want to specify it explicitly, add "format": "parquet" or "format": "ndjson" to the request body. Whatever format arrives in the stage is the one you pass to FILE_FORMAT in COPY INTO.
Poll GET /datasets/snapshots/YOUR_SNAPSHOT_ID to check delivery status, or monitor it in the Deliveries tab of the control panel. When the Status column shows complete, your files are in the stage and ready to load. Great!
When delivery finishes, you will also receive an email with a link to the snapshot page in the control panel. There, you can preview the first 30 records, check the total record count, and download a cost summary report. At $2.50 per 1,000 records, the report shows you exactly how many records arrived and what they cost. Great!
Loading the Data into Snowflake
Bright Data’s job ends when the files land in your internal stage. Loading them into the table is your responsibility, and it takes one SQL command. This separation is worth understanding: it means you control when the load runs, what error handling applies, and how often you refresh the table.
Prerequisites
To follow along with this section, you should have:
- Completed the Snowflake setup and Bright Data configuration sections above.
- Confirmed that a snapshot delivery has finished (via email or the snapshot page in the Bright Data control panel).
Step #1: Confirm Files Arrived in the Stage
Run this before anything else:
LIST @bright_data_db.web_data.bright_data_stage;You should see one or more files listed with their sizes and timestamps. If the stage is empty, the snapshot has not finished delivering yet. Check its status on the snapshot page in the Bright Data control panel.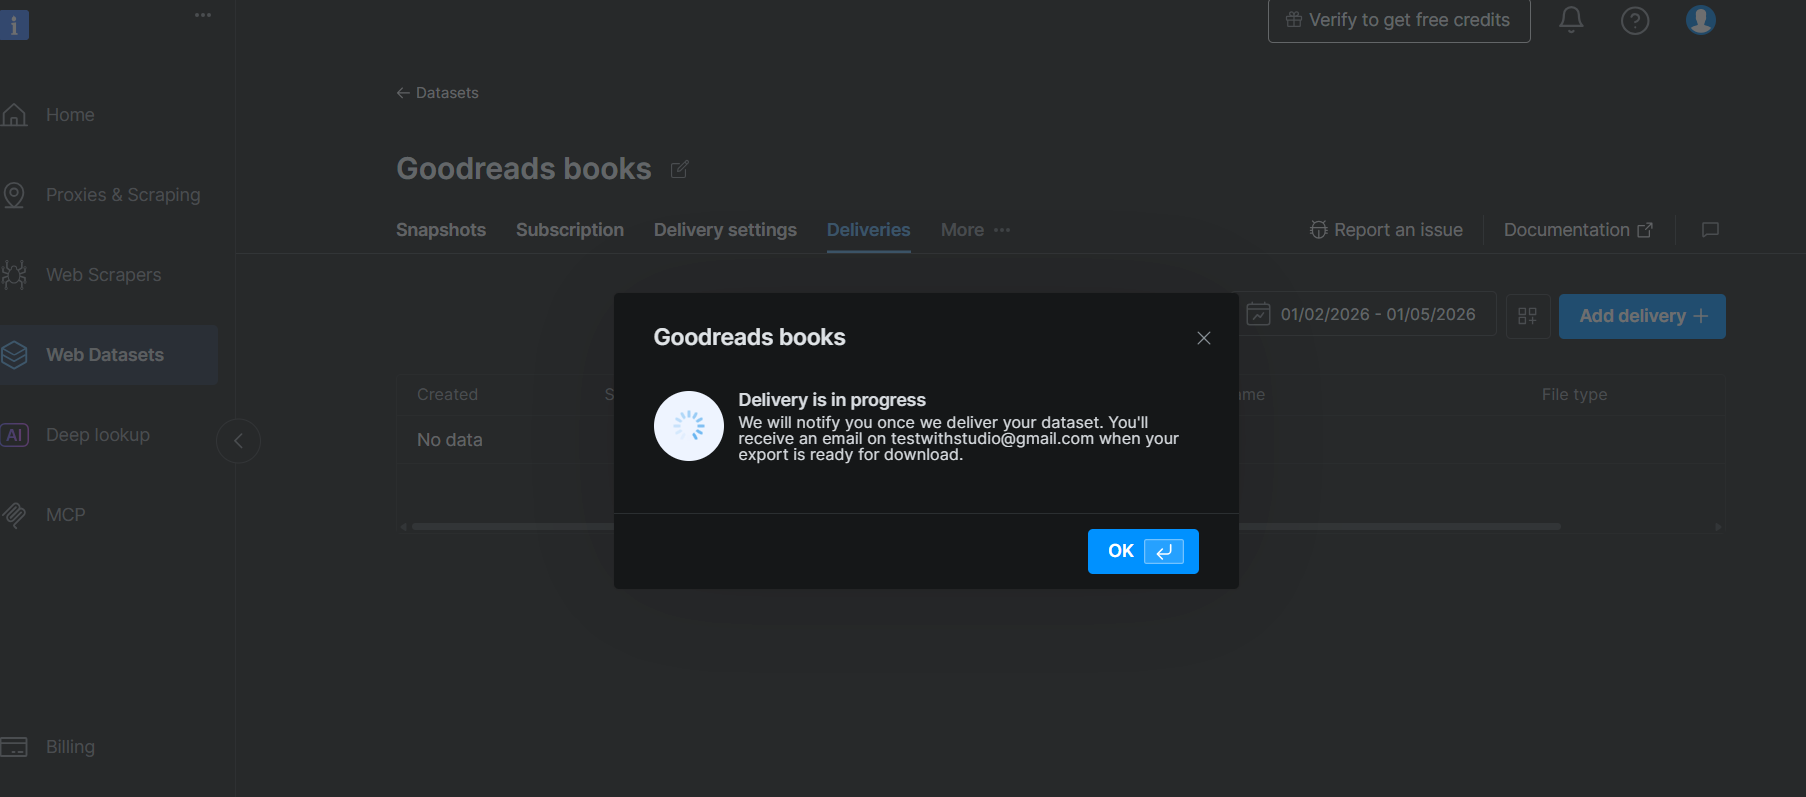
Note the file extension in the results. The format Bright Data uses for delivery determines the FILE_FORMAT you pass to COPY INTO in the next step. For UI-triggered snapshots, Bright Data typically delivers NDJSON unless you specified otherwise when configuring the delivery. For API-triggered snapshots using the deliver-snapshot endpoint, the format is whatever you passed in the request body. If you see .parquet files, use TYPE = 'PARQUET'. If you see .json or .ndjson files, use TYPE = 'JSON'.
Step #2: Load the Files into the Table
For Parquet files:
COPY INTO bright_data_db.web_data.goodreads_books
FROM @bright_data_db.web_data.bright_data_stage
FILE_FORMAT = (TYPE = 'PARQUET')
MATCH_BY_COLUMN_NAME = CASE_INSENSITIVE
ON_ERROR = 'CONTINUE';
For JSON or NDJSON files:
COPY INTO bright_data_db.web_data.goodreads_books (
  id, name, url, author, star_rating, num_ratings,
  num_reviews, summary, genres, first_published,
  about_author, community_reviews
)
FROM (
  SELECT
    $1:id::VARCHAR,
    $1:name::VARCHAR,
    $1:url::VARCHAR,
    $1:author::VARIANT,
    $1:star_rating::FLOAT,
    $1:num_ratings::INT,
    $1:num_reviews::VARCHAR,
    $1:summary::VARCHAR,
    $1:genres::VARIANT,
    $1:first_published::VARCHAR,
    $1:about_author::VARIANT,
    $1:community_reviews::VARIANT
  FROM @bright_data_db.web_data.bright_data_stage
)
FILE_FORMAT = (TYPE = 'JSON' STRIP_OUTER_ARRAY = TRUE)
ON_ERROR = 'CONTINUE';
MATCH_BY_COLUMN_NAME (Parquet only) maps column names automatically so order does not matter. ON_ERROR = CONTINUE skips malformed rows rather than aborting the entire load.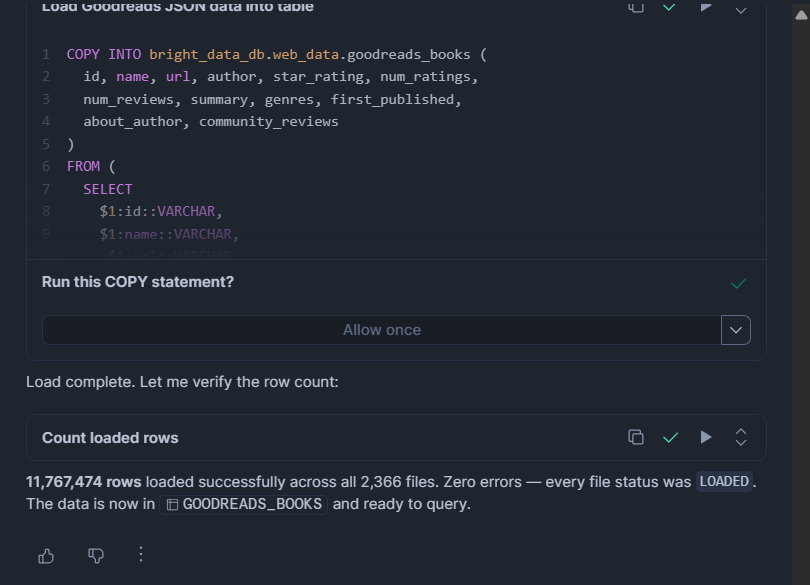
Step #3: Verify the Load
-- Count the loaded rows
SELECT COUNT(*) FROM bright_data_db.web_data.goodreads_books;

-- Check for skipped rows or errors in the last hour
SELECT *
FROM TABLE(BRIGHT_DATA_DB.INFORMATION_SCHEMA.COPY_HISTORY(
  TABLE_NAME => 'BRIGHT_DATA_DB.WEB_DATA.GOODREADS_BOOKS',
  START_TIME => DATEADD(HOURS, -1, CURRENT_TIMESTAMP())
));
COPY_HISTORY shows rows loaded, rows skipped, file names processed, and the exact error message for any row that failed. Review this after every load, especially the first time.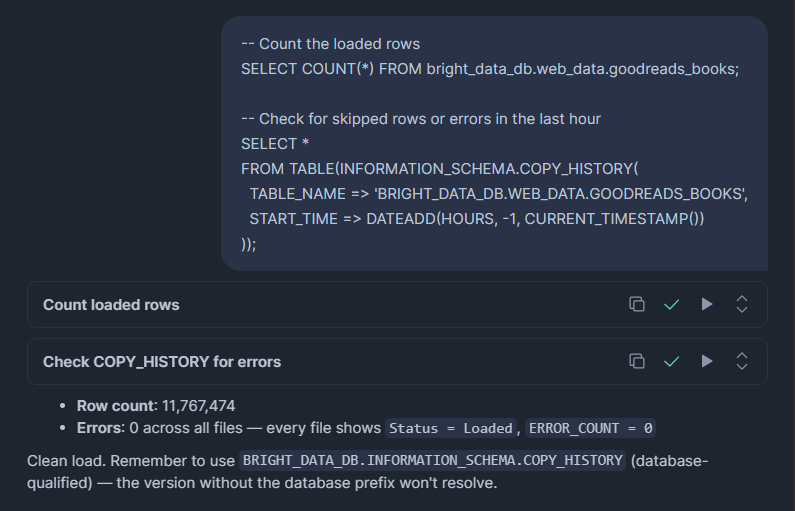
Querying the Data
With Goodreads book data in Snowflake, the value is understanding reading trends, author performance, and genre popularity at scale across millions of titles. The queries below reflect those use cases directly.
Inspect the raw data
Before writing analytical queries, verify the data looks as expected:
SELECT id, name, url, star_rating, num_ratings, first_published
FROM bright_data_db.web_data.goodreads_books
LIMIT 10;
RESULT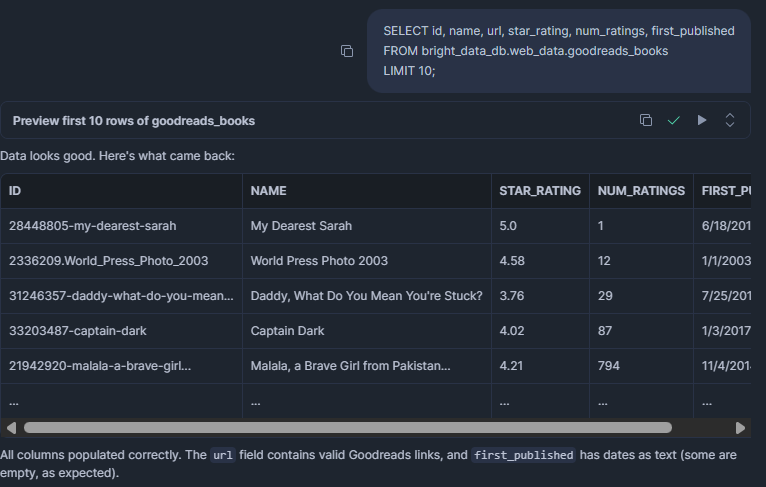
Which books have the strongest reader validation?
A high star_rating alone is not enough. A book with 4.8 stars from 12 people tells you very little. This query surfaces books that are both highly rated and widely read, which is the combination that signals a book has genuine staying power.
SELECT
  name,
  author[0]:name::VARCHAR       AS primary_author,
  star_rating,
  num_ratings,
  first_published
FROM bright_data_db.web_data.goodreads_books
WHERE num_ratings > 10000
  AND star_rating >= 4.5
ORDER BY num_ratings DESC
LIMIT 20;
Result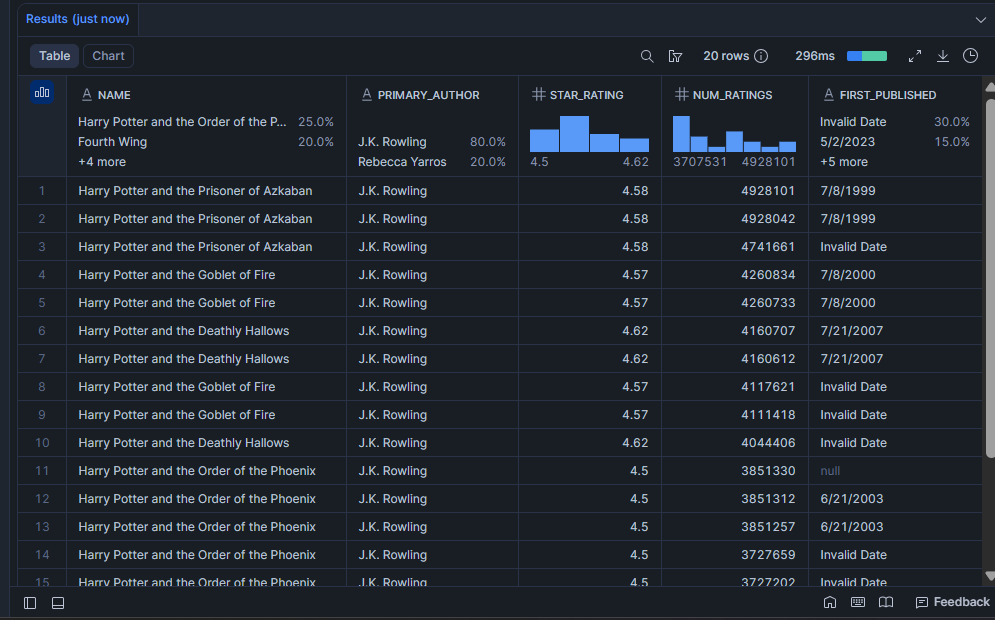
Which genres have the most titles and the highest average rating?
Useful for understanding where reader demand is concentrated. A genre with a large number of titles but a low average rating may be flooded with low-quality entries, which is an opportunity for publishers or recommendation engines.
SELECT
  g.value::VARCHAR              AS genre,
  COUNT(*)                      AS book_count,
  ROUND(AVG(star_rating), 2)    AS avg_rating,
  SUM(num_ratings)              AS total_ratings
FROM bright_data_db.web_data.goodreads_books,
  LATERAL FLATTEN(INPUT => genres) g
WHERE g.value IS NOT NULL
GROUP BY genre
ORDER BY total_ratings DESC
LIMIT 15;
Result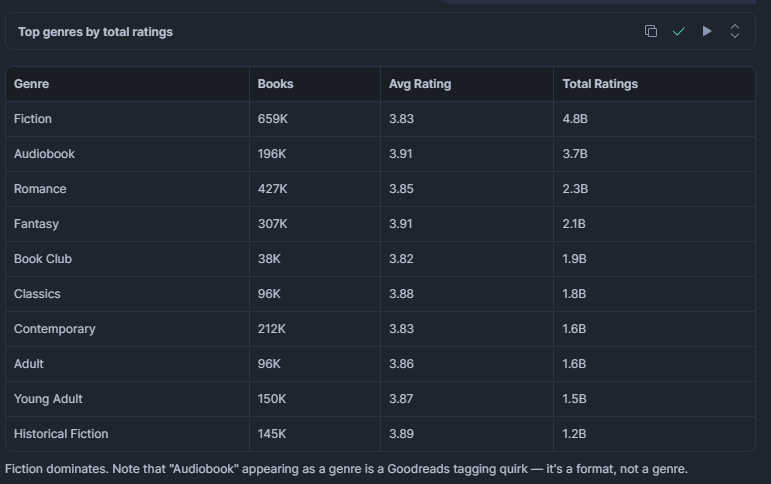
Who are the most-followed authors in the dataset?
Author follower count is a proxy for platform audience. Pairing it with average book rating shows whether the most-followed authors are also the most respected, or whether follower count and quality diverge.
about_author is a flat object on each book record, making it straightforward to query without array indexing. Note that this reflects the author as described on that specific book’s page, which may differ slightly from author (the array of credited authors).
SELECT
  about_author:name::VARCHAR          AS author_name,
  about_author:num_books::INT         AS books_published,
  about_author:num_followers::VARCHAR AS followers,
  ROUND(AVG(star_rating), 2)          AS avg_book_rating,
  SUM(num_ratings)                    AS total_ratings_received
FROM bright_data_db.web_data.goodreads_books
WHERE about_author:name IS NOT NULL
GROUP BY author_name, books_published, followers
ORDER BY followers DESC NULLS LAST
LIMIT 20;
Resut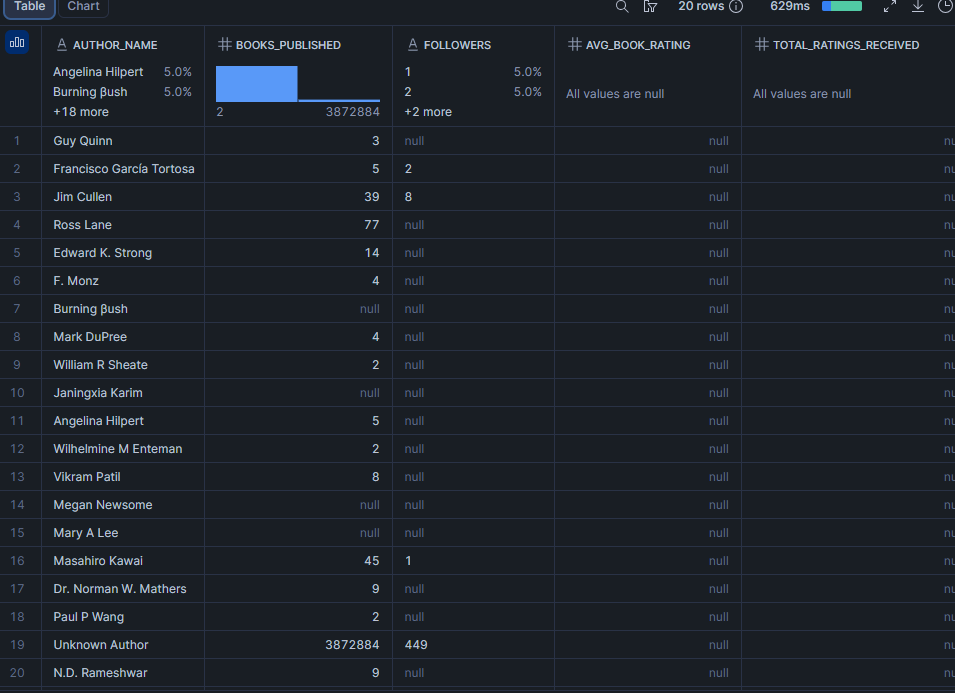
Note: followers is sorted as text because the source field is VARCHAR (it may contain formatted values like "12.3k"). If your dataset delivers a clean integer, cast it with TO_NUMBER(followers) and sort numerically.
How polarising is a book? Extract star breakdown from community reviews
A book with a high average rating but a large share of 1-star reviews may be controversial rather than universally loved. This query pulls the rating distribution for any specific book.
SELECT
  name,
  star_rating,
  num_reviews,
  community_reviews['5_stars']:reviews_num::INT       AS five_star_count,
  community_reviews['4_stars']:reviews_num::INT       AS four_star_count,
  community_reviews['3_stars']:reviews_num::INT       AS three_star_count,
  community_reviews['2_stars']:reviews_num::INT       AS two_star_count,
  community_reviews['1_stars']:reviews_num::INT       AS one_star_count,
  community_reviews['1_stars']:reviews_percentage::FLOAT AS one_star_pct
FROM bright_data_db.web_data.goodreads_books
WHERE id = 'YOUR_BOOK_ID';  -- substitute the Goodreads book ID
num_reviews gives the total written review count alongside the star breakdown, useful for distinguishing books that attract lengthy written opinions from those that collect silent star ratings.
Et voilà! You now have a working pipeline that pulls structured web data from Bright Data and makes it queryable in Snowflake.
Automating Refreshes
For production use, you will want new snapshots to load automatically rather than manually running COPY INTO each time. Start with Option A. Only move to Option B if you need the table to update within seconds of delivery completing.
Option A: Snowflake Task for schedule-driven ingestion
A Snowflake Task runs COPY INTO on a cron schedule and requires no additional infrastructure. Set a matching delivery schedule in Bright Data so files are ready in the stage when the task fires.
CREATE TASK IF NOT EXISTS bright_data_db.web_data.load_goodreads_task
  WAREHOUSE = bright_data_wh
  SCHEDULE = 'USING CRON 0 6 * * * UTC'
AS
COPY INTO bright_data_db.web_data.goodreads_books
FROM @bright_data_db.web_data.bright_data_stage
FILE_FORMAT = (TYPE = 'PARQUET')
MATCH_BY_COLUMN_NAME = CASE_INSENSITIVE
ON_ERROR = 'CONTINUE';

ALTER TASK bright_data_db.web_data.load_goodreads_task RESUME;
Pro tip: On your first automated run, check COPY_HISTORY after the task fires to confirm the schedule timing aligns with when Bright Data finishes delivering. A task that runs before delivery completes will find an empty stage and load zero rows.
Option B: Snowpipe REST API for low-latency event-driven ingestion
Snowpipe loads files from the stage within seconds of them arriving, triggered programmatically via its insertFiles REST endpoint. Use this only if your use case requires near-real-time freshness. It adds meaningful setup complexity compared to Option A.
The setup has two parts. First, create the pipe:
CREATE PIPE IF NOT EXISTS bright_data_db.web_data.goodreads_pipe
AS
COPY INTO bright_data_db.web_data.goodreads_books
FROM @bright_data_db.web_data.bright_data_stage
FILE_FORMAT = (TYPE = 'PARQUET')
MATCH_BY_COLUMN_NAME = CASE_INSENSITIVE;
Note the absence of AUTO_INGEST = TRUE. For internal named stages, auto-ingest via cloud messaging is only available for AWS-hosted Snowflake accounts and is currently a preview feature. The REST API approach works on all cloud platforms.
Second, wire your webhook handler to list the staged files and submit them to Snowpipe when a snapshot is ready:
import snowflake.connector
from snowflake.ingest import SimpleIngestManager, StagedFile

SNOWFLAKE_ACCOUNT  = "your-account-identifier"
SNOWFLAKE_USER     = "brightdata_svc"
SNOWFLAKE_PASSWORD = "YourStrongPasswordHere"
PIPE_NAME          = "bright_data_db.web_data.goodreads_pipe"
STAGE_NAME         = "bright_data_db.web_data.bright_data_stage"

def handle_brightdata_webhook(snapshot_id: str):
    # Step 1: list files that arrived in the stage
    conn = snowflake.connector.connect(
        account=SNOWFLAKE_ACCOUNT,
        user=SNOWFLAKE_USER,
        password=SNOWFLAKE_PASSWORD,
    )
    cursor = conn.cursor()
    cursor.execute(f"LIST @{STAGE_NAME}")
    staged_files = [StagedFile(row[0], None) for row in cursor.fetchall()]
    cursor.close()
    conn.close()

    if not staged_files:
        print(f"No files found in stage for snapshot {snapshot_id}")
        return

    # Step 2: tell Snowpipe to load them
    ingest_manager = SimpleIngestManager(
        account=SNOWFLAKE_ACCOUNT,
        host=f"{SNOWFLAKE_ACCOUNT}.snowflakecomputing.com",
        user=SNOWFLAKE_USER,
        pipe=PIPE_NAME,
        private_key=open("rsa_key.p8", "rb").read(),  # Snowpipe REST requires key-pair auth
    )
    response = ingest_manager.ingest_files(staged_files)
print(f"Snowpipe response: {response}")Note: The Snowpipe REST API requires key-pair authentication, not password auth. Generate an RSA key pair, assign the public key to brightdata_svc in Snowflake (ALTER USER brightdata_svc SET RSA_PUBLIC_KEY='...'), and pass the private key file path above. Install the SDK with pip install snowflake-ingest.
Conclusion
In this article, you learned how to build a complete web data ingestion pipeline from Bright Data into Snowflake. The workflow:
- Prepares Snowflake with a dedicated database, stage, role, and service user that Bright Data authenticates against directly.
- Configures a Bright Data dataset with Snowflake as the delivery destination, with no intermediate storage required.
- Triggers a snapshot via the control panel’s Deliveries tab or the Dataset API, then monitors delivery status until files arrive in the stage.
- Loads the staged files into a structured Snowflake table with a single
COPY INTOcommand and queries the data with standard SQL.
The same setup works for any dataset in Bright Data’s marketplace: Amazon products, LinkedIn companies, job postings, hotel listings, Crunchbase records, and more. Each one follows the same delivery pattern; only the table schema changes.
Create a free Bright Data account today and start bringing live web data into your Snowflake environment!



Technical Writer
Arindam Majumder is a developer advocate, YouTuber, and technical writer who simplifies LLMs, agent workflows, and AI content for 5,000+ followers.