TL;DR: This tutorial will teach you how to extract data from a site in Ruby and why it is one of the most effective languages for web scraping.
This guide will cover:
- Is Ruby good for web scraping?
- Best Ruby web scraping gems
- Build a web scraper in Ruby
Is Ruby Good for Web Scraping?
Ruby is an interpreted, open-source, dynamically-typed programming language that supports functional, object-oriented, and procedural development. It is designed to be simple, with elegant syntax that is easy to write and natural to read. Its focus on productivity has made it a popular choice in several applications, including web scraping.
In particular, Ruby is an excellent choice for scraping because of the wide range of third-party libraries available. These are called “gems” and there is one for almost every task. When it comes to programmatically retrieving information from the Web, there are gems for downloading pages, analyzing their HTML content, and extracting data from them.
In summary, web scraping in Ruby is not only possible but also easy thanks to the many libraries available. Let’s find out which ones are the most popular!
Best Ruby Web Scraping Gems
Here are the three best web scraping libraries for Ruby:
- Nokogiri(鋸): A robust and flexible HTML and XML parsing library with a complete API for traversing and manipulating HTML/XML documents, making it easy to extract relevant data from them.
- Mechanize: A library with headless browser functionality that provides a high-level API for automating interaction with websites. It can store and send cookies, deal with redirects, follow links, and submit forms. Also, it provides a history to keep track of the sites visited.
- Selenium: A Ruby binding of the most popular framework for running automated tests on web pages. It can instruct a browser to interact with a website as a human user would. This technology plays a key role in bypassing anti-bot solutions and scraping sites that rely on JavaScript for rendering or retrieving data.
Prerequisites
Before writing some code, you need to install Ruby on your machine. Follow the guide below related to your operating system.
Install Ruby on macOS
By default, Ruby is included in macOS since version 10.11 (El Capitan), released in 2015. Considering that macOS natively relies on Ruby to provide some functionality, you should not touch it. Updating the native Ruby version with brew install ruby or update ruby mac is not recommended as it may break some built-in features.
Install Ruby on Windows
Download the RubyInstaller package, launch it, and follow the installation wizard to set up Ruby. A system restart may be required. As of Windows 10, you can also use the Windows Subsystem for Linux to install Ruby the instruction below.
Install Ruby on Linux
The best way to set up a Ruby environment in Linux is to install it via a package manager.
In Debian and Ubuntu, launch:
sudo apt-get install ruby-fullIn other distributions, the terminal command to run is different. Consult the guide on the official site to see all package management systems supported.
Regardless of what your OS is, you can now be able to verify that Ruby is working with:
ruby -vThis should print something like:
ruby 3.2.2 (2023-03-30 revision e51014f9c0)Great! You are now ready to get started with Ruby web scraping!
Build a Web Scraper in Ruby
In this section, you will see how to create a Ruby web scraper. This automated script will retrieve data from the Bright Data home page. In detail, it will:
- Connect to the target site
- Select the HTML elements of interest from the DOM
- Extract data from them
- Convert the scraped data to easy-to-explore formats, such as CSV and JSON
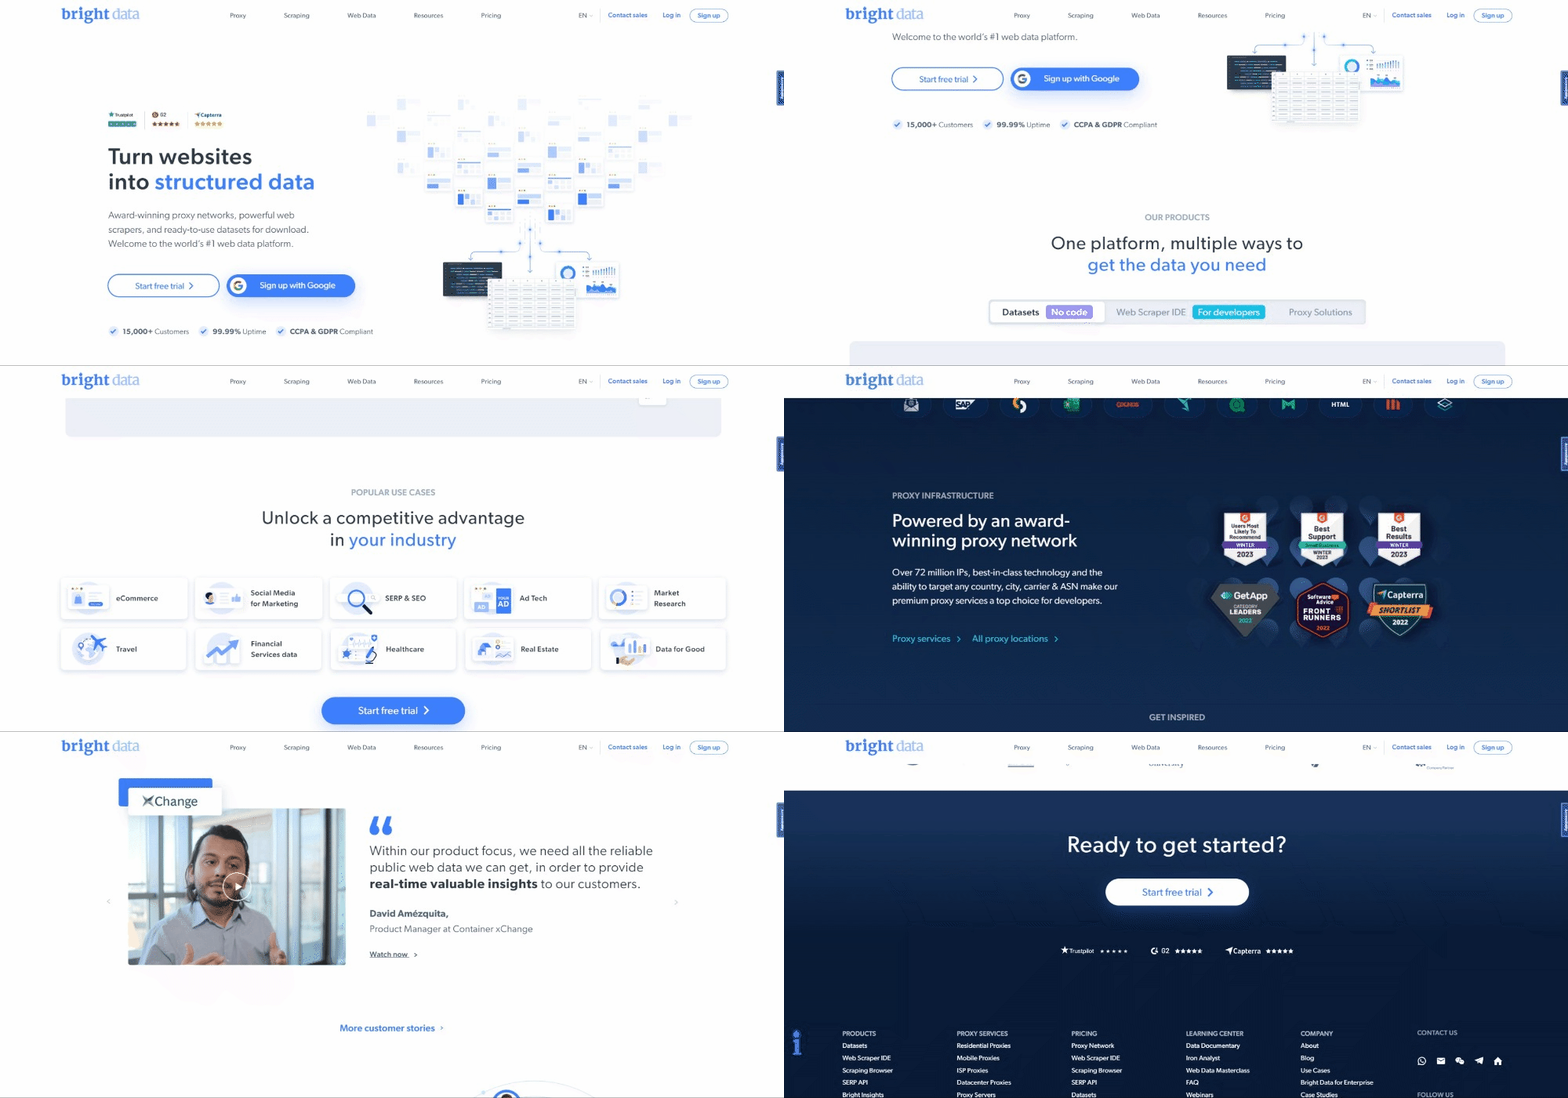
At the time of writing, this is what users see when they visit the target webpage:

Take into account that the BrightData home page changes frequently and may not be the same by the time you read this article.
The specific scraping goal is to get the use case info contained in the following cards:

Follow the step-by-step tutorial below and learn how to do web scraping with Ruby!
Step 1: Initialize a Ruby project
Before getting started, you need to set up your Ruby project. Launch the terminal, create the project folder, and enter it with:
mkdir ruby-web-scraper

cd ruby-web-scraper
The ruby-web-scraper directory will contain your scraper.
Next, initialize a scraper.rb file inside the project folder with the following content:
puts "Hello, World!"The snippet above is the easiest Ruby script possible.
Verify that it works by running in your terminal:
ruby scraper.rbThis should print this message:
Hello, World!Time to import your project in your IDE and start defining some advanced Ruby scraping logic! In this guide, you will see how to set up Visual Studio Code (VS Code) for Ruby development. At the same time, any other Ruby IDE will do.
Since VS Code does not support Ruby natively, you first have to add the Ruby extension. Start Visual Studio Code, click the “Extensions” icon in the left bar, and type “Ruby” in the search input on the top.

Click on the “Install” button on the first element to add Ruby highlighting capabilities to VS Code. Wait for the plugin to be added to the IDE. Then, open the ruby-web-scraper folder with “File,” “Open Folder…”
Click on the scraper.rb file under the “EXPLORER” bar to start editing the file:

Step 2: Choose the scraping library
Building a web scraper in Ruby becomes easier with the right library. For this reason, you should adopt one of the gems presented earlier. To figure out which web scraping Ruby library best fit your goals, you need to spend some time analyzing your target site.
For that reason, visit the target page in your browser, right-click on a blank spot in the background, and click on the “Inspect” option. This will launch your browser’s developer tools. In Chrome, reach the “Network” tab, and explore the “Fetch/XHR” section.

As you can note in the screenshot above, there are only seven AJAX requests. Dig into each XHR call and you will notice that they do not involve any meaningful data. This means that the target page does not retrieve content at rendering time. Thus, the HTML document returned by the server already contains all the data to show to users.
That proves that the target webpage does not use JavaScript for data retrieval or rendering purposes. In other words, you do not need a gem with headless browser capabilities to perform web scraping. You can still use Mechanize or Selenium, but they would only add some performance overheads. After all, they run a browser instance behind the scene, which takes resources.
In summary, you should opt for a simple HTML/XML parser such as Nokogiri. Install it via the nokogiri gem with:
gem install nokogiriYou can then import the library by adding the following line on top of your scraper.rb file:
require "nokogiri"Make sure your Ruby IDE does not report any errors, and you can now scrape some data in Ruby!
Step 3: Use HTTParty to get the target page
To parse the HTML document of the target page, you first have to download it through an HTTP GET request. Ruby comes with a built-in HTTP client called Net::HTTP, but its syntax is a bit cumbersome and not intuitive. You should use HTTParty instead, which is the most popular Ruby library to perform HTTP requests.
Install it through the httparty gem with:
gem install httparty

Then, import it in the scraper.rb file:

require "httparty"

Use HTTParty to connect to the target page with:

response = HTTParty.get("https://brightdata.com/")
The get() method allows you to perform a GET request to the URL passed as a parameter. The response.body field will contain the HTML document returned by the server.
Note that the HTTP request made via get() can fail. When that happens, HTTParty will raise an exception and stop the execution of your script with an error. There can be numerous reasons behind a failure, but what usually occurs is that an anti-bot technology adopted by the target site intercepted and blocked your automated requests. The most basic anti-scraping systems tend to filter out requests without a valid User-Agent HTTP header. Take a look at our article to jump into User-Agents for web scraping.
Like any other HTTP client, HTTParty uses a placeholder User-Agent. This is generally very different from the agents used by popular browsers, making its requests easily spottable by anti-bot solutions. To avoid getting blocked because of that, you can specify a valid User-Agent in HTTParty as follows:
response = HTTParty.get("https://brightdata.com/", {

  headers: { "User-Agent" => "Mozilla/5.0 (Windows NT 10.0; Win64; x64) AppleWebKit/537.36 (KHTML, like Gecko) Chrome/112.0.0.0 Safari/537.36"},

})
The request performed through that get() will now appear to the server as coming from Google Chrome 112.
This is what scraper.rb currently contains:
require "nokogiri"
require "httparty"

# get the target page
response = HTTParty.get("https://brightdata.com/", {
  headers: {
    "User-Agent" => "Mozilla/5.0 (Windows NT 10.0; Win64; x64) AppleWebKit/537.36 (KHTML, like Gecko) Chrome/112.0.0.0 Safari/537.36",
  },
})

# scraping logic...
Step 4: Parse the HTML document with Nokogiri
To parse the HTML document associated with the target webpage, pass its content to the Nokogiri HTML() function:
doc = Nokogiri::HTML(response.body)You can now employ the DOM manipulation and exploration API offered through the doc variable. Specifically, the two most important methods to select HTML elements are:
- xpath(): Returns the list of HTML nodes matching the XPath query
- css(): Returns the list of HTML nodes matching the CSS selector passed as a parameter
Both approaches work, but CSS queries are usually the easiest way to express what you are looking for.
Step 5: Define the CSS selectors for the HTML elements of interest
To understand how to select the desired HTML elements on the target page, you need to analyze the DOM. Visit the Bright Data homepage in your browser, right-click on one of cards of interest, and select “Inspect”:

Take some time to explore the HTML code in the DevTools section. Each use case card is a <div> that contains:
- A <figure> that has an <img> HTML element showing the image associated with the industry and an <a> element containing the URL to the industry page.
- A <div> HTML element storing the industry name in a <a> tag.
The data extraction goal of the Ruby scraper is to get the image URL, page URL, and industry name from each card.
To define good CSS selectors, shift your attention to the CSS classes assigned to the DOM nodes of interest. You will notice that you can get all use case cards with the CSS selector that follows:
.section_cases_row_col_itemGiven a card, you can then select the nodes storing the relevant data from its <figure> and <div> children with:
- figure img
- figure a
- .elementor-image-box-content a
Step 6: Scrape data from a webpage with Nokogiri
You now have to use Nokogiri to retrieve the desired data from the target HTML webpage.
Before diving into the data scraping logic, do not forget that you need some data structures where to store the collected data. For that purpose, you can define a UseCase class in a single line with a Struct:
UseCase = Struct.new(:image, :url, :name)In Ruby, a Struct allows you to bundle one or more attributes in the same data class. The struct above has the three attributes corresponding to the info to retrieve from each use case card.
Initialize an empty array of UseCase and implement the scraping logic to populate it:
# initialize the list of objects

# that will store all retrieved data

use_cases = []

# select all use case HTML elements

use_case_cards = doc.css(".section_cases_row_col_item")

# iterate over the HTML cards

use_case_cards.each do |use_case_card|

    # extract the data of interest

    image = use_case_card.at_css("figure img").attribute("data-lazy-src").value

    url = use_case_card.at_css("figure a").attribute("href").value

    name = use_case_card.at_css(".elementor-image-box-content a").text

    # instantiate an UseCase object with the

    # collected data

    use_case = UseCase.new(url, image, name)

    # add the UseCase instance to the array

    # of scraped objects

    use_cases.push(use_case)

end
The snippet above selects all use case cards and iterates over them. Then, it scrapes from each card the image URL, industry page URL and name with at_css(). This is a Nokogiri function that returns the first element that maches the CSS query and represents a shortcut for:
image = use_case_card.css("figure img").first.attribute("data-lazy-src").valueFinally, it uses the retrieved data to instantiate a new UseCase object and adds it to the list.
Web scraping using Ruby with Nokogiri is pretty simple. With attribute(), you can select an attribute from the current HTML element. Then, the value field enables you to get its value. Similarly, the text field directly returns all text contained in the current HTML node as a plain string.
Now, you could go further and scrape the use case industry pages as well. You could follow the links discovered here and implement new scaping logic tailored to them. Welcome to the web crawling and web scraping world!
Fantastic! You just learned how to achieve your scraping goals with Ruby. There still some lessons to learn, though.
Step 7: Export the scraped data
After the each() loop, use_cases will contain the scraped data in Ruby objects. This is not the best format to provide data to other teams. Fortunately, Ruby comes with CSV and JSON conversion built-in capabilities. Learn how to export the retrieved data to CSV and JSON.
For CSV export, import the following gem:
import "csv"This is part of the Ruby Standard API and provides a complete interface to deal with CSV files and data.
You can take advantage of it to export the use_cases array to an output.csv file as below:
# populate the CSV output file

CSV.open("output.csv", "wb") do |csv|

  # write the CSV header

  csv << ["url", "image", "name"]

  # transfrom each use case scraped info to a

  # CSV record

  use_cases.each do |use_case|

    csv << use_case

  end

end
The snippet above creates the output.csv file. Then, it opens it and initializes it with the header record. Next, it iterates over the use_cases array and appends it to the CSV file. When using the << operator, Ruby will automatically convert each use_case instance to an array of strings as required by the built-in CSV class.
Try to run the script with:
ruby scraper.rbAn output.csv file containing the data below will be produced in the root directory of your project:

Similarly, you can export use_cases to output.json:
# propulate the JSON output file

File.open("output.json", "wb") do |json|

  json << JSON.pretty_generate(use_cases.map { |u| Hash[u.each_pair.to_a] })

end
This will generate the following JSON file:
[

  {

    "image": "https://brightdata.com/use-cases/ecommerce",

    "url": "https://brightdata.com/wp-content/uploads/2022/07/E_commerce.svg",

    "name": "eCommerce "

  },

  // ...

  {

    "image": "https://brightdata.com/use-cases/data-for-good",

    "url": "https://brightdata.com/wp-content/uploads/2022/07/Data_for_Good_N.svg",

    "name": "Data for Good"

  }

]
Et voilà! Now you know how to convert an array of structs to CSV and JSON in Ruby!
Step 8: Put it all together
Here is the full code of the Ruby scraper:
# scraper.rb

require "nokogiri"

require "httparty"

require "csv"

# get the target page

response = HTTParty.get("https://brightdata.com/", {

  headers: {

    "User-Agent" => "Mozilla/5.0 (Windows NT 10.0; Win64; x64) AppleWebKit/537.36 (KHTML, like Gecko) Chrome/112.0.0.0 Safari/537.36",

  },

})

# parse the HTML document retrieved with the GET request

doc = Nokogiri::HTML(response.body)

# define a class where to keep the scraped data

UseCase = Struct.new(:image, :url, :name)

# initialize the list of objects

# that will store all retrieved data

use_cases = []

# select all use case HTML elements

use_case_cards = doc.css(".section_cases_row_col_item")

# iterate over the HTML cards

use_case_cards.each do |use_case_card|

  # extract the data of interest

  image = use_case_card.at_css("figure img").attribute("data-lazy-src").value

  url = use_case_card.at_css("figure a").attribute("href").value

  name = use_case_card.at_css(".elementor-image-box-content a").text

  # instantiate an UseCase object with the

  # collected data

  use_case = UseCase.new(url, image, name)

  # add the UseCase instance to the array

  # of scraped objects

  use_cases.push(use_case)

end

# populate the CSV output file

CSV.open("output.csv", "wb") do |csv|

  # write the CSV header

  csv << ["url", "image", "name"]

  # transfrom each use case scraped info to a

  # CSV record

  use_cases.each do |use_case|

    csv << use_case

  end

end

# propulate the JSON output file

File.open("output.json", "wb") do |json|

  json << JSON.pretty_generate(use_cases.map { |u| Hash[u.each_pair.to_a] })

end
In around 50 lines of code, you can create a data scaping script in Ruby!
Conclusion
In this tutorial, you understood why Ruby is a great language for scraping the Internet. You also had the opportunity to see what the best web scraping Ruby gems libraries are, why, and what features they offer. Then, you dove into how to use Nokogiri and Ruby’s standard API to build a Ruby scraper that can scrape a real-world target. As you saw, data scraping with Ruby takes very few lines of code.
However, do not underestimate the existing challenges when it comes to extracting data from web pages. This is why an increasing number of sites have been implementing anti-bot and anti-scraping systems to protect their data. These technologies are able to detect the requests performed by your scraping Ruby script and preventing from accessing the site. Fortunately, you can build a web scraper that can bypass those blocks with Bright Data’s next-generation web scraper APIs.
Don’t want to deal with web scraping at all but are interested in web data? Explore our ready-to-use datasets.


