Imagine if you could launch a completely automated newsletter. With minimal coding and some API credentials, now you can. n8n, Bright Data, and OpenAI give us the power to do exactly this.
Today, we’ll run through this process to show you just how easy it really is!
Getting Started
We’ll start by accessing the workflow (you can start using it for free). Click on the button titled “Use workflow” near the top of his post. When prompted, make sure to run a self-hosted instance of n8n.

Self-Hosting n8n
sudo snap install dockerStart docker, and get n8n up and running.
sudo docker volume create n8n_data
sudo docker run -it --rm --name n8n -p 5678:5678 -v n8n_data:/home/node/.n8n docker.n8n.io/n8nio/n8n
Installing Community Nodes
Now, it’s time to install a couple community nodes. Go to “Settings” and click on “Community nodes”.

In the “npm” entry box, enter the Bright Data node.
n8n-nodes-brightdataNext, do the same for Document Generator.
n8n-nodes-document-generator
Once you’ve installed these nodes, kill your Docker instance with ctrl+c.
Then, restart it.
sudo docker run -it --rm --name n8n -p 5678:5678 -v n8n_data:/home/node/.n8n docker.n8n.io/n8nio/n8nYou can view the full docs for installing Community Nodes here.
Getting Your API Keys
Bright Data
If you haven’t already, you need to sign up for Web Unlocker. This tool offers all sorts of cool scraping features like CAPTCHA bypass and proxy integration. In the playground, you can get your API key.

Take this key and save it somewhere safe.
OpenAI
From the OpenAI dashboard, you can view and create new keys at the API Keys Tab.

Once again, store your keys somewhere safe.
SMTP
For SMTP, I’m using Elastic Email. On their free plan, you can only send emails to yourself, but that’s good enough for this tutorial.
Note: I ran into an error when creating the SMTP connection. Disabling SSL fixed this for me.

With SMTP, no matter which client you use (Elastic Email or anything else), you need to save your username, password and connection details. With Elastic Email, you can view these here.

Adjusting The Workflow
Getting the Site With Web Unlocker
Right-click the Bright Data icon in your workflow and click “Open”. Click the pencil icon to edit your settings.

Add your Web Unlocker API Key in the “Token” section.

Now, let’s adjust our schema so everything works properly. At the bottom of the settings, make sure the format is set to “JSON”. In the image below, our url is https://www.mediamarkt.de/, replace this with whatever url you want to scrape. Replace the zone name with your own web unlocker zone name.

Extracting the HTML
Now, let’s make sure our HTML extraction is configured properly. Make sure your “Source Data” is set to “JSON”. The extraction values should match what you see in the image below: Key: title, CSS Selector: title, Return Value: Text. If you’re working with a different site, you can adjust these fields to fit your needs, but if a page doesn’t have a body or title, it’s probably not worth scraping anyway.

Before closing it out, scroll down and match these other fields as well: Key: body, CSS Selector: body, Return Value: Text.

Passing the Data To ChatGPT
ChatGPT is going to parse our data for us. With the power of LLMs, we don’t even need to write a parser. You can learn more about scraping with AI models here. The process here is pretty simple: we give ChatGPT a webpage, and it spits out a clean list of products.
Now, it’s time to configure your ChatGPT connection. Open up the settings for the node titled, “Generate List of Deals by Category”. Add your OpenAI API key the same way you added your Bright Data API key. Then make sure the following fields are correct: Resource: Text, Operation: Message a Model. If you wish to use a different model, feel free to change it, but we’re using GPT-4o mini.

Scroll down to the bottom and make sure the rest of the fields are correct.

Extracting The Results From ChatGPT
Now, open the settings for the node titled, “Extract items from results”. Make sure “Fields to Split Out” is set to message.content.results.

Generating Your HTML Document
Now, it’s time to generate your HTML document. This is the raw HTML that makes up the actual email. If you run a workflow test, you can actually drag and drop input values into the HTML template. Make sure the “Template String” is set to Expression.

If you want, you can copy and paste my HTML template from below. The HTML below is not a requirement, it’s just there to help get you started. You can style your data however you’d like–just make sure you insert the JSON data correctly.
<h1>{{ $json.name }}</h1>

<p>{{ $json.description }}</p>

<a href={{ $('Generate List of Deals by Category').item.json.message.content.results[0].link }}>
    {{ $('Generate List of Deals by Category').item.json.message.content.results[0].link }}
</a>

<h2>{{ $('Generate List of Deals by Category').item.json.message.content.results[1].name }}</h2>
<ul>
    <li><p>{{ $('Generate List of Deals by Category').item.json.message.content.results[1].description }}</p></li>
    <li>{{ $('Generate List of Deals by Category').item.json.message.content.results[1].price }}</li>
    <li>
        <a href={{ $('Generate List of Deals by Category').item.json.message.content.results[1].link }}>
            {{ $('Generate List of Deals by Category').item.json.message.content.results[1].link }}
        </a>
    </li>
</ul>

<h2>{{ $('Generate List of Deals by Category').item.json.message.content.results[2].name }}</h2>
<ul>
    <li><p>{{ $('Generate List of Deals by Category').item.json.message.content.results[2].description }}</p></li>
    <li>{{ $('Generate List of Deals by Category').item.json.message.content.results[2].price }}</li>
    <li>
        <a href={{ $('Generate List of Deals by Category').item.json.message.content.results[2].link }}>
            {{ $('Generate List of Deals by Category').item.json.message.content.results[2].link }}
        </a>
    </li>
</ul>

<h2>{{ $('Generate List of Deals by Category').item.json.message.content.results[3].name }}</h2>
<ul>
    <li><p>{{ $('Generate List of Deals by Category').item.json.message.content.results[3].description }}</p></li>
    <li>{{ $('Generate List of Deals by Category').item.json.message.content.results[3].price }}</li>
    <li>
        <a href={{ $('Generate List of Deals by Category').item.json.message.content.results[3].link }}>
            {{ $('Generate List of Deals by Category').item.json.message.content.results[3].link }}
        </a>
    </li>
</ul>

<h2>{{ $('Generate List of Deals by Category').item.json.message.content.results[4].name }}</h2>
<ul>
    <li><p>{{ $('Generate List of Deals by Category').item.json.message.content.results[4].description }}</p></li>
    <li>{{ $('Generate List of Deals by Category').item.json.message.content.results[4].price }}</li>
    <li>
        <a href={{ $('Generate List of Deals by Category').item.json.message.content.results[4].link }}>
            {{ $('Generate List of Deals by Category').item.json.message.content.results[4].link }}</a></li>
</ul>

<h2>{{ $('Generate List of Deals by Category').item.json.message.content.results[5].name }}</h2>
<ul>
    <li><p>{{ $('Generate List of Deals by Category').item.json.message.content.results[5].description }}</p></li>
    <li>{{ $('Generate List of Deals by Category').item.json.message.content.results[5].price }}</li>
    <li>
        <a href={{ $('Generate List of Deals by Category').item.json.message.content.results[5].link }}>
            {{ $('Generate List of Deals by Category').item.json.message.content.results[5].link }}
        </a>
    </li>
</ul>
Notifying The User By Email
Now, it’s time to hook up to the SMTP server. If you haven’t already added your API keys, click the “pencil” icon to edit your connection details. Change “From Email” to the email you’ll be sending from. Make the “Subject” whatever you’d like. Make sure to leave “Email Format” as HTML.

Now, add the credentials to your SMTP account. You need the User, Password, Host, and Port.

Inform The User of Success
Now, let’s create the page that tells our user everything finished. Change the “Completion Message” and “Completion Title” to whatever you’d like. All of these other fields should remain the same–we’re simply informing the user that the process has finished.

The Resulting Email
Now that we’re done setting everything up, let’s try it out. Click on “Test Workflow.” You should get a popup like this. Choose your category and enter an email address to receive your deals.
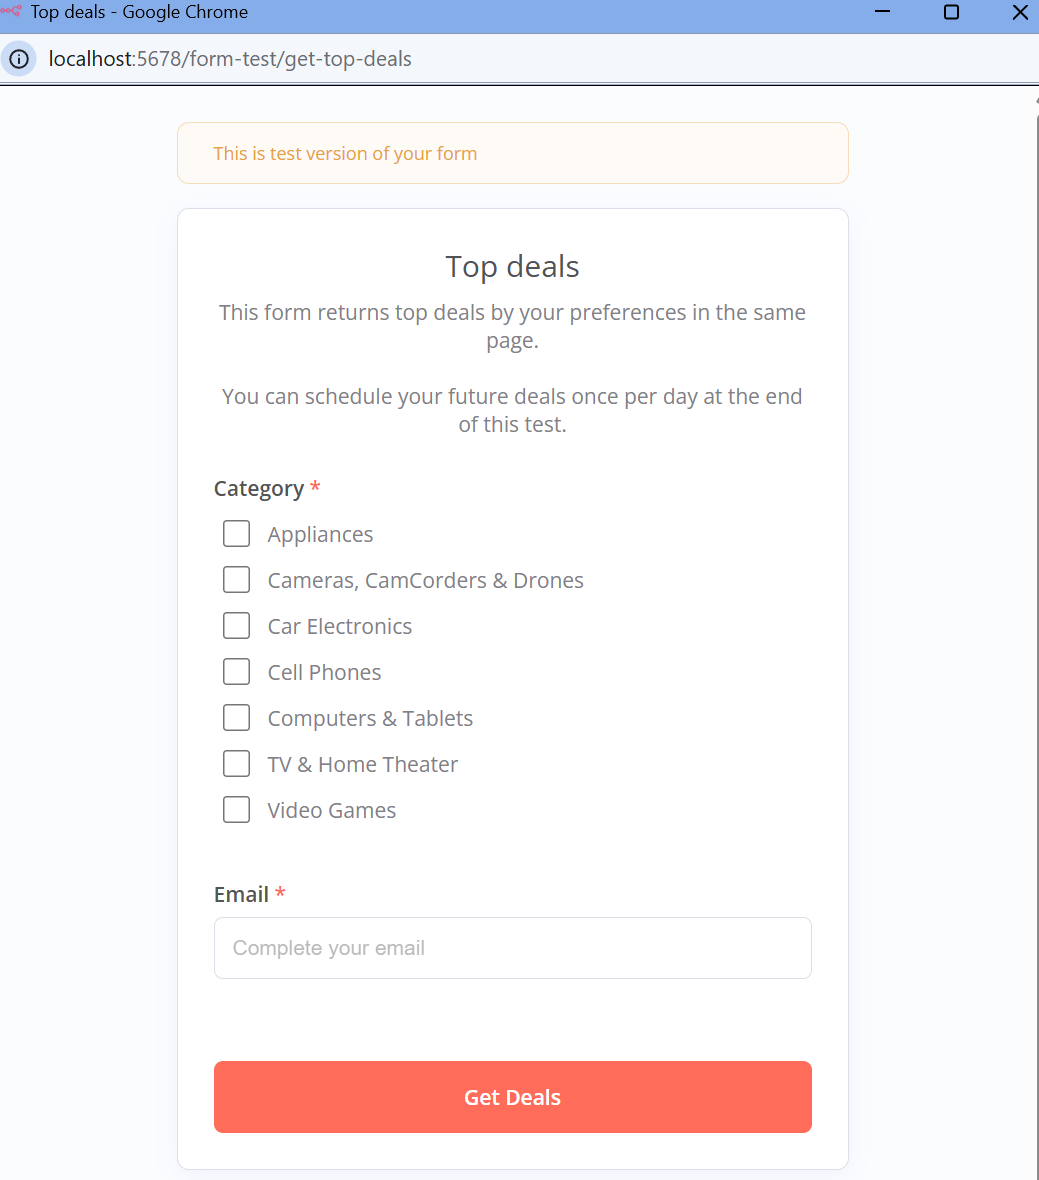
Click on “Get Deals”. Once you’ve submitted your information, your popup should look like this.

Finally, check your inbox. If you don’t see the deals email right away, take a look at your spam folder. Most modern email services mark mass mailers like this as spam. Once you find the email, open it up and take a look at your deals!

Conclusion
With n8n, Bright Data, and OpenAI, you now have the tools to fully automate a smart, data-driven newsletter. By leveraging Web Unlocker for data extraction, ChatGPT for content generation, and SMTP for email delivery, you can create personalized deal recommendations with minimal effort.
But why stop here? Bright Data offers a suite of data solutions to enhance your automation even further:
- Residential Proxies
- Scraping Browser
- Scraper API
- Datasets
Take your email marketing automation to the next level. Sign up for a free trial today and start building smarter, more efficient workflows!

Technical Writer
Jacob Nulty is a Detroit-based software developer and technical writer exploring AI and human philosophy, with experience in Python, Rust, and blockchain.