By the end of this Laravel proxy integration guide, you will understand:
- What proxies are and how they work in Laravel
- When and why you might need them
- How to set up a proxy in your Laravel project
- How to handle proxy authentication, SSL certificate issues, and IP rotation in Laravel
- How to integrate a proxy in Symfony’s
HttpClientcomponent
Let’s dive in!
What Is a Laravel Proxy?
A Laravel proxy acts as an intermediary between your Laravel backend and an external server. It enables you to programmatically route your server’s traffic through a proxy server to hide your IP address.
Below is how a proxy in Laravel works:
- Laravel sends an HTTP request using an HTTP client library with a proxy configured.
- The request goes through the proxy server.
- The proxy forwards it to the destination server.
- The destination server responds to the proxy.
- The proxy then returns the response to Laravel.
As a result, the destination server sees the request coming from the proxy’s IP—not your Laravel server’s. This mechanism helps bypass geo-restrictions, improve anonymity, and manage rate limits.
Use Cases for Proxies in Laravel
Proxies in Laravel are useful in many scenarios, but these three are the most common:
- Web scraping: Use proxies to avoid IP bans, rate limits, or other blocks when building a web scraping API. For more, read our tutorial on web scraping with Laravel.
- Bypassing rate limits on third-party APIs: Rotate proxy IPs to stay within API usage quotas and avoid throttling.
- Accessing geo-restricted content: Select proxy servers in specific regions to access services only available in certain countries.
For more examples, see our guide on web data and proxy use cases.
Using a Proxy in Laravel: Step-By-Step Guide
In this section, we will show how to integrate a proxy in Laravel using the default HTTP client. If you are a Symfony HttpClient user, do not worry—we will cover proxy integration with that library later in the article.
Note: Laravel’s HTTP client is built on top of Guzzle, so you might want to check our Guzzle proxy integration guide.
To demonstrate the integration, we will create a GET /api/v1/get-ip endpoint that:
- Sends a
GETrequest tohttps://httpbin.io/ipusing the configured proxy. - Retrieves the exit IP address from the response.
- Returns that IP to the client calling the Laravel endpoint.
If everything is set up correctly, the returned IP by that API will match the proxy’s IP.
Let’s get started!
Step #1: Project Setup
If you already have a Laravel application set up, you can skip this step and proceed to Step #2.
Otherwise, follow the instructions below to create a new Laravel project. Open your terminal and run the following Composer create-command command to initialize a fresh Laravel project:
composer create-project laravel/laravel laravel-proxies-applicationThis command will generate a new Laravel project in a folder named laravel-proxies-application. Open this folder in your preferred PHP IDE.
At this point, the above folder should contain the default Laravel file structure:

Wonderful! You now have a Laravel project in place.
Step #2: Define the Test API Endpoint
In the project directory, run the following Artisan command to generate a new controller:
php artisan make:controller IPControllerThis will create a file named IPController.php in the /app/Http/Controllers directory with this default content:
<?php

namespace AppHttpControllers;

use IlluminateHttpRequest;

class IPController extends Controller
{
    //
}
Now, add the getIP() method below to IPController.php:
public function getIP(): JsonResponse
{
    // make a GET request to the "/ip" endpoint to get the IP of the server
    $response = Http::get('https://httpbin.io/ip');

    // retrieve the response data
    $responseData = $response->json();

    // return the response data
    return response()->json($responseData);
}
This method uses Laravel’s Http client to fetch your IP address from https://httpbin.io/ip and returns it as JSON.
Do not forget to import these two imports:
use IlluminateHttpJsonResponse;
use IlluminateSupportFacadesHttp;
Since you want your Laravel application to offer stateless APIs, enable API routing using the install:api Artisan command:
php artisan install:apiTo expose this method via an API endpoint, add the following route to the routes/api.php file:
use AppHttpControllersIPController;

Route::get('/v1/get-ip', [IPController::class, 'getIP']);
Your new API endpoint will be accessible at:
/api/v1/get-ipNote: Keep in mind that each Laravel API is available under the /api path by default.
Time to test the /api/v1/get-ip endpoint!
Start the Laravel development server by running:
php artisan serveYour server should now be listening locally on port 8000.
Make a GET request to the /api/v1/get-ip endpoint using cURL:
curl -X GET 'http://localhost:8000/api/v1/get-ip' Note: On Windows, replace curl with curl.exe. Learn more in our guide on how to send GET requests with cURL.
You should get a response similar to:
{
  "origin": "45.89.222.18"
}
The above response is exactly the same produced by the /ip endpoint of HttpBin, which confirms that your Laravel API is working perfectly. In particular, the IP address shown is your machine’s public IP. Next up, let’s integrate a proxy to mask that IP!
Step #3: Retrieve a Proxy
To use a proxy in your Laravel application, you first need access to a working proxy server.
While many websites offer free proxy URLs, it is important to be cautious—maintaining proxy infrastructure is costly. If a service provides proxies for free, ask yourself how they are funding it. Often, the answer involves shady practices like data harvesting or traffic rerouting.
Note: Free proxies should be used strictly for testing or educational purposes—never in production environments.
If you need reliable proxies, go for reputable providers that offer free trials or limited free plans. For instance, you can try out our free proxies.
Now, a typical proxy URL looks like this:
<protocol>://<host>:<port>Where:
protocolis the protocol required to connect to the proxy server (e.g.,http,https,socks5)hostis the IP address or domain of the proxy serverportis the port used to route the traffic
In this example, assume your proxy URL is:
http://66.29.154.103:3128Store that in a variable inside the getIP() method:
$proxyUrl = 'http://66.29.154.103:3128';Time to see how to use a proxy with Http in Laravel!
Step #4: Integrate the Proxy in Http
Integrating a proxy into Laravel using the Http client only requires a small amount of additional configuration:
$proxyUrl = 'http://66.29.154.103:3128';

$response = Http::withOptions([
    'proxy' => $proxyUrl
])->get('https://httpbin.io/ip');

$responseData = $response->json();
As you can see, all you need to do is pass the proxy URL as an option using the withOptions() method. This tells Laravel’s HTTP client to route the request through the specified proxy server, using Guzzle’ proxy option.
Amazing! Laravel proxy integration completed.
Step #5: Put It All Together
Your final Laravel API logic with proxy integration should now look like this:
<?php

namespace AppHttpControllers;

use IlluminateHttpRequest;
use IlluminateHttpJsonResponse;
use IlluminateSupportFacadesHttp;

class IPController extends Controller
{

    public function getIP(): JsonResponse
    {
        // the URL of the proxy server
        $proxyUrl = 'http://66.29.154.103:3128'; // replace with your proxy URL

        // make a GET request to /ip endpoint through the proxy server
        $response = Http::withOptions([
            'proxy' => $proxyUrl
        ])->get('https://httpbin.io/ip');

        // retrieve the response data
        $responseData = $response->json();

        // return the response data
        return response()->json($responseData);
    }
}
Test it by running Laravel locally:
php artisan serveAnd connect to the /api/v1/get-ip endpoint again:
curl -X GET 'http://localhost:8000/api/v1/get-ip' This time, the output should be something like:
{
  "origin": "66.29.154.103"
}
The "origin" field shows the IP address of the proxy server, confirming that your actual IP is now hidden behind the proxy.
Warning: Free proxy servers are often unstable or short-lived. By the time you try this, the example proxy may no longer work. If needed, replace the $proxyUrl with a currently active one before testing.
Note: If you encounter SSL errors while making the request, see the troubleshooting tips provided in the advanced use cases section below.
Advances Use Cases
You just learned the basics of proxy integration with Laravel, but there are other more advanced scenarios to consider.
Proxy Authentication
Premium proxies often require authentication so that only authorized users can access them. In that case, if you do not specify the right credentials, you will get this error:
cURL error 56: CONNECT tunnel failed, response 407The URL of an authenticated proxy typically follows this format:
<protocol>://<username>:<password>@<host>:<port>Where username and password are your authentication credentials.
Laravel’s Http class (which is Guzzle-based under the hood) fully supports authenticated proxies. So, you do not need to change much. Just include the authentication credentials directly in the proxy URL:
$proxyUrl = '<protocol>://<username>:<password>@<host>:<port>';For example:
// authenticated proxy with username and password
$proxyUrl = 'http://<username>:<password>@<host>:<port>';

$response = Http::withOptions([
    'proxy' => $proxyUrl
])->get('https://httpbin.io/ip');
Replace the value of $proxyUrl with a valid authenticated proxy URL.
Http will now route the traffic to the configured authenticated proxy server!
Avoid SSL Certificate Issues
When setting up a proxy using Laravel’s Http client, your requests might fail due to SSL certificate verification errors like:
cURL error 60: SSL certificate problem: self-signed certificate in certificate chainThat typically occurs when the proxy server uses a self-signed SSL certificate.
If you trust the proxy server and you’re only testing locally or in a safe environment, you can disable SSL verification like this:
$response = Http::withOptions([
    'proxy' => $proxyUrl,
    'verify' => false, // disable SSL certificate verification
])->get('https://httpbin.io/ip');Warning: Disabling SSL verification exposes you to man-in-the-middle attacks. Thus, use this option only in trusted environments.
Otherwise, if you have the proxy server’s certificate file (e.g., proxy-ca.crt), you can use it for SSL verification like this:
$response = Http::withOptions([
    'proxy' => $proxyUrl,
    'verify' => storage_path('certs/proxy-ca.crt'), // Path to the CA bundle
])->get('https://httpbin.io/ip');
Make sure the proxy-ca.crt file is stored in a secure and accessible directory (e.g., storage/certs/), and Laravel has permission to read it.
With either method in place, the SSL verification error caused by the proxy should go away.
Proxy Rotation
If you keep using the same proxy server repeatedly, the target website is likely to eventually detect and block that proxy’s IP address. To avoid that, you can rotate your proxy servers—using a different one for each request.
These are the steps to rotate proxies in Laravel:
- Create an array containing multiple proxy URLs
- Randomly select one before each request
- Set the selected proxy in the HTTP client configuration
Implement that with this code:
<?php

namespace AppHttpControllers;

use IlluminateHttpRequest;
use IlluminateHttpJsonResponse;
use IlluminateSupportFacadesHttp;

function getRandomProxyUrl(): string
{
    // a list of valid proxy URLs (replace with your proxy URLs)
    $proxies = [
        '<protocol_1>://<proxy_host_1>:<port_1>',
        // ...
        '<protocol_n>://<proxy_host_n>:<port_n>',
    ];

    // return a proxy URL randomly picked from the list
    return $proxies[array_rand($proxies)];
}

class IPController extends Controller
{
    public function getIP(): JsonResponse
    {
        // the URL of the proxy server
        $proxyUrl = getRandomProxyUrl();
        // make a GET request to /ip endpoint through the proxy server
        $response = Http::withOptions([
            'proxy' => $proxyUrl
        ])->get('https://httpbin.io/ip');

        // retrieve the response data
        $responseData = $response->json();

        // return the response data
        return response()->json($responseData);
    }
}
The above snippet demonstrates how to randomly select a proxy from a list to simulate proxy rotation. While this approach works, it has some drawbacks:
- You must maintain a pool of reliable proxy servers, which often comes at a cost.
- For effective rotation, the proxy pool needs to be large enough. Without a large pool, the same proxies will be repeatedly used, which can lead to detection and blocking.
To bypass those limitations, consider taking advantage of Bright Data’s rotating proxy network. That infrastructure automatically rotates IP addresses on your behalf and gives you access to:
- 1500M+ IPs across 195 countries
- High uptime and a 99.9% success rate
In the next section, we will show you how to use Bright Data’s rotating proxies with Laravel.
Use a Bright Data Proxy in Laravel
Bright Data operates one of the largest proxy networks in the world, supporting Fortune 500 companies and over 20,000 customers. Their proxy network includes:
- Datacenter proxies – 1,300,000+ datacenter IPs.
- Residential proxies – 400M+ residential IPs in more than 195 countries.
- ISP proxies – 1,300,000+ ISP IPs.
Follow the steps below to use Bright Data’s residential proxies with Laravel.
If you do not have an account yet, go ahead and sign up to Bright Data. If you already have one, log in to access your user dashboard:

Once logged in, click the “Get proxy products” button to proceed:

You will be redirected to the “Proxies & Scraping Infrastructure” page:

In the table, find the “Residential” row and click on it:
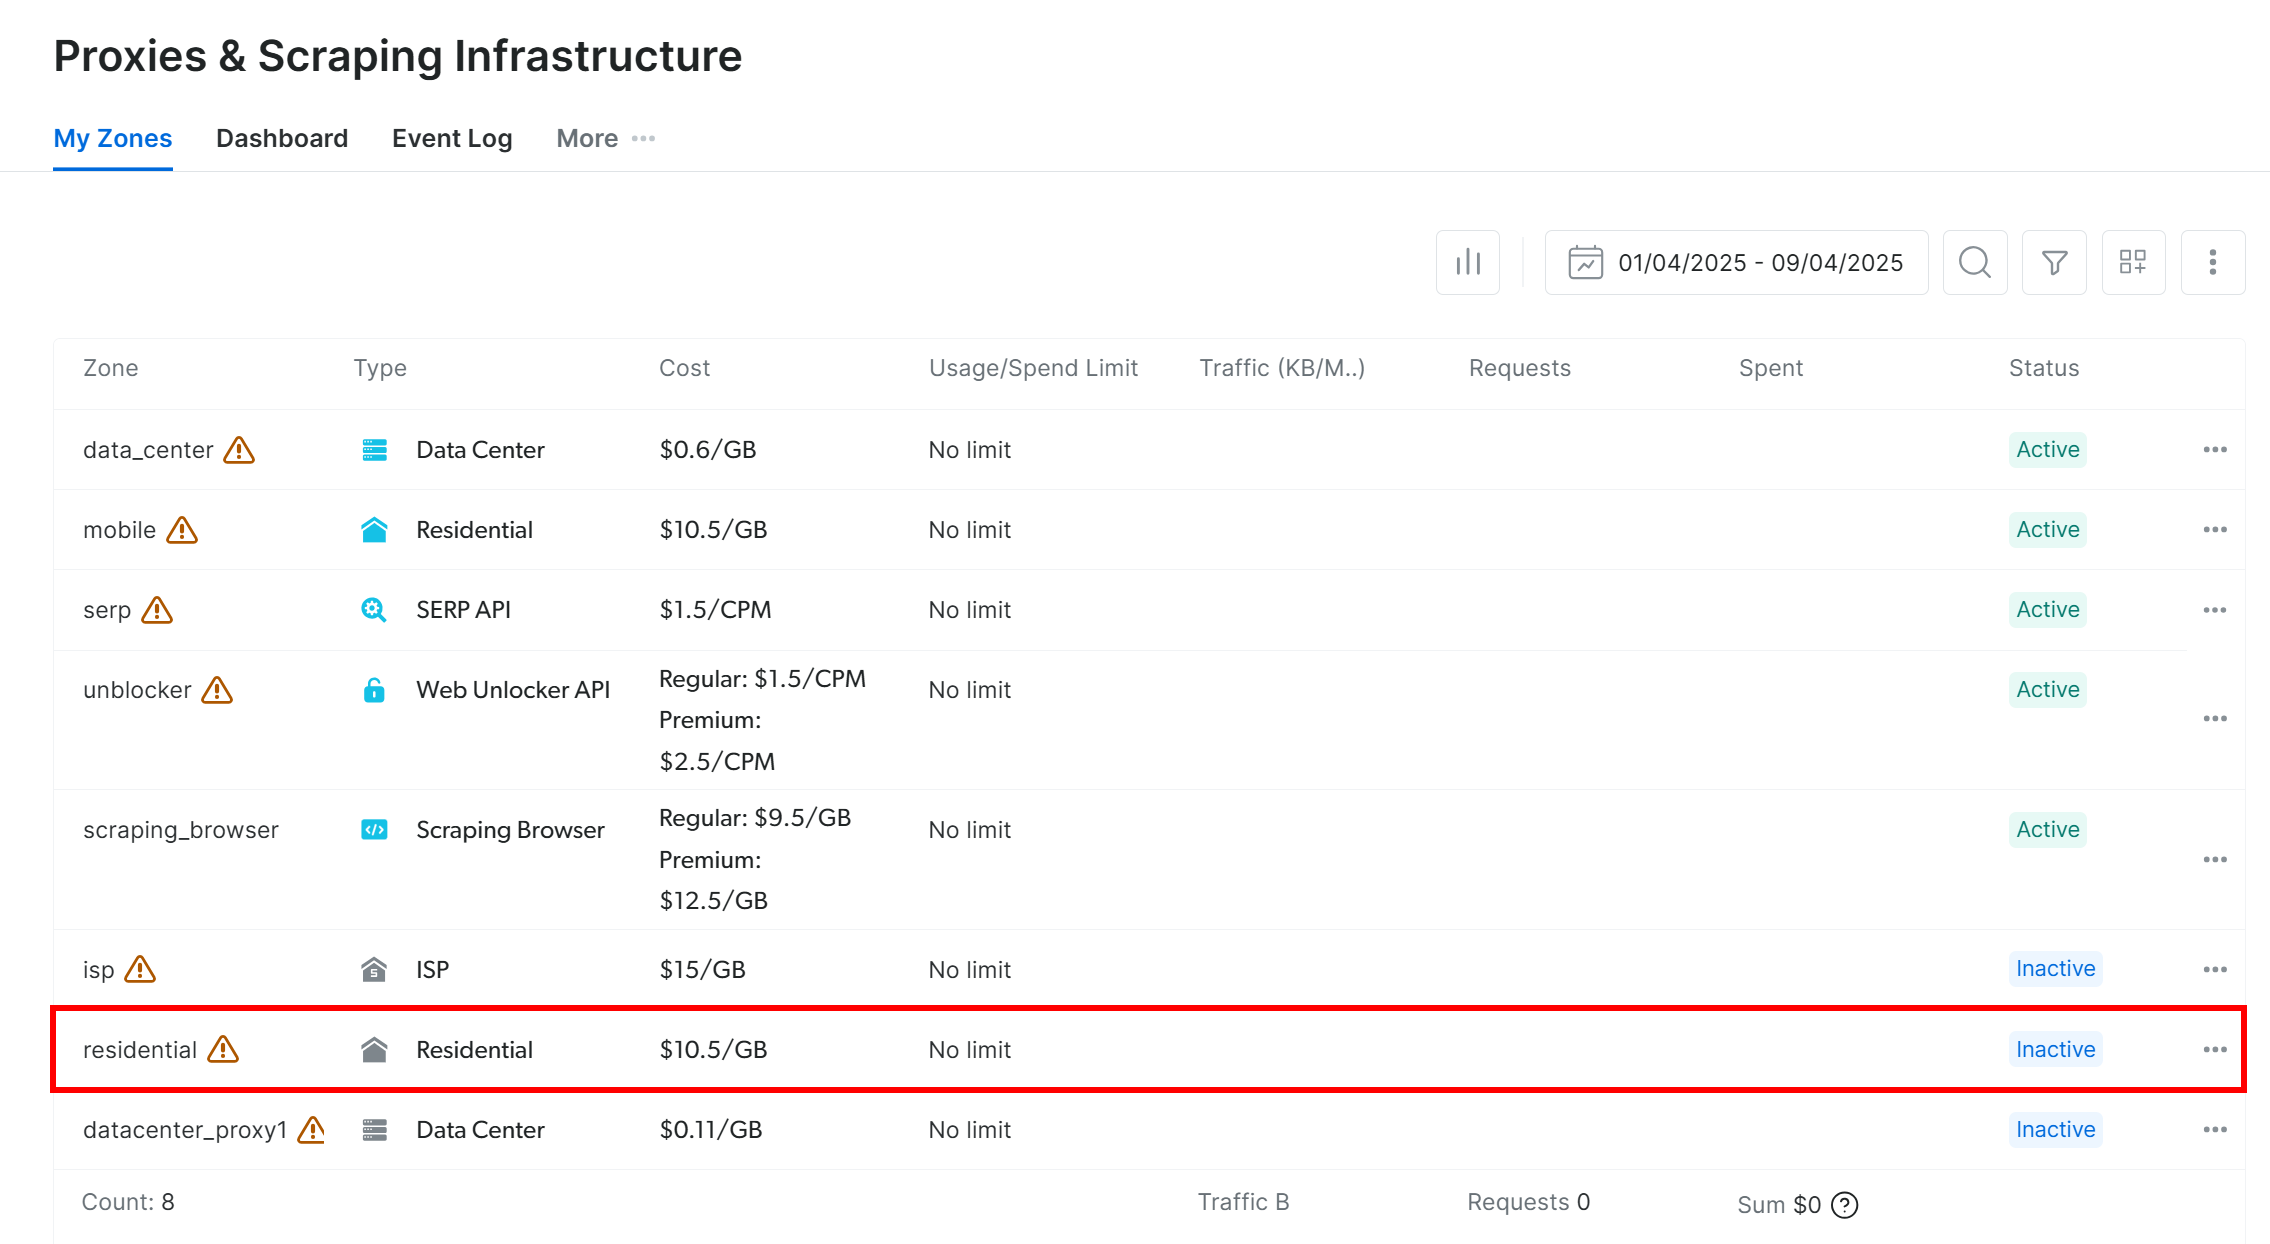
You will be directed to the residential proxy page:

If it is your first time, follow the wizard to configure the proxy service according to your needs. For further assistance, feel free to reach out to the 24/7 support.
In the “Overview” tab, find your proxy’s host, port, username, and password:

Use these details to build your proxy URL:
$proxyUrl = 'http://<brightdata_proxy_username>:<brightdata_proxy_password>@<brightdata_proxy_host>:<brightdata_proxy_port>';eplace the placeholders (<brightdata_proxy_username>, <brightdata_proxy_password>, <brightdata_proxy_host>, <brightdata_proxy_port>) with your actual proxy credentials.
Make sure to toggle the “Off” setting to enable the proxy product, and follow the rest of the instructions to complete the setup:

With your proxy URL set up, now you can integrate it into Laravel using the Http client. Here the logic to send a request via the rotating Bright Data residential proxy in Laravel:
public function getIp()
{
    // TODO: replace the placeholders with your Bright Data's proxy info
    $proxyUrl = 'http://<brightdata_proxy_username>:<brightdata_proxy_password>@<brightdata_proxy_host>:<brightdata_proxy_port>';

    // make a GET request to "/ip" through the proxy
    $response = Http::withOptions([
        'proxy' => $proxyUrl,
    ])->get('https://httpbin.org/ip');

    // get the response data
    $responseData = $response->json();

    return response()->json($responseData);
}
Every time you run the above script, you will see a different exit IP.
Laravel proxy rotation has never been easier with Bright Data’s auto-rotating proxies!
[Extra] Symfony’s HttpClient Proxy Integration
Suppose you prefer Symfony’s HttpClient component over Laravel’s default HTTP client Http.
Follow the instructions below to implement proxy integration in HttpClient with Laravel.
First, you need to install the Symfony HTTP client package via Composer:
composer require symfony/http-clientNext, you can use Symfony’s HttpClient with a proxy as follows:
<?php

namespace AppHttpControllers;

use SymfonyContractsHttpClientHttpClientInterface;
use IlluminateHttpJsonResponse;

class IpController extends Controller
{
    // where to store the HttpClient instance
    private $client;

    public function __construct(HttpClientInterface $client)
    {
        // initialize the HttpClient private instance
        $this->client = $client;
    }

    public function getIp(): JsonResponse
    {
          // your proxy URL
          $proxyUrl = 'http://66.29.154.103:3128'; // replace with your proxy URL

          // make a GET request to the "/ip" endpoint through the proxy
          $response = $this->client->request('GET', 'https://httpbin.io/ip', [
              'proxy' => $proxyUrl,
          ]);

          // parse the response JSON and return it
          $responseData = $response->toArray();
          return response()->json($responseData);
    }
}
This setup allows you to use Symfony’s HttpClient to send requests through a proxy.
Conclusion
In this proxy integration tutorial, you learned why proxies matter and how to use them in Laravel. We covered how to easily configure proxies in Laravel, with both Laravel’s default HTTP client and Symfony’s HttpClient.
You also saw why free proxy services can be unreliable and even risky. For stable performance, security, and scalability, you must choose a trusted proxy provider. Save time and energy and go straight to the best proxy provider on the market, Bright Data.
Create an account and start testing our proxies for free today!

Technical Writer
Antonello Zanini is a technical writer, editor, and software engineer with 5M+ views. Expert in technical content strategy, web development, and project management.