


In this article, you will learn:
- What a proxy server is and how it works with Windows 10.
- Which proxy setup methods are available.
- How to configure HTTP and HTTPS proxy settings in Windows 10.
- How to set up a SOCKS proxy through the Control Panel.
- How to troubleshoot common Win 10 proxy connection issues.
- The advantages and limitations of OS-wide proxy configuration.
Let’s dive in!
What Is a Windows Proxy Server?
A proxy server acts as an intermediary between your Windows 10 computer and the Internet. When you visit a website or access an online resource, your request is first sent to the proxy. The proxy then forwards it to the destination server and returns the response to your computer.
In other words, configuring a proxy in Windows 10 routes supported network traffic through the proxy server rather than connecting directly to websites from your device.
When choosing a proxy provider, evaluate these key factors:
- The number of available IPs and their geographic locations.
- Connection stability and customer service quality.
- The provider’s data protection policies and IP sourcing practices.
- The reputation and suitability of the available addresses.
- Costs, plans, and payment models.
Proxy Settings Available in Windows 10
There are three ways to use a proxy server on Windows 10:
- Automatically detect settings: Windows automatically detects the proxy settings when you connect to a network, so you don’t need to enter any information manually.
- Use a setup script: You need to provide the URL of your organization’s proxy configuration script. This address is usually provided by your company’s IT department.
- Manual setup: You must enter the proxy server’s hostname or IP address and port number yourself. If you are using a company proxy, contact your IT department for these details. Otherwise, you can obtain them from your proxy provider.
The first two options are primarily intended for users connecting to corporate networks, where proxy settings are typically managed by the organization. The third option is also suitable for individual users who want to route their Windows traffic through a proxy server.
This article focuses on manual proxy configuration. If you prefer automatic detection or a setup script, follow the instructions in the links above. See how to set up a proxy in Windows 10!
How to Change Proxy Settings in Windows 10
In this section, you will see how to configure a proxy server in Windows 10 via the manual setup option.
(For instructions on setting up a proxy in Windows 11, refer to our Windows 11 proxy setup tutorial.)
Prerequisites
Before getting started, make sure you have:
- A Windows 10 machine: This guide refers to Windows 10 version 22H2, the final Windows 10 release.
- A Windows 10-compatible proxy server.
This section shows how to configure a Bright Data proxy server in Windows. Bright Data is the leading proxy provider, offering a network of over 400 million IP addresses across 195 countries, automatic IP rotation, and support for HTTP, HTTPS, and SOCKS protocols.
To get started, follow the Bright Data documentation for setting up a residential proxy. You will end up with a proxy configuration page like this:
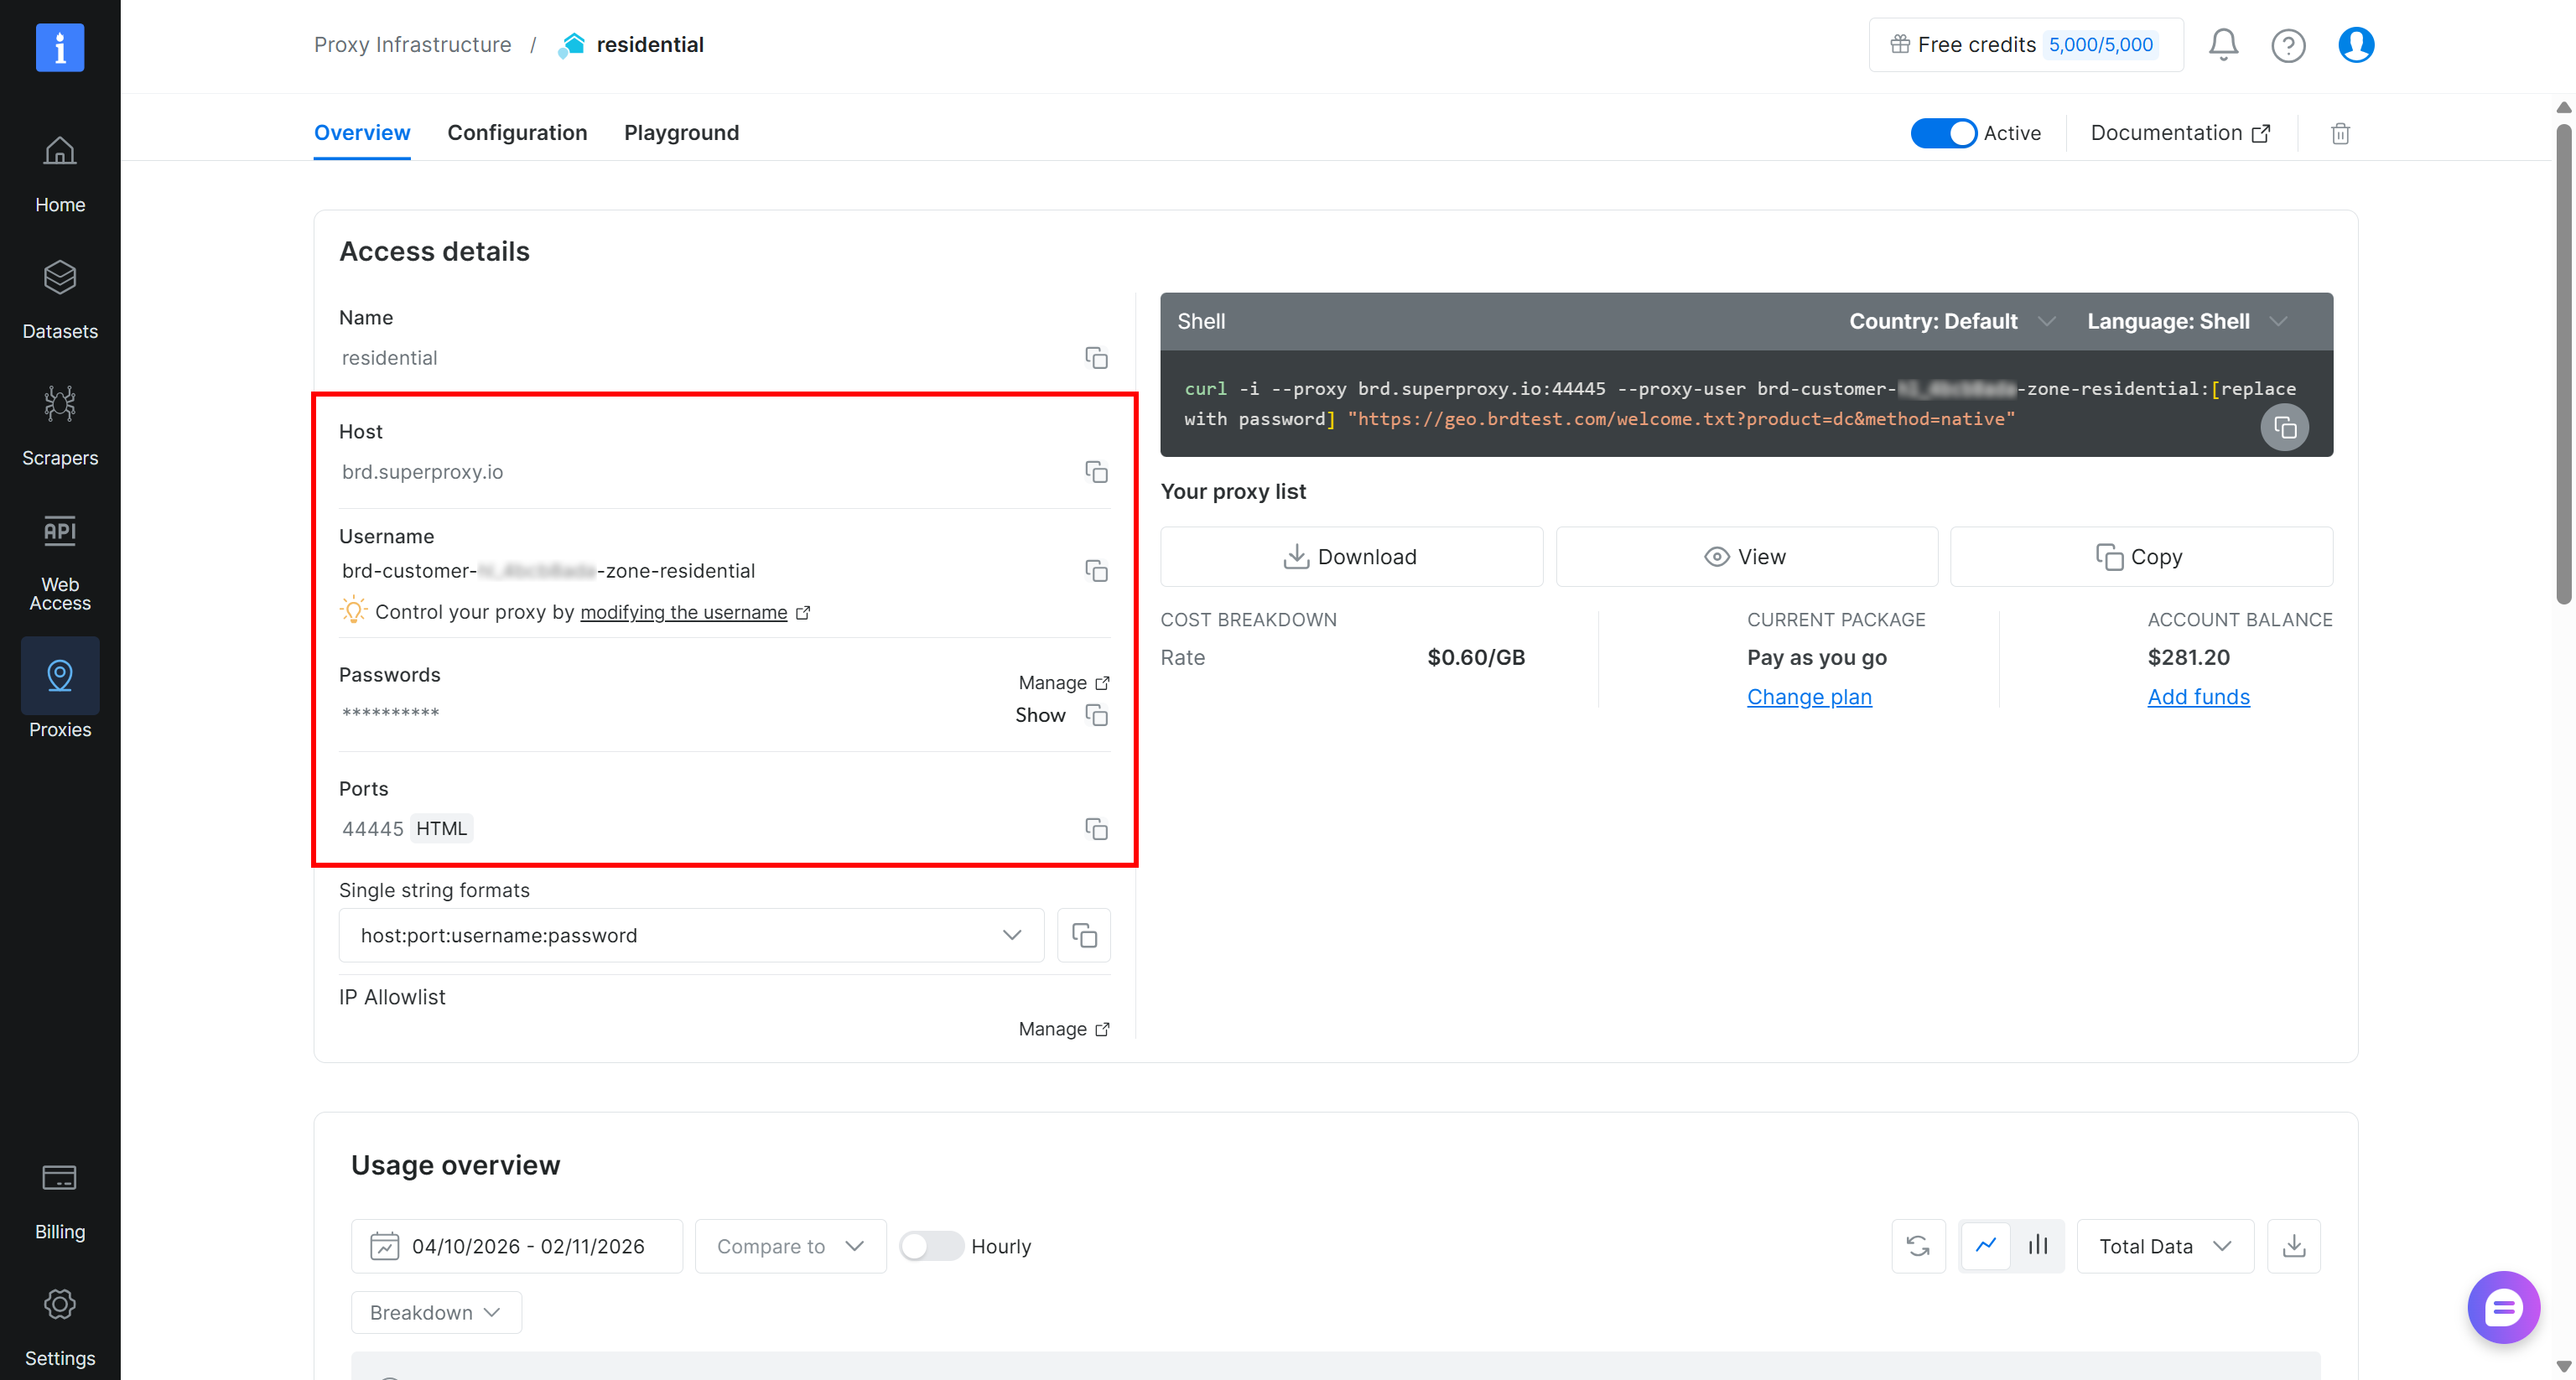
Notice that the proxy connection details are:
- Proxy hostname:
brd.superproxy.io - Proxy port:
44445(the default Bright Data port) - Proxy username:
brd-customer-XXXXXXXXX-zone-<PROXY_NAME>(e.g.,brd-customer-XXXXXXXXX-zone-residential) - Proxy password:
YYYYYYY
The steps and screenshots below will use these example values. Be sure to replace them with the actual connection details provided by your proxy provider.
Note: Bright Data datacenter or ISP proxies, or proxies from any other provider, will work as well. The procedure for changing proxy settings in Windows 10 remains the same.
Reach the Proxy Configuration Settings
Follow these preliminary steps to access the proxy configuration settings in Windows 10:
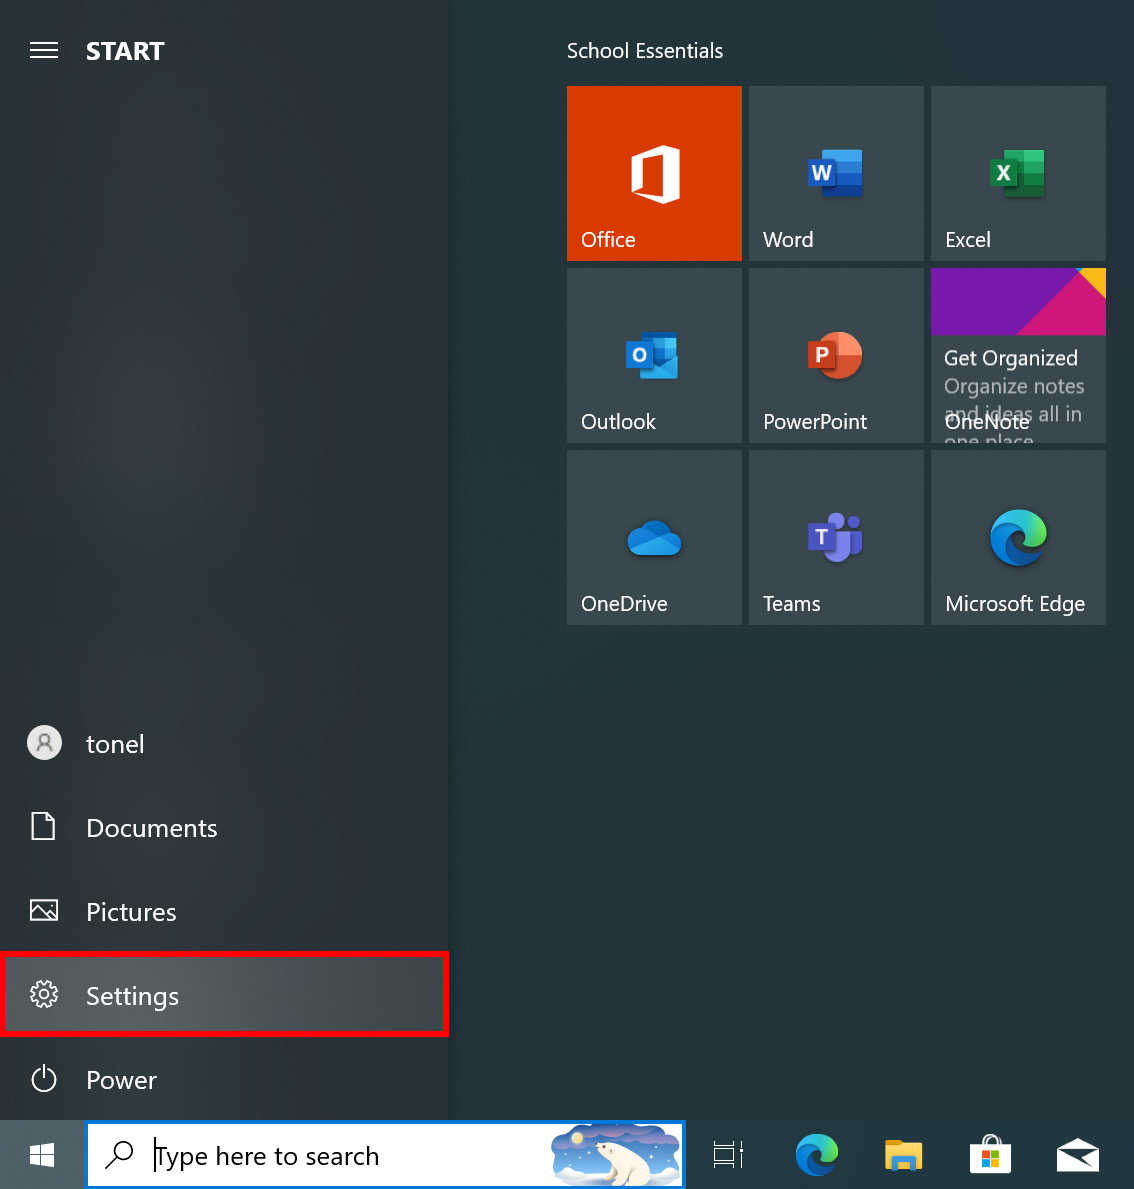
- Step 1: Click the Windows Start button (⊞) in the bottom-left corner and select “Settings” from the Start menu:
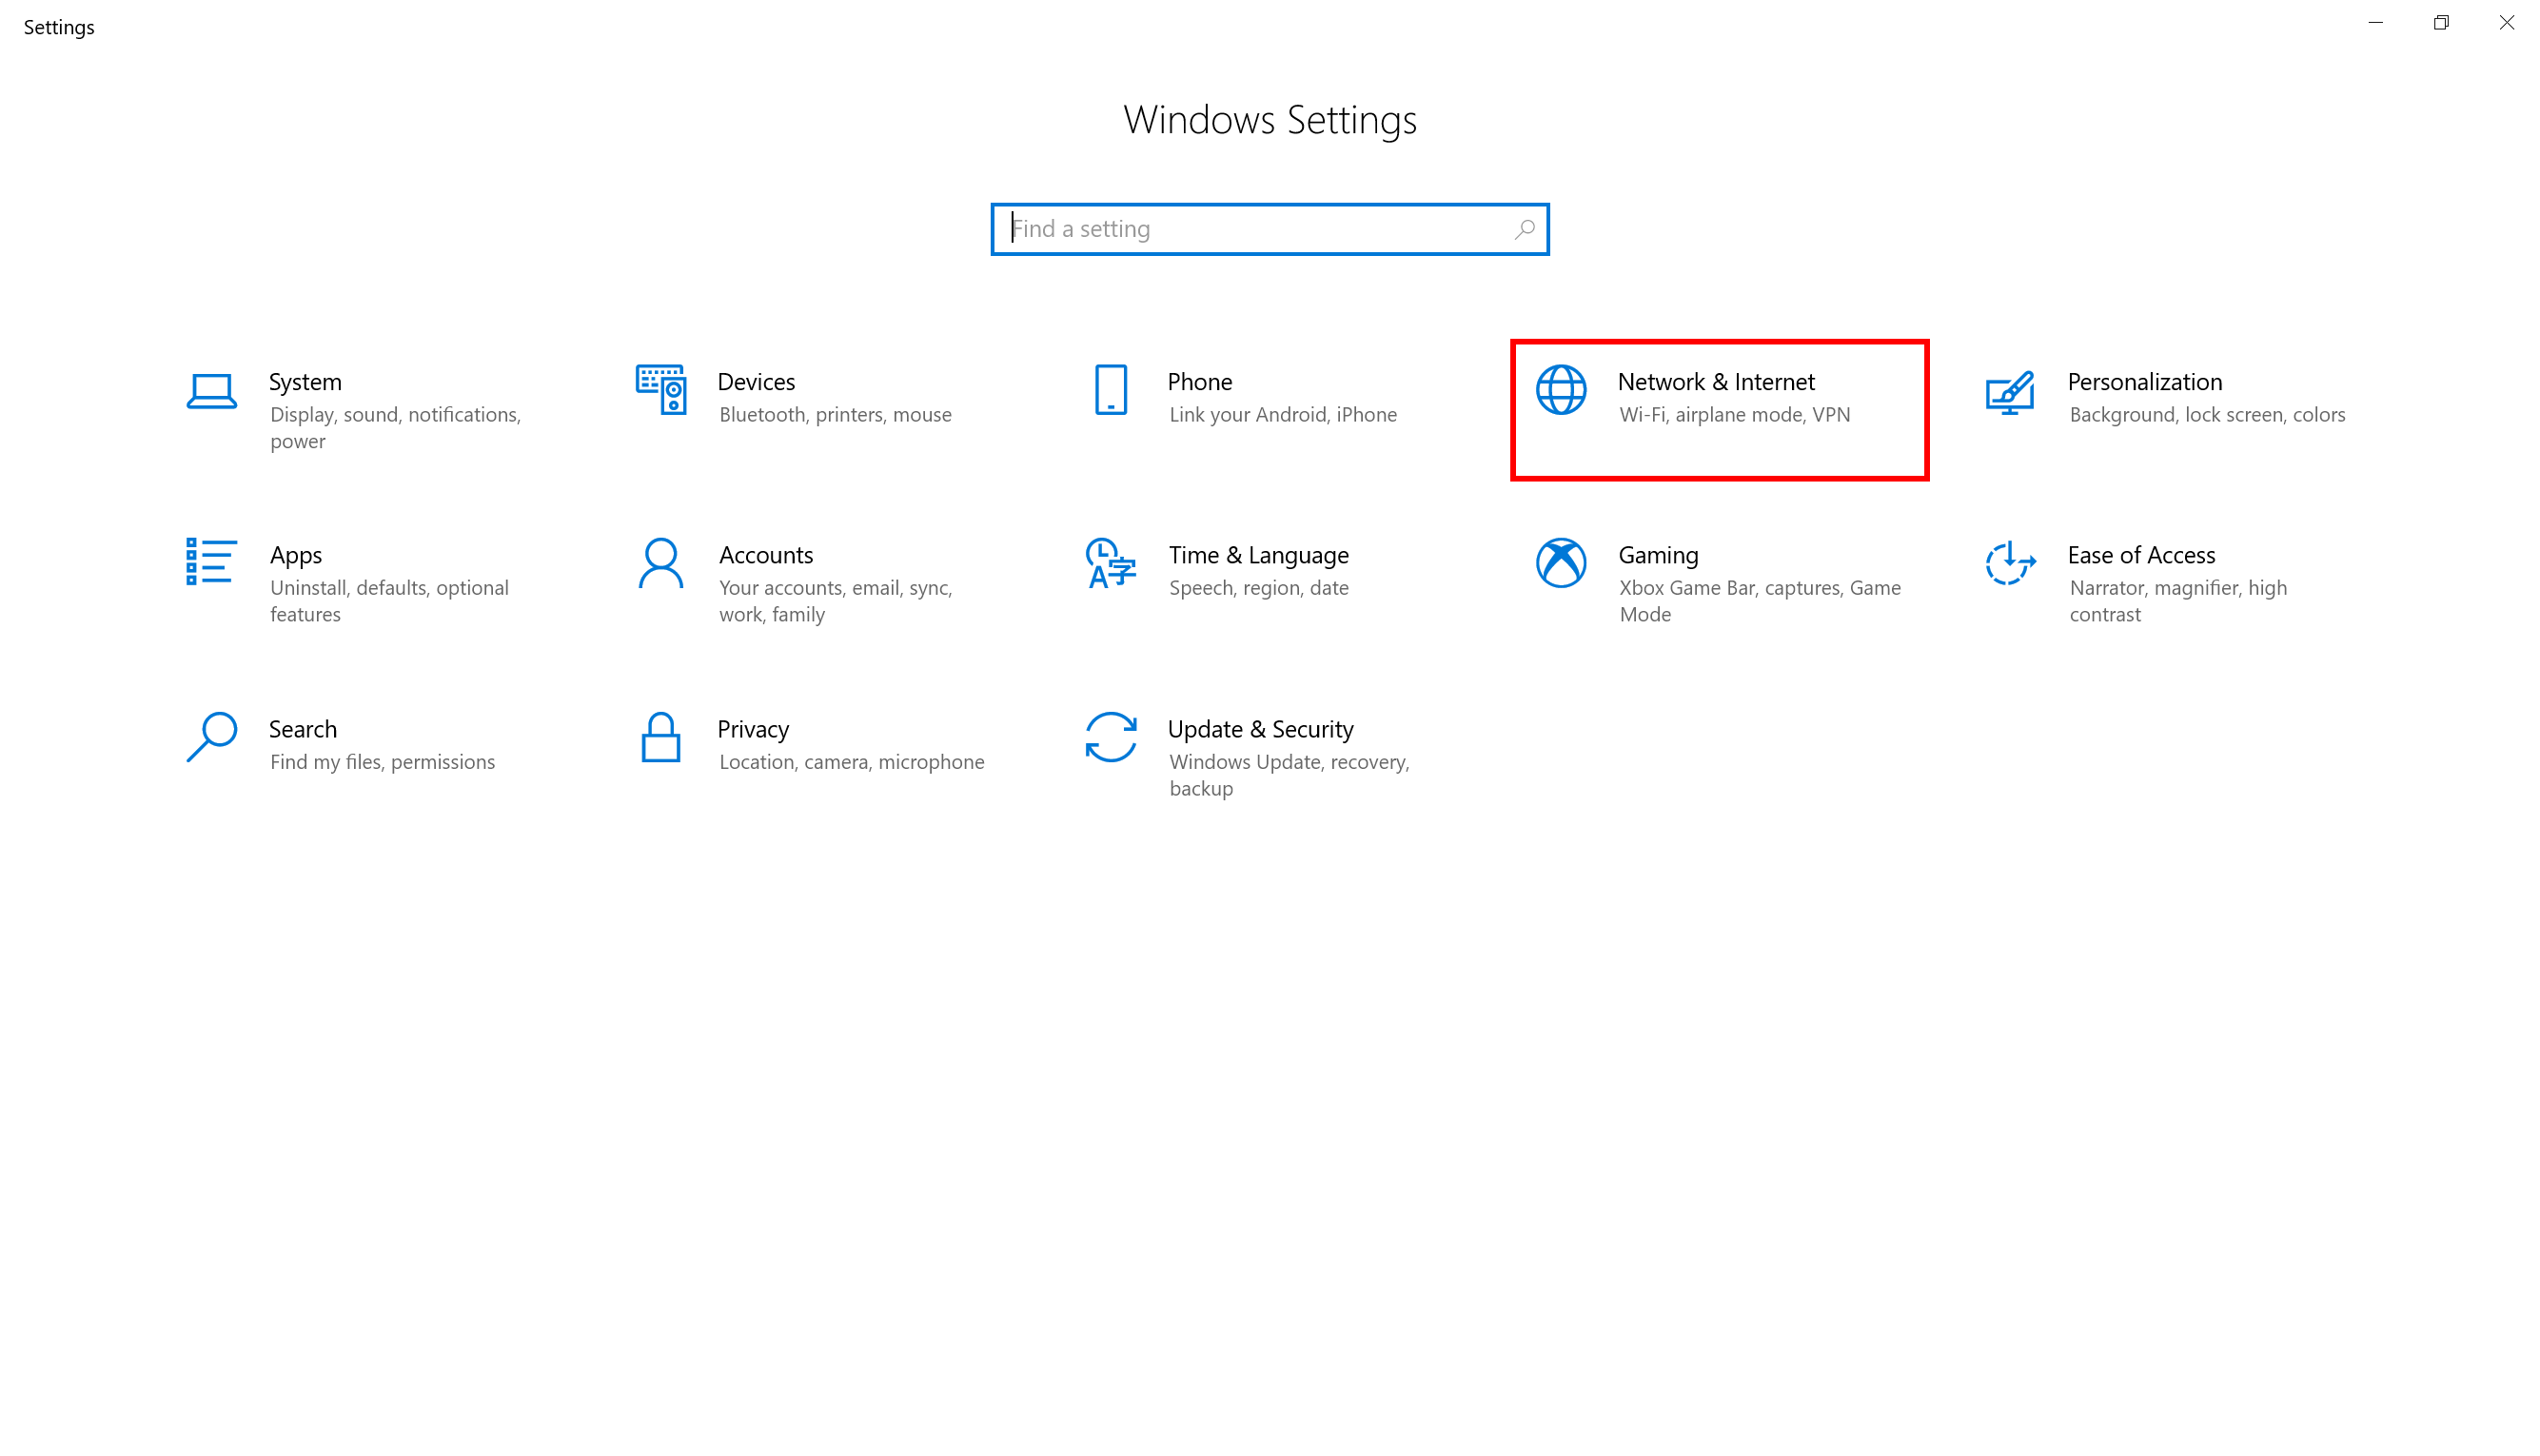
- Step 2: In the “Windows Settings” window, choose the “Network & Internet” option:
- Step 3: Move to the “Proxy” section from the left-hand sidebar:
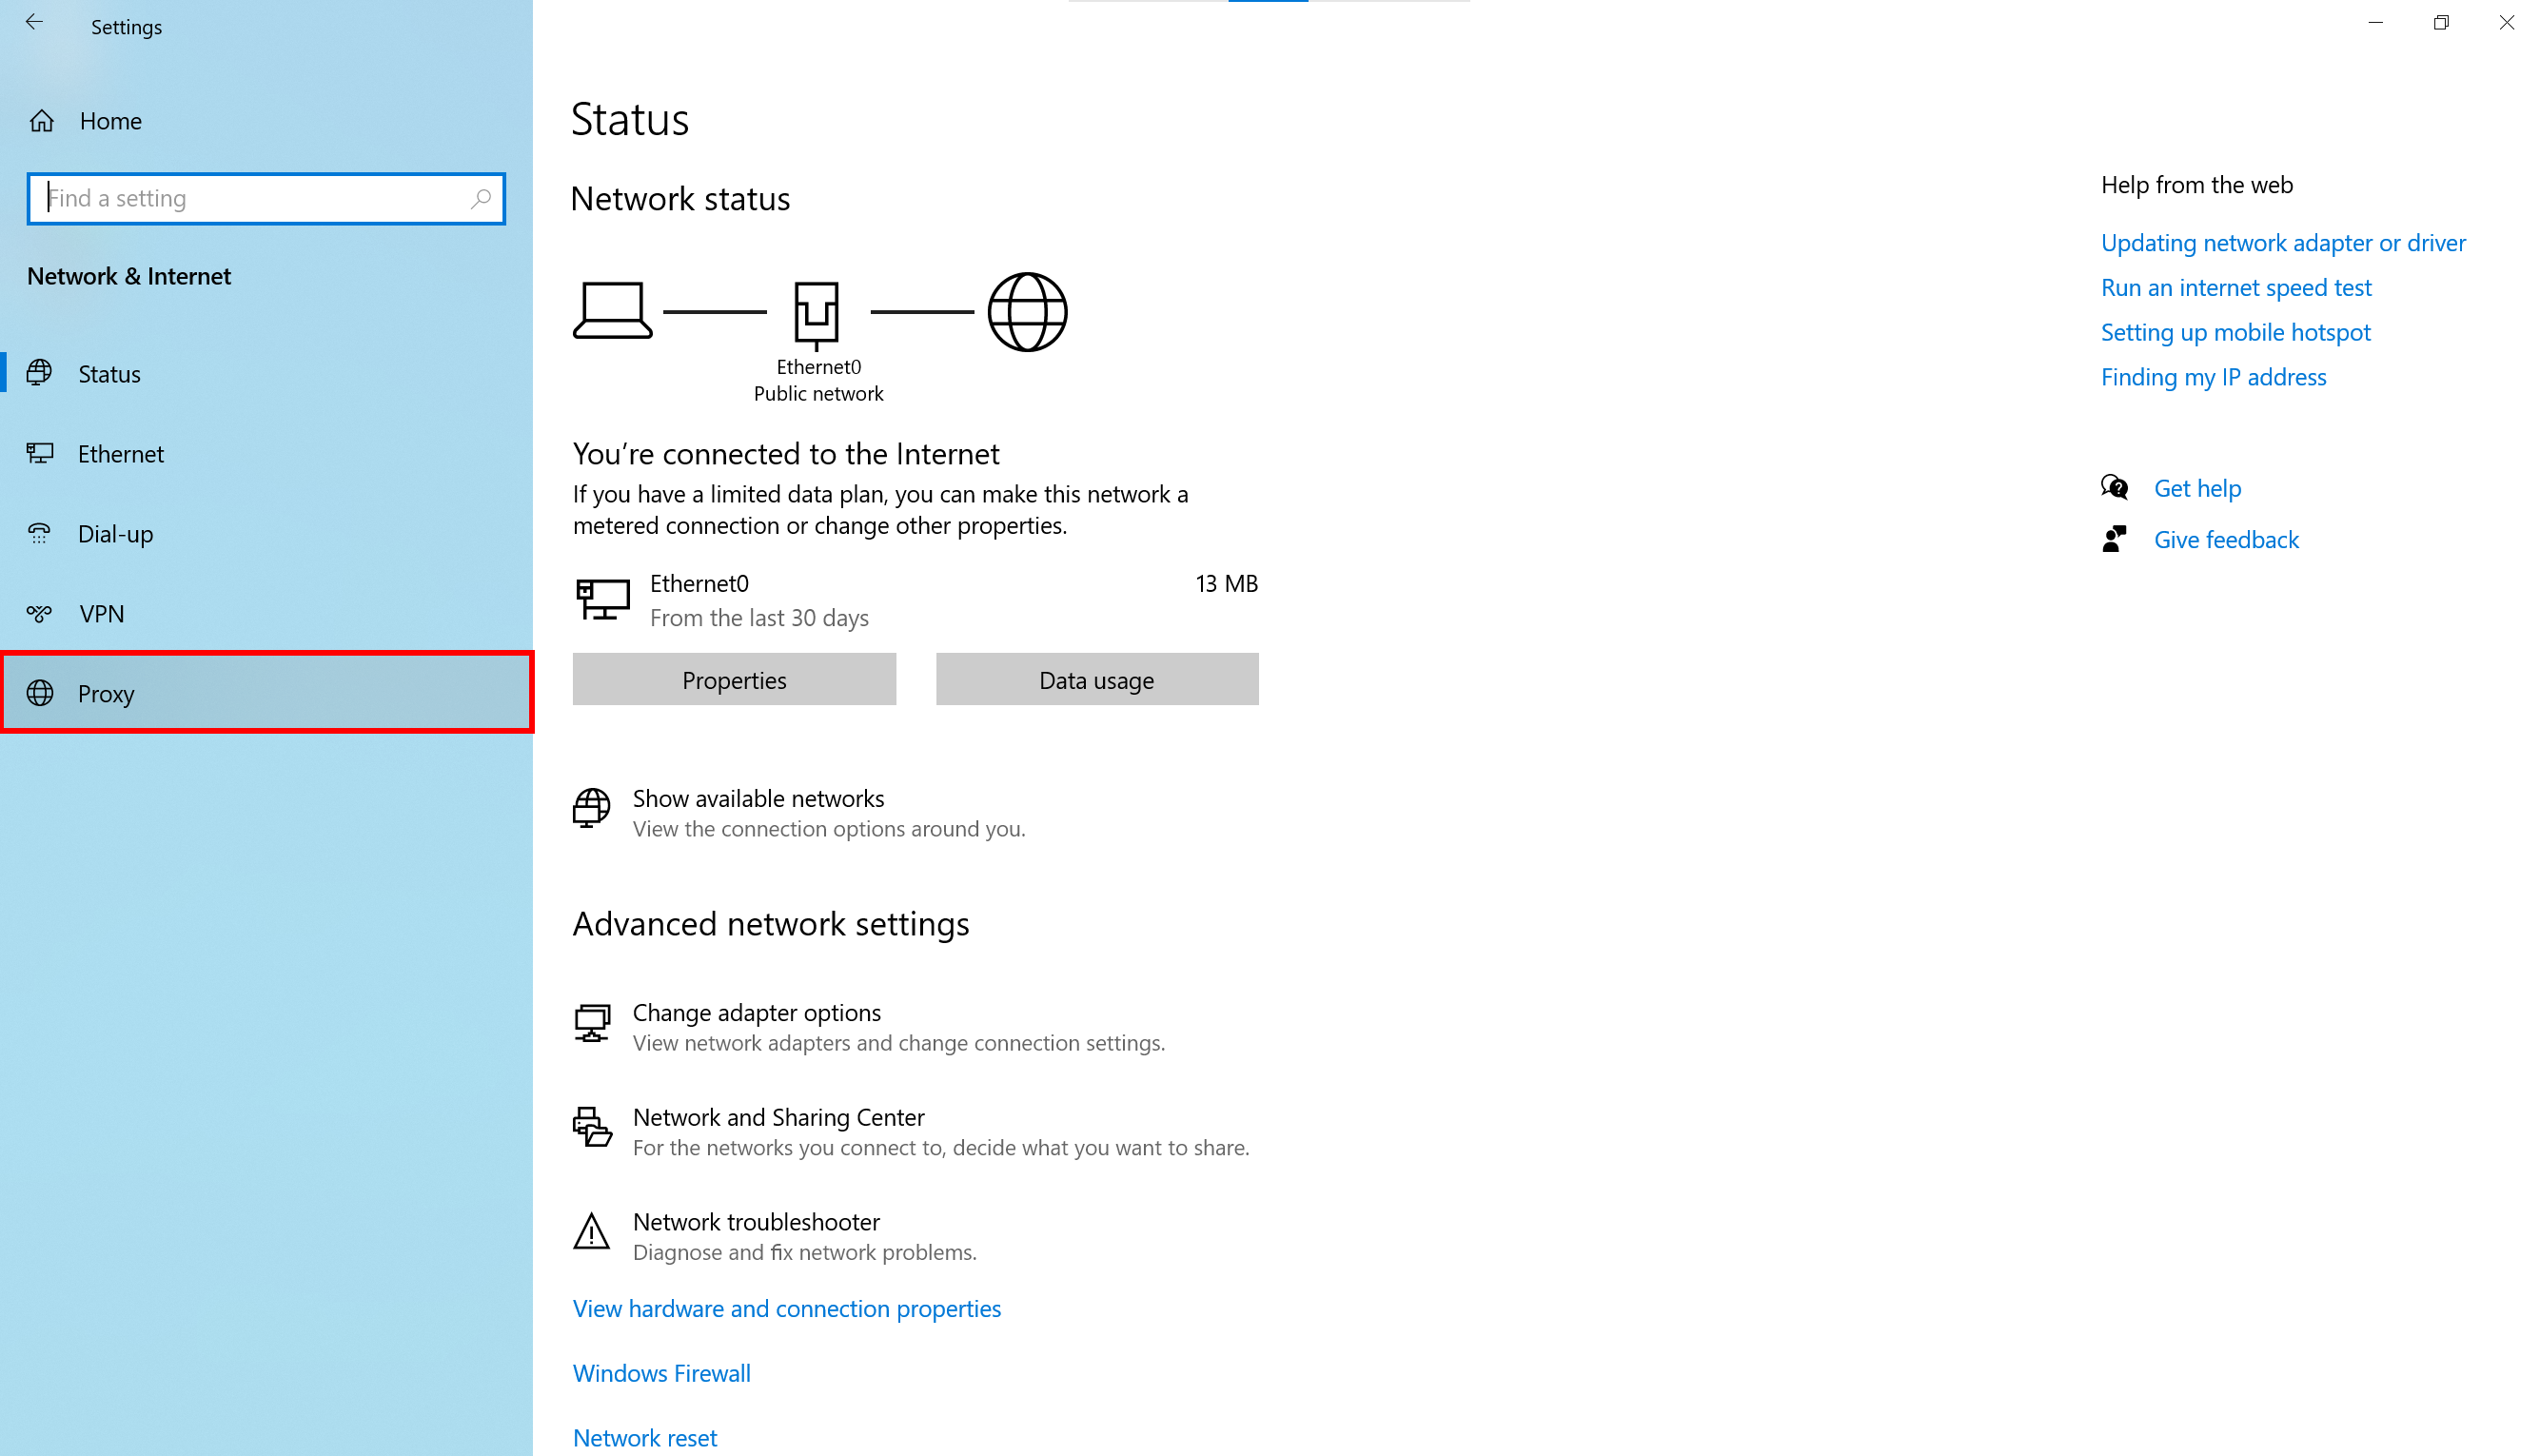
You should now be on the “Network & Internet > Proxy” page, where you can configure your proxy settings in Windows 10:
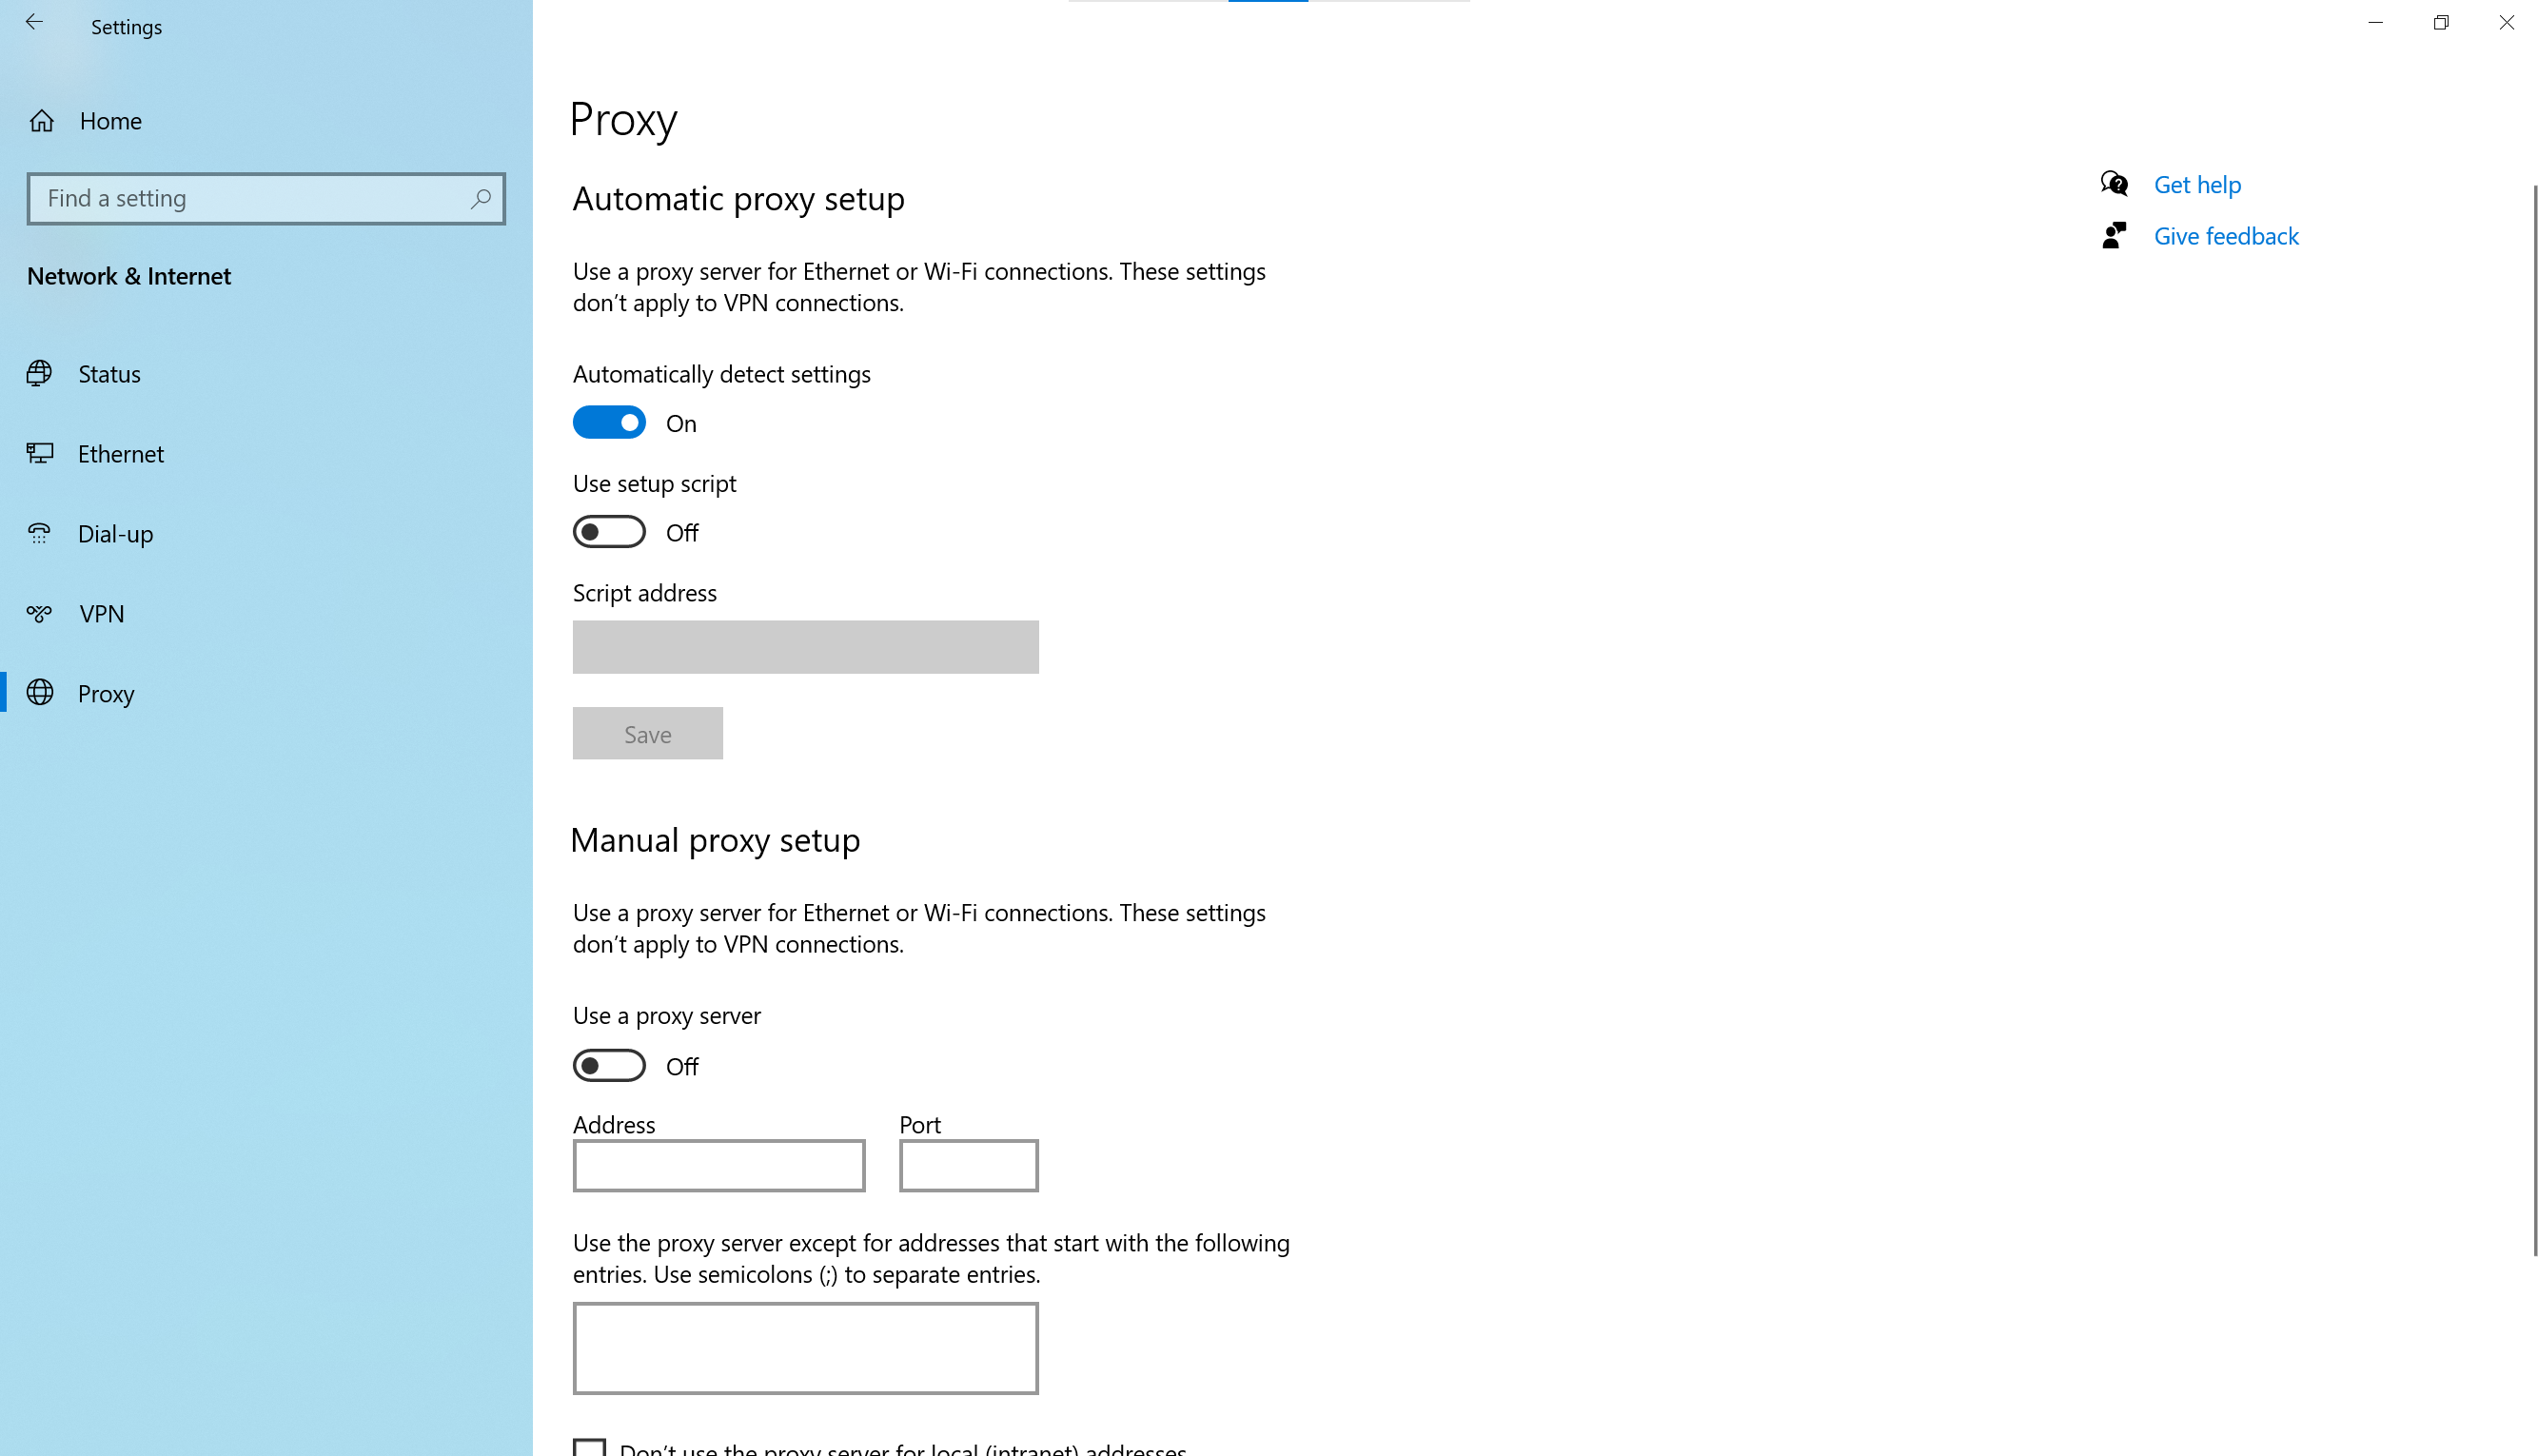
Configure the Proxy
- Step 4: Under the “Manual proxy setup” section, toggle “Use a proxy server” to “On”. Then, enter your proxy server’s IP address or hostname and port number in the corresponding fields:
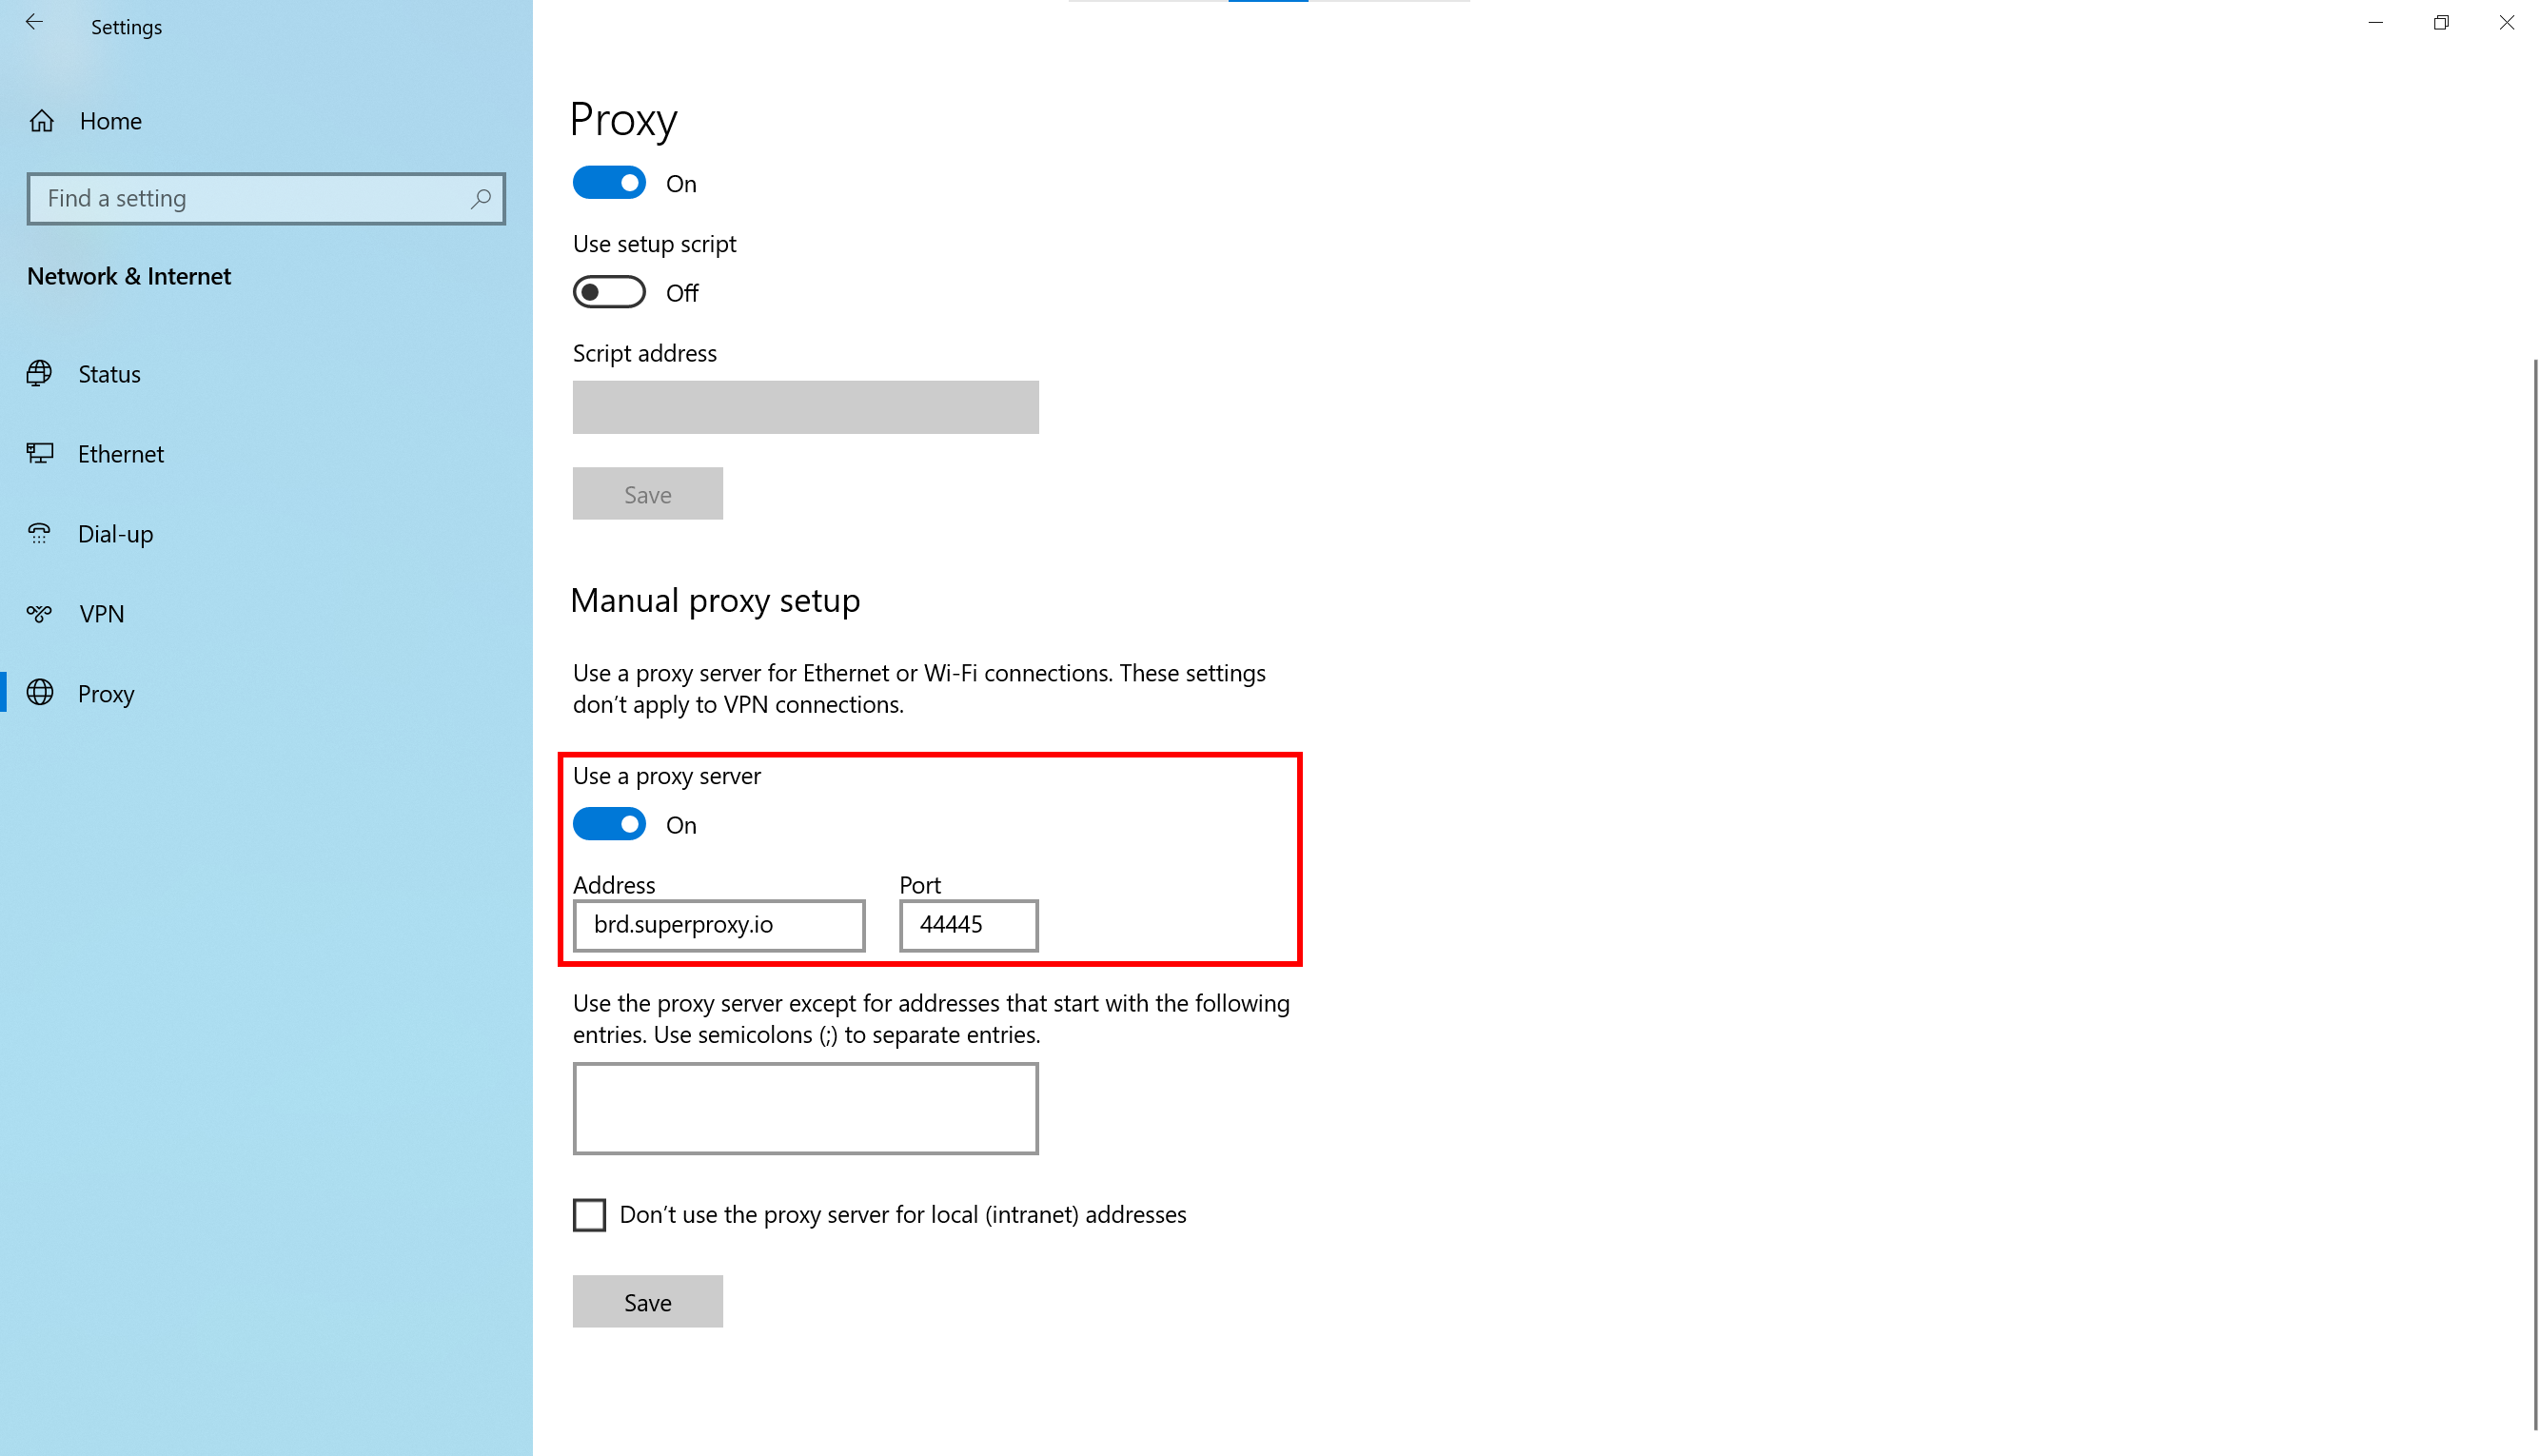
Note #1: “Address” accepts either a raw IP address (e.g., XX.XX.XX.XX) or a hostname (e.g., brd.superproxy.io).
Note #2: If you do not want to route the OS-level traffic through the proxy server on specific websites, enter their domains in the exceptions text box using the following format:
*.example1.com; example2.com;
This way, Windows will bypass the proxy setting for example1.com and all its subdomains and example2.com.
- Step 5: After clicking “Save”, if your proxy server requires authentication, Windows 10 will display a pop-up window asking for a username and password. Enter your proxy credentials in the corresponding fields and click “OK”:
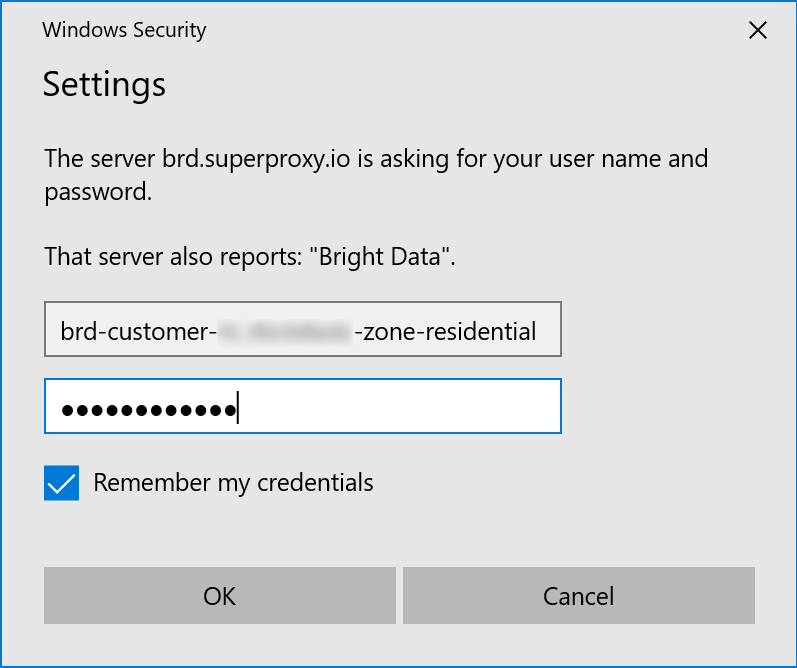
Great! You just configured a proxy server in Windows 10.
Verify That Your Windows 10 Proxy Configuration Works
To check whether your proxy server is working correctly in Windows 10, open your preferred web browser and navigate to the IP endpoint on HTTPBin.io:
https://httpbin.io/ip
This endpoint returns the IP address associated with your connection, allowing you to verify that your traffic is going through the proxy.
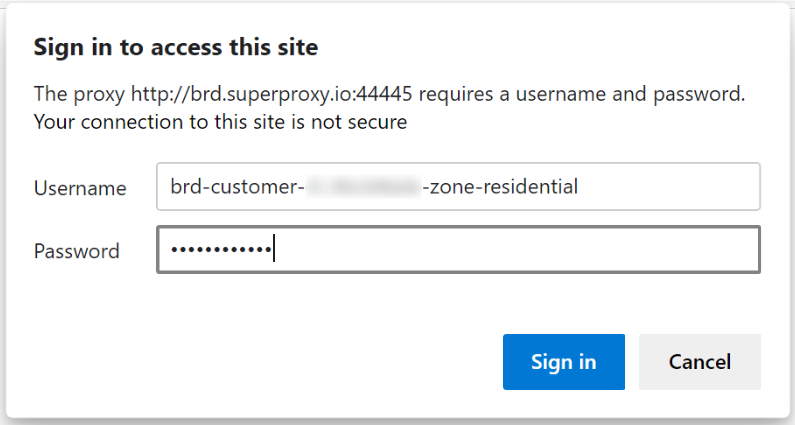
If you configured an authenticated proxy server in Windows 10, you will be prompted to enter your username and password. As before, provide your proxy credentials in the corresponding fields. Then, press “Sign in”:
If the proxy is working correctly, the endpoint will return the proxy’s IP address rather than your original IP address:
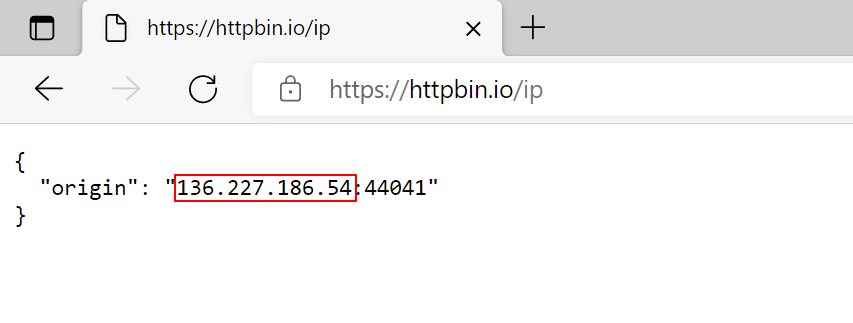
Additionally, if you configured a rotating proxy, reloading the page should return a different IP address in the origin field, depending on your provider’s rotation settings.
Et voilà! Your Windows 10 proxy configuration is up and running.
How to Set Up a SOCKS Proxy in Windows 10 Using the Control Panel
The traditional Control Panel provides an alternative way to configure a proxy server in Windows 10. Unlike the previous method, this approach also allows you to specify a SOCKS proxy. If you are unfamiliar with SOCKS proxies, read our guide to SOCKS vs HTTP proxies.
Prerequisites
Before you begin, ensure you have:
- A Windows 10 machine
- A Windows 10-compatible SOCKS proxy server: Any SOCKS5 proxy provider will do.
Note: All Bright Data proxy types (residential, datacenter, and ISP) support HTTP, HTTPS, and SOCKS connections. The only difference when using SOCKS is the connection port. By default, Bright Data uses port 22228 for SOCKS connections, instead of 44445 for HTTP/HTTPS.
Open Internet Properties in the Control Panel
Take these actions to access the SOCKS proxy configuration settings in the Windows 10 Control Panel:
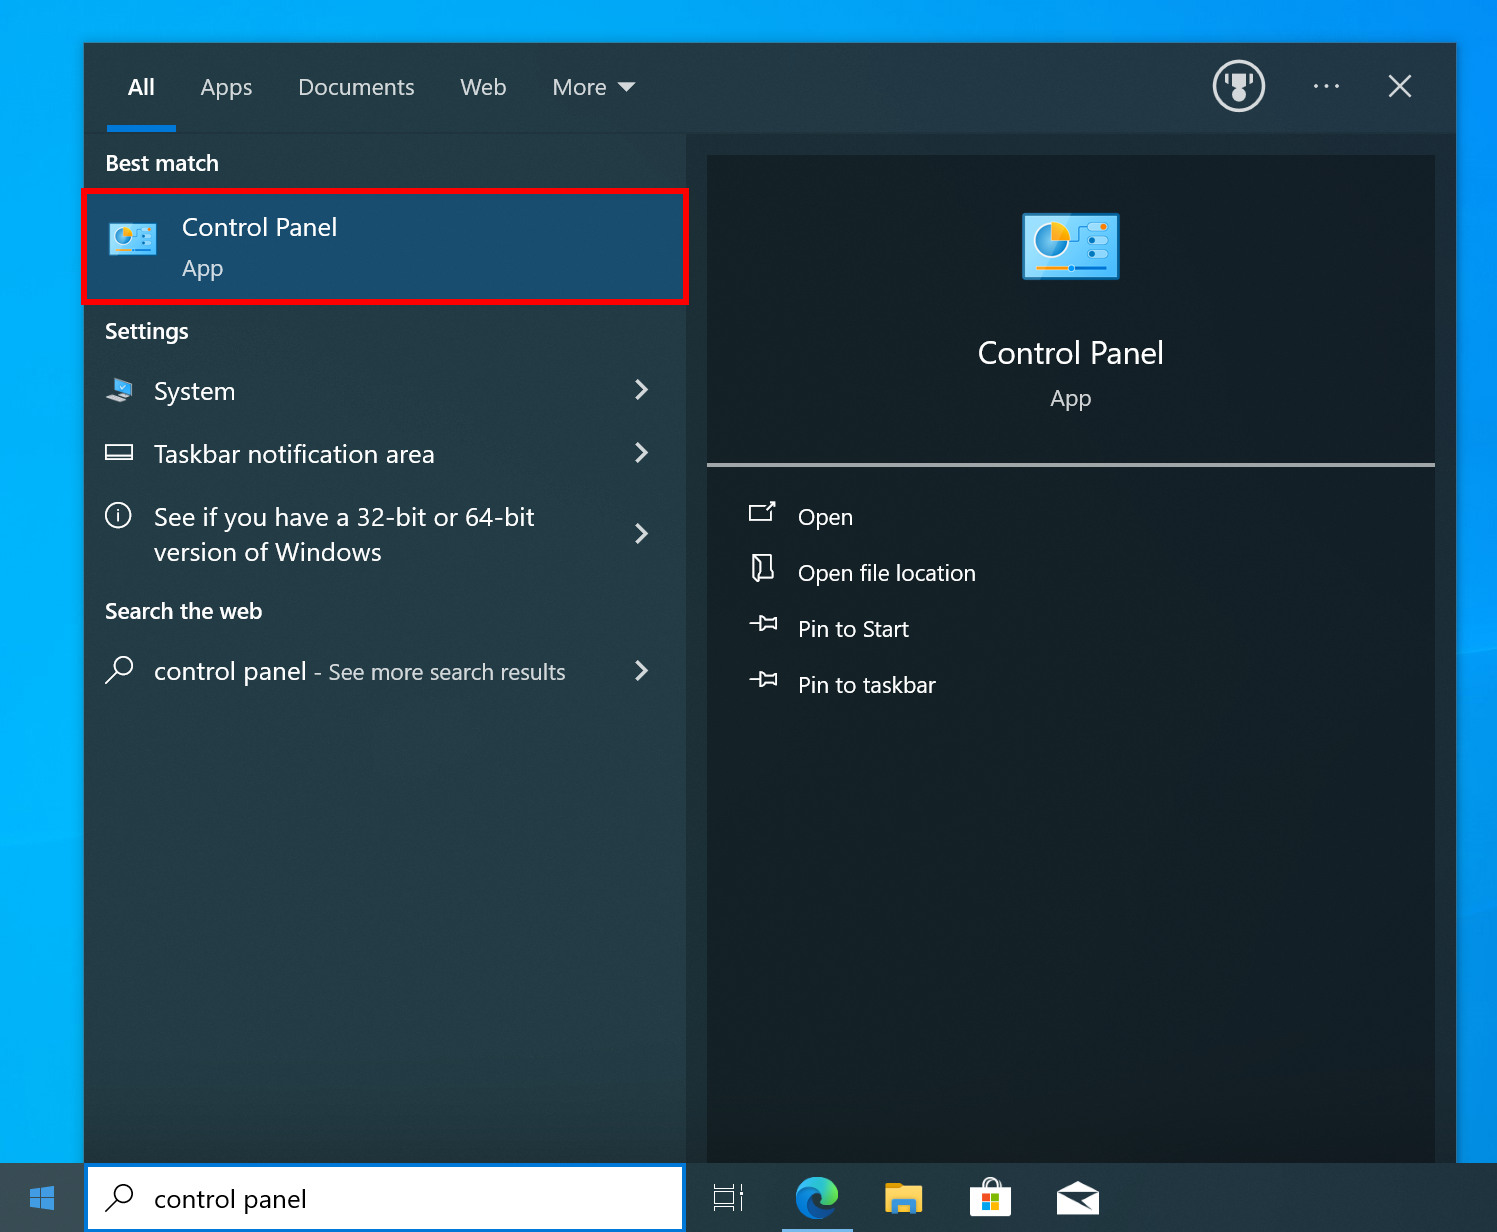
- Step 1: In the Windows search bar, type “control panel” and select the “Control Panel” app from the search results.
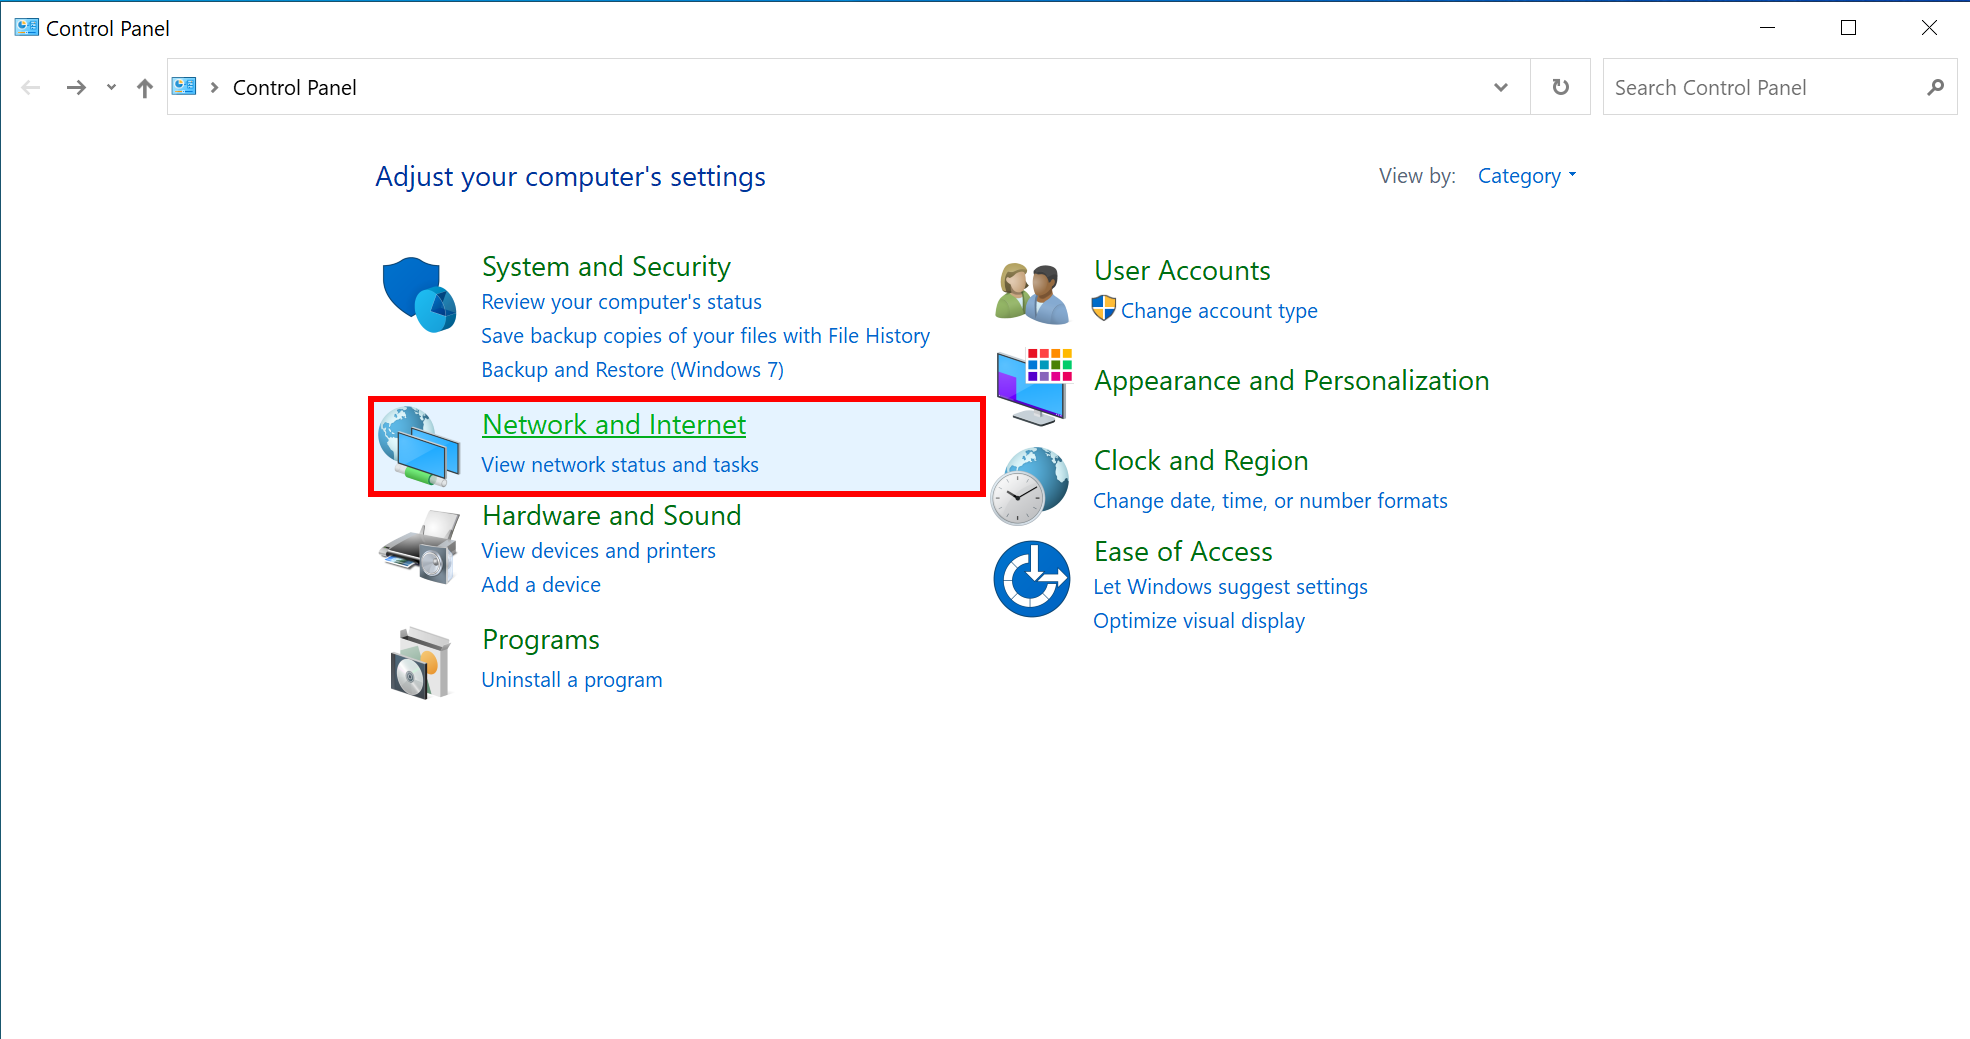
- Step 2: In the “Control Panel” window, select “Network and Internet”:
- Step 3: Under the “Network and Internet” section, click “Internet Options”:
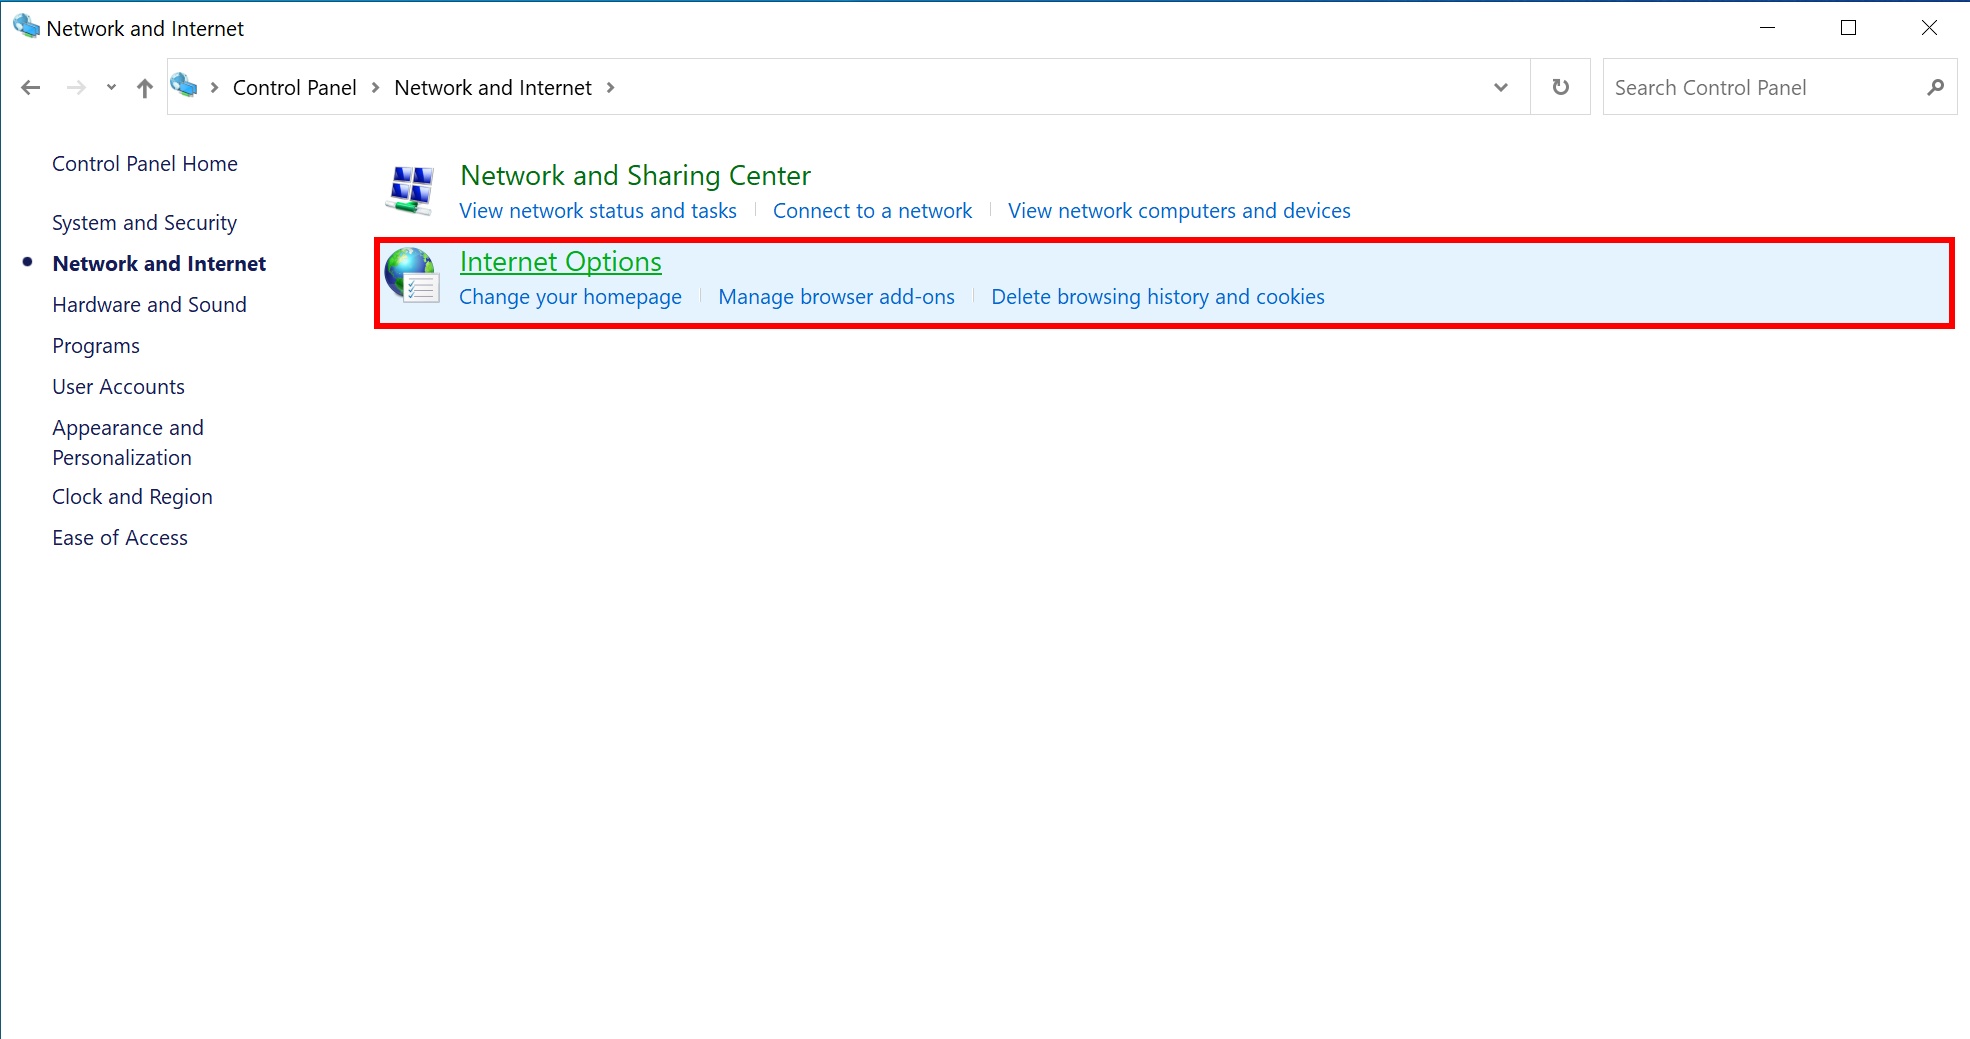
This will open the classic “Internet Properties” window, where you can manually configure your proxy settings in Windows 10. Wonderful!
Set Up the SOCKS Proxy
- Step 4: In the “Internet Properties” window, switch to the “Connections” tab and click the “LAN settings” button:
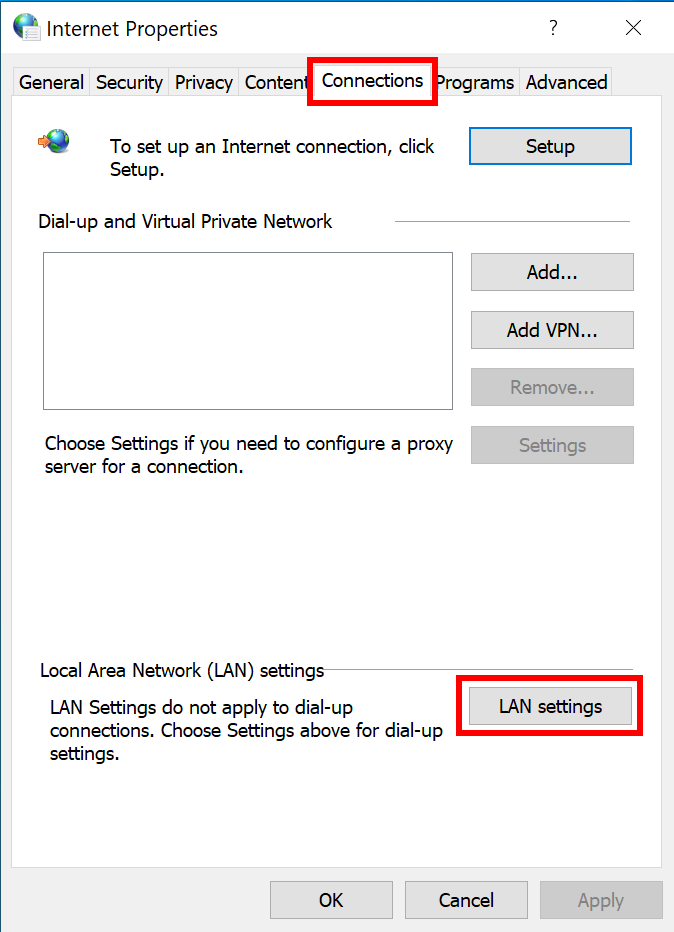
- Step 5: In the “Local Area Network (LAN) Settings” window, locate the “Proxy server” section and click “Advanced” to access the detailed proxy configuration options:
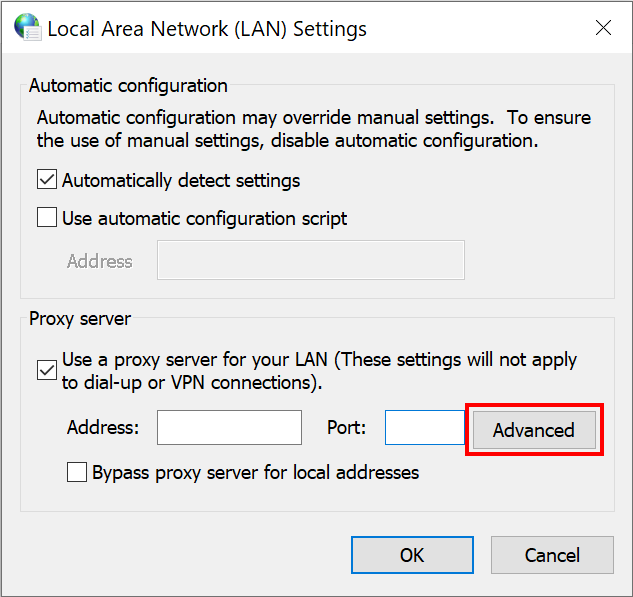
- Step 6: In the “Proxy Settings” window, enter your SOCKS proxy hostname and port in the “Socks” row:
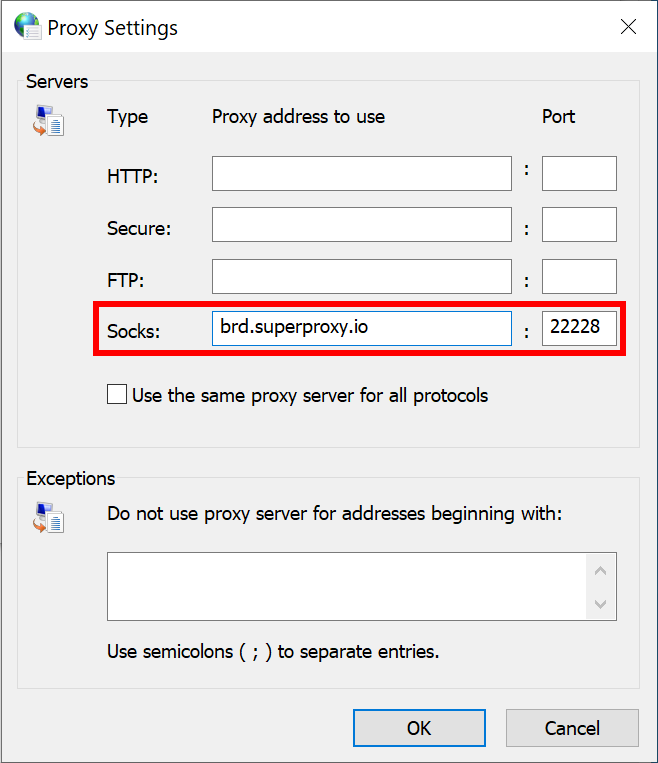
This interface also allows you to configure other proxy protocols, including HTTP, HTTPS (under the “Secure” field), and FTP. So, you could also use it as an alternative to the “Settings” way presented earlier.
Mission complete! You successfully configured a SOCKS proxy in Windows 10.
Address the Main Windows 10 Proxy Errors
Before investigating a specific issue, try these general troubleshooting steps:
- Temporarily disable your VPN or third-party security software to see whether it is interfering with the proxy connection.
- Flush the DNS cache by running
ipconfig /flushdnsin the Command Prompt. - Restart your browser after configuring the proxy, and clear its cache if necessary.
- Restart your computer.
For solutions to specific Windows 10 proxy issues, refer to the sections below.
Proxy Settings in Windows 10 Are Not Saved After Clicking “Save”
Cause: Windows is unable to establish a connection to the configured proxy server.
Solution: Check that the proxy hostname or IP address and port are correct. Make sure there are no typos and that the proxy server is available.
The Proxy Authentication Prompt Does Not Appear
Possible causes:
- Credentials for the proxy may already be saved in Windows Credential Manager.
- Windows may need to send a web request before displaying the authentication prompt.
Solutions:
- Open Windows Credential Manager and check whether credentials for the current proxy are already saved. Update or remove outdated credentials if necessary.
- Wait a few seconds (up to 10-15 seconds) for the Windows Security prompt asking for your proxy username and password to appear.
“Windows Could Not Automatically Detect This Network’s Proxy Settings”
Possible causes: A failure in Web Proxy Auto-Discovery (WPAD), a corrupted network stack, or a faulty network adapter.
Solutions:
- Run the “Network Troubleshooter” by going to “Settings > Update & Security > Troubleshoot > Internet Connections”.
- Reset the network stack in an administrator CMD terminal by running these commands one at a time:
netsh winsock reset
netsh int ip reset
ipconfig /flushdns
- Restart your computer. If the issue persists, update or reinstall your network adapter driver through Device Manager.
Error 502, 503, or 504 (Bad Gateway, Service Unavailable, or Gateway Timeout)
Possible causes: The proxy server may be overloaded, the upstream server may be unavailable, or network congestion may be interrupting the connection.
Solutions:
- Wait a moment and try again. Test another website to determine whether the issue affects all destinations or just one. If only one is affected, you may be receiving a block page due to a low-quality proxy.
- Clear your browser’s cache and cookies.
- If the errors persist, contact your proxy provider or network administrator.
The Proxy Works in the Browser but Not in Other Apps (or Vice Versa)
Cause: Different Windows applications may use different proxy configurations. Browsers commonly use WinINET settings, while some applications and services rely on WinHTTP or their own proxy settings.
Solutions:
- Check the current WinHTTP proxy configuration:
netsh winhttp show proxy - Import the proxy settings from Windows Internet Options:
netsh winhttp import proxy source=ie - Reset the WinHTTP proxy configuration:
netsh winhttp reset proxy - If an application still cannot connect, configure its proxy settings separately. Tools such as Git, npm, and pip may require their own proxy configuration.
Certificate or SSL Errors When Connecting Through the Proxy
Possible cause: A corporate proxy may inspect HTTPS traffic and present its own certificate. If that certificate is not trusted by Windows, the browser or application may display a certificate or SSL error.
Solution: Get the official CA certificate from your proxy provider and install it in the “Trusted Root Certification Authorities” certificate store. Only install certificates from an organization or provider you trust.
Pros and Cons of Setting a Windows OS-Level Proxy
Benefits
- System-wide coverage: One configuration routes traffic from Edge, Chrome, and other WinINET-based apps without per-application setup.
- No extra software: Everything is built into Windows, so no third-party clients or extensions are required. For more control, consider applications like Bright Data’s Proxy Manager.
- Quick, simple setup: Toggle the proxy on, enter the hostname and port, and save in under a minute.
- Flexible bypass rules: The exceptions box lets you skip the proxy for chosen domains.
- Provider-agnostic: Works with any HTTP/HTTPS proxy, including residential, datacenter, and ISP types, using the same steps.
Limitations
- Not truly universal: Apps using their own network stack or WinHTTP may ignore the settings, so some traffic bypasses the proxy.
- Static IP only: IP rotation depends entirely on the provider, and you can’t switch IPs or locations per request.
- All-or-nothing routing: Everything goes through one proxy, so per-app or per-task proxy rules need extra tools.
Conclusion
In this blog post, you learned two different ways to configure a proxy server in Windows 10. The next step is choosing the right proxy provider. For a reliable, ethical, high-performance solution, consider Bright Data.
Bright Data operates a global proxy network trusted by Fortune 500 companies and more than 50,000 customers. Its network includes:
- Residential proxies: Over 400M+ residential IPs in 195 countries.
- Datacenter proxies: Over 1,300,000+ datacenter IPs.
- ISP proxies: Over 1,300,000+ ISP IPs.
Speak with one of our data experts to learn more about our proxy and web scraping solutions!



Technical Writer
 5.5 years experience
Antonello Zanini is a technical writer, editor, and software engineer with 5M+ views. Expert in technical content strategy, web development, and project management.


