

If you’re interested in web scraping, understanding HTML is key because every website is built with it. Web scraping can be used in all kinds of scenarios and can help gather data from websites without APIs, monitor product prices, build lead lists, conduct academic research, and more.
In this article, you’ll learn the basics of HTML and how to extract, parse, and process data using Python.
Interested in an in-depth Python web scraping guide? Click here.
How to Scrape Websites and Extract HTML
Before you begin this tutorial, let’s take a moment to review the essential components of HTML.
Intro to HTML
HTML is a collection of tags that tell a browser about a website’s structure and elements. For example, <h1> Text </h1> tells a browser that the piece of text following the tag is a heading, and <a href=""> link </a> identifies a hyperlink.
An HTML attribute provides additional information about a tag. For example, the href attribute for the <a> </a> tag gives you information about the URL of the page the attribute is pointing to.
Classes and IDs are critical attributes for accurately identifying elements on a page. Classes group similar elements to style them consistently using CSS or manipulate them uniformly with JavaScript. Classes are targeted using .class-name.
On the W3Schools website, class groups look like this:
<div class="city">
  <h2>London</h2>
  <p>London is the capital of England.</p>
</div>

<div class="city">
  <h2>Paris</h2>
  <p>Paris is the capital of France.</p>
</div>

<div class="city">
  <h2>Tokyo</h2>
  <p>Tokyo is the capital of Japan.</p>
</div>
You can see how each title and city block is wrapped with a div that has the same city class.
In contrast, IDs are unique to each element (i.e., two elements cannot have the same ID). For example, the following H1s have unique IDs and can be styled/manipulated uniquely:
<h1 id="header1">Hello World!</h1>

<h1 id="header2">Lorem Ipsum Dolor</h1>
The syntax for targeting elements with IDs is #id-name.
Now that you know the basics of HTML, let’s start web scraping.
Set Up Your Scraping Environment
This tutorial uses Python as it offers many HTML scraping libraries and the language is easy to learn. To check whether Python is installed on your computer, run the following command in PowerShell (Windows) or your terminal (macOS):
python3
If Python is installed, you’ll see your version number; if not, you’ll receive an error. Go ahead and install Python if you don’t already have it.
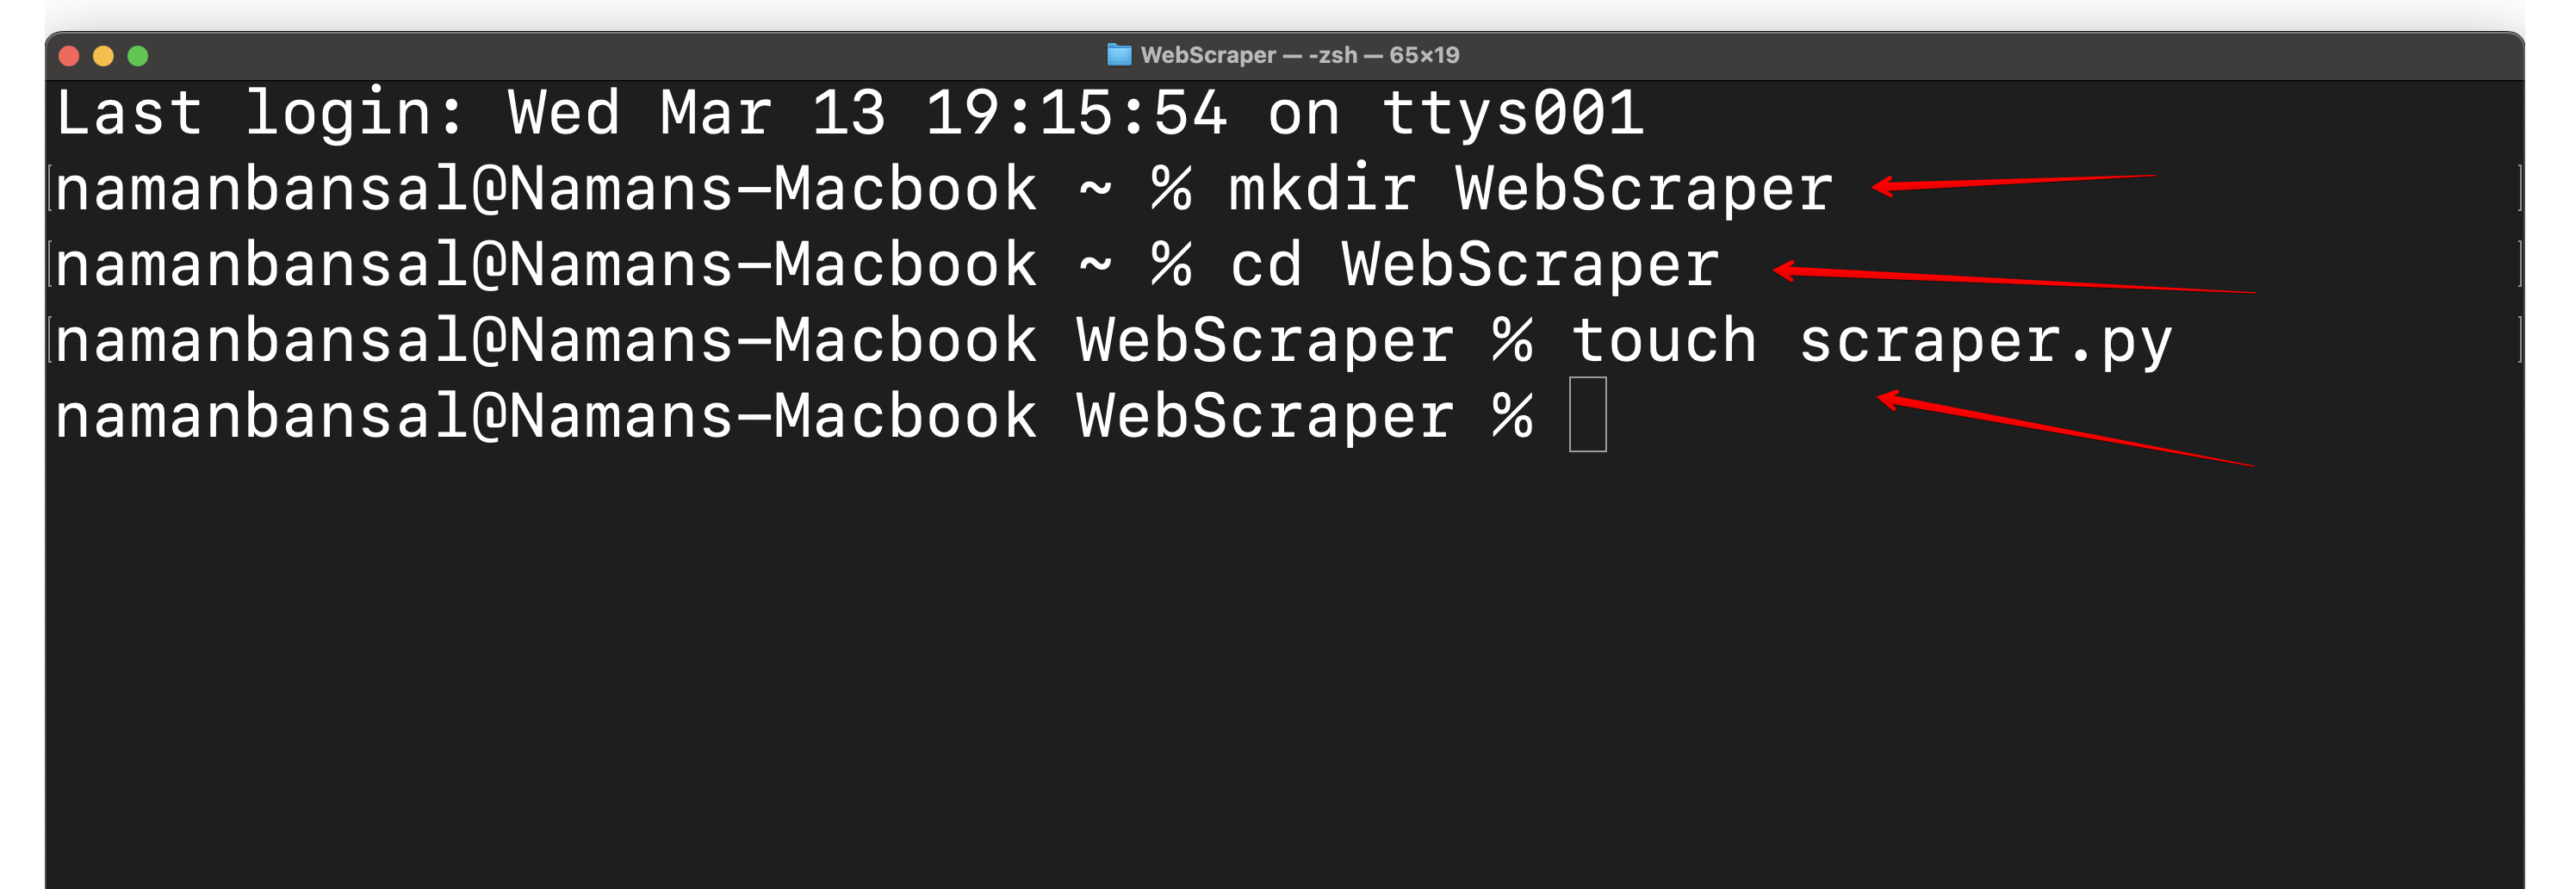
Next, create a folder called WebScraper and create a file inside the WebScraper folder named scraper.py. Then open it in your integrated development environment (IDE) of choice. Visual Studio Code is used here:
An IDE is a multipurpose application that allows programmers to write code, debug it, test programs, build automation, and more. You’ll use it here to code your HTML scraper.
Next, you need to separate your global Python installation from your scraping project by creating a virtual environment. This helps avoid dependency conflicts and keeps the entire application organized.
To do so, install the virtualenv library using the following command:
pip3 install virtualenv
Navigate into your project folder:
cd WebScraper
Then create a virtual environment:
python<version> -m venv <virtual-environment-name>
This command creates a folder for all the packages and scripts inside your project folder:

Now, you need to activate the virtual environment using one of the following commands (based on your platform):
source <virtual-environment-name>/bin/activate #In MacOS and Linux

<virtual-environment-name>/Scripts/activate.bat #In CMD

<virtual-environment-name>/Scripts/Activate.ps1 #In Powershell
Upon successful activation, you’ll see the name of your virtual environment on the left-hand side of the screen:

Now that your virtual environment is activated, you need to install a web scraping library. There are numerous options, including Playwright, Selenium, Beautiful Soup, and Scrapy. Here, you utilize Playwright because it is easy to use, supports multiple browsers, can handle dynamic content, and offers a headless mode (scraping without a graphical user interface (GUI)).
Run pip install pytest-playwright to install Playwright; then install the required browsers with playwright install.
After installing Playwright, you’re ready to get started on web scraping.
Extract HTML from a Website
The first step of any web scraping project is identifying the website you want to scrape. Here, you utilize this test site.
Next, you need to identify the information you want to scrape from the page. In this case, it’s the page’s full HTML content.
Once you’ve identified the information you’re trying to scrape, you can start coding the scraper. In Python, the first step is importing the required libraries for Playwright. Playwright lets you import two types of APIs: sync and async. The async library is used while writing asynchronous code only, so you import the sync library with the following command:
from playwright.sync_api import sync_playwright
After importing the sync library, you need to declare a Python function using the following code snippet:
def main():
    #Rest of the code will be inside this function
As you can see from the preceding note, you write your web scraping code inside this function.
Typically, to get information from a website, you would open a web browser, create a new tab, and visit that website. To scrape the site, you need to translate these actions into code, which is what you’ll use Playwright for. Their documentation shows that you can call the sync_api imported earlier and open a browser with this snippet:
with sync_playwright() as p:
        browser = p.chromium.launch(headless=False)
By adding headless=False inside the brackets, you are able to see the website’s contents.
After opening your browser, open a new tab and visit the target URL:
page = browser.new_page()
try:
  page.goto("https://webscraper.io/test-sites/e-commerce/static")
except:
  print("Error")
Note: The preceding lines need to be added under the lines before, which launched the browser. All this code goes inside the main function and inside one file.
This code snippet wraps the goto() function inside a try-except block for better error handling.
When you enter a site’s URL in the search bar, you have to wait for it to load. To mimic that in the code, you can use the following:
page.wait_for_timeout(7000) #millisecond value in brackets
Note: These preceding lines need to be added under the lines before.
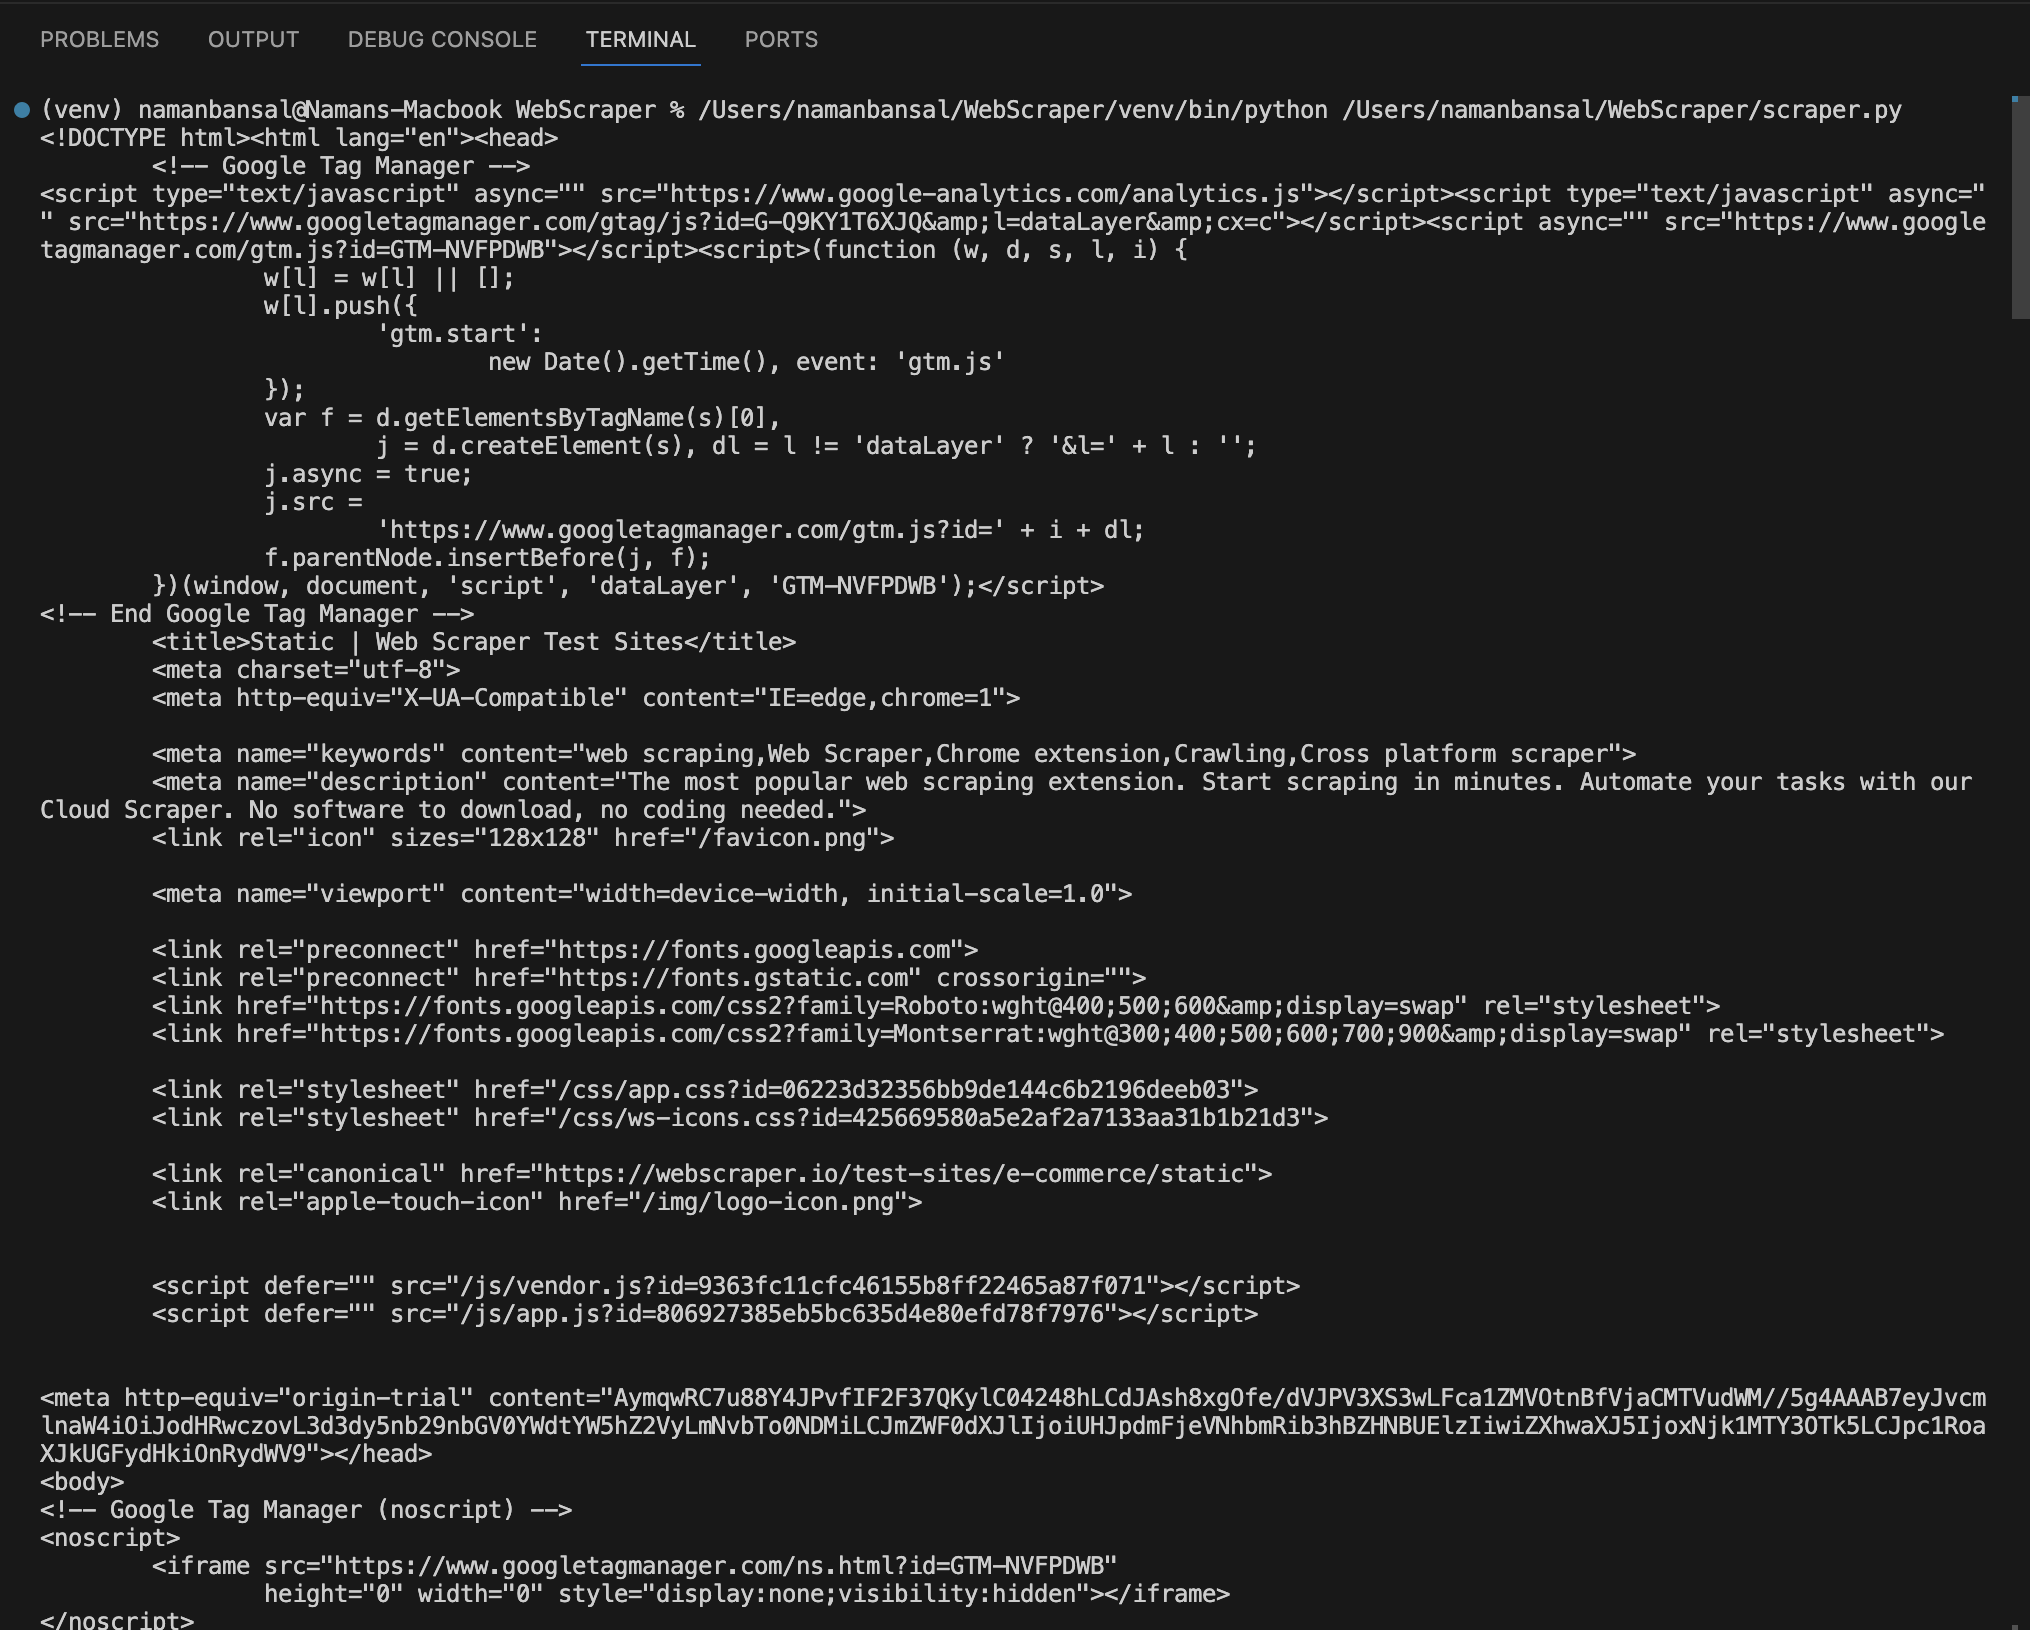
Finally, it’s time to extract all the HTML content from the page using this line of code:
print(page.content())
The complete code to extract the HTML of a page looks like this:
from playwright.sync_api import sync_playwright

def main():
  with sync_playwright() as p:
        browser = p.chromium.launch(headless=False)
        page = browser.new_page()
        try:
            page.goto("https://webscraper.io/test-sites/e-commerce/static")
        except:
            print("Error")

        page.wait_for_timeout(7000)
        print(page.content())

main()
In Visual Studio Code, the extracted HTML looks like this:
Extract HTML Using Specific Attributes
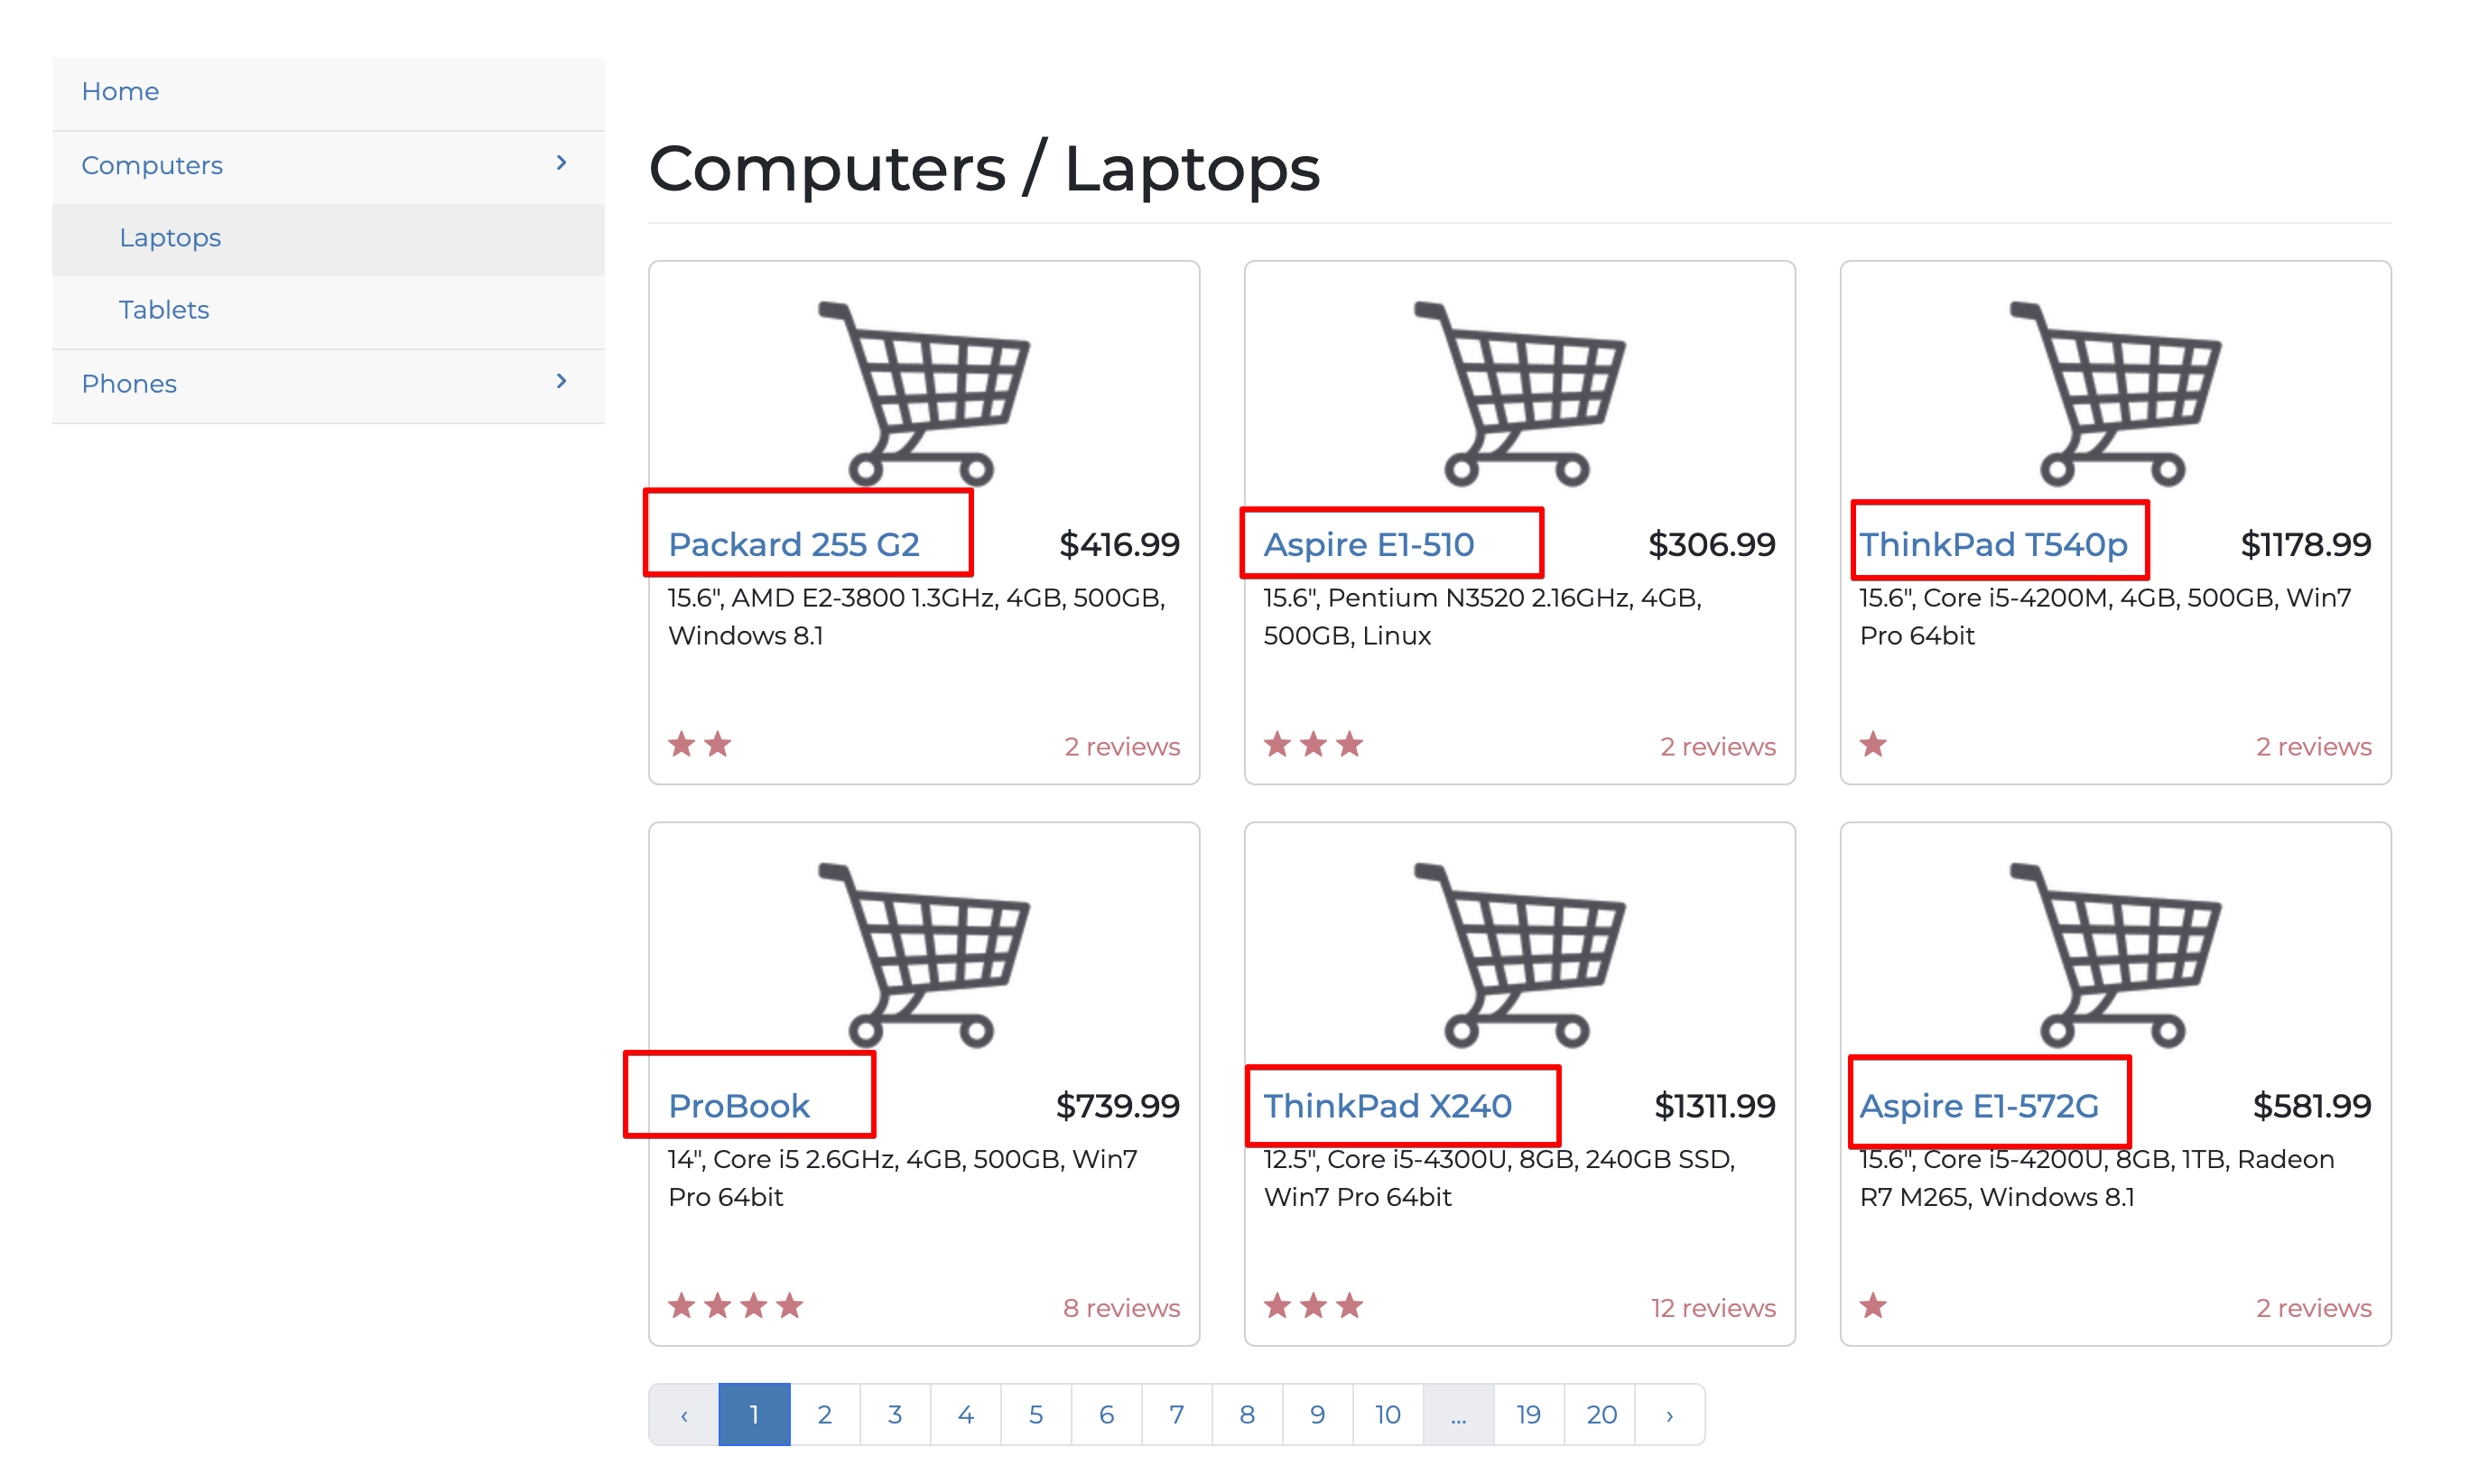
Earlier, you extracted all the elements of the Web Scraper web page; however, web scraping isn’t useful unless you limit yourself to scraping only the information you need. In this section, you extract only the titles of all the laptops on the website’s first page:
To extract specific elements, you need to understand the target website’s structure. You can do that by right-clicking and selecting the Inspect option like this:
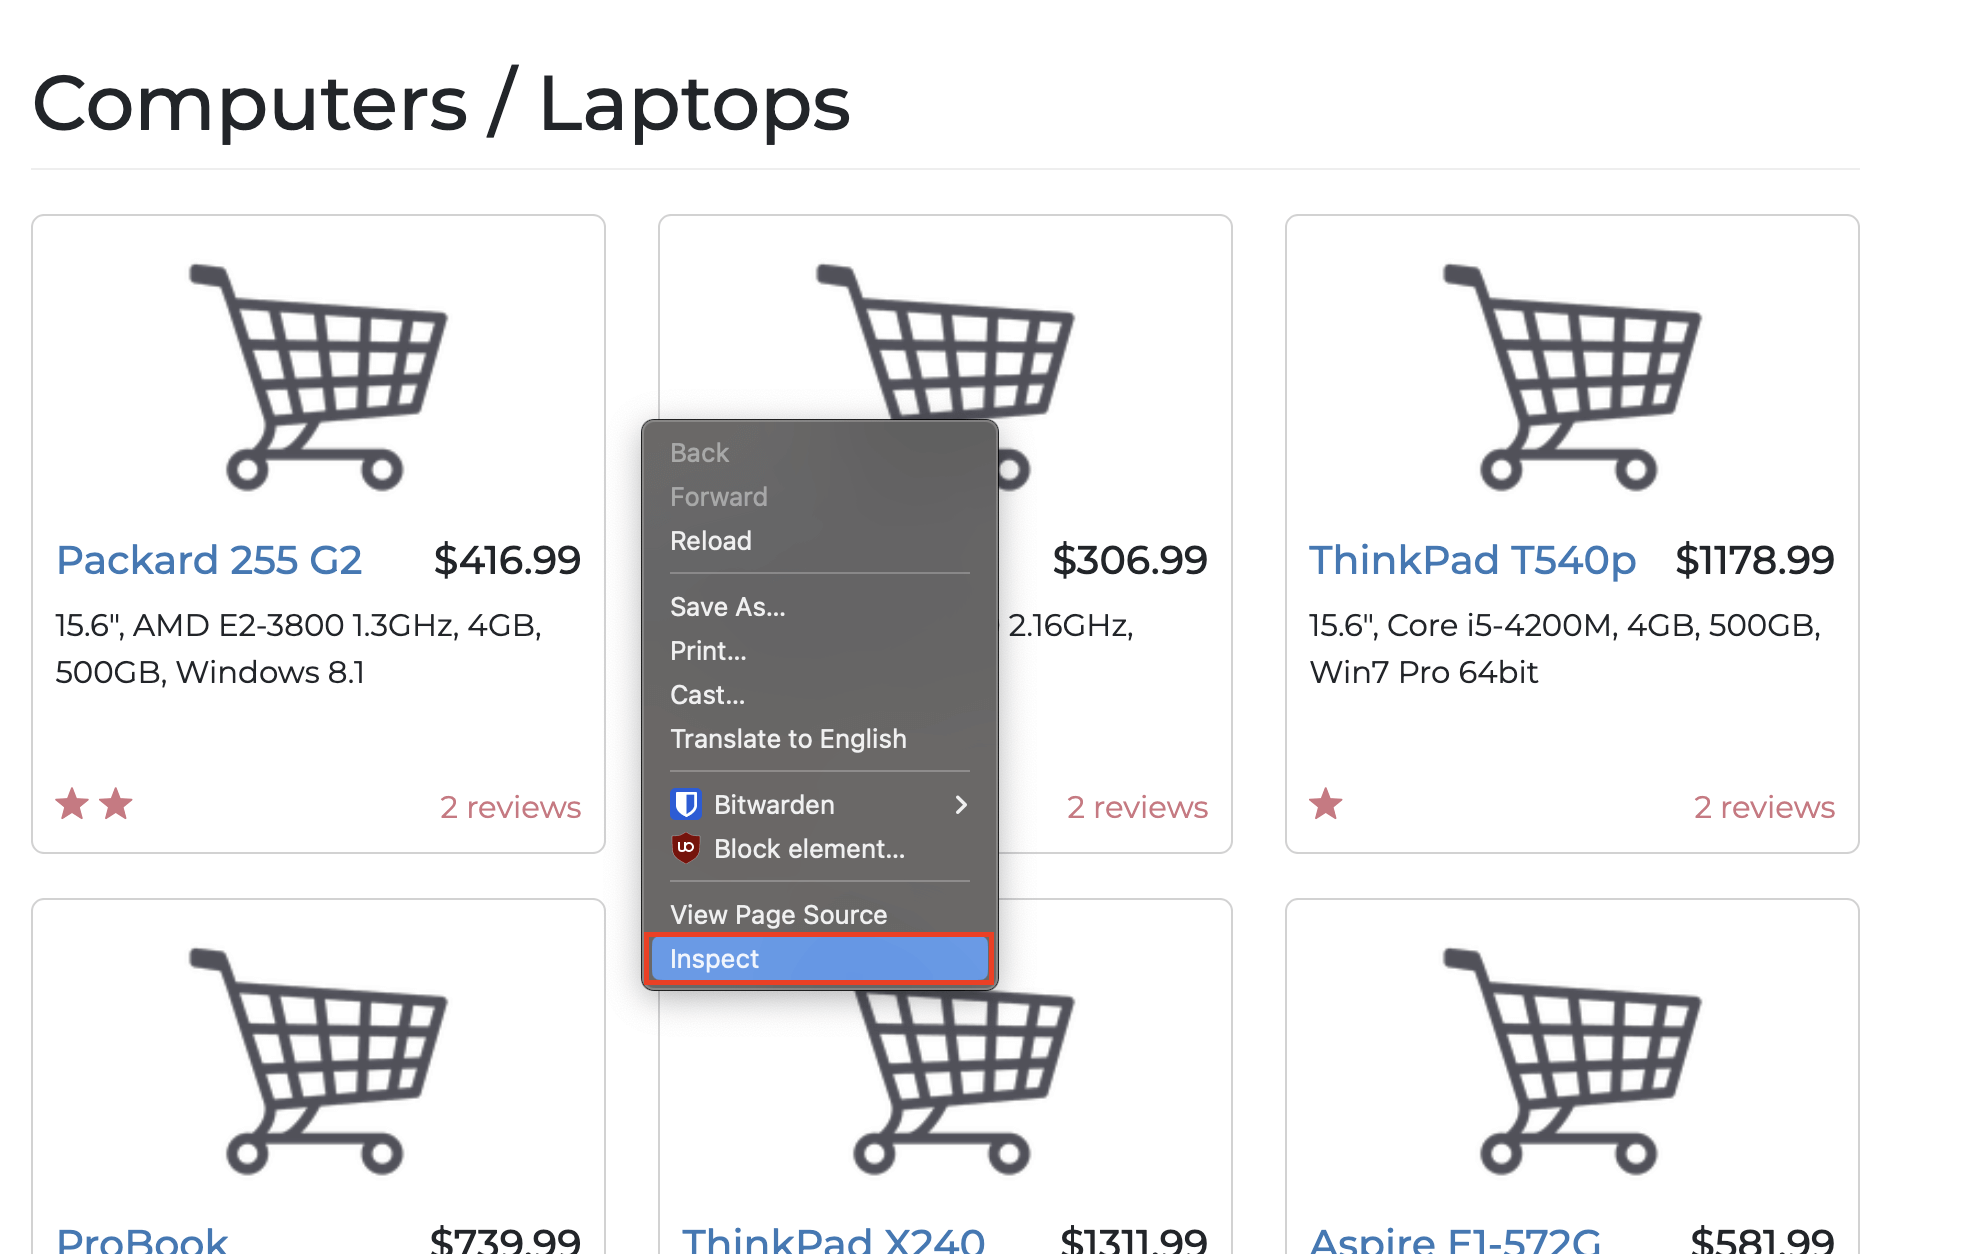
Alternatively, you can use these keyboard shortcuts:
- For macOS, use Cmd + Option + I
- For Windows, use Control + Shift + C
Here’s the structure of the target page:
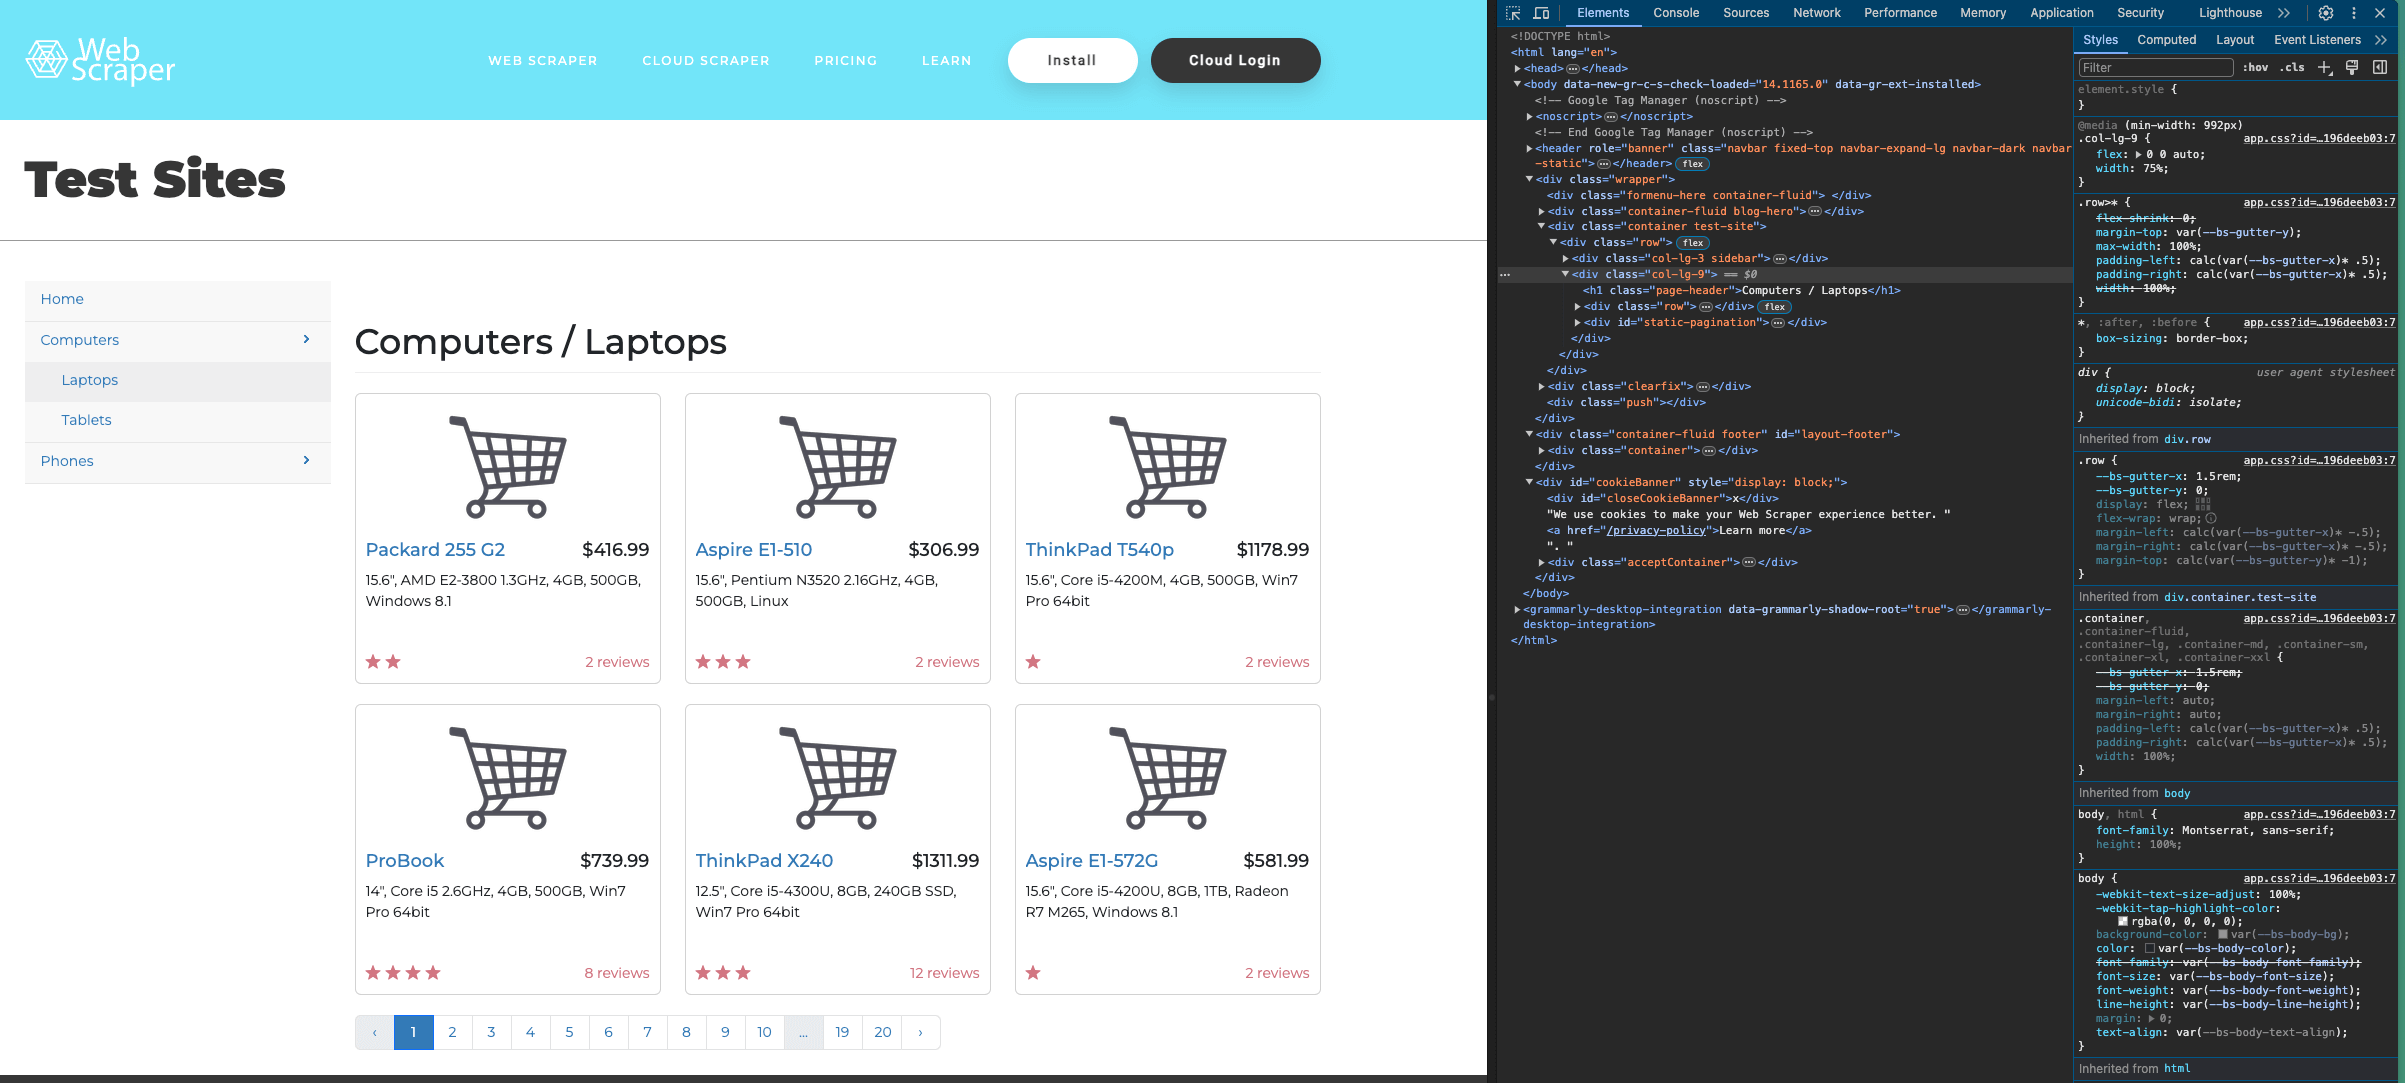
You can view the code for a specific item on a page using the selection tool in the top-left of the Inspect window:
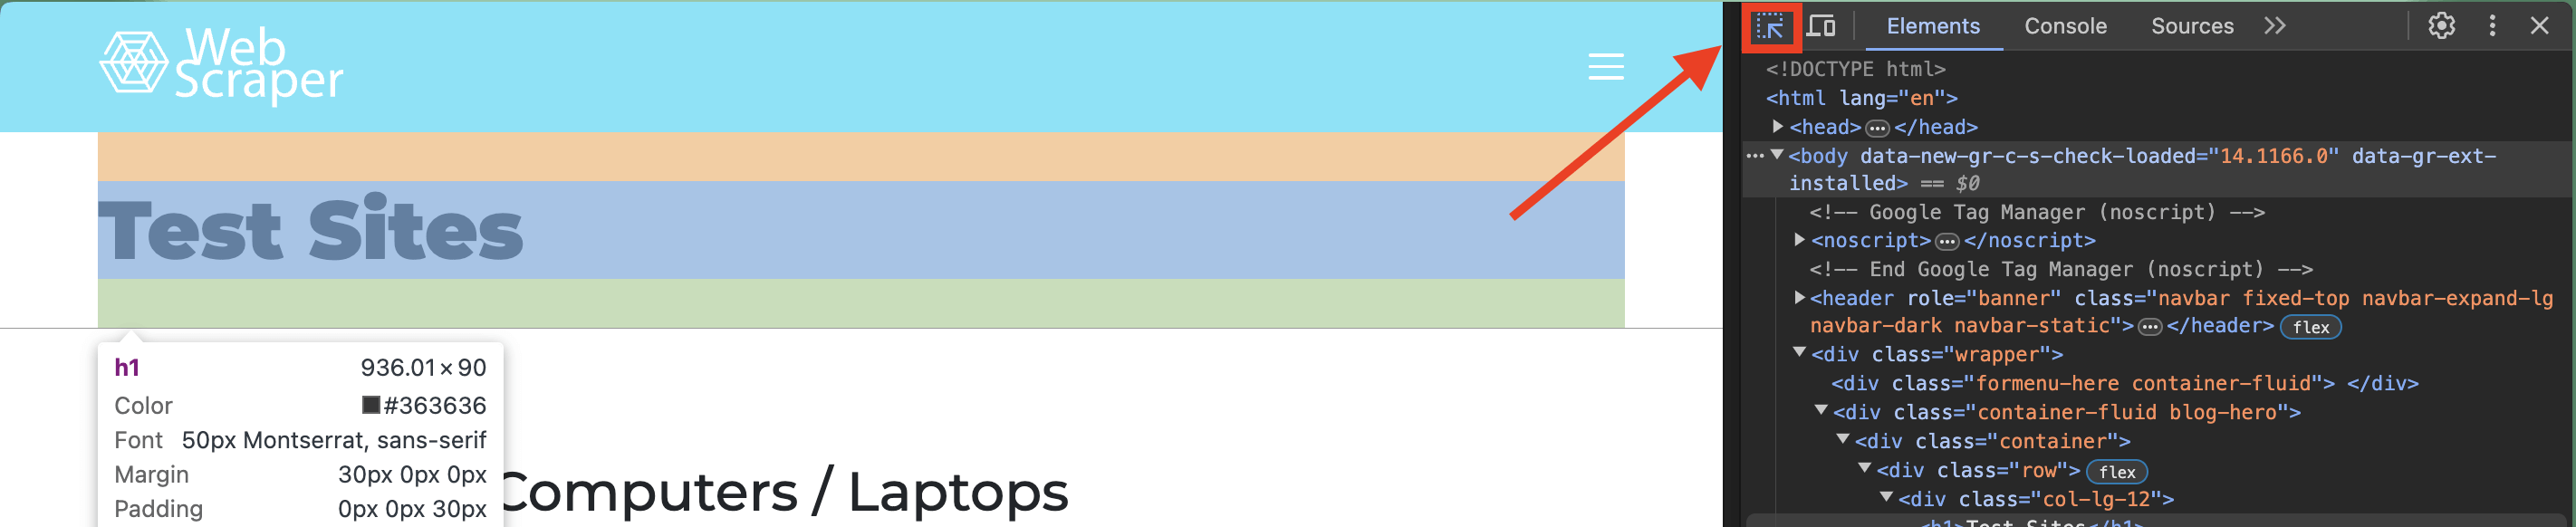
Select one of the laptop titles in your Inspect window:

You can see that the title is inside an <a> </a> tag, which is wrapped by an h4 tag, and the link has a class of title. That means you’re looking for <a href> tags (URLs) inside <h4> tags that have a title class.
To create a scraping program that accurately targets these elements, you need to import the libraries to create a Python function, launch the browser, and navigate to the target website:
from playwright.sync_api import sync_playwright

def main():
    with sync_playwright() as p:
        browser = p.chromium.launch(headless=False)
        page = browser.new_page()
        try:
            page.goto("https://webscraper.io/test-sites/e-commerce/static/computers/laptops")

        except:
            print("Error")

        page.wait_for_timeout(7000)
Notice that the target URL inside the page.goto() function has been updated to point to the first page that contains the list of laptops.
Once you’ve created the scraping program, you need to locate the target element based on your website structure analysis. Playwright has a tool called locators that allows you to locate elements on a page based on various attributes, such as the following:
get_by_label()locates the target element using the label associated with an element.get_by_text()locates the target element using the text the element contains.get_by_alt_text()locates the target element and performs actions on images using their alt text.get_by_test_id()locates the target element using an element’s test ID.
You can refer to the official documentation for more methods to locate elements.
To scrape all the laptop titles, you need to locate the <h4> tags as they wrap all the laptop titles. You can use the get_by_role() locator to find elements based on their function, such as buttons, checkboxes, and headings. That means, to find all the headings on the page, you need to write the following:
titles = page.get_by_role("heading").all()
After that, you can print it in your console with the following code:
print(titles)
After printing, you’ll notice that it gives an array of elements:
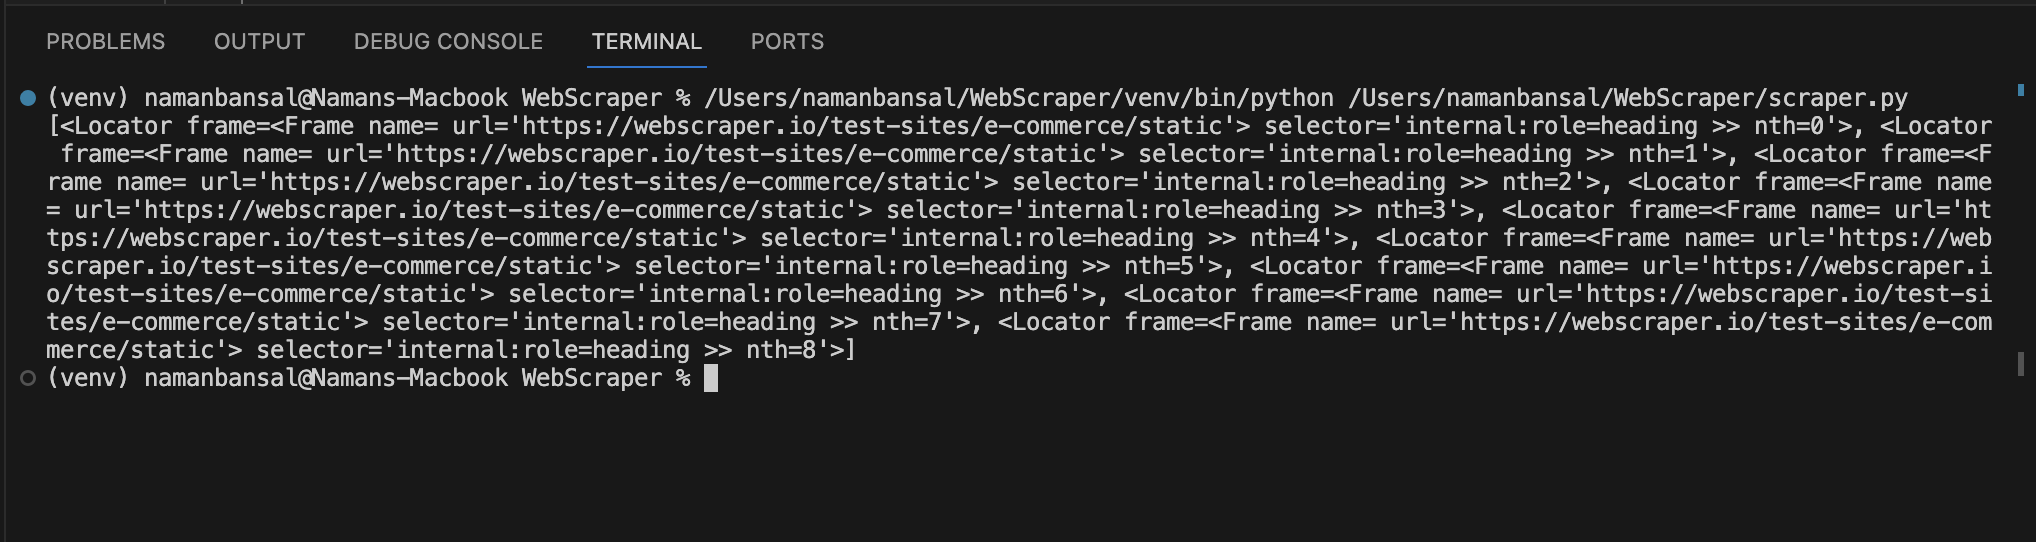
This output does not include titles, but it does reference elements matching the selector conditions. You must loop through these elements to find an <a> tag with a title class and the text inside it.
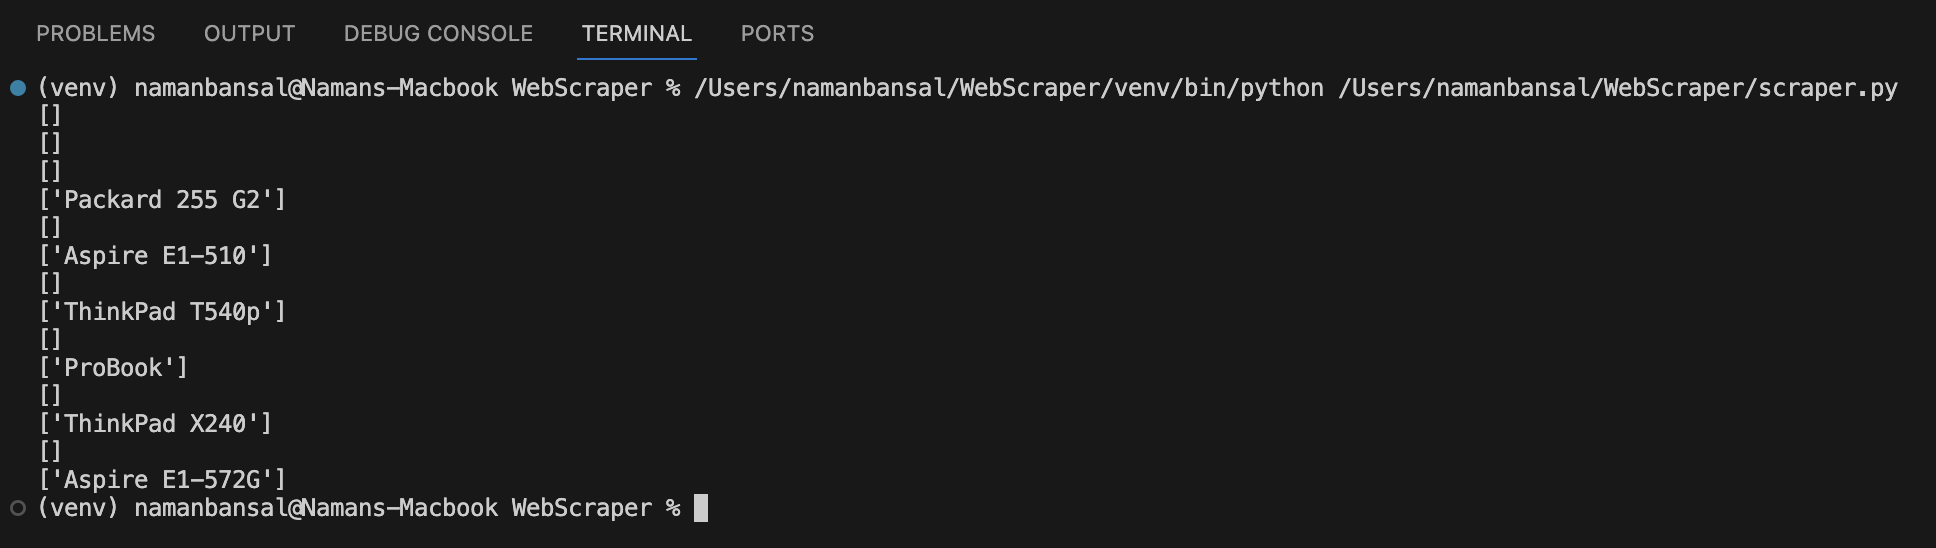
It’s recommended to use the CSS locator to find an element based on its path and class, and you can use the all_inner_texts() function to extract an element’s inner text like this:
for title in titles:
  laptop = title.locator("a.title").all_inner_texts()
Upon running this code, your output should look like this:
To reject arrays with no values, write the following:
if len(laptop) == 1:
  print(laptop[0])
Once you reject arrays with no values, you’ve successfully built a scraping program that extracts only specific elements.
Here’s the complete code for this scraper:
from playwright.sync_api import sync_playwright

def main():
    with sync_playwright() as p:
        browser = p.chromium.launch(headless=False)
        page = browser.new_page()
        try:
            page.goto("https://webscraper.io/test-sites/e-commerce/static/computers/laptops")

        except:
            print("Error")

        page.wait_for_timeout(7000)

        titles = page.get_by_role("heading").all()

        for title in titles:
            laptop = title.locator("a.title").all_inner_texts()
            if len(laptop) == 1:
                print(laptop[0])

main()
Interact with Elements
Let’s take things up a notch now and build a program that extracts the titles from the first page containing laptops, navigates to the second page, and extracts those titles, too.
Since you already know how to extract titles from a page, you only need to figure out how to navigate to the next page of laptops.
You may have already noticed Pagination buttons on the page that you’re currently on.
You must locate 2 and click on it using your scraping program. Upon inspecting the page, you’ll see that the required element is a list element (<li> tag) and has the inner text 2:
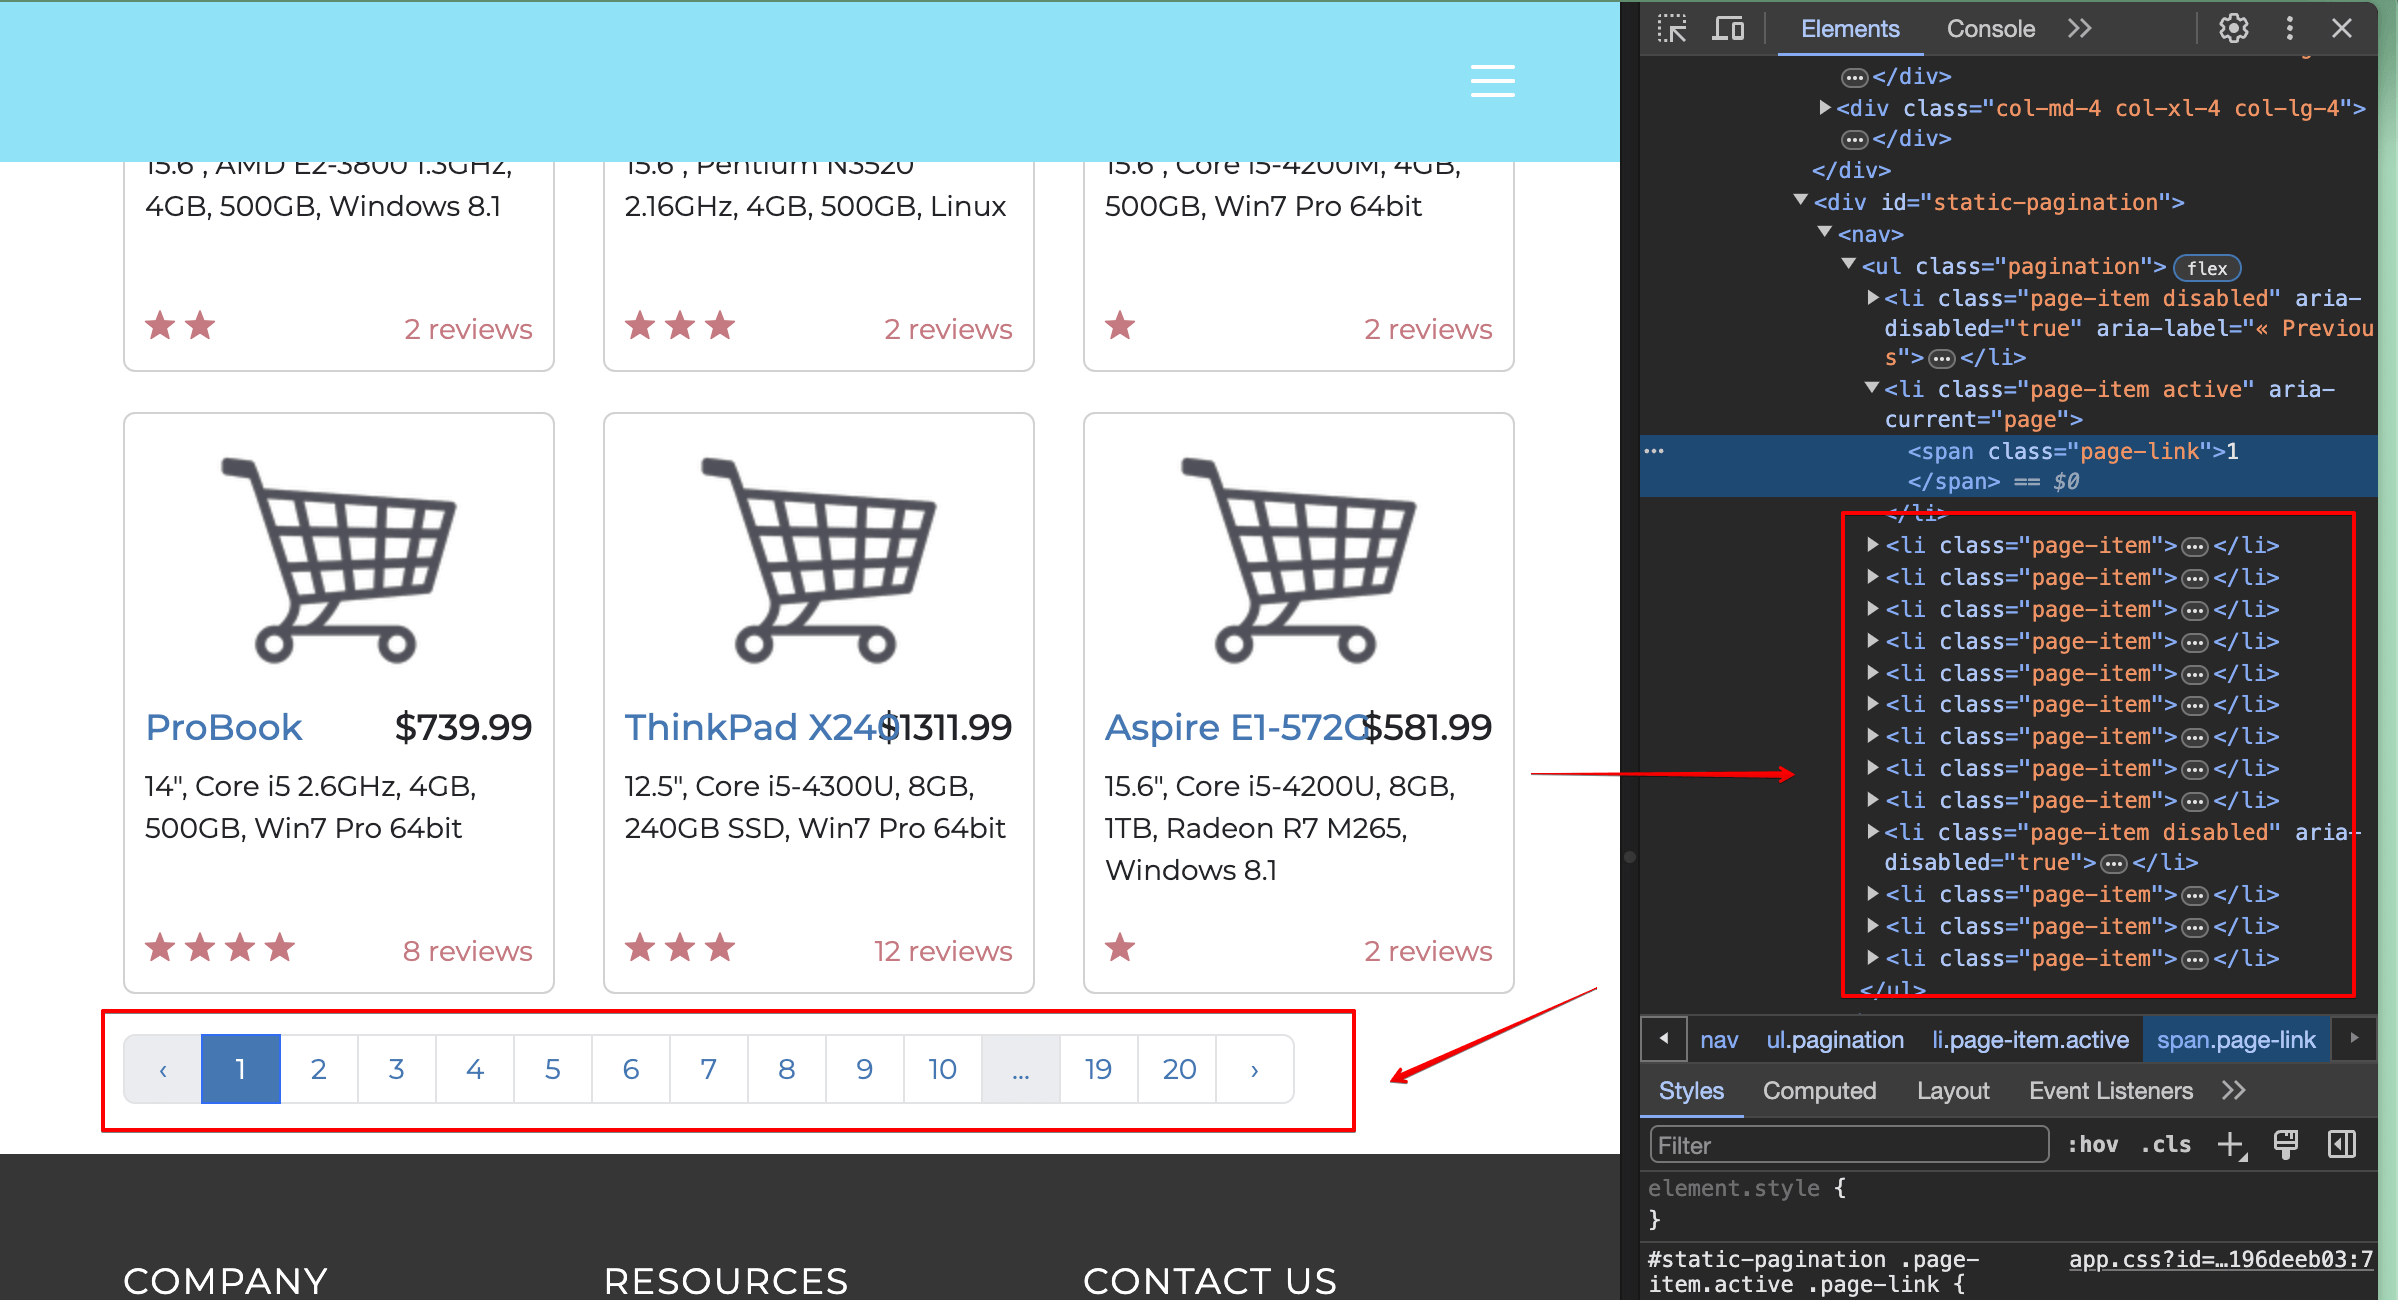
That means you can use the get_by_role() selector to find a list item and a get_by_text() selector to find an element with 2 as the text.
Here’s how to code it in your file:
page.get_by_role("listitem").get_by_text("2", exact=True)
This finds an element that matches two conditions: first, it must be a list item, and second, it should have 2 as the text.
exact=True is a function argument to find the element with the given text.
To click the button, alter the previous code so that it looks like this:
page.get_by_role("listitem").get_by_text("2", exact=True).click()
In this code, the click() function clicks the given element.
Wait for the page to load and extract all the titles again:
        page.wait_for_timeout(5000)

        titles = page.get_by_role("heading").all()

        for title in titles:
            laptop = title.locator("a.title").all_inner_texts()
            if len(laptop) == 1:
                print(laptop[0])
Your complete code block should look like this:
from playwright.sync_api import sync_playwright

def main():
    with sync_playwright() as p:
        browser = p.chromium.launch(headless=False)
        page = browser.new_page()
        try:
            page.goto("https://webscraper.io/test-sites/e-commerce/static/computers/laptops")

        except:
            print("Error")

        page.wait_for_timeout(7000)

        titles = page.get_by_role("heading").all()

        for title in titles:
            laptop = title.locator("a.title").all_inner_texts()
            if len(laptop) == 1:
                print(laptop[0])

        page.get_by_role("listitem").get_by_text("2", exact=True).click()

        page.wait_for_timeout(5000)

        titles = page.get_by_role("heading").all()

        for title in titles:
            laptop = title.locator("a.title").all_inner_texts()
            if len(laptop) == 1:
                print(laptop[0])

main()
Extract HTML and Write It to a CSV
If you don’t store and analyze the data you scrape, it’s useless. In this section, you’ll create an advanced program that takes user input for the number of pages of laptops to scrape, extracts the titles, and stores them in a CSV file in your project folder.
For this program, you need a pre-installed CSV library, which can be imported using the following command:
import csv
After you’ve installed the CSV library, you need to figure out how you’ll visit a variable number of pages depending on the user’s input.
If you look at the website’s URL structure, you’ll notice that each page of laptops is indicated using a URL parameter. For example, the URL of the second page in the laptop directory is https://webscraper.io/test-sites/e-commerce/static/computers/laptops?page=2.
You can visit different pages by altering the URL parameter ?page=2 with different numeric values. That means you need to ask the user to input the number of pages to scrape with the following command:
pages = int(input("enter the number of pages to scrape: "))
To visit each page from 1 to the number of pages inputted by the user, you use a for loop like this:
for i in range(1, pages+1):
Inside this range function, you use 1 and pages+1 as your function arguments to represent the values that the loop starts and ends at. The second function argument is excluded from the loop. For example, if the range function is range(1,5), the program would loop from 1 to 4 only.
Next, you need to visit each page by entering the i value as the URL parameter in the iteration. You can add variables to a string using Python f-strings.
While outputting a string, you prefix the quotation marks with an f to indicate that it’s an f-string. Inside the quotation marks, you can use curly brackets to indicate variables.
Here’s an example of how you can use f-strings to print variables along with strings:
print(f"The value of the variable is {variable_name_goes_here}")
Coming back to the scraper, you can utilize f-strings by writing this block of code in the file:
     try:
             page.goto(f"https://webscraper.io/test-sites/e-commerce/static/computers/laptops?page={i}")

     except:
            print("Error")
Wait for the page to load with a timeout function and extract the titles using the following:
            page.wait_for_timeout(7000)

            titles = page.get_by_role("heading").all()
Once you have all the title elements, you need to open your CSV file, loop through each title, extract the required text, and write it to your file.
To open a CSV file, use the following syntax:
with open("laptops.csv", "a") as csvfile:
Here, you’re opening the laptops.csv file with the append (a) mode. You use the append mode here because you don’t want to lose old data every time the file is opened. If the file doesn’t exist, the library creates one in the project folder. CSV offers several modes for you to open a file, including the following:
- r is the default option used if nothing is specified. It opens the file for read-only.
- w opens a file to write only. Every time a file is opened, the previous data is overwritten.
- a opens a file to append data. Previous data is not overwritten.
- r+ opens a file for both reading and writing.
- x creates a new file.
Underneath the previous code, you need to declare a writer object that lets you manipulate the CSV file:
writer = csv.writer(csvfile)
Next, loop over each title element and extract the text with the following:
                for title in titles:
                    laptop = title.locator("a.title").all_inner_texts()
This gives you multiple arrays, each containing the title of individual laptops. To reject empty arrays, write the following conditional code to the CSV file:
               if len(laptop) == 1:
                        writer.writerow([laptop[0]])
The writerow function lets you write new rows in a CSV file.
Here’s the entire code for the program:
from playwright.sync_api import sync_playwright
import csv

def main():
    with sync_playwright() as p:
        browser = p.chromium.launch(headless=False)
        page = browser.new_page()
        pages = int(input("enter the number of pages to scrape: "))

        for i in range(1, pages+1):
            try:
                page.goto(f"https://webscraper.io/test-sites/e-commerce/static/computers/laptops?page={i}")

            except:
                print("Error")

            page.wait_for_timeout(7000)

            titles = page.get_by_role("heading").all()

            with open("laptops.csv", "a") as csvfile:
                writer = csv.writer(csvfile)
                for title in titles:
                    laptop = title.locator("a.title").all_inner_texts()
                    if len(laptop) == 1:
                        writer.writerow([laptop[0]])

        browser.close()


main()
After running this code, your CSV file should look like this:
Conclusion
In this article, you learned how to extract, parse, and store HTML using Python.
While this tutorial was relatively straightforward, in a real-world scenario, you’d likely hit various roadblocks while scraping, including CAPTCHAs, rate limits, website layout changes, or regulatory requirements. Thankfully, Bright Data can help. Bright Data offers tools like advanced residential proxies to improve your scraping, a Web Scraper IDE to build scrapers at scale, and a Web Unblocker to unblock public websites, including solving CAPTCHAs. These tools can help you gather accurate data at scale and overcome roadblocks. Additionally, Bright Data’s commitment to ethical scraping ensures you stay within website terms of service and legal regulations.
With Bright Data’s feature-rich platform, you can focus on extracting the valuable data you need, leaving the complexities of web scraping behind. Start your free trial today!


