







In this tutorial, you will learn:
- What the MuleSoft Anypoint Platform is and the features it offers.
- The main limitations of agent networks, AI-powered applications, and APIs, and how to overcome them using Bright Data MCP.
- How to connect a MuleSoft agent network to the Bright Data MCP for gaining web scraping, search, discovery, and browser automation capabilities.
Let’s dive in!
What Is the MuleSoft Anypoint Platform?
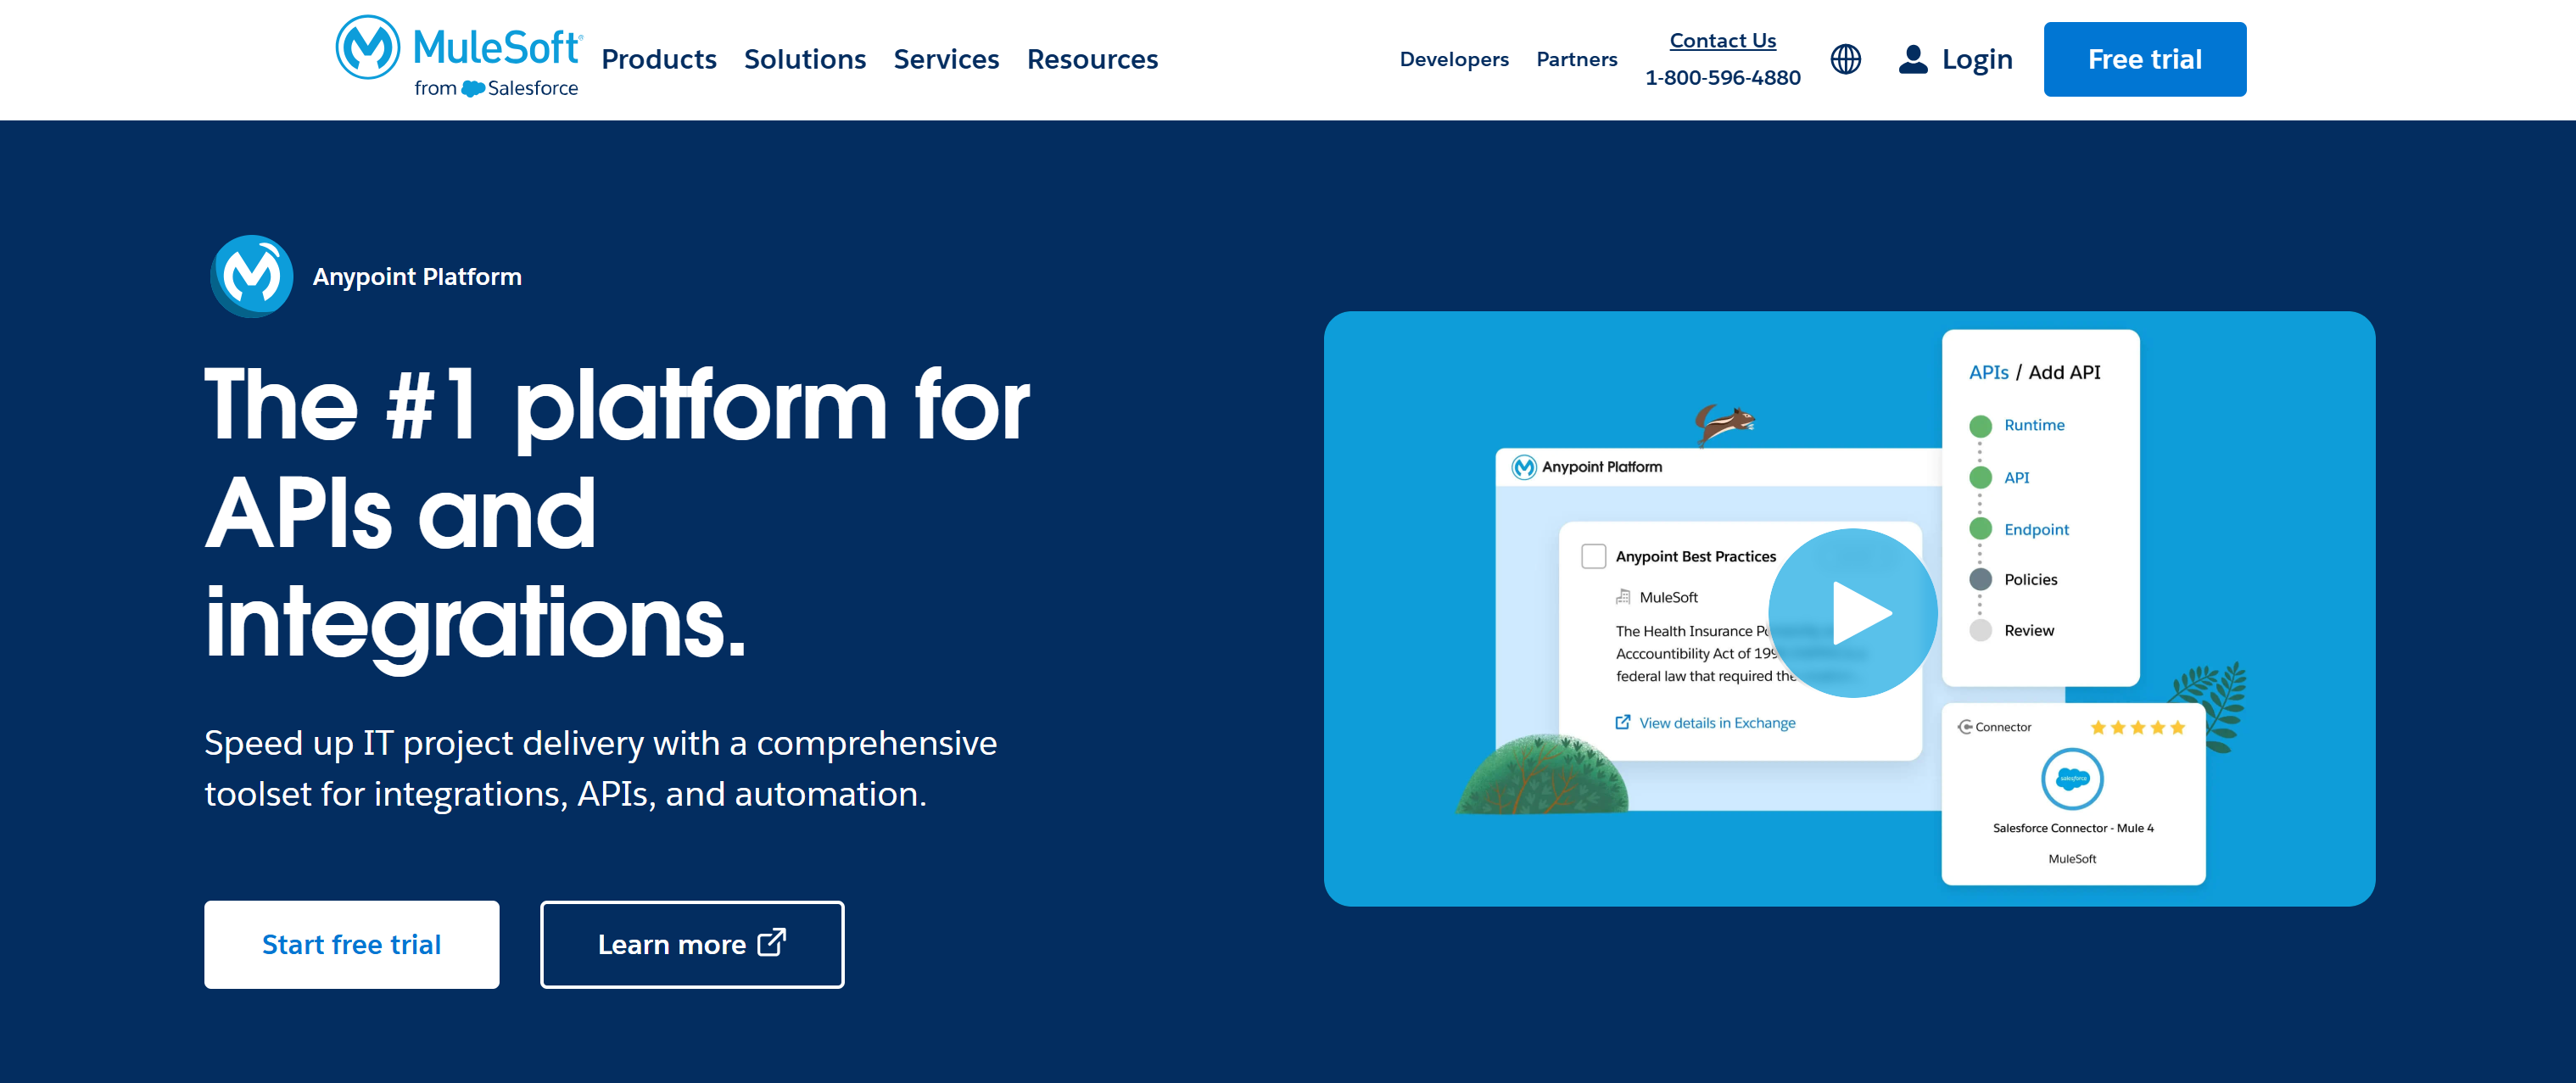
The MuleSoft Anypoint Platform is a cloud-based enterprise integration platform. It allows you to build applications, APIs, data sources, AI agents, and business systems through a unified environment.
Organizations rely on it to design, deploy, manage, and secure integrations across cloud and on-premises environments. Its main use cases include API management, enterprise application integration, workflow automation, B2B connectivity, AI agent orchestration, and more.
The main features provided by the MuleSoft Anypoint Platform are:
- API design and management: Design, document, secure, govern, and monitor APIs from a centralized platform.
- Integration tools: Build integrations using low-code tools, IDEs, and reusable connectors.
- Prebuilt connectors: Connect to SaaS apps, databases, cloud services, LLMs, and legacy systems.
- AI and MCP support: Expose APIs to AI agents and integrate with MCP-compatible systems.
- Deployment flexibility: Deploy in the cloud, on-premises, or hybrid environments.
- Monitoring and security: Real-time monitoring, API governance, security policies, and threat protection.
- Asset reuse: Share APIs, templates, and connectors through Anypoint Exchange.
- Automation and messaging: Support asynchronous workflows, queues, and pub/sub messaging.
Why Extend MuleSoft Anypoint Platform with Web Data and Discovery Tools
Large language models operate on limited knowledge derived from static training data. That means they are not aware of the latest events and business practices. In enterprise environments, this becomes a problem because tolerance for outdated recommendations or incomplete insights is very low.
This is a core bottleneck of any AI-powered application, regardless of how well it is designed with MuleSoft or any other enterprise-grade platform. To address this limitation, you need to equip MuleSoft Agent Networks, AI APIs, and applications with real-time web data capabilities through native integration connectors (e.g., MCP Connector).
Bright Data MCP for MuleSoft
Bright Data MCP supports integration with MuleSoft Anypoint Platform, enabling live web access, structured data extraction, search, and automated browsing capabilities. This gives MuleSoft agents and APIs the ability to operate with up-to-date, contextual, verifiable information instead of relying solely on static knowledge.
Bright Data MCP exposes 70+ tools for interacting with Bright Data’s API-based infrastructure. Even in Rapid (free) mode, it includes useful capabilities such as:
| Tool | Description |
|---|---|
search_engine (+ batch tool for parallel execution) |
Returns structured search results from engines like Google, Bing, and others |
scrape_as_markdown (+ batch tool for parallel execution) |
Converts web pages into clean Markdown while handling anti-bot protection |
discover |
AI-powered search that returns ranked and relevant web results |
In [Pro mode](https://github.com/brightdata/brightdata-mcp?tab=readme-ov-file#-pricing, modes), additional advanced tools unlock structured data extraction from platforms such as Amazon, LinkedIn, Crunchbase, ZoomInfo, Zillow, Yahoo Finance, Yahoo, Instagram, Google Maps, and more than 40 other sources. It also enables full browser automation workflows.
Important: Bright Data MCP is built on top of a global infrastructure of over 400 million residential IPs across 195+ countries. This ensures reliable, scalable, and consistent access to web data, even under enterprise-level workloads.
How to Integrate the Bright Data MCP in MuleSoft Anypoint Code Builder
In this step-by-step tutorial, you will learn how to create a MuleSoft agent network integrated with the Bright Data MCP. We will use Anypoint Code Builder, the development environment within Anypoint Platform, to build APIs and AI integrations.
Note: With a similar approach, you can also integrate the Bright Data MCP into Anypoint APIs and Mule applications.
Follow the instructions below!
Prerequisites
Before going through the next steps, make sure you have:
- A MuleSoft Anypoint Platform account (even on a free trial).
- Visual Studio Code installed locally.
- A Bright Data account with an API key configured. Follow the official guide to generate a Bright Data API key.
- An OpenAI API key (or alternatively, an API key for any LLM provider supported by MuleSoft).
While not strictly required, the following will also be helpful:
- Familiarity with how MCP works.
- Familiarity with the tools exposed by the Bright Data MCP server.
Step #1: Set up Anypoint Code Builder for Desktop
Start by logging in to your MuleSoft Anypoint Platform account. This is what you should see:
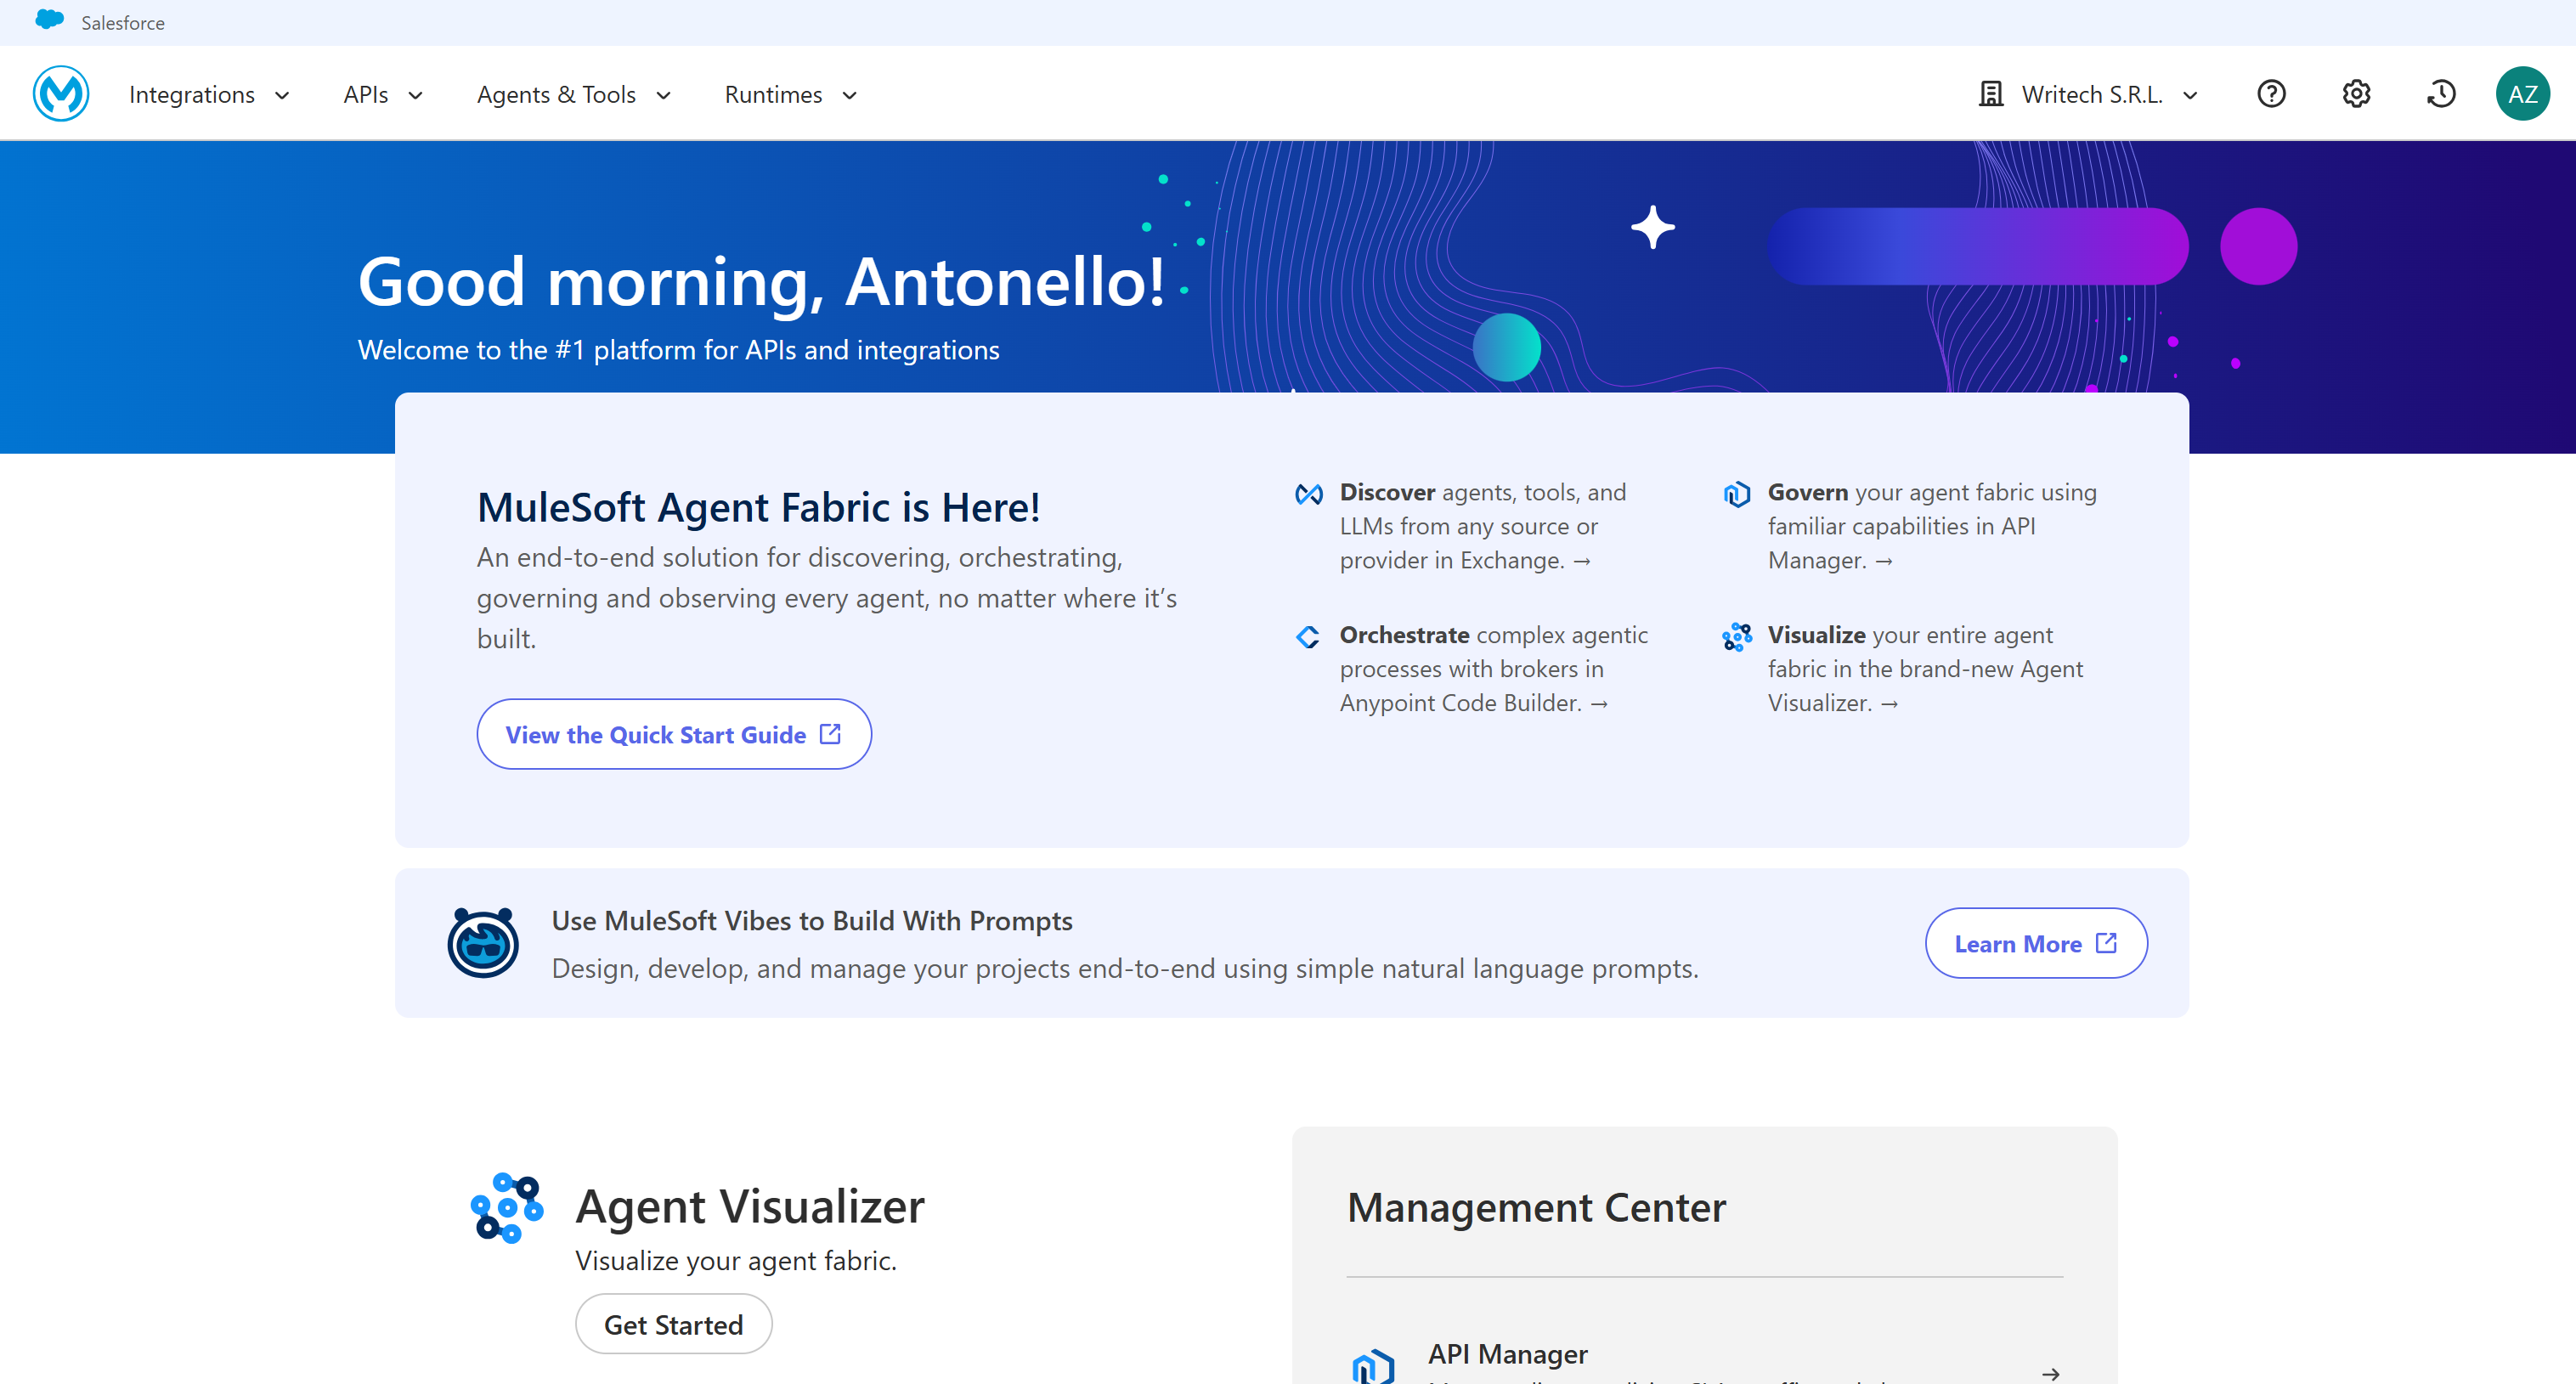
In the top menu, select “Anypoint Code Builder” under the “Integrations” dropdown. You will be redirected to the page below. There, click the “Install” button to install Anypoint Code Builder for Desktop:
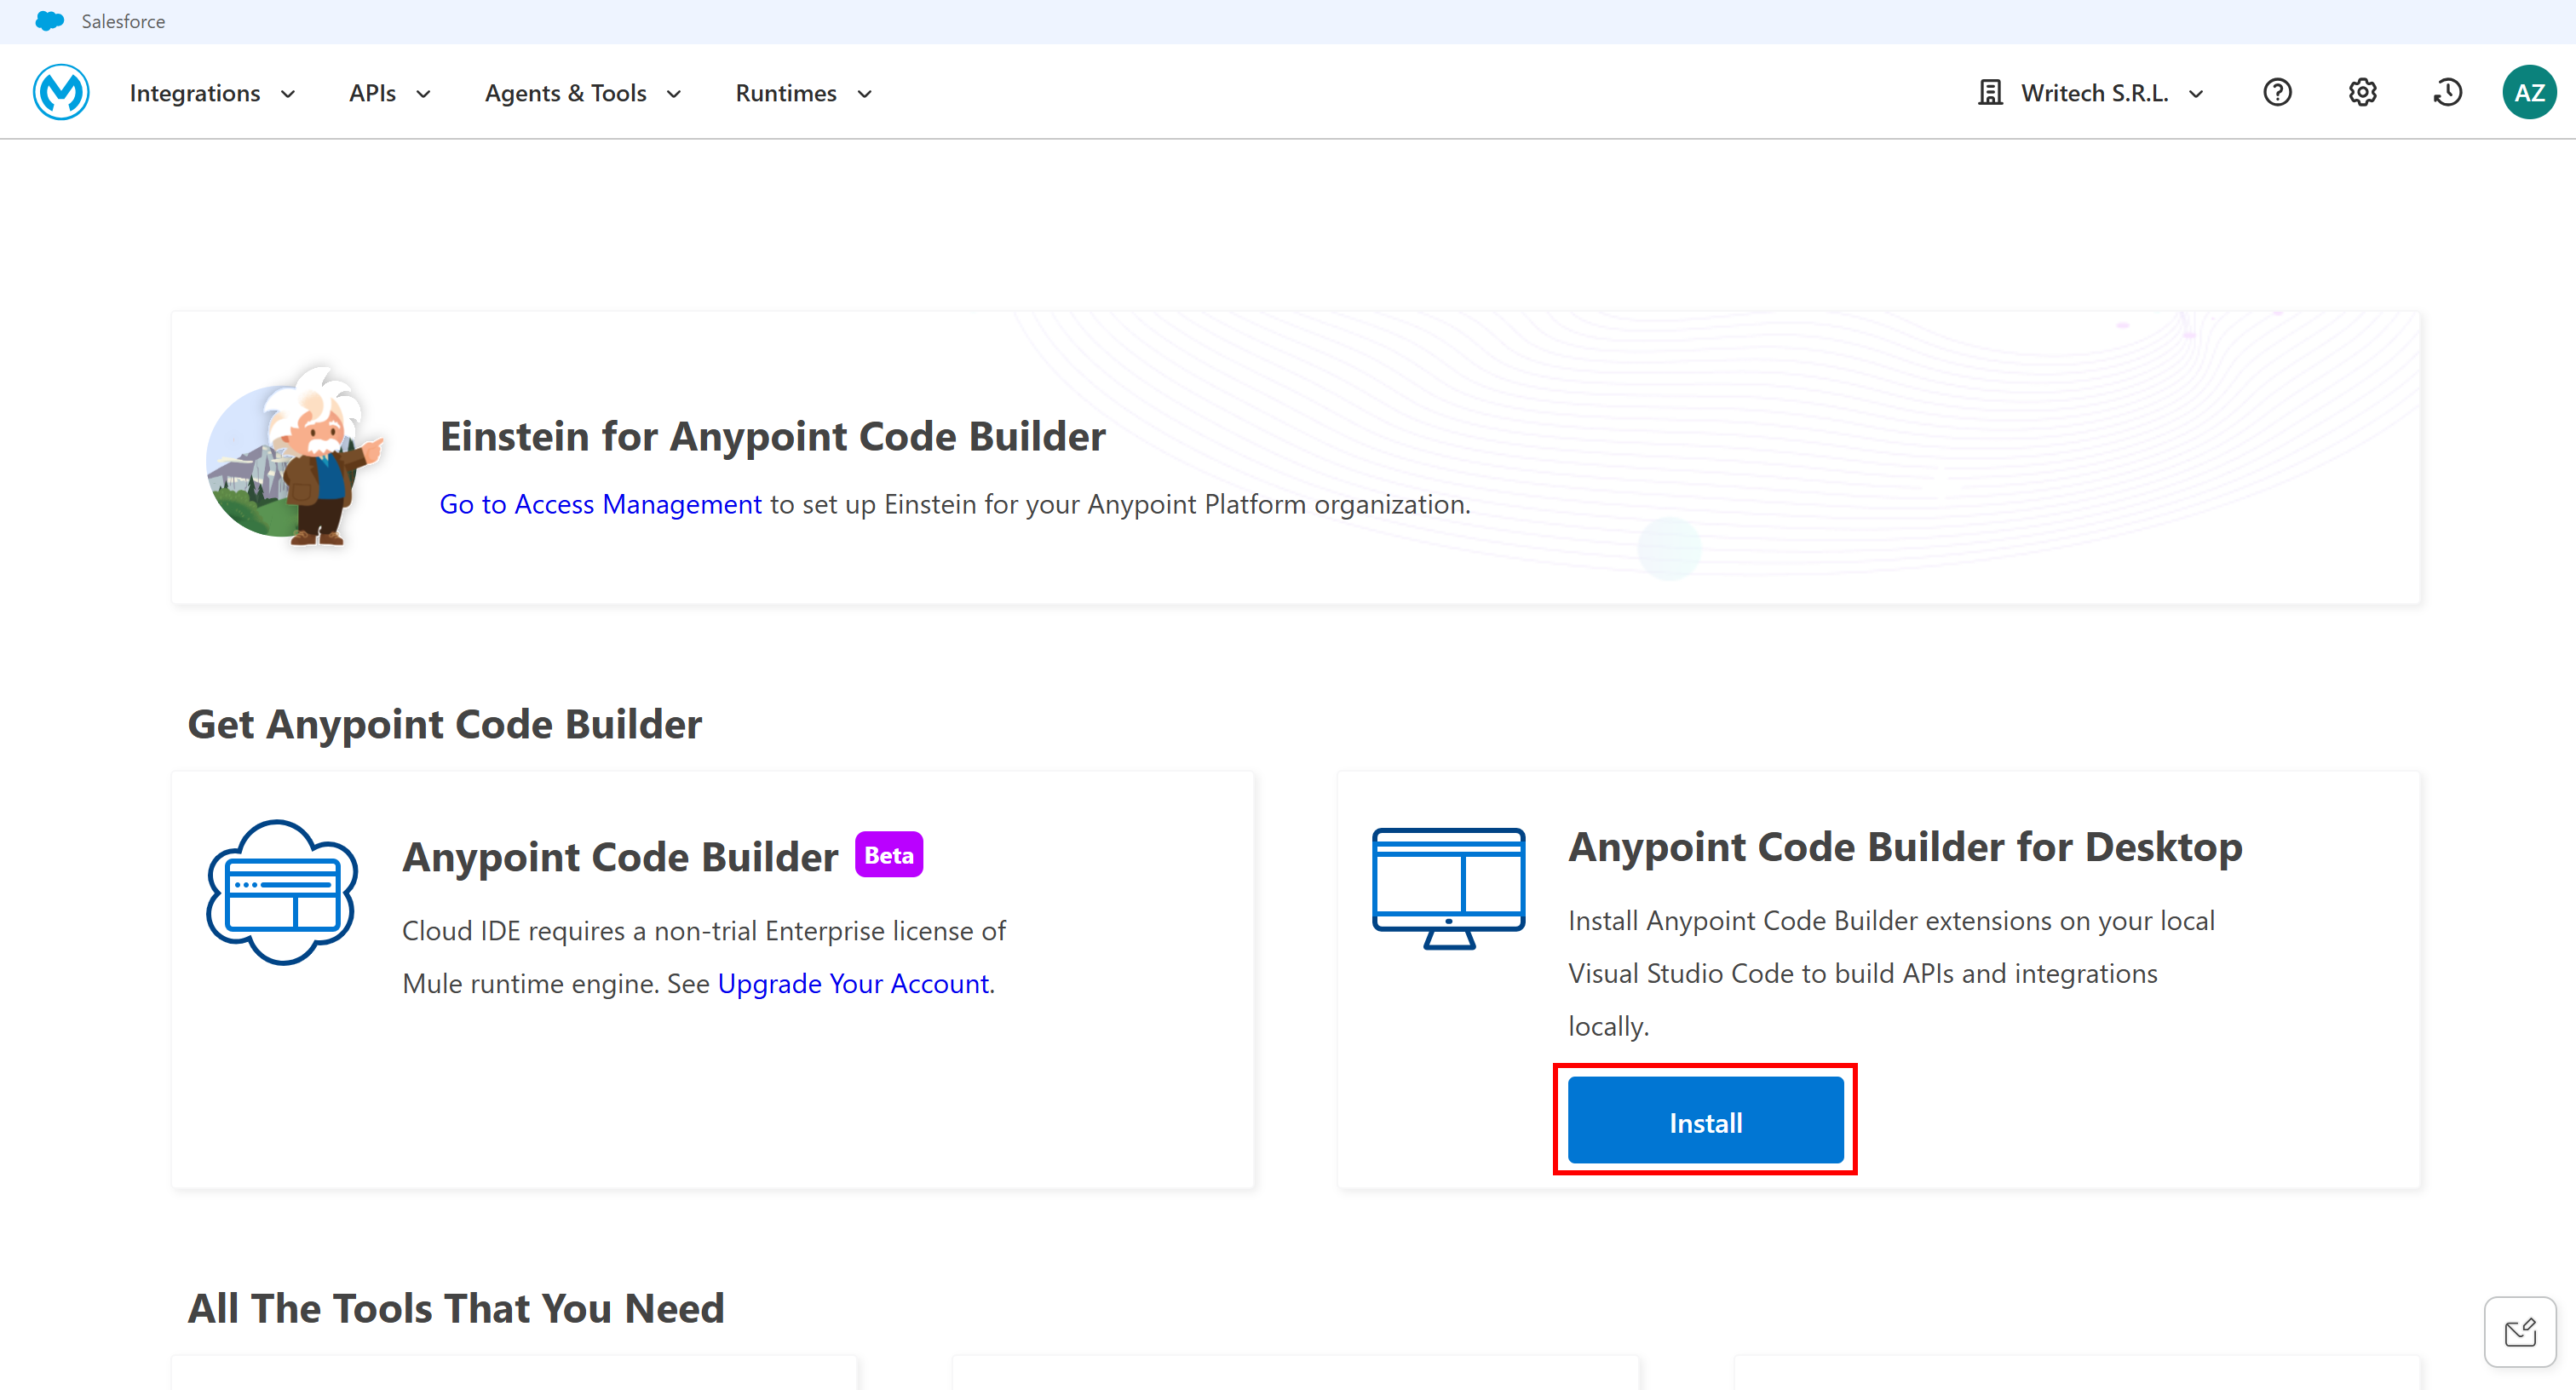
This will take you to the “Anypoint Extension Pack” page in the Visual Studio Code Marketplace:
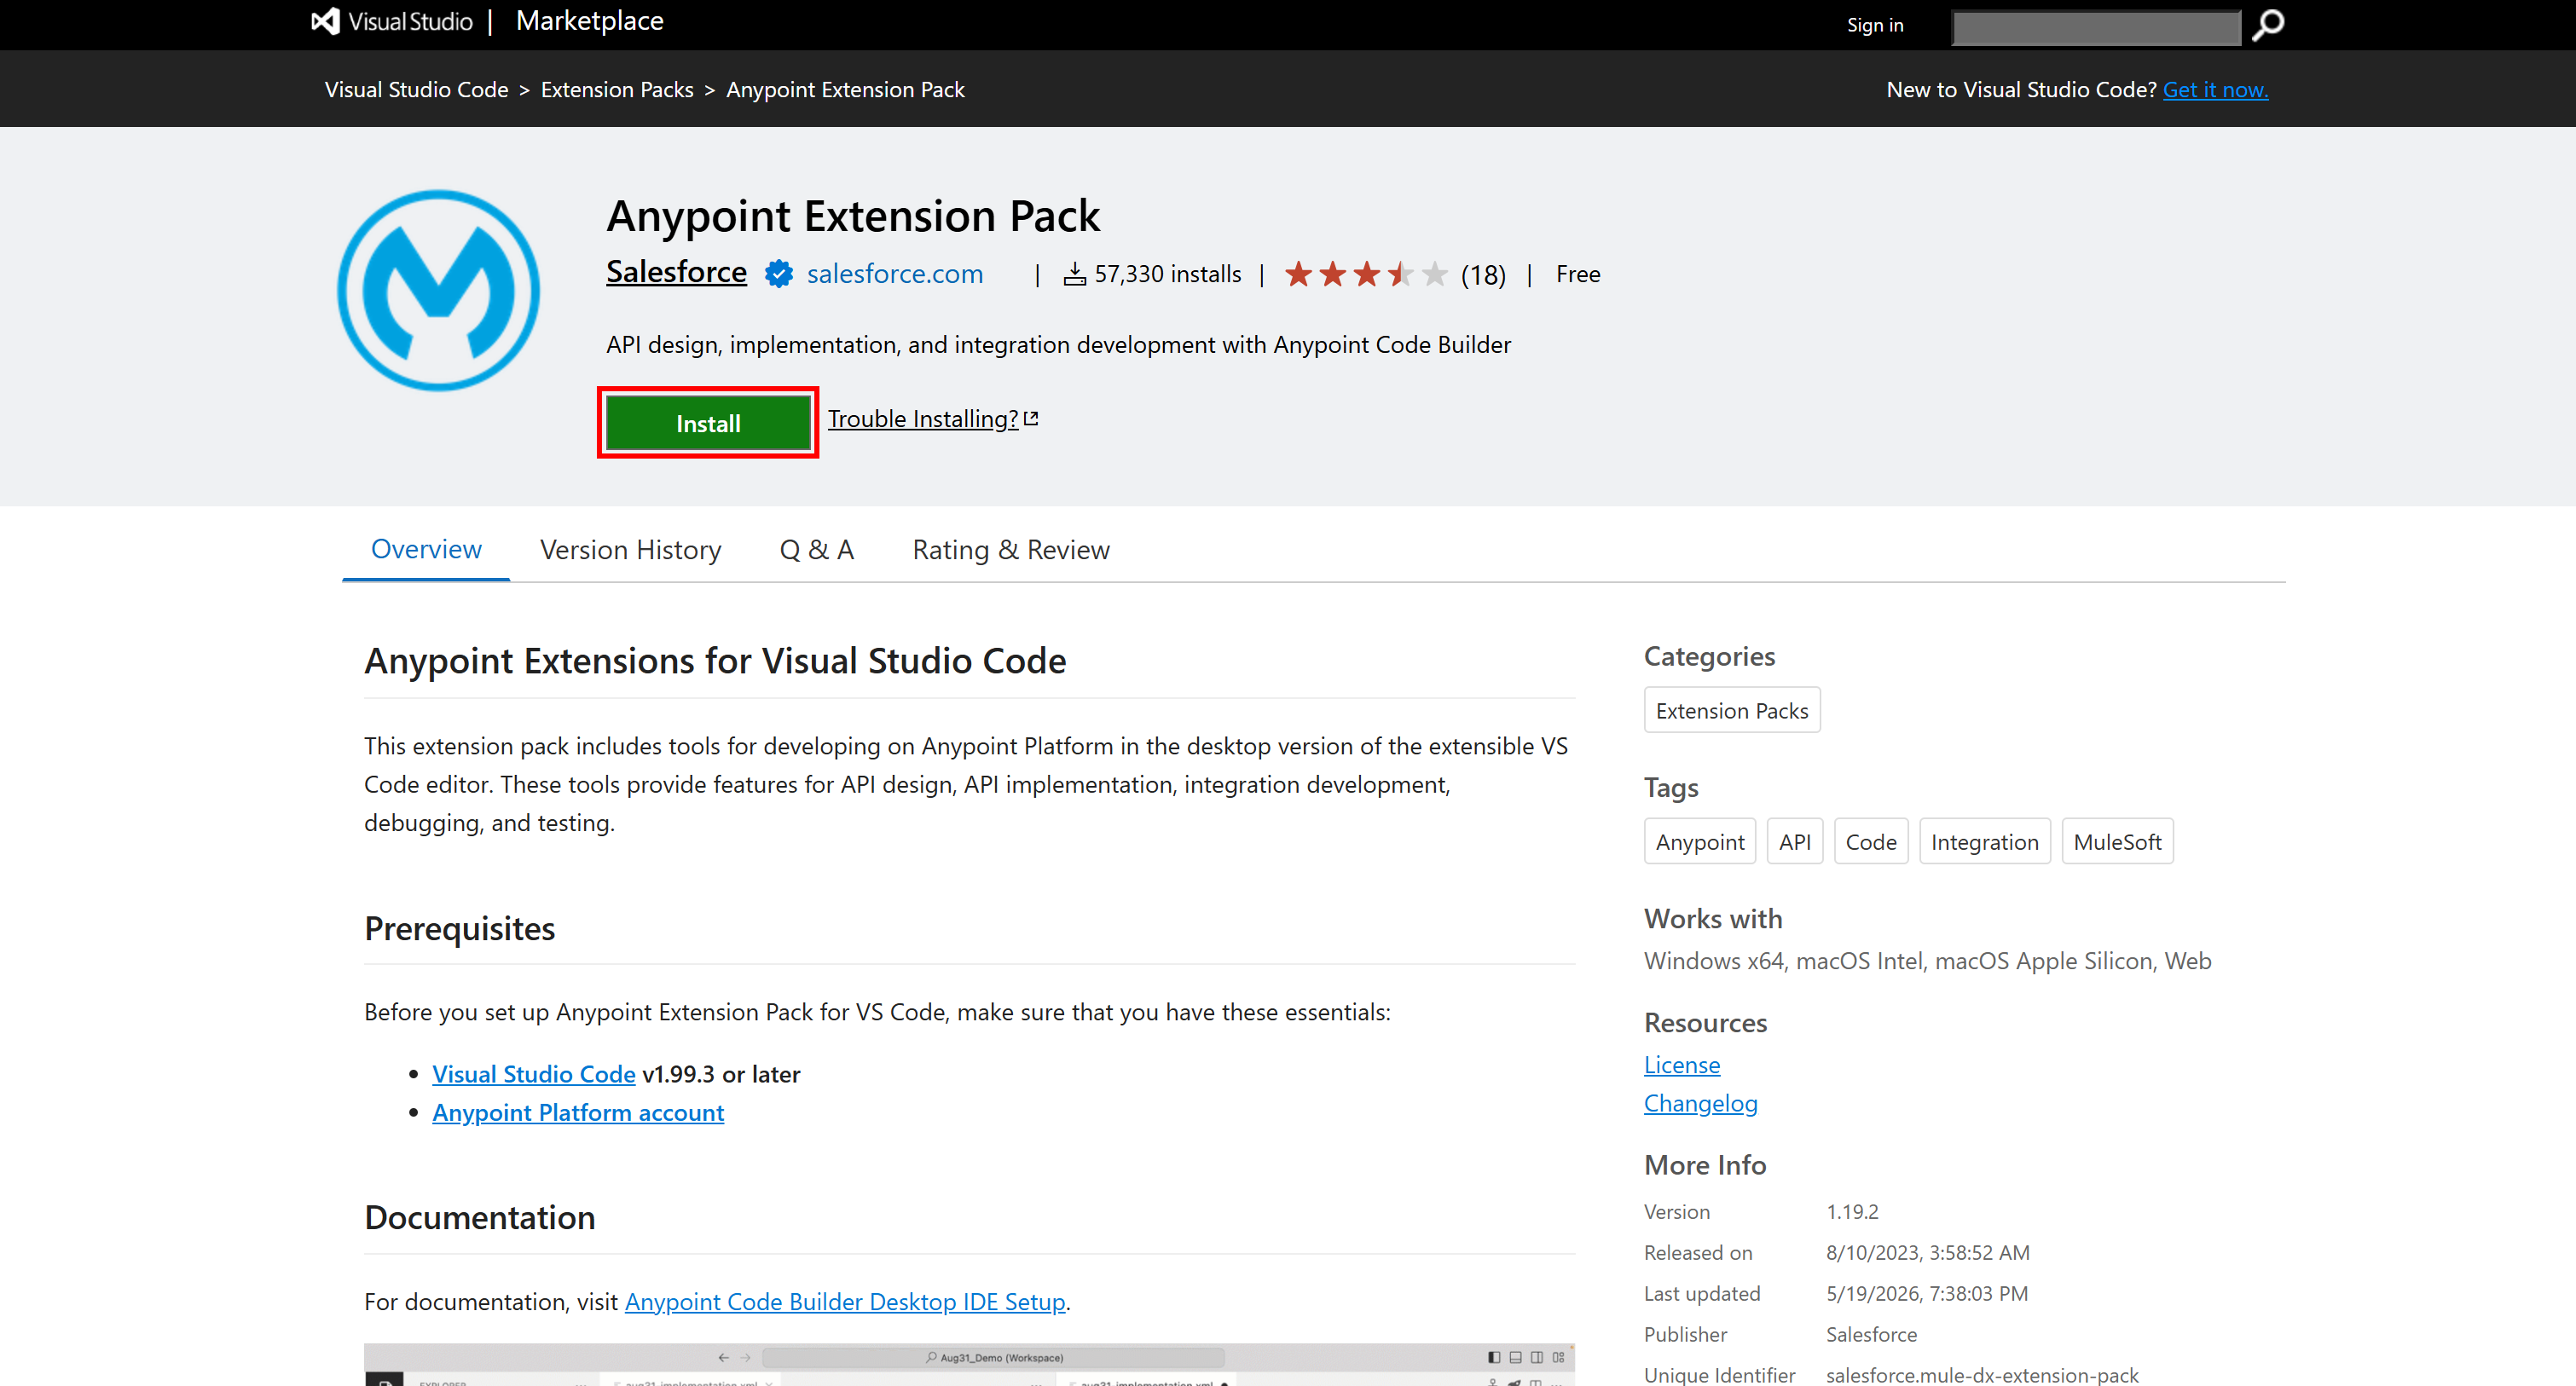
Click “Install”, and a new tab will open in your local Visual Studio Code instance:
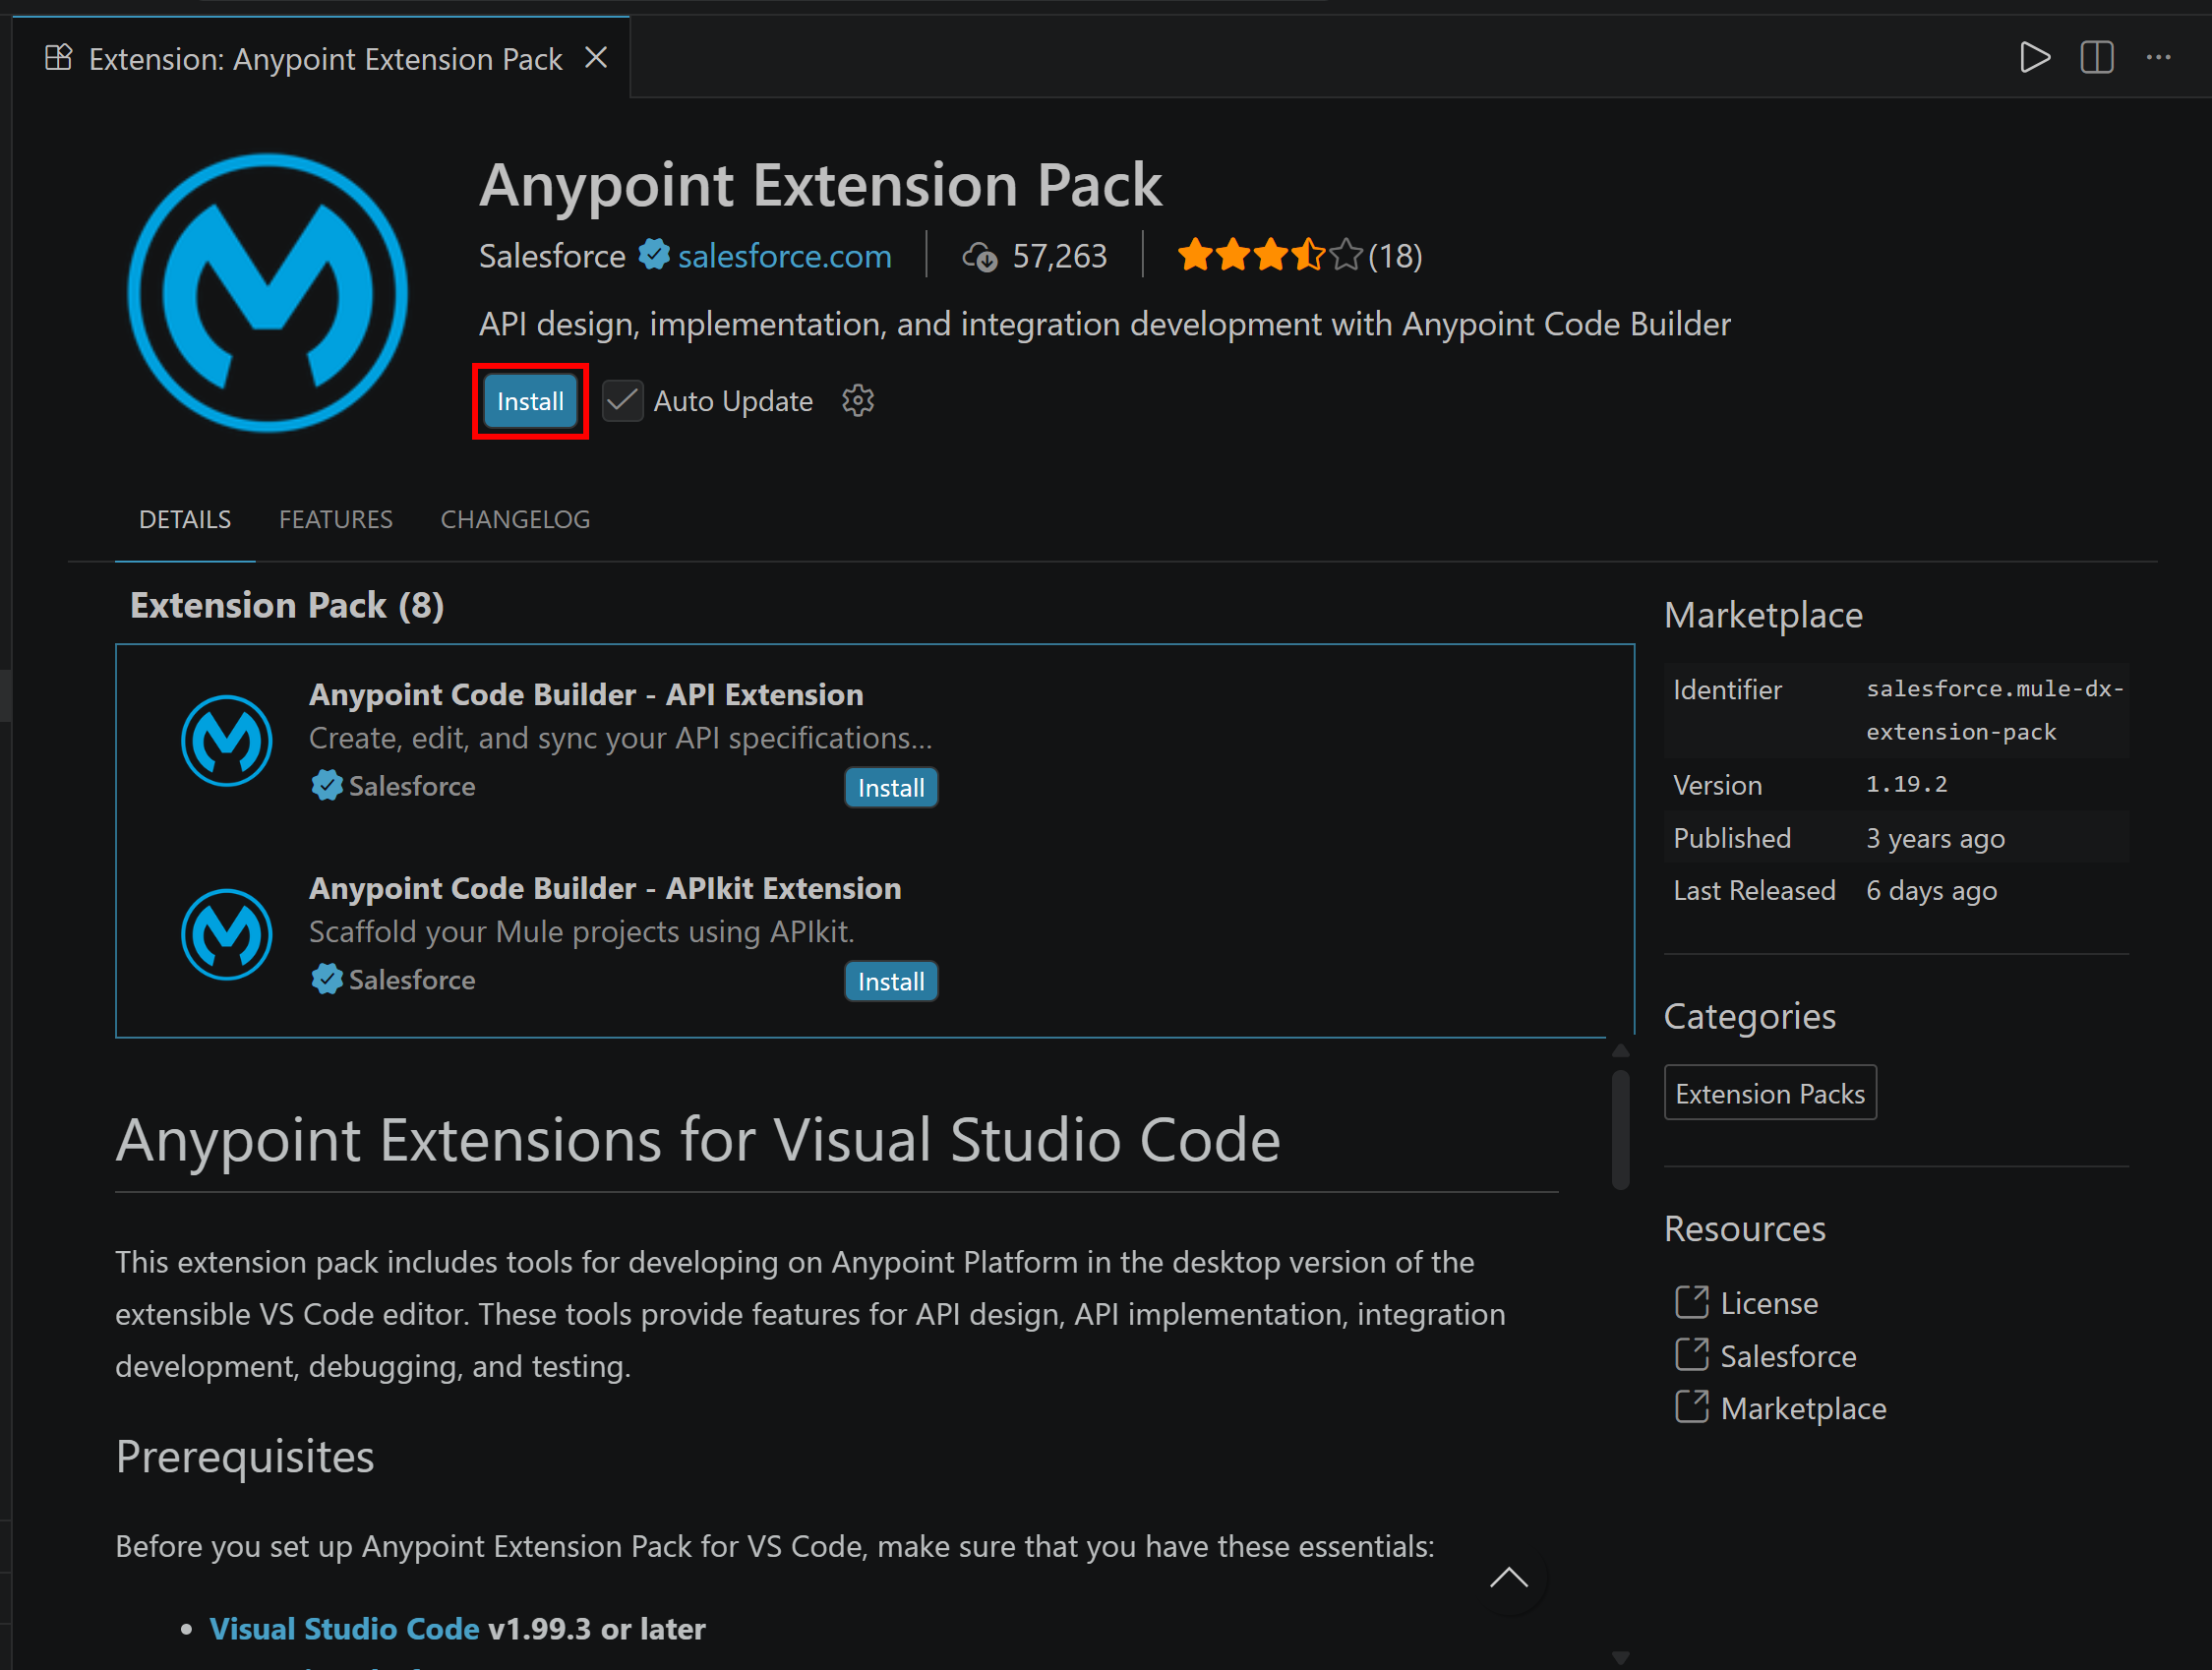
Again, click “Install” and wait for the installation to complete. Once finished, a new option will appear in the bottom-left corner letting you log in to the MuleSoft Anypoint Platform.

Click it and follow the instructions to log in to your MuleSoft Anypoint Platform account and authenticate the connection in Visual Studio Code.
After logging in, you will see your MuleSoft username in the same UI section:

Well done! You have successfully set up Anypoint Code Builder for Desktop.
Step #2: Create an Agent Network Project**
To add a new agent network project, start by clicking the “Anypoint Code Builder” icon in the Extensions sidebar of VSC. Then, double-click “Create an Agent Network”:
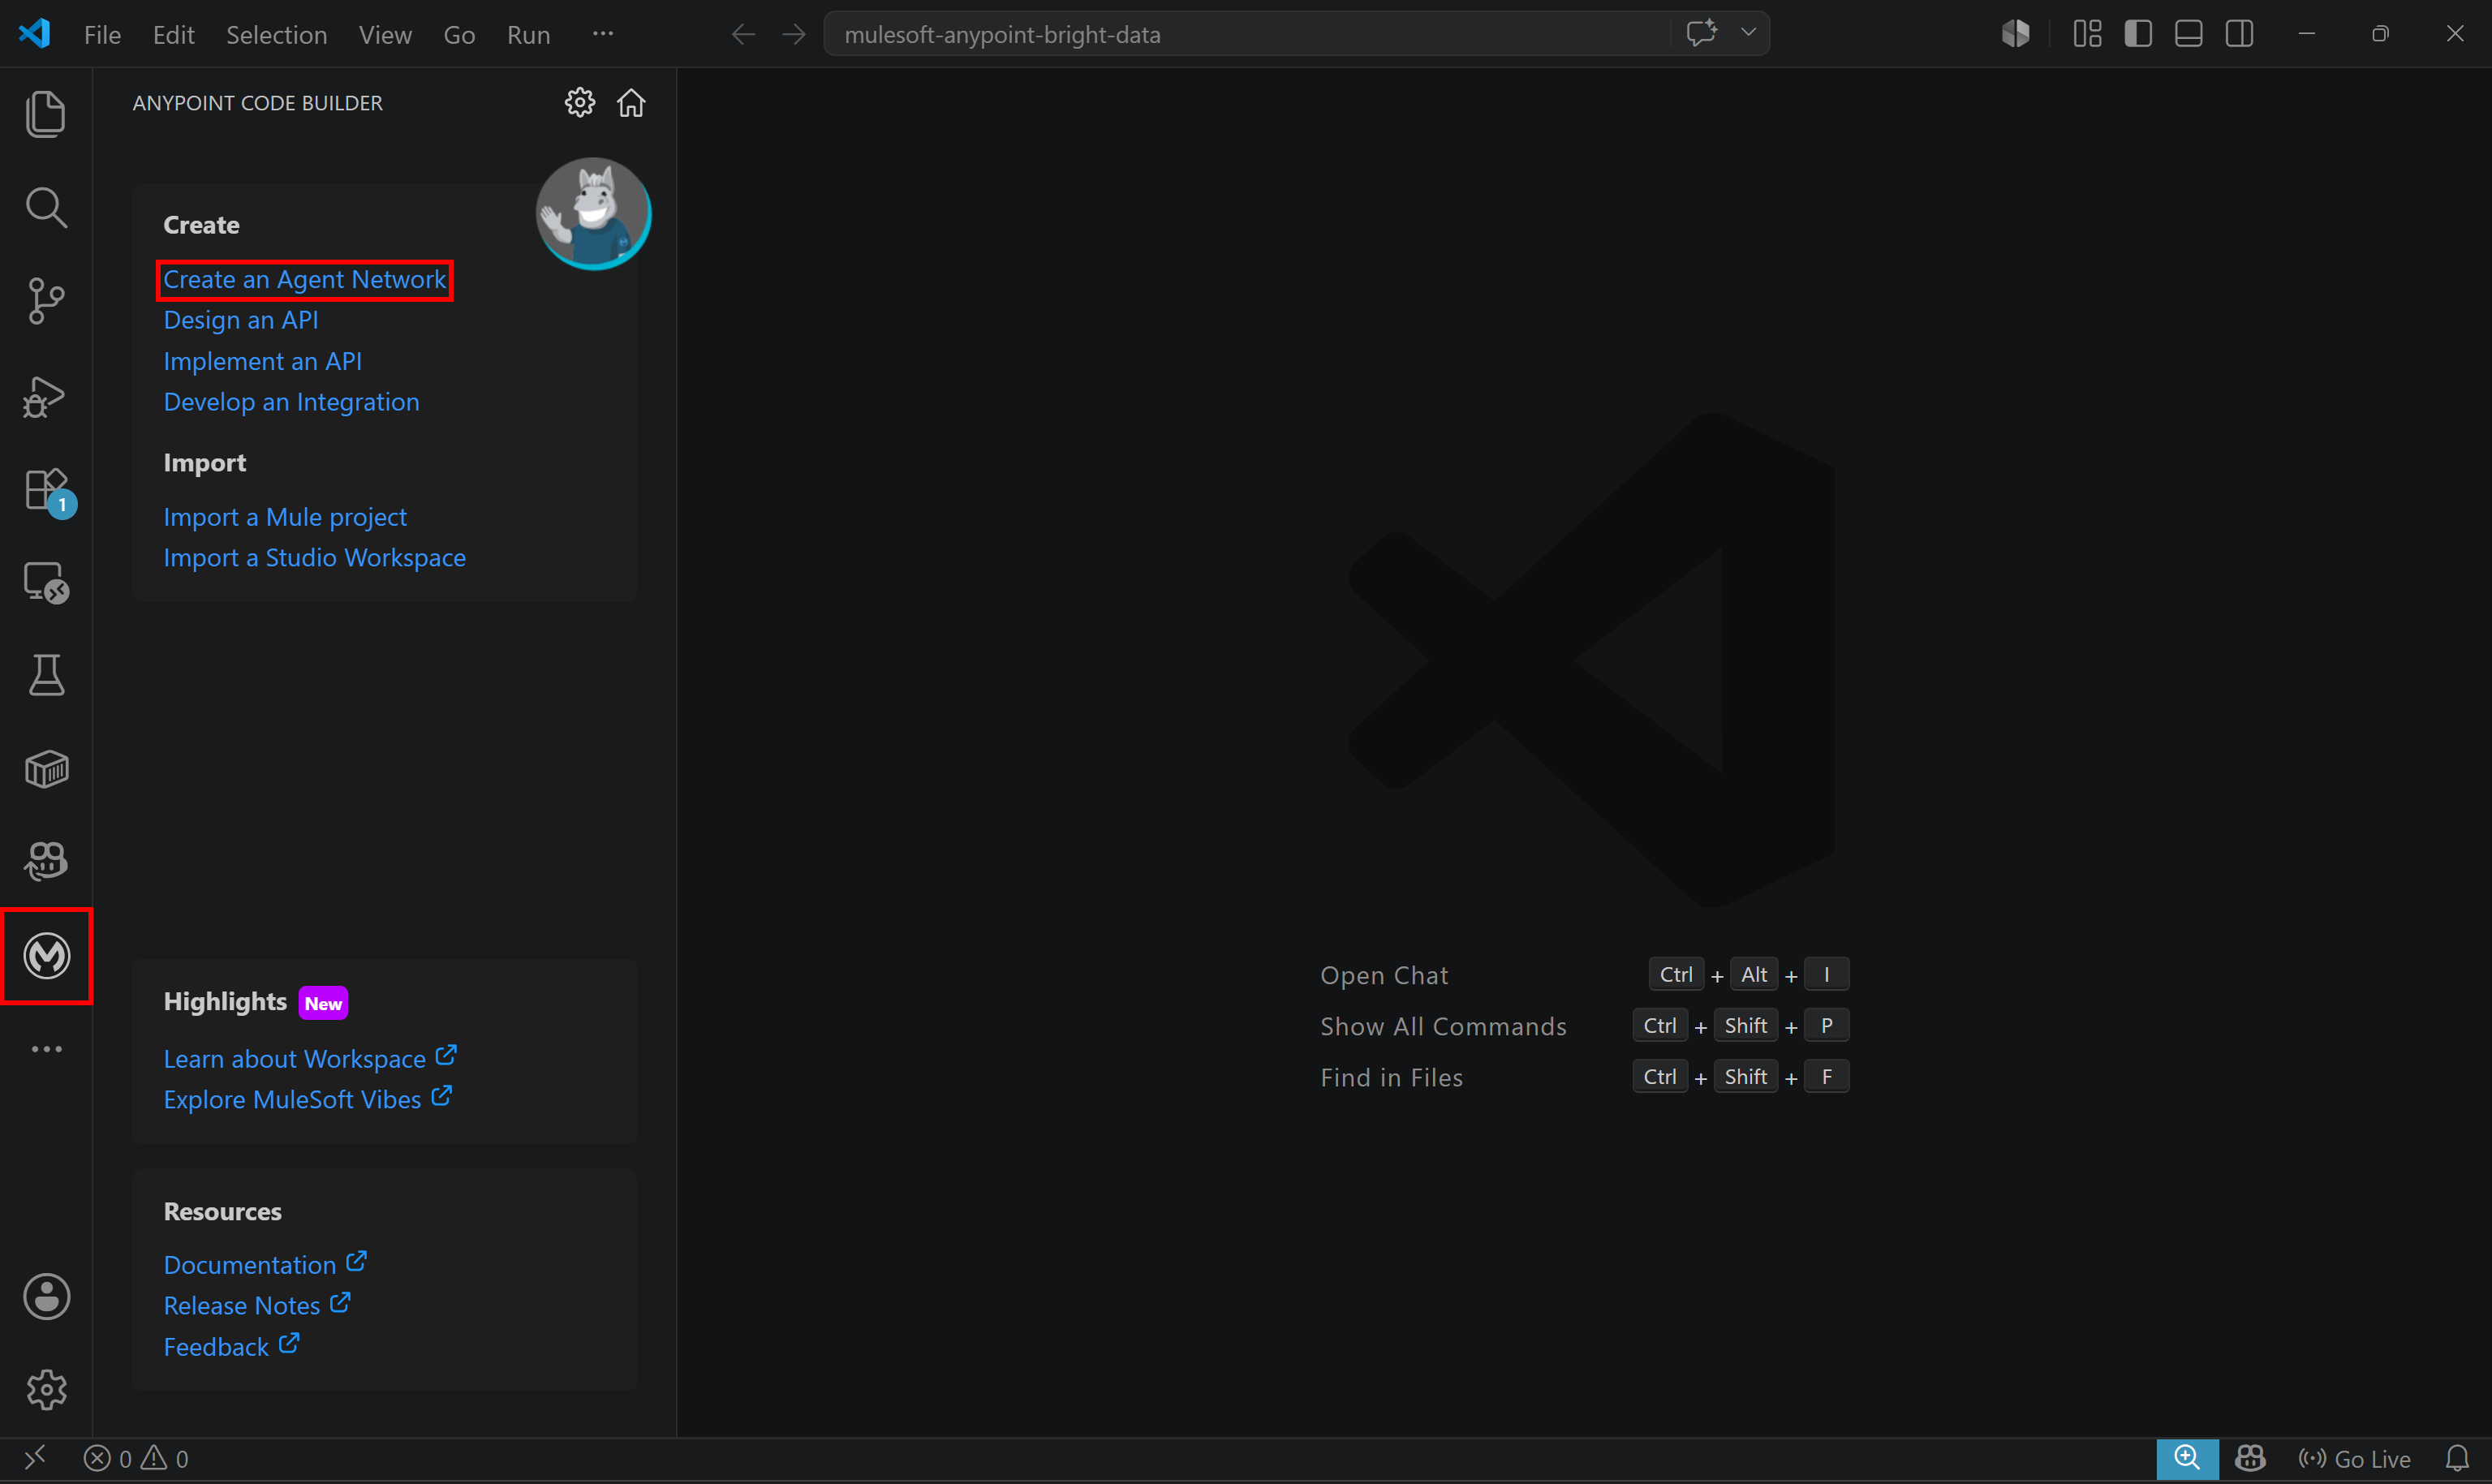
The “Create an Agent Network Project” tab will open. Keep in mind that it may take a few seconds to load, so please be patient.
This form lets you configure your agent network project. Provide a project name (e.g., “Web Analysis Network”), select the project location path, choose your business group, and click the “Create Project” button:
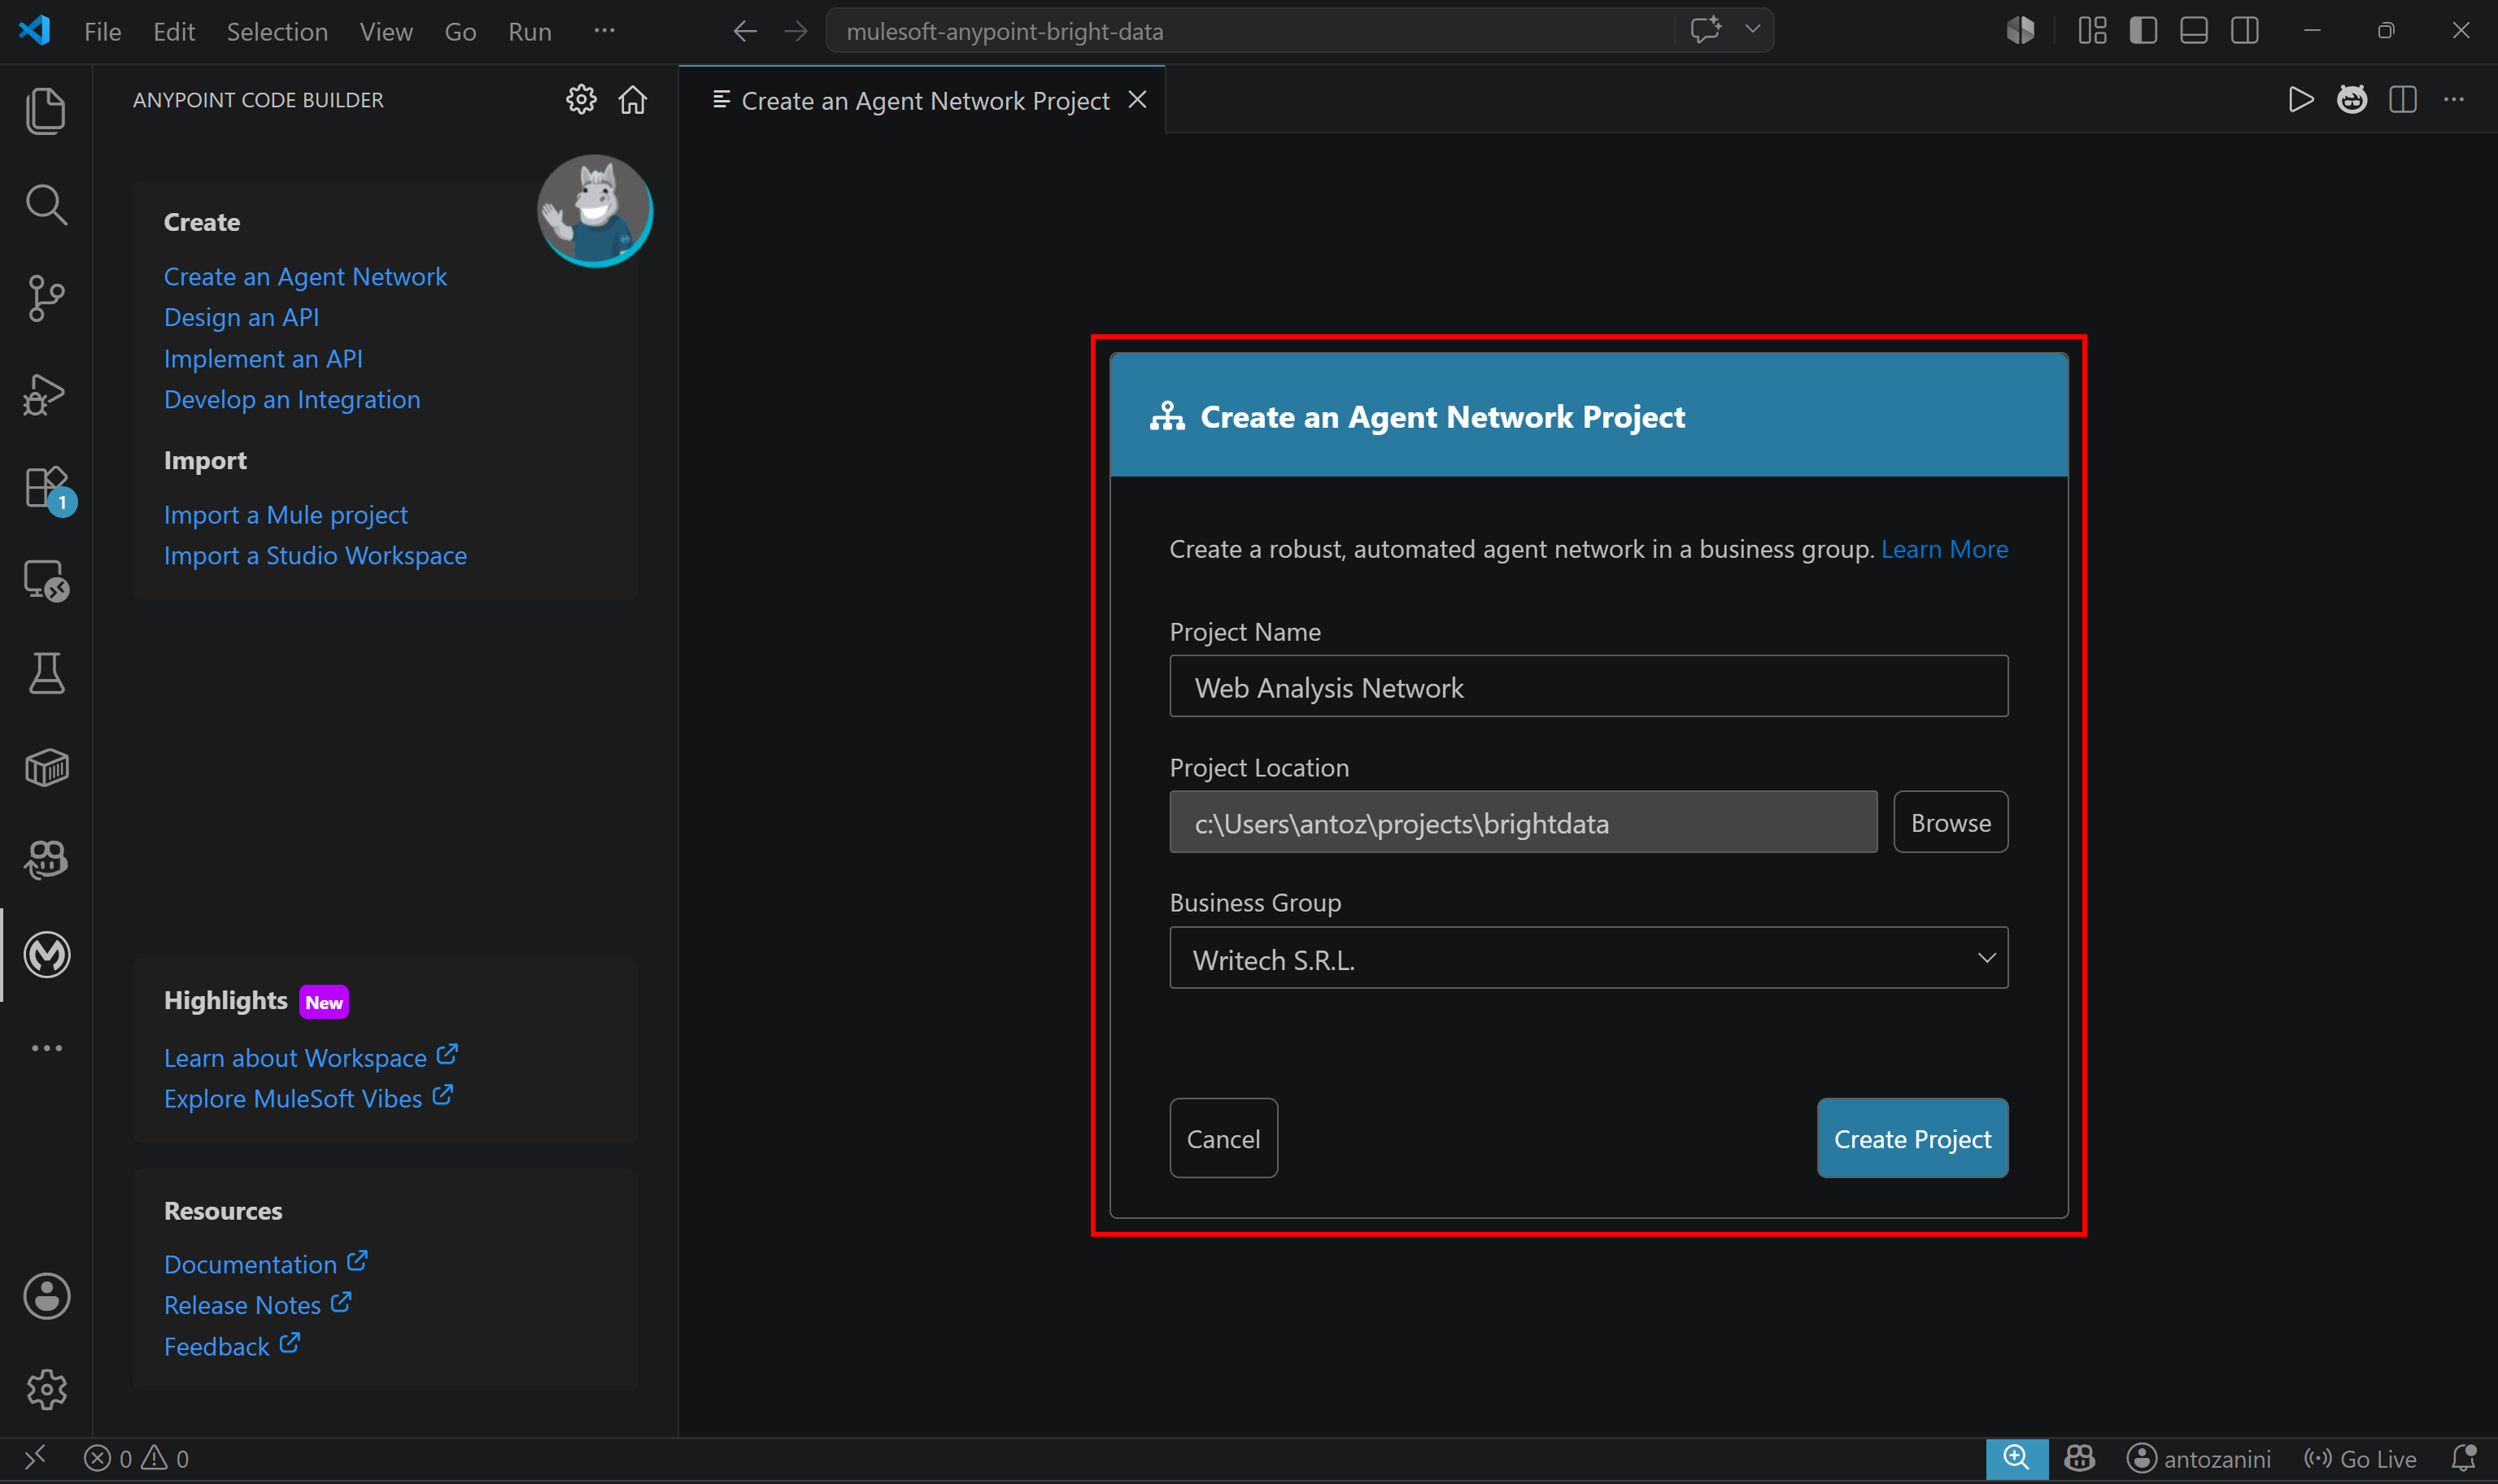
A new web-analysis-network/ folder will be created in the selected location. When you open it, you will see:
web-analysis-network/
├── agent-network.yaml
└── exchange.json
The above two files are the core of any MuleSoft agent network project:
agent-network.yaml: Defines agent behavior, tools, and inter-agent communication.exchange.json: Contains metadata for publishing to Anypoint Exchange.
Load web-analysis-network/ in Visual Studio Code, then open agent-network.yaml. Wait for the MuleSoft extensions to fully load (this may take a few seconds, or even minutes). Once ready, you will see the “Show Canvas” button, which lets you visually explore the agent network definition.
Press it to open the visual representation of the agent network:

Here is what you will see:
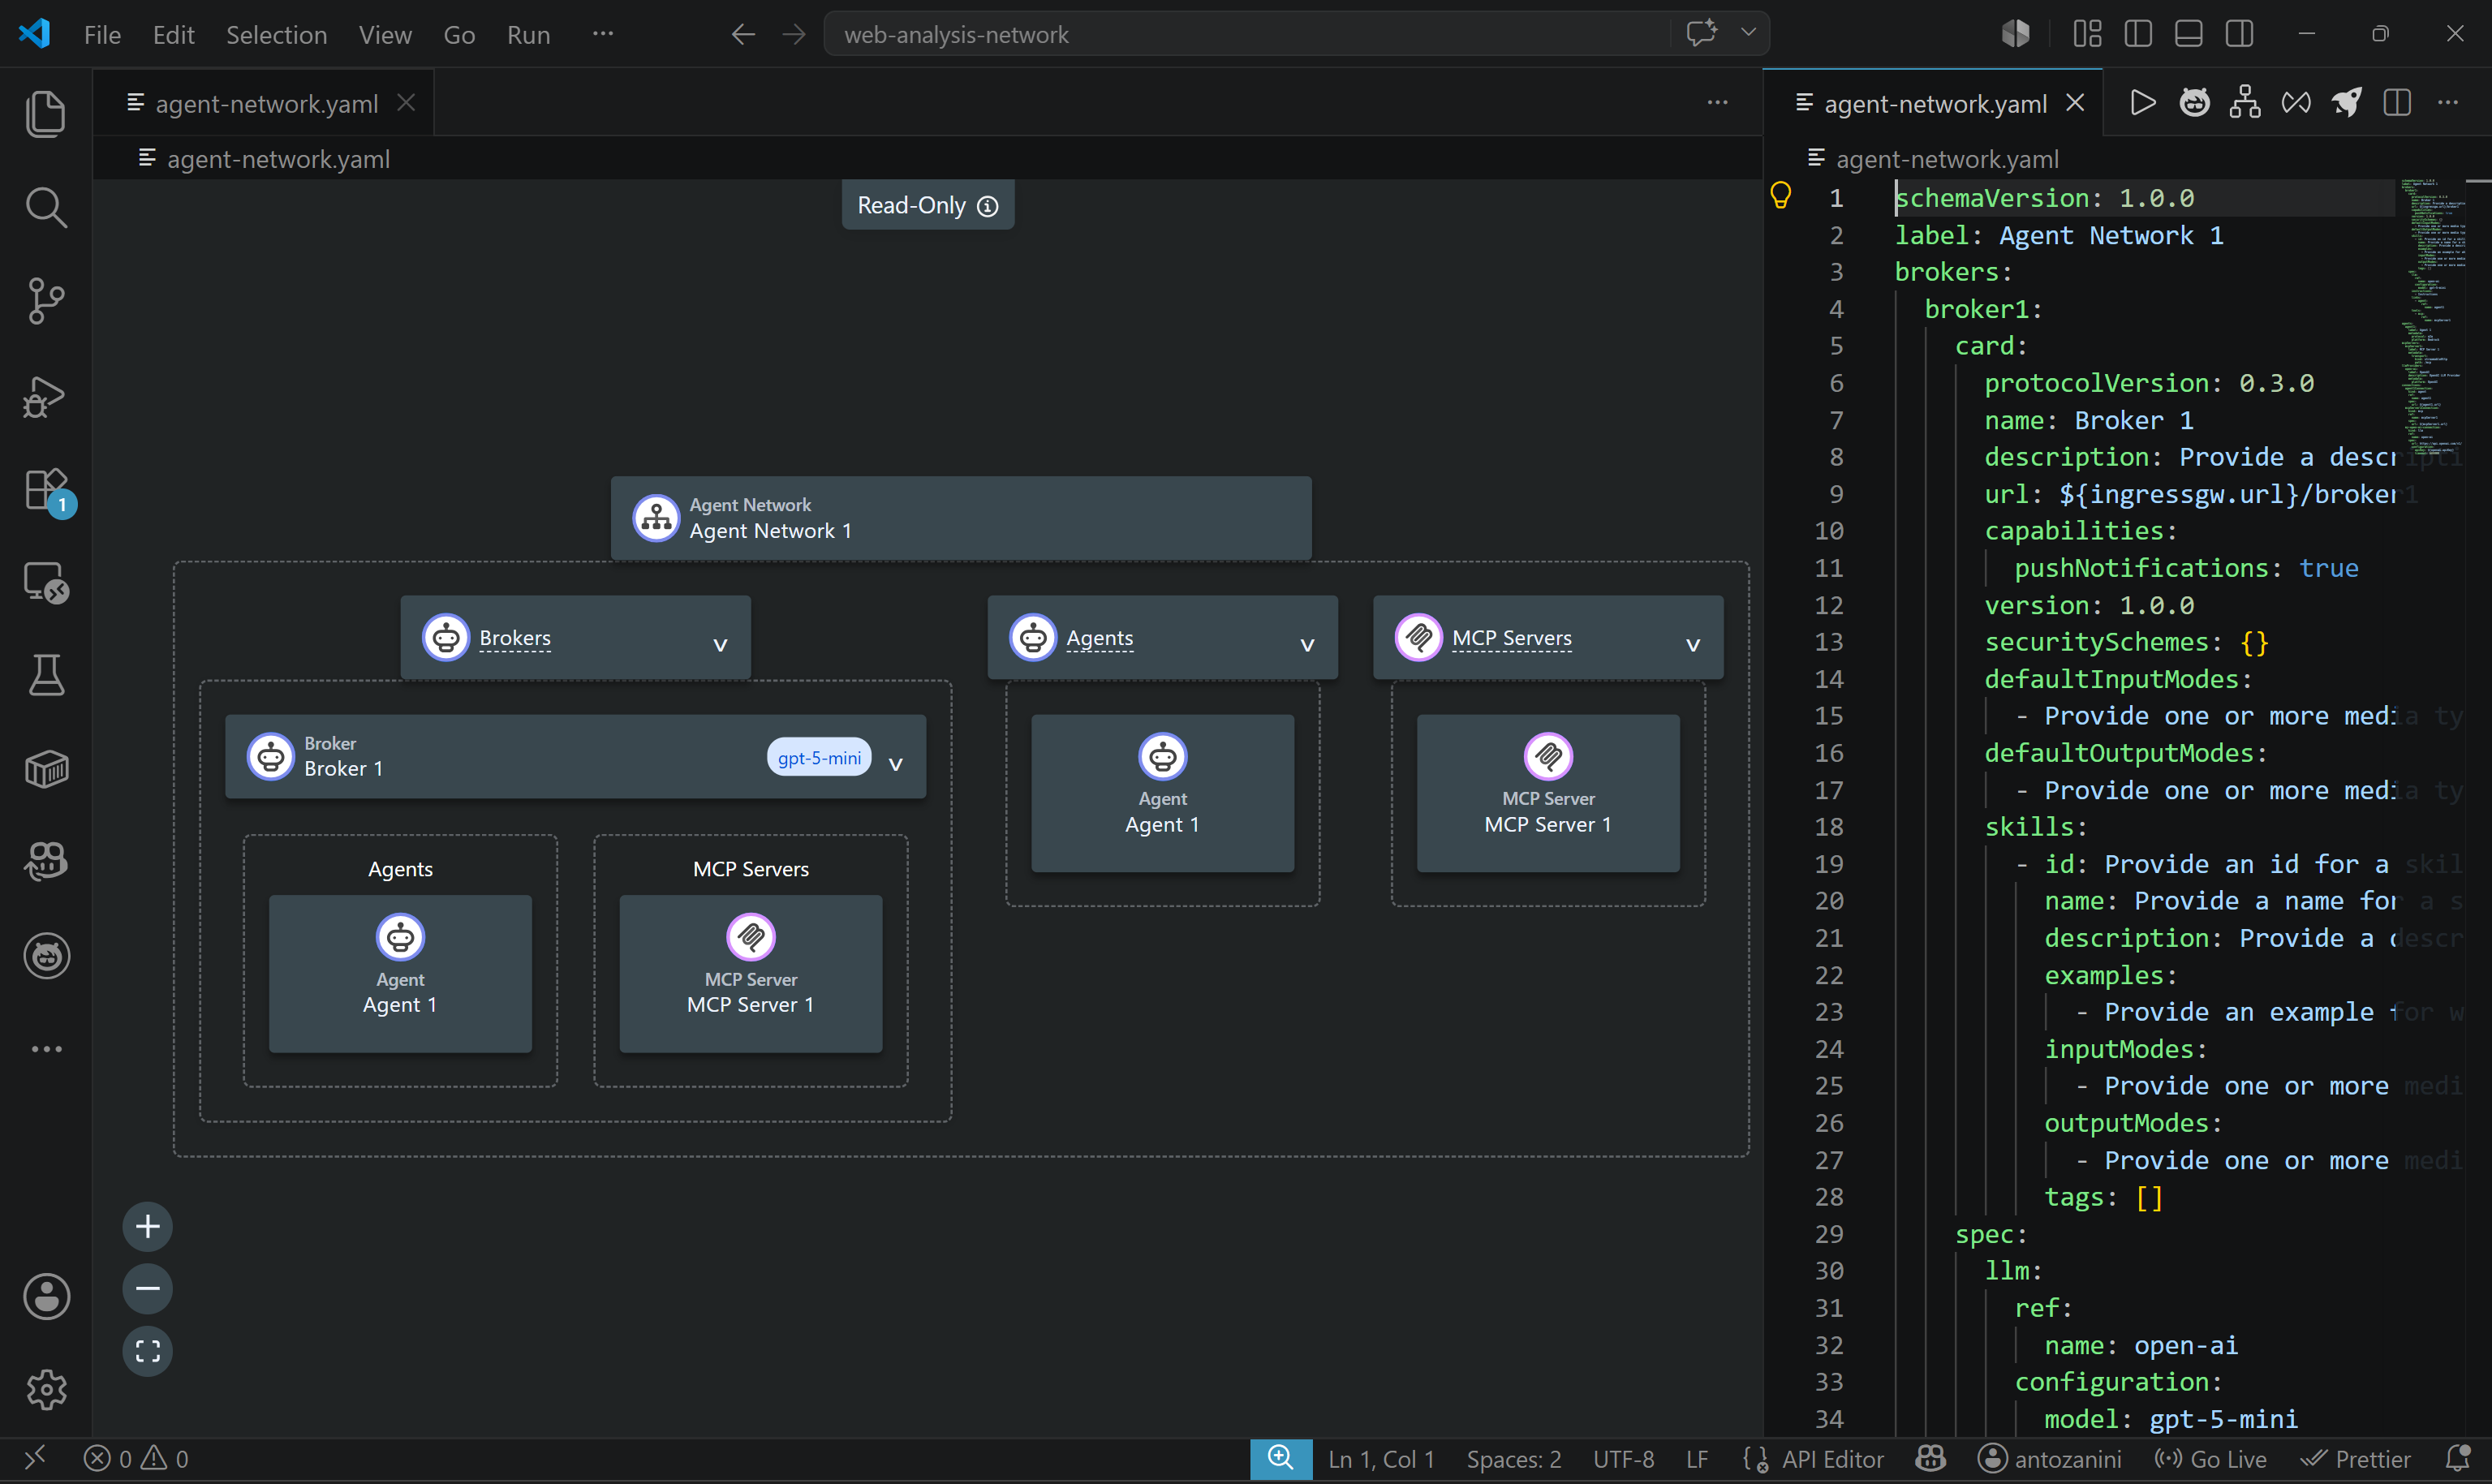
When you modify the agent-network.yaml file, the visual representation updates in real time.
Cool! You now have an agent network development project in MuleSoft Code Builder for Desktop.
Step #3: Integrate Bright Data MCP into Your Agent Network
Inspect the agent network project created by MuleSoft Code Builder. This declares a broker that uses an LLM (OpenAI GPT-5 mini) to coordinate tasks, expose a skill interface, and route work to a linked agent (agent1) and an MCP server (mcpServer1).
The default example is mainly to help you understand the agent network structure. Next, we will build a simple web analysis project. This uses a broker to coordinate an agent connected to the Bright Data MCP for web research and scraping tasks.
To achieve that, update your agent-network.yaml file as follows:
schemaVersion: 1.0.0
label: Web Analysis Network

brokers:
  web-analysis-broker:
    card:
      protocolVersion: 0.3.0
      name: Web Analysis Broker
      description: >
        Broker that coordinates web analysis tasks through a
        local web analysis agent.
      url: ${ingressgw.url}/web-analysis-broker
      capabilities:
        pushNotifications: true
      version: 1.0.0
      securitySchemes: {}

      defaultInputModes:
        - text/plain
        - application/json

      defaultOutputModes:
        - text/plain
        - application/json

      skills:
        - id: web-analysis
          name: Web Analysis
          description: Analyze web content and answer web-related questions.
          examples:
            - Analyze the latest news about AI agents
            - Research a topic on the web
          inputModes:
            - text/plain
            - application/json
          outputModes:
            - text/plain
            - application/json
          tags:
            - web
            - analysis

    spec:
      llm:
        ref:
          name: open-ai
        configuration:
          model: gpt-5-mini

      instructions:
        - |
          You are a web analysis broker.

          Delegate all web research and analysis tasks to the
          web-analysis-agent.

          Return concise and human-readable responses.

      links:
        - agent:
            ref:
              name: web-analysis-agent

      tools:
        - mcp:
            ref:
              name: web-mcp

agents:
  web-analysis-agent:
    label: Web Analysis Agent
    description: Agent responsible for web research and analysis.
    metadata:
      protocol: a2a
      platform: local
      tools:
        - mcp:
            ref:
              name: web-mcp

mcpServers:
  web-mcp:
    label: Bright Data MCP
    description: MCP server for web access and analysis.
    metadata:
      transport:
        kind: streamableHttp
        path: /mcp

llmProviders:
  open-ai:
    label: OpenAI
    description: OpenAI LLM Provider
    metadata:
      platform: OpenAI
      models:
        - gpt-5-mini

connections:
  web-mcp:
    kind: mcp
    ref:
      name: web-mcp
    spec:
      url: ${webMcp.url}

  open-ai:
    kind: llm
    ref:
      name: open-ai
    spec:
      url: https://api.openai.com/v1/
      configuration:
apiKey: ${openai.apiKey}Remember: This is an example setup to demonstrate Bright Data MCP integration. A production-ready agent network would typically include multiple agents, each communicating with the broker via A2A (Agent-to-Agent), one of the most popular AI protocols.
Next, update exchange.json as below:
{
  "main": "agent-network.yaml",
  "name": "Web Analysis Network",
  "classifier": "agent-network",
  "organizationId": "0266f4c2-8ecb-4b42-a5d3-c3bb25e5f814",
  "descriptorVersion": "1.0.0",
  "tags": [],
  "metadata": {
    "variables": {
      "webMcp": {
        "url": {
          "description": "Bright Data MCP Server URL",
          "default": "",
          "secret": true
        }
      },
      "openai": {
        "apiKey": {
          "description": "OpenAI API key",
          "default": "",
          "secret": true
        }
      }
    }
  },
  "dependencies": [],
  "groupId": "0266f4c2-8ecb-4b42-a5d3-c3bb25e5f814",
  "assetId": "web-analysis-network",
  "version": "1.0.0"
}
Note that the OpenAI API key and Bright Data MCP connection URL are variables that you will need to provide at deployment time.
Once configured, visualize the agent network, and you will see:
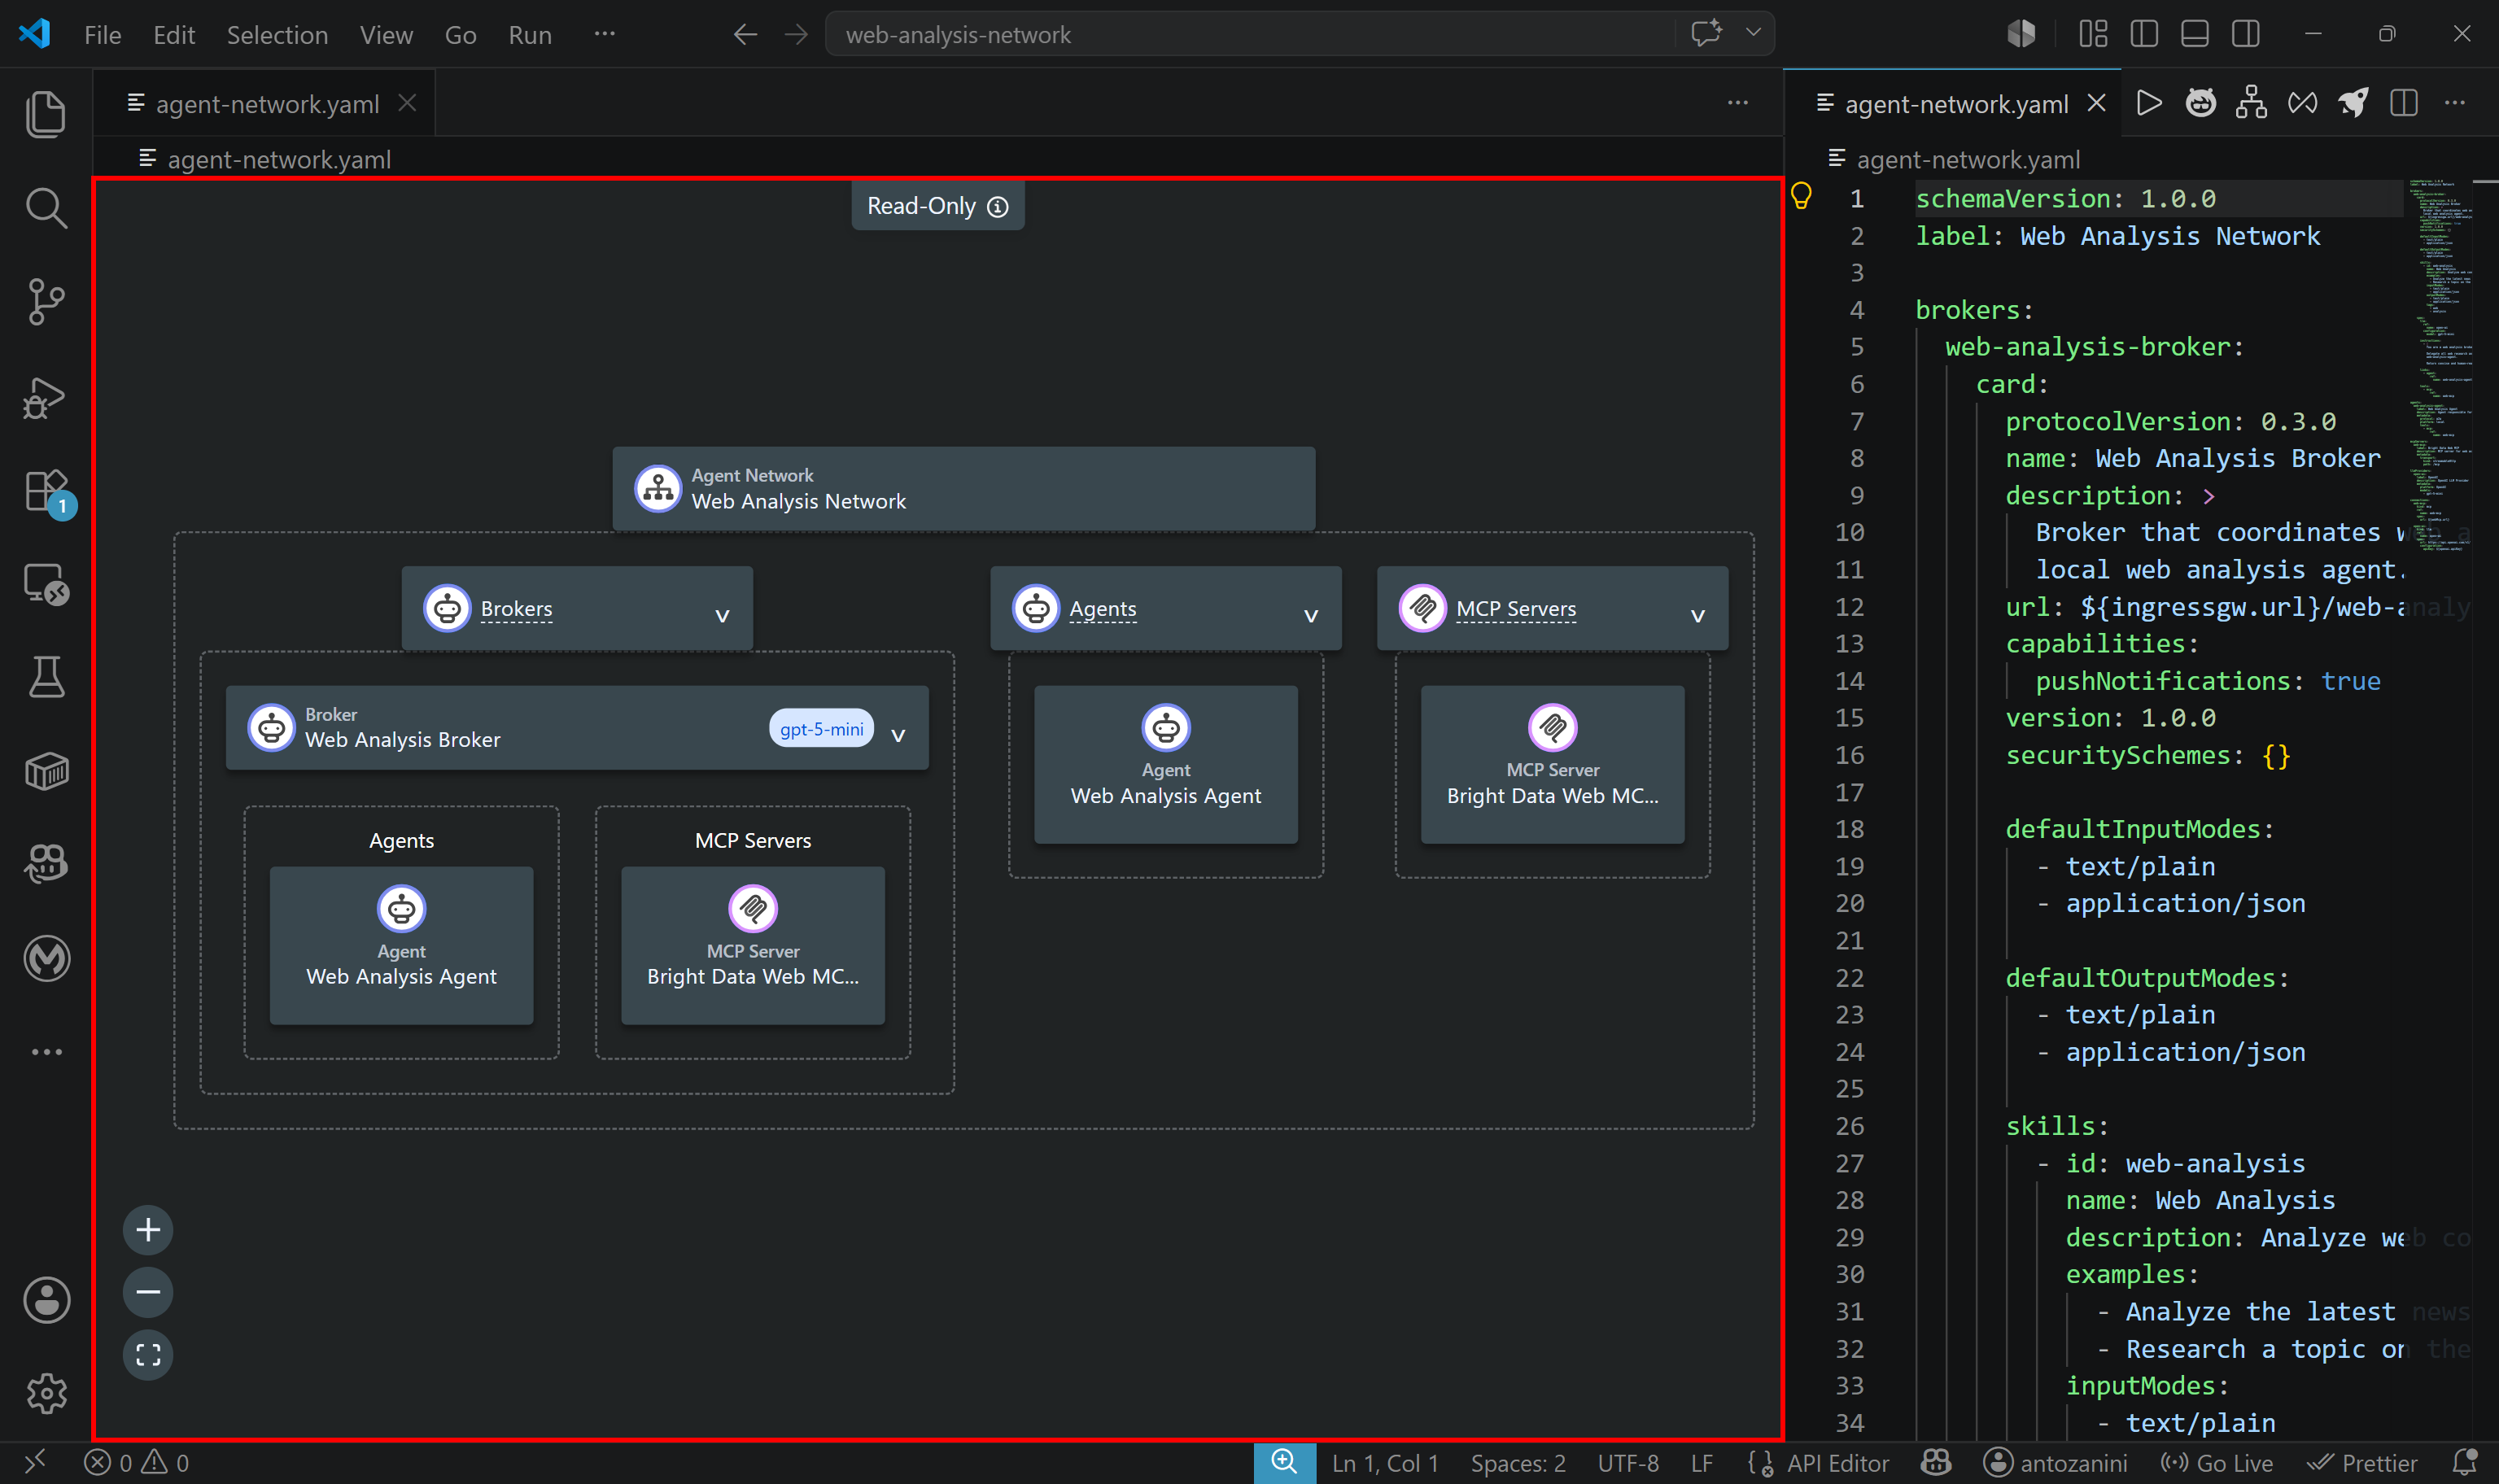
Note that the Bright Data MCP tools are exposed to both the web analysis agent and the broker. This is useful because the broker might also need direct web access for coordination tasks.
Excellent! You are ready to publish and deploy the project.
Step #4: Publish the Project
Now, you will likely want to reuse components from your Agent Network, especially the Bright Data MCP server. So, it is a good idea to publish them as reusable Anypoint Exchange assets.
When you publish an Agent Network project, MuleSoft first builds the project. It then creates a separate asset for each broker, agent, and MCP server defined in agent-network.yaml. The asset ID is based on the value of the name key.
To build and publish your Agent Network, click the “Publish Agent Network Assets” button in the top-right corner:

The following form will appear:
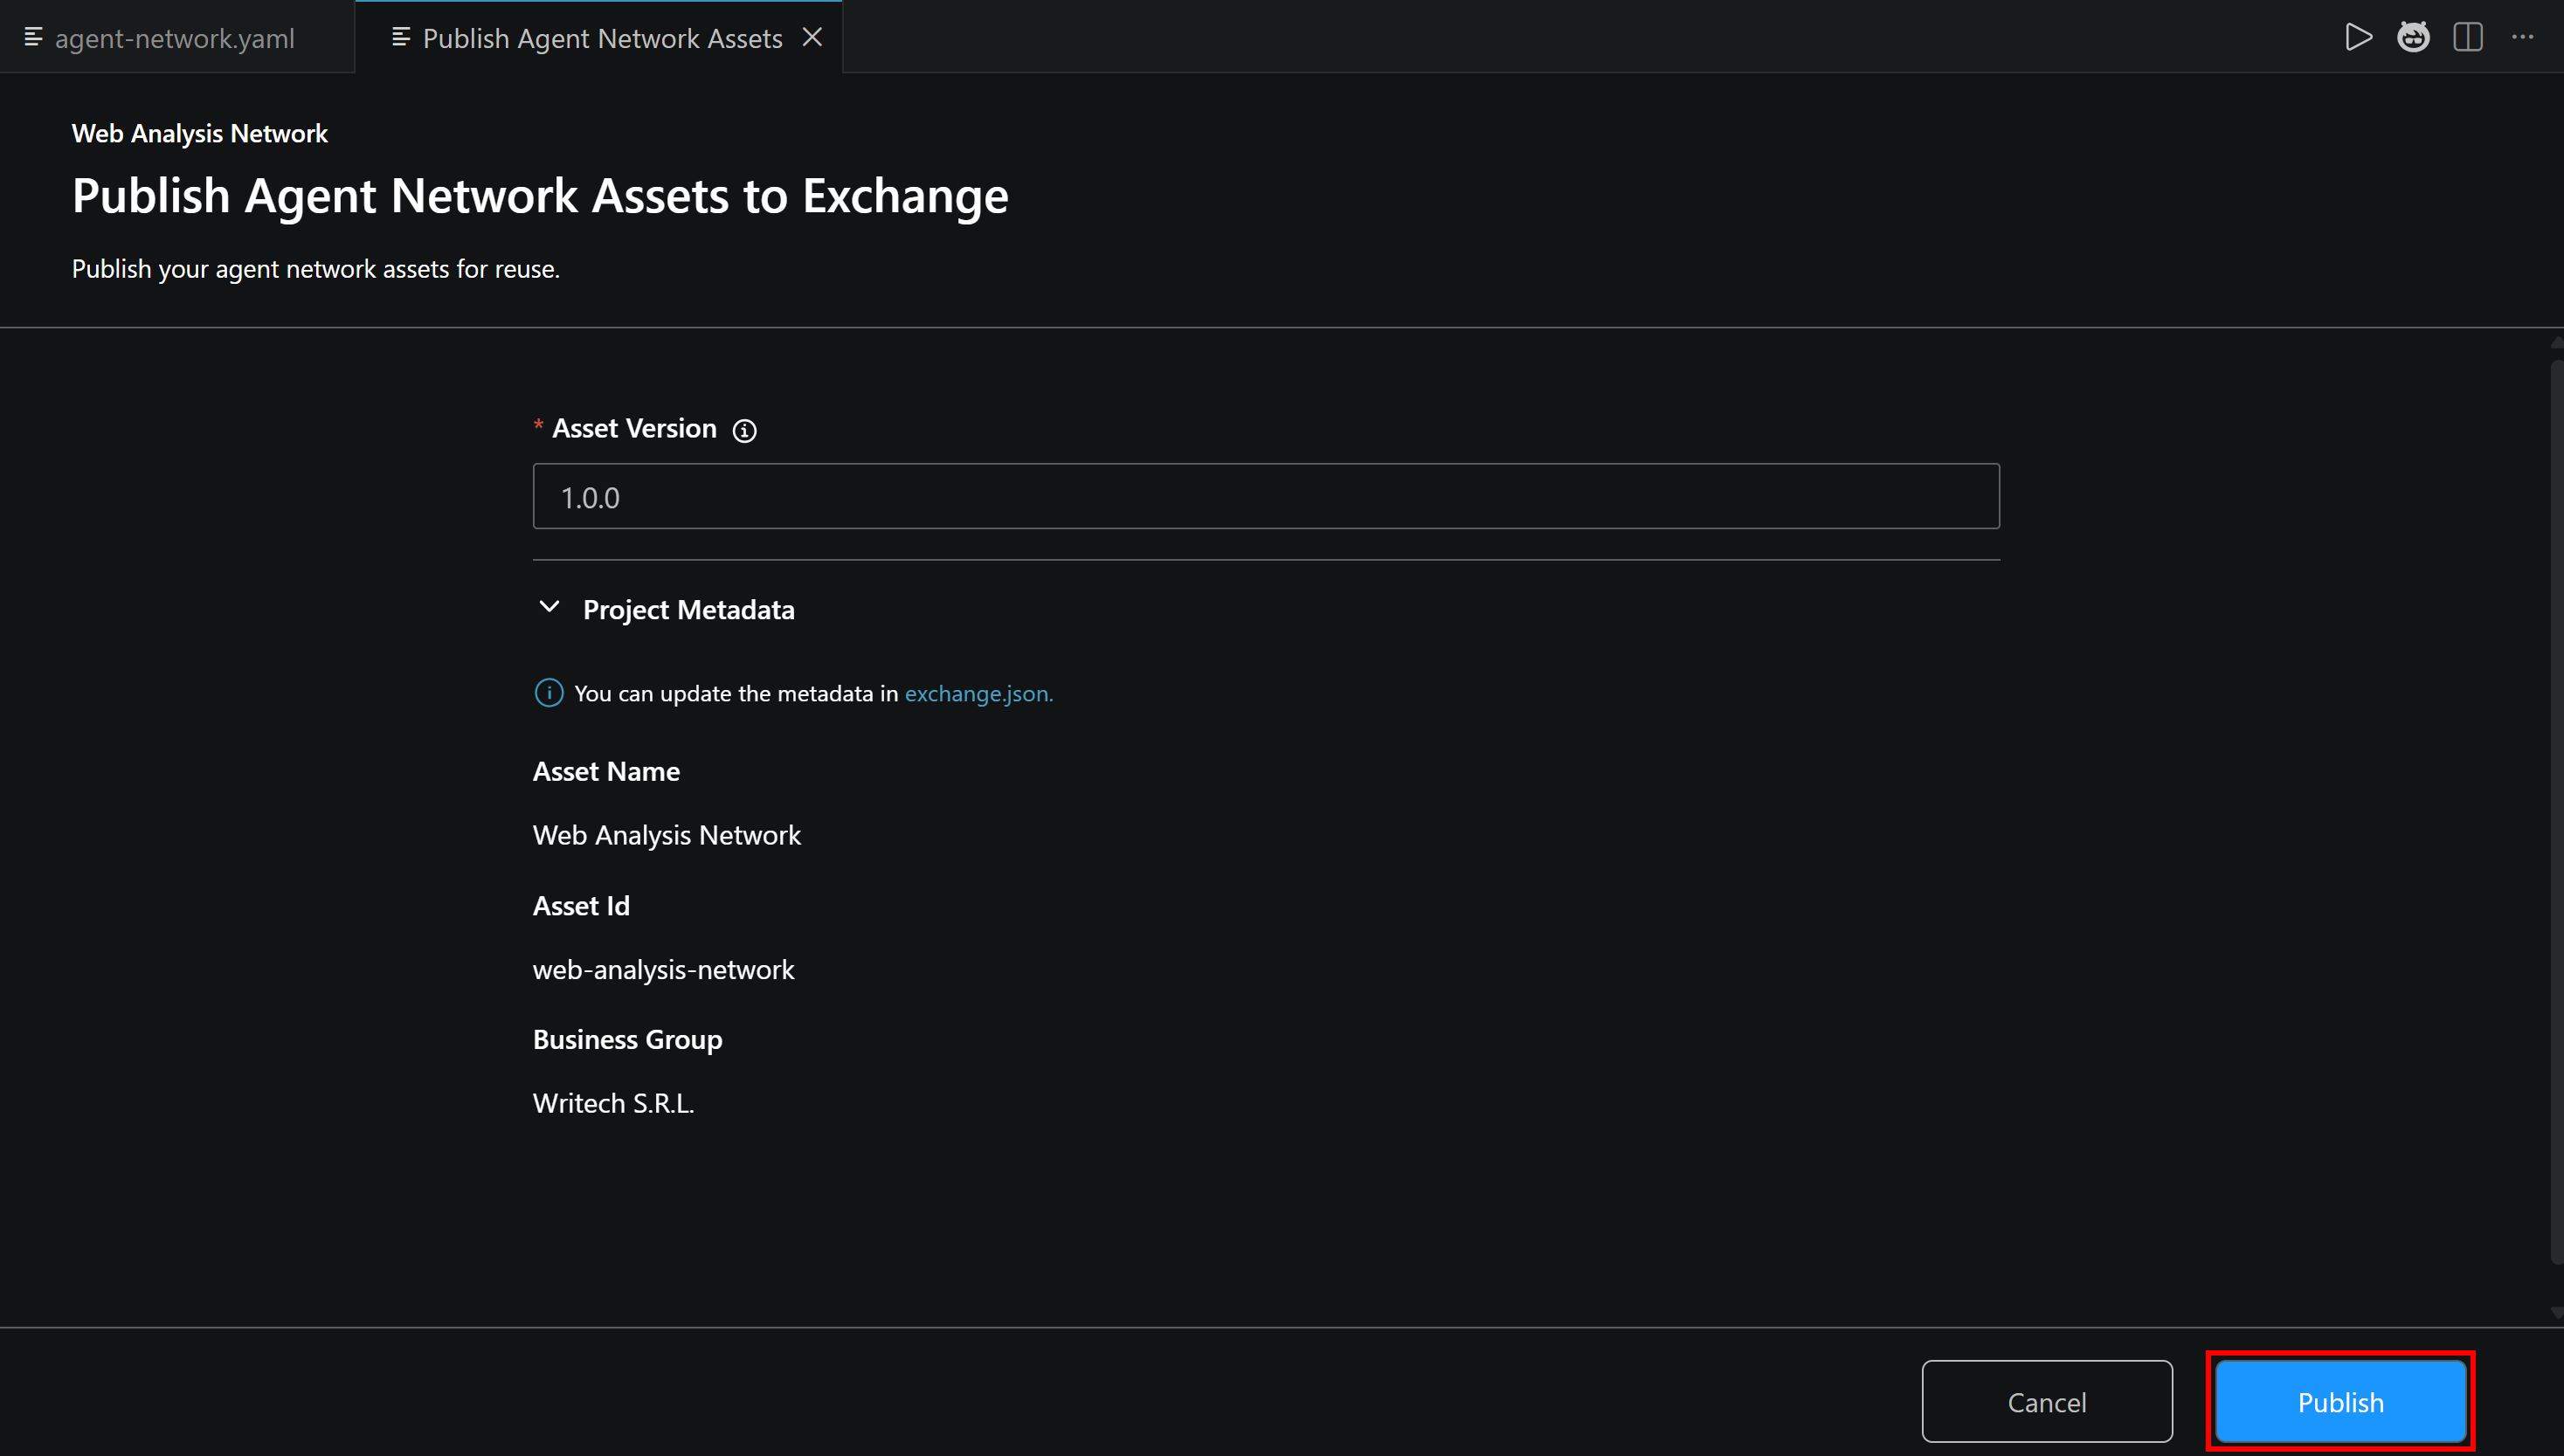
Click “Publish”, and you will receive the “Validating Agent Network and preparing to deploy…” message.
Once publishing is complete, go back to your MuleSoft Anypoint Platform account in your browser. Under the “Agents & Tools” dropdown menu, select the “Exchange” option. That opens the Anypoint Exchange “All assets” page:
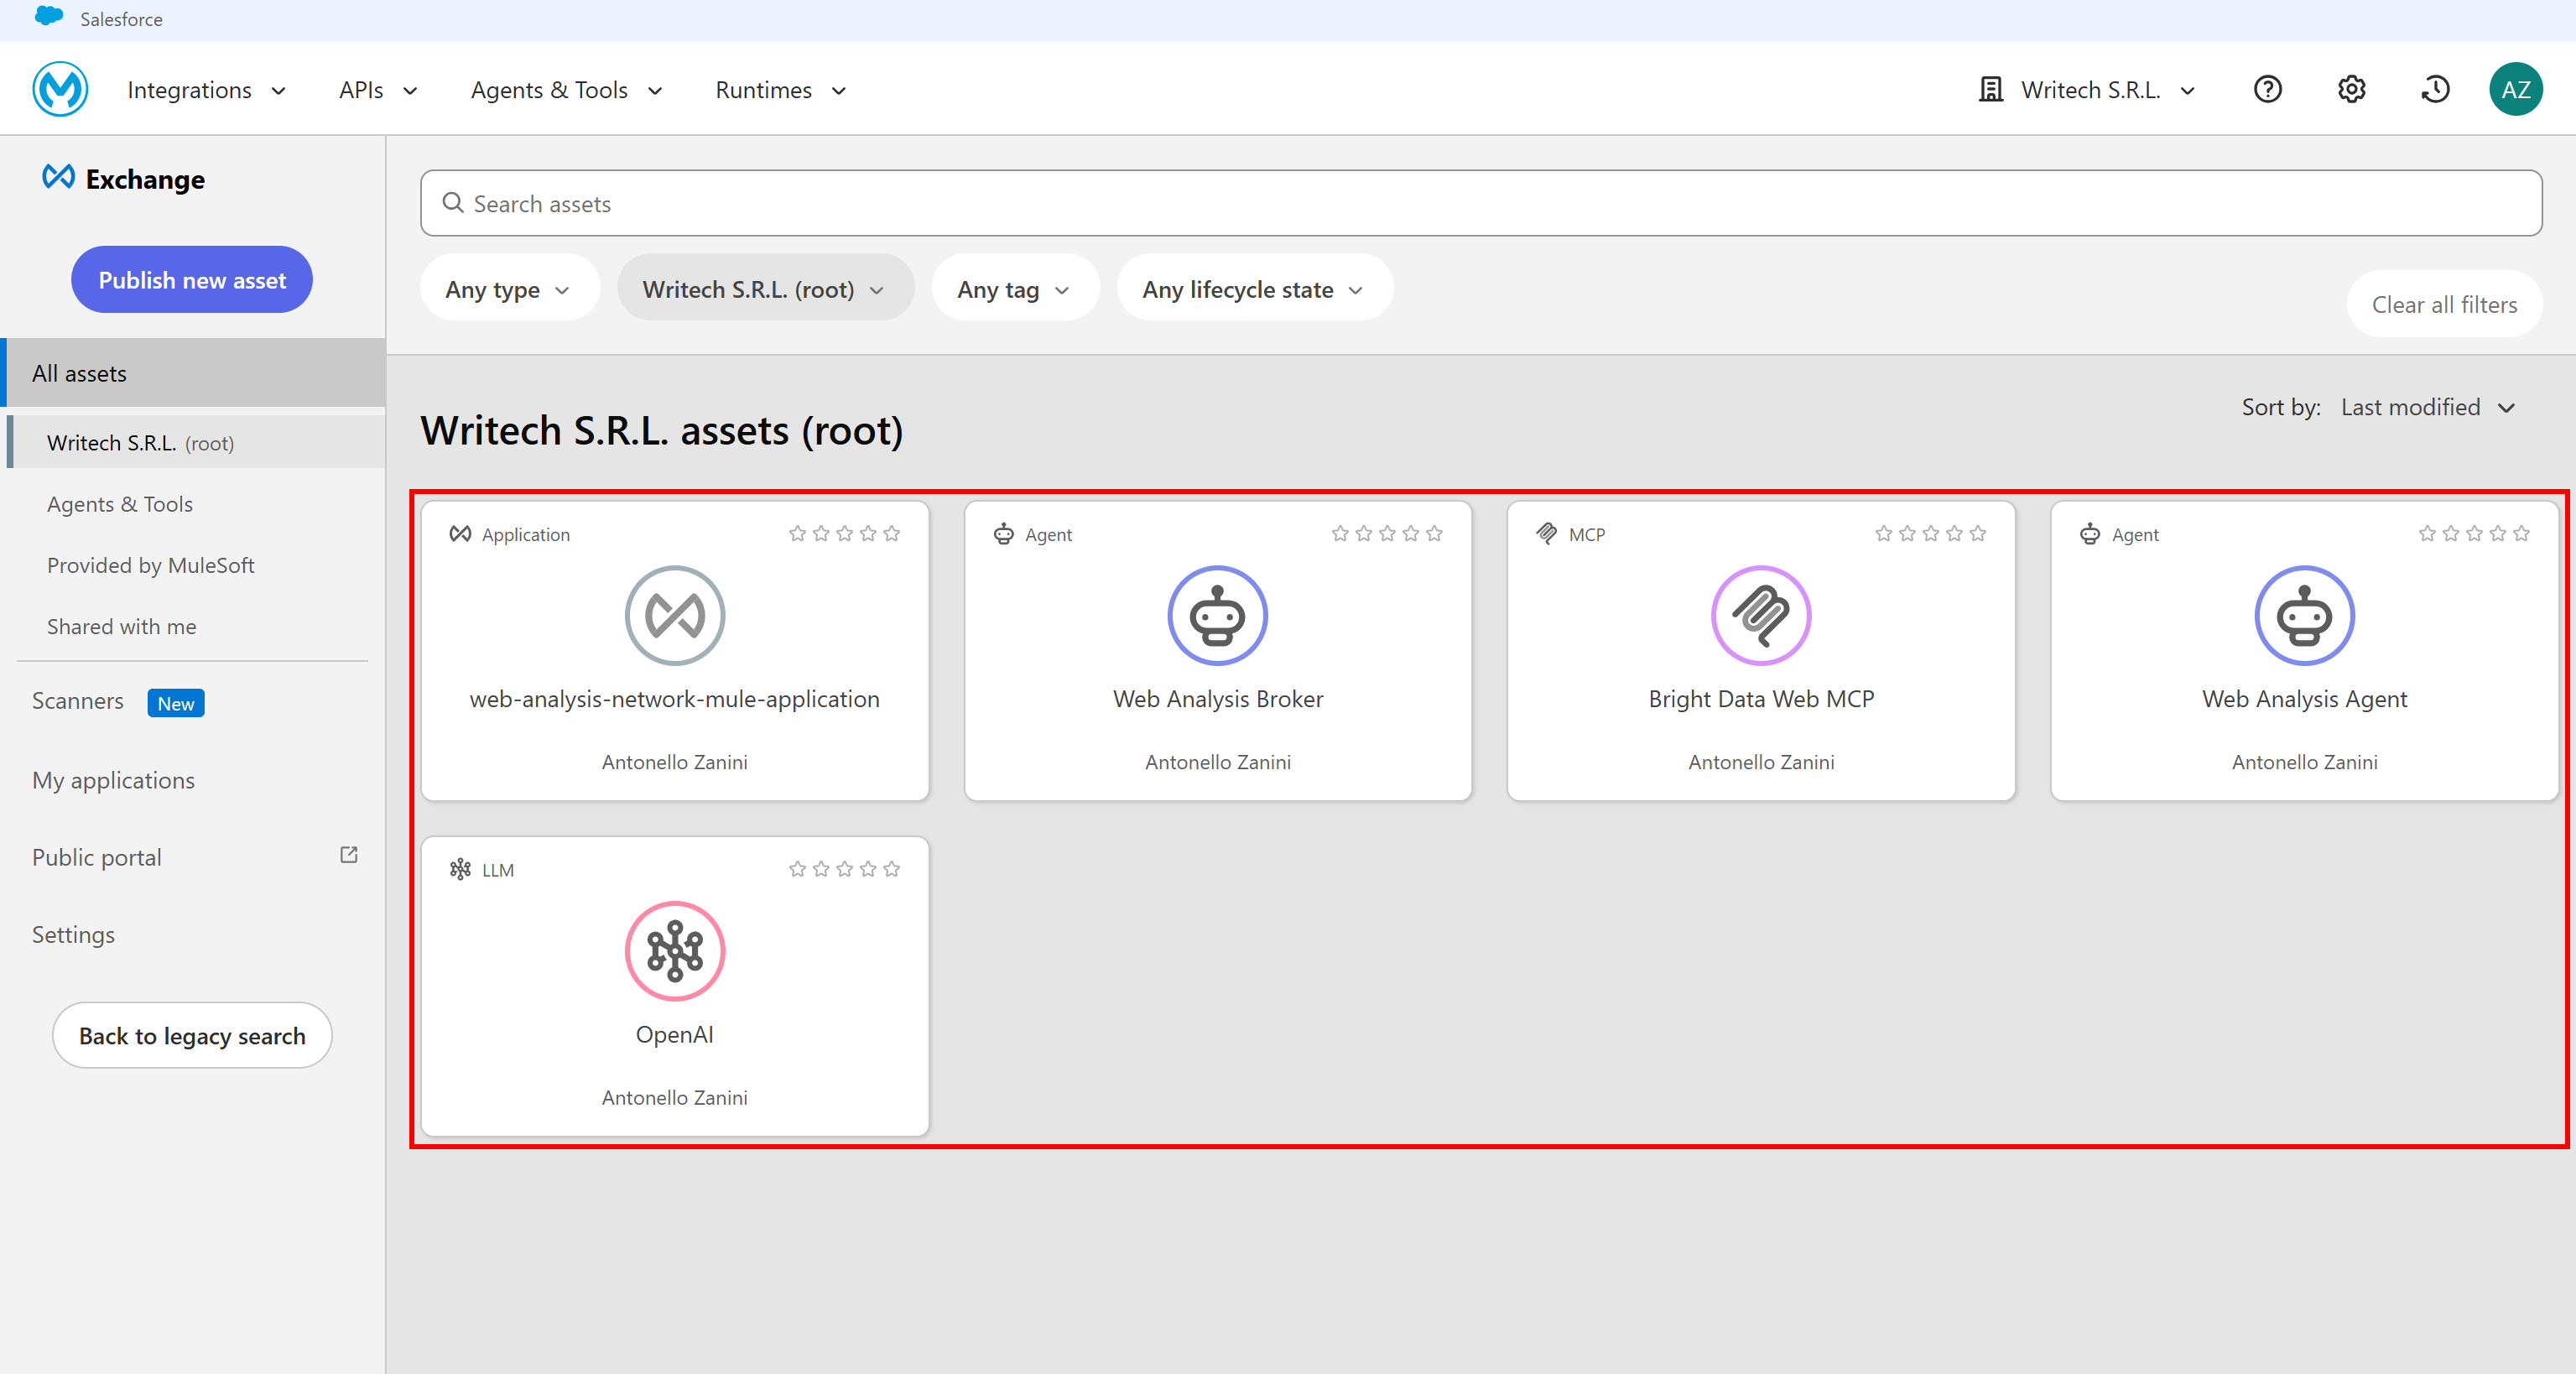
Notice how the page now includes all assets related to the agent network project you created earlier.
Your Agent Network components are now published and reusable across projects. Fantastic!
Step #5: Retrieve the Bright Data MCP Connection URL
Right now, we have treated the Bright Data MCP connection as just a variable. It is time to retrieve the actual connection URL!
Since MuleSoft Anypoint Platform applications run in the cloud, you must connect to the remote version of the Bright Data MCP server.
Note: The Bright Data MCP remote server is enterprise-ready. It supports unlimited connections and scalability, just like all other Bright Data products.
To get started, familiarize yourself with the Bright Data MCP remote connection URL format:
https://mcp.brightdata.com/mcp?token=<YOUR_BRIGHT_DATA_API_KEY>&pro=1Remember that the &pro=1 parameter is optional:
- Without
&pro=1: You get access only to the free tools available in Rapid mode (5,000 requests per month). - With
&pro=1: You unlock the full suite of 70+ tools and advanced capabilities. Standard usage charges apply.
Make sure to replace the <YOUR_BRIGHT_DATA_API_KEY> placeholder with your actual Bright Data API token.
If you need more granular control over exposed tools, you can generate a custom MCP connection URL directly from the Bright Data dashboard.
Log in to your Bright Data account and navigate to “AI Gateways > MCP”. Follow the setup wizard to configure your MCP server access by enabling only specific tools or tool groups. At the end of the process, you will receive a customized connection URL:
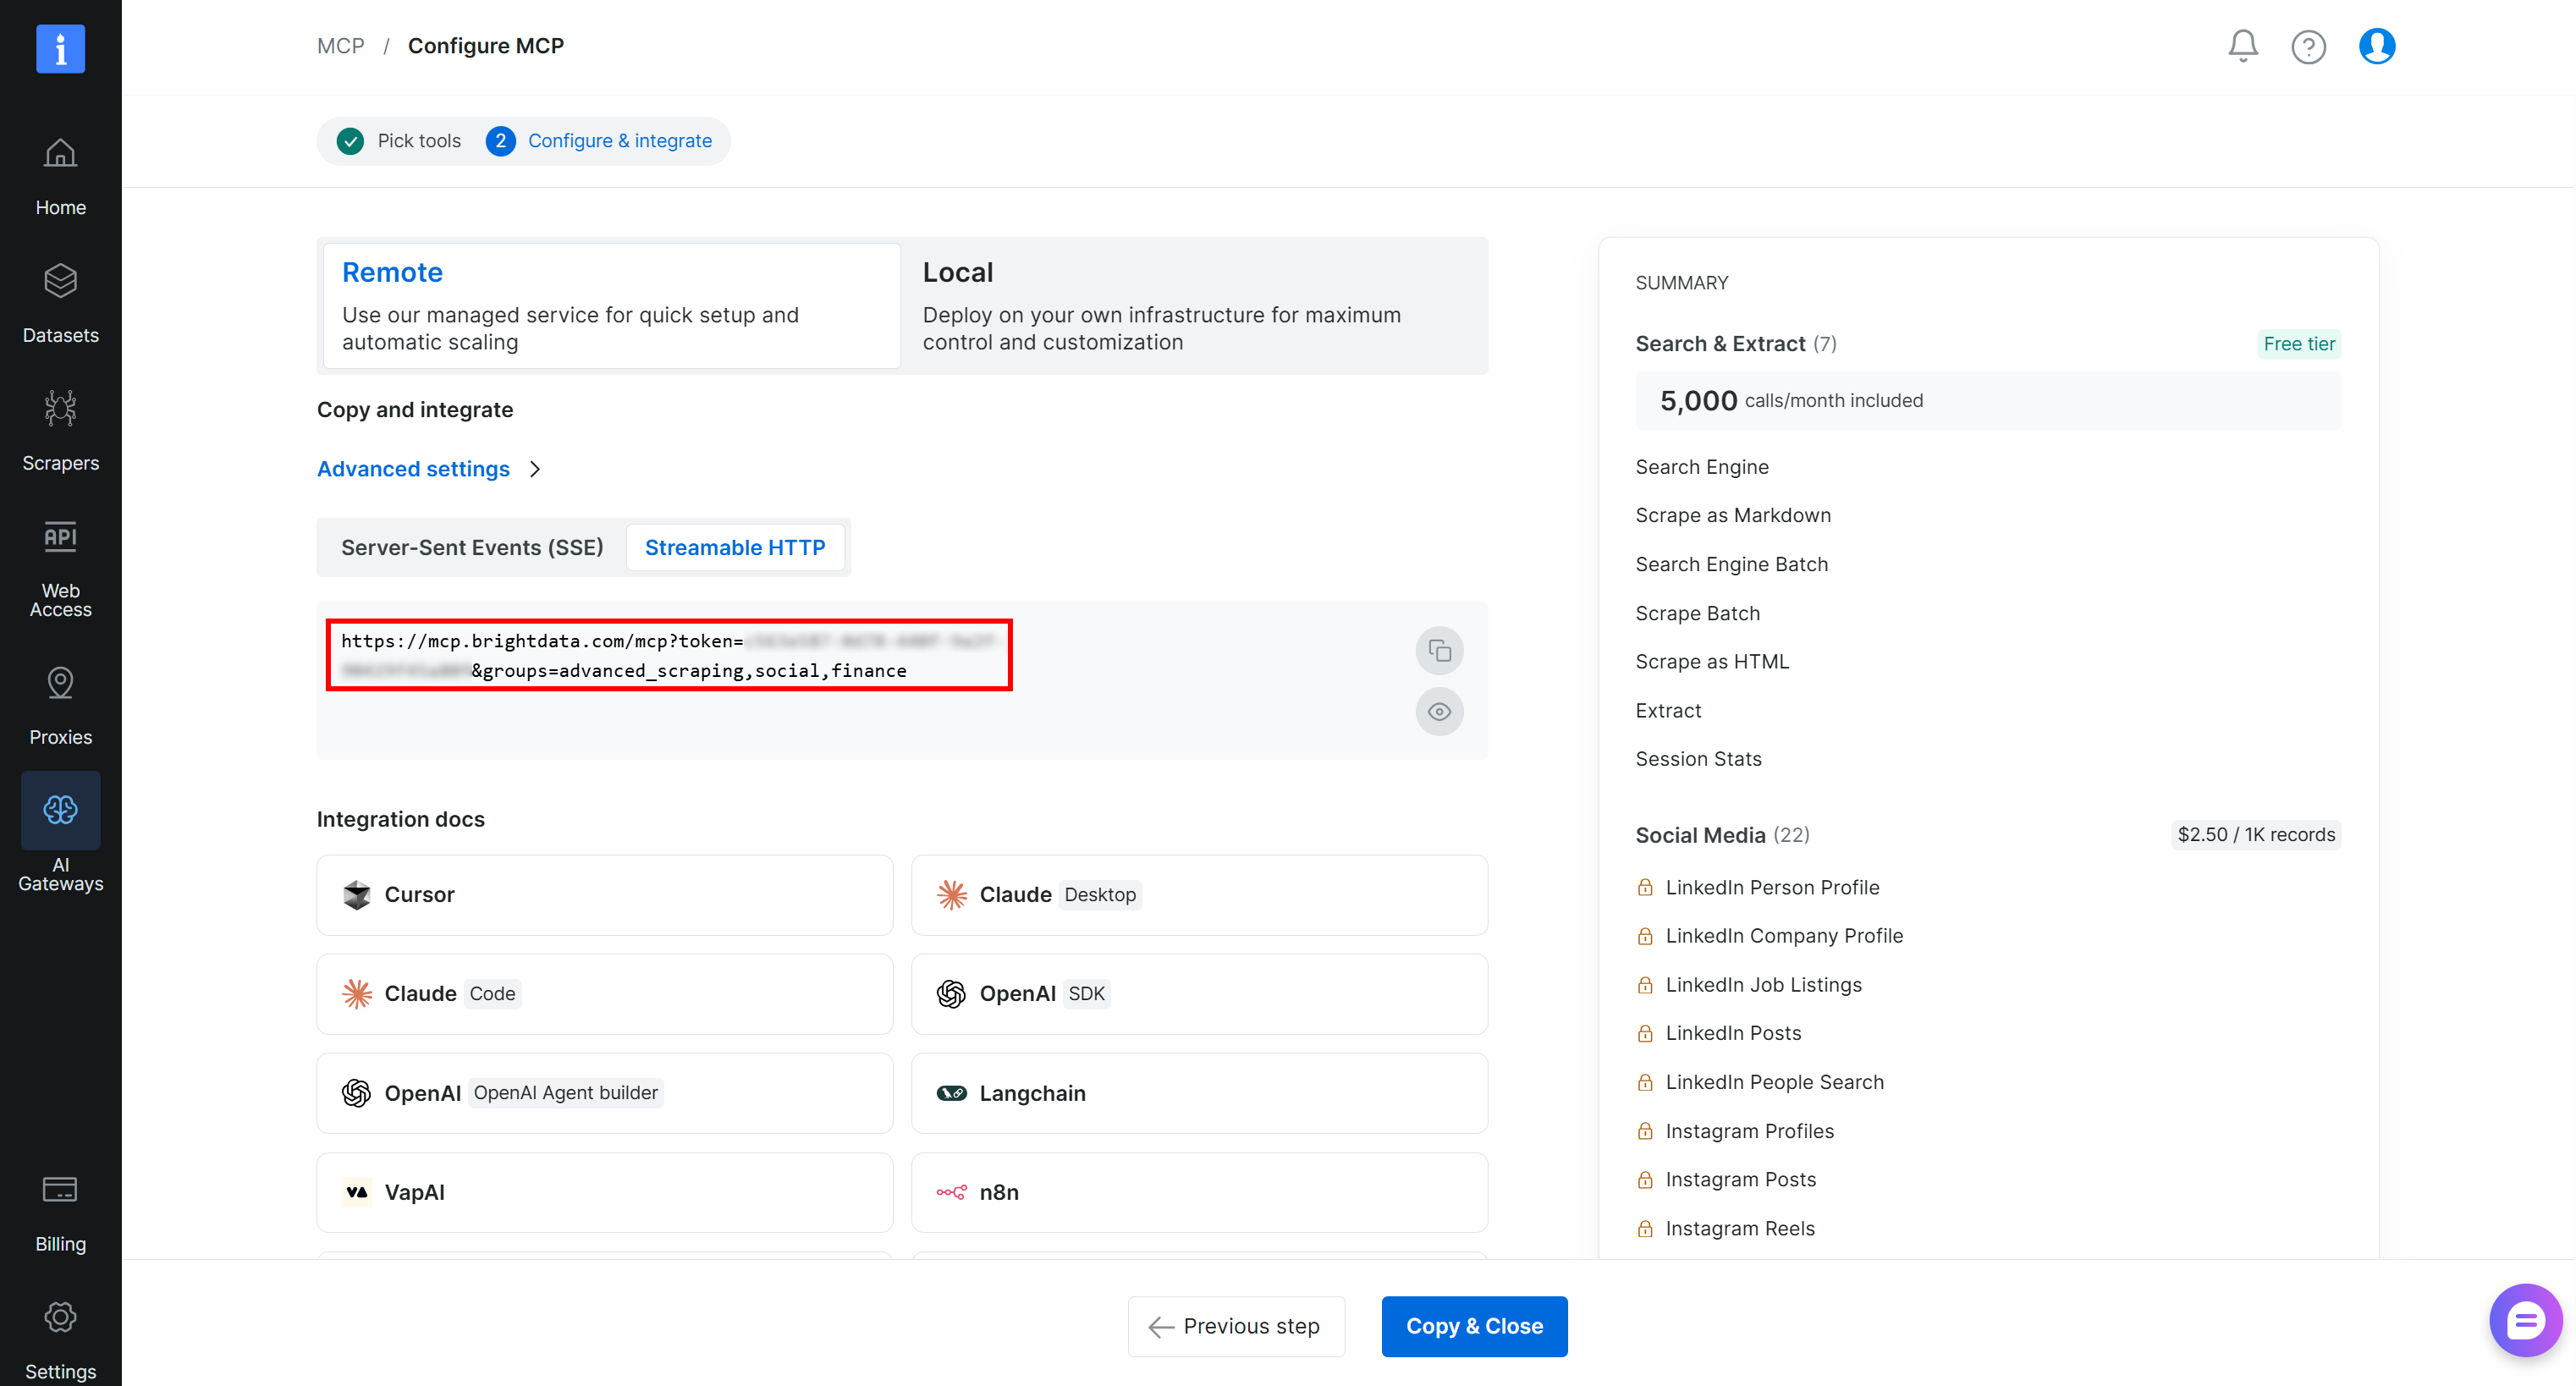
Copy the “Streamable HTTP” connection URL (or produce one as explained before) and store it in a safe place. You will need it shortly to configure the Bright Data MCP connection in your agent network. Awesome!
Step #6: Deploy the Project
Now that you have the Bright Data MCP remote connection URL, you are almost ready to deploy your Agent Network. The only missing piece is an Omni Gateway.
You can follow the official setup guide or configure a managed one directly from the platform. Reach the “Runtime Manager” page from the “Agents & Tools” menu. Move to the “Omni Gateway” tab, click “Add Managed Omni Gateway”, and follow the wizard:
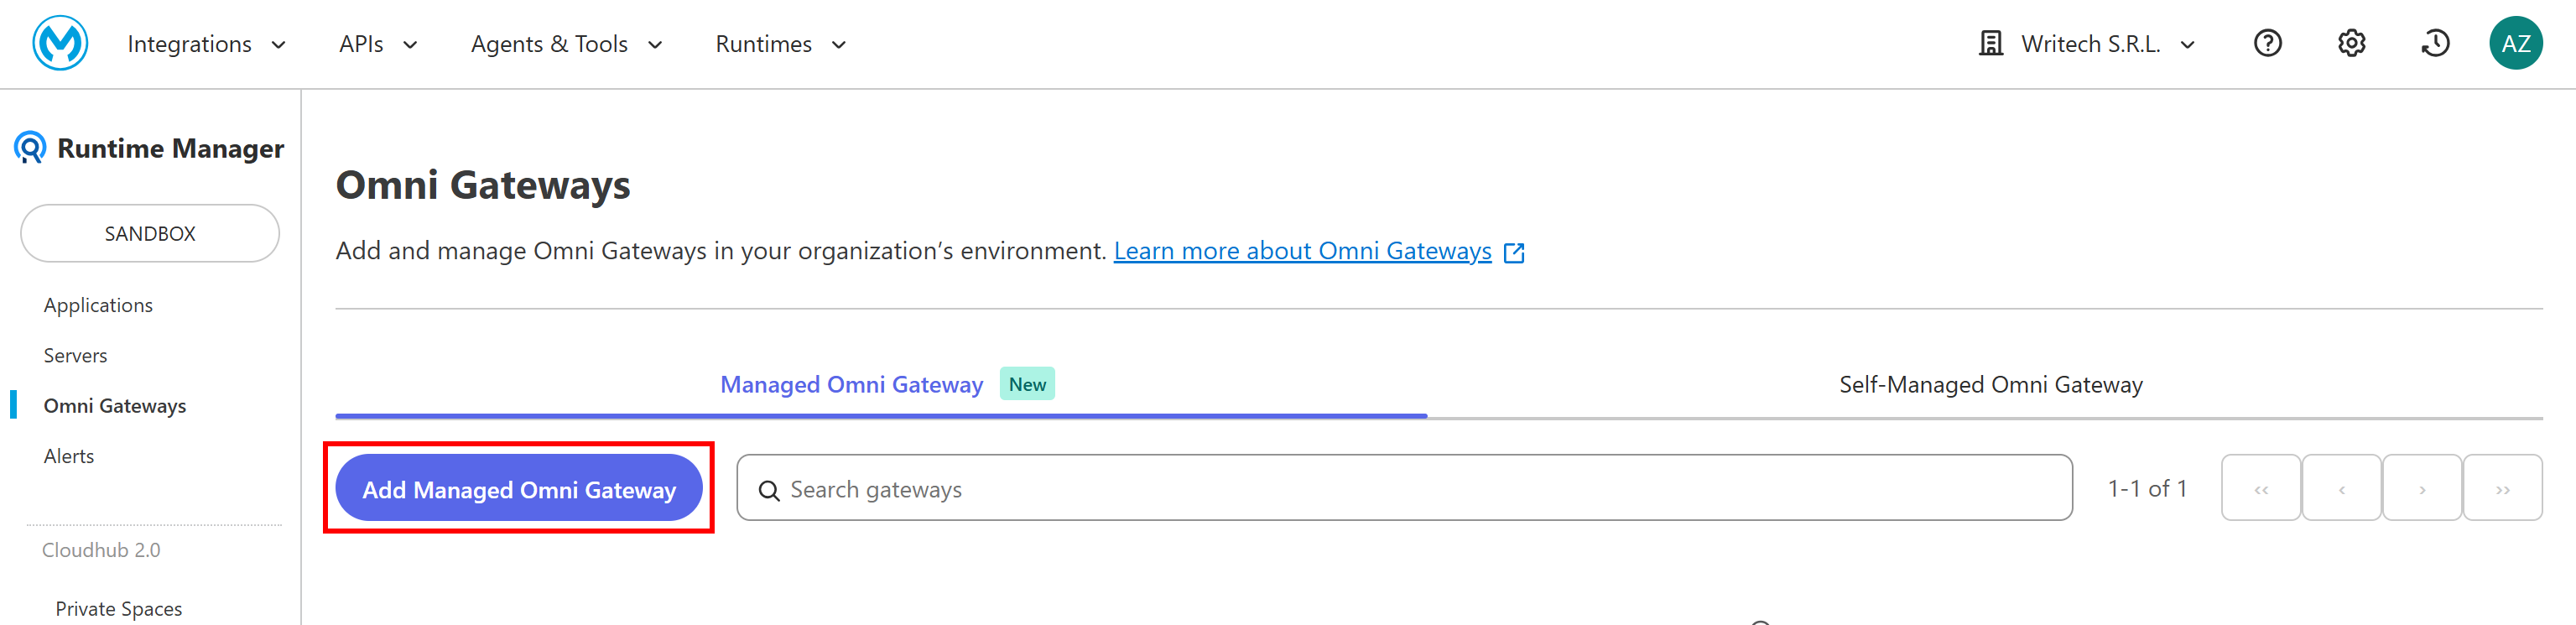
A MuleSoft Managed Omni Gateway is a fully hosted, enterprise-grade gateway that secures and governs traffic across APIs, AI agents, and LLMs. You need one to deploy your Agent Network project.
Once your gateway is ready, click the “Deploy Agent Network” button in Visual Studio Code to proceed with deployment:

The “Deploy Agent Network” form will appear. First, select the Omni Gateway you configured earlier. Then, populate the required variables:
webMcp.url: Paste the Bright Data MCP remote connection URL obtained before.openai.apiKey: Paste your OpenAI API key.
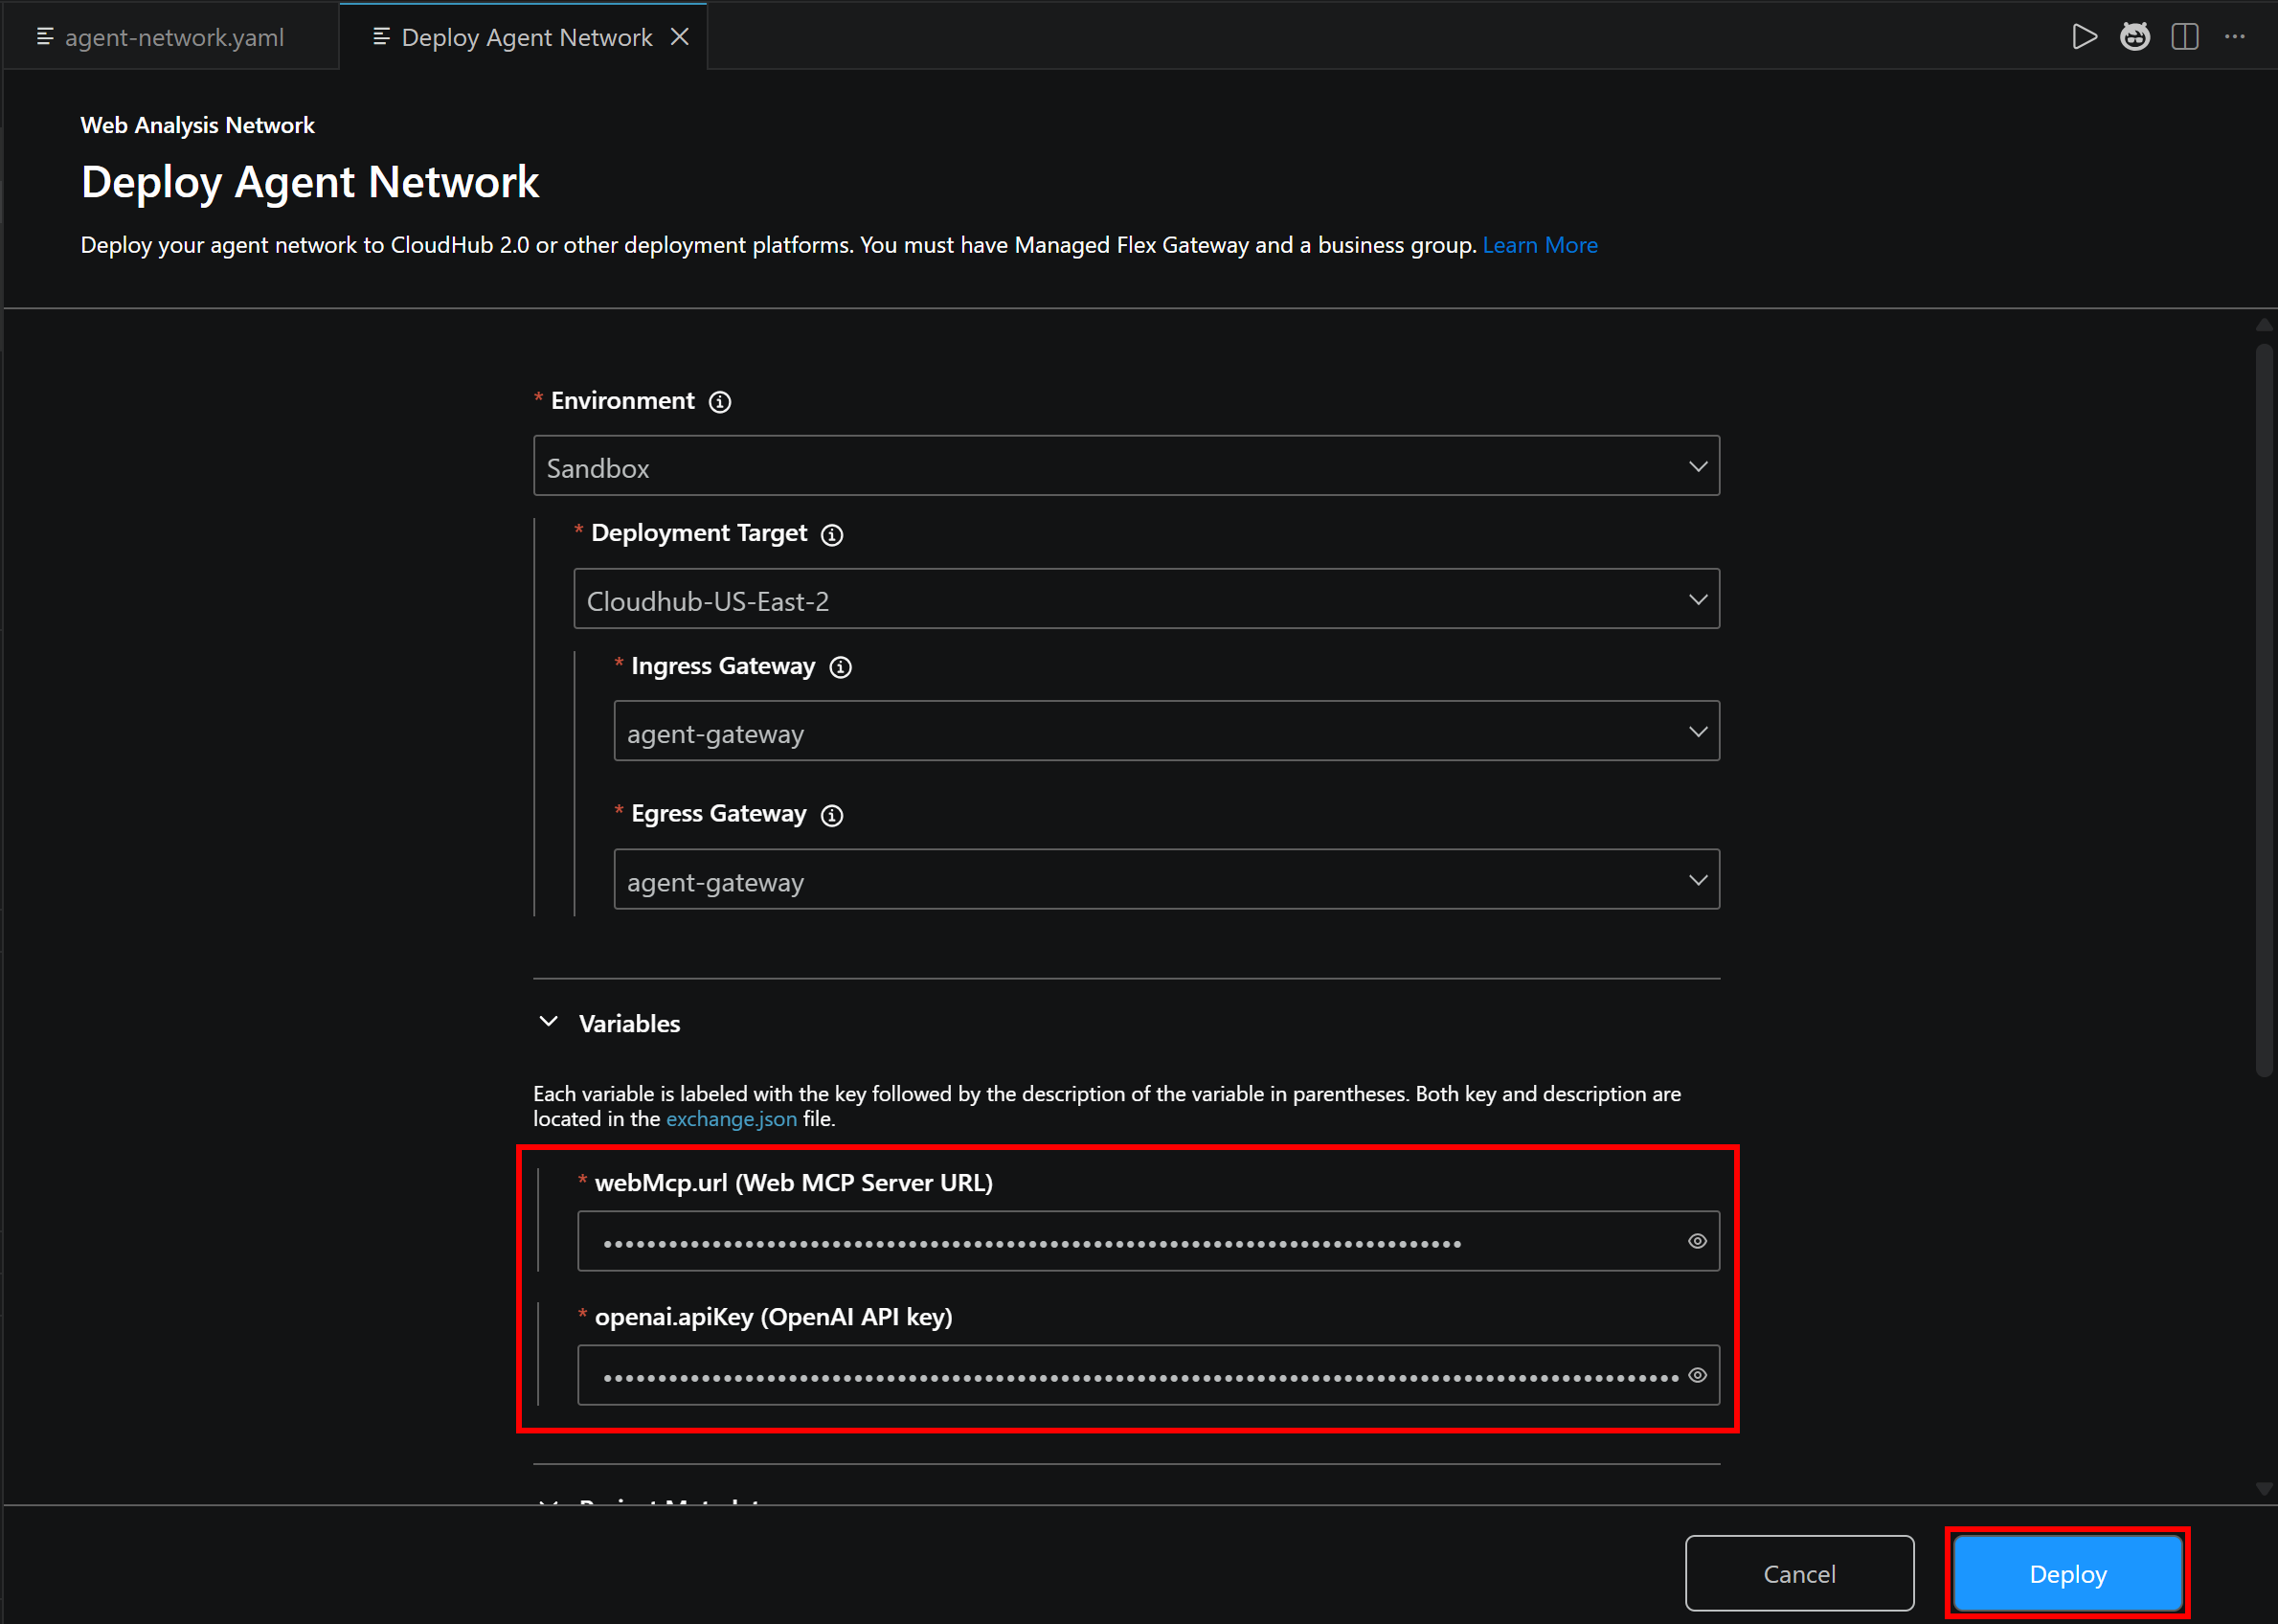
Notice that webMcp.url and openai.apiKey match the variables previously defined in exchange.json. Click “Deploy” and wait for the deployment to complete. This process may take a few minutes, so be patient.
Once finished, move to the “Agents & Tools Instances” section in the “API Manager” page within your MuleSoft Anypoint Platform account. This will show a deployed “Bright Data MCP” instance:
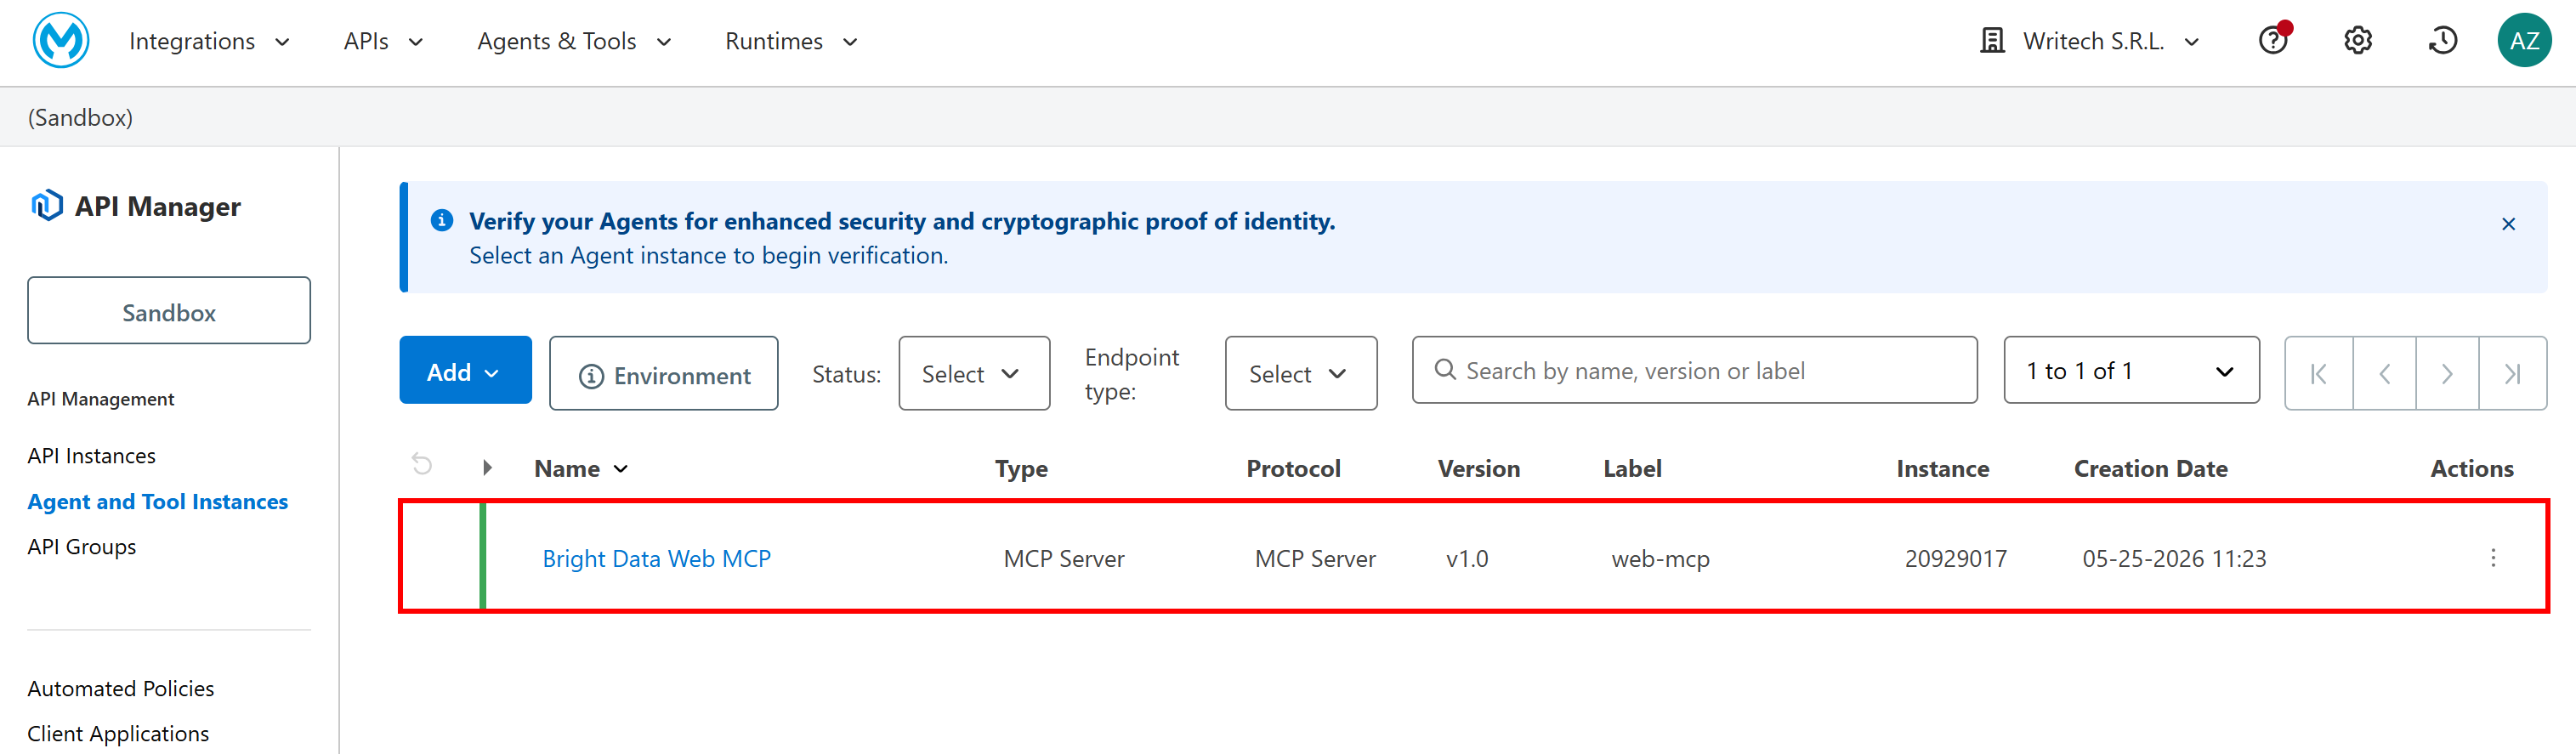
This instance acts as a bridge between your MuleSoft agent network and the remote Bright Data MCP server. Basically, it exposes Bright Data MCP tools to the AI agents running in your network.
If you open the “Tools” section of the Bright Data MCP asset, you will see:
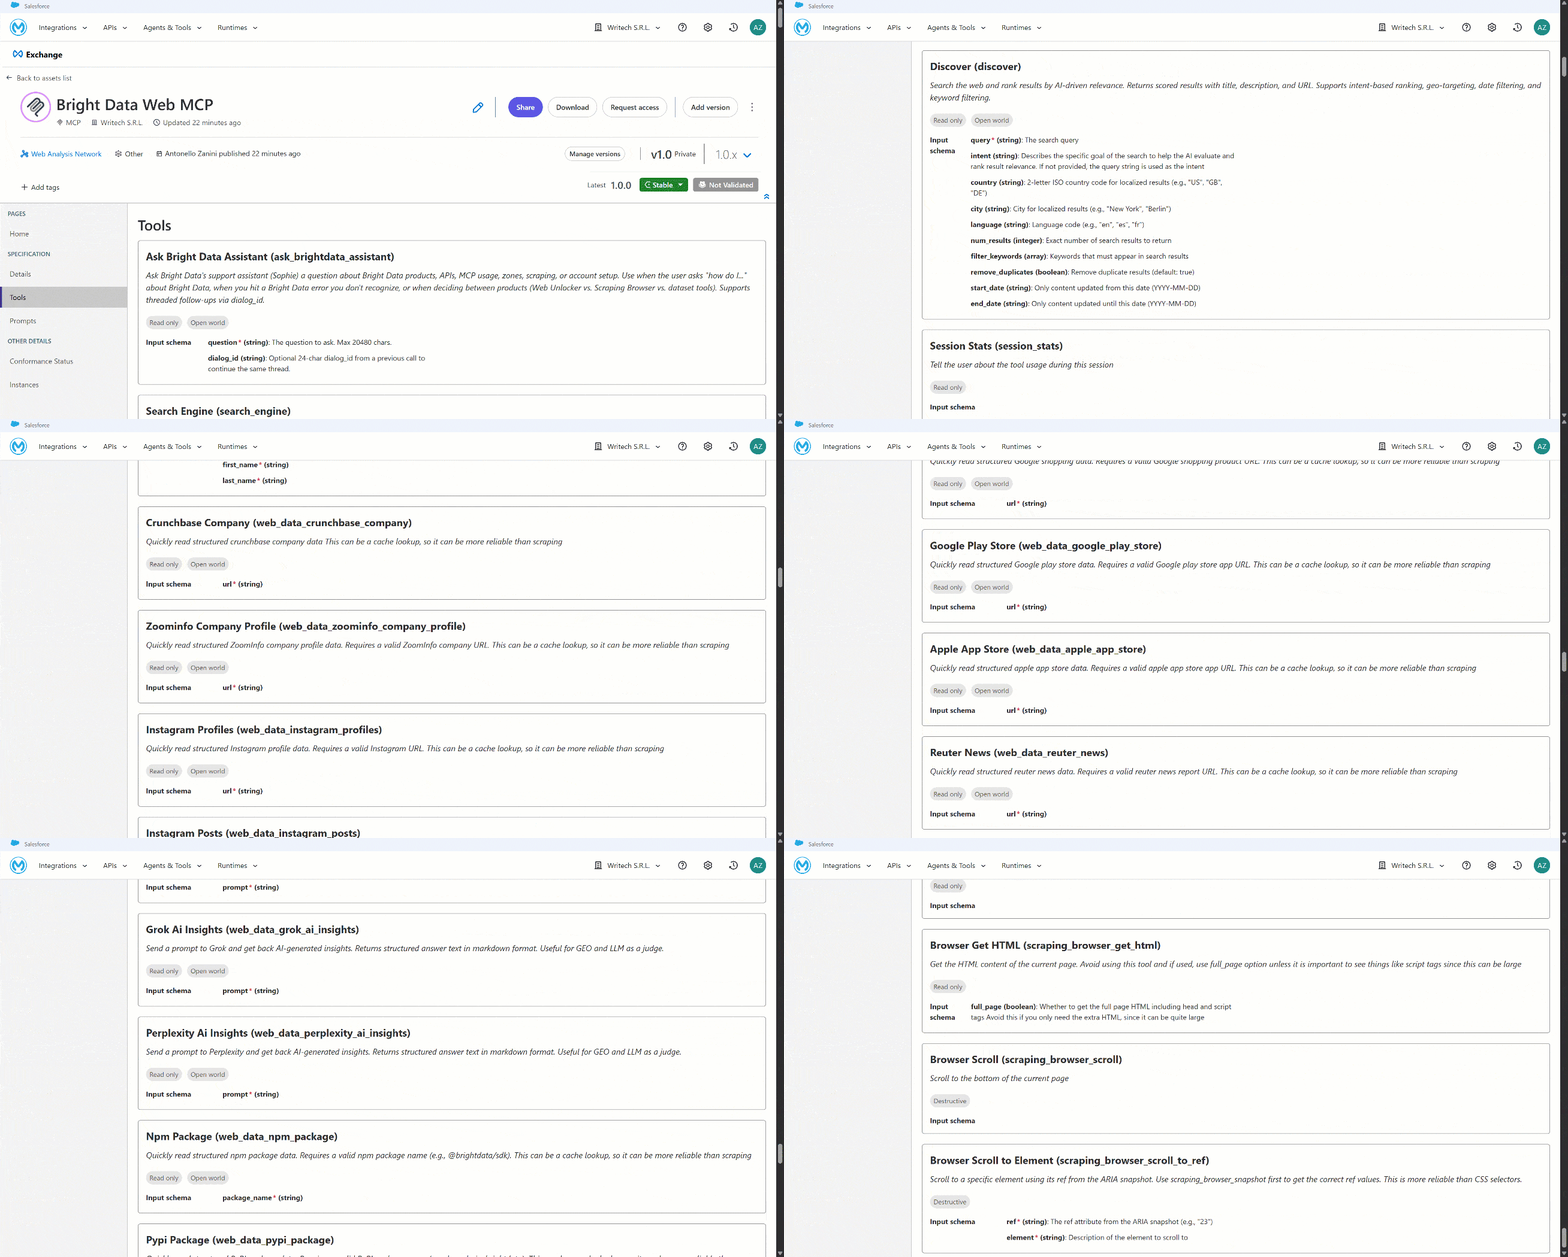
This lists all 70+ tools exposed by Bright Data MCP when configured in Pro mode (&pro=1), or only the subset available in Rapid (free) mode.
Et voilà! Your MuleSoft agent network now has access to enterprise-ready tools for web scraping, browser automation, web discovery, structured data retrieval, and web search through the Bright Data MCP. This opens the door to a wide range of AI agent use cases and automation scenarios.
Conclusion
In this article, you learned how to build a MuleSoft agent network enhanced with real-world web access. That has been possible thanks to the Bright Data MCP tools, which are backed by Bright Data’s enterprise-grade infrastructure.
This integration takes MuleSoft APIs, agent networks, and applications to the next level. It enables them to search the web, autonomously discover new sources, extract structured data, and interact with real-world websites in real time.
Get started with Bright Data for free today and begin integrating our AI-ready web tools!



Technical Writer
 5.5 years experience
Antonello Zanini is a technical writer, editor, and software engineer with 5M+ views. Expert in technical content strategy, web development, and project management.