SwitchyOmega Proxy Integration
Leveraging SwitchyOmega with Bright Data proxies allows for easy management and enhanced control over your web browsing.
This guide may be outdated. For an up-to-date guide please see our documentation.
- 400M+ Residential IPs
- Sticky and rotating sessions
- 99.95% success rate
- Geo-location targeting - FREE

Watch our youtube video for a step by step guide on how to integrate Bright Data proxies with SwitchyOmega
What is SwitchyOmega?
SwitchyOmega is a powerful proxy management Google Chrome extension that streamlines the process of switching between multiple proxies. With SwitchyOmega, you can easily manage and configure proxies without the need to navigate through complex settings or repeatedly modify your operating system’s proxy configurations.
Enjoy the convenience of setting up all your proxies from the Chrome browser and seamlessly switch between them with a single click. With its intuitive interface and efficient proxy switching capabilities, SwitchyOmega enhances your browsing experience and saves you time. Experience the simplicity and power of SwitchyOmega today and take control of your proxy management effortlessly.
How to setup SwtichyOmega
with Bright Data proxies:

Install SwitchyOmega Extension:
Install the SwitchyOmega extension from the Google Chrome Web Store by clicking here.

Access SwitchyOmega Options:
Click on the SwitchyOmega icon in your browser toolbar and select “Options” from the drop-down menu.
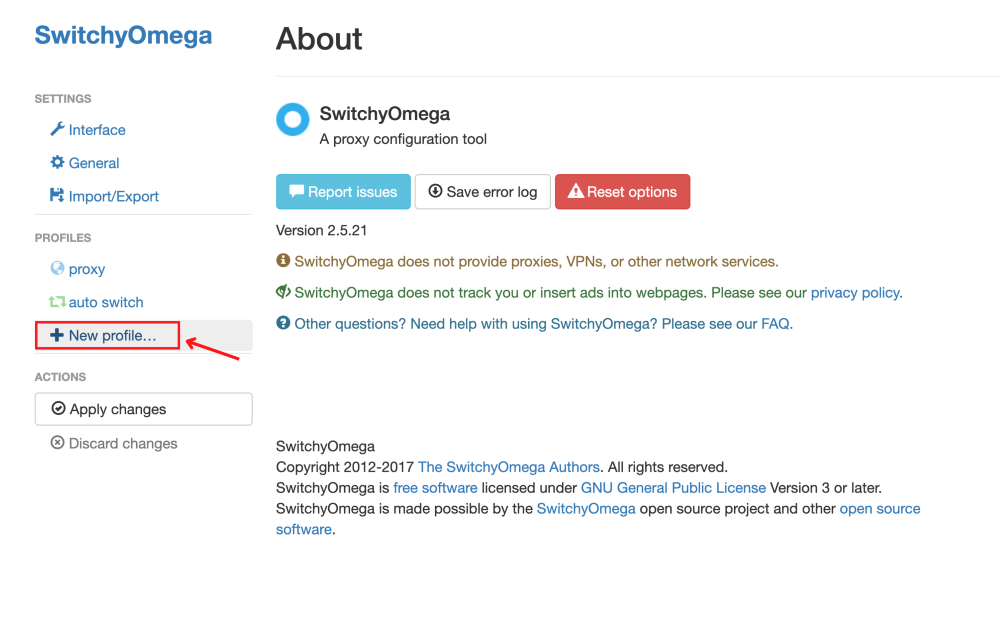
Create a New Profile:
Click on “+ New Profile” to create a new proxy profile.

Name Your Proxy Profile:
Enter a descriptive name for your proxy profile and click on the “Create” button.

Configure Proxy Protocol:
Under protocol, select HTTP.

Set Proxy Server and Port:
For Bright Data proxies, set the server to brd.superproxy.io and the port to 33335.

Enter Proxy Username and Password:
Click on the lock icon next to the port. This will prompt you to enter your Bright Data proxy username and password.

Obtain Proxy Credentials from Bright Data:
Go to Bright Data’s “Proxies & Scraping Infra” and select the proxy zone you’re using.

Copy Proxy Username and Password:
Look for the access parameter option and copy the Username and Password provided.

Paste Proxy Credentials in SwitchyOmega:
Return to SwitchyOmega and paste the copied Username and Password into the corresponding fields and save the changes.

Apply Final Changes:
Click “Apply Changes” to finalize the configuration.

Select Proxy and Start Browsing:
To use the proxy, select it from the SwitchyOmega extension. Open your target website, such as Linkedin.com, to start utilizing the proxy.

Verify Proxy Usage:
To confirm the use of your Bright Data proxy, refer to the Event Log section in your Proxies & Scraping Infrastructure dashboard.
⚠️Important note: If you are using Bright Data’s Residential Proxies, Web Unlocker or SERP API, you need to install an SSL certificate to enable end-to-end secure connections to your target website(s). This is a simple process, see https://docs.brightdata.com/general/account/ssl-certificate#installation-of-the-ssl-certificate for instructions.
Get proxies for SwitchyOmega
A proxy for every development path
Mix-and-match networks, peers, and IPs to optimize your continuous flow of web data.


Proxy Network Pricing


- Unlimited scale
- Unlimited seats
- Premium SLA
- 99.99% Network Uptime
- Free Proxy Manager
- Complete data coverage
- Custom price per GB
- Custom solutions
- Unlimited scale
- Unlimited seats
- Premium SLA
- 99.99% Network Uptime
- Free Proxy Manager
- Complete data coverage
- Custom price per GB
- Custom solutions
- Unlimited scale
- Unlimited seats
- Premium SLA
- 99.99% Network Uptime
- Free Proxy Manager
- Complete data coverage
- Custom price per GB
- Custom solutions
The category leader in proxies and data collection

650TB of public data collected every day

New feature releases every day

Serving 7/10 of the world’s leading universities
