Octoparse proxy integration
Integrating Bright Data proxies with Octoparse enhances your web scraping efficiency, providing secure and anonymous data extraction while reducing the risk of IP blocks.
This guide may be outdated. For an up-to-date guide please see our documentation.
- 400M+ Residential IPs
- Sticky and rotating sessions
- 99.95% success rate
- Geo-location targeting - FREE

What is Octoparse?
Octoparse is an easy-to-use tool that turns web pages into organized data without needing any coding. It’s perfect for everyone, from beginners to big companies, making web data collection simple for all.
Key Features of Octoparse
Octoparse stands out with its intuitive and user-friendly interface, making web scraping a breeze for anyone. Leverage the power of AI for seamless scraper configurations, and immerse yourself in a visual workflow tailored for ease and efficiency. Benefit from continuous 24/7 cloud scraping and timely data extraction. Overcome web scraping hurdles with features like IP rotation and CAPTCHA handling. And with pre-configured templates for popular sites, alongside customizable tasks for specific requirements, all the web data you need is just a click away.
Steps to integrate Octopase with Bright Data proxies

Sign up to Bright Data:
After signing up, in the Bright Data dashboard, navigate to the “Proxy & Scraping Infrastructure” section and Add a new designated Zone for your proxy usage.

Select proxy type:
In this example, we will show how to set up ISP proxies.

Name proxy solution:
Set the desired IP type, shared IPs, dedicated IPs, or premium IPs.

Select IP count:
Fill in the number of IPs you need.

Country & city selection:
Choose your desired country and city for the IP location.

Choose domain:
Use specific domains or use ‘All domains’ for one IP to target websites using the same IP.

Add zone:
Click the “Add” button to create the Zone.

Access parameters:
Click on the name of your Zone, navigate to the “Access Parameters” tab, and note down the proxy credentials:
- host
- port
- username
- password

Setting up Octoparse with Bright Data proxies:
- Sign up for a free Octoparse account.
- Download Octoparse as per your OS.
- Go to settings on the login panel

Proxy configuration:
Choose Manual proxy configurations.

Proxy credentials:
Retrieve the required proxy details from your previously set up Bright Data zone:
- IP address
- Port
- Username
- Password

Input proxy details:
Fill in your proxy details
- IP Address: brd.superproxy.io
- Port: 33335
- Username: [Your Bright Data username]
- Password: [Your Bright Data password]
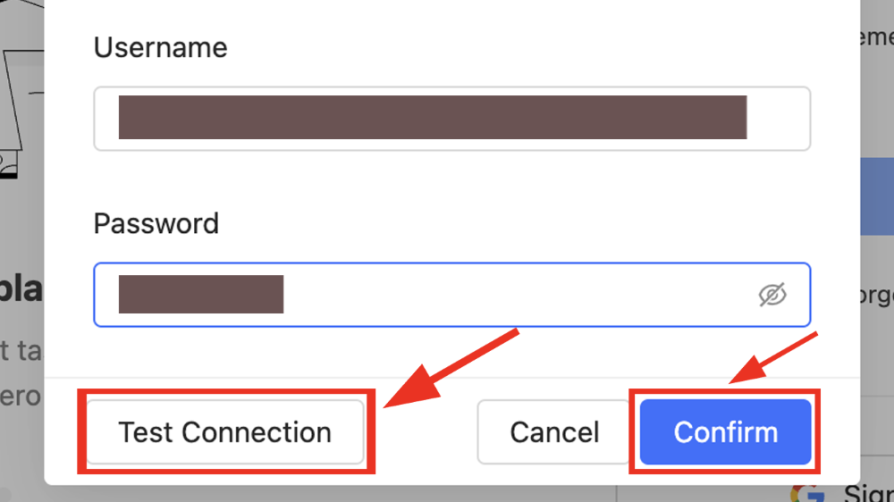
Test connection:
Confirm the setup

Open task for setup:
Open the task you would like to set up proxies for and go to the task settings.

Anti-blocking section:
Go to the Anti-blocking section.

Check Access websites via proxies.
Now, choose the ‘Access websites via proxies’ option.
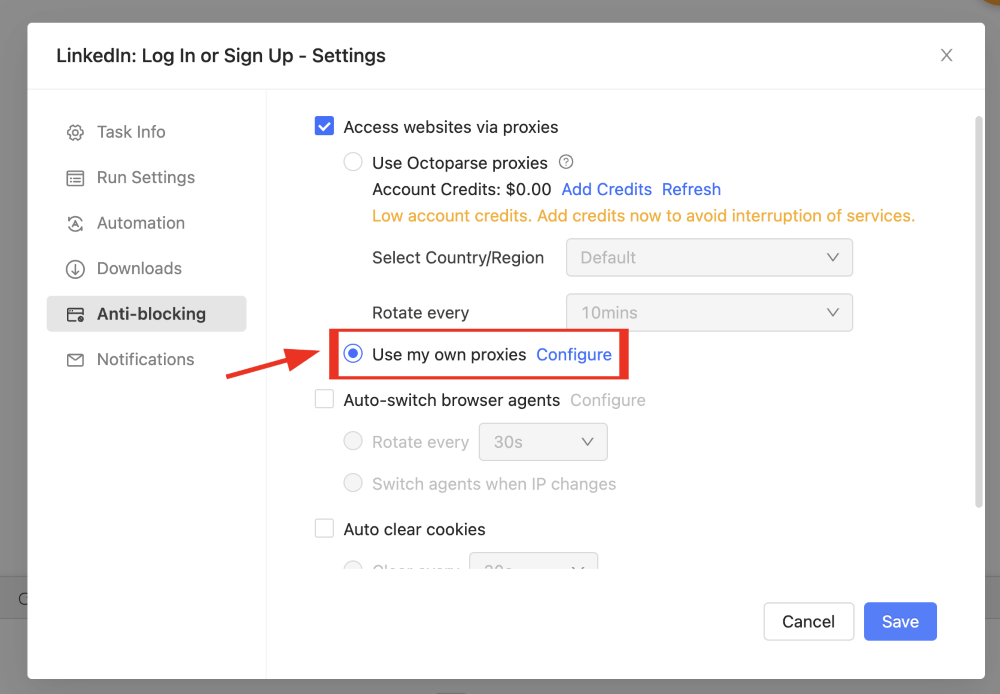
Select Use my own proxies:
Select Use my own proxies and click configure.

Bright Data zone configuration:
Go back to the Bright Data zone configuration section and download IP’s list.

Paste the IP’s in Octoparse:
Save the setup.

Event log:
To confirm the use of your Bright Data proxy, refer to the Event Log section in your
Proxies & Scraping Infrastructure dashboard.
⚠️Important note: If you are using Bright Data’s Residential Proxies, Web Unlocker or SERP API, you need to install an SSL certificate to enable end-to-end secure connections to your target website(s). This is a simple process, see https://docs.brightdata.com/general/account/ssl-certificate#installation-of-the-ssl-certificate for instructions.
Ready to get started?

Powered by an award-winning proxy infrastructure
Over 400 million residential IPs, best-in-class technology and the ability to target any country, city, ZIP Code, carrier, & ASN make our premium proxy services a top choice for developers.
A proxy for every development path
Mix-and-match networks, peers, and IPs to optimize your continuous flow of web data.


Proxy Network Pricing


- Unlimited scale
- Unlimited seats
- Premium SLA
- 99.99% Network Uptime
- Free Proxy Manager
- Complete data coverage
- Custom price per GB
- Custom solutions
- Unlimited scale
- Unlimited seats
- Premium SLA
- 99.99% Network Uptime
- Free Proxy Manager
- Complete data coverage
- Custom price per GB
- Custom solutions
- Unlimited scale
- Unlimited seats
- Premium SLA
- 99.99% Network Uptime
- Free Proxy Manager
- Complete data coverage
- Custom price per GB
- Custom solutions
- Unlimited scale
- Unlimited seats
- Premium SLA
- 99.99% Network Uptime
- Free Proxy Manager
- Complete data coverage
- Custom price per GB
- Custom solutions
The category leader in proxies and data collection

650TB of public data collected every day

New feature releases every day

Serving 7/10 of the world’s leading universities
