NGINX Proxy Integration
This guide may be outdated. For an up-to-date guide please see our documentation.
Setting up NGINX proxies with Bright Data
Zone Configuration:
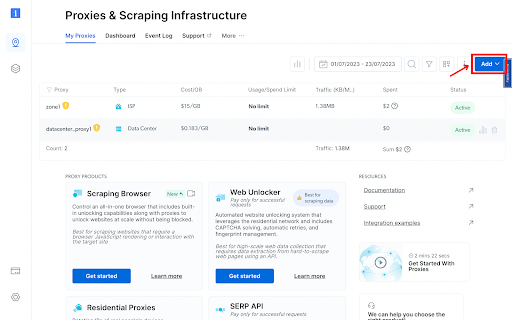
Navigate to the “Proxy & Scraping Infrastructure” section and Add a new designated Zone for your proxy usage.
Specify domains:
Specific domains or use ‘All domains’ for one IP to target websites using the same IP.
Install Proxy Manager:
Go to this page : https://brightdata.com/cp/zones/lpm
Install the proxy manager that fits to your OS.
Create your first port:
Choose your preferred proxy zone and continue, then choose browser and Create the proxy port.
Install NGINX:
Installing an Nginx Nginx is required to mask Bright’s domain from your users. The needed actions are creating a new server and configure the settings.
- Install – Install nginx to server e.g by official instructions (version 1.15.10 or higher)
- Make sure server IP is not added to Proxy Manager admin and proxy whitelists
- Open nginx config file /etc/nginx/nginx.conf – Set worker_processes to auto
- Set worker_connections to 200 -This should be in correlation with the amount of ports you want to use
- At the end of the HTTP section add the line include /etc/nginx/sites-enabled/*;
- Create directory /etc/nginx/sites-enabled – Create file /etc/nginx/sites-enabled/pmgr.conf
- Restart nginx sudo service nginx restart – Add nginx IP to Proxy Manager reverse_proxy_ips
This is how your /nginx.conf file should look like :
      worker_processes  auto;


user              www-data;


error_log         /var/log/nginx/error.log info;


events {


    worker_connections 200;


}


http {


    include         /etc/nginx/mime.types;


    access_log      /var/log/nginx/access.log combined;


    server {


        server_name   localhost;


        listen        127.0.0.1:80;


        error_page    500 502 503 504  /50x.html;


    }


    # Other configuration...


    include /etc/nginx/sites-enabled/*;


}
And this is how your pmgr.conf file should look like:
        GNU nano 4.8                                                                                                                       pmgr.conf


server {


listen 24000-24100;


 location /{


 resolver 8.8.8.8;


 proxy_pass http://127.0.0.1:$server_port;


 proxy_set_header Host $host;


 proxy_set_header X-Real-IP $remote_addr;


}


}
You can test your connection by sending this request :
curl --proxy http://10.0.2.15:24000 "http://lumtest.com/myip.json" -v
And the expected output will be :
{"ip":"43.252.31.41","country":"US","asn":{"asnum":207990,"org_name":"HostRoyale Technologies Pvt Ltd"},"geo":{"city":"Chicago","region":"IL","region_name":"Illinois","postal_code":"60602","latitude":41.8874,"longitude":-87.6318,"tz":"America/Chicago","lum_city":"chicago","lum_region":"il"}}
You can check the logs on your proxy manager to make sure that the request routed through the nginx server. Make sure that “sent from” is your actual Nginx server IP address.
You are all set and ready to go!
⚠️Important note: If you are using Bright Data’s Residential Proxies, Web Unlocker or SERP API, you need to install an SSL certificate to enable end-to-end secure connections to your target website(s). This is a simple process, see https://docs.brightdata.com/general/account/ssl-certificate#installation-of-the-ssl-certificate for instructions.
Get proxies for NGINX

Powered by an award-winning proxy infrastructure
Over 150 million residential IPs, best-in-class technology and the ability to target any country, city, ZIP Code, carrier, & ASN make our premium proxy services a top choice for developers.
A proxy for every development path
Mix-and-match networks, peers, and IPs to optimize your continuous flow of web data.
The best customer experience in the industry
New feature releases every day
To answer any questions right when you need it
Real-time network performance dashboard
To optimize your performance
To meet your data collection goals
The category leader in proxies and data collection

650TB of public data collected every day

New feature releases every day

Serving 7/10 of the world’s leading universities


