Maskfog Proxy Integration
Using Bright Data proxies with Maskfog strengthens your web scraping and data collection by providing secure, anonymous browsing, reducing the risk of detection.
This guide may be outdated. For an up-to-date guide please see our documentation.
- 400M+ Residential IPs
- Sticky and rotating sessions
- 99.95% success rate
- Geo-location targeting - FREE

Maskfog Proxy Integration Steps

Registration on Bright Data:
Sign up on the Bright Data platform.

Email verification:
Verify your email address to activate your account.

Zone Configuration:
Navigate to the “Proxy & Scraping Infrastructure” section and Add a new designated Zone for your proxy usage.

Proxy type selection:
Select the type of proxies you need. In this example, ISP will be selected.

IP Type and Location Selection:
Name your solution. Set the IP type to “Dedicated”

IPs amount:
Fill in the number of IPs you need.

IP location:
Choose your desired country and city for the IP location.

Specify domains:
Specific domains or use ‘All domains’ for one IP to target websites using the same IP.

Plan Confirmation:
Review your chosen plan and its associated costs.

Create zone:
Click the “Add” button to create the Zone.

Accessing proxy details:
Click on the name of your Zone, navigate to the “Access Parameters” tab, and note down the proxy credentials:
– host
– port
– username
– password

Login to Maskfog:
- Click [New Profile] -> [Single Import].

Fill in info:
- Fill in Name (optional).
- Select a group for browser.
- Select User Agent (OS and browser version).

Proxy info:
[Proxy] -> select [Custom proxy], and choose proxy type as Bright Data. Paste proxy information you got in Bright Data TXT file into [Proxy host]. After that, Proxy Host, Proxy Port, username and password will be filled automatically. Please click [Check Proxy].

Connection test:
- “Connection test passed!” means this proxy is available.
- “Connection test failed!” means there is no connection between your Internet and the proxy server. Please refer to “How to check your proxy” to solve this problem.

Account platform:
Information -> Account Platform. Select the platform you want to access. If the drop-down box doesn’t contain the platform you need, you can select [other] to input a specified URL.

Fill in info:
- Configure target website access parameters as needed for your data collection task.
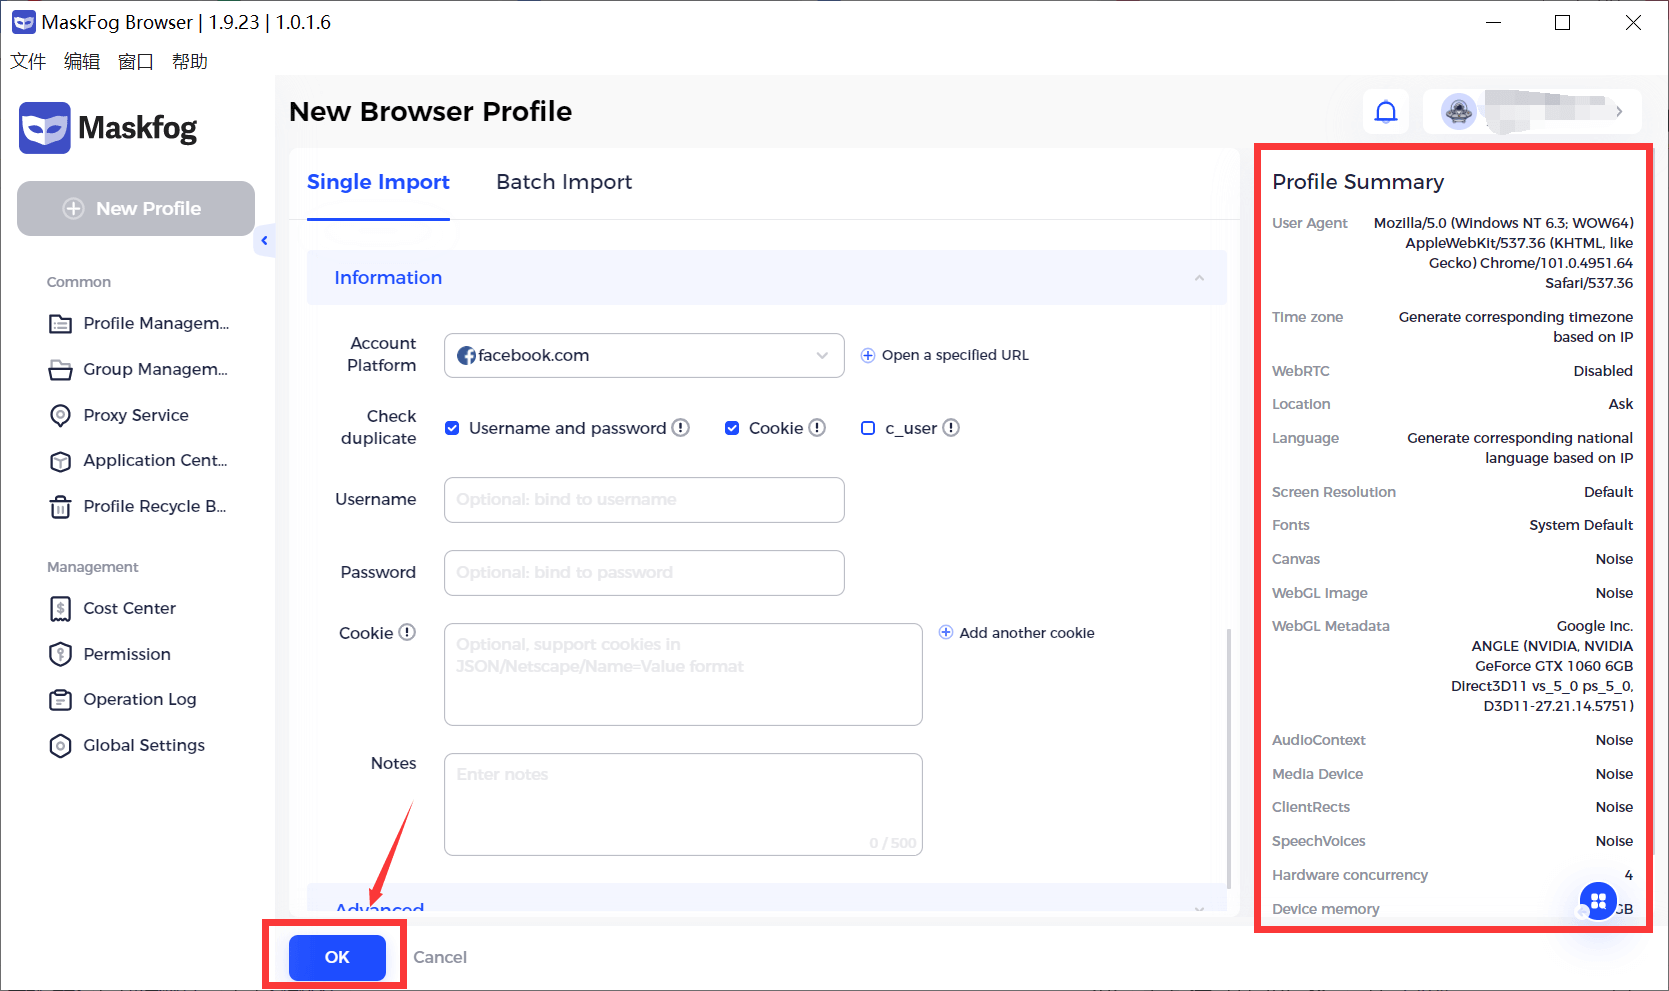
Advanced settings:
Browser fingerprints are set by default, while you can change them if you need specific setting. You can find Profile Summary on the right side.

Click OK button:
Click the OK button to view the newly created profile in the [Profile Management] page. Click the Open button to launch this browser.
⚠️Important note: If you are using Bright Data’s Residential Proxies, Web Unlocker or SERP API, you need to install an SSL certificate to enable end-to-end secure connections to your target website(s). This is a simple process, see https://docs.brightdata.com/general/account/ssl-certificate#installation-of-the-ssl-certificate for instructions.
Get proxies for Maskfog
Powered by an award-winning proxy network
400M+ monthly proxy IPs, best-in-class technology and the ability to target any country, city, ZIP Code, carrier, & ASN make our premium proxy services a top choice for developers.

Proxy Network Pricing


- Unlimited scale
- Unlimited seats
- Premium SLA
- 99.99% Network Uptime
- Free Proxy Manager
- Complete data coverage
- Custom price per GB
- Custom solutions
- Unlimited scale
- Unlimited seats
- Premium SLA
- 99.99% Network Uptime
- Free Proxy Manager
- Complete data coverage
- Custom price per IP
- Custom solutions
- Unlimited scale
- Unlimited seats
- Premium SLA
- 99.99% Network Uptime
- Free Proxy Manager
- Complete data coverage
- Custom price per IP
- Custom solutions
A proxy for every development path
Mix-and-match networks, peers, and IPs to optimize your continuous flow of web data.


The best customer experience in the industry
New feature releases every day
To answer any questions right when you need it
Real-time network performance dashboard
To optimize your performance
To meet your data collection goals
The category leader in proxies and data collection

650TB of public data collected every day

New feature releases every day

Serving 7/10 of the world’s leading universities
