Insomniac Proxy Integration
Using Bright Data proxies with Insomniac boosts your automation efforts by providing secure, anonymous connections, reducing the risk of detection and ensuring smoother operations.
This guide may be outdated. For an up-to-date guide please see our documentation.
- 150M+ Residential IPs
- Sticky and rotating sessions
- 99.95% success rate
- Geo-location targeting - FREE

What is Insomniac?
Insomniac is an online purchasing tool allowing you to hide your digital footprint through its multi-session browser. Insomniac browser allows you to apply one proxy per tab and hide your online footprint by applying a different IP address for every tab you open.
How to setup Insomniac with Bright Data proxies:
Set-up for Insomniac browser
- Download and install the Insomniac browser
- Open Insomniac browser
- Click on Insomniac Proxy Per Tab → Manage Proxy List
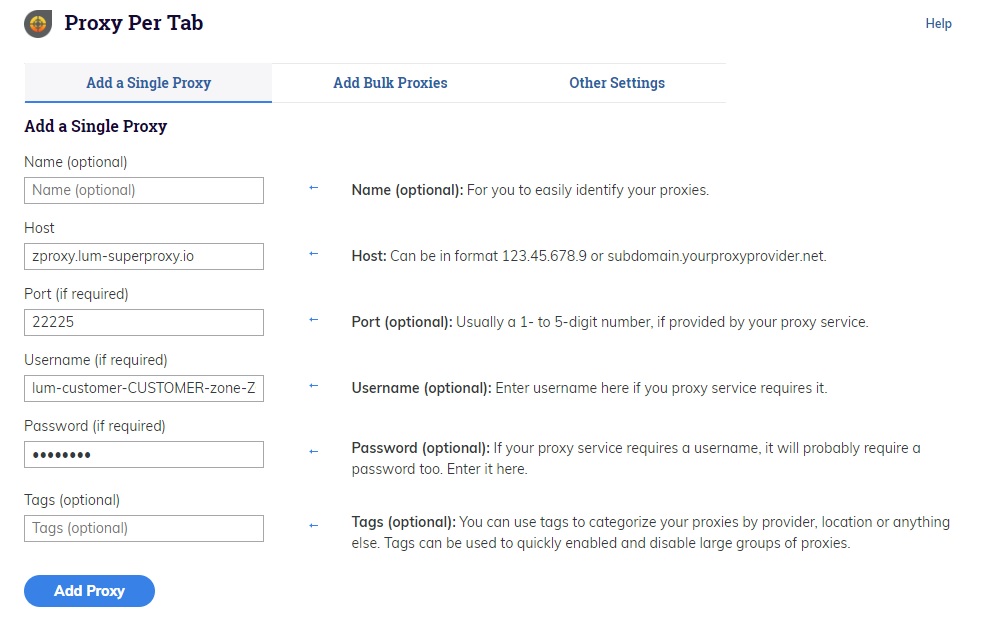
- In the extension, click the Add a Single Proxy tab

Integrating Insomniac with Bright Data Proxies
- Go to your Bright Data Dashboard and click Create a Zone
- Choose your Network Type
- Click Save
- In Insomniac Proxy Per Tab click on the Add single Proxy tab and copy your proxy details:
- Host name: brd.superproxy.io
- Port: 33335
- Username: enter your Bright Data Zone username
- Copy the Bright Data Zone password (found in the Zone settings) to the password field in Insomniac
- Click Add proxy

- In the Proxy Per Tab extension, select Rotate through the proxy in order
- This particular selection will automatically select a proxy port for each tab in linear order versus random order

Integrating Multiple Proxy Manager ports with Insomniac
- Download Proxy Manager
- Click Add new Proxy to create a new port
- Select the new port (24XXX)
- Go to the General tab in the port settings
- In the Multiply proxy port field select the number of proxy ports to create. This will create multiple proxy ports with the same settings
- Your Spreadsheet Contains the following columns:
- Custom Name: Add a name for each proxy
- Host: 127.0.0.1
- Port: 24XXX
- Username, Password, and Tags: leave EMPTY(the Proxy Manager has already been authenticated with the Super Proxy)
- Save the file as a CSV and not as an XLS or XLSX
- In Insomniac Proxy per tab extension select Manage Proxy list, and select Add bulk proxies
- Select Import proxy list and upload the CSV file

⚠️Important note: If you are using Bright Data’s Residential Proxies, Web Unlocker or SERP API, you need to install an SSL certificate to enable end-to-end secure connections to your target website(s). This is a simple process, see https://docs.brightdata.com/general/account/ssl-certificate#installation-of-the-ssl-certificate for instructions.
Get proxies for Insomniac
A proxy for every development path
Mix-and-match networks, peers, and IPs to optimize your continuous flow of web data.
Proxy Network Pricing
The category leader in proxies and data collection

650TB of public data collected every day

New feature releases every day

Serving 7/10 of the world’s leading universities


