

In this guide, you will discover:
- How to automate LinkedIn scraping using n8n, Bright Data, and OpenAI
- How to build a no-code workflow that sends candidate profiles straight to your inbox
- Why combining Web Unlocker, ChatGPT, and SMTP creates a powerful recruiting tool
Let’s get started!
Getting Started
You can view this workflow on n8n here. However, for the easiest setup, there are a few things we need to do first.
Self-Hosting n8n
This workflow relies on n8n’s Community Nodes. Community Nodes are third-party tools provided by good samaritans in the n8n community. The best way to manage all these moving parts by wrapping them into a Docker Container.
Installing Docker
Using native Ubuntu or Ubuntu via WSL on Windows, run the following command to install Docker. You can learn about installing Docker for other platforms here.
sudo snap install dockerOnce Docker’s installed, create a storage volume and run your container.
Creating an n8n Container
sudo docker volume create n8n_data
sudo docker run -it --rm --name n8n -p 5678:5678 -v n8n_data:/home/node/.n8n docker.n8n.io/n8nio/n8n
Installing Community Nodes
Open up http://localhost:5678/ in your browser. You’ll have a completely self-hosted version of the n8n webapp running locally.
On the sidebar, click the three dots next to your profile and select “settings”.

Once you’re at the settings menu, select “Community Nodes”. This gives you access to those third party tools I mentioned earlier.
Click “Install” and you’ll see a popup for the node you want to install. In the npm package section, paste the following package.
n8n-nodes-brightdataWhen you’re ready, click “Install”.

Now, repeat this process for Document Generator.
n8n-nodes-document-generator
Restarting the Container
Once your Community Nodes are installed, kill the Container with ctrl+c. Run the command below to restart n8n.
sudo docker run -it --rm --name n8n -p 5678:5678 -v n8n_data:/home/node/.n8n docker.n8n.io/n8nio/n8nImporting the Workflow
After setup, we’re finally ready to import that workflow I mentioned earlier. Go to their n8n page and click on the “Use for free” button.

You should see a popup with several different options. The easiest way is to select “Import template to localhost:5678 self-hosted instance”.

Enter or Import Your Credentials
Now, you’ll be automatically prompted to enter your credentials for Bright Data, OpenAI, and SMTP.

Obtaining Your API Keys
Bright Data
This workflow uses Web Unlocker to perform our search. After signing up for Web Unlocker, navigate to the Web Unlocker Dashboard and get your API key. n8n will use this key to scrape results with Bright Data.

OpenAI
Head on over to OpenAI’s Developer Platform and create an account if you haven’t already. Then, click on “API keys” to generate a key.

SMTP
This process is compatible with any SMTP client. Currently, I’m using Elastic Email. Their free plan is excellent for local projects like this. Save your Username, Password, Server, and Port. We’ll use these with n8n to automate your email process.

Workflow Steps

When User Completes a Form
When a user completes a webform, this kicks off our workflow. Feel free to open up this node and look at the params and settings. However, everything on this step should be pre-configured–no need for editing.

Creating the LinkedIn URL and Company Search
When the form is completed, we launch two separate, workflows.
One of them creates a Google URL to search for this person’s LinkedIn profile.

Our other one makes a separate Google url to search LinkedIn for their company.
Both of these URLs get passed into Web Unlocker to avoid getting blocked.

Extracting HTML From The Results
Now, we extract the HTML from our results. we have two nodes called “Extract Body and Title from Website.” Both of these pull the title and body from Bright Data’s JSON response.

In the workflow, both of these highlighted steps are happening at the same time.

Parsing the Results With ChatGPT
Now that we’ve pulled the title and body from each search, we pass our HTML results into ChatGPT for processing. Each of these nodes contains a process like what you see below. We define our model (GPT-4o mini) and give it a prompt to extract our data.

As you can see below, This happens on both of our processes concurrently as well.
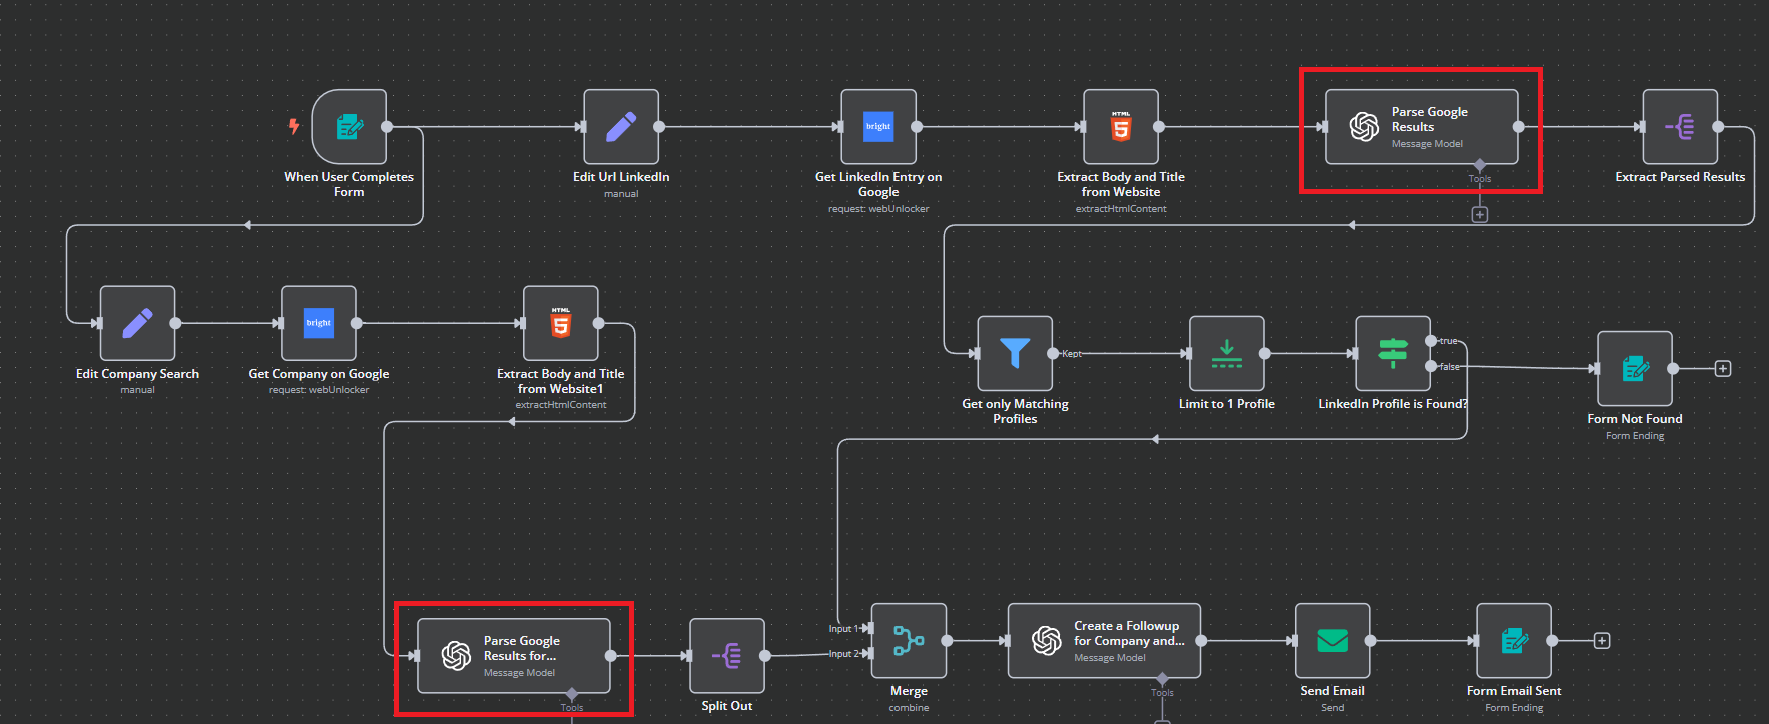
Extract the Parsed Results and Split-Out to End The Company Search
During this step, one of our separate workflows ends with a “Split Out”. As the “Company” workflow ends, we extract parsed results from our “Person” workflow.
Here are the instructions for the extraction. As you can see, we’re basically just pulling smaller pieces from the larger JSON body.

Our “Company” workflow has now ended and our “Person” workflow has a few steps to complete. The “Company” workflow will stay paused until these processes are ready to merge–this is where the beauty of n8n really starts to shine through… asynchronous programming with no coding involved!

Limit to 1 Profile and Validate Its Existence
Our “Person” workflow filters the result to use only matching profiles. Then, we limit it to one profile and ensure that their profile exists. If it doesn’t exist, we handle it by updating the form and telling the user that the profile wasn’t found.

As long as the profile exists, we’re now ready to merge back into a single, coherent workflow.

Merging the Workflows
As you can see below, the data from both workflows gets used as input. They get merged into one single output for us to pass into ChatGPT one final time.

Everything is finally coming together. Once we’ve got a single workflow, we’re ready to execute the final steps.

Crafting Outreach and Follow-Up Steps
Now, we pass this single output back into ChatGPT to finalize our email. It even writes custom HTML so we don’t even need to worry about markup code.

Once the HTML comes back, we’re ready to email the results.

Sending The Email
Open up the “Send Email” node to ensure your credentials and connection details are correct. As you can see, we pass in json.message.content.content to create the email. This literally takes the HTML from ChatGPT and pastes it straight into the body of the email.

Change the “From Email” to the SMTP email you’re using. The email then gets sent to the “To Email”–change this to your personal email to receive the results in your personal inbox.

Updating the Form to Show Completion
Finally, we update the form to tell the user that the operation was successful. If you open up “Form Email Sent”, you’ll see the different parameters for the form update. As you can see, we show a “Completion Tile” that says, “Thank you!” and a message saying, “We have sent you an email.”

We’ve now finished the final step in the workflow! Feel free to click the “Test Workflow” button and see how the entire thing runs.

The Results
If you decide to run the workflow, first you’ll see a popup asking you to complete your search form. Complete the form and click “Get References”.

After the process has finished running, your form should now look like the one below. As you can see, it says “Thank you!” and displays our completion message.
If you open up your inbox, you’ll have a new email with a detailed overview of your candidate with links to their website and LinkedIn profile. Below that, you’ll see outreach and follow-up recommendations from ChatGPT.

Conclusion
With n8n, Bright Data, OpenAI, and SMTP, you’ve built a fully automated LinkedIn scraping and outreach workflow—without writing complex code. This powerful setup streamlines your recruitment process, delivering enriched candidate profiles and personalized outreach directly to your inbox.
Whether you’re scaling a hiring pipeline or enhancing lead generation, this workflow is just the beginning. Bright Data offers a full suite of tools to take your automation to the next level:
- Web Unlocker: Bypass CAPTCHAs, blocks, and bot detection to scrape LinkedIn and other sites reliably.
- Residential Proxies: Access real-user IPs from around the world to ensure high success rates and geo-targeting.
- Scraping Browser: A headless browser with built-in proxy support—ideal for JavaScript-heavy pages.
- Scraper API: Use pre-built scraping templates to extract structured data effortlessly.
- Datasets: Tap into ready-made datasets for job listings, company data, and more to enrich your outreach.
Sign up for a free trial and start automating smarter today!

Technical Writer
Jacob Nulty is a Detroit-based software developer and technical writer exploring AI and human philosophy, with experience in Python, Rust, and blockchain.


