
Web scraping is a programmatic way of collecting data from websites, and there are endless use cases for web scraping, including market research, price monitoring, data analysis, and lead generation.
In this tutorial, you’ll look at a practical use case focused on a common parenting struggle: gathering and organizing information sent home from school. Here, you’ll focus on homework assignments and school lunch information.
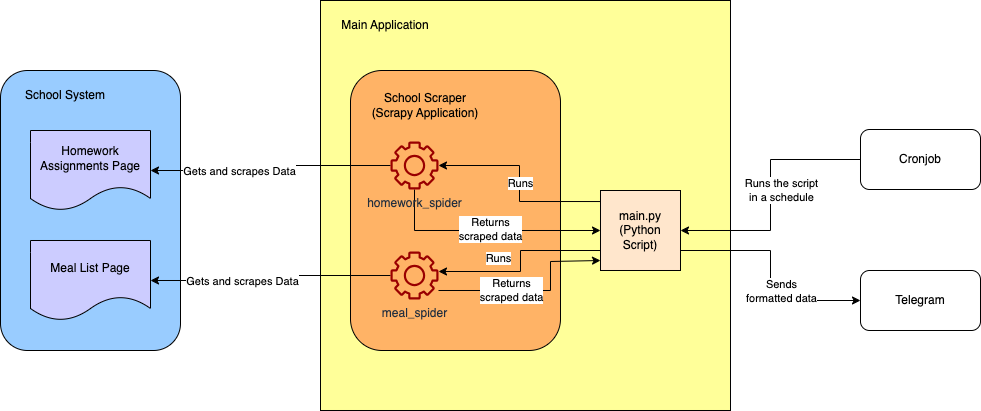
Following is the rough architecture diagram of the final project:
Prerequisites
To follow along with this tutorial, you need the following:
- Python 3.10+
- virtual environment that has been activated
- Scrapy CLI 2.11.1
- Visual Studio Code
For privacy, you’ll use this dummy school system website: https://systemcraftsman.github.io/scrapy-demo/website/.
Create the Project
In your terminal, create your base project directory (you can put this anywhere):
mkdir school-scraper
Navigate into your newly created folder and create a new Scrapy project by running the following command:
cd school-scraper &
scrapy startproject school_scraper
The project structure should look like this:
school-scraper
└── school_scraper
    ├── school_scraper
    │   ├── __init__.py
    │   ├── items.py
    │   ├── middlewares.py
    │   ├── pipelines.py
    │   ├── settings.py
    │   └── spiders
    │       └── __init__.py
    └── scrapy.cfg
The previous command creates two levels of school_scraper directories. In the inner directory, there’s a set of autogenerated files: middlewares.py, where you can define Scrapy middlewares; pipelines.py, where you can define custom pipelines to modify your data; and settings.py, where you can define the general setting for your scraping application.
Most importantly, there’s a spiders folder where your spiders are located. Spiders are Python classes that can be utilized to scrape a particular site in a particular way. They adhere to the separation of concerns principle within the scraping system, allowing for the creation of a dedicated spider for each scraping task.
Because you don’t have a generated spider yet, this folder is empty, but in the next step, you’ll be generating your first spider.
Create the Homework Spider
To scrape homework data from a school system, you need to create a spider that first logs into the system and then navigates to the homework assignments page to scrape the data:

You’ll use the Scrapy CLI to create a spider for web scraping. Navigate to the school-scraper/school_scraper directory of your project and run the following command to create a spider named HomeworkSpider in the spiders folder:
scrapy genspider homework_spider systemcraftsman.github.io/scrapy-demo/website/index.html
NOTE: Don’t forget to run all the Python- or Scrapy-related commands in your activated virtual environment.
The scrapy genspider command generates the spider. The next parameter is the name of the spider (ie homework_spider), and the last parameter defines the start URL of the spider. This way, systemcraftsman.github.io is recognized as an allowed domain by Scrapy.
Your output should look like this:
Created spider 'homework_spider' using template 'basic' in module:
  school_scraper.spiders.homework_spider
A file called homework_spider.py must be created under the school_scraper/spiders directory and should look like this:
class HomeworkSpiderSpider(scrapy.Spider):
    name = "homework_spider"
    allowed_domains = ["systemcraftsman.github.io"]
    start_urls = ["https://systemcraftsman.github.io/scrapy-demo/website/index.html"]

    def parse(self, response):
        pass
Rename the class name to HomeworkSpider to get rid of the redundant Spider in the class name. The parse function is the initial function that starts the scraping. In this case, that’s logging into the system.
NOTE: The login form on
https://systemcraftsman.github.io/scrapy-demo/index.htmlis a dummy login form that consists of a couple of JavaScript lines. Since the page is HTML, it doesn’t accept any POST request, and an HTTP GET request is used to mimic the login instead.
Update the parse function as follows:
...code omitted...
    def parse(self, response):
        formdata = {'username': 'student',
                    'password': '12345'}
        return FormRequest(url=self.welcome_page_url, method="GET", formdata=formdata,
                           callback=self.after_login)
Here, you create a form request to submit the login form inside the index.html page. The submitted form should redirect to the defined welcome_page_url and should have a callback function to continue the scraping process. You’ll add the after_login callback function soon.
Define the welcome_page_url by adding it at the top of the class where other variables are defined:
...code omitted...
    start_urls = ["https://systemcraftsman.github.io/scrapy-demo/website/index.html"]
    welcome_page_url = "https://systemcraftsman.github.io/scrapy-demo/website/welcome.html"
...code omitted...
Then add the after_login function right after the parse function in the class:
...code omitted...
    def after_login(self, response):
        if response.status == 200:
            return Request(url=self.homework_page_url,
                           callback=self.parse_homework_page
                           )
...code omitted...
The after_login function checks that the response status is 200, which means it’s successful. Then it navigates to the homework page and calls the parse_homework_page callback function, which you’ll define in the next step.
Define the homework_page_url by adding it at the top of the class where the other variables are defined:
...code omitted...
    start_urls = ["https://systemcraftsman.github.io/scrapy-demo/website/index.html"]
    welcome_page_url = "https://systemcraftsman.github.io/scrapy-demo/website/welcome.html"
    homework_page_url = "https://systemcraftsman.github.io/scrapy-demo/website/homeworks.html"
...code omitted...
Add the parse_homework_page function after the after_login function in the class:
...code omitted...
    def parse_homework_page(self, response):
        if response.status == 200:
            data = {}
            rows = response.xpath('//*[@class="table table-file"]//tbody//tr')
            for row in rows:
                if self._get_item(row, 4) == self.date_str:
                    if self._get_item(row, 2) not in data:
                        data[self._get_item(row, 2)] = self._get_item(row, 3)
                    else:
                        data[self._get_item(row, 2) + "-2"] = self._get_item(row, 3)
            return data
...code omitted...
The parse_homework_page function checks if the response status is 200 (ie successful); then it parses the homework data, which is provided in an HTML table.
The function checks the HTTP 200 code and then uses XPath to extract each row of data. After extracting each row, the function iterates over the data and extracts the specific items using the private _get_item function, which you need to add to your Spider class.
The _get_item function should look like this:
...code omitted...
    def _get_item(self, row, col_number):
        item_str = ""
        contents = row.xpath(f'td[{col_number}]//text()').extract()
        for content in contents:
            item_str = item_str + content
        return item_str
The _get_item obtains the content in each cell using XPath along with the row and column numbers. If a cell has more than one paragraph, the function iterates over them and appends each paragraph.
The parse_homework_page function also requires a date_str to be defined, which you should define as 12.03.2024 as this is the date data you have in your static website.
NOTE: In a real-life scenario, you should define the date dynamically as the website data would be dynamic.
Define the date_str by adding it at the top of the class where other variables are defined:
...code omitted...
    homework_page_url = "https://systemcraftsman.github.io/scrapy-demo/website/homeworks.html"
    date_str = "12.03.2024"
...code omitted...
The final homework_spider.py file looks like this:
import scrapy

from scrapy import FormRequest, Request


class HomeworkSpider(scrapy.Spider):
    name = "homework_spider"
    allowed_domains = ["systemcraftsman.github.io"]
    start_urls = ["https://systemcraftsman.github.io/scrapy-demo/website/index.html"]
    welcome_page_url = "https://systemcraftsman.github.io/scrapy-demo/website/welcome.html"
    homework_page_url = "https://systemcraftsman.github.io/scrapy-demo/website/homeworks.html"
    date_str = "12.03.2024"

    def parse(self, response):
        formdata = {'username': 'student',
                    'password': '12345'}
        return FormRequest(url=self.welcome_page_url, method="GET", formdata=formdata,
                           callback=self.after_login)

    def after_login(self, response):
        if response.status == 200:
            return Request(url=self.homework_page_url,
                           callback=self.parse_homework_page
                           )

    def parse_homework_page(self, response):
        if response.status == 200:
            data = {}
            rows = response.xpath('//*[@class="table table-file"]//tbody//tr')
            for row in rows:
                if self._get_item(row, 4) == self.date_str:
                    if self._get_item(row, 2) not in data:
                        data[self._get_item(row, 2)] = self._get_item(row, 3)
                    else:
                        data[self._get_item(row, 2) + "-2"] = self._get_item(row, 3)
            return data

    def _get_item(self, row, col_number):
        item_str = ""
        contents = row.xpath(f'td[{col_number}]//text()').extract()
        for content in contents:
            item_str = item_str + content
        return item_str
In your school-scraper/school_scraper directory, run the following command to verify that it successfully scrapes the homework data:
scrapy crawl homework_spider
You should see the scraped output between the other logs:
...output omitted...
2024-03-20 01:36:05 [scrapy.core.scraper] DEBUG: Scraped from <200 https://systemcraftsman.github.io/scrapy-demo/website/homeworks.html>
{'MATHS': "Matematik Konu Anlatımlı Çalışma Defteri-6 sayfa 13'ü yapınız.n", 'ENGLISH': 'Read the story "Manny and His Monster Manners" on pages 100-107 in your Reading Log and complete the activities on pages 108 and 109 according to the story.nnReading Log kitabınızın 100-107 sayfalarındaki "Manny and His Monster Manners" isimli hikayeyi okuyunuz ve 108 ve 109'uncu sayfalarındaki aktiviteleri hikayeye göre tamamlayınız.n'}
2024-03-20 01:36:05 [scrapy.core.engine] INFO: Closing spider (finished)
...output omitted...
Congratulations! You’ve implemented your first spider. Let’s create the next one!
Create the Meal List Spider
To create a spider that crawls the meal list page, run the following command in your school-scraper/school_scraper directory:
scrapy genspider meal_spider systemcraftsman.github.io/scrapy-demo/website/index.html
The generated spider class should look like this:
class MealSpiderSpider(scrapy.Spider):
    name = "meal_spider"
    allowed_domains = ["systemcraftsman.github.io"]
    start_urls = ["https://systemcraftsman.github.io/scrapy-demo/website/index.html"]

    def parse(self, response):
        pass
The meal spider creation process is very similar to the homework spider creation. The only difference is the HTML scraping page.
To save some time, replace all the content in meal_spider.py with the following:
import scrapy

from datetime import datetime

from scrapy import FormRequest, Request


class MealSpider(scrapy.Spider):
    name = "meal_spider"
    allowed_domains = ["systemcraftsman.github.io"]
    start_urls = ["https://systemcraftsman.github.io/scrapy-demo/website/index.html"]
    welcome_page_url = "https://systemcraftsman.github.io/scrapy-demo/website/welcome.html"
    meal_page_url = "https://systemcraftsman.github.io/scrapy-demo/website/meal-list.html"
    date_str = "13.03.2024"

    def parse(self, response):
        formdata = {'username': 'student',
                    'password': '12345'}
        return FormRequest(url=self.welcome_page_url, method="GET", formdata=formdata,
                           callback=self.after_login)

    def after_login(self, response):
        if response.status == 200:
            return Request(url=self.meal_page_url,
                           callback=self.parse_meal_page
                           )

    def parse_meal_page(self, response):
        if response.status == 200:
            data = {"BREAKFAST": "", "LUNCH": "", "SALAD/DESSERT": "", "FRUIT TIME": ""}
            week_no = datetime.strptime(self.date_str, '%d.%m.%Y').isoweekday()
            rows = response.xpath('//*[@class="table table-condensed table-yemek-listesi"]//tr')
            key = ""
            try:
                for row in rows[1:]:
                    if self._get_item(row, week_no) in data.keys():
                        key = self._get_item(row, week_no)
                    else:
                        data[key] = self._get_item(row, week_no, "n")
            finally:
                return data

    def _get_item(self, row, col_number, seperator=""):
        item_str = ""
        contents = row.xpath(f'td[{col_number}]//text()').extract()
        for i, content in enumerate(contents):
            item_str = item_str + content + seperator
        return item_str
Notice that the parse and the after_login functions are almost the same. The only difference is the name of the callback function parse_meal_page, which parses the HTML of the meal page using a different XPath logic. The function also gets help from a private function called _get_item, which works similarly to the one created for homework.
The way the table is used in the homework and meal list pages differs, so the parsing and handling of the data also differ.
To verify the meal_spider, run the following command in your school-scraper/school_scraper directory:
scrapy crawl meal_spider
Your output should look like this:
...output omitted...
2024-03-20 02:44:42 [scrapy.core.scraper] DEBUG: Scraped from <200 https://systemcraftsman.github.io/scrapy-demo/website/meal-list.html>
{'BREAKFAST': 'PANCAKE n KREM PEYNİR n SÜZME PEYNİR nnKAKAOLU FINDIK KREMASI n SÜTn', 'LUNCH': 'TARHANA ÇORBAnEKŞİLİ KÖFTEnERİŞTEn', 'SALAD/DESSERT': 'AYRANnKIRMIZILAHANA SALATAnROKALI GÖBEK SALATAn', 'FRUIT TIME': 'FINDIK& KURU ÜZÜMn'}
2024-03-20 02:44:42 [scrapy.core.engine] INFO: Closing spider (finished)
...output omitted...
NOTE: Because the data is from an original website, none of it has been translated to keep it in its original format.
Format the Data
The scrapers you’ve created for the homework assignments and meal lists page are ready to scrape the data in JSON format. However, you might want to format the data by triggering the spiders programmatically.
In Python applications, the main.py file typically serves as the entry point where you initialize your application by invoking its key components. However, in this Scrapy project, you didn’t create an entry point because the Scrapy CLI provides a prebuilt framework for implementing the spiders, and you can run the spiders via the same CLI.
To format the data in this scenario, you’ll build a basic Python command line program that takes arguments and scrapes accordingly.
Create a file called main.py in the root directory of your school-scraper project with the following content:
import sys

from scrapy.crawler import CrawlerProcess
from scrapy.utils.project import get_project_settings

from school_scraper.school_scraper.spiders.homework_spider import HomeworkSpider
from school_scraper.school_scraper.spiders.meal_spider import MealSpider

results = []


class ResultsPipeline(object):
    def process_item(self, item, spider):
        results.append(item)


def _prepare_message(title, data_dict):
    if len(data_dict.items()) == 0:
        return None

    message = f"===={title}====n----------------n"
    for key, value in data_dict.items():
        message = message + f"==={key}===n{value}n----------------n"

    return message


def main(args=None):
    if args is None:
        args = sys.argv
    settings = get_project_settings()
    settings.set("ITEM_PIPELINES", {'__main__.ResultsPipeline': 1})
    process = CrawlerProcess(settings)

    if args[1] == "homework":
        process.crawl(HomeworkSpider)
        process.start()
        print(_prepare_message("HOMEWORK ASSIGNMENTS", results[0]))
    elif args[1] == "meal":
        process.crawl(MealSpider)
        process.start()
        print(_prepare_message("MEAL LIST", results[0]))


if __name__ == "__main__":
    main()
The main.py file has a main function and is the entry point function for your application. When you run the main.py, the main method is invoked. The main method takes an array argument called args, which you can use to send arguments to the program.
The main.py starts by checking the args value and configures the Scrapy crawler settings by defining a pipeline called ResultsPipeline. As you can see, the ResultsPipeline is defined in this file, but you define the pipelines under the pipelines package.
The ResultsPipeline simply gets the results and appends them to an array called results. That means that the results array can be used as input for the private function _prepare_message, which is used to prepare the formatted message. This is done per spider in the main function, and the distinction becomes possible with the args array’s second argument, which stands for the spider type. If the spider type is homework, then the crawler process calls the HomeworkSpider and starts it. If the spider type is meal, then the crawler process calls the MealSpider and starts it.
When a spider starts, the injected ResultsPipeline appends the data in the results array, and the main function can use it for each spider by calling _prepare_message, which helps format the data output.
In your main project directory, run the newly implemented main.py with the following command to retrieve the homework assignments:
python main.py homework
Your output should look like this:
...output omitted...
====HOMEWORK ASSIGNMENTS====
----------------
===MATHS===
Matematik Konu Anlatımlı Çalışma Defteri-6 sayfa 13'ü yapınız.

----------------
===ENGLISH===
Read the story "Manny and His Monster Manners" on pages 100-107 in your Reading Log and complete the activities on pages 108 and 109 according to the story.

Reading Log kitabınızın 100-107 sayfalarındaki "Manny and His Monster Manners" isimli hikayeyi okuyunuz ve 108 ve 109'uncu sayfalarındaki aktiviteleri hikayeye göre tamamlayınız.

----------------
...output omitted...
To get the meal list for the day, run the python main.py meal command. Your output looks like this:
...output omitted...
====MEAL LIST====
----------------
===BREAKFAST===
PANCAKE
 KREM PEYNİR
 SÜZME PEYNİR

KAKAOLU FINDIK KREMASI
 SÜT

----------------
===LUNCH===
TARHANA ÇORBA
EKŞİLİ KÖFTE
ERİŞTE

----------------
===SALAD/DESSERT===
AYRAN
KIRMIZILAHANA SALATA
ROKALI GÖBEK SALATA

----------------
===FRUIT TIME===
FINDIK& KURU ÜZÜM

----------------

...output omitted...
Tips for Overcoming Common Web Scraping Obstacles
Congratulations! If you’ve made it this far, you’ve officially created a Scrapy scraper.
While creating a web scraper with Scrapy is easy, you may face some obstacles during implementation, such as CAPTCHAs, IP bans, session or cookie management, and dynamic websites. Let’s take a look at a few tips for handling these different scenarios:
Dynamic Websites
Dynamic websites provide varying content to visitors based on factors such as system configuration, location, age, and gender. For instance, two individuals visiting the same dynamic website may see different content tailored to them.
While Scrapy can scrape dynamic web content, it’s not designed for that. To scrape dynamic content, you’d need to schedule Scrapy to run regularly, saving and comparing results to track changes on web pages over time.
In certain cases, dynamic content on web pages may be treated as static, especially when those pages are updated only occasionally.
CAPTCHAs
Generally, CAPTCHAs are dynamic images featuring alphanumeric characters. Visitors to the page must enter the matching values from the CAPTCHA image to pass the validation process.
CAPTCHAs are used on web pages to ensure that the visitor of the page is human (as opposed to a spider or bot) and, often, to prevent web scraping.
The dummy school system you worked with here doesn’t use a CAPTCHA system, but if you end up encountering one, you can create a Scrapy middleware that downloads the CAPTCHA and converts it into text using an OCR library.
Session and Cookie Manipulation
When you open a web page, you enter into a session within that page’s system. This session retains your login information and other relevant data to recognize you throughout the system.
Similarly, you can track information about a web page visitor using a cookie. However, unlike session data, cookies are stored on the visitor’s computer rather than the website server, and users can delete them if desired. As a result, you cannot use cookies to keep a session, but you can use them for various supporting tasks where data loss is not critical.
There may arise situations where you need to manipulate a user’s session or update their cookies. Scrapy can handle both situations, either through its built-in features or through compatible third-party libraries.
IP Ban
IP ban, also known as IP address blocking, is a security technique where a website blocks specific incoming IP addresses. This technique is typically used to prevent bots or spiders from accessing sensitive information, ensuring that only human users can access and process the data. Alongside CAPTCHAs, companies use IP banning to deter web scraping activities.
In this scenario, the school system doesn’t use an IP-banning mechanism. However, if they had implemented one, you would need to adopt strategies such as using a dynamic IP or hiding your IP address behind a proxy wall to continue scraping their website.
Conclusion
In this article, you learned how to create spiders for logging in and parsing tables using XPath in Scrapy. Additionally, you learned how to trigger the spiders programmatically for enhanced data control.
You can access the complete code for this tutorial in this GitHub repository.
For those looking to extend Scrapy’s capabilities and overcome scraping obstacles, Bright Data provides solutions tailored for public web data. Bright Data’s integration with Scrapy enhances scraping capabilities, the proxy services help avoid IP bans, and Web Unlocker simplifies handling CAPTCHAs and dynamic content, making data collection with Scrapy more efficient.
Register now and talk to one of our data experts about our scraping solutions.


