

Web scraping is the automated process of collecting large amounts of data in various formats (ie text, numbers, images, audio, or videos presented in an HTML format) from websites. The majority of websites, including YouTube or eBay, provide dynamic content by displaying data according to user input during interactions.
If you’re interested in web scraping, you may have heard of Selenium. It’s an open source web scraping tool that offers advanced techniques to scrape data from dynamic websites. It can simulate user interactions by performing various operations, such as filling out a form, navigating the web page, and selecting specific content rendered by JavaScript.
This tutorial will teach you how to get started scraping data using the Selenium Python package.
Setting Up Selenium and the Python Environment
Before you start web scraping with Selenium, you need to set up a Python environment and install the Selenium Python package and webdriver_manager Python package. webdriver_manager is a Python package used to download and manage binary drivers for different web browsers, including Chrome, Firefox, and Edge.
Once you’ve installed those packages, you also need to configure the environment variables and proxy server in your environment. Once you’ve installed all the packages you need, you’re ready to launch your browser and scrape some data.
To automatically launch a Chrome browser and surf the web page of a specific URL, run the following code in a Python script file (eg web_scrape.py) in your terminal:
# import module
from selenium import webdriver

#setup chrome webdriver
driver = webdriver.Chrome()

#load the web page
driver.get('https://yourwebsite.com')

# print page source
print(driver.page_source)

# close the driver
driver.quit()
To run the preceding code, use the following command in your terminal:
python web_scrape.py
After this code launches the Chrome browser and surfs the web page of the URL provided, it displays the HTML of the loaded web page and closes the Chrome driver instance.
Understanding HTML and Locating Elements
HTML structures web content using elements enclosed in tags (eg <h1> content </h1>). These elements organize content into a hierarchical structure, defining the layout, formatting, and interactivity of a web page.
To locate an HTML tag in a web page using a browser, you can right-click on the element you want to find and select Inspect (or something similar, depending on your specific browser). This opens the browser’s developer tools, where you can view the HTML code and locate a specific tag:

After locating an element, you can right-click on it in the Inspector and copy its tag, class, CSS selector, or absolute XPath expression.
Selenium provides two techniques for locating HTML elements on web pages for web scraping: the find_element and find_elements. The find_element method seeks a specific single element on the web page, whereas the find_elements method retrieves a list containing all elements discovered on the web page.
These methods are compatible with various locators as defined by Selenium and include the following:
By.Namelocates elements based on their name attribute.By.IDlocates elements based on their ID.By.XPATHlocates elements based on an XPath expression.By.TAG_NAMElocates elements based on their tag name.By.CLASS_NAMElocates elements based on classes.By.CSS_SELECTORlocates elements based on the CSS selector.
Let’s say you want to collect data based on the available HTML element and have an HTML document like this:
<!DOCTYPE html>
<html>
<head>
    <title>Sample HTML Page</title>
</head>
<body>
    <div id="content">
        <h1 class="heading">Welcome to my website!</h1>
        <p>This is a sample paragraph.</p>
    </div>
</body>
</html>
You can use the By.Name locator from Selenium to locate the h1 tag:
h1 = driver.find_element(By.NAME, 'h1')
To locate the ID from the HTML document, you can use By.ID locator:
content = driver.find_element(By.ID, 'content')
You can also use By.CLASS_NAME to locate all HTML elements with a class called "heading":
classes = driver.find_elements(By.CLASS_NAME, 'heading')
Web Scraping with Selenium
After locating the HTML tags, Selenium has different extraction methods that you can use to collect data from a website. The most common methods are as follows:
textextracts the text from the HTML tags.get_attributes()extracts the value of the attribute in the HTML tags.
The following examples demonstrate how you can use locators (ie ID, CSS selector, and tag name) and extraction methods to interact and scrape the title of the page and other details from the following Amazon page:

To scrape the page, the first thing you need to do is create a new Python script file (ie selenium_scraping.py) to write the scraping code. Next, you import Python packages and instantiate the WebDriver.
Importing Python Packages and Instantiating the WebDriver
To import the required modules, add the following code at the top of selenium_scraping.py:
# import libraries
from selenium import webdriver
from selenium.webdriver.chrome.service import Service
from selenium.webdriver.common.by import By
from webdriver_manager.chrome import ChromeDriverManager
from selenium.webdriver.common.keys import Keys
from selenium.webdriver.common.action_chains import ActionChains
from selenium.webdriver.support.ui import WebDriverWait
from selenium.webdriver.support import expected_conditions as EC
import time
from selenium.webdriver.chrome.options import Options
This code imports different modules from Selenium and WebDriver that you need to scrape the data.
To automatically browse an Amazon URL and scrape data, you need to instantiate a Chrome WebDriver that interacts with Selenium.
Paste the following code, which installs the ChromeDriver binary, if it’s not already installed, and then instantiates it:
driver = webdriver.Chrome(service=Service(ChromeDriverManager().install()))
Note: If you don’t want to use Chrome, Selenium supports drivers for other browsers, too.
Defining the URL and Scraping the Product Title
To automatically load the web page, you need to define the Amazon URL in a Python variable (eg url) and then pass it to the get() method of the driver:
#Define the URL
url = "https://www.amazon.com/AmazonBasics-Matte-Keyboard-QWERTY-Layout/dp/B07WJ5D3H4/"

#load the web page
driver.get(url)

#set the maximum time to load the web page in seconds
driver.implicitly_wait(10)
When you run this code, Selenium automatically loads the Amazon page link in ChromeDriver. The time frame is specified to make sure that all content and HTML elements are fully loaded on the web page.
To scrape the title of the product from the Amazon link, you need to use the ID presented on the web page. To do so, open the Amazon URL in your web browser, and then right-click and select Inspect to identify the ID that holds the title of the product (ie productTitle):
Next, call the find_element() method from Selenium to find the HTML element with the ID value identified. You need to pass By.ID as the first argument and ID as the second argument as these are the arguments accepted by the find_element() method:
# collect data that are within the ID of contents
title_element = driver.find_element(By.ID, "productTitle")

# extract the title
title = title_element.text

# show the title of the product
print(title)
This code block collects data that is within the ID attribute of productTitle and then extracts the title of the product using the text attribute. Finally, it shows the title of the product.
Run the following Python script file in your terminal to scrape the title of the product:
python selenium_scraping.py
The extracted title looks like this:
Amazon Basics Low-Profile Wired USB Keyboard with US Layout (QWERTY), Matte Black
Scraping the Product’s Details Using CSS Selector and Tag Names
Now that you know how to scrape the title, let’s scrape some other details from the section called About this item using the CSS selector and HTML tags:

To extract the product’s details, you need to collect all the HTML elements on the Amazon link with a CSS selector named li.a-spacing-mini and then collect data from the HTML elements with a <span> tag name:
# Locate the outer span by using css selector
details_elements = driver.find_elements(By.CSS_SELECTOR, 'li.a-spacing-mini')

# Loop through all located details elements
for detail_element in details_elements:
    try:
        # Extract the detail from the inner span
        detail = detail_element.find_element(By.TAG_NAME, 'span')
        print(detail.text)
    except Exception as e:
        print("Could not extract detail:", e)
This code collects all the HTML elements with a CSS selector called li.a-spacing-mini from the WebElement contents object and stores the elements in the details_elements list. Then it loops through all the elements in the detail_elements to collect HTML elements whose tag name is span using the find_element method with By.TAG_NAME. It extracts the text data from the span HTML element using the text attribute.
Here is the extracted data from the span HTML elements:
Keyboard with QWERTY layout and low-profile keys for a comfortable, quiet typing experience
Hot keys enable easy access to Media, My Computer, Mute, Volume up/down, and Calculator; 4 function keys control Previous Track, Stop, Play/Pause, and Next Track on a media player
USB wired connection
Compatible with Windows 2000, XP, Vista, 7, 8, and 10
Product Dimensions: 17.4 x 5 x 1.1 inches (LxWxH)
Executing JavaScript Code
If you want to execute a JavaScript code within the current window of a dynamic website, you can do so with the execute_script() function. For example, you can execute the following JavaScript code to return all available links presented on the web page of https://quotes.toscrape.com/:
# import libraries
from selenium import webdriver
from pprint import pprint

# Setup Chrome WebDriver
driver = webdriver.Chrome()

# Define the URL
url = "https://quotes.toscrape.com/"

# load the web page
driver.get(url)

# set maximum time to load the web page in seconds
driver.implicitly_wait(10)

# Execute JavaScript to collect all links
javascript_code = "return Array.from(document.getElementsByTagName('a'), a => a.href);"
links = driver.execute_script(javascript_code)

print(links)

# Close the WebDriver
driver.quit()
This code imports necessary libraries, initializes a Chrome WebDriver instance, and navigates to the specified URL. Then it executes the JavaScript code to collect all links on the page using the execute_script() function. Finally, it saves the links in the links variable, prints the collected links, and closes the WebDriver instance.
Your output looks like this:
['https://quotes.toscrape.com/',
'https://quotes.toscrape.com/login',
'https://quotes.toscrape.com/author/Albert-Einstein',
'https://quotes.toscrape.com/tag/change/page/1/',
'https://quotes.toscrape.com/tag/deep-thoughts/page/1/',
'https://quotes.toscrape.com/tag/thinking/page/1/',
'https://quotes.toscrape.com/tag/world/page/1/',
'https://quotes.toscrape.com/author/J-K-Rowling',
.....
]
Note: If you intend to execute JavaScript code asynchronously, opt for the
execute_async_script()function instead.
Handling Challenges and Advanced Scraping Techniques with Selenium
Scraping data from dynamic websites often presents various challenges, including the need to handle pagination, authentication, or CAPTCHAs.
Pagination requires navigating through multiple pages of the website to collect all desired data. However, handling pagination can be difficult as different websites use different techniques for pagination. You need to handle the logic for moving to the next page and handle the case where no more pages are available. Additionally, some websites have a login form that requires authentication to access restricted content before you can perform any web scraping tasks.
If you’re not familiar with CAPTCHAs, they’re a type of challenge-response test designed to determine whether the user is human or a bot. This security measure is often used to prevent automated programs (bots) from accessing a website or performing certain actions. However, if CAPTCHAs are not automatically handled, they can block you from scraping the data you want from dynamic websites.
Thankfully, Selenium provides advanced techniques that can help you overcome these challenges.
Extracting Data from Multiple Pages
Various product details from e-commerce websites, including product information, prices, reviews, or stock availability, are often paginated across multiple product listing pages.
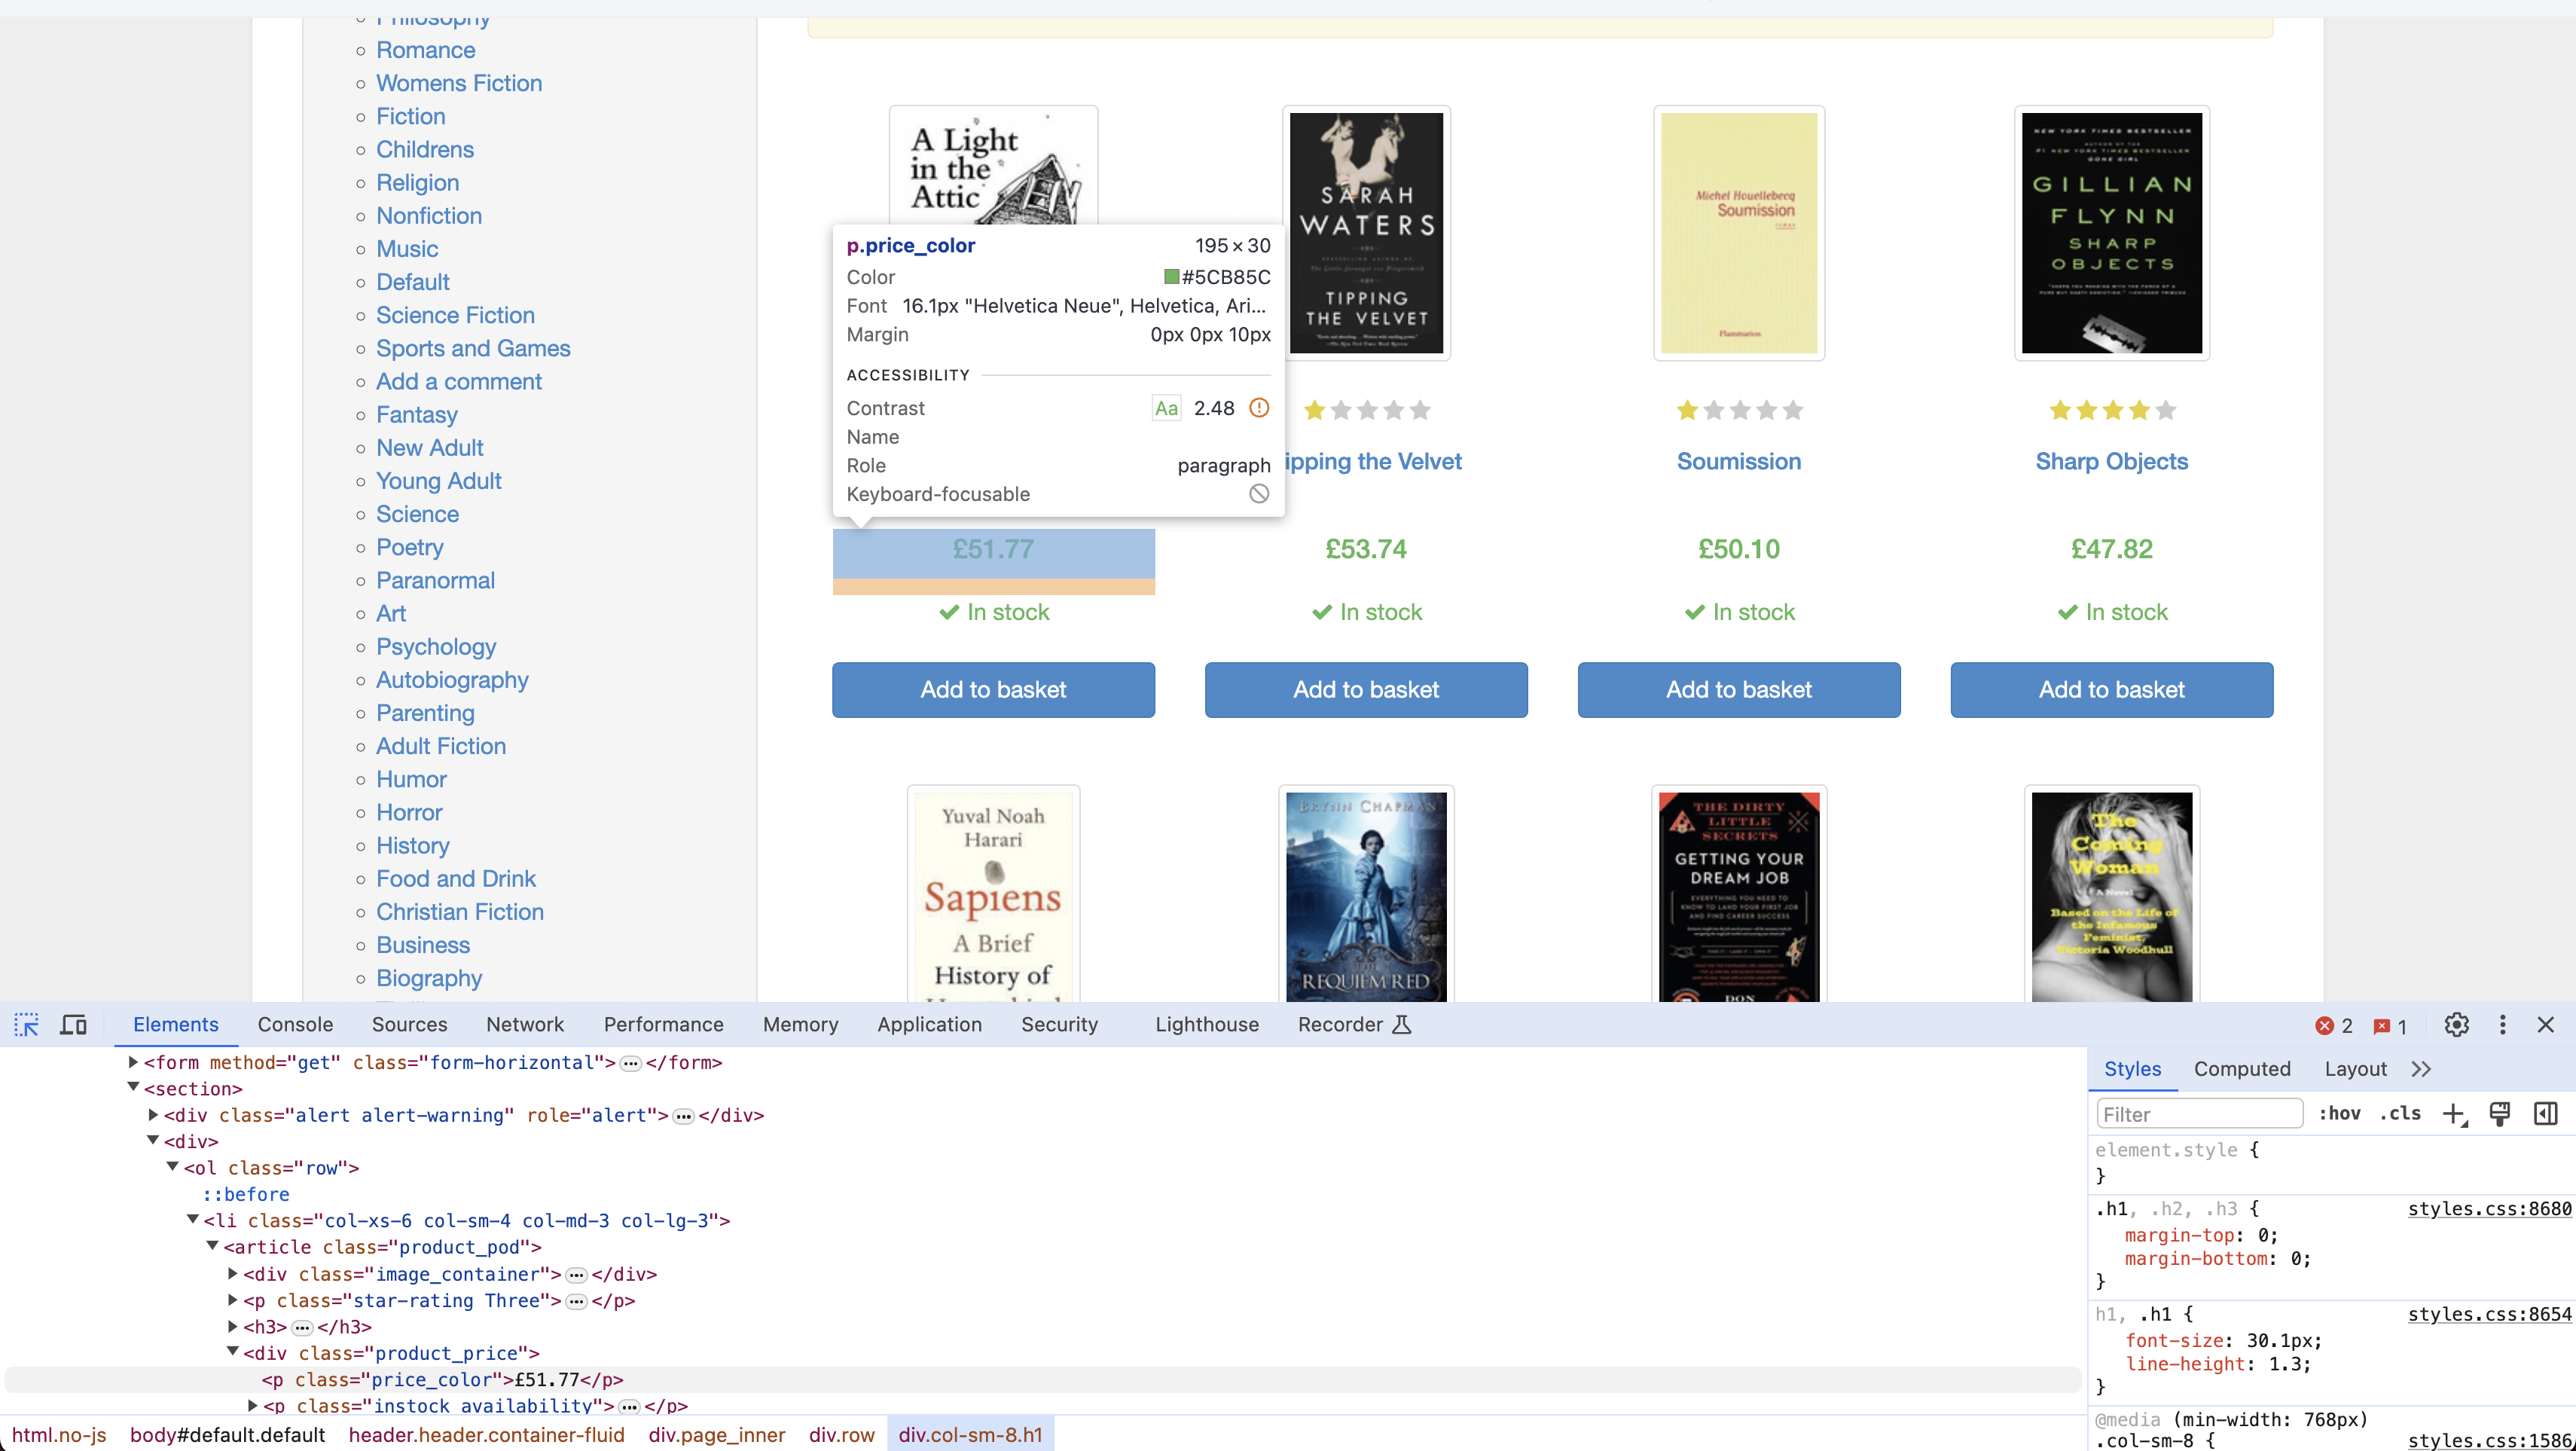
In the following example, you’ll scrape the titles and prices of books from books.toscrape.com. This website has numerous books listed across fifty web pages:

To extract data from multiple pages, you need to define the website URL in a Python variable and load the web page using the get() method from the driver object:
# Define the URL
url = "https://books.toscrape.com/"

# load the web page
driver.get(url)
To scrape the data, you need to use CSS selectors to find the HTML tags containing the titles and prices of each book on the web page. The CSS selector for locating a book’s title is h3 > a and for finding the book’s price, it’s price_color:


Following is the code to scrape both the title and price of each book:
# Initialize empty list to store scraped data
books_results = []

while True:
    # Extract data
    for selector in driver.find_elements(By.CSS_SELECTOR, "article.product_pod"):
        try:
            title_element = selector.find_element(By.CSS_SELECTOR, "h3 > a")
            title = title_element.get_attribute("title")
            price_element = selector.find_element(By.CSS_SELECTOR, ".price_color")
            price = price_element.text
            books_results.append({"title": title, "price": price})
        except NoSuchElementException:
            # Handle the case where either title or price element is not found
            print("Title or price element not found.")
            continue

    # Check for next page link
    try:
        next_page_link_element = driver.find_element(By.CSS_SELECTOR, "li.next a")
        next_page_link = next_page_link_element.get_attribute("href")
        if next_page_link == "https://books.toscrape.com/catalogue/page-50.html":
            print("Reached the last page. Scraping process terminated.")
            break
        else:
            driver.get(next_page_link)
    except NoSuchElementException:
        # Handle the case where the next page link element is not found
        print("Next page link element not found.")
        break

# Close WebDriver
driver.quit()

print(books_results)
This code uses an empty list called books_results to store the scraped data. It enters a loop to extract titles and prices from each book displayed on the current web page. The loop iterates over elements with the CSS selector article.product_pod to locate each book entry. Within each book entry, it finds the title using the CSS selector "h3 > a" and the price using".price_color". If either the title or price element is not found, it handles the exception and continues.
After scraping all the books on the page, it checks for a link to the next page using a CSS selector li.next a. If found, it navigates to the next page and continues scraping. If there is no next page or if it reaches the last page (page 50), the scraping process terminates. Finally, it prints the scraped data stored in the books_results list using pprint and closes the WebDriver.
The data extracted from all fifty web pages looks like this:
[{'title': 'A Light in the Attic', 'price': '£51.77'},
{'title': 'Tipping the Velvet', 'price': '£53.74'},
{'title': 'Soumission', 'price': '£50.10'},
{'title': 'Sharp Objects', 'price': '£47.82'},
{'title': 'Sapiens: A Brief History of Humankind', 'price': '£54.23'},
{'title': 'The Requiem Red', 'price': '£22.65'},
{'title': 'The Dirty Little Secrets of Getting Your Dream Job', 'price': '£33.34'},
{'title': 'The Coming Woman: A Novel Based on the Life of the Infamous Feminist, Victoria Woodhull', 'price': '£17.93'},
{'title': 'The Boys in the Boat: Nine Americans and Their Epic Quest for Gold at the 1936 Berlin Olympics', 'price': '£22.60'}
.....
]
Automatically Handling a Login Form
Many websites, including social media platforms, require a login or user authentication to access certain data. Thankfully, Selenium can automate the login process, allowing you to access and scrape data behind authentication walls.
In the following example, you’ll use Selenium to automatically log in to the Quotes to Scrape website (a sandbox website) that lists quotes from various famous individuals.
To log in to the Quotes to Scrape website, you need to define the website URL in a Python variable and load the web page using the get() method from the driver object. Wait ten seconds for the page to load fully before extracting the data:
# Define the URL
url = "https://quotes.toscrape.com/login"

# load the web page
driver.get(url)

# set maximum time to load the web page in seconds
driver.implicitly_wait(10)
Next, use XPath to find and input the username and password into the login form. In the web page’s Inspect page, the input field for the username is named username, and the input field for the password is named password:

From this screenshot, you can view the code of input fields for both username and password. Following is the code to find and fill in both username and password then submit the form by clicking the Submit button:
# Find the username field
username_field = driver.find_element(By.XPATH, "//input[@name='username']")

# Enter username
username_field.send_keys("[email protected]")

# Find the password field
password_field = driver.find_element(By.XPATH, "//input[@name='password']")

# Enter password
password_field.send_keys("secret1234")

# Submit the form
submit_button = driver.find_element(By.XPATH, "//input[@type='submit']")
submit_button.click()

# Wait for the logout link to appear
try:
    logout_link = WebDriverWait(driver, 15).until(
        EC.visibility_of_element_located((By.XPATH, "//a[contains(text(), 'Logout')]"))
    )
    print("Login successful! Logout link was found.")
except:
    print("Login failed or logout link was not found.")

# Close the browser
driver.quit()
This code locates the username input field on the web page using XPath with the attribute name='username': //input[@name='username']. It inputs the username [email protected] into the located username field using the send_keys() method. Then it locates the password input field on the web page using XPath with the attribute name='password': //input[@name='password'].
It inputs the password secret1234 into the located password field using the send_keys() method. Then it finds and clicks the Submit button of the login form using XPath with the attribute type='submit': //input[@type='submit'].
It waits up to fifteen seconds for the logout link to appear after a successful login. Then it uses WebDriverWait to wait for the visibility of an element located by XPath containing the text “Logout”: //a[contains(text(), 'Logout')]. If the logout link appears within the specified time, it prints "Login successful! Logout link was found.". If the logout link does not appear or if login fails, it prints "Login failed or logout link was not found.".
Close the browser session after the login process has finished.
Your output looks like this:
Login successful! Logout link was found.
Handling CAPTCHAs
Some websites have added CAPTCHAs to verify if you are a human or a bot before accessing the content. To avoid interacting with CAPTCHAs when scraping data from dynamic websites, you can implement a headless mode from Selenium. The headless mode lets you run a browser instance without displaying it on the screen. This means that the browser runs in the background, and you can interact with it programmatically using your Python script:
from selenium.webdriver.chrome.options import Options

# Set Chrome options for headless mode
chrome_options = Options()
chrome_options.add_argument("--headless")

# Setup Chrome WebDriver
driver = webdriver.Chrome(options=chrome_options)
This code imports Options from selenium.webdriver.chrome.options. Then it configures Chrome options to run in headless mode and initializes a Chrome WebDriver instance named driver with these options. It enables a web scraping task without displaying the browser interface.
Working with Cookies
A cookie is a piece of data that is transferred from a website you access and stored on your computer. It consists of a name, value, expiry, and path, which are used to recognize the user’s identity and load the stored information, including your login and search history.
Cookies can enhance your scraping capabilities by maintaining session states, which are crucial for navigating authenticated or personalized parts of a website. You can avoid repeated logins and continue scraping when cookies are applied, which automatically helps to reduce the execution time.
Websites also often use cookies as part of their antiscraping mechanisms. When you preserve and use cookies from a legitimate browsing session, you can make your requests look more like those of a regular user and reduce the risk of being blocked.
You can interact with cookies using built-in methods provided by the WebDriver API.
To add cookies to the current browsing context, use the add_cookie() method by providing the name and its value in dictionary format:
# Import package
from selenium import webdriver

# Initialize the WebDriver
driver = webdriver.Chrome()

# Navigate to the base URL
driver.get("http://www.example.com")

# Adds the cookie into the WebDriver Session
driver.add_cookie({'name': 'session_id', 'value': 'abc123', 'domain': 'example.com', 'path': '/', 'expiry': None})

# Refresh the page to apply the cookies
driver.refresh()

# Wait for a few seconds to ensure cookies are applied and the page is loaded
time.sleep(5)

# Now you can proceed with any scraping task that require the cookies to be set
Here, you add cookies to your web scraping task using the add_cookie() method. Then it refreshes the page to apply the cookies using the refresh() method and waits for five seconds to ensure the cookies are applied before proceeding with any scraping task.
All available cookies can be returned using the get_cookies() method. If you want to return a specific cookie’s details, then you need to pass the name of the cookie like this:
# import package
from selenium import webdriver

# Initialize the WebDriver
driver = webdriver.Chrome()

# Navigate to url
driver.get("http://www.example.com")

# Adds the cookie into current browser context
driver.add_cookie({"name": "foo", "value": "bar"})

# Get cookie details with named cookie 'foo'
print(driver.get_cookie("foo"))
The code block returns details of the cookie named foo.
Note: If you want to learn more methods to deal with cookies, please visit the Selenium documentation page here.
Best Practices and Ethical Considerations for Web Scraping
When it comes to web scraping, it’s important to follow best practices designed to ensure responsible data extraction from websites. This includes respecting robots.txt files, which outline the rules for crawling and scraping a website.
Make sure you avoid overloading servers with excessive requests, which can disrupt the website’s functionality and negatively interrupt the user experience. This overload can lead to denial-of-service (DoS) attacks.
Web scraping also raises legal and ethical concerns. For example, scraping copyrighted material without permission can lead to legal consequences. It’s critical that you carefully evaluate the legal and ethical implications of web scraping before proceeding. You can do so by reading the data privacy policy, intellectual property, and terms and conditions available on the website.
Conclusion
The process of scraping data from dynamic websites requires effort and planning. With Selenium, you can automatically interact with and collect data from any dynamic website.
In this article, you learned how to use the Selenium Python package to scrape data from various HTML elements displayed on YouTube and other sandbox websites using different locating elements. You also learned how to handle different challenges like pagination, login forms, and CAPTCHAs using advanced techniques. All the source code for this tutorial is available in this GitHub repo.
While it’s possible to scrape data with Selenium, it’s time-consuming, and it quickly becomes complicated. That’s why it’s recommended to use Bright Data. With its scraping browser, which supports Selenium and various types of proxies, you can start extracting data right away. Instead of maintaining your server and code, consider starting a free trial and utilizing the scraping API and provided by Bright Data.


