AdsPower Proxy Integration
Integrating AdsPower with Bright Data proxies streamlines web scraping and data collection, offering robust anti-detection and flexible proxy control.
This guide may be outdated. For an up-to-date guide please see our documentation.
- 400M+ Residential IPs
- Sticky and rotating sessions
- 99.95% success rate
- Geo-location targeting - FREE

What is AdsPower?
Introducing AdsPower: the ultimate antidetect browser with multi-account management. It revolutionizes the way you browse and automate tasks, offering virtual browser profiles that mimic genuine devices with unique fingerprints. With AdsPower, you can streamline business workflows, enhance productivity, and ensure data security through encrypted transmission and servers.
AdsPower unlocks new possibilities across various industries. Whether you’re in affiliate marketing, agencies, crypto, or e-commerce, AdsPower empowers you to maximize your potential. AdsPower supports web data collection, market research, and competitive intelligence tasks, enables you break free from physical infrastructure limitations, and boost your sales across multiple channels. With AdsPower, you have the ultimate solution to propel your business forward. Experience its unrivaled capabilities and unlock new levels of success.
Unlock New Possibilities with Bright Data Proxies and AdsPower
Tap into the unlimited potential of AdsPower combined with Bright Data proxies. Experience a world of possibilities and take your browsing experience to new heights.
- Access the world’s largest proxy pool with 400M+ monthly IPs, including datacenter, residential, mobile, and web unlocker proxies.
- Real-time visibility into traffic with live previews.
- Harness the power of logs and statistics for comprehensive insights.
- Optimize bandwidth and reduce costs with traffic splitting rules.
- Ensure reliable data retrieval with automatic request retries.
- Effortlessly overcome captchas and adapt to markup changes.
- Customize headers and SSL fingerprints with ease.
- Enjoy the benefits of IP rotation and session management for enhanced anonymity.
- Seamlessly integrate with existing workflows through the user-friendly API.
Together, AdsPower and Bright Data Proxies create a formidable combination that amplifies your capabilities, providing you with unparalleled control and flexibility in navigating the ever-changing online landscape.
AdsPower Proxy Integration

Create a Zone in Bright Data:
To begin integrating AdsPower with Bright Data, it is recommended to create an ISP zone with a dedicated IP. Make sure to include your targeted domains or select the “All domains” setting to target multiple sites using the same IP.

Example Zone Setting:
Create a designated Zone for your proxy usage.
Note: if you chose either Residential, Mobile, Unlocker or SERP zones, you must install Bright Data SSL certificate to secure your end to end communication.
Installation instructions can be seen here

Obtain Access Parameters:
Open the Proxies & Scraping Infrastructure in Bright Data, select the zone you have created, and choose access parameters. Keep the browser tab open as you will need these credentials in the coming steps.

Download AdsPower:
Download and install the latest version of AdsPower for your operating system by clicking here.

Login to Your AdsPower Account:
Sign in to your AdsPower account using your login credentials.

Create a New Profile:
Click on the “ New profile” button and Name the profile.

Select Bright Data Proxies:
Scroll down to the Proxy section. Select “Custom” or “Proxy provider”, from the Proxy type dropdown menu and choose either Bright Data or Brightauto for rotating proxies.

Go to Bright Data control panel and get your account info:
Go to Bright Data’s “Proxies & Scraping Infra” and select the proxy zone you are using. Click on the “Access parameter” option and copy the provided Username and Password.
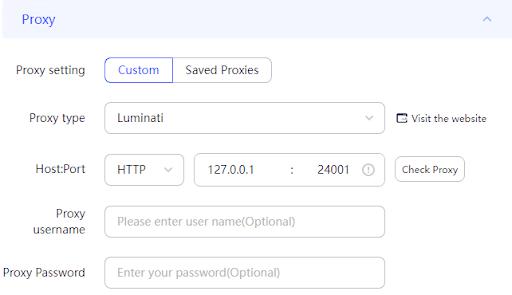
(Optional) Set your Proxy Manager Server and Port
When using Proxy Manager you can set the Host to: 127.0.0.1 and port to: 24XXX according to the existing ports on your Proxy Manager.

Configure Proxy Protocol:
Under the protocol settings to Configure Your Proxies, you can chose HTTP, HTTPS or Sock5
- Proxy Type: Choose fromHTTP,HTTPS, orSOCKS5(based on your proxy type).
- Proxy Host: Enter http://brd.superproxy.io/.
- Proxy Port: 33335 (if you chose SOCKS5, please use port 22228)
- Proxy Username: Enter your Bright Data proxy zone username.
Proxy Password: Enter your Bright Data proxy zone password.
Return to AdsPower and paste the copied Username and Password into the corresponding fields.

Check Proxy and Save Browser Profile:
Click on the “check proxy” button and ensure that you see a “Connection test passed” message. Click OK to save the browser profile.

Verify Proxy Usage:
To confirm the use of your Bright Data proxy, refer to the Event Log section in your Proxies & Scraping Infrastructure dashboard.
⚠️Important note: If you are using Bright Data’s Residential Proxies, Web Unlocker or SERP API, you need to install an SSL certificate to enable end-to-end secure connections to your target website(s). This is a simple process, see https://docs.brightdata.com/general/account/ssl-certificate#installation-of-the-ssl-certificate for instructions.
In addition, for this integration KYC Verification is required. For more information please click here: https://docs.brightdata.com/proxy-networks/residential/network-access#kyc-verification
Conclusion
Integrating Bright Data proxies with AdsPower enables you to leverage the powerful capabilities of both platforms, unlocking new levels of productivity, security, and control in your online activities. By following these straightforward steps, you can create a formidable toolset that provides an unrivaled browsing experience. Whether you’re performing web scraping, market research, or ensuring reliable data retrieval, this powerful combination ensures that you’re well-equipped to navigate the constantly evolving digital landscape. Harness the synergy of Bright Data proxies and AdsPower today, and elevate your business to new heights.
Get proxies for AdsPower
A proxy for every development path
Mix-and-match networks, peers, and IPs to optimize your continuous flow of web data.


Proxy Network Pricing


- Unlimited scale
- Unlimited seats
- Premium SLA
- 99.99% Network Uptime
- Free Proxy Manager
- Complete data coverage
- Custom price per GB
- Custom solutions
- Unlimited scale
- Unlimited seats
- Premium SLA
- 99.99% Network Uptime
- Free Proxy Manager
- Complete data coverage
- Custom price per GB
- Custom solutions
- Unlimited scale
- Unlimited seats
- Premium SLA
- 99.99% Network Uptime
- Free Proxy Manager
- Complete data coverage
- Custom price per GB
- Custom solutions
- Unlimited scale
- Unlimited seats
- Premium SLA
- 99.99% Network Uptime
- Free Proxy Manager
- Complete data coverage
- Custom price per GB
- Custom solutions
The category leader in proxies and data collection

650TB of public data collected every day

New feature releases every day

Serving 7/10 of the world’s leading universities
